Years ago when I was deep into VBScript and HTAs, I wrote a tool called PWDMan. It was an HTA that processed a list of computers and returned password age information for the local administrator account. It was also capable of setting a new account password. Apparently this is still a common task because I’ll periodically get emails from people asking where they can get a hold of PWDMan. You can’t. And the reason is that we now have PowerShell and that is what you should be using, and if necessary, learning. So let me share a few examples of how to achieve the same functionality from my old PWDMan tool using PowerShell.
In the HTA, I used ADSI to connect to the remote computer and get the local administrator account. The object you get back has a PasswordAge property that is the number of seconds since the password was changed. So here’s a code sample.
$computers="chi-win8-01","chi-win81","chi-core01","chi-fp02","chi-hvr2"
$account="administrator"
#get password age
$computers | foreach {
[int]$Age = ([adsi]"WinNT://$_/$account,user").passwordage.value/86400
$LastChange=(Get-Date).AddHours(-$age)
New-Object -TypeName PSObject -Property @{
Computername = $_
Account = $Account
Age = $Age
LastChange = $LastChange
}
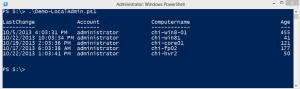
}In this example I’m defining a list of names. But you could easily read the contents of a text file with Get-Content or query Active Directory. Because you might have renamed the administrator account, or perhaps you need to check a different local acccount, I’ve created a variable for the account name. PowerShell then takes each computername and builds an ADSI connection to the administrator account, getting the passwordage value and dividing it by the number of seconds in a day. So $Age becomes the account password age in days. Because PowerShell is all about the objects, I create a custom object with some relevant information. Here’s the result.
You may be wondering why I used ForEach-Object instead of the ForEach enumerator. That’s because the latter doesn’t write anything to the pipeline and I might want to save results to a text file or export to a CSV.
$computers="chi-win8-01","chi-win81","chi-core01","chi-fp02","chi-hvr2"
$account="administrator"
#get password age
$computers | foreach {
 [int]$Age = ([adsi]"WinNT://$_/$account,user").passwordage.value/86400
 $LastChange=(Get-Date).AddHours(-$age)
 New-Object -TypeName PSObject -Property @{
  Computername = $_
  Account = $Account
  Age = $Age
  LastChange = $LastChange
 }
} | Export-CSV -path c:\work\local-admin-report.csv -notypeinformation
Be aware that I’m simply demonstrating some PowerShell examples. Ideally, you would want to build a tool to get the password information that you could combine with other PowerShell tools. In fact, what I’ve given you is close to being a function already but I’ll let you see if you can work it out. You want to be able to run a command like this:
get-content computers.txt | get-localpasswordAge | export-csv -path c:\work\age.csv
The middle command is the tool you will build.
Now, what about changing the password? That too, can be accomplished with a one line command.
([adsi]"WinNT://COMPUTER01/administrator,user").setpassword("P@ssw0rd")If you wanted to change the password for all of the machines that you reported on, it wouldn’t take much work to modify “get” code. So you see, using ADSI in PowerShell is just as easy, if not more so, than using it in VBScript.
There are a few caveats:
- Don’t forget that the WinNT moniker is case sensitive.
- There is no easy way to use alternate credentials.
- There is no WhatIf support, unless you write a script that provides it.
My code samples here are intended as educational. You should take the time to build and test a more robust solution based on your needs. So the next time you think you need VBScript, stop and advance to PowerShell Place.
 I recently upgraded to Windows 8.1, and I want to know how to use Windows PowerShell to determine the status.
 Use the Get-MpComputerStatus function. It reports the status of Windows Defender services,


 Windows 8.1 brought a few changes