Pete Cook
Shared posts
Automation of Microsoft Intune via Microsoft Graph API – an introduction
Pete CookI really need to get a grip on the Graph.
Always On VPN Remote Access and Network Policy Server

Why You Should Use Microsoft’s Active Directory Tier Administrative Model


In this Ask the Admin, I’ll explain what Microsoft’s AD tier administrative model is and how it can improve security.
Access controls are an important defense mechanism for sensitive information systems. But access controls can be ineffective if poorly implemented. One bad decision can lead to a compromise. You only have to look at many organization’s Active Directory (AD) to realize that little thought has been put into how to grant access to the directory, domain controllers (DCs), and other sensitive assets. It is common to find IT support staff with domain administrative privileges, domain admin accounts used to log in to users’ PCs, and administrative user accounts and passwords shared across multiple devices.
Microsoft has been working to reduce the impact of breaches caused by poor access controls. For example, Windows 10 Credential Guard aims to protect domain credentials on compromised PCs. The new Azure Confidential Computing initiative uses Trusted Execution Environments (TEEs) to protect unencrypted data as it is being processed.
For more information on Azure Confidential Computing, see Microsoft Announces Azure Confidential Computing on the Petri IT Knowledgebase. You can read about Windows 10 Credential Guard on Petri here: Windows 10 Enterprise Feature: Credential Guard.
Active Directory Administrative Tier Model
Despite the security features Microsoft is including in Windows 10 and Windows Server 2016, implementing proper access controls is still an important defense. The tiered administrative model aims to help organizations to better secure environments. The model defines three tiers that create buffer zones to separate administration of high-risk PCs and valuable assets like domain controllers.

Active Directory Tiered Administrative Model Control Restrictions (Image Credit: Microsoft)
Tier 0 is the highest level and includes administrative accounts and groups, domain controllers, and domains that have direct or indirect administrative control of the AD forest. Tier 0 administrators can manage and control assets in all tiers but only log in interactively to Tier 0 assets. I.e. a domain administrator should never interactively log in to a Tier 2 asset.
Tier 1 is for domain member servers and applications. Accounts that control these assets have access to sensitive business data. Tier 1 administrators can access Tier 1 or Tier 0 assets (network logon) but can only manage Tier 1 or Tier 2 assets. Tier 1 administrators can only log on interactively to Tier 1 assets.
Tier 2 is for end-user devices. For example, helpdesk staff would be part of this tier. Tier 2 administrators can access all tier assets (network logon) as necessary but can only manage Tier 2 assets. Tier 2 admins can log in interactively to Tier 2 assets.

Active Directory Tiered Administrative Model Logon Restrictions (Image Credit: Microsoft)
The three tiers increase the cost for an attacker trying to compromise sensitive systems. You should consider that a user that has full access to all Tier 2 assets could get access to assets in a higher tier. The tiered administrative model makes it harder for a hacker to move from a Tier 2 to a Tier 0 asset but doesn’t make it impossible.
Security Best Practice
Understanding the tiered model gives you a better insight into Microsoft’s security best practices. For example, a Privileged Access Workstation (PAW) that is used by a domain administrator is also considered a Tier 0 asset. A Tier 0 administrator must use a Tier 0 PAW to manage other Tier 0 assets, such as domain controllers because the account will be a member of a highly-privileged domain or forest group.
The tiered administrative model isn’t hard to implement. It does require additional resources, like PAWs, and some planning in how to manage access and control between the tiers. It is achievable for most organizations and goes a long way to implementing effective access controls that will keep hackers from compromising sensitive systems.
For more information on how to manage end-user devices without using domain administrative privileges, see Manage Workstations Without Domain Admin Rights on Petri.
Follow Russell on Twitter @smithrussell.
The post Why You Should Use Microsoft’s Active Directory Tier Administrative Model appeared first on Petri.
5 Things You Can Do With AWX

As you’ve probably already heard, Red Hat announced the release of the AWX project at AnsibleFest in San Francisco. AWX is the open source project behind Red Hat® Ansible® Tower, offering developers access to the latest features, and the opportunity to directly collaborate with the Ansible Tower engineering team.
AWX is built to run on top of the Ansible project, enhancing the already powerful automation engine. AWX adds a web-based user interface, job scheduling, inventory management, reporting, workflow automation, credential sharing, and tooling to enable delegation.
Even if you’re only managing a small infrastructure, here are 5 things you can do with AWX. And we promise, they’ll make your job as a system administrator a whole lot easier:
Delegate
Central to AWX is the ability to create users, and group them into teams. You can then assign access and rules to inventory, credentials, and playbooks at an individual level or team level. This makes it possible to setup push-button access to complex automation, and control who can use it, and where they can run it.
For example, when developers need to stand up a new environment, they don’t need to add another task to your already overbooked schedule. Instead, you can empower them to log into AWX, and run the provisioning playbook on their own. You can even configure AWX to prompt for parameters, providing sane defaults and reasonable choices.
Access Reporting
Now that you have users, you’ll need tools for tracking playbook runs and troubleshooting problems. AWX adds a custom callback plugin to Ansible playbook runs that captures event and output data in real time. A high-level summary of the stored output is presented on a dashboard, providing an overview of job executions, failures, and successes, as well as a breakdown of inventory successes and failures. You’ll immediately know what playbooks have run and any trouble spots needing attention, and you can immediately click into the details.
At the playbook level, you’ll be able to access the results and output down to an individual task on a specific host. So if that new environment the development team attempted to create didn’t provision exactly as expected, you can quickly troubleshoot, and correct the problem.
Schedule Workflow
You’ll bring together credentials, playbooks and inventory by creating a job template. The template represents the command line execution of ‘ansible-playbook,’ except you no longer need to touch the command line. Instead, you can run the job template on demand, and watch real-time playbook output in your web browser. Or, schedule it to run later, or even on a recurring basis, and get full access to the output whenever you need it.
In addition to running a single playbook, you can create a job template with the workflow editor that chains together multiple playbook runs. Add a step that reads the latest set of hosts from your public cloud inventory, add another that automatically pulls the latest copy of the playbooks from your source repository, and add a final step to send notifications when everything is done. And just as before, run it on demand, or schedule it in the future.
Automate Through an API
At the heart of AWX is a powerful restful API. In fact, the user interface communicates with the backend entirely through the API, demonstrating its power and completeness. Anything you can do through the web browser, you can affect through API calls.
It’s fully browsable, and self-documenting. Point your browser to the API at http://<Tower server name>/api/, and you can literally click your way through every endpoint. At the top of each page is the endpoint title. Click the ? just to the right of it, and you’ll see a detailed description for each data element, indications of which elements are required when creating a new object, and how to search, sort and filter existing data.
The Tower CLI can also be used to make calls directly to the API from a shell script. It alleviates the need to make API calls using lower level tools like curl or wget, and provides a further source of examples, and documentation. It‘s written in Python, so in addition to being a useful tool in its own right, the source code is a how-to guide for programming API calls.
With full access to the API, and help from the Tower CLI, it’s possible to integrate AWX with other applications like ticketing tools, source code management, continuous integration systems, and shell scripts. It gives you the ability to easily automate deployment, maintenance, and mitigation tasks that previously would have been difficult, if not impossible, with just an Ansible Playbook.
Getting Started
To get started, follow the installation guide at the AWX GitHub repository. All you’ll need is a virtual machine with Docker and Ansible installed, and you’ll be up and running within a few minutes. If you run into trouble, or have questions, check the issues log to see if there’s already help available. You can also reach out to the AWX team on the #awx-ansible channel at irc.freenode.net, or post a question to the mailing list.Tower development is now happening out in the open in the AWX repo, which opens the door for you to get involved and collaborate with the community and the Tower engineering team. If you’re interested, check out the contributing guide, and join us!
Upgrading Your ASP.NET Core 1.x Web API to 2.0
Container Images are now out for Windows Server version 1709!
With the release of Windows Server version 1709 also come Windows Server Core and Nano Server base OS container images.
It is important to note that while older versions of the base OS container images will work on a newer host (with Hyper-V isolation), the opposite is not true. Container images based on Windows Server version 1709 will not work on a host using Windows Server 2016. Read more about the different versions of Windows Server.
We’ve also made some changes to our tagging scheme so you can more easily specify which version of the container images you want to use. From now on, the “latest” tag will follow the releases of the current LTSC product, Windows Server 2016. If you want to keep up with the latest patches for Windows Server 2016, you can use:
“microsoft/nanoserver”
or
“microsoft/windowsservercore”
in your dockerfiles to get the most up-to-date version of the Windows Server 2016 base OS images. You can also continue using specific versions of the Windows Server 2016 base OS container images by using the tags specifying the build, like so:
“microsoft/nanoserver:10.0.14393.1770”
or
“microsoft/windowsservercore:10.0.14393.1770”.
If you would like to use base OS container images based on Windows Server version 1709, you will have to specify that with the tag. In order to get the most up-to-date base OS container images of Windows Server version 1709, you can use the tags:
“microsoft/nanoserver:1709”
or
“microsoft/windowsservercore:1709”
And if you would like a specific version of these base OS container images, you can specify the KB number that you need on the tag, like this:
“microsoft/nanoserver:1709_KB4043961”
or
“microsoft/windowsservercore:1709_KB4043961”.
We hope that this tagging scheme will ensure that you always choose the image that you want and need for your environment. Please let us know in the comments if you have any feedback for us.
Note: We currently do not intend to use the build numbers to specify Windows Server version 1709 container images. We will only be using the KB schema specified above for the tagging of these images. Let us know if you have feedback about this as well
Regards,
Ender
Cobe.io: Pruning a Private Docker Registry
Why do we need a private Docker registry?
We currently use Jenkins to run our build and test process and we currently have two slaves running on our Jenkins cluster. When a pull request is created/updated, our process builds the Docker files that are stored within the code repository. Once a slave has built a Docker image it's ideal that the other slave can access the newly built image. One way to achieve this is to have a centrally accessible registry.
How to run a Docker registry
This is relatively easy step as there is a Docker registry image available on Docker Hub. Currently our registry is running on our Jenkins master server. Execute this command to run it:
docker run -d -p 5000:5000 --name registry \
    --restart=unless-stopped -e REGISTRY_STORAGE_DELETE_ENABLED=true registry
I'll go through each command option briefly:
- docker run
- Uses Docker to run a container based on an image.
- -d
- Run in detatched mode.
- -p 5000:5000
- Expose port 5000 from the current host into the registry container.
- --name registry
- Names the container to make it easier to reference.
- --restart=unless-stopped
- Tells Docker to keep this container running unless manually stopped.
- -e REGISTRY_STORAGE_DELETE_ENABLED=true
- Configures the registry to allow DELETE requests.
- registry
- The image to run from Docker Hub.
This will run a Docker registry that allows delete requests on port 5000.
Persisting the registry
When the image is restarted it loses its images that it stores. This is solved by using a Docker volume to store the images.
docker volume create registry-vol
And adding the following argument to the Docker run command above:
-v registry-vol:/var/lib/registry:rw
So the full command is now:
docker run -d -p 5000:5000 --name registry \
    --restart=unless-stopped \
    -e REGISTRY_STORAGE_DELETE_ENABLED=true \
    -v registry-vol:/var/lib/registry:rw registry
Clearing out unused images
As all of the images that Jenkins pushes are tagged as latest our goal is to search through all of the repositories in the registry and delete all of the images tagged as latest.
To do this we first get all of the repositories using this method.
REGISTRY_URL = "https://registry:5000/v2/"

def get_repositories():
    resp = requests.get(REGISTRY_URL + "_catalog")
    return resp.json()['repositories']
For each of our repositories we get a list of tags.
def get_tags(repository):
    resp = requests.get(REGISTRY_URL + repository + "/tags/list")
    return resp.json()['tags'] if json_resp['tags'] else []
In order to delete an image we need its digest.
def get_digest(repository, tag):
    url = "{}{}/manifests/{}".format(JENKINS_REGISTRY_URL, repository, tag)
    headers = {"Accept": "application/vnd.docker.distribution.manifest.v2+json"}
    resp = requests.get(url, headers=headers)
    return resp.headers.get("Docker-Content-Digest")
And we use this method to submit a delete request.
def delete_digest(repository, digest):
    requests.delete(REGISTRY_URL + repo + "/manifests/" + digest)
So to tie all of this together we use this method.
def clear_registry_tag(tag="latest"):
    for repository in get_repositories():
        for found_tag in get_tags(repository):
            if found_tag == tag:
                digest = get_digest(repository, found_tag)
                delete_digest(repository, digest)
For brevity error handling and printing have been removed but a full version of the Python script can be downloaded pruning-docker-registry.py.
The Backyard View
Pete CookOne of my favourite places in the world :)
Hasselblad X1D Review
If you haven’t seen my Hasselblad X1D Review, please pop on over! I’ve added some new photos recently that you may enjoy.
Daily Photo – The Backyard View
Whenever I get a new camera, I head out into the backyard to take some test photos. This is one of the first photos I took when I got the new Hasselblad X1D. It arrived at the house, and I didn't even realize the delivery until the sunset. I was so excited and I threw a memory card in there to run out and take this photo.

Single Page Applications with Vue.js
Announcing Windows Server Insider Preview Build 16267
Hello Windows Insiders!
Today we are pleased to be releasing Windows Server Insider Preview Build 16267 to Windows Insiders. To obtain the build, registered Insiders may navigate directly to the Windows Server Insider Preview download page. Matching symbols and the Remote Server Administration Tools (RSAT) packages are available on the same page. When installed on a Windows 10 client, RSAT allows a user to remotely manage and administer Insider Preview builds of Windows Server via GUI tools. Valid on Windows 10 client builds greater than 16250.
For the best experience, the Windows Server team recommends a clean install.
If you have not yet registered as an Insider, register through the Windows Insiders for Business program or the Windows Insider program.
General Scenario Highlights
Developers and Containers:
- New base container images (available on Windows Insider Docker Hub repo)
- Optimized Nano Server base image (over 70% smaller)
- The .NET team is providing a preview image based on Nano Server with .NET Core 2.0
- The PowerShell team is providing a preview image based on PowerShell 6.0
- Optimized Server Core base image (over 20% smaller)
- Optimized Nano Server base image (over 70% smaller)
- Support for SMB volume mounting
- Infrastructure for Orchestrators
- Networking enhancements for ongoing Kubernetes work
- Named pipe mapping support
- Bug fixes, performance enhancements
Cloud Guest:
- IIS
- TLS info: administrators can make specific recommendations to default to HTTPS
- Disaster Recovery
- Storage Replica Test Failover
- Guest + Host better together
- vPMEM in Guest: Tenants can use and manage PMEM/SCM
- Tenant-Aware VM Start Ordering: App Ready / OS Heartbeat for better load balancing
- Guest RDMA
- Improvement in time accuracy
- Azure enlightened clusters – optimized to run on Azure IaaS
Cloud Host:
- Software Defined Data Center (SDDC) host
- Security
- Shielded Linux VM
- SDN: Encrypted virtual networks
- Secure clusters
- SMB 1 disabled by default
- Resiliency and Availability
- SDN: Reduced downtime for tenant connections through gateways
- Spaces Direct: Scoped Spaces to mitigate impact of multi-node loss
- Spaces Direct: Marginal drive handling for predictive detection of drive failures
- Efficiency
- Data Deduplication available for ReFS
- New Data Deduplication DataPort API for optimized ingress/egress
- Space efficiency with ReFS Compaction
- Performant Spaces Direct Multi Resilient Volumes (MRV)
- Hyper-converged Scale
- Cluster Sets: Significantly increases hyper-converged SDDC cloud scale by grouping multiple clusters into a larger fabric
- Hardware support
- Support for Storage Class Memory (SCM) in Spaces Direct
- Security
What’s New in Build 16267 for Windows Server
There are no new features in build 16267
How to Download
NOTE: If you signed up for Windows Insiders for Business using an AAD account, there is a temporary issue with access to the Windows Server Download page using AAD accounts. If you registered using an MSA account at the Windows Insider program, your MSA account may be used to access the page and to download builds until this is resolved.
The latest Windows Server build and matching symbols are available for download here. Simply click on the desired file(s) and save locally. Matching Windows Server container images will be available via the Docker Hub. For more information about Windows Server containers and Insider builds, please visit http://aka.ms/containers/insiders.
The following keys are available for unlimited activations of Windows Server. These keys may be used throughout the pre-release cycle.
- Windows Server Datacenter Core: B69WH-PRNHK-BXVK3-P9XF7-XD84W
- Windows Server Standard Core: V6N4W-86M3X-J77X3-JF6XW-D9PRV
The RSAT version currently posted has not been updated, so if you already have it, you won’t need to download it again.
It’s all about your feedback!
Use the Feedback Hub app to provide feedback on Windows Server builds. Feedback Hub comes pre-installed on Windows 10. Register a Windows 10 device with the Windows Insider or Windows Insider for Business programs. Open the Feedback Hub application. Choose the Server category and then the appropriate subcategory for your feedback. Please indicate what edition and build number you are providing feedback on. The Feedback Hub app cannot scan a server for diagnostic information, however you may manually attach screenshots or other files to your feedback entry.
We encourage you to visit the Windows Server Insiders space on the Microsoft Tech Communities forum to collaborate, share and learn from experts.
The expiration date for this server preview build is 12/4/2017.
Known issues
- Cluster Sets: A couple of key functionalities to enable end-to-end testing of Cluster Sets scenarios are not present in this build, so defer all evaluation of this scenario to a future build.
- When a computer runs the Windows Preinstallation Environment (WinPE) from a local drive, the EFI system partition, which contains the WinPE image (boot.wim), does not have a drive letter assigned. This issue can adversely affect some automation.
- Apps that call into the firewall, such apps that use networking, may become unresponsive until the user reboots because of an application hang end-task error (0xCFFFFFFF) in the Windows firewall API library (FirewallAPI.dll), which occurs when the library is blocked on an advanced local procedure call (ALPC) port while attempting to diagnose a connection failure and retrieve information.
- A stop error may occur during volume repair in a cluster. The recommended workaround is to restart the computer. No corruption or data loss is expected.
No downtime for Hustle-As-A-Service,
Dona <3
The post Announcing Windows Server Insider Preview Build 16267 appeared first on Windows Experience Blog.
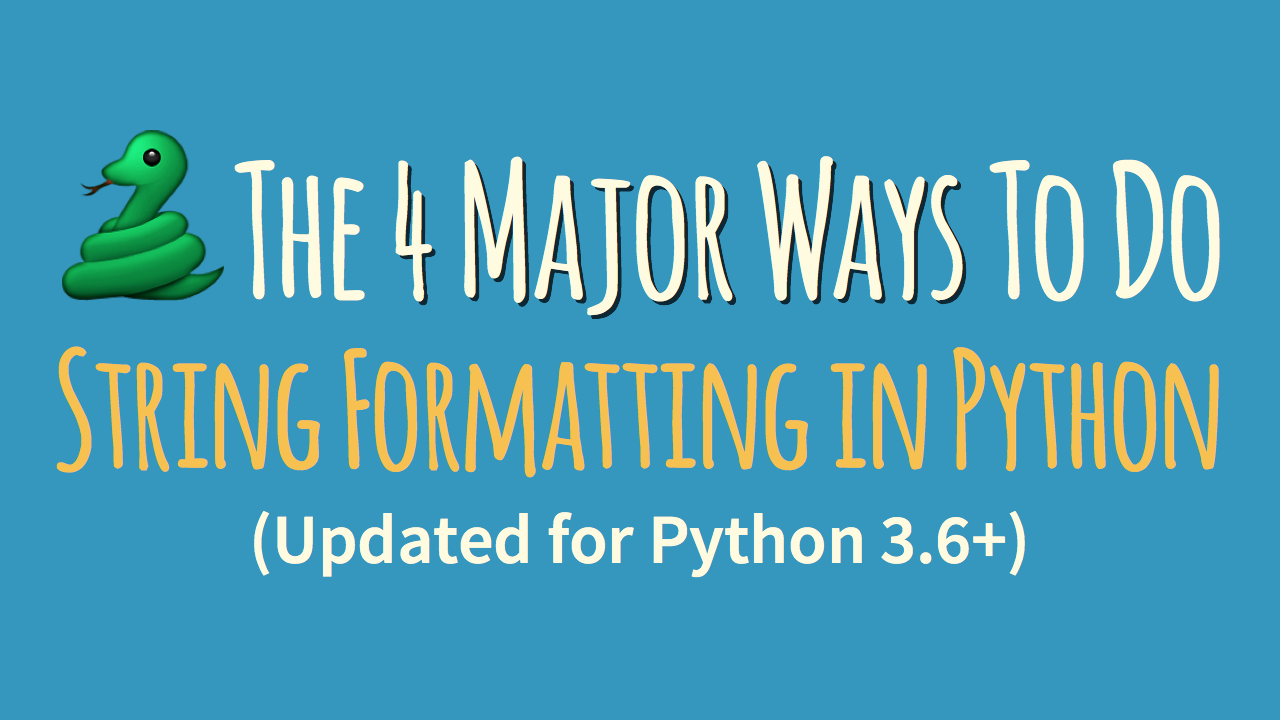
Daniel Bader: The 4 Major Ways to Do String Formatting in Python
The 4 Major Ways to Do String Formatting in Python
Remember the Zen of Python and how there should be “one obvious way to do something in Python”? You might scratch your head when you find out that there are *four* major ways to do string formatting in Python.
In this article I’ll demonstrate how these four string formatting approaches work and what their respective strengths and weaknesses are. I’ll also give you my simple “rule of thumb” for how I pick the best general purpose string formatting approach.
Let’s jump right in, as we’ve got a lot to cover. In order to have a simple toy example for experimentation, let’s assume we’ve got the following variables (or constants, really) to work with:
>>> errno = 50159747054
>>> name = 'Bob'
And based on these variables we’d like to generate an output string containing a simple error message:
'Hey Bob, there is a 0xbadc0ffee error!'
Hey… now that error could really spoil a dev’s Monday morning. But we’re here to discuss string formatting. So let’s get to work.
#1 – “Old Style” String Formatting (%-operator)
Strings in Python have a unique built-in operation that can be accessed with the %-operator. This lets you do simple positional formatting very easily. If you’ve ever worked with a printf-style function in C you’ll recognize how this works instantly. Here’s a simple example:
>>> 'Hello, %s' % name

"Hello, Bob"
I’m using the %s format specifier here to tell Python where to substitute the value of name, represented as a string.
There are other format specifiers available that let you control the output format. For example it’s possible to convert numbers to hexadecimal notation or to add whitespace padding to generate nicely formatted tables and reports (cf. Python Docs: “printf-style String Formatting”).
Here, we can use the %x format specifier to convert an int value to a string and to represent it as a hexadecimal number:
>>> '%x' % errno

'badc0ffee'
The “old style” string formatting syntax changes slightly if you want to make multiple substitutions in a single string. Because the %-operator only takes one argument you need to wrap the right-hand side in a tuple, like so:
>>> 'Hey %s, there is a 0x%x error!' % (name, errno)

'Hey Bob, there is a 0xbadc0ffee error!'
It’s also possible to refer to variable substitutions by name in your format string, if you pass a mapping to the %-operator:
>>> 'Hey %(name)s, there is a 0x%(errno)x error!' % {
...     "name": name, "errno": errno }

'Hey Bob, there is a 0xbadc0ffee error!'
This makes your format strings easier to maintain and easier to modify in the future. You don’t have to worry about making sure the order you’re passing in the values matches up with the order the values are referenced in the format string. Of course the downside is that this technique requires a little more typing.
I’m sure you’ve been wondering why this printf-style formatting is called “old style” string formatting. It was technically superseded by “new style” formatting, which we’re going to talk about in a minute.
#2 – “New Style” String Formatting (str.format)
Python 3 introduced a new way to do string formatting that was also later back-ported to Python 2.7. This “new style” string formatting gets rid of the %-operator special syntax and makes the syntax for string formatting more regular. Formatting is now handled by calling a format() function on a string object (cf. Python Docs: “str.format”).
You can use the format() function to do simple positional formatting, just like you could with “old style” formatting:
>>> 'Hello, {}'.format(name)

'Hello, Bob'
Or, you can refer to your variable substitutions by name and use them in any order you want. This is quite a powerful feature as it allows for re-arranging the order of display without changing the arguments passed to the format function:
>>> 'Hey {name}, there is a 0x{errno:x} error!'.format(
...     name=name, errno=errno)

'Hey Bob, there is a 0xbadc0ffee error!'
This also shows that the syntax to format an int variable as a hexadecimal string has changed. Now we need to pass a format spec by adding a :x suffix. The format string syntax has become more powerful without complicating the simpler use cases. It pays off to read up on this string formatting mini-language in the Python documentation (cf. Python Docs: “Format String Syntax”).
In Python 3, this “new style” string formatting is to be preferred over %-style formatting. While “old style” formatting has been de-emphasized it has not been deprecated. It is still supported in the latest versions of Python. According to this discussion on the Python dev email list %-formatting is going to stick around for a long time to come.
Still, the official Python 3.X documentation doesn’t exactly recommend “old style” formatting or speak too fondly of it:
The formatting operations described here exhibit a variety of quirks that lead to a number of common errors (such as failing to display tuples and dictionaries correctly). Using the newer formatted string literals or the str.format() interface helps avoid these errors. These alternatives also provide more powerful, flexible and extensible approaches to formatting text. (Source: Python 3 Docs)
This is why I’d personally try to stick with str.format for new code moving forward. Starting with Python 3.6 there’s yet another way to format your strings. I’ll tell you all about it in the next section.
#3 – Literal String Interpolation (Python 3.6+)
Python 3.6 adds a new string formatting approach called Formatted String Literals. This new way of formatting strings lets you use embedded Python expressions inside string constants. Here’s a simple example to give you a feel for the feature:
>>> f'Hello, {name}!'

'Hello, Bob!'
This new formatting syntax is powerful. Because you can embed arbitrary Python expressions you can even do inline arithmetic with it. See here for example:
>>> a = 5
>>> b = 10
>>> f'Five plus ten is {a + b} and not {2 * (a + b)}.'

'Five plus ten is 15 and not 30.'
Formatted string literals are a Python parser feature that converts f-strings into a series of string constants and expressions. They then get joined up to build the final string.
Imagine we had the following greet() function that contains an f-string:
>>> def greet(name, question):
...     return f"Hello, {name}! How's it {question}?"
...

>>> greet('Bob', 'going')
"Hello, Bob! How's it going?"
When we disassemble the function and inspect what’s going on behind the scenes we can see that the f-string in the function gets transformed into something similar to the following:
>>> def greet(name, question):
...    return "Hello, " + name + "! How's it " + question + "?"
The real implementation is slightly faster than that because it uses the BUILD_STRING opcode as an optimization. But functionally they’re the same:
>>> import dis
>>> dis.dis(greet)
  2           0 LOAD_CONST               1 ('Hello, ')
              2 LOAD_FAST                0 (name)
              4 FORMAT_VALUE             0
              6 LOAD_CONST               2 ("! How's it ")
              8 LOAD_FAST                1 (question)
             10 FORMAT_VALUE             0
             12 LOAD_CONST               3 ('?')
             14 BUILD_STRING             5
             16 RETURN_VALUE
String literals also support the existing format string syntax of the str.format() method. That allows you to solve the same formatting problems we’ve discussed in the previous two sections:
>>> f"Hey {name}, there's a {errno:#x} error!"

"Hey Bob, there's a 0xbadc0ffee error!"
Python’s new Formatted String Literals are similar to the JavaScript Template Literals added in ES2015. I think they’re quite a nice addition to the language and I’ve already started using them in my day to day (Python 3) work. You can learn more about Formatted String Literals in the official Python documentation (cf. Python Docs: “Formatted string literals”).
#4 – Template Strings (standard library)
Here’s one more technique for string formatting in Python: Template Strings. It’s a simpler and less powerful mechanism, but in some cases this might be exactly what you’re looking for.
Let’s take a look at a simple greeting example:
>>> from string import Template
>>> t = Template('Hey, $name!')
>>> t.substitute(name=name)

'Hey, Bob!'
You see here that we need to import the Template class from Python’s built-in string module. Template strings are not a core language feature but they’re supplied by a module in the standard library.
Another difference is that template strings don’t allow format specifiers. So in order to get our error string example to work we need to transform our int error number into a hex-string ourselves:
>>> templ_string = 'Hey $name, there is a $error error!'
>>> Template(templ_string).substitute(
...     name=name, error=hex(errno))

'Hey Bob, there is a 0xbadc0ffee error!'
That worked great. So when should you use template strings in your Python programs? In my opinion the best use case for template strings is when you’re handling format strings generated by users of your program. Due to their reduced complexity template strings are a safer choice.
The more complex formatting mini-languages of the other string formatting techniques might introduce security vulnerabilities to your programs. For example, it’s possible for format strings to access arbitrary variables in your program.
That means, if a malicious user can supply a format string they can potentially leak secret keys and other sensible information! Here’s a simple proof of concept of how this attack might be used:
>>> SECRET = 'this-is-a-secret'
>>> class Error:
...     def __init__(self):
...         pass
>>> err = Error()
>>> user_input = '{error.__init__.__globals__[SECRET]}'

# Uh-oh...
>>> user_input.format(error=err)

'this-is-a-secret'
See how a hypothetical attacker was able to extract our secret string by accessing the __globals__ dictionary? Scary, huh? Template Strings close this attack vector. And this makes them a safer choice if you’re handling format strings generated from user input:
>>> user_input = '${error.__init__.__globals__[SECRET]}'
>>> Template(user_input).substitute(error=err)

ValueError:
"Invalid placeholder in string: line 1, col 1"
Which String Formatting Method Should I Use?
I totally get that having so much choice for how to format your strings in Python can feel very confusing. This is an excellent cue to bust out this handy flowchart infographic I’ve put together for you:
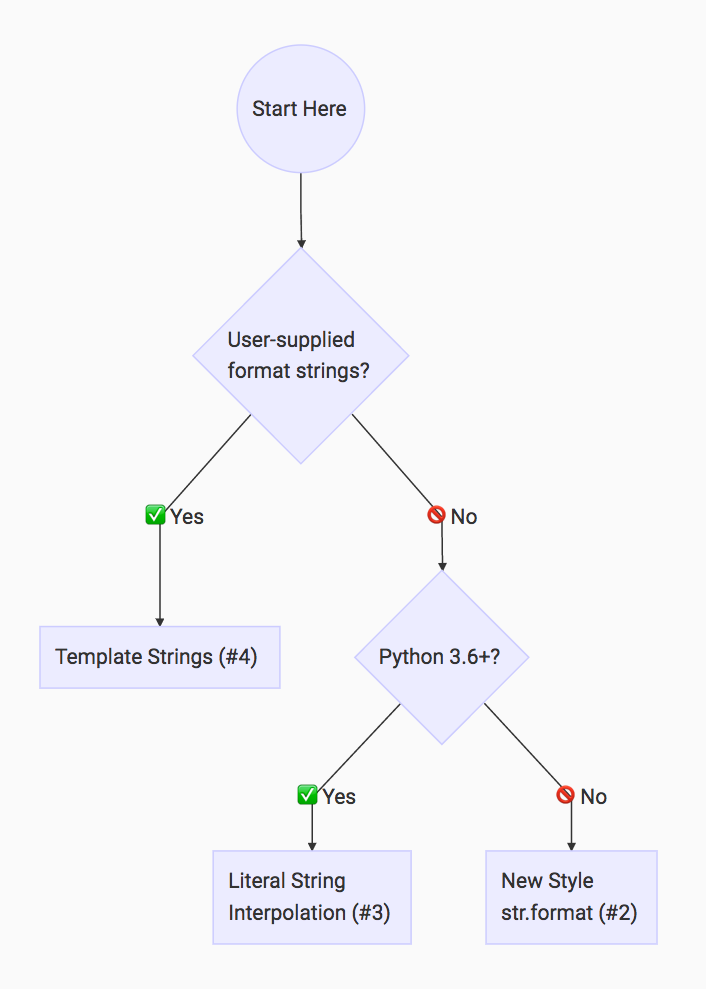
This flowchart is based on the following rule of thumb that I apply when I’m writing Python:
Dan’s Python String Formatting Rule of Thumb:
If your format strings are user-supplied, use Template Strings (#4) to avoid security issues. Otherwise, use Literal String Interpolation (#3) if you’re on Python 3.6+, and “New Style” str.format (#2) if you’re not.
Sponsored: Everything You Need to Know About Microsoft Nano Server


With security concerns and IT workloads on the rise, IT professionals need faster, more flexible, and more secure deployments. In response, Microsoft took steps to address these issues in Windows Server 2016. Nano Server is a new Windows Server installation option which focuses on remote management. Nano Server delivers significant improvements in servicing, security, resource utilization, and deployment processes. To deploy Nano Server quickly and efficiently, IT teams should become familiar with Nano Server packages, parameters, management options, and troubleshooting tools.
Aidan Finn and Mike Resseler discuss features and functionality available in Microsoft Nano Server.
Windows Server 2016 addresses IT concerns about agility, flexibility, and security.
IT security is a major concern for business and IT leaders. Data breaches can take months to detect and can result in costly ransom demands, identity theft, and more. The stakes are high. And the risks aren’t limited to large enterprises as 60% of small companies that suffer a cyber-attack are out of business within six months.
To protect companies’ data, IT professionals need faster, more flexible, more secure deployments. Microsoft’s Windows Server 2016 release, generally available on October 12, reacts to challenges facing businesses and IT teams. Windows Server 2016 includes built-in layers of security, a software-defined data center, and a cloud-ready application platform. Key aspects of the Windows Server journey and how it has led to the release of Nano Server include:
- Over time, Windows Server has migrated to the cloud. Windows NT and Windows Server 2003 existed during the Enterprise Era and provided a “server for the masses.” Fast forward to 2008 and Windows Server supported data centers through virtualization and optimization. Windows Server 2012 began the migration to the cloud with Azure.

- Microsoft has learned important lessons from both Azure and Cloud Platform System (CPS). Microsoft Azure revealed that patches and reboots interrupt service delivery. A large number of servers in combination with high levels of OS resource utilization means high “cost of goods sold” for organizations. In addition, deploying and patching large host images competes for network resources. CPS, an on-premises, private cloud solution, also uncovered similar findings. Patches and reboots disrupt service and create downtime, while lengthy setup times create brittle and complex deployments.
- In response to these experiences and customer needs, Microsoft introduced Nano Server. Nano Server is a new Windows Server installation option with a focus on remote management. It provides higher density, as well as reduced servicing requirements. The smaller image size translates into a smaller attack surface and faster boot time. Nano Server is ideal for cloud-inspired infrastructures and next-generation app development. It is built for containers and cloud-native apps. The full developer experience is possible with Windows SDK and Visual Studio.

Nano Server delivers significant improvements in security, size, and speed.
Nano Server is secure because organizations can install only the pieces they need. It is smaller in terms of disk and RAM consumption, so more resources are available for other purposes. Nano Server uses a virtual hard disk and requires less patching, which results in faster deployments and fewer maintenance requirements. The streamlined system offers faster performance, as some reboots take only seconds.
Nano Server delivers significant improvements in four areas:
- Servicing Improvements. Compared to Server Core and Full Server installations, Nano Server has had dramatically fewer important and critical bulletins, as well as far fewer reboots.

- Security Improvements. Since Nano Server has fewer drivers, services, and open ports compared to Server Core, it has a smaller attack surface and fewer vulnerabilities. As a result, hackers have a harder time breaking into the information infrastructure.

- Resource Utilization Improvements. Nano Server uses fewer processes, less boot IO, and less kernel memory. Lower levels of resource utilization translate into faster boot times.

- Deployment Improvements. On an SSD, Nano Server takes just 40 seconds to deploy. Compared to Server Core, Nano Server’s disk footprint and VHD size are very small.

Although Nano Server lives up to the promises, it may not be the right option for every organization. Aidan Finn feels that Nano Server may be perfect for “born-in-the-cloud” apps, but is better suited to medium to large enterprises than small ones. Finn also has driver concerns, since it is impossible to flip between Nano Server and the full GUI.
“When it comes to deployment and maintenance, Nano Server saves organizations time and effort. With dramatically fewer patches, Nano Server reduces the change control needed for systems. This is important especially in regulated environments.”
– Aidan Finn
Nano Server uses packages to deploy certain workloads.
With Nano Server, packages are needed to deploy certain workloads. Microsoft has created several packages that can be deployed on Nano Server using APPX tools. Mike Resseler created a list of packages and highlighted several:
- Hyper-V. Veeam has tested Nano Server with Hyper-V and found it to be very stable.
- Windows Defender. Organizations using Nano Server have the option to deploy Windows Defender by using a package, or they can elect not to use it.
- Internet Information Server (IIS). This package would likely be deployed for specific types of workloads.

PowerShell cmdlets are used to deploy Nano Server packages. These include New-NanoServerImage, Get-NanoServerPackages, and Edit-NanoServerImage.
“Packages are needed to deploy certain workloads on Nano Server. Microsoft has created several packages that can be deployed using APPX tools. For example, Veeam has tested the Hyper-V package and found it to be very stable on Nano Server.”
– Mike Resseler
To customize Nano Server installations, IT teams can apply various parameters.
Mike Resseler discussed several parameters in more depth:
- CopyPath. This parameter specifies an additional directory path on the computer where you create the image. That directory and files in it will be added to the root of the VHD(X). This can be used, for example, to auto deploy certain files into Nano Server. When Resseler builds lab environments, he puts a repository of scripts in Nano Server upon deployment. Remote PowerShell can be used to launch those scripts, resulting in saved time.
- DomainName. This joins the image to the specified domain performing an offline join.
- MaxSize. This defines the size in bytes of the dynamic VHD(X) to be created. The default is 4GB. If organizations want a larger dynamic VHD(X), they must define the size during the Nano Server deployment process.
- InterfaceNameOrIndex. This parameter, as well as IP related parameters, are used to change the IP settings of an adapter. These can be retrieved using Get-NetAdapter, netsh, or EMC if you already created an image, and in a VM, the first interface will always be named Ethernet. This parameter can be used to give servers a fixed IP address.
Nano Server offers a variety of management options.
Nano Server users have different options in terms of management tools. Alternatives include:
- Nano Server Recovery Console (formerly the Emergency Management Console). This is the only UI in Nano Server. It is similar to old Linux or DOS user interfaces. Nano Server Recovery Console allows users to edit IP settings, the route table, and firewall rules. It is also possible to shut down and restart the server
- PowerShell Remoting/Direct. Remoting requires a network, while going direct uses VMbus
- PowerShell cmdlets are not supported. This is because Nano Server runs PowerShell core.
- Windows PowerShell CIM. This needs to be enabled and it runs over WinRM. Windows PowerShell CIM can be used to run WMI commands.
- Windows Remote Management (WinRM). This is the Microsoft version of WS-Man. It runs programs remotely on Nano Server
- Remote Consoles. Most MMC consoles will work with Nano Server. This includes Hyper-V Manager, Cluster Failover Manager, DNS, and Server Manager
- Remote Server Management Tools. Web-based tools exist in Azure. They serve as a replacement for local-only tools. However, a gateway on-premises is needed to talk with Azure.
To troubleshoot Nano Server issues, IT teams have access to setup and boot eventlog collection, kernel debugging, performance and event monitoring, and more.
Several tools exist for in-depth troubleshooting with Nano Server:
- Setup and boot eventlog collection offers greater visibility with a simple setup. Users can remotely view debug errors, as well as events from the deployment process, boot loader, OS, and services. This enables troubleshooting without physical access. Setup and boot eventlog collection works on both physical and virtual machines. It requires little additional infrastructure and can be setup using PowerShell or an unattend file. The result is lower mean time to repair. Data access is real-time and can be correlated with other diagnostic data to identify problems faster. This new feature in Windows Server 2016 is a push operation, not pull. IT teams can use Message Analyzer or a tool of their choice.

- Kernel debugging is also possible with Nano Server. This can be done over a serial port, TCP/IP, FireWire, or USB. Kernel debugging is not enabled by default in Nano Server. It must be enabled upfront through a parameter.

- Performance and event monitoring is also supported. Nano Server includes wpr.exe (Windows performance recorder tool), event tracing management cmdlets, typeperf.exe (cmdline equivalent of perfmon GUI), Get-Winevent (remotely read event viewer), and wevtutil.exe (retrieves information from event logs and specific publishers).
- Emergency Management Service is available, but not enabled by default. This provides a Serial Console interface in bootloader. It can be enabled with the following command: -EnableEMS -EMSPort 3 -EMSBaudRate 9600.
IT teams should be aware that not all Windows Server functionality is available in Nano Server.
Additional notes about Nano Server include:
- DISM tools are still there. These include SetupComplete.cmd and Unattend.xml.
- DNS Package needs to be enabled.
- IIS doesn’t support everything, but the features that IT teams consider most interesting are there.
- All aspects of Hyper-V are supported, except RemoteFX.
- For clustering, no cmdlets are local on Nano Server. File and Hyper-V are included.
- To access DFS, additional configuration is needed up front.
Code Samples:
Mike Resseler provided code examples to illustrate key points:


Other Important Points
- Domain join. Domain join can be used to join the same domain as the image creation computer or to join a different domain. It can also be used to reuse a domain account, as well as for online domain join and for using unattend.xml.
- Nano Server and Azure. Nano Server can be deployed in Azure. It is available in the Gallery. You can also bring your own disk to Azure, upload it, and attach it to a VM.
The post Sponsored: Everything You Need to Know About Microsoft Nano Server appeared first on Petri.
Real Python: Automating Django Deployments with Fabric and Ansible

In the last post, we covered all the steps required to successfully develop and deploy a Django app on a single server. In this tutorial we will automate the deployment process with Fabric (v1.12.0) and Ansible (v2.1.3) to address these issues:
- Scaling: When it comes to scaling a web app to handle thousands of daily requests, relying on a single server is not a good approach. Put simply, as the server approaches maximum CPU utilization, it can cause slow load times which can eventually lead to server failure. To overcome this, the app must be scaled to run on more than one server so that the servers can cumulatively handle the incoming concurrent requests.
- Redundancy: Deploying a web app manually to a new server means a lot of repeated work with more chances of human error. Automating the process is key.
Specifically, we will automate:
- Adding a new, non-root user
- Configuring the server
- Pulling the Django app code from a GitHub repo
- Installing the dependencies
- Daemonizing the app
Setup and Config
Start by spinning up a new Digital Ocean droplet, making sure to use the Fedora 25 image. Do not set up a pre-configured SSH key; we will be automating this process later via a Fabric script. Since the deployment process should be scalable, create a separate repository to house all the deployment scripts. Make a new project directory locally, and create and activate a virtualenv using Python 2.7x.
Why Python 2.7? Fabric does NOT support Python 3. Don’t worry: We’ll be using Python 3.5 when we provision the server.
1 2 3 4 |
|
Fabric Setup
Fabric is a tool used for automating routine shell commands over SSH, which we will be using to:
- Set up the SSH keys
- Harden user passwords
- Install Ansible dependencies
- Upgrade the server
Start by installing Fabric:
1 |
|
Create a new folder called “prod”, and add a new file called fabfile.py to it to hold all of the Fabric scripts:
1 2 3 4 5 6 7 8 9 10 11 12 13 14 15 16 17 18 19 20 21 22 23 24 25 26 27 28 29 30 31 32 33 34 35 |
|
Take note of the inline comments. Be sure to add you remote server’s IP address to the env.hosts variable. Update env.full_name_user as well. Hold off on updating env.password; we will get to that shortly. Look over all the env variables – they are completely customizable based on your system setup.
Set up the SSH keys
Add the following code to fabfile.py:
1 2 3 4 5 6 7 8 9 10 11 12 13 14 15 16 17 18 19 20 21 22 23 24 |
|
This function acts as the entry point for the Fabric script. Besides triggering a series of functions, each explained in further steps, it explicitly-
- Generates a new pair of SSH keys in the specified location within your local system
- Copies the contents of the public key to the authorized_keys file
- Makes changes to the remote sshd_config file to prevent root login and disable password-less auth
Preventing SSH access for the root user is an optional step, but it is recommended as it ensures that no one has superuser rights.
Create a directory for your SSH keys in the project root:
1 2 3 |
|
Harden user passwords
This step includes the addition of three different functions, each executed serially to configure SSH password hardening…
Create deployer group
1 2 3 4 5 6 7 8 9 |
|
Here, we add a new group called deployers and grant sudo permissions to it so that users can carry out processes with root privileges.
Create user
1 2 3 4 5 6 7 8 9 10 11 12 |
|
This function-
- Adds a new user to the
deployersuser group, which we defined in the last function - Sets up the SSH directory for keeping SSH key pairs and grants permission to the group and the user to access that directory
Upload SSH keys
1 2 3 4 5 6 7 8 9 10 11 |
|
Here, we-
- Upload the locally generated SSH keys to the remote server so that non-root users can log in via SSH without entering a password
- Copy the public key and the authorized keys to the remote server in the newly created ssh-keys directory
Install Ansible dependencies
Add the following function to install the dependency packages for Ansible:
1 2 3 4 5 6 |
|
Keep in mind that this is specific to the Fedora Linux distro, as we will be using the DNF module for installing packages, but it could vary by distro.
Set SELinux to permissive mode
The next function sets SELinux to permissive mode. This is done to overcome any potential Nginx 502 Bad Gateway errors.
1 2 3 4 5 6 |
|
Again, this is specific to the Fedora Linux distro.
Upgrade the server
Finally, upgrade the server:
1 2 3 4 5 6 7 8 |
|
Sanity check
With that, we’re done with the Fabric script. Before running it, make sure you SSH into the server as root and change the password:
1 2 3 4 5 6 |
|
Be sure to update env.password with the new password. Exit the server and return to the local terminal, then execute Fabric:
1 |
|
If all went well, new SSH keys will be generated, and you will be asked to create a password (make sure to do this!):
1 2 3 |
|
A number of tasks will run. After the deployer user is created, you will be prompted to add a password for the user-
1 |
|
-which you will then have to enter when the SSH keys are uploaded:
1 |
|
After this script exits successfully, you will NO longer be able to log into the remote server as a root user. Instead, you will only be able to use the non-root user deployer.
Try it out:
1 2 |
|
This is expected. Then, when you run-
1 |
|
-you should be able to log in just fine:
1 |
|
Ansible Primer
Ansible is a configuration management and provisioning tool used to automate deployment tasks over SSH.
You can fire individual Ansible tasks against the app servers from your shell remotely and execute tasks on the go. Tasks can also be combined into Playbooks – a collection of multiple plays, where each play defines certain specific tasks that are required during the deployment process. They are executed against the app servers during the deployment process. Playbooks are written in YAML.
Playbooks
Playbooks consist of a modular architecture as follows:
- Hosts specify all the IP addresses or domain names of our remote servers that need to be orchestrated. Playbooks always run on a targeted group of hosts.
-
Roles are divided into sub parts. Let’s look at some sample roles:
- Tasks are a collection of multiple tasks that need to be carried out during the deployment process.
- Handlers provide a way to trigger a set of operations when a module makes a change to the remote server (best thought of as hooks).
- Templates, in this context, are generally used for specifying some module-related configuration files – like nginx.
- Variables are simply a list of key-value pairs where every key (a variable) is mapped to a value. Such variables can be used in the Playbooks as placeholders.
Sample Playbook
Now let’s look at a sample single-file Playbook:
1 2 3 4 5 6 7 8 9 10 11 12 13 14 15 16 17 18 19 20 21 22 |
|
Here, we defined the-
- Hosts as
hosts: all, which indicates that the Playbook will run on all of the servers that are listed in the inventory/hosts file - Variables
http_port: 80andapp_name: django_bootstrapfor use in a template - Tasks in order to install nginx, set up the nginx config (
becomeindicates that we need admin privileges), and trigger the restart handler - Handler in order to restart the nginx service
Playbook Setup
Now let’s set up a Playbook for Django. Add a deploy.yml file to the “prod” directory:
1 2 3 4 5 6 7 8 |
|
The above snippet glues together the Ansible hosts, users, and roles.
Hosts
Add a hosts (plain text format) file to the “prod” directory and list the servers under their respective role names. We are provisioning a single server here:
1 2 |
|
In the above snippet, common refers to the role name. Under the roles we have a list of IP addresses that need to be configured. Make sure to add your remote server’s IP address in place of <server-ip-address>.
Variables
Now we define the variables that will be used by the roles. Add a new folder inside “prod” called “group_vars”, then create a new file called all (plain text format) within that folder. Here, specify the following variables to start with:
1 2 3 4 5 6 7 8 9 |
|
Make sure to update <path-to-your-ssh-keys>. To get the correct path, within the project root, run:
1 2 3 |
|
With these files in place, we are now ready to coordinate our deployment process with all the roles that need be carried out on the server.
Playbook Roles
Again, Playbooks are simply a collection of different plays, and all these plays are run under specific roles. Create a new directory called “roles” within “prod”.
Did you catch the name of the role in the deploy.yml file?
Then within the “roles” directory add a new directory called “common” – the role. Roles consists of “tasks”, “handlers”, and “templates”. Add a new directory for each.
Once done your file structure should look something like this:
1 2 3 4 5 6 7 8 9 10 11 12 13 14 15 |
|
All the plays are defined in a “tasks” directory, starting with a main.yml file. This file serves as the entry point for all Playbook tasks. It’s simply a list of multiple YAML files that need to be executed in order.
Create that file now within the “tasks” directory, then add the following to it:
1 2 3 4 5 6 7 8 9 10 11 12 |
|
Now, let’s create each task. Be sure to add a new file for each task to the “tasks” directory and add the accompanying code to each file. If you get lost, refer to the repo.
01_server.yml
1 2 3 4 5 6 7 8 9 10 11 12 13 14 15 16 17 18 19 20 21 22 23 24 25 |
|
Here, we list all the system packages that need to be installed.
02_git.yml
1 2 3 4 5 6 7 8 9 10 |
|
Add the following variables to the group_vars/all file:
1 2 3 4 5 |
|
Make sure to fork then clone the django-bootstrap repo, then update the code_repository_url variable to the URL of your fork.
03_postgres.yml
1 2 3 4 5 6 7 8 9 10 11 12 13 14 15 16 17 18 19 20 21 22 23 24 25 26 27 28 29 30 31 32 33 34 35 |
|
Update group_vars/all with the database configuration needed for the playbook:
1 2 3 4 5 |
|
Update the db_password variable with a secure password.
Did you notice that we restart the postgres service within the main.yml file in order to apply the changes after the database is configured? This is our first handler. Create a new file called main.yml in the “handlers” folder, then add the following:
1 2 3 |
|
04_dependencies.yml
1 2 3 4 5 6 7 8 9 10 11 12 13 14 |
|
Update group_vars/all like so:
1 2 3 |
|
Add a template called env.j2 to the “templates” folder, and add the following environment variables:
1 2 3 4 5 |
|
Be very careful with the environment variables and their values in env.j2 since these are used to get the Django Project up and running.
05_migrations.yml
1 2 3 4 5 6 7 8 9 10 11 12 13 14 15 16 17 |
|
06_nginx.yml
1 2 3 4 5 6 7 8 9 10 11 12 |
|
Add the following variable to group_vars/all:
1 2 3 |
|
Don’t forget to update <remote-server-ip>. Then add the handler to handlers/main.yml:
1 2 3 |
|
Then we need to add the django_bootstrap.conf template. Create that file within the “templates” directory, then add the code:
1 2 3 4 5 6 7 8 9 10 11 12 13 14 15 16 17 18 19 20 21 22 23 24 25 26 27 28 29 |
|
07_gunicorn.yml
1 2 3 4 5 6 7 8 9 10 11 12 13 14 15 |
|
Add more variables to groups_vars/all:
1 2 3 4 5 6 7 8 |
|
Add the gunicorn_start template:
1 2 3 4 5 6 7 8 9 10 11 12 13 14 15 16 17 18 19 20 21 22 23 24 25 26 27 28 29 30 31 32 33 34 35 36 37 38 39 40 41 42 43 44 |
|
08_systemd.yml
1 2 3 4 5 6 7 8 9 10 |
|
Add the template – django-bootstrap.service:
1 2 3 4 5 6 7 8 9 10 11 12 13 14 15 |
|
Add the following to the handlers:
1 2 3 |
|
09_fix-502.yml
1 2 3 4 5 6 |
|
Sanity Check (final)
With the virtualenv activated, install Ansible locally:
1 |
|
Create a new file called deploy_prod.sh in the project root to run the playbook, making sure to update <server-ip>:
1 2 3 |
|
Then run following command to execute the playbook:
1 |
|
If any errors occur, consult the terminal for info on how to correct them. Once fixed, execute the deploy script again. When the script is done visit the server’s IP Address to verify your Django web app is live and running!

Make sure to uncomment this line in prod/roles/common/tasks/main.yml if you see the 502 error, which indicates that there is a problem with communication between nginx and Gunicorn:
1 |
|
Then execute the playbook again.
If you execute the playbook more than once, make sure to comment out the
Run initdb commandfound in 03_postgres.yml since it needs run only once. Otherwise, it will throw errors when trying to reinitialize the DB server.
Conclusion
This post provides a basic understanding of how you can automate the configuring of a server with Fabric and Ansible. Ansible Playbooks are particularly powerful since you can automate almost any task on the server via a YAML file. Hopefully, you can now start writing your own Playbooks and even use them in your workplace to configure production-ready servers.
Please add questions and comments below. The full code can be found in the automated-deployments repository.
Cool Tool - ESXTOP NMONVisualizer
NMONVisualizer is a free Java GUI tool for analyzing nmon system files from both AIX and Linux. It also parses IOStat files, IBM verbose GC logs, Windows Perfmon & ESXTop CSV data and JSON data.
Download the latest version here. Kudos Mark Achtemichuk! Great find.
How to install SQL Server Express 2016 in a Windows Container (Docker)
Container technology (the original Linux containers commonly known as LXC) has been around for a long time but became popular with the adoption of Docker. Docker brought significant changes to the existing container technology and automated the deployment of applications in containers by providing an additional layer of abstraction.
Running SQL Server in Docker
Some people call it the next version of virtualization; others think VMs and Containers have different use cases and it’s better to run them side-by-side. Microsoft also wants to be in this game and recently announced support for containers on Windows operating systems and Hyper-V VMs. Redmond didn’t only introduce the capability to run containers in Windows but also provided native Docker shell support. If you are familiar with Docker, you can keep on using it as before with native Docker commands, or you can chose our lovely PowerShell cmdlets for container tasks.
Microsoft is also doing a great job of contributing to communities and DockerHub. If you browse DockerHub for "Microsoft," you will find plenty of images ready to use. They also recently uploaded a SQL Server Express container image and made it publicly available on DockerHub.
You may ask why they are offering only Express edition rather than full SQL Server. Well, my answer would be "licensing issues." As you are probably aware, SQL Server Express is the free edition of SQL Server and does not create any licensing conflict in container scenarios. The full edition of SQL Server, however, requires you to have licenses in place. Microsoft is still looking for possible ways to license SQL Server hosted in containers. (This might not be happen anytime soon.)
The second question you may ask is whether running a database inside a container is a good idea or not. The discussion about which applications are a good fit for containers has been running for a long time. Some say that only stateless applications make sense for container scenarios as they don’t care about data. You can fire up hundreds of containers, do what you want, and then destroy them.
45 (and counting) ASP.NET Core Samples
I came across this repo by accident and as soon as I saw it I knew I had today's post. I don't know about you, but I learn code by looking at code. Today's project is 45 and count cool ASP.NET code samples, from Hello World and up...
dodyg/practical-aspnetcore
45 samples for aspnetcore fundamentals (updated daily)
Some of the samples you see here involve mixed projects (net451) that will run only in Windows. For many .NET developers, full framework is the reality for forseeable future. We are not going to port multi-year production systems to run on Linux. We want to improve the creaky .NET MVC 2.0 that we have lying around and bring it up to speed to aspnetcore MVC.
All these projects require the following dependencies
"Microsoft.AspNetCore.Hosting" : "1.0.0-*"This dependency pulls its own dependencies which you can check at project.lock.json.
This allows us to not explicitly specify some dependencies ourselves.If a sample require additional dependencies, I will list them.
I highly recommend using Visual Studio Code to play around with these samples but it is not required.
To run these samples, simply open your command line console, go to each folder and execute
dotnet restoreand then continue withdotnet watch run.
Setup your most basic web app and enable the change+refresh development experience.
We are using
IApplicationBuilder Run, an extension method for adding terminal middleware.Hello World with startup basic
This project contains all the available services available in Startup class constructor,
ConfigureServicesandConfiguremethods. ...Routing
We take dependency on
"Microsoft.AspNetCore.Routing" : "1.0.0-*"to enable routing facilities in your aspnetcore apps. There are several samples to illuminate this powerful library. ...Middleware
We will explore all aspect of middleware building in this section. There is no extra dependency taken other than
Kestrelanddotnet watch. ...
- Features
Features are collection of objects you can obtain from the framework at runtime that serve different purposes.
- Dependency Injection
aspnetcore lives and die by DI. It relies on
Microsoft.Extensions.DependencyInjectionlibrary. There is no need to put this dependency in yourproject.jsonexplicitly because aspnetcore already has this package as its own dependency.
- In Memory Caching (a.k.a local cache)
These samples depends on
Microsoft.Extensions.Caching.Memorylibrary. Please add this dependency to yourproject.json. ...
- Configuration
This section is all about configuration, from memory configuration to INI, JSON and XML. ...
- Localization and Globalization
This section is all about languages, culture, etc ...
Serve static files
Simply serve static files (html, css, images, etc).
This additional dependency is required to enable the functionality
"Microsoft.AspNetCore.StaticFiles": "1.0.0".There are two static files being serve in this project, index.html and hello.css. They are stored under
wwwrootfolder, which is the default folder location for this library.To access them you have to refer them directly e.g.
localhost:5000/index.htmlandlocalhost:5000/hello.css.Serve markdown file as html file. You will see how you can create useful app using a few basic facilities in aspnetcore.
We take
"CommonMark.Net" : "0.13.4"as dependency.
Follow @CH9
Follow @coding4fun
Follow @gduncan411

Daniel Bader: The ultimate list of Python Podcasts
The ultimate list of Python Podcasts
I couldn’t find a good and updated list of Python developer or Python programming podcasts online. So I created my own list with the best Python podcasts.

I enjoy listening to all kinds of podcasts when I’m at the gym or driving. There are some really good podcasts about Python development out there but I just couldn’t find a good (and updated) list.
I initially created this list on forum posts and by searching the iTunes podcast directory and I will continue to grow it with user feedback. I plan to keep this list updated, so feel free to shoot me an email if you think anything is missing or if you’d like to see your own Python podcast added.
My criteria for inclusion on this list are:
- episode download links must work; and
- the podcast must be active (new episodes are coming out) OR at least have an interesting archive with old episodes worth listening to.
Enjoy the podcasts! 🎙🐍
Talk Python To Me
Talk Python to Me is a weekly podcast hosted by Michael Kennedy. The show covers a wide array of Python topics as well as many related topics (e.g. MongoDB, AngularJS, DevOps). The format is a casual 45 minute conversation with industry experts.
- Website: talkpython.fm
- Twitter: @TalkPython
- Subscribe: RSS ⋅ iTunes ⋅ Overcast.fm
Podcast.__init__
A podcast about Python and the people who make it great. Hosted by Tobias Macey and Christopher Patti.
- Website: www.podcastinit.com
- Twitter: @Podcast__init__
- Subscribe: RSS ⋅ iTunes ⋅ Overcast.fm
Python Bytes
Python Bytes is a weekly podcast hosted by Michael Kennedy and Brian Okken. Python Bytes podcast delivers headlines directly to your earbuds. If you want to stay up on the Python developer news but don’t have time to scour reddit, twitter, and other news sources, just subscribe and you’ll get the best picks delivered weekly.
- Website: pythonbytes.fm
- Twitter: @PythonBytes
- Subscribe: RSS ⋅ iTunes ⋅ Overcast.fm
The Python Experience
The personal ramblings of the perpetual computer programming newb, finally finding his way “home” to Python, and determined to do things more Pythonically.
- Website: python.madewithopinion.com
- Twitter: @miklevin
- Subscribe: RSS ⋅ iTunes ⋅ Overcast.fm
Test & Code
A podcast about Software Development, Software Testing, and Python. How did you become a software developer/tester/engineer/lead, etc? Odds are we all are missing some important information to do our jobs most effectively. This podcast is an attempt to fill those education gaps. I focus on testing and process questions like “How do I know it works?”, “How do I effectively test?”, and the like. But really, anything in the software development realm is fair game.
- Website: pythontesting.net/podcast
- Twitter: @TestPodcast
- Subscribe: RSS ⋅ iTunes ⋅ Overcast.fm
Import This: A Python Podcast for Humans
Featuring Kennneth Reitz and Alex Gaynor. Alex and I wanted there to be more tech podcasts. So, we made our own.
- Website: www.kennethreitz.org/import-this/
- Twitter: @kennethreitz
- Subscribe: RSS ⋅ iTunes ⋅ Overcast.fm
Radio Free Python
A monthly podcast focused on the Python programming language and its community.
(No updates since 2013 but an interesting archive of episodes.)
- Website: radiofreepython.com
- Twitter: @RadioFreePython]
- Subscribe: RSS
from python import podcast
A small-batch artisanal podcast for irreverent pythonistas. Easy-going, conversational, often silly, and occasionally earning our iTunes “explicit” tag, From Python Import Podcast is news, analysis, discussion, and general shenanigans about the Python language and community. Put on your headphones and come hang out with us!
(No updates since 2014 but an interesting archive of episodes.)
- Website: frompythonimportpodcast.com
- Twitter: @__fpip__
- Subscribe: RSS ⋅ iTunes ⋅ Overcast.fm
If you think anything is missing from this list or if you’d like to see your own Python podcast added, then please email me at mail@dbader.org.
Sponsored: Active Directory Cleanup – Removing Stale Objects


Due to the nature of the tasks Active Directory (AD) performs as an identity management solution, inactive objects are not only an inconvenience, cluttering the directory with outdated and unused objects, but also pose a security risk.
User and computer accounts have passwords, so they can authenticate with AD, and like any object with credentials, provide a means of entry to your systems. Although other AD objects, such as Organizational Units (OUs) and groups, can also pose security and operational risks if not properly managed.
Prevention is better than cure, so managing the full lifecycle of user objects so that they are added, updated, and removed in a timely manner can reduce security concerns. But as organizations tend to have more devices than employees, there might not be a one-to-one relationship between devices and users, so managing the lifecycle of machine accounts isn’t always so simple.
Computers accounts authenticate to AD using a password, with the only difference from user accounts being that the password is changed every 30 days and this process is initiated by the computer, not AD, so the computer must be turned on and connected to a domain controller at least once a month. Additionally, computer account passwords don’t expire, so a password that’s older than 30 days can still be used until a password change is initiated by the client device.
Removing Stale Objects Using PowerShell
Although prevention is better than cure, it’s inevitable, especially in the case of machine accounts, that you will end up with stale objects in AD. And because of the security risk that these objects pose, you should have a strategy to deal with them.
The most common way to handle this issue is to use a PowerShell script to parse AD that flags computer accounts that haven’t had a password change in 30 days, and user accounts that haven’t logged in for a determined period of time.
Using the Get-AdComputer and Get-Date cmdlets, plus a simple filter, I can return a list of machine accounts in AD that haven’t had a password reset in more than 30 days.
$date = (Get-Date).adddays(-30)
Get-AdComputer -Filter {passwordlastset -lt $date} -Properties passwordlastset | Select name, passwordlastset | sort passwordlastset
And if I’m happy with the results, I can then remove the accounts from AD by piping the results of Get-AdComputer to the Remove-AdObject cmdlet:
Get-AdComputer -Filter {passwordlastset -lt $date} -Properties passwordlastset | Remove-AdObject -Recursive -Verbose -Confirm:$false
If you have a Windows Server 2003 functional domain level or higher, you can use the Search-ADAccount cmdlet to return a list of inactive users by looking at the LastLogonTimeStamp attribute, which unlike the LastLogon attribute, gets replicated between domain controllers. Although it’s worth noting that AD updates the LastLogonTimeStamp attribute only about once every 12 days, to reduce network replication traffic, so it has limited accuracy but might be fine if you want to search for who hasn’t logged on in the past few months. The following command returns a list of users that haven’t logged in for the past 90 days:
Search-ADAccount -AccountInactive -TimeSpan 90.00:00:00
AD groups that are assigned permissions to sensitive data or systems might provide a way for an attacker to elevate privileges. Similarly, PowerShell can also be used to scan AD for empty groups using the Get-AdGroup and Get-AdGroupMember cmdlets:
Get-AdGroup -Filter * | Where {-Not($_ | Get-AdGroupMember)} | Select Name
If AD isn’t cleaned up on a regular basis, the chances of a security breach increase, so a regular review of objects needs to be undertaken. And the most thorough way to perform this task is using some form of automation, as it’s easy to miss something if you rely on a manual effort. It’s also wise to move objects to a dedicated OU where they can be reviewed and then deleted after a period of time.
Softerra Adaxes
Administrators are often reluctant to use PowerShell scripts alone for removing stale objects for fear of breaking critical systems. Third-party AD management solutions, such as Softerra Adaxes, can take much of the risk out of the process by first focusing on prevention (i.e., managing the full lifecycle of user accounts) and adding the ability to run scheduled tasks that are based on rules, which can then be integrated into a workflow that requires approval. So rather than blindly deleting accounts that have been automatically identified as inactive, approval can be required from a manager to establish that the object is no longer needed.
Adaxes also uses a more intelligent approach to determining a user’s last logon date by applying its own algorithm to provide more accuracy than AD’s LastLogonTimeStamp. The flexible nature of Adaxes lets system administrators create rules for dealing with empty security groups and OUs, plus the ability to archive inactive Exchange mailboxes and run reports on stale objects, among many other AD automation tasks that a critical for maintaining a healthy and secure directory.
The post Sponsored: Active Directory Cleanup – Removing Stale Objects appeared first on Petri.
OSD – Microsoft Deployment Toolkit Build 8443 is out
Pete CookHopfluy with it just being a build number now we will get more rugal ur updates :)
Today a new version of MDT was released, the main reason is Quality Updates and full support for Windows Server 2016 as well as Windows 10 1607. It does require ADK 1607. If you are using MDT in your OS deployment solution, go ahead, download, read, update and enjoy live.

/mike

Threading Support Is In The Works For Raspberry Pi's VC4 Open-Source GPU Driver
Talk Python to Me: #55 How our engineering environments are killing diversity (and how we can fix it)
Full Stack Journey Episode #2: Matt Oswalt
In Episode #2 of the Full Stack Journey podcast, my guest is none other than Matt Oswalt. You may know Matt as the primary author at Keeping It Classless, or as @mierdin on Twitter or GitHub (he also has a YouTube channel and a podcast of his own). Matt is primarily focused on network infrastructure, but is really interested in the intersection of network infrastructure and software development. Matt, along with Jason Edelman and yours truly, is one of the co-authors of a new book on network automation and programmability, and as such is a perfect guest for the Full Stack Journey.
As always, you can get the podcast recording from Soundcloud, or you can subscribe via iTunes.
In other show updates, I hope to have a dedicated web site for the Full Stack Journey podcast up and running by the beginning of March, in time for the next episode. So stay tuned for more details on that!
Show Notes
- Matt’s career started out in software development, but he spent a fair amount of time in networking and doing network consulting before moving back to his current role, where he does software development solely within the context of networking and network infrastructure.
- Aside from a minor quibble with the word “full” implying that the stack is finite (which is isn’t), Matt’s view on a full stack engineer is someone who’s always on a journey to the “next big thing,” or peering over the wall at what’s coming down the line and constantly challenging herself or himself.
- Matt started getting pulled back into software development in 2014, with the rise in popularity of containers, orchestration systems, and tools like Ansible.
- Key topics that Matt sees as important today (within the framework of his current shift from doing predominantly networking to software development in a networking context):
- You don’t need to be a full-time programmer to achieve some benefit and “quick wins” from using a tool or programming language like Python within your environment.
- Matt likes Docker because it really simplifies things for development and deployment, and is really interested in how network vendors are starting to use Docker for various purposes.
- With respect to Docker (though this applies to other technologies as well)—you don’t necessarily need to know how to use Docker from a development standpoint, but you do need to know how and why it helps solve developers’ problems, and how you will interface or interact with such tools as a result.
- One challenge for Matt has been making network automation topics relatable and practical, even though a lot of what’s happening is new and the industry as a whole is still learning. How does one take completely new topics and make them relatable?
- Have an objective when setting out to learn a new technology—what is the outcome going to be? What are you going to do with the new skill? At least have some sort of idea on how you’ll use it in your career.
- Some tools/techniques that Matt found useful:
- CodeAcademy (not necessarily for Matt but for others he’s helped)
- Lots of hands-on time
- My own web site
- Writing about his own personal learnings (he finds writing helps with the learning process)
- Ultimately, those seeking to learn something need to own it—just get started, don’t let the lack of a game plan keep you from starting.
- Jason Edelman (blog, Twitter, GitHub) is a great resource for network automation, if you’re looking to get started in that space.
- Kirk Byers (web site, Twitter, GitHub) is another great resource for Python and network automation.
- In retrospect, Matt would have spent more time on fundamentals and core concepts instead of focusing on vendor-specific platforms and products. The fundamentals and core concepts can be used to learn the details on specific implementations.
- Watch out for the absolute statements on how something works without first making sure you understand the technology and its applications/use cases. Find data. Find proof. Experiment, break things, determine your own hypotheses, and come to your own conclusions.
- Don’t let other people define your destiny.
- Do things in public—writing (via blogging or elsewhere), sharing code, etc. Matt believes that this will help you improve your quality, and it will give others the opportunity to help you improve.
- If you feel you’re stagnating, you probably are.
- What’s interesting to Matt right now? Containers, Kubernetes, and attention to quality in software and infrastructure projects (use smaller and more digestible improvements).
- Watch out for impostor syndrome! It can be a huge hurdle when making career transitions.
List of Resources
Here are some other resources mentioned during the podcast:
Early Access edition of Network Programmability and Automation: get it here via O’Reilly
The 7 Habits of Highly Effective People: Powerful Lessons in Personal Change via Amazon
Windows 10 ADK and Configuration Manager
MCSA Windows Server 2012 R2: How to study guide & useful links

Windows Server first came into existence in the year 1993 as Windows NT 3.1. Windows Server 2012 R2 today comes with many enhanced features, that were not available in previous versions. As Server versions are upgraded, the demand for IT [...]
This post MCSA Windows Server 2012 R2: How to study guide & useful links is from TheWindowsClub.com.
First Git, now Vagrant
When I shared the story behind migrating the blog to Jekyll and GitHub, I mentioned that one of the reasons for the migration was to embrace Git as a part of my regular workflow. I’d been recommending to folks that they learn and use Git, and now I needed to “walk the walk” as well as “talk the talk.” This post describes another step in my effort to “walk the walk.”
As the title of the post implies, this step involves the well-known tool Vagrant. (If you are unclear what Vagrant is or what it does, please read my quick introduction to Vagrant.) In the same presentation where I was recommending to folks to learn tools like Git, I was also recommending that they learn (and use, where applicable) tools like Vagrant. Once again, though, I was talking a good game but not backing it up with my actions. So, I’ve resolved to expand my use of Vagrant, sharing with all of my readers and followers along the way. And, because I believe that VMware Fusion is the most robust virtualization solution for Mac OS X, I’ll be using Vagrant with VMware Fusion.
So what will I be sharing, you might ask? Well, a couple of things at least:
-
As I started to expand my use of Vagrant, I found what I felt was a shortage of base boxes for Fusion/Workstation. Therefore, one of the first things I’ll be sharing are some Vagrant base boxes built specifically for the
vmware_desktopprovider (which supports both VMware Fusion and VMware Workstation). A couple of these are already online; you can see the details here and pull either of them down for use with Vagrant on your systems. (Feedback is appreciated; I’d particularly like folks to test it with VMware Workstation and versions of VMware Fusion other than 6.0.5.) -
To make use of these base boxes, I’ll also be sharing a number of different
Vagrantfiles, each designed to help with learning something. For example, I’m looking at building aVagrantfilethat will build a system running a recent build of Open vSwitch (OVS) so as to make it easier for folks to learn how to use and work with OVS. As a follow-up to the vBrownBag session I did recently, I’ll also post aVagrantfilethat helps build out an etcd cluster on CoreOS Linux. (Feel free to drop me an e-mail if you have any other suggestions.)
I have two goals with this effort. First, I want to make it easier for other people to learn what Vagrant is and how they can put it to use in their career. Second, I want to make it easier for people to learn other new technologies that will help arm them for success in the IT industry. Hopefully I’ll be able to make some progress toward these goals.
DevOps for VMware Administrators available for pre-order
 DevOps represents a powerful new approach to delivering IT services, where software developers and IT operations teams work closely together to deploy projects far more often and more reliably.
 As pioneers like Google, Amazon, and Netflix have discovered, DevOps can improve efficiency, accelerate delivery, and reduce costs. However, most discussions of DevOps focus on theory rather than implementation, and DevOps raises unique issues in virtualized environments.
- Puppet IT automation software for managing infrastructure across its lifecycle, including provisioning, configuration, orchestration, and reporting
- Chef configuration management tool for writing system configuration "recipes" that streamline server configuration and maintenance and can integrate with cloud-based platforms such as Rackspace and Amazon EC2 to automate provisioning
- Ansible, the flexible open source toolkit for automating configuration management and orchestration in Unix and Unix-style environments
- Windows PowerShell for automating tasks and configuration management in Windows environments
Hello

Hi, I’m Paul Thurrott. You may remember me from such web sites as Paul Thurrott’s SuperSite for Windows and Windows IT Pro, and from podcasts like Windows Weekly and What the Tech. And with that Simpsons reference out of the way, I’d like to welcome you to my new web site, thurrott.com. If you enjoyed the goings-on at the SuperSite, you’re going to feel right at home here.
Thurrott.com is a partnership between Blue Whale Web—which also publishes the highly-respected Petri IT Knowledgebase—and myself. Leaving my previous employer was a difficult decision. But the wonderful team of people at Blue Whale Web, led by Managing Partner George Coll, made this next step very easy.
If you were a fan of the SuperSite, no worries: Thurrott.com will be similar, and I will continue to focus largely on Microsoft, its products and services, and on consumer technology in general. I will be expanding my coverage a bit to include some more technical topics such as building and upgrading PCs, software development, and more, but that will be phased in after we work to get this new site up and running.
And the “we” there is very important. My voice, my enthusiasm for technology, and my desire to get to the truth of things all remain unchanged. But Thurrott.com is indeed a partnership, and while many have congratulated me for striking out on my own, the truth is that I couldn’t—and don’t want to—do this by myself. I’ve been lucky in life in a variety of ways, but I’ve been particularly lucky in this case.
Blue Whale Web is a small team of very dedicated people who are … just awesome. Watching them get this site up and running quickly has been incredible, and a whirlwind compared to the slow-moving corporate behemoth to which I was previously shackled. I’m in good hands here. We all are.
So here’s what’s happening.
This site is brand new, it still has that new car smell, and there are content holes and kinks that will need to get worked out. We’re using this initial soft-launch long weekend to get some of those issues fixed. But do let me know if you see something particularly egregious.
In addition to posting to thurrott.com regularly, I will also be posting news stories to Petri.com five days a week. This means I get to work alongside Petri’s esteemed cadre of authors—Daniel Petri, Aidan Finn, Jeff Hicks, Russell Smith, and many others—as well as editors like Jeff James and Blair Greenwood, both of whom I’ve worked with in the past. I also want to thank my new Blue Whale Web teammates Tim Speciale, Maria Plasterer, Sean McCabe, and Cindy Roth-Wurster for helping make this site a reality so quickly. You are all amazing.
Here on thurrott.com, the content will be driven by what you want to see. As I noted previously, I have some ideas for the future, and I previously asked my podcast listeners for advice about the types of articles and series of articles they’d like to see. The feedback so far has been incredible, but I’d like to extend this offer to everyone reading the site. So please, use the form on the Contact Paul page to send me any feedback about the site, and any thoughts about what you’d like to see.
One thing I’m particularly excited about is that this site is based on WordPress, so I’ll be able to improve it far more quickly over time. But even in this initial state, thurrott.com offers much bigger and higher-quality images (with lightboxing coming soon), simpler sharing, and, much better commenting: while I had to manually moderate comments at my previous site, we’re using Disqus here. How delightfully modern.
So take a look around. Tell me what you like, and what you don’t like. Please do subscribe to the RSS feed, and sign up for my Thurrott Daily email newsletter, which will arrive via email Monday through Friday (starting Tuesday, as this Monday is a holiday). And what the heck, follow me on Twitter, and listen in on both Windows Weekly and What the Tech.
I’m so excited to be a part of this site launch. It’s scary and different and new, but the one thing I am sure of is that this is the right team of people to make it work.
Thanks for reading,
Paul Thurrott
January 2015
The post Hello appeared first on Thurrott.com.
Weekend Scripter: The Best Ways to Learn PowerShell
Summary: PowerShell MVP, Teresa Wilson, talks about the best ways to learn Windows PowerShell.
Microsoft Scripting Guy, Ed Wilson, is here. Today we have a guest post by Windows PowerShell MVP, Teresa Wilson, aka The Scripting Wife. I asked her to talk a little bit about how one goes about learning Windows PowerShell. Take it away, Scripting Wife…
Hello everyone,
Teresa Wilson here. From time-to-time, whether at TechEd, at a user group meeting, or even online, people ask me how to go about learning Windows PowerShell. In general, my answer it the same. So here goes…
Everyone learns in a different fashion, some by reading, some by listening, some by doing, and some by a combination of all of these. Personally, I like to hear an explanation, then have someone give me an example to follow. Then by trying it myself, I can apply what I have learned.
If you are an IT professional, you may have an idea of something you do in a repeated manner that could possibly be automated. You can use that as your goal, and learn how to write the Windows PowerShell script to accomplish it. Bear in mind (believe it or not) that Windows PowerShell is not always the best tool for the job.
One such example was a man who kept asking Ed and others to help him with his script to build an organizational chart for his company. I am not going to get into all the details, but the short and true answer is that Windows PowerShell is not the tool for this task. It might be possible, but the complexity of the script, along with the likelihood of (hopefully) limited script reuse, made such a proposition a huge pain. Simply fire up Visio, spend a few hours adding shapes and text, and voila! You are done. It would take more time than that to find the documentation for the Visio API—not to mention beginning to understand it.
There is no reason to spend hours of time and frustration trying to get Windows PowerShell to create an organizational chart. Just like you probably don’t want to use Windows PowerShell to write payroll checks. I do believe that attempting to get the formatting right would be way, way, way too hard. On the other hand, if your vendor happens to supply you with an Out-PayRollCheck cmdlet, then more Windows PowerShell to ya!
OK, enough of that. Let’s start with some basic ideas and places to go to learn Windows PowerShell.
1. Training series
If you like to listen to someone explaining or showing you how to accomplish a task, you can go to the Windows PowerShell Scripting page on the Script Center Learn tab and watch two series of training by Ed. As shown in the following screenshot, each series of Webcasts includes five episodes. One series is called the Windows PowerShell Essentials for the Busy Admin Series and the other series is Windows PowerShell: Learn it now before It’s an Emergency.

2. Don Jones on You Tube
Windows PowerShell MVP, Don Jones, has a You Tube channel dedicated to learning. It is called Learn Windows PowerShell in a Month of Lunches.

3. Books
Books are a way to learn. Don Jones also wrote a book called Learn Windows PowerShell in a Month of Lunches. It is an awesome book for learning to use Windows PowerShell.
Ed wrote Windows PowerShell 3.0 First Steps, and Windows PowerShell team member, Lee Holmes, wrote Windows PowerShell Cookbook. These are only three of the several books available about Windows PowerShell.
4. The Hey, Scripting Guy! Blog
This #1 blog has lots of information, but for the beginner, I recommend that you start with some easy lessons that Ed demonstrates by using me as his student. The important thing to keep in mind is that the Scripting Wife posts build on each other—so start with the very first one and work your way forward from there: Scripting Wife series.
5. Events
There are also Windows PowerShell events that take place throughout the year where you can go and learn about Windows PowerShell in person. PowerShell User Groups include a virtual group, and some groups (such as Mississippi and a few others) have remote attendees. Also consider attending PowerShell Saturdays, the PowerShell Summit, and Ignite (formerly known as Microsoft TechEd).
6. Community help
If you run in to issues, there are lots of sources to turn to for help. For example, on Twitter, follow @ScriptingWife and @ScriptingGuys and create a search filter for #PowerShell). If your question is short and clear, you will more than likely get a quick answer (although probably not from me or from the Scripting Guy).
There are also forums on PowerShell.org and TechNet that are devoted to Windows PowerShell, as well as the Official Scripting Guys Forum…not to mention the Scripting Guys Facebook site and the various Windows PowerShell groups mentioned there.
7. Online script examples
Many times, it is helpful to see an example. You can find thousands of sample scripts in the Script Center Repository and on PoshCode. In addition, there are add-ons for the Windows PowerShell ISE that make it convenient to find scripts: for more information, see Introducing Script Browser and Script Analyzer.
I hope this information will get you started on the path to learning Windows PowerShell. Have a scriptastic day!
~Teresa
I invite you to follow me on Twitter and Facebook. If you have any questions, send email to me at scripter@microsoft.com, or post your questions on the Official Scripting Guys Forum. See you tomorrow. Until then, peace.
Ed Wilson, Microsoft Scripting Guy
Weekend Scripter: Why Should I Learn PowerShell?
Summary: Microsoft Scripting Guy, Ed Wilson, talks about why you should learn Windows PowerShell.
Microsoft Scripting Guy, Ed Wilson, is here. The other day, I ran into an IT pro at the mall. He recognized me and started talking to me. It was like, dude, I was trapped. It turned out that he was cool, and yapping with him was much more fun than walking around a boring mall. Although, this particular mall happens to have a Microsoft Store in it (which incidentally is why the Scripting Wife and I made the trek downtown). Hmm, come to think of it, that might also be why there happened to be an IT pro hanging around. Anyway, he asked me a question that I have taken for granted for a number of years. In fact, I was actually a bit shocked that an IT pro would even ask this question today. But it turned out to be a good experience.
Basically, he said that at work he is swamped. Really swamped. Over the past several years, their staff has literally been cut in half, but the number of servers per staff member has nearly tripled. It is working him to death. Basically, he said that he does not have time to learn Windows PowerShell. Their training budgets disappeared years ago, and there is no time off to attend free events at the Microsoft Office. There is no lab at work, so if he was to learn anything new, it has to be on his own time, at home, using whatever equipment he happens to have on hand.
When I asked him how they managed their environment at work, he told me it was basically a hodge-podge of things cobbled together over the years. Many of their solutions were created by people who are no longer with the company, or by people who no longer have time to manage the solution that was created. This is because they now have new positions or so many additional responsibilities, that they have no time to fix or modify whatever was created so many years ago. Therefore, when something breaks, there is basically no one to fix it. They spend most of their time in break/fix mode, and they move from crisis to crisis.
When I asked him why he remained at the company, he told me that he felt he was lucky to have a job. As a matter of a fact, he had been looking for a new position, but his skills were pretty much out of date (they still have some NT 4.0 servers in production).
So, I told him he needed to learn Windows PowerShell. Surprisingly, he asked, “Why?”
And then I told him. Here are some of the main points I made.
Top five reasons for learning Windows PowerShell
1. It will save time.
Big time. Here is a prediction: For every hour, you spend learning Windows PowerShell, in the course of a single year, you will realize a two-fold return on the investment in your time. This value increases exponentially with the size of your network and the number of servers for which you are responsible. Note: I made this up, and there is no implied guarantee associated with this. But the numbers are also based on hundreds of conversations I have had with IT pros over the years.
Consider the following real world scenario:
You have no automation in place, and you need to create 50 new users in Active Directory. By using the graphical tools, it takes a minimum of 30 seconds per user. That is 25 hours of boring, error-prone work. But even a novice can create and run a script to create all 50 users in less than two hours. For the sake of argument, let’s say it takes five hours to research, create, and test the script. That one script still saves 20 hours of work—a tenfold payback with the very first use. And the next time another 50 users need to be created, it will take much less time to simply modify the script and run it anew.
2. It is less error prone.
As I alluded to in point number 1, it is less error prone. I don’t know about you, but I still remember a time when I was using Active Directory Users and Computers at a customer site (14 years ago). It was about 2:00 A.M. and I had been working for over 18 hours straight. I dozed off with the mouse in my hand. That was when I first learned that Microsoft had put drag-and-drop in Active Directory Users and Computers. Dude, I was panic stricken as I tried for the next several hours to find and to confirm everything that I had inadvertently moved.
If I had of written a Windows PowerShell script, a mistake like that would not have occurred. How many user names have you ever seen in Active Directory that were all lower-case, some that were first initial only, and every other possible combination of entry? How many streets are abbreviated, and how many are spelled out? Is it One Times Square, one times sq, or 1 x sq? Or is it all of these?
3. It is self-documenting.
Even if I mess up in a script, I at least know exactly what happened because my script becomes my change control. The script itself is what was done. Even when working interactively from the Windows PowerShell console, I can turn on logging. Therefore, I have a record of what was typed and what the outcome of the command was.
4. It is the Microsoft standard for automation.
Everything has Windows PowerShell in it. It is the standard for Microsoft automation. This means that I can use Windows PowerShell for Exchange Server, for SQL Server, for SharePoint, for Windows Server, for Hyper-V, for Office 365, for Azure, and so on. If I want to automate processes, configuration, maintenance, and other daily activities, Windows PowerShell is the way to go.
5. Everything you learn applies to everything else.
PowerShell is PowerShell is PowerShell. Everywhere, it the same. This means that if I use Windows PowerShell to administer Active Directory, I can also apply that knowledge to administering Exchange Server. When I learn Windows PowerShell conventions, I can sense how it will work on other products.
But that is not all because the Windows PowerShell team respects the effort you spend in learning Windows PowerShell. What I learned about Windows PowerShell 1.0 applies equally well to Windows PowerShell 4.0, and this knowledge will also provide me with a good stead when the next version comes out.
It is not like having to forget everything I learned last year to work with this year’s version of the product. There may be improvements, shortcuts, and new features, but the old ways continue to work. I have scripts that I wrote in the beta of Windows PowerShell 1.0 and they still work today.
There are many other reasons for learning Windows PowerShell, such as interaction with a great community of fellow scripters, and the fact that Windows PowerShell is just plain fun. If you become addicted to Windows PowerShell, you might even begin talking in Windows PowerShell code. I remember one time when someone asked someone else how they were doing that day, and they replied, “Dollar sign wonderful.” I am not naming names, mind you—but that actually happened, and there were witnesses!
I hope you have an awesome day.
I invite you to follow me on Twitter and Facebook. If you have any questions, send email to me at scripter@microsoft.com, or post your questions on the Official Scripting Guys Forum. See you tomorrow. Until then, peace.
Ed Wilson, Microsoft Scripting Guy
Introducing Auto-Password Changing with LastPass
.png)
We saw many people struggling with where to begin that process. Even for those already using a password manager like LastPass, it still required setting aside time to navigate through each account and update passwords one by one. Until now.
We’re excited to announce that the Auto-Password Change feature we released to our Pre-Build Team last week is now available for all users in beta. LastPass can now change passwords for you, automatically. We’re releasing this feature for free to all our users, on Chrome, Safari, and Firefox (starting with version 3.1.70).
Maintaining your privacy and security is our top priority. That’s why we’re doing this differently. We’ve implemented this feature to make password changes locally on your machine, ensuring we stay true to our mission and never have access to your data. All of your sensitive information is encrypted on your computer before syncing, and your encryption key is never shared with LastPass.
Auto-Password Change already supports 75 of the most popular websites, including Facebook, Twitter, Amazon, Pinterest, Home Depot, and Dropbox. When clicking “edit” for a supported site, a “Change Password Automatically” button appears:
We’re committed to making password management easier, faster, and even more practical. We’re building features that help you minimize the impact of breaches. Give Auto-Password Change a try. We think you’ll find it life-changing, too.