Shared posts

30 Aug 14:40

The Linen Project

by Selvedge Team

The Dutch Crafts Council, together with ArtEZ Master Fashion Design is exploring the possibility of reviving local flax and linen production. Flax is a crop which is traditionally grown in the Netherlands. Historically, the linen of the Lowlands was highly desirable, because it was considered of the best quality in the world. It is a so-called alternating crop: it can be grown once every seven years on the same piece of land, promoting biodiversity and soil regeneration. The Linen Project aims to develop new economic, social and cultural ecosystems to demonstrate the vital importance of biodiversity, the revival of skills and our connection with the processes of production.  

Discussing the project, the Crafts Council says: “We’re changing the dialogue when it comes to agriculture, history, heritage, (landscape) architecture, fashion, food, craft, design, contemporary art, economics and innovative business operations. Because the world is changing. And we are digitally connected more than ever. But how and where are our roots? How can we reconnect with deep human values and age-old knowledge and skills?”

“A very urgent challenge is upon us: the people within the Netherlands who are able to transfer their knowledge and skills when it comes to growing and processing flax are dying out. We see the importance of involving young people, not just designers, but also young people who choose farming or a life as a craftsperson. The Linen Project activates “old” knowledge, skills and the different meanings associated with flax and linen production. New technologies, new connections and possibilities are applied to this, so that future production is based and builds on a restored connection with people and nature. With this project people with a diversity of backgrounds are collaborating. We no longer define design as just a product, but as one of the processes in a larger set of complementary and reinforcing activities.”

Extracted article republished with permission from Crafts Council Netherlands.

Stay up to date with the project at Crafts Council Nederland and by following The Linen Project on Instagram.

01 Jun 15:35

Nourishing Lip Mask

by Marie

Today we’re blending up a simple, all-natural, Nourishing Lip Mask. I’ve called it a lip mask, but honestly, it’s a super versatile salve for all kinds of dry, irritated skin. It stars a short and sweet list of rich, soothing emollients to create a gorgeous ointment that’s brilliant for all kinds of things. Enjoy!

How to Make a Nourishing Lip Mask

Want to watch this project instead of reading it?

Watch Now

The bulk of this lip mask is lanolin; a thick, ointment-y substance pressed from sheep’s wool. It is a rich skin protectant, moisturizer, softener, and occlusive—brilliant for dry lips and irritated skin anywhere on the body. It’s a favourite amongst breastfeeding women, featuring heavily in many nipple creams. I’d say the one less-than-awesome thing about lanolin is its smell, which is often described as “characteristic”—sort of oily and musty, and overall not super delicious. So, while there’s quite a lot of lanolin in here, I did cut it with some liquid oils and other things that don’t smell like, well… lanolin.

My initial daydreams for this formulation included quite a lot more lecithin because I love it, and brainstorm brain was all “more is better!”. But, alas, a quick check reminded me that lecithin is limited to 15% in formulations, so that’s what we’re using. Like lanolin, lecithin is a wonderful emollient and occlusive, and is great for barrier repair. I love how rich it makes concoctions feel—you’ll find it in several lip-thing formulations here on Humblebee & Me.

I’ve also included two lovely liquid oils: rich and glossy castor oil, and golden jojoba oil. They help make this mask a bit lighter and dilute the lanolin-y smell while bringing their awesome-ness to the party. Awwww yeah!

For thickening: we’ve already got a pretty viscous base thanks to the high concentrations of lanolin and lecithin, but I still wanted to include some wax for added staying power, richness, and thickness. I tried both beeswax and cera bellina, and while I like them both, I like the extra-ointmenty feel the cera bellina adds, so I’m listing that as my first choice.

The finished Nourishing Lip Mask is a rich, soft, ointment-y salve with a lovely sunny colour. I love it not only for my lips, but for dry knuckles and cuticles, and other rough patches, like on my feet and elbows. I hope you enjoy it as much as I do!

Want to watch this project instead of reading it?

Watch Now

Nourishing Lip Mask

Heated phase
4.55g | 45.5% lanolin
1.5g | 15% soy lecithin (liquid)
1.5g | 15% castor oil
1.4g | 14% jojoba oil
1g | 10% cera bellina (USA / Canada) or beeswax

Cool down phase
0.05g | 0.5% vitamin E oil

Prepare a water bath by bringing about 3cm/1″ of water to a bare simmer over low to medium-low heat in a small saucepan.

Weigh the heated phase ingredients into a small heat-resistant glass measuring cup. Place the measuring cup in your prepared water bath to melt everything through.

After about 20–30 minutes everything should be completely melted through. Remove the water bath from the heat, remove the measuring cup from the water bath, and dry it off with a dishtowel. Stir with a flexible silicone spatula to incorporate.

Stir the mixture occasionally as it cools. I chose not to use an ice bath here as the batch is small enough that it cools fairly quickly on its own, but if you scale it up / want things to move faster, you might want to use an ice bath to speed up the cooling.

Once the mixture has thickened and appears translucent, stir in the vitamin E, and transfer the lip mask to a small tin or jar. And that’s it!

To use, apply generously to the lips before going to bed. You can also apply this mask anywhere, really—this is very versatile! You can definitely think of it as more of a salve than a lip mask if lip masks aren’t your jam 😊 Enjoy!

Because this lip mask is 100% oil-based, it does not require a broad-spectrum preservative (broad spectrum preservatives ward off microbial growth, and microbes require water to live—no water, no microbes!). Kept reasonably cool and dry, it should last at least a year before any of the oils go rancid. If you notice it starts to smell like old nuts or crayons, that’s a sign that the oils have begun to oxidize; chuck it out and make a fresh batch if that happens.

Substitutions

As always, be aware that making substitutions will change the final product. While these swaps won’t break the recipe, you will get a different final product than I did.

  • As I’ve provided this recipe in percentages as well as grams you can easily calculate it to any size using a simple spreadsheet as I’ve explained in this post. As written in grams this recipe will make 10g.
  • To learn more about the ingredients used in this formulation, including why they’re included and what you can substitute them with, please visit the Humblebee & Me Encyclopedia. It doesn’t have everything in it yet, but there’s lots of good information there! If I have not given a specific substitution suggestion in this list (soy lecithin) please look up the ingredient in the encyclopedia before asking.
  • This formulation is not vegan. Given it is comprised of 55.5% non-vegan ingredients (lanolin + beeswax/cera bellina), you’ll be in re-development territory if you want to substitute out the non-vegan ingredients.
  • I don’t recommend swapping out the castor oil.
  • You could choose a different midweight to heavyweight liquid carrier oil instead of jojoba oil.
  • If you’d like to include an essential oil, I’d go with 0.5%, taking that out of the lanolin. Be sure you choose something lip safe!

The post Nourishing Lip Mask appeared first on Humblebee & Me.

01 Apr 15:15

Sweet Potato Enchilada Soup

by Ali

This sweet potato enchilada soup is easy to make, full of rich cheesy enchilada flavors, and SO cozy and comforting.

Vegetarian Sweet Potato Enchilada Soup Recipe

A few weeks ago, I found myself craving my old throwback cheesy chicken enchilada soup recipe from the blog.  But with no chicken in the house, and with a hungry vegetarian husband by my side, I decided to pivot and try adapting this soup with sweet potatoes instead.

And you guys — Barclay 100% flipped out over this soup.

Lol, we have literally made it no less than three times since because he loves it so much.  But this sweet potato enchilada soup (arguably more of a sweet potato chili?) has also been on our rotation lately because it’s made with simple pantry and refrigerator staples that you likely already have on hand.  It also keeps well in the freezer if you would like to make a batch for easy meal prep.  It’s naturally gluten-free and can also be made vegan, if you would like.  And best of all, it is just so incredibly flavorful and comforting and delicious.

If you’re anything like our family, I think you’re going to love it! ♡

(more…)

01 Jan 01:01

More / Less

by swissmiss

Feeling inspired by Julia Rothman’s end of year More/Less list. Off to creating my own…

08 Jan 18:51

vanilla cake, vanilla frosting, and a marzipan succulent

by molly yeh
very-vanilla-cake-12.jpg
very-vanilla-cake-3.jpg
very-vanilla-cake-11.jpg
very-vanilla-cake-10.jpg

oof! nobody told me that the first week back to work after a wedding/chrismukkah double feature is about as fun as peeing in a public bathroom. *flips hair/rolls eyes* ok, i'm being extremely dramatic, but still, i was a grumpy gabby more times this week than i'm willing to admit (maybe i've got a case of the januaries???), so i'm just going to weed all of those out and tell you about some of the finer moments from these past few days:

eggboy and i made butter!!! we were discussing the origins of fairy bread and how we could elevate it to best fit our grownup married life and i suggested using homemade butter, to which he responded what? no. that's wizardry. you can't make butter. and then i showed him, the old heavy cream in a jar way, and it blew his mind. he tried to drink the whey because he thought it would make him buff. 

the destruction, or rather transplanting, of my gingerbread farm. i was ready to burn it to the ground because it's taking up precious dining room space and getting coconut everywhere, but eggdad refused to see that happen, so i think he's actually "renting out space in our basement" to store it while he researches the best shellac method for gingerbread buildings. 

my first hotdish. ok, for how many failed recipes i made this week, i deserved to nail this one on the first try. i nailed it like a nail gun going into plywood. nay, styrofoam. it smelled so good, it tasted great, and it's even healthy. as soon as i figure out how to make it look not like the grossest barf in all the land, i'm going to show it to you!

a whole bunch of "cold day" pictures and texts from my parents, in chicago, depicting "cold day" marathon bread baking sessions and "cold day" crafts. they were cute, but from what i can understand, a "cold day" is like a snow day without a whole lot of snow, just a lot of cold. and based on my weather app, that cold was a balmy one degree. did you know that in the st. paul school system the temperature requirement for a cold day is negative 40????? chicago, you are a bunch of penises*.

*ugh, you're right, i shouldn't judge, i don't ever leave the house during the winter and when i do i look like a michelin man. 

my brunch club began to plan the baby shower for our first brunch club baby!!!!! i've never planned a baby shower before but i am soooo excited. it's not for three and a half months and i already have the menu planned. teeny weeny sandwiches, teeny weeny scones, teeny weeny cocktail weenies. 

very-vanilla-cake-6.jpg

and for what is sure to be the finest moment of this week: egg mama's birthday tomorrow!!!! seven cheers for egg mama. egg mama is an o.g. farm wife, a master at many things (my favorite of which is chicken and dumpling soup), and the best mother-in-law an egg girl could ever ask for!!

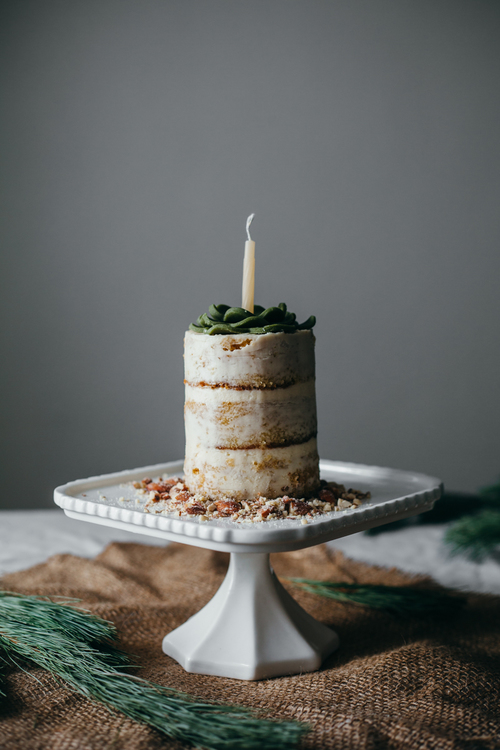
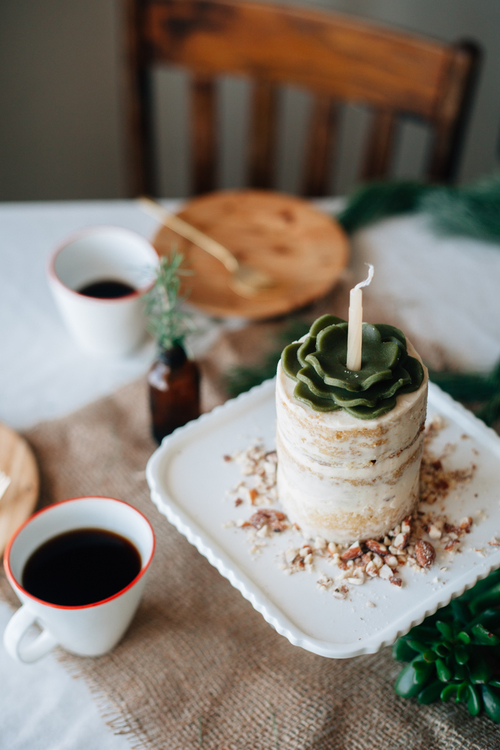
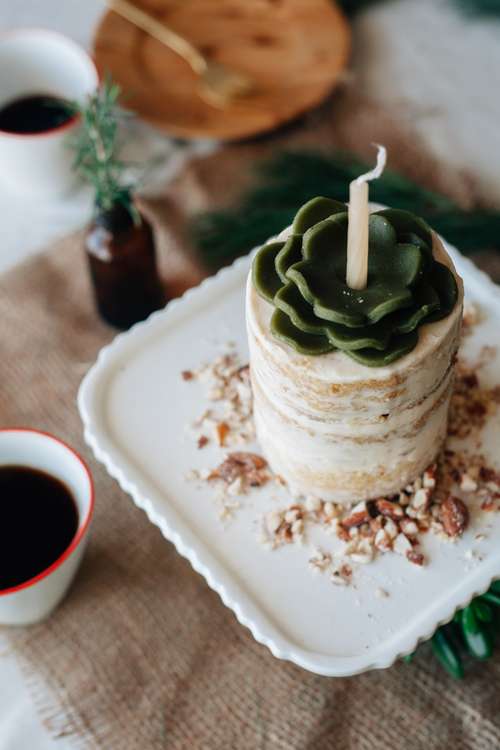
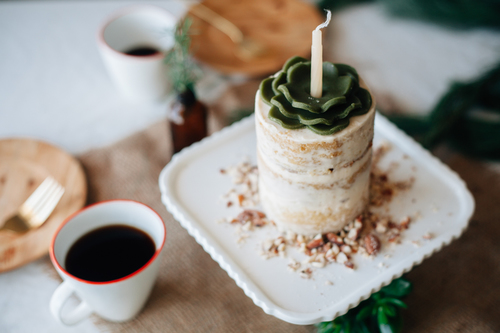
this little cake is for her and it's a great great grand baby of magnolia's chocolate cupcakesi've made that chocolate cupcake recipe countless times and each time people tell me that it's the best cake they've ever had. even "people who don't normally like cake" like this cake. it's so rich and unbelievably m-word (ok, moist). i've had difficulty finding a vanilla cake that i love just as much as those chocolate cupcakes, almost to the point of obsession, but i think i've found it. this vanilla cake retains the fierce moisture that makes those chocolate cupcakes so good, yet it's just the slightest bit denser, making it easier to handle in layer cake form. the one pictured here is a half batch, which i've simply baked in an 8" pan, frozen over night, and then cut into three 3 1/4-inch rounds and frosted. you can choose to frost it all naked (like the one in the picture) or double the frosting recipe and slather it up because it is january 8th and your diet should be over by now. 


vanilla cake with vanilla buttercream and a marzipan succulent

makes one 2-layer 8-inch cake

ingredients

cake:

1 3/4 c sugar

2 1/2 c all-purpose flour

1 1/2 tsp each: baking soda, baking powder, kosher salt

2 large eggs

1 c buttermilk

1/2 c flavorless oil, like canola

1 1/2 tsp vanilla extract

3/4 c boiling water

frosting**:

1 c unsalted butter, softened

1 1/3 c powdered sugar

2 tsp vanilla extract

a pinch of kosher salt

**this will make enough frosting for a naked cake (like the cake in the picture). if you'd like to slather on a thick layer of frosting all over the cake, double this recipe.

succulent:

a nice handful of marzipan

green food coloring

flower cookie cutters in three sizes (or you could free-hand it!)


clues

cake:

preheat oven to 350.

grease two 8-inch round cake pans and line the bottoms with parchment.

in a large bowl, whisk together all the dry ingredients. in a medium bowl, whisk together all the wet ingredients except for the boiling water. whisk the wet ingredients into the dry ingredients and then stir in the boiling water. it will be a very thin batter. pour into cake pans and bake until the tops are lightly browned and a toothpick inserted into the center comes out clean. begin checking for doneness at 28 minutes.

let cool in the pans for 10 minutes, and then turn onto a cooling rack.

frosting:

use an electric mixer to beat all ingredients together until smooth. taste and add more sugar, if desired. 

to assemble:

level your cakes and slap a hefty dose of frosting in between them and on top. smooth a thin layer of frosting all over the edges and use a bench scraper to scrape down the sides until they're smooth.

succulent:

knead a small amount of food coloring into your marzipan. roll it out on a surface dusted with powdered sugar and cut out three flower shapes in three different sizes. stack them up with the biggest on the bottom and press down in the center so that they stick. you could also place a small dollop of frosting between them to help them stick. crimp up the flower petals to give it some dimension. place it on your cake!


happy birthday, egg mama!!

-yeh!

06 Nov 14:14

:: bate na madeira ::

by Kika Reichert
valentinescantbuyher

I could live in any of these places...