
Melanie Fessler
Shared posts
28 Mar 17:47
 In Wednesday's Practical Ed Tech Live episode I suggested having students use Google's Jamboard to collaboratively create drawings. A couple people have emailed me to ask how that is done if you don't...
How to Use Jamboard Without Owning a Jamboard
by noreply@blogger.com (Richard Byrne)
28 Mar 15:36

I am not ashamed to admit that I don't know the answer to this conundrum. I am always looking to find a balance between these two ends of the spectrum when I am designing activities for my students, although I am guessing that the "One Size Does Not Fit All" image might give away my personal bias towards flexible designs.
Knowing my students helps me design and redesign activities to support the student learning experience for each of my students. Frequent formative assessment allows my students and me to shift our focus on the fly. The most difficult part of all of this is finding the time to create activities that are flexible enough to meet the needs at any given moment.
While I may have a specific moment and/or class in mind when I design an activity, I try to build in some options for student choice and teacher flexibility in most of the activities I create. I have not mastered this, but I am learning.

At the most basic level, I start my lesson design by exploring the how and the why before focusing on the content objectives. Up next is the quest for resources that I can connect to the content and the skills I want students practicing as they explore the content.
Part of all of this is the search for the best resources to support and enhance our learning experiences in different ways. Pear Deck is one tool that can be used in a variety of ways to get something done! It is one of those Swiss Army Knife tools on my EdTech Superhero Utility Belt.

This week I wanted to engage my students in the exploration of human population dynamics and how the growth of our population impacts Planet Earth.
Why? - The simple answer is that I teach AP Environmental and the students need to understand the impacts of population growth on the environment. This would have been easy enough for me to just lecture about or I could have taken some time to create a student-paced HyperDoc.
I needed something that I could use to engage students the week before Spring Break. I also wanted students to connect what they already know to the content in the activity. I wanted an activity that was a blend of exploration, discussion, and reflection. I wanted my students to think critically, collaborate, create, and communicate.
How? - I love student-centered self-paced activities but I didn't think that my students' full engagement would be assured the week before Spring Break. I also didn't want a passive lesson where they were just waiting for me to provide the answers.
What? - I decided to create a Teacher-Paced Google Slides Pear Deck facilitated by me. I also wanted it to be something that I could easily modify in the future.

I think this activity serves as a great example of an activity that was designed to be flexible now and in the future.
Pear Deck - The Swiss Army Knife of Lesson Design
by Steve Wick
Are the best student activities created for a single student or a single class or even a single moment in time?
or
Are the best student activities designed to be flexible enough to engage every student at any moment in time?
Knowing my students helps me design and redesign activities to support the student learning experience for each of my students. Frequent formative assessment allows my students and me to shift our focus on the fly. The most difficult part of all of this is finding the time to create activities that are flexible enough to meet the needs at any given moment.
While I may have a specific moment and/or class in mind when I design an activity, I try to build in some options for student choice and teacher flexibility in most of the activities I create. I have not mastered this, but I am learning.
At the most basic level, I start my lesson design by exploring the how and the why before focusing on the content objectives. Up next is the quest for resources that I can connect to the content and the skills I want students practicing as they explore the content.
Part of all of this is the search for the best resources to support and enhance our learning experiences in different ways. Pear Deck is one tool that can be used in a variety of ways to get something done! It is one of those Swiss Army Knife tools on my EdTech Superhero Utility Belt.
This week I wanted to engage my students in the exploration of human population dynamics and how the growth of our population impacts Planet Earth.
Why? - The simple answer is that I teach AP Environmental and the students need to understand the impacts of population growth on the environment. This would have been easy enough for me to just lecture about or I could have taken some time to create a student-paced HyperDoc.
I needed something that I could use to engage students the week before Spring Break. I also wanted students to connect what they already know to the content in the activity. I wanted an activity that was a blend of exploration, discussion, and reflection. I wanted my students to think critically, collaborate, create, and communicate.
How? - I love student-centered self-paced activities but I didn't think that my students' full engagement would be assured the week before Spring Break. I also didn't want a passive lesson where they were just waiting for me to provide the answers.
What? - I decided to create a Teacher-Paced Google Slides Pear Deck facilitated by me. I also wanted it to be something that I could easily modify in the future.
I think this activity serves as a great example of an activity that was designed to be flexible now and in the future.
- I wanted to engage my students in an active classroom discussion during the two days before Spring Break. Done!
- I knew some students might miss one or both of these days, so I wanted something I could share with those students. Turn on Student-Paced and the absent students can still engage in the videos. Done!
- I wanted something that I could also use as a student-paced HyperDoc in the future. Done!
- I wanted to be able to come back to this after the break and the Pear Deck Takeaways gives my students and me something concrete to use after the break. Done!
- I wanted something that allows for some student-paced exploration blended with directed engagement. Done!
- I wanted to be able to adjust the pace based on our discussions and live student responses that I could follow in the teacher dashboard. Done!
- I wanted something that would be easy to change/modify in the future without needing to recreate the wheel next time we explore human population. Done!
- If it goes well with my students, I want it to be an activity that could serve as a template for future lessons connected to different content. Done!
- This could also serve as a template for a substitute plan for a day I am gone in the future. Done!
05 Feb 16:31
 I love writing… blog posts, stories, poems, and more. As much as I love it though, writing can be a challenge. Often one of the most difficult parts is just getting started. Sometimes we just need a little inspiration, a jump start to get us thinking down a new path.
When my daughter was younger we used to do poetry nights where we would use a website (Watch Out for Snakes) that would randomly create titles for us by putting together adjectives and nouns. We would then challenge each other to write a poem based on one of the prompts, followed by reading our new creations. Yes, I have always been a nerd.
Just like those random titles inspired me to compose poems, such tools can help our students when they need to write a journal entry, short story, essay, article, poem, or such. Thankfully there are many resources available to use for writing prompts, story starters, and other writing inspiration. In this blog post we will take a look at 10 example tools to use in your class.
By the way, if you are interested to see some examples of what came out of my poetry nights, feel free to check out Elemental Love, Moonstruck Conifer, and Smallest Pony.
#5 - Describing Words
http://describingwords.io/
This is another tool that is different from the others in that it does not create random prompts, but instead helps extend an idea the student already has.
This site can be helpful for a student who has a general idea of what they need to write about, but could use some inspiration. Alternately it could be interesting to have every student in the class start with the same word, and then use this site to get creative ideas on what to do with that word, comparing their final writings.
#9 - Google Drawings Story Cubes
https://www.controlaltachieve.com/2018/09/story-cubes.html
Story cubes can be a fun way for students to get inspiration for writing. Typically they are regular cubes with a different picture or word on each face. Students can pick a few cubes and then roll them to randomly get elements for a story.
Although you can certainly buy these cubes, you can also make you own. Below you will find three Google Drawing templates for making story cubes. Each is optimized for different types of cubes including picture cubes, emoji cubes, and text cubes.

#10 - Watch Out for Snakes
http://watchout4snakes.com/wo4snakes/Random/RandomPhrase
And finally, the one that started it all for my poetry writing fun, this site offers several different random prompt tools. The option I used most often was the "Phrase" tool.

In addition to the "Phrase" tool, the site also has other generation tools including "Word", "Word+", "Sentence", and "Paragraph".
Post by Eric Curts. Bring me to your school, organization, or conference with over 50 PD sessions to choose from. Connect with me on Twitter at twitter.com/ericcurts and on Google+ at plus.google.com/+EricCurts1
10 Writing Prompt Tools for Creative Inspiration
by Eric
 I love writing… blog posts, stories, poems, and more. As much as I love it though, writing can be a challenge. Often one of the most difficult parts is just getting started. Sometimes we just need a little inspiration, a jump start to get us thinking down a new path.
When my daughter was younger we used to do poetry nights where we would use a website (Watch Out for Snakes) that would randomly create titles for us by putting together adjectives and nouns. We would then challenge each other to write a poem based on one of the prompts, followed by reading our new creations. Yes, I have always been a nerd.
Just like those random titles inspired me to compose poems, such tools can help our students when they need to write a journal entry, short story, essay, article, poem, or such. Thankfully there are many resources available to use for writing prompts, story starters, and other writing inspiration. In this blog post we will take a look at 10 example tools to use in your class.
By the way, if you are interested to see some examples of what came out of my poetry nights, feel free to check out Elemental Love, Moonstruck Conifer, and Smallest Pony.
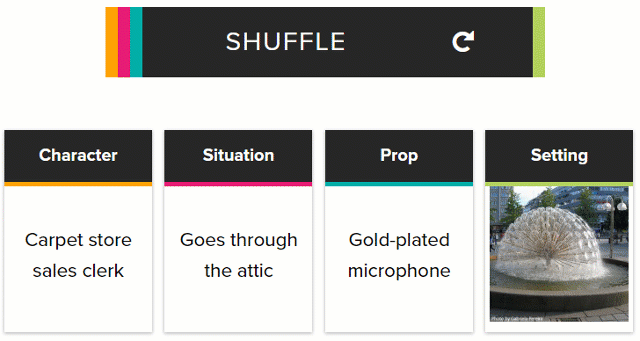
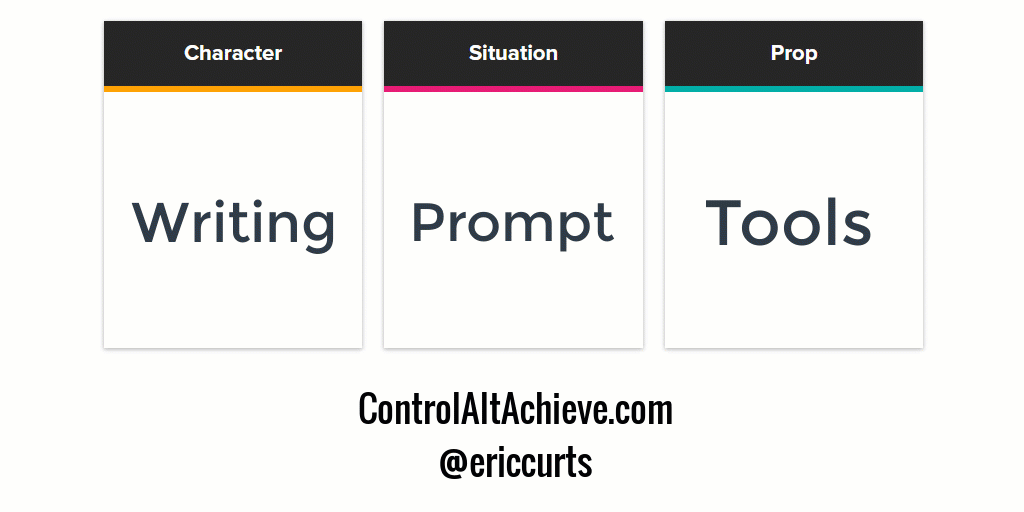
#1 - Writer Igniter
This site is a simple but fun way to make random story ideas. Simply click the "Shuffle" button to get a new random prompt including "Character", "Situation", "Prop", and "Setting" (which will display as an image).
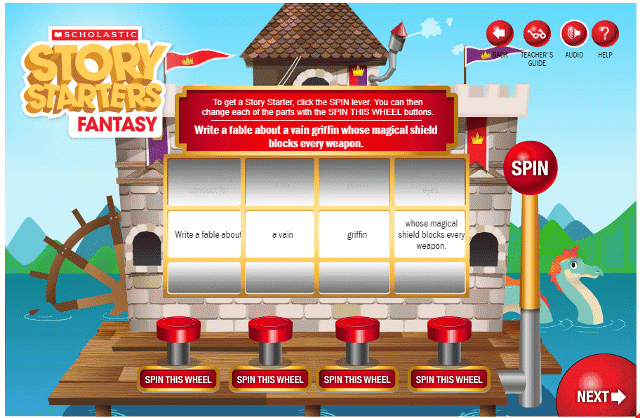
#2 - Scholastic Story Starters
This tool for grades K through 6 randomly generates plots for adventure, fantasy, and science fiction stories, and then works students through the writing process.
- To begin, choose the type of story you want to write including "Adventure", "Fantasy", "Sci-Fi", and "Scrambler".
- Next choose the grade level from "K-1st", "2nd", "3rd", "4-6th".
- Now pull the lever to spin the wheels and get a story prompt.
- If you want, you can also push the individual buttons to spin just single wheels and change just a portion f the prompt.
- When you are happy with the prompt, now choose the format for the writing including "Notebook", "Letter", "Newspaper", or "Postcard".
- Finally the student can now write their story.
- There is also an option to draw a picture to include with the story if desired.
- When done, you can print your story or download it as a PDF.
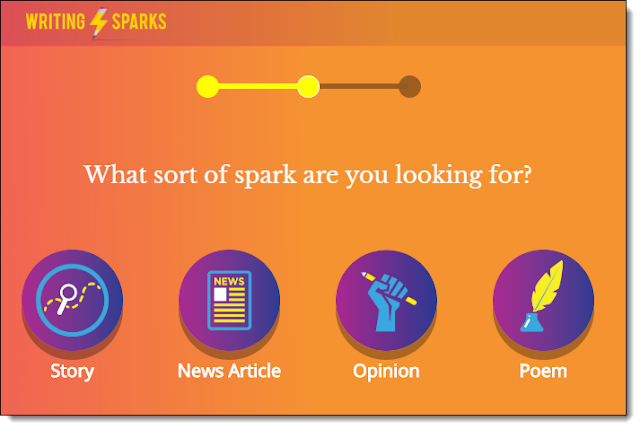
#3 - Writing Sparks
This site guides students through the writing process, providing inspiration along the way. Here's how to use it:
- First, begin by clicking the "Create Spark" link.
- Next, choose the age of your students, either "7 and under" or "8 and over".
- Next, select the type of writing you want your students to do, including "Story", "News Article", "Opinion", and "Poem".
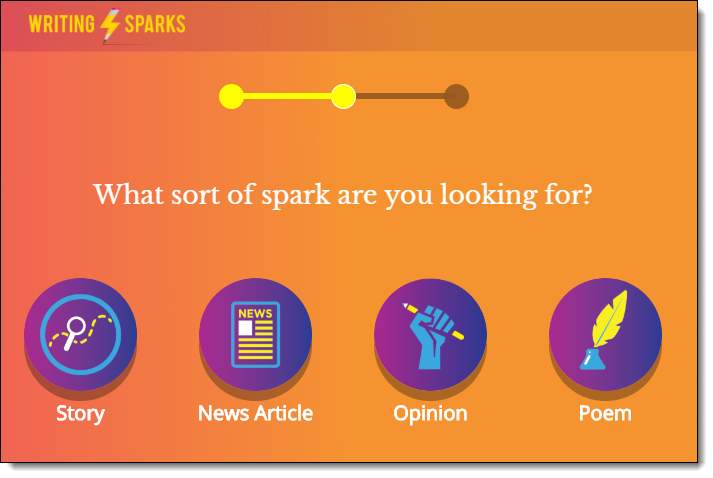
- Then choose how long the writing exercise should last, from "10 minutes" to "15 minutes" to "20 minutes".
- The site will now provide the writing prompt and guide the students through the writing process.
- Along the way, the site will continue to provide inspirations that can be including in the project.
Here is a video from Writing Sparks with more details:
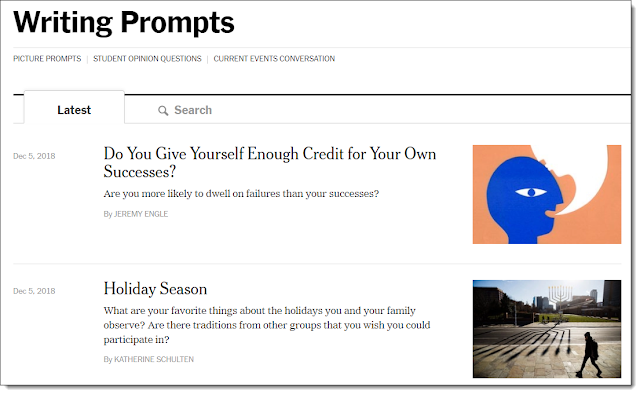
#4 - New York Times Learning Network
https://www.nytimes.com/spotlight/learning-writing-prompts
This site is a little different from the others in that it does not generate random prompts. Instead the site offers several new writing prompts each week. The added value however is that each prompt comes along with an associated New York Times article for the student to explore, as well as thought-provoking questions to help the students dig deeper in the topic before writing.

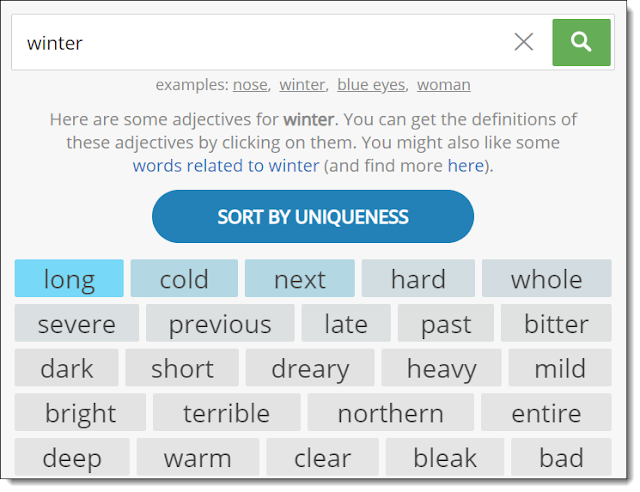
#5 - Describing Words
http://describingwords.io/
This is another tool that is different from the others in that it does not create random prompts, but instead helps extend an idea the student already has.
- To use the site, start by typing in the key word you want to write about, and then press the search button.
- You will now get a giant list of adjectives and phrases related to your main word.
- You can click "Sort by usage frequency" to show the list from most common to least common.
- Or click "Sort by uniqueness" to get more unusual options at the top.

This site can be helpful for a student who has a general idea of what they need to write about, but could use some inspiration. Alternately it could be interesting to have every student in the class start with the same word, and then use this site to get creative ideas on what to do with that word, comparing their final writings.
#6 - Writing Exercises
http://writingexercises.co.uk/children/index.php
This site has a large collection of many different writing prompt tools to get students thinking in creative ways. The tools include the following:

Note: The site also has a main page at http://writingexercises.co.uk with even more writing prompt tools. However the main site is not specifically for children, so some of the prompt could be more mature.
#7 - Google Sheets Random Writing Prompt Generator
https://www.controlaltachieve.com/2016/04/writing-prompt-generator.html
This option uses a Google Sheets template I created that randomly pulls from a list of about 2,000 adjectives and 1,000 nouns to create over 2 million unique prompts. To get your own copy of the "Random Writing Prompt Generator" spreadsheet, click the link below:
The Google Sheet has three tabs:

You can get a new set of 20 random prompts by pressing "Ctrl" and "R" (to recalculate) or by refreshing the page in your browser.
http://writingexercises.co.uk/children/index.php
This site has a large collection of many different writing prompt tools to get students thinking in creative ways. The tools include the following:
- Story Title - Click the "Adjective" and "Noun" button to generate a title for your writing.
- Story Title 2 - Click the "Press here" button to get a different random story title each time.
- Story Plot - Click the buttons for "Character 1", "Character 2", "Place", and "Event" to get the elements of a story plot.
- Character - Click the "Create a Character" button to get a couple of sentences describing your character to include in your writing.
- Animal Character - Click the "Animal Character" button to get the description of a creature to write about.
- First Line for a Story - Click "Press Here" to get the beginning of the story, and then write from there.
- The Journey - Click each of the three "Press Here" buttons to get different parts of a story about going on a trip.
- Random Picture - This tool gives you an image to describe and write about.
- News Headline - Click the "Press here" button to get a headline from which you can write a news story, answering where, how, and why.
- Odd Object - This option will generate an object in a strange location. Students can write about why it is there and what it is doing.
- Random Words - The final generator simply gives you three (probably unrelated) words that you need to incorporate into your writing.

Note: The site also has a main page at http://writingexercises.co.uk with even more writing prompt tools. However the main site is not specifically for children, so some of the prompt could be more mature.
#7 - Google Sheets Random Writing Prompt Generator
https://www.controlaltachieve.com/2016/04/writing-prompt-generator.html
This option uses a Google Sheets template I created that randomly pulls from a list of about 2,000 adjectives and 1,000 nouns to create over 2 million unique prompts. To get your own copy of the "Random Writing Prompt Generator" spreadsheet, click the link below:
- Random Writing Prompt Generator - Google Sheets link
The Google Sheet has three tabs:
- The Prompts tab - Here you will find 20 randomly generated writing prompts in the form of an adjective followed by a noun. These can be used for the title of a poem or the topic of a story.
- The Adjectives tab - Here you will find a list of about 2,000 adjectives.
- The Nouns tab - Here you will find a list of about 1,000 nouns.
You can get a new set of 20 random prompts by pressing "Ctrl" and "R" (to recalculate) or by refreshing the page in your browser.
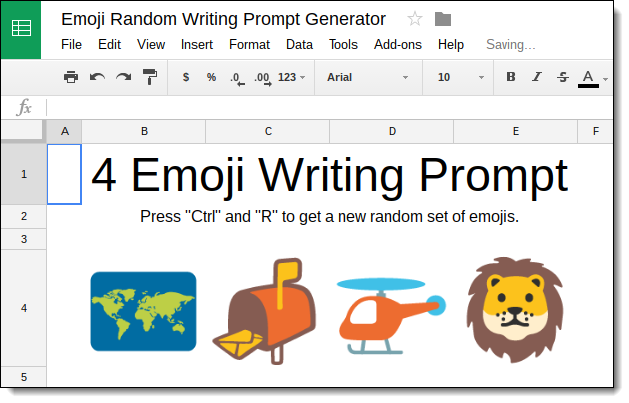
#8 - Google Sheets Emoji Writing Prompt Generator
https://www.controlaltachieve.com/2016/11/emoji-writing-prompts.html
Here is another Google Sheets template I created, but this one uses emojis instead of words to generate writing ideas. To get your own copy of the "Emoji Random Writing Prompt Generator" spreadsheet, click the link below:
The Google Sheets has six tabs along the bottom:
https://www.controlaltachieve.com/2016/11/emoji-writing-prompts.html
Here is another Google Sheets template I created, but this one uses emojis instead of words to generate writing ideas. To get your own copy of the "Emoji Random Writing Prompt Generator" spreadsheet, click the link below:
- Emoji Random Writing Prompt Generator - Google Sheets link
The Google Sheets has six tabs along the bottom:
- "Directions" tab - Here you will find the directions for using the spreadsheet.
- "2 Emojis" tab - This tab randomly generates 2 emojis as a writing prompt.
- "3 Emojis" tab - This tab randomly generates 3 emojis as a writing prompt.
- "4 Emojis" tab - This tab randomly generates 4 emojis as a writing prompt.
- "5 Emojis" tab - This tab randomly generates 5 emojis as a writing prompt.
- "Data" tab - This tab has over 800 emojis, from which the other tabs randomly pull.
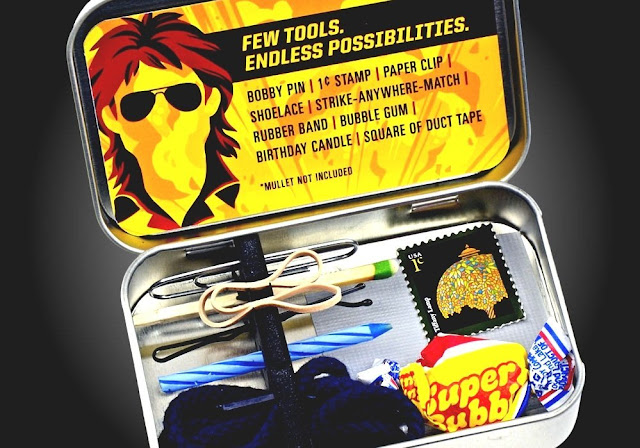
#9 - Google Drawings Story Cubes
https://www.controlaltachieve.com/2018/09/story-cubes.html
Story cubes can be a fun way for students to get inspiration for writing. Typically they are regular cubes with a different picture or word on each face. Students can pick a few cubes and then roll them to randomly get elements for a story.
Although you can certainly buy these cubes, you can also make you own. Below you will find three Google Drawing templates for making story cubes. Each is optimized for different types of cubes including picture cubes, emoji cubes, and text cubes.
- Story Cube Template - Picture Version - Google Drawing link
- Story Cube Template - Emoji Version - Google Drawing link
- Story Cube Template - Text Version - Google Drawing link

#10 - Watch Out for Snakes
http://watchout4snakes.com/wo4snakes/Random/RandomPhrase
And finally, the one that started it all for my poetry writing fun, this site offers several different random prompt tools. The option I used most often was the "Phrase" tool.
- You can choose up to four different words, which can include nouns, verbs, adjectives, adverbs, interjections, and prepositions.
- For each word you can also choose how common it is, with choices ranging from "Very Common" all the way to "Obscure".
In addition to the "Phrase" tool, the site also has other generation tools including "Word", "Word+", "Sentence", and "Paragraph".
Conclusion
Hopefully one or more of these tools will be a great match for your class and your students! If you have your students create some writings from using any of these prompt generators, please consider sharing some examples of what they make. I would love to see their creations!
Hopefully one or more of these tools will be a great match for your class and your students! If you have your students create some writings from using any of these prompt generators, please consider sharing some examples of what they make. I would love to see their creations!
05 Feb 16:29
 Writing is a process, not a one-and-done event. When a student is writing their first draft, it is important that they simply get their ideas out, mistakes and all. After that brain dump, now comes the work of editing and revising.
This is summed up beautifully in the following quote:
There are many tools and techniques available to assist with the editing process. A while back I covered many such resources in my blog post "Self-Editing Tools for Student Writing in Google Docs". Recently I came across a new add-on for Google Docs that deserves to be added on to this list.
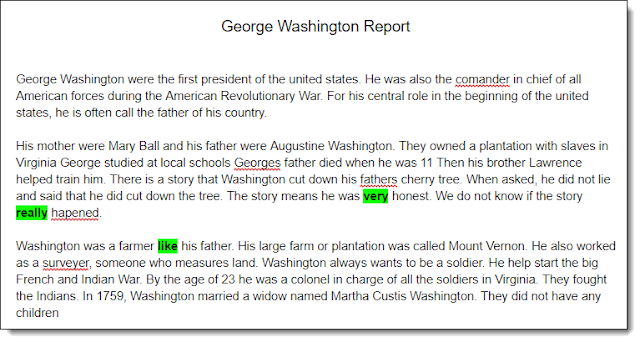
The tool is a free add-on called "Writer's Highlighter". It can be used in several ways, but the main focus is to highlight words in your document that match a customized list. For example, these could include overused words or phrases, including "very", "really", "stuff", and more. The add-on can also color-code your sentences based on their lengths.
See below for more details and directions on how to use this very useful tool. Or, rather I mean "this helpful tool".
Install Writer's Highlighter Add-on
Writer's Highlighter is an add-on for Google Docs. You will need to install it one time for your account, then you will be able to use it anytime you need. Here's how to install this tool:

And that's it! The add-on is now installed.
Set Up Your Word List
For Writer's Highlighter to work, it needs a list of words to compare against your writing. These could include words that are commonly overused, or a custom list specific to a student. The word list needs to be created in a Google Sheet. Here's how:
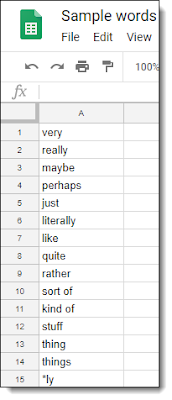
As an example you can use, here is a link to a Sheet I created with a handful of words that might be overused or vague or weak:
Using Writer's Highlighter
Now that you have a word list, you can use the Writer's Highlighter add-on to scan your writing. Here's how:
Spreadsheet Settings
In the "Spreadsheet Settings" section you will select the word list to use:

Highlight Settings
In the next section you will choose how the matching words in your document will be formatted.
Other Settings
In this next section you can adjust some settings for matching your words.
Run the Search!
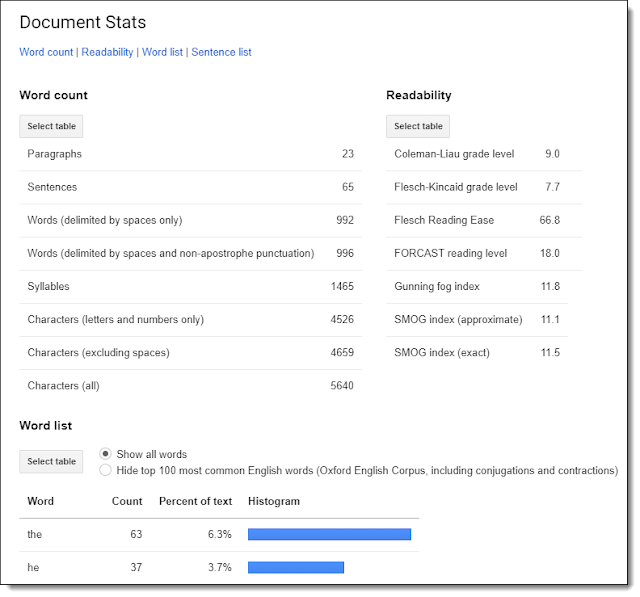
Viewing Document Statistics
In addition to highlighting words from your word list, the add-on can do some other helpful tasks. One feature to is view a page full of useful statistics about your writing. Simply click on the "View stats" button to see this report.
The "Document Stats" report includes:
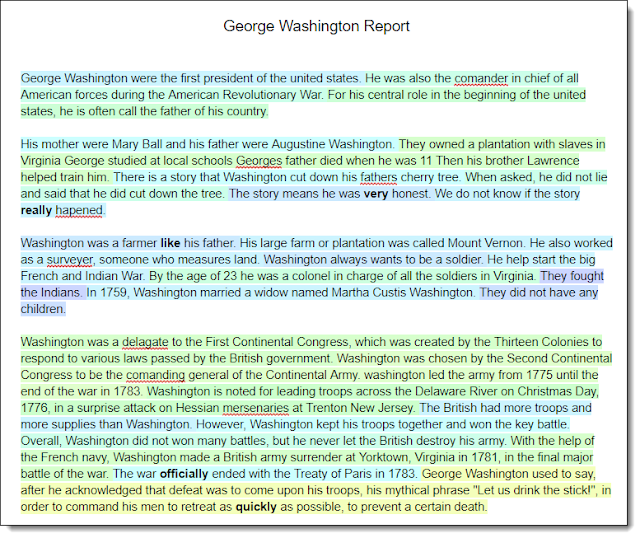
Highlighting Sentences by Length
Finally, you can also use this add-on to highlight all of the sentences in your document with colors based on their length. Shorter sentences are colored darker (blues and greens) and longer sentences are colored lighter (yellows, etc.). To see this just click the "Highlight sentences" button.
Post by Eric Curts. Bring me to your school, organization, or conference with over 50 PD sessions to choose from. Connect with me on Twitter at twitter.com/ericcurts and on Google+ at plus.google.com/+EricCurts1
Write Better with Writer's Highlighter Add-on for Docs
by Eric

This is summed up beautifully in the following quote:
"You write to communicate to the hearts and minds of others what's burning inside you, and we edit to let the fire show through the smoke." - Arthur Plotnik
There are many tools and techniques available to assist with the editing process. A while back I covered many such resources in my blog post "Self-Editing Tools for Student Writing in Google Docs". Recently I came across a new add-on for Google Docs that deserves to be added on to this list.
The tool is a free add-on called "Writer's Highlighter". It can be used in several ways, but the main focus is to highlight words in your document that match a customized list. For example, these could include overused words or phrases, including "very", "really", "stuff", and more. The add-on can also color-code your sentences based on their lengths.
See below for more details and directions on how to use this very useful tool. Or, rather I mean "this helpful tool".
Install Writer's Highlighter Add-on
Writer's Highlighter is an add-on for Google Docs. You will need to install it one time for your account, then you will be able to use it anytime you need. Here's how to install this tool:
- First, open a Google Doc as normal.
- Next, click "Add-ons" in the top menu bar.
- Then choose "Get add-ons" from the drop-down menu.
- You can now use the search box in the top right corner to search for "Writer's Highlighter".
- Alternately you can use this direct link - Google Doc Add-on link
- Once you find the "Writer's Highlighter" listing, click on the "+ FREE" button to begin installing it.
- You will get a pop-up asking you to select your account.
- Then you will get a screen asking for permissions, where you will need to scroll down and click "Allow".
And that's it! The add-on is now installed.
Set Up Your Word List
For Writer's Highlighter to work, it needs a list of words to compare against your writing. These could include words that are commonly overused, or a custom list specific to a student. The word list needs to be created in a Google Sheet. Here's how:

- Create a new Google Sheet as normal by going to Google Drive, clicking the "New" button, then choosing "Google Sheets".
- Give your Sheet an appropriate title, such as "Words to Watch Out For".
- In the first column of the Sheet, type in the words or phrases you want to search for, one word or phrase per row.
- Note: If you want to include wildcards, such as any word that ends with an "ly" (to search for adverbs), you can use an asterisk. For example "*ly".
- When done, copy the web address for your Sheet from the URL box at the top of your browser. You will need to paste this web address into the add-on soon.
- Also, if you wish to let other people use your word list, you will need to share the Sheet with them as normal, so they will have access to it.
As an example you can use, here is a link to a Sheet I created with a handful of words that might be overused or vague or weak:
- Sample Word List - Google Sheet link
Using Writer's Highlighter
Now that you have a word list, you can use the Writer's Highlighter add-on to scan your writing. Here's how:
- Start by opening up a Google Document that has your writing you are wanting to edit.
- Next click "Add-ons" in the top menu bar.
- Click on "Writer's Highlighter" from the drop-down menu, then choose "Start".
- The Writer's Highlighter add-on will open as a panel on the right side of your document.
Spreadsheet Settings
In the "Spreadsheet Settings" section you will select the word list to use:
- In the "Spreadsheet link" box paste in the link to your word list Sheet (copied earlier).
- The "Sheet name" box will default to the first sheet in your spreadsheet, but can be changed if needed.
- Similarly, the "Sheet column" box will default to the first column in your spreadsheet, but can be changed if you want to use a word list from a different column.
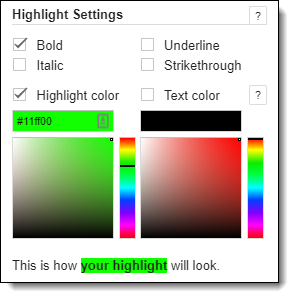
Highlight Settings
In the next section you will choose how the matching words in your document will be formatted.
- You can choose to have the matching words "Bold", "Italic", "Underline", and/or "Strikethrough".
- If you want to highlight behind the words, check the "Highlight color" box and pick a color below.
- If you want to change the font color of the words, check the "Text color" box and pick a color below.
- An example of what your matching words will look like will be displayed.
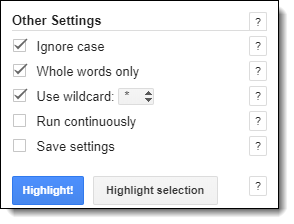
Other Settings
In this next section you can adjust some settings for matching your words.
- Check "Ignore case" to match the words regardless of upper or lower case.
- Check "Whole words only" to avoid matching just a portion of a word, such as finding "just" inside of "justified".
- Check "Use wildcard" and select the symbol you wish to use to match words that fit a pattern, such as "*ly" to match any word that ends in a "ly" (such as an adverb).
- Check "Run continuously" if you want the add-on to search for matches as you type. Note: this can slow down your computer.
- Check "Save settings" to keep all your selections for the next time you open the add-on.
Run the Search!
- Finally, you can click on the "Highlight" button to search your document for matches to your word list, and to highlight the words accordingly.
- You can also use "Highlight selection" to scan just the portion of the document your have selected, rather than the entire document.
- If needed, use the "Clear all" or "Clear selection" buttons to reset the highlighting.


Viewing Document Statistics
In addition to highlighting words from your word list, the add-on can do some other helpful tasks. One feature to is view a page full of useful statistics about your writing. Simply click on the "View stats" button to see this report.
The "Document Stats" report includes:
- Word count - Totals for characters, words, sentences, paragraphs, and more.
- Readability - Multiple scores for grade level, reading level, and more.
- Word list - All of the words used, in order from most to least used in this document
- Sentence list - A list of all the sentences with their lengths in words, with the option to color code by length

Highlighting Sentences by Length
Finally, you can also use this add-on to highlight all of the sentences in your document with colors based on their length. Shorter sentences are colored darker (blues and greens) and longer sentences are colored lighter (yellows, etc.). To see this just click the "Highlight sentences" button.
Post by Eric Curts. Bring me to your school, organization, or conference with over 50 PD sessions to choose from. Connect with me on Twitter at twitter.com/ericcurts and on Google+ at plus.google.com/+EricCurts1
05 Feb 16:28
 Google Docs is a powerful word processing program with many unique features including voice typing, the Explore tool, Version History, web fonts, and much more. However, Google knows that even with all of those features, Docs may not be able to do everything you want it to do. So Google Docs allows you to install Add-ons to extend the capabilities of the program.
Add-ons are third-party tools that provide extra features for Docs. Over time the amount of available Add-ons has grown tremendously. Over the past few years, I have done a webinar and many blog posts on notable add-ons for Docs. Since technology is a moving target, I felt it was time to take another shot at listing some of my current favorite add-ons.
As of this writing, there are just a little over 500 available add-ons for Google Docs. So how do you wade through all of these to find the best ones and the hidden gems? To help out I have collected a list of 20 of my favorite Add-ons for Docs. Certainly this is not a comprehensive list, and there are other awesome Add-ons beyond my list, but these will give you a good place to start. Some of these Add-ons will likely be familiar to you, but hopefully you will find a few new ones or be encouraged to dig deeper into one you have tried before.
See below for my list of 20 recommended Docs Add-ons, what they do, ideas for how they can be used in schools, and a quick overview of how to install, use, and remove Add-ons.
Session Resources
How to install an Add-on
When you are using Google Documents, you will see that there is an Add-ons menu item in the top menu bar. You can click this menu item to access your installed Add-ons and to find new Add-ons. To install a new Add-on do the following:

How to use installed Add-ons
 Once you have installed an Add-on, it will show up in the drop-down menu when you click Add-ons in the top menu bar. To use an Add-on:
How to remove installed Add-ons
If you decide you no longer need a particular Add-on, you can remove it easily.
Recommended Add-ons for Google Documents
Below are 20 great Add-ons for schools, in no particular order, along with a short explanation on what they do and how they can be used in school.
1) Language Tool
Google Docs Add-on link
 Language Tool is a helpful add-on for proofreading your writing. The tool scans your Google Doc for style and grammar problems. When issues are found, it not only identifies the spot, but also offers an explanation of what the problem is and possible ways to fix it. This can be very beneficial for students checking their work before submitting to their teacher, or even for students providing peer editing feedback for their classmates. (For more resources on self-editing see my blog post here.)
2) SAS Writing Reviser
Google Docs Add-on link
 Another helpful tool for proofreading is the SAS Writing Reviser Add-on. When you run this tool you can choose from 25 different tests that will check over your document. These include tests in sentence economy, sentence variety, sentence power, sentence clarity, and more. This can be helpful to give students additional insight into their writing and some possible corrections or improvement they may make when revising. (For more resources on self-editing see my blog post here.)
3) Writer's Highlighter
Google Docs Add-on link
 Writer's Highlighter is another tool to help with self-editing. It can be used in several ways, but the main focus is to highlight words in your document that match a customized list. For example, these could include overused words or phrases, including "very", "really", "stuff", and more. Beyond that, the add-on can also color-code your sentences based on their lengths, and can provide a report of statistics of your writing. (For more details on this add-on see my blog post here.)
4) Easy Accents
Google Docs Add-on link
 Normally to insert accented characters into your Google Doc, you need to click “Insert” then “Special characters” then locate the character you need. Although that works fine, it can be a little time consuming, especially if you are writing in a world language with lots of accented characters. The Easy Accents Add-on provides you with quick access to accented characters in a variety of languages. First you chose the language you want (out of 24 available) and then a panel opens up on the right side of your Doc with a list of accented character from that language. Anytime you need one of those characters, simply click on it in the panel and it will be inserted into your Doc. (For more ideas on Google tools for world languages see my blog post here and here.)
5) Translate Plus
Google Docs Add-on link
 Google Docs already has a powerful translation feature built in. Simply click "Tools" and then "Translate document". This makes a new copy of your document in the language of your choice. As useful as this is, what if you just need to translate a portion of your document, rather than making an entire new copy? The Translate Plus Add-on will do the trick. Simply highlight the text you want to translate and then choose the language you want, including over 100 languages. The Add-on will give you a translation of the selected text, which you can then insert into the current document. This can be a useful way to practice your writing in a world language, by converting your text to English to see how well you did. (For more ideas on Google tools for world languages see my blog post here and here.)
6) Highlight Tool
Google Docs Add-on link
 Google Docs already provides an option to highlight text (click the “Text color” button in the menu bar and then select “Highlight”) so why would you need an add-on for this? Well the Highlight Tool Add-on provides two new features that the normal highlighting in Docs does not have.
First, it allows you to give names or labels to the different colors so you know what they stand for. Perhaps you want red to be verbs, and green to be nouns, and blue to be adjectives. When you create highlight colors you can click the “Edit” button to type in the name you want to assign to that color. You can even share your custom highlighters with others, and import theirs by clicking “Add-ons” then “Highlight Tool” and then “Share Highlighters” or “Import Highlighters”.
The second feature of this add-on is the ability to export all the text you have highlighted to a new Google Doc. You can choose to export “By sequence” (in the order the words show up in the Doc) or “By color” (to group all the same colored words together). This allows the student to create a Doc with all the noun, verb, and adjective examples nicely grouped. (For more online highlighting tools see my blog post here.)
7) Rhyme Finder
Google Docs Add-on link
 The Rhyme Finder Add-on for Google Docs is a tool that provides a list of rhyming words for any word you select in a Google Document. When students are writing poetry, this may help them discover rhyming words they may not have thought of, or find a rhyme when they are stuck. To use it, simply launch the add-on, highlight any word in your Google Doc, and click the “Find Rhyme” button in the panel on the right. A list of rhyming words, with their number of syllables, will show up in the panel. (For more student poetry resources see my blog post here.)
8) Word Cloud Generator
Google Docs Add-on link
 A word cloud is used to show which words in a selection of text are used most often and which are less frequent. This can be a good way to quickly discover the most common topics in an essay, story, or speech. Students can do this with their own writing or with someone else’s work in a Google Doc by using the Word Cloud Generator Add-on. When you run the Add-on, a word cloud is displayed in a panel on the right of the document, which you can then download or append to the document in large or small format. It also includes “Advanced Options” that allow you to set the maximum number of words, a list words to exclude, and color palettes. (For more online word cloud tools see my blog post here.)
9) DocTools
Google Docs Add-on link
 Sometimes it is the little things you are missing when using Google Docs. There are a few features in Microsoft Word that are not yet included in Google Docs, including the ability to sort text. This missing option, as well as a few others, can be handled by the DocTools Add-on.
With this Add-on you can select several lines of text and then click the “Sort A to Z” or “Sort Z to A” option to reorder the text alphabetically. This is great for sorting a list of student names, countries, elements, or such. As a bonus, it also lets you sort the rows in a Google Docs table. (For more details see my blog post here.)
10) Orange Slice Teacher Rubric
Google Docs Add-on link
 Many teachers use rubrics when grading written assignments. They help the student know what is expected, and allow the teacher to provide detailed and consistent feedback when assessing. With the Orange Slice Teacher Rubric Add-on teachers can move rubrics into the digital age. First you create a rubric by inserting a table into a Google Doc and filling in the rubric values. Then simply paste that rubric into any Google Doc you wish to grade, run the Orange Slice Add-on to do the assessment, and the completed rubric and grade will be displayed in the Doc. (For more rubric tools see my blog post here.)
11) WriQ
Google Docs Add-on link
 WriQ is an add-on that can help with both proofreading and grading with a rubric. When you run the add-on it will start with a quick grammar check of the document, highlighting issues with grammar, punctuation, and spelling. Next it will let you choose from one of several pre-made rubrics to assess the writing and provide feedback. The completed rubric is inserted at the top of the document for the student to see. (For more rubric tools see my blog post here.)
12) EasyBib
Google Docs Add-on link
 One important aspect of writing is proper citation. As students learn to cite their sources, a useful tool is the EasyBib Add-on. With EasyBib students can search for books, journal articles, and websites, and then add those to their collection of references. When their list is complete, they can click “Add Bibliography to Doc” to create a completed works cited page at the bottom of the document. There is even an option to choose the citation style including MLA, APA, Chicago, and many more.
13) Flat for Docs - Music notation
Google Docs Add-on link
 How about using Google Docs with the fine arts? Flat allows you to compose and insert sheet music right inside of Google Slides. From the Add-on you can insert a musical snippet with wide variety of notes and musical symbols. Your completed sheet music is then inserted as an image into your document. That's not it though! You can play back the music by selecting the image and re-opening the Flat add-on. (For more ideas on using Google tools with music education see my blog post here.)
14) DocuTube
Google Docs Add-on link
 Although we can't technically insert a video into a Google Doc, there are some clever workarounds, such as the DocuTube add-on. When a user has the DocuTube add-on installed, it can scan through the document looking for any video links. Then the user can click on any of the videos found in the document to play the video in a pop-up window or in a panel on the side of the Doc. This allows users to view your videos without having to leave the document.
15) Show
Google Docs Add-on link
 One feature I definitely miss from Microsoft Office is the option to show non-printing characters, such as spaces, tabs, paragraph marks, and more. Sometimes a document can be "acting funny" and it is helpful to be able to see all of the non-printing characters and elements to see what may be affecting the layout. With the Show add-on you can temporarily show (and then hide) spaces, tabs, line breaks, and more. (For more details on using this add-on, see my blog post here.)
16) Full Deck for Google Docs (Unsplash)
Google Docs Add-on link
 When adding images to a Google Doc, it is important to make sure we are inserting pictures we have the rights to use. One tool to help with this is the Full Deck add-on which helps you access the copyright-free images from Unsplash. With the add-on you can run a search and then get back a list of matching images which can be inserted directly into your document. The add-on also has a button you can click to insert a link for proper citation of the picture. (For more free image sites, see my blog post here.)
17) Insert Icons for Docs
Google Docs Add-on link
 Another option for inserting graphics is the Insert Icons add-on. Instead of photos, this tool focuses on icons. You can search over 1,800 icons from Font Awesome and Material Design. when you find the icon you want, you can choose the color for it and then insert it into your document. All of the icons are free for use! (For more free image sites, see my blog post here.)
18) Story Speaker
Google Docs Add-on link
 Story Speaker is an awesome add-on that lets you create talking, interactive "Choose Your Own Adventure" stories in Docs. Templates provide you with the format and syntax to use, with no coding required. When done making your story, it can be read right there in Docs or can be played on any Google Home or a device with the Google Assistant app. The tool reads the story aloud and then lets the listener speak their responses to then move the story forward.
19) OneLook Thesaurus
Google Docs Add-on link
 This add-on is actually way more than just a thesaurus. The OneLook Thesaurus tool will let you select a word in your document, or type in a word, and then will give you suggested words in six categories: Synonyms, Triggers (associated words), Rhymes, Complete (words that that with your term), Adjectives (related), and Nouns (related). This can be a useful tool to improve your word choice and writing, as well as generate writing ideas.
20) Fun Text
Google Docs Add-on link
 Want to add some more creativity to your writing? The Fun Text add-on lets you make lots of neat changes to how your words look. Some effects include rainbow text, random colors, wobbly font sizes, upside down text, and many, many more. These special effects can add a fun look to a final writing project. As an example, the random colors would be a great way to do my "Holiday Light Writing" activity which you can see in my blog post here.
Conclusion
So how do you use the Add-ons mentioned above in your class or school? And what other favorite Add-ons would you add to the list? Feel free to share your ideas and suggestions in the comment section below.
Post by Eric Curts. Bring me to your school, organization, or conference with over 50 PD sessions to choose from. Connect with me on Twitter at twitter.com/ericcurts and on Google+ at plus.google.com/+EricCurts1
20 Awesome Add-ons for Google Docs
by Eric
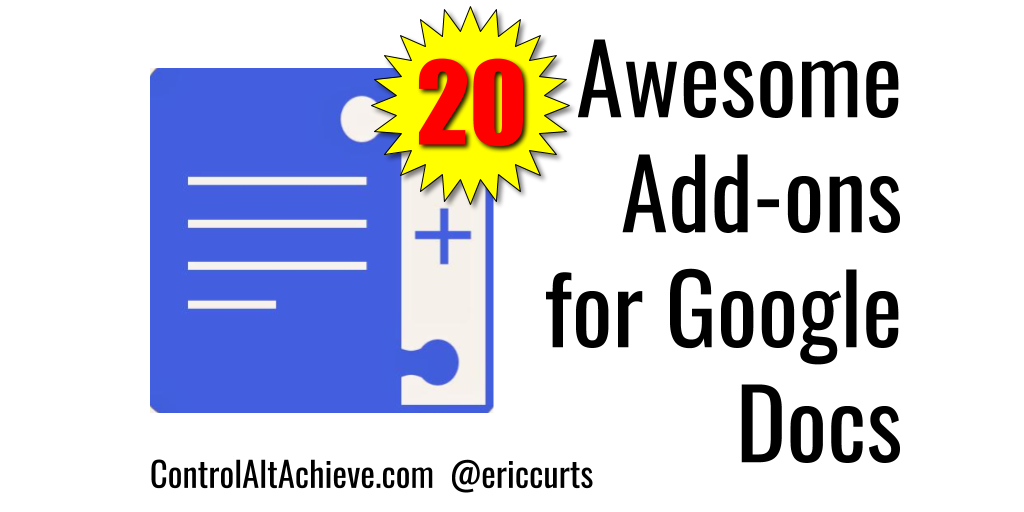
Add-ons are third-party tools that provide extra features for Docs. Over time the amount of available Add-ons has grown tremendously. Over the past few years, I have done a webinar and many blog posts on notable add-ons for Docs. Since technology is a moving target, I felt it was time to take another shot at listing some of my current favorite add-ons.
As of this writing, there are just a little over 500 available add-ons for Google Docs. So how do you wade through all of these to find the best ones and the hidden gems? To help out I have collected a list of 20 of my favorite Add-ons for Docs. Certainly this is not a comprehensive list, and there are other awesome Add-ons beyond my list, but these will give you a good place to start. Some of these Add-ons will likely be familiar to you, but hopefully you will find a few new ones or be encouraged to dig deeper into one you have tried before.
See below for my list of 20 recommended Docs Add-ons, what they do, ideas for how they can be used in schools, and a quick overview of how to install, use, and remove Add-ons.
Session Resources
- Session Agenda - Google Doc link
- Session Slideshow - Google Slides link
- Sample Google Doc for testing - Google Doc link
How to install an Add-on
When you are using Google Documents, you will see that there is an Add-ons menu item in the top menu bar. You can click this menu item to access your installed Add-ons and to find new Add-ons. To install a new Add-on do the following:
- Click the Add-on menu item in the top menu bar.
- Click Get Add-ons from the drop-down menu.
- This will open the Add-ons window.
- You can scroll through the available Add-ons, or narrow down the choices with the filter menu, or type in a search term.


- If you find an Add-on that looks interesting, you can click on it to get more details.
- In the pop-up window you can read more about the Add-on, see images and/or videos, and see reviews and ratings.
- If you decide to install an Add-on, click the blue +FREE button.
- You will then get a pop-up window explaining what privileges the Add-on needs, and asking for your permission to install it.
- Click the blue Accept button to allow the Add-on to install.
How to use installed Add-ons

- Click the Add-ons menu.
- Click on the Add-on you want to use in the drop-down menu
- A side menu will pop-up and will typically include a menu item to launch the Add-on.
How to remove installed Add-ons
If you decide you no longer need a particular Add-on, you can remove it easily.
- Click the Add-ons menu item in the top menu bar.
- Click Manage add-ons... from the drop-down menu.
- This will open a pop-up window showing all your installed Add-ons.
- Click the Manage button next to an Add-on, and then click Remove from the drop-down menu.
- The Add-on will now be uninstalled.
- If desired, you can always reinstall the Add-on again.
Recommended Add-ons for Google Documents
Below are 20 great Add-ons for schools, in no particular order, along with a short explanation on what they do and how they can be used in school.
1) Language Tool
Google Docs Add-on link
2) SAS Writing Reviser
Google Docs Add-on link
3) Writer's Highlighter
Google Docs Add-on link
4) Easy Accents
Google Docs Add-on link
5) Translate Plus
Google Docs Add-on link
6) Highlight Tool
Google Docs Add-on link
First, it allows you to give names or labels to the different colors so you know what they stand for. Perhaps you want red to be verbs, and green to be nouns, and blue to be adjectives. When you create highlight colors you can click the “Edit” button to type in the name you want to assign to that color. You can even share your custom highlighters with others, and import theirs by clicking “Add-ons” then “Highlight Tool” and then “Share Highlighters” or “Import Highlighters”.
The second feature of this add-on is the ability to export all the text you have highlighted to a new Google Doc. You can choose to export “By sequence” (in the order the words show up in the Doc) or “By color” (to group all the same colored words together). This allows the student to create a Doc with all the noun, verb, and adjective examples nicely grouped. (For more online highlighting tools see my blog post here.)
7) Rhyme Finder
Google Docs Add-on link
8) Word Cloud Generator
Google Docs Add-on link
A word cloud is used to show which words in a selection of text are used most often and which are less frequent. This can be a good way to quickly discover the most common topics in an essay, story, or speech. Students can do this with their own writing or with someone else’s work in a Google Doc by using the Word Cloud Generator Add-on. When you run the Add-on, a word cloud is displayed in a panel on the right of the document, which you can then download or append to the document in large or small format. It also includes “Advanced Options” that allow you to set the maximum number of words, a list words to exclude, and color palettes. (For more online word cloud tools see my blog post here.)9) DocTools
Google Docs Add-on link
With this Add-on you can select several lines of text and then click the “Sort A to Z” or “Sort Z to A” option to reorder the text alphabetically. This is great for sorting a list of student names, countries, elements, or such. As a bonus, it also lets you sort the rows in a Google Docs table. (For more details see my blog post here.)
10) Orange Slice Teacher Rubric
Google Docs Add-on link
11) WriQ
Google Docs Add-on link
12) EasyBib
Google Docs Add-on link
13) Flat for Docs - Music notation
Google Docs Add-on link
14) DocuTube
Google Docs Add-on link
15) Show
Google Docs Add-on link
16) Full Deck for Google Docs (Unsplash)
Google Docs Add-on link
17) Insert Icons for Docs
Google Docs Add-on link
18) Story Speaker
Google Docs Add-on link
19) OneLook Thesaurus
Google Docs Add-on link
20) Fun Text
Google Docs Add-on link
Conclusion
So how do you use the Add-ons mentioned above in your class or school? And what other favorite Add-ons would you add to the list? Feel free to share your ideas and suggestions in the comment section below.
Post by Eric Curts. Bring me to your school, organization, or conference with over 50 PD sessions to choose from. Connect with me on Twitter at twitter.com/ericcurts and on Google+ at plus.google.com/+EricCurts1
Pmnelson likes this
05 Feb 16:23
 A lot of times it is common to focus on "The Big 4" of language arts, math, science, and social studies, when exploring technology tools for learning. However, it is important to see how technology can be integrated into all subject areas and skills.
One excellent area for using Google tools is in music education. Technology can help students create their own music, as well as explore and understand musical concepts that may be difficult to visualize otherwise.
In this blog post we will take a look at many tools from Google, or that work with Google, that can be used for teaching, learning, and creating with music. These include Chrome Music Lab, Song Exploder's Inside Music, AI Duet, Groove Pizza, Mix Lab, Flat, and many more!
See below for details, links, and descriptions for all of these tools.
Session Resources
 Groove Pizza is a fun tool to create beats. You start with a "pizza" and then add beats to three different rings, which can then be played back. Here's how it works:

To learn more about how this tool works, check out the video below from Google:
#4 - AI Duet
https://experiments.withgoogle.com/ai/ai-duet
AI Duet gives you a chance to play music along with an Artificial Intelligence. Using Machine Learning, Google fed loads of music into the AI so it can respond to what you play with its own complimentary tune. To try this out:
To learn more about how this tool works, check out the video below from Google:
#5 - Inside Music
https://experiments.withgoogle.com/inside-music
Inside Music lets you step inside of music to see and hear how each piece contributes to the whole. This experiment used Web VR to put you inside of a 360 degree representation of a song, with each of the different instruments or vocals broken out separately. To experience this do the following:
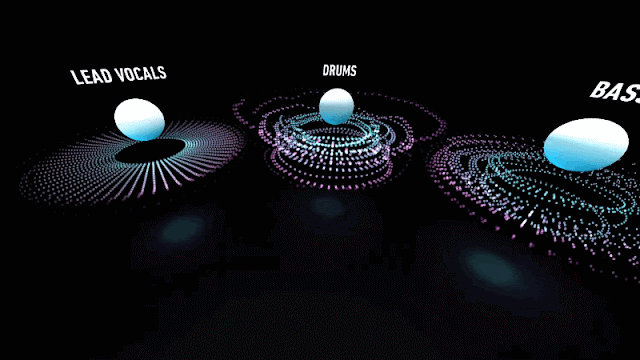
This can be a useful tool to help students dissect a song to understand better how each instrument or track contributes to the whole song. To learn more about how this tool works, check out the video below from Google:
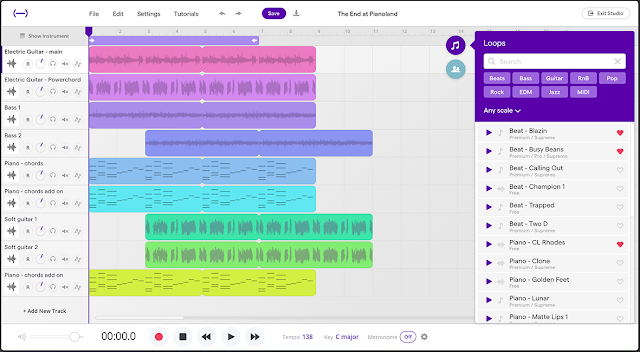
Google Tools and Activities for Music Education
by Eric
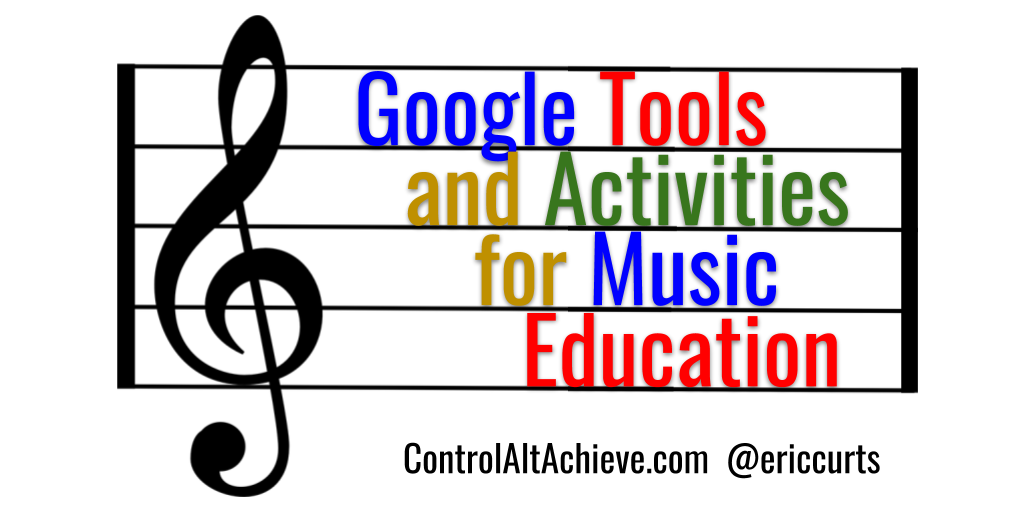
One excellent area for using Google tools is in music education. Technology can help students create their own music, as well as explore and understand musical concepts that may be difficult to visualize otherwise.
In this blog post we will take a look at many tools from Google, or that work with Google, that can be used for teaching, learning, and creating with music. These include Chrome Music Lab, Song Exploder's Inside Music, AI Duet, Groove Pizza, Mix Lab, Flat, and many more!
See below for details, links, and descriptions for all of these tools.
Session Resources
- Session Agenda - Google Docs link
- Session Slideshow - Google Slides link
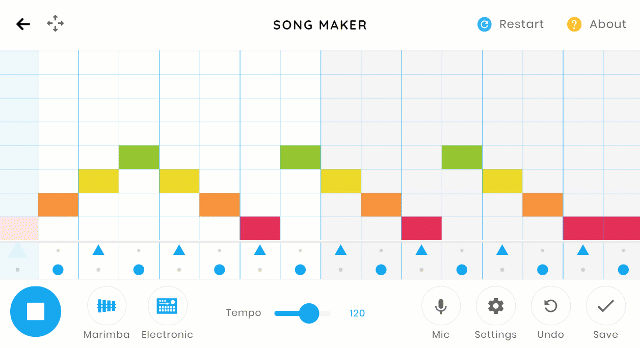
#1 - Chrome Music Lab
Chrome Music Lab is a collection of 13 interactive "experiments" that let users create, play, and learn with a wide range of music concepts. Experiments include Song Maker, Rhythm, Spectrogram, Chords, Sound Waves, Arpeggios, Kandinsky, Melody Maker, Voice Spinner, Harmonics, Piano Roll, Oscillators, and Strings. These activities are also cross-platform, working on laptops, tablets, and phones.
I recently did a blog post where I went into details on each of the 13 tools in Chrome Music Lab. You can get all of those details here: "Learning Music, Art, Science, Math and more with Chrome Music Lab"

#2 - Groove Pizza

- Launch the tool at the website: https://apps.musedlab.org/groovepizza
- You can begin with premade "Specials" to see what can be created and then modify those as desired.
- Or you can start with a "Plain" pizza where you make your rhythm from scratch.
- You can add beats to three different tracks.
- You can make up to four groove pizzas at a time that will play one after the other.
- You can change instruments including "Rock", "Techno", "Afro-Latin", "Hip-Hop", and "Jazz".
- You can adjust the "Volume", "BPM" (beats per minute), the "Swing" (to slightly offset some of the beats), and the "Slices" (number of beats).
- When done you can even download your creation as a .WAV file.
Another neat feature of Groove Pizza is its math application:
- If you click on the "Angle" button, the angle measurements for each vertex will be displayed. This can be a helpful way to teach or reinforce the concept of the sum of the interior angles of a polygon.
- You can also click the "Polygon" button to shade in the shapes on your pizza. This can tie into the study of different polygons.
- Finally, fractions can be visualized using the groove pizza, as well as the option to change the number of "Slices" which can be applied to comparing fractions and equivalent fractions.

To learn more about how this tool works, check out the video below from Google:
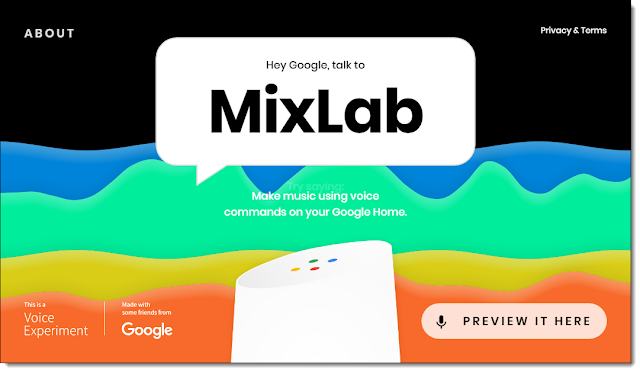
#3 - Mix Lab
https://experiments.withgoogle.com/voice/mixlab
Mix Lab is a Google experiment that lets you use voice commands to create music. This can be a neat way to see how different instruments and music styles can be used together to create unique sounds. Here's how it works:
To learn more about how this tool works, check out the video below from Google:
https://experiments.withgoogle.com/voice/mixlab
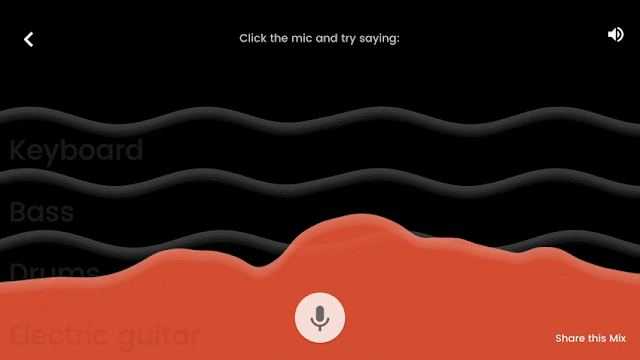
Mix Lab is a Google experiment that lets you use voice commands to create music. This can be a neat way to see how different instruments and music styles can be used together to create unique sounds. Here's how it works:
- You can launch the tool from the website at https://mixlab.withgoogle.com/
- Or you can just say "Hey Google, talk to MixLab" when using Google Assistant or a Google Home.

- Now you can simply speak to Google to add different sounds to four tracks including "Guitar", "Drums", "Bass", and "Keyboard".
- You can say things like "Play me a funky bass" or "Add some jazz drums" or just "Play me something".
- If you like what you create, you can share it with others by clicking "Share this mix" in the bottom right corner.

To learn more about how this tool works, check out the video below from Google:
#4 - AI Duet
https://experiments.withgoogle.com/ai/ai-duet
AI Duet gives you a chance to play music along with an Artificial Intelligence. Using Machine Learning, Google fed loads of music into the AI so it can respond to what you play with its own complimentary tune. To try this out:
- Go to the site at: https://experiments.withgoogle.com/ai/ai-duet/view/
- Click "Play"
- Start playing my clicking on the on screen musical keyboard.
- Or use your computer keyboard with the "A" row being the white keys of the keyboard, and the "Q" row being the black keys.
- The computer will then play a duet with you based on what you played.
To learn more about how this tool works, check out the video below from Google:
https://experiments.withgoogle.com/inside-music
Inside Music lets you step inside of music to see and hear how each piece contributes to the whole. This experiment used Web VR to put you inside of a 360 degree representation of a song, with each of the different instruments or vocals broken out separately. To experience this do the following:
- Go to the site at: https://experiments.withgoogle.com/webvr/inside-music/view/
- Click "Enter 360".
- Choose a song you want to hear.
- The song will play with each track broken out.
- You can click and drag to move around the scene, and then click on any instrument to turn it off or on.
- This works on your web browser, but can also be experiences with a VR headset or on your phone.

This can be a useful tool to help students dissect a song to understand better how each instrument or track contributes to the whole song. To learn more about how this tool works, check out the video below from Google:
#6 - Seeing Music
https://experiments.withgoogle.com/seeing-music
The "Seeing Music" tool allows you to visualize sounds and music. You can choose multiple sources for the music, as well as several different methods for displaying the sounds. Here's how it works:

#7 - Semi-Conductor
https://experiments.withgoogle.com/semi-conductor
Semi-Conductor lets you conduct an orchestra right in your browser. Using your computer's camera, you can move your arms to change the tempo, volume, and instrumentation of the piece of music. The program then plays the score based on your movements as you conduct. Here's how it works:
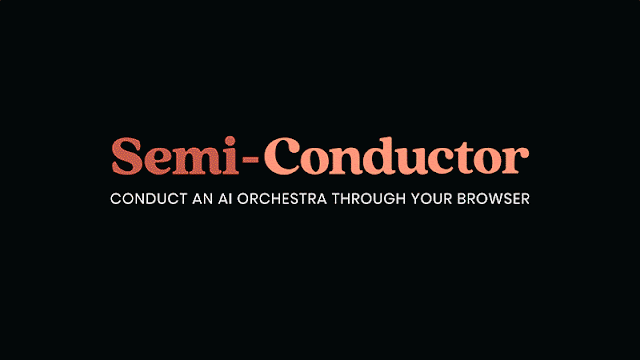
To learn more about how this tool works, check out the video below from Google:

#9 - YouTube
https://www.youtube.com
Of course no list of music resources would be complete without mentioning YouTube. This is a fantastic way to expose students to music from around the world and throughout time, as well as learn about topics in music theory. Below is just a small list of some helpful music-related YouTube channels and playlists to get started with:


#11 - Soundtrap
https://www.soundtrap.com
Soundtrap is a very powerful, but very easy to use, music composition and collaboration tool. Although it is not from Google, it works well with you Google account. You can log in using your Google account, and if you choose to purchase the educational version, it integrates with Google Classroom (and has lots of other benefits).
 For my testing, I just tried out the free version, which still had an impressive amount of options. With the no cost personal version you get:
Here are the basics (way oversimplified by me) on how Soundtrap works:
Standing up in front of a class or group of students to sing a song or play an instrument can be a stressful situation for some students. It is very easy for their nerves to get in the way so that the student’s performance is a poor representation of what they really know. One option to help with this is to allow students to record themselves with a screencast.
 Although we often think of screencasting as recording your screen, most tools will also allow you to just record your webcam. Students can record themselves singing their song or performing their music in the privacy of their own home. This can have several benefits:
There are many excellent screen recording tools you and your students can use. One of my favorites is the Screencastify Chrome extension, which can be installed from the Chrome Web Store here.
For more details see my blog post on "7 Super Screencasting Activities for School" as well as the video clip below from a recorded webinar I did that specifically addresses using screencasting for a student to give a speech or performance:
Conclusion
Music is a powerful tool for student learning and expression. Technology can provide many ways to enrich and extend this experience. If you have other technology resources that are helpful in teaching and learning with music, please consider sharing them in the comments below.
Post by Eric Curts. Bring me to your school, organization, or conference with over 50 PD sessions to choose from. Connect with me on Twitter at twitter.com/ericcurts and on Google+ at plus.google.com/+EricCurts1
https://experiments.withgoogle.com/seeing-music
The "Seeing Music" tool allows you to visualize sounds and music. You can choose multiple sources for the music, as well as several different methods for displaying the sounds. Here's how it works:
- Go to the website at: https://creatability.withgoogle.com/seeing-music/
- Choose where you want to get your sample music/sounds from including your microphone, sample provided sounds (sax, guitar, violin. etc.), a playable on-screen piano, or an uploaded audio file of your choice.
- Choose which visualization you wish to use including Hilbert Scope, Spectogram, Waveform, Oscilloscope, and more.
- You can also turn on the option for "Grid and Notes" which will display the actual notes as the music is playing.

https://experiments.withgoogle.com/semi-conductor
Semi-Conductor lets you conduct an orchestra right in your browser. Using your computer's camera, you can move your arms to change the tempo, volume, and instrumentation of the piece of music. The program then plays the score based on your movements as you conduct. Here's how it works:
- Go to the site at: https://semiconductor.withgoogle.com/
- Click "Start"
- Position your body so your webcam fits you within the outline on the screen.
- When you are in position the orchestra will start and you can conduct.
- The speed you move your arms controls the speed the orchestra plays.
- Moving your arms up or down makes the orchestra play louder or softer.
- Moving your arms from side-to-side controls which sections of the orchestra are playing.

To learn more about how this tool works, check out the video below from Google:
#8 - Google Arts and Culture
https://artsandculture.google.com/project/performing-arts
The Google Arts and Culture site is a massive collection of photos, primary source documents, videos, VR experiences, and more, all dedicated to cataloging and exploring human history, art, music, and more. For music, one particularly useful collection is the "Performing Arts" section of the site.
- Go to the site at: https://artsandculture.google.com/project/performing-arts
- Explore the different section of "Performing Arts" including:
- Stories - Multimedia presentations on music topics
- Virtual Tours - 360 degree street-view style tours of theaters around the world and other musical locations
- Items - Over 15,000 photos and artifacts in high resolution
- Videos - 360 degree immersive videos that put you inside of musical performances
- Collections - Themed collections of material on different locations, theaters, movements, and more

#9 - YouTube
https://www.youtube.com
Of course no list of music resources would be complete without mentioning YouTube. This is a fantastic way to expose students to music from around the world and throughout time, as well as learn about topics in music theory. Below is just a small list of some helpful music-related YouTube channels and playlists to get started with:
- TED-Ed Music Education - YouTube link
- Two Minute Music Theory - YouTube link
- Chris Wright - Understanding Music - YouTube link
- Wakeland High School AP Music Theory - YouTube link
- The Listener's Guide - YouTube link
- Instruments of the Orchestra first grade - YouTube link
- Odd Quartet - Music History, Theory, and Tech - YouTube link
- Music Theory Guy - YouTube link
- The Physics of Music - YouTube link

#10 - Flat Website and Add-ons
Another music composition tool is the Flat website, as well as the Flat add-on for Doc and Slides. The website at https://flat.io is the full version of the tool, which allows students to collaboratively write sheet music with a wide range of instruments. There is a free version, a paid version, and an educational version (https://flat.io/edu) which integrates with Google Classroom. I tested out the free version which lets you create 15 scores with over 100 instruments.

In addition to the full version of Flat on the web, there is also a simplified version as an add-on for Google Docs and Google Slides. Here are the basics for how that works:
- Install the Flat add-on for Docs or the Flat add-on for Slides.
- Launch the tool by clicking "Add-ons" then "Flat" then "Insert Musical Snippet".
- You can now compose your musical snippet using the notes and menu items.
- Click the play button as needed to hear what you have created.
- Click "Insert" when done to add the snippet to your Doc or Slide as an image.
- Later you can play back the music by selecting the image and re-opening the add-on.

https://www.soundtrap.com
Soundtrap is a very powerful, but very easy to use, music composition and collaboration tool. Although it is not from Google, it works well with you Google account. You can log in using your Google account, and if you choose to purchase the educational version, it integrates with Google Classroom (and has lots of other benefits).
- 5 projects
- 900 loops
- 210 instruments and sounds
Here are the basics (way oversimplified by me) on how Soundtrap works:
- Log into the site at https://www.soundtrap.com
- Open and existing project or create a new one.
- On the editor screen you can now add and edit tracks for your composition.
- You can add a track by choosing from the large collection of pre-made loops with many different instruments.
- Or you can add a track by recording it yourself with the on-screen keyboard, again using hundreds of instrument sounds.
- You can invite collaborators to work in Soundtrap with you on your creation.
- When done you can export your music in several different formats.

#12 - Screencastify
Chrome Web Store Extension linkStanding up in front of a class or group of students to sing a song or play an instrument can be a stressful situation for some students. It is very easy for their nerves to get in the way so that the student’s performance is a poor representation of what they really know. One option to help with this is to allow students to record themselves with a screencast.
- The student will be much less nervous you will get a more accurate measure of what they know or can do.
- The student will likely do the recording multiple times to get it perfect, encouraging lots of practice and repetition.
- The student will likely gain confidence, as the screencast serves as a stepping stone to presenting live eventually.
There are many excellent screen recording tools you and your students can use. One of my favorites is the Screencastify Chrome extension, which can be installed from the Chrome Web Store here.
For more details see my blog post on "7 Super Screencasting Activities for School" as well as the video clip below from a recorded webinar I did that specifically addresses using screencasting for a student to give a speech or performance:
Conclusion
Music is a powerful tool for student learning and expression. Technology can provide many ways to enrich and extend this experience. If you have other technology resources that are helpful in teaching and learning with music, please consider sharing them in the comments below.
Post by Eric Curts. Bring me to your school, organization, or conference with over 50 PD sessions to choose from. Connect with me on Twitter at twitter.com/ericcurts and on Google+ at plus.google.com/+EricCurts1
Melanie Fessler likes this
05 Feb 16:18
 Although there is no replacement for getting your hands dirty with finger paints, technology can offer many ways for students to be creative when making art. In addition to creativity, technology can also allow students to explore and learn about art in new and engaging ways.
There are so many awesome technology tools for art, including desktop programs, mobile apps, and interactive websites. Along with all of those, there are many tools from Google that can help with teaching, learning, exploring, and creating art.
In this blog post we will look at a wide range of Googley tools and activities for art. Many of these have shown up in one form or other on my blog in the past, but I thought it would be helpful to pull them all together in one place. As I come across more resources in the future, I will be sure to add them to this growing list.
See below for the activities, and as always, feel free to use and share however you like!
Session Resources
#1 - Pixel Art with Google Sheets
https://www.controlaltachieve.com/2017/02/sheets-pixelart.html
"Pixel Art" is a style of drawing where you make images out of a small grid with limited number of colors (sort of like the old video game graphics from when I was a kid). This can be a neat art activity for students as is forces them to be creative within the limitations of a small area and color palette, and consider what is really essential to illustrate an item or idea.
One way to create pixel art is by coloring in the cells on a spreadsheet. This can be done with the "paint can" button in Google Sheets, but to make the process quicker and easier, I created a spreadsheet template that uses conditional formatting. All you have to do is type letters into the cells and corresponding colors will be filled in.

For full details and directions on how to use the template, see my earlier post "Pixel Art Activities for any Subject with Google Sheets".
You can get the template there or make a copy of it with the link below.
#2 - Mondrian Art with Google Sheets
https://www.controlaltachieve.com/2018/10/mondrian-sheets.html
Mondrian Art is an abstract form of art that uses a creative layout of squares and rectangles, often filled in with primary colors. Because Mondrian Art is composed of lots of different sized rectangles and squares, it is the perfect style to be created with digital tools... specifically with Google Sheets!

With Google Sheets you can merge cells together to make rectangles of various sizes, and then use the "paint can" button to fill them in with colors. To make this even easier, I have created a template that sets up the Sheet so that the cells are all nice squares.
You can get all of the detailed directions on how to make Mondrian Art in my earlier blog post "Make Mondrian Art with Google Sheets".
The template can be found in the blog post, as well as through the link below:
#3 - Self-Portraits with Google Drawings
http://www.julielyle.com/2018/12/digital-art-and-google-drawings.html
(credit to Julie Lyle)
Anyone who reads my blog knows how much I love Google Drawings (see my Drawings resources here). Recently I came across an awesome activity from Julie Lyle on using Drawings to create self-portraits.
In short the idea goes like this:
 You can get all of the details in the resources below:
Bonus note: Although you can use any colors you want, if you prefer to try to match the original colors in your photo you can use a color picker extension for Chrome such as ColorZilla or Eye Dropper.
#4 - Mosaics with Google Drawings
http://www.julielyle.com/2018/12/digital-art-and-google-drawings-mosaic.html
(credit to Julie Lyle)
Similar to the self-portrait activity above, another creative way to make art with Google Drawings is this mosaic project. Rather than trying to make a "realistic" version of yourself, in this activity you transform a source image with colored shapes like mosaic tiles or stained glass. Here's the basic steps:
You can get all of the details in the resources below:
#5 - Google's Arts and Culture
Website - https://artsandculture.google.com/
Android mobile app
iOS mobile app
Google Arts & Culture is a website from the Google Cultural Institute dedicated to collecting and sharing art, photographs, and primary source documents from all over the world and throughout history. Items are organized by themes, artists, mediums, movements, historical events, historical people, places around the world, stories of the day, and more.
With Google Arts & Culture (https://artsandculture.google.com) students can get closer to works of art and historical artifacts than they ever could in a museum. The digital items were scanned or photographed by Google using an ultra-high resolution camera so you can see every brush stroke, letter, or detail. Some of the collections even feature 360-degree videos and photos to immerse you in the experience.
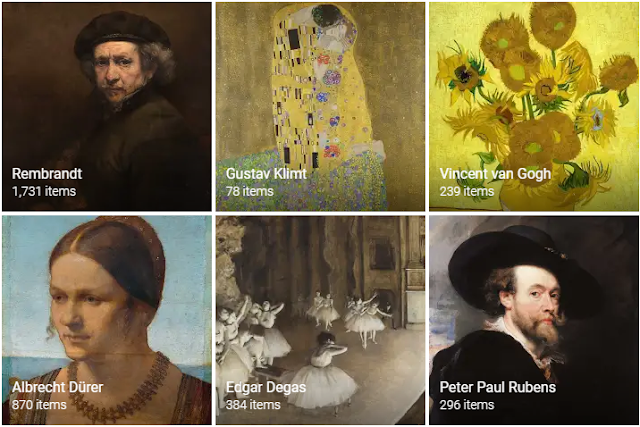
In addition to the amazing website, there is also a mobile app version of Google Arts and Culture (Android or iOS) that adds another fun tool. The mobile version includes the "Selfie" option that lets you take a picture of your face, and then it searches thousands of artworks to see if any look like you.

#6 - Curator Table
Overview - https://experiments.withgoogle.com/curator-table
Launch Tool - https://artsexperiments.withgoogle.com/curatortable/
Curator Table is one of Google's "experiments" which creates a massive virtual 3D gallery of artwork you can explore. You can use your mouse to simply browse, or you can use the search feature to pull out art for a specific artist, styles, or object. When you find the art you want, clicking on it will open a page with more details on that work.

#7 - Art Palette
Overview - https://experiments.withgoogle.com/art-palette
Launch Tool - https://artsexperiments.withgoogle.com/artpalette/
Color is one of the fundamental aspects of art, used to communicate mood, style, and ideas. So Google decided to create a search engine based on color! Art Palette allows you to search through thousands of paintings, drawings, sculptures, and more, based on colors you choose. Students can then use the results to explore similarities and connections between the color-matching art. Here's how it works:
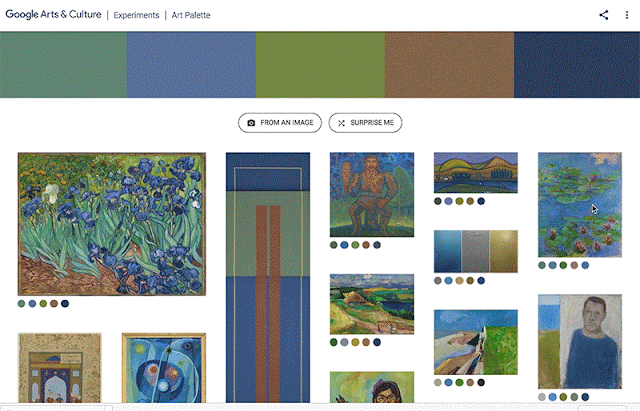
To learn more about Art Palette see the video below from Google:
#8 - AutoDraw
Blog Post - https://www.controlaltachieve.com/2017/04/google-autodraw.html
Overview - https://experiments.withgoogle.com/autodraw
Launch Tool - https://www.autodraw.com/
AutoDraw is a very simple and easy to use drawing tool, with most of the normal features such as drawing, filling colors, resizing, adding text, and more. However, there is one big twist. AutoDraw includes Google's artificial intelligence to help you draw by taking your squiggles and doodles, and offering to replace them with pre-made clipart-style images.
 Some possible uses might include:
For detailed directions on how to use this tool, see my earlier post here: "Using Google AutoDraw for Sketchnotes, Infographics, Drawings, and More"
To learn more about AutoDraw see the video below from Google:
#9 - Just a Line
Website - https://experiments.withgoogle.com/justaline
Android mobile app
iOS mobile app
Although 3D art has always existed through sculpture and modeling, when we think of drawing, we normally think of 2D. Well what if we could draw in 3D? That's why Google created the "Just a Line" mobile app. This augmented reality app allows you to move around and draw in your physical environment. Here's how it works:

#10 - Doodle for Google
https://doodle4google.com
All the way back in 1998, Google launched their first "Google Doodle". The company founders were going to spend a week at the Burning Man Festival and wanted to let people know they would be out of the office. So they changed the normal Google logo on the site to one that included the Burning Man logo for the second "O". Since then it has been a staple of the website to show creative versions of the Google logo to celebrate events, people, and ideas.
Building on this, starting in 2008 Google has hosted an annual "Doodle for Google" contest. K-12 students can create and submit their own artwork for the Google logo for a chance to have it displayed on Google's site and win some great scholarships and tech packages for their schools.
 This is an awesome project for students to take part in each year, where they can combine any style of art with things they are passionate about. You can find out all the details about the competition, past winners, resources, and more at: https://doodle4google.com
Conclusion
Art is a powerful tool for student learning and expression. Technology can provide many ways to enrich and extend this experience. If you have other technology resources that are helpful in teaching, learning, and creating with art, please consider sharing them in the comments below.
Post by Eric Curts. Bring me to your school, organization, or conference with over 50 PD sessions to choose from. Connect with me on Twitter at twitter.com/ericcurts and on Google+ at plus.google.com/+EricCurts1
Google Tools and Activities for Art Education
by Eric

There are so many awesome technology tools for art, including desktop programs, mobile apps, and interactive websites. Along with all of those, there are many tools from Google that can help with teaching, learning, exploring, and creating art.
In this blog post we will look at a wide range of Googley tools and activities for art. Many of these have shown up in one form or other on my blog in the past, but I thought it would be helpful to pull them all together in one place. As I come across more resources in the future, I will be sure to add them to this growing list.
See below for the activities, and as always, feel free to use and share however you like!
Session Resources
- Session Agenda - Google Docs link
- Session Slideshow - Google Slides link
#1 - Pixel Art with Google Sheets
https://www.controlaltachieve.com/2017/02/sheets-pixelart.html
"Pixel Art" is a style of drawing where you make images out of a small grid with limited number of colors (sort of like the old video game graphics from when I was a kid). This can be a neat art activity for students as is forces them to be creative within the limitations of a small area and color palette, and consider what is really essential to illustrate an item or idea.
One way to create pixel art is by coloring in the cells on a spreadsheet. This can be done with the "paint can" button in Google Sheets, but to make the process quicker and easier, I created a spreadsheet template that uses conditional formatting. All you have to do is type letters into the cells and corresponding colors will be filled in.
For full details and directions on how to use the template, see my earlier post "Pixel Art Activities for any Subject with Google Sheets".
You can get the template there or make a copy of it with the link below.
- 20-Color Pixel Art Template - Google Sheets link
#2 - Mondrian Art with Google Sheets
https://www.controlaltachieve.com/2018/10/mondrian-sheets.html
Mondrian Art is an abstract form of art that uses a creative layout of squares and rectangles, often filled in with primary colors. Because Mondrian Art is composed of lots of different sized rectangles and squares, it is the perfect style to be created with digital tools... specifically with Google Sheets!
With Google Sheets you can merge cells together to make rectangles of various sizes, and then use the "paint can" button to fill them in with colors. To make this even easier, I have created a template that sets up the Sheet so that the cells are all nice squares.
You can get all of the detailed directions on how to make Mondrian Art in my earlier blog post "Make Mondrian Art with Google Sheets".
The template can be found in the blog post, as well as through the link below:
- Mondrian Art Template - Google Sheets link
#3 - Self-Portraits with Google Drawings
http://www.julielyle.com/2018/12/digital-art-and-google-drawings.html
(credit to Julie Lyle)
Anyone who reads my blog knows how much I love Google Drawings (see my Drawings resources here). Recently I came across an awesome activity from Julie Lyle on using Drawings to create self-portraits.
In short the idea goes like this:
- Create a Google Drawing and insert a photo of yourself.
- Next use the "Polyline" tool and the "Curve" tool to make colored shapes for all of the different portions of your picture.
- When done, you can then delete your original underlying photo and you will be left with a digital "clipart-style" image of yourself.
- Blog post - Self-Portraits with Google Drawings - Website link
- Project Criteria and Tips - Google Docs link
- Demo video - "Doodle Yourself with Google Drawing" - YouTube link
Bonus note: Although you can use any colors you want, if you prefer to try to match the original colors in your photo you can use a color picker extension for Chrome such as ColorZilla or Eye Dropper.
#4 - Mosaics with Google Drawings
http://www.julielyle.com/2018/12/digital-art-and-google-drawings-mosaic.html
(credit to Julie Lyle)
Similar to the self-portrait activity above, another creative way to make art with Google Drawings is this mosaic project. Rather than trying to make a "realistic" version of yourself, in this activity you transform a source image with colored shapes like mosaic tiles or stained glass. Here's the basic steps:
- Create a Google Drawing and set the background to black.
- Then insert the photo you want to transform.
- Next use any of the "Shape" tools or the "Polyline" tool to cover the image with quadrilaterals, triangles, or other shapes that fit your desired style.
- Leave some room between the shapes so the background can show through later.
- Color in the shapes to match the portion of the image they are covering (again you can go with the default colors provided in Drawings, or you can use a color picker extension such as ColorZilla or Eye Dropper and then set a custom fill color).
- When done, delete the original image so that you just have your colors tiles on the black background for you completed mosaic art.

You can get all of the details in the resources below:
- Blog post - Mosaics with Google Drawings - Website link
- Project Criteria and Tips - Google Docs link
#5 - Google's Arts and Culture
Website - https://artsandculture.google.com/
Android mobile app
iOS mobile app
Google Arts & Culture is a website from the Google Cultural Institute dedicated to collecting and sharing art, photographs, and primary source documents from all over the world and throughout history. Items are organized by themes, artists, mediums, movements, historical events, historical people, places around the world, stories of the day, and more.
With Google Arts & Culture (https://artsandculture.google.com) students can get closer to works of art and historical artifacts than they ever could in a museum. The digital items were scanned or photographed by Google using an ultra-high resolution camera so you can see every brush stroke, letter, or detail. Some of the collections even feature 360-degree videos and photos to immerse you in the experience.
In addition to the amazing website, there is also a mobile app version of Google Arts and Culture (Android or iOS) that adds another fun tool. The mobile version includes the "Selfie" option that lets you take a picture of your face, and then it searches thousands of artworks to see if any look like you.
#6 - Curator Table
Overview - https://experiments.withgoogle.com/curator-table
Launch Tool - https://artsexperiments.withgoogle.com/curatortable/
Curator Table is one of Google's "experiments" which creates a massive virtual 3D gallery of artwork you can explore. You can use your mouse to simply browse, or you can use the search feature to pull out art for a specific artist, styles, or object. When you find the art you want, clicking on it will open a page with more details on that work.

#7 - Art Palette
Overview - https://experiments.withgoogle.com/art-palette
Launch Tool - https://artsexperiments.withgoogle.com/artpalette/
Color is one of the fundamental aspects of art, used to communicate mood, style, and ideas. So Google decided to create a search engine based on color! Art Palette allows you to search through thousands of paintings, drawings, sculptures, and more, based on colors you choose. Students can then use the results to explore similarities and connections between the color-matching art. Here's how it works:
- Go to the Art Palette site at: https://artsexperiments.withgoogle.com/artpalette/
- Use the color bar at the top to select the colors you want to include in your palette.
- Google will now display a grid of artwork that use the colors you have chosen.
- Alternately you can click the "From an image" button to upload a picture or use your webcam to take a picture for the site to match against.

To learn more about Art Palette see the video below from Google:
#8 - AutoDraw
Blog Post - https://www.controlaltachieve.com/2017/04/google-autodraw.html
Overview - https://experiments.withgoogle.com/autodraw
Launch Tool - https://www.autodraw.com/
AutoDraw is a very simple and easy to use drawing tool, with most of the normal features such as drawing, filling colors, resizing, adding text, and more. However, there is one big twist. AutoDraw includes Google's artificial intelligence to help you draw by taking your squiggles and doodles, and offering to replace them with pre-made clipart-style images.
- Sketch notes
- Infographics
- Illustrating a story
- Creating a scene
- Desktop publishing (flyer, poster)
- Creative drawing
For detailed directions on how to use this tool, see my earlier post here: "Using Google AutoDraw for Sketchnotes, Infographics, Drawings, and More"
To learn more about AutoDraw see the video below from Google:
#9 - Just a Line
Website - https://experiments.withgoogle.com/justaline
Android mobile app
iOS mobile app
Although 3D art has always existed through sculpture and modeling, when we think of drawing, we normally think of 2D. Well what if we could draw in 3D? That's why Google created the "Just a Line" mobile app. This augmented reality app allows you to move around and draw in your physical environment. Here's how it works:
- Install the app: Android or iOS
- Launch the app and point your camera at your surroundings.
- Use your finger to draw in the air a few feet in front of you.
- Walk around to draw in different locations.
- As you move around you can see your 3D drawing superimposed in your physical space.
- You can click the "Draw with a partner" button to let someone join you to draw together in the same space.
- You can click the "Record" button to make a video of your 3D art to share with others.
#10 - Doodle for Google
https://doodle4google.com
All the way back in 1998, Google launched their first "Google Doodle". The company founders were going to spend a week at the Burning Man Festival and wanted to let people know they would be out of the office. So they changed the normal Google logo on the site to one that included the Burning Man logo for the second "O". Since then it has been a staple of the website to show creative versions of the Google logo to celebrate events, people, and ideas.

Building on this, starting in 2008 Google has hosted an annual "Doodle for Google" contest. K-12 students can create and submit their own artwork for the Google logo for a chance to have it displayed on Google's site and win some great scholarships and tech packages for their schools.

Conclusion
Art is a powerful tool for student learning and expression. Technology can provide many ways to enrich and extend this experience. If you have other technology resources that are helpful in teaching, learning, and creating with art, please consider sharing them in the comments below.
Post by Eric Curts. Bring me to your school, organization, or conference with over 50 PD sessions to choose from. Connect with me on Twitter at twitter.com/ericcurts and on Google+ at plus.google.com/+EricCurts1
Melanie Fessler likes this
04 Feb 16:23
EdTech Tip of the Week - Remove Backgrounds From Photos
by Steve Wick
Sometimes you have the perfect image, except there is something in the background that just doesn't work for the message you are trying to send. What do you do?
You could try to crop the image to eliminate most of the background? Or maybe snip out just the part of the image you want to use? Not perfect, but without access to good photo editing tool that was about the best you could do.
Most of the free online photo editing tools were either incredible time consuming as you tried to carefully trace what you wanted. Even with a lot of patience, it was hard to get it just right.
The challenge of removing a background is no longer such a challenge. Today you are just a few clicks away from an image with a transparent background.
Go from this!

To this in less than a minute!

Here are two sites that you might want to explore next time you need to remove a background from an image.

Have another favorite photo editing site? We'd love to read about it in the comments below!
Special thanks to Matt Miller and Tony Vincent who inspired me to explore these resources during the 2018 #DitchSummit.
Looking for more EdTech and Google Tips? Explore the Archive of Past EdTech Tips.
You could try to crop the image to eliminate most of the background? Or maybe snip out just the part of the image you want to use? Not perfect, but without access to good photo editing tool that was about the best you could do.
Most of the free online photo editing tools were either incredible time consuming as you tried to carefully trace what you wanted. Even with a lot of patience, it was hard to get it just right.
The challenge of removing a background is no longer such a challenge. Today you are just a few clicks away from an image with a transparent background.
Go from this!
To this in less than a minute!
Here are two sites that you might want to explore next time you need to remove a background from an image.
________________________________
________________________________
________________________________
Have another favorite photo editing site? We'd love to read about it in the comments below!
Special thanks to Matt Miller and Tony Vincent who inspired me to explore these resources during the 2018 #DitchSummit.
Looking for more EdTech and Google Tips? Explore the Archive of Past EdTech Tips.
Melanie Fessler likes this
04 Feb 16:19
 In yesterday's Practical Ed Tech Tip of the Week I shared directions for using Remove.bg to take the background out of selfies and then use those modified pictures to virtually place yourself in a new setting. At the end of that newsletter update I mentioned PhotoScissors as an alternative to Remove.bg.
PhotoScissors lets you remove the background from any picture, not just selfies. This afternoon I used PhotoScissors to remove the background from a picture of my dog. I then used a picture of the White House's lawn in a Google Slide and layered the cutout of my dog on top of it. Watch this short video from my YouTube channel for an overview of how to use PhotoScissors.
This post originally appeared on Free Technology for Teachers if you see it elsewhere, it has been used without permission.
How to Use PhotoScissors to Remove the Background from Any Image
by noreply@blogger.com (Richard Byrne)

PhotoScissors lets you remove the background from any picture, not just selfies. This afternoon I used PhotoScissors to remove the background from a picture of my dog. I then used a picture of the White House's lawn in a Google Slide and layered the cutout of my dog on top of it. Watch this short video from my YouTube channel for an overview of how to use PhotoScissors.
This post originally appeared on Free Technology for Teachers if you see it elsewhere, it has been used without permission.
04 Feb 16:17
Students Can Create Their Own Tours to Share in Google Expeditions
by noreply@blogger.com (Richard Byrne)
Googles' Tour Creator launched last spring and since then has become one of my favorite tools for history and geography classes. One of my few complaints about it was that while students could easily build virtual reality tours, it wasn't always easy to share those tours with their teachers and classmates. That is about to change. Yesterday, Google announced that the updated version of the Expeditions Android app (iOS support is coming soon) will allow sharing of tours that students build in Tour Creator.
If you haven't tried Tour Creator, take a look at the following tutorials that I created.
How to Use Google's VR Tour Creator (The Basics)
How to Add Points of Interest in Tour Creator
How to Include Narration in Tour Creator
Applications for Education
In addition to making tours for history and geography lessons, students can use Tour Creator to build VR tours based on their favorite books. My detailed directions for that process are available here.
This post originally appeared on Free Technology for Teachers if you see it elsewhere, it has been used without permission.
04 Feb 14:32
 CleverPDF is a free service that anyone can use to convert a PDF into a Word document, a Pages file, or an ePub file. That's just the tip of the iceberg of what's on offer from CleverPDF. The service can be used to create PowerPoint slides, Keynote slides, images, Numbers, and Excel files.
In addition to turning existing PDFs into other formats, CleverPDF can be used to convert other files into PDFs. For example, you can use CleverPDF to create PDFs from Word, PPTX, Excel, and images.
And if you already have a PDF, but need to modify it, CleverPDF has tools for that too. CleverPDF will let you combine PDFs, split PDFs, apply watermarks to your PDFs, and encrypt your PDFs.
I used CleverPDF to convert one of my PDFs into a Word document today. It was quick and easy. I didn't have to register on the site or enter my email address in order to convert my PDF and then download the Word document.
Applications for Education
CleverPDF could be useful for applying watermarks to draft documents that you want to send to colleagues for review. Of course, it could also be a good choice when you need to convert a PDF into an editable format.
This post originally appeared on Free Technology for Teachers if you see it elsewhere, it has been used without permission.
CleverPDF Offers 20 Ways to Work With PDFs in Other Formats
by noreply@blogger.com (Richard Byrne)

In addition to turning existing PDFs into other formats, CleverPDF can be used to convert other files into PDFs. For example, you can use CleverPDF to create PDFs from Word, PPTX, Excel, and images.
And if you already have a PDF, but need to modify it, CleverPDF has tools for that too. CleverPDF will let you combine PDFs, split PDFs, apply watermarks to your PDFs, and encrypt your PDFs.
I used CleverPDF to convert one of my PDFs into a Word document today. It was quick and easy. I didn't have to register on the site or enter my email address in order to convert my PDF and then download the Word document.

Applications for Education
CleverPDF could be useful for applying watermarks to draft documents that you want to send to colleagues for review. Of course, it could also be a good choice when you need to convert a PDF into an editable format.
This post originally appeared on Free Technology for Teachers if you see it elsewhere, it has been used without permission.
Melanie Fessler likes this
21 Nov 02:05
CoRubrics - An Add-on to Facilitate Assessment Among Students
by noreply@blogger.com (Richard Byrne)
This week I am hosting guest posts. This one was authored by Jaume Feliu at the Salas i Xandri High School in Sant Quirze del Vallès, near Barcelona.
More and more rubrics are coming into the classroom for assessment. Rubrics are tools that encourage formative assessment, especially when students use them for self-assessment and peer assessment. But this co-evaluation can be a long and tedious process.
CoRubrics is a free add-on for Google Sheets, developed by a teacher. It is used to assess students (or groups of students) with a rubric and it also allows students to assess other students (co-evaluation).
First, teachers design the rubric they want to use in Google Sheets. Then they add the students' names and their email address (these can be imported from Google Classroom). Once this is done, the add-on will:
Once the add-on is installed, the add-on menu will guide you through the process.
 The first step is to create the rubric template. Three sheets will be created where we will have to indicate the rubric, the students and the teachers’ names and emails. You can delete and add aspects and levels.


From here the process is really fast. Using the Corubrics menu the rubric form is created.

Students answer the form with their mobile phone or with their computer and the complement carries out all the calculation in order to obtain the results.

Finally, the rubric of result is sent to each student.

The following video shows the usage process:
Detailed information can be found at the following CoRubrics link and updates are published on the following CoRubrics Twitter account.
Jaume Feliu is a Teacher of Technology at the Salas i Xandri High School in Sant Quirze del Vallès, near Barcelona.
Blog: Tecnocentres
Twitter: @jfeliua
Passionate about education and technological training, I try to take advantage of ICT to improve the organization of the center, to facilitate the methodologies where the student is the main character of his/her learning and to improve the evaluation. In this sense, I have developed some complements (CoRubrics and ImExClass). I am convinced that, in order to improve education, we must constantly rethink what we are doing.
This post originally appeared on Free Technology for Teachers if you see it elsewhere, it has been used without permission.
More and more rubrics are coming into the classroom for assessment. Rubrics are tools that encourage formative assessment, especially when students use them for self-assessment and peer assessment. But this co-evaluation can be a long and tedious process.
CoRubrics is a free add-on for Google Sheets, developed by a teacher. It is used to assess students (or groups of students) with a rubric and it also allows students to assess other students (co-evaluation).
First, teachers design the rubric they want to use in Google Sheets. Then they add the students' names and their email address (these can be imported from Google Classroom). Once this is done, the add-on will:
- Create a Google Form with the contents of the rubric.
- Send the form to the students by email or simply provide the link to the teacher.
- Process the data once the form is filled out (by the students or by the teacher).
- Finally, send the results to the students (each student receives only his/her results) with a personalized comment.
Once the add-on is installed, the add-on menu will guide you through the process.


From here the process is really fast. Using the Corubrics menu the rubric form is created.

Students answer the form with their mobile phone or with their computer and the complement carries out all the calculation in order to obtain the results.

Finally, the rubric of result is sent to each student.

The following video shows the usage process:
Detailed information can be found at the following CoRubrics link and updates are published on the following CoRubrics Twitter account.
Jaume Feliu is a Teacher of Technology at the Salas i Xandri High School in Sant Quirze del Vallès, near Barcelona.
Blog: Tecnocentres
Twitter: @jfeliua
Passionate about education and technological training, I try to take advantage of ICT to improve the organization of the center, to facilitate the methodologies where the student is the main character of his/her learning and to improve the evaluation. In this sense, I have developed some complements (CoRubrics and ImExClass). I am convinced that, in order to improve education, we must constantly rethink what we are doing.
This post originally appeared on Free Technology for Teachers if you see it elsewhere, it has been used without permission.
Melanie Fessler likes this
21 Nov 02:03
 This week I am hosting some guest bloggers. This entry is from Jerry Schneider who shares a couple of good examples of using a "flex-time PD model."
In an effort to make professional development more flexible and adaptable to the needs of our teachers, our school district is trying something new. Teachers in our school district are able to earn PD hours during the school day that can be applied to the flex-time PD hours. For example, if a classroom teacher spends time planning a project with the library media specialist or instructional technology coach on ways to increase the level of rigor by integrating technology, the planning hours go toward the flex-time PD hours. We have dubbed this as “shoulder partner time” where we are sitting “shoulder to shoulder working together to reach a common good for our students.”
Other examples for flexible PD time include curriculum development with fellow teachers outside of the school day or learning about new web tools from the library media specialist or instructional technology coach during teacher prep periods. Those teachers that fulfill their PD flex-time obligation are able to take the scheduled PD off since they have fulfilled their PD hour requirements. The combination of credit for PD time and collaborative time to learn new software or develop new curriculum/lessons has meant teachers seek out the library media specialist and instructional technology coach often.
The shoulder partner time model helps our teachers who are constantly looking for ways to integrate current technology apps into their curriculum. In meeting with one of our Latin teachers, we discussed ways for students to use technology when evaluating a historical quotation. She decided to do a #PassageSnap adapted from Tara Martin’s “#BookSnaps with Seesaw.”
The concept was based on SnapChat, an app that takes any picture, video, or message you send to followers and makes them available to the receivers for only a short time before it becomes inaccessible. Users can mark up or annotate the message with text, drawing, emojis, images, filters, etc. Since SnapChat is often blocked in schools, Martin used Seesaw to create a #BookSnap, where students promote their books with those same enhancements available on SnapChat using Seesaw.
Instead of using Seesaw, I decided to try using Google Drawing for the #PassageSnap. Students were given a specific Latin quote, and the students were to use those same enhancements available on SnapChat on Google Drawing and Google Docs. The Latin teacher shared with the students through Google Classroom a Google Doc with the instructions and rubric for assessment. The students then added a page break and inserted a Google Drawing onto the Google Doc. They were to define different words of the Latin quote on Drawing using text, drawing, emojis, images, etc. When completed, the students were able to turn in the Google Doc using the Turn In feature of Google Classroom either in the Google Doc or in Google Classroom. The students went above and beyond the teacher’s expectations; she was in awe of the creativity and originality of the students. She said she will be doing this again in the near future. As educators, we need to allow our students to demonstrate their depth of understanding using student-created projects.
One of our freshmen English/Language Arts teacher came to me asking about a mapping tool where students could map out a journey. My suggestion was to use Google’s Tour Creator incorporating Google Street View. Tour Creator uses the Google Street View to drop pins (stops on a trip that shows the view from the street view in the past 1-5 years) along a planned route. The E/LA teacher wanted the students to create their own map of the stops of Odysseus from the novel The Odyssey. Along with views of the stops on the journey, students were able to record audio narration of the journey, using the PLD’s Voice Recorder, and upload to the location of the stop on the journey so students could hear about the significance of this particular stop. Students would then share the link to their tours with the teacher and the rest of the class. Many of the projects were extremely detailed and very well done. This is the fun part of my job...seeing what can students create when given the tools and the time to create something that shows what they know.
About Jerry
 For the past three years, Jerry Schneider has worked between a high school and middle school in Fargo, North Dakota, as an instructional technology coach. Prior to that, he worked as the instructional technology coach at the high school level for five years full-time and one year split as a business education classroom teacher and instructional technology coach.
For his first 17 years in education, Jerry was a business education/software applications teacher. He is a Google Certified Levels 1 and 2 Educator, earned Google Certified Trainer status, is a certified online instructor through Florida Virtual High School, and is an adjunct instructor at North Dakota State University where he teaches online Google Certified Levels 1 and 2 Educator courses. Jerry is a member of ISTE and the NDATL (North Dakota Association of Technology Leaders). As part of his Personal Learning Network (PLN) Jerry frequents Twitter, Google+ Communities, Spigot, Feedly, and Diigo as he feels it is important to stay up to date on new features in web tools, software, and hardware as well as finding and evaluating new products. He blogs at https://fnhtechnologycoach.edublogs.org and enjoys following technology companies, bloggers, administrators, and educators on Twitter https://twitter.com/FNH_Tech_Coach.
This post originally appeared on Free Technology for Teachers if you see it elsewhere, it has been used without permission.
BookSnaps, Passage Snaps, and a Flex-time PD Model
by noreply@blogger.com (Richard Byrne)

In an effort to make professional development more flexible and adaptable to the needs of our teachers, our school district is trying something new. Teachers in our school district are able to earn PD hours during the school day that can be applied to the flex-time PD hours. For example, if a classroom teacher spends time planning a project with the library media specialist or instructional technology coach on ways to increase the level of rigor by integrating technology, the planning hours go toward the flex-time PD hours. We have dubbed this as “shoulder partner time” where we are sitting “shoulder to shoulder working together to reach a common good for our students.”
Other examples for flexible PD time include curriculum development with fellow teachers outside of the school day or learning about new web tools from the library media specialist or instructional technology coach during teacher prep periods. Those teachers that fulfill their PD flex-time obligation are able to take the scheduled PD off since they have fulfilled their PD hour requirements. The combination of credit for PD time and collaborative time to learn new software or develop new curriculum/lessons has meant teachers seek out the library media specialist and instructional technology coach often.
The shoulder partner time model helps our teachers who are constantly looking for ways to integrate current technology apps into their curriculum. In meeting with one of our Latin teachers, we discussed ways for students to use technology when evaluating a historical quotation. She decided to do a #PassageSnap adapted from Tara Martin’s “#BookSnaps with Seesaw.”
The concept was based on SnapChat, an app that takes any picture, video, or message you send to followers and makes them available to the receivers for only a short time before it becomes inaccessible. Users can mark up or annotate the message with text, drawing, emojis, images, filters, etc. Since SnapChat is often blocked in schools, Martin used Seesaw to create a #BookSnap, where students promote their books with those same enhancements available on SnapChat using Seesaw.
Instead of using Seesaw, I decided to try using Google Drawing for the #PassageSnap. Students were given a specific Latin quote, and the students were to use those same enhancements available on SnapChat on Google Drawing and Google Docs. The Latin teacher shared with the students through Google Classroom a Google Doc with the instructions and rubric for assessment. The students then added a page break and inserted a Google Drawing onto the Google Doc. They were to define different words of the Latin quote on Drawing using text, drawing, emojis, images, etc. When completed, the students were able to turn in the Google Doc using the Turn In feature of Google Classroom either in the Google Doc or in Google Classroom. The students went above and beyond the teacher’s expectations; she was in awe of the creativity and originality of the students. She said she will be doing this again in the near future. As educators, we need to allow our students to demonstrate their depth of understanding using student-created projects.
One of our freshmen English/Language Arts teacher came to me asking about a mapping tool where students could map out a journey. My suggestion was to use Google’s Tour Creator incorporating Google Street View. Tour Creator uses the Google Street View to drop pins (stops on a trip that shows the view from the street view in the past 1-5 years) along a planned route. The E/LA teacher wanted the students to create their own map of the stops of Odysseus from the novel The Odyssey. Along with views of the stops on the journey, students were able to record audio narration of the journey, using the PLD’s Voice Recorder, and upload to the location of the stop on the journey so students could hear about the significance of this particular stop. Students would then share the link to their tours with the teacher and the rest of the class. Many of the projects were extremely detailed and very well done. This is the fun part of my job...seeing what can students create when given the tools and the time to create something that shows what they know.
About Jerry

For his first 17 years in education, Jerry was a business education/software applications teacher. He is a Google Certified Levels 1 and 2 Educator, earned Google Certified Trainer status, is a certified online instructor through Florida Virtual High School, and is an adjunct instructor at North Dakota State University where he teaches online Google Certified Levels 1 and 2 Educator courses. Jerry is a member of ISTE and the NDATL (North Dakota Association of Technology Leaders). As part of his Personal Learning Network (PLN) Jerry frequents Twitter, Google+ Communities, Spigot, Feedly, and Diigo as he feels it is important to stay up to date on new features in web tools, software, and hardware as well as finding and evaluating new products. He blogs at https://fnhtechnologycoach.edublogs.org and enjoys following technology companies, bloggers, administrators, and educators on Twitter https://twitter.com/FNH_Tech_Coach.
This post originally appeared on Free Technology for Teachers if you see it elsewhere, it has been used without permission.
Melanie Fessler likes this
14 Nov 02:06
Get Fancy with the Cool Text Generator
by edutech4teachers
 Ever wish you could add some pizzazz to your Google Classroom posts? Well, now you can with the ᑕOOᒪ ᖴᗩᑎᑕY TE᙭T GEᑎEᖇᗩTOᖇ.
This nifty workaround is a copy and paste font generator that converts regular text to free cool fonts including 𝐛𝐨𝐥𝐝, 𝘪𝘵𝘢𝘭𝘪𝘤, ʄǟռƈʏ and 🅜🅞🅡🅔 that can be used on Twitter, Facebook, Instagram, Snapchat, blog posts and yes, gσσgℓє ¢ℓαѕѕяσσм.
How does it work? Access the ᑕOOᒪ ᖴᗩᑎᑕY TE᙭T GEᑎEᖇᗩTOᖇ, select a font, click the 


 🆁
🆁 🆃 button and customize your text. Once you dig the output, click the
  🆈 button and then 🆂🆃 your $цpёя cѳѳг text wherever you need some good stuff.
In addition to sᴛʏʟɪsʜ fonts, the ᑕOOᒪ ᖴᗩᑎᑕY TE᙭T GEᑎEᖇᗩTOᖇ also offers some pretty neat ★·.·´¯`·.·★ tєхt dєcσrαtíσns ★·.·´¯`·.·★ and symbols that can be added to the mix as well.
So, the next time you want to impress your students, colleagues and/or friends, dial up the ᑕOOᒪ ᖴᗩᑎᑕY TE᙭T GEᑎEᖇᗩTOᖇ—or if you’d prefer the mobile version, check out the Fancy Text iOS app or the Fancy Text Android app.
*•.¸,¤°´✿.。.:* Nօȶɛ: Fancy text may not be compatible with all devices, screen readers and translators. *•.¸,¤°´✿.。.:*
ᑕᒪᗩᔕᔕᖇOOᗰ ᑕOᑎᑎEᑕTIOᑎ:
Grab your students’ attention with information that ✤ ѕтαɴdѕ αpαrт ✤ from the rest by using the ᑕOOᒪ ᖴᗩᑎᑕY TE᙭T GEᑎEᖇᗩTOᖇ.
Melanie Fessler likes this
14 Nov 02:05

Podcast Playlist for Innovative Educators
by Lisa Nielsen
The learning never stops for Innovative educators. When you’re jogging, cleaning, driving, or out walking your dog, a podcast provides a great way to keep the learning going while you’re doing something else.
Here is my current podcast list.
The 10-minute teacher is a 5-day a week show for remarkable teachers from around the world who are very busy. Every weekday get inspired with quick interviews of important trends, topics, and tools impacting K12 teachers.
Host: Cool Cat Teacher’s Vicki A Davis’s


Big questions and provocative conclusions about technology and culture.
Host: The Atlantic’s Derek Thompson

EdTechAfterDark is more than just a discussion about education or technology. It's an idea. An idea that even when the sun goes down, our school communities never stop moving forward for our children.
Hosts: Ed Tech After Dark’s Dan Koch, Alex Stubenbort, Zac Leonard


Discover the hidden side of everything with each week as Freakonomics Radio tells you things you always thought you knew (but didn’t) and things you never thought you wanted to know (but do) — from the economics of sleep to how to become great at just about anything.
Expert interviews, real-world stories, and provocative insight in a fast-paced, interview-style podcast

The podcast is about learning with technology, the realities and exciting potential, but it’s also about youth and the practitioners who support them–youth developers, museum educators, teachers, mentors, counselors, parents–as they grow their identity, and journey forward.

The #NYCSchoolsTech Podcast amplifies the innovative practices of NYCSchoolsTech staff and inspires others in NYC and beyond.
These are podcasts that I listen to or have been recommended to me by #NYCSchoolsTech colleagues including Lori Stahl-Van Brackle, Clemencia Acevedo, SteveBorba, and Kim Landman.
Melanie Fessler likes this
14 Nov 01:38
What Makes a Great Presentation Topic For Your Next Faculty Meeting?
by Jeffrey Bradbury
Welcome to the TeacherCast Educational Network.
In this episode of “Ask the Tech Coach,” Jeff and Nick discuss how Tech Coaches can impress not just one teacher but an faculty by choosing and pulling off the perfect faculty meeting presentation.
The post What Makes a Great Presentation Topic For Your Next Faculty Meeting? appeared first on The TeacherCast Educational Network.
Melanie Fessler likes this
14 Nov 01:35
Celebrate Geography Awareness Week with Augmented Reality Scavenger Hunts
by Monica Burns
It’s here! This week is Geography Awareness Week, and I’m excited to share some tech-friendly ideas for exploring the world with your students. Augmented reality scavenger hunts can get your kids moving both inside and outside the classroom. With an AR creation tool like Metaverse, teachers and students can create scavenger hunts for Geography Awareness […]
The post Celebrate Geography Awareness Week with Augmented Reality Scavenger Hunts appeared first on Class Tech Tips.
Melanie Fessler likes this
14 Nov 01:27
How Augmented Reality with iPads is Changing the Classroom
by Mason Mason
How Augmented Reality with iPads is Changing the Classroom
Kids today have more resources at their fingertips than ever before. Raised in the digital era, most children have traded outside playtime for iPads and other mobile devices for communication and entertainment. Today’s students are the first to grow up amidst such aggressive advancements in mobile technology, and in order to be smart communicators, educators need to adapt to the latest tech trends. Over the years, tech in the classroom has been met with mixed views. Usually deemed as a distraction, cellphones were banned in a lot of schools, according to an article by The Atlantic. But even back then, eliminating tech wasn’t the solution. Now, it’s safe to say that teachers have learned to embrace educational technology in the name of progress. A previous post here on Teaching With iPad sheds light on the unique ways you can use iPad devices creatively in the classroom, one of which is via augmented reality (AR). In light of recent advancements, teachers are finding ways use AR in the classroom. Students are already using AR-powered apps like Pokémon Go or Snapchat for entertainment, which means that the challenge, then, is to help them learn using this technology. Here are some notable apps to check out for learning.
Cost-effectiveness
Image credit: Real Estate Magazine Canada Instead of spending thousands on heavy textbooks for each student, iPads provide a more cost-effective solution. The device is able to deliver interactive content that can be used in the classroom or at home. It is also more portable, making it easier for students to carry and more cost-effective in the long run. Even print materials can come to life on an iPad screen with Layar. This app can scan magazines, newspapers, and other materials, and turn them into rich digital experiences. Visual learning
Image credit: Technabob It is a known fact that different students have different styles of learning that call for personalized methods of teaching. Very Well Family states that students with visual-spatial intelligence learn best when taught using written, modelled, or diagrammed instructions and visual media. These students are less inclined towards auditory-sequential teaching methods such as lectures, recitations, drills, and repetition. AR allows visual learners to grasp concepts better than when delivered by a teacher in class lectures. For chemistry students, Elements 4D puts a face on all the compounds and concepts. The app shows dynamic 4D representations of elements and chemical equations. Students can even combine elements to see the reaction as it occurs in nature.
Image credit: Curiscope According to Forbes, Virtuali-Tee presents a cool new way to learn about human anatomy. By pointing a device at different parts of a student’s t-shirt that represents the human body, Virtuali-Tee (app link) breaks down human physiology and anatomy for easier learning. Transporting Students Places AR has the power to take students to places a school bus cannot. Blippar (iTunes link), for example, puts learners right at the center of the solar system as planets orbit around them. Learners have the option to select which planet they’d like to discover more through a single tap.
Image credit: Blippar To travel back in history, kids can use Dino Park AR+ (iTunes link), which builds a virtual prehistoric world around their surroundings. Watch in awe as dinosaurs can be seen moving around the classroom.
Image credit: Apple World Today Making learning more fun It can sometimes be a challenge to make kids interested in mentally taxing topics like math or science. Often, they have to resort to memory, which has long been proven ineffective in retaining knowledge. Thankfully, AR can make the process worth remembering since it offers more immersive experiences.
Image credit: iTunes Those learning English can practice their language chops with Our Discovery Island: Phonic Trickers (iTunes link). The game follows a group of “Tricksters” who escaped from Our Discovery Islands and are stealing letters from the English Bank of Phonemes. Players must chase these phonic Tricksters to “save the English language,” while improving their understanding of phonics along the way.
Image credit: Fete! Lunch Rush Fete! Lunch Rush, on the other hand, is geared towards students looking to brush up on their math skills. The premise is simple: players must keep up with lunch orders by answering basic math problems and thinking on their feet. Feature post especially for teachingwithipad.org |


Melanie Fessler likes this
26 Oct 14:26
5 Ways for Teachers to Take Back Time and Make the Most of It
by Vicki Davis
Episode 380 of the 10-Minute Teacher Podcast
From the Cool Cat Teacher Blog by Vicki Davis
Follow @coolcatteacher on Twitter
Sarah Johnson is a leader who is passionate about stemming burnout through sharing the balance message for fellow educators, elevating women in leadership, and inspiring others with faith-filled leadership. She has been a teacher for grades 6-12, a principal for 4k-12, and is currently leading on a broader scale through consulting, coaching, and speaking. She believes leadership is a calling and is proud to answer every day! We talk about her productivity tips from Balance Like a Pirate.

Advancement Courses has more than 200 graduate level online professional development courses for K-12 teachers. You can take these courses for continuing education, salary advancement, or recertification. They are practical courses that have teachers developing tangible resources to use in their classrooms immediately. Go to advancementcourses.com/coolcat and use the code COOL20 at checkout to get 20% off any course. With this coupon, a 3 grad credit course is only $359.
Listen to the Show
- Listen to the show on iTunes or Stitcher
- Stream by clicking here.
Bio of Sarah Johnson
 Sarah Johnson is a leader who is passionate about stemming burnout through sharing the balance message for fellow educators, elevating women in leadership, and inspiring others with faith-filled leadership. She has been a teacher for grades 6-12, a principal for 4k-12, and is currently leading on a broader scale through consulting, coaching, and speaking. She believes leadership is a calling and is proud to answer every day!
Blog: https://sarahsajohnson.com/
Twitter: @SarahSajohnson
Disclosure of Material Connection: This is a “sponsored post.” The company who sponsored it compensated me via cash payment, gift, or something else of value to edit and post it. Regardless, I only recommend products or services I believe will be good for my readers and are from companies I can recommend. I am disclosing this in accordance with the Federal Trade Commission’s 16 CFR, Part 255: “Guides Concerning the Use of Endorsements and Testimonials in Advertising.”)
The post 5 Ways for Teachers to Take Back Time and Make the Most of It appeared first on Cool Cat Teacher Blog by Vicki Davis @coolcatteacher helping educators be excellent every day. Meow!
18 Oct 12:53
 This week Microsoft unveiled a slew of new accessibility options for the services that teachers and students use most. One of those features is the inclusion of Immersive Reader in Flipgrid.
Immersive Reader is a free service that students can use to have text read aloud to them. Immersive Reader not only reads aloud it will also highlight parts of speech and individual syllables within every word on a page. What this means in the context of Flipgrid is that students who need assistance accessing directions or discussion prompts can now use Immersive Reader to hear those directions and prompts read aloud.
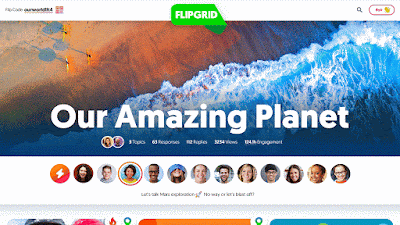
Office Lens is another Microsoft product that now includes Immersive Reader. This free app (available for Android and iOS) will now let you take a picture of text and have that text read aloud through the use of Immersive Reader.
More implementations of Immersive Reader as scheduled for later this fall. Those implementations include real-time translation and the math pane in OneNote. Read more about those features in Microsoft's announcement of the expansion of Immersive Reader implementation.
This post originally appeared on Free Technology for Teachers if you see it elsewhere, it has been used without permission.
New Accessibility Options in Flipgrid and Other Microsoft Products
by noreply@blogger.com (Richard Byrne)

Immersive Reader is a free service that students can use to have text read aloud to them. Immersive Reader not only reads aloud it will also highlight parts of speech and individual syllables within every word on a page. What this means in the context of Flipgrid is that students who need assistance accessing directions or discussion prompts can now use Immersive Reader to hear those directions and prompts read aloud.

Office Lens is another Microsoft product that now includes Immersive Reader. This free app (available for Android and iOS) will now let you take a picture of text and have that text read aloud through the use of Immersive Reader.
More implementations of Immersive Reader as scheduled for later this fall. Those implementations include real-time translation and the math pane in OneNote. Read more about those features in Microsoft's announcement of the expansion of Immersive Reader implementation.
This post originally appeared on Free Technology for Teachers if you see it elsewhere, it has been used without permission.
10 Oct 02:11
Engaging Learners with Video
by Steve Wick
Video in the classroom is not a new thing, but it is evolving as an essential resource for all learners. If you were born before 1980 you've probably experienced at least one classroom documentary on a film strip with an awesome and noisy Film Strip Projector. I know I was always excited to see the film projector and reels in the room, but when I reflect on my these learning experiences I realize that most of these documentaries did very little to engage me as a learner.

Video in the classroom has evolved. Today, classroom video is all about engagement and critical thinking. Students and teachers are creating content and actively engaging in videos using a variety of strategies and tools. Video has become a great medium for Creative Student Voice. I was inspired to dive deeper into my exploration of video in the classroom after exploring some of Common Sense Education's Video in the Classroom Resources.
I have also been looking to incorporate the ISTE standards as part of my teaching and learning foundations. There are some direct connections to video in some of the ISTE Standards.
ISTE Standards for Students - Creative Communicator
Students communicate clearly and express themselves creatively for a variety of purposes using the platforms, tools, styles, formats and digital media appropriate to their goals.ISTE Standards for Students - Knowledge Constructor
Students curate information from digital resources using a variety of tools and methods to create collections of artifacts that demonstrate meaningful connections or conclusions.ISTE Standards for Educators - Learner
Set professional learning goals to explore and apply pedagogical approaches made possible by technology and reflect on their effectiveness.
ISTE Standards for Educators - Designer
Use technology to create, adapt and personalize learning experiences that foster independent learning and accommodate learner differences and needs.
Learn More: ISTE
When I think about using video to engage students I usually start by considering one of two categories: Creation and Exploration. Students and educators can create videos as part of the learning process. Exploring videos connected to concepts and skills can serve as a lesson hook, part of the body of a lesson, or as a way to reinforce or review key concepts. Mixing videos in with text and images are also great ways to differentiate the learning experience.
Favorite Video Creation Resources
- Adobe Spark Video - Create photo stories with voice-overs and music
- Flipgrid - Video discussion platform
- Recap - Video discussion platform
- Screencastify - Screen recorder extension for Chrome
- WeVideo - Full featured video creation, editing, and screen-casting resource
Favorite Video Exploration Resources
- ClassHook - Popular clips from TV shows and movies
- Edpuzzle - Interactive video engagement resource
- PlayPosit - Interactive video engagement resource
- TEDEd - Customized video lessons
- TED Talks - Collection of talks from expert speakers
- YouTube - Playlists and channels connected to anything and everything.
Learn More -Additional Resources
- Sal Khan TED Talk - Let's use video to reinvent education
- Wicked EdTech - Digital Resources to Support Creative Student Voice
- Edutopia - Student-Created Videos in the Classroom
- Wicked EdTech - Videos Connected to Teaching and Learning
- WickedEdTech - Collaborative Video HyperDocs
- Wicked EdTech - Save Time Watching Long YouTube Videos
05 Oct 19:54
 Over the last few weeks I have received a lot of emails from readers who had made virtual reality tours in Google's VR Tour Creator but then ran into difficulty sharing those tours with their students. To answer those questions I made the following video that demonstrates how you can share your VR tours with students.
Learn more about how to use Google's VR Tour Creator by watching this video that I made earlier this year.
Google's VR Tour Creator is one of the tools that I feature in depth in my Teaching History With Technology course.
This post originally appeared on Free Technology for Teachers if you see it elsewhere, it has been used without permission.
How to Share Your Google VR Tours With Students
by noreply@blogger.com (Richard Byrne)

Learn more about how to use Google's VR Tour Creator by watching this video that I made earlier this year.
Google's VR Tour Creator is one of the tools that I feature in depth in my Teaching History With Technology course.
This post originally appeared on Free Technology for Teachers if you see it elsewhere, it has been used without permission.
29 Sep 13:55
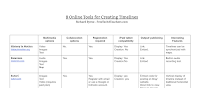 Creating timelines has been a go-to activity for history teachers since the beginning of history. When I made timelines as a student and in my first year or two of teaching, timelines were made on paper. Today, there are better ways to have students create timelines. In fact, in Teaching History With Technology I feature a couple of my favorite timeline tools for use in high school, middle school, and elementary school classrooms. In the chart embedded below I highlight the main features of eight free multimedia timeline creation tools.
Click here for a Google Docs copy of the chart.
A Timeline Game!
Play Your Dates Right is a templates that I like to use to create a game that is focused on helping students recall the sequence of historical events. In the video embedded below I demonstrate how to create a simple timeline-based game with the Play Your Dates Right template from ClassTools.net.
Learn more about these tools and other strategies for using technology in social studies classes in my upcoming course, Teaching History With Technology.
This post originally appeared on Free Technology for Teachers if you see it elsewhere, it has been used without permission.
8 Tools for Making Multimedia Timelines
by noreply@blogger.com (Richard Byrne)

Click here for a Google Docs copy of the chart.
A Timeline Game!
Play Your Dates Right is a templates that I like to use to create a game that is focused on helping students recall the sequence of historical events. In the video embedded below I demonstrate how to create a simple timeline-based game with the Play Your Dates Right template from ClassTools.net.
Learn more about these tools and other strategies for using technology in social studies classes in my upcoming course, Teaching History With Technology.
This post originally appeared on Free Technology for Teachers if you see it elsewhere, it has been used without permission.
29 Sep 13:55
5 Ways to Use Google Slides Besides Making Presentations
by noreply@blogger.com (Richard Byrne)
Google Slides has come a long way since the first time that I had students use it a decade ago. Many features have been added in that time. Many of those features make it possible to use Google Slides for more than just making slideshows. Here are five ways that you and your students can use Google Slides besides making presentations.
1. Create Comic Strips
2. Create Jeopardy-style games.
3. Create Choose-Your-Own Adventure Stories.
By using the same logic that is applied in making a Jeopardy-style game in Google Slides, students can create choose-your-own adventure stories. Have students publish the presentation to the web so that their classmates can interact with their stories.
4. Create and Printable Storyboards.
5. Make Certificates.
Open the template gallery at slides.google.com and you will find a template for making certificates. You can use those certificates as is (obviously altering names and descriptions) or customize the colors and font styles before downloading them as PDFs or printing them.
Learn more about how to use Google Slides by participating in my upcoming course, Getting Going With G Suite.
This post originally appeared on Free Technology for Teachers if you see it elsewhere, it has been used without permission.
Melanie Fessler likes this
17 Sep 16:49


Macau Pork Chop Sandwich à la Anthony Bourdain
by Jean Carnahan
Macau Pork Chop Sandwich. Photo: Cooked the Books
In Anthony Bourdain’s last cookbook “Appetites,” he featured a sandwich, that captured his heart when he was in Macau. His recipe is a loose interpretation of a street food he had in the southernmost part of China. Bourdain called it a Macau-style Pork Chop Sandwich and labeled it the best recipe in his book.
Macau Pork Sandwich as featured in Anthony Bourdain’s cookbook. Indeed, Boudain mastered the art of elevating the simple to the sublime. Photo: Cooked the Books
At first you think this recipe is far too simple to be all that good. But like peanut butter and jelly on bread, the sandwich exceeds the sum of its parts. It’s essentially a pork chop on either a piggy roll, as the Macanese call it, or a pineapple roll. But, if you’re willing to wink at convention, you can just flop the chop atop a bowl of greens or use sliced white bread, as Bourdain did.
The meat is crispy on the outside, juicy and flavorful inside. It gets that way because the pork is first marinated in a mixture of soy sauce, black vinegar, sesame oil, garlic, 5-spice powder and brown sugar. You might have to make a trip to the supermarket for some of those items, but I’m tellin’ you, it’s worth it.
The Bread Quest
I had so many questions about this Asian street food. I emailed my friend Alyson Dickerman, who spent much of her childhood in Macau. Back in the 80s, I visited the family, but I don’t recall having seen this street delicacy in what was a Portuguese colony until the China reclaimed it in 1999.
Pineapple rolls for Macau Pork Chop Sandwich have no pineapple only the pattern of the fruit on the bun.
Alyson couldn’t recall the chops either, though she did perk up at my mention of the piggy bun. She ate them as a kid with lots of butter, she recalled. She alerted me that Portuguese pineapple bread has no pineapple. The buns have the markings of a pineapple on the outside, a crispy crust and fluffy center. She also noted that Macanese food is something that everyone who claims foodie status needs to try. “Quite exquisite,” she said, and offered me some of her recipes.
The Search Continues
Next I called Wei Hong Chinese Bakery on Grand. They’d never heard of pineapple bread or even piggy bread. This was not a good sign. I was beginning to know why Bourdain suggested using white bread. Next, I called Global Foods, nada. But then I called Jay’s International. Bingo! They had pineapple bread! But only on Thursdays. By the time I got over to South Grand, they had 3 buns left. I grabbed ’em along with some 5-spice powder and headed for the farm.
Ah! Five Spice Powder. Just what I was looking for.
While at Jay’s Market, I came upon this unique, raspberry-colored Dragon Fruit. The interior is white with teeny, black edible seeds. I put them back. I didn’t want to try too many exotic things on my guest in one weekend.
Pork and Pears
Once I got the ingredients, making the pork sandwiches was a breeze. First, there was some pounding of the cutlets to flatten those little piglets before they wallowed in an egg and Panko-flour mixture. Then I fried the chops about 5 minutes on each side and nestled them between bread slices. You can add chili paste, if you want, but no need; purist keep it simple.
The marinated chop, breaded and fried was quite tasty. But I found the pineapple bread overly sweet and preferred the cutlet on sliced bread—like Bourdain suggested—but with a smear of mayo.
Sharing in my experimental sandwich this weekend were three total strangers. The British trio, exploring the Mississippi River region, were friends of a friend. They stopped briefly for lunch on their journey southward.
Our visitors arrived in time to help with the pear picking. Th old tree is loaded this year. They’re hard as a rock, but will soften over time. We sent our new friends on their journey with some pears for the road and probably a few ticks and chigger bites to remind them of their afternoon in the Ozark outdoors.
Yes, it was a beautiful weekend for pork . . . and pears . . . and the pleasure of breaking bread with new friends, even for a brief while.
Anthony Bourdain’s Macau-style Pork Chop Sandwich
Ingredients:
-

Ready for the skillet
4 boneless pork rib chops or cutlets (about 6 oz. each)
- ¼ cup soy sauce
- ¼ cup Chinese rice wine
- ¼ cup black vinegar
- 1 Tbs. sesame oil
- 4 garlic cloves, coarsely chopped
- 1 Tbs. five-spice powder
- 1 Tbs. dark brown sugar, packed
- 1 large egg
- ½ cup all-purpose flour
- 1½ cups panko bread crumbs Salt and freshly ground black pepper to taste
- 1 cups peanut oil, for frying, plus more as needed
- 8 slices white sandwich bread
- Chili paste, for garnish
Directions:
- Pound the pork to ¼ inch thickness.
- In a small mixing bowl, whisk together the soy sauce, rice wine, vinegar, sesame oil, garlic, five-spice powder and sugar. Place pork in a zip lock with the marinade, making sure everything is coated, seal and put in fridge for at least 1 hour and up to 12.
- Remove chops from marinade and brush off garlic. Beat the eggs in a bowl with a tablespoon of water and place flour and Panko in separate bowls. Season the flour with salt and pepper.
- Add the oil to a heavy-bottomed frying pan (I used my large cast iron) and heat over medium-high.
- Test the oil with a pinch of breadcrumbs and make sure they sizzle.
- One at a time, dip chops in flour—coating thoroughly, but shaking off excess—then into the egg, then into the Panko, pressing lightly to help it stick.
- Add the chops to the oil, cooking in batches if necessary. Cook about 5 minutes/side. Remove the chops and let drain on a lines sheet pan or paper towel. Season lightly with salt.
- Serve on lightly toasted bread with chili paste, if desired.


The post Macau Pork Chop Sandwich à la Anthony Bourdain appeared first on Good Food St. Louis.
Melanie Fessler likes this
10 Sep 17:28
Here today, gone tomorrow? This can be EdTech as many of us know it today. This can be good when we are able to move onto something better or it can be devastating when we've invested so much time into learning a tool does what we need it to do. This is why we believe that sound teaching pedagogy will always trump the power of any technology tool when we create a recipe for learning.
The best teaching and learning recipes start with ingredients connected to strong pedagogy concepts before adding in the technology ingredients.
Today, we try to always start supporting educators and students by asking "why" questions. Sometimes, when we don't know why we are doing something, we always have to ask why are we still doing it? Maybe we need to look at changing the recipe, before moving forward? Without a reason why we need technology, we rarely see technology have a solid impact on improving the teaching and learning experience.
It is important for any educator or group of educators to first explore how they might approach the instructional goals before adding technology to the plan. Once we have a pedagogical plan, we are ready to find the right technology that we can add to our teaching and learning recipe.
These two resources are great places to start exploring how we can create great learning experiences.
We also always try to emphasize that the best EdTech does not have the power to make a bad lesson great. EdTech can even make a good lesson worse. A strong teaching and learning plan must always come first or the power of instructional technology is to often wasted time.
Here are a few of the resources that might help EdTech and Instructional Coaches build their recipe cards to best support teachers and students.
Building an Instructional Coach Mindset
by Steve Wick
What are your must-have ingredients in a recipe for learning? Is it just about the technology and the content or is there something more?
The best teaching and learning recipes start with ingredients connected to strong pedagogy concepts before adding in the technology ingredients.
Today, we try to always start supporting educators and students by asking "why" questions. Sometimes, when we don't know why we are doing something, we always have to ask why are we still doing it? Maybe we need to look at changing the recipe, before moving forward? Without a reason why we need technology, we rarely see technology have a solid impact on improving the teaching and learning experience.
It is important for any educator or group of educators to first explore how they might approach the instructional goals before adding technology to the plan. Once we have a pedagogical plan, we are ready to find the right technology that we can add to our teaching and learning recipe.
These two resources are great places to start exploring how we can create great learning experiences.
What Are Your Teaching Fundamentals? (Edutopia Article)
I hate wasting time!
Here are a few of the resources that might help EdTech and Instructional Coaches build their recipe cards to best support teachers and students.
- The ISTE Standards for Educators might be a great starting point to help teachers focus on essential skills that can be supported with EdTech.
- The ISTE Standards for Coaches is a great place to start building your coaching mindset.
- The ISTE Standards for Students can help planning from the student perspective.
- The 7 Habits of Highly Effective Teachers Who Use Technology is another resource to explore EdTech in the classroom.
- If you are a Google district I would consider using the Google Training Courses as part of the course plan. These are well put together and focus on skills before the tools.
Here are a few additional resources that can support an Instructional Coaching Mindset.
- Skills Connected to the 4 Cs (Collaboration, Communication, Critical Thinking, Creativity.)
- Teaching and Learning Book Recommendations (Great educational books organized by topics.)
- Student-Centered Learning (Less us, more them!)
- Formative Assessment (Quick formative tools are a great way to hook educators)
- Coaching Pedagogy (10 Tips for Instructional Coaches)
- Leadership (Resources to support teachers as leaders)
- 10 Great Hashtags Educators Should Be Exploring
- Innovative Educational Organizations to Follow on Twitter
- 25 Innovative Educators to Follow on Twitter
What courses/concepts/skills/resources do you think are essential for an Instructional Coach's Mindset?
Melanie Fessler likes this
10 Sep 17:24
 In a post earlier today I shared an explanation of the Mystery Skype game and some places to find partners to play the game. But if you're not sure how to get started, Microsoft offers a detailed overview in the form of Become a Mystery Skype Master.
Become a Mystery Skype Master is a nine part course that walks you through almost everything you need to know to conduct Mystery Skype activities. The only thing it doesn't teach you is how to install Skype. (There are lots of YouTube videos about how to do that). The course includes ideas for variations on the "traditional" Mystery Skype activity, how to use Mystery Skype if students speak different languages, and how to find Mystery Skype partners. In the course you will also find some practical classroom management tips for making your Mystery Skype activities run smoothly. You can watch the following video to learn those tips.
This post originally appeared on Free Technology for Teachers if you see it elsewhere, it has been used without permission.
How to Become a Mystery Skype Master!
by noreply@blogger.com (Richard Byrne)

Become a Mystery Skype Master is a nine part course that walks you through almost everything you need to know to conduct Mystery Skype activities. The only thing it doesn't teach you is how to install Skype. (There are lots of YouTube videos about how to do that). The course includes ideas for variations on the "traditional" Mystery Skype activity, how to use Mystery Skype if students speak different languages, and how to find Mystery Skype partners. In the course you will also find some practical classroom management tips for making your Mystery Skype activities run smoothly. You can watch the following video to learn those tips.
This post originally appeared on Free Technology for Teachers if you see it elsewhere, it has been used without permission.
29 Aug 13:15
Student-Driven Hyperdocs
by Vicki Davis
Katie Bradford and Brett Miller in Episode 348 of the 10-minute Teacher Podcast
From the Cool Cat Teacher Blog by Vicki Davis
Follow @coolcatteacher on Twitter
Kate Bradford and Brett Miller share their secrets for student-driven Hyperdocs. Taken from their popular ISTE 2018 session, learn about the next evolution of Hyperdocs and how they’re being used in the classroom.

Sponsor: Read my review of the Acer Windows Mixed Reality Headset at www.coolcatteacher.com/vr and learn how to enter to win a STEAM Lab Makeover from Acer and Microsoft, who are giving away 10 Acer Windows Mixed Reality Headsets and 10 Acer Aspire 7 laptops. Learn how at coolcatteacher.com/vr, and see the virtual reality video I shot using my Acer Windows Mixed Reality Headset.
Listen to the Show
![]()
- Listen to the show on iTunes or Stitcher
- Stream by clicking here.
Bio as Submitted
 See their presentation: https://docs.google.com/document/d/1DLvDIxwmXJOZRG9RA4r4OcOxBFARXJ_vJgIVv2KOe5g/edit?usp=sharing
Katie Bradford
Katie @MrsKBradford is a former middle school Language Arts teacher and Project-Based Learning facilitator with a passion for transformative learning experiences! Currently, she is an Innovative Learning Specialist for Five-Star Technology Solutions and a Google Certified Trainer spreading love for #EdTech that empowers students to think critically and follow their passion!
Brett Miller
I  am Brett, @bmiller_fsts an Innovative Learning Specialist for Five-Star Technology in Southern Indiana. First-year e-learning coach for South Ripley Community Schools. Before coaching, I was a 6th-grade teacher who was passionate about creating AWESOME learning experiences for kids.
In my personal life, I am married to an inspiring educator. She is my better half, and constantly challenges me to grow!
Website: www.techcoachnotebook.com
Other Related Articles:
- Hyperdocs: How to’s and Tips for Teachers
- Hyperdocs Literacy Task Boards and Flipgrid Reading Circles
Disclosure of Material Connection: This is a “sponsored podcast episode.” The company who sponsored it compensated me via cash payment, gift, or something else of value to include a reference to their product. Regardless, I only recommend products or services I believe will be good for my readers and are from companies I can recommend. I am disclosing this in accordance with the Federal Trade Commission’s 16 CFR, Part 255: “Guides Concerning the Use of Endorsements and Testimonials in Advertising.”
The post Student-Driven Hyperdocs appeared first on Cool Cat Teacher Blog by Vicki Davis @coolcatteacher helping educators be excellent every day. Meow!
28 Aug 01:07
5 ways to use Adobe Spark Video in your classroom
by DitchThatTxtbk
Video is a powerful medium for storytelling. And creating videos has never been so simple. You and your students can easily put a story together on your mobile phone, laptop, PC, or Chromebook. How? With Adobe Spark Video, you and your students can create compelling videos in just a few minutes using professional looking themes […]
28 Aug 01:03
Tips on What to Include in Digital Portfolios
by noreply@blogger.com (Richard Byrne)
During the course of the school year our students will create some fantastic digital artifacts. Building a digital portfolio is a greatway for students to organize those artifacts to share with you and to share with their parents. If you're considering having your students create digital portfolios this year, but you're not sure what to have them include in their portfolios, consider the advice that Carl Sjogreen shared with me in this interview last fall. Carl is one of the founders of the popular digital portfolio service, SeeSaw.
On a related note, SeeSaw has added new activities collections for the new school year. Watch this video to learn more about SeeSaw's activities library.
This post originally appeared on Free Technology for Teachers if you see it elsewhere, it has been used without permission.

On a related note, SeeSaw has added new activities collections for the new school year. Watch this video to learn more about SeeSaw's activities library.
This post originally appeared on Free Technology for Teachers if you see it elsewhere, it has been used without permission.