Shared posts

14 Aug 21:31

Instructional Tech Coach Tips: Staying Organized While Working In Multiple School Buildings

by Jeffrey Bradbury

In this episode of “Ask the Tech Coach,” we take a look at how to stay digitally organized while being a Technology Coach in multiple school buildings.

The post Instructional Tech Coach Tips: Staying Organized While Working In Multiple School Buildings appeared first on The TeacherCast Educational Network.

13 Aug 01:56

9 Updates for Google Classroom (and 3 more to come)

by Eric
When Google Classroom launched in 2014 it was immediately a valuable tool to save educators time and increase connection with students. Since then Google has continued to make updates to Classroom, bringing new features and improvements.

Google has been very busy over the summer for the start of the new 2018 school year. Classroom has received nine updates, and has three more to come in the near future. In this blog post we will take a look at each of these updates, how they work, and what impact they will have on teaching and learning.


Update #1 - New Classwork Page

One of the most noticeable changes to Classroom is the addition of a new tab for a "Classwork" page. In the past your Assignments and Questions were part of the Stream, along with the Announcements for the class. Although it was convenient to have everything in one place, it also could become very messy and confusing once a lot of content was posted.

To help clean this up, the Assignments and Questions have been moved to the new Classwork page.


For even more organization you can use Topics to group your Assignments and Questions, and can move each item up and down to put everything in exactly the order you want. This is a helpful change from the chronological order of the Stream, and looks much more like a traditional learning management system with course content arranged by units.


Update #2 - Streamlined Stream Page

The Stream page has always existed as part of Classroom, but as mentioned above, it could get crowded with Announcements, Assignments, and Questions all in one place.

With the new updates, the Stream now only contains teacher Announcements, student Posts (if enabled), and any replies to these. Basically it is now a discussion stream. The Assignments and Questions have been moved to the Classwork page.


It is important to note though, a couple of other features have been removed from the Stream. To help organize the Stream in the past, you had the option to add a Topic to an announcement for filtering purposes, as well as the option to move a post to the top of the Stream for better visibility.

Now that Assignments and Questions have been moved to the Classwork page, the Stream no longer has Topics or the "Move to top" option. Posts in the Stream will simply appear in chronological order with the newest at the top.


Update #3 - New People Page

In the past you would manage students and guardians on the "Students" page, and co-teachers on the "About" page. This has all been consolidated on the "People" page now.

From the People page you can invite co-teachers, students, and guardians. You can also manage these users in several ways including:

  • Students - Email, Remove, Mute
  • Teachers - Email, Remove, Make Class Owner


Update #4 - New Settings Page

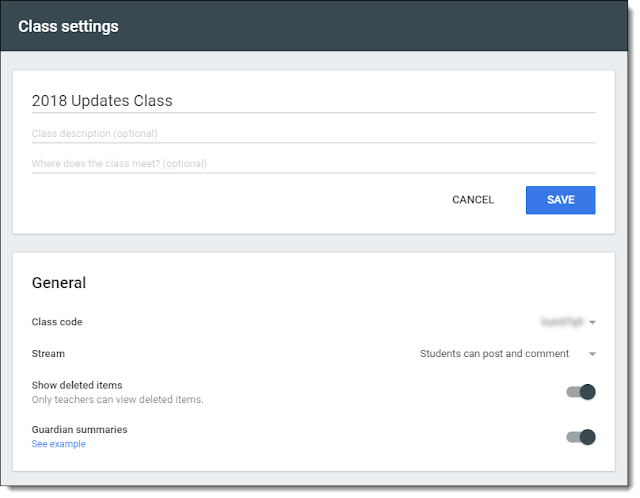
Settings for each class have now been pulled together in one central location, rather than being scattered around on different screens as before. To get to the new Settings page, simply click the gear icon in the top right corner of the class.

On the new Settings page you will find the following options:

  • Class Details - Click on the pencil icon next to the class title to edit the title, class description, and location where the class meets
  • Class code - To give to your students so they can self-enroll in your class
  • Stream - Permissions for what students are allowed to do on the Stream page, such as posting, commenting, or nothing
  • Show deleted items - Control whether teachers can see items that have been deleted, which can be helpful to deal with inappropriate student posts or comments
  • Guardian summaries - Option to include information from this class in the email summaries sent out to parents who have signed up for guardian notifications


Update #5 - Deprecated About Page

Although several new things have been added to Classroom, some things have gone away as well. One of these is the About page. In the past the About page contained several resources that have been moved elsewhere now:

  • The class title, description, and location can now be edited on the Settings page.
  • The option to add co-teachers in now on the People page.
  • The links to access the class calendar and Drive folder are now on the Classwork page.

The one big thing missing however is the ability to add class resources. The About page was a nice location to provide easy access to common websites, a syllabus, style guides, and other reference materials for students.

Note: For suggestions on how to add class materials with the "About" page see my other recent post - What to do About the Missing "About" Page in Google Classroom?

If you previously added such content to the About page, it is still visible through the "About" link on the Stream page, but is no longer editable. Thankfully this change will be addressed in an update coming soon, which is covered further down in this post.


Update #6 - Quick Switch when Grading

One of the most useful updates to Classroom is an improvement to accessing and grading student work. In the past you could access all of the turned in work from your students in one place, but you still needed to open each document separately. Now Classroom allows you to quickly and easily switch from one student document to the next.

  • First, simply begin by opening a student document as normal from the assignment page in Classroom.
  • You will notice that the student file will open in a special new window with two extra panels.
  • At the top will be a panel where you can easily rotate through each of your students using either the left and right arrows, or using the drop-down student name menu.
  • On the right side will be another panel that will list all of the files the student has submitted for that assignment. If the student has more than one file you can just click through the list to open each one.


This new feature will save teachers so much time, no longer having to open each student submission separately and having to manage multiple open tabs.


Update #7 - Feedback Options when Grading

In addition to being able to easily switch between student documents, the new Classroom grading view also provides you with several convenient ways to provide feedback to students.

  • First you can enter a grade directly in the right-hand panel instead of having to go back to the assignment page.
  • Second, below the grade there is a spot to send the student a private comment. Again this is much more convenient while grading the file than having to find this option back on the assignment page.
  • Third, and completely new, is the option to maintain and use a comment bank on the grading screen.

To use this new feature:

  • Click the "Comment bank" link at the top of the right-hand panel.
  • This will open up your comment bank.
  • You can add new content by clicking "Add to comment bank".
  • You can even type in or paste in multiple comments at once by having a line break after each one.
  • To use these comments you can simply open the comment bank and then copy and paste the desired text into a normal marginal comment in the student document.
  • If you have lots of comments, you can use the search button in the comment bank to narrow it down to the entries you are looking for.


Update #8 - Copy a Class

Of all the updates, this one may likely save you the most time of any. We have always had the ability to reuse an old Assignment or Question. This was a convenient way to copy an assignment we did the year before without having to recreate everything. As nice as this was, it only worked for one post at a time.

Now Classroom gives you to option to copy an entire class all at once!

  • Go to the homepage for Google Classroom.
  • Locate the class you wish to copy and click the "three-dots" button in the top right corner of the class tile.
  • Choose "Copy" from the drop-down menu.
  • You can now edit the name, section, and subject for your new class.
  • You will now have a copy of the class.

What gets copied in this process are the Topics, Assignments, and Questions on the Classwork page.
However all of the items are set to "Draft" so you can publish them to your students one by one as needed.
Note: Posts from the Stream are not copied.


This feature will be incredibly helpful for a teacher who wants to reuse all of the content from a previous year in a new class for this year. This will also be helpful for people using Google Classroom as an LMS. Someone could create a master course in Classroom, then anyone added as a co-teacher could make a copy of the master course to use with their students.


Update #9 - Disable Notifications for an Entire Class

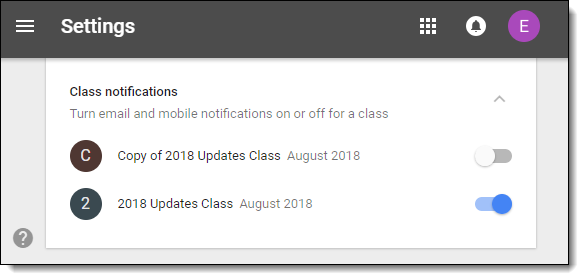
The final new option is the ability to turn off all notifications for an entire class all at once. Previously you could turn off certain types of notifications, and still can, but now you can disable all of them for a class. This may be especially helpful for someone who is a co-teacher for a class, but does not want to be receiving notifications.

  • First click the menu button in the top left corner of Classroom.
  • Scroll down and choose "Settings".
  • At the bottom of the "Notifications" section you will find the "Class notifications" option.
  • Click on that option to get a list of all your classes.
  • You can now turn notifications on or off for any class in the list.


Coming Soon

In addition to the nine updates that have already rolled out for this school year, Google has shared about three more that will be coming soon.

1) Add Materials to the Classwork Page

Now that the "About" page is being phased out, teachers need a place to post class resources. Soon we will be able to do this on the Classwork page.

In addition to the Assignments and Questions there, you will be able to add materials including a class syllabus, common websites, class policy documents, and more. This change makes Classroom much more like an LMS with the ability to add and structure all of the content for a course in one place.

Note: Until this update rolls out, for suggestions on how to add class materials with the "About" page see my other recent post - What to do About the Missing "About" Page in Google Classroom?

2) Create Classwork Page for Old Classes

Classes that were created before these updates do not have a Classwork page. Instead the Assignments and Questions are still in the Stream like before. Soon you will have the ability to convert older classes to the new format with their own Classwork page.

3) Create Forms Quizzes from Classroom

It is already easy to add a Google Form Quiz to Classroom as an Assignment. However, we are being told that soon you will have the ability to create a new Google Form Quiz from scratch right inside of Classroom for even more convenience.


Conclusion

For more details and to keep an eye open for additional updates, be sure to check out Google's "Back to School 2018 FAQ" page.


Post by Eric Curts. Bring me to your school, organization, or conference with over 50 PD sessions to choose from. Connect with me on Twitter at twitter.com/ericcurts and on Google+ at plus.google.com/+EricCurts1
09 Aug 00:09

A Step-by-Step Plan for Teaching Narrative Writing

by Jennifer Gonzalez


Listen to this post as a podcast:

Sponsored by Peergrade and Microsoft Class Notebook


This post contains Amazon Affiliate links. When you make a purchase through these links, Cult of Pedagogy gets a small percentage of the sale at no extra cost to you.


“Those who tell the stories rule the world.” This proverb, attributed to the Hopi Indians, is one I wish I’d known a long time ago, because I would have used it when teaching my students the craft of storytelling. With a well-told story we can help a person see things in an entirely new way. We can forge new relationships and strengthen the ones we already have. We can change a law, inspire a movement, make people care fiercely about things they’d never given a passing thought.

But when we study storytelling with our students, we forget all that. Or at least I did. When my students asked why we read novels and stories, and why we wrote personal narratives and fiction, my defense was pretty lame: I probably said something about the importance of having a shared body of knowledge, or about the enjoyment of losing yourself in a book, or about the benefits of having writing skills in general.

I forgot to talk about the power of story. I didn’t bother to tell them that the ability to tell a captivating story is one of the things that makes human beings extraordinary. It’s how we connect to each other. It’s something to celebrate, to study, to perfect. If we’re going to talk about how to teach students to write stories, we should start by thinking about why we tell stories at all. If we can pass that on to our students, then we will be going beyond a school assignment; we will be doing something transcendent.

Now. How do we get them to write those stories? I’m going to share the process I used for teaching narrative writing. I used this process with middle school students, but it would work with most age groups.

A Note About Form: Personal Narrative or Short Story?

When teaching narrative writing, many teachers separate personal narratives from short stories. In my own classroom, I tended to avoid having my students write short stories because personal narratives were more accessible. I could usually get students to write about something that really happened, while it was more challenging to get them to make something up from scratch.

In the “real” world of writers, though, the main thing that separates memoir from fiction is labeling: A writer might base a novel heavily on personal experiences, but write it all in third person and change the names of characters to protect the identities of people in real life. Another writer might create a short story in first person that reads like a personal narrative, but is entirely fictional. Just last weekend my husband and I watched the movie Lion and were glued to the screen the whole time, knowing it was based on a true story. James Frey’s book A Million Little Pieces sold millions of copies as a memoir but was later found to contain more than a little bit of fiction. Then there are unique books like Curtis Sittenfeld’s brilliant novel American Wife, based heavily on the early life of Laura Bush but written in first person, with fictional names and settings, and labeled as a work of fiction. The line between fact and fiction has always been really, really blurry, but the common thread running through all of it is good storytelling.

With that in mind, the process for teaching narrative writing can be exactly the same for writing personal narratives or short stories; it’s the same skill set. So if you think your students can handle the freedom, you might decide to let them choose personal narrative or fiction for a narrative writing assignment, or simply tell them that whether the story is true doesn’t matter, as long as they are telling a good one.

Here are some examples of what that kind of flexibility could allow:

  • A student might tell a true story from their own experience, but write it as if it were a fiction piece, with fictional characters, in third person.
  • A student might create a completely fictional story, but tell it in first person, which would give it the same feel as a personal narrative.
  • A student might tell a true story that happened to someone else, but write it in first person, as if they were that person. For example, I could write about my grandmother’s experience of getting lost as a child, but I might write it in her voice.

If we aren’t too restrictive about what we call these pieces, and we talk about different possibilities with our students, we can end up with lots of interesting outcomes. Meanwhile, we’re still teaching students the craft of narrative writing.

A Note About Process: Write With Your Students

One of the most powerful techniques I used as a writing teacher was to do my students’ writing assignments with them. I would start my own draft at the same time as they did, composing “live” on the classroom projector, and doing a lot of thinking out loud so they could see all the decisions a writer has to make.

The most helpful parts for them to observe were the early drafting stage, where I just scratched out whatever came to me in messy, run-on sentences, and the revision stage, where I crossed things out, rearranged, and made tons of notes on my writing. I have seen over and over again how witnessing that process can really help to unlock a student’s understanding of how writing actually gets made.

A Narrative Writing Unit Plan

Before I get into these steps, I should note that there is no one right way to teach narrative writing, and plenty of accomplished teachers are doing it differently and getting great results. This just happens to be a process that has worked for me.

Step 1: Show Students That Stories Are Everywhere

Getting our students to tell stories should be easy. They hear and tell stories all the time. But when they actually have to put words on paper, they forget their storytelling abilities: They can’t think of a topic. They omit relevant details, but go on and on about irrelevant ones. Their dialogue is bland. They can’t figure out how to start. They can’t figure out how to end.

So the first step in getting good narrative writing from students is to help them see that they are already telling stories every day. They gather at lockers to talk about that thing that happened over the weekend. They sit at lunch and describe an argument they had with a sibling. Without even thinking about it, they begin sentences with “This one time…” and launch into stories about their earlier childhood experiences. Students are natural storytellers; learning how to do it well on paper is simply a matter of studying good models, then imitating what those writers do.

So start off the unit by getting students to tell their stories. In journal quick-writes, think-pair-shares, or by playing a game like Concentric Circles, prompt them to tell some of their own brief stories: A time they were embarrassed. A time they lost something. A time they didn’t get to do something they really wanted to do. By telling their own short anecdotes, they will grow more comfortable and confident in their storytelling abilities. They will also be generating a list of topic ideas. And by listening to the stories of their classmates, they will be adding onto that list and remembering more of their own stories.

And remember to tell some of your own. Besides being a good way to bond with students, sharing your stories will help them see more possibilities for the ones they can tell.

Step 2: Study the Structure of a Story

Now that students have a good library of their own personal stories pulled into short-term memory, shift your focus to a more formal study of what a story looks like.

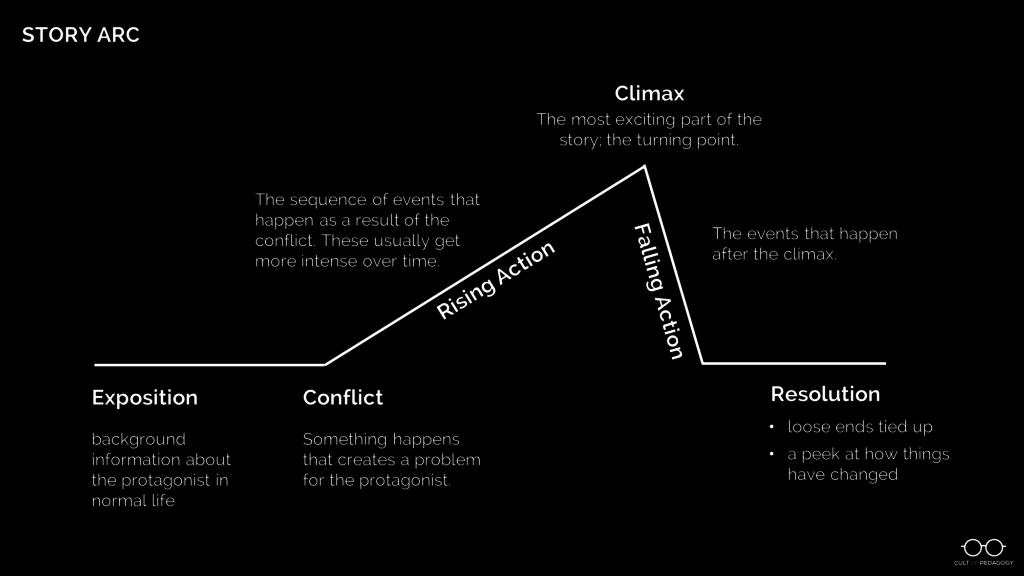
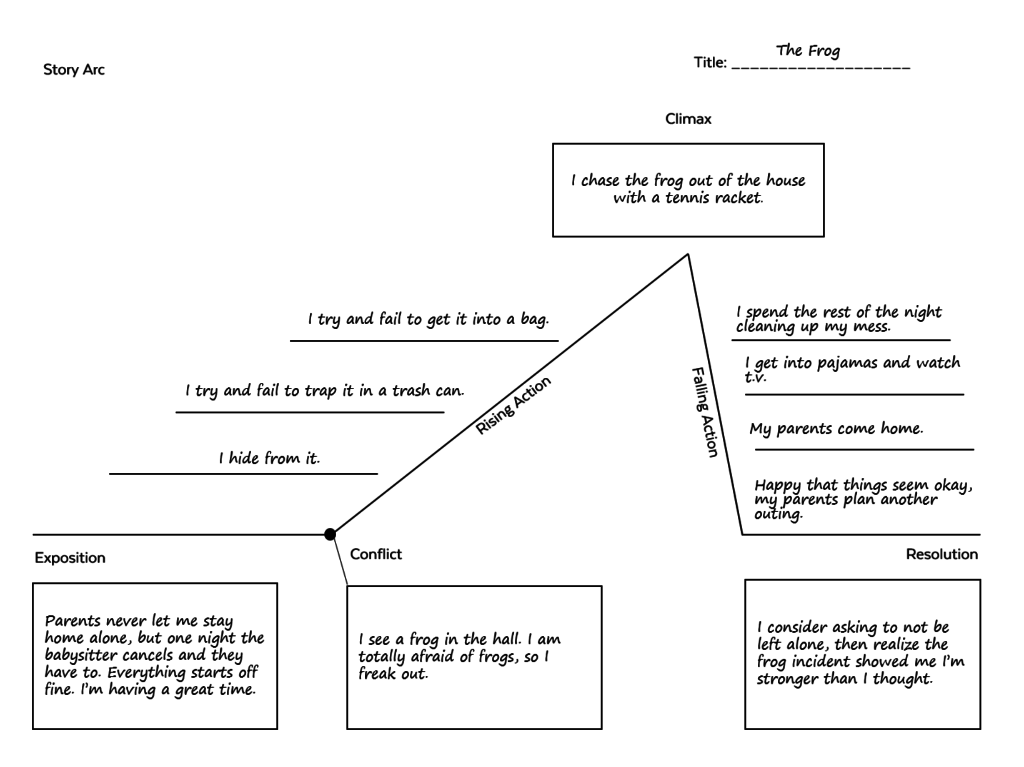
Use a diagram to show students a typical story arc like the one below. Then, using a simple story—like this Coca Cola commercial—fill out the story arc with the components from that story. Once students have seen this story mapped out, have them try it with another one, like a story you’ve read in class, a whole novel, or another short video.

Step 3: Introduce the Assignment

Up to this point, students have been immersed in storytelling. Now give them specific instructions for what they are going to do. Share your assignment rubric so they understand the criteria that will be used to evaluate them; it should be ready and transparent right from the beginning of the unit. As always, I recommend using a single point rubric for this.

Step 4: Read Models

Once the parameters of the assignment have been explained, have students read at least one model story, a mentor text that exemplifies the qualities you’re looking for. This should be a story on a topic your students can kind of relate to, something they could see themselves writing. For my narrative writing unit (see the end of this post), I wrote a story called “Frog” about a 13-year-old girl who finally gets to stay home alone, then finds a frog in her house and gets completely freaked out, which basically ruins the fun she was planning for the night.

They will be reading this model as writers, looking at how the author shaped the text for a purpose, so that they can use those same strategies in their own writing. Have them look at your rubric and find places in the model that illustrate the qualities listed in the rubric. Then have them complete a story arc for the model so they can see the underlying structure.

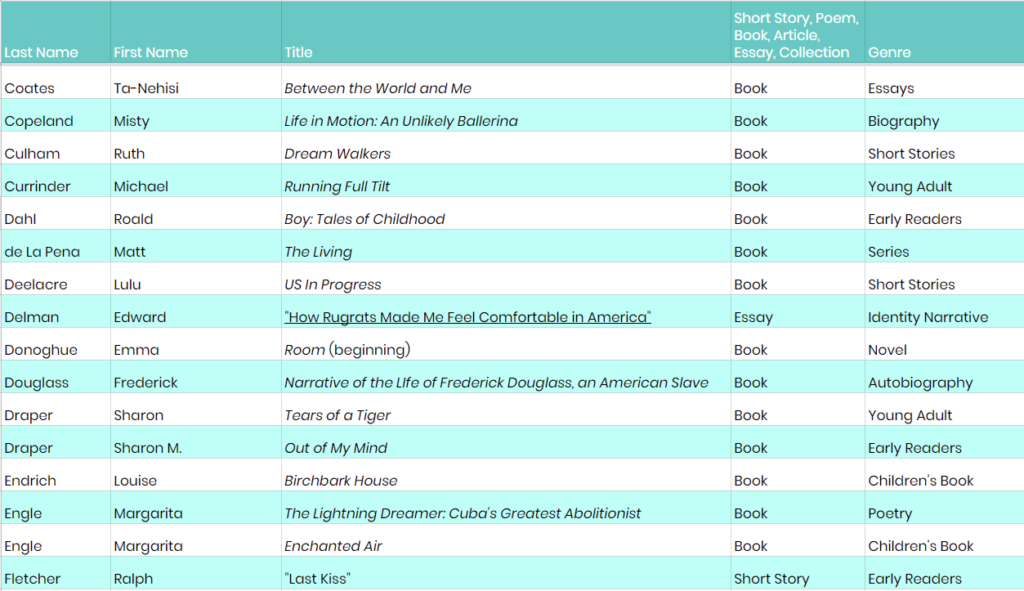
Ideally, your students will have already read lots of different stories to look to as models. If that isn’t the case, this list of narrative texts recommended by Cult of Pedagogy followers on Twitter would be a good place to browse for titles that might be right for your students. Keep in mind that we have not read most of these stories, so be sure to read them first before adopting them for classroom use.

Click the image above to view the full list of narrative texts recommended by Cult of Pedagogy followers on Twitter. If you have a suggestion for the list, please email us through our contact page.

Step 5: Story Mapping

At this point, students will need to decide what they are going to write about. If they are stuck for a topic, have them just pick something they can write about, even if it’s not the most captivating story in the world. A skilled writer could tell a great story about deciding what to have for lunch. If they are using the skills of narrative writing, the topic isn’t as important as the execution.

Have students complete a basic story arc for their chosen topic using a diagram like the one below. This will help them make sure that they actually have a story to tell, with an identifiable problem, a sequence of events that build to a climax, and some kind of resolution, where something is different by the end. Again, if you are writing with your students, this would be an important step to model for them with your own story-in-progress.

Step 6: Quick Drafts

Now, have students get their chosen story down on paper as quickly as possible: This could be basically a long paragraph that would read almost like a summary, but it would contain all the major parts of the story. Model this step with your own story, so they can see that you are not shooting for perfection in any way. What you want is a working draft, a starting point, something to build on for later, rather than a blank page (or screen) to stare at.

Step 7: Plan the Pacing

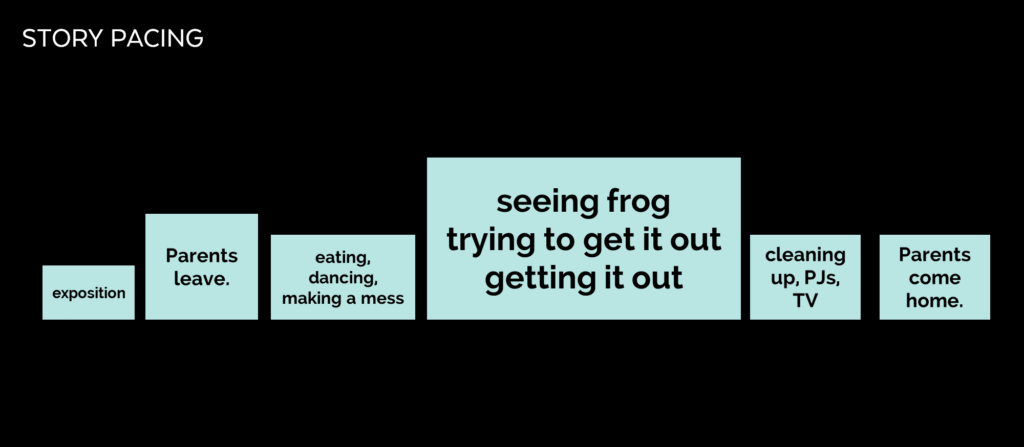
Now that the story has been born in raw form, students can begin to shape it. This would be a good time for a lesson on pacing, where students look at how writers expand some moments to create drama and shrink other moments so that the story doesn’t drag. Creating a diagram like the one below forces a writer to decide how much space to devote to all of the events in the story.

Before students write a full draft, have them plan out the events in their story with a pacing diagram, a visual representation of how much “space” each part of the story is going to take up.

Step 8: Long Drafts

With a good plan in hand, students can now slow down and write a proper draft, expanding the sections of their story that they plan to really draw out and adding in more of the details that they left out in the quick draft.

Step 9: Workshop

Once students have a decent rough draft—something that has a basic beginning, middle, and end, with some discernible rising action, a climax of some kind, and a resolution, you’re ready to shift into full-on workshop mode. I would do this for at least a week: Start class with a short mini-lesson on some aspect of narrative writing craft, then give students the rest of the period to write, conference with you, and collaborate with their peers. During that time, they should focus some of their attention on applying the skill they learned in the mini-lesson to their drafts, so they will improve a little bit every day.

Topics for mini-lessons can include:

  • How to weave exposition into your story so you don’t give readers an “information dump”
  • How to carefully select dialogue to create good scenes, rather than quoting everything in a conversation
  • How to punctuate and format dialogue so that it imitates the natural flow of a conversation
  • How to describe things using sensory details and figurative language; also, what to describe…students too often give lots of irrelevant detail
  • How to choose precise nouns and vivid verbs, use a variety of sentence lengths and structures, and add transitional words, phrases, and features to help the reader follow along
  • How to start, end, and title a story

Step 10: Final Revisions and Edits

As the unit nears its end, students should be shifting away from revision, in which they alter the content of a piece, toward editing, where they make smaller changes to the mechanics of the writing. Make sure students understand the difference between the two: They should not be correcting each other’s spelling and punctuation in the early stages of this process, when the focus should be on shaping a better story.

One of the most effective strategies for revision and editing is to have students read their stories out loud. In the early stages, this will reveal places where information is missing or things get confusing. Later, more read-alouds will help them immediately find missing words, unintentional repetitions, and sentences that just “sound weird.” So get your students to read their work out loud frequently. It also helps to print stories on paper: For some reason, seeing the words in print helps us notice things we didn’t see on the screen.

To get the most from peer review, where students read and comment on each other’s work, more modeling from you is essential: Pull up a sample piece of writing and show students how to give specific feedback that helps, rather than simply writing “good detail” or “needs more detail,” the two comments I saw exchanged most often on students’ peer-reviewed papers.

Step 11: Final Copies and Publication

Once revision and peer review are done, students will hand in their final copies. If you don’t want to get stuck with 100-plus papers to grade, consider using Catlin Tucker’s station rotation model, which keeps all the grading in class. And when you do return stories with your own feedback, try using Kristy Louden’s delayed grade strategy, where students don’t see their final grade until they have read your written feedback.

Beyond the standard hand-in-for-a-grade, consider other ways to have students publish their stories. Here are some options:

  • Stories could be published as individual pages on a collaborative website or blog.
  • Students could create illustrated e-books out of their stories.
  • Students could create a slideshow to accompany their stories and record them as digital storytelling videos. This could be done with a tool like Screencastify or Screencast-O-Matic.


So this is what worked for me. If you’ve struggled to get good stories from your students, try some or all of these techniques next time. I think you’ll find that all of your students have some pretty interesting stories to tell. Helping them tell their stories well is a gift that will serve them for many years after they leave your classroom. ♦


Want this unit ready-made?

If you’re a writing teacher in grades 7-12 and you’d like a classroom-ready unit like the one described above, including slideshow mini-lessons on 14 areas of narrative craft, a sample narrative piece, editable rubrics, and other supplemental materials to guide students through every stage of the process, take a look at my Narrative Writing unit. Just click on the image below and you’ll be taken to a page where you can read more and see a detailed preview of what’s included.


Come back for more.
Join my mailing list and get weekly tips, tools, and inspiration that will make your teaching more effective and fun. You’ll get access to my members-only library of free downloads, including 20 Ways to Cut Your Grading Time in Half, the e-booklet that has helped thousands of teachers save time on grading. Over 50,000 teachers have already joined—come on in!


07 Aug 14:41

Great Week of Coding Camps with Elementary Students

by Shelly Fryer

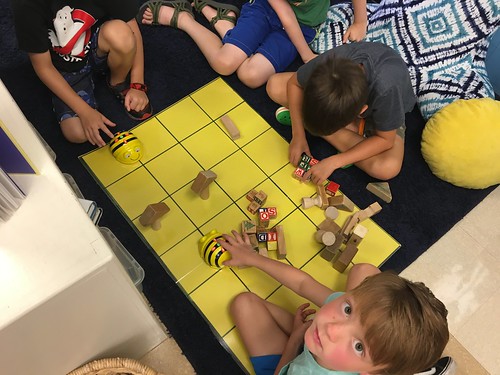
This past week I led two coding camps. Both were 4 day camps, which lasted 3 hours each day. The morning session was for 1st through 3rd graders, and the afternoon session was for 4th and 5th graders. A few of the students had participated in my Spring 2018 after-school Scratch Club, but most were new to coding. In this post I’ll share some of the apps and websites we used, both “plugged” and “unplugged” activities we did, and some of my lessons learned.


I’ve shared all the lesson plans I developed in this Google Drive folder.


I drew lessons from both Code.org’s elementary “unplugged” activities (“CS Fundamentals Unplugged”), and from PBSkids Scratch Jr. lessons. Direct links to those websites and resources are included in each lesson plan. All of these lessons and resources are available free.


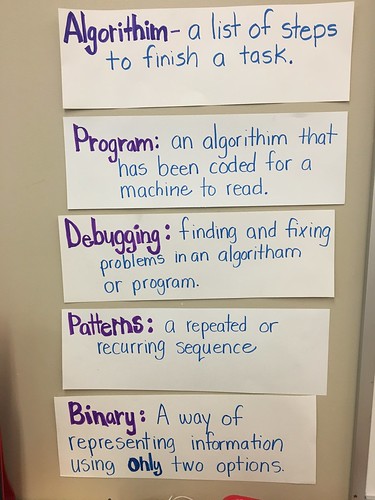
One of the most important elements of the week was developing our coding vocabulary. Algorithm, program, debugging, binary, patterns, looping, repeating, and digital citizenship were all terms and concepts we learned about together. All of these terms came from the Code.org unplugged activities.

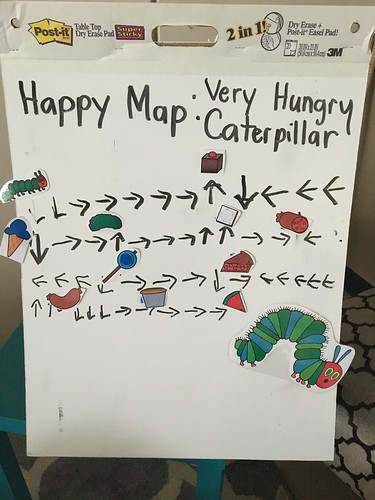
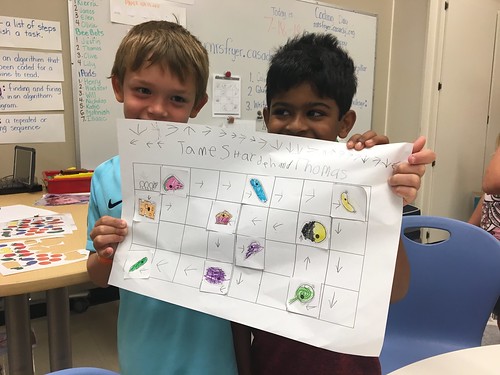
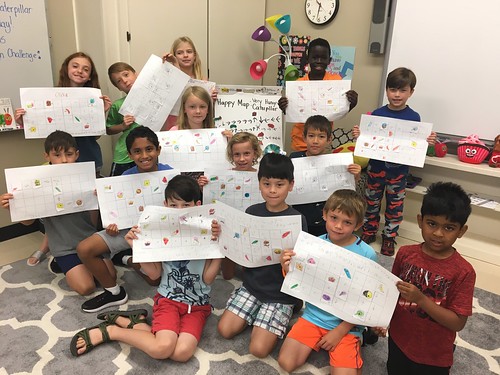
I love how coding can open the door to interdisciplinary and cross-curricular connections for students. One example of this was our coding of “The Very Hungry Caterpillar” by Eric Carle. I created this lesson as a remix /  modification of Code.org’s “Happy Maps” unplugged activity lesson model.

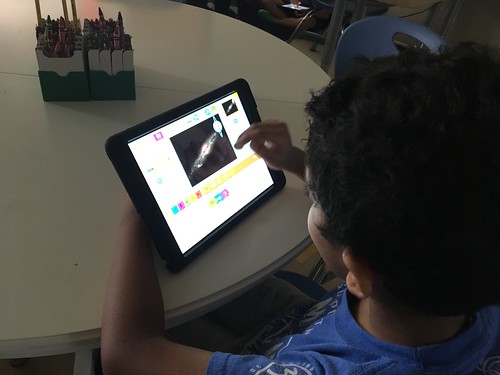
We began each coding camp half day for my younger students with an unplugged lesson. This was followed by coding activity stations, which included the Bee-Bot  and Bee-Bot robots, as well as the Osmo apps Coding Awbie and Tangram. Younger students used only iPads for their coding activities.  Each day we included a break with time to go outside for recess, and this provided an important brain break with unstructured play time outside. We also had a snack during our break.

This schedule and lesson sequence allowed students to engage in paired coding, which is strongly encouraged by Code.org in their CS Fundamentals courses. This past spring, I completed the Code.org teacher training with a face-to-face workshop in San Antonio as well as follow-up monthly webinars. Code.org provides free training for teachers who want to learn how to teach and lead coding lessons with their students.

After our break we used PBSkids Scratch Jr. lessons and design challenges. The lessons and videos provided context and inspiration for students to explore the coding blocks and create their own programs.

One of the things I love the most about bringing Scratch Jr. and the Scratch program to my students is how they use these platforms for open ended creativity. They love drawing, recording their voices, and making things disappear! These invitations to open-ended creativity provide a nice balance to the lessons of Code.org. Code.org lessons tend to be more scripted and puzzle oriented. Both are great, and can compliment each other. My students enjoyed both in our coding camps this week.

In the afternoon with my older students, our coding camp time started with open exploration. Just as we know from working with students using math manipulatives, students need opportunities to play and explore independently before participating in guided instruction. This lesson sequence worked well for my students. Instead of promising students “free time” if they finished early, every student had about 30 minutes at the start of our camp each day to play.

After open exploration and play time, each day we completed an “unplugged activity” which focused on vocabulary and building basic coding foundations. One of my favorite lessons was the digital citizenship video and conversation we watched and had our last day together. When I shared this video with my students, I played it from my lesson plan link using SafeYouTube.net, which removes (free) all advertising, comments, and related videos.

After the unplugged activity, our break and snack, we jumped into “Getting Unstuck” coding challenges using Scratch on our Chromebooks. Getting Unstuck is a 21 day challenge currently being facilitated worldwide by the Creative Computing Lab at the Harvard Graduate School of Education.

These challenges were great because they provided simple prompts that introduced my students to different Scratch blocks. We were also able to view many projects created by others, which were both inspiring and simple to remix. I loved the simplicity of these coding challenges! You can check out all of the projects my students created and shared in this Scratch Studio, which is a gallery of projects.

We ended each day by writing in our reflection journals, which is a strategy suggested by Code.org. I printed a Code.org reflection journal for each student, and this proved to be a wonderful way to wrap up our intensive half-days of learning. The reflection below was one of my favorites from the week. “Today I learned it’s ok to remix.” Indeed it is, and the Scratch community provides the perfect environment to learn both that lesson as well as many other important lessons we are emphasizing in our school’s Digital Citizenship initiative.

I recorded some wonderful videos of my coding camp students reading their code, explaining their thinking, and demonstrating their algorithms in action. I will share those here later, after I am able to contact the parents and get their permission to share them publicly.

If any of the ideas, resources or links I’ve mentioned here are helpful or inspiring to you, please share a comment or reach out to me on Twitter @sfryer. I can’t want to continue coding and learning with my students in the school year ahead!

07 Aug 14:40

50 Awesome Books for Teachers

by Kasey Bell

The post 50 Awesome Books for Teachers appeared first on Shake Up Learning.

I love to read! And my professional learning bookshelf is always full as well as my Kindle app! So I decided to put together this HUGE list of books for educators, 50 Awesome Books for Teachers!

50 Awesome Books for Teachers!

There’s a little bit of something for everyone, no matter what your role in education.

All of these books are books that I have personally read, or are currently on my own reading list!

This list will continue to grow and evolve! Please feel free to leave a comment and suggest your faves. You can also check out all of my recommendations on my Amazon Influencer Page.

This list is in no particular order so it is not numbered.

* The links in this post are affiliate links, which means if you make a purchase after clicking on them, I get a small commission at no extra cost to you. Thanks for supporting the free resources on Shake Up Learning!


50 Awesome Books for Teachers! #edchat #edtech
Click To Tweet


Shake Up Learning

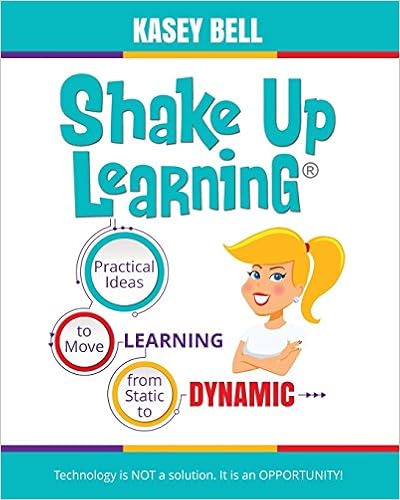
by Kasey Bell


Ditch That Homework: Practical Strategies to Help Make Homework Obsolete by [Miller, Matt, Keeler, Alice]

Ditch That Homework

by Matt Miller and Alice Keeler

The Google Infused Classroom: A Guidebook to Making Thinking Visible and Amplifying Student Voice by [Clark, Holly, Avrith, Tanya]

The Google Infused Classroom

by Holly Clark and Tanya Avrith

Google Apps for Littles: Believe They Can

by Christine Pinto and Alice Keeler

Teach Like a Pirate

by Dave Burgess

Social LEADia: Moving Students from Digital Citizenship to Digital Leadership by [Casa-Todd, Jennifer]

Social LEADia

by Jennifer Casa-Todd

50 Things You Can Do with Google Classroom

by Alice Keeler and Libbi Miller

Understanding by Design

by Grant Wiggins and Jay McTighe

Integrating Differentiated Instruction and Understanding by Design

by Carol Ann Tomlinson and Jay McTighe

The New Art and Science of Teaching: more than fifty new instructional strategies for academic success by [Marzano, Robert J.]The New Art and Science of Teaching

by Robert J. Marzano

Shift This!: How to Implement Gradual Changes for MASSIVE Impact in Your Classroom by [Kirr, Joy]

Shift This

by Joy Kirr

Education Write Now

edited by Jeffrey Zoul and Joe Mazza

The Innovator’s Mindset: Empower Learning, Unleash Talent, and Lead a Culture of Creativity by [Couros, George]

The Innovator’s Mindset

by George Couros

Teaching Math with Google Apps: 50 G Suite Activities by [Keeler, Alice, Herrington, Diana]Teaching Math with Google Apps

by Alice Keeler and Diana Herrington

Classroom Management That Works

by Robert J. Marzano

New Pillars of Modern Teaching, The (Solutions: Solutions for Modern Learning) by [Allen, Gayle]The New Pillars of Modern Teaching

by Gayle Allen

Cultivating Communication in the Classroom

by Lisa Johnson

Ditch That Textbook: Free Your Teaching and Revolutionize Your Classroom by [Miiller, Matt]Ditch That Textbook

by Matt Miller

Lead Like a PIRATE: Make School Amazing for Your Students and Staff by [Burgess, Shelley, Houf, Beth]

Lead Like a Pirate

by Shelley Burgess and Beth Houf

Gamify Literacy: Boost Comprehension, Collaboration and Learning by [Haiken, Michele]Gamify Literacy

by Michele Haiken

Mathematical Mindsets

by Jo Boaler

Culturally Responsive Teaching & The Brain

by Zaretta Hammond

Code Breaker: Increase Creativity, Remix Assessment, and Develop a Class of Coder Ninjas! by [Aspinall, Brian]

Code Breaker

by Brian Aspinall

Learner-Centered Innovation: Spark Curiosity, Ignite Passion, and Unleash Genius by [Martin, Katie]Learner Centered Innovation

by Katie Martin

How to Differentiate Instruction in Academically Diverse Classrooms

by Carol Ann Tomlinson

50 Things to Go Further with Google Classroom: A Student-Centered Approach by [Keeler, Alice, Miller, Libbi]50 Things to Go Further with Google Classroom

by Alice Keeler and Libbi Miller

The EduProtocol Field Guide: 16 Student-Centered Lesson Frames for Infinite Learning Possibilities by [Hebern, Marlena, Corippo, Jon]

EduProtocol Field Guide

by Marlena Hebern and Jon Corippo

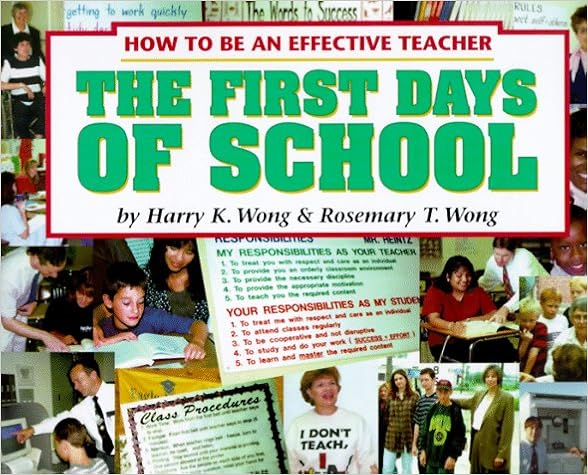
The First Days of School

by Harry Wong

The HyperDoc Handbook: Digital Lesson Design Using Google Apps by [Highfill, Lisa, Hilton, Kelly, Landis, Sarah]The Hyperdoc Handbook

by Lisa Highfill, Kelly Hinton, and Sarah Landis

The Growth Mindset Coach: A Teacher's Month-by-Month Handbook for Empowering Students to Achieve by [Brock, Annie, Hundley, Heather]

The Growth Mindset Coach: A Teacher’s Month-by-Month Handbook for Empowering Students to Achieve

by Annie Brock and Heather Hundley

Mindset: The New Psychology of Success

by Carol Dweck

Grit: The Power of Passion and Perseverance by [Duckworth, Angela]Grit

by Angela Duckworth

Inquiry Mindset: Nurturing the Dreams, Wonders, and Curiosities of Our Youngest Learners by [MacKenzie, Trevor, Bathurst-Hunt, Rebecca]

Inquiry Mindset

by Trevor MacKenzie and Rebecca Bathurst-Hunt

Dive into Inquiry: Amplify Learning and Empower Student Voice by [MacKenzie, Trevor]Dive Into Inquiry

by Trevor Mackenzie

Teaching with Poverty in Mind

by Eric Jensen

Readicide: How Schools Are Killing Reading and What You Can Do About It

by Kelly Gallagher

Write Like This: Teaching Real-World Writing Through Modeling and Mentor Texts

by Kelly Gallagher

Deeper Reading: Comprehending Challenging Texts, 4-12

by Kelly Gallagher

Teaching with the Brain in Mind

by Eric Jensen

Why School?: How Education Must Change When Learning and Information Are Everywhere (Kindle Single) by [Richardson, Will]Why School?

by Will Richardson

Start with Why

by Simon Sinek

The 7 Habits of Highly Effective People: Powerful Lessons in Personal Change by [Covey, Stephen R.]The 7 Habits of Highly Effective People

by Stephen R. Covey

Unshakeable: 20 Ways to Enjoy Teaching Every Day...No Matter What by [Watson, Angela]

Unshakeable: 20 Ways to Enjoy Teaching Every Day…No Matter What

by Angela Watson

Hacking Education: 10 Quick Fixes for Every School (Hack Learning Series) by [Barnes, Mark, Gonzalez, Jennifer]Hacking Education: 10 Quick Fixes for Every School

by Mark Barnes and Jennifer Gonzalez

Formative Assessment & Standards-Based Grading (Classroom Strategies) by [Marzano, Robert J.]Formative Assessment & Standards-Based Grading (Classroom Strategies) 

by Robert J. Marzano

Fair Isn’t Always Equal, 2nd edition: Assessment & Grading in the Differentiated Classroom

by Rick Wormeli


Making Thinking Visible: How to Promote Engagement, Understanding, and Independence for All Learners

by Ron Ritchhart, Mark Church, Karin Morrison

Sketchnotes for Educators

by Sylvia Duckworth


Show Your Work!: 10 Ways to Share Your Creativity and Get Discovered by [Kleon, Austin]

Show Your Work

by Austin Kleon

Intention: Critical Creativity in the Classroom by [Burvall, Amy, Ryder, Dan]Intention: Critical Creativity in the Classroom

by Amy Burvall and Dan Ryder

What do you think? What would you add to this list? Leave me a comment below.

© Shake Up Learning 2018. Unauthorized use and/or duplication of this material without express and written permission from this blog’s author and/or owner is strictly prohibited. Excerpts and links may be used, provided that full and clear credit is given to Kasey Bell and Shake Up Learning with appropriate and specific direction to the original content on ShakeUpLearning.com. See: Copyright Policy.

The post 50 Awesome Books for Teachers appeared first on Shake Up Learning.

07 Aug 14:29

How to Add Music to Google Slides

by noreply@blogger.com (Richard Byrne)
In my previous post I shared some information about the AudioPlayer for Google Slides Chrome extension. If you need some help getting started with that extension, please watch the following video tutorial that I created.


It should be noted that the first time you use the extension it could take ten to fifteen minutes for your Google Drive audio files to sync and become available through the extension. Be patient with the first time you use it. After the initial use it is much faster.


This post originally appeared on Free Technology for Teachers if you see it elsewhere, it has been used without permission.
07 Aug 14:28

An Easy Way to Find 360 Videos to View in Google Cardboard

by noreply@blogger.com (Richard Byrne)
Google Expeditions offers lots of 360 content that your students can explore in Google Cardboard viewers. But Google Expeditions isn't the only source of 360 content that you can use in your Google Cardboard or other virtual reality headsets. There is a lot of 360 content available on YouTube. For example, take a look at the 360 video about constellations that I shared last week. The easiest way to find 360 videos is to conduct a keyword search on YouTube and then filter results to view only 360 videos. Watch my video that is embedded below to learn how to filter YouTube results to display only 360 content.


This post originally appeared on Free Technology for Teachers if you see it elsewhere, it has been used without permission.
07 Aug 14:27

An Easy Way to Find Images for Google Slides Presentations

by noreply@blogger.com (Richard Byrne)
There are plenty of good places to find public domain and Creative Commons images to use in your Google Slides presentations. The Unsplash photos add-on even makes it possible to find public domain images without ever leaving the slides editor. But even with the wealth of images available in the public domain, using your own images can be your best option. If you use Google Photos to save all of the pictures that you take with your phone, you can easily add those images to your Google Slides presentation. Watch my video that is embedded below to see how easy it is to add your Google Photos images to your Google Slides presentations.


On a related note, here are three good places to find free images to use in any multimedia project.


This post originally appeared on Free Technology for Teachers if you see it elsewhere, it has been used without permission.
07 Aug 14:25

A New Grammar Checker is Coming to Google Docs

by noreply@blogger.com (Richard Byrne)
Google Docs has had a spell check tool for years. The grammar check tool has always been a bit rudimentary. That is going to change in the next few months.

Earlier today Google announced that a new grammar suggestions tool is going to be added to Google Docs. The new grammar suggestions tool will automatically underline possible grammar mistakes. Google Docs users will be able to right-click on underlined grammar mistakes to see suggested corrections.

The new grammar suggestions tool in Google Docs will initially be available only to those who apply for the Early Adopter Program.


This post originally appeared on Free Technology for Teachers if you see it elsewhere, it has been used without permission.
07 Aug 14:24

Editing PDFs and Nine Other Microsoft Word Tutorials

by noreply@blogger.com (Richard Byrne)
On Wednesday morning I published a couple of tutorials about annotating PDFs and annotating Google Slides. Shortly after publishing those tutorials Mike Tholfsen Tweeted a link to Microsoft's 10 Handy Tips for Microsoft Word. One of those tips is using Word to edit PDFs. A short video tutorial for that process is embedded below.


The nine other tips in Microsoft's 10 Handy Tips for Microsoft Word are:

  • Dictate to type
  • Spelling, grammar, and clarity check.
  • Track changes
  • Insert a table
  • Add and edit text
  • Insert headers and footers
  • Insert or remove page breaks
  • Add a table of contents
  • Change line spacing
Video tutorials for all of those tips can be found here


This post originally appeared on Free Technology for Teachers if you see it elsewhere, it has been used without permission.
07 Aug 14:23

Try Using Icebreaker Tags at New Staff Orientation

by noreply@blogger.com (Richard Byrne)
The new school year is almost here and that means there will be new staff orientation meetings are happening everywhere. Rather than using generic name tags or ID badges for that first meeting, try using Icebreaker Tags. IceBreaker Tags is a free tool for making your name tags that can help people break out of the typical "what do you do?" questions that are asked when meeting for the first time.

To use Icebreaker Tags just go to the site, enter your desired display name, upload an image to display on your name tag, and type your ice-breaker question or statement. When you hit the print button your customized name tags will be displayed in a sheet of eight name tags that you can download and print on sticker paper (here's the kind I use).


On a related note, while looking for the sticker paper link mentioned above, I found these cool super hero name tags on Amazon.


This post originally appeared on Free Technology for Teachers if you see it elsewhere, it has been used without permission.
07 Aug 14:22

Five Tools for Creating Animated Videos on Chromebooks

by noreply@blogger.com (Richard Byrne)
The new school year will be here soon and I haven't taken a break all summer. I'm taking a short break from the Internet to go fishing at one of my favorite places in the world, Kennebago Lake. I'll be back with new posts on Saturday. While I'm gone I'll be republishing some of the most popular posts of the year so far. 


Creating animated videos can be a great way for students to explain a science concept, to tell a history story, or to bring to life short stories they've written. One of last week's most popular posts was about how to do those things on an iPad. Chromebook users have some good tools available to them too.

Option 1: Toontastic 3D
If you have a Chromebook that supports the use of Android apps, Toontastic 3D is a tool you must try. On Toontastic 3D students can pick from a variety of story setting templates or they can create their own. Once they have established a background setting students then select cartoon characters to use in their stories. Students can choose from a wide array of customizable cartoon characters or they can create their own from scratch. Once characters are placed into the story scenes students can begin recording themselves talking while moving the characters around in each scene. Students can swap characters between scenes, change the appearance of characters between scenes, and move characters from one scene to the next. Check this list to see if your Chromebook supports the use of Android apps.

Option 2: Animaker Edify
Animaker Edify is the classroom version of the popular Animaker animation creation tool. To create a video on Animaker Edify students start by selecting “video” from the menu of project options. Then they can choose to make a video by following a template or by building from scratch. Creating a video in Animaker Edify is done on a frame-by-frame basis. Each frame can be designed by dragging and dropping individual characters, speech bubbles, background scenes, and clip art into the scene. Animaker Edify provides tools for animating each character. For example, you can make a character appear to be running across the screen, walking, or talking. You can build as many characters and animation actions into each scene as you need. Once you have built the frames for your video you can add sound effects, music, or narration. Animake Edify provides a large gallery of royalty-free music and sound effects that you can use. But you can also record your own voice by using the built-in voice-over capability.

Option 3: PowToon
Creating a video on PowToon is similar to making one on Animaker Edify. It has been a popular platform for creating animated videos for many years. In PowToon students create animated videos on a scene-by-scene basis through a series of slides. Students can choose background scenes, characters, and scene objects from a huge media gallery. After configuring the scenes of their stories, students can record voiceovers or play music in the background.

Option 4: Animatron
Animatron is a nice tool for creating animated videos and images. To create a video on Animatron you start by dragging and dropping characters on a background scene and then choosing how long each character will be displayed in a scene. You can also set the length of time for each character in a scene to be in motion. By using Animatron's timeline editor you can make objects appear and disappear from a scene. The best feature of Animatron is that you can record audio directly over the animation. The built-in recording tools lets you see the scene while you're recording so that you can precisely synchronize each scene with its audio track.

Option 5: MySimpleShow
MySimpleshow is a free tool for creating Common Craft-style explanatory videos. MySimpleshow requires you to write a script for your video before you can start adding illustrations and sounds to it. In MySimpleshow you will find a wide variety of script templates that will help you plan your video. The script is written in chapters that become the outline for your video. After you have written your script MySimpleshow will take your chapters and give you suggested images and animations to use. The suggestions are based on the keywords in your script. You also have the option to upload your own visuals to use in your video. Adding narration to your video is the last step in the MySimpleshow editor. There is an automated text-to-speech narration that will read your script as narration for your video. Completed videos can be downloaded and or directly uploaded to YouTube from MySimpleshow.

Disclosure: Animaker and Mysimpleshow have been advertisers on this blog at various times. 


This post originally appeared on Free Technology for Teachers if you see it elsewhere, it has been used without permission.
07 Aug 14:22

How to Use Google's VR Tour Creator

by noreply@blogger.com (Richard Byrne)
The new school year will be here soon and I haven't taken a break all summer. I'm taking a short break from the Internet to go fishing at one of my favorite places in the world, Kennebago Lake. I'll be back with new posts on Saturday. While I'm gone I'll be republishing some of the most popular posts of the year so far. 

In May Google announced the launch of their new VR Tour Creator. This free tool lets everyone create their own virtual tours to view in Google Cardboard and or in the Chrome web browser. Tours are created by selecting locations in Google Maps and then selecting 360 degree Street View imagery. There's also an option to upload your own 360 degree imagery.

The process of creating a tour in the Tour Creator is straight-forward one. Watch my video embedded below to learn how you and your students can create virtual reality tours in Tour Creator.


This post originally appeared on Free Technology for Teachers if you see it elsewhere, it has been used without permission.
07 Aug 14:21

Add Science & Math Simulations to Your PowerPoint Slides

by noreply@blogger.com (Richard Byrne)
The new school year will be here soon and I haven't taken a break all summer. I'm taking a short break from the Internet to go fishing at one of my favorite places in the world, Kennebago Lake. I'll be back with new posts on Saturday. While I'm gone I'll be republishing some of the most popular posts of the year so far. 


PhET is a free resource that has been popular with science and math teachers for many years. PhET provides free interactive math and science simulations covering topics in physics, chemistry, biology, earth science, and mathematics. In the PhET library you'll find simulations appropriate for elementary, middle, high school, and university students. PhET even offers a search tool that will help you find lesson ideas built upon the free simulations.

56 of the PhET simulations are available to insert into PowerPoint presentations through the use of PhET's free PowerPoint Add-in. With the Add-in installed you can browse the available simulations and insert them into your slides. The simulations work in your slide just as they do on the PhET website.

Applications for Education
The PhET PowerPoint Add-in could be time-saver if you are planning to use more than one simulation during a lesson. Rather than clicking through menus or clicking through bookmarks to bring-up the right simulation, you could just create a slideshow that has your PhET simulations arranged in the sequence you plan to use them during your lesson.


This post originally appeared on Free Technology for Teachers if you see it elsewhere, it has been used without permission.
07 Aug 14:20

Five Observations Students Can Record With Google's Science Journal App

by noreply@blogger.com (Richard Byrne)
The new school year will be here soon and I haven't taken a break all summer. I'm taking a short break from the Internet to go fishing at one of my favorite places in the world, Kennebago Lake. I'll be back with new posts on Saturday. While I'm gone I'll be republishing some of the most popular posts of the year so far. 


Google's Science Journal app provides some neat tools for recording data and writing observations. Within the app students create notebooks for recording experiment data and observations. Students can also use those notebooks to simply organize observations by topic. There are sensors built into the app for recording sound, speed, light, direction, and magnetism. Here are five things that students can record with Google's Science Journal app (click here for Android version and here for iOS version).

1. Decibel Levels
Ask your students if a basketball clanging off of a rim is louder in an empty gym or a full gym? Have them make a hyphothesis then test it in your school's gym. (Check with your physical education teacher to make sure it's okay to borrow his or her classroom).

2. Speed. 
Have students record how quickly or slowly they walk down the hallway.

3. Speed and Sound Correlation
Have students record the speed with which they walk down the hallway. Have them record the sound at the same time. Ask them to try to identify a correlation between the speed with which they walk and the amount of noise that they make.

4. Light
Today, whenever I look out of my office window I am nearly blinded by the reflection of the sun off of the frozen snow. It was brighter earlier today when the sun was hitting the snow at a more direct angle. Students can use the Science Journal app to measure and compare the brightness of one place throughout the day.

5. Light and angles correlation
The Science Journal app has an inclinometer function. Have students use that function to measure the angle of the sun to a fixed position throughout the day. Have them use the light meter whenever they use the inclinometer. Then ask them to determine the correlation between the angle of the sun and the brightness at the chosen spot. They might be surprised at the results.

Bonus item:
I plan to use the Science Journal app on my phone to record the cries of my baby in relation to the speed at which I walk and bounce her. Maybe I will find the perfect speed at which she always stops crying.


This post originally appeared on Free Technology for Teachers if you see it elsewhere, it has been used without permission.
07 Aug 14:19

Take a Look at Microsoft's Free Hands-on STEM Lesson Plans and Projects

by noreply@blogger.com (Richard Byrne)
The new school year will be here soon and I haven't taken a break all summer. I'm taking a short break from the Internet to go fishing at one of my favorite places in the world, Kennebago Lake. I'll be back with new posts on Saturday. While I'm gone I'll be republishing some of the most popular posts of the year so far. 


"Hacking STEM" was one of the initiatives that Microsoft was heavily promoting at the BETT Show last month. I asked a few Microsoft employees what "hacking STEM" meant. They all replied with explanations that centered on the idea of providing teachers with hands-on STEM lessons and projects that can be done without having to spend much money, if any, on physical materials. One of the many examples that Microsoft had on display to represent their hacking STEM projects was the homemade wave machine pictured in this blog post. You can find directions for that project here (link opens PDF).

Microsoft's Hacking STEM Library is divided into activities that take multiple days to complete and activities that can be completed in one day. All of the activities in the Hacking STEM Library include detailed directions, materials lists including places to acquire materials, and lesson objectives. The homemade wave machine project is an example of a one-day project. This lesson on harnessing electricity to communicate is an example of a multiple day project.


This post originally appeared on Free Technology for Teachers if you see it elsewhere, it has been used without permission.
18 Jul 17:29

Trainers and Coaches: Unleash Your “Incredibles” Superpowers!

by Kasey Bell

The post Trainers and Coaches: Unleash Your “Incredibles” Superpowers! appeared first on Shake Up Learning.

Trainers and Coaches: Unleash Your “Incredibles” Superpowers!

This guest post was written by Debbie Perkins and Brooke Higgins based on their ISTE 2018 session “Trainers and Coaches Suit Up: Unleash Your “Incredibles” Superpowers!

Trainers and Coaches: Unleash Your “Incredibles” Superpowers!

If you want to be an “Incredible” tech trainer or instructional coach, your mission must include honing the superhero skills of Collaborating and Networking, Facilitating High-Quality Professional Development, Coaching, and Mentoring, and Powering it ALL with Technology.

Thwart the “villains” that make traditional meetings monotonous and mundane. Yes! You can make “Incredibles” superpowers your PD sidekicks.

Traditional professional development does not model the best instructional practices that teachers need to experience in order to understand their value and transfer to classroom practice. So how can you provide what they do need?

Take a look at some of the Incredibles essential superpowers. Are you ready to become an “Incredibles” Superhero?


Trainers and Coaches: Unleash Your “Incredibles” Superpowers! #ETcoaches #TOSAchat #edtech…
Click To Tweet


Trainers and Coaches: Unleash Your “Incredibles” Superpowers!


Superhero Facilitators

Trainers and Coaches: Unleash Your “Incredibles” Superpowers!

Image credit: Disney Pixar

Channel your inner Dash Parr by being a QUICK thinking Superhero Facilitator; plan ahead to provide research-based, durable PD that enhances educators’ expertise.

As a Superhero Facilitator, you must make “in-the-moment” modifications while engaging learners in ACTIVE, hands-on experiences. Design and facilitate learner-centered instructional activities that include strategies to differentiate and personalize learning for adults. Engage educators in professional learning enhanced by technology with the ultimate goal of transfer to professional practice.

Learn more about Superhero Facilitators.


Superhero Coach/Mentors

Trainers and Coaches: Unleash Your “Incredibles” Superpowers!

Image credit: Disney Pixar

Just like Violet makes herself invisible, you become a Superhero Coach/Mentor by empowering teachers while making yourself less and less necessary.

Bring out others’ STRENGTHS as you PROTECT learners’ thinking with accurate paraphrasing and insights. Model how to design and implement technology-enhanced learning experiences while supporting educators in transferring these skills into professional practice.

Make sure to emphasize creativity, higher-order thinking skills, and habits of mind. Become less necessary over time by consulting, collaborating, or coaching to support educators as they grow their own superpowers.

Learn more about Superhero Coach/Mentors.


Superhero Collaborators

Trainers and Coaches: Unleash Your “Incredibles” Superpowers!

Image credit: Disney Pixar

Superhero Collaborators, like Elastigirl, FLEXIBLY incorporate purposeful collaboration in learning experiences and STRETCH others’ thinking.

Rather than telling someone else what to do, be a Superhero Collaborator! Provide everyone with opportunities to participate and share ideas. Engage in and develop digital age learning environments as both a consumer and contributor.

Model a variety of instructional practices in face-to-face, blended, and online learning environments including purposeful collaboration, planning for individualization, and providing choice.

Learn more about Superhero Collaborators.


Superhero Tech Users

Trainers and Coaches: Unleash Your “Incredibles” Superpowers!There seems to be no end to Jack-Jack’s powers!

Technology can also exponentially increase your superpowers IF you use your laser VISION to purposefully select tools and apps that make sense for the job at hand and ENHANCE learners’ skills.

Employ strategies for inspiring technology and instructional innovations. Identify, create, use, share, and organize a variety of resources to support purposeful technology integration. Plan learning experiences that incorporate resources and research-based instructional design practices in meaningful ways as a model for other educators.

As Edna Mode knows, it’s never WHAT you use; it’s HOW you use it! Be an expert DESIGNER of professional development; use technology to ACCOMMODATE the superpower you see in each superhero educator with whom you have the awesome opportunity and privilege to work.

Learn more about Superhero Tech Users.


Your Mission (should you choose to accept it)

Coaches and trainers, suit up! It’s time to use your superpowers for good and incorporate innovative methods to facilitate effective adult learning opportunities.

Remember, “With great power comes great responsibility!” ~Ben Parker, in The Amazing Spider-man

One Page Summary of the Superpowers

Find a one-page summary of these superpowers on the Trainers and Coaches Suit Up: Unleash Your “Incredibles” Super Powers! website. Want to delve deeper? Prefer a game-based approach? Solve the clues for each Unleash Your “Incredibles” Super Powers Gameboard section and receive badges and certificates in addition to more information.

About the authors of this post:

Brooke Higgins (@higginsb) and Debbie Perkins (@perkinsd) are Instructional Specialists for eMINTS National Center.

They develop and implement professional development programs grounded in best pedagogical practices powered by technology for teachers, trainers/coaches, and educational leaders. They currently work with eMINTS Affiliates participating in their train-the-trainer program.

Learn more about eMINTS National Center and the eMINTS Affiliate Trainer Program.


© Shake Up Learning 2018. Unauthorized use and/or duplication of this material without express and written permission from this blog’s author and/or owner is strictly prohibited. Excerpts and links may be used, provided that full and clear credit is given to Kasey Bell and Shake Up Learning with appropriate and specific direction to the original content on ShakeUpLearning.com. See: Copyright Policy.

The post Trainers and Coaches: Unleash Your “Incredibles” Superpowers! appeared first on Shake Up Learning.

13 Jul 00:35

How to Share Specific Google Earth Views in Google Classroom

by noreply@blogger.com (Richard Byrne)
The development of the browser-based version made Google Earth accessible to students who use Chromebooks as their primary classroom computers. One way that I like to use Google Earth is to create sets of inquiry questions based upon a specific location and or a specific view of a place. You can tell students the location and have them find it on their own in Google Earth. But if you are short on time, let's say your intent is to quickly start a classroom conversation about a particular view, then sharing a link to a specific view is the way to go. You can share that link in Google Classroom or any other LMS. In the following video I demonstrate how to share specific Google Earth views in Google Classroom.


This post originally appeared on Free Technology for Teachers if you see it elsewhere, it has been used without permission.
09 Jul 02:26

Augmented Reality in the Classroom

by Craig Kemp

Today’s blog is a guest post from Tim Evans who leads Digital Learning at our sister school in Hong Kong. It has been a pleasure working closely with Tim and the team in Hong Kong to help develop their Digital Learning program. Tim is a must-follow in your PLN. I am constantly inspired by what he does and what he shares.

Augmented Reality. We’ve all heard of it by now, but what exactly is? Whenever I’ve been asked this question, be it from students, fellow educators or parents, I always start with “Remember Pokemon Go?”. It was during the time of Pokemon Go that I really started to look into AR and the what, how, when questions that come with it.

It was the spring of 2016, in Spain where I was teaching at the time, that the world went Pokemon crazy! I remember seeing hundreds of people near monuments, in parks, by roundabouts, just staring at their phones… and getting excited. This got me thinking, what is this? So, for a week or so, I admit, I played Pokemon Go.

How did go? It was exciting, enthralling, fun, engaging, addictive and more. Being a teacher, who works closely with technology, these were adjectives I love to hear when talking about learning. So this was when I started to look at ways of bringing AR into the classroom, all with the hope of replicating some of those feelings.

At the time, there were one or two apps out there, but nothing that I could have said: “genuinely improves the students learning experience”. So I continued searching, then about a year ago, I discovered Merge Cubes – via a tweet I may add.

These are hand-sized, soft cubes, that every side can be used to project/trigger an AR experience. I believe that these cubes started out as a toy, but quickly, for whatever reason (thank you Merge!), they started releasing exciting educational apps. There a number of these by now, maybe 6 or 7, but the main two I want to highlight are Mr Body and Galactic Explorer.

Mr Body is an app that concentrates on learning more about the Human Body. Students can use it to gain awareness of the body, where organs are located and delve a little deeper into functions of these organs

Galactic Explorer is all about the Solar System. The app projects the sun and the planets orbiting (including animation) around it. In the same way, as Mr Body does, this introduces students to a topic that they can then explore further. Students can zoom into a specific planet, see what it has orbiting it. It also provides a brief summary of the planet and its workings.

Part of my role here in Hong Kong is to search and source tools, be it app/software based or hardware based, that we can integrate into our classrooms. One of the main criteria I have when searching for the “perfect” tool is Vertical Planning. How can these tools be used at various grade levels within the school? I do not want to invest (time and money) into tools that may only be used once or twice a year, by one class in a grade. Merge Cubes meet this criterion comfortably. Both the apps I mentioned above could be used throughout Elementary School. Grade 1 could use them as an introducing to a topic, to learn where certain parts of body/solar system are located. Grade 5 could use them to learn specific functions of the body/how the solar system actually works. At the same time they can use the “screen-record” tool and create a presentation on the topic (the possibilities here are endless: green-screening, video editing, presentation to groups within their class or even presentations to students in the grades below.)

I also looked at ways of replicating the Merge Cube to be used as visuals around the school (this is something Merge are happy with and something they actually promote.) So, with an all in or nothing attitude, I printed out a 170cm X 170cm poster of the front of the cube. And it worked! This took the AR experience to another level. The Wow factor that AR brings to the classroom went through the roof. All the students were mesmerized for a few minutes as the took it all. It was great to see. What we have done now, is printed out a few of these to put up around the school. We have had issues with students trying to sneak in some “game time” during transitions or between after school clubs, we have found with these types of visuals (we have other AR ones about too,) students have looked to explore these. Again, it’s great to see!

Here is a link to my Merge print-outs.

So where do I see Merge Cube going, and AR in general? I think Merge is definitely in its infancy stage, with them releasing new educational apps monthly. So there is a still a lot left in those cubes yet. And AR, it too is still only now starting to become more common in education. Where a few years ago it was more game oriented, developers have seen a market in education and with this has come more and more great apps, which, as I mentioned before, are “genuinely improving our students learning experiences.” It’s an exciting time to be an educator… let alone an 8-year-old.

Here is a list of some awesome educators I follow for updates on all things AR (and VR):

@ICTEvangelist

@steve_bambury

@JaimeDonally

@Doctor_Harves

07 Jul 01:05

8 Things I Don’t Want You to Miss From ISTE

by Kasey Bell

The post 8 Things I Don’t Want You to Miss From ISTE appeared first on Shake Up Learning.

The biggest edtech conference in the world, ISTE, took place in Chicago last week, and y’all, it did NOT disappoint! Here are 8 Things I Don’t Want You to Miss From ISTE 2018.

8 Things I Don't Want You to Miss From ISTE

ISTE is my busiest conference, and I spend most of my time presenting and signing books. In case you missed it, I shared all of my presentations in a previous blog post. I wish I had more time to learn, but the power of connecting and sharing enabled me to cultivate some goodies even though I couldn’t attend a lot of sessions.

Check out this awesome spreadsheet of crowd-sourced notes from ISTE 2018!

I love Twitter and following the #ISTE18 hashtag can help me put my finger on the pulse of what’s happening at the conference. But Twitter can overwhelm, and I really wanted to get some feedback from my connections who were in attendance so I asked the Shake Up Learning Facebook Group to share their favorite takeaways. Below are some of the most interesting and presentations that they shared.


8 Things I Don’t Want You to Miss From #ISTE18 #shakeuplearning #edtech
Click To Tweet


8 Things I Don’t Want You to Miss From ISTE 2018

(in no particular order)

Rethinking Creation on Chromebooks by Holly Clark and Tanya Avrith

My buddies Holly Clark and Tanya Avrith did a bazillion presentations (and you can access them all here.) But I thought this creation session for Chromebooks would interest you the most!

Based on the philosophy and ideas from their best-selling book, The Google Infused Classroom, this session will help you rethink what’s possible on Chromebooks!

And if you don’t have a copy of their book, you can get it here. (You can thank me later!)


An Emoji Education from Tony Vincent

Leave it to Tony Vincent to show us the power of emojis! I have learned so many tips from Tony Vincent over the years, and I promise there are some super cool and student-centered strategies embedded in his digital handout. Learn about the history of emojis, what they mean, and how they affect communication. Below is just a screenshot from his page, and it is just the tip of the iceberg of the awesome ideas he shared!

10 Awesome Things I Learned at ISTE


Student-Created AR and VR from Jen and Brian Cauthers

As I shared in the 18 Challenges for Teachers in 2018 ebook and online course, the next stage of AR and VR is student creation and that was definitely abuzz at ISTE this year.

Melanie Arrington shared this awesome presentation link in the Facebook group. Check out all of the great ways students can now create augmented reality and virtual reality!


Trainers & Coaches: Unleash Your “Incredibles” Superpowers from Brooke Higgins and Debbie Perkins

How stinkin’ cute is this? Check out this awesome website of ideas and resources from the Unleash Your “Incredibles” Superpowers session by Brooke Higgins and Debbie Perkins. (Thanks to Matt Sly for sharing it in the group.)

In this site, you will find ideas geared toward tech trainers and instructional coaches on everything from collaboration and facilitation to mentoring and blended learning.

10 Awesome Things I Learned at ISTE


EduProtocols from Marlena Hebern and Jon Corippo

Marlena Hebern and Jon Corippo presented ideas from their fabulous book, The EduProtocol Field Guide: 16 Student-Centered Lesson Frames for Infinite Learning Possibilities. I didn’t get the chance to attend any of their sessions, but Kim Voge raved in our Facebook group and shared a link to all the resources. Be sure to explore not only this book but the practical templates and lesson frames to maximize student potential in your classroom.

10 Awesome Things I Learned at ISTE


Create Your Own App Using Google Slides from Micah Shippee

Micah Shippee presented this fabulous idea on using Google Slides to create an app-like experience. Brilliant! (Again, I must mention my love for Google Slides as the Swiss Army Knife of G Suite!) Check out Micah’s super cool presentation below, and thank you to Shannon Morgan for sharing with the Facebook group.


Updates to Google Classroom and Google Forms

One of the biggest things buzzing around ISTE this year was about some of the updates that Google announced to Google Classroom and Google Forms. Google does a great job at responding to the needs of teachers and students, and I think we are on the precipice of some interesting changes.

The focus of these updates is about giving teachers more control. Whether you agree with the philosophy or not, these updates were made because teachers have been requesting it through the feedback portal. Google reads every single piece of feedback and prioritizes their updates based on teacher need.

The details of the updates were shared in this blog post from Google.

If you’ve logged into Google Classroom recently, you may see this new pop-up:

10 Awesome Things I Learned at ISTE

I am playing with the new features now and working on a blog post that I will share with you soon.

Click here to sign-up for beta access and to try the new features.


Notable Poster Sessions (Shared by Nate Simons)

Poster sessions can spark new ideas, conversation, and can showcase student innovation. Nate Simons shared his favorites in this list. (Thanks, Nate!)


What were your favorite takeaways from ISTE? Please share in the comments below!


© Shake Up Learning 2018. Unauthorized use and/or duplication of this material without express and written permission from this blog’s author and/or owner is strictly prohibited. Excerpts and links may be used, provided that full and clear credit is given to Kasey Bell and Shake Up Learning with appropriate and specific direction to the original content on ShakeUpLearning.com. See: Copyright Policy.

The post 8 Things I Don’t Want You to Miss From ISTE appeared first on Shake Up Learning.

07 Jul 00:56

How to Use SeeSaw's New Activity Library

by noreply@blogger.com (Richard Byrne)
Earlier this week SeeSaw unveiled a new activity library for teachers. The new library contains more than 1500 activities that you can assign to your students in your SeeSaw classroom. You can use the activities as they are written or modify them to meet your students' needs. In the following video I demonstrate how to access activities in the SeeSaw library and share those activities with your students.


This post originally appeared on Free Technology for Teachers if you see it elsewhere, it has been used without permission.
07 Jul 00:55

MathsLinks - A Good Place to Find Resources for Math Lessons

by noreply@blogger.com (Richard Byrne)
MathsLinks.net is a great site created by a mathematics teacher for mathematics teachers. On the site you will find collections of games, interactive demonstrations, and lesson ideas for use in elementary, middle, and high school mathematics lessons.

The best way to get started on MathsLinks is to head to the Links section of MathsLinks and select a topic and subtopic. You chosen subtopic will display resources like games, interactive displays, and PDFs that contain lesson ideas. Speaking of lesson ideas, the Starters section of MathsLinks offers plenty of quick "do-now" types of activities that you can use in your classroom. And if you just need some simple graph paper, lined paper, or blank pie chart templates, head to the Essentials section of MathsLinks.

Applications for Education
MathsLinks is a good site for anyone who teaches math to keep bookmarked. Whether you need simply need to print a graph or you're looking for a great interactive demonstration to use in your geometry lesson, MathsLinks has something for you. And if you want to get involved in making MathsLinks better, you can submit your own resources for sharing.


This post originally appeared on Free Technology for Teachers if you see it elsewhere, it has been used without permission.
07 Jul 00:52

New Metaverse Tutorials - Build Your Own Augmented Reality Games

by noreply@blogger.com (Richard Byrne)
Over the last year Metaverse has become a popular tool for creating your own augmented reality games. Many teachers have used it to create digital breakout games. Like many other tools that quickly rise in popularity, Metaverse has made some changes to make it easier for new users to get started. To that end, this week Metaverse published sixteen new tutorial videos for beginners.

In the first playlist, Getting Started, you'll find everything you need to know to make your first augmented reality experience through the Metaverse platforms.


In the second playlist, More Features, you'll find tutorials for the advanced options available within Metaverse.


This post originally appeared on Free Technology for Teachers if you see it elsewhere, it has been used without permission.
29 Jun 02:18

Reflections from ISTE 2018 and a Bit of Google Awesomeness

by Steve Wick
While I am still trying to gather my thoughts, explore some new resources, and figure out what activities and resources will fit in my classroom, I didn't want to wait to reflect on my experience.

The Conference was literally huge. There was a record number of attendees and sessions. Some people even thought it was too big. For me, the size meant more opportunities to connect with my PLN. My favorite part of ISTE is meeting with my PLN friends and connecting with new educators face to face. The conversations in the Poster Sessions, in the Playgrounds, and during the Social Gatherings also helped to make a big conference seem much smaller.

The lines for sessions were long. Many sessions quickly filled up and had to turn educators away. While this was frustrating at times, I was able to have some great conversations while waiting in line or outside of a session I just couldn’t get into. The missed sessions were also an opportunity to spend a bit more time in the Playgrounds, Posters, and Expo Center. These added up to some great learning experiences outside of the sessions.

While the tools were everywhere, most sessions and conversations focused on the essential skills enhanced with EdTech. Most sessions I attended were about helping students build what we sometimes call “soft skills, instead of a race through the tools. The 4 Cs of collaboration, communication, critical thinking, and creativity were everywhere. Throw in a dash of curiosity and some problem solving and we had some great recipes for learning.

If you know me, you know I love to create. I have a few things that I am still working on that I will be sure to share in the future, but I was able to finish up a Google Drawing Project with Matt Miller in his 5 Brain-Friendly Google Drawings Activities Session that I would like to share.

Need more Google Awesomeness? Check out the Google Smackdown Presentation by Matt Miller, Kasey Bell, Eric Curts, and Vicki Davis.

Have a top takeaway from the conference? Please share it below.

29 Jun 02:15

Photo Roulette - A Library of Congress Game

by noreply@blogger.com (Richard Byrne)
Photo Roulette is a fun little game from Library of Congress. The game shows you a randomly selected pictures from the LOC's digital collections and you have to guess the year in which the picture was taken. You have ten guesses before you're out of luck. After the submission of each guess you're given a hint as to which way to make your next guess. For example, if you're first guess is off by being ten years too early, Photo Roulette will give you a clue like "turn the calendar." When you do make a correct guess, you'll be able to see the image source and read more about the context of when the image was taken.


Applications for Education
Photo Roulette could be a fun activity to use in a history class. Encourage students to use some context clues and their knowledge of history to make educated guesses.

If you have the technical chops, you can use the code for the LOC's Photo Roulette to make your own version of the game.


This post originally appeared on Free Technology for Teachers if you see it elsewhere, it has been used without permission.
30 May 12:04

Kasey Bell’s 8 Great Ways to Use Google Slides

by Vicki Davis

Kasey Bell on episode 322 of the 10-Minute Teacher Podcast

From the Cool Cat Teacher Blog by Vicki Davis

Follow @coolcatteacher on Twitter

Kasey Bell teaches us eight great ways to use Google Slides. From stop motion to video controls and cool add-ins for formative assessment and graphics, learn about this Swiss Army Knife of Google tools – Google Slides.

kasey bell 8 tips google slides

Kasey Bell’s Google Certification courses are open for enrollment from May 28 until June 10, 2018. Just go to coolcatteacher.com/shake to learn more.

Listen Now

***

Enhanced Transcript

Kasey Bell’s 8 Great Ways to Use Google Slides

Link to show: www.coolcatteacher.com/e322
Date: May 29, 2018

Vicki: Today we’re talking with my friend Kasey Bell from “Shake Up Learning” and author of Shake Up Learning: Practical Ideas to Move Learning from Static to Dynamic.

Kasey, today we’re going to talk about all of the cool things that we can do with Google Slides that we might not know that we could do!

So what’s your first thing that you see teachers get really excited about what they can do on Google Slides?

What tricks do teachers get really excited about in Google Slides?

8 great ways to use google slides google slides tips

Kasey: Honestly, I find myself referencing Google Slides all the time.

When a teacher asks me, “Hey, what app should I choose to do this?” Pretty much it’s the Swiss Army knife. It can do so many things.

One of the first things that is really easy to do is to create an interactive Table of Contents.

Google Slide Tip #1: Create an interactive Table of Contents

You can do that at the beginning of your slide deck. This might be a Table of Contents for an interactive lesson that you’re creating for students, or you could be having a collaborative slide deck.

Each of those links on the Table of Contents could actually link back to the students’ individual slides so they don’t end up using the wrong slide. They stay in their own little space.


Vicki: Oh, see, I love this, because we’re getting ready to use Google Slides for our app presentation for Shark Tank. This way I could actually merge all the kids’ slides together, and then have each one as a link so I could go straight to the students’ slides. Is that what I can do?

Kasey: Yes, exactly. It’s just like a regular link. I use the keyboard shortcut Command+K, and then you just drop down slides in this presentation, and you choose a slide. So you link to the slide instead of an external link.

Vicki: Oh, I love that. But now, can you link inside — like within and link to other slides also?

Kasey: That’s exactly what I meant. When you insert the link, you’ll be able to see the options to slides in this presentation. You can choose which slide you want to link to.

Vicki: Oh! Okay, simple!

Okay, so what’s another one? Some people are using Google Slides for more than just slides, aren’t they?

Kasey: Absolutely.

One of the ways that I think is one of my favorites is creating an eBook inside Google Slides.

Google Slide Tip #2: Create an eBook

I have created several eBooks now inside Google Slides because when I try to do it in Google Docs, I pull my hair out.

That’s because I have so many images and screenshots and things like that. So that if you’ve ever caught yourself about to lose it because you can’t get images exactly where you want in Docs, you can in Slides.

So, if you think about it, you can put anything anywhere on a slide. That makes it easy to create images, illustrations, and do all of that.

But it gets better because you can resize slides into absolutely any size you want.

If you go to File → Page Setup, and then choose the little drop-down, go to Custom, you can make anything in inches, centimeters, points, or pixels.

So I can create an 8.5”x11” page size, so if I want it to look like a real book or possibly print it as a real book, and then you just go to Download As… and you can download it as a PDF. If you want to publish it as a PDF, publish it on the web, embed it on your website.

I’ve seen lots of teachers picking this up and having their students publish their books, whether those are collaborative or individual or class books, and then they put those online.


Vicki: Very cool.

You know, eBooks are just such a powerful way for kids to share. It also gives them an authentic audience if you’re adding it to their portfolio or sharing it with parents.

Now, you have lots of tips for some cool things we can do inside of Google Slides. Give us some of those.

Kasey: There are also some new things called “add-ons” that we now have in Slides that we used to only have inside Sheets and Forms and some of the other apps, so this is a little bit newer.

If you go to the menu, you can go to Add-Ons → Get Add-Ons.

This continues to grow, but I have some favorites.

One of those is Pair Deck. Are you a fan of Pair Deck?

Google Slide Tip #3: Use the Pear Deck Add-On

Vicki: You know, I have a lot of friends who love it. Let’s look at it.

Kasey: Pear Deck is a formative assessment tool.

What they’ve now done is integrated their Dashboard and their tool inside Slides. When you add the add-on, you get a sidebar that pops up.

They have an entire template gallery of formative assessments you can use at the beginning of the lesson, in the middle of the lesson, and at the end of the lesson.

These might be Thumbs-Up/Thumbs-Down. These might be having students Draw to Respond. You might be asking them questions, and they’re completely editable.


Then you can present that, and students can respond from any device. So they’re really handy, and everything I just mentioned — with the exception of the drawing, I think that’s in the upgrade — the rest of it is all in the free version.

I haven’t ever paid for Pear Deck, but I love it. I think it’s a great little tool to mash up with Google Slides.

Vicki: Yes. Adding those formative assessments in and preparing for those. We should be checking for understanding pretty frequently. I think it’s great to just have it built in.

Are there some other add-ons you like?

Kasey: Yes. Icons by Noun Project is another favorite.

Google Slide Tip #4: Use Icons by Noun Project

You may have seen Icons. It’s just its own website where you can get some really nice graphics for creating things like infographics or whatever it is that you’re working on.

You can get these icons, and they’re usually Creative Commons License, so you have permission — you do have to cite them, they have a very specific way they need to be cited — but they’re great, so now you can pull those into your slide projects that much easier. That was a favorite.

Google Slide Tip #5: Use UnSplash Photos Add-On

I also like UnSplash Photos — those high-resolution stock photography types of photos that we can pull in — and those are actually fully usable and reusable within Google Slides. Students can pull those and not have to worry about filtering for licensing and all of those types of things.

Vicki: Now, for add-ons to be available, does the Google Apps admin for your school have to go in and add it, or is this something teachers can just add on their own?

Kasey: They should be able to add on their own. I don’t think add-ons are controlled by the panel, but I don’t remember. I’m sure somebody listening will correct me if I’m wrong.

Vicki: For some reason, I think they’re not, but there are some certain things that happened in the past. It’s just a little tricky, I just didn’t know if you know.

Kasey: Yeah.

Vicki: If you have teachers, then do check with your admin, and ask them to enable or add that. I had to ask myself since I’m on my own admin to enable Gmail features because last week I wanted them.

Check with your admin about Google features

Okay, what are some other things that are pretty cool?

A lot of people like to use video in their presentations. Do you have some tips for using video?

Kasey: Yes. Last year, we got some pretty cool features added to videos inside Google Slides.

Google Slide Tip #6: Adjust Your Videos in Google Slides

It’s still a YouTube or a video that exists inside Google Drive, but you can do a few things once you get it in there as well.

If you right-click on the video and go to Video Options, or you can also see that in the contextual toolbar, but you’ll see more options to do some adjustments to that video.

For instance, you can customize the video start time and end time. If you want to use a clip, you don’t have to download it and open it in some fancy software to edit it down to what you just want to use. You can actually get down to the second — exactly what you want to use inside that slide.

Vicki: That is so awesome.

Google Slide Tip #7: Mute the Video As You Run Google slides

Now, one feature that I love to do is, a lot of times when I’m presenting, I like the videos to play, but I don’t actually want the noise. I just want it as background. Can you do anything with that?

Kasey: Yes. That is one of the other features you’ll see.

There’s a little checkbox in the video options. If you want it to auto-play as soon as you switch slides or if you want to mute the audio — and at first when I saw the mute, I wondered, “When am I going to use that?” and I swear I used it the next week because it’s something cool, I wanted the effect.

I wanted to be the narrator of the video in a live setting, so it’s pretty handy.

Vicki: Do you have any other features that teachers go “Wow!” over?

Google Slide Tip #8: Stop Motion Animation

Kasey: One of the really popular things right now — for the super-users of Google Slides and the ones who are really willing to step out and get uncomfortable — is stop-motion animation.

Some of that requires a lot fancy equipment if you really get into it, and it could get complicated, but it’s really easy to do inside Slides.

It could be animation just with graphics inside your Slide.

Since I have a video where I’m demonstrating this, I just downloaded a graphic of a raven. I put in one corner of my slides. I duplicated the slide – which, by the way, is Command+D for shortcut to duplicate — and then I move the crow a little bit, Command+D, duplicate – move the crow a little bit, Command+D, move the crow a little bit, and then you publish to the web.

And you have it change slides every second, and it looks like the crow is flying across the slides.

Vicki: Oh, cute!

I guess you can even do a little video capture in there as you go.

Kasey: That could be students taking pictures. They could actually be acting something out with LEGOs, or claymation, or whatever, and taking pictures and moving those into the slides and having it animate that way as well. So it can go from simple to pretty complex.

Vicki: As we finish up, Kasey, I know that you’ve really — and you just mentioned it earlier — in your book, you really talk about getting comfortable with being uncomfortable.

As these features keep rolling out, things keep changing. Some folks with Google or getting familiar with Google Classroom or Google, they get a little bit nervous.

Could you give us a thirty-second pep talk about how to progress and advance using Google with our kids?

How can educators progress and advance using Google with our kids?

Kasey: Yes. First of all, support.google.com is your best friend. If you ever need help, you can find just about any kind of answer there.

The other thing is just not to be afraid to just click around and try.

I also am a huge right-click fan. That helps me find things as well.

If you expect to learn something, say, in a training, step-by-step directions and that would be it for the next year or two years? Those days are over.

One of the best skills that we can teach ourselves and teach our students is how to LEARN, and how teach ourselves on the go — whether it’s finding videos on YouTube and tutorials. J

Just sort of accepting the fact that things are going to change so fast that you can’t keep up, but you can embrace it.

It’s totally okay if you don’t know where something is, because usually in Google — what I love is — it’s usually not too hard to find.

That’s why I kind of refer to Google as being this gateway tool because it’s so easy to use that it can lead you to have more confidence in using technology and maybe trying some other stuff.

Vicki: So, educators, we can do this. We can keep learning more.

There are so many awesome features out there, and Kasey’s given a lot of them with Google Slides.

Do check out her resources and check out the Shownotes because I’m going to have lots of great things and great ways to interact with Kasey to learn more about Google.

She’s kind of my Miss Google, and I follow everything she does.

Thanks, Kasey!

Kasey: Thank you so much, Vicki.

Contact us about the show: http://www.coolcatteacher.com/contact/

Transcribed by Kymberli Mulford kymberlimulford@gmail.com

Bio as submitted


Kasey Bell is part sparkling smile, part witty personality and a whole heap of passion as big as a Texas–go big or go home, y’all! She is a disruptor of the boring. An engaging, innovative, from the heart sharer who inspires educators while transforming their teaching with original, timely and use-tomorrow ideas for student choice, differentiation, and technology integration. Whether it is learning from home through online courses, professional development, conference workshops or as a keynote speaker Kasey is a relentless innovator of ideas and a devoted transformer of classrooms and teaching. Through teacher empowering publications and award-winning educational resources at ShakeUpLearning.com, learner-driven workshops and presentations and co-hosting Google Teacher Tribe weekly podcast, Kasey proves why we should never settle for the boring when it comes to bringing out the very best in our students, and we should always strive to Shake Up Learning!

  • Co-host of The Google Teacher Tribe Podcast
  • Author of The Teacher’s Guide to Google Classroom
  • Google Certified Innovator
  • Google Certified Trainer
  • Amazon Education Thought Leader
  • Digital Innovation in Learning Award Winner in “Sharing is Caring”
  • One of 20 TrustED Educational Thought Leaders
  • #3 EdTech Blog
  • #3 EdTech and E-Learning Influencer on Twitter
  • Must Read EdTech Blog
  • Edublog Awards Finalist

ShakeUpLearning.com provides teachers and educators with easy to understand, use tomorrow resources for Google and G Suite for Education, mobile learning and classroom technology integration through digital learning resources, technology tips and tricks, in-depth e-courses, books, resources, cheat sheets, blog publications. and podcasts.

Blog: http://www.shakeuplearning.com

Twitter: @ShakeUpLearning

Disclosure of Material Connection: This is a “sponsored podcast episode.” The company who sponsored it compensated me via cash payment, gift, or something else of value to include a reference to their product. Regardless, I only recommend products or services I believe will be good for my readers and are from companies I can recommend. I am disclosing this in accordance with the Federal Trade Commission’s 16 CFR, Part 255: “Guides Concerning the Use of Endorsements and Testimonials in Advertising.” This company has no impact on the editorial content of the show.

The post Kasey Bell’s 8 Great Ways to Use Google Slides appeared first on Cool Cat Teacher Blog by Vicki Davis @coolcatteacher helping educators be excellent every day. Meow!

28 May 00:34

How to Use Google's New VR Tour Creator

by noreply@blogger.com (Richard Byrne)
A few hours ago Google announced the launch of their new VR Tour Creator. This free tool lets everyone create their own virtual tours to view in Google Cardboard and or in the Chrome web browser. Tours are created by selecting locations in Google Maps and then selecting 360 degree Street View imagery. There's also an option to upload your own 360 degree imagery.

This afternoon I made a couple of tours with the VR Tour Creator. The process of creating a tour in the Tour Creator is straight-forward one. Watch my video embedded below to learn how you and your students can create virtual reality tours in Tour Creator.


This post originally appeared on Free Technology for Teachers if you see it elsewhere, it has been used without permission.
28 May 00:34

Animaker Edify - Easily Create Animated Videos In an Online Classroom

by noreply@blogger.com (Richard Byrne)
Disclosure: This is sponsored content. 

Animaker Edify is an excellent service for teachers and students who want to create animated videos. In reviewing Animaker Edify it hit on all of the things that I look for in a video creation tool for classrooms. It provides for teacher management of students’ accounts, offers a huge gallery of royalty-free media to use in videos, and it provides students with almost limitless possibilities for turning their stories into animated videos.

Making a Video

(click here if you cannot see the video in RSS or email). 

To create a video on Animaker Edify start by selecting “video” from the menu of project options. (Animaker Edify also provides tools for making presentations and infographics, but for this blog post I’m focusing on video creation). Once you have selected the video option you can choose to work from one of many video templates or you can create a video from scratch. Once you have made the choice of using a template or building a video from scratch, you’re ready to start making a video. In this case, I’m going to make a video from scratch.

Creating a video in Animaker Edify is done on a frame-by-frame basis. Each frame can be designed by dragging and dropping individual characters, speech bubbles, background scenes, and clip art into the scene. Animaker Edify provides tools for animating each character. For example, you can make a character appear to be running across the screen, walking, or talking. You can build as many characters and animation actions into each scene as you need. Once you have built the frames for your video you can add sound effects, music, or narration. Animake Edify provides a large gallery of royalty-free music and sound effects that you can use. But you can also record your own voice by using the built-in voice-over capability.


Your completed video project is saved in your Animaker Edify account. You can export to YouTube or Facebook. Users of the paid service can download their videos. Students using Animaker Edify can post their videos for their teachers to review before any further sharing takes place.

Take a look at this sample to see one of many types of videos that students can make in Animaker Edify. Watch this video for a full overview of how to make a video in Animaker Edify.

Great Features of the Animaker Edify Classroom
As I mentioned in the opening, Animaker Edify gives teachers the power to oversee their students’ accounts. When after you register and confirm your Animaker Edify account you can create accounts for your students. The free version of Animaker Edify allows you to add up to twenty-five students to your account. Your students do not need to have email addresses in order to use Animaker Edify. In fact, there isn’t even an option for students to add their email addresses. Students get their usernames and their passwords directly from you. If they need their passwords reset, you can do that for them from within your Animaker Edify account. Watch this short tutorial to see easy it is to add students to your classroom.

The benefits of Animaker Edify teacher accounts don’t end with managing students’ accounts. As a teacher you can create tasks for your students to complete. (Tasks is the term that Animaker Edify uses to describe assignments). When you create a task you can specify a start date and a due date. Your task description can include the type of video or presentation that you want your students to make. If you have a rubric that you want students to view as they work, you can attach that rubric to the task by uploading a PDF or Word document.

When a student completes an assigned task he or she submits it to you by simply selecting “share” and then “submit task” in the project editor. Then as the teacher you will be able to view the student’s project from your dashboard. Within your teacher account you can comment on the student’s work.

One more feature of your Animaker Edify teacher dashboard is the option to create student groups. You can create as many groups as you like of whatever size you like. This allows you to send messages to groups of students to encourage them to complete a task or to give them feedback on their work.

More Than Videos
This post focused on video creation because that’s what tends to get the most attention. That said, there is more to Animaker Edify than video creation. Animaker Edify also provides tools for creating infographics, creating posters, and slideshow presentations. And soon you’ll be able to make whiteboard videos and GIFs in Animaker Edify too. You can see all of the Animaker Edify features in action in this playlist of videos.

Disclosure: This is sponsored content. but all of the article was written by me about a tool that I wouldn't hesitate to use in my classroom.


This post originally appeared on Free Technology for Teachers if you see it elsewhere, it has been used without permission.
16 May 18:57

Weebly vs. Google Sites

by noreply@blogger.com (Richard Byrne)
Twice in the last few I have chatted with a school technology coaches who wanted my opinion about which platform their teachers should use to create classroom websites for the next school year. In one case I recommended Weebly and in the other I recommended Google Sites. Here's the rationale that I used in both recommendations.

Google Sites
The short version: Google Sites is a good option if your school already uses G Suite for Education and you don't want to introduce a new set of usernames and passwords for people to have to remember.

  • Pros:
    • Easy to embed files from Google Drive (Docs, Sheets, Slides, Forms).
    • Easy to embed calendars and videos.
    • Easy to invite other teachers and or students to collaborate on site development.
    • "New" version of Google Sites is optimized for mobile display.
  • Cons:
    • URLs assigned to Google Sites are long, cumbersome, and nearly impossible to remember. Don't believe, try to get all of your 7th graders to this site in ten minutes or less https://sites.google.com/a/freetech4teachers.com/civics-with-mr-byrne/ and then try to get them to remember it.
    • While design options have definitely improved in the new version of Google Sites, they're still far behind what you'll find on Weebly.
    • Support for embedding content from providers outside of the Google ecosystem has improved, but is still lagging behind other website creation services.
    • No support for a blog section within the new version of Google Sites.
Weebly
The short version: Weebly offers a Weebly for Education product which is free and is preferable to the standard Weebly free product because the education version doesn't display advertising. If you're not invested in G Suite, then Weebly is a slightly better choice. 
  • Pros:
    • Weebly for Education lets you manage up to forty student accounts in one free teacher account.
    • Large gallery of design templates that you can customize to your liking.
    • Includes option to have a blog section within your site.
    • Supports embedding content from many 3rd party sources.
  • Cons:
    • So many options that it can be a bit overwhelming to first-time users.
    • Annoying pop-up message trying to sell you a custom domain appears every time you publish a new page.
    • Doesn't have a collaboration option to let you invite other teachers work on a site with you without also giving them administrative rights. 


This post originally appeared on Free Technology for Teachers if you see it elsewhere, it has been used without permission.
16 May 18:55

Lensoo Create - Create Whiteboard Videos on Your Phone or Tablet

by noreply@blogger.com (Richard Byrne)
Lensoo Create is an app for creating whiteboard videos on your phone or tablet. The app is available in an Android version and in an iOS version (iPad only).

To create a video on Lensoo Create just open the app and tap the record button in the top of the screen. You can then start drawing on the white canvas in the app. Everything that you draw and type is captured in the video as is anything that you say while drawing. You can pause the recording then add a new page on which you draw while talking. When you're finished just tap the "done" button to save your work.

One of the shortcomings of Lensoo Create is that you cannot save your videos to your phone or tablet's camera roll. Instead you have to create a free Lensoo Create account to save your videos on their cloud service. Once saved you can share links to your video. Lensoo says that you can download your videos from your online account, but I haven't been able to make that function work update: I tried it again the next morning and I was able to download the video.

Applications for Education
Lensoo Create could be a good choice for teachers who want to make whiteboard videos to explain how to solve math problems or anything else that is best illustrated with handwriting. As a free app, it's not a bad option. That said, it's not quite as good as the paid ShowMe or Explain Everything apps.

Thanks to Allison Theissen for correctly pointing out that the iOS version only works on iPads not on iPhones. 


This post originally appeared on Free Technology for Teachers if you see it elsewhere, it has been used without permission.