Shared posts

19 Jun 12:26

How Domain Join is different in Windows 10 with Azure AD

by Jairo

In the previous post I talked about the three ways to set up devices for work with Azure AD. In this post I will talk about Domain Join and how additional capabilities are enabled in Windows 10 when Azure AD is present.

Domain Join until now

Domain Join has been deployed by many of you since the beginning of this millennium (although Domain Join existed even before AD was born and Windows NT was around).

Domain Join adds a computer to a particular realm, the Active Directory domain. The computer gets a unique identity and a channel is created so admins can reach out to the computer for settings and policy purposes (a.k.a. Group Policy).

When the computer is physically in the domain network it authenticates to the domain through a domain controller (DC). The computer participates in authorization decisions when accessing other resources in the domain. Users who sign-in to these computers using their AD accounts get authenticated to the domain as well.

Domain Join in Windows 10 and Azure AD

None of the existing behaviors for Domain Join change in Windows 10, however new capabilities light up when Azure AD is in the picture:

  1. Users don’t see additional authentication prompts when accessing work resources (a.k.a. SSO). Users enjoy SSO to Azure AD apps even when not connected to the domain network.
  2. Enterprise compliant roaming of user settings across joined devices. Users don’t need to connect a Microsoft account (e.g. Hotmail) to see settings across devices.
  3. Access to Windows Store for Business using AD account. Users can choose from an inventory of applications pre-selected by the organization.
  4. Microsoft Passport for Work and Windows Hello for secure and convenient access to work resources.
  5. Restriction of access to apps from only devices that meet compliance policy.

Domain joined devices will automatically register to Azure AD and avail of the above mentioned experiences. You can enable this functionality in your organization quite easily through a particular Group Policy. Note that you need to have the latest version of Azure AD Connect (AAD Connect). Look for a future post where I’ll discuss the AAD Connect role in enabling Windows 10 experiences.

To understand how this process works let’s consider the following illustration:

Blog - Windows 10 and Domain Join Registration


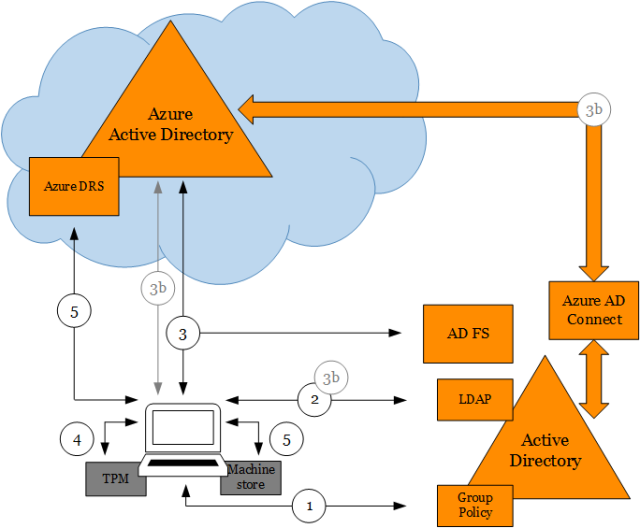
(1) Policy signals device to start auto-registration with Azure AD

When the policy Register domain computers as devices is pushed down to the computer via Group Policy the device registration process will trigger. This policy is found at:

Computer Configuration/Policies/Administrative Templates/Windows Components/Device Registration

Please notice that if you are using the Group Policy management console from Windows Server 2012 R2 the policy name is Automatically workplace join client computers and is found at:

Computer Configuration/Policies/Administrative Templates/Windows Components/Workplace Join

The registry key value for this policy in the device is the REG_DWORD value autoWorkplaceJoin under:

HKEY_LOCAL_MACHINE\SOFTWARE\Policies\Microsoft\Windows\WorkplaceJoin

A task registered in Task Scheduler with name Automatic-Device-Join under \Microsoft\Windows\Workplace Join triggers once the registry key value for the policy changes. A value of 1 means that auto-registration is enabled.

(2) Device queries Active Directory to get information about Azure AD tenant

The task which runs as SYSTEM reaches out to AD using the computer identity to query Azure AD tenant information stored in a Service Connection Point (SCP) object in the configuration naming context of the forest where the computer domain belongs.

The SCP is created by AAD Connect during Express installation. AAD Connect provides a PowerShell cmdlet to create the object manually. Please see more details at step-by-step to register Windows 10 domain joined devices to Azure AD. This SCP is placed in the following location (for example for the contoso.com domain):

CN=62a0ff2e-97b9-4513-943f-0d221bd30080,CN=Device Registration Configuration,CN=Services,CN=Configuration,DC=contoso,DC=com

The keywords multi-valued attribute on this object contains two values, one for the tenant domain name and one for the tenant ID. For example:

azureADName:contoso.com; azureADId:6c8b4242-a724-440d-a64c-29373788285b

(3) Device authenticates itself to Azure AD via AD FS to get a token for registration

Once it gets this information, it authenticates to Azure DRS via AD FS using Windows Integrated Authentication (i.e. Kerberos auth using the computer identity). AD FS issues a token to Azure AD before Azure AD issues the final token for Azure DRS. Three claims are passed to Azure AD via the AD FS token when the computer authenticates, and are written as attributes in the newly created device object:

  1. Object GUID of computer object on-prem.
  2. SID (Security Identifier) of computer object on-prem.
  3. Claim stating that computer is domain joined.

These claims are generated thanks to three AD FS issuance transform rules that are created by AAD Connect during Express installation. To know how to create these rules manually please see more details at step-by-step to register Windows 10 domain joined devices to Azure AD.

AAD Connect will then later use these attributes in the device object to correlate it with the computer object in on-prem AD. This is needed for lifecycle of the device object which is authoritative on-prem. For more details please look for a future post where I’ll discuss the AAD Connect role in enabling Windows 10 experiences.

(3b) Device authenticates itself to Azure AD (when Azure AD SSO configuration is password hash sync’ i.e. no AD FS)

When Azure AD SSO configuration is not federated but password hashes are sync’ed from on-prem, the following happens for the device to authenticate to Azure DRS:

  1. The task will create a credential in the form of a self-signed certificate and will register with the computer via LDAP in the userCertificates attribute.
  2. AAD Connect detects that the computer has registered this credential and takes it up to Azure AD in the form of a device object holding this credential, the object GUID and the computer SID.
  3. The task will use the credential in #1 to authenticate to Azure DRS directly once the device is created in #2.

Please notice that there is a inherent delay between the time the policy reaches the device and the device is ready for registration. This is because the credential that is used to complete device registration against Azure AD must flow up through AAD Connect in the absence of federation. For more details please look for a future post where I’ll discuss the AAD Connect role in enabling Windows 10 experiences.

(4) Device generates keys used in device registration

The task generates a private/public key pair to be used in a certificate signing request (CSR) to Azure DRS to obtain the certificate that the device will use to authenticate to Azure AD later on.

In addition, the task generates a second private/public key pair that is later used to bind the Primary Refresh Token (PRT) to the physical device upon authentication. This removes the risk of token replay in other devices. The PRT is the token used to provide SSO when users in that device access Azure AD applications. Please look for a future post about SSO in Windows 10 devices to understand in detail how this works.

If AD FS vNext is deployed (i.e. AD FS in Windows Server 2016 which is in Production Preview as of the date of this post), the device will also obtain an AD FS PRT for SSO to AD FS applications. Please look for a future post that I will publish about AD FS support for Windows 10.

If the device has a Trusted Platform Module (TPM) the private keys will be hardware protected.

(5) Device registers with Azure AD via Azure DRS

The task sends the CSR obtaining the certificate which places in the LocalMachine\My store. A device object is created in Azure AD and the certificate thumbprint is associated with it.

In addition the public key for PRT binding is registered with the device object as well. To learn how this key is used during authentication to protect the PRT look for a future post where I’ll cover the topic of SSO in Windows 10 devices.


Final thoughts

Once registration is complete users will enjoy the new experiences described at the beginning of this post. IT will also be able to restrict access to only devices that are domain joined or only domain joined devices that are compliant. Please also look for a future post that I will publish about device conditional access and Windows devices.

Until next time,

Jairo (Twitter: @JairoC_AzureAD)

30 Aug 13:12

Let’s code! Build a custom progress ring in Windows XAML

by Jerry Nixon

imageThere are several controls that ship for free in the Visual Studio XAML toolbox. One of them is the ProgressRing, a neat, animated ring of dots that goes round and round and round. BirdsDevelopers use the ProgressRing to indicate to the user that something is working, loading, or just doing something where the user should wait.

But what if you wanted to do more without splitting the atom? Could you build your own, custom progress in that super-charges the branding of your Windows app?

Yes. Let’s do it.

In the video above, we build out a custom ProgressRing in an attempt to show some of the great animation and storyboard capabilities XAML developers have and how to manipulate those in Blend. It’s worth mentioning that there is zero code-behind in this entire project. Everything is declared in XAML.

Get the code here.

Best of luck!

27 Apr 13:31

Complete Guide to Surface Book

by Paul Thurrott
Complete Guide to Surface Book

I'm using Microsoft's ultimate laptop full-time, and this guide--a complete collection of all of my Surface Book how-to articles---can help you do the same.

The post Complete Guide to Surface Book appeared first on Thurrott.com.

27 Apr 13:17

Why nuclear energy is our best option at the moment

27 Apr 13:00

Excel-Vorlagen: Die 7 besten Quellen für die professionelle Tabellenkalkulation

by Andreas Weck

Es gibt etliche Excel-Vorlagen für das Projektmanagement, die Buchhaltung oder das Personalwesen. Wir haben sieben gute Template-Quellen zusammengetragen.

Es gibt für alles eine App – ob für das private Haushaltsbuch oder für die professionelle Zeiterfassung im Beruf. Zudem gibt es dutzende wirklich gute Programme für die Finanz- oder Projektplanung, egal ob persönlich oder geschäftlich. Doch so gut diese Möglichkeiten auch sind, sie können in der Funktionalität lange nicht mit Microsoft Excel mithalten. „Mit Excel kann man die Weltherrschaft an sich reißen“, hat mir ein guter Freund, der Angewandte IT studiert, einmal gesagt. Und ja, es gibt wenig, das ihr mit der Tabellenkalkulations-Software nicht anstellen könnt – sofern ihr die Befehle und Funktionen beherrscht.

Projektmanagement, Buchhaltung oder Personalwesen: Excel-Vorlagen für den professionellen Einsatz

Excel-Vorlagen wie das „Money-Management-Template“ von Vertex42 helfen bei der professionellen Tabellenkalkulation. (Screenshot: Vertex42.com)

Doch bevor wir jetzt größenwahnsinnige Gedanken in euch hervorrufen: stopp! Wir werden euch hier sicherlich keine Tipps für einen Eroberungsfeldzug geben, sondern einfach nur ein paar Quellen kuratieren, die sinnvolle Excel-Vorlagen bieten. Denn selbst wenn ihr nicht einmal die rudimentärsten Grundlagen von Excel beherrscht, heißt das nicht, dass ihr ausgeschlossen sein müsst. Das Web ist voll von Templates, die euch bei verschiedensten Szenerien behilflich sein können.

  1. Zu allererst einmal ist da natürlich die offizielle Vorlagen-Webseite von Microsoft zu empfehlen. Hier findet ihr nicht nur dutzende Excel- sondern auch PowerPoint- und Word-Vorlagen – sortiert unter anderem nach entsprechenden Kategorien wie Ausbildung, Budgets oder Rechnungen. Der Excel-Bereich bietet beispielsweise Templates zur Aufgabenverwaltung für Studierende, zur Verfolgung von Ticketverkäufen sowie Haushaltsausgaben.
  1. Während die offiziellen Vorlagen der Microsoft-Webseite relativ simpel und vermutlich eher für private Szenarien geeignet sind, finden Profis auf Vertex24.com wesentlich umfangreichere Excel-Templates. Sortiert unter anderem nach den Kategorien „Calenders & Schedules“, „Budgets & Personal Finance“, „Invoice-Templates“ sowie „Timesheets & HR“ gibt es hier viele wirklich umfassende Downloads mit beruflichem Kontext.
  1. Auf Chandoo.org findet ihr nicht nur Templates zum Download, es gibt sogar etliche kostenfreie Tutorials, die euch sowohl Basis- als auch Fortgeschrittenenkurse bieten. Ihr könnt hier also auch was lernen! Die Navigation durch die Excel-Templates ist hingegen etwas unsortiert, was Suchenden nicht gerade in die Hände spielt. Von einem Top-10-Bereich einmal abgesehen, der die häufigsten Downloads präsentiert, werden die Vorlagen lose in einer Liste aufgeführt. Dennoch: Nützlich sind sie allemal.
  1. Wesentlich aufgeräumter geht es auf Spreadsheetzone.com zu. Hier sind die unterschiedlichen Templates sogar nach Branchen unterteilt – beispielsweise Advertising & PR, Banking, Non-Profit und Retail. Thematisch kann auch unterschieden werden, etwa in Health & Fitness oder IT. Die Excel-Vorlagen sind mit Sternen versehen, die das Rating der Nutzer widerspiegeln. Falls ihr selbst Templates einreichen wollt, könnt ihr das ebenfalls tun.
  1. Während die Quellen zwei bis vier in englischer Sprache verfasst sind, ist Excel-Vorlagen.net wieder eine deutsche Website. Die Plattform bietet verschiedene Templates wie einen Kalender und einen Zeitplaner, kann jedoch vom Umfang her kaum mit den oberen Seiten konkurrieren. Das Angebot ist übersichtlich, was allerdings auch ein Vorteil sein kann.
  1. Auf Smartsheet.com finden Interessierte jede Menge Excel-Vorlagen für den Bereich des Projektmanagements. Angefangen beim Gantt-Chart-Template über ein Issue-Tracker-Template bis hin zum Agile-Project-Plan-Template findet ihr hier vielerlei nützliche Quellen.
  1. Was viele Anwender oft gar nicht bemerken: Excel selbst bietet ebenfalls verschiedene Vorlagen an, die euch helfen, schnell und einfach Tabellen anzulegen. Klickt ihr auf „Neue Datei“ werden sowohl leere Arbeitsmappen als auch To-Do- und Pro-und-Contra-Listen sowie Kalender und Erfassungsblätter für die Inventur angeboten. Jedes Template lässt sich natürlich anpassen.

Powerpoint und Keynote: Hier findet ihr Templates und Vorlagen für Präsentationen

Powerpoint und Keynote: Hier findet ihr Templates und Vorlagen für Präsentationen. (Grafik: Shutterstock)

PowerPoint und Keynote gehören zu den am häufigsten eingesetzten Lösungen für Präsentationen. Wir haben für euch das Web nach schicken PowerPoint-Templates und Vorlagen für Keynote durchforstet und einige Quellen zusammengetragen.

Viel Spaß mit dem Artikel „Powerpoint und Keynote: Hier  findet ihr diverse Templates und Vorlagen für schicke Präsentationen“.

27 Apr 12:59

Windows Kernel Architecture Internals (2010) [pdf]

27 Apr 12:58

The Wolfram Language: Fast Introduction for Programmers

27 Apr 12:55

Share your Excel data with Power BI publisher for Excel Preview

by Power BI Team

Introducing Power BI publisher for Excel: sharing key Excel insights just got easier. Save snapshots of important PivotTables, Charts, cell ranges, and more from across all of your spreadsheets to a single location quickly.


Share your Excel data to online dashboards in seconds: select an Excel element on the grid of an open worksheet and then click the Pin button on the Power BI ribbon tab.


In the Pin to dashboard dialog, you can select an existing dashboard from a list of dashboards for which you have write permissions or you can create a new dashboard. Then click Pin to pin the element’s snapshot as a tile to the dashboard.


Once pinned, users are presented with a confirmation message including a link to the new tile in the dashboard.


Pin to update

When you select an Excel element that has already been pinned, you will be asked to choose if this is an update to the already pinned element, a new pin to the same dashboard, or a new pin to another dashboard.


Pin manager

Users can review and update all pinned elements from an open worksheet through the list shown in Pin manager. The list consists of pinned elements on the open worksheet and their mapping to tiles on each dashboard it has been pinned to.

Power BI publisher for Excel supports updates of a single selection as well as updates of multiple elements.

Highlighting a list item shows the pinned element selection on the Excel grid.

Clicking the dashboard name link will open the associated dashboard in a browser.

Users can remove a pin by using the Remove button. This is mostly useful when the tile had been deleted from the dashboard through Power BI or when the pinned element has been deleted from the worksheet. In both cases, you will get a notification icon with the relevant error.

For each line with a message icon, warnings and error details will appear as a tooltip on hover.


Note: in order to keep the Pin manager up-to-date and to support updates of pinned elements, the file must be saved after a Pin or Update operation has completed and before the file is closed.


If you want to learn more about Power BI publisher for Excel, you can read our documentation.

Enjoy and let us know what you think!

27 Apr 12:52

SEO-Audit in 13 Schritten: So optimierst du deine Suchmaschinen-Rankings

by Eva Wagner

Bereit, die Rankings in Suchmaschinen zu erobern und erste Positionen bei bestimmten Suchbegriffen zu besetzen? Nicht so schnell. Bevor man sich an die Optimierung der eigenen Webseite macht, ist es hilfreich, eine umfassende Analyse durchzuführen, in der Fachsprache auch als SEO-Audit oder Site-Klinik bezeichnet.

Ein SEO-Audit untersucht meistens, ob die Prozesse, Anforderungen und Richtlinien nach allen Regeln der Suchmaschinenoptimierung durchgeführt worden sind. Wenn das nicht der Fall ist, hilft ein solches Audit zu identifizieren, wo die Optimierungspotentiale liegen und wo ungenutzte Chancen im Ranking oder in der Qualitätsverbesserung einer Webseite liegen. In großen Agenturen, die sich auf Suchmaschinenoptimierung spezialisiert haben, ist dieses Vorgehen state of the art. Auch größere Inhouse-Teams bedienen sich solcher Listen. Dieser Artikel zeigt in 13 Schritten, wie man ein professionelles und strukturiertes SEO-Audit sorgfältig planen und erfolgreich durchführen kann.

SEO-Audit richtig planen

SEO-Audit-Template zum Planen und Nachfassen. (Grafik: aleydasolis.com)

Bevor man sich an die ausführliche SEO-Analyse wagt, sollte man sich zunächst einen gut durchdachten Plan zurecht legen. Die meisten können es kaum erwarten, direkt die Analyse zu starten und riskieren somit, einige der wesentlichen Faktoren aus den Augen zu verlieren. Auch das Nachfassen kann zu kurz kommen oder die Deadlines nicht eingehalten werden. Es ist also empfehlenswert, einen Plan zu erstellen, an dem man auch in Teams festhält. Wichtig ist, die wichtigen Suchmaschinenfaktoren dabei zu berücksichtigen. Auf dem Markt gibt es eine Reihe Templates und Best-Practice-Beispiele, wie eine SEO-Audit-Planung aussehen kann. Dabei können viele Kriterien wie Priorisierung oder Deadlines zur Umsetzung berücksichtigt werden.

Status Quo ermitteln

Ein SEO-Audit startet für gewöhnlich mit einer eingehenden Analyse der Website. Hierfür ist es empfehlenswert, diverse automatisierte Werkzeuge in Anspruch zu nehmen, da der manuelle Aufwand bei größeren Websites enorm hoch sein kann. Es gibt eine Reihe an kostenlosen und kostenpflichtigen Analyse-Tools, die eine Website vollständig oder teilweise überprüfen können. Im Idealfall berücksichtigen die Tools nicht nur das technische Setup einer Website, sondern gehen auf die internen Links, Content- und Website-Architektur ein. So kann man mit einem Werkzeug sämtliche Bereiche einer Website analysieren, ohne dass man mehrere Auswertungen zusammenführen muss. In der Praxis hat sich der Einsatz der Google-Search-Console bewährt. Die Google-Search-Console ist ein kostenloser Dienst von Google, bei dem Website-Inhaber ihre Websites mit der Search-Console verbinden und verschiedene Suchdaten analysieren können. Das Tool von Google gibt einen guten Überblick über die Strukturfehler, Code-Unstimmigkeiten oder kaputte Links. Anhand der Analyse können entsprechende Optimierungsmaßnahmen abgeleitet werden. Die Search-Console ermöglicht zwar einen guten Überblick über die Website-Daten. Wer jedoch noch tiefer in die Analyse einsteigen möchte, um tiefergehenden Daten zu bekommen, kann zusätzlich auch auf Tools wie Screaming Frog oder OnPage.org zurückgreifen.

Hinweis: Stell euch darauf ein, dass ihr ab diesem Zeitpunkt eine unglaublich große Datenmenge bekommt und die Daten gegebenenfalls auch zusammenführen müsst. Wenn euer Webauftritt sehr groß ist, empfiehlt es sich, sich zunächst nur auf die wichtigen Website-Bereiche zu beschränken.

Nach der Ermittlung des Status Quo kann das eigentliche SEO-Audit durchgeführt werden. Auf diese 13 Kriterien solltet ihr besonders achten, wenn ihr eine Website hinsichtlich Suchmaschinenfaktoren „auseinander nehmen“ wollt.

  1. Zugänglichkeit
  2. Seiten im Index analysieren
  3. Seitenstruktur nachvollziehen
  4. Interne Links
  5. Externe Links
  6. OnPage-Faktoren
  7. Content
  8. Keywords
  9. Wichtige SEO-KPIs
  10. Mobile
  11. International
  12. Rich Snippets
  13. Local SEO

1. Zugänglichkeit prüfen (Accessibility)

Eine wichtige Voraussetzung für eine erfolgreiche Aufnahme einer Webseite in den Index ist ihre Zugänglichkeit. Es ist wichtig, sicher zu stellen, dass der Suchmaschinen-Bot die Seite korrekt überprüfen (crawlen) kann. Der Bot von Google wird als Google-Bot bezeichnet. Es ist ein Crawler, der die vorhandenen Webseitendaten erfasst, damit diese zum späteren Zeitpunkt indexiert werden können.

Auch hier kann die Search-Console Abhilfe schaffen, indem sie eine Webseite wie der Google-Bot überprüft und beim Crawling gefundene Fehler anzeigt. Der Google-Bot kann folgende Aktionen durchführen:

  • Erfassen von HTML-Dateien, Images, PDFs und anderen Dateienformaten
  • Erfassen von JavaScript, Ajax und CSS
  • Annahme der Cookies
  • URL-Normalisierung
  • Berücksichtigung der Robots.txt-Datei
  • Überprüfung von Subdomains
  • Sitemap berücksichtigen
  • Blockierte URLs ignorieren
  • uvm.

Der Google-Bot arbeitet so die Dokumente einer Webseite durch, folgt den Links, die sich auf den Seiten befinden und hat das Ziel, die gefundenen und relevanten Seiten entsprechend zu indexieren. Sobald der Bot eine Seite besucht, kann er als solcher identifiziert werden:

  • Googlebot - "Mozilla/5.0 (compatible; Googlebot/2.1; +http://www.google.com/bot.html)"

Um die Zugänglichkeit von bestimmten Seiten zu gewährleisten, sollte man bestimmte Regeln beachten, damit der Google-Bot alle wichtigen Seiten crawlen kann.

Robots.txt

Beispiel einer robots.txt von otto.de. (Screenshot: otto.de)
Beispiel einer robots.txt von otto.de.

Die Robots.txt-Datei ist eine Textdatei, die im Root-Verzeichnis hinterlegt wird und bestimmte Anweisungen für Crawler enthält. Bevor ein Suchmaschinencrawler mit dem Crawling beginnt, wird nach dieser Datei explizit gesucht und deren Anweisungen berücksichtigt.

Meta Tag „robots“

So wird das Meta-Tag „robots“ im Code deklariert.

Das Meta-Tag „robots“ ist ein Meta-Tag, das im Header einer Seite deklariert wird. Es beinhaltet zwei Attribute, die dem Bot mitteilen, wie die Vorgehensweise für diese Seite erfolgen muss. Die vier Eigenschaften, die man im Tag mitgeben kann, sind: index oder noindex und follow oder nofollow. Dabei weisen die „index“- und „noindex“-Attribute auf die Indexierung hin und „follow“ beziehungsweise „nofollow“ auf das Crawling und das Folgen der vorhandenen internen und externen Links auf einer Seite.

Sitemap.xml

Beispiel einer XML-Sitemap-Datei.

Die Sitemap ist eine Datei, die dem Crawler lediglich helfen kann, die richtigen und wichtigen Inhalte zu erfassen. Im Gegensatz zum robots-Tag und der robots.txt kann die Sitemap den Crawler nicht blockieren. Jedoch kann man in einer sitemap.xml sinnvolle indexrelevante Seiten hinterlegen, die dem Nutzer einen eindeutigen Mehrwert bieten. Darunter ist es auch möglich, bestimmte Seiten Google vorzuschlagen, die eine besonders hohe Priorität haben.

Ausschließen muss auch mal sein

Es können jedoch auch bestimmte Daten existieren, die sensibel sind und nicht im Suchmaschinenindex erscheinen sollen. Das könnten Listen mit Duplikat-URLs sein, der Login-Bereich einer Webseite oder Payment-Seiten. Auch Impressum und Datenschutzbestimmungen sind Klassiker unter den auszuschließenden Seiten. Diese sollten dann vom Crawling bewusst, mittels der oben genannten Maßnahmen, ausgeschlossen werden.

Die Zugänglichkeit für Suchmaschinen ist sehr wichtig für SEO, deshalb sollte man sich diesem Thema insbesondere widmen. Beantwortet man im Rahmen des SEO-Audits diese Fragen, dann ist man schon auf der sicheren Seite:

  • Ist der Google-Bot als Crawler zugelassen? (robots.txt/User-Agent-Weiche)
  • Wird die Webseite regelmäßig von Google gecrawlt?
  • Werden wichtige Verzeichnisse oder Unterseiten blockiert?
  • Existiert eine gültige sitemap.xml?
  • Werden wichtige Inhalte der Webseite durch die robots.txt oder über die Robots-Meta ausgeschlossen?
27 Apr 12:51

Why I No Longer Use MVC Frameworks

26 Apr 11:38

Kein Vertrauen in die Cloud? Cryptomator verschlüsselt eure Daten bei Dropbox, Google und Co. [Update]

by Florian Blaschke

Cloud-Dienste sind praktisch und oft kostenlos. Doch wirklich sensible Daten wollen ihnen viele nicht anvertrauen. Cryptomator versucht sich an einer Lösung: Das Open-Source-Tool verschlüsselt ausgewählte Daten per Scrypt und AES.

Cryptomator in Version 1.0 erschienen

Update vom 9. März 2016: Etwas mehr als ein Jahr nach dem Release der Beta-Version ist Cryptomator jetzt in der finalen Version 1.0 veröffentlicht worden – mit Apps für iPhone und iPad sowie Versionen für Mac OS X, Linux und Windows. Im App-Store von Apple ist Cryptomator für den Einführungspreis von 1,99 Euro erhältlich, eine Version für Android ist nach Angaben der Entwickler in der Entwicklung. Auf der Homepage von Cryptomator können die Versionen für Windows, Mac OS X und Linux kostenfrei runtergeladen werden. Wer den Entwicklern etwas Gutes tun will, kann das über ein „Pay-what-you-want“-Modell tun.

Cryptomator ist Open Source, Informationen über das Dateisystem und die Verschlüsselung finden Nutzer außerdem auf cryptomator.org/architecture. Der Quellcode ist auf GitHub erhältlich.

Cloud-Dienste: Deutschland nur im Mittelfeld

Cloud-Dienste sind ein Milliarden-Geschäft. Gerade erst hat Apple 1,7 Milliarden Euro in neue Rechenzentren investiert, für die vergangenen Jahre haben Branchenverbände und Marktforscher Wachstumsraten von bis zu 120 Prozent prophezeit. Nicht nur im privaten Bereich, auch für Unternehmen und Freiberufler sind Dienste wie Dropbox, Google Drive, OneDrive oder Box nicht mehr aus dem Alltag wegzudenken.

So soll Apples neues Rechenzentrum in Dänemark aussehen. (Bild: Apple)

Zwar liegt Deutschland bei der Nutzung von Cloud-Speichern nur im europäischen Mittelfeld – nur jeder fünfte Deutsche (21 Prozent) hat 2014 seine Daten bei einem Cloud-Dienst gespeichert –, doch auch bei uns steigen die Nutzungszahlen stetig an. Zwei große Probleme aber bleiben: Das mangelnde Vertrauen der Nutzer in die Anbieter – und die mangelnde Bereitschaft der Anbieter, stärker auf Verschlüsselung zu setzen.

Daten in der Cloud: Eine Frage von Verfügbarkeit und Vertraulichkeit

Der Entwickler Sebastian Stenzel hat für dieses Problem eine Lösung gefunden. Stenzel, der gemeinsam mit Tobias Hagemann auch schon die Passwortverwaltung tooPassword entwickelt hat, will Nutzern mit Cryptomator das Verschlüsseln von Daten in der Cloud ermöglichen.

Cloud-Dienste: „Die garantierte Ausfallsicherheit liegt um das hundertfache höher als bei heimischen Lösungen.“

„Die Idee entstand wie bei tooPassword aus eigenem Bedarf heraus“, sagt Stenzel. Hinter allem habe die Frage gesteckt, was ihm für seine Daten wichtig sei. Insbesondere zwei sogenannte Schutzziele habe er sich dabei gesteckt: Verfügbarkeit und Vertraulichkeit.

In Sachen Verfügbarkeit habe er guten Gewissens auf bestehende Lösungen zurückgreifen können: „Selbst der Amazon-S3-Reduced-Redundancy-Storage-Space speichert Daten weltweit mehrfach redundant. Die garantierte Ausfallsicherheit liegt um das hundertfache höher als bei heimischen Lösungen. Und gegen Aufpreis kriegt man sogar noch erhöhte Redundanz. Was bringt mir meine Backup-Festplatte, wenn sie im selben Raum wie mein Computer steht? Ein Brand und weg sind meine Daten.“

Anders habe das allerdings bei der Vertraulichkeit ausgesehen – zwar gebe es Cloud-Anbieter, die versprechen, die Daten serverseitig zu verschlüsseln, doch wie könne man das kontrollieren? Und: „Ein Nutzer, der glaubt zu wissen, wo seine Daten landen, belügt sich selbst. Private Dokumente landen bei mir deshalb nach wie vor nur auf lokalen Speichermedien.“ Es werde schon keinen Hardwareschaden geben, fügt er augenzwinkernd hinzu.

Der Lösungsansatz von Cryptomator: Open Source

Um trotzdem beide Ziele zu erreichen, hat er sich auf die Suche nach Tools gemacht, die Daten clientseitig verschlüsseln. Und er ist fündig geworden: „Viivo, Boxcryptor, SafeMonk und cloudfogger haben alle das geleistet, was ich brauche. Zumindest auf den ersten Blick. Der zweite Blick offenbarte dann jedoch: Account-Erstellungs-Zwänge, Abogebühren, Authentifizierung gegen die Server der Anbieter und dergleichen.“

Nach dem Entsperren mountet Cryptomator den Ordner via Webdav. (Screenshot: t3n/Cryptomator)
Cryptomator ist extrem einfach zu bedienen. (Screenshot: t3n/Cryptomator)

„Ok, liebe NSA, ihr dürft meine Daten haben, aber ich fordere, dass ihr euch das mindestens 43 Milliarden Dollar kosten lasst.“

Und: Sein Vertrauensproblem habe nach wie vor bestanden. „Zwar hätte ich meinem Cloud-Storage-Provider jetzt nicht mehr zu vertrauen brauchen, doch ich müsste Boxcryptor vertrauen, dass die nicht in der Lage sind, meinen Schlüssel zu entschlüsseln.“ Also hat er sich selbst an die Arbeit gemacht – und Cryptomator entwickelt. Sein Lösungsansatz: Open Source. Nur wenn die Community kontrolliere, dass die Software frei von Backdoors ist, sei sie vertrauenswürdig. Positiver Nebeneffekt: „Schwachstellen fallen sofort auf und werden berichtet.“

Nachdem Stenzel bei der Schlüsselherleitung zunächst auf PBKDF2 gesetzt hat, ist er nach einem Hinweis aus der Community noch mal umgeschwenkt. Statt PBKDF2 nutzt Cryptomator jetzt Scrypt, eine Passwort-basierte Schlüsselableitungsfunktion, die 2010 von Colin Percival veröffentlicht wurde – eben weil bcrypt oder PBKDF2 gegen Brute-Force- und Wörterbuch-Angriffe verwundbar sind. „Statt anzugeben, wie viele Jahrtausende ein Brute-Forcer sich die Zähne ausbeißen würde, ist doch die Fragestellung nach dem Budgetaufwand von Interesse, wenn man mit parallel arbeitender Spezialhardware (ASICs) innerhalb eines vorgegebenen Zeitraums ein Passwort knacken will“, sagt Stenzel. Und da habe er sich gesagt: „Ok, liebe NSA, ihr dürft meine Daten haben, aber ich fordere, dass ihr euch das mindestens 43 Milliarden Dollar kosten lasst.“

Cryptomator nutzt WebDAV – eine speicherschonende Lösung

Die genauen kryptografischen Details hat Stenzel auf der Website von Cryptomator offengelegt, um „dem Internet“ den Reviewprozess zu vereinfachen. „Ich lehne jede Form von ‚Security by Obscurity‘ ab. Wer Kerkhoffs’ Prinzip kennt, weiß, dass die Offenlegung keine Risiken birgt.“ Zudem setze er bei sämtlichen kryptografischen Operationen bewusst nur auf ausgereifte Bibliotheken. Einzige Ausnahme: das Verfahren, das zur Dateinamensverschlüsselung zum Einsatz kommt. Seine Eigenimplementierung des RFC 5297 bestehe jedoch alle offiziellen Testvektoren.

Auch bei der weiteren Umsetzung von Cryptomator hat Stenzel auf Open-Source-Projekte zurückgegriffen. Unter anderem:

Cryptomator selbst ist – fast schon altmodisch – eine Java-Anwendung mit JavaFX-Frontend. In ihr legt der Nutzer einen Ordner-Namen fest, den er überall auf seinem Rechner – also auch in einem Cloud-Verzeichnis von Dropbox, Google Drive, OneDrive oder einem der anderen Anbieter anlegen kann. Dieser Ordner wird mit einem eigenen Passwort versehen und dann per AES mit einem 256 Bit langen Schlüssel gesichert. Entsperrt der Nutzer sein Verzeichnis wieder, lässt Cryptomator das Verzeichnis per Shell-Befehl mounten, sodass über den Finder oder ein ähnliches Programm via WebDAV automatisiert darauf zugegriffen werden kann. Der Vorteil: Dadurch, dass diese Laufwerke rein virtuell sind, wird auch kein Speicherplatz verschwendet.

Cryptomator: So funktioniert die Verschlüsselung für die Cloud

cryptomator-screenshot-01cryptomator-screenshot-02cryptomator-screenshot-03cryptomator-screenshot-04
Alle 7 Bilder

War der Port des lokalen WebDAV-Serverprozesses in der ersten Version noch konfigurierbar und hatte jeder Vault noch eine eigene Serverinstanz auf einem individuellen Port, ist das in der aktuellen Version anders. Inzwischen laufen alle Vaults über einen Server, und das mit einem individuellen Pfadprefix in der URL, der bei jedem Mount zufällig generiert wird. Der Vorteil: mehr Convenience. Der Nachteil: Automatisierte Speicherlösungen funktionieren mit Cryptomator nicht, da diese jedes Mal mit einer neuen URL zurecht kommen müssten.

Aktuell befindet sich Cryptomator noch in der Beta-Version, weshalb Stenzel auch empfiehlt, das Tool nur mit Daten zu nutzen, die sich im Falle eines Falles wiederherstellen lassen. Doch in unserem Test funktionierte das Programm einwandfrei. Einziges Manko: Der Nutzer braucht seinen Rechner, um auf die Daten in der Cloud zuzugreifen, der Zugriff via Web-Interface ist naturgemäß nicht möglich. Neben der von uns getesteten Version für Mac OS gibt es Cryptomator auch als Windows- und Linux-Version sowie als Generic JAR-File. Eine iOS-App ist geplant, eine Android-Portierung, so Sebastian Stenzel, sollte sehr einfach sein, da die Desktop-App Java nutzt. „Hier hoffe ich auf die Community.“

Wer mehr über Cryptomator erfahren will: Sebastian Stenzel hat sein Projekt auch auf GitHub veröffentlicht.

Dieser Artikel ist eine Überarbeitung eines Artikels vom 9. März 2015. Letztes Update: 9. März 2016.

12 Apr 11:23

The Matrix Updated

12 Apr 11:20

Free Machine Learning Library for .NET

12 Apr 10:58

Developer's introduction to Azure IoT

by Olivier Bloch

For the vast quantity of articles, guides and opinions written about the Internet of Things (IoT), it seems much attention goes to shiny, new “Things,” while the humble, foundational “Internet,” waits in the wing for its moment in the spotlight. The truth of the matter is that IoT as we know it today takes an ensemble cast and crew to make the show sing. Behind the scenes, developers are hard at work making any number of decisions on how to connect devices to the cloud, how to determine which protocols can be used, how to secure connections and the best methods of authentication.

This post is for the cast and crew of developers that make any IoT solution work for its intended audience. It's a guide not just to the “Things,” but to their secure connection to the “Internet” that powers every IoT solution.

What is Azure IoT?

Microsoft’s end-to-end IoT platform is the most complete IoT offering, enabling enterprises to build and realize value from IoT solutions quickly and efficiently. Our IoT solutions, including Azure IoT Suite and Azure IoT Hub, harness the power of our full cloud, data and developer offerings for the enterprise to provide hyperscale IoT services, rich data and analytics, and deep integration. Developers can start building custom solutions using IoT Hub or get started quickly with the comprehensive preconfigured solutions of Azure IoT Suite (which includes Azure IoT Hub). This post will focus mostly on Azure IoT Hub.

To help developers leverage the power of IoT in their endeavors and get started quickly, Azure IoT offers a set of open source SDKs, samples, preconfigured solutions and tools. Microsoft engineers work on these SDKs, tools and samples on GitHub, collaborating with the community and partners in the open to add features; support new languages, protocols, and devices and platforms; fix bugs; and improve performance.

The Azure IoT developer center is a great place to start your journey with Azure IoT, and this article will give you a big picture of what to expect when you jump in.

Develop for Azure IoT Hub

Azure IoT Hub provides an easy and secure way to connect, provision and manage millions of IoT devices sending and receiving billions of messages per month. IoT Hub is the bridge between your devices and their solutions in the cloud, allowing them to store, analyze and act on that data in real time. IoT Hub enables secure, reliable, two-way communication — from device to cloud and cloud to device — over open protocols such as MQTT, HTTPS and AMQPS that are already widely used in IoT.

As a developer you will be looking at three main objectives: connecting devices to IoT Hub, managing the IoT Hub service itself and integrating IoT Hub into your overall IoT solution in the cloud.

To achieve all three, the Azure IoT Hub service exposes REST APIs along with AMQP and MQTT communication support, but implementing communication protocols is not trivial by nature. We've got you covered on both the service and the device client sides with open source SDKs and samples that abstract the complexity of these protocols and expose simple and straightforward APIs. All our client SDKs are open sourced on GitHub and offer the following:

  • Device client:
    • Support for C, JavaScript (node), Java and C#
    • Support for AMQP, AMQP over WebSockets, MQTT and HTTP/REST for the device–to-cloud communication
    • Support for SSL (using third-party dependencies such as openSSL or WolfSSL)
    • Simple APIs to:
      • Establish a secure connection to IoT Hub
      • Send messages to IoT Hub
      • Receive messages from IoT Hub
  • Service client:
    • Support for C#, Java and JavaScript (node)
    • Simple APIs to:
      • Manage the device registry (Create, Remove, Update, Delete)
      • Read data from IoT Hub
      • Send messages to specific devices

For connecting devices that cannot talk to the protocols supported by IoT Hub, there is an open source sample for a cloud protocol gateway that serves as a bridge between the protocol of your choice and IoT Hub.

The diagram below shows where the open source SDKs and samples can be used.

Azure IoT Hub dev diagram

Connecting securely to Azure IoT Hub

Azure IoT Hub offers a secure mechanism for connecting devices.

First is the notion of access control. The Azure IoT Hub service uses a set of permissions to grant access to endpoints. Developers can set up permissions using shared access policies for services, apps and devices and can create per-device security credentials leveraging the device identity registry feature of the service.

Then Azure IoT Hub will authenticate endpoints by verifying a token against the shared access policies and device identity registry security credentials. Security credentials, such as symmetric keys, are never sent over the wire. The security token generation is implemented in the device client SDKs.

Last but not least, all endpoints connect to Azure IoT Hub over TLS, ensuring no endpoint is ever exposed on unencrypted or unsecured channels.

For devices, the device client SDKs implement all of this under the hoods for you, so as a developer you can focus on the development of the actual solution trusting that the plumbing is robust and secured.

Connecting a device is as simple as the below line of C code:

iotHubClientHandle = IoTHubClient_CreateFromConnectionString(connectionString, AMQP_Protocol);

For managing the service from an application, the service client SDKs also implement all that’s needed to connect securely to Azure IoT Hub.

To learn more on communication security for Azure IoT Hub, read the security section of the service developer’s guide.

Sending and receiving messages

Once a secure connection is established from devices to Azure IoT Hub, all that’s left to do is to send and receive messages. Azure IoT Hub offers a raw messaging infrastructure, meaning you can put whatever you want and need in the body of your messages.

Sending messages is as simple as the C code snippet below:

msgHandle = IoTHubMessage_CreateFromByteArray(msgText, strlen(msgText));

IoTHubClient_SendEventAsync(iotHubClientHandle, msgHandle, SendConfirmationCallback, NULL);

And if you want to receive messages from Azure IoT Hub on the device, you need to register a callback like in the below C example:

IoTHubClient_SetMessageCallback(iotHubClientHandle, ReceiveMessageCallback, NULL);

The SDKs also allow to know and notify when a message has been received on the other side.

You will find more details in the various samples in the SDKs repository for each of the languages.

Packages, tools, documentation and samples to make your life easier

In addition to simple APIs, developers will benefit from binary packages, tools, documentation and samples, all part of the SDKs open source repository, to get started faster and implement and debug their solutions efficiently.

Binary packages such as npm for JavaScript, NuGet for C#, apt-get for some Linux Distributions and Maven for Java saves you from having to build and compile the whole SDK project on your target device if not needed. Running a sample on a device using one of these packages is just a few easy steps.

In the process of creating and debugging your IoT solution with Azure IoT Hub, you will need to configure access credentials in the IoT Hub service, create device identities, monitor messages coming from devices and send messages to devices to test your code. To achieve these tasks easily, a couple tools are provided:

  • iothub-explorer is a cross-platform CLI tool based on node.js that allows CRUD operations on an Azure IoT Hub device registry and sending and receiving messages to and from a specific device.
  • Device Explorer is a Windows application that comes with a Windows user interface and allows pretty much the same operations as the iothub-explorer tool.

When it comes to documentation, you can find three types:

Last but not least, tons of open source samples are available in the SDKs repository for you to get started faster. Simple samples show, for each language, how each of the supported protocols work to send and receive messages, while more advanced ones show how to connect to Azure IoT Suite or how to implement a simple temperature anomaly detection system. You can find a list of all these samples in the readme file of the project.

End-to-end samples are also published on the Azure samples portal by the broader community that you can get inspired by as well.

Hardware and software requirements

You can connect a wide range of devices directly to Azure IoT Hub. Your device will have to have enough resources to have an IP address and establish a TCP over SSL connection. The device client SDKs support various platforms depending on the languages: microcontrollers, real-time OS, Linux, Windows, etc. You can find an exhaustive list of all the supported OS platforms, HW platforms tested, protocols here.

If you prefer shopping for hardware that already supports Azure IoT connectivity, check out the extensive list of supported platforms along with a list of the boards certified for Azure IoT Hub.

When it comes to the OS you will be developing on, you can work on Windows, Linux or OSX, depending on the devices you are targeting and whether or not you intend to compile the SDKs yourself or use one of the binary packages. You can find details on how to set up your development environment in the various sample instructions.

Developing for Azure IoT Suite

IoT Hub is an amazing, foundational service for a customized IoT solution, but it is just the start. Microsoft goes beyond building-block services by providing preconfigured IoT solutions, so that what used to take weeks for a customer to build can now be automatically provisioned in minutes with Azure IoT Suite. Azure IoT Suite enables customers to quickly provision a working, end-to-end IoT solution that includes IoT Hub as well as other Azure services — and even includes simulated devices to help you get started rapidly prototyping your end-to-end solution with a one-click deploy in minutes.

Developing for Azure IoT Suite is divided in two simple steps:

  • Connecting devices to a solution, which consists of connecting devices to Azure IoT Hub and ensure the devices are sending the data in the right format for the IoT Suite solution instance. For each of the Azure IoT Suite preconfigured solutions, you will find samples and instructions for connecting devices.
  • Customizing the services deployed as part of the Azure IoT Suite preconfigured solution. All the preconfigured solutions are provided as source code, which allows you to modify, adapt and redeploy every single part of the solution. Extensive documentation can be found here.

To learn more on the development for Azure IoT Suite, check out its developers' documentation.

And more …

Azure IoT Hub and Azure IoT Suite are obviously not the only things you will want to work with and develop against when creating an end-to-end solution. There are plenty other services you can utilize, benefit from and spin up on Azure to create your IoT solution. A good starting point for a first implementation of an end-to-end IoT solution is Azure IoT Suite, as you will very easily deploy a set of services that are pre-configured and up and running in a few minutes.

What's next?

This was only the introduction to what Azure IoT has to offer to developers, from securely connecting “Thing” to the “Internet” to sending and receiving messages and debugging your IoT solutions, SDKs, tools, samples and documentation. This will allow you to focus on what counts: your idea for tomorrow’s next big IoT solution.

Visit our Azure IoT developer center, check out some of the introduction videos on IoT Hub or IoT Suite, scan the list of certified hardware, try out some of our getting started instructions and samples, and as always, if you have questions, suggestions or issues, come meet the Azure IoT dev team on GitHub.

12 Apr 10:58

Cutting Edge - Pushing Notifications to Mobile Apps

by Dino Esposito
Dino Esposito explains what it takes to add a notification layer on top of mobile applications, regardless of the mobile operating system itself. He also reviews the services of the Azure Notification Hub platform.
12 Apr 10:58

Internet of Things - Develop an Azure-Connected IoT Solution in Visual Studio with C++

by Marc Goodner
Marc Goodner shows you how to connect a device to Azure IoT using C++ project templates in Visual Studio, how to set up an Azure IoT hub to ingest the device data, and how related Azure services can act on that data.
12 Apr 10:58

Modern Apps - Writing UWP Apps for the Internet of Things

by Frank La Vigne
For developers used to writing code, creating the actual “things” for the Internet of Things might be intimidating. This article aims to make Makers out of coders, building a Raspberry Pi 2-based device running UWP apps on Windows 10 IoT Core.
19 Nov 13:06

Berlin public transport in real time

16 Jan 17:23

Dieser Münchner hofft auf einen Oscar

Los Angeles - Für Jan Lachauer (30) aus München ist am Donnerstag der Traum eines jeden Filmschaffenden in Erfüllung gegangen: Er wurde für einen Oscar nominiert!