Shared posts

11 Aug 16:11

The Best of Both Worlds: Using Excel and Power BI Together

by Saurabh Desai

There are many IT technologies available for storing data, but Excel remains the most popular data tool for users of IT in businesses. Excel is just so versatile, but the downside is that everything remains in your local machine. You can’t share the data, it doesn’t get backed up and it isn’t so secure. However, by using Power BI app too, you can view, analyze and share Excel files on the web.

In first section of article you will see, how to Publish an Excel file ‘as is’ to Power BI app, create a dashboard in Power BI and share components of an Excel file to other users. The second section will cover how to create a data model in Excel, export the Excel data model to Power BI and then create visualizations in the Power BI app. We will also explain how to analyze any Power BI dataset in Excel. In the final third section, we will cover the topic of how to import data from various data sources into Power BI.

Publish Excel file to Power BI, create dashboard in Power BI and share with others

In our daily work, many of us use Excel in one or other way. Once we finished doing our data massaging and creating visualization, we are ready to share the file with others. Very often, people will share an Excel workbook with others by attaching the Excel file in an email and sending an email to several people. Later on, if they find any problem with the Excel file or if they have done some enhancements to it, they have to send it again. This is a bad idea because the Excel file may contain a large amount of data which will clog the network and the recipients are likely to use the wrong version. We need a better way to share Excel file.

In Power BI, we can view the Excel file as is, we can select Excel chart and share selected Excel chart with others. Once you publish Excel file to Power BI, it is easy to reflect any changes in the original file to the publication in Power BI.

First, let’s publish an Excel file to Power BI. Open Excel and copy the data in the table into Excel. In Excel, select the data in the ‘Employee’ and ‘Sales’ fields, click on the ‘Insert’ tab and select ‘bar’ chart. Now in the Excel file, we have some data and a bar chart. Our Excel file is ready to save and publish.

Employee

Sales

Client

Product

Industry

John

100

ABC

Long Term Equity

Real Money

David

200

XYZ

Short Term Corporate Bond

HedgeFund

Lina

600

PQR

Future

HedgeFund

Stephanie

300

ABC

Long Term Equity

Real Money

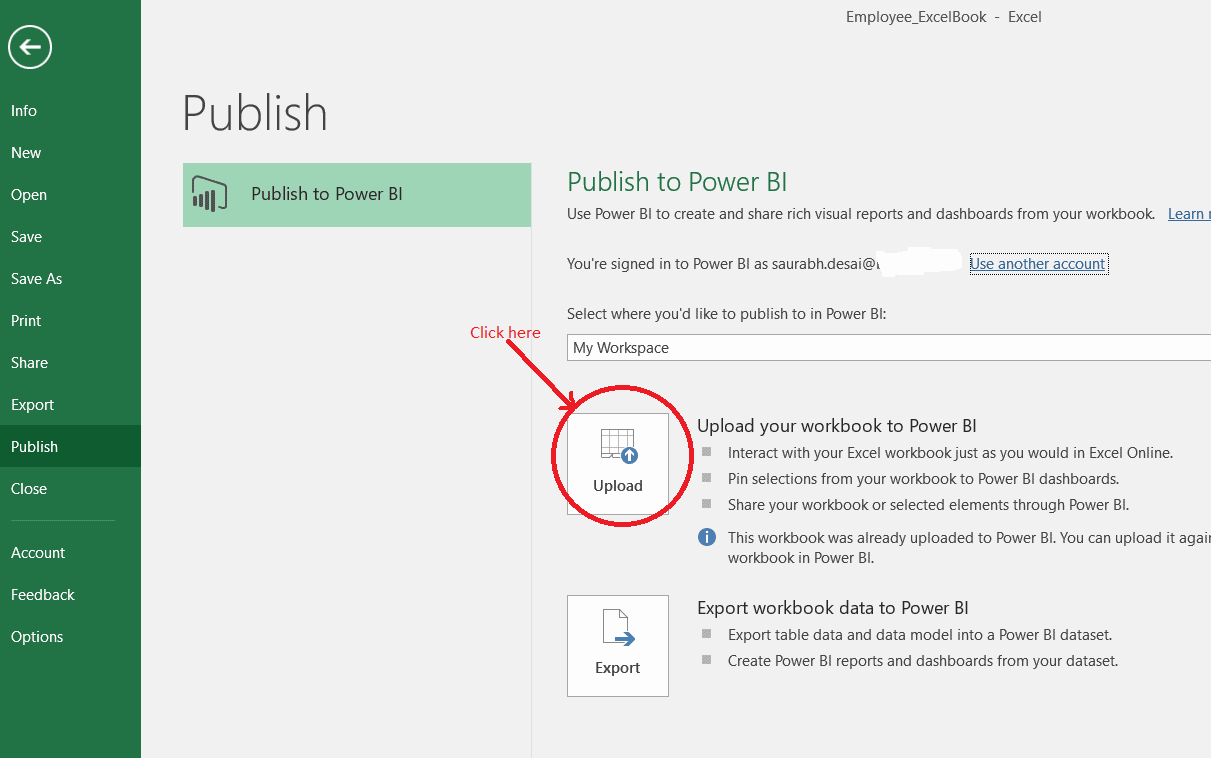
Save Excel file as ‘employee_Excelbook.xlsx’. Click on the ‘File’ menu and click ‘Publish’. To publish Excel file in Power BI, you need to ‘sign in’ using Power BI app account. You can use your ‘Office 365’ account or you can switch to another account.

Once you sign in using your Power BI account, you can select the option ‘Upload your workbook to Power BI’. This ‘Upload your workbook to Power BI’ option is intended for publishing an Excel file in Power BI.

Once file is published, you will see the message ‘PUBLISH TO POWER BI Workbook uploaded successfully’’. Open ‘app.powerbi.com’ and sign in with your Power BI account. In ‘My Workspace’, you will see different tabs.

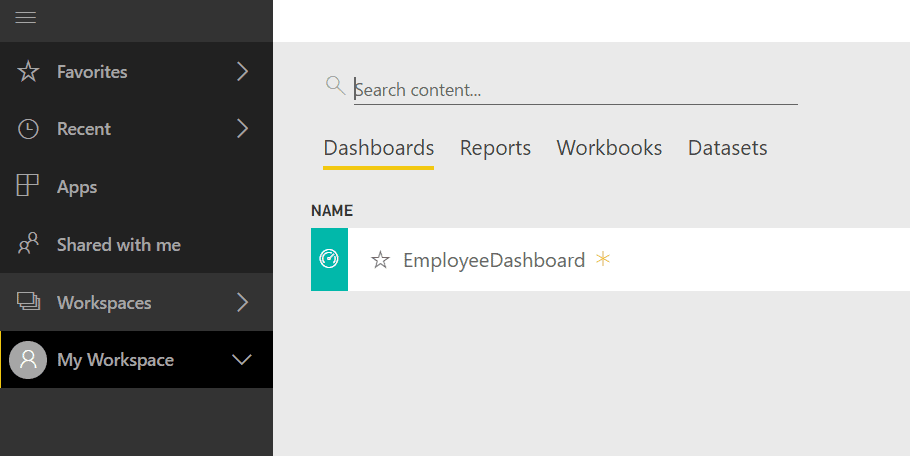
In Power BI, under ‘My Workspace’, there are 4 tabs.

  • ‘Datasets’: When you are publishing Excel file to Power BI, if you choose ‘Export workBook data to Power BI’ option, only Excel data will publish to Power BI. Excel data will appear in ‘Datasets’ section.
  • ‘Reports’: From ‘Datasets’ section, you can select any dataset to create reports and report will appear in ‘Reports’ section.
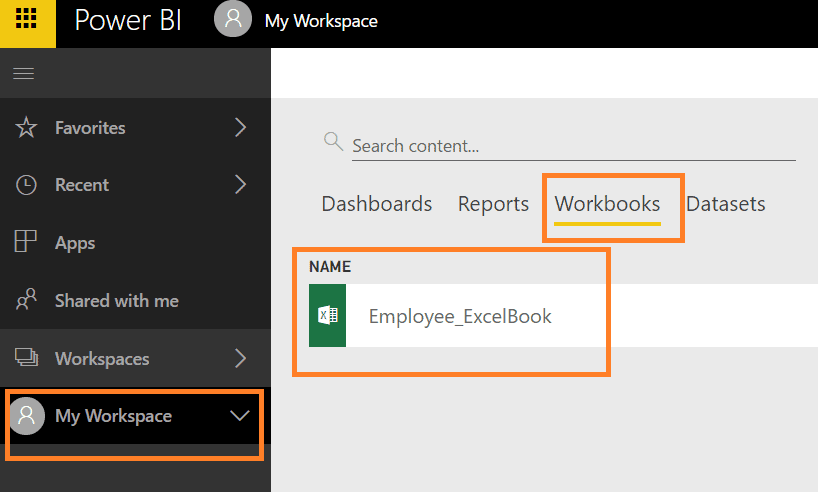
  • ‘Workbooks’: When you are publishing Excel file to Power BI, if you choose ‘Upload your workbook to Power BI’ option, ‘as is’ Excel file is uploaded to Power BI app. Excel file appear in ‘Worksbooks’ section.
  • Dashboards’: From ‘Reports’ and ‘workbooks’ section, you can ‘pin’ any data/chart to create a dashboard.

Since we have uploaded Excel file to Power BI, click on ‘workbooks’ tab in Power BI to see your uploaded Excel file.

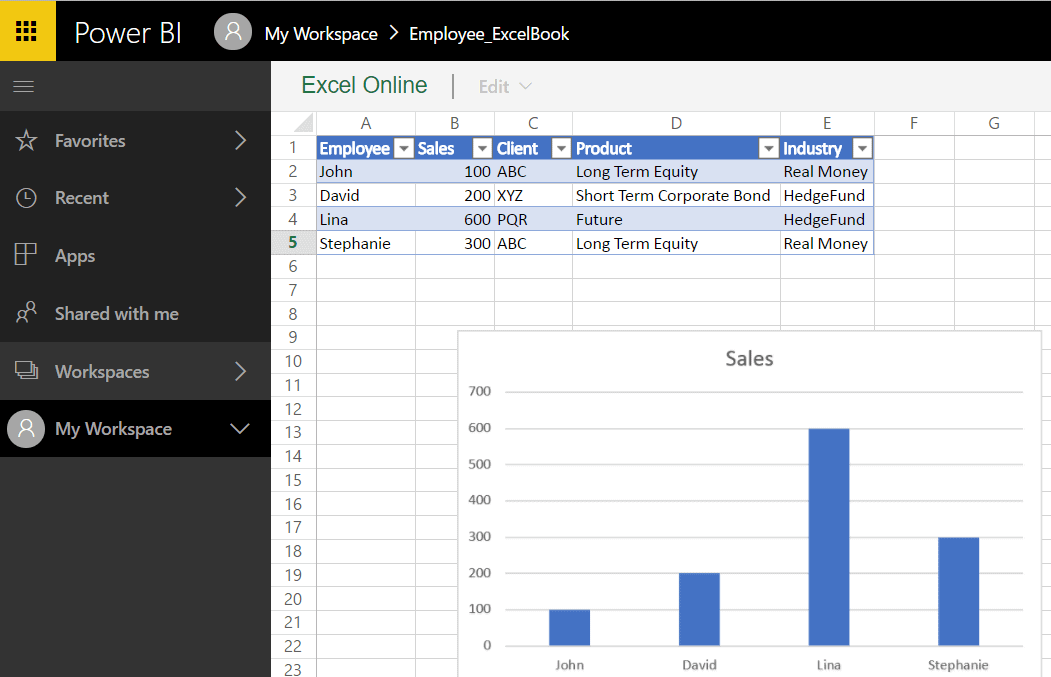
Click on ‘Employee_ExcelBook’ file to view the Excel workbook in the Power BI app. In Power BI, you can see the Excel file as-is.

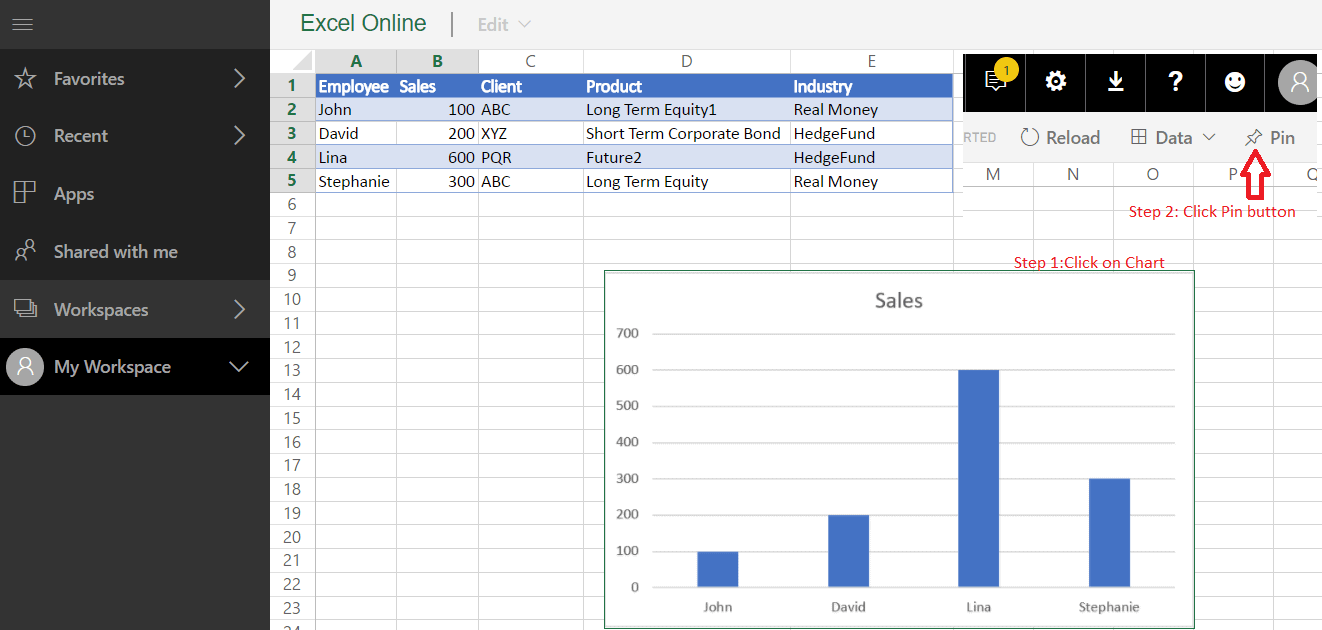
Now, we will create a dashboard from the ‘Employee_ExcelBook’ workbook. As shown below, select the Excel chart and click ‘pin’.

Once you click ‘pin’, you will see a new prompt to select dashboard. Select the ‘new dashboard‘ option, assign the name ’EmployeeDashboard’ and click ‘ok’. A new dashboard called ’EmployeeDashboard’ will appear under ‘My workspaceDashboard’

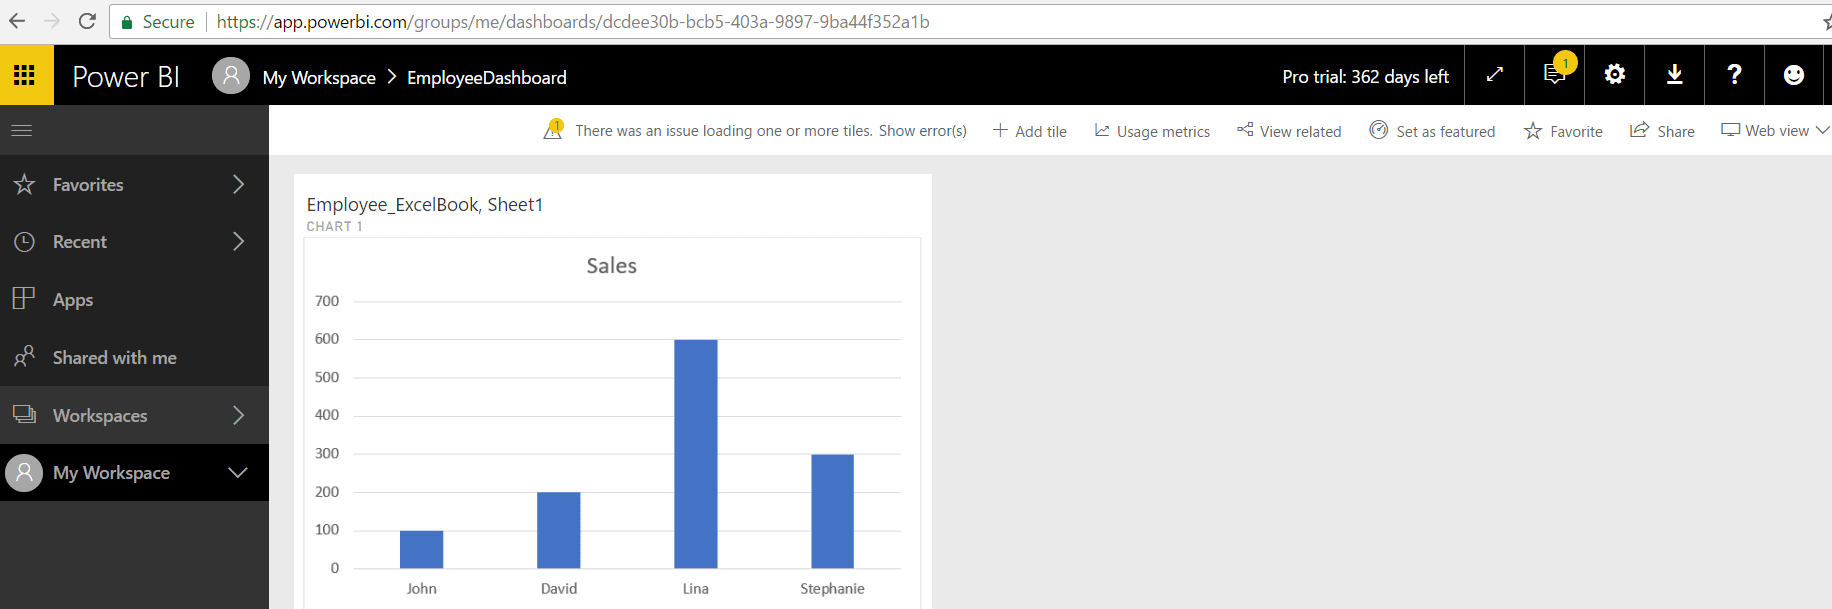
Click on ‘EmployeeDashboard’ to view the dashboard in Power BI. You can see the ‘sales by employee’ chart in dashboard.

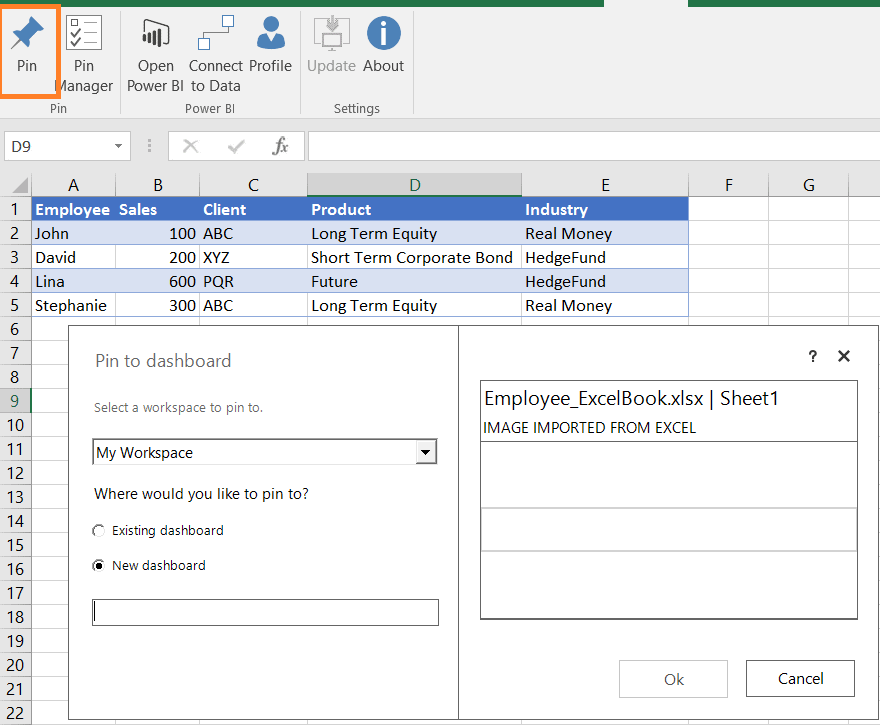
In this step, we have ‘pinned’ a chart and creatd a Power BI dashboard. You can create a Power BI dashboard from Excel without going to Power BI. To create a Power BI dashboard from Excel, download the ‘Power BI publisher for Excel’ plugin. Once the ‘Power BI publisher for Excel’ plugin is installed, you will see the ‘Power BI’ ribbon in Excel.

To create a Power BI dashboard, select ‘chart /data range’ and click ‘pin’. If you are already signed in using your Power BI account, you will be prompted to select a dashboard. Choose either the ‘Existing dashboard’ or ‘New dashboard’ option, assign a dashboard name and click ‘ok’. Now your Power BI dashboard is created.

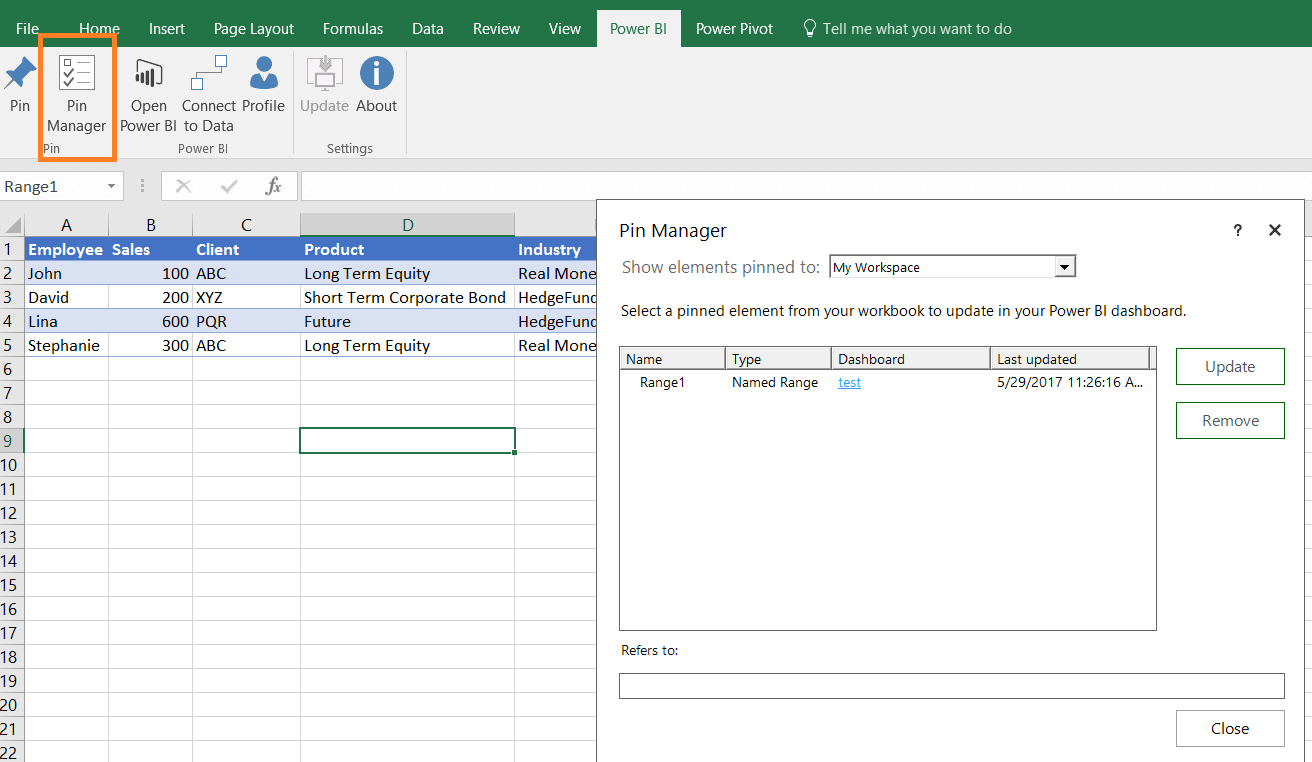
Once you ‘pin’ an element and create a Power BI dashboard, you can manage the pinned element using ‘pin manager’ in Excel. Click on ‘Pin Manager’ and you will see an update option to change the data range, and a remove option to ’remove object mapping’ between Excel and Power BI. This remove option does not delete the chart from Power BI but any further changes in the chart will no longer be reflected in Power BI. To delete a data object from the Power BI dashboard, you would need to open ‘app.powerbi.com’ and delete the chart from there.

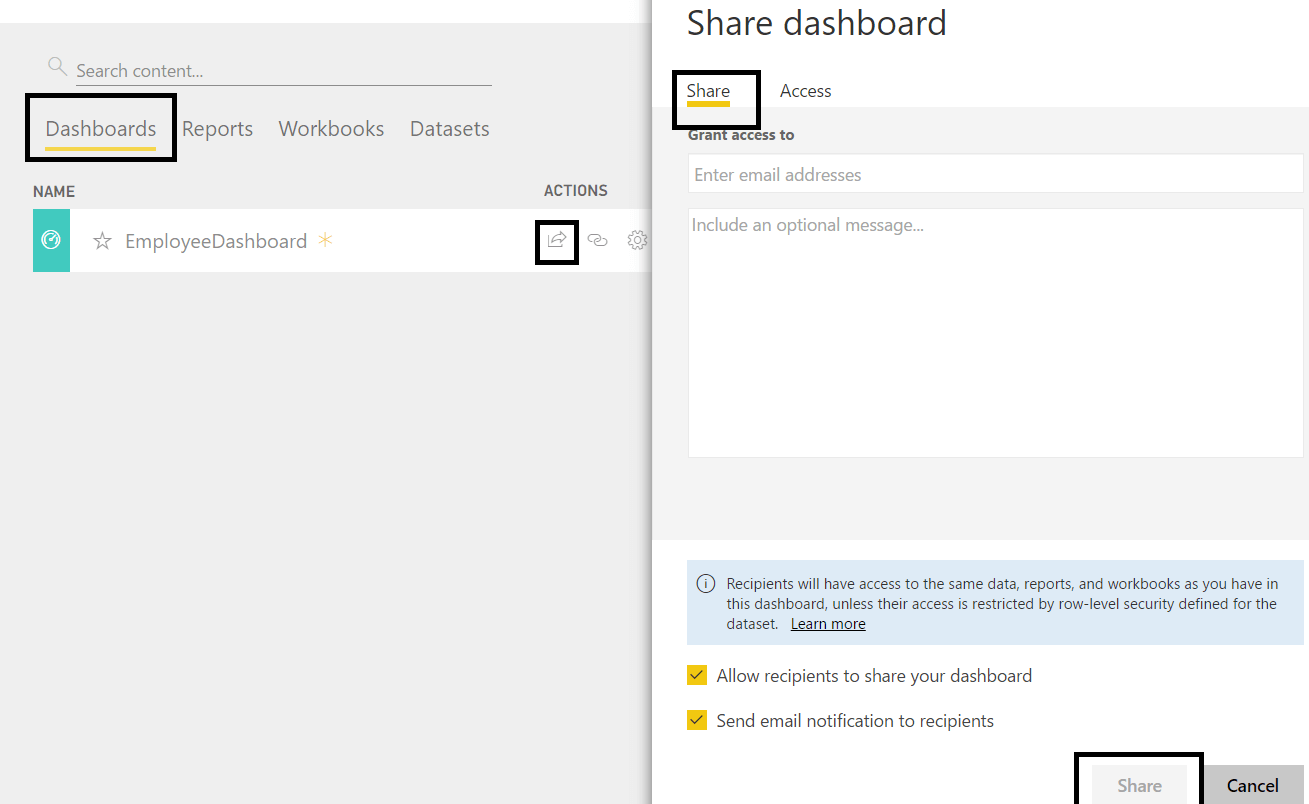
You have seen several ways to create a Power BI dashboard. Once the dashboard is created, you can share this dashboard with other users. To share the dashboard, you must go to app.powerbi.com. Open ‘app.powerbi.com’, go to ‘My WorkspaceDashboards actions’, click on ‘share’ and enter the email addresses of the people with whom you want to share the dashboard.

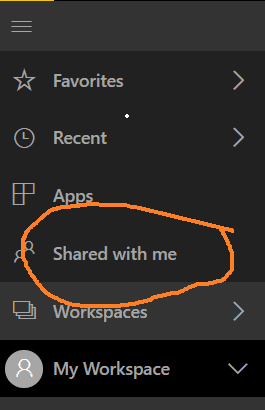
Users can access the shared dashboard by logging in to app.powerbi.com. On left-panel users can see a ‘shared with me’ option. Click on ‘shared with me’ to view the list of shared dashboards.

So far, we have published the Excel file, created a dashboard and shared this dashboard in Power BI. If you want to update published data, you can modify the Excel file locally and republish the Excel file with the same name to Power BI. Excel changes should be reflected automatically in Power BI dashboard as shown below.

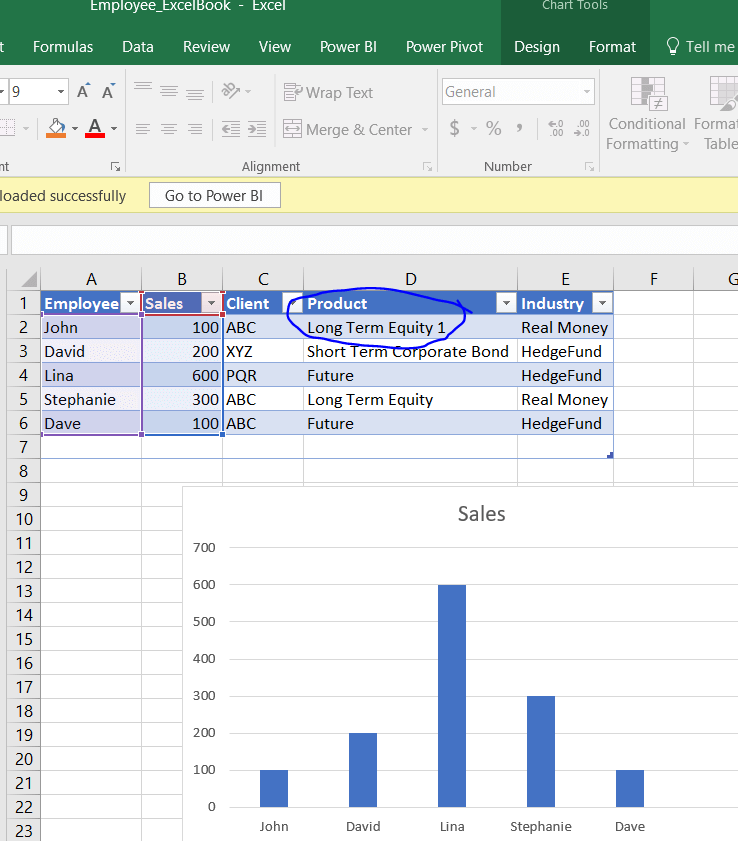
In Excel, open the ‘employee_Excelbook.xlsx’ file, change the industry name ‘Long Term Equity’ to ‘Long Term Equity 1’, save and republish the Excel file to the Power BI app.

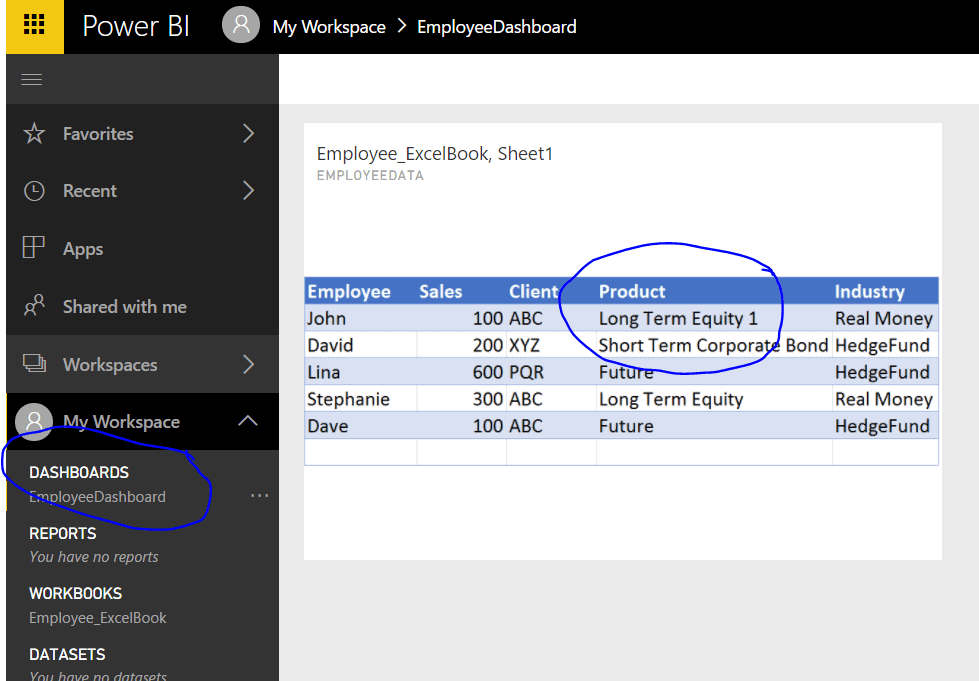
Open the Power BI app and you can then see that the ‘EmployeeDashboard’ dashboard is updated.

Here we have published ‘as is’ an Excel file to Power BI. But if you have more than one dataset in Excel and you want to create an interactive dashboard using those dataset, you will need to create a data model in Excel, publish the data model and then create a visualization in Power BI, as covered in the next section.

Create data model in Excel and visualization in Power BI

To create an interactive dashboard in Power BI using more than one dataset, first we need to create a data model in Excel. Open a new Excel file and copy the two data sets below. Save the Excel file ‘Employee_ExcelData.xlsx’

Employee

Sales

Client

Product

Industry

John

100

ABC

Long Term Equity

Real Money

David

200

XYZ

Short Term Corporate Bond

HedgeFund

Lina

600

PQR

Future

HedgeFund

Stephanie

300

ABC

Long Term Equity

Real Money

Employee

State

John

Hawai

David

Hawai

Lina

NY

Stephanie

NY

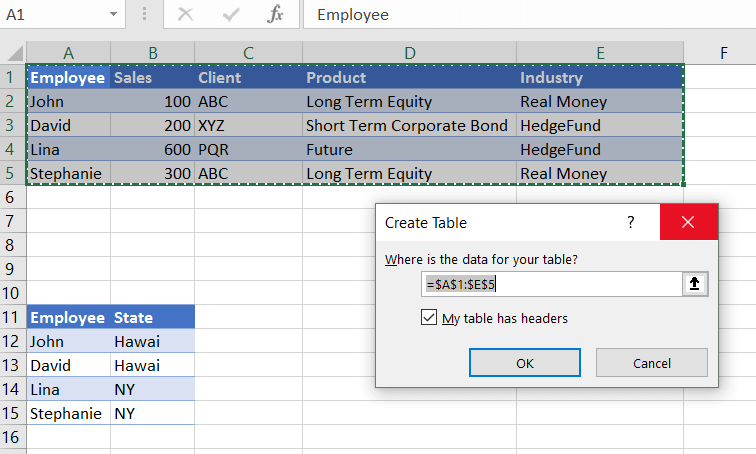
Now we will convert this dataset into table format. In Excel file, select the data set, click on ‘Insert’ Table’. Then press ‘Ok’ to create the table.

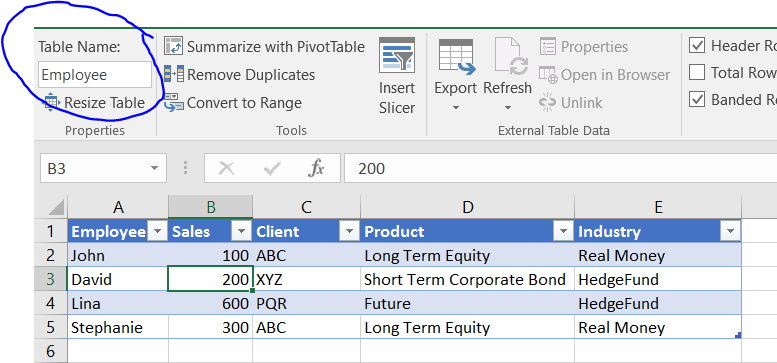
Name the table as ‘Employee’. Since we are aiming to use Excel data in Power BI, it is very important to convert data into a table. To create a dataset in Power BI, Excel data must be in tabular format.

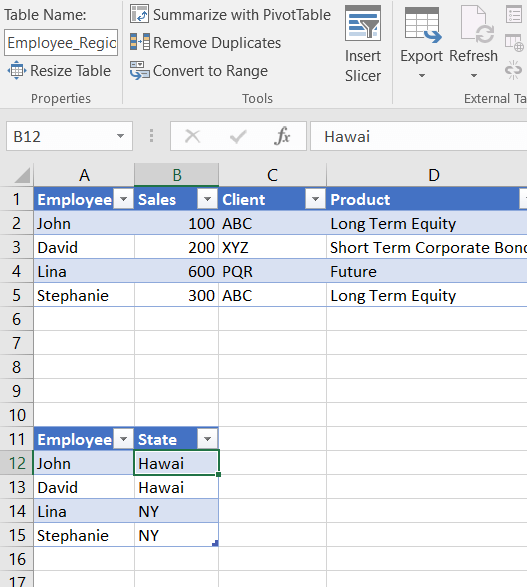
Repeat the steps to convert the ‘employee-state’ data into a table. Name the table as ‘Employee_Region’.

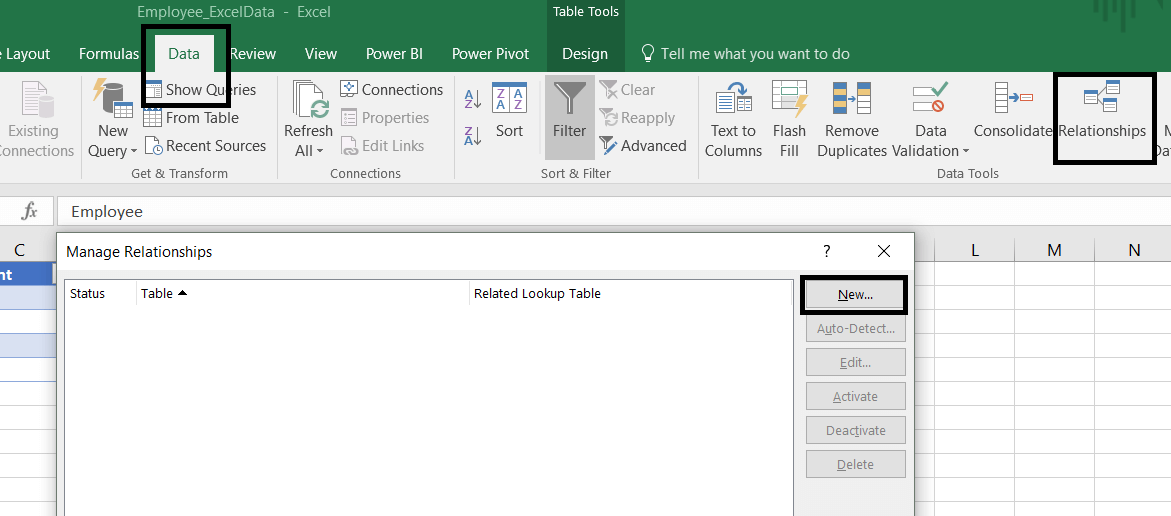
Before we export this Excel data to Power BI, we will create a relation between the Employee and Employee_Region table. Click ‘DataRelationships’ to open the Relationship window.

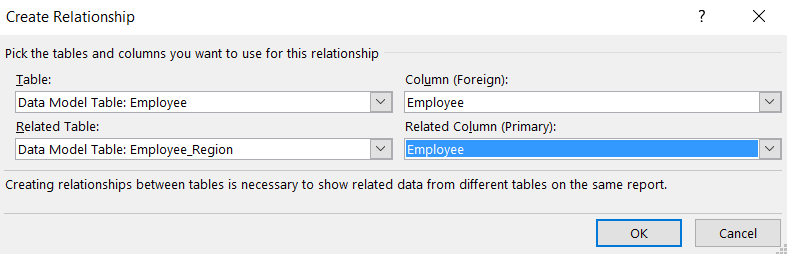
Click on the ‘New…’ button and select the Excel table names and field names to create a new relationship between the two data set.

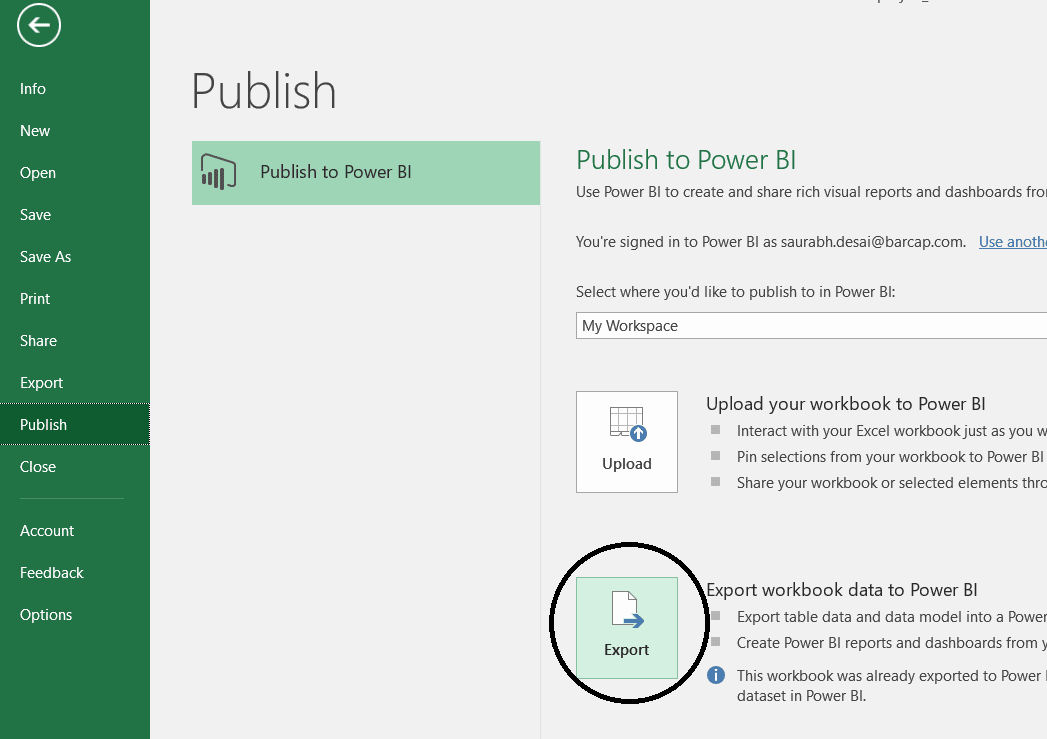
Click ‘ok’ to close the ‘manage relationship’ dialog box and save the ‘Employee_ExcelData.xlsx’ file. The Excel data model is created and is ready to publish. In Excel 2016, go to the File menu and click ‘Publish’. To export Excel data to Power BI, select an option ‘Export workbook data to Power BI’.

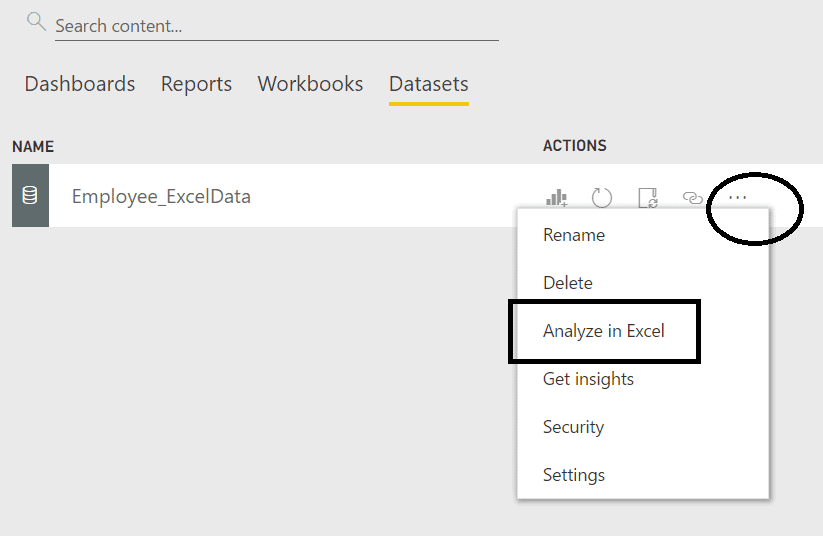
Once the data is published to Power BI, you will see a message in the Excel file ‘PUBLISH TO POWER BI Workbook exported successfully’’. Open ‘app.powerbi.com’, click on ‘My Workspace’Dataset and you will see published data set ‘Employee_ExcelData’. In the ‘Datasets’ section, you can see list of datasets sourced from various supported data sources such as SQL, Excel, SSAS cube and Oracle. If you want to view the dataset, Power BI provides the ‘Analyze in Excel’ option. Click the eclipse icon […] and select ‘Analyze in Excel’.

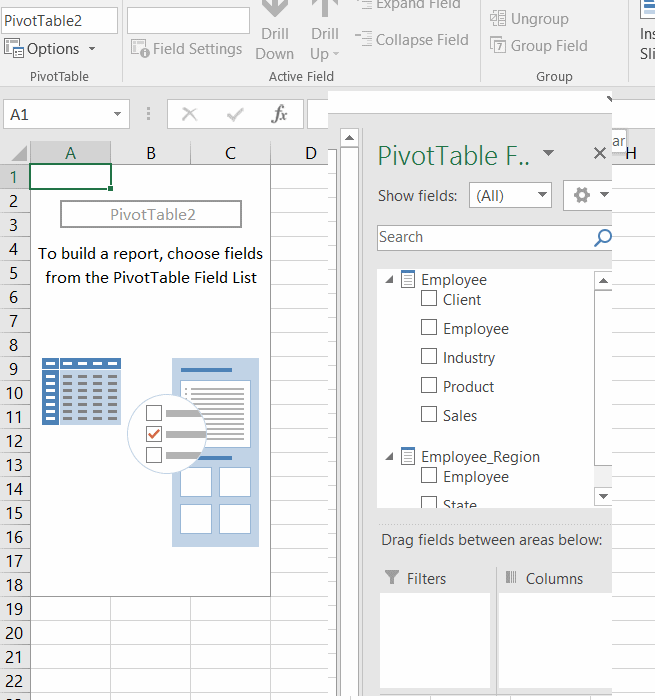
Once you click on ‘Analyze in Excel’,the Microsoft Office Data Connection file ‘.odc’ will get downloaded to your machine. Open the downloaded file in Excel and you will see the dataset fields in a pivot table. Now, select and filter the fields, you can view the data in Power Pivot Table.

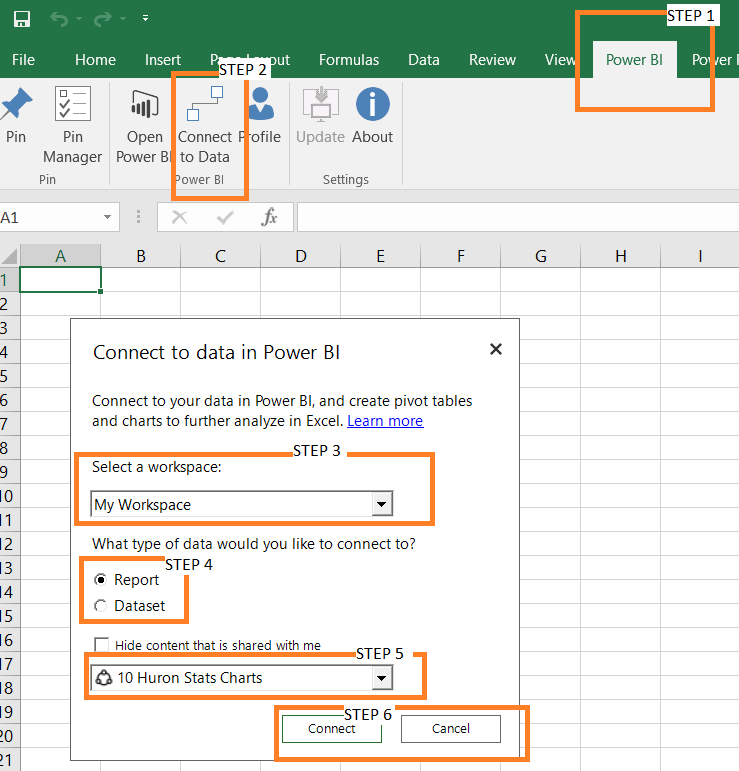
The ‘Power BI publisher for Excel’ plugin is another way to analyze a Power BI dataset in Excel. First install the ‘Power BI publisher for Excel’ plugin and then click on the Power BI ribbon, there is an option ‘Connect to Data’. Using ‘Connect to Data’ option, you can connect to a Power BI dataset and analyze the data in Excel. As we have seen before, the ‘Power BI publisher for Excel’ plugin is also used to ‘pin’ a data element and create a dashboard.

From ‘My workspace’, select the datatype ‘report/dataset’. Choose the report /dataset name and hit ‘connect’.

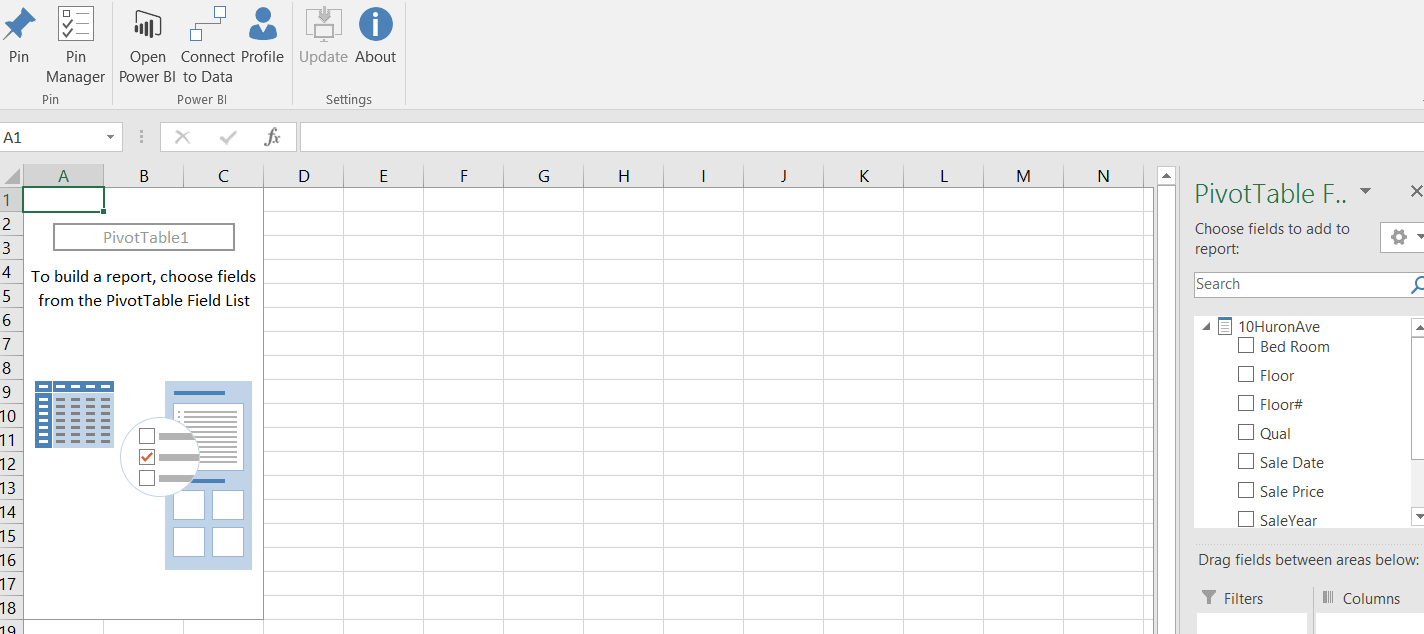
Once you hit the ‘connect’ button, you will see Power BI dataset/report in the Excel Power pivot table. Using the ‘Power BI’ ribbon, we can connect to any Power BI app report/dataset and analyze the data in Excel.

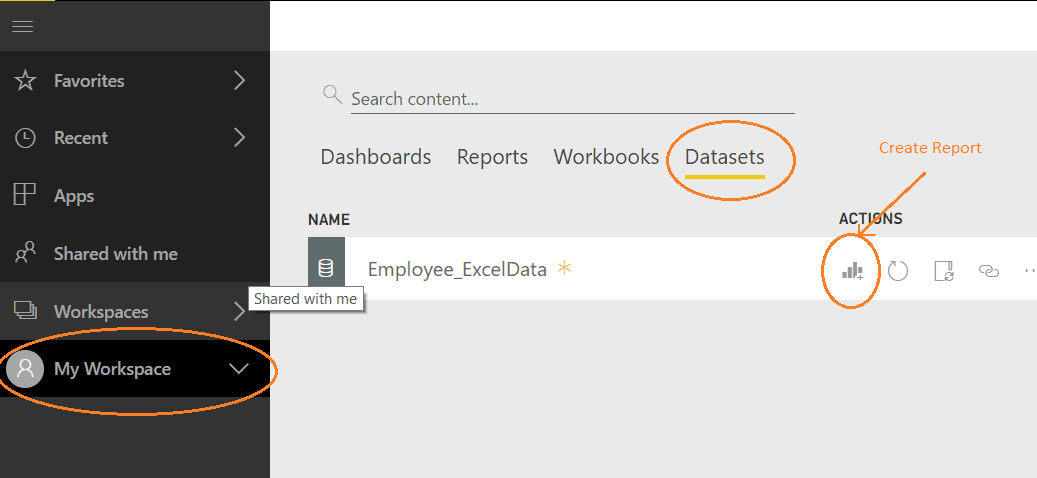
Once you view/analyze data, you can create a report in Power BI. Go to the app.powerbi.com > ’My Workspace’ > ‘dataset’ . Click on the chart icon to create a report in Power BI.

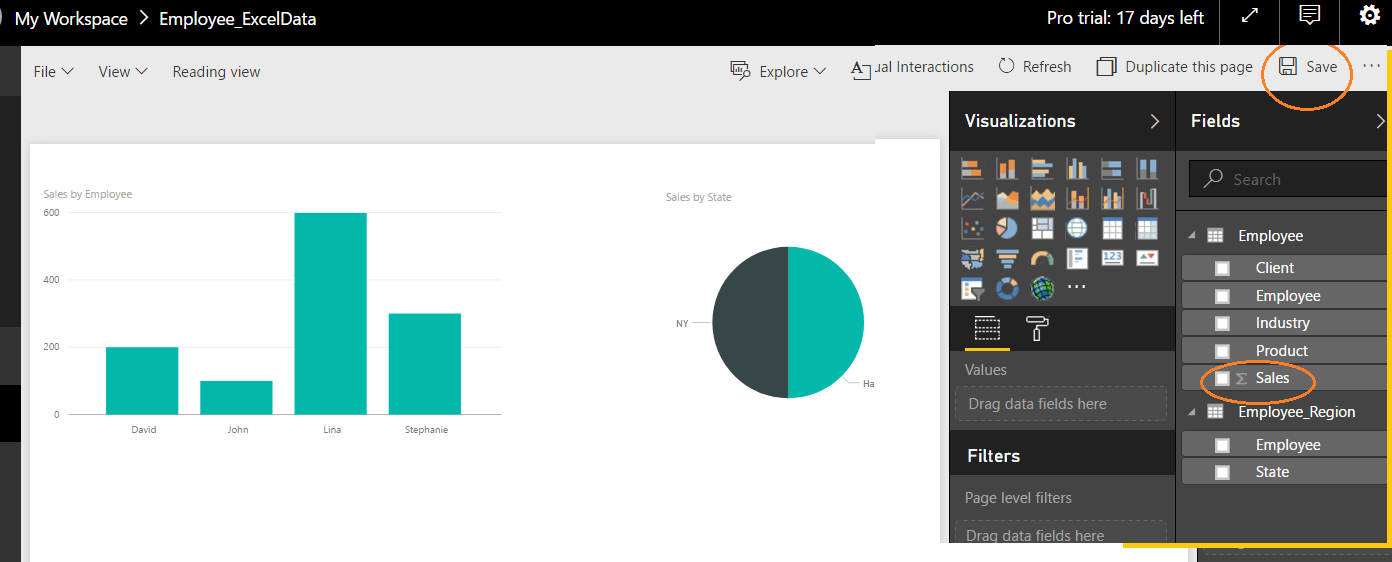
In the report section, double click on ‘pie chart’ or any other visualization. Once an empty visualization chart is in the report section, select thetable fields. In Excel, we have defined a relation between the ‘Employee’ and ‘Employee_Region’ dataset, so in a chart you can select fields from either dataset. Select the ‘sales’ field from the ‘Employee’ dataset and the ‘state’ field from the ‘Employee_Region’ dataset. The chart shows ‘sales’ number by ‘state’. Save the report ‘Employee_ExcelReport’. As you have seen before, in order to to add any chart to dashboard, select ‘chart’ and click ‘Pin’. We have also seen how to share a dashboard with different users.

Once your data is published in Power BI, you can use various Power BI features. Using Power BI, you can refresh data, view the dashboard in mobile and share reports. Power BI allows users to import data as well. In next section we will cover, how to import data from Power BI.

Import data from Power BI

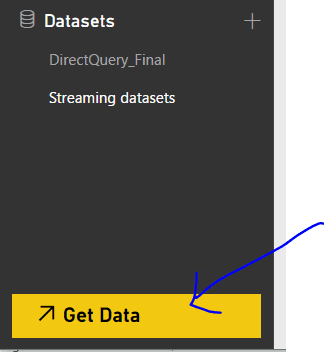
As you have seen, you can publish Excel file to Power BI. There is a way to get data from  Excel to the Power BI app. Using ‘Get data’ option in Power BI, you can import  an Excel work book and Excel data to Power BI. Open ‘app.powerBI.com’, in left panel you will see the  ‘Get data’ option.

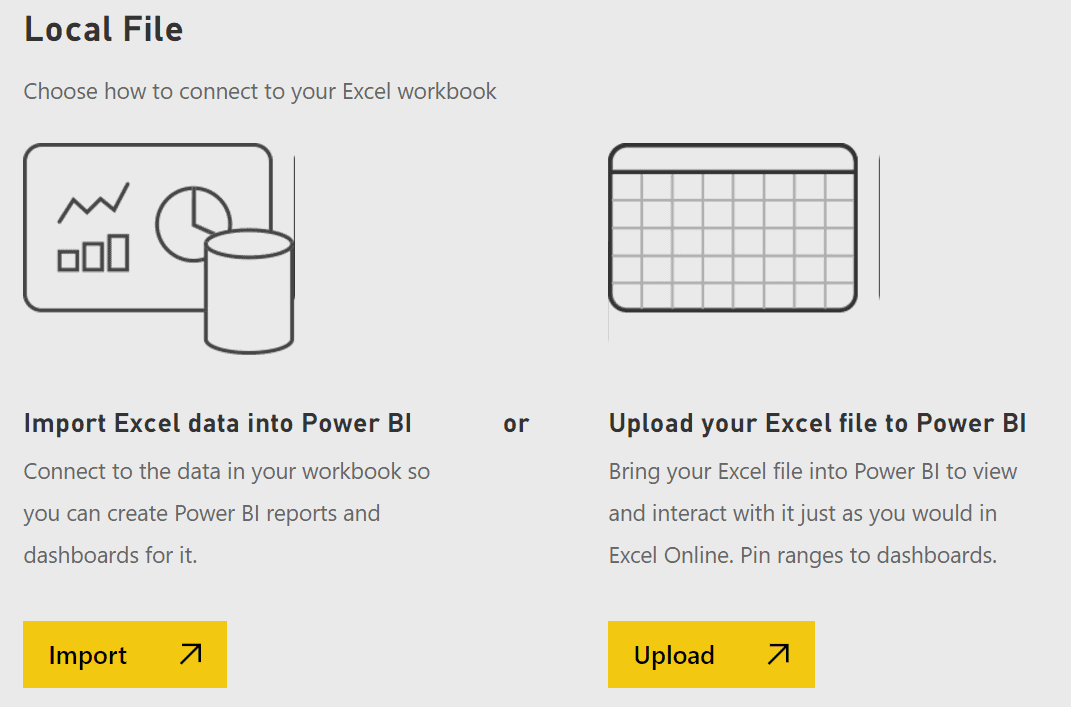
Click on ‘Get data’ and you will see several options to select data source. To import data from Excel, under ‘Files’ tile, click ‘Get’ to choose Excel file location. Now you have two options ‘Import Excel data into Power BI’ and ‘Upload your Excel file to Power BI’. If you select ‘Import Excel data into Power BI’ option, only Excel data appear in Power BI and you can create visualization in Power BI. If you select ‘Upload your Excel file to Power BI’ option, ‘as is’ Excel file will upload in Power BI app.

Once you Import data in Power BI, the data will appear under ‘My workspace’Datasets’. If you have selected the ‘Upload’ option in Power BI, the file will appear under ‘My workspace; ;WorkBooks’. As you have seen, there are many ways to connect Excel with Power BI. If you are in Power BI app, you can use a ‘Get Data’ option to get the Excel file into Power BI. If you are in Excel, you can use the ‘publish’ option to publish an Excel file to Power BI.

Conclusion

In this article, we have seen that Excel and Power BI are easily connected together .  Power BI is an easy tool to work with, and no complex coding is required. Power BI is adding business intelligence capability to Excel. Power BI allows people to collaborate in using Excel and provides additional features such as visualization, sharing etc. Excel with Power BI create a robust BI solution.

The post The Best of Both Worlds: Using Excel and Power BI Together appeared first on Simple Talk.

11 Aug 16:10

Automating the light in my living room

11 Aug 15:30

Überall dieses Misstrauen

by Udo Vetter

Die neue NRW-Landesregierung schafft die Kennzeichnungspflicht für Polizisten wieder ab, die es erst seit Ende des letzten Jahres gibt. Die Kennzeichnungspflicht sei „ein Ausdruck von Misstrauen gegenüber den Beamten“. Die Polizei brauche „Rückhalt statt Stigmatisierung“.

Das ist schon eine sehr schräge Argumentation, zumal Innenminister Herbert Reul wohl argumentativ noch draufgesattelt hat: 2016 sei die Zahl der Übergriffe auf Beamte deutlich gestiegen. Darf man das also so verstehen, dass Polizisten im Einsatz besser vor Übergriffen geschützt sind, wenn sie anonym bleiben? Was ja für schwarze Schafe in Uniform durchaus die angenehme Folge hat, dass Dienstaufsichtsbeschwerden und eventuelle Strafanzeigen ins Leere laufen, weil sich die Verantwortlichen im Kollektiv verbergen?

Abgesehen davon ist es natürlich höchst lobenswert, wenn die neue Landesregierung dieses ständige Misstrauen thematisiert, das in unserer Gesellschaft mittlerweile herrscht. Sie könnte sich auch mal dem staatlichen Misstrauen widmen, das jedem Bürger Tag für Tag entgegenschlägt. Zum Beispiel wenn seine Verbindungsdaten nach derzeit geltendem Recht auf Vorrat gespeichert werden, wenn er künftig zur DNA-Abgabe gezwungen wird, um damit Verwandte zu belasten. Oder wenn bald mit staatlicher Schnüffel-Schadsoftware Festplatten und Mobiltelefone von jedem von uns ausgespäht werden dürfen, und das ohne großartige Eingriffsvoraussetzungen.

Man könnte auch mal die vor wenigen Wochen in Kraft getretene Gewinnabschöpfung in der Strafprozessordnung hinterfragen, welche die Unschuldsvermutung komplett außer Kraft setzt. Und nicht zuletzt die drastisch verschärften Regeln für „Widerstand gegen Vollstreckungsbeamte“, die fast schon jedes Wortgefecht mit Polizeibeamten zum Fall für den Staatsanwalt machen.

Aber letztlich ist es natürlich auch schon wieder vielsagend, an welcher Stelle die Politik Handlungsbedarf sieht.

Bericht in den Ruhr Nachrichten

Flattr this!

11 Aug 14:23

SharePoint Online Site Collection Admin Audit Log Changes

by Bill Baer

Beginning July 24th, 2017, we're making some important changes to SharePoint Online Site Collection Admin Audit Logging.

18 Jul 17:03

Anti-Forgery Validation in ASP.NET Core

by Dino Esposito

The cross-site request forgery (CSRF or XSRF or one-click) is a sneaky kind of attack that, unlike script or SQL injection, doesn’t really depend on something that developers may have done patently wrong. Your ASP.NET application can have a regular form that posts data within the fences of cookie authentication and it can also use model binding and data and request validation to fend off injection of potentially malicious data: even so, the posting form and the entire application is still at risk of being compromised. To be precise, the risk is not that the application data set is compromised but that one particular user account is hacked and owned by an outsider. The actual damage for the application then depends on the type and the power of the compromised account. CSRF is in the list of major threats of the OWASP organization. (See Cross-Site Request Forgery (CSRF))

The good news is that both ASP.NET MVC and ASP.NET Core provide effective tools that can protect your forms against CSRF attacks. The bad news is that you must enable those tools explicitly. However, in ASP.NET Core things are going to be better because CSRF protection is almost entirely on by default. Let’s find out more about the mechanics of the attack and defense strategy.

Mechanics of CSRF

The primary victim of the attack is the user, but because the hacker can impersonate the user—realistically only for a short period of time—some misbehavior may result also at the application level especially if the role of the hacked user includes several permissions.

Let’s suppose that the victim is regularly logged to the site and while logged she is allured to click on some link or visit some particularly attractive page. Let’s also suppose that the link points to a page with the following structure.

<body onload="postForm()">
   <!-- Some attractive content -->
</body>

The script runs upon loading of the page and can create a form ‘on the fly’ to post to a known URL endpoint. The authentication cookie is sent when the form is posted, because the whole thing takes place on the victim’s computer, and the domain of the cookie matches the domain of the target server. To be harmful, however, the attack must target a URL that performs a sensitive operation such as changing the password or deleting some data. Besides this, the hacker must have discovered a fair amount about the internal structure of the site. However, the attack is definitely possible whether or not there is then any opportunity for harm

To defend against CSRF, you need to add additional and user-specific information to each and every form that the hacker can’t find out. Needless to say, the code on the server side must check that this additional information has not been tampered with.

Preventing CSRF Attacks in ASP.NET

ASP.NET MVC has offered a strong line of defense against CSRF attacks for a long while, but developers too often tend to forget to enable it. I believe the reason is that the defense requires two steps, and everybody is too busy and rushed to be able to stop and think about basic facts of security.

Any HTML form created out of Razor pages should include a call to the AntiForgeryToken HTML helper. The helper emits a hidden field and a cookie.

<form ...>
   @Html.AntiForgeryToken()
   <!-- Content of the form -->
</form>

The hidden field contains a randomly-generated binary blob that is 128 bytes long. The cookie contains the same binary blob but encrypted using the Data Protection API with the key kept in the Local Security Authority of the Windows operating system.

<input name="__RequestVerificationToken" 
       type="hidden" 
       value="saTFWpk...c4YbZAm" />

The hidden field is not transmitted when the user clicks a link on an external web site, whereas the cookie could make it to the attacker’s site. However, because the content of the cookie is encrypted the hacker has no way to figure out the value for the hidden field and can’t forge a valid POST.

This defense strategy works just as long as the controller’s code that handles the POST double-checks that it is receiving a hidden field named __RequestVerificationToken and a cookie with the same name. If both are sent, then the code should decrypt the cookie’s content and match it to the content of the hidden field. If the two values won’t match, well, a security exception should be thrown. ASP.NET MVC offers an action method selector component for the job—the ValidateAntiForgeryToken attribute.

[HttpPost]
[ValidateAntiForgeryToken]
public ActionResult Save(...)
{
   ...
}

The attribute only works with POST requests. This is because GET requests should never perform any tasks that can alter the state of the system.

Preventing CSRF Attacks in ASP.NET Core

In ASP.NET Core, the core of the defense strategy is the same. The arsenal of tools, instead, is a bit more powerful. In particular, Microsoft attempts to hide from developers as much as possible of the effort to protect applications from CSRF. The AntiForgeryToken HTML helper is still there and works as usual. The ValidateAntiForgeryToken attribute is still there and works in the same way as in classic ASP.NET MVC. In other words, the same solution that did the job in older versions of ASP.NET MVC can still be used as-is in ASP.NET Core. In addition, though, ASP.NET Core features a few other solutions to offer especially to make the process of injecting the request verification token a bit more automatic and seamless.

The Razor engine in ASP.NET Core supports a new type of server-side component called a ‘tag helper’. A tag helper is invoked by the Razor parser in order to transform some custom markup elements and attributes into standard HTML elements and attributes. In the end, the output emitted is the same HTML that you could have coded yourself manually except that the syntax required to express it is more concise and readable. Let’s consider the following syntax for a FORM element.

<form class="form-horizontal" 
      method="post"
      asp-controller="Account" 
      asp-action="Register">
   ...
</form>

Clearly, neither asp-action nor asp-controller are standard HTML attributes. However, they are recognized as tag helper attributes by Visual Studio and IntelliSense and, most importantly, by the Razor parser. ASP.NET Core comes with an entire library of tag helper components that a view can reference through the following @addTagHelper new directive:

@addTagHelper *, Microsoft.AspNetCore.Mvc.TagHelpers

All classes in the library that are tag helpers are decorated with a special attribute and are derived from a common base class. All elements with a linked tag helper enjoy a special treatment in Visual Studio and from the Razor parser. When the parser encounters these elements, it yields to the tag helper and tag helper has a chance to inspect the structure of the element and can edit its content. In particular, the asp-* attributes associated with the FORM element modify the action attribute of the FORM by setting it to the action resulting from the combination of the controller name (asp-controller attribute) and the action name (asp-action attribute). It doesn’t end here, though. By applying those attributes, you also tell the form tag helper to emit the anti-forgery hidden field and cookie. In ASP.NET Core, the name of the request verification token is different but role and content are just the same as in classic ASP.NET MVC. In other words, tag helpers automatically emit the token just for the cost of using tag helper attributes to define the action URL of the form.

Flavors of Anti-Forgery Token Attributes

The ValidateAntiForgeryToken attribute is not alone in ASP.NET Core. It is partnered by the AutoValidateAntiForgeryToken attribute, which does the same job except that it covers all potentially unsafe HTTP verbs and not just POST. It also covers, in fact, PUT, DELETE and PATCH. It doesn’t cover other verbs supposed to be used for read-only actions only. Interestingly, if you register the AutoValidateAntiForgeryToken attribute as a global filter, and use the asp-* attributes on all FORM elements then you’re very well protected against possible CSRF attacks without having to explicitly code for it each and every time.

services.AddMvc(options =>
{
    options.Filters.Add(new AutoValidateAntiforgeryTokenAttribute());
});

If the AutoValidateAntiForgeryToken attribute is registered as a global filter, however it throws any time a FORM element, that has been created without the asp-* attributes, posts its content. The exception being thrown results in a HTTP 400 Bad Request code.

It’s a type of exception that you run into pretty soon during development and that is sort of an alarm bell that reminds you to use the tag helper attributes on the FORM element. However, if you have reasons to disable the verification of the token on a particular method on an unsafe HTTP verb, then you can use the IgnoreValidateAntiforgeryToken attribute instead.

Playing with the Referrer Header

The referrer HTTP header indicates the URL that requested the resource being currently served. In other words, it links the caller of the current page to the previous page. In a CSRF context, the referrer would contain the URL of the site that is actually placing the call. In other words, the URL of the attacker’s site. In light of this, an obvious conclusion would be that one would be able to easily fend off any CSRF attacks simply by checking the content of the referrer HTTP header. All that would do, in fact, is to check that the form was posted from the same site, if not from a specific page.

[HttpPost]
public ActionResult Save(...)
{
   // Check referrer content here
   ...
}

The problem with the referrer HTTP header is that it is considered an optional information and it is not guaranteed to be there all the time. Some browsers, in fact, allow users to disable referrers and sometimes that information might be stripped off by proxy servers. In addition, the HTML5 standard introduced the noreferrer attribute for anchor tags which instructs the browser to retain from setting the referrer header.

<a href="..." rel="noreferrer" />

Also consider that it is not a far-fetched idea to speculate that it could be spoofed especially if the request is forged outside a browser and set using a custom application as the HTTP client.

The bottom line is that for the purpose of defending a web site from CSRF one-click attacks, it is not sufficient to check the URL referrer’s HTTP header. If you’re looking for a full line of defense, then your best option is to use the verification token as discussed so far; especially in ASP.NET Core where there is so little coding effort required to use verification tokens.

Using Referrer Anyway

The referrer HTTP header, however, can be also quite helpful in slightly different circumstances. Suppose you have a set of HTTP endpoints—yes, let’s call it a web API—that you invoke via Ajax/JavaScript from the client side. Because they are an internal resource you sometimes just invoke them through ASP.NET controllers, subject to authentication and authorization rule. In other words, those endpoints will be invoked if a valid authentication cookie can be found.

It could be useful, though, just reinforce the security a bit by enforcing a given server to appear as the referrer. Here’s a simple action method selector that does just that. It’s part of a set of helper methods that I published at http://github.com/despos and on Nuget under the Youbiquitous.Mvc moniker.

[AttributeUsage(AttributeTargets.Class | AttributeTargets.Method)]
public class RequireReferrerAttribute : ActionMethodSelectorAttribute
{
   public RequireReferrerAttribute(params string[] trustedServers)
   {
      TrustedServers = trustedServers;
   }

   public string[] TrustedServers { get; }

   public override bool IsValidForRequest(
              ControllerContext controllerContext, MethodInfo methodInfo)
   {
       var referrer = controllerContext.HttpContext.Request.UrlReferrer;
       if (referrer == null)
           return false;
       var list = new List<string>(TrustedServers);
       var uri = referrer.AbsoluteUri.ToLower();
       return list.Any(ts => uri.StartsWith(ts.ToLower()));
   } 
}

If no referrer is found, the method protected by this attribute is denied. Here’s how you would use the attribute.

[HttpPost]
[RequireReferrer("http://yourserver.com", "http://www.yourserver.com")]
public ActionResult Save( ... )
{
    ...
}

The Save method will only be invoked if the request comes from any of the listed servers.

A Few Words on IP Addresses

To wrap up the discussion, what about checking IP addresses? Unfortunately, IP addresses are not reliable either because it can be hidden in case of a serious attack. In addition, it might be difficult to find the exact IP address and map that to an authorized user. When running behind a proxy or a router, the HTTP context only reports the address of the router: Not to mention that a legitimate user might be using the site from a variety of different locations and connections. At any rate, while checking IP addresses cannot be considered a generally valid measure of protection for a web API, it still remains an option on the table for some specific situations. Here’s an example of how to get the IP address.

public string GetIP(HttpContext context)
{
    var ip = context.Request.ServerVariables["HTTP_X_FORWARDED_FOR"];
    if (String.IsNullOrEmpty(ip))
     return context.Request.ServerVariables["REMOTE_ADDR"];
      return ip;
}

Summary

Web security is always a hot, and rapidly-changing, topic.  It is not one of those software concerns that can be added as an afterthought. It needs serious preliminary analysis for any site that needs good security. However, even for applications where security is not the primary concern, you can always implement some basic lines of defense with almost  no cost that ensure that no abuse of the API can succeed: Or, at least, limit it as much as possible.

The post Anti-Forgery Validation in ASP.NET Core appeared first on Simple Talk.

18 Jul 17:03

Investigating the Cause of SQL Server High CPU Load Conditions When They Happen

by Laerte Junior

Catching them in the act

There are plenty of ways of finding out those queries that are killing your database’s performance. With SQL Server 2016 and Query Store, it’s become so much easier to monitor performance in SQL Server, but there are plenty of techniques that are still useful, particularly if you don’t have SQL Server 2016 Query Store on the database that you’re checking.

I have my favourite techniques for doing this: I like to use both process explorer and sp_whoisactive to find the queries that are killing the CPU in SQL Server, but I like to run them at the actual moment that the heavy usage happens, even if I’m actually at home relaxing. In this article, I will show you how to use both these tools and, especially, how to do it in real time when the CPU needle is ‘hitting the red’. It is like catching a close-up of a villain in the floodlights at the very moment of the crime. I am talking about a technique where you set up an event-driven solution that will be fired by a WMI event when the CPU is high, thereby avoiding pooling and jobs having to running every few seconds. When it fires, the process checks if the source of the WMI event is SQL Server and then logs in and executes the statements for you. Yes, you don’t need to be in the front of your workstation; you can check later and then perform whatever corrective action needs to be done in the light of the data you’ve captured.

One of these techniques, using Process Explorer, is very nicely described here by Michael J Swart: Note that he updated the post, explaining that now he uses sp_whoisactive. I will show how to do it using both (Michael J Swart – Identifying High CPU SQL Processes)

Whatever the query you prefer to use, the big question will be how to do it in real time when the problem is actually happening, and log whatever information you need, even on the unattended server. There are plenty of times you need to do this, especially if you don’t have a full-time DBA or if you are running in the cloud and needs some support from the cloud provider. You can help the support Engineer by sending him the queries that are breaking your system. In AWS, this kind of service is out of scope of support, but if you have luck to find an Engineer that knows SQL Server and is willing to help you, as I was, it will, help him or her to help you to tune the queries. You just need to leave the solution and then get the CSV log with the queries.

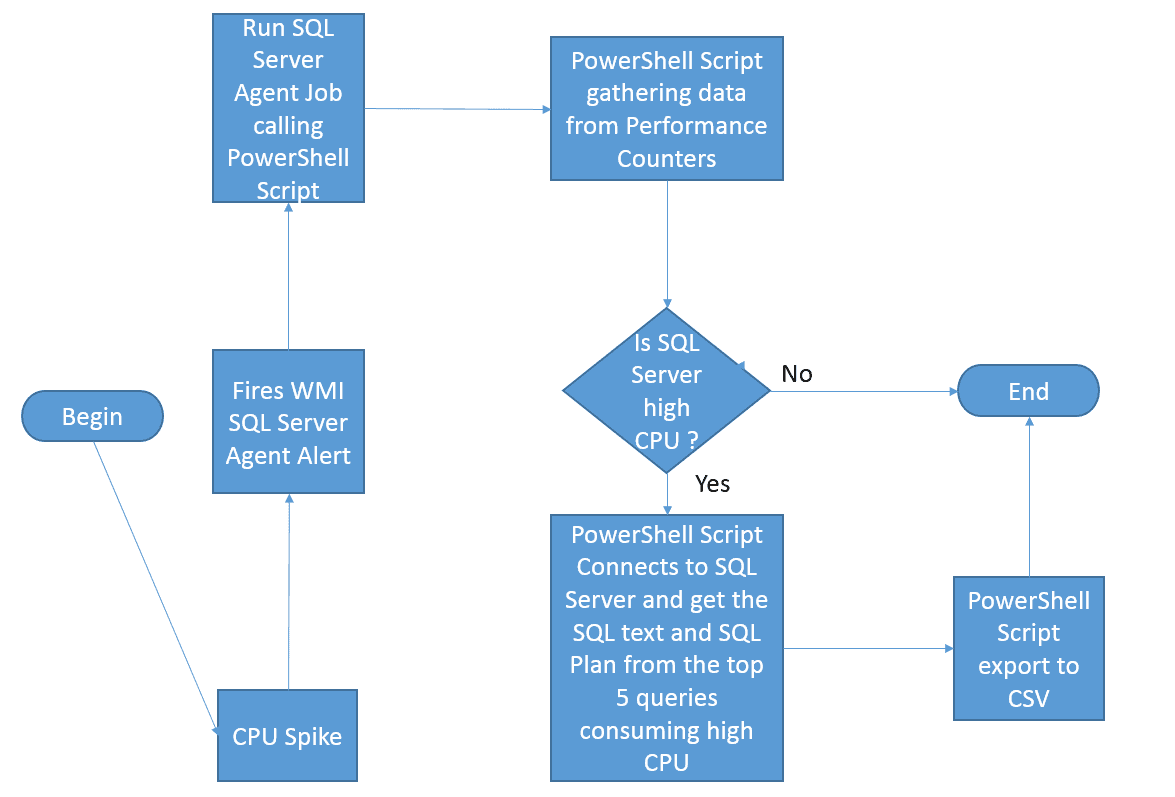
This is how the solution works:

Because the PowerShell script needs to modify the registry to change the output from the Get-Counter [1], the account that will runs the PowerShell Script will need to have administrative rights; the SQL Server Agent Service account in this case.

In the case of AWS EC2 with SQL Server ( but not RDS, since this solution does not works in RDS), the account that is installed By default is the NT Service\SQLServerAgent, which does not have the appropriate permissions. For that we have two options :

  1. Change the SQL Server Agent Account to LocalSystem or an appropriate service account with elevated rights. Server Configuration – Service Accounts
  2. Create a SQL Proxy account to run the PowerShell Script. That is what we will use.

[1] See the following references – The Process object in Performance Monitor can display Process IDs (PIDs) and Handling Duplicate Instance Names

Configuring Permissions to run the Script

Open SSMS :

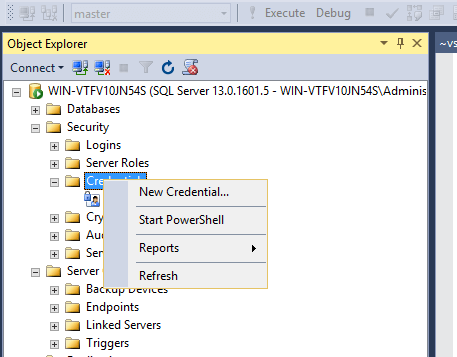
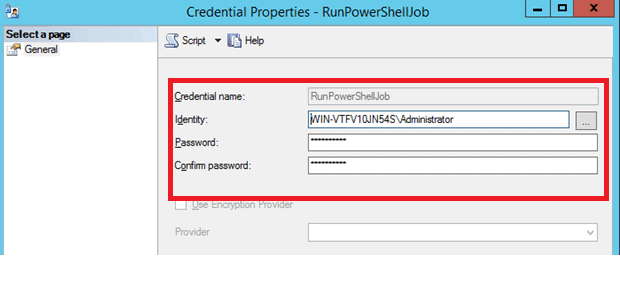
Create a Credential

Security’ -> ‘Credentials’->’New Credential’ and define a name and identity for the credential

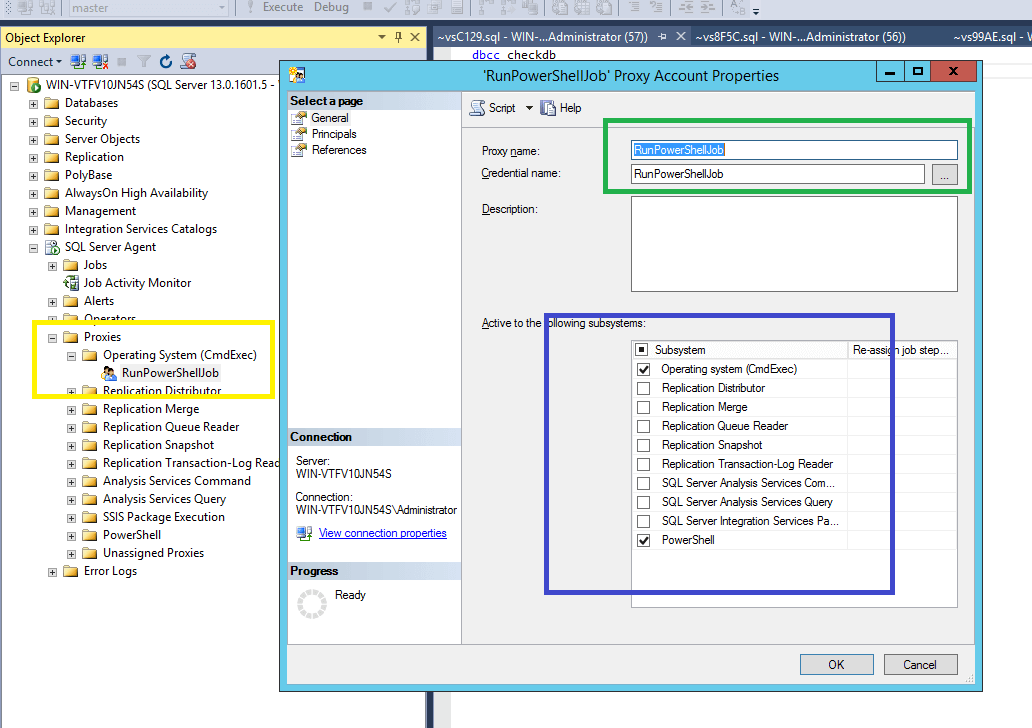
Create a SQL Proxy Account

SQL Server Agent’->’Proxies’->’Operating System(CmdExec)’->’New Proxy’ (Yellow box)

Type the ProxyName and associate this with the previous credential account created (Green box)

Check box what the account can do -> ‘Operating System(CmdExec)’ (checking ‘PowerShell’ is optional because the SQL Server job that will be created is a CmdExec Job and not PowerShell job)

Create the SQL Server Agent Job to call the PowerShell Script

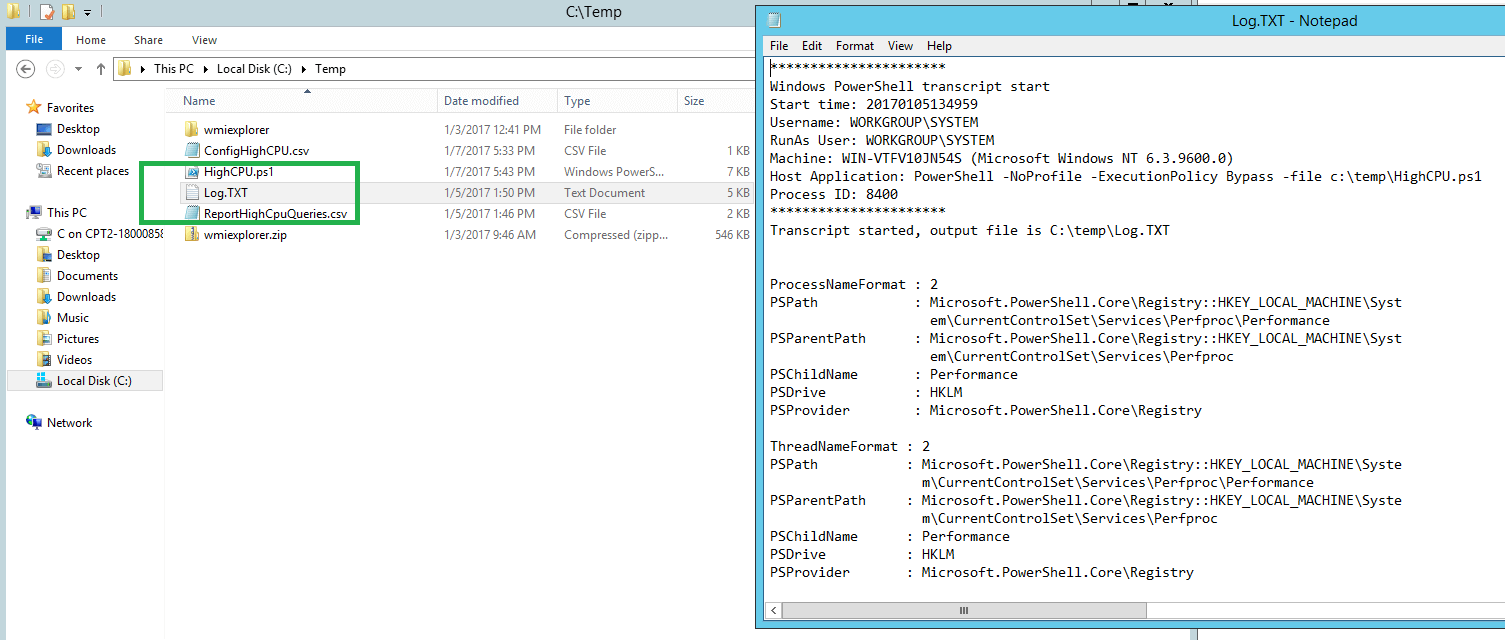
Create a path and save the HighCPU.ps1and ConfigHighCpu.csv files in this path ie: C:\temp

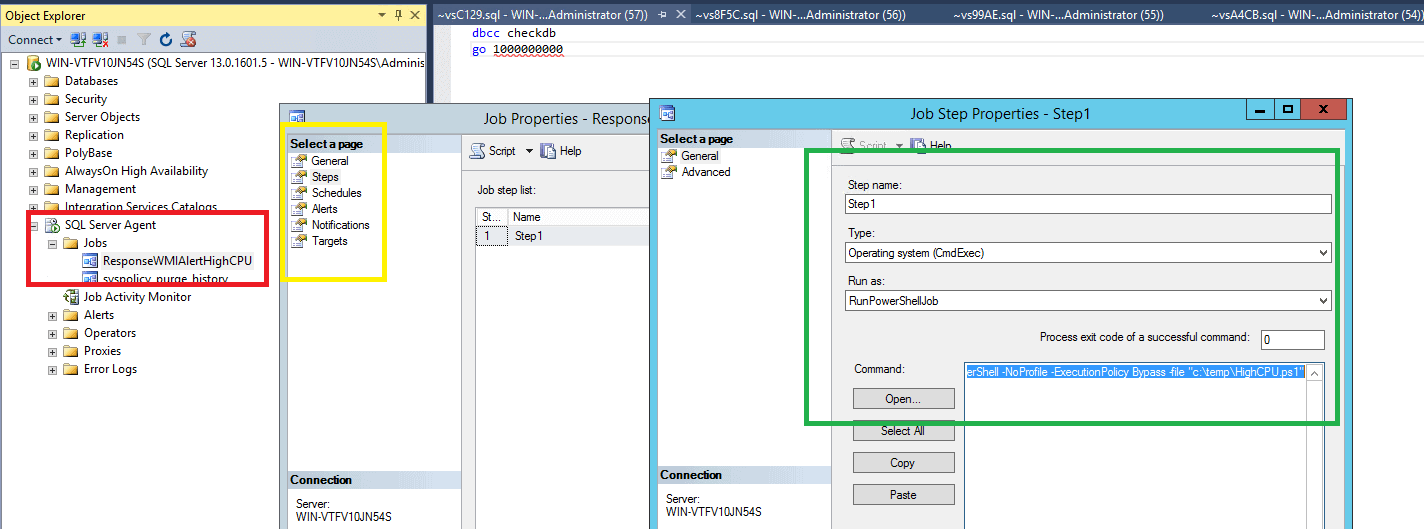
Go to ‘SSMS’->’SQL Server Agent’ -> ‘Jobs’ -> ‘New Job’ (Red)

In the tab ‘General’ (on the left side), type the name of the Job and click in the Step tab (Yellow box)

Type (see the Green box):

  • The name of the Step. ie : ‘Step 1’
  • In the ‘Type’ Choose ‘Operating System (CmdExec)
  • Run as – the Proxy Account previously created
  • In the Command type :

PowerShell -NoProfile -ExecutionPolicy Bypass -file “c:\temp\HighCPU.ps1”, where the –file parameter requires the full path of the .ps1 file

Create a SQL Server WMI Alert for the High CPU

The intention is to avoid having any kind of program polling the CPU. We will, instead, use WMI Events fired by a SQL Server Agent Alert. It will be fired when the CPU exceeds the threshold defined in the WQL (Windows Query Language). It does not matter at this point if SQL Server is consuming CPU. This check will be made in the PowerShell script. The WMI SQL Server Agent Alert for high CPU is :

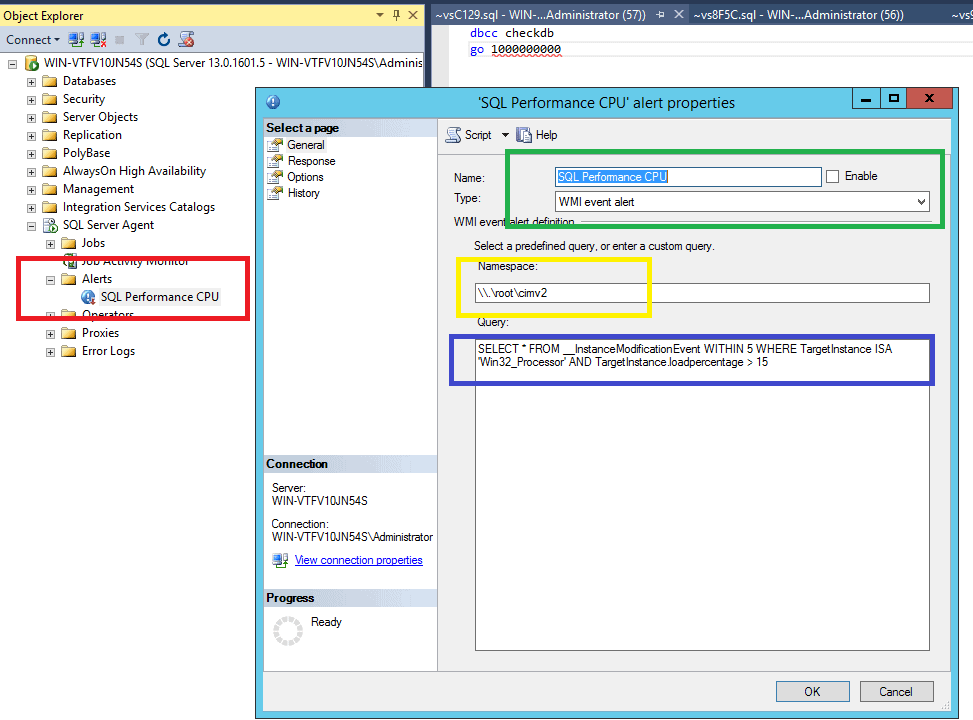
SELECT * FROM __InstanceModificationEvent WITHIN 5 WHERE TargetInstance ISA Win32_Processor' AND TargetInstance.loadpercentage > 50

The statement TargetInstance.loadpercentage > 50 identifies the threshold for the CPU. In the example the alert will be fired with anything more than 50% of CPU in Total.

To register the event :

  • SSMS’-> ‘SQL Server Agent’->’Alerts’->(Right Click)->’New Alert…’ (see the Red box)
  • Add the name of the Alert and, in the ‘Type’ combo box, select ‘WMI event alert’ (see the Green box)
  • In the ‘NameSpace’ type \\.\root\cimv2 (Yellow box)
  • In the Query Type the WQL I’ve already shown you : (Blue box)

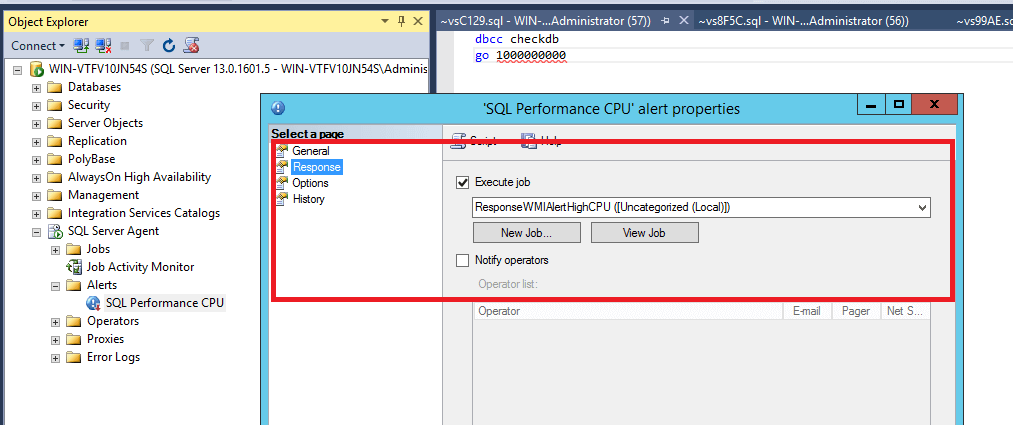
  • In the ‘Response’ Tab, check the box ‘Execute Job’ and select the SQL Server Agent Job previously created

Set up the Configure File

In the alert, we are setting up the event to be fired by total CPU so this configuration file will define the CPU threshold for the SQL Server process and each SQL Server thread from this process. Just open the ConfigHighCPU.csv file located at the same folder as the .ps1 file and provide:

PercentHighCPUTotalSQLServer – Defines the threshold for the total load percentage of the SQL Server process itself need to be above. IE 50 means that if the total process of the SQL Server is higher than 50% the PowerShell Script will gather the threads of this process.

PercentHighCpuPerThread – – Defines the threshold for the each thread of the SQL Server Process. IE 50 means if there are any thread higher than 50% the script will get the SQL Server statement and SQlL Server plan from this T-SQL

All is now set up.

When the Total CPU exceed 50%, the script will check if the SQL Server process CPU load percentage is higher than 50 (defined in the configuration file) and if it is, it will get the top 5 thread ids higher than 50% in a sample of 5 seconds and will connect into SQL Server, get the SQL Server statements related to these thread ids and log these in a CSV file called ReportHighCpuQueries.CSV. The information in this file is appended by the date and time.

ReportHighCpuQueries.CSV

The output file called ReportHighCpuQueries.CSV will store the information :

  • TimeStamp : Date and Time of the gathering
  • ProcessID : ProcessID of the SQL Server
  • ThreadId : Thread Id of the SQL Server Process
  • PercentProcessorAVG : Average percent for this particular thread . This value is calculated always by the last gathering.
  • PercentProcessorMin : Minimum percent for this particular thread . This value is calculated always by the last gathering.
  • PercentProcessorMax: Maximum percent for this particular thread . This value is calculated always by the last gathering.
  • SQLSessionID : Session Id in the SQL Server
  • SQLQueryText : T-SQL that is running the high thread CPU
  • SQLQueryPlan : SQL Plan of the query

The CSV file :

To check the query plan

Copy the SQLQueryPlan cell . Just the column SQLQueryPlan

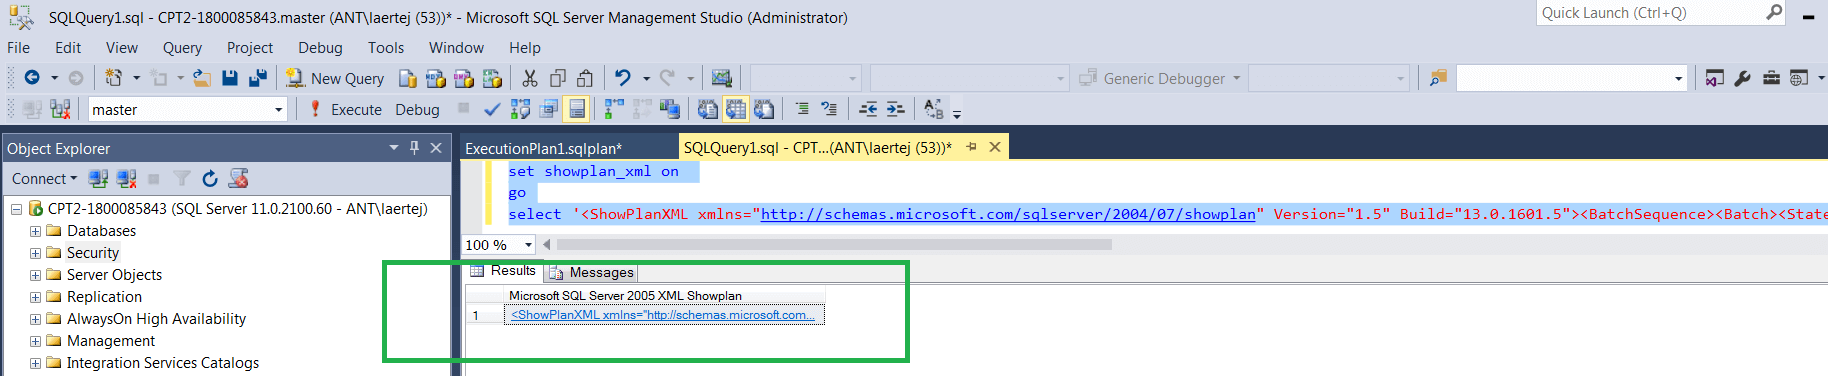
Open SSMS and type :

set showplan_xml on 
  go
  select ''

–2 single quotes and then paste the cell you just copied between the ”

IE :

Set showplan_xml on
  GO
  SELECT '<ShowPlanXML xmlns="http://schemas.microsoft.com/sqlserver/2004/07/showplan" Version="1.5" Build="13.0.1601.5"><BatchSequence><Batch><Statements><StmtSimple StatementText="dbcc checkdb" StatementId="1" StatementCompId="1" StatementType="DBCC" RetrievedFromCache="false" /></Statements></Batch></BatchSequence></ShowPlanXML>'

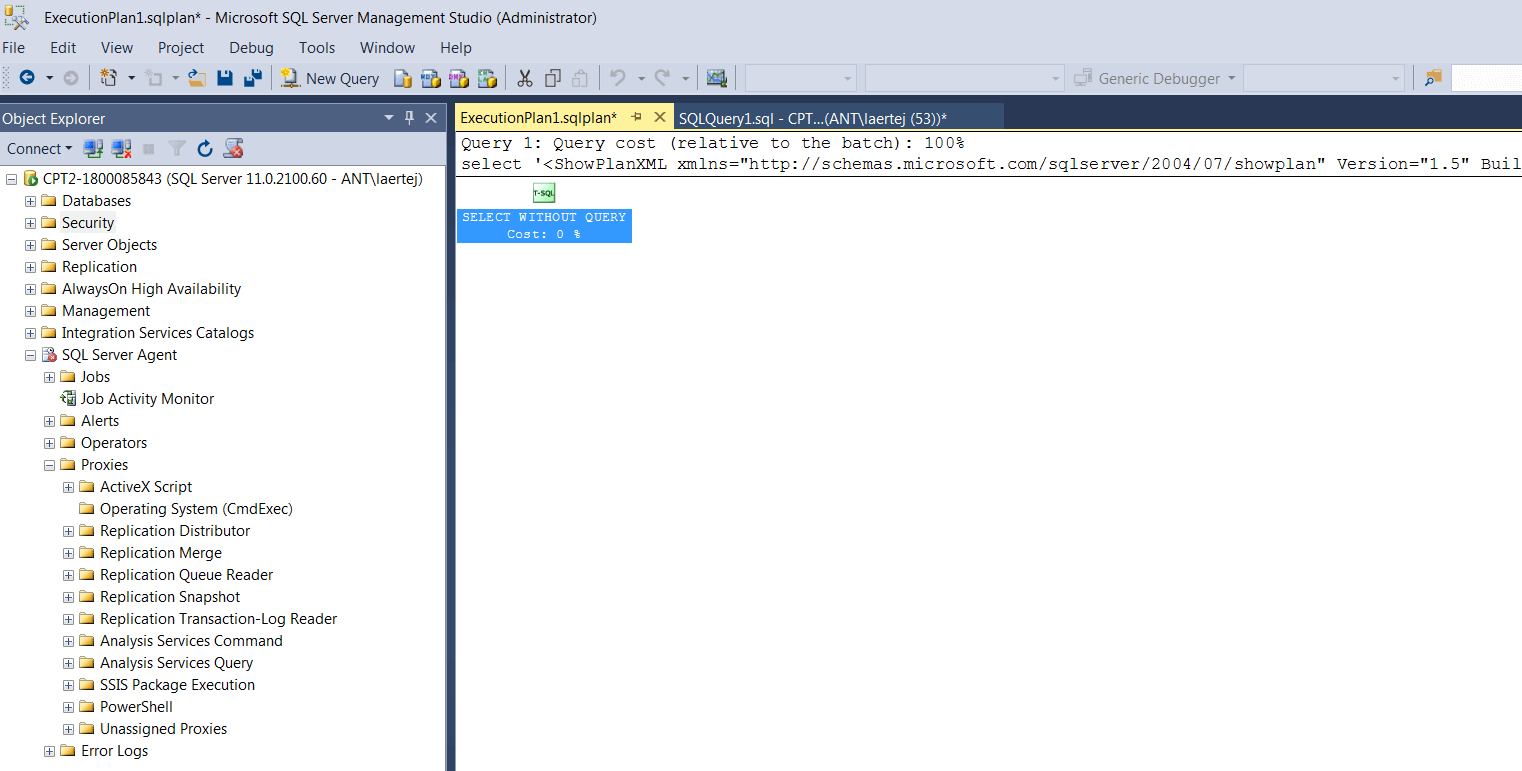
Run the Query – F5 or CRTL + E and you have the SQL Server plan from the query with problems.

Click in the link generated (Green)

Also all the steps for each time the script ran are logged in a file called LOG.TXT in the same path.

The PowerShell script file is included with this article and it’s an optimised version of a script published in this article. Thanks to the author of SQLscope for the original script :

SQLScope – Identifying high CPU SQL Server threads

In the case of sp_whoisactive, its even easier. You just need to setup the WMI agent job that will call a script that runs the SP_Whosactive and output to a file something like :

$SQL = “ EXEC master..sp_whoisactive ……” 
  $SQLReturn = Invoke-sqlcmd -ServerInstance $ComputerName -Database master -Query $SQL #-ErrorAction stop | 
  Select  ColumnIwantShow1, ColumnIwantShow2 | 
  Export-csv -Path "$($PSScriptRoot)\ReportHighCpuQueries.csv" -Force -NoClobber -NoTypeInformation –Append

Conclusion

The busy DBA wants precision in his alerts. Baselines and details are all very well, but it is too much irrelevant information. What is better is the DBA equivalent of CCTV or a dashcam that captures the moment when things go wrong and stores the data. The way we can do this is to configure SQL Agent to use WMI and specify our alerts in WQL. Doing this is like setting a trap for catching critters. We don’t want to have to sit there watching a mousetrap do we? It doesn’t matter what sporadic event we’re interested in because we just choose the best for the task. Then we can relax, pull on the headphones and the death metal music, and dream of Copacabana beach while WMI lies in wait to catch that elusive database problem.

The post Investigating the Cause of SQL Server High CPU Load Conditions When They Happen appeared first on Simple Talk.

18 Jul 17:02

ACAB: Parade mit Stoffbeutel

by Udo Vetter

Mit der Strafbarkeit der berühmten Abkürzung „ACAB“ auf T-Shirts, Jacken und Plakaten befassen sich mittlerweile Dutzende Gerichtsurteile. Nun bereichert das Bundesverfassungsgericht die Liste mit einem Beschluss, in dem es um einen mit ACAB bedruckten Stoffbeutel ging.

Ein wenig liest sich die Entscheidung wie eine Gebrauchsanweisung an die Einsatzkräfte der Polizei, sofern diese sich beleidigt fühlen wollen. An sich, so das Gericht, sei die ACAB-Parole nicht strafbar, auch nicht im öffentlichen Raum. So reiche es nicht aus, wenn sich der Betroffene trotz Aufforderung weigert, den Beutel wegzustecken. Ebenso wenig könnten sich die anwesenden Polizisten automatisch beleidigt fühlen, bloß weil sie Polizisten sind.

Aber: Laut dem Strafurteil war der Angeklagte „nachgerade paradierend“ vor den Kräften auf und ab gegangen, die eine Demonstration abschirmten. Er habe den Beutel „ostentativ“ gezeigt. Das wiederum, so das Verfassungsgericht, könne belegen, dass sich der Angeklagte bewusst in die Nähe der konkreten Beamten begeben und sich „individualisiert“ auf sie bezogen hat. Das reiche aus, damit sich die einzelnen Polizisten beleidigt fühlen können.

Na ja, damit ist nun klar, was auf jeden Fall in einer ACAB-Anzeige drin zu stehen hat.

Unter dem großen ACAB auf dem Stoffbeutel stand übrigens eine Erklärung: „All cats are beautiful.“ Geholfen hat es dem Angeklagten nicht. Das Verfassungsgericht geht hierauf mit keinem Wort ein (Aktenzeichen 1 BvR 2832/15).

Flattr this!

18 Jul 17:02

AGB einfach weggeklickt? Diese abstrusen Bestimmungen haben 22.000 Nutzer akzeptiert

Nirgendwo wird im Internet so viel gelogen wie bei der Angabe „ja, ich habe die AGB gelesen“. Niemand liest AGB wirklich, man klickt sie einfach weg. Eine britische Firma hat jetzt ein Experiment gemacht.Allgemeine Geschäftsbedingungen sind langweilig. Niemand liest sie. Und doch sollte man das tun. Denn ein britischer WLAN-Betreiber hat seine AGB für zwei Wochen ein wenig erweitert: Demzufolge verpflichte man sich, 1.000 Stunden soziale Arbeit für die Gesellschaft zu leisten. Das könne sein, Klos zu putzen, alte Kaugummis vom Gehsteig zu kratzen, streunende Tiere zu umarmen, Schneckenhäuser zu bemalen oder Abwasserrohre mit der Hand zu reinigen. „Wir wollten damit aufzeigen, wie wenig Konsumenten darauf achten, zu was sie sich verpflichten, wenn sie kostenloses WLAN nutzen“, erklärt Purple-Chef Gavin Wheeldon dem Guardian.

AGB führen zu einem Vertragsschluss – rausreden wird schwierig

Immerhin 22.000 Nutzer akzeptierten bei einem Festival in Manchester die AGB, ohne über den Passus zu stolpern. Ob ein solcher Paragraph überhaupt bindend ist, hängt von seiner Ausgestaltung ab. Zwar ist man einerseits dazu verpflichtet, einen Vertrag auch zu lesen, bevor man ihn akzeptiert. Sich später rauszureden kann schwierig werden, zumal die Auswirkungen solcher Verträge auch noch Jahre später gelten können. Andererseits sind ganz abstruse Bestimmungen wie diese schon aufgrund des Verbots von Überraschungsklauseln nicht wirklsam. Abgesehen davon hatte Justizminister Heiko Maas bereits vor zwei Jahren vorgerechnet, dass man alleine 67 Arbeitstage bräuchte, um die AGB zu lesen, denen man zustimme.

Der Provider aus Manchester, der die WLAN-Netze unter anderem für Legoland und Pizza Express betreibt, hatte immerhin in den AGB auch einen Preis versteckt für denjenigen, der sich das wirklich durchliest. Ein einziger Anwender hat dies offenbar getan, wie Wheeldon berichtet.

Abstruse AGB gab es schon in der Vergangenheit

Dass das Ergebnis so ausfällt, verwundert nicht: Der finnische Security-Software-Hersteller F-Secure hatte 2014 einen ähnlichen Paragraphen in seine AGB geschmuggelt. Darin hatten sich die Nutzer verpflichtet, zur freien Nutzung ihr erstgeborenes Kind an F-Secure zu übergeben – im Notfall auch das geliebte Haustier, wenn man kinderlos sei. Auch Amazon hatte 2016 die Zombie-Apokalypse in einem Vertrag zur Nutzung eines Spiels stehen.

Wenn du schon keine AGB liest, lies wenigstens diese Artikel:

18 Jul 17:01

Bus-Streik in München: Das erwartet Fahrgäste am Dienstag

Die Gewerkschaft Verdi hat für Dienstag die bei der Münchner Verkehrsgesellschaft (MVG) angestellten Busfahrer zu einem Streik aufgerufen. Was Fahrgäste an diesem Tag erwartet. 
18 Jul 17:00

SQLCLR in Practice: Creating a Better Way of Sending Email from SQL Server

by Darko Martinović

In this article, I will demonstrate how to build a SQLCLR stored procedure that extends the functionality of the procedure sp_send_dbmail that is provided in SQL Server. I will be including the code, which is on Github here. The main purpose of this article is to illustrate that SQLCLR is a very good way of  accessing .NET functionality for special purposes, but I’m also hoping that the example might be useful to you.

There are a few reasons for wanting to have a more comprehensive way of sending email from SQL Server than sp_send_dbmail .

  • You may not have the appropriate rights on the instance level
  • You need to have more control of the process of sending e-mails
  • You need to implement custom logging of emails for security.
  • You have to use your e-mail profiles, rather than those provided by DBA team
  • If you, as a software vendor, are providing a database that is co-hosted with databases from other software vendors, there are some server-based resources that you have to share. Usually, each of your customers has their DBA team, but you, the vendor, are responsible for your database.
    It is all simple until you require a server-based resource: maybe you have to create some SQL Server Agent alerts or jobs. It could be that you need to send an e-mail to yourself or your company’s dedicated e-mail address to transmit a report, graph or warning message.
    Then you have to negotiate with local DBA team or with the other software vendors. In SQL Server Agent’s alert system, it is only possible to have one active e-mail profile, and you can’t change it without restarting SQL Server Agent.
  • There are situation when local DBA team, just replace public ¸e-mail profile in SQL Server mailing system and you suddenly start receiving phone calls that something goes wrong.
  • When you need to send an e-mail from a process in your database, that process must have appropriate rights to MSDB database in order to execute sp_send_dbmail. Alternatively, you see a message like this:

You will sometimes hear that a reason to replace ‘sp_send_dbmail’ with a custom SQLCLR stored procedure is that you is that e-mailing isn’t a feature of SQL Server EXPRESS edition. Actually, this isn’t the case because EXPRESS edition merely lacks the GUI wizard to set up e-mailing. If, instead, you use the T-SQL script (see Appendix B) and replace the information in the declaration statement with actual values, you can set up e-mail on EXPRESS or any other edition of SQL Server.

If you ever look at the parameter list of sp_send_dbmail, you will probably be slightly astonished at the number of parameters. Of course, many of them are optional. In the screenshot below, I surround with red those parameters that I consider crucial for sending an e-mail.
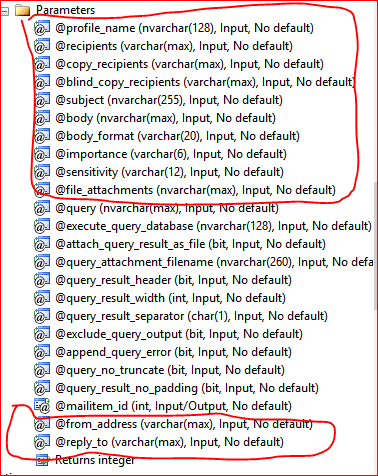
I decided that, if I had to create an alternative sp_send_dbmail for a database, it would be more convenient to have an email profile rather than have to repeatedly enter every item of information that you’d need for an e-mail profile.

The main goal for the project was to have everything needed for e-mailing contained within the database. This means that we must not be required to access the instance or system databases in any way. Of course, CLR should be enabled (see Appendix B for information how to do that) but this is the only setting at the instance level that should be changed.

This article talks about how to build such procedure using .NET on the server. This requires using SQLCLR.

Here is how this article is organized:

  • In the first section, I will make a brief overview about e-mailing on SQL Server.
  • Then I will introduce CLR stored procedure EMAIL.CLRSendMail
  • In the third section, I will present a set of new tables needed to implement custom e-mailing.
  • Then we are talking about sensitive information and how to protect them
  • Fifth section talks about testing and monitoring SQLCLR solution
  • Sixth section talks about debugging SQLCLR solution
  • Finally, I will discuss how supported material is organized.

A Brief Overview of SQL Server E-Mailing

Database mail is extremely huge and excellent designed system. Sending e-mails occurs outside of SQL Server, in a separate process using external executable. When you send a message, Database Mail adds request to Service Broker queue. The stored procedure ‘sp_send_dbmail’ returns immediately.

According Microsoft documentation: ’Database Mail uses Service Broker activation to start the external program when there are e-mail messages to be processed. Database Mail starts one instance of the external program. The external program runs in the security context of the service account for SQL Server’.

Therefore, by default, Service Broker has enabled in MSDB database and there is no mailing without Service Broker.

Probably some of you did not know that in background Service Broker uses external program. The Database Mail external executable is DatabaseMail.exe, located in the MSSQL\Binn directory of the SQL Server installation

In addition to the procedure (sp_send_dbmail) parameters, there are configuration parameters that ‘sysmail_configure_sp’ stored procedure regulate. Parameters have listed in table below. These ones colored with green have implemented in SQLCLR solution. In addition, these one colored with blue are new in SQLCLR solution and black ones are omitted.

Parameter name

Description

Default Value

Account Retry Attempts

The number of times that the external mail process attempts to send the e-mail message using each account in the specified profile

1

Account Retry Delay (seconds)

The amount of time, in seconds, for the external mail process to wait after it tries to deliver a message using all accounts in the profile before it attempts all accounts again.

5000

Database Mail Executable Minimum Lifetime (seconds)

The minimum amount of time, in seconds, that the external mail process remains active. The process remains active as long as there are e-mails in the Database Mail queue. This parameter specifies the time the process remains active if there are no messages to process.

600

DefaultAttachmentEncoding

The default encoding for e-mail attachments

MIME

MaxFileSize

The maximum size of an attachment, in bytes.

1000000

Prohibited Extensions

A comma-separated list of extensions, which cannot be sent as an attachment to an e-mail message.

exe,dll,vbs,js

LoggingLevel

Specify which messages are recorded in the Database Mail log. One of the following numeric values:

1 – This is normal mode. Logs only errors.

2 – This is extended mode. Logs errors, warnings, and informational messages.

3 – This is verbose mode. Logs errors, warnings, informational messages, success messages, and additional internal messages. Use this mode for troubleshooting.

2

Save Emails

Saving e-mails in database. E-mails have saved in MSDB database. There are two tables: [dbo]. [sysmail_mailiems] and [dbo]. [sysmail_attachments]. In SQLCLR there are two tables too, located in schema EMAIL. In SQLCLR, solution there is option to save an e-mail to the database.

False

Send Mail Asynchronously

This is default, but you can choose to send syncronously

True

No Piping

There is no messages in message box, after success sending

True

Save Attachments

Do we save attachments

True

Finally, there are two configuration objects: The database configuration objects provide a way for you to configure the settings that Database mail should use when sending an email from your database application or SQL Server Agent. These are the Database Mail accounts and Database Mail profiles.

The Database Mail profile can contain one or more Database Mail accounts. When you fail to send an e-mail using the first account on the list, the process of sending e-mails will sleep for a while (the duration of this wait is specified by configuration property Account Retry Delay) and then the process will start sending an e-mail using another account.
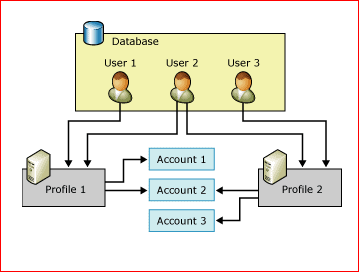
Of course it is not easy to reproduce some of the features such as scalability and reliability using SQLCLR.

Introduction to the stored procedure [EMAIL].[CLRSendMail]

In order to implement any CLR project such as sending e-mails on SQL Server, we should create a SQLCLR project. One of the properties of the project is the permission set (level). In our case it should be ‘UNSAFE’ (Microsoft designers divide SQLCLR projects according the permission set to ‘SAFE’,’EXTERNAL_ACCESS’ & ‘UNSAFE’).
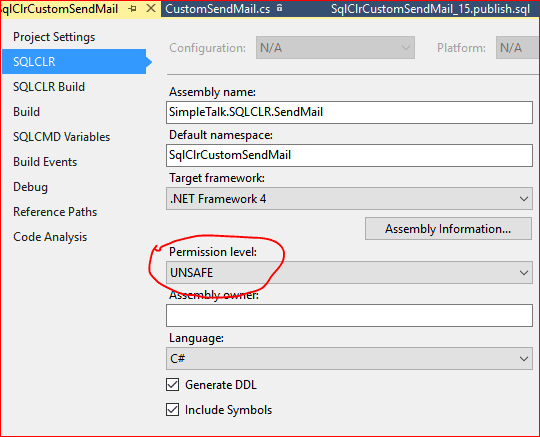
SQL Server uses ‘GRANT’ ‘DENY’ ‘REVOKE’ commands in order to provide access to specific database objects. .NET framework on the other hand uses Code Access Security that controls the interaction between modules of higher/lower privilege. It is very difficult to combine these two security methods, so Microsoft designers decide to simplify the whole thing by dividing it into three parts.

In ‘SAFE’ mode, the assembly’s methods can do pretty much the same as in T-SQL stored procedure. Caller’s credentials are used to execute the assembly method.

In ‘EXTERN_ACCESS’ mode the assembly method can perform file & network input & output. External code runs with the SQL Server service account’s privileges, so impersonation should be used to ensure that the caller’s privileges are used when controlling access to external resources specified by user input.

In ‘UNSAFE’ mode, permission extends the external set of permissions and allows the assembly to call unmanaged (uncontrolled) code. This might suggest that everything is possible in ‘UNSAFE’ mode. Of course, it is not. As I explained in earlier Practical usage of SQLCLR: Building QueryToHtml Function calling compiler is not possible, although it might be very cool feature in some cases

I wish that there was a wizard in Visual Studio that could determine the correct permission set, because it is a daunting task for anyone inexperienced in SQLCLR to work out the correct permission set. If you make the wrong assumption, you will probably receive an error during the execution of your SQLCLR procedure. Strangely, that solution will compile successfully!

This error will look something like this. A Massage 6522 should suggest to you that you have a problem with security and that you will have to decrease the security level to ‘EXTERNAL ACCESS’ or ‘UNSAFE’. I add another strange notice about message 6522 In Appendix D

Msg 6522, Level 16, State 1, Procedure CLRSendMail, Line 0
A .NET Framework error occurred during execution of user-defined routine or aggregate "CLRSendMail": 
System.Security.HostProtectionException: Attempted to perform an operation that was forbidden by the CLR host.

The protected resources (only available with full trust) were: All
The demanded resources were: ExternalThreading

System.Security.HostProtectionException: 
   at StoredProcedures.CLRSendMail(SqlString profileName, SqlString mailTo, SqlString mailSubject, SqlString mailBody, SqlString fromAddress, SqlString mailCc, SqlString blindCopyRec, SqlString replyAddress, SqlString group, SqlString fileAttachments, SqlBoolean requestReadReceipt, SqlInt16 deliveryNotification, SqlInt16 sensitivity, SqlInt16 mailPriorty, SqlBoolean bodyHtml, SqlString configName)

We will create a SQLCLR stored procedure for this project by harnessing the ‘SmtpClient’ class, locating in ‘System.Net.Mail’ namespace.

The end-product of the SQLCLR project will be an assembly that contains information about our SQLCLR stored procedure.

In order to use this stored procedure, we first have to deploy the appropriate assembly. I named the assembly as showed in the screenshot below as ‘SimpleTalk.SQLCLR.SendMail’. The stored procedure name is ‘EMAIL.CLRSendMail’.
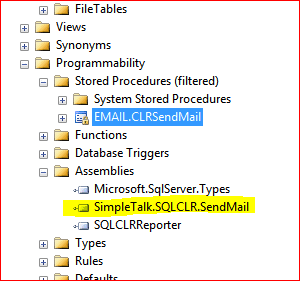
In the Deploying section, I will explain how to deploy the assembly. Now, let see what the parameters of the stored procedure are and how to call it.

The simplest call is like this:

EXEC [EMAIL].[CLRSendMail]
     @profileName = N'SimpleTalk',
     @mailTo = N'<semicolon-delimited list of e-mail addresses to send the message to>',
     @mailBody = N'test';

…will produce an e-mail like this.
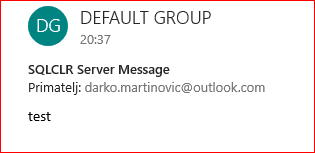
You’ll have noticed that we have to specify only three parameters in order to send an e-mail using SQLCLR. Although mailBody is also optional in sp_send_dbmail, it could not be optional in SQLCLR, because SQLCLR does not allow default values for nvarchar (max) types.

Help is available in any point by executing

SELECT
	*
FROM EMAIL.CustomSendMailHelp('EMAIL.ClrSendMail');

The result of help command is a list of parameters similar like table below.

Parameter Name

Parameter Description

Parameter Type

Default Value

Can be null

@profileName

Is the name of the profile to send the message from. Can be built in or user defined (readable from database). @profileName must be specified.

Nvarchar(20)

No default value

No

@mailTo

Is a semicolon-delimited list of e-mail addresses to send the message to.

Nvarchar(max)

No default value

No

@mailSubject

Is the subject of the e-mail message. The subject is of type nvarchar(255). If no subject is specified, the default is ‘SQLCLR Server Message’

Nvarchar(255)

No SQLCLR Server Message’

Yes

@mailBody

Is the body of the e-mail message. The message body is of type nvarchar(max),

Nvarchar(max)

No default value

No. This is limitation of SQLCLR nvarchar(max)

@fromAddress

Is the value of the ‘from address’ of the email message. This is an optional parameter used to override the settings in the mail profile. SMTP security settings determine if these overrides are accepted. If no parameter is specified, the default is NULL.

Nvarchar(500)

NULL

Yes

@displayName

Display name associate with from email address

Nvarchar(400)

NULL

Yes

@mailCC

Is a semicolon-delimited list of e-mail addresses to carbon copy the message to.

Nvarchar(4000)

NULL

Yes

@blindCopyRec

Is a semicolon-delimited list of e-mail addresses to blind carbon copy the message to.

Nvarchar(4000)

NULL

Yes

@replyAddress

Is the value of the ‘reply to address’ of the email message. It accepts only one email address as a valid value. This is an optional parameter used to override the settings in the mail profile.

Nvarchar(400)

NULL

Yes

@fileAttachments

Is a semicolon-delimited list of file names to attach to the e-mail message. Files in the list must be specified as absolute paths. The attachments list is of type nvarchar(max). By default, SQLCLR Mail limits file attachments to 1 MB per file

Nvarchar(max)

NULL

Yes

@requestReadReceipt

Request read receipt. Not implemented in sp_send_dbmail

Bit

0

YES

@deliveryNotification

Delivery notification.Not implemented in sp_send_dbmail.

Şmallint

1

Yes

@sensitivity

Is the sensitivity of the message. The parameter may contain one of the following values: Normal,Personal,Private & Confidential

Smallint

1

YES

@mailPriorty

Is the importance of the message.The parameter may contain one of the following values: Low,Normal & High

Smallint

1

Yes

@bodyHtml

Is the format of the message bodyCan be HTML or TEXT

Bit

1

0

@configName

Is the name of the configuration. Configuration is responsible for protecting system of large file attachements, prohibiting file extension, saving e-mail in database etc.

Nvarchar(20)

NULL

Yes

Here are some examples how to call the stored procedure:

If we need to send attachments in our mail message, we specify

EXEC [EMAIL].[CLRSendMail]	@profileName =N'SimpleTalk'
  	,@mailTo = N'<your recepiens>
  	,@mailSubject = N'test'
  	,@fileAttachments = 'D:\a1\AtlantaMDF_031207112.ppt;D:\OneDrive\TKD\608-Horvat.pdf'
  	,@mailBody = N'test'
  GO

When working with attachments, it is important to know that there are some default extensions such as ‘exe’,’js’,’dll’ that are prohibited for security reasons.

The file attachment should exist on file system. If the file does not exist, a warning item is added to the ‘Monitor Log’ table. The E-mail message will be still sent.

The file attachment should be smaller than the size specified by the configuration object.

If you need to specify the display name, you just override the default by specifying it:

EXEC [EMAIL].[CLRSendMail]	@profileName = N'SimpleTalk'
  	,@mailTo = N'<your recepiens>’
  	,@mailSubject = N'Test with display name'
  	,@displayName = 'SQLCLR display name'
  	,@mailBody = N'test';

Which will produce an email like this
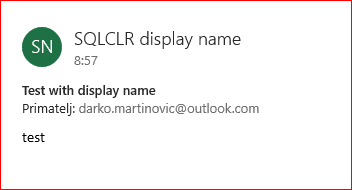
This project uses a profile. In the next section I will explain what a profile is, and what properties it has. One property of the profile is ‘DefaultDisplayName’, so parameter @displayName, could be omitted too.

If you need to specify a reply address that is different from address you sent an e-mail to, and then specify parameter @replyAddress.

	,@replyAddress = '<your reply address>'

If you like to request read recipient, you can call procedure like this:

	,@requestReadReceipt = 1

Similar, if you like to setup delivery notification, you can choose one of the value. 0-means none, 1-On Success, 2-On Failure.

,@deliveryNotification = 1 --On Success

In order to setup sensitivity, you can choose one of the value for parameter sensitivity. 0-means personal, 1- means private, 2-means Company confidential.

	,@sensitivity=2

And finally, if you like to setup e-mail priority, you can call the stored procedure like this. You can use 0-for normal priority, 1-for low priority and 2-for high priority.

,@mailPriorty = 2

Omnia Mea Mecum Porto

What information we need to in order to implement SQLCRL support for sending e-mails?

In order to setup accounts and configuration for e-mailing and save e-mail messages in database, we have to create a set of new tables.

For the sake of the readability of these tables, we will set it in a special schema called EMAIL.

As you see on the table below, I added five (5) tables.

Table name

Table description

EMAIL.Configurations

We will save configuration options such as maximum attachment size or prohibited extension. This table will take on the equivalent role of msdb.dbo.sysmail_configuration

EMAIL.Profiles

This is where we save information such as the login name, password, host name, port number etc.

EMAIL.MailItems

This is similar to msdb.dbo.sysmail_mailitems. If it is specified by configuration options, then e-mails will be saved in this table..

EMAIL.Attachments

Similar to msdb.dbo.sysmail_attachments

EMAIL.MonitorLog

Basic logging table

You can see relations between tables on the screenshot bellow.
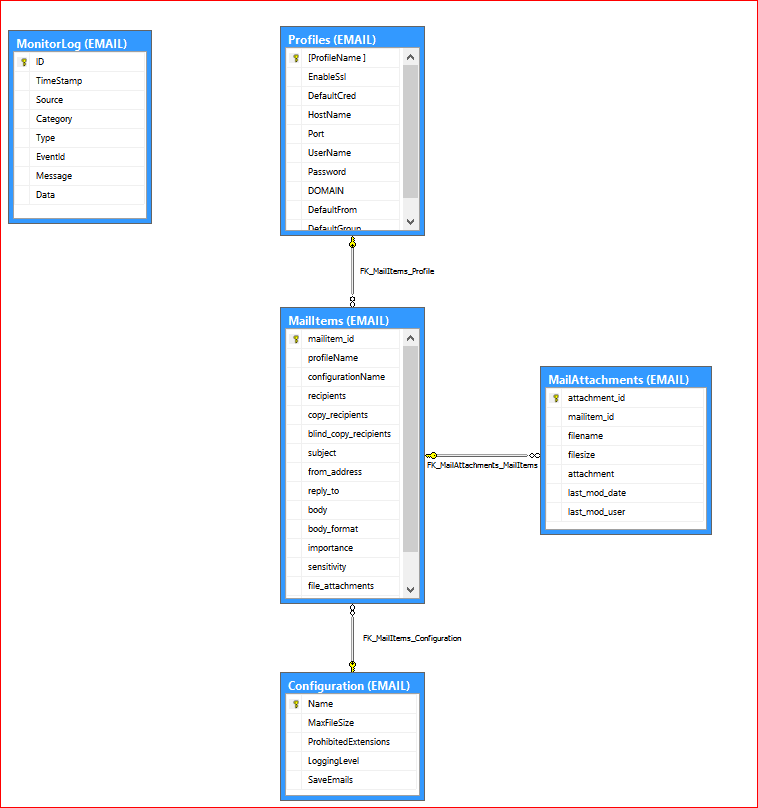
The T-SQL script for creating the database schema and tables is included in the supporting materials. See the Deployment section for details.

As I wrote at the beginning, we will use the SmtpClient class in order to send an e-mail message. In addition to this class, there are two more classes implemented in SQLCLR solution. One is called SysConfig and the other SysProfile.

SysConfig do pretty much the same as sysmail_configure_sp. It is a simple class with bunch of properties. It has the implementation like this:

public class SysConfig
      {
          //Implemented
          /// <summary>
          /// Maximum file size in bytes. Default 1MB
          /// </summary>
          public Int32 maxFileSize
          {
              get; set;
          } = 1000000;
          //Implemented
          /// <summary>
          /// File extension that are not allowed
          /// </summary>
          public string prohibitedExtension
          {
              get; set;
          } = "exe,dll,vbs,js";
          public eLoggingLevel loggingLevel
          {
              get; set;
          } = eLoggingLevel.Minimal;
          /// <summary>
          /// Do we save e-mails?
          /// </summary>
          public bool saveEmails
          {
              get; set;
          } = true;
          /// <summary>
          /// What is configuration name
          /// </summary>
          public string name
          {
              get; set;
          } = null;
          /// <summary>
          /// How we send an e-mail?
          /// </summary>
          public bool sendAsync
          {
              get; set;
          } = true;
          /// <summary>
          /// Do we need piping
          /// </summary>
          public bool noPiping
          {
              get; set;
          } = true;
  /// <summary>
          /// Do we save attachments
          /// </summary>
          public bool saveAttachments
          {
              get; set;
          } = true;
      }

Using the object type SysConfig is an option. If we do not specify the configuration parameter then the default one is used. The default behavior is pretty much the same as showed on the code snippet above. The configuration object could be instantiated by specifying the configuration parameter. In that case, the configuration object will be instantiated by reading the record from the EMAIL.Configurations table. Here is the structure of this table.
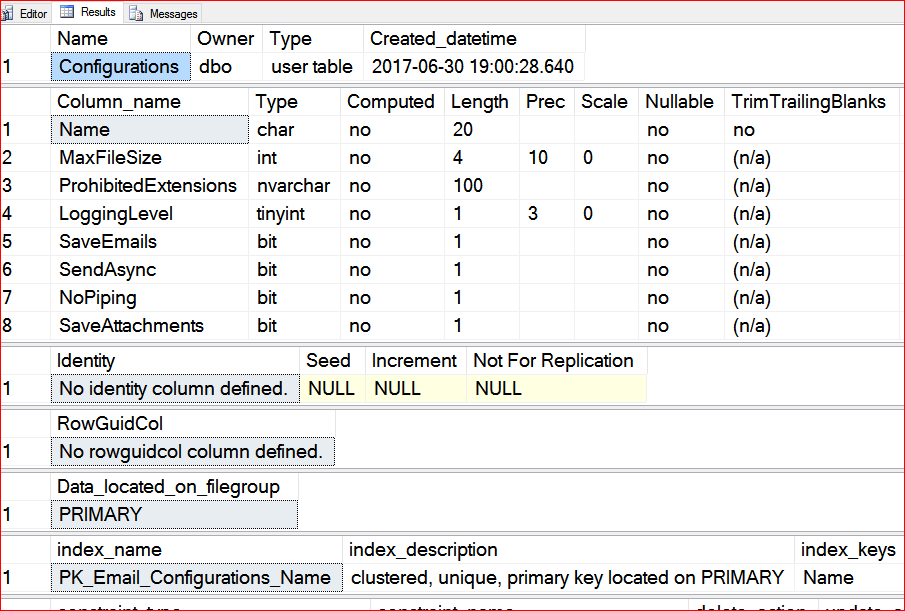
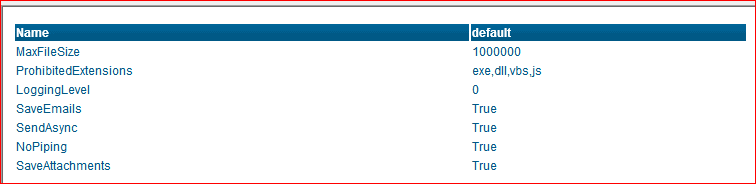
During the assembly deployment, the T-SQL setup script will detect if there is any record in this table. If not, the T-SQL script will insert default one, like showed here

SELECT * FROM EMAIL.CONFIGURATIONS;
SysProfilehas to be instantiated. There are two options to doing this. First in code, there are two ( in this solution, but you have as many as you wish) built-in profiles. In addition to these profiles, you can instantiate SysProfile by reading information from the ‘Email.Profiles’ table.

This table has structure similar like this:
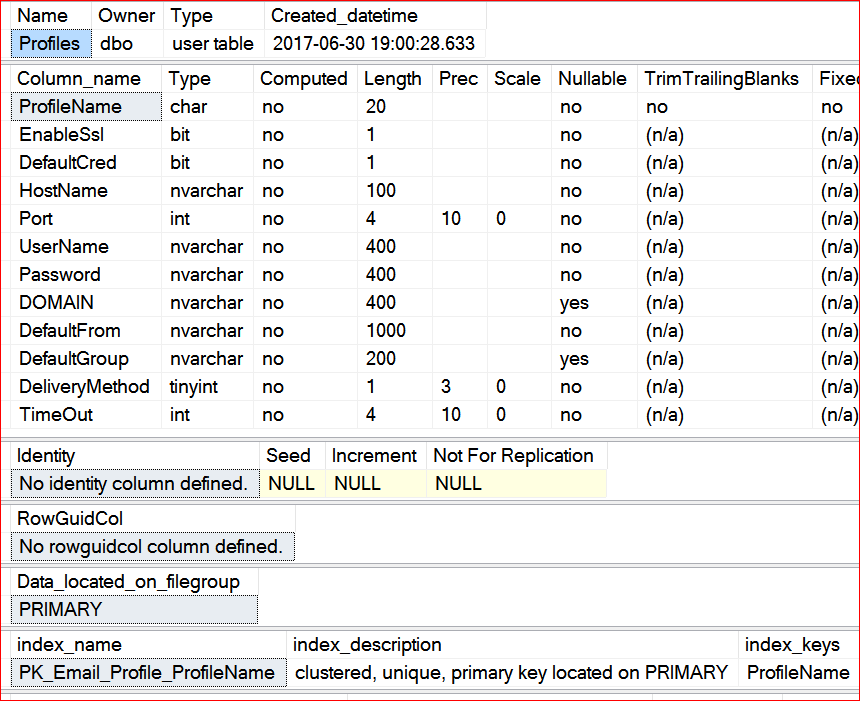
My idea was to have built-in profiles. These profiles should be considered as a fall-back. When the stored procedure is invoked, its first action is to resolve the profile. If the profile name matches one of the built-in profiles, then that built-in profile is used. Otherwise, the stored procedure will determine the profiles by querying the database. Determining the profile in the stored procedure is accomplished as in this snippet of code.

private static SysProfile GetClient(string name, ref string error)
      {
          SysProfile p = null;
          EncryptSupport.Simple3Des wrapper = new EncryptSupport.Simple3Des(SECRET_WORD);
          //Built in profile called ssl
          if (name == "ssl")
          {
              p = new SysProfile();
              p.builInName = name;
              p.client = new SmtpClient();
              p.client.UseDefaultCredentials = false;
              p.client.Port = 587;
              p.client.Host = "smtp.gmail.com";
              p.client.EnableSsl= true;
              p.client.Credentials = new NetworkCredential(wrapper.DecryptData("DE5ZET4hY95fZ7JadaxKqchFuvrR3p12vlY="), wrapper.DecryptData("ovkrtZ/="));
          }
          //Built in profile called simple
          else if (name == "simple")
          {
              p = new SysProfile();
              p.builInName = name;
              p.client = new SmtpClient();
              p.client.UseDefaultCredentials = false;
              p.client.Port = 25;
              p.client.Host = "mail.iskon.hr";
              p.client.EnableSsl = false;
              p.client.Credentials = new NetworkCredential(wrapper.DecryptData("El+=="), wrapper.DecryptData("=="));
          }
          else
          {
              //determine profile by querying the database
              SqlParameter[] listOfParams = new SqlParameter[1];
              SqlParameter pName = new SqlParameter("name", name);
              pName.Size = 20;
              pName.SqlDbType = System.Data.SqlDbType.Char;
              listOfParams[0] = pName;
              p = DataAccess.GetProfile(listOfParams, wrapper,ref error);
          }
          return p;
      }

Result of publishing SQLCLR solution is T-SQL script, which is by default putted in SQLCMD mode. We can add during developing pre-deployment and post-deployment action, also in form of T-SQL scripts. The post-deployment script will detect if there is no record in this table. If it does not exist, then the T-SQL script will add a record. So, part of this post-build script looks similar like this

IF ( SELECT COUNT(*) FROM EMAIL.PROFILES ) = 0 
  BEGIN
  INSERT INTO email.profiles (profilename, EnableSsl, DefaultCred, Port, HostName, UserName, Password,DefaultFrom)
  		SELECT
  			'SimpleTalk'
  			,1
  			,0
  			,587
  			,'smtp.gmail.com'
  			,N'L5Yr/GLP9vbH82Fah78mSeUHInP/ws8XN0K0ky3W4PvpfSOgo='
  			,N'KYEVsZBY8c08fKO4vLihIrcwwOxInvas1I='
  			,'your_address@company.com';
  ---Use these values if you decide to apply T-SQL encryption by using ENCRYPTBYCERT function 
  			--,ENCRYPTBYCERT(CERT_ID('TestCert'), N'pomocniracun25@gmail.com')
  			--,ENCRYPTBYCERT(CERT_ID('TestCert'), N'Anja26032011')
  			--,'darko.martinovic@outlook.com';
  	
  END

You can, of course, modify this script in order to test this solution, because at the end I will replace sensitive information such as the ‘UserName’ and ‘Password’, with your concrete values. . See more on this section ( Sensitive data).

During the execution of the stored procedure, the configuration and its profile is known. If we decide to save the details of the e-mail into the database by choosing the appropriate property in the configuration object, then we can see the configuration properties for this particular e-mail and what profile was used.

The main table for saving e-mails is Email.MailItems with structure similar to this:
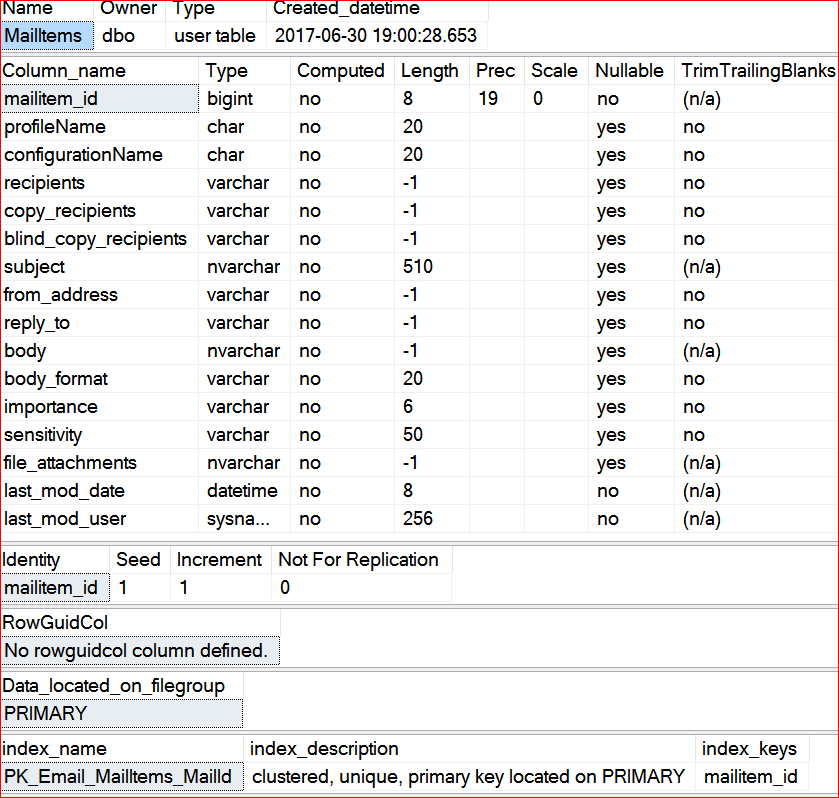
In addition to this table, there is a table for saving attachments. It is named Email.MailAttachments. There is a property in the configuration object that determines whether we save e-mail attachments as well. The default value for this property is ‘true’. The structure of this table looks similar to the screenshot bellow.
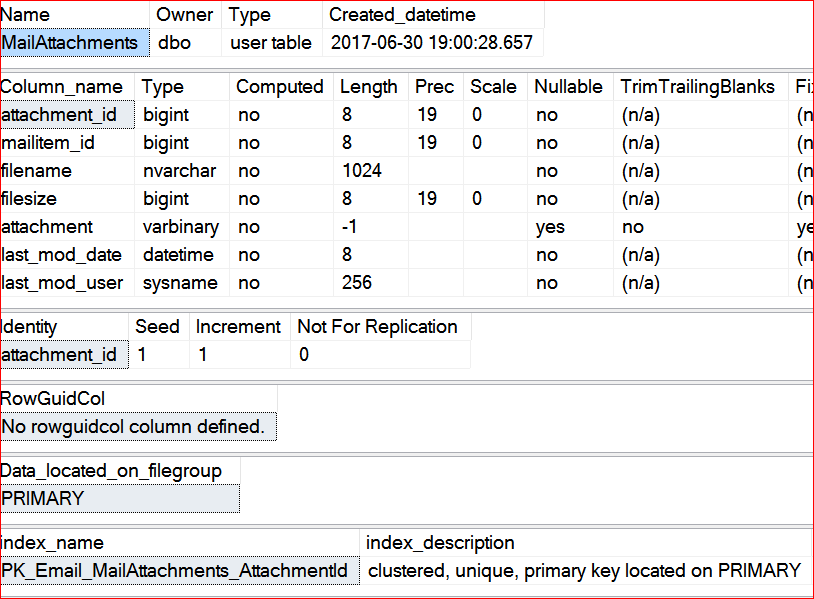
The process of saving e-mail attachments is resource-consuming. In my opinion, the best way of inserting e-mail attachments in the database, is to use table value parameters (TVPs). This code snippet will save e-mail attachments. Therefore, we pass ‘DataTable’ as a parameter to the command object. This parameter has SqlDbType.Structured type and it has the value of ‘EMAIL.TVP_Emails’.

if (saveAttachments && validAttachments.Trim().Equals(string.Empty) == false)
     {
     comm.CommandText = @"INSERT INTO [EMail].[MailAttachments] (mailitem_id,fileName,fileSize,attachment)
                         SELECT @mailItem, fileName, fileSize, attachment FROM @tvpEmails";
     comm.Parameters.AddWithValue("@mailItem", id);
     comm.Parameters[comm.Parameters.Count - 1].SqlDbType = System.Data.SqlDbType.BigInt;
      DataTable dt = CreateTable();
      DataRow newRow = null;
      foreach (Attachment eml in mm.Attachments)
      {
        newRow = dt.NewRow();
        newRow["FileName"] = eml.Name;
        newRow["FileSize"] = eml.ContentStream.Length;
        byte[] allBytes = new byte[eml.ContentStream.Length];
        int bytesRead = eml.ContentStream.Read(allBytes, 0, (int)eml.ContentStream.Length);
        newRow["Attachment"] = allBytes;
        eml.ContentStream.Position = 0;
        dt.Rows.Add(newRow);
      }
      comm.Parameters.AddWithValue("@tvpEmails", dt);
      comm.Parameters[comm.Parameters.Count - 1].TypeName = "EMAIL.TVP_Emails";
      comm.Parameters[comm.Parameters.Count - 1].SqlDbType = SqlDbType.Structured;
      comm.ExecuteNonQuery();
      dt = null;
      newRow = null;
      }
      comm.Transaction.Commit();
      if (conn.State == ConnectionState.Open)
          conn.Close();

During the deployment of the SimpleTalk.SQLCLR.SendMail solution, a T-SQL script will detect if such a TVP exists. If not, then the T-SQL script will create it.

IF NOT EXISTS (SELECT
  		*
  	FROM sys.types st
  	JOIN sys.schemas ss
  		ON st.schema_id = ss.schema_id
  	WHERE st.name = N'TVP_Emails'
  	AND ss.name = N'EMail')
  CREATE TYPE [EMail].[TVP_Emails] AS TABLE ([FileName] [NVARCHAR](260) NOT NULL
  , [FileSize] [BIGINT] NOT NULL
  , [Attachment] [VARBINARY](MAX) NOT NULL);

Finally, there is a table for logging called Email.MonitorLog. It has the structure similar like this:
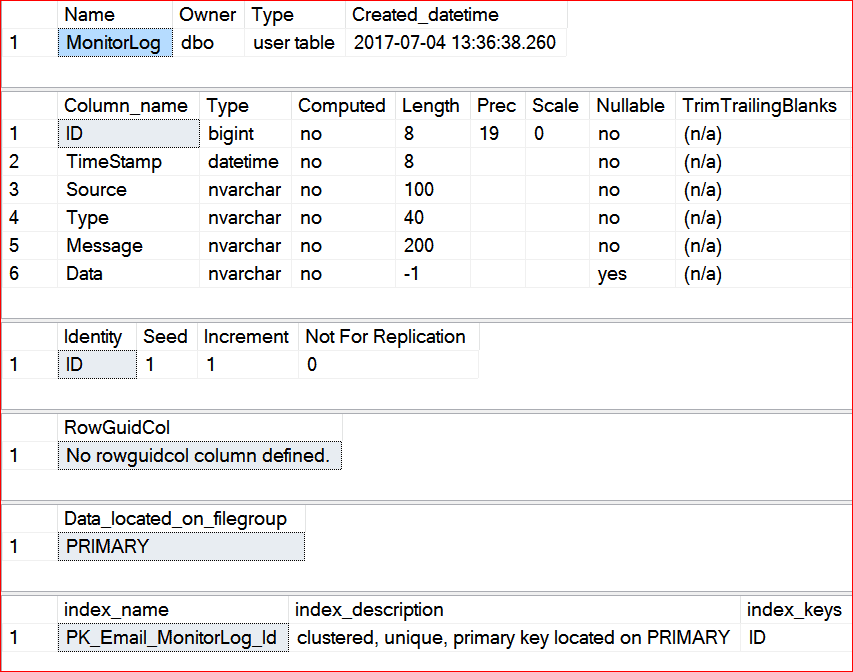
Correspondent class is ‘LogEntry’, with only one static method called ‘LogItem’.

Typically, the monitor log looks similar like this:
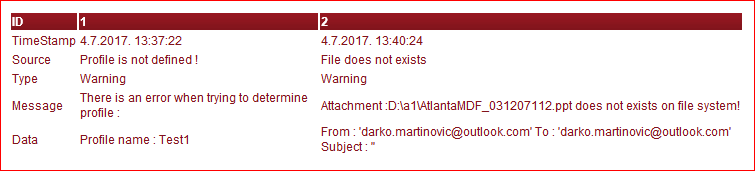
It captures information about the file attachment, profiles etc. Records in this table can be queried by record type. The record type can be ‘Information’, ‘Warning’ and ‘Fatal’. It is very helpful during logging that you know the basic information about the e-mail message. This include information about form address, subject and send to address. In order to make it more readable and easier to reuse, I make many extensions of the class ‘MailMessage’. All these extension are located in ‘Extensions’ folder inside the solution. The extension to describe the e-mail is named ‘HeaderInformation’.

public static string HeaderInformation(this MailMessage mm)
  {
    return @"From     : " + "'" + mm.From.Address.Trim() + "'" + "\r\n" +
            "To       : " + "'" + mm.To[0].Address.ToString().Trim() + "'" + "\r\n" +
            "Subject  : " + "'" + mm.Subject.ToString().Trim() + "'";
  }

The benefit of this type of coding is that Visual Studio Intellisense knows your extension and so coding is easier and more readable. Now is the time to say something about sensitive data. E.g. such as username and password.

What about Sensitive Data?

When you create an account on public servers (see Appendix C for choosing public SMPT servers), you usually have to provide information such as your login name, password, and wanted e-mail address, host name, port number etc. Some of this information is very sensitive. It means that you have to save them in an encrypted form in order to not compromise confidential data. Usually, this includes an encrypted login name and password. Encryption could be accomplished using T-SQL and/or .NET.

T-SQL encryption can be accomplished by creating master key and certificate, as in this script.

--Create master key. Master key has id 101
IF NOT EXISTS (SELECT *
  	FROM sys.symmetric_keys
  	WHERE symmetric_key_id = 101)
  BEGIN
  CREATE MASTER KEY ENCRYPTION BY PASSWORD = 'SimpleTalk'
  END
  GO
  --Create our certificate if not exists
  IF NOT EXISTS (SELECT
  		*
  	FROM sys.certificates
  	WHERE name = 'TestCert')
  BEGIN
  CREATE CERTIFICATE TestCert WITH SUBJECT = 'Test certifikate', EXPIRY_DATE = '20251231'
  END
  GO
  --Encrypt string by using certificate
  SELECT
  	ENCRYPTBYCERT
  	(
  	CERT_ID('TestCert'), N'UserSensitiveData');
  GO
  --Decrypt by using certificate
  SELECT
  	CAST(DECRYPTBYCERT(CERT_ID('TestCert'), 0x4189E1E22596180DF3407C831484ED4E6DDD34F97E6798E741542E7C0967AFF9EF93BA1C8D157AA37003670BC33B4AED6BB82D2997C0AF0712774AD902E7CCD6C08F5641DB713A2681FC1963749A315FC8903F9769B34F10316135F77AB546123E81B4A5BB75C10FEADCE22D4CE56C9BF7C0920B0F0D906C389B153636C71492) AS NVARCHAR(100));
  --Will return string ‘UserSensitiveData’

Therefore, when inserting record in table EMAIL.PROFILES, we can use script like this

IF ( SELECT
  		COUNT(*)
  	FROM EMAIL.PROFILES)
  = 0
  BEGIN
  INSERT INTO EMAIL.PROFILES (ProfileName, EnableSsl, DefaultCred, Port, HostName, UserName, Password, DefaultFrom)
  		SELECT
  			'SimpleTalk'--Profile name
  			,1--EnableSsl
  			,0--Use default credential
  			,587--Port number
  			,'smtp.gmail.com'--Host name
  			,ENCRYPTBYCERT(CERT_ID('TestCert'), N'<your login name>')
  			,ENCRYPTBYCERT(CERT_ID('TestCert'), N'<your password>’)
  			,'<default from address’;
  END

In our SQLCLR solution, it is possible to make use of an instance of the X509Certificate2 class, located in the System.Security.Cryptography.X509Certificates namespace, To do this, we import the private key into the solution and do decryption without specifying any secret key or password. However, I found this solution difficult to follow. In addition, because this is SQLCLR solution, I decide to implement everything using .NET.

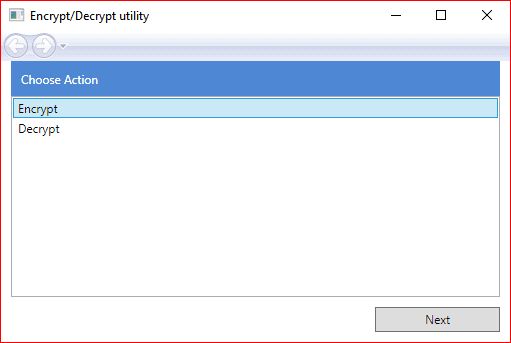
I make a simple utility, which is available on this address. It is WPF program, which has four steps. First, you can choose an action, as in the picture below. You can choose ‘encrypt’ or ‘decrypt’.
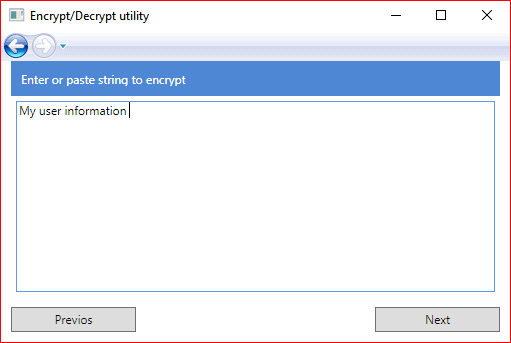
Then you can enter or paste the string to encrypt or decrypt as in the screenshot below, when I entered the string “My user information”.
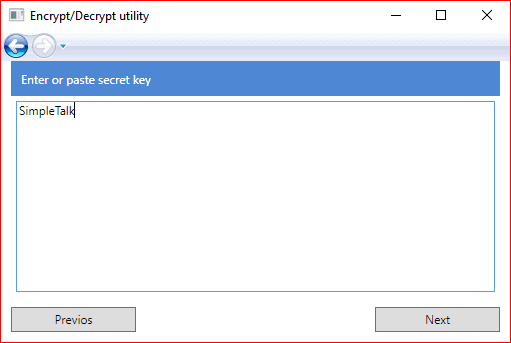
Then you choose ‘secret key’, as below, at which point I entered “Simple Talk”.
At the final step, you can view the result.
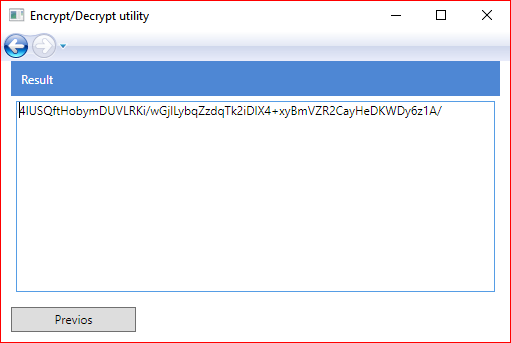
This is a simple tool, which uses TripleDESCryptoServiceProvider located in the System.Security.Cryptography namespace, in order to encrypt/decrypt the string. If, at the last step, receive the result of ‘bad data’, it is probably because your secret key is incorrect.

As a result of these operations, we can create T-SQL code to fill our EMAIL.PROFILES table. It means replacing ENCRYPTBYCERT with the ‘Result’ string we’ve just obtained. In front of the result string, and before the initial single-quote delimiter you have to put N to specify that it is a Unicode string. This script will be with the other T-SQL scripts in last section.

In SQLCLR, we can specify a hard-coded secret key in the solution, although I provide built-in hardcoded user profiles as well. These profiles could be used as some kind of fallback.

Testing & Monitoring

It is not easy to test this solution. Firstly, you have to create a couple of new profiles and dedicated e-mail addresses for testing purpose. The reason is quite simple; there is a good chance that some public server will detect you as a spammer. When you are flagged as a spammer, then further sending is blocked.

After that, I need to choose some content for the body of the e-mail. It cannot be just a simple ‘Test’ word.

I would like to include some information from a blocked process report as a body, which usually contains a bunch of text as well as few attachments.

The declaration part of the T-SQL script to test should look something like this

DECLARE @myFileAttachment as nvarchar(max) = 'your attachments hear'
  DECLARE @myBody as nvarchar(max) = N'a lot of text'
  DECLARE @counter as int = 0
  DECLARE @mysubject as nvarchar(255) = 'Test'
  --mail to. You should replace values with concrete e-mail addresses
  DECLARE @myMainTo  as nvarchar(max) = ''
  DECLARE @myMainTo_1  as nvarchar(max) = '<list_one>'
  DECLARE @myMainTo_2  as nvarchar(max) = '<list_two>'
  DECLARE @myMainTo_3  as nvarchar(max) = '<list_three>'
  DECLARE @myMainTo_4  as nvarchar(max) = '<list_fourth>'
  DECLARE @myMainTo_5  as nvarchar(max) = '<list_five>'
  --end mail to 
  --Profiles. First you have to insert all these profiles in EMAIL.Profiles table
  DECLARE @myProfile as nvarchar(20) = ''
  DECLARE @myProfile1 as nvarchar(20) = 'Test1'
  DECLARE @myProfile2 as nvarchar(20) = 'Test2'
  DECLARE @myProfile3 as nvarchar(20) = 'Test3'
  DECLARE @myProfile4 as nvarchar(20) = 'Test4'
  DECLARE @myProfile5 as nvarchar(20) = 'Test5'
  --End profiles
  --How many times we will executing the stored procedure
  DECLARE @multiple as int = 1
  DECLARE @firstStop as int = 5 * @multiple
  DECLARE @secondStop as int = 10 * @multiple
  DECLARE @thirdStop as int = 15 * @multiple 
  DECLARE @fourtstop as int = 20 * @multiple
  DECLARE @fifthStop as int = 25 * @multiple

The script body should look like this

WHILE (1=1)
  BEGIN
  	IF @counter < @firstStop
  	BEGIN
  		SET @myMainTo = @myMainTo_1
  		SET @myProfile = @myProfile1
  	END
  	ELSE
  		IF @counter >= @firstStop and @counter < @secondStop
  		begin
  			SET @myMainTo = @myMainTo_2
  			SET @myProfile = @myProfile2
  		end
  		ELSE
  			IF @counter >= @secondStop and @counter < @thirdStop
  			begin
  				SET @myMainTo = @myMainTo_3
  				SET @myProfile = @myProfile3
  			end
  			else IF @counter >= @thirdStop and @counter < @fourtStop
  				begin
  					SET @myMainTo = @myMainTo_4
  					SET @myProfile = @myProfile4
  				end
  				else IF @counter >= @fourtStop and @counter <= @fifthStop
  					begin
  						SET @myMainTo = @myMainTo_5
  						SET @myProfile = @myProfile5
  					end
  	EXEC [EMAIL].[CLRSendMail] @profileName     = @myProfile
  	,                          @mailTo          = @myMainTo
  	,                          @mailSubject     = @mysubject
  	,                          @fileAttachments = @myFileAttachment
  	,                          @mailBody        = @mybody;
  	SET @mysubject = CAST(@counter AS NVARCHAR(10))
  	SET @counter = @counter + 1
  	IF @counter > @fifthStop
  	  BREAK;
  END

We could start not only one, but also several clients in a batch. In my testing environment the SQLCLR solution is faster than sp_send_dbmail.

As a monitoring tool, we could use a winforms application; I developed one of these that I described in my last article, Practical usage of SQLCLR: Building QueryToHtml Function.

This tool has a tab labelled ‘Monitor’ as showed on this screenshot.
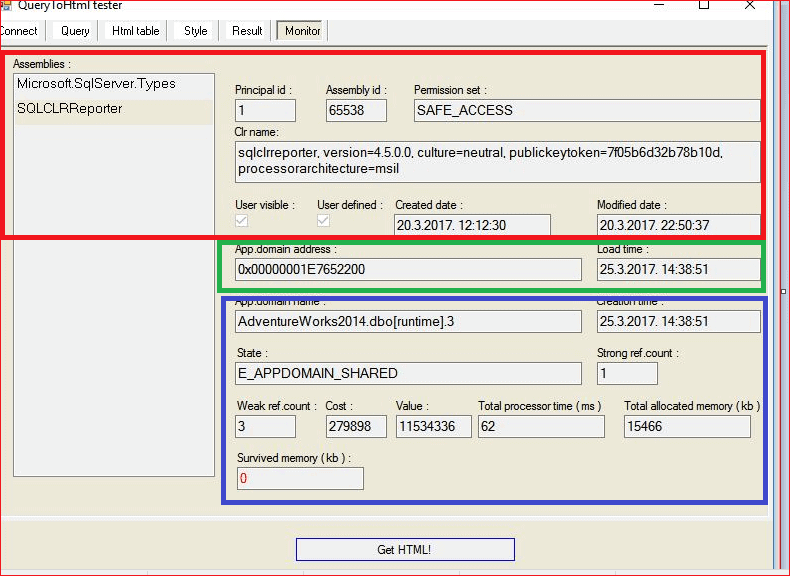
Binding will only occur on the ‘Monitor’ tab only if you have first specified a credential on the first tab that has ‘view server state’ permission. In that case, you will see a screen similar to the one below. If you have no appropriate permission, you see only blanks. The Information on the tab Monitor is the combination of three system views. Surrounded with red is the information from sys.assemblies. This returns a row for each assembly that is created in the current database, the database you choose on the first tab. Information from sys.dm_clr_loaded_assemblies is surrounded with a green line. This view returns a row for each managed user assembly that is loaded into the server address space. The area of the screen surrounded with blue is information from sys.dm_clr_appdomains. This returns a row for each application domain in the server. An application domain is a construct in the Microsoft .NET Framework common language runtime (CLR) that is the unit of isolation for an application.

According to the Microsoft documentation, the sys.dm_clr_loaded_assemblies view has a many-to-one relationship with sys.dm_clr_appdomains.appdomain_address. In addition, sys.dm_clr_loaded_assemblies view has a one-to-many relationship with sys.assemblies. So, it possible that you have a different user principal. We only have one user principal. In that case, we can assume that the relation between views are one to one.

When you create an assembly in your database, you will have a corresponding record in the sys.assemblies system view. You know information like principal id, assembly id, permission set etc.

When user asks for the first time for some functionality located in your assembly, an application domain is created. As I wrote above, the appdomain is as a lightweight process used to enforce isolation between running .NET code within the same SQLOS process. SQLCLR uses appdomains to isolate execution of .NET code on a per-database and per-assembly owner basis.

This process of loading (creating appdomains) takes time (this is a performance penalty). Therefore, the first execution of your SQLCRL function is always much slower than next execution. Unlike .NET appdomains, our appdomain, once loaded, remains loaded for further reuse. This behavior increases performance, so that the managed database objects contained in the assembly can be called in the future without having to reload the appdomain. The appdomain remains loaded until SQL Server comes under memory pressure. Main conclusion in monitoring should be to take care of memory and to watch periodically three-system views sys.dm_clr_appdomains, sys.dm_clr_loaded_assemblies and sys.assmblies

Debugging

In order to debug the SQLCLR project, you have to start Visual Studio as Administrator. There are couple of ways to do that. In my opinion, the easiest way is to right-click the program shortcut ‘devenv.exe’, and then choose ‘properties’ from the menu. Click on the ‘Shortcut’ tab for a program shortcut, and then click on the ‘Advanced’ button. Check the ‘Run as administrator’ box, and click on ‘OK’.

Then on Visual Studio’s ‘View’ menu, choose ‘SQL Server Object Explorer’.
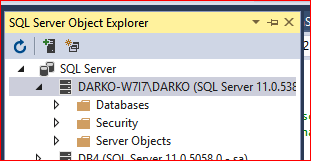
Expand the ‘SQL Server’ node. Choose your server. Right click, and check both ‘Application Debugging’ and ‘Allow SQL/CLR Debugging’, as showed on the picture below.
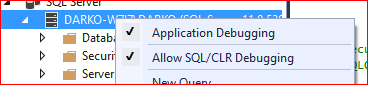
In the newest version of Visual Studio, you can have multiple starting points for debugging. These could be a T-SQL script, which type is ‘NOT in build’, as showed on the picture bellow.
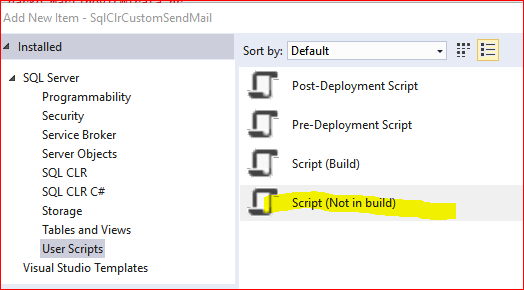
You can name such a script as you wish. Once you have added the script, you can start writing your T-SQL code to test as shown on the screenshot below.
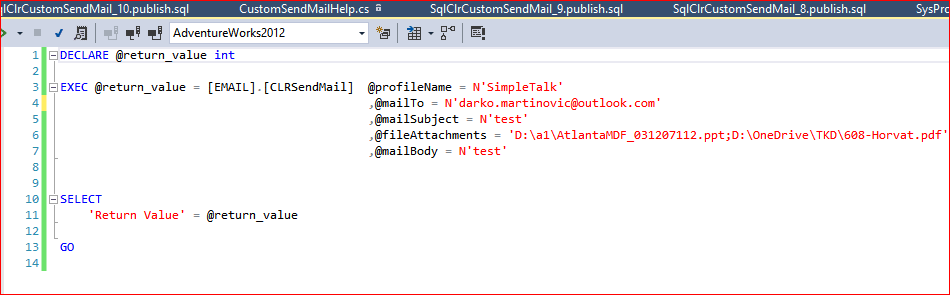
Notice the special green triangle.
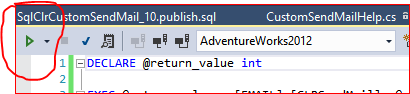
Click on black ‘dropdown’ triangle near to green one to see more options, as in the screenshot below, or press ALT+F5
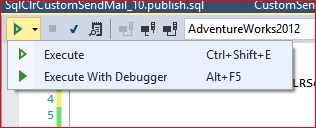
Then you have to confirm this in the alert box. One frustrating thing happens when you restart Visual Studio. Maybe I’ve just got it wrong, but I could not find any possibility of how to save checks to ‘Application Debugging’ and ‘SQL/CLR’ debugging.

It means that you should always check these settings and if you do not see an alert as in the picture below, you probably should not check these two check boxes.
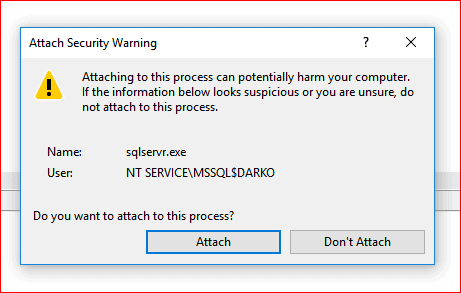
Of course, the project settings should include debugging information. This you can check by choosing project settings, then tab ‘SQLCLR build’, then scroll down through the end and click on button ‘Advanced’. Noticed Combo Box labeled with ‘Debug info’, as showed on the screenshot bellow
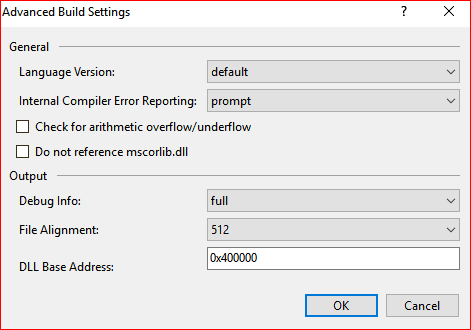
And you are in debugging mode! As I wrote in my previous article on SQLCLR Practical usage of SQLCLR: Building QueryToHtml Function, debugger capabilities are less powerful than in the standard Visual Studio solution. However, even such a debugger as this is indispensable in solving problems.

All that I’ve written in this section refers to debugging the source code of an assembly that is installed on the local SQL Server instance. Remote debugging is out of the scope of this article

Support Material & Deploying

One of the weakness of Microsoft’s SQLCLR solution shows itself when you try to work with schemas in SQL Server. When I started developing this solution, I decide that the resulting stored procedure would be in appropriate database schema, named ‘EMAIL’, as are the other objects created in this solution.

Microsoft designers give us the means to do this by specifying the default schema on the tab ‘Project Settings’, as shown in this screenshot.
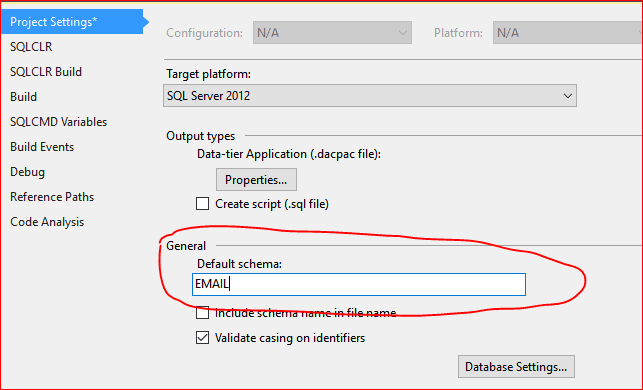
However, if you try to compile the solution after making such changes, you will receive an error like this.

This is normal, because at the time of compilation, we do not specify the connection information. In order to apply a specific schema, we have to import the database information. It means pulling in information from a specific database.

In order to prefix the resulting stored procedure with specific schema named ‘EMAIL’, I use another possibility provided by the SQLCLR framework in ‘Visual Studio’.

This means specifying something in the pre-deployment script and then to add something else in the post-deployment script. Both script are combined during the publishing process.

In the pre-deployment script, I include the following statement to create database schema ‘EMAIL

IF NOT EXISTS (
  	SELECT schema_name
  	FROM information_schema.schemata
  	WHERE schema_name = 'EMAIL' )
  BEGIN
  	EXEC sp_executesql N'CREATE SCHEMA EMAIL'
  END

In post deployment script, I include following script in order to transfer the stored procedure from ‘DBO’ to the ‘EMAIL’ schema.

--Transfer procedure
  IF EXISTS (SELECT
  		*
  	FROM sysobjects
  	WHERE id = OBJECT_ID(N'[EMAIL].[CLRSendMail]')
  	AND OBJECTPROPERTY(id, N'IsProcedure') = 1)
  BEGIN
  DROP PROCEDURE [EMAIL].[CLRSendMail]
  END
  ALTER SCHEMA EMAIL TRANSFER dbo.CLRSendMail;
  --Transfer function
  IF EXISTS (SELECT
  		*
  	FROM sysobjects
  	WHERE id = OBJECT_ID(N'[EMAIL].[CustomSendMailHelp]')
  	AND type = N'FT')
  BEGIN
  DROP FUNCTION [EMAIL].[CustomSendMailHelp]
  END
  ALTER SCHEMA EMAIL TRANSFER dbo.CustomSendMailHelp

Result is as showed on the picture bellow.
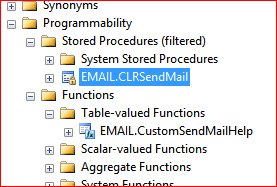
Summary

In this article, I have explained, bit-by-bit, how to replace or complement SQL Server’s mailing system with a custom SQLCLR solution. I have used this solution for years in many settings and have found no difficulties with it. The solution performs well and could be extended in many ways. It gives you the feeling that you can manage an e-mail sending process far simpler than through Service Broker. This solution works well on all editions of SQL Server since SQL 2008 onwards.

Appendix A: Enabling CLR on SQL Server

-- Enable & Check CLR
  sp_configure N'clr enabled', 1
  GO
  RECONFIGURE
  GO
  SELECT
  	sc.*
  FROM sys.configurations AS sc
  WHERE sc.[name] = N'clr enabled'

Appendix B: T-SQL script to setup e-mail on EXPRESS (or any kind) edition

--Enabling Database Mail
sp_configure N'show advanced options',1
RECONFIGURE						
GO
sp_configure N'Database Mail XPs',1
RECONFIGURE
GO
--Profile definition
DECLARE @profileName sysname='MyProfile'
DECLARE @profileDescription nvarchar(256)='MyProfileDescription'
--Account definition
DECLARE @accountName as sysname='MyAccount'
DECLARE @accountDescription as nvarchar(256) = 'MyDescription'
--Enter e-mail address you choose e.g. simpleTalk@gmail.com
DECLARE @accountEmail as sysname=''
--Enter reply address e.g. SimpleTalk@SimpleTalk.com
DECLARE @accountReplyTo as sysname=''
--Enter display information. E.g. Test account
DECLARE @accountDisplayName as sysname=''
DECLARE @accountMailServer as sysname='smtp.gmail.com'
DECLARE @accountMailPort as int = 587
-----------------------------------------------------------Most sensitive date
DECLARE @accountUserName as sysname=''
DECLARE @accountPassword as sysname=''
---------------------------------------------------------------------------------------
DECLARE @accountUseDefaultCredential as bit = 0
DECLARE @accountEnableSsl as bit = 1
--Sequence number
DECLARE @accountSequenceNumber as int = 1
--Principal definition
DECLARE @principalName as sysname = 'dbo'
DECLARE @princtipalDefault as bit = 1
-- Create a Database Mail account  
EXECUTE msdb.dbo.sysmail_add_account_sp	@account_name = @accountName
			,@description = @accountDescription
			,@email_address = @accountEmail
			,@replyto_address = @accountReplyTo
			,@display_name = @accountDisplayName
			,@mailserver_name = @accountMailServer
			,@port = @accountMailPort
			,@username = @accountUserName
			,@password = @accountPassword
			,@use_default_credentials = @accountUseDefaultCredential
			,@enable_ssl = @accountEnableSsl
GO
-- Create a Database Mail profile  
EXECUTE msdb.dbo.sysmail_add_profile_sp	@profile_name = @profileName
			,@description = @profileDescription;
GO
-- Add the account to the profile  

EXECUTE msdb.dbo.sysmail_add_profileaccount_sp	@profile_name = @profileName
			,@account_name = @accountName
			,@sequence_number = @accountSequenceNumber;
GO
-- Grant access to the profile to the DBMailUsers role  

EXECUTE msdb.dbo.sysmail_add_principalprofile_sp	@profile_name = @profileName
			,@principal_name = @principalName
			,@is_default = @princtipalDefault;
GO

Appendix C: Public SMTP servers

In the table below, you can find one of the public servers and create an account on them.

SMTP servers

Google

smtp.gmail.com

SSL

587

OUTLOOK

smtp-mail.outlook.com

SSL

587

Yahoo

smtp.mail.yahoo.com

SSL

465

AOL

smtp.aol.com

SSL

587

You can choose an SMTP server from the following site SMTP & POP3 servers as well.

Appendix D 6522 Message

Message 6522 will appear in any situation when where you have an unhandled exception, or if an exception occurs in a catch block. This message will be misleading. If your project has permission set property ‘UNSAFE’ and you receive the 6522 message, it is better to try step into your code and figure out what problem is in your code.

The post SQLCLR in Practice: Creating a Better Way of Sending Email from SQL Server appeared first on Simple Talk.
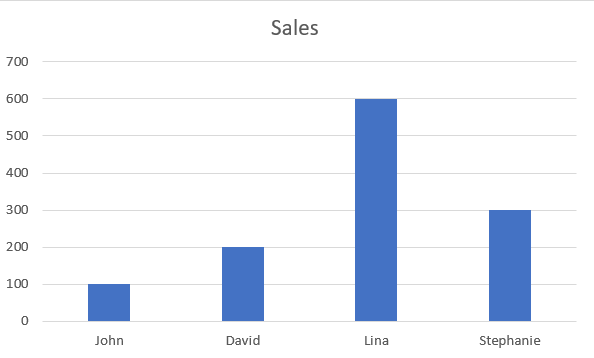
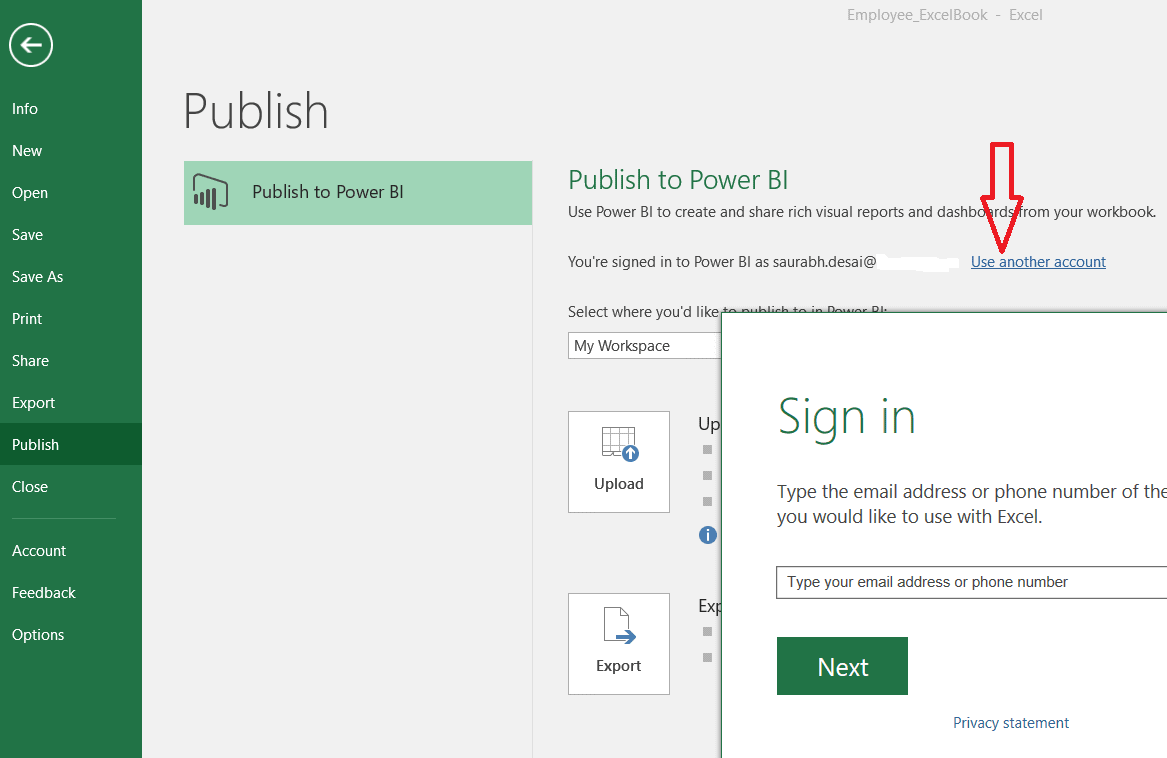
18 Jul 09:23

Office 365 Roadmap Updated: 2017-07-17

18 Jul 07:11

Eating Clean is Useless

17 Jul 15:06

Whatsapp ganz weit vorne: Das sind die 10 beliebtesten Android-Apps in Deutschland

Keine Android-App wurde im Juni 2017 auch nur ansatzweise so häufig heruntergeladen wie Whatsapp. Wir verraten euch, welche die anderen Top-Apps waren.

Android: Das sind die derzeit beliebtesten Apps in Deutschland

Der Deutschen liebste Android-App ist Whatsapp. Zumindest wenn wir nach den Download-Zahlen im Juni 2017 gehen: Laut Statista und dem App-Store-Intelligence-Anbieter Priori Data wurde die Messaging-App aus dem Hause Facebook in diesem Zeitraum fast 2,4 Millionen Mal aus dem Play-Store heruntergeladen. Auf Platz 2 folgt mit deutlichem Abstand das Spiel Wort Guru mit knapp 1,2 Millionen Downloads.

Der Facebook Messenger belegt mit 735.000 Downloads den dritten Platz. Zusammen mit Instagram (Platz 7) kann sich der Social-Media-Gigant demnach gleich drei Plätze in der Top 10 sichern. Konkurrent Snapchat landet mit 441.000 Downloads immerhin vor Instagram auf Platz 6.

Play-Store: Diese zehn Android-Apps wurden im Juni 2017 am häufigsten heruntergeladen. (Grafik: Statista / Lizenz: CC BY-ND 4.0)

E-Commerce-Apps: Wish legt deutlich zu

Die Top 10 für den Juni enthält nur zwei E-Commerce-Apps: Wish und Ebay-Kleinanzeigen. Während sich die Kleinanzeigen-App von Ebay im Vergleich zum Monat Mai nur wenig bewegt hat, konnte Wish bei den Download-Zahlen deutlich zulegen. Im Juni wurde die App 548.000 Mal heruntergeladen. Im Mai 2017 lag dieser Wert noch bei 289.000 Downloads.

Ebenfalls interessant:

17 Jul 14:30

Temposenkung: DSL-Tarif von 1&1 nur noch mit 16 MBit/s

Provider 1&1 bietet seinen Tarif DSL Basic für Neukunden mit weniger Tempo an und drosselt ab 100 GB.
17 Jul 14:13

Transferring a domain to Azure (dns and billing)

by Jos

Lately I’ve been playing with custom domains in Azure, Microsoft has been allowing us to directly purchase domain in Azure for a while now. This leverages GoDaddy’s API, but Microsoft bills you for the domain, consolidating your domains, management and usage nicely in Azure.

The portal only allows you to purchase new domains, so how do you transfer existing domains to Azure DNS?

First you’ll need a transfer code, which you can get from your current DNS provider. Then, execute the following script:


Register-AzureRmResourceProvider -ProviderNamespace Microsoft.DomainRegistration
$rgName = "NAME OF YOUR RESOURCE GROUP"
$ResourceLocation = "Global"
$ResourceName = "MYDOMAINNAME.NL"
$PropertiesObject = @{
'Consent' = @{
'AgreementKeys' = @("DNPA","DNTA");
'AgreedBy' = '122.13.11.20'; #ip address you're running this script from
'AgreedAt' = '2017-17-07T08:37:40'; #roughly the current time
};
'authCode' = 'DOMAIN TRANSFER CODE'; #code by current domain provider
'Privacy' = 'true';
'autoRenew' = 'true';
}

New-AzureRmResource -ResourceName $ResourceName -Location $ResourceLocation -PropertyObject $PropertiesObject -ResourceGroupName $rgName -ResourceType Microsoft.DomainRegistration/domains -ApiVersion 2015-02-01 -Verbose

It will take a long time to run, but you’ll have a custom domain in Azure that you can now connect to websites and/or manage through AzureDNS.

Note: this only works for domains OLDER than 60 days and can take 5-7 days until the domain is usable in Azure, all domain records will be copied to an Azure DNS zone.

17 Jul 14:13

Elektromobilität: Kein Strom an der Tanke

by ZEIT ONLINE: Mobilitaet - Christof Vieweg
Der Bund fördert Ladesäulen für Elektroautos. Das Geld geht an Parkhäuser, Hotels und Supermärkte – die Tankstellen ziehen nicht mit. Verschlafen sie die Zukunft?
17 Jul 14:12

SQL Data Aggregation Aggravation

by Joe Celko

Raw data is usually bulky, so we like to aggregate it into smaller chunks to make it easier to digest, but there are a lot of subtle problems with aggregating data. We like to aggregate data in such a way that when we put the small chunks back together, we get the original set. In mathematics, this is called a partitioning of a set. When you can do it; it’s very, very, nice. But it’s not always possible.

Defining Subgroups

Your first thought is that you’re going to partition it by using some kind of GROUP BY clause. But back up a step. Many years ago there was a popular puzzle that originally appeared in a Martin Gardner Scientific American column called The Vanishing Leprechaun (See the Youtube demonstration here). The puzzle consists of three parts, like a jigsaw puzzle, which can be rearranged one of two ways. Depending how the pieces are arranged, one of the leprechauns seems to disappear.

The puzzle asks the false question; “where did the leprechaun go?” The problem was that the “leprechaun” was not well-defined. If we were to talk about using the same flour, eggs, butter and sugar to bake a dozen cookies or to make a small cake, you would not look at the cake and ask where the individual cookies are inside the cake, nor where the cake is inside the individual cookies. You would realize the two options with the original materials were aggregated differently. The cake is simply different from the cookies, and vice versa.

As an example of a well-defined aggregation, consider the children’s game Cootie (for an explanation, see the Wikipedia page). The object of the game is to be the first player to build a “cootie” piece by piece from various plastic body parts that include a beehive-like body, a head, antennae, eyes, a coiled proboscis, and six legs. Body parts are acquired by rolling a die. The winner is the first player to completely assemble a cootie. The number of each body part required to make a valid cootie is very well-defined; if he’s missing a part, he’s not a cootie.

The moral to the story is that the set of aggregations is not always the same as the original set.

Equivalence Classes and Relations

In set theory, we have equivalence classes and equivalence relations. They partition the set based on some relationship that is well-defined. The two that come to mind in SQL are equality and grouping. The difference is that simple equality (=) doesn’t work with NULLs, but only known values. We also have the mod (n) function, which creates (n) equivalence classes; the simplest example is that of breaking integers into odd and even classes.

Grouping (as in the GROUP BY clause, PARTITION and some other places in SQL) treats NULLs as falling in the same equivalence class.

By using the AVG() and SUM() math functions with GROUP BY, you reduce a group attribute to a value. These are the ones we picked in the early days of SQL, because they were very easy and very well understood. The problem is that they depend on the numeric values that we can compute.

We could depict the median, or a whole bunch of other measures of central tendency whose names involve a famous statistician, or Greek letter. They have a common characteristic, however; they depend on numeric values upon which we can do computations. In short, they’re not very good for discrete or descriptive values. In fact, they don’t make sense for such things. What is the average of the colors of shoes when you group by a city? If both yellow and red are equally represented, is the average color orange? The question is absurd. This is a classic issue of continuous versus discrete variables when you are doing statistics. Did you notice that the value returned does not have to be a member of the set from which it was created? That’s important. It means that it’s perfectly logical for the families in the population to have an average of 2.3 children. But in practice, it’s very embarrassing if the police find you with a 0.3 child in your house.

SQL did give you some aggregate functions that apply to discrete variables. The extrema functions (MIN () and MAX ()) extract a single value from the class. These values have be attributes of at least one element in that set. The obvious discrete statistical function that is missing is the MODE(), or most frequently occurring value in the set. It’s a terrible measure of central tendency in the set and there can be several of them in the case of ties, but it has the advantage of representing majority rule voting when it is unique.

A major problem with the mode, and other discrete statistical functions, is that they behave differently for the whole population than in subsets of the population. The best-known example of this is Simpson’s paradox (see my article: Data is crazier than you think).

Simpson’s paradox has nothing to do with Homer Simpson or O. J. Simpson; it is named after the British statistician Edward Hugh Simpson who wrote about it in the 1950s. Simpson’s paradox happens when a trend that appears in separate groups of data disappears when these groups are combined, and the reverse trend appears for the aggregate data. It tends to happen when you partition your data into subsets where each of the subsets is a little skewed and of odd sizes, and illustrates the dangers of errors in population sampling.

Gerrymandering

Instead of trying to break up our population into subsets that avoid Simpson’s paradox, we can actually try to increase it! This is called gerrymandering. For a really nice animation on the basic principles go to Gerrymandering Explained.

The example is a population of 50 voters who belong to either Red or Blue party. We have voters who are 60% Blue and 40% Red. In what is called a perfect representation, each of five districts has two Reds and three Blues in it. This gives Blues absolute domination over the five districts of 10 voters each. And we have the tyranny of the majority.

However, I can group the voters in such a way that I have six Blue districts and four Red districts. Even better, create two all Blue districts and three (6 Reds + 4 Blues) districts. Suddenly the Reds are in control!

In the case of gerrymandering, this is done deliberately, but in the case of sampling, it might be accidental, or at least unintentional. For my generation, we remember the draft lottery in 1969 for the Vietnam war. A piece of paper with each calendar day was put it in a capsule, and the capsule was drawn from a bingo game tumbling cage. The capsules were drawn by hand and that date was assigned draft number #1, the next date was draft #2, until the last one was draft #366 (they included leap days).

Bad Sampling

These numbers determined the order in which people would be drafted, and it was projected that about 10% of the males would be sent to Vietnam immediately after bootcamp and that another 10% would go to Vietnam within their period of enlistment.

The correlation between day of birth (1-366) and draft number was -.28. A random process would have produced a correlation around zero. Because this correlation was statistically significant, the lottery was challenged in court. The reason the drawing didn’t work properly was the way the capsules were put in the tumbler and drawn from it. This was fixed later in the following draft lottery, which was based on initials.

Ntile Partitions

One obvious way to split up your data with the RANK and DENSE_RANK functions. The problem with this is that the groups they form have a uniform value for whatever you grouped on. We are really trying to find subsets of things. Yes, they should have a commonality, but not be identical. Think back to our voting districts; they really should have some variety of voters.

The NTILE() function varies a bit from one SQL or statistical product to another, but they are all basically the same in intent. R and statistical packages tend to have more options than just SQL. The Microsoft syntax is a windowed function call:

NTILE <positive integer constant>) OVER ([<partition by clause>] <order by clause>)

The <positive integer constant> specifies the number of groups into which each partition must be divided. Without the ORDER BY clause, this makes no sense and without the PARTITION BY clause, the whole table is assumed. The row and range clause would make no sense. No surprises here.

Basically, you’re going to take the result set, order it and partition it into <positive integer constant> groups. To go back to the previous example, if I had a set of 50 voters, I could order them on, say, campaign contribution amounts and then divide them into the fat cats in one group (largest contributors) and rank the rest of them down to zero contributions. Obviously, we have some problems with ties. I’m sure that a lot of voters on my mailing list haven’t sent me anything and just want to get the free coffee mug or whatever I’m using is a bribe.

If the total number of rows is divisible by the number of groups, the rows will be evenly distributed among the groups. For example, if the total number of rows is 50, and there are five groups, each bucket will contain 10 rows.

If the number of rows in a partition is not divisible by <positive integer constant>, I will have odd men left over and need a rule for signing them to some group. The rule, which is arbitrary, is that larger groups come before smaller groups in the order specified by the OVER clause. For example if the total number of rows is 53 and the number of groups is five, the first three groups will have 11 rows and the two remaining groups will have 10 rows each.

NTILE() is not deterministic. In fact, it’s really pretty weird. Consider this quick example, which lacks a key, and is therefore not a valid table:

CREATE TABLE Foobar (x INTEGER NOT NULL);

INSERT INTO Foobar
VALUES (1), (2), (2), (3), (3), (4), (4), (5);

SELECT x, NTILE(4) OVER (ORDER BY x) AS quad FROM Foobar;
x   quad
--------
1   1
2   1
2   2
3   2
3   3
4   3
4   4
5   4

Now every quadrille group shares a value with the one next to it in sequence! But what else should it do? The description of this function is to split the original data into <positive integer constant> groups. If I wanted to get rid of ties, I would have had to handle this in my query.

Summary

The message of this little thought piece is that “it’s really hard to put together leprechauns from leprechaun parts” – which is really, kinda gruesome when you think about it. But at least I hope you’ll think about your data, when you try to aggregate from a raw set of the rows.

The post SQL Data Aggregation Aggravation appeared first on Simple Talk.
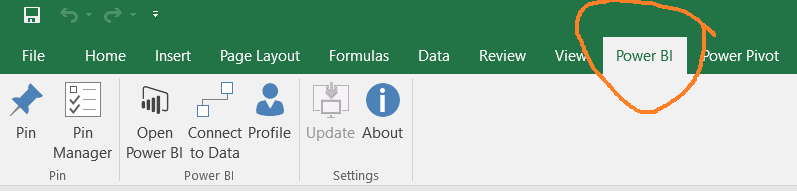
17 Jul 14:12

Microsoft unveils its new LinkedIn app for Windows 10

by Zac Bowden

Microsoft has today unveiled its brand new LinkedIn app built from the ground up for Windows 10 users. The new app, which starts its rollout in the Windows Store today, appears to be a UWP web app with a few Windows 10 integrations such as a Live Tile and toast notifications.

In an announcement on the official LinkedIn blog, the company said:

The LinkedIn app for Windows 10 makes it easier than ever to connect to opportunity, work smarter, and tap into your professional potential. It is easily accessible from your Start menu and taskbar, and you can also pin a Live Tile so that when you click on Start, you never miss important highlights from your connections.

While the app itself being a web wrapper will disappoint many die-hard UWP fans, the Windows 10 integrations may actually prove to be useful for those who do use LinkedIn on a daily basis. No longer will you need to manually check the site for notifications, as they'll now popup directly on your desktop.

Microsoft says the app is now rolling out in the Windows Store for Windows 10 users on PC. No mention of this app working on Mobile, unfortunately. We'll update this post with a link to the app once it becomes available. In the meantime, are you happy to see a LinkedIn app for Windows 10?

17 Jul 14:10

Mobiles Internet im Netz vom Telefónica im Test

Telefónica-Netz unter der LupeWir haben zwei Monate lang auf Reisen den Internet-Zugang in den deutschen Mobilfunk-Netzen unter die Lupe genommen. Aus dem Telefónica-Netz hatten wir dazu gleich zwei SIM-Karten zur Verfügung.
17 Jul 14:10

Apple verhandelt mit Australien über Verschlüsselung

Apple soll in Australien beim Knacken von iPhones den Behörden helfen, sonst gibt es härtere Gesetze, droht ein Strafverfolger.
17 Jul 12:37

Manspreading: Ein breites Feld

by ZEIT ONLINE: zeit-magazin - Carolin Würfel, Heike Faller
In einigen Städten hängen jetzt Schilder in der U-Bahn, die Männer dazu auffordern, nicht mehr breitbeinig dazusitzen. Muss "manspreading" wirklich verboten werden?
17 Jul 11:34

Archiveteam are backing up SoundCloud

17 Jul 11:32

Polizei will ab Montag verstärkt kontrollieren

Wer in München zu schnell mit dem Auto unterwegs ist, kann in den kommenden Tagen mit Polizeikontrollen rechnen. Doch nicht nur Raser sollen bis Ende Juli verstärkt aufgehalten werden.
17 Jul 11:32

Blindenhund krank: Besitzer bleibt auf Reise-Stornokosten sitzen

by Peter T. Schmidt
Für einen 39-Jährigen Stuttgarter ist sein Hund nicht nur ein Haustier. Der Mann ist blind und auf den Vierbeiner angewiesen - auch im Urlaub. Ein Gericht sah den Fall jetzt anders.
17 Jul 11:31

Wie entstehen Zugnummern bei der Deutschen Bahn?

by DB Redaktion

Tag für Tag fahren unzählige Züge durch Deutschland und die angrenzenden Länder. Damit sie sich voneinander unterscheiden und koordiniert werden können, benötigen sie ein eindeutiges Erkennungszeichen: die Zugnummer.

Für jeden Fahrplan wird ein Zugnummernplan zwischen dem Infrastrukturbetreiber (DB Netz AG) und den Eisenbahnverkehrsunternehmen abgestimmt. Dieser wird von DB Netz veröffentlicht und zeigt, aus welchen Zugnummernbereichen die Unternehmen wählen können.

Zugnummern im Fernverkehr

Eine Zugnummer besteht im deutschen Fernverkehr in der Regel aus mehreren Ziffern und ist wie ein eindeutiger Name, der sich einem speziellen Zug zuordnen lässt. Züge mit einer ungeraden Endziffer fahren von West nach Ost oder von Nord nach Süd. Züge, die aufeinander folgende Nummern haben, fahren gewöhnlich auf der gleichen Strecke, nur in die entgegengesetzte Richtung. So fährt der Zug 582 von München nach Hamburg und der mit der Nummer 581 von Hamburg nach München. An der Ziffer vorne kann das Zugpersonal erkennen, dass es sich um einen ICE handelt. Die zweite Ziffer von hinten lässt auf die Strecke schließen.

Entstehung Zugnummern

Zug- und Liniennummern im Regionalverkehr

Nicht zu verwechseln ist die Zugnummer übrigens mit der Liniennummer. Diese gilt innerhalb einer bestimmten Region und kann deutschlandweit mehrfach vergeben werden. Im Bereich des Fernverkehrs dient sie allerdings nur internen Zwecken.
Eine wichtige Bedeutung kommt ihr im Regionalverkehr zu. Hier erscheint in der Fahrplanauskunft und auf den Anzeigetafeln im Bahnhof vorrangig die Liniennummer.
Mit der jeweiligen Liniennummer lassen sich im regionalen Schienennetzplan des Verkehrsverbundes dann auch die genaue Fahrstrecke des Zuges und die einzelnen Haltepunkte nachschauen.

Lesen Sie auch

Zugnummern im internationalen Verkehr

Für den internationalen Fernverkehr sind bestimmte Zugnummernbereiche vorgesehen, so z. B. die Zugnummern 2-499 für den IC-, ICE- und Nachtzugverkehr und für den grenzüberschreitenden Hochgeschwindigkeitsverkehr nach Frankreich die Zugnummern 9550-9599. Ist ein Zug in zwei Ländern unterwegs, darf diese Nummer in beiden Ländern nicht noch einmal vergeben werden. Die jeweiligen Eisenbahnunternehmen stimmen sich jährlich untereinander über die Vergabe der Zugnummern ab.

Ausnahmen bei der Vergabe der Zugnummern

Wie bei jeder Regel gibt es auch bei der Vergabe der Zugnummern Ausnahmen. Hilfszüge, also Züge, die losgeschickt werden, wenn es einen Zwischenfall auf der Strecke gibt, werden gesondert benannt. So weiß jeder Fahrdienstleiter gleich, dass es sich um einen Hilfszug handelt, dem gegenüber anderen Zügen Vorfahrt eingeräumt wird. Auch Sonderzüge, die einmalig z.B. während einer Veranstaltung eingesetzt werden, haben eine andere Zugnummer als sonst.
Ist die Bundeskanzlerin auf Reisen, hat sie übrigens eine ganz besondere Nummer. Wenn sie im Zug durch Deutschland fährt, trägt dieser immer die Nummer „1“.


17 Jul 11:26

IETF: DNS über HTTPS ist besser als DNS

Die IETF diskutiert einen Vorschlag, um DNS-Informationen nativ über HTTPS zu übertragen. Der Grund ist laut einem der Autoren des Entwurfs ganz einfach: Über Port 443 lässt sich mehr machen, als Bilder zu übertragen, und es ist einfach besser. (DNS, Server-Applikationen)
17 Jul 11:25

How to add hands-free typing to Office apps

by Mauro Huculak

Microsoft's Dictate brings speech recognition to Office using Cortana's technology, and here's how to use it.

If there is one feature missing in Word, Outlook, and other Office apps is the ability to type hands-free. Sure, you can set up speech recognition in Windows, but it's not a really good experience, and it's a feature that hasn't been updated in a long time.

However, if you speak faster than you can type, the Microsoft Garage team has created Dictate, a new add-in that brings a good speech-to-text experience to Word, PowerPoint, and Outlook.
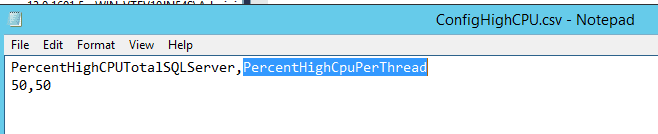
While Dictate is an experimental project, it's a powerful tool. It uses Cortana's speech recognition technology to convert voice into text in more than twenty languages, there is support for voice commands to control a dictation session, and it also includes real-time translation in sixty different languages.

In this guide, we'll walk you through the steps to add and use Dictate to incorporate speech-to-text functionality into Office apps.

17 Jul 09:07

Einwegkamera-Simulation: Foto-App Gudak gibt Bilder erst nach drei Tagen frei

Die iOS-App Gudak macht aus dem iPhone eine Wegwerfkamera, indem es die Funktionen der eingebauten Smartphonekamera deutlich einschränkt, die Bildqualität senkt und die Fotos erst nach drei Tagen ausgibt. (Digitalkamera, Grafiksoftware)

17 Jul 09:07

Tierschutz: Grüne wollen Schweinen und Rindern "eine Stimme geben"

by ZEIT ONLINE: Deutschland -
Die Grünen wollen den Tierschutz reformieren. Ein Fraktionsbeschluss sieht vor, dass Verbände die Interessen von Tieren vor Gericht vertreten können.
17 Jul 08:54

July 17: the worst day in aviation history

by Harro Ranter

The 17th of July is the worst day in aviation history with 927 fatalities in 17 airliner accidents, according to ASN data.

The average over the period 1946-2016 is 11 accidents 234 fatalities.


17 JUL 1946 Curtiss C-46 ANDESA 30
17 JUL 1948 Consolidated PBY-5A Catalina Cathay Pacific Airways 25
17 JUL 1950 Douglas C-47 Indian National Airways 22
17 JUL 1955 Convair CV-340 Braniff International Airways 22
17 JUL 1958 Curtiss C-46 Dominicana de Aviacion 2
17 JUL 1963 Curtiss C-46 Air America 6
17 JUL 1994 Yakovlev 40 Sankuru Air Service 5
17 JUL 1994 Britten-Norman BN-2B Islander Air Martinique 6
17 JUL 1995 DHC-6 Twin Otter 300 Merpati Nusantara Airlines 1
17 JUL 1996 Boeing 747-131 Trans World Airlines – TWA 230
17 JUL 1996 DHC-6 Twin Otter 300 Aerolatino 1
17 JUL 1997 Fokker F-27 Friendship Sempati Air Transport 28
17 JUL 1998 Ilyushin 78 Air Sofia 10
17 JUL 2000 Boeing 737-2A8 Alliance Air 55
17 JUL 2002 DHC-6 Twin Otter 300 Skyline Airways 4
17 JUL 2007 Airbus A320-233 TAM Linhas Aéreas 187
17 JUL 2012 Canadair CRJ-200ER SkyWest Airlines 1
17 JUL 2014 Boeing 777-2H6ER Malaysia Airlines 298

The post July 17: the worst day in aviation history appeared first on ASN News.