Shared posts

19 Nov 10:14

Integrate HangFire With ASP.NET Core WEB API

by Talking Dotnet

HangFire is an easy way to perform background processing in .NET and .NET Core applications. There isn’t any need to have a separate windows service or any separate process. Hangfire supports all kinds of background tasks – short-running and long-running, CPU intensive and I/O intensive, one shot and recurrent. You don’t need to reinvent the wheel – it is ready to use. In this post, we will see how to integrate HangFire with ASP.NET Core WEB API.

Integrate HangFire With ASP.NET Core WEB API

HangFire uses persistence storage to persist background jobs information. Since all the information is saved in persistent storage, application restarts doesn’t affect the job processing. At the time of writing this post, HangFire uses SQL Server, Redis, PostgreSQL, MongoDB and Composite C1. In this post, I will be using SQL Server. So let’s create an empty database in SQL Server and name it “HangFireDemo”.

Let’s create an ASP.NET Core Web API project. Once the project is created, we need to install HangFire via nuget. You can install it via Package Manager Console and executing below command.

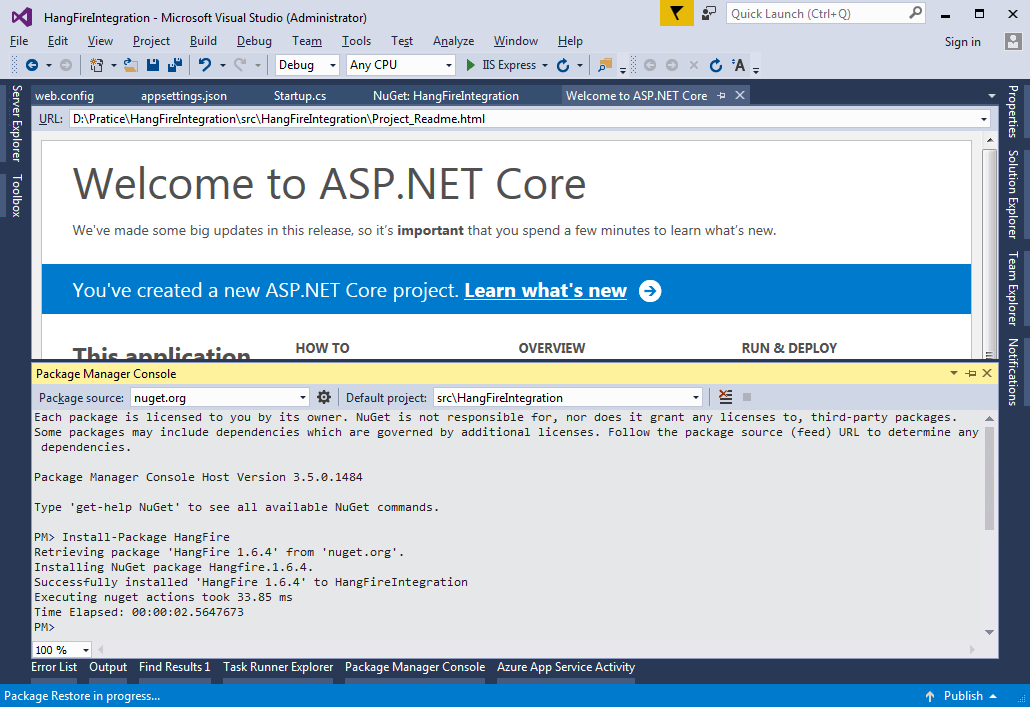
Install-Package HangFire 

Install HangFire Package from Package Manager Console

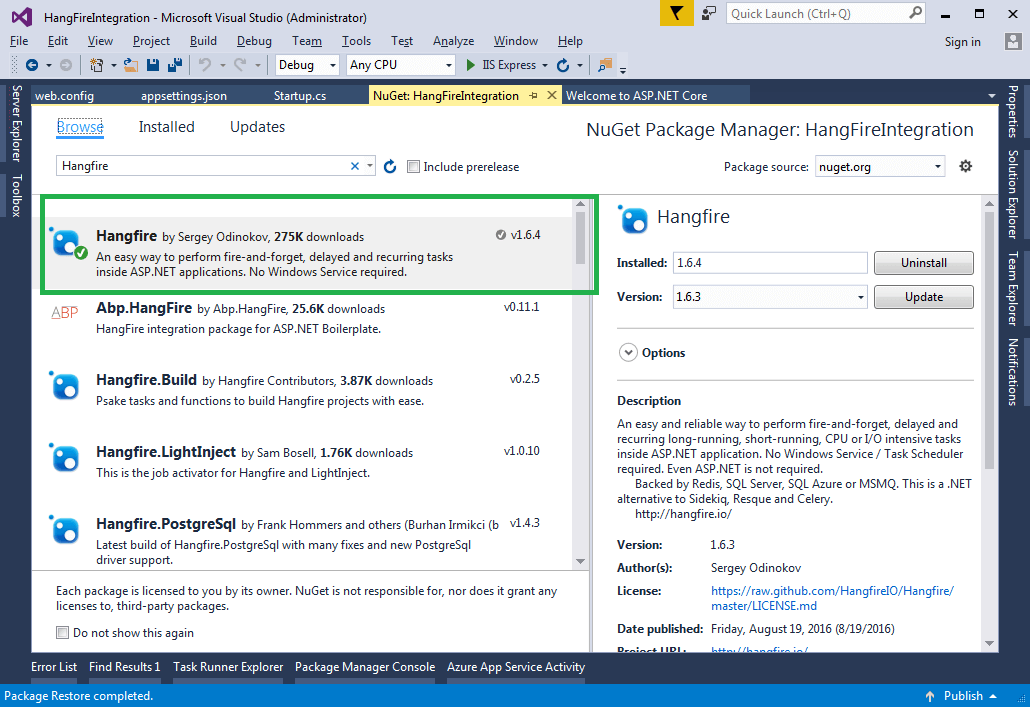
Or you can also install via NuGet Pacakge Manager. Search for “HangFire” and click install.

Install HangFire Nuget Package with ASP.NET Core

Okay. So HangFire is installed. Now let’s configure it. Open Startup.cs, navigate to ConfigureServices method and add HangFire service to middleware. Here we must provide HangFireDemo database connection string, which I have put in web.config.

public void ConfigureServices(IServiceCollection services)
{
    // Add framework services.
    services.AddApplicationInsightsTelemetry(Configuration);
    string sConnectionString = ConfigurationManager.ConnectionStrings["Hangfire"].ConnectionString;
    services.AddHangfire(x => x.UseSqlServerStorage(sConnectionString));
    services.AddMvc();
}

Once the service is configured, navigate to Configure method and add highlighted line. app.UseHangfireDashboard(); will setup a dashboard where you could find all the information about your background jobs. And app.UseHangfireServer(); will setup a new instance of BackgroundJobServer, responsible for background job processing.

public void Configure(IApplicationBuilder app, IHostingEnvironment env, ILoggerFactory loggerFactory)
{
    loggerFactory.AddConsole(Configuration.GetSection("Logging"));
    loggerFactory.AddDebug();

    app.UseApplicationInsightsRequestTelemetry();

    app.UseApplicationInsightsExceptionTelemetry();
    app.UseHangfireDashboard();
    app.UseHangfireServer();
    app.UseMvc();
}

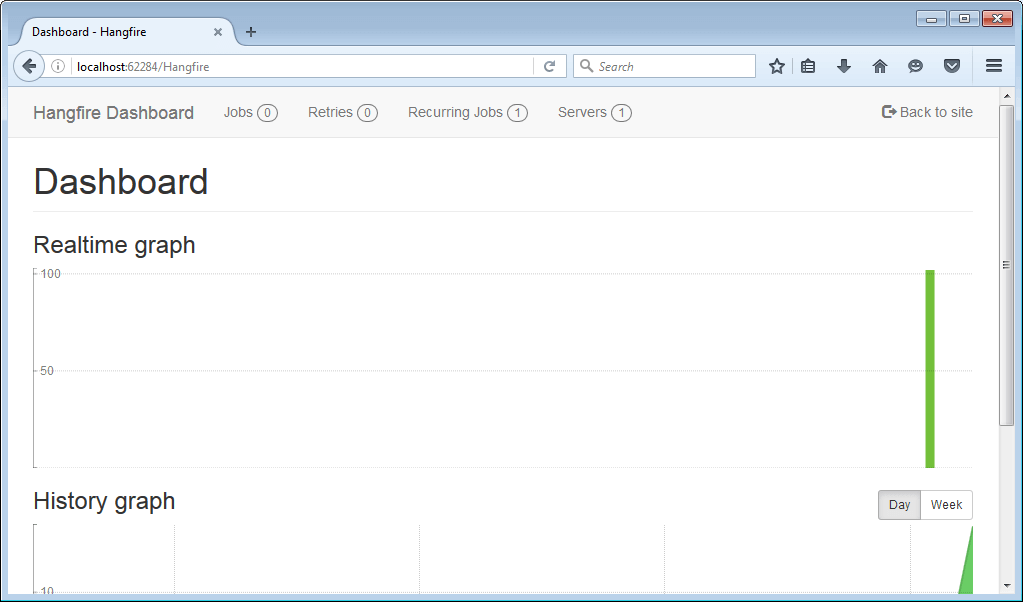
Now run the app. To see HangFire Dashboard, hit the http://<site-url>/hangfire URL to see the Dashboard.

ASP.NET Core HangFire DashBoard

You can see a list of jobs, servers, real-time graph and other things in DashBoard. By default, Hangfire maps the dashboard to /hangfire URL, but you can change it.

// Map the Dashboard to the root URL
app.UseHangfireDashboard("");
// Map to the '/dashboard' URL
app.UseHangfireDashboard("/dashboard");

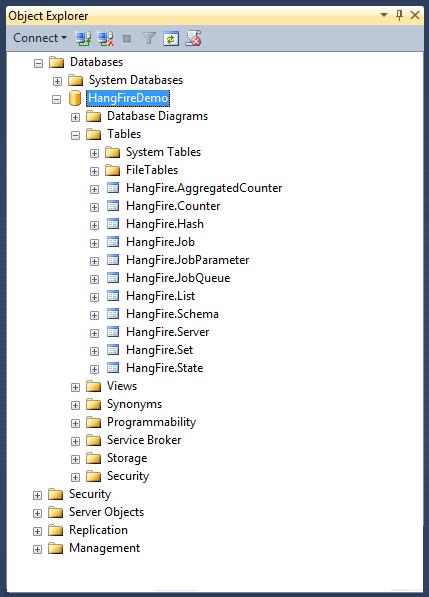
If you expand “HangFireDemo” database, then you can see set of tables created in the Database for storing background job information.

SQLServer HangFire DataBase

It’s really easy to integrate HangFire. But HangFire dashboard works only for local requests. In order to use it in production, we need to implement authorization. To implement authorization, we use IAuthorizationFilter interface and implement OnAuthorization method to implement own authorization.

public class CustomAuthorizeFilter : IAuthorizationFilter
{
     public void OnAuthorization(AuthorizationFilterContext context)
     {
        //logic to authorize user
     }
}

And modify Startup.cs to pass this filter to UseHangfireDashboard method.

app.UseHangfireDashboard("/dashboard", new DashboardOptions
{
    AuthorizationFilters = new[] { new CustomAuthorizeFilter() }
});

This will ensure that Hangfire dashboard running in production only after successful authorization. Now, let’s create a background job. With Free version of HangFire, you can create following types of jobs.

  • Fire-and-forget: Fire-and-forget jobs are executed only once and almost immediately after creation.
  • Delayed: Delayed jobs are executed only once too, but not immediately, after a certain time interval.
  • Recurring: Recurring jobs fire many times on the specified CRON schedule.
  • Continuations: Continuations are executed when its parent job has been finished.

For the demonstration purposes, create a Recurring Task which will write something to output window every minute. So add the following line in Startup.cs -> Configure(), below the app.UseHangfireServer() to create a Recurring task.

RecurringJob.AddOrUpdate(
                () => Debug.WriteLine("Minutely Job"), Cron.Minutely);

Run the app and observe Visual Studio output window. “I am a minutely job.” will be written to output window after every minute. And if we take a look at dashboard, all the information related to the job is there.

 HangFire Recurring Job Demo

You can find HangFire documentation on their website.

Summary

HangFire is a great tool and makes life easy for background job processing. And the good thing is that is uses persistence storage for job information. So in case of application failure, information is not lost. If you have not used HangFire yet, it’s worth to give it a try. And integrating this with ASP.NET Core is also quite simple and straight forward.

Thank you for reading. Keep visiting this blog and share this in your network. Please put your thoughts and feedback in comments section.

The post Integrate HangFire With ASP.NET Core WEB API appeared first on Talking Dotnet.

19 Nov 10:09

Change Startup.cs and wwwroot folder name in ASP.NET Core

by Talking Dotnet

ASP.NET Core runs on conventions. It expects Startup.cs file for starting up the ASP.NET Core application and wwwroot folder for the application’s static contents. But what if you want to change the name of Startup.cs and wwwroot to your choice? Well, that can be done. In this short post, we will see how to change Startup.cs and wwwroot folder name in ASP.NET Core.

Change Startup.cs class name

You can easily change the startup class name. Open the Startup.cs file and change the startup class name from Startup to “MyAppStartup” (or anything of your choice). And also change the name of the constructor.

public class MyAppStartup
{
    public MyAppStartup(IHostingEnvironment env)
    {
       
    }
}

Now you need to tell ASP.NET Core about new Startup class name, otherwise application will not start. So open Program.cs file and change the UseStartup() call as follows:

public static void Main(string[] args)
{
    var host = new WebHostBuilder()
        .UseKestrel()
        .UseContentRoot(Directory.GetCurrentDirectory())
        .UseIISIntegration()
        .UseStartup<MyAppStartup>()
        .Build();
    host.Run();
}

That’s it.

Change wwwroot folder name

Earlier, I posted how to rename the wwwroot folder via hosting.json file but that doesn’t seem to work now. To change the name, right on wwwroot folder and rename it to “AppWebRoot” (or anything of your choice).

Now, open Program.cs file and add highlighted line of code to Main().

public static void Main(string[] args)
{
    var host = new WebHostBuilder()
        .UseKestrel()
        .UseWebRoot("AppWebRoot")
        .UseContentRoot(Directory.GetCurrentDirectory())
        .UseIISIntegration()
        .UseStartup<MyStartup>()
        .Build();

    host.Run();
}

That’s it.

Hope you liked it. Thank you for reading. Keep visiting this blog and share this in your network. Please put your thoughts and feedback in the comments section.

The post Change Startup.cs and wwwroot folder name in ASP.NET Core appeared first on Talking Dotnet.

19 Nov 10:00

Use HiLo to generate keys with Entity Framework Core

by Talking Dotnet

Entity Framework Core supports different key generation strategies like identity, Sequence and HiLo. In my previous post, I talked about using SQL Server Sequence with EF Core to Create Primary Key. Database sequences are cached, scalable and address concurrency issues. But there would be a database round-trip for every new the sequence value. And in case of high number of inserts this becomes a little heavy. But you can optimize the sequence with HiLo pattern. And EF Core supports “HiLo” out of the box. So in this post, we will see how to use HiLo to generate keys with Entity Framework Core.

Use HiLo to generate keys with Entity Framework Core

To begin with, a little info about HiLo Pattern. HiLo is a pattern where the primary key is made of 2 parts “Hi” and “Lo”. Where the “Hi” part comes from database and “Lo” part is generated in memory to create unique value. Remember, “Lo” is a range number like 0-100. So when “Lo” range is exhausted for “Hi” number, then again a database call is made to get next “Hi number”. So the advantage of HiLo pattern is that you know the key value in advance. Let’s see how to use HiLo to generate keys with Entity Framework Core.

First, define the models. Here is code for 2 model classes. For demonstration, I created 2 models with no relationship.

public class Category
{
    public int CategoryID { get; set; }
    public string CategoryName { get; set; }
}

public class Product
{
    public int ProductID { get; set; }
    public string ProductName { get; set; }
}

Remember, EF Core by convention configures a property named Id or <type name>Id as the key of an entity. Now we need to create our DBContext. Add a new class file and name it SampleDBContext.cs and add the following code.

public class SampleDBContext : DbContext
{
    public SampleDBContext()
    {
        Database.EnsureDeleted();
        Database.EnsureCreated();
    }
    protected override void OnConfiguring(DbContextOptionsBuilder optionbuilder)
    {
        string sConnString = @"Server=localhost;Database=EFSampleDB;Trusted_Connection=true;"
        optionbuilder.UseSqlServer(sConnString);
    }

    protected override void OnModelCreating(ModelBuilder modelbuilder)
    {
        modelbuilder.ForSqlServerUseSequenceHiLo("DBSequenceHiLo");
    }

    public DbSet<Product> Products { get; set; }
    public DbSet<Category> Categories { get; set; }
}
  • The SampleDBContext() constructor is an implementation of database initializer DropCreateDatabaseAlways.
  • OnConfiguring() method is used for configuring the DBContext.
  • OnModelCreating method is a place to define configuration for the model. To define HiLo Sequence, use ForSqlServerUseSequenceHiLo extension method. You need to supply the name of the sequence.

Run the application. And you should see “EFSampleDB” created with Categories and Products table. And with DBSequenceHiLo sequence.

EF Core HiLo Sequence Database

Following is the create script of DBSequenceHiLo,

CREATE SEQUENCE [dbo].[DBSequenceHiLo] 
 AS [bigint]
 START WITH 1
 INCREMENT BY 10
 MINVALUE -9223372036854775808
 MAXVALUE 9223372036854775807
 CACHE 
GO

As you can see it starts with 1 and get increment by 10. There is a difference between a Sequence and HiLo Sequence with respect to INCREMENT BY option. In Sequence, INCREMENT BY will add “increment by” value to previous sequence value to generate new value. So in this case, if your previous sequence value was 11, then next sequence value would be 11+10 = 21. And in case of HiLo Sequence, INCREMENT BY option denotes a block value which means that next sequence value will be fetched after first 10 values are used.

Let’s add some data in the database. Following code first add 3 categories and calls SaveChanges() and then adds 3 products and calls SaveChanges().

using (var dataContext = new SampleDBContext())
{
    dataContext.Categories.Add(new Category() { CategoryName = "Clothing" });
    dataContext.Categories.Add(new Category() { CategoryName = "Footwear" });
    dataContext.Categories.Add(new Category() { CategoryName = "Accessories" });
    dataContext.SaveChanges();
    dataContext.Products.Add(new Product() { ProductName = "TShirts" });
    dataContext.Products.Add(new Product() { ProductName = "Shirts" });
    dataContext.Products.Add(new Product() { ProductName = "Causal Shoes" });
    dataContext.SaveChanges();
}

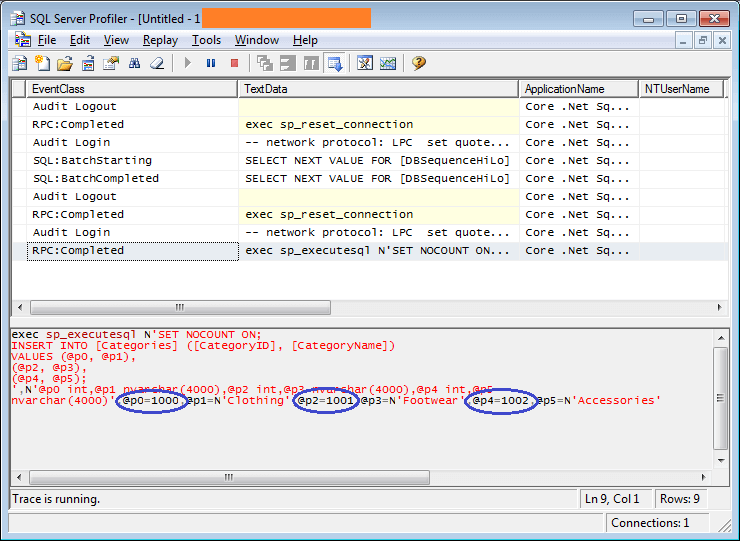
When this code is executed for the first time and as soon as it hit the first line where “Clothing” category is added to DBContext, a database call is made to get the sequence value. You can also verify it via SQL Server Profiler.

efcore-hilo-sequence-trace

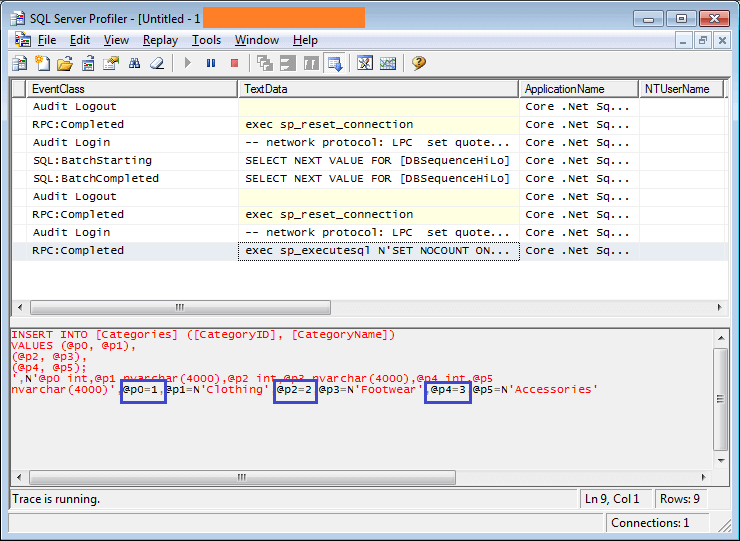
And when the first dataContext.SaveChanges();, all 3 categories will be saved. The interesting part to look at the generated query. The primary key values are already generated and fetched only once.

efcore-hilo-sequence-sql-query-trace

And even when 3 products are inserted, the sequence value will not be fetched from database. It’s only when 10 records are inserted (the Lo part is exhausted), then only a database call will be made to get next (Hi Part) sequence value.

Using HiLo for single entity

The above code makes use of HiLo sequence in both the tables. If you want to have it only for a particular table, then you can use the following code.

modelbuilder.Entity<Category>()
            .Property(o => o.CategoryID).ForSqlServerUseSequenceHiLo();

This code will create a new sequence with default name “EntityFrameworkHiLoSequence” as no name was specified. You can also have multiple HiLo sequences. For example,

protected override void OnModelCreating(ModelBuilder modelbuilder)
{
    modelbuilder.ForSqlServerUseSequenceHiLo("DBSequenceHiLo");
    modelbuilder.Entity<Category>()
            .Property(o => o.CategoryID).ForSqlServerUseSequenceHiLo();
}

And within the database, 2 sequences will be created. For category EntityFrameworkHiLoSequence will be used and for all other entities, DBSequenceHiLo will be used.

EF Core Multiple HiLo Sequence Database

Configuring HiLo Sequence

Unlike ForSqlServerHasSequence, there are no options available to change start value and increment value. However, there is a way to define these options. First, define a sequence with StartAt and IncrementBy options and use the same sequence ForSqlServerUseSequenceHiLo() extension method. Like,

modelbuilder.HasSequence<int>("DBSequenceHiLo")
                  .StartsAt(1000).IncrementsBy(5);
modelbuilder.ForSqlServerUseSequenceHiLo("DBSequenceHiLo");

In this case, following is the script of DBSequenceHiLo.

CREATE SEQUENCE [dbo].[DBSequenceHiLo] 
 AS [int]
 START WITH 1000
 INCREMENT BY 5
 MINVALUE -2147483648
 MAXVALUE 2147483647
 CACHE 
GO

So when we execute the same code to insert 3 categories, then the key value will start from 1000.

efcore-hilo-sequence-sql-query-trace-1

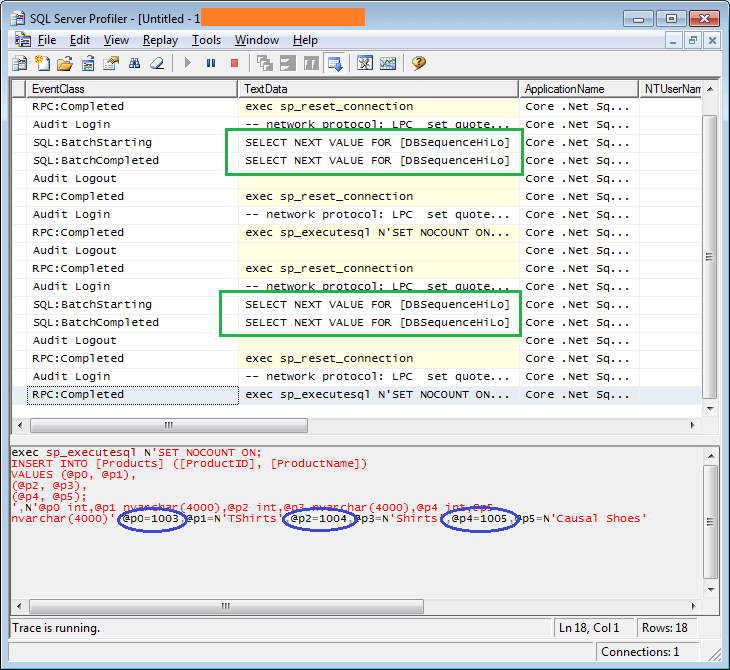
And since the IncrementBy option is set to “5”, so when the 6th insert is added in the context, a database call will be made to get next sequence value. Following is the screen shot of SQL Server profiler for 3 inserts of categories and then 3 inserts of products. You can see the database call to get the next value of the sequence is 2 times.

efcore-hilo-sequence-sql-query-trace-2

That’s it.

Thank you for reading. Keep visiting this blog and share this in your network. Please put your thoughts and feedback in the comments section.

The post Use HiLo to generate keys with Entity Framework Core appeared first on Talking Dotnet.

02 Oct 19:35

Sharing Authorization Cookies between ASP.NET 4.x and ASP.NET Core 1.0

by Scott Hanselman

ASP.NET Core 1.0 runs on ASP.NET 4.6 nicelyASP.NET Core 1.0 is out, as is .NET Core 1.0 and lots of folks are making great cross-platform web apps. These are Web Apps that are built on .NET Core 1.0 and run on Windows, Mac, or Linux.

However, some people don't realize that ASP.NET Core 1.0 (that's the web framework bit) runs on either .NET Core or .NET Framework 4.6 aka "Full Framework."

Once you realize that it can be somewhat liberating. If you want to check out the new ASP.NET Core 1.0 and use the unified controllers to make web apis or MVC apps with Razor you can...even if you don't need or care about cross-platform support. Maybe your libraries use COM objects or Windows-specific stuff. ASP.NET Core 1.0 works on .NET Framework 4.6 just fine.

Another option that folks don't consider when talk of "porting" their apps comes up at work is - why not have two apps? There's no reason to start a big porting exercise if your app works great now. Consider that you can have a section of your site by on ASP.NET Core 1.0 and another be on ASP.NET 4.x and the two apps could share authentication cookies. The user would never know the difference.

Barry Dorrans from our team looked into this, and here's what he found. He's interested in your feedback, so be sure to file issues on his GitHub Repo with your thoughts, bugs, and comments. This is a work in progress and at some point will be updated into the official documentation.

Sharing Authorization Cookies between ASP.NET 4.x and .NET Core

Barry is building a GitHub repro here with two sample apps and a markdown file to illustrate clearly how to accomplish cookie sharing.

When you want to share logins with an existing ASP.NET 4.x app and an ASP.NET Core 1.0 app, you'll be creating a login cookie that can be read by both applications. It's certainly possible for you, Dear Reader, to "hack something together" with sessions and your own custom cookies, but please let this blog post and Barry's project be a warning. Don't roll your own crypto. You don't want to accidentally open up one or both if your apps to hacking because you tried to extend auth/auth in a naïve way.

First, you'll need to make sure each application has the right NuGet packages to interop with the security tokens you'll be using in your cookies.

Install the interop packages into your applications.

  1. ASP.NET 4.5

    Open the nuget package manager, or the nuget console and add a reference to Microsoft.Owin.Security.Interop.

  2. ASP.NET Core

    Open the nuget package manager, or the nuget console and add a reference to Microsoft.AspNetCore.DataProtection.Extensions.

Make sure the Cookie Names are identical in each application

Barry is using CookieName = ".AspNet.SharedCookie" in the example, but you just need to make sure they match.

services.AddIdentity<ApplicationUser, IdentityRole>(options =>

{
options.Cookies = new Microsoft.AspNetCore.Identity.IdentityCookieOptions
{
ApplicationCookie = new CookieAuthenticationOptions
{
AuthenticationScheme = "Cookie",
LoginPath = new PathString("/Account/Login/"),
AccessDeniedPath = new PathString("/Account/Forbidden/"),
AutomaticAuthenticate = true,
AutomaticChallenge = true,
CookieName = ".AspNet.SharedCookie"

};
})
.AddEntityFrameworkStores<ApplicationDbContext>()
.AddDefaultTokenProviders();
}

Remember the CookieName property must have the same value in each application, and the AuthenticationType (ASP.NET 4.5) and AuthenticationScheme (ASP.NET Core) properties must have the same value in each application.

Be aware of your cookie domains if you use them

Browsers naturally share cookies between the same domain name. For example if both your sites run in subdirectories under https://contoso.com then cookies will automatically be shared.

However if your sites run on subdomains a cookie issued to a subdomain will not automatically be sent by the browser to a different subdomain, for example, https://site1.contoso.com would not share cookies with https://site2.contoso.com.

If your sites run on subdomains you can configure the issued cookies to be shared by setting the CookieDomain property in CookieAuthenticationOptions to be the parent domain.

Try to do everything over HTTPS and be aware that if a Cookie has its Secure flag set it won't flow to an insecure HTTP URL.

Select a common data protection repository location accessible by both applications

From Barry's instructions, his sample will use a shared DP folder, but you have options:

This sample will use a shared directory (C:\keyring). If your applications aren't on the same server, or can't access the same NTFS share you can use other keyring repositories.

.NET Core 1.0 includes key ring repositories for shared directories and the registry.

.NET Core 1.1 will add support for Redis, Azure Blob Storage and Azure Key Vault.

You can develop your own key ring repository by implementing the IXmlRepository interface.

Configure your applications to use the same cookie format

You'll configure each app - ASP.NET 4.5 and ASP.NET Core - to use the AspNetTicketDataFormat for their cookies.

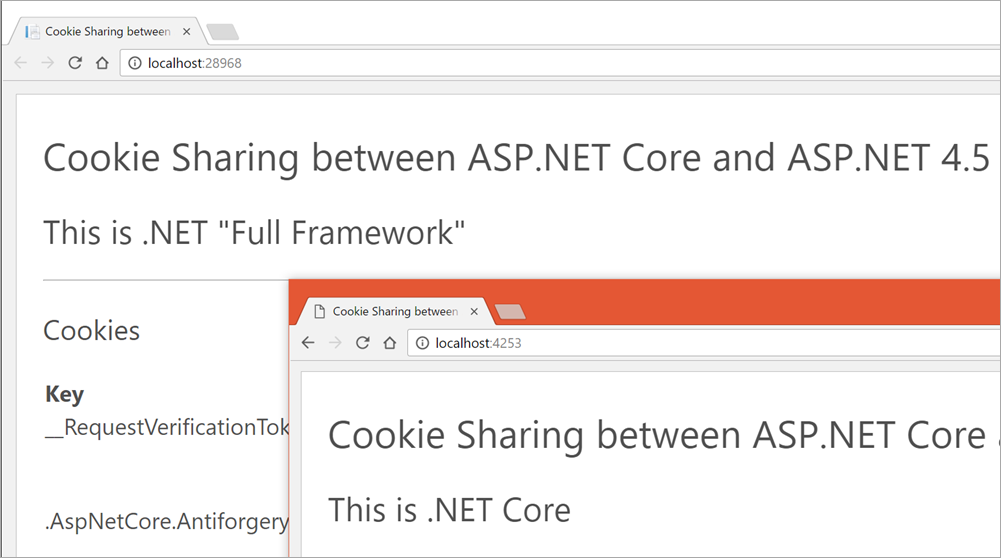
Cookie Sharing with ASP.NET Core and ASP.NET Full Framework

According to his repo, this gets us started with Cookie Sharing for Identity, but there still needs to be clearer guidance on how share the Identity 3.0 database between the two frameworks.

The interop shim does not enabling the sharing of identity databases between applications. ASP.NET 4.5 uses Identity 1.0 or 2.0, ASP.NET Core uses Identity 3.0. If you want to share databases you must update the ASP.NET Identity 2.0 applications to use the ASP.NET Identity 3.0 schemas. If you are upgrading from Identity 1.0 you should migrate to Identity 2.0 first, rather than try to go directly to 3.0.

Sound off in the Issues over on GitHub if you would like to see this sample (or another) expanded to show more Identity DB sharing. It looks to be very promising work.


Sponsor: Big thanks to Telerik for sponsoring the blog this week! 60+ ASP.NET Core controls for every need. The most complete UI toolset for x-platform responsive web and cloud development.Try now 30 days for free!


© 2016 Scott Hanselman. All rights reserved.
     
02 Oct 10:56

Use NancyFx in ASP.NET Core

by Talking Dotnet

NancyFx is a lightweight, low-ceremony, framework for building HTTP based services on .NET and Mono. The goal of the framework is to stay out of the way as much as possible and provide a super-duper-happy-path to all interactions. Advantage of NancyFx is, it prefers conventions over configuration and supports DELETE, GET, HEAD, OPTIONS, POST, PUT and PATCH requests and provides a simple and elegant way to return response with just a couple of keystrokes. In this post, let’s find out how to use NancyFx in ASP.NET Core.

Use NancyFx in ASP.NET Core

Before we move to using NancyFx with ASP.NET, here is some advantage of NancyFx.

  • No configuration required. The framework is easy to setup, customize and no need to go through configuration hell just to get up and running.
  • Its host-agnostic and runs anywhere which means you can run it on IIS, WCF, embedded within an EXE, as a windows service or within a self hosted application.
  • Built in Dependency Injection.

I recommend you to read the post Why use NancyFX?.

Let’s see how to use it in the ASP.NET Core application. First, let’s create an empty ASP.NET Core application and open Project.json to include NancyFx. You need to include 2 nuget packages.

  • Microsoft.AspNetCore.Owin: “1.0.0”
  • Nancy: “2.0.0-barneyrubble”
{
"dependencies": {
  "Microsoft.NETCore.App": {
    "version": "1.0.0",
    "type": "platform"
  },
  "Microsoft.AspNetCore.Diagnostics": "1.0.0",
  "Microsoft.AspNetCore.Server.IISIntegration": "1.0.0",
  "Microsoft.AspNetCore.Server.Kestrel": "1.0.0",
  "Microsoft.Extensions.Logging.Console": "1.0.0",
  "Microsoft.AspNetCore.Owin": "1.0.0",
  "Nancy": "2.0.0-barneyrubble"
},

Now we need to make sure the Nancy handles the request, instead of the ASP.NET runtime. So open Startup.cs and look for Configure method. And add the highlighted line of code.

public void Configure(IApplicationBuilder app, IHostingEnvironment env, ILoggerFactory loggerFactory)
{
    loggerFactory.AddConsole();
    if (env.IsDevelopment())
    {
        app.UseDeveloperExceptionPage();
    }
    app.UseOwin(x => x.UseNancy());
}

Now we need to create a Module that will handle the request. Modules are the lynchpin of any given Nancy application. Modules are the one thing you simply cannot avoid because they are where you define the behavior of your application. You can think of a module like the Controller in ASP.NET MVC or WEB API.

Although you can place module classes anywhere but ideally you should put them inside a “Modules” directory. So create a Modules directory and add create a new class “HomeModule” as follows,

public class HomeModule : NancyModule
{
    public HomeModule()
    {
        Get("/", args => "Hello From Home Module.");
        Get("/test", args => "Test Message.");
    }
}

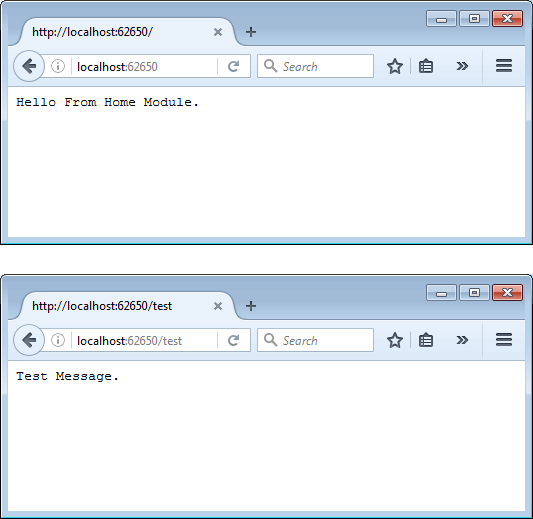
A module is created by inheriting from the NancyModule class; it’s as simple as that. Above code defines a Nancy Module, which can handle 2 different GET request and returns the plain text as response.

Running Nancy Module in browser

You need to have at least one module defined in your application. Although you can have as many modules as you like in your application. So let’s define another module which is a little complex. Below code defines ProductModules which handles 3 different requests.

  • /products/: A get request which returns list of products.
  • /products/{id}: Another get request which returns name of the product matching the id value.
  • /product/create/{Name}: A Post request which adds product to list.
public class ProductModules : NancyModule
{
   public static int nProductId = 1;
   public static List<Product> lst = new List<Product>();
   public ProductModules() : base("/products")
   {
       Get("/", args => GetProductList());
       Get("/{id:int}", args => GetProductById(args.id));
       Post("/create/{Name}", args =>
       {
          lst.Add(new Product() { Id = nProductId++, Name = args.Name });
          return HttpStatusCode.OK;
       });
    }

   public List<Product> GetProductList()
   {
       lst.Add(new Product() { Id = nProductId++, Name = "Bed" });
       lst.Add(new Product() { Id = nProductId++, Name = "Table" });
       lst.Add(new Product() { Id = nProductId++, Name = "Chair" });
       return lst;
   }

   public Product GetProductById(int Id)
   {
       return lst.Find(item => item.Id == Id);
   }

   public class Product
   {
       public int Id { get; set; }
       public string Name { get; set; }
   }
}

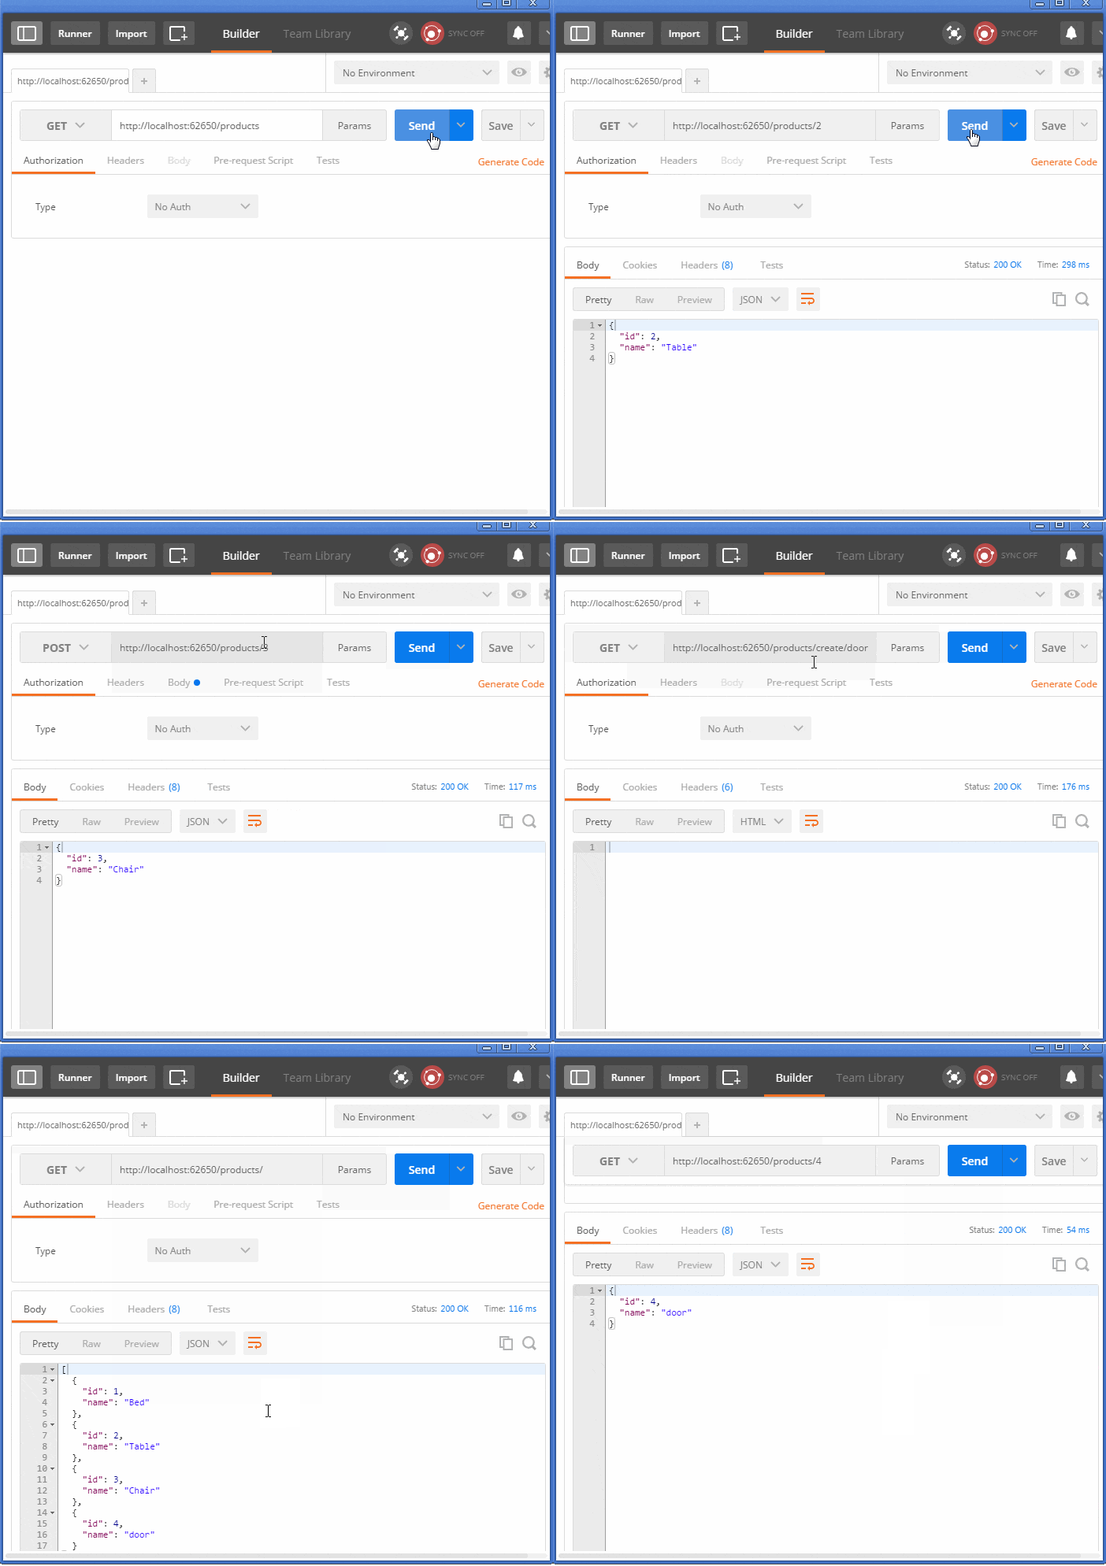
Here is the response of all the product’s API using Postman tool.

Use NancyFx in ASP.NET Core Postman

That’s it. NancyFx is very modular and flexible. We saw that it is really easy to integrate NancyFx with ASP.NET Core. Once integration is done, you can start writing your code quickly and you can easily define routes for modules and HTTP verb commands. Hope you liked it.

It would be really nice to have Swagger for NancyFx also like ASP.NET Core Web API but unfortunately at this moment there are no nuget packages available for .NET Core.

Thank you for reading. Keep visiting this blog and share this in your network. Please put your thoughts and feedback in the comments section.

The post Use NancyFx in ASP.NET Core appeared first on Talking Dotnet.

02 Oct 06:11

Introducing .NET Standard

by Immo Landwerth [MSFT]

Questions? Check out the .NET Standard FAQ.

In my last post, I talked about how we want to make porting to .NET Core easier. In this post, I’ll focus on how we’re making this plan a reality with .NET Standard. We’ll cover which APIs we plan to include, how cross-framework compatibility will work, and what all of this means for .NET Core.

If you’re interested in details, this post is for you. But don’t worry if you don’t have time or you’re not interested in details: you can just read the TL;DR section.

For the impatient: TL;DR

.NET Standard solves the code sharing problem for .NET developers across all platforms by bringing all the APIs that you expect and love across the environments that you need: desktop applications, mobile apps & games, and cloud services:

  • .NET Standard is a set of APIs that all .NET platforms have to implement. This unifies the .NET platforms and prevents future fragmentation.
  • .NET Standard 2.0 will be implemented by .NET Framework, .NET Core, and Xamarin. For .NET Core, this will add many of the existing APIs that have been requested.
  • .NET Standard 2.0 includes a compatibility shim for .NET Framework binaries, significantly increasing the set of libraries that you can reference from your .NET Standard libraries.
  • .NET Standard will replace Portable Class Libraries (PCLs) as the tooling story for building multi-platform .NET libraries.
  • You can see the .NET Standard API definition in the dotnet/standard repo on GitHub.

Why do we need a standard?

As explained in detail in the post Introducing .NET Core, the .NET platform was forked quite a bit over the years. On the one hand, this is actually a really good thing. It allowed tailoring .NET to fit the needs that a single platform wouldn’t have been able to. For example, the .NET Compact Framework was created to fit into the (fairly) restrictive footprint of phones in the 2000 era. The same is true today: Unity (a fork of Mono) runs on more than 20 platforms. Being able to fork and customize is an important capability for any technology that requires reach.

But on the other hand, this forking poses a massive problem for developers writing code for multiple .NET platforms because there isn’t a unified class library to target:

dotnet-today

There are currently three major flavors of .NET, which means you have to master three different base class libraries in order to write code that works across all of them. Since the industry is much more diverse now than when .NET was originally created it’s safe to assume that we’re not done with creating new .NET platforms. Either Microsoft or someone else will build new flavors of .NET in order to support new operating systems or to tailor it for specific device capabilities.

This is where the .NET Standard comes in:

dotnet-tomorrow

For developers, this means they only have to master one base class library. Libraries targeting .NET Standard will be able to run on all .NET platforms. And platform providers don’t have to guess which APIs they need to offer in order to consume the libraries available on NuGet.

Applications. In the context of applications you don’t use .NET Standard directly. However, you still benefit indirectly. First of all, .NET Standard makes sure that all .NET platforms share the same API shape for the base class library. Once you learn how to use it in your desktop application you know how to use it in your mobile application or your cloud service. Secondly, with .NET Standard most class libraries will become available everywhere, which means the consistency at the base layer will also apply to the larger .NET library ecosystem.

Portable Class Libraries. Let’s contrast this with how Portable Class Libraries (PCL) work today. With PCLs, you select the platforms you want to run on and the tooling presents you with the resulting API set you can use. So while the tooling helps you to produce binaries that work on multiple platforms, it still forces you to think about different base class libraries. With .NET Standard you have a single base class library. Everything in it will be supported across all .NET platforms — current ones as well as future ones. Another key aspect is that the API availability in .NET Standard is very predictable: higher version equals more APIs. With PCLs, that’s not necessarily the case: the set of available APIs is the result of the intersection between the selected platforms, which doesn’t always produce an API surface you can easily predict.

Consistency in APIs. If you compare .NET Framework, .NET Core, and Xamarin/Mono, you’ll notice that .NET Core offers the smallest API surface (excluding OS-specific APIs). The first inconsistency is having drastic differences in the availability of foundational APIs (such as networking- and crypto APIs). The second problem .NET Core introduced was having differences in the API shape of core pieces, especially in reflection. Both inconsistencies are the primary reason why porting code to .NET Core is much harder than it should be. By creating the .NET Standard we’re codifying the requirement of having consistent APIs across all .NET platforms, and this includes availability as well as the shape of the APIs.

Versioning and Tooling. As I mentioned in Introducing .NET Core our goal with .NET Core was to lay the foundation for a portable .NET platform that can unify APIs in shape and implementation. We intended it to be the next version of portable class libraries. Unfortunately, it didn’t result in a great tooling experience. Since our goal was to represent any .NET platform we had to break it up into smaller NuGet packages. This works reasonably well if all these components can be deployed with the application because you can update them independently. However, when you target an abstract specification, such as PCLs or the .NET Standard, this story doesn’t work so well because there is a very specific combination of versions that will allow you to run on the right set of platforms. In order to avoid that issue, we’ve defined .NET Standard as a single NuGet package. Since it only represents the set of required APIs, there is no need to break it up any further because all .NET platforms have to support it in its entirety anyways. The only important dimension is its version, which acts like an API level: the higher the version, the more APIs you have, but the lower the version, the more .NET platforms have already implemented it.

To summarize, we need .NET Standard for two reasons:

  1. Driving force for consistency. We want to have an agreed upon set of required APIs that all .NET platforms have to implement in order to gain access to the .NET library ecosystem.
  2. Foundation for great cross-platform tooling. We want a simplified tooling experience that allows you to target the commonality of all .NET platforms by choosing a single version number.

What’s new in .NET Standard 2.0?

When we shipped .NET Core 1.0, we also introduced .NET Standard. There are multiple versions of the .NET Standard in order to represent the API availability across all current platforms. The following table shows which version of an existing platform is compatible with a given version of .NET Standard:

.NET Platform .NET Standard
1.0 1.1 1.2 1.3 1.4 1.5 1.6 2.0
.NET Core 1.0 vNext
.NET Framework 4.5 4.5.1 4.6 4.6.1 4.6.2 vNext 4.6.1
Xamarin.iOS vNext
Xamarin.Android vNext
Universal Windows Platform 10.0 vNext
Windows 8.0 8.1
Windows Phone 8.1
Windows Phone Silverlight 8.0

The arrows indicate that the platform supports a higher version of .NET Standard. For instance, .NET Core 1.0 supports the .NET Standard version 1.6, which is why there are arrows pointing to the right for the lower versions 1.0 – 1.5.

You can use this table to understand what the highest version of .NET Standard is that you can target, based on which .NET platforms you intend to run on. For instance, if you want to run on .NET Framework 4.5 and .NET Core 1.0, you can at most target .NET Standard 1.1.

You can also see which platforms will support .NET Standard 2.0:

  • We’ll ship updated versions of .NET Core, Xamarin, and UWP that will add all the necessary APIs for supporting .NET Standard 2.0.
  • .NET Framework 4.6.1 already implements all the APIs that are part of .NET Standard 2.0. Note that this version appears twice; I’ll cover later why that is and how it works.

.NET Standard is also compatible with Portable Class Libraries. The mapping from PCL profiles to .NET Standard versions is listed in our documentation.

From a library targeting .NET Standard you’ll be able to reference two kinds of other libraries:

  • .NET Standard, if their version is lower or equal to the version you’re targeting.
  • Portable Class Libraries, if their profile can be mapped to a .NET Standard version and that version is lower or equal to the version you’re targeting.

Graphically, this looks as follows:

netstandard-refs-today

Unfortunately, the adoption of PCLs and .NET Standard on NuGet isn’t as high as it would need to be in order to be a friction free experience. This is how many times a given target occurs in packages on NuGet.org:

Target Occurrences
.NET Framework 46,894
.NET Standard 1,886
Portable 4,501

As you can see, it’s quite clear that the vast majority of class libraries on NuGet are targeting .NET Framework. However, we know that a large number of these libraries are only using APIs we’ll expose in .NET Standard 2.0.

In .NET Standard 2.0, we’ll make it possible for libraries that target .NET Standard to also reference existing .NET Framework binaries through a compatibility shim:

netstandard-refs-tomorrow

Of course, this will only work for cases where the .NET Framework library uses APIs that are available for .NET Standard. That’s why this isn’t the preferred way of building libraries you intend to use across different .NET platforms. However, this compatibility shim provides a bridge that enables you to convert your libraries to .NET Standard without having to give up referencing existing libraries that haven’t been converted yet.

If you want to learn more about how the compatibility shim works, take a look at the specification for .NET Standard 2.0.

.NET Standard 2.0 breaking change: adding .NET Framework 4.6.1 compatibility

A standard is only as useful as there are platforms implementing it. At the same time, we want to make the .NET Standard meaningful and useful in and of itself, because that’s the API surface that is available to libraries targeting the standard:

  • .NET Framework. .NET Framework 4.6.1 has the highest adoption, which makes it the most attractive version of .NET Framework to target. Hence, we want to make sure that it can implement .NET Standard 2.0.
  • .NET Core. As mentioned above, .NET Core has a much smaller API set than .NET Framework or Xamarin. Supporting .NET Standard 2.0 means that we need to extend the surface area significantly. Since .NET Core doesn’t ship with the OS but with the app, supporting .NET Standard 2.0 only requires updates to the SDK and our NuGet packages.
  • Xamarin. Xamarin already supports most of the APIs that are part of .NET Standard. Updating works similar to .NET Core — we hope we can update Xamarin to include all APIs that are currently missing. In fact, the majority of them were already added to the stable Cycle 8 release/Mono 4.6.0.

The table listed earlier shows which versions of .NET Framework supports which version of .NET Standard:

1.4 1.5 1.6 2.0
.NET Framework 4.6.1 4.6.2 vNext 4.6.1

Following normal versioning rules one would expect that .NET Standard 2.0 would only be supported by a newer version of .NET Framework, given that the latest version of .NET Framework (4.6.2) only supports .NET Standard 1.5. This would mean that the libraries compiled against .NET Standard 2.0 would not run on the vast majority of .NET Framework installations.

In order to allow .NET Framework 4.6.1 to support .NET Standard 2.0, we had to remove all the APIs from .NET Standard that were introduced in .NET Standard 1.5 and 1.6.

You may wonder what the impact of that decision is. We ran an analysis of all packages on NuGet.org that target .NET Standard 1.5 or later and use any of these APIs. At the time of this writing we only found six non-Microsoft owned packages that do. We’ll reach out to those package owners and work with them to mitigate the issue. From looking at their usages, it’s clear that their calls can be replaced with APIs that are coming with .NET Standard 2.0.

In order for these package owners to support .NET Standard 1.5, 1.6 and 2.0, they will need to cross-compile to target these versions specifically. Alternatively, they can chooose to target .NET Standard 2.0 and higher given the broad set of platforms that support it.

What’s in .NET Standard?

In order to decide which APIs will be part of .NET Standard we used the following process:

  • Input. We start with all the APIs that are available in both .NET Framework and in Xamarin.
  • Assessment. We classify all these APIs into one of two buckets:
    1. Required. APIs that we want all platforms to provide and we believe can be implemented cross-platform, we label as required.
    2. Optional. APIs that are platform-specific or are part of legacy technologies we label as optional.

Optional APIs aren’t part of .NET Standard but are available as separate NuGet packages. We try to build these as libraries targeting .NET Standard so that their implementation can be consumed from any platform, but that might not always be feasible for platform specific APIs (e.g. Windows registry).

In order to make some APIs optional we may have to remove other APIs that are part of the required API set. For example, we decided that AppDomain is in .NET Standard while Code Access Security (CAS) is a legacy component. This requires us to remove all members from AppDomain that use types that are part of CAS, such as overloads on CreateDomain that accept Evidence.

The .NET Standard API set, as well as our proposal for optional APIs will be reviewed by the .NET Standard’s review body.

Here is the high-level summary of the API surface of .NET Standard 2.0:

netstandard-apis

If you want to look at the specific API set of .NET Standard 2.0, you can take a look at the .NET Standard GitHub repository. Please note that .NET Standard 2.0 is a work in progress, which means some APIs might be added, while some might be removed.

Can I still use platform-specific APIs?

One of the biggest challenges in creating an experience for multi-platform class libraries is to avoid only having the lowest-common denominator while also making sure you don’t accidentally create libraries that are much less portable than you intend to.

In PCLs we’ve solved the problem by having multiple profiles, each representing the intersection of a set of platforms. The benefit is that this allows you to max out the API surface between a set of targets. The .NET Standard represents the set of APIs that all .NET platforms have to implement.

This brings up the question how we model APIs that cannot be implemented on all platforms:

  • Runtime specific APIs. For example, the ability to generate and run code on the fly using reflection emit. This cannot work on .NET platforms that do not have a JIT compiler, such as .NET Native on UWP or via Xamarin’s iOS tool chain.
  • Operating system specific APIs. In .NET we’ve exposed many APIs from Win32 in order to make them easier to consume. A good example is the Windows registry. The implementation depends on the underlying Win32 APIs that don’t have equivalents on other operating systems.

We have a couple of options for these APIs:

  1. Make the API unavailable. You cannot use APIs that do not work across all .NET platforms.
  2. Make the API available but throw PlatformNotSupportedException. This would mean that we expose all APIs regardless of whether they are supported everywhere or not. Platforms that do not support them provide the APIs but throw PlatformNotSupportedException.
  3. Emulate the API. Mono implements the registry as an API over .ini files. While that doesn’t work for apps that use the registry to read information about the OS, it works quite well for the cases where the application simply uses the registry to store its own state and user settings.

We believe the best option is a combination. As mentioned above we want the .NET Standard to represent the set of APIs that all .NET platforms are required to implement. We want to make this set sensible to implement while ensuring popular APIs are present so that writing cross-platform libraries is easy and intuitive.

Our general strategy for dealing with technologies that are only available on some .NET platforms is to make them NuGet packages that sit above the .NET Standard. So if you create a .NET Standard-based library, it’ll not reference these APIs by default. You’ll have to add a NuGet package that brings them in.

This strategy works well for APIs that are self-contained and thus can be moved into a separate package. For cases where individual members on types cannot be implemented everywhere, we’ll use the second and third approach: platforms have to have these members but they can decide to throw or emulate them.

Let’s look at a few examples and how we plan on modelling them:

  • Registry. The Windows registry is a self-contained component that will be provided as a separate NuGet package (e.g. Microsoft.Win32.Registry). You’ll be able to consume it from .NET Core, but it will only work on Windows. Calling registry APIs from any other OS will result in PlatformNotSupportedException. You’re expected to guard your calls appropriately or making sure your code will only ever run on Windows. We’re considering improving our tooling to help you with detecting these cases.
  • AppDomain. The AppDomain type has many APIs that aren’t tied to creating app domains, such as getting the list of loaded assemblies or registering an unhandled exception handler. These APIs are heavily used throughout the .NET library ecosystem. For this case, we decided it’s much better to add this type to .NET Standard and let the few APIs that deal with app domain creation throw exceptions on platforms that don’t support that, such as .NET Core.
  • Reflection Emit. Reflection emit is reasonably self-contained and thus we plan on following the model as Registry, above. There are other APIs that logically depend on being able to emit code, such as the expression tree’s Compile method or the ability to compile regexes. In some cases we’ll emulate their behavior (e.g. interpreting expression trees instead of compiling them) while in other cases we’ll throw (e.g. when compiling regexes).

In general, you can always work around APIs that are unavailable in .NET Standard by targeting specific .NET platforms, like you do today. We’re thinking about ways how we can improve our tooling to make the transitions between being platform-specific and being platform-agnostic more fluid so that you can always choose the best option for your situation and not being cornered by earlier design choices.

To summarize:

  • We’ll expose concepts that might not be available on all .NET platforms.
  • We generally make them individual packages that you have to explicitly reference.
  • In rare cases, individual members might throw exceptions.

The goal is to make .NET Standard-based libraries as powerful and as expressive as possible while making sure you’re aware of cases where you take dependencies on technologies that might not work everywhere.

What does this mean for .NET Core?

We designed .NET Core so that its reference assemblies are the .NET portability story. This made it harder to add new APIs because adding them in .NET Core preempts the decision on whether these APIs are made available everywhere. Worse, due to versioning rules, it also means we have to decide which combination of APIs are made available in which order.

Out-of-band delivery. We’ve tried to work this around by making those APIs available “out-of-band” which means making them new components that can sit on top of the existing APIs. For technologies where this is easily possible, that’s the preferred way because it also means any .NET developer can play with the APIs and give us feedback. We’ve done that for immutable collections with great success.

Implications for runtime features. However, for features that require runtime work, this is much harder because we can’t just give you a NuGet package that will work. We also have to give you a way to get an updated runtime. That’s harder on platforms that have a system wide runtime (such as .NET Framework) but is also harder in general because we have multiple runtimes for different purposes (e.g. JIT vs AOT). It’s not practical to innovate across all these spectrums at once. The nice thing about .NET Core is that this platform is designed to be fully self-contained. So for the future, we’re more likely to leverage this capability for experimentation and previewing.

Splitting .NET Standard from .NET Core. In order to be able to evolve .NET Core independently from other .NET platforms we’ve divorced the portability mechanism (which I referred to earlier) from .NET Core. .NET Standard is defined as an independent reference assembly that is satisfied by all .NET platforms. Each of the .NET platforms uses a different set of reference assemblies and thus can freely add new APIs in whatever cadence they choose. We can then, after the fact, make decisions around which of these APIs are added to .NET Standard and thus should become universally available.

Separating portability from .NET Core helps us to speed up development of .NET Core and makes experimentation of newer features much simpler. Instead of artificially trying to design features to sit on top of existing platforms, we can simply modify the layer that needs to be modified in order to support the feature. We can also add the APIs on the types they logically belong to instead of having to worry about whether that type has already shipped in other platforms.

Adding new APIs in .NET Core isn’t a statement whether they will go into the .NET Standard but our goal for .NET Standard is to create and maintain consistency between the .NET platforms. So new members on types that are already part of the standard will be automatically considered when the standard is updated.

As a library author, what should I do now?

As a library author, you should consider switching to .NET Standard because it will replace Portable Class Libraries for targeting multiple .NET platforms.

In case of .NET Standard 1.x the set of available APIs is very similar to PCLs. But .NET Standard 2.x will have a significantly bigger API set and will also allow you to depend on libraries targeting .NET Framework.

The key differences between PCLs and .NET Standard are:

  • Platform tie-in. One challenge with PCLs is that while you target multiple platforms, it’s still a specific set. This is especially true for NuGet packages as you have to list the platforms in the lib folder name, e.g. portable-net45+win8. This causes issues when new platforms show up that support the same APIs. .NET Standard doesn’t have this problem because you target a version of the standard which doesn’t include any platform information, e.g. netstandard1.4.
  • Platform availability. PCLs currently support a wider range of platforms and not all profiles have a corresponding .NET Standard version. Take a look at the documentation for more details.
  • Library availability. PCLs are designed to enforce that you cannot take dependencies on APIs and libraries that the selected platforms will not be able to run. Thus, PCL projects will only allow you to reference other PCLs that target a superset of the platforms your PCL is targeting. .NET Standard is similar, but it additionally allows referencing .NET Framework binaries, which are the de facto exchange currency in the library ecosystem. Thus, with .NET Standard 2.0 you’ll have access to a much larger set of libraries.

In order to make an informed decision, I suggest you:

  1. Use API Port to see how compatible your code base is with the various versions of .NET Standard.
  2. Look at the .NET Standard documentation to ensure you can reach the platforms that are important to you.

For example, if you want to know whether you should wait for .NET Standard 2.0 you can check against both, .NET Standard 1.6 and .NET Standard 2.0 by downloading the API Port command line tool and run it against your libraries like so:

> apiport analyze -f C:\src\mylibs\ -t ".NET Standard,Version=1.6"^
                                    -t ".NET Standard,Version=2.0"

Note: .NET Standard 2.0 is still work in progress and therefore API availability is subject to change. I also suggest that you watch out for the APIs that are available in .NET Standard 1.6 but are removed from .NET Standard 2.0.

Summary

We’ve created .NET Standard so that sharing and re-using code between multiple .NET platforms becomes much easier.

With .NET Standard 2.0, we’re focusing on compatibility. In order to support .NET Standard 2.0 in .NET Core and UWP, we’ll be extending these platforms to include many more of the existing APIs. This also includes a compatibility shim that allows referencing binaries that were compiled against the .NET Framework.

Moving forward, we recommend that you use .NET Standard instead of Portable Class Libraries. The tooling for targeting .NET Standard 2.0 will ship in the same timeframe as the upcoming release of Visual Studio, code-named “Dev 15”. You’ll reference .NET Standard as a NuGet package. It will have first class support from Visual Studio, VS Code as well as Xamarin Studio.

You can follow our progress via our new dotnet/standard GitHub repository.

Please let us know what you think!
01 Oct 12:20

Rennes : l’expérimentation à 70 km/h fait un flop, les 90 km/h de retour

by Thibaut Emme
1280px-StadeRDL_aerien5

Il y a un an, la maire de Rennes, Nathalie Appéré lançait l’expérimentation de passer la rocade à 70 km/h. Un an après elle fait (enfin) marche arrière après la démonstration que cela ne diminue pas la pollution. Le passage de 90 à 70 km/h (et de section d’approche de 110 à 90 km/h) de la […]

Cet article Rennes : l’expérimentation à 70 km/h fait un flop, les 90 km/h de retour est apparu en premier sur le blog auto.

01 Oct 08:25

Scientist.NET 1.0 released!

by Phil Haack

In the beginning of the year I announced a .NET Port of GitHub’s Scientist library. Since then I and several contributors from the community (kudos to them all!) have been hard at work getting this library to 1.0 status. Ok, maybe not that hard considering how long it’s taken. This has been a side project labor of love for me and the others.

Today I released an official 1.0 version of Scientist.NET with a snazzy new logo from the GitHub creative team. It’s feature complete and used in production by some of the contributors.

Scientist logo with two test tubes slightly unbalanced

You can install it via NuGet.

Install-Package scientist

I transferred the repository to the github organization to make it all official and not just some side-project of mine. So if you want to get involved by logging issues, contributing code, whatever, it’s now located at https://github.com/github/scientist.net.

You’ll note that the actual package version is 1.0.1 and not 1.0.0. Why did I increment the patch version for the very first release? A while back I made a mistake and uploaded an early pre-release as 1.0.0 on accident. And NuGet doesn’t let you overwrite an existing version. Who’s fault is that? Well, partly mine. When we first built NuGet, we didn’t want people to be able to replace a known good package to help ensure repeatable builds. So while this decision bit me in the butt, I still stand by that decision.

Enjoy!

30 Sep 07:13

Windows 10 will soon run Edge in a virtual machine to keep you safe

by Peter Bright

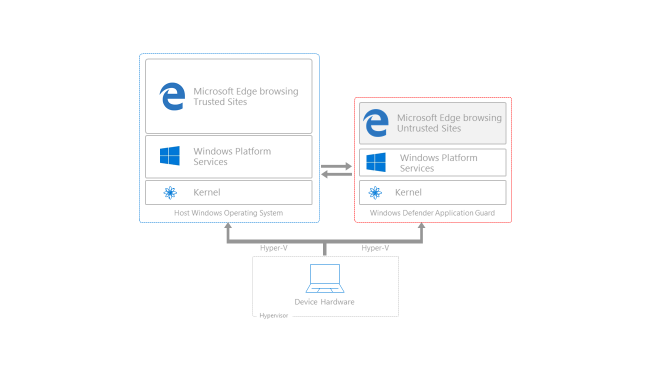
Enlarge / Untrusted sites get a minimal set of Windows Platform Services and no access to the rest of the system. (credit: Microsoft)

ATLANTA—Microsoft has announced that the next major update to Windows 10 will run its Edge browser in a lightweight virtual machine. Running the update in a virtual machine will make exploiting the browser and attacking the operating system or compromising user data more challenging.

Called Windows Defender Application Guard for Microsoft Edge, the new capability builds on the virtual machine-based security that was first introduced last summer in Windows 10. Windows 10's Virtualization Based Security (VBS) uses small virtual machines and the Hyper-V hypervisor to isolate certain critical data and processes from the rest of the system. The most important of these is Credential Guard, which stores network credentials and password hashes in an isolated virtual machine. This isolation prevents the popular MimiKatz tool from harvesting those password hashes. In turn, it also prevents a hacker from breaking into one machine and then using stolen credentials to spread to other machines on the same network.

The Edge browser already creates a secure sandbox for its processes, a technique that tries to limit the damage that can be done when malicious code runs within the browser. The sandbox has limited access to the rest of the system and its data, so successful exploits need to break free from the sandbox's constraints. Often they do this by attacking the operating system itself, using operating system flaws to elevate their privileges.

Read 8 remaining paragraphs | Comments

30 Sep 07:12

Microsoft launches “fuzzing-as-a-service” to help developers find security bugs

by Sean Gallagher

Enlarge / No, not that sort of fuzzing for bugs. (credit: Micha L. Rieser)

At Microsoft's Ignite conference in Atlanta yesterday, the company announced the availability of a new cloud-based service for developers that will allow them to test application binaries for security flaws before they're deployed. Called Project Springfield, the service uses "whitebox fuzzing" (also known as "smart fuzzing") to test for common software bugs used by attackers to exploit systems.

In standard fuzzing tests, randomized inputs are thrown at software in an effort to find something that breaks the code—a buffer overflow that would let malicious code be planted in the system's memory or an unhandled exception that causes the software to crash or processes to hang. But the problem with this random approach is that it's hard to get deep into the logic of code. Another approach, called static code analysis (or "whiteboxing"), looks instead at the source code and walks through it without executing it, using ranges of inputs to determine whether security flaws may be present.

Whitebox fuzzing combines some of the aspects of each of these approaches. Using sample inputs as a starting point, a whitebox fuzz tester dynamically generates new sets of inputs to exercise the code, walking deeper into processes. Using machine learning techniques, the system repeatedly runs the code through fuzzing sessions, adapting its approach based on what it discovers with each pass. The approach is similar to some of the techniques developed by competitors in the Defense Advanced Research Projects Agency's Cyber Grand Challenge to allow for automated bug detection and patching.

Read 2 remaining paragraphs | Comments

29 Sep 12:44

Tink Labs : $125 millions pour déployer le smartphone hôtelier Handy

by Geoffray

Tink Labs annonce avoir levé 125 millions de dollars, notamment auprès de Foxconn, pour accélérer le déploiement de son service auprès des hotels : un smartphone dédié dans chaque chambre permettant aux clients de profiter de communications gratuites et de services adaptés à leur séjour.

Vous est-il arrivé de vous poser la question de comment continuer à téléphoner en voyage, de la compatibilité de votre mobile avec le réseau local, du prix des données en roaming, des bonnes apps à installer dans le pays de destination ou de la manière la plus aisée de trouver les restaurants à la mode.. ?

Certains choisissent simplement d’acheter une carte SIM locale le temps de leur voyage (c’est ce que je fais à chaque visite au CES par exemple, pour profiter d’une 4G haut-débit sans dépenser plus que 50 dollars…) mais la startup Tink Labs a trouvé une alternative plus simple.

La société basée à Hong-Kong vient de lever 125 millions de dollars auprès de Foxconn et Sinovation Ventures pour déployer son concept et tenter de séduire le secteur hotelier mondial avec une idée simple : proposer dans chaque chambre un smartphone dédié contenant les bons contenus et dont l’utilisation est gratuite.

Présentation de Tink Labs

Le patron de Tink Labs, Terence Kwok (24 ans) indique à TechCrunch que sa société est désormais  valorisée au delà des 500 millions de dollars, faisant de Tink Labs la plus grosse startup tech basée à Hong-Kong.

En plaçant son point de contact dans les chambres d’hotel plutôt que dans la zone d’arrivée des aéroports –comme initialement–, Tink Labs est parvenue à trouver un modèle de rentabilité qui a séduit les investisseurs autant que les grandes chaines d’hôtellerie : Starwood, Accor, Shangri-La et Melia sont déjà clients du smartphone Handy de Tink Labs.

Celui-ci ôte entièrement les difficultés citées précédemment et permet aux voyageurs de passer des appels et d’envoyer des SMS n’importe où dans le monde dès lors qu’ils sont passé par leur chambre pour récupérer l’appareil.

Le smartphone Handy contient toutes sortes de services et d’informations préinstallées pour faciliter le séjour du visiteur, à propos des prestations de l’hotel ou des attractions de la ville hôte. On peut par exemple commander du room-service depuis Handy, appeler le mobile d’une autre chambre via son numéro ou solliciter un taxi dans une langue que vous ne maitrisez pas…

Avec Handy, on pourra évidemment aussi réserver une table au restaurant de l’hotel, une place au spa ou contrôler la télévision connectée de sa chambre… c’est cet aspect versatile qui semble séduire les mastodontes du secteur jusqu’ici.

Un modèle vertueux ?

Cet outil fourni un modèle vertueux : les clients bénéficient d’un service gratuit supplémentaire et les hotels disposent avec Handy d’un canal d’engagement fort pour proposer des prestations additionnelles différentiantes.

Après une étude de 2 ans, Tink Labs est parvenu à déterminer que les clients seraient prêts à dépenser jusqu’à 21 dollars supplémentaires pour séjourner dans une chambre d’hotel équipée de son smartphone Handy.

Le service Handy est proposé dans 100 hotels à Singapour et Hong-Kong et Londres à l’heure actuelle, soit environ 1 million d’utilisateurs mensuels selon Tink Labs.

L’objectif est de faire croitre rapidement cette base d’établissements équipés, et Tink Labs en a désormais les moyens…

Via

29 Sep 07:33

Microsoft Cloud is first CSP behind the Privacy Shield

by Alice Rison

Privacy Shield FrameworkMicrosoft was proud to become the first global cloud service provider to appear on the Department of Commerce’s list of Privacy Shield certified entities as of August 12th 2016. The European Commission adopted The EU-US Privacy Shield Framework on July 12th 2016, replacing the International Safe Harbor Privacy Principles as the mechanism for allowing companies in the EU and the US to transfer personal data across the Atlantic in a manner compliant with the EU data protection requirements. As stated on PrivacyShield.gov,

“The EU-U.S. Privacy Shield Framework was designed by the U.S. Department of Commerce and European Commission to provide companies on both sides of the Atlantic with a mechanism to comply with EU data protection requirements when transferring personal data from the European Union to the United States in support of transatlantic commerce.”Privacy Shield Trust Center

Adherence to this framework underscores the importance and priority we at Microsoft put on privacy, compliance, security, and protection of customer data around the globe.  A link to Microsoft’s statement of compliance can be found here.  The Microsoft Cloud offers an array of integrated tools which can enhance an IT professional’s productivity, supports a broad spectrum of operating systems, is highly scalable, and can integrate with existing customer IT environments.  These highly competitive attributes attract a globally diverse customer population whose compliance needs and regulations we are ready and able to support.  Check out the Microsoft Trust Center to learn more about our expansive compliance capabilities including our commitment and compliance with the Privacy Shield Framework.

29 Sep 07:18

Announcing the public preview of Azure Monitor

by Ashwin Kamath

Today we are excited to announce the public preview of Azure Monitor, a new service making inbuilt monitoring available to all Azure users. This preview release builds on some of the monitoring capabilities that already exist for Azure resources. With Azure Monitor, you can consume metrics and logs within the portal and via APIs to gain more visibility into the state and performance of your resources. Azure Monitor provides you the ability to configure alert rules to get notified or to take automated actions on issues impacting your resources. Azure Monitor enables analytics, troubleshooting, and a unified dashboarding experience within the portal, in addition to enabling a wide range of product integrations via APIs and data export options. In this blog post, we will take a quick tour of Azure Monitor and discuss some of the product integrations.

Quick access to all monitoring tasks

With Azure Monitor, you can explore and manage all your common monitoring tasks from a single place in the portal. To access Azure Monitor, click on the Monitor tab in the Azure portal. You can find Activity logs, metrics, diagnostics logs, and alert rules as well as quick links to the advanced monitoring and analytics tools. Azure Monitor provides these three types of data – Activity Log, Metrics, and Diagnostics Logs.

Activity Log

Operational issues are often caused by a change in the underlying resource. Activity Log keeps track of all the operations performed on your Azure resources. You can use the Activity Log section in the portal to quickly search and identify operations that may impact your application. Another valuable feature of the portal is the ability to pin Activity log queries on your dashboard to keep a tab on the operations you are interested in. For example, you can pin a query that filters Error level events and keep track of their count in the dashboard. You can also perform instant analytics on Activity Log via Log Analytics, part of Microsoft Operations Management Suite (OMS).

Metrics

With the new Metrics tab, you can browse all the available metrics for any resource and plot them on charts. When you find a metric that you are interested in, creating an alert rule is just a single click away. Most Azure services now provide out-of-the-box, platform-level metrics at 1-minute granularity and 30-day data retention, without the need for any diagnostics setup. The list of supported resources and metrics is available here. These metrics can be accessed via the new REST API for direct integration with 3rd party monitoring tools.

Blog_image1_metrics

Diagnostics logs

Many Azure services provide diagnostics logs, which contain rich information about operations and errors that are important for auditing as well as troubleshooting purposes. In the new Diagnostic logs tab, you can manage diagnostics configuration for your resources and select your preferred method of consuming this data.

Blog_image2_diaglogs

Alerts & automated actions

Azure Monitor provides you the data to quickly troubleshoot issues. But you want to be proactive and fix issues before it impacts your customers. With Alert rules, you can get notified whenever a metric crosses a threshold. You can receive email notifications or kick off an Automation-runbook script or webhook to fix the issue automatically. You can also configure your own metrics using custom metrics and events APIs to send data to Azure Monitor pipeline and create alert rules on them. With the ability to create alerts rules on platform, custom and app-level metrics, you now have more control on your resources. You can learn more about alert rules here.

Single monitoring dashboard

Azure provides you a unique single dashboard experience to visualize all your platform telemetry, application telemetry, analytics charts and security monitoring. You can share these dashboards with others on your team or clone a dashboard to build new ones.

Extensibility

The portal is a convenient way to get started with Azure Monitor. However, if you have a lot of Azure resources and want to automate the Azure Monitor setup you may want to use a Resource Manager template, PowerShell, CLI, or REST API. Also, if you want to manage access permissions to your monitoring settings and data look at the monitoring roles.

Product integrations

You may have the need to consume Azure Monitor data but want to analyze it in in your favorite monitoring tool. This is where the product integrations come into play – you can route the Azure Monitor data to the tool of your choice in near real-time. Azure Monitor enables you to easily stream metrics and diagnostic logs to OMS Log Analytics to perform custom log search and advanced alerting on the data across resources and subscriptions. Azure Monitor metrics and logs for Web Sites and VMs can be easily routed to Visual Studio Application Insights, unlocking deep application performance management within the Azure portal.

The product integrations go beyond what you see in the portal. Our partners bring additional monitoring experiences, which you may wish to take advantage of. We are excited to share that there is a growing list of partner services available on Azure to best serve your needs. Please visit the supported product integrations list and give us feedback.

To wrap up, Azure Monitor helps you bring together the monitoring data from all your Azure resources and combine it with the monitoring tool of your choice to get a holistic view of your application. Here is a snapshot of a sample dashboard that we use to monitor one of our applications running on Azure. We are excited to launch Azure Monitor and looking forward to the dashboards that you build. Review the Azure Monitor documentation to get started and please keep the feedback coming.

Blog_image3_dashboard

29 Sep 06:03

Announcing Azure Command-Line Interface (Azure CLI) 2.0 Preview

by Jason R. Shaver

With the continued growth of Azure, we’ve seen a lot of customers using our command-line tools, particularly the Windows PowerShell tools and our Azure XPlat command-line interface (CLI).  We’ve received a lot of feedback on the great productivity provided by command-line tools, but have also heard, especially from customers working with Linux, about our XPlat CLI and its poor integration with popular Linux command-line tools as well as difficulties with installing and maintaining the Node environment (on which it was based).

Based on this feedback - along with the growth in the Azure Resource Manager-based configuration model - we improved the CLI experience and now provide a great experience for Azure. Starting today, we’re making this new CLI available. We’re calling it the Azure Command-Line Interface (Azure CLI) 2.0 Preview, now available as a beta on GitHubPlease try it out and give us your feedback!

Now, if you’re interested in how we approached this project and what it means for you, read on!

What Makes a Great, Modern CLI?

As we set out to develop our next generation of command-line tools, we quickly settled on some guiding principles:

It must be natural and easy to install: Regardless of your platform, our CLI should be installed from where you expect it, be it from “brew install azure-cli” on a MacBook, or from “apt-get install azure-cli” for BASH on Windows (coming soon).

It must be consistent with POSIX tools: Success with command-line tools is the result of the ease and predictability that comes with the implementation of well-understood standards.

It must be part of the open source ecosystem: The value of open source comes from the community and the amazing features and integrations they develop, from DevOps (Chef, Ansible) solutions to query languages (JMESPath).

It must be evergreen and current with Azure: In an age of continuous delivery, it's not enough to simply deploy a service. We must have up-to-date tools that let our customers immediately take advantage of that service. 

As we applied these principles, we realized that the scope of improvements went beyond a few breaking changes, and when combined with the feedback we’ve received about our XPlat CLI, it made sense to start from the ground up. This choice allowed us to focus exclusively on our ARM management and address another common point of feedback: the ASM/ARM “config mode” switch of our XPlat CLI.

Introducing the Azure CLI 2.0 Preview

While we are building out support for core Azure services at this time, we would like to introduce you to the next generation of our command-line tool: Azure CLI 2.0 Preview.

AzBlogAnimation4

Get Started without delay with a quick and easy install, regardless of platform

Your tools should always be easy to access and install, whether you work in operations or development. Soon, Azure CLI 2.0 Preview will be available on all popular platform package services.

Love using command-line tools such as GREP, AWK, JQ?  So do we!

Command-line tools are the most productive when they work together well. The Azure CLI 2.0 Preview provides clean and pipe-able outputs for interacting with popular command-line tools, such as grep, cut, and jq.

Feel like an Azure Ninja with consistent patterns and help at your fingertips

Getting started in the cloud can feel overwhelming, given all the tools and options available, but the Azure CLI 2.0 Preview can help you on your journey, guiding you with examples and educational content for common commands.  We've completely redesigned our help system with improved in-tool help.

In future releases, we will expand our documentation to include detailed man-pages and online documentation in popular repositories.

The less you type, the more productive you are

We offer 'tab completion' for commands and parameter names. This makes it easy to find the right command or parameter without interrupting your flow. For parameters that include known choices, as well as resource groups and resource names, you can use tab completion to look-up appropriate values.

Moving to the Azure CLI 2.0 Preview

What does this mean to existing users of the XPlat CLI? We're glad you asked! Here are a few key answers to some questions we've anticipated:

You don't need to change anything: The XPlat CLI will continue to work and scripts will continue to function. We are continuing to support and add new features to the CLI.

You can install and use both CLIs side-by-side: Credentials and some defaults, such as default subscriptions, are shared between CLIs. This allows you to try out the CLI 2.0 Preview while leaving your existing Azure XPlat CLI installation untouched. 

No, ASM/Classic mode is not supported in the Azure CLI 2.0 Preview: We've designed around ARM primitives, such as resource groups and templates. ASM/Classic mode will continue to be supported by the XPlat CLI.

Yes, we'll help you along the way: While we can't convert scripts for you, we've created an online conversion guide, including a conversion table that maps commands between the CLIs.

Please note: credential sharing with the Azure XPlat CLI requires version 0.10.5 or later.

Interested in trying us out?

We're on GitHub, but we also publish on Docker: get the latest release by running "$ docker run -it azuresdk/azure-cli-python".

If you have any feedback, please type "az feedback" into the CLI and let us know!

Attending the Microsoft Ignite conference (September 26-30, 2016, Atlanta, GA)? Come visit us at the Azure Tools booth for a demo or attend our session titled:  Build cloud-ready apps that rock with open and flexible tools for Azure.

Frequently Asked Questions

What does this mean to existing users of the XPlat CLI?

The XPlat CLI will continue to work and scripts will continue to function. Both of them support a different top level command (‘azure’ vs ‘az’), and you can use them together for specific scenarios. Credentials and some defaults (such as default subscription) are shared between CLIs allowing you to try out Azure CLI 2.0 Preview while leaving your existing CLI installation untouched. We are continuing to support and add new features the XPlat CLI.

I have scripts that call the “azure” command – will those work with the new tool?

Existing scripts built against the Azure XPlat CLI ("azure" command) will not work with the Azure CLI 2.0 Preview. While most commands have similar naming conventions, the structure of the input and output have changed. For most customers, this means changing scripts to 'workarounds' required by the Azure XPlat CLI, or relying on the co-existence of both tools.

Are you going to discontinue the Azure XPlat CLI? When will you take Azure CLI 2.0 out of preview?

The current XPlat CLI will continue to be available and supported, as it is needed for all ASM/Classic based services. The new Azure CLI 2.0 will stay in preview for now as we collect early user feedback to drive improvements up until the final release (date TBD).

Is .NET Core and PowerShell support changing on this release?

Support for .NET Core and PowerShell is not changing with this release. They will continue to be available and fully supported. We feel that PowerShell and POSIX-based CLIs serve different sets of users and provides the best choice for automation/scripting scenarios from the command-line. Both of these options are available on multiple platforms.  Both are open source now and we are investing in both of them.

25 Sep 14:05

Rejecting the Deadbeat Dad Stereotype (13 photos)

Photographer Phyllis B. Dooney was introduced to East New York, a low-income Brooklyn neighborhood, by way of a marching band. Rather than running home to a traditional nuclear family, the students she photographed would spend evenings with their aunts, with their grandmothers, or shuttling between their mom’s and dad's separate houses or apartments. Communities like this are often condemned by the media as having broken homes. But Dooney wanted to explore what parenting, specifically fatherhood, really looked like when adults and children alike are grappling with "the long-term societal and psychological effects of mass incarceration, the War on Drugs and the 1980s crack epidemic, and frequent exposure to crime and trauma."

She interviewed and took portraits of these men in their homes, often with their children, and utilized camera obscuras to project the streets into their private spaces. "The men seen here expose how the 'deadbeat Dad' label—often stapled to the American inner-city Black man and men of color in particular—is a gross and counter-productive simplification," Dooney said.

Raheem Grant, 39, poses for a portrait with his daughter, Nature Grant, on April 18, 2015. “When I was growing up I didn’t have a father. My little one, she gets scared of the dark: ‘You don’t have to be scared because Daddy is here.’ Just knowing that I am there for them makes me feel like I accomplished a lot.” (Phyllis B. Dooney)
24 Sep 06:09

Reusing Configuration Files in ASP.NET Core

by Connie Yau

Introduction

The release of ASP.NET Core 1.0 has enticed existing ASP.NET customers to migrate their projects to this new platform. While working with a customer to move their assets to ASP.NET Core, we encountered an obstacle. Our customer had a many configuration files (*.config) they used regularly. They had hundreds of configuration files that would take time to transform into a format that could be consumed by the existing configuration providers. In this post, we’ll show how to tackle this hurdle by utilizing ASP.NET Core’s configuration extensibility model. We will write our own configuration provider to reuse the existing *.config files.

The new configuration model handles configuration values as a series of name-value pairs. There are built-in configuration providers to parse (XML, JSON, INI) files. It also enables developers to create their own providers if the current providers do not suit their needs.

Creating the ConfigurationProvider

By following the documentation outlined in Writing custom providers, we created a class that inherited from ConfigurationProvider. Then, it was a matter of overriding the public override void Load() function to parse the data we wanted from the configuration files! Here’s a little snippet of that code below.

The ConfigurationProvider in Action

Consider the following Web.config:

to reuse this file, all we have to do is use our new provider like below and run dotnet run to see the code in action.

`dotnet run` console output

Our configuration provider code is on GitHub so you can check it out yourself and see how easy it is to use the ASP.NET configuration model.

References

23 Sep 17:00

TypeScript 2.0 is now available!

by Daniel Rosenwasser

Today we’re excited to announce the final release of TypeScript 2.0!

TypeScript 2.0 has been a great journey for the team, with several contributions from the community and partners along the way. It brings several new features that enhance developer productivity, advances TypeScript’s alignment with ECMAScript’s evolution, provides wide support for JavaScript libraries and tools, and augments the language service that powers a first class editing experience across tools.

To get started, you can download TypeScript 2.0 for Visual Studio 2015 (which needs Update 3), grab it with NuGet, start using TypeScript 2.0 in Visual Studio Code, or install it with npm:

npm install -g typescript@2.0

For Visual Studio “15” Preview users, TypeScript 2.0 will be included in the next Preview release.

The 2.0 Journey

A couple of years ago we set out on this journey to version 2.0. TypeScript 1.0 had successfully shown developers the potential of JavaScript when combined with static types. Compile-time error checking saved countless hours of bug hunting, and TypeScript’s editor tools gave developers a huge productivity boost as they began building larger and larger JavaScript apps. However, to be a full superset of the most popular and widespread language in the world, TypeScript still had some growing to do.

TypeScript 1.1 brought a new, completely rewritten compiler that delivered a 4x performance boost. This new compiler core allowed more flexibility, faster iteration, and provided a performance baseline for future releases. Around the same time, the TypeScript repository migrated to GitHub to encourage community engagement and provide a better platform for collaboration.

TS 1.4 & 1.5 introduced a large amount of support for ES2015/ES6 in order to align with the future of the JavaScript language. In addition, TypeScript 1.5 introduced support for modules and decorators, allowing Angular 2 to adopt TypeScript and partner with us in the evolution of TypeScript for their needs.

TypeScript 1.6-1.8 delivered substantial type system improvements, with each new release lighting up additional JavaScript patterns and providing support for major JavaScript libraries. These releases also rounded out ES* support and buffed up the compiler with more advanced out-of-the-box error checking.

Today we’re thrilled to release version 2.0 of the TypeScript language. With this release, TypeScript delivers close ECMAScript spec alignment, wide support for JavaScript libraries and tools, and a language service that powers a first class editing experience in all major editors; all of which come together to provide an even more productive and scalable JavaScript development experience.

The TypeScript Community

Since 1.0, TypeScript has grown not only as a language but also as a community. Last month alone, TypeScript had over 2 million npm downloads compared to just 275K in the same month last year. In addition, we’ve had tremendous adoption of the TypeScript nightly builds with over 2000 users participating in discussion on GitHub and 1500 users logging issues. We’ve also accepted PRs from over 150 users, ranging from bug fixes to prototypes and major features.

DefinitelyTyped is another example of our community going above and beyond. Starting out as a small repository of declaration files (files that describe the shape of your JS libraries to TypeScript), it now contains over 2,000 libraries that have been written by-hand by over 2,500 individual contributors. It is currently the largest formal description of JavaScript libraries that we know of. By building up DefinitelyTyped, the TypeScript community has not only supported the usage of TypeScript with existing JavaScript libraries but also better defined our understanding of all JavaScript code.

The TypeScript and greater JavaScript communities have played a major role in the success that TypeScript has achieved thus far, and whether you’ve contributed, tweeted, tested, filed issues, or used TypeScript in your projects, we’re grateful for your continued support!

What’s New in TypeScript 2.0?

TypeScript 2.0 brings several new features over the 1.8 release, some of which we detailed in the 2.0 Beta and Release Candidate blog posts. Below are highlights of the biggest features that are now available in TypeScript, but you can read about tagged unions, the new never type, this types for functions, glob support in tsconfig, and all the other new features on our wiki.

Simplified Declaration File (.d.ts) Acquisition

Typings and tsd have been fantastic tools for the TypeScript ecosystem. Up until now, these package managers helped users get .d.ts files from DefinitelyTyped to their projects as fast as possible. Despite these tools, one of the biggest pain points for new users has been learning how to acquire and manage declaration file dependencies from these package managers.

Getting and using declaration files in 2.0 is much easier. To get declarations for a library like lodash, all you need is npm:

npm install --save @types/lodash

The above command installs the scoped package @types/lodash which TypeScript 2.0 will automatically reference when importing lodash anywhere in your program. This means you don’t need any additional tools and your .d.ts files can travel with the rest of your dependencies in your package.json.

It’s worth noting that both Typings and tsd will continue to work for existing projects, however 2.0-compatible declaration files may not be available through these tools. As such, we strongly recommend upgrading to the new npm workflow for TypeScript 2.0 and beyond.

We’d like to thank Blake Embrey for his work on Typings and helping us bring this solution forward.

Non-nullable Types

JavaScript has two values for “emptiness” – null and undefined. If null is the billion dollar mistake, undefined only doubles our losses. These two values are a huge source of errors in the JavaScript world because users often forget to account for null or undefined being returned from APIs.

TypeScript originally started out with the idea that types were always nullable. This meant that something with the type number could also have a value of null or undefined. Unfortunately, this didn’t provide any protection from null/undefined issues.

In TypeScript 2.0, null and undefined have their own types which allows developers to explicitly express when null/undefined values are acceptable. Now, when something can be either a number or null, you can describe it with the union type number | null (which reads as “number or null”).

Because this is a breaking change, we’ve added a --strictNullChecks mode to opt into this behavior. However, going forward it will be a general best practice to turn this flag on as it will help catch a wide range of null/undefined errors. To read more about non-nullable types, check out the PR on GitHub.

Control Flow Analyzed Types

TypeScript has had control flow analysis since 1.8, but starting in 2.0 we’ve expanded it to analyze even more control flows to produce the most specific type possible at any given point. When combined with non-nullable types, TypeScript can now do much more complex checks, like definite assignment analysis.

function f(condition: boolean) {
    let result: number;
    if (condition) {
        result = computeImportantStuff();
    }

    // Whoops! 'result' might never have been initialized!
    return result;
}

We’d like to thank Ivo Gabe de Wolff for contributing the initial work and providing substantial feedback on this feature. You can read more about control flow analysis on the PR itself.

The readonly Modifier

Immutable programming in TypeScript just got easier. Starting TypeScript 2.0, you can declare properties as read-only.

class Person {
    readonly name: string;

    constructor(name: string) {
        if (name.length < 1) {
            throw new Error("Empty name!");
        }

        this.name = name;
    }
}

// Error! 'name' is read-only.
new Person("Daniel").name = "Dan";

Any get-accessor without a set-accessor is also now considered read-only.

What’s Next

TypeScript is JavaScript that scales. Starting from the same syntax and semantics that millions of JavaScript developers know today, TypeScript allows developers to use existing JavaScript code, incorporate popular JavaScript libraries, and call TypeScript code from JavaScript. TypeScript’s optional static types enable JavaScript developers to use highly-productive development tools and practices like static checking and code refactoring when developing JavaScript applications.

Going forward, we will continue to work with our partners and the community to evolve TypeScript’s type system to allow users to further express JavaScript in a statically typed fashion. In addition, we will focus on enhancing the TypeScript language service and set of tooling features so that developer tools become smarter and further boost developer productivity.

To each and every one of you who has been a part of the journey to 2.0: thank you! Your feedback and enthusiasm have brought the TypeScript language and ecosystem to where it is today. We hope you’re as excited for 2.0 and beyond as we are.

If you still haven’t used TypeScript, give it a try! We’d love to hear from you.

Happy hacking!

The TypeScript Team

20 Sep 05:42

Build cloud apps at warp speed

by James Staten

One of your best customers just tweeted about a problem with your product and you want to respond to them ASAP. It would be great if you could automatically catch this type of communications and automagically respond with either the right documentation or escalate this to your support team. But the thought of writing an application to handle this event, with all that entails - allocating VMs, assigning staff to manage either the IaaS instances or the cloud service, not to mention the cost of development, (which might include software licenses) all that seems like a lot just to recognize and handle a tweet.

What if you could catch the tweet, direct it to the right person and respond to the customer quickly with no code and no infrastructure hassles: no systems-level programming, no server configuration step, not even code required – just the workflow. Just the business process.

serverless1It’s possible in the new era of cloud computing.  With newly introduced capabilities in the Microsoft Cloud – Microsoft Flow, Microsoft PowerApps, and Azure Functions, you can design your workflow in a visual designer and just deploy it.

Now in preview, these new cloud offerings foreshadow the future of cloud applications.

Intrigued? Read on.

Take a look to the left. There’s the Microsoft Flow designer being set up to tell your Slack channel any time somebody complains about your product. 

That’s it. One click and voila: your workflow is running!

(And there’s the result in Slack!)

SlackShot

But perhaps your smart support representative contacts the unhappy customer – who it turns out has a valid issue. Your rep takes down the relevant information and starts a new workflow to have the issue looked at.

Need a server for that? No! With Microsoft Power Apps, you can visually design a form for your rep: and it can kick off a Flow.  Want that app mobile-enabled on any smartphone? No problem, as you see below. And as it shows you use the Common Data Model available in PowerApps enabling a lingua franca between applications.

serverless3

If you need more sophisticated, or custom processing, your developers can create Azure Functions on the event, say, updating an on-premises or cloud-based sentiment analysis engine with the tweet, or invoking a marketing application to offer an incentive. Again: no server. (In fact, no IDE either: your devs write their business logic code directly on the Azure portal and deploy from there.)

serverless4So why do I say Microsoft Flow, PowerApps and Functions presage a new model of cloud applications? Because increasingly, cloud apps are evolving toward a lego-block model of “serverless” computing: where you create and pay only for your business logic, where chunks of processing logic are connected together to create an entire business application.

Infrastructure? Of course it’s there (“serverless” may not be the best term), but it’s under the covers: Azure manages the servers, configures them, updates them and ensures their availability. Your concern is what it should be: your business logic.

This is potentially a seismic shift in how we think about enterprise computing.

Think about it: with PowerApps your business users can quickly create apps, and with Microsoft Flow, create business processes with a few clicks. With Flow’s bigger cousin, Azure Logic Apps, you can quickly connect to any industry-standard enterprise data source such as your local ERP system, a data warehouse, support tools and many others via open protocols and interfaces such as EDIFACT/X.12, AS2, or XML. And you can easily connect to a wide variety of social media and internet assets, like Twitter, Dropbox, Slack, Facebook and many others. With Functions you can catch events generated by Logic Apps and make decisions in real time.

And you haven’t deployed a single server. What code you’ve written is business logic only; not administration scripts or other code with no business value. Your developers have focused on growing your business. And, most importantly, you’ve created a rich, intelligent end-to-end application –by simply attaching together existing blocks of logic.

Like Lego blocks. Other cloud platforms offer serverless options, but none as deep and as varied as Microsoft’s, empowering everyone in your organization, from business analyst to developer, with tools appropriate to their skills. For enterprises, the implications could not be more profound.

Maybe it’s appropriate, on this fiftieth anniversary of Star Trek, that with tools on the Microsoft Cloud, you can run your business at warp speed using Azure.

20 Sep 05:38

Introducing IdentityServer4 for authentication and access control in ASP.NET Core

by Jeffrey T. Fritz

This is a guest post by Brock Allen and Dominick Baier. They are security consultants, speakers, and the authors of many popular open source security projects, including IdentityServer.

Modern applications need modern identity. The protocols used for implementing features like authentication, single sign-on, API access control and federation are OpenID Connect and OAuth 2.0. IdentityServer is a popular open source framework for implementing authentication, single sign-on and API access control using ASP.NET.

While IdentityServer3 has been around for quite a while, it was based on ASP.NET 4.x and Katana. For the last several months we’ve been working on porting IdentityServer to .NET Core and ASP.NET Core. We are happy to announce that this works is now almost done and IdentityServer4 RC1 was published to NuGet on September 6th.

IdentityServer4 allows building the following features into your applications:

Authentication as a Service
Centralized login logic and workflow for all of your applications (web, native, mobile, services and SPAs).

Single Sign-on / Sign-out
Single sign-on (and out) over multiple application types.

Access Control for APIs
Issue access tokens for APIs for various types of clients, e.g. server to server, web applications, SPAs and native/mobile apps.

Federation Gateway
Support for external identity providers like Azure Active Directory, Google, Facebook etc. This shields your applications from the details of how to connect to these external providers.

Focus on Customization
The most important part – many aspects of IdentityServer can be customized to fit your needs. Since IdentityServer is a framework and not a boxed product or a SaaS, you can write code to adapt the system the way it makes sense for your scenarios.

You can learn more about IdentityServer4 by heading to https://identityserver.io. Also you can visit the github repo, the documentation, and see our support options.

There are also quick-start tutorials and samples that walk you through common scenarios for protecting APIs and implementing token-based authentication.

Give it a try. We appreciate feedback, suggestions, and bug reports on our issue tracker.

15 Sep 18:20

Azure DocumentDB powers the modern marketing intelligence platform

by Aravind Ramachandran

Affinio is an advanced marketing intelligence platform that enables brands to understand their users in a deeper and richer level. Affinio’s learning engine extracts marketing insights for its clients from mining billions of points of social media data. In order to store and process billions of social network connections without the overhead of database management, partitioning, and indexing, the Affinio engineering team chose Azure DocumentDB.

You can learn more about Affinio’s journey in this newly published case study.  In this blog post, we provide an excerpt of the case study and discuss some effective patterns for storing and processing social network data.


image

Why are NoSQL databases a good fit for social data?

Affinio’s marketing platform extracts data from social network platforms like Twitter and other large social networks in order to feed into its learning engine and learn insights about users and their interests. The biggest dataset consisted of approximately one billion social media profiles, growing at 10 million per month. Affinio also needs to store and process a number of other feeds including Twitter tweets (status messages), geo-location data, and machine learning results of which topics are likely to interest which users.

A NoSQL database is a natural choice for these data feeds for a number of reasons:

  • The APIs from popular social networks produced data in JSON format.
  • The data volume is in the TBs, and needs to be refreshed frequently (with both the volume and frequency expected to increase rapidly over time).
  • Data from multiple social media producers is processed downstream, and each social media channel has its own schema that evolves independently.
  • And crucially, a small development team needs to be able to iterate rapidly on new features, which means that the database must be easy to setup, manage, and scale.

Why does Affinio use DocumentDB over AWS DynamoDB and Elasticsearch

The Affinio engineering team initially built their storage solution on top of Elasticsearch on AWS EC2 virtual machines. While Elasticsearch addressed their need for scalable JSON storage, they realized that setting up and managing their own Elasticsearch servers took away precious time from their development team. They then evaluated Amazon’s DynamoDB service which was fully-managed, but it did not have the query capabilities that Affinio needed.

Affinio then tried Microsoft Azure DocumentDB, Microsoft’s planet-scale NoSQL database service. DocumentDB is a fully-managed NoSQL database with automatic indexing of JSON documents, elastic scaling of throughput and storage, and rich query capabilities which meets all their requirements for functionality and performance. As a result, Affinio decided to migrate its entire stack off AWS and onto Microsoft Azure.

“Before moving to DocumentDB, my developers would need to come to me to confirm that our Elasticsearch deployment would support their data or if I would need to scale things to handle it. DocumentDB removed me as a bottleneck, which has been great for me and them.”

-Stephen Hankinson, CTO, Affinio

Modeling Twitter Data in DocumentDB – An Example

As an example, we take a look at how Affinio stored data from Twitter status messages in DocumentDB. For example, here’s a sample JSON status message (truncated for visibility). 

{  
   "created_at":"Fri Sep 02 06:43:15 +0000 2016",
   "id":771599352141721600,
   "id_str":"771599352141721600",
   "text":"RT @DocumentDB: Fresh SDK! #DocumentDB #dotnet SDK v1.9.4 just released!",
   "user":{  
      "id":2557284469,
      "id_str":"2557284469",
      "name":"Azure DocumentDB",
      "screen_name":"DocumentDB",
      "location":"",
      "description":"A blazing fast, planet scale NoSQL service delivered by Microsoft.",
      "url":"http://t.co/30Tvk3gdN0"
   }
}

Storing this data in DocumentDB is straightforward. As a schema-less NoSQL database, DocumentDB consumes JSON data directly from Twitter APIs without requiring schema or index definitions. As a developer, the primary considerations for storing this data in DocumentDB are the choice of partition key, and addressing any unique query patterns (in this case, searching with text messages). We'll look at how Affinio addresses these two.

Picking a good partition key:  DocumentDB partitioned collections require that you specify a property within your JSON documents as the partition key. Using this partition key value, DocumentDB automatically distributes data and requests across multiple physical servers. A good partition key has a number of distinct values and allows DocumentDB to distribute data and requests across a number of partitions. Let’s take a look at a few candidates for a good partition key for social data like Twitter status messages.

  • "created_at" – has a number of distinct values and is useful for accessing data for a certain time range. However, since new status messages are inserted based on the created time, this could potentially result in hot spots for certain time value like the current time
  • "id" – this property corresponds to the ID for a Twitter status message. It is a good candidate for a partition key, because there are a large number of unique users, and they can be distributed somewhat evenly across any number of partitions/servers
  • "user.id" – this property corresponds the ID for a Twitter user. This was ultimately the best choice for a partition key because not only does it allow writes to be distributed, it also allows reads for a certain user’s status messages to be efficiently served via queries from a single partition

With "user.id" as the partition key, Affinio created a single DocumentDB partitioned collection provisioned with 200,000 request units per second of throughput (both for ingestion and for querying via their learning engine).

Searching within the text message: Affinio needs to be able to search for words within status messages, and didn’t need to perform advanced text analysis like ranking. Affinio runs a Lucene tokenizer on the relevant fields when it needs to search for terms, and it stores the terms as an array inside a JSON document in DocumentDB. For example, "text" can be tokenized as a "text_terms" array containing the tokens/words in the status message. Here’s an example of what this would look like:

{  
   "text":"RT @DocumentDB: Fresh SDK! #DocumentDB #dotnet SDK v1.9.4 just released!",
   "text_terms":[  
      "rt",
      "documentdb",
      "dotnet",
      "sdk",
      "v1.9.4",
      "just",
      "released"
   ]
}

Since DocumentDB automatically indexes all paths within JSON including arrays and nested properties, it is now possible to query for status messages with certain words in them like “documentdb” or “dotnet” and have these served from the index. For example, this is expressed in SQL as:

SELECT * FROM status_messages s WHERE ARRAY_CONTAINS(s.text_terms, "documentdb")

Next Steps

In this blog post, we looked at why Affinio chose Azure DocumentDB for their market intelligence platform, and some effective patterns for storing large volumes of social data in DocumentDB.

  • Read the Affinio case study to learn more about how Affinio harnesses DocumentDB to process terabytes of social network data, and why they chose DocumentDB over Amazon DynamoDB and Elasticsearch.
  • Learn more about Affinio from their website.
  • If you’re looking for a NoSQL database to handle the demands of modern marketing, ad-technology and real-time analytics applications, try out DocumentDB using your free trial, or schedule a 1:1 chat with the DocumentDB engineering team.  
  • Stay up-to-date on the latest DocumentDB news and features by following us on Twitter @DocumentDB.
15 Sep 06:06

Putting (my VB6) Windows Apps in the Windows 10 Store - Project Centennial

by Scott Hanselman

Evernote in the Windows 10 Store with Project CentennialI noticed today that Evernote was in the Windows Store. I went to the store, installed Evernote, and it ran. No nextnextnextfinish-style install, it just worked and it worked nicely. It's a Win32 app and it appears to use NodeWebKit for part of it's UI. But it's a Windows app, just like VB6 apps and just like .NET apps and just like UWP (Universal Windows Platform) apps, so I found this to be pretty cool. Now that the Evernote app is a store app it can use Windows 10 specific features like Live Tiles and Notifications and it'll be always up to date.

The Windows Store is starting (slowly) to roll out and include existing desktop apps and games by building and packaging those apps using the Universal Windows Platform. This was called "Project Centennial" when they announced it at the BUILD conference. It lets you basically put any Windows App in the Windows Store, which is cool. Apps that live there are safe, won't mess up your machine, and are quickly installed and uninstalled.

Here's some of the details about what's happening with your app behind the scenes, from this article. This is one of the main benefits of the Windows Store. Apps from the Store can't mess up your system on a global scale.

[The app] runs in a special environment where any accesses that the app makes to the file system and to the Registry are redirected. The file named Registry.dat is used for Registry redirection. It's actually a Registry hive, so you can view it in the Windows Registry Editor (Regedit). When it comes to the file system, the only thing redirected is the AppData folder, and it is redirected to the same location that app data is stored for all UWP apps. This location is known as the local app data store, and you access it by using the ApplicationData.LocalFolderproperty. This way, your code is already ported to read and write app data in the correct place without you doing anything. And you can also write there directly. One benefit of file system redirection is a cleaner uninstall experience.

The "DesktopAppConverter" is now packaged in the Windows Store as well, even though it runs at the command prompt! If your Windows Desktop app has a "silent installer" then you can run this DesktopAppConvertor on your installer to make an APPX package that you can then theoretically upload to the Store.

NOTE: This "Centennial" technology is in Windows 10 AU, so if you haven't auto-updated yet, you can get AU now.

They are also working with install vendors like InstallShield and WiX to so their installation creation apps will create Windows Store apps with the Desktop Bridge automatically. This way your existing MSIs and stuff can turn into UWP packages and live in the store.

DesktopAppConverter

It looks like there are a few ways to make your existing Windows apps into Windows 10 Store-ready apps. You can use this DesktopAppConverter and run it in your existing  silent installer. Once you've made your app a Store App, you can "light up" your app with Live Tiles and Notifications and  other features with code. Check out the https://github.com/Microsoft/DesktopBridgeToUWP-Samples GitHub Repro with samples that show you how to add Tiles or Background tasks. You can use [Conditional("DesktopUWP")] compilation if you have both a Windows Store and Windows desktop version of your app with a traditional installer.

If your app is a simple Xcopy-deploy app that has no installer, it's even easier. To prove this I installed Visual Basic 6 on my Windows 10 machine. OH YES I DID.

NOTE: I am using VB6 as a fun but also very cool example. VB6 is long out of support but apps created with it still run great on Windows because they are win32 apps. For me, this means that if I had a VB6 app that I wanted to move into the Store and widen my audience, I could.

I made a quick little Project1.exe in VB6 that runs on its own.

Visual Basic 6 on Windows 10

I made an AppxManifest.xml with these contents following this HelloWorld sample.

<?xml version="1.0" encoding="utf-8"?>

<Package
xmlns="http://schemas.microsoft.com/appx/manifest/foundation/windows10"
xmlns:uap="http://schemas.microsoft.com/appx/manifest/uap/windows10"
xmlns:rescap="http://schemas.microsoft.com/appx/manifest/foundation/windows10/restrictedcapabilities">
<Identity Name="HanselmanVB6"
ProcessorArchitecture="x64"
Publisher="CN=HanselmanVB6"
Version="1.0.0.0" />
<Properties>
<DisplayName>Scott Hanselman uses VB6</DisplayName>
<PublisherDisplayName>Reserved</PublisherDisplayName>
<Description>I wish there was a description entered</Description>
<Logo>Assets\Logo.png</Logo>
</Properties>
<Resources>
<Resource Language="en-us" />
</Resources>
<Dependencies>
<TargetDeviceFamily Name="Windows.Desktop" MinVersion="10.0.14316.0" MaxVersionTested="10.0.14316.0" />
</Dependencies>
<Capabilities>
<rescap:Capability Name="runFullTrust"/>
</Capabilities>
<Applications>
<Application Id="HanselmanVB6" Executable="Project1.exe" EntryPoint="Windows.FullTrustApplication">
<uap:VisualElements
BackgroundColor="#464646"
DisplayName="Hey it's VB6"
Square150x150Logo="Assets\SampleAppx.150x150.png"
Square44x44Logo="Assets\SampleAppx.44x44.png"
Description="Hey it's VB6" />
</Application>
</Applications>
</Package>

In the folder is my Project1.exe long with an Assets folder with my logo and a few PNGs.

Now I can run the DesktopAppConverter if I have a quiet installer, but since I've just got a small xcopyable app, I'll run this to test on my local machine.

Add-AppxPackage -register .\AppxManifest.xml

And now my little VB6 app is installed locally and in my Start Menu.

VB6 as a Windows App

When I am ready to get my app ready for production and submission to the Store I'll follow the guidance and docs here and use Visual Studio, or just do the work manually at the command line with the MakeAppx and SignTool utilities.

"C:\Program Files (x86)\Windows Kits\10\bin\x86\makeappx" pack /d . /p Project1.appx

Later I'll buy a code signing cert, but for now I'll make a fake local one, trust it, and make a pfx cert.

"C:\Program Files (x86)\Windows Kits\10\bin\x86\makecert" /n "CN=HanselmanVB6" /r /pe /h /0 /eku "1.3.6.1.5.5.7.3.3,1.3.6.1.4.1.311.10.3.13" /e 12/31/2016 /sv MyLocalKey1.pvk MyLocalKey1.cer

"C:\Program Files (x86)\Windows Kits\10\bin\x86\pvk2pfx" -po -pvk MyLocalKey1.pvk -spc MyLocalKey1.cer -pfx MyLocalKey1.pfx
certutil -user -addstore Root MyLocalKey1.cer

Now I'll sign my Appx.

NOTE: Make sure the Identity in the AppxManifest matches the code signing cert's CN=Identity. That's the FULL string from the cert. Otherwise you'll see weird stuff in your Event Viewer in Microsoft|Windows\AppxPackagingOM|Microsoft-Windows-AppxPackaging/Operational like "error 0x8007000B: The app manifest publisher name (CN=HanselmanVB6, O=Hanselman, L=Portland, S=OR, C=USA) must match the subject name of the signing certificate exactly (CN=HanselmanVB6)."

I'll use a command line like this. Remember that Visual Studio can hide a lot of this, but since I'm doing it manually it's good to understand the details.

"C:\Program Files (x86)\Windows Kits\10\bin\x86\signtool.exe" sign /debug /fd SHA256 /a /f MyLocalKey1.pfx Project1.appx


The following certificates were considered:
Issued to: HanselmanVB6
Issued by: HanselmanVB6
Expires: Sat Dec 31 00:00:00 2016
SHA1 hash: 19F384D1D0BD33F107B2D7344C4CA40F2A557749

After EKU filter, 1 certs were left.
After expiry filter, 1 certs were left.
After Private Key filter, 1 certs were left.
The following certificate was selected:
Issued to: HanselmanVB6
Issued by: HanselmanVB6
Expires: Sat Dec 31 00:00:00 2016
SHA1 hash: 19F384D1D0BD33F107B2D7344C4CA40F2A557749


The following additional certificates will be attached:
Done Adding Additional Store
Successfully signed: Project1.appx

Number of files successfully Signed: 1
Number of warnings: 0
Number of errors: 0

Now I've got a (local developer) signed, packaged Appx that has a VB6 app inside it. If I double click I'll get the Appx installer, but what I really want to do is sign it with a real cert and put it in the Windows Store!

VB6 in the Windows Store

Here's the app running. Pretty amazing UX, I know.

VB6 app as a Windows Store App

It's early days, IMHO, but I'm looking forward to a time when I can go to the Windows Store and get my favorite apps like Windows Open Live Writer, Office, Slack, and more! Now's the time for you to start exploring these tools.

Related Links


Sponsor: Big thanks to Redgate for sponsoring the feed this week. Discover the world’s most trusted SQL Server comparison tool. Enjoy a free trial of SQL Compare, the industry standard for comparing and deploying SQL Server schemas.


© 2016 Scott Hanselman. All rights reserved.
     
15 Sep 06:00

Azure Event Hubs Archive is now in public preview, providing efficient micro-batch processing

by Shubha Vijayasarathy

Azure Event Hubs is a real-time, highly scalable, and fully managed data-stream ingestion service that can ingress millions of events per second and stream them through multiple applications. This lets you process and analyze massive amounts of data produced by your connected devices and applications.

Included in the many key scenarios for Event Hubs are long-term data archival and downstream micro-batch processing. Customers typically use compute or other homegrown solutions for archival or to prepare for batch processing tasks. These custom solutions involve significant overhead with regards to creating, scheduling and managing batch jobs. Why not have something out-of-the-box that solves this problem? Well, look no further – there’s now a great new feature called Event Hubs Archive!

Event Hubs Archive addresses these important requirements by archiving the data directly from Event Hubs to Azure storage as blobs. ‘Archive’ will manage all the compute and downstream processing required to pull data into Azure blob storage. This reduces your total cost of ownership, setup overhead, and management of custom jobs to do the same task, and lets you focus on your apps!

Benefits of Event Hub Archive

  1. Simple setup

    Extremely straightforward to configure your Event Hubs to take advantage of this feature.

  2. Reduced total cost of ownership

    Since Event Hubs handles all the management, there is minimal overhead involved in setting up your custom job processing mechanisms and tracking them.

  3. Cohesive with your Azure Storage

    By just choosing your Azure Storage account, Archive pulls the data from Event Hubs to your containers.

  4. Near-Real time batch analytics

    Archive data is available within minutes of ingress into Event Hubs. This enables most common scenarios of near-real time analytics without having to construct separate data pipelines.

A peek inside the Event Hubs Archive

Event Hubs Archive can be enabled in one of the following ways:

  1. With just a click on the new Azure portal on an Event Hub in your namespace

  2. Azure Resource Manager templates

Once the Archive is enabled for the Event Hub, you need to define the time and size windows for archiving.

The time window allows you to set the frequency with which the archival to Azure Blobs will happen. The frequency range is configurable from 60 – 900 seconds (1 - 15 minutes), both inclusive, with a granularity of 1 second. The default setting is 300 seconds (5 minutes).

The size window defines the amount of data built up in your Event Hub before an archival operation. The size range is configurable between 10MB – 500MB (10485760 – 524288000 bytes), both inclusive, at byte level granularity.

The archive operation will kick in when either the time or size window is exceeded. After time and size settings are set, the next step is configuring the destination which will be the storage account of your choosing.

That’s it! You’ll soon see blobs being created in the specified Azure Storage account’s container.

The blobs are created with the following naming convention:

<Namespace>/<EventHub>/<Partition>/<YYYY>/<MM>/<DD>/<HH>/<mm>/<ss>

For example: Myehns/myhub/0/2016/07/20/09/02/15 and are in standard Avro format.

If there is no event data in the specified time and size window, empty blobs will be created by Archive.

Pricing

Archive will be an option when creating an Event Hub in a namespace and will be limited to one per Event Hub. This will be added to the Throughput Unit charge and thus will be based on the number of throughput units selected for the Event Hub.

Opting Archive will involve 100% egress of ingested data and the cost of storage is not included. This implies that cost is primarily for compute (hey, we are handling all this for you!).

Check out the price details on Azure Event Hubs pricing.

Let us know what you think about newer sinks an newer serialization formats.

Start enjoying this feature, available today.

If you have any questions or suggestions, leave us a comment below.


09 Sep 04:41

What Is Aleppo? This Is Aleppo (24 photos)

Earlier today, the Libertarian presidential nominee Gary Johnson was asked by journalist Mike Barnicle “What would you do, if you were elected, about Aleppo?” Johnson  replied with his own question: "What is Aleppo?" Aleppo is Syria's largest city, an urban battlefield in the brutal Syrian Civil War since 2012. Reporters and photojournalists have been covering the conflict for years, documenting the belligerents as well as the tragic circumstances of those civilians caught up in the multifaceted war. When Barnicle asked “What would you do about Aleppo?” he was asking what would the candidate do to stop the horrors made visible to us by the photojournalists below. See also, our own Uri Friedman’s answer to “What is Aleppo?” (Thanks to Corinne Perkins for the title and idea.) Editor’s note: Many of the following images are graphic in nature.

A Syrian man cries as he holds the lifeless body of his son, killed by the Syrian Army, near Dar El Shifa hospital in Aleppo, Syria, on October 3, 2013. (Manu Brabo / AP)
08 Sep 19:29

Improved Automatic Tuning boosts your Azure SQL Database performance

by Vladimir Ivanovic

Azure SQL Database is the world’s first intelligent database service that learns and adapts with your application, enabling you to dynamically maximize performance with very little effort on your part.

Today we released an exciting update to Azure SQL Database Advisor that greatly reduces the time (from a week to a day) required to produce and implement index tuning recommendations

This brings us one step closer to our vision where developers no longer have to worry about physical database schema management, as the system will self-optimize to provide predictable and optimal performance for every database application.

About SQL Database Advisor

Database Advisor provides custom performance tuning recommendations for your databases using machine learning intelligence. It saves you time, automatically tuning your database performance, so you can focus your energy on building great applications.

  • Database Advisor continuously monitors your database usage and provides recommendations to improve performance (create/drop indexes, and more)
  • You can choose to have the recommendations be automatically applied (via Automatic Tuning option)
  • Recommendations applied or rolled back manually (via Azure Portal or REST API)

Improved Automatic Tuning boosts your Azure SQL Database performance

What’s new in this release?

The following table summarizes the improvements in this release:
Area Before Now
Time to produce new index recommendations
(for a database with daily usage)
~7 days ~18 hours
Delay before T-SQL statement is executed
(CREATE INDEX or DROP INDEX)
~12 hours delay Immediately
(starts within minutes)
Time to react to any regressions and revert “bad” tuning actions ~12 hours <=1 hour
Delay between implementing consecutive index recommendations ~12 hours delay between indexes Immediately
(starts within minutes)
TOTAL TIME TO IMPLEMENT
(for a DB with 3 active recommendations)
~9 DAYS ~1 DAY

Automated Index Tuning is now even more powerful

All these improvements together make automated index tuning an even more attractive choice for managing the performance of your Azure SQL databases. With the new recommendation models and greatly improved underlying automation, Database Advisor will tirelessly work 24/7 to make your database applications run blazing fast at all times.

If you’re not using automated tuning yet, we strongly encourage you to give it a try – you’ll be pleasantly surprised with the results, as many of our other customers already were.

Summary

You can now run your production DB workload in SQL DB for a day, and Database Advisor will help you improve your database performance by providing custom tuning recommendations. You can also opt-in to automated tuning mode where the tuning recommendations will be auto-applied to your database for a complete hands-off tuning experience.

Now you can dedicate your energy and attention on building great database applications, while the SQL DB service keeps your databases running and performing great for you.

Next steps

If you’re new to Azure SQL Database, sign up now for a free trial and discover how built-in intelligence of Azure SQL DB make it easier and faster than ever to build amazing database applications.

If you’re already using Azure SQL Database, try SQL Database Advisor today and share your feedback with us using the built-in feedback mechanism on the Azure Portal, or in the comments section of this post. We’d love to hear back from you!

Improved Automatic Tuning boosts your Azure SQL Database performance
For more detailed information, check out the SQL Database Advisor online documentation.

08 Sep 11:50

How to deal with Technology Burnout - Maybe it's life's cycles

by Scott Hanselman
Burnout photo by Michael Himbeault used under cc

Sarah Mei had a great series of tweets last week. She's a Founder of RailsBridge, Director of Ruby Central, and the Chief Consultant of DevMynd so she's experienced with work both "on the job" and "on the side." Like me, she organizes OSS projects, conferences, but she also has a life, as do I.

If you're reading this blog, it's likely that you have gone to a User Group or Conference, or in some way did some "on the side" tech activity. It could be that you have a blog, or you tweet, or you do videos, or you volunteer at a school.

With Sarah's permission, I want to take a moment and call out some of these tweets and share my thoughts about them. I think this is an important conversation to have.

This is vital. Life is cyclical. You aren't required or expected to be ON 130 hours a week your entire working life. It's unreasonable to expect that of yourself. Many of you have emailed me about this in the past. "How do you do _____, Scott?" How do you deal with balance, hang with your kids, do your work, do videos, etc.

I don't.

Sometimes I just chill. Sometimes I play video games. Last week I was in bed before 10pm two nights. I totally didn't answer email that night either. Balls were dropped and the world kept spinning.

Sometimes you need to be told it's OK to stop, Dear Reader. Slow down, breathe. Take a knee. Hell, take a day.

Here's where it gets really real. We hear a lot about "burnout." Are you REALLY burnt? Maybe you just need to chill. Maybe going to three User Groups a month (or a week!) is too much? Maybe you're just not that into the tech today/this week/this month. Sometimes I'm so amped on 3D printing and sometimes I'm just...not.

Am I burned out? Nah. Just taking in a break.

Whatever you're working on, likely it will be there later. Will you?

Is your software saving babies? If so, kudos, and please, keep doing whatever you're doing! If not, remember that. Breathe and remember that while the tech is important, so are you and those around you. Take care of yourself and those around you. You all work hard, but are you paying yourself first?

You're no good to us dead.

I realize that not everyone with children in their lives can get/afford a sitter but I do also want to point out that if you can, REST. RESET. My wife and I have Date Night. Not once a month, not occasionally. Every week. As we tell our kids: We were here before you and we'll be here after you leave, so this is our time to talk to each other. See ya!

Thank you, Sarah, for sharing this important reminder with us. Cycles happen.

Related Reading

* Burnout photo by Michael Himbeault used under CC


© 2016 Scott Hanselman. All rights reserved.
     
03 Sep 06:33

Bizarre ant colony discovered in an abandoned Polish nuclear weapons bunker

by Annalee Newitz
  • Taken in 2014, this picture shows the partly blocked entrance to the Soviet-era bunker system in Poland. In the background, pine-spruce forest overgrowing the hillock was built to camouflage the structure.
    Wojciech Stephan

For the past several years, a group of researchers has been observing a seemingly impossible wood ant colony living in an abandoned nuclear weapons bunker in Templewo, Poland, near the German border. Completely isolated from the outside world, these members of the species Formica polyctena have created an ant society unlike anything we've seen before.

The Soviets built the bunker during the Cold War to store nuclear weapons, sinking it below ground and planting trees on top as camouflage. Eventually a massive colony of wood ants took up residence in the soil over the bunker. There was just one problem: the ants built their nest directly over a vertical ventilation pipe. When the metal covering on the pipe finally rusted away, it left a dangerous, open hole. Every year when the nest expands, thousands of worker ants fall down the pipe and cannot climb back out. The survivors have nevertheless carried on for years underground, building a nest from soil and maintaining it in typical wood ant fashion. Except, of course, that this situation is far from normal.

Polish Academy of Sciences zoologist Wojciech Czechowski and his colleagues discovered the nest after a group of other zoologists found that bats were living in the bunker. Though it was technically not legal to go inside, the bat researchers figured out a way to squeeze into the small, confined space and observe the animals inside. Czechowski's team followed suit when they heard that the place was swarming with ants. What they found, over two seasons of observation, was a group of almost a million worker ants whose lives are so strange that they hesitate to call them a "colony" in the observations they just published in The Journal of Hymenoptera. Because conditions in the bunker are so harsh, constantly cold, and mostly barren, the ants seem to live in a state of near-starvation. They produce no queens, no males, and no offspring. The massive group tending the nest is entirely composed of non-reproductive female workers, supplemented every year by a new rain of unfortunate ants falling down the ventilation shaft.

Read 6 remaining paragraphs | Comments

02 Sep 05:23

Next Windows 10 looks like it’ll get a night mode that cuts down the blue

by Peter Bright

With suggestions that bluish lights disrupt our sleep, software that shifts screen white balance towards the red end of the spectrum in the evening—cutting back that potentially sleep-disrupting light—has gained quite a following. f.lux is the big name here with many people enjoying its gradual color temperature shifts.

Apple recently built a color shifting feature into iOS, under the name Night Shift, and there are now signs that Microsoft is doing the same in Windows 10. Twitter user tfwboredom has been poking around the latest Windows insider build and found hints that the operating system will soon have a "blue light reduction" mode. Similarly to f.lux, this will automatically reduce the color temperature in the evenings as the sun sets and increase it in the mornings when the sun rises.

Signs are that the feature will have a quick access button in the Action Center when it is eventually enabled.

Read 1 remaining paragraphs | Comments

31 Aug 06:55

Announcing TypeScript 2.0 RC

by Daniel Rosenwasser

TypeScript 2.0 is almost out, and today we’re happy to show just how close we are with our release candidate! If you haven’t used TypeScript yet, check out the intro tutorial on our website to get started.

To start using the RC now, you can download TypeScript 2.0 RC for Visual Studio 2015 (which requires VS Update 3), grab it through NuGet, or use npm:

npm install -g typescript@rc

Visual Studio Code users can follow the steps here to use the RC.

This RC gives an idea of what the full version of 2.0 will look like, and we’re looking for broader feedback to stabilize and make 2.0 a solid release. Overall, the RC should be stable enough for general use, and we don’t expect any major new features to be added past this point.

On the other hand, lots of stuff has been added since 2.0 beta was released, so here’s a few features that you might not have heard about since then.

Tagged Unions

Tagged unions are an exciting new feature that brings functionality from languages like F#, Swift, Rust, and others to JavaScript, while embracing the way that people write JavaScript today. This feature is also called discriminated unions, disjoint unions, or algebraic data types. But what’s in the feature is much more interesting than what’s in the name.

Let’s say you have two types: Circle and Square. You then have a union type of the two named Shape.

interface Circle {
    kind: "circle";
    radius: number;
}

interface Square {
    kind: "square";
    sideLength: number;
}

type Shape = Circle | Square;

Notice that both Circle and Square have a field named kind which has a string literal type. That means the kind field on a Circle will always contain the string "circle". Each type has a common field, but has been tagged with a unique value.

In TypeScript 1.8, writing a function to get the area of a Shape required a type assertions for each type in Shape.

function getArea(shape: Shape) {
    switch (shape.kind) {
        case "circle":
            // Convert from 'Shape' to 'Circle'
            let c = shape as Circle;
            return Math.PI * c.radius ** 2;

        case "square":
            // Convert from 'Shape' to 'Square'
            let sq = shape as Square;
            return sq.sideLength ** 2;
    }
}

Notice we made up intermediate variables for shape just to keep this a little cleaner.

In 2.0, that isn’t necessary. The language understands how to discriminate based on the kind field, so you can cut down on the boilerplate.

function getArea(shape: Shape) {
    switch (shape.kind) {
        case "circle":
            // 'shape' is a 'Circle' here.
            return Math.PI * shape.radius ** 2;

        case "square":
            // 'shape' is a 'Square' here.
            return shape.sideLength ** 2;
    }
}

This is totally valid, and TypeScript can use control flow analysis to figure out the type at each branch. In fact, you can use --noImplicitReturns and the upcoming --strictNullChecks feature to make sure these checks are exhaustive.

Tagged unions make it way easier to get type safety using JavaScript patterns you’d write today. For example, libraries like Redux will often use this pattern when processing actions.

More Literal Types

String literal types are a feature we showed off back in 1.8, and were tremendously useful. Like you saw above, we were able to leverage them to bring you tagged unions.

We wanted to give some more love to types other than just string. In 2.0, each unique boolean, number, and enum member will have its own type!

type Digit = 0 | 1 | 2 | 3 | 4 | 5 | 6 | 7 | 8 | 9;
let nums: Digit[] = [1, 2, 4, 8];

// Error! '16' isn't a 'Digit'!
nums.push(16);

Using tagged unions, we can express some things a little more naturally.

interface Success<T> {
    success: true;
    value: T;
}

interface Failure {
    success: false;
    reason: string;
}

type Result<T> = Success<T> | Failure;

The Result<T> type here represents something that can potentially fail. If it succeeds, it has a value, and if it fails, it contains a reason for failure. The value field can only be used when success is true.

declare function tryGetNumUsers(): Result<number>;

let result = tryGetNumUsers();
if (result.success === true) {
    // 'result' has type 'Success<number>'
    console.log(`Server reported ${result.value} users`);
}
else {
    // 'result' has type 'Failure'
    console.error("Error fetching number of users!", result.reason);
}

You may’ve noticed that enum members get their own type too!

enum ActionType { Append, Erase }

interface AppendAction { 
    type: ActionType.Append;
    text: string;
}

interface EraseAction {
    type: ActionType.Erase;
    numChars: number;
}

function updateText(currentText: string, action: AppendAction | EraseAction) {
    if (action.type === ActionType.Append) {
        // 'action' has type 'AppendAction'
        return currentText + action.text;
    }
    else {
        // 'action' has type 'EraseAction'
        return currentText.slice(0, -action.numChars);
    }
}

Globs, Includes, and Excludes

When we first introduced the tsconfig.json file, you told us that manually listing files was a pain. TypeScript 1.6 introduced the exclude field to alleviate this; however, the consensus has been that this was just not enough. It’s a pain to write out every single file path, and you can run into issues when you forget to exclude new files.

TypeScript 2.0 finally adds support for globs. Globs allow us to write out wildcards for paths, making them as granular as you need without being tedious to write.

You can use them in the new include field as well as the existing exclude field. As an example, let’s take a look at this tsconfig.json that compiles all our code except for our tests:

{
    "include": [
        "./src/**/*.ts"
    ],
    "exclude": [
        "./src/tests/**"
    ]
}

TypeScript’s globs support the following wildcards:

  • * for 0 or more non-separator characters (such as / or \).
  • ? to match exactly one non-separator character.
  • **/ for any number of subdirectories

Next Steps

Like we mentioned, TypeScript 2.0 is not far off, but using the RC along with 2.0’s new features will play a huge part in that release for the broader community.

Feel free to reach out to us about any issues through GitHub. We would love to hear any and all feedback as you try things out. Enjoy!

30 Aug 18:33

Visual Studio's most useful (and underused) tips

by Scott Hanselman

There was a cool comment in my last blog post (one of many, as always, the comments > the content).

Btw, "until I realized that the Solution Explorer tree nodes are searchable." This one is a saver!

The commenter, Sam, noticed a throwaway bit in the middle of the post where I noted that the Solution Explorer was text-searchable. There's a lot of little tricks like this in Visual Studio that even the most seasoned developers sometimes miss. This phenomenon isn't limited to Visual Studio, of course. It's all software! Folks find non-obvious UX all the time in Windows, OSX, iPhone, everyday. If UX were easy then everything would be intuitive but it's not so it ain't. ;)

There's an old joke about Microsoft Office, which is known for having a zillion features.

"Most of the exciting new Office features you discover have always been in Office." - Me and Everyone Else

Here's some exceedingly useful stuff in Visual Studio (It's free to download and use, BTW) that folks often miss.

Search Solution Explorer with Ctrl+;

You can just click the text box above the Solution Explorer to search all the the nodes - visible or hidden. Or, press "Ctrl + ;"

Ctrl ; will filter the Solution Explorer

Even stuff that's DEEP in the beast. The resulting view is filtered and will remain that way until you clear the search.

Ctrl ; will filter the Solution Explorer and open subnodes

Quick Launch - Ctrl+Q

If there is one feature that no one uses and everyone should use, it's Quick Launch. Someone told me the internal telemetry numbers show that usage of Quick Launch in the single digits or lower.

Do you know that you (we) are constantly digging around in the menus for stuff? Most of you use the mouse and go Tools...Options...and stare.

Just press Ctrl+Q and type. Need to change the Font Size?

Find the Fonts Dialog quickly

Want to Compare Files? Did you know VS had that?

Compare Files

What about finding a NuGet package faster than using the NuGet Dialog?

image

Promise me you'll Ctrl+Q for a few days and see if you can make it a habit. You'll thank yourself.

Map Mode for the Scroll Bar

I love showing people features that totally surprise them. Like "I had NO IDEA that was there" type features. Try "map mode" in the Quick Launch and turn it on...then check out your scroll bar in a large file.

Map Mode for the Scroll Bar

Your scrollbar will turn into a thumbnail that you can hover over and use to navigate your file!

Map Mode turns your Scrollbar into a Scroll Thumbnail

Tab Management

Most folks manage their tabs like this.

  • Open Tab
  • Repeat
  • Declare Tab Bankruptcy
  • Close All Tabs
  • Goto 0

But you DO have both "pinned tabs" and "preview tabs" available.

Pin things you want to keep open

If you pin useful tabs, just like in your browser those tabs will stay to the left and stay open. You can not just "close all" and "close all but this" on a right click, but you can also "close all but pinned."

image

Additionally, you don't always have to double-click in the Solution Explorer to see what's in a file. That just creates a new tab that you're likely going to close anyway. Try just single clicking, or better yet, use your keyboard. You'll get a preview tab on the far right side. You'll never have more than one and preview tabs won't litter your tab list...unless you promote them.

Navigate To - Ctrl+, (Control+Comma)

Absolutely high on the list of useful things is Ctrl+, for NavigateTo. Why click around with your mouse to open a file or find a specific member or function? Press Ctrl+, and start typing. It searches files, members, type...everything. And you can navigate around with your keyboard before you hit enter.

There's basically no reason to poke around in the Solution Explorer if you already know the name of the item you want to see. Ctrl+, is very fast.

image

Move Lines with your keyboard

Yes I realize that Visual Studio isn't Emacs or VIM (unless you want it to be VsVim) but it does have a few tiny tricks that most VS users don't use.

You can move lines just by pressing Alt-up/down arrows. I've never seen anyone do this in the wild but me. You can also Shift-Select a bunch of lines and then Alt-Arrow them around as a group.

Move those lines with ALT-ARROW

You can also do Square Selection with Alt and Drag...and drag yourself a nice rectangle...then start typing to type on a dozen lines at once.

Perhaps you knew these, maybe you learned a few things. I think the larger point is to have the five to ten most useful features right there in your mind ready to go. These are mine. What are your tips?


Sponsor: Do you deploy the same application multiple times for each of your end customers? The team at Octopus have been trying to take the pain out of multi-tenant deployments. Check out their 3.4 beta release.


© 2016 Scott Hanselman. All rights reserved.
     
30 Aug 18:24

What is Serverless Computing? Exploring Azure Functions

by Scott Hanselman

There's a lot of confusing terms in the Cloud space. And that's not counting the term "Cloud." ;)

  • IaaS (Infrastructure as a Services) - Virtual Machines and stuff on demand.
  • PaaS (Platform as a Service) - You deploy your apps but try not to think about the Virtual Machines underneath. They exist, but we pretend they don't until forced.
  • SaaS (Software as a Service) - Stuff like Office 365 and Gmail. You pay a subscription and you get email/whatever as a service. It Just Works.

"Serverless Computing" doesn't really mean there's no server. Serverless means there's no server you need to worry about. That might sound like PaaS, but it's higher level that than.

Serverless Computing is like this - Your code, a slider bar, and your credit card. You just have your function out there and it will scale as long as you can pay for it. It's as close to "cloudy" as The Cloud can get.

Serverless Computing is like this. Your code, a slider bar, and your credit card.

With Platform as a Service, you might make a Node or C# app, check it into Git, deploy it to a Web Site/Application, and then you've got an endpoint. You might scale it up (get more CPU/Memory/Disk) or out (have 1, 2, n instances of the Web App) but it's not seamless. It's totally cool, to be clear, but you're always aware of the servers.

New cloud systems like Amazon Lambda and Azure Functions have you upload some code and it's running seconds later. You can have continuous jobs, functions that run on a triggered event, or make Web APIs or Webhooks that are just a function with a URL.

I'm going to see how quickly I can make a Web API with Serverless Computing.

I'll go to http://functions.azure.com and make a new function. If you don't have an account you can sign up free.

Getting started with Azure Functions

You can make a function in JavaScript or C#.

Getting started with Azure Functions - Create This Function

Once you're into the Azure Function Editor, click "New Function" and you've got dozens of templates and code examples for things like:

  • Find a face in an image and store the rectangle of where the face is.
  • Run a function and comment on a GitHub issue when a GitHub webhook is triggered
  • Update a storage blob when an HTTP Request comes in
  • Load entities from a database or storage table

I figured I'd change the first example. It is a trigger that sees an image in storage, calls a cognitive services API to get the location of the face, then stores the data. I wanted to change it to:

  • Take an image as input from an HTTP Post
  • Draw a rectangle around the face
  • Return the new image

You can do this work from Git/GitHub but for easy stuff I'm literally doing it all in the browser. Here's what it looks like.

Azure Functions can be done in the browser

I code and iterate and save and fail fast, fail often. Here's the starter code I based it on. Remember, that this is a starter function that runs on a triggered event, so note its Run()...I'm going to change this.

#r "Microsoft.WindowsAzure.Storage"
#r "Newtonsoft.Json"
using System.Net;
using System.Net.Http;
using System.Net.Http.Headers;
using Newtonsoft.Json;
using Microsoft.WindowsAzure.Storage.Table;
using System.IO; 
public static async Task Run(Stream image, string name, IAsyncCollector<FaceRectangle> outTable, TraceWriter log)
{
    var image = await req.Content.ReadAsStreamAsync();
    
    string result = await CallVisionAPI(image); //STREAM
    log.Info(result); 
    if (String.IsNullOrEmpty(result))
    {
        return req.CreateResponse(HttpStatusCode.BadRequest);
    }
    ImageData imageData = JsonConvert.DeserializeObject<ImageData>(result);
    foreach (Face face in imageData.Faces)
    {
        var faceRectangle = face.FaceRectangle;
        faceRectangle.RowKey = Guid.NewGuid().ToString();
        faceRectangle.PartitionKey = "Functions";
        faceRectangle.ImageFile = name + ".jpg";
        await outTable.AddAsync(faceRectangle); 
    }
    return req.CreateResponse(HttpStatusCode.OK, "Nice Job");  
}
static async Task<string> CallVisionAPI(Stream image)
{
    using (var client = new HttpClient())
    {
        var content = new StreamContent(image);
        var url = "https://api.projectoxford.ai/vision/v1.0/analyze?visualFeatures=Faces";
        client.DefaultRequestHeaders.Add("Ocp-Apim-Subscription-Key", Environment.GetEnvironmentVariable("Vision_API_Subscription_Key"));
        content.Headers.ContentType = new MediaTypeHeaderValue("application/octet-stream");
        var httpResponse = await client.PostAsync(url, content);
        if (httpResponse.StatusCode == HttpStatusCode.OK){
            return await httpResponse.Content.ReadAsStringAsync();
        }
    }
    return null;
}
public class ImageData {
    public List<Face> Faces { get; set; }
}
public class Face {
    public int Age { get; set; }
    public string Gender { get; set; }
    public FaceRectangle FaceRectangle { get; set; }
}
public class FaceRectangle : TableEntity {
    public string ImageFile { get; set; }
    public int Left { get; set; }
    public int Top { get; set; }
    public int Width { get; set; }
    public int Height { get; set; }
}

GOAL: I'll change this Run() and make this listen for an HTTP request that contains an image, read the image that's POSTed in (ya, I know, no validation), draw rectangle around detected faces, then return a new image.

public static async Task<HttpResponseMessage> Run(HttpRequestMessage req, TraceWriter log) {

var image = await req.Content.ReadAsStreamAsync();

As for the body of this function, I'm 20% sure I'm using too many MemoryStreams but they are getting disposed so take this code as a initial proof of concept. However, I DO need at least the two I have. Regardless, happy to chat with those who know more, but it's more subtle than even I thought. That said, basically call out to the API, get back some face data that looks like this:

2016-08-26T23:59:26.741 {"requestId":"8be222ff-98cc-4019-8038-c22eeffa63ed","metadata":{"width":2808,"height":1872,"format":"Jpeg"},"faces":[{"age":41,"gender":"Male","faceRectangle":{"left":1059,"top":671,"width":466,"height":466}},{"age":41,"gender":"Male","faceRectangle":{"left":1916,"top":702,"width":448,"height":448}}]}

Then take that data and DRAW a Rectangle over the faces detected.

public static async Task<HttpResponseMessage> Run(HttpRequestMessage req, TraceWriter log)
{
    var image = await req.Content.ReadAsStreamAsync();
    MemoryStream mem = new MemoryStream();
    image.CopyTo(mem); //make a copy since one gets destroy in the other API. Lame, I know.
    image.Position = 0;
    mem.Position = 0;
    
    string result = await CallVisionAPI(image); 
    log.Info(result); 
    if (String.IsNullOrEmpty(result)) {
        return req.CreateResponse(HttpStatusCode.BadRequest);
    }
    
    ImageData imageData = JsonConvert.DeserializeObject<ImageData>(result);
    MemoryStream outputStream = new MemoryStream();
    using(Image maybeFace = Image.FromStream(mem, true))
    {
        using (Graphics g = Graphics.FromImage(maybeFace))
        {
            Pen yellowPen = new Pen(Color.Yellow, 4);
            foreach (Face face in imageData.Faces)
            {
                var faceRectangle = face.FaceRectangle;
                g.DrawRectangle(yellowPen, 
                    faceRectangle.Left, faceRectangle.Top, 
                    faceRectangle.Width, faceRectangle.Height);
            }
        }
        maybeFace.Save(outputStream, ImageFormat.Jpeg);
    }
    
    var response = new HttpResponseMessage()
    {
        Content = new ByteArrayContent(outputStream.ToArray()),
        StatusCode = HttpStatusCode.OK,
    };
    response.Content.Headers.ContentType = new MediaTypeHeaderValue("image/jpeg");
    return response;
}

I also added a reference to System. Drawing using this syntax at the top of the file and added a few namespaces with usings like System.Drawing and System.Drawing.Imaging. I also changed the input in the Integrate tab to "HTTP" as my input.

#r "System.Drawing

Now I go into Postman and POST an image to my new Azure Function endpoint. Here I uploaded a flattering picture of me and unflattering picture of The Oatmeal. He's pretty in real life just NOT HERE. ;)

Image Recognition with Azure Functions

So in just about 15 min with no idea and armed with just my browser, Postman (also my browser), Google/StackOverflow, and Azure Functions I've got a backend proof of concept.

Azure Functions supports Node.js, C#, F#, Python, PHP *and* Batch, Bash, and PowerShell, which really opens it up to basically anyone. You can use them for anything when you just want a function (or more) out there on the web. Send stuff to Slack, automate your house, update GitHub issues, act as a Webhook, etc. There's some great 3d party Azure Functions sample code in this GitHub repo as well. Inputs can be from basically anywhere and outputs can be basically anywhere. If those anywheres are also cloud services like Tables or Storage, you've got a "serverless backed" that is easy to scale.

I'm still learning, but I can see when I'd want a VM (total control) vs a Web App (near total control) vs a "Serverless" Azure Function (less control but I didn't need it anyway, just wanted a function in the cloud.)


Sponsor: Aspose makes programming APIs for working with files, like: DOC, XLS, PPT, PDF and countless more.  Developers can use their products to create, convert, modify, or manage files in almost any way.  Aspose is a good company and they offer solid products.  Check them out, and download a free evaluation.


© 2016 Scott Hanselman. All rights reserved.