אנחנו, ואיתנו גם הסמארטפון, תמיד בריצה. אנחנו קמים בבוקר, בודקים סטטוסים, מתארגנים לעבודה, משיבים למיילים, קופצים מפגישה לפגישה, שולחים הודעות ב-WhatsApp, עד שנכנסים לשירותים ו… פלופ! המכשיר באסלה. דממת אלחוט לעשירית השניה – הלחץ עולה, הדופק מאיץ ואז נותר לנו רק להשלים עם העובדה שעלינו לחזור ללבטים – איזה סמארטפון רוכשים עכשיו?
לכם זה אולי עוד לא קרה באופן אישי, אך אין מדובר במקרה נדיר שמכשירים סלולריים נפגעים מנוזלים. אבל מה אם היינו אומרים לכם שישנם צעדי מנע? כן, לסיפור יכול להיות סיום שונה לגמרי. בשבוע שעבר נפגשנו עם יזהר אריאלי, מנכ"ל חברת ליקוויפל ישראל, אשר סיפר לנו על חברת הבת שהוא עומד בראשה ועל המהפכה שהיא מביאה עמה.
ליקוויפל והשוק הישראלי
ליקוויפל ישראל היא חברת-בת של חברת STS הישראלית וחברת ליקוויפל העולמית הידועה כחלוצה בכל הקשור למחקר ופיתוח ננוטכנולוגיה המשמשת לחיפוי והגנה על מוצרים שונים. ליקוויפל ישראל הוקמה לפני כשנה וחצי במטרה להכיר לצרכן הישראלי את המגוון הרחב של פתרונות הננוטכנולוגיה ועל הדרך, לחסוך לו כסף. הודות לטכנולוגיה מתקדמת שפיתחה ליקוויפל העולמית, אותה הציגה בתערוכת CES 2012, מאפשרת החברה הפיכתו של כל מכשיר קיים (למעט מכשירי BlackBerry) לעמיד בפני מים.
אריאלי מספר כי מדי יום ביומו נאלץ הצרכן להתמודד עם בעיה מהותית – אי היכולת שלו להגן על מכשירו באופן הרמטי מפני נוזלים. מספיק שכמה טיפות גשם יצליחו לחדור את המעטה החיצוני של המכשיר שלנו – והוא מיד נמצא בסכנה של קצר חשמלי שישבית אותו מכל פעולה. מעבר לכך, גם אם נוזלים לא באו במגע ישיר עם רכיבים אלקטרוניים, ישנה סבירות גבוהה שתיווצר קורוזיה, אשר עלולה גם היא לשבש בכמה אופנים את תפקודו של המכשיר.
סקרים רבים שערכה החברה הראו כי הצרכן הישראלי אכן מחפש פתרון לחוסר העמידות של המכשיר הסלולרי שלו. נתון מעניין שעלה מן הסקרים הוא ש-29 אחוזים מהנשאלים אכן העידו כי הם חוששים במידה רבה ומעלה מנזק שעשוי להיגרם למכשירם בעקבות חשיפה לנוזלים. עוד מראים הנתונים כי 13 אחוזים מכלל הנשאלים חוו לפחות פעם אחת בעבר פגיעה במכשיר כתוצאה מחדירת נוזלים. נתון נוסף מתייחס גם לנזקי הקורוזיה – על פי מדגם מעבדות תיקונים, 7 אחוזים מכלל הנזקים במכשירי הלקוחות מקורם בקורוזיה.
הטכנולוגיה שמאחורי המוצר
"אנו משתמשים במתקן בצורת קוביה בגודל מטר על מטר, אליו ניתן להכניס עד 30 מכשירים בו זמנית", סיפר אריאלי על אופן הפיכתם של מכשירים לעמידים בפני מים. "בשלב הראשון נשאב האוויר הכלוא בחלל הקוביה ונוצר ריק ברמה של 87 אחוזים – זאת במטרה לשאוב את האוויר הכלוא בתוך המכשירים". לאחר מכן, אל חלל הקוביה מרוססת פורמולה ייחודית שפותחה על ידי ליקוויפל, תפקידה לתפוס את מקומו של האוויר בפנים המכשיר וליצור שכבה ברמה אטומית שתפריד בין הנוזלים ובין הרכיבים האלקטרוניים. בסיום התהליך, מתפזרת במרחב הקוביה פלזמה שהופכת את התרסיס ליונים ובכך הופך המכשיר עמיד בפני מים.
ייתכן והתיאור יזכיר לכמה מכם את שיעורי הכימיה המורכבים מבית הספר, אך התהליך כולו פשוט למדי ואורך כשעה אחת בלבד. בסיום, יוגדר מכשירכם כבעל עמידות בתקן המחמיר IPX7 המאפשר שהייה בעומק של חצי מטר מתחת לפני המים למשך כחצי שעה. אם תיאור שלבי התלהיך הצליח להלחיץ אתכם, הרשו לנו להרגיע - אריאלי מדגיש כי התהליך בטוח לגמרי ושלמכשיר לא נשקפת כל סכנה – על כך יעידו עשרות אלפי המכשירים שונים שצופו באמצעות הטכנולוגיה עד כה.
עם זאת, מטרתה של ליקוויפל היא לא להפוך את מכשירכם לצוללן מנוסה. התהליך הכימי נועד לגרום למכשיר לצלוח פגיעות מים מקריות – אין לנסות להכניס אותו בכוח למים או לבדוק את עמידותו בכל מיני מצבים ומקרים.
השאיפה – פריסה ארצית
חברת ליקוויפל ישראל נמצאת כיום במגעים עם חברות הסלולר הגדולות בשוק הישראלי וגם עם זכיינים פרטיים במטרה להגיע בקרוב לפריסה ארצית של עמדות בהן נוכל להפוך את המכשירים שלנו (סמארטפונים, טאבלטים ומחשבי ניידים) לעמידים בפני מים. בכוונתה של ליקוויפל ישראל לאפשר לכל דורש להפוך את המכשיר היקר שלולעמיד בפני מים, זאת במחיר הוגן של 240 שקלים בלבד, בנוסף לאחריות שאורכה שנה אחת.
קשה להתווכח – הסמארטפון הפך להיות מרכז החיים שלנו. מלבד העובדה שרוב המידע האישי והחשוב נמצא על פיסת סיליקון דקיקה שעשויה להינזק ביום מן הימים, זה די כואב לאבד מוצר שעלותו אלפי שקלים ברגע אחד של חוסר תשומת לב. כעת, הודות לליקוויפל, נוכל לישון קצת יותר בשקט (גם בגשם).
חברת מוטורולה חשפה אתמול (ב') את Project Ara, פלטפורמת חומרה פתוחה שתשמש מפתחים ומעצבים ככלי התחלתי ליצירת מכשירי טלפון מודולריים. צוות ייעודי של החברה עבד בשנה האחרונה לשם פיתוח הפרוייקט, אשר עתיד "לעשות לעולם החומרה את מה שעשתה פלטפורמת האנדרואיד עבור עולם התוכנה".
נושא הטלפונים המודולריים קיבל לא מעט תשומת לב לאחר שלאחרונה חשף המעצב ההולנדי דייב האקנס קונספט לטלפון בהרכבה עצמית עם פרוייקט Phonebloks. במוטורולה לא נשארו אדישים לעבודתו של האקנס וחברו אליו במטרה להוסיף ל-Project Ara את קהילת המפתחים והעוקבים הנלהבים אחר תחום בניית המכשירים המודולריים.
ממש כפי שתיאר האקנס בפרוייקט Phoneblocks, כך מתארת גם מוטורולה את הטלפון המודולרי שלה, אשר יציג שלד בסיסי (Endoskeleton), עליו יורכבו חלקים שונים שייצרו סמארטפון עבור כל מטרה. המודולים שניתן יהיה להרכיב על השלד של מוטורולה יכללו כמעט כל רכיב אפשרי המוכר לנו מסמארטפונים הקיימים כיום בשוק: מסכים, מקלדת, סוללה, מצלמה, חיישנים שונים ועוד.
בחודשים האחרונים סייר צוות מיוחד של מוטורולה ברחבי ארה"ב עם רכב ובו חלקים שונים ממכשיריה הניידים של החברה. מכשירים אלו שימשו מפתחים ומעצבים לבניית דגמי אב-טיפוס למודולים אותם הם היו רוצים לראות בסמארטפונים שלהם. המודולים שנבנו הציגו צדדים מעט יותר שאפתניים מהוספת נפח אחסון למכשיר וכללו יצירת תקשורת עם כפפות חכמות לצורך זיהוי שפת הסימנים, שליחת וקבלת מידע אודות מיקום אופניים בקרבת רכבים ושידור וקבלת קול אולטרה-סוני.
כבר בחודשים הקרובים צפויה מוטורולה להתחיל לשלוח הזמנות למפתחים המעוניינים לקחת חלק בבניית מודולים עבור Project Ara, כאשר ערכת הפיתוח בגרסת אלפא תגיע גם היא בקרוב. אם ברצונכם לקחת חלק בפיתוח מודולים עבור Project Ara של מוטורולה, תוכלו לגשת לאתר הייעודי של החברה עבור הפרוייקט.
Leawo iOS Data Recovery is a powerful data recovery program that could recover multiple lost data from all models of iPhone, iPad and iPod touch. It could help retrieve data lost for almost any kinds of reasons, like wrong deletion, iOS upgrade, factory settings restoring, breaking or losing the devices, etc.
The professional iPad/iPod/iPhone data recovery tool can not only selectively recover deleted data from previous iTunes backup without the need of devices, but can also retrieve deleted files directly from iOS devices when there’s no backup available. Besides, the iPhone data recovery software can also work as an iTunes backup extractor and data backup tool that could help extract 12 kinds of files in iTunes backup and then export the files to local computer in batch.
NB: as a part of their Halloween campaign Leawo team offers 100$ Amazon Gift Cards to the authors of 5 best comments and suggestions for today’s giveaway. Both GOTD comment section and Idea Informer widget are taken into consideration. The comments you post should be:
Genuine and objective, no matter it is good, bad or something in between;
Product-related and as detailed as possible;
Constructive, helpful for our future version improvement;
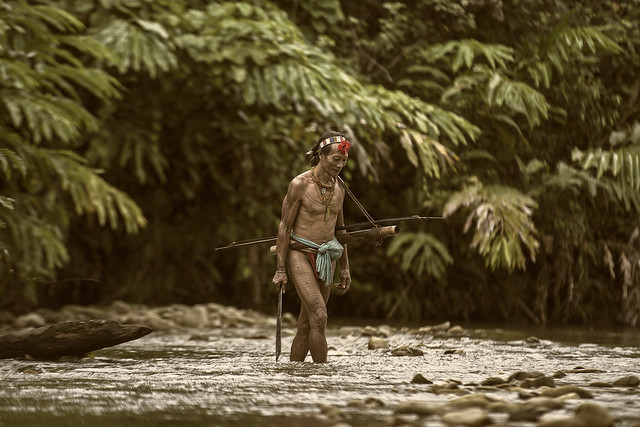
It's hard to find a part of the world with more history than Israel and Palestine. With so many cultures at play, the area is a photographer's dream. Both traditional and environmental portraits are fine.
(Note: The photos may be political and thought-provoking. Or, they can simply capture a slice of life. That is totally up to you guys, and the submitting photographers. (BUT NOTE: I RESERVE THE RIGHT TO DQ AN IMAGE IF I FIND IT OFFENSIVE. I trust that this step will not be necessary, it takes a lot to really offend me.) If you have any questions, please submit early in the week, so that you have plenty of time to submit a different image if there is a problem. As usual for my challenges, Entrants are required to (1) vote for each other entry, (2) read the comments (if any) below this challenge, in case I or other entrants post with Rules questions or clarifications, and (3) follow each of the challenge rules...including voting WITHIN THE FIRST SIX DAYS of the challenge. (14 entries, 294 votes)
החברה הזו מקופרטינו שמייצרת סמארטפונים? אה, כן. סביר להניח שענקית הטכנולוגיה הקוריאנית סמסונג שמעה על המתחרה עם לוגו התפוח, אבל לפי נתונים אחרונים שהתפרסמו, היא...
Light painting and stop motion are both techniques that require a ludicrous amount of time and effort to get perfectly right. Light painting needs long exposures, and essentially working blind in the attempt to make an image look how you want it to. Stop motion necessitates exacting attention to detail to make sure every individual frame flows correctly from one image to the next. But combining the two? That's an exercise in wonderful insanity.
And that's exactly what light artist Darren Pearson with his video Light Goes On. This...
(read more)
חברת אסוס משיקה בישראל את Transformer Book T100, מחשב נייד שהוא גם טאבלט המבוסס על מעבד הדור הבא מסדרת ה-Atom של אינטל ומריץ את מערכת ההפעלה Windows 8.1 בגרסה המלאה. ה-Asus Transformer Book T100 שייך לסדרה הותיקה של יצרנית המחשבים הטייואנית וניתן בקלות לפרק את המסך מהמחשב הנייד ולעשות בו שימוש כטאבלט. היתרון הענק של המחשב הנייד הוא במימדיו הקומפקטיים (מסך 10.1 אינץ' ומשקל 1.07 ק"ג) והיכולת להריץ כל תוכנה ולא רק כאלו המותאמות במיוחד לווינדוס 8 כפי שדורשת גרסת ה-RT של מערכת ההפעלה.
Transformer Book T100 הוא מהמחשבים הניידים הראשונים בשוק שעושה שימוש במעבד מסדרת Bay Trail-T החדשה מדגם ה-Atom Z3740, מרובע-ליבה בתדר שעון 1.33Ghz ומגיע עד ל-1.86Ghz בהתאם לצרכי השימוש, שאמור לספק ביצועים גבוהים וצריכת חשמל משופרת. שאר מפרטו של הנייד כולל מסך 10.1 אינץ' ברזולוציה של 1366X768, זיכרון פנימי 2GB RAM, נפח אחסון פנימי של 32GB או 64GB, מצלמת 1.2 מגה-פיקסל, בלוטות' 4.0 ו-WiFi בתקן N.
הטאבלט בעל חיבורי MicroUSB (לטעינה), חיבור MicroHDMI וחיבור אזניות. המקלדת מוסיפה גם חיבור USB 3.0 ומשטח מגע לעכבר. על מנת לשמור על המשקל הנמוך המקלדת לא כוללת בתוכה סוללה נוספת, אבל השימוש במעבד החדש עדיין מספק זמן עבודה ארוך של 11 שעות. עובי ה-Transformer Book T100 עומד על 10.5 מ"מ ומשקלו כאשר מחובר למקלדת במצב מחשב נייד 1.07 ק"ג ובמצב טאבלט 550 גרם.
כפי שציינו, מערכת ההפעלה אותה מריץ המחשב (ישירות מהקופסא) היא Windows 8.1 העדכנית מבית מיקרוסופט והרוכשים מקבלים את חבילת התוכנות Office הכוללת Word, Excel, Power Point ו-OneNote. היכולת להריץ את מגוון התוכנות העצום שיש לווינדוס להציע יחד עם חבילת התוכנות מבית מיקרוסופט הופכות את האסוס Transformer Book T100 לכלי עבודה בעל ניידות גבוהה ועם תג מחיר סביר בהחלט של 2,088 ש"ח לדגם ה-32GB ו-2,496 ש"ח לדגם ה-64GB.
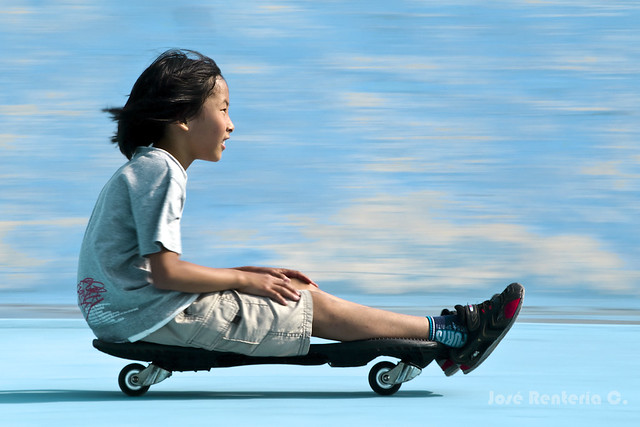
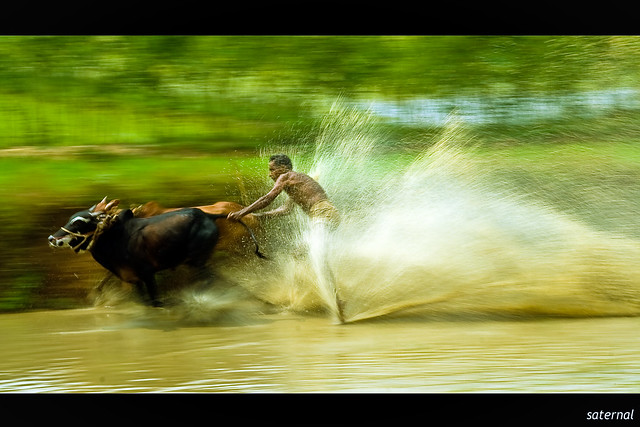
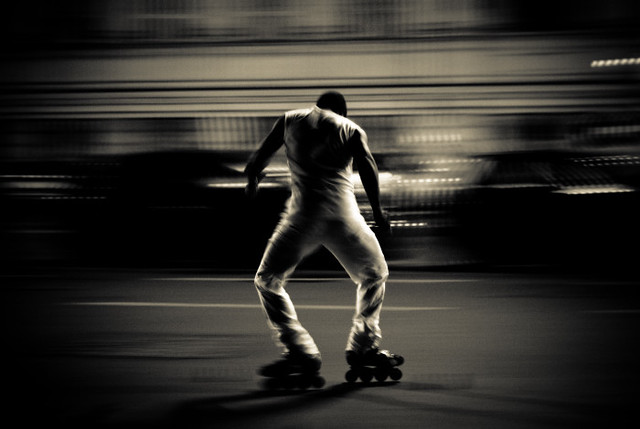
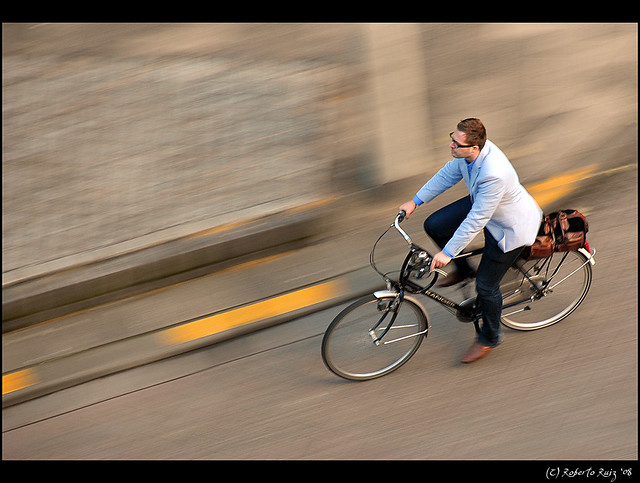
We’ve covered the topic of how to use ‘panning’ to photograph moving subjects previously here on dPS in Mastering Panning and The Art of Panning – so today I thought I’d put together a bit of an image collection of some panning images. Enjoy!
Want to know more about how to take Panning Images?
Check out these tutorials on Panning in our archives:
You may already be familiar with Dustin Farrell. If you’re not, you should be. His time-lapses are incredible. Dustin’s shoots all over the world, but some of his most epic are from the American West. In this video, we get to follow Dustin on location in Utah and the step-by-step process that follows. [more]
גוגל הכריזה על uProxy, תוסף חינמי לדפדני 'כרום' ו'פיירפוקס' אשר מיועד למשתמשים הנמצאים במקומות בהם מופעלת צנוזרה על רשת האינטרנט – כמו סין או איראן....
באירוע ההכרזה על דגמי האייפד החדשים שנערך לפני יומיים בסאן-פרנסיסקו, הודיעה אפל על שיחרור של גרסאה חדשה של חבילת התוכנות המשרדיות 'איי-וורקס' (iWorks). היו אלו...
Today is the start of the PhotoPlus Expo in New York, an annual tradeshow that's rare in catering not just to those manufacturing and reporting on all the latest photo gear, but also to the photographers who'll be using it. For those who can't attend, leading lens and camera manufacturer Sigma has come to the rescue.
You can watch a live webcast of Sigma's tutorial sessions, straight from the show floor. Throughout all three days (today, Friday and Saturday) of the PhotoPlus Expo, you'll be able to...
(read more)
It’s almost impossible to sign into Vimeo without getting sucked into the latest and greatest timelapse video. It’s easy to understand why these videos find such great success. They allow the viewer to experience something incredibly surreal, yet familiar. Something as simple and beautiful as a sunrise can now be devoured in seconds. [more]
בפעם הראשונה שטעמתי סושי לא ממש התלהבתי. אני זוכרת (למרות שזה היה די מזמן) שהדבר העיקרי שחשבתי היה "חמוץ", ולא במובן הטוב של המילה. היום אני יודעת לומר שסושי צריך לאכול במקום שמתמחה בסושי. אז אומנם אכלתי במסעדה אסייתית, אך לא … להמשיך לקרוא ←
If you search for advice on how to take better pictures of children there are certain gems that are sure to appear on any list of tips. “Get on their level” and “Get Closer”, are the two that come to mind right away and they are both solid ways to improve your kid shots. Let’s look first at why these work and then how to expand those ideas to create infinitely more interesting images.
The top tip on any list you find is often going to be “Get on their level”. There is a reason that it should be as it is great advice and will make a big difference immediately. If you get down on the same level as a child to take their portrait, you give them power by allowing them to look into the camera straight on. Kneel down so that you become the same height as the child. Chat with your subject and engage them before just going right into taking their photograph. When the time is right, lift your camera and ask the kids if they can see themselves (or a fairy or a pony or any other magical subject) in your lens to get direct eye contact.
Photography is a visual language and the angle with which you shoot the photograph is an integral part of the structure of your story you are telling. Think of composition as part of the “grammar” of this language and that the choices that you make should serve a purpose. Photography is a common language that even kids can understand and when you make the effort to physically go down to their level you are showing them a certain respect.
Tech tip:Use a long lens so that you can put some distance between the camera and the child’s face. That is just another layer of respect.
Once you have begun to incorporate the “Get on their level” angle into your regular routine, here are four other ideas to break the cycle of the adult eye level shots:
Over Their Shoulder: You are down on their level, you have taken a straight on portrait, now move around the child and have a look at what they are doing. Immerse yourself in their world and let your camera see what they see.
Tech tip:If you have a fast 50mm lens, use it now and include some of the child in the frame. If they are busy, you will need to use a faster shutter speed to freeze the motion. Using a fast 50mm lens means you will be able to open up the aperture to allow you to use that faster shutter speed indoors and avoid triggering your flash.
Go Low: Kids are short and you may have gotten on your knees to get their eye level, but now, go further. Come on, you can do it, lie down. You may be amazed at what the world looks like from the ground. Babies tend to hate tummy time, but if you get down with them, they may even enjoy it more and you can end up with some wonderfully funny faces. Or, how about that mountain of toys on the playroom floor? You think it looks bad from where you are standing? It is massive from down here!
Tech tip:Keep your aperture as wide as your lens will let you go so you can blur some of the floor in the foreground of these shots. That will help you isolate your subject even more.
Bird’s Eye: Breaking the adult’s eye level angle is not always just about sitting “criss-cross applesauce” or laying on the floor. It is about carefully observing the world that your child inhabits. It may be the same one as you, but it sure can appear different when you make an effort to look from unexpected points of view. Climb (carefully!) up above the kids and shoot directly down on mealtime, playtime, naptime, story time or bath time…anytime really. I have balanced (carefully! yet precariously) on the edges of various bathtubs, crib railings and dinner tables to get some of my favorite shots. It may be easier to grab a step stool though.
Tech tip:Use the widest focal length that you have and really get a sweeping scope of the children in their environment. Just watch out for your own feet getting into the frame.
Reflections: Use reflections to not only capture yourself with kids, but to catch their expression when they don’t realize the camera is trained on them. You don’t need a house full of mirrors to do this either. When you start looking, you will find shiny surfaces all around you.
Tech Tip:Show yourself in the shot. Set the camera to closest subject auto focus mode and take the camera away from your face before you press the shutter button.
Almost as often, when searching for ways to improve your photos of children, you will be told to “Get closer.” Children’s faces are so perfect and beautiful that it is great advice for you to fill the frame with them. Isolate the tiniest of details by photographing in close on things like newborn lashes, pursed toddler lips going in for a kiss or the drips of a juicy orange picked right from the tree. These shots make for beautiful additions to your collection of images.
Tech tip:Use a macro lens, close-up adapter (or the little flower icon for point and shooters) to get the closest focus possible.
Far Away: Now that you have that powerful and fantastic full frame eye contact shot of your child, step back and let the kids in your photos breathe. You will need to really step back and feature the children in their big world. This angle will emphasize their smallness, but their confidence at being alone in the frame will be their strength.
Tech tip:Use color and negative space well. A messy shot will not be as powerful.
Simple is the name of the game with these photo magnets.
Using only a few ingredients you can turn small photos into awesome pieces of refrigerator art.
They are fun to make, easy on the brain and cute as all get out. Once you make the first one you’ll want to start an assembly line of relaxation. A very productive assembly line of relaxation.
After watching many families at the beach over the school holidays, I noticed that most of the parents, as well as some professional photographers, were making the same 3 HUGE mistakes when they were photographing kids. I could see the parents getting frustrated and it looked like no one was having fun.
I guess I can summarise the 3 mistakes in one sentence. “Hey kids, please sit down over there, look this way and smile!”
Mistake 1: Asking Kids to Sit Still: “Hey kids, please sit…”
The kids are all dressed up for the photo shoot and excited, but don’t quite know what will happen, so they do what comes naturally – they run off and play.
The photographer and parents then try to round up the kids, find a place to photograph them and then ask the kids to sit down and be still and look at the photographer. Ever tried this? It goes against all the natural instincts of the kids – they are super excited and told to sit still. Very difficult to achieve!
Solution – Let the kids run & play
All kids love to run and play. It’s a natural part of being a kid, so why not let them do what comes naturally? Some of the best images I capture are when kids are allowed to run on the beach or at a park. I take this one step further and create games for the kids to play, like racing each other, or getting the parents to chase the kids.
There are 2 things that happen when kids are allowed to run & play:
Kids have all this built up energy that needs to be released, and now they get to use it up. It’s fun for them and they become happy, playful kids. This is what you want.
Parents and kids get to relax and we capture natural facial expressions, un-posed with no fake smiles.
Tip: Shoot in sports mode – use a fast shutter speed 1/500th sec or 1/1000th sec with AI Servo auto focus (tracking autofocus). When kids are racing towards you, a very fast shutter speed and tracking autofocus will mean that you capture all the action and your subjects are in focus.
Mistake 2: Asking for a Smile – “…look this way and smile!”
Wow, this is a big one. I don’t think I have ever seen a parent not say “smile” to their children when they are being photographed. “Common kids, smile. Give us a big smile!”
Yes, sometimes we get a smile, but it’s normally a fake smile. Who wants images of their children with fake smiles? Not me.
Solution – Be the Clown
Have you ever taken your kids to the circus to see a clown? A really entertaining clown, who gets the kids laughing. Go behind the clown and photograph the kids – those are real smiles!
So you (the photographer) need to become the clown.
How do you do that? When you meet the kids for the first time get down to their level and introduce yourself in a very enthusiastic and loud voice. Set the scene from the start, then, when you are photographing the kids, be loud, be funny, do funny things like roll your eyes, stumble around, dance, or get the kids to scare you! Bring along props to entertain the kids, like a clown nose.
An alternate to being the clown is the have the parents or siblings become the clown. When I’m shooting the close-ups (after the kids have run around and released all that energy) I get the parents to stand behind me and I get them to dance around. This always gets the kids smiling and laughing – seeing dad do “gangnam style” dance is hugely entertaining for the kids. It’s also a lot of fun for the parents.
Mistake 3: Standing Tall
Have you ever had someone stand over you and talk down to you? How do you feel? Inferior, small & insignificant? This is what kids feel like when someone photographs them from high-up. They feel intimidated and it’s not fun for the kids.
Also there is nothing special about the images captured from high-up, they are more like snapshots.
Solution – Get Down Low
When I first get to meet the kids I’m about to photograph, I get down low, and introduce myself. “Hey kids, my name is Brent and we are going to have so much fun today! What is your name?” I connect with the kids in a very enthusiastic voice. From then onwards the kids know that I’m on their side.
When I photograph them, I kneel down to their level, sometime I lay down flat on the ground to get a very different angle of view. Parents love these images, because they have never seen their children from this low angle, and the kids do not feel intimidated so they relax and play along with me.
Summary:
So, next time you go out and photograph kids keep these 3 tips in your mind. The photo shoot will flow and everyone will have much more fun – including you!
Let the kids run and play.
Be the clown and get the kids to laugh naturally.
Get down low to their level.
Hope you enjoyed these kids’ photography tips. If you want to find out more then checkout my “How to Photography Kids – Naturally” course which is currently 50% off at SnapnDeals.
Who is Brent? Brent is an award-winning professional photographer who runs a successful portrait photography studio near the beach in Australia. Brent also teaches photography and has a free mini-course here, as well as
other photography training courses here.
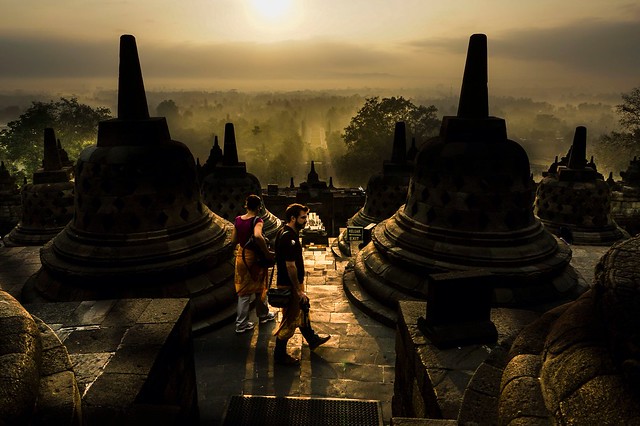
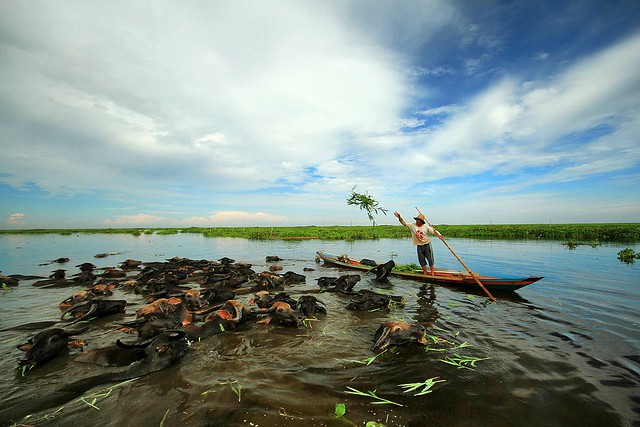
Photos from Indonesia, a country of over 17,508 islands. The densely populated nation has a uniqueness in natural scenery and culture that’s made it a top destination for tourists, especially the temples and active volcano Mount Bromo.
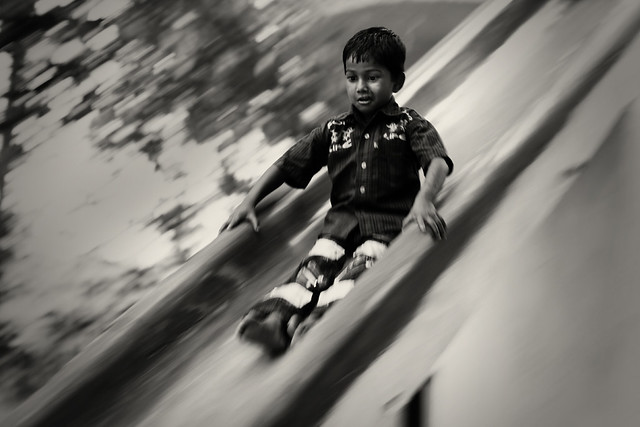
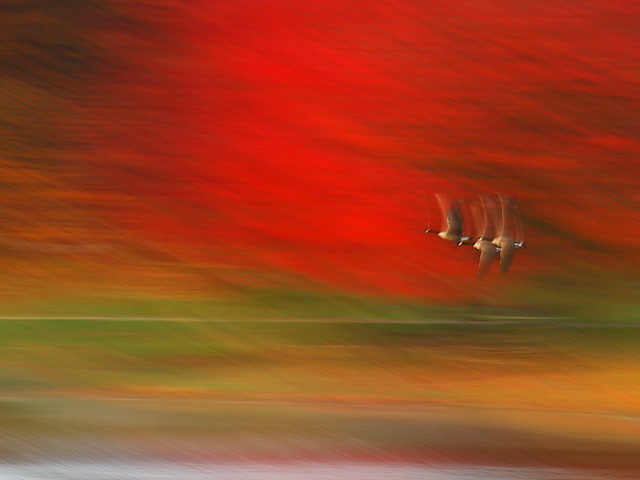
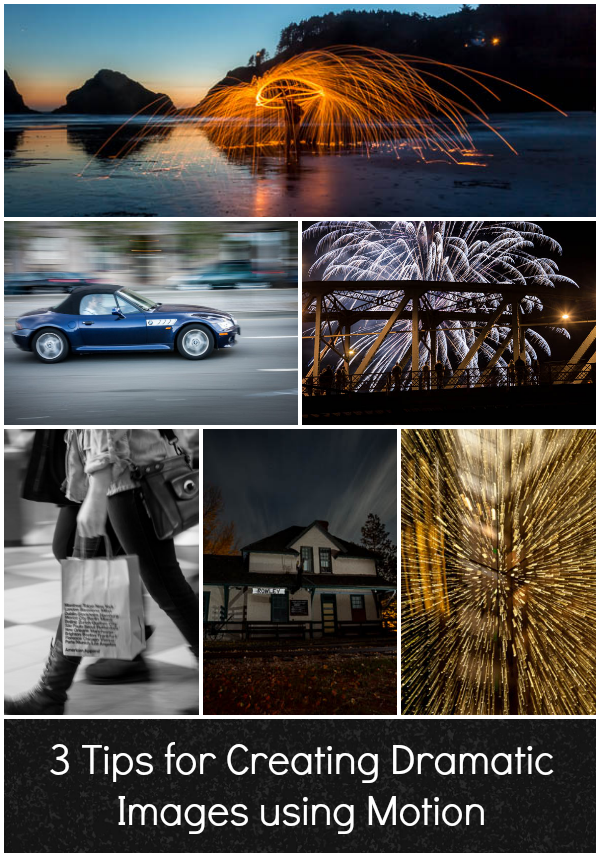
There is a common misconception that if your image isn’t tack sharp and free of motion blur then it isn’t a good image. I’d like to show you three ways you can use motion blur to add drama and interest to your photography.
Misconception: motion blur in photography = a bad image
I would disagree and say, not necessarily so! It really depends on the subject you are shooting and your intention as the photographer and artist. Using blur can add interest and show implied movement in the image. It can help add a feeling of speed. If your are shooting a subject like sports, for example, you have use a fast lens and fast shutter speed to freeze motion at the peak of the action. OR you can introduce intentional motion blur by using a slower shutter speed to add a sense of speed. Neither is right or wrong, they’re just different. You get to choose and if you aren’t sure, do both!
Three tips for adding motion to your images
panning a moving subject
long exposures for affect
zooming or moving the camera during the exposure
Let’s look at each in more detail.
PANNING
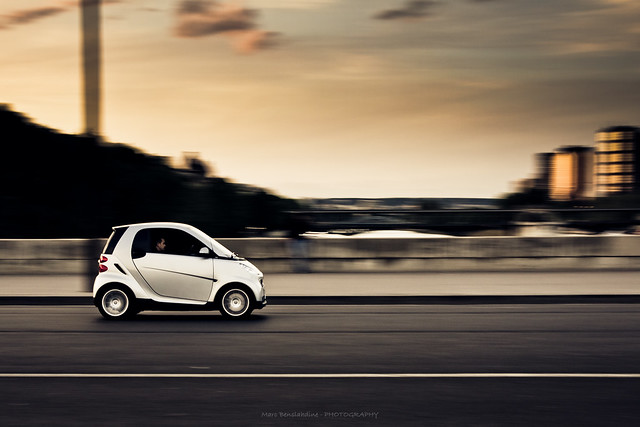
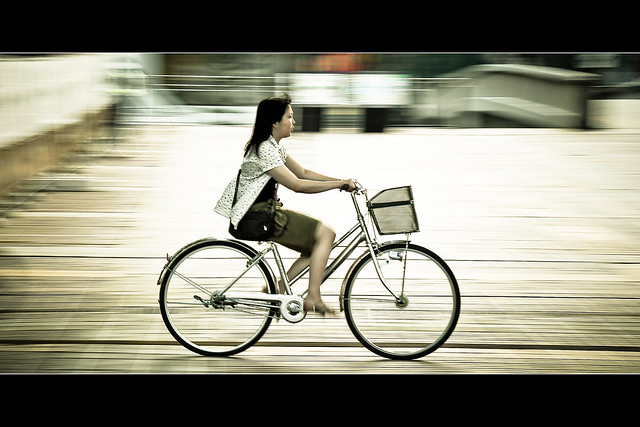
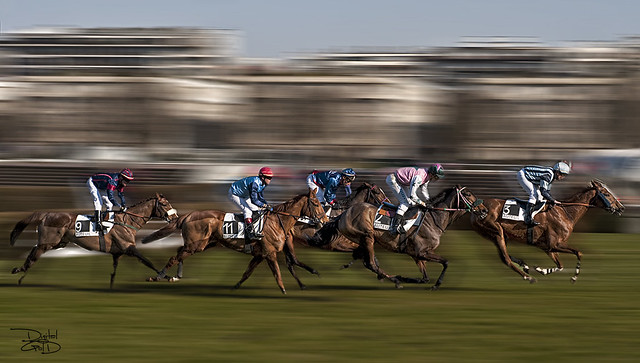
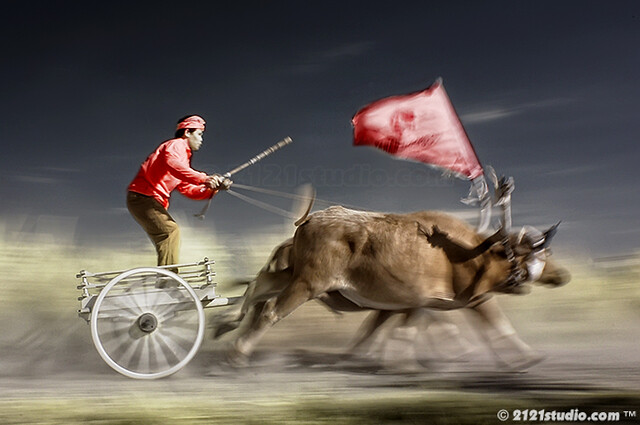
Panning is a technique for photographing moving subjects which allows you to get the subject relatively sharp, and blur the background. This adds a sense of speed and works particularly well when you have a background that is unattractive or distracting. The basics behind panning is you choose a slow shutter speed, and move your camera to follow the subject. Here are some tips on setting your camera for panning and giving it a try.
use high speed or “burst” shooting mode to take multiple images while holding down the shutter button
select Shutter Priority on your mode dial
start with 1/30th of a second and adjust slower and faster as necessary
practice following the moving object after it passes by
just like in golf, follow through is the key. Point your camera towards the approaching subject, shoot and follow them as they move through your field of view, and keep following their motion even after you stop shooting.
It takes a little bit of practice and a lot of trial and error but can result in some really stunning and creative images. Try shooting the same subject using a fast shutter speed and freezing the motion, then try panning and compare. It’s not something you will use for every subject, but it’s a good technique to have in your bag of tricks!
Here are a few examples of panning.
1/25th of a second panned
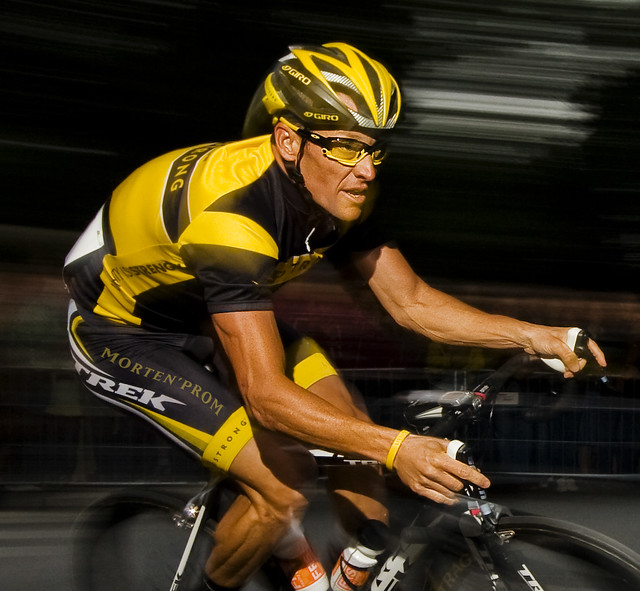
1/30th of a second, panned
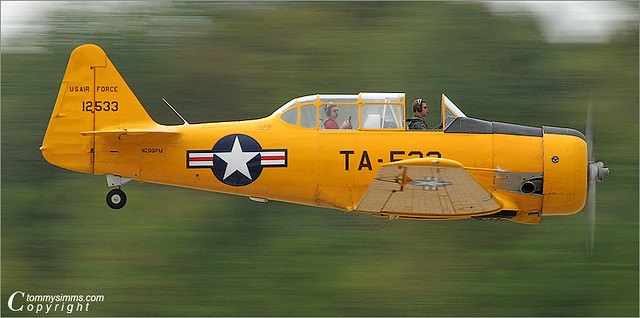
1/25th of a second, panned
LONG EXPOSURES
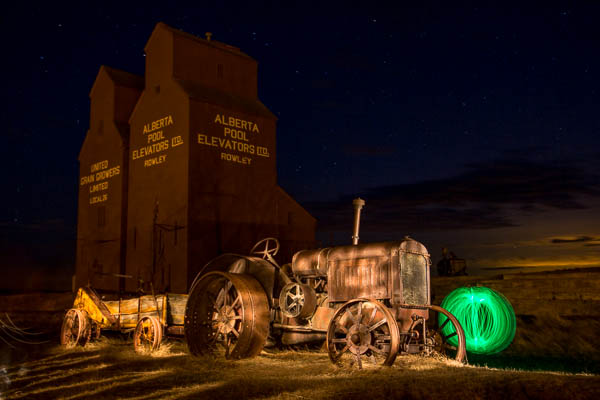
By long exposures I’m taking about a shutter speed slower than you would usually be able to hand hold the camera. There are many reasons to use long exposures including: moving water, capturing star trails at night, car headlights moving through your scene, and night photography in general. You will need a sturdy tripod, a remote trigger to fire your camera and time. I say time for two reasons: one you will have to wait for some really long exposures sometimes, especially star trails; and two because you will need time to shoot, adjust and correct. A lot of photography is trial and error and in this age of digital photography we have the huge benefit of being able to have instant feedback so we can correct or adjust in the field and continue shooting.
Here’s an example of the same subject photographed at different shutter speeds. Which do you prefer?
1/5000th of a second
1/40th of a second
Besides night photography another common reason to use long exposures during the day is to photograph waterfalls and moving water. Keep in mind neither approach is right or wrong, you just yield different results based on the choice you make. A faster shutter speed will freeze the water in mid air (like the first image above). A long exposure will blur the water, and if you use a long enough exposure it can even disappear or become misty looking. Here’s a comparison:
1/100th of a second
2.5 seconds
With moving water, there also comes a point where doing a longer exposure doesn’t look any different. Compare the image below a 5 seconds, to the one above at 2.5 seconds. The water looks pretty similar, but what did happen was the tree above was blurrier in the 5 second one, so I chose to use the 2.5 exposure.
5 seconds
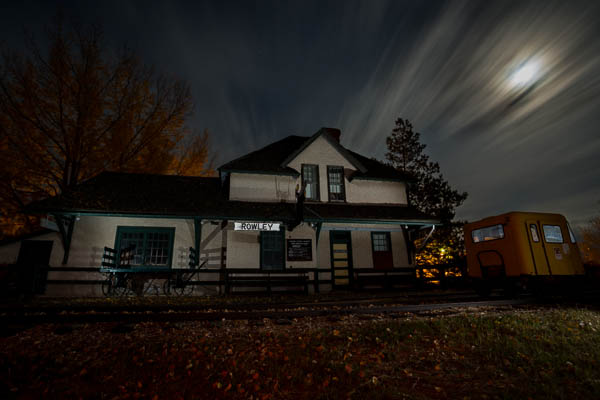
Here are a few more examples of long exposures.
Do you see the motion in the images below? What is moving in each?
For more information on how to shoot these types of scenes read:
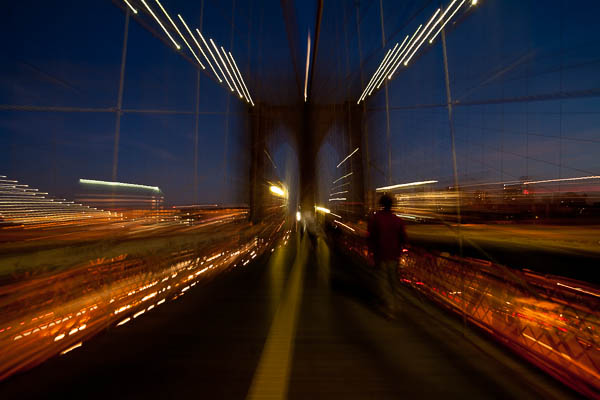
Last but not least, you can add motion by zooming your lens during the exposure. Basically what you do is physically rotate your zoom lens to change the focal length during a long exposure. This works really well and gives some really neat affects on night scenes with lights, neon signs, and even fireworks. But try it during the day too and see what you can create. It often results in a rather abstract image, sometimes completely obscuring the subject to make it unidentifiable. But that’s okay! Experiment and play with this idea. Have fun with it and get creative.
Some tips for zooming during your exposure:
Zoom in first to focus and lock it there so it doesn’t shift when you press the shutter button. You can use focus lock (a bit cumbersome), use autofocus and then turn it off, or use your camera’s back button focus capability. Whichever you choose just make sure you’ve focused with the lens at the longest focal length where it’s more critical than a wide one
Practice rotating the zoom mechanism on your lens. Get comfortable with which way to turn it, and how to turn it smoothly without making a bumpy mess.
Use an exposure of one second or longer. It’s pretty hard to do this a a/100th of a second!
Experiment with different zoom speeds (how fast you rotate the lens) and timing. The image will look different if you pause at the beginning and then zoom quickly, versus zoom slowly at the beginning and pause at the end of the exposure.
Here are a few examples of zoomed exposures
No zoom. Notice all the small lights in this hotel lobby.
2 seconds
Also 2 seconds, notice how different they are? That’s the zoom timing.
2.5 seconds. Abstracted image of the sculpture in the first non-zoomed image (bottom left corner)
No zoom, I thought it was boring so I played with panning and zooming while on the carousel. Parents were looking at me funny after my 4th time around.
Zoomed version. Is it better? Debatable but it’s the process of playing that leads to creating great images. Always continue to play.
ACTION PLAN
If you haven’t really played with long exposures much, I challenge you to try some of these techniques. Find some moving subjects and blur them on purpose. Or find something that will make an interesting abstract and blur it by zooming.
The point is that not every image has to be tack sharp and some have absolutely nothing in focus and they’re still great images. Don’t get stuck on technical things like sharpness and try experimenting with out of focus for a while. Add some motion using these tips, or maybe even shoot completely out of focus on purpose. Come back and share your images and experience with us.
Have you got some great motion blur images? Do share those as well in the comments below.
Got another tip you want to add to the list? Please do!
Easy Archive Recovery is a marvelous tool for recovering both ZIP and RAR archive types. It supports files, created in RAR, WinRar, WinZip, PKZIP, InfoZip, 7-Zip and other popular utilities. The files can be deleted or damaged, the storage device can be formatted but your files can still be recovered.
With Raw Search technology, the program finds and restores broken archives even on severely corrupted hard drives, memory cards or flash disks and recovers maximum possible data. It has a Recovery Wizard built in as well as a preview tool that shows files before the recovery and tells a user if they can be restored. No knowledge is needed for archive repair, just following the instructions on the screen is enough. Both professional and amateur users will be amazed at how much data the program can bring back in just a little time.
To purchase a personal license (including support and updates) at 70% discount please follow this direct link. If you’d like to purchase a business or a service license, please notify us via email: sales@munsoft.com
Everything you need to edit, cut, convert and produce your videos and home movies. Ashampoo Movie Studio comes with an intuitive step-by-step user interface that guides you from start to finish. Seamlessly blend scenes together using built-in high quality transition effects and create cinematic depth and atmosphere with visual effect and background music.
You don’t need to be a professional to achieve professional results. And thanks to the integrated ad removal tool, ads and commercials are a thing of the past.
Users of Ashampoo Movie Studio 2013 can always upgrade to Ashampoo Movie Studio at a special discount.
In this useful video by Jay P. Morgan of The Slanted Lens he walks you through how to pack your gear to be ready for airplane travel whether it be within the United States or overseas. Jay explains the proper paperwork you should have for your gear when traveling internationally and what gear he typically packs when flying and most importantly why. The video and the advice that Jay gives you is very detailed and extensive. It’s a great resource to watch every time you’re about to fly out to your next location and might just save you a headache or two. [more]
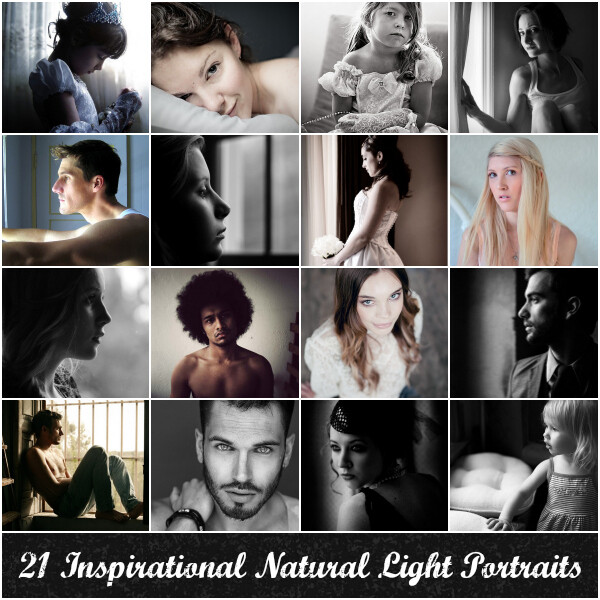
One of the most effective pieces of lighting gear ever invented is available to almost every photographer in the world… unless you’re living in a cave (and even then you might have one).
It’s the window.
Here is a collection of natural light portraits. They were all taken predominantly with natural light – in most cases at or near a window. Enjoy.
Image by Daniel Zedda
Image by Anna Gay
Image by Eric Meuller
I hear many photographers asking about what lighting gear to purchase to light their portraits – but I’m a firm believer that the natural light provided by a window can often do the job as well – if not better – than any expensive gear that you might buy.
Image by Meredith Farmer
Image by Shandi-Lee
Image by Paul Goyette
Image by John Meuller
Image by Mr Story
Image by Beni Ishaque Luthor
Image by Gabriela Camerotti
Image by The Q
Image by Sebastiano Pitruzzello
Image by Gabriela Camerotti
Image by Jay Ryness
Image by Raymond Larose
Image by gabriele fanelli
Image by Sebastiano Pitruzzello
Image by Jay Ryness
Image by Drew Herron
Image by brice hardelin
Image by Lauren Nelson
Further Natural Light Portraits Reading
We hope you enjoyed these Portraits. If you have some shots to share please do so in comments below. If you’re looking for a little inspiration – check out these links.
Occasionally folks have asked, especially in terms of speed lights, how many do I travel with and how do I pack them? So, here goes.
Will enumerate the above as we go. This picture is a tad dated, as we now travel with a couple other things. Been experimenting with the Lastolite Micro Apollo speed light boxes. And, we have tried some magnetized grid systems, which are cool. But the above is a kit we travel with, presented in all its various pieces.
First piece of the puzzle is the case, which is a Thinktank Logistics Manager. Any sensitive gear we have that we throw in the hold of an airplane goes into these now. They are tough, and well designed.
Of course, the flashes come first. I carry a mix of ten SB 900 and 910 units. They work, and are quite durable. Some of my 900 speed lights have easily more than a half million air miles on them, and remain in working order. Along with them, we have accumulated over the years a bunch of SD-9 external battery packs. I tend to use the packs that are proprietary to the system. It just presents less of a danger for over-clocking your flash. Chargers are crucial. We use Maha quick chargers, with Powerex batteries. That combo has worked well for us. We keep two mesh bags in the case–green for charged batts, and red for uncharged. We don’t use ring flash too often, but we throw a Ray Flash in there for good measure.
We use a variety of sizes of the ThinkTank cable organizer bags, for three SC-29 cords, flashlights, tape, gels, utility knives, head lamps, etc. We also bring along two sets of Pocket Wizards, with multiple backup Wizard to PC cables, and camera remote cables. We are currently using the PWIII’s and the newer PlusX models. The PlusX units are outstanding. Affordable, no frills, and they work. Also into the case goes a spare Hoodman Loupe.
Additionally, we take two small light shapers with us, the Flashpoint Beauty Dish, and the Flashpoint Snooted Grid. Mixed in are some Honl bits and pieces, like speed gobos, and some velcro straps for attaching cutters and flags to the speed light heads. Also, invariably, a roll of gaffer tape makes it into the case.
For coloring light, we bring along a couple of the Strobist gel kits, and mixes of other gels, which we organize into our color correction kit, and our theatrical gel kit. Both are housed in ThinkTank gel wallets. A former assistant, Will Foster, had the idea to cut the seam on the ThinkTank flash card organizers to make room for small flash gels, and ThinkTank got wind of it, and started officially making them.
An additional light shaper I’m quite fond of also travels in the kit, and that’s the Lastolite Speed Light Soft Box. It collapses really small, and has an interior diffuser, which I like, so for a small light shaper, it puts out a nice quality of light.
Throw in some various magic markers, and the instruction manuals for all the products, and we are good to go. This case, you may have noticed, has blue tape on everything. Whatever is blue taped, goes in this bag. That way, it sits on the shelf, complete, and we know, when we’re moving fast to the airport, it’s complete. Yank it off the shelf, throw into checked baggage, and when I get to location (presumably it has followed me there) I can light just about whatever I confront. The whole thing doesn’t travel all the time, but most of the time, for sure.
I hope this is helpful to those folks who have asked about what we travel with in terms of small flash, and how it’s packed. Many thanks to Lynda Peckham, at our studio, a fine photog, and organizing force of nature, who created the packing system, and shot the above pix. More tk….
ביום ההולדת האחרון קיבלתי מהאחים שלי במתנה מצלמה על תנאי. התנאי היה שאשפר את כישורי הצילום שלי, וכך כאשר אחי הגדול שלח לי דוא"ל על סדנת צילום מזון בגליץ, נרשמתי מיד. כלומר, כמעט מיד – כי כששאלו אותי איזו מצלמה … להמשיך לקרוא ←
Many Photoshop users are not aware of the many advantages of Adobe Photoshop Lightroom. In fact, many will tell you that they aren’t really sure what it is used for and how it differs from Bridge. In this tutorial, we will explain a bit more about what Adobe Photoshop Lightroom is used for and will highlight 10 reasons that you should start using this fantastic app today. Let’s take a look!
1. Fast Access to Your RAW Photos
Prior to Lightroom, photographers and photo editors had long complained that they needed a better way to view, organize, and edit their photos. If you have ever tried to sort through hundreds or thousands of photographs without using an application like Lightroom, you probably know what a tedious process it is. So having fast access to your RAW photos is probably the biggest advantage that Lightroom will offer you.
Lightroom has a smart way of linking the photographs to a catalog file, which only records the changes you make to them, but keeps the photos intact wherever they are stored. This saves a lot of processing power and storage space on your computer. You might end up having thousands or tens of thousands of high-resolution RAW photos in your catalog, but Lightroom will still be able to open it up in a couple of seconds and show all the photos together.
Since Lightroom 4 you also have an interesting option called Embed Fast Load Data under the Preferences > File Handling tab. Enabling this allows Lightroom to load Digital Negative (DNG) files even faster. The only downside of it is that it makes their file size a bit bigger. DNG is Adobe’s own camera RAW file format, which is great for archiving.
Lightroom can convert all kinds of Camera RAW files into DNGs easily. Lightroom is part of Creative Cloud so if you are paying for the membership you are free to download the latest version to see out how it works.
The files containing all the changes and previews of photos imported into a Lightroom catalog
2. Several Ways to Add Keywords
Keywords can save you a lot of time when trying to find specific photos, but it also takes time to properly add them to all your photographs. This is another area where Lightroom really shines. Bridge is good for keywording too, but Lightroom has so much more to offer. You can apply keywords while importing photos, you can add them to groups of selected images, you can apply them quickly with the Painter tool and you can even assign keyboard shortcuts to a set of keywords.
Adding keywords
3. Geo-Tagging With Built-in Google Maps
This feature was introduced in Lightroom 4 and it opened up a completely new way of organising photographs by their geographic location. If you have a GPS device in your camera then you won’t have to do anything as your photos will automatically be placed on the map in the Map module.
This module uses Google Maps but you have to be online to make it work. If you don’t have GPS data saved in your photos you will have to place the photos on the map manually, but Lightroom really helps you out with its intuitive features and user interface. You can easily locate specific places on Google Maps’ search engine and then you can place photos onto the map by simply dragging and dropping them.
You can even set up Saved Locations for places that you visit often, which will again save you time when tagging your photos. The great thing about manual tagging is that Lightroom will automatically write a lot of useful information into the metadata of your photos, like the Country, City and Sublocation. These all come handy when you are filtering your catalog.
Using the Map module to geo-tag photos
4. On-Image Editing
A great feature in Lightroom is the On-image editing tool, which looks like a small circle with an arrow above it and another one below it. You can find this tool under the Tone Curve and the HSL / Color / B&W panels. By selecting it you can apply local adjustments by targeting specific parts of your photos. It makes the adjustments much more intuitive and more effective.
Using the on-image tool to desaturate colors selectively
5. No Need for Saving
Another big advantage of Lightroom’s catalog system is that you never have to save any of your changes as they are automatically saved into the catalog’s database and they don’t affect the individual photographs. This would already be amazing, but on top of this Lightroom also saves the history of every step of your editing process for each and every photo in your catalog. Saving the history is not even an option in Photoshop, so it is really nice to have this feature work automatically in Lightroom. You can even preview all of the steps of the History with the Navigator panel while moving your mouse over the steps.
Using the Navigator and the History panels to check the stages of the editing
6. Before and After Views
Being able to compare your changes with the original photo is crucial in image editing and this is another area where Lightroom really shines. In the Develop module you have 4 different view options that you can use to see the difference between your original, adjusted, and edited photo:
Before/After Left/Right
Before/After Left/Right Split
Before/After Top/Bottom
Before/After Top/Bottom Split
What is especially useful is the Split modes as they allow you to see the changes on one single photo and you can easily drag the dividing line around to compare specific parts. To do this you just simply need to click on the photo to zoom into it. When you are ready with comparing click on the image again to zoom out.
Before/After Left/Right view
7. Filtering Your Catalog
We already discussed how Lightroom allows you to quickly add keywords and GPS data to help you categorize your photos more efficiently but Lightroom also allows you to quickly filter and search through your photos very easily using the filter feature in the Library Module.
You can enable the filter menu by going to the View Menu or by pressing Backslash (\). Once enabled, you will see 4 columns which you can use to refine your search by adding criteria. You should start from left and keep adding filtering options to the columns on the right until you have refined your search enough to see the photos you were looking for.
It is also good to know that you can save your filtering results as a Collection so you can find them much easier the next time you need them. You can also turn a single keyword into a filter by simply clicking on the little arrows to the right of keywords in the Keyword List panel.
Searching for photos in the catalog with the Filter bar
8. Virtual Copies
Previously, we talked about the fact that Lightroom doesn’t change the photos, it only records the amends separately into a database. Based on this technology Lightroom offers a great way to save several different edits of the same photographs using Virtual Copies. The biggest advantage with this is that you can save a lot space on your computer, as you don’t need to duplicate files whenever you want to compare different edits.
Comparing a Master photo and its Virtual copy
9. Editing Video Files
Even though Lightroom is mainly for cataloging and editing photos it also offers video editing features. Don’t expect anything advanced like Adobe Premiere, but it still does a good job if you only need to trim and correct White Balance or the basic Exposure of your videos. Don’t try to use the Develop module as you will only be able to use Lightroom’s Library Module in the Quick Develop panel to edit your videos.
Trimming and editing a video in the Library module of Lightroom
10. Creating Photo Books
Introduced in version 4, Lightroom now allows users to create photo books with the photos imported into their catalog, and even purchase prints of them using an online publishing service called Blurb. This built-in layout editing engine is great for anyone who wants to include an extra service like providing professional printed photo books for their clients. You don’t have to learn another application like InDesign, you can do everything directly in Lightroom. This feature is a big plus for wedding or event photographers.
Welcome back to our series on pricing your commercial photography. A few weeks ago we released Part 1 of the series which explored the benefits and pitfalls of working for free. As we explored the topic it became evident that working for free has its place but in order to create a sustainable and professional industry we must educate our community on the importance of properly pricing their work. Thus in Part 2 we will begin by showing you my personal approach to laying out a commercial invoice and the thought process behind the layout. [more]
Bitdefender Sphere is a collection of tools which provides complete all-round security for all your devices: PCs, Macs, Androids smartphone and tablets.
Bitdefender Total Security 2014 is on hand to cater for your PC protection needs. It's a full-featured security suite which provides everything you need to keep you safe, both online and off: an antivirus engine; phishing protection; a smart firewall; a spam filter; parental controls, secure online backup space, social networking protection, and more.
Macs need watching, too - if only to make sure you don't pass on Windows viruses to other PC users - and so Sphere also includes Bitdefender Antivirus for Mac, which work to keep any Intel-based Mac malware-free.
And elsewhere, Bitdefender Mobile Security provides three major services for your Android 2.2 (or later) smartphones or tablets. It can detect and remove any malware which might be on your device already; warns you of dangerous websites to hopefully prevent you from encountering any more; and includes a recovery feature to help you locate lost or stolen computers.
Bitdefender highlights the fact that a single Sphere license will cover an "unlimited" amount of devices, and while this is true, there are restrictions. Specifically, Bitdefender Sphere is for home use, so you can't buy a copy and expect it to cover all your business employees. And it only covers three users, although each of those can then individually protect as many devices as they like.
Perhaps the best part of all this, though, is the discount. Because while choosing all three of these packages would normally cost you $159.75, Bitdefender Sphere is available from this store for $39.95 for a one year licence (that's only marginally more than the cost of buying PC protection on its own). If you've a PC, Mac and Android device then this is a great way to get quality protection at a reasonable price.
Please note that the trial version here is for Bitdefender Total Security 2014 (which is the Windows component of Bitdefender Sphere).
Bitdefender Sphere [2-YR] includes an unlimited device 2-Year license.
Special Offer: there is no Giveaway this weekend, back on Monday. During this weekend, we're giving you the chance to buy Bitdefender Sphere, along with a 2-Year license, for a discounted price!
 אנחנו, ואיתנו גם הסמארטפון, תמיד בריצה. אנחנו קמים בבוקר, בודקים סטטוסים, מתארגנים לעבודה, משיבים למיילים, קופצים מפגישה לפגישה, שולחים הודעות ב-WhatsApp, עד שנכנסים לשירותים ו… פלופ! המכשיר באסלה. דממת אלחוט לעשירית השניה – הלחץ עולה, הדופק מאיץ ואז נותר לנו רק להשלים עם העובדה שעלינו לחזור ללבטים – איזה סמארטפון רוכשים עכשיו?


 Leawo iOS Data Recovery is a powerful data recovery program that could recover multiple lost data from all models of iPhone, iPad and iPod touch. It could help retrieve data lost for almost any kinds of reasons, like wrong deletion, iOS upgrade, factory settings restoring, breaking or losing the devices, etc.
 חברת אסוס משיקה בישראל את Transformer Book T100, מחשב נייד שהוא גם טאבלט המבוסס על מעבד הדור הבא מסדרת ה-Atom של אינטל ומריץ את מערכת ההפעלה Windows 8.1 בגרסה המלאה. ה-Asus Transformer Book T100 שייך לסדרה הותיקה של יצרנית המחשבים הטייואנית וניתן בקלות לפרק את המסך מהמחשב הנייד ולעשות בו שימוש כטאבלט. היתרון הענק של המחשב הנייד הוא במימדיו הקומפקטיים (מסך 10.1 אינץ' ומשקל 1.07 ק"ג) והיכולת להריץ כל תוכנה ולא רק כאלו המותאמות במיוחד לווינדוס 8 כפי שדורשת גרסת ה-RT של מערכת ההפעלה.
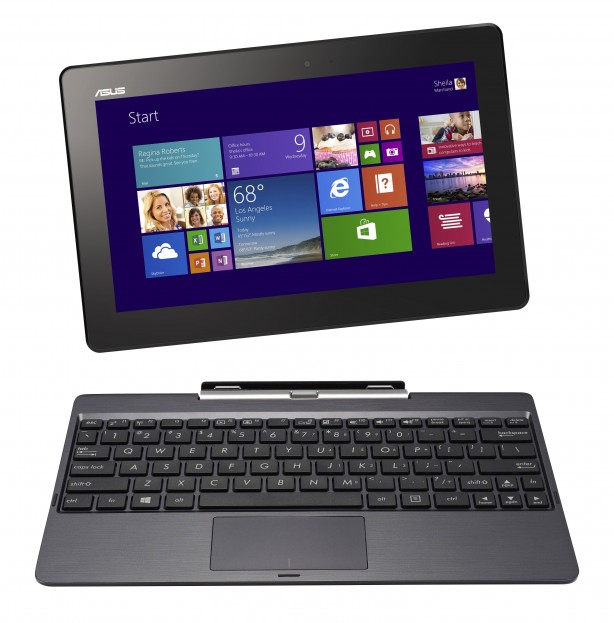 כפי שציינו, מערכת ההפעלה אותה מריץ המחשב (ישירות מהקופסא) היא Windows 8.1 העדכנית מבית מיקרוסופט והרוכשים מקבלים את חבילת התוכנות Office הכוללת Word, Excel, Power Point ו-OneNote. היכולת להריץ את מגוון התוכנות העצום שיש לווינדוס להציע יחד עם חבילת התוכנות מבית מיקרוסופט הופכות את האסוס Transformer Book T100 לכלי עבודה בעל ניידות גבוהה ועם תג מחיר סביר בהחלט של 2,088 ש"ח לדגם ה-32GB ו-2,496 ש"ח לדגם ה-64GB.


 Easy Archive Recovery is a marvelous tool for recovering both ZIP and RAR archive types. It supports files, created in RAR, WinRar, WinZip, PKZIP, InfoZip, 7-Zip and other popular utilities. The files can be deleted or damaged, the storage device can be formatted but your files can still be recovered.
 Everything you need to edit, cut, convert and produce your videos and home movies. Ashampoo Movie Studio comes with an intuitive step-by-step user interface that guides you from start to finish. Seamlessly blend scenes together using built-in high quality transition effects and create cinematic depth and atmosphere with visual effect and background music.


