
Shh.listen
Shared posts

14 Jul 14:18


Korean Beef Skewers
by Sabrina Modelle
These grilled Korean beef skewers are a little sweet, a little spicy from the gochujang (which is a Korean chili paste), and full of umami. The best part is that you can have them on the table in about a half hour.
I’ll never forget the first time I ate Korean food. We were visiting my mom’s friend in Los Angeles and she took us out for Korean barbecue. My first taste of kimchi, banchan, and bulgogi and I was hooked.
Continue reading "Korean Beef Skewers" »
11 Jul 18:48
Sip and contemplate, this whiskey decanter has a hand engraved, deconstructed Tartan pattern.
by Harry
Details: Designed by Joe Doucet, the Alba Collection – Alba is Gaelic for Scotland – pays respect to the spiritual home of whiskey, Scotland.

Says Doucet, “The elegantly reductive forms are punctuated by hand engraved deconstructed Tartan pattern, reflecting the origin of whiskies. The set is [also] punctuated by the unique stopper, which leans omnidirectionally. We invite the owner to always point the stopper in the direction of Scotland.”

Source: Via MOCO Submit.


29 Jun 19:39
Foot-Powered Washing Machine
by swissmiss
Shh.listenThis is great if you want to wash four pieces of clothing at a time!
Yirego created a foot-powered, mobile washing machine. Smart.
Chelsea likes this
29 Jun 19:33
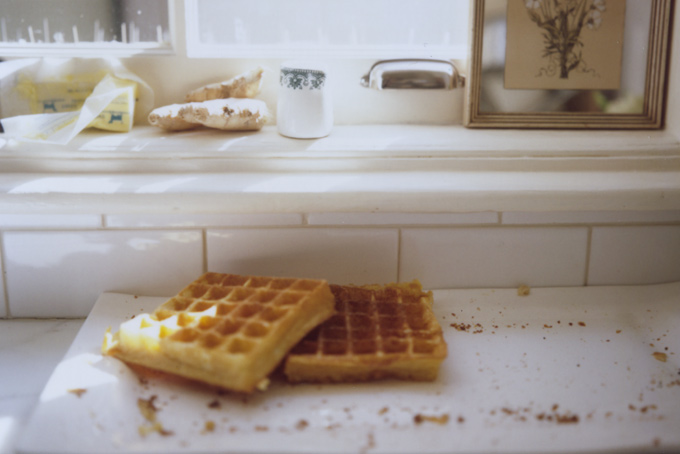


Whole Wheat Waffles
If you're a waffle fan, please give these a try. Everyone needs a solid waffle recipe in their back pocket, and I'm quite sure these are the end of the waffle conversation for me. You're looking at the waffles I make for every family brunch. They're the waffles requested by my seven-year old nephew when he spends the night - the ones he like from breakfast and dinner ;) And they're the ones included in Near & Far.
I've made them dozens of times, in both Belgian and standard waffle irons. The batter is a combination of whole wheat and all-purpose flours along with rolled oats. This combination conspires with lots of buttermilk to give each waffle a nice, moist interior, and a crisp, and beautifully golden crust. A bit of rice flour (or organic cornstarch) keeps the batter from cooking up damp and heavy. You can also play around with the batter. I tend to keep the ratio of whole wheat to all-purpose flour constant, but sometimes trade in wheat germ for the oats. Or add a bunch of chopped chives and herbs, or a few tablespoons of cacao powder for a chocolate version and chocolate chips when I really want to score points with the kids.


A couple pro tips: mix up the dry ingredients and keep in a mason jar(s) for easy morning-of assembly. I sometimes do a double or triple batch of the dry ingredients, divide into jars, and keep them on hand for a last-minute cabin, or brunch adventure. Once you combine the dry ingredients, the batter comes together in a flash with just buttermilk, eggs, and butter.
You can also see them on Tara's site (Seven Spoons), and Madeline's too (Madeline Marie). Enjoy! -h
Continue reading Whole Wheat Waffles...
29 Jun 19:31
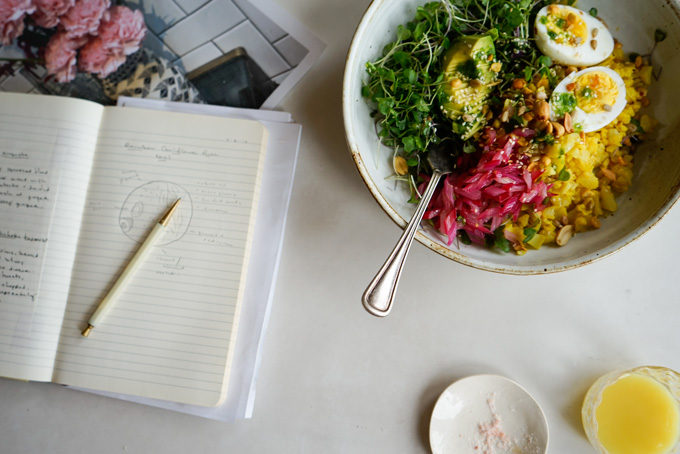


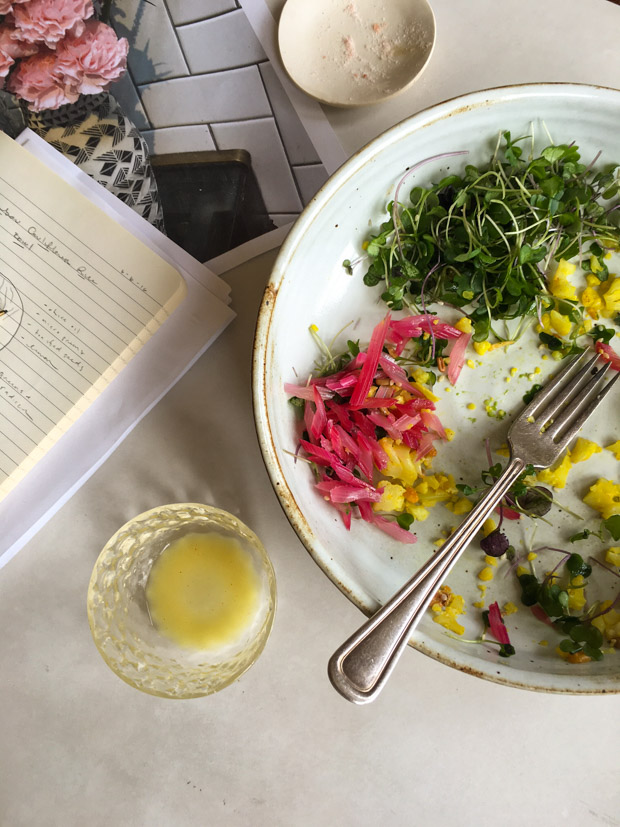
Rainbow Cauliflower Rice Bowl
This is the sort of meal I crave after a travel stint. It's when I end up lingering around the produce section even longer than usual in an effort to cherry-pick the most vibrant ingredients. In this case, rainbow chard with electric pink stems, a tight head of pale yellow cauliflower, just-cut chives - green, tall, and straight. The perfect avocado. I think we can all agree, these types of rainbow bowls are all about finding good ingredients. Here's how it played out. Lightly cooked cauliflower is chopped, then tossed with turmeric, cumin, cayenne, and a touch of ghee - although, you could certainly, use coconut or olive oil. The cauliflower is the base to which you add whatever else you might have at hand - sliced avocado, hard-boiled eggs, toasted seeds, rainbow chard stems, lettuces. While the cauliflower was steaming, I pureed the chives with olive oil for a finishing drizzle. It's a bowl exploding with color and freshness, light and bright with enough substance to keep me feeling A+ throughout the afternoon....Enjoy! -h

29 Jun 19:31
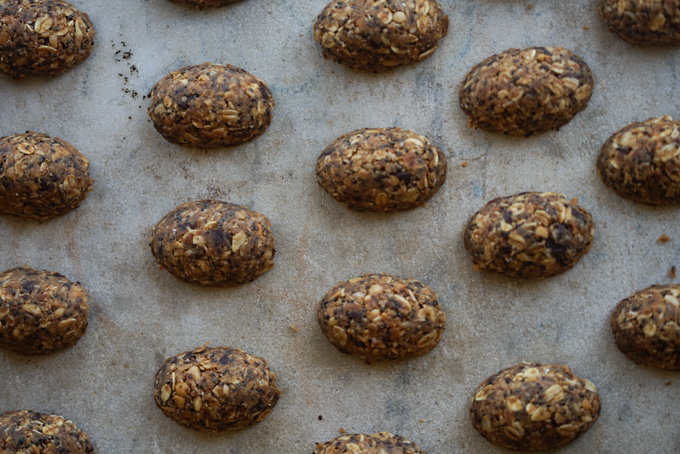


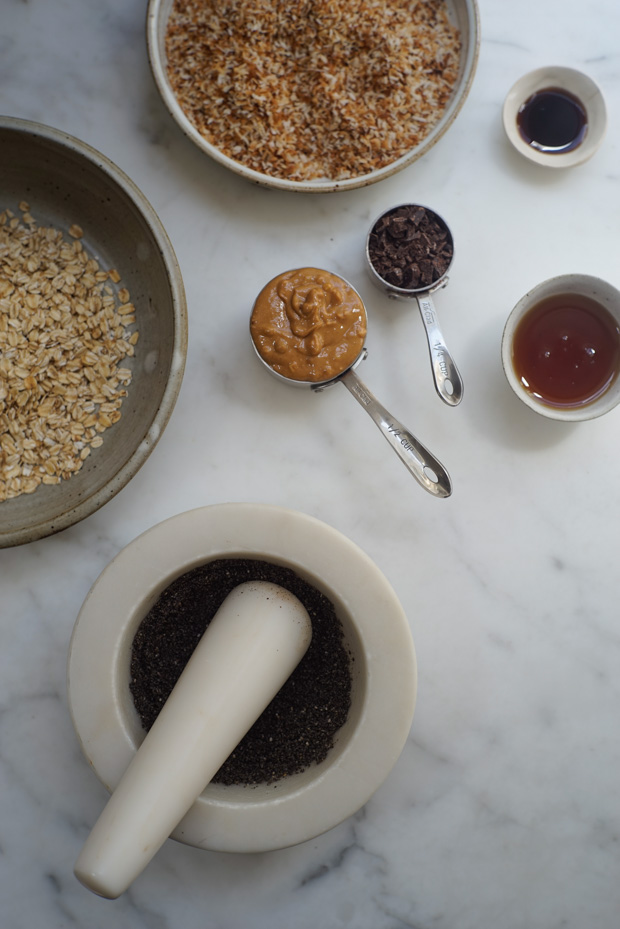
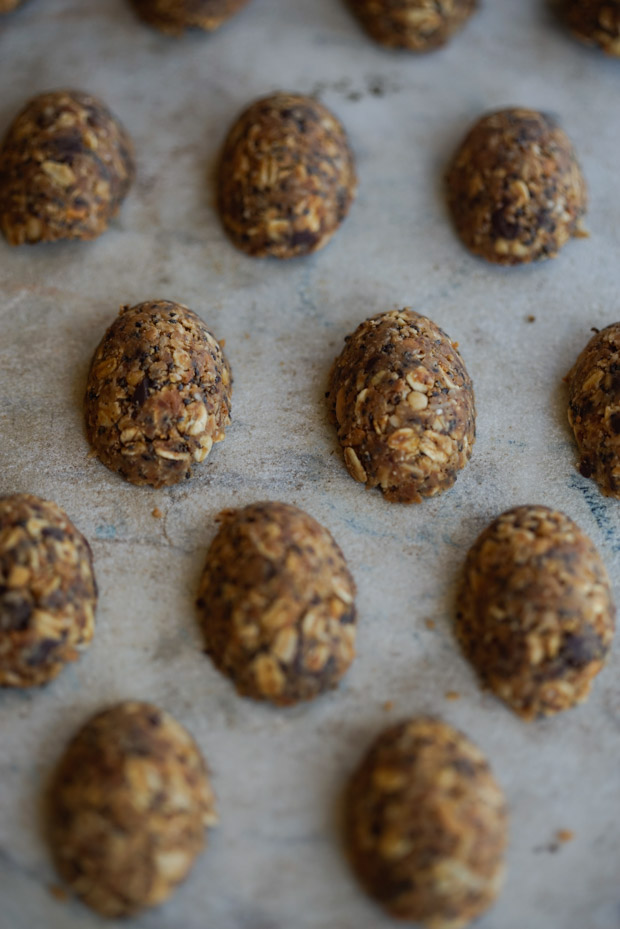
4 o'clock No-bake Energy Bites
Energy bites aren't a new thing, but if you're a person that grabs commercial power bars regularly, and you're not already on board, give these a try as a DIY alternative. I make them for a 4 o'clock late afternoon snack to reach for when I'm at the studio, but they're also a great travel option. Kids love them. Adults love them. The best part is that you're in control of the ingredients, and they're a breeze to make. That said, I deploy a few, small, but (I'll argue) significant personal preferences when I set out to make energy bites. Most recipes tend to use raw coconut flakes, and raw oats. I find a light toasting of both is worth the slight extra effort. I also like chia seeds here, and tend to use them as my seed of choice, but I first beat them up in a mortar and pestle a bit before adding them to the mix. Also, feel free to swap things up a bit - trade in alternate seeds, use whatever sweetener you prefer, add spices if you like, or an alternative nut butter, or keep things simple, and just go with this version - Enjoy! ---I posted the recipe here---....
23 Jun 16:37
Small Victories
by swissmiss

Small Victories takes files in a Dropbox folder and turns them into a website. Here are some super fab examples:


Try it yourself: Small Victories
23 Jun 16:34
Flowers
by swissmiss

Next time you are going over to someone’s house and want to bring some flowers, try a bouquet of scented Tattly. They are water color designs by French artist Vincent Jeannerot.
(image by Ace Boothby)
23 Jun 16:32
prompt
by swissmiss

Prompt is an experimental email-based community project.
The premise is simple: every day, you get a prompt in your inbox. You get 18 hours to write back with anything you want. The next day, you get a new prompt, but you also get to see what everybody else on the list wrote back.
Not that I want one more extra email in my inbox, but I do find the idea charming.


23 Jun 16:28
IKEA Museum
by swissmiss


An IKEA museum is scheduled to open at the end of this month inside the building that housed the company’s first ever store. I’d visit.
23 Jun 16:28
Cast Iron Pan
by swissmiss

I love to cook with cast iron pans but have never seen this type of shape. I’d give it a loving home.
23 Jun 16:25
Fortune Cookie Necklace
by swissmiss

Who doesn’t love a fortune cookie? Here’s one you can wear around your neck, made out of gold. Thumbs up!
23 Jun 16:02
Plume Wi-Fi
by swissmiss

Plume offers a new take on improving home Wi-Fi by eliminating the router entirely and replacing it with a fleet of mini-hubs that plug right into your wall sockets. YES!
17 Jun 14:30
 Getting really organized isn't as simple as just cleaning up. And when you see these awesome shelves and pantries and closets on Pinterest, they all have one thing in common – matching containers and the feeling that EVERYTHING has a spot. I've forever been intimidated about buying organizational items because 1. It's kind of expensive, and 2. I don't really know what I need.


 Here's a useful acrylic cart we found on a random Home Goods trip!


 These hyacinth bins in Elsie's pantry actually came from the bathroom aisle!
Where Professional Organizers Shop (You're gonna love this!)
by A Beautiful Mess
Today Clea and Joanna from The Home Edit are here to help us get past that phase with their advice for creative places to shop to get the best stuff and save some money along the way!
Here are six places that professional organizers shop, straight from the source!
We wander these aisles EVERY day. So we thought we would save you some of the wandering and point you in the right direction!
1. We LOVE adding glass jars to just about anything. Whether it's to store food in a pantry or cotton balls on the bathroom counter, it gives a luxe look for very little money. Look for glass cracker jars, hermetic glass jars, or our favorite all-purpose glass canisters.
2. One of our favorite go-to tricks is to add drawer dividers to virtually every drawer. Whether it's for one of our a closets, dressers, kitchen, or bathroom, it's an easy and low cost way to organize your space. You can go with white dividers or clear, and for deep drawers, there are larger options available.
3. Finding a multi-functional storage bin that's also chic is not the easiest task. So when we found the white Nordic Basket with bamboo lids, we were pretty excited. It's so versatile that we've used it in everything from a home office with open shelving to laundry rooms to pantries.
Sometimes it's easier to do your shopping from the couch. But ordering online can also help when you want to buy something in bulk since stores typically carry lower levels of stock. Here are some of our favorite options!
1. When we buy shoe boxes, we pretty much always need a huge supply. It's not so easy to fit 50 shoe boxes into a shopping cart – so we have them shipped! These shoe boxes come in a case of 18 and easily stack in a closet or cabinet.
2. Our favorite items tend to be ones that offer a variety of utilities. We love being able to repurpose things throughout a house and come up with unique ways to use them! This Russell + Hazel acrylic file divider for instance is perfect in an office but also doubles as a handbag holder in a closet.
Ikea is not just for college students... It's actually a GREAT resource for inexpensive product, and it offers that clean Scandinavian design for a fraction of the cost.
1. For your office, or even an entryway desk, we love the Kvissle collection. Especially the letter tray, desk organizer, and phone charging station. Where else can you get so many cool items under $20?
2. One of the techniques we always add into a home is a sentimental box – either for the entire family or per family member. It's a place to hold the birthday cards, kids' drawings, or ticket stub you just can't get rid of. The Tjena lidded box (in a variety of colors and sizes) is a really inexpensive storage bin that you won't mind leaving out on your shelf.
The beauty of Home Goods is that it's a treasure hunt, and you never know what you'll stumble across. The downside is that we can't point out some of our favorite finds! Here are a few things to look out for at your local store:
1. InterDesign products are a go-to in the organizing industry since they offer that clear acrylic style that has become so popular. The only problem is they tend to be very expensive. So whenever we are in Home Goods, we make a beeline to the kitchen aisles and stock up on InterDesign products for a about half the price of traditional retail.
2. Browse the decorative accessories to find some pieces for your bookshelves, coffee table, or mantel. They always have great decorative accents that will help style whatever project you are working on!
We love Target for pretty much all things – particularly the home section. Between their designer collaborations and continuous stream of new products, it's easy to find new items to work with.
1. Do not ever walk by the dollar section! We have found everything from industrial baskets, to glass jars, to chalkboard labels, and baker's twine. In fact, some of our favorite items have come from the dollar section, and when we spot them, we buy out the whole store. Because once they are gone, you might never see them again!
2. The Nate Berkus line for Target is an obvious choice for a home office, but the products actually work all over the house. The gold and white desktop accessories double as great jewelry storage, an entryway tray to leave your keys on, or a bathroom valet tray. The magnetic hanging chalkboard makes a great addition to a playroom or kid's room, as does the hanging cork-board map.
3. One of the best places to find bins at Target is actually in the kids' aisle. They come in so many great styles and have everything from stacking natural wood bins to gray woven storage cubes to wire milk crates. If you don't find what you're looking for, make sure you explore other sections of the store. You can also find great items in the bath and the garden section as well!
Sometimes you can pull together a whole room by adding a single item that gives everything a polished look. For not that much more money, you can find some great items that will make your space look extra styled.
1. You can find GREAT baskets in a ton of different styles and textiles. We love these metallic woven baskets that work great on the floor to hold magazines or blankets.
2. There are a big assortment of decorative boxes that are actually really functional for storing everyday jewelry, business cards, or office supplies. And for a set of three, these trinket boxes are a great deal.
PRO Tip: Shop in the wrong aisle!
If you're organizing your kitchen, try the bathroom container aisle. Sounds weird, but you never know when you'll find that perfect size container!
Thank you so much to The Home Edit for sharing your secrets here today. If you haven't followed them on Instagram yet, you're in for a real treat! xx- Elsie
Credits//Author: Elsie Larson with tips from Clea and Joanna of The Home Edit. Photos by Elsie Larson and The Home Edit.
14 Jun 15:16

Before & After: A Bright Kitchen Upgrade
by Nora Taylor

Ahhh the magic of white paint. Roxanne updated and brightened up her kitchen with some gorgeous new additions but kept the original cabinetry and used some really nice paint with great success.
13 Jun 14:43
20 Renter-Friendly Decor Ideas
by A Beautiful Mess
Happy Saturday! Many of our readers have requested more renter-friendly posts, so we thought it would be fun to do a roundup of our favorites. First off is this washi tape wall. You can get really creative with the design, and it's a simple and inexpensive way to decorate a wall!
We love this mid century plant stand, and it doesn't require any woodworking. Bonus!
Make a rope rug for your space. Weekend project anyone?
This modern bottle opener doubles as wall art.
Replace a towel bar with lucite and some gold hardware.
Makeover an outdoor space with these tips. A new rug and some plants can add so much!
There are so many fun removable wallpaper patterns available right now. Add some to your stairs!
Make this pretty watercolor phrase art to display on a mantel.
So fun! Use your favorite nail polish colors to make this knife holder.
Give a plain chair a fun makeover with this DIY.
Add a leaning ladder to your living room or kitchen. Here are five ways to style one.
Use leftover wine corks to make this bulletin board.
Add some color to your living room with this palm leaf pillow DIY.
If your bathroom needs a little something new, you can make this woven bath mat over the weekend.
Make a new side table like this one made from copper pipe.
Print your favorite photo (in color!) and hang it up with some washi tape or a simple frame.
Make this collapsible playhouse for a kid's room. So cute!
We're always looking for new ways to display plants. These rope wrapped planters are super easy to make!
Instead of messing with an ironing board, make a magnetic ironing mat for your laundry room.
Last but not least, add some color and texture to any wall with macrame garland.
Have a great weekend! -The ABM Team
10 Jun 18:07
Kale, Miso, and Soft Egg Salad
by A Beautiful Mess
Shh.listenMMMMMmmmmmmmmmmm
Somedays you just need a good salad. When these days come (and they do often), I'm talking about a salad that is filling, flavor packed, and hearty. I don't want some wilty side salad that tastes just as bland as it looks. I think that's the number one reason I didn't get into salads for some time. I had too many bad ones so I didn't realize how good they can really be. And man oh man, this is a good one.
This salad is simple. It's really just three main ingredients for the salad and four ingredients for the dressing (not counting salt and pepper, as I think that's a given). This is one of those meals that totally sneaks up on you in that it seems like there's nothing to it, but it turns out to be wildly flavorful and quite filling.
I'm a big fan of simple and delicious. That's usually code for "easy to make but surprisingly good", which is pretty much the perfect blend for at-home cooking.
If you don't like soft boiled (or hard boiled) eggs, you could swap that out for more nuts, baked tofu, sautéed tempeh, or even some cooked meat if that's what you're into. But if you do like runny yolk eggs, then you'll be happy to know that the bright, lemony miso dressing goes SO well with them. They are food soul mates for sure. :)
Kale, Miso, and Soft Egg Salad, serves two
For the salad:
4-5 oz. kale
1/4 cup sliced almonds
2-3 soft boiled eggs
For the dressing:
2-3 tablespoons oil (I used olive but you can use any kind)
juice from one lemon (approx. 2 tablespoons)
1 cloves of garlic, well minced
1 tablespoon miso (yellow or white)
salt + pepper
First, get your eggs going. For the egg you see in my photos here, I cooked it for 5 minutes. Place three eggs in a small pot and fill it with water to cover the eggs. Bring the water to a rolling boil (really, wait until it's really boiling here!). Then remove the pot from the heat, cover with a lid, and let the eggs sit in there and continue to cook for 5 minutes. Then drain them and place the eggs in a bowl of cold water to cool (and also stop cooking) while you prepare the other elements of this salad. Generally, if you want your soft boiled egg to have a mostly or completely set white but still a gooey or runny yolk, then you'll want to boil it for 4 to 5 minutes. I err on the side of boiling for a bit more time (5 minutes) because I'd rather slightly more cooked yolks than undercooked whites. But that's just me. You could also continue to cook for 9 to 10 minutes if you want them hard boiled. It's totally up to you here; this is just what I prefer.
For the dressing, stir together the lemon juice, miso, minced garlic, and oil. Taste and season with salt and pepper. Set aside.
Remove any large veins from the kale; you just want the leaves. Finely chop and toss in the dressing. Divide onto two plates and top with almonds and any other veggies you'd like to add (I added a little tomato, but I've eaten this with just kale, almonds, eggs, and it's great on its own as well). Top with the soft boiled egg.
That's it – super simple! This makes a fantastic quick lunch or dinner, and you'll feel great eating this.
Also, quick random note. Guys, thank you so much for allowing me to share recipes with you for years and years now. I LOVE it. It's one of my very favorite things to do, truly. So thank you for reading! xx. Emma
Credits // Author and Photography: Emma Chapman. Photos edited with A Beautiful Mess actions.
chapinc likes this
10 Jun 10:47
Pink Lemonade Jello Shots
by A Beautiful Mess
Shh.listenWe should make these at our next shindig
Summer is all about party foods, am I right? What excites me the most about going to a picnic or pool party is really what's being served at the snack table more than anything else. We've done our fair share of jello shots here at the blog, and I always have some extra love for the ones that are really cute as well as really tasty, so I thought a pink lemonade version of a lemon drop shot would be just the thing to get this summer started off right. They may look complicated, but they are super easy to make – I promise!
Pink Lemonade Jello Shots, makes about 9 lemon halves you can cut into wedges
2 packets of unflavored gelatin
1 cup pink lemonade
1/2 cup regular vodka
1/2 cup lemon vodka or Lemon Eddy
5 lemons
Cut your lemons in half and use a spoon (a serrated grapefruit spoon works great if you have one) to scoop out the insides as much as you can.
Heat the lemonade in a pan over medium heat and stir in the packets of gelatin slowly until they dissolve. Add the lemonade and gelatin mixture to a bowl and pour in your vodka liquids. Stir until combined.
Transfer the liquid into a pourable container and place your lemon halves into a muffin tin to keep them upright. Pour in the liquid until each half is full and refrigerate for 4 hours or until set.
Remove the tin once the lemons have set and slice into slices right before serving. Enjoy!
How pretty are these all sliced up? Such a cute look for a summer party. You can make them with water instead of vodka if you'd like them for a kid's party instead. If making these for an outdoor party, I would serve them on a bed of ice to keep the jello from melting too quickly. Cut them into bigger or smaller slices depending on the serving size you want, and watch them disappear!! xo. Laura
Credits//Author and Photography: Laura Gummerman. Photos edited with A Beautiful Mess actions.
Heidianna likes this
03 Jun 14:49


Salmon with Lemon Cream Sauce
by Elise Bauer
It’s always hard to plan for a fish meal around here, because it all depends on what the market has fresh. You can show up at the store with the best intentions of securing a thick halibut steak only to be disappointed with what clearly looks like it’s been sitting under the glass for a few days.
Fish is best fresh, there’s no way around it. The fresher the better! So, the best attitude to approach the fish section is, what looks best?
With whole fish, you can usually tell just by looking at the eyes—they should be clear, not foggy and sunken. With fillets, if the surface is dried out and tired looking, that’s not a good sign. The fillet should glisten, like it was just cut, and should smell fresh, not fishy.
Continue reading "Salmon with Lemon Cream Sauce" »


18 May 14:28
Triple Tiki Rum Punch
by A Beautiful Mess
I have realized recently that the light and fruity cocktails are actually my favorite type of drink to order. Put me at the bar at a tropical vacation resort and I will probably like every drink they put in front of me – it's all delicious! Elsie bought me these adorable cat tiki glasses this year, and so I thought it would be fun to make the perfect tiki drink to go along with them for a summer party. I call it a "triple" tiki punch because of the three juices that make up most of the punch, but you could swap out almost any other tropical juice flavor if one of them is not your favorite. Mix and match!
Triple Tiki Rum Punch, serves one
1 oz white rum
1 oz pineapple juice
1 oz orange juice
1 oz grapefruit juice
0.5 oz grenadine
1-2 oz of club soda or seltzer water
squeeze of lime wedge
pineapple, cherries, oranges, or limes for garnish Add the rum, pineapple juice, grapefruit juice, orange juice, grenadine, lime juice, and seltzer into a glass. If you like your drinks a little stronger, add another ounce of rum to the drink. Mix to combine, and pour into a tiki glass filled with ice.
Add some lime, orange, or grapefruit wedges to a wooden skewer with pineapple and cherries to create some festive garnishes for your punch!
Add to your drink, and you're ready to start sipping!
So, where's the cabana, am I right?? I feel like the best part of tiki drinks is actually eating all the yummy fruit off the skewers, so don't skimp on the good stuff! You can either make these to order or multiply the recipe to keep in a pitcher nearby for self-serve drinks or refills. As if I needed an excuse to drink anything out of a cat glass, this refreshing and fruity tropical drink is perfect for your next summer party (tiki theme or not). xo. Laura
Credits//Author and Photography: Laura Gummerman. Photos edited with A Beautiful Mess actions.
17 May 21:12
DIY Natural Room Freshener
by A Beautiful Mess
When I try or learn something I love, I can become extremely loyal to it. Hardcore, if you will. ;) And that's my opening line for this blog post about air fresheners.
Last year I made this pillow mist recipe with natural ingredients, and I've been using it all year. In fact, that bottle is still sitting in my guest bedroom right now. I spritz all the sheets in the house on laundry day and always give it an extra spritz before we have guests.
I've even used it for general room freshening a couple times. I don't typically buy many air freshener products from the cleaning aisle at the grocery store because they tend to be full of chemicals, which is the opposite of what I want in my home.
Today I experimented further with my original recipe and came up with some fun (and pretty!) options for natural room sprays using essential oils! You can still use them on sheets, but also so much more!
Here's how it's done–
Supplies:
-essential oils (a variety of scents)
-water
-witch hazel
-mini funnel
-pretty perfume bottles (I found mine on Amazon – this size and this size)
Using a tiny funnel, pour 15-20 drops each of two different essential oils into your bottle. (I'll share my combinations below!)
Next, fill the bottle halfway with witch hazel.
Then, fill the bottle the rest of the way with water.
So the recipe is basically – 1 part witch hazel, 1 part water, and 30-40 drops essential oils in any scents you like.
Last, I used a white paint pen to write a fun (made up) name on each bottle! You can name them anything you want. So fun, since one of my not-so-secret dream jobs is to be someone who gets to name nail polishes and paint colors. :))
You can create endless scents using various essential oils, choosing them was my favorite part! Here are three recipes that I really like!
Cozy Vibes is a combination of white fir and bergamot. My absolute fave!
Fresh Vibes is a combination of combination of grapefruit and Purify. Very fresh and citrusy!
Campfire Vibes is a combination of wild orange and clove. You can really smell both, and it reminds me of the perfect mixture of summer and autumn!
The perfume bottles give it a nice touch! You can use any glass bottle, but I went ahead and chose these since they're so beautiful, and you can use them over and over again.
Two words – GIFT IDEAS!
These smell SO good! I am obsessed with how they came out and know I will get plenty of use out of these. It's really too bad you can't reach through the screen and smell each one because if you could, I know you'd be making some right away! They're really nice.
I love knowing that there are no weird chemicals hiding in there, but additionally, they smell so much more REAL than anything you'll find in that grocery store aisle.
One more note! I like to shake the bottle between each use. Although I have tested it and you don't have to shake it to get the scent. Since it's oil, it never completely combines with the water, but don't worry – it still does the job!
Thanks so much for reading! xx- Elsie
Credits//Author: Elsie Larson. Photography: Amber Ulmer and Elsie Larson. Photos edited with A Beautiful Mess Actions.
Edwards.rosemaryj likes this
17 May 15:49


Pasta with Tuna and Arugula
by Elise Bauer
Best use of canned tuna ever! I first read about this classic Italian recipe years ago in the San Francisco Chronicle, and it has since become one of my favorite quick and easy go-to dinners.
All you need is canned tuna (packed in olive oil), garlic, olive oil, chili pepper flakes, baby arugula, and pasta.
Continue reading "Pasta with Tuna and Arugula" »
17 May 14:45
Photo Ledge DIY
by A Beautiful Mess
Today I am excited to share a simple and very useful DIY with you!
We all have these walls in our homes that we don't know what to do with, right? In Jeremy's studio there was one such wall above this small side table. Originally I was planning one large print for this space, but since there is already a big photo in another part of the room, it just didn't feel right. The idea of photo ledges appealed to me because the art could be changed from season to season, and what's even better is it doesn't ALL have to be art. For these photos, I threw a few favorite records up there, but I think some framed sheet music or other personal mementos would also be nice.
And of course, we printed some special photos as well!
This post is part of our long-running work with the amazing folks at Canon USA, and I used my personal favorite printer, the Canon PIXMA iP8720 Crafting Printer for the photos you see up there. I love having the large format to print multiple photos on a page. It gives me a little more freedom with the sizing.
Supplies:
- 2.5" x .75" board
- 1" x .75" board
- 1.5" x .5" board (sometimes these only come about 3' long, so you may have to use two if making a long ledge)
- jigsaw, chop saw, or have the nice people at the lumber store cut it to size for you!
- 1" nails
- 1.25" wood screws
- wood glue
- small clamps
- drill
- keyhole hanger
- paint
- Canon PIXMA iP8720 Crafting Printer
Measure how long you want your ledge to be and cut all three of your board sizes to that exact length. To create the back and bottom of your photo ledge, glue and clamp the side of the 1" x .75" board to the edge of the 2.5" x .75" board. Allow the glue to set a few minutes.
Use some wood screws to securely attach the smaller board to the larger one through the back of the larger board. This back side is also the back side of your ledge, so the screw heads won't show when done.
Use more glue and clamps to clamp the edge of the 1.5" x .5" board onto the other open side of the 1" x .75" board. Allow the glue to set for a few minutes.
Once the glue is set, remove the clamps and drive a few small nails into the edge of the board to keep the front board secure.
Attach some keyhole hangers onto the back of your ledge for hanging, and paint or stain your boards whatever color you choose. Now you're ready to hang and add your photos!
I love how it turned out! This is a project that can be done in a day, fit to the exact size of YOUR space, and makes a huge impact in the room on a small budget.
xx! Elsie
Credits//Author: Elsie Larson, Photography: Elsie Larson and Laura Gummerman. Project Assistant: Laura Gummerman. Photos edited with A Beautiful Mess actions.
Heidianna likes this