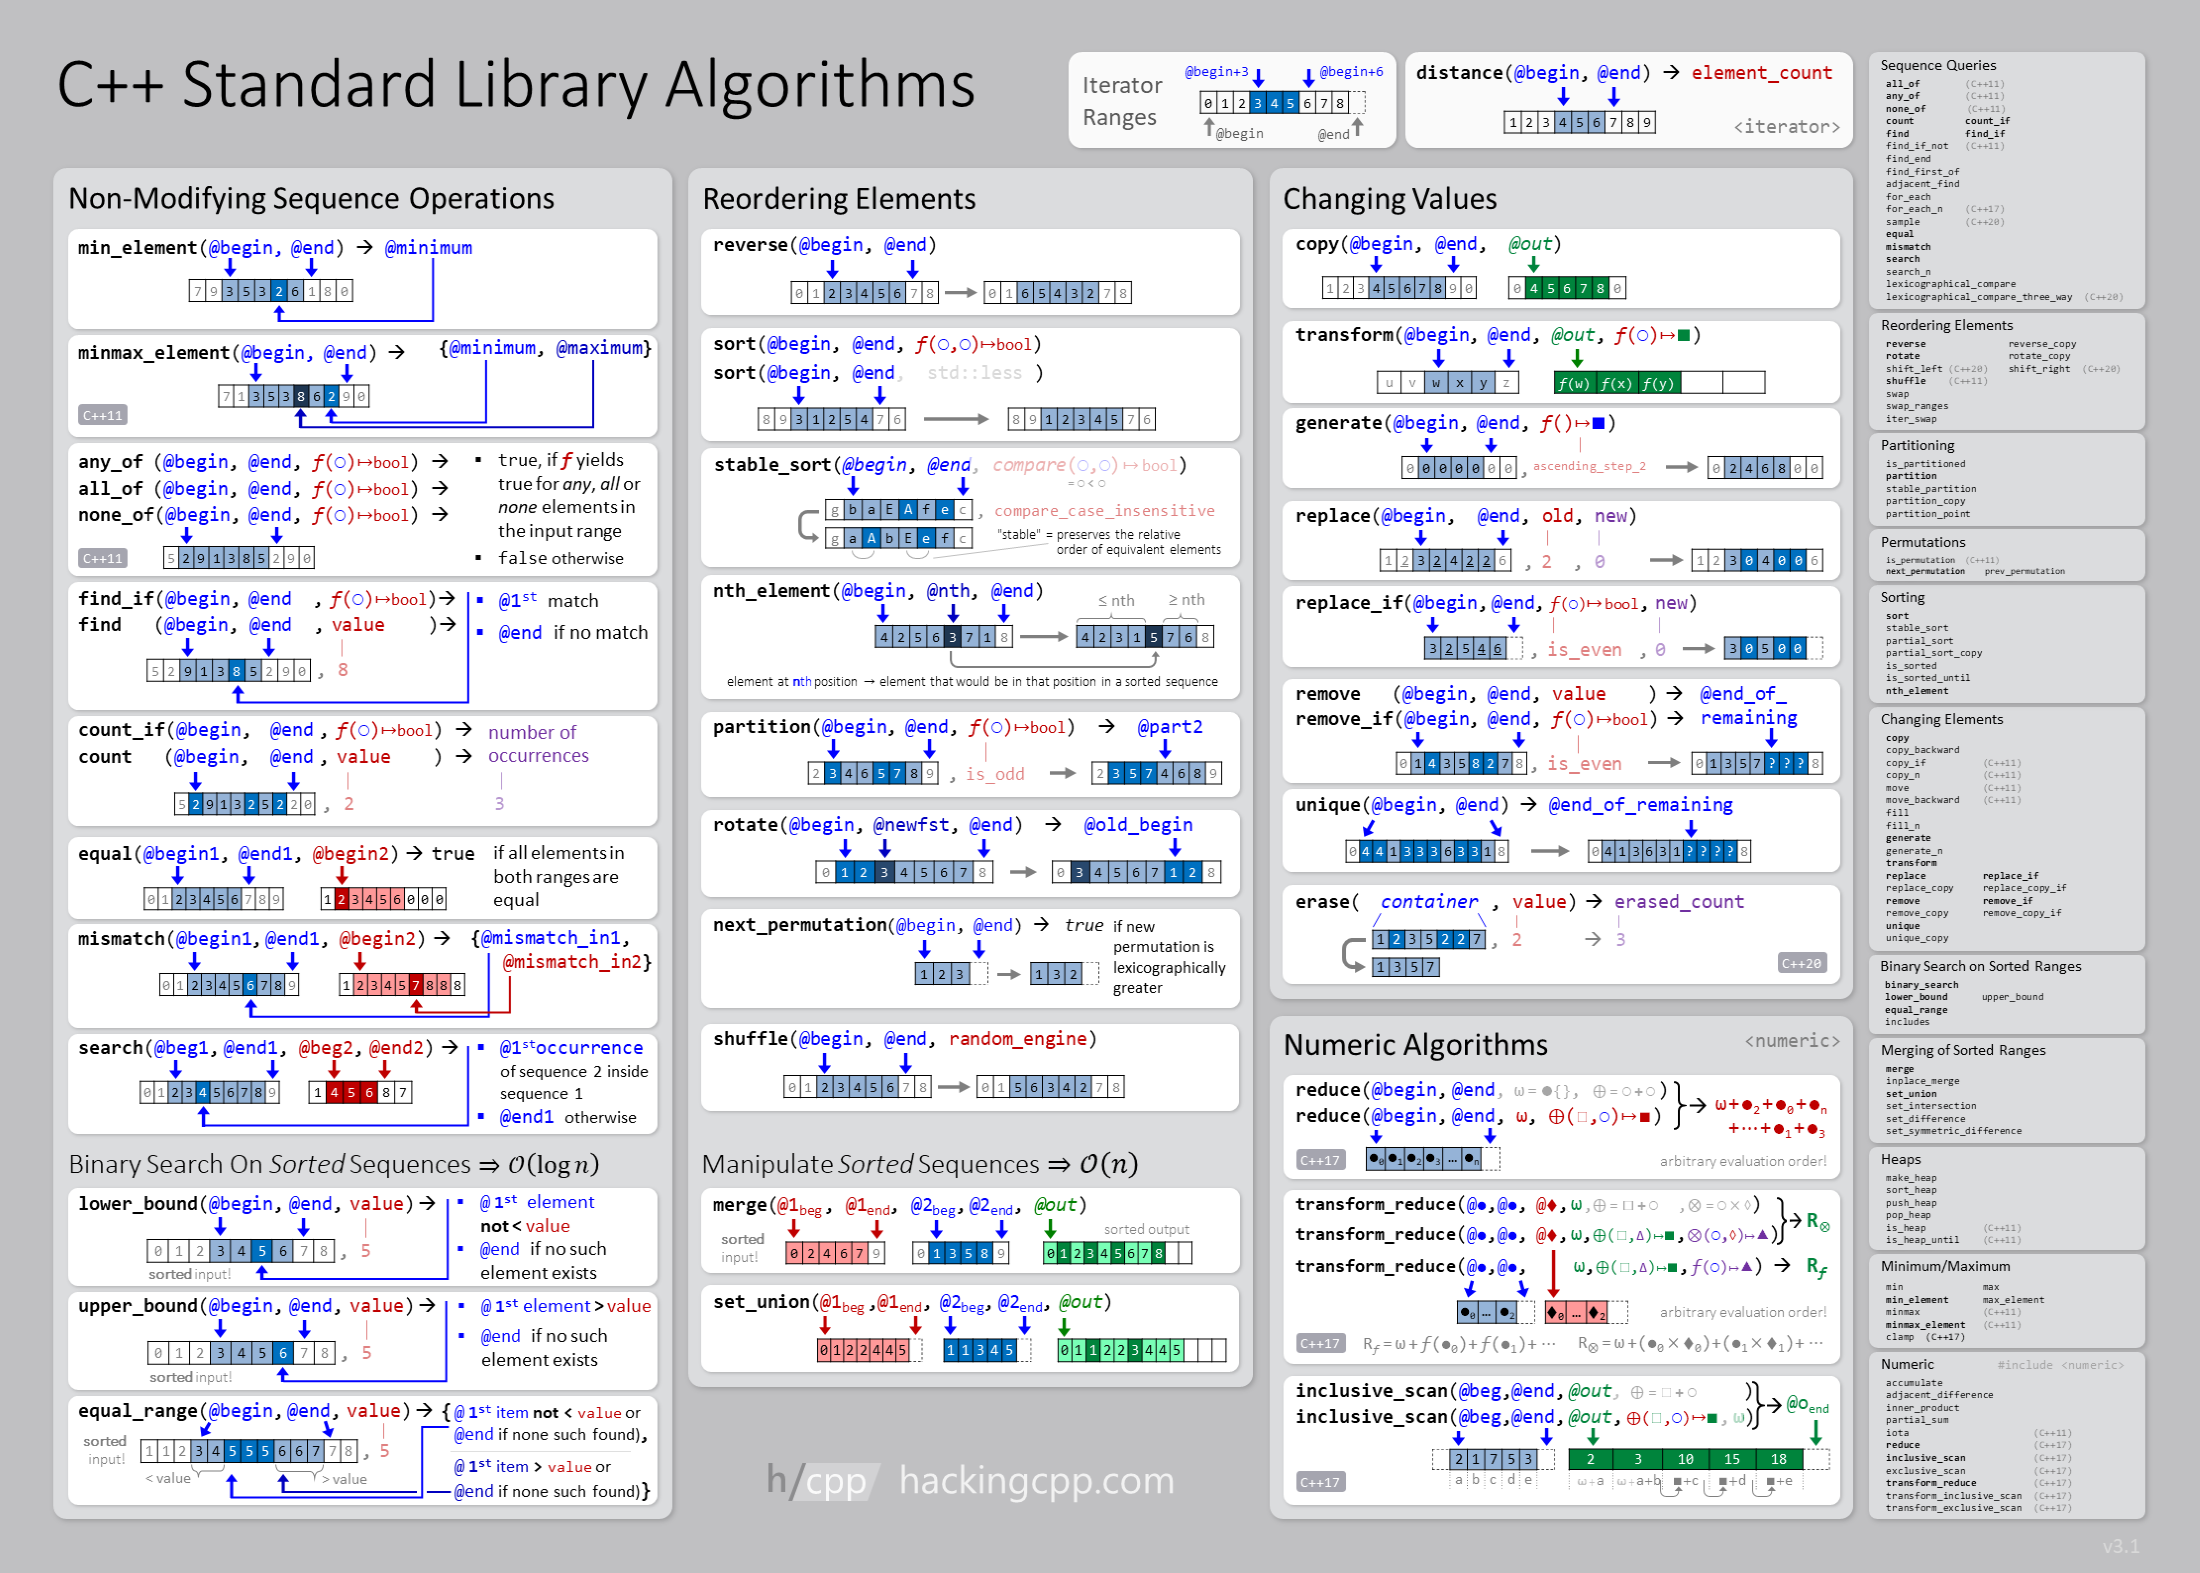
Compact.
Cheat Sheets & Infographics
by André Müller
From the article:
Ravi Sagar has a quick video that shows you how to bulk-rename tags in an Org file. If you don’t use tags in your Org files, this probably seems like something you’d hardly ever want to do. Indeed, even Sabar doesn’t seem to understand its real use. But if you do use tags regularly, it’s extraordinarily helpful.
I have several Org files—such as my journal and blog queue—that have one or more tags for every entry. If you’re a real person, you probably get confused when specifying tags. Is it grocery or groceries? Or maybe you get confused about capitalization. My tags are (supposed to be) lower case but sometimes habit takes over and I automatically capitalize a tag that also happens to be a proper name. In any event, I often find myself needing to change several instances of a tag in a file.
Sagar shows a snippet of code that allows you to do just that. You specify the name of the tag you want to change and the name you want to change it to and the code takes care of it for you. The code is from Stack Excahnge and is here. Again, if you don’t use tags you’re probably saying, “Meh, who cares” but if you do, you can immediately see the usefulness of the code.
Since a few days I frequently got a java.lang.OutOfMemoryError: Metaspace
after a few tests in the SBT shell. I attached VisualVM to the SBT process
and indeed Metaspace didn’t go down after test had finished:

By the way with many SBT processes running the following SBT alias comes handy: It shows the PID of the running process which helps you pick the right SBT process to attach to in VisualVM:
addCommandAlias(
  "runtimeName",
  "eval java.lang.management.ManagementFactory.getRuntimeMXBean().getName()"
)
I had a suspicion: The application runs on top of Akka, and perhaps I had
forgotten to shutdown some actor systems in my tests? And indeed in the
“Threads” tab I saw a couple of threads lingering even after test had
finished:

Akka conveniently names threads after the Actor system they belong to, and since luckily I had named my Actor systems after the test suites that created them I immediately knew which test suites to look at.
Indeed these suites didn’t have the trait that implemented actor system shutdown
mixed in. I fixed these test suites, and the OutOfMemory error was gone. The
whole thing took less than half an hour. Never underestimate the power of
monitoring tools!
Travis recently announced early stage Windows support, and it already supports Rust. I couldn’t wait to try it—I don’t really enjoy AppVeyor—so I set it up for mdcat and it worked really well.
The change was really simple, and I just took me a few iterations to get almost everything—in particular deployments to Github releases—working just like on Linux and macOS. I could eventually remove AppVeyor entirely which makes me really happy. This post describes the change and also outlines what little’s still missing for me.
The following diff contains the entire change:
@@ -76,6 +77,15 @@ jobs:
         - export PATH="$HOME/Library/Python/2.7/bin:$PATH"
       env:
         - CARGOTARGET=x86_64-apple-darwin
+    - stage: test
+      os: windows
+      rust: stable
+      # Don't install ansi2html on Travis CI: Python isn’t readily available on
+      # Windows, so skip these tests
+      before_install: ''
+      env:
+        - CARGOTARGET=x86_64-pc-windows-msvc
+        - CARGOFLAGS='--no-default-features'
     # Catch regressions in beta and nightly
     - stage: test
       os: linux
@@ -116,20 +126,23 @@ jobs:
       install: ""
       script: cargo build --target "$CARGOTARGET" $CARGOFLAGS --release --verbose
       before_deploy:
+        # Strip the binary to reduce its size
+        - strip "target/${CARGOTARGET}/release/mdcat"
+        # Put all the things into a dedicated directory, as usual with TAR files
         - export ARCHIVE_NAME="${TRAVIS_TAG}-${CARGOTARGET}"
         - echo "Building ${ARCHIVE_NAME}"
         - mkdir "/tmp/${ARCHIVE_NAME}"
         - cp README.md CHANGELOG.md LICENSE "/tmp/${ARCHIVE_NAME}"
         - cp "target/${CARGOTARGET}/release/mdcat" "/tmp/${ARCHIVE_NAME}"
-        # Strip the binary to reduce its size
-        - strip "/tmp/${ARCHIVE_NAME}/mdcat"
-        - tar -czf "/tmp/${ARCHIVE_NAME}.tar.gz" -C /tmp/ "${ARCHIVE_NAME}"
+        # Pack the tarball
+        - export ARCHIVE_FILE="/tmp/${ARCHIVE_NAME}.tar.gz"
+        - tar -czf "${ARCHIVE_FILE}" -C /tmp/ "${ARCHIVE_NAME}"
       deploy:
         skip_cleanup: true
         provider: releases
         api_key:
           secure: [elided]
-        file: /tmp/${ARCHIVE_NAME}.tar.gz
+        file: "${ARCHIVE_FILE}"
         on:
           tags: true
     - <<: *deploy-settings
@@ -140,3 +153,17 @@ jobs:
         # Only include iterm2 when building for macos, and also enable remote
         # resources for iterm2
         - CARGOFLAGS='--no-default-features --features iterm2,remote_resources'
+    - <<: *deploy-settings
+      os: windows
+      before_install: ""
+      env:
+        - CARGOTARGET=x86_64-pc-windows-msvc
+        - CARGOFLAGS='--no-default-features'
+      before_deploy:
+        # Windows likes file extensions :)
+        - mv LICENSE LICENSE.txt
+        # and ZIP files
+        - export ARCHIVE_FILE="${TRAVIS_TAG}-${CARGOTARGET}.zip"
+        # The leading dots are important: They make 7z ignore the path part and
+        # add the file directly to the archive root.
+        - 7z a "${ARCHIVE_FILE}" "./target/${CARGOTARGET}/release/mdcat.exe" ./README.md ./CHANGELOG.md ./LICENSE.txt
I find that this is really surprisingly litte given that I really setup a totally alien system here. After all, not being based on Unix Windows is really very different from macOS and Linux, yet I can build for both systems with almost the same configuration. That’s really cool.
In particular I didn’t have to change anything in the actual build scripts: The Windows environment runs in Git bash, so I can use the same tools and syntax as for macOS and Linux. No more BAT or powershell scripts like on AppVeyor.
The biggest change is the deployment script, and that’s only because I wanted to
pack the Windows binary in a ZIP file which seems a lot more common than TAR
files on Windows. Since I could no longer use a hard-coded .tar.gz file
extension I also had to add a new $ARCHIVE_FILE variable to tell Travis CI
what file to deploy, hence the small changes the the deployment configuration
for Linux and macOS above.
I took me two or three iterations on a test branch with some dummy tags, but in the end the new 0.11.0 release has all its binaries built on Travis CI.
I use a Python utility in some tests for mdcat (see formatting.rs). I couldn’t get Python to work after a three or four attempts and I didn’t want to spend more time on it, so in the end I decided to disable these tests—they’re not system-dependent anyway, so I think that’s an an acceptable price to pay for an overall much simpler Windows CI setup.
I didn’t try any more fancy stuff, like using C libraries, etc—mdcat only needs pure Rust dependencies on Windows—so for more complex projects there are probably a lot more differences between different environments and also to AppVeyor than this post suggests, but for a simple plain Rust project the new Windows environment does a great job.
Thank you Travis CI!
Mike Zamansky has another video up in his Using Emacs series. This one is a continuation of his last video on Org Mode capture. Most of the video explains how Zamansky pops up an Org capture buffer even if he’s not in Emacs. I use a similar method all the time and find it really useful. If I want to make a quick note or capture a browser link for a blog post, I just pop up the capture menu and use the appropriate template.
Zamansky’s method is better than mine because his pops up a temporary frame that is deleted when he saves the capture and leaves him back where he started. Mine switches to Emacs and displays the menu but I have to switch back to whatever I was doing after I save the capture. It’s a bit harder to pop up a capture buffer with MacOS because you have to use AppleScript. I think if I install a keyboard macro app I can duplicate Zamansky’s method so I’ll probably give that a try.
The other nice trick I learned from the video is obvious but I never thought of it. Zamansky maintains an Org file of useful browser links along with helpful commentary. He exports this to HTML and then saves the file as a browser bookmark. That way, he can click on the book mark to bring up the page of his links and then click on the appropriate link to visit the page he’s interested in. As I said, it’s obvious in retrospect but a great tip if you haven’t considered it.
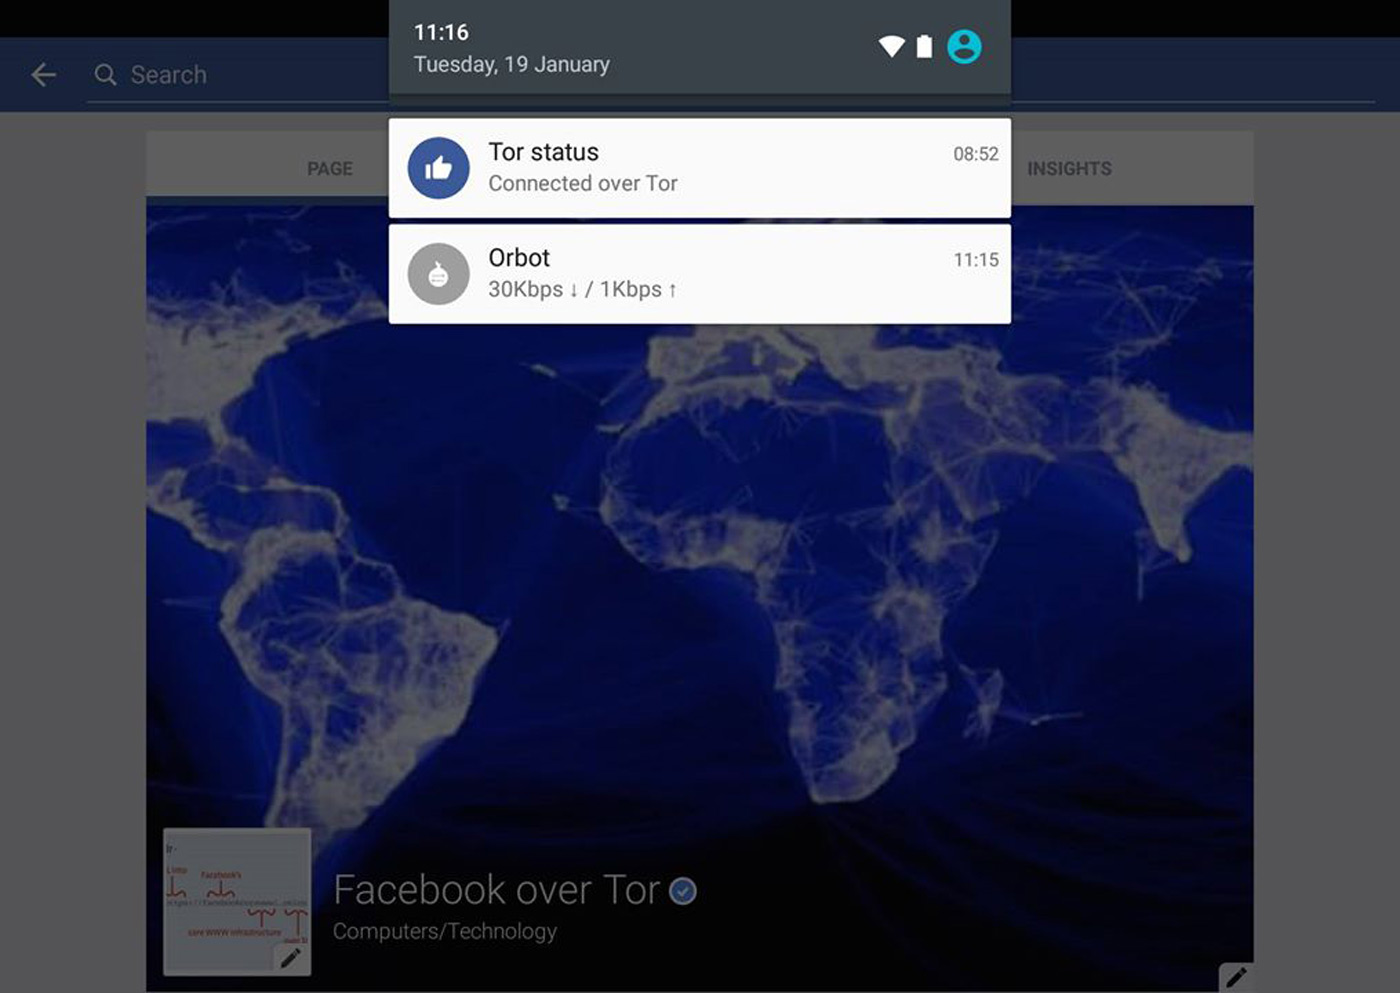
Facebook has offered Tor support for a while if you've been concerned about keeping your social networking activity private, but what about on your phone? Don't worry, you're covered. The site has started rolling out Tor support on Android, giving you a (relatively) easy way to encrypt your Facebook viewing on the road. You'll need to download the Orbot proxy app to make this stick, but you'll always know whether or not your communications are under lock and key.
The Tor access option will take a few days to reach everyone, and Facebook notes that it's looking for feedback on how well it works. This is still a bit rough around the edges, folks. Nonetheless, it's worth a look if you want to keep your mobile Facebook conversations under wraps.
Source: Facebook

Last year, the Electronic Frontier Foundation along with Mozilla and Cisco launched an initiative called "Let's Encrypt" that promised to hand out free certificates anyone can use. Today, the team has released its first one -- it's only available to beta testers for now, but everyone can see it in action on the group's website. The project aims to make HTTPS implementation easier for website and online shop owners, in order to ensure the safety of customers' data. According to the EFF, participants can forget "muddling through complicated programming to set up encryption on a website, or yearly fees." The team did mention when the project launched that all users have to do to use the free certificate is to run a program.
Folks who want to participate in the beta testing phase can sign up and submit their domains for consideration. Major browsers still don't recognize Let's Encrypt's certificate as a trusted authority, though, so beta testers will have to do much more than "run a program." Thankfully, the team's already working with Google (for Chrome), Mozilla (for Firefox), Apple (for Safari) and Microsoft (for Edge) to make that happen. If all goes well, the certificate will be available for everyone to use on the week of November 16th, 2015.
[Image credit: Jorg Greuel]
Filed under: Misc
Source: Let's Encrypt, EFF
Tags: encryptioncertificate, letsencrypt, security
On Friday, xkcd #1190—Time—came to an end.
It was a huge project, but since it was all concealed within a single comic panel, I thought I’d end with this short post to explain what was going on. If you want to see the story yourself before I spoil anything, you can use one of the many excellent third-party Time explorers, like the Geekwagon viewer, or one of the others listed here.
When the comic first went up, it just showed two people sitting on a beach. Every half hour (and later every hour), a new version of the comic appeared, showing the figures in different positions. Eventually, the pair started building a sand castle.
There was a flurry of attention early on, as people caught on to the gimmick. Readers watched for a while, and then, when nothing seemed to be happening, many wandered away—perhaps confused, or perhaps satisfied that they’d found a nice easter-egg story about castles.
But Time kept going, and hints started appearing that there was more to the story than just sand castles. A few dedicated readers obsessively cataloged every detail, watching every frame for clues and every changing pixel for new information. The xkcd forum thread on Time grew terrifyingly fast, developing a subculture with its own vocabulary, songs, inside jokes, and even a religion or two.
And as Time unfolded, readers gradually figured out that it was a story, set far in the future, about one of the strangest phenomena in our world: The Mediterranean Sea sometimes evaporates, leaving dry land miles below the old sea level … and then fills back up in a single massive flood.

(A special thank you to Phil Plait for his advice on the far-future night sky sequence, and to Dan, Emad, and everyone else for your help on various details of the Time world.)
Time was a bigger project than I planned. All told, I drew 3,099 panels. I animated a starfield, pored over maps and research papers, talked with biologists and botanists, and created a plausible future language for readers to try to decode.
I wrote the whole story before I drew the first frame, and had almost a thousand panels already drawn before I posted the first one. But as the story progressed, the later panels took longer to draw than I expected, and Time began—ironically—eating more and more of my time. Frames that went up every hour were sometimes taking more than an hour to make, and I spent the final months doing practically nothing but drawing.
To the intrepid, clever, sometimes crazy readers who followed it the whole way through, watching every pixel change and catching every detail: Thank you. This was for you. It’s been quite a journey; I hope you enjoyed the ride as much as I did!
P.S. A lot of people have asked if I can sell some kind of Time print collection (or a series of 3,099 t-shirts, where you run to the bathroom and change into a new one every hour). I’m afraid I don’t have anything like that in the works right now. I just made this because I thought it would be neat, and now that it’s done, my only plan is to spend the next eleven thousand years catching up on sleep. If you liked the project, you’re always welcome to donate via PayPal (xkcd@xkcd.com) or buy something from the xkcd store. Thank you.
I don’t know if you know this about me, but I like cycling. Whilst 99% of the time I’m cycling from A to B on the streets of London, on a rare opportunity, I’ll go on a cycling trip.
Recently, I’ve cycled in Germany, Bolivia and Devon. Next up, I’m hoping to ride the streets of New York for the first time.
When all these trips are coming together, I spend a fair bit of time researching. I like to know: What’s the route like? Can I rent a bike there easily or should I bring my own? How many miles is it? Are there good stops along the way? What kind of scenery can I expect?
However, it’s often surprisingly hard to get a good overview of the information I’d like.
That’s why when I received a link to The Wild Atlantic Way I was stunned.
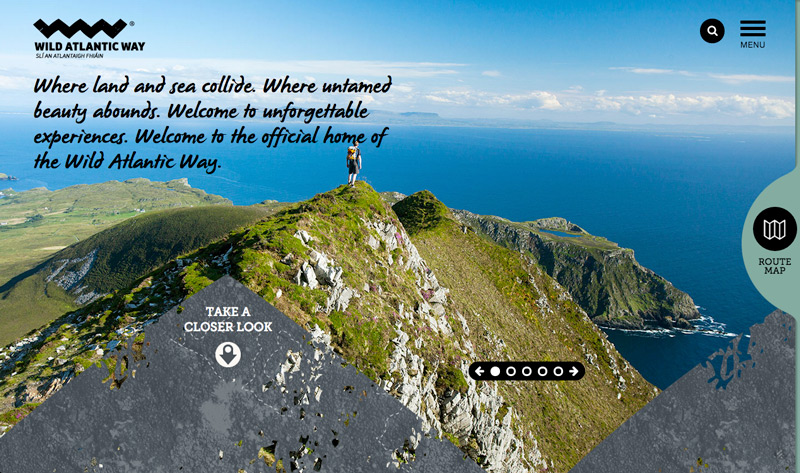
Loading the website, you instantly get a set of stunning pictures that make you want to take a closer look. After playing around with the images, I clicked on the route map.
It’s just on the doorstep in Ireland!
The next step was to share it with a friend with the message “We must do this one day – it would be a great craic!”. I congratulated myself on my little joke and knew that the stunning pictures would capture my friends imagination too.
Within about 30 seconds I had a nice idea of the route and scenery.
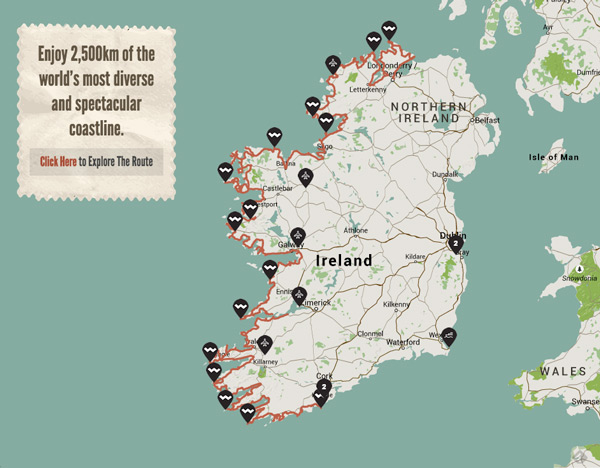
My next though was – I’m unlikely to be able to ride 2,500km (approximately 1,500 miles) in one trip. What part of this route should I explore?
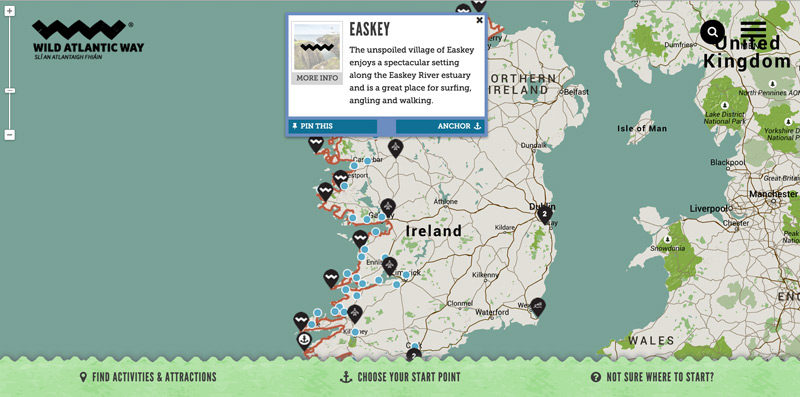
Here the map comes in handy, as you can tap different parts of the route to get an idea of what you’ll see there. I imagine surfing in the cold Irish seas would be one to remember. I also liked the ability to pin areas that appealed particularly.
Under the stories section, I also came across the Things to do in Summer post, which talks about the Great Western Greenway cycle route.
I’m impressed at how the website is able to quickly give you an idea of different parts of this 2,500km route.
What about navigation?
The website didn’t offer up any KML or GPX files which I could load in to my iPhone or Garmin. However, the organisers have created a free iPhone and Android app.
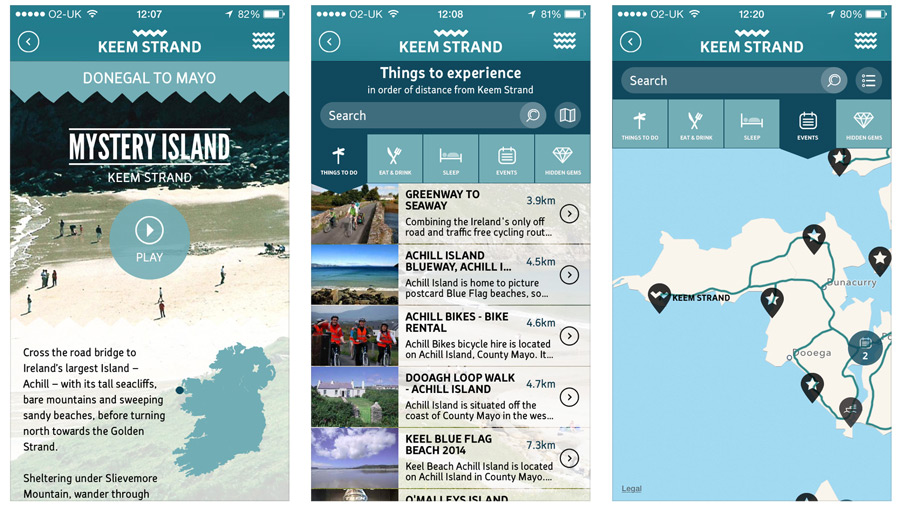
This takes some of the useful information available on the website and makes it available to explore offline. Additionally, there is a map which can give you a good idea of the general route. However, I imagine you’d need to do some plotting of GPS coordinates yourself in order to create something that’s really easy to follow on the bike.
I’m still clicking round and discovering more as there’s such a depth of content here.
The website is by the Fáilte Ireland National Tourism Development Authority. Clearly not every destination that wants to appeal to more tourists and cyclists is going to have the kind of budget necessary to build this kind of site, but it’s exciting to see what’s possible.
I hope the site achieves the intended goal of increasing tourism in the area.
If you’d like to take a look head to wildatlanticway.com.
Aujourd’hui un moyen ultra simple et rapide pour avoir un lecteur de flux RSS : KrISS !

Derrière ce nom ce cache un système qui utilise la « philosophie » KISS : Keep It Simple and Smart. Tout est dans un seul fichier. L’intégration avec le partageur de liens shaarli est facilitée, le chargement automatique, JS et CSS intégrés, etc. Et l’interface est changeable pour se créer son propre thème visuel (vous trouverez des exemples ici). Plus simple que notre installation de Tiny RSS !
Alors comment l’installer ?
Et c’est tout !
Le premier écran vous demande de choisir un identifiant et un mot de passe

Vous arriverez sur un écran de configuration où vous pourrez charger un fichier OPML, configurer les menus, etc. Suivez les instructions (si vous avez un soucis de langue, cliquez sur le petit drapeau en haut)

Vous reviendrez sur l’écran principal avec vos flux.
Pensez à gérer la mise à jour automatique via crontab. Tout est dans l’écran de configuration (tout en bas)

Bonne lecture !
Cet article Raspberry Pi Home Server – Lecteur RSS ultra léger est apparu en premier sur Raspberry Pi Home Server.


--host : Name of your vCenter Server (only tested with vCenter)Here is an example of running the script:
--user : User to login with
--password : Password for the user
--datastore : Name of the datastore in which VMs will be created in
--count : The number of Dummy VMs to create
./create_random_marvel_vms.py --host vcenter --user root --password vmware --datastore mini-local-datastore-1 --count 10