Shared posts

12 Dec 12:54

A small library to support the CQS pattern.

by Jürgen Gutsch

The last years, I loved to use the Command and Query Segregation pattern. Using this pattern in every new project, requires to have the same infrastructure classes in this projects. This is why I started to create a small and reusable library, which now supports ASP.NET Core and is written to match .NET Standard 1.6.

About that CQS

The idea behind CQS is to separate the query part (the read part / fetching-the-data-part) from the command part (the write part / doing-things-with-the-data-part). This enables you to optimize both parts in different ways. You are able to split the data flow into different optimized pipes.

From my perspective, the other most important benefit of it is, that this approach enforce you, to split your business logic into pretty small peaces of code. This is because each command and each query only does one single thing:

  • fetching a specific set of data
  • executing a specific command

E. g. if you press a button, you probably want to save some data. You will create a SaveDataCommand with the data to save in it. You'll pass that command to the CommandDispatcher and this guy will delegate the command to the right CommandHandler, which is just responsible to save that specific data to the database, or what ever you want to do with that data. You think you'll also add a log entry with the same command? No problem: Just create another CommandHandler using the same command. With this approach you'll have two small components, one to save the data and another one to add a log entry, which are completely independent and can be tested separately.

What about fetching the data? Just create a "Query" with the data used as a filter criteria. Pass the Query to the QueryProcessor, which delegates the Query to the right QueryHandler. in this QueryHandler, you are able to select the data from the data source, map it to the result you expect and return it back.

Sounds easy? It really is as easy.

Each Handler, both the QuerHandlers and the CommandHandlers, are isolated peaces of code, if you use Dependency Injection in it. This means unit tests are as easy as the implementation itself.

What is inside the library?

This library contains a CommandDispatcher and a QueryProcessor to delegate commands and queries to the right handlers. The library helps you to write your own commands and queries, as well as your own command handlers and query handlers. There are two main NameSpaces inside the library: Command and Query

The Command part contains the CommandDispatcher, an ICommand interface and two more interfaces to define command handlers (ICommandHandler<in TCommand>) and async command handlers (IAsyncCommandHandler<in TCommand>):

The CommandDispatcher interface looks like this:

public interface ICommandDispatcher
{
    void DispatchCommand<TCommand>(TCommand command) where TCommand : ICommand;
    Task DispatchCommandAsync<TCommand>(TCommand command) where TCommand : ICommand;
}

The Query part contains the QueryProcessor, a generic IQuery, which defines the result in the generic argument and two different QueryHandlers. It also contains two more interfaces to define query handlers (IHandleQuery<in TQuery, TResult>) and async query handlers (IHandleQueryAsync<in TQuery, TResult>)

public interface IQueryProcessor
    {
        TResult Process<TResult>(IQuery<TResult> query);
        Task<TResult> ProcessAsync<TResult>(IQuery<TResult> query);
    }

Using the library

For the following examples, I'll reuse the speaker database I already used in previous blog posts.

After you installed the library using Nuget, you need to register the the QueryProcessor and the CommandDispatcher to the dependency injection. You can do it manually in the ConfigureSerices method or just by using AddCqsEngine()

public void ConfigureServices(IServiceCollection services)
{
	services.AddMvc(),

	services.AddCqsEngine();

	services.AddQueryHandlers();
	services.AddCommandHandlers();
}

The methods AddQueryHandlers and AddCommandHandlers are just methods to encapsulate the registrtion of your Handlers, and are propably written by you as a user of this library. The method could look like this:

public static IServiceCollection AddQueryHandlers(this IServiceCollection services)
{
	services.AddTransient<IHandleQueryAsync<AllSpeakersQuery, IEnumerable<Speaker>>, SpeakerQueryHandler>();
	services.AddTransient<IHandleQueryAsync<SpeakerByIdQuery, Speaker>, SpeakerQueryHandler>();

	services.AddTransient<IHandleQueryAsync<AllEventsQuery, IEnumerable<Event>>, EventQueryHandler>();
	services.AddTransient<IHandleQueryAsync<SingleEventByIdQuery, Event>, EventQueryHandler>();

	services.AddTransient<IHandleQueryAsync<AllUsergroupsQuery, IEnumerable<Usergroup>>, UsergroupQueryHandler>();
	services.AddTransient<IHandleQueryAsync<SingleUsergroupByIdQuery, Usergroup>, UsergroupQueryHandler>();

	services.AddTransient<IHandleQueryAsync<AllNewslettersQuery, IEnumerable<Newsletter>>, NewsletterQueryHandler>();
	services.AddTransient<IHandleQueryAsync<SingleNewsletterByIdQuery, Newsletter>, NewsletterQueryHandler>();
	
	return services;
}

Usually you will place this method near you handlers.

The method AddCqsEngine is overloaded to add your QueryHandlers and yor CommandHandlers to the dependnecy injection. There is no real magic behind that method. It is just to group the additional dependencies:

services.AddCqsEngine(s =>
	{
		s.AddQueryHandlers();
		s.AddCommandHandlers();
	});

The parameter s is the same Seervicecollection as the one in the ConfigureServices method.

This library makes heavily use of dependency injection and uses the IServiceProvider, which is used and provided in ASP.NET Core. If you replace the built in DI container with different one, you should ensure that the IServiceProvider is implemented and registered with that container.

Query the data

Getting all the speakers out of the storage is a pretty small example. I just need to create a small class called AllSpeakersQuery and to implement the generic interface IQuery:

public class AllSpeakersQuery : IQuery<IEnumerable<Speaker>>
{
}

The generic argument of the IQuery interface defines the value we want to retrieve from the storage. In this case it is a IEnumerable of speakers.

Querying a single speaker looks like this:

public class SpeakerByIdQuery : IQuery<Speaker>
{
    public SingleSpeakerByIdQuery(Guid id)
    {
        Id = id;
    }

    public Guid Id { get; private set; }
}

The query contains the speakers Id and defines the return value of a single Speaker.

Once you got the QueryProcessor from the dependency injection, you just need to pass the queries to it and retrieve the data:

// sync
var speaker = _queryProcessor.Process(new SpeakerByIdQuery(speakerId));
// async
var speakers = await _queryProcessor.ProcessAsync(new AllSpeakersQuery());

Now let's have a look into the QueryHandlers, which are called by the QueryProcessor. This handlers will contain your business logic. This are small classes, implementing the IHandleQuery<in TQuery, TResult> interface or the IHandleQueryAsync<in TQuery, TResult> interface, where TQuery is a IQuery<TResult>. This class usually retrieves a data source via dependency injection and an Execute or ExecuteAsync method, with the specific Query as argument:

public class AllSpeakersQueryHandler :
    IHandleQuery<AllSpeakersQuery, IEnumerable<Speaker>>
{
    private readonly ITableClient _tableClient;

    public SpeakerQueryHandler(ITableClient tableClient)
    {
        _tableClient = tableClient;
    }

    public Task<IEnumerable<Speaker>> Execute(AllSpeakersQuery query)
    {
        var result = _tableClient.GetItemsOf<Speaker>();
        return result;
    }
}

public class SpeakerByIdQueryQueryHandler :
    IHandleQueryAsync<SpeakerByIdQuery, Speaker>
{
    private readonly ITableClient _tableClient;

    public SpeakerQueryHandler(ITableClient tableClient)
    {
        _tableClient = tableClient;
    }
    
    public async Task<Speaker> ExecuteAsync(SpeakerByIdQuery query)
    {
        var result = await _tableClient.GetItemOf<Speaker>(query.Id);
        return result;
    }
}

Sometimes I handle multiple queries in a single class, this is possible by just implementing multiple IHandleQuery interfaces. I would propose to do this only, if you have really small Execute methods.

Executing Commands

Let's have a quick look into the commands too.

Let's assume we need to create a new speaker and we need to update a speakers email address. To do this we need to define two specific commands

public class AddSpeakerCommand : ICommand
{
    AddSpeakerCommand(Speaker speaker)
    {
        Speaker = speaker;
    }

    public Speaker Speaker { get; private set; }
]

public class UpdateSpeakersEmailCommand : ICommand
{
    UpdateSpeakersEmailCommand(int speakerId, string email)
    {
        SpeakerId = speakerId;
        Email = email;
    }

    public int SpeakerId { get; private set; }

    public string Email { get; private set; }
}

As equal to the queries, the commands need to be passed to the CommandDispatcher, which is registered in the DI container.

// sync
_commandDispatcher.DispatchCommand(new AddSpeakerCommand(myNewSpeaker));
// async
await _commandDispatcher.DispatchCommandasync(new UpdateSpeakersEmailCommand(speakerId, newEmail));

The CommandHandlers are small classes which are implementing the ICommandHandler or the IAsyncCommandHandler where TCommand is a ICommand. Thise handlers contain a Handle or a HandleAync method with the specific Command as argument. As equal to the query part, you usually will also get a data source from the dependency injection:

public class AddSpeakerCommandHandler : ICommandHandler<AddSpeakerCommand>
{
	private readonly ITableClient _tableClient;

	public AddSpeakerCommandHandler(ITableClient tableClient)
	{
		_tableClient = tableClient;
	}

	public void Handle(AddSpeakerCommand command)
	{
		_tableClient.SaveItemOf<Speaker>(command.Speaker);
	}
}

Command validation

What about validatig the commands? Sometimes it is needed to check authorization or to validate the command values before executing the commands. You can do the checks inside the handlers, but this is not always a good idea. This increases the size and the complexity of the handlers and the validation logic is not reusable like this.

This is why the CommandDispatcher supports precondition checks. As equal to the command handlers, you just need to write command preconditions (ICommandPrecondition<in TCommand>) od async command preconditions (ICommandPrecondition<in TCommand>). This interfaces contain a Chack or ChackAsync method which will be executed before the command handlers are executed. You can hava as many preconditions as you want for a single command. If you register the preconditions to the DI container, the command dispatcher will find and execute them:

public class ValidateChangeUsersNameCommandPrecondition : ICommandPrecondition<ChangeUsersNameCommand>
{
    public void Check(ChangeUsersNameCommand command)
    {
        if (command.UserId == Guid.Empty)
        {
            throw new ArgumentException("UserId cannot be empty");
        }
        if (String.IsNullOrWhiteSpace(command.Name))
        {
            throw new ArgumentNullException("Name cannot be null");
        }
    }
}

In case of errors, the command dispatcher will throw an AggregateException with all the possible exceptions in it.

Conclusion

The whole speaker database application is built like this: Using handlers to create small components, which are handling queries to fetch data or which are executing commands to do something with the data.

What do you think? Does it make sense to you? Would it be useful for your projects? Please drop some lines and tell me about your opinion :)

This library is hosted on GitHub in the "develop" branch. I would be happy about any type contribution on GitHub. Feel free to try id out and let me know about issues, tips and improvements :)

26 Nov 19:47

Joe Armstrong Interviews Alan Kay

Youtube video (via HN)

By far not the best presentation of Kay's ideas but surely a must watch for fans. Otherwise, skip until the last third of the interview which might add to what most people here already know.

It is interesting that in this talk Kay rather explicitly talks about programming languages as abstraction layers. He also mentions some specifics that may not be as well known as others, yet played a role in his trajectory, such as META.

I fully sympathize with his irritation with the lack of attention to and appreciation of fundamental concepts and theoretical frameworks in CS. On the other hand, I find his allusions to biology unconvincing.
An oh, he is certainly right about Minsky's book (my first introduction to theoretical CS) and in his deep appreciation of John McCarthy.

12 Jan 09:05

Programmierkonzepte, Teil 2: Funktionen höherer Ordnung

by Golo Roden
Funktionen höherer Ordnung nehmen Funktionen als Parameter entgegen oder liefern eine Funktion als Rückgabewert zurück. Im Gegensatz dazu stehen Funktionen, die ausschließlich Daten verarbeiten können. Doch nicht alle Programmiersprachen unterstützen das Konzept gleichermaßen.
24 Dec 22:29

Creating an Angular 2 build with Gulp, TSLint and DefinitelyTyped

by ceberhardt@scottlogic.com (Colin Eberhardt)

From my perspective Angular 2 is a great improvement over Angular 1. The framework is simpler, and as a result your code is more concise, making use of modern JavaScript concepts. However, this does come at a cost; with Angular 2 the required tooling is really quite complicated.

The Angular 2 website has a great tutorial introduction to the framework. Although in order to focus on the Angular framework itself they keep the tooling as simple as possible, making use of command-line tools. This is great for the purposes of a simple tutorial, however for a more complex application your build will become more complex, incorporating numerous steps. At this point it makes sense to move from command-line tools to gulp (or grunt).

Interestingly, there are a number of people that advocate command-line tools and npm run over grunt and gulp. I think this makes a lot of sense for small projects, and reduces the amount of time you spend fighting with the build!

In this blog post I’ll take the ‘Tour of Heroes’ app from the Angular 2 tutorial and create a Gulp build. I found this to be a great exercise in understanding how the various components of the Angular 2 application actually work, and used it as an excuse to explore other aspects of TypeScript development including TSLint, DefinitelyTyped and SystemJS module loading.

The Starter App Build

Tour of Heroes is a simple Angular 2 app that demonstrates the core concepts (DI, components, routing, binding, … ):

John Papa has a repo on GitHub for this app, which is what I used as a starting point for my build.

The development build process is defined within package.json as a number of npm scripts:

"scripts": {
  "tsc": "tsc",
  "tsc:w": "tsc -w",
  "lite": "lite-server",
  "start": "concurrent \"npm run tsc:w\" \"npm run lite\" "
}

Running npm start concurrent performs npm run tsc:w and npm run lite. The first starts the TypeScript compiler in watch mode, while the second starts up the lite-server development server (which has a watch / live-reload function).

You might be wondering why there is a tsc script defined which simply runs tsc? When you install TypeScript globally it provides a command-line compiler via the tsc binary. You could use the global compiler for your TypeScript projects, however, by doing this you can encounter version errors with the compiler itself.

The Tour of Heroes project declares its TypeScript version dependency via devDependencies:

"devDependencies": {
  ...
  "typescript": "^1.7.3"
}

As a result, when you run npm install you will now have a local copy of the correct version of the TypeScript compiler.

When you use npm run to run one of your scripts, npm adds node_modules/.bin to the path provided to the scripts. The net result of this is that the locally installed tsc binary will be used rather than the global binary. As a result it is preferable to run npm run tsc in order to compile your project.

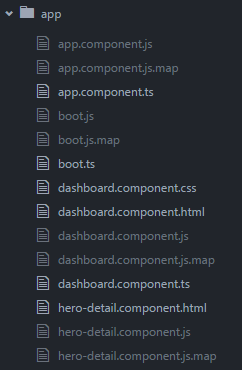
One drawback of using the command-line compiler is that the generated JavaScript and sourcemap files are output directly alongside the source TypeScript files:

This looks a bit messy to me!

Building with Gulp

I’d like to move the build to Gulp as I feel it is a better foundation for more complex builds. Furthermore, I’d like the build to place its output (JS, CSS, HTML, sourcemaps) into a separate folder so that it is clear which files are required for distribution.

Although, at the same time I don’t want to lose the ability to run tools like tsc on the command line - this makes it easier to trouble-shoot the build and support other tooling such as IDEs.

The first step is to add gulp and the gulp-typescript plugin to the project

"gulp": "^3.9.0",
"gulp-typescript": "^2.8.0",
"del": "^2.1.0"

The following is a minimal gulpfile that performs the required TypeScript compilation:

const gulp = require('gulp');
const del = require('del');
const typescript = require('gulp-typescript');
const tscConfig = require('./tsconfig.json');

// clean the contents of the distribution directory
gulp.task('clean', function () {
  return del('dist/**/*');
});

// TypeScript compile
gulp.task('compile', ['clean'], function () {
  return gulp
    .src('app/**/*.ts')
    .pipe(typescript(tscConfig.compilerOptions))
    .pipe(gulp.dest('dist/app'));
});

gulp.task('build', ['compile']);
gulp.task('default', ['build']);

A couple of things to note here:

  1. The compiled output is now placed in a dist folder so that it is no longer mixed up with the source.
  2. The compiler configuration is loaded from the tsconfig.json file which is already present in the project and used by the command-line compiler.

However, this has already introduced an issue. The gulp build outputs files to the dist folder, whereas tsc still generates files that co-exist with the source.

The tsconfig.json file provides configuration to the TypeScript compiler and is documented on the TypeScript Wiki. Fortunately the compiler options (also documented on the wiki) has an optional outDir property that can be used to specify the target directory for the compiled output:

{
  "compilerOptions": {
    "outDir": "dist/app", // <--- newly added configuration parameter
    "target": "ES5",
    "module": "system",
    "sourceMap": true,
    "emitDecoratorMetadata": true,
    "experimentalDecorators": true,
    "moduleResolution": "node",
    "removeComments": false,
    "noImplicitAny": true,
    "suppressImplicitAnyIndexErrors": true
  },
  "exclude": [
    "node_modules"
  ]
}

Sourcemaps

Unfortunately gulp-typescript does not generate sourcemaps and as a result ignores the sourceMap compiler option. This can be added via the gulp-sourcemaps plugin.

Adding sourcemaps to the build is simply a matter of installing the plugin then wrapping the typescript compile step as follows:

const sourcemaps = require('gulp-sourcemaps');
...

// TypeScript compile
gulp.task('compile', ['clean'], function () {
  return gulp
    .src(tscConfig.files)
    .pipe(sourcemaps.init())          // <--- sourcemaps
    .pipe(typescript(tscConfig.compilerOptions))
    .pipe(sourcemaps.write('.'))      // <--- sourcemaps
    .pipe(gulp.dest('dist/app'));
});

Handling static files

The current gulpfile writes the generated JavaScript files to the dist folder, however, in order to run the application this folder also needs a copy of the HTML, CSS and external libraries.

The Tour of Heroes index.html grabs the external libraries direct from the folders where they were installed by npm:

<script src="node_modules/angular2/bundles/angular2-polyfills.js"></script>
<script src="node_modules/systemjs/dist/system.src.js"></script>
<script src="node_modules/rxjs/bundles/Rx.js"></script>
<script src="node_modules/angular2/bundles/angular2.dev.js"></script>
<script src="node_modules/angular2/bundles/router.dev.js"></script>

A build step can be added that copies these dependencies to a dist/lib folder:

// copy dependencies
gulp.task('copy:libs', ['clean'], function() {
  return gulp.src([
      'node_modules/angular2/bundles/angular2-polyfills.js',
      'node_modules/systemjs/dist/system.src.js',
      'node_modules/rxjs/bundles/Rx.js',
      'node_modules/angular2/bundles/angular2.dev.js',
      'node_modules/angular2/bundles/router.dev.js'
    ])
    .pipe(gulp.dest('dist/lib'))
});

And the URLs updated accordingly:

<script src="lib/angular2-polyfills.js"></script>
<script src="lib/system.src.js"></script>
<script src="lib/Rx.js"></script>
<script src="lib/angular2.dev.js"></script>
<script src="lib/router.dev.js"></script>

The build also needs to copy the index.html file and any component templates / CSS to the dist folder. Here’s a suitable build step:

// copy static assets - i.e. non TypeScript compiled source
gulp.task('copy:assets', ['clean'], function() {
  return gulp.src(['app/**/*', 'index.html', 'styles.css', '!app/**/*.ts'], { base : './' })
    .pipe(gulp.dest('dist'))
});

The file pattern ['app/**/*', '!app/**/*.ts'] copies any non TypeScript file into the dist folder. The index.html and styles.css are included explicitly because they are outside of the app folder. Personally I don’t like this project structure! I prefer to a clear separation between source-code and configuration / build files. It makes it easier to navigate the project and the build simpler.

With these changes in place you can now run gulp build then start a static web server from the dist folder to see the results. Adding live-reload and a watch is a pretty trivial step from this point.

Linting

While the TypeScript compile performs a certain class of checks on your code (for example, ensuring that all variables are explicitly typed), I like to include semantic and syntactic checks. TSLint is a great tool for this job.

Adding a lint step to the build is quite straightforward via the gulp-tslint plugin:

const tslint = require('gulp-tslint');
...

gulp.task('tslint', function() {
  return gulp.src('app/**/*.ts')
    .pipe(tslint())
    .pipe(tslint.report('verbose'));
});
...

gulp.task('build', ['tslint', 'compile', 'copy:libs', 'copy:assets']);

TSLint is configured via a tslint.json file. In the interests of allowing command-line usage, the following can be added to package.json:

"scripts": {
  "tslint": "tslint -c tslint.json app/**/*.ts",
}

As a results npm run tslint will lint all of the projects TypeScript files.

DefinitelyTyped

So far the build has been quite straightforward and not so different to any other build that requires a JavaScript transpilation step ( e.g. ES6 to ES5). With TypeScript things become a lot more complicated when you start integrating 3rd party libraries!

In order to illustrate the point, I’ve modified the Tour of Heroes project so that the ID of each ‘hero’ is generated via an external UUID generation library, node-uuid.

Adding node-uuid to the project is straightforward, via npm i node-uuid --save (which installs and adds it to your package.json file), then the build can be updated to copy the library to the dist/lib folder. The tricky part is keeping the TypeScript compiler happy!

Currently the ID for each hero is a number:

import { Hero } from './hero';

export var HEROES: Hero[] = [
  {'id': 11, 'name': 'Mr. Nice'},
  {'id': 12, 'name': 'Narco'},
  ...
];

This needs to be replaced with an ID generated via uuid.v4(). However, the TypeScript compiler doesn’t know anything about the UUID interface. In this case, as it is a single method, you can supply the type information yourself:

import { Hero } from './hero';

interface UUID {
  v4: {(): string};
}

declare var uuid: UUID;

export var HEROES: Hero[] = [
  {'id': uuid.v4(), 'name': 'Mr. Nice'},
  {'id': uuid.v4(), 'name': 'Narco'},
  ...
];

However this doesn’t work so well if you want to use a more complex library such as D3.

DefinitelyTyped is a community effort to provide type definitions for JavaScript libraries. It has a command-line interface, tsd, which is similar to npm. In order to obtain the required type information it is simply a matter locating the corresponding project, then executing tsd install. However, things are not so easy in practice! In practice there are a number of pitfalls to this approach:

  1. Versioning - In the case of node-uuid the type definitions lack a version (e.g. node-uuid-1.2.3.d.ts), which indicates that they are for the current version of node-uuid, but of course this may no longer be the case.
  2. Environments - In the case of node-uuid it can be used via common-js (typically in a node environment) or as a global (within the browser). You have to take care to ensure that the correct type definitions are being used.
  3. Absent libraries - Some libraries do not use DefinitelyTyped, for example immutable-js ships its type definitions alongside the JavaScript distributable. In my opinion this is a much better approach as it removes the versioning issue mentioned earlier.
  4. Conflicting techniques - This being the world of JavaScript there is more than one solution to a problem! Typings is a new type definition manager for TypeScript which I’ve seen a few projects using.

Anyhow, back to the task in hand. In this case the node-uuid-global type definitions are what’s needed:

tsd install node-uuid-global --save

 - node-uuid    / node-uuid-global
   -> node-uuid > node-uuid-base

This writes a bunch of *.d.ts files to a typings folder (which should not be added to source control), and creates a tsd.json file that details exactly which type definitions are being used.

You can now reference type definitions via special comments as follows:

/// <reference path="../typings/node-uuid/node-uuid-global.d.ts" />
import { Hero } from './hero';

export var HEROES: Hero[] = [
  {'id': uuid.v4(), 'name': 'Mr. Nice'},
  {'id': uuid.v4(), 'name': 'Narco'},
  ...
];

The project is now a little more complex in that it requires both an npm install and a tsd install step before someone can build and run the application. To make life easier for would-be contributors you can actually roll these two together by adding a post-install step within package.json:

"scripts": {
  "tslint": "tslint -c tslint.json app/**/*.ts",
  "postinstall": "tsd install"
}

TypeScript File Globbing

One thing that is a little messy about the solution described above is the need to add those strange looking comments to each file in order to point the compiler towards type definitions:

/// <reference path="../typings/node-uuid/node-uuid-global.d.ts" />

The relative file paths also cause pain when trying to refactor projects.

A better alternative is to provide an explicit list of files to the TypeScript compiler, which includes all your sourcecode together with the type definitions. So how does the compiler know which files to compiler? Looking in tsconfig.json:

{
  "compilerOptions": {
    ...
  },
  "exclude": [
    "node_modules"
  ]
}

The default behaviour of the compiler is to compiler and .ts files in the current folder and sub-folders. The exclude property above is used to exclude certain folders, which in this case stops the compiler from trying to compile everything it finds in the node_modules folder (for obvious reasons).

Rather than specify an exclusion, I think it makes more sense to be explicit about which files should be compiled. This can be achieved via the files property, which is an array of files. However, this property does not support file patterns, so you must explicitly list each and every file.

Fortunately there is a better way, you can supply a pattern via the filesGlob property:

{
  "compilerOptions": {
    ...
  },
  "filesGlob": [
    "app/**/*.ts",
    "typings/**/*.d.ts"
  ],
  "atom": {
    "rewriteTsconfig": true
  }
}

With the Atom editor, this is expanded to the following:

{
  "compilerOptions": {
    ...
  },
  "filesGlob": [
    "app/**/*.ts",
    "typings/**/*.d.ts"
  ],
  "files": [
    "app/app.component.ts",
    "app/boot.ts",
    "app/dashboard.component.ts",
    "app/hero-detail.component.ts",
    "app/hero.service.ts",
    "app/hero.ts",
    "app/heroes.component.ts",
    "app/mock-heroes.ts",
    "typings/node-uuid/node-uuid-base.d.ts",
    "typings/node-uuid/node-uuid-global.d.ts",
    "typings/tsd.d.ts"
  ],
  "atom": {
    "rewriteTsconfig": true
  }
}

Notice that I mention ‘with the Atom editor’. Unfortunately Visual Studio Code (which is a popular and rather good editor), does not support filesGlob. This property is non-standard and isn’t part of the specification for tsconfig.json.

Fortunately, there is a project tsconfig-glob, which supplied this functionality and can be integrated into the build as follows:

gulp.task('tsconfig-glob', function () {
  return tsconfig({
    configPath: '.',
    indent: 2
  });
});

Adding the above task to a ‘watch’ will ensure that the files property of tsconfig.json is always up-to-date.

This is an issue that a lot of people are facing and as a result there are a number of people calling for filesGlob to be supported by the compiler directly.

Module loading

The above example which added node-uuid to the project is a little simplified because the uuid variable is added as a global, so the node-uuid library can simply by added via a script tag. However, in most cases you’ll probably want to include external libraries as modules rather than globals. To illustrate the point, I’ve added the immutable.js to the project. This library provides support for immutable arrays, maps and objects. In this case I’ll just use it to replace the array of heroes with an equivalent immutable list.

As mentioned previously immutable provides type definitions as part of its distribution, therefore you don’t need to use DefinitelyTyped. You do of course have to tell the TypeScript compiler where to find the type definitions by updating the tsconfig.json file as follows:

"filesGlob": [
  "app/**/*.ts",
  "typings/**/*.d.ts",
  "node_modules/immutable/dist/immutable.d.ts"
]

This allows your code to make use of the external immutable module:

import { Hero } from './hero';
import { List } from 'immutable';

export var HEROES = List<Hero>([
  {'id': uuid.v4(), 'name': 'Mr. Nice'},
  {'id': uuid.v4(), 'name': 'Narco'},
  ...
]);

If you update the build to copy the immutable library to the dist/lib folder then run the application … it doesn’t work:

The error indicates that the SystemJS module loader is attempting to load the immutable module via an XHR request, however the file cannot be found.

To solve this problem you need to update your SystemJS configuration to map the immutable module to the path lib/immutable.js:

System.config({
  packages: {
    app: {
      format: 'register',
      defaultExtension: 'js'
    }
  },
  map: {
    immutable: 'lib/immutable.js'
  }
});

The additional map above solves the issue, allowing SystemJS to load this module.

If you want to also load node-uuid via SystemJS things get even more complicated! When used in a common-js environment, node-uuid attempts to load the crypto module (which exists in node environments). However, SystemJS will go ahead and try to load crytpo, failing when it isn’t found.

To solve this issue, you not only have to map node-uuid to the correct file in your dist/lib folder, but also have to map the crytpo module to @empty which tells SystemJS not to attempt to load it.

System.config({
  packages: {
    app: {
      format: 'register',
      defaultExtension: 'js'
    },
    'node-uuid': {
      format: 'cjs',
      map: {
        crypto: '@empty'
      }
    }
  },
  map: {
    immutable: 'lib/immutable.js',
    'node-uuid': 'lib/uuid.js'
  }
});

You can probably imagine how long it took me to work out the above configuration ;-)

Conclusions

This has been a bit of a long rambling blog post about various things I have learnt along the way when trying to assemble a sensible Angular 2 / TypeScript build for non-trivial projects. There are still things missing such as unit testing (I managed to get Mocha working, but as of Angular 2 beta it no longer works) and bundling.

Angular 2 is really interesting framework, however, the complexity of TypeScript and the associated build system is no doubt going to be quite a challenge for many newcomers.

The source code for this application, which is the original Tour of Heroes app, plus my Gulp build, is on GitHub.

Regards, Colin E.

01 Oct 06:49

5 Games That Teach You How to Code

by Jacob Gube

These Web games will give you a fun and engaging introduction to the world of programming.

CodeCombat

CodeCombat is an HTML5 role-playing game (RPG) that teaches you fundamental programming concepts.

CodeCombat

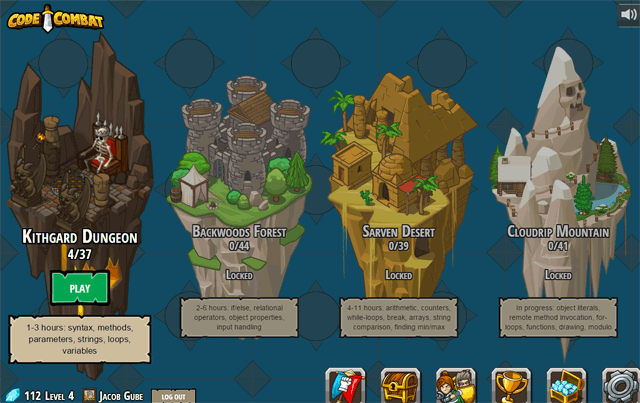
In CodeCombat, you play a hero adventuring through the game’s levels. The first level is Kithard Dungeon, which covers basic programming concepts. You’re faced with coding challenges throughout your journey, and if you overcome them, you’ll unlock the next level and earn experience points (XP) that you can use to improve your hero.

Levels in CodeCombat

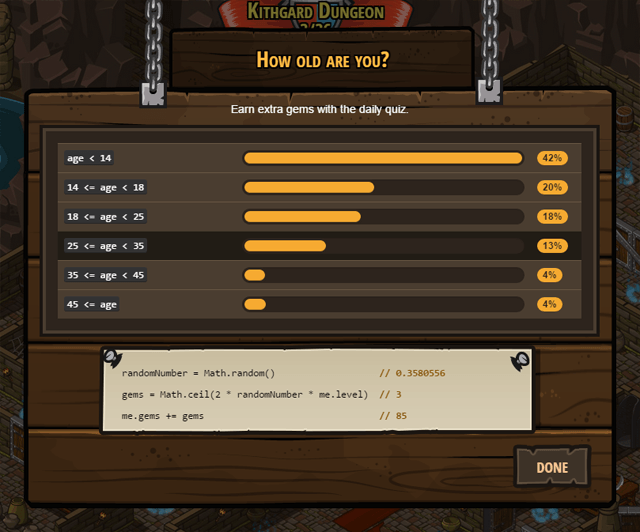
CodeCombat is appealing to young, aspiring programmers. According to an in-game survey, 62% of CodeCombat’s users are under 18 years old.

CodeCombat supports five programming languages: JavaScript, CoffeeScript, Lua, and Python. The game covers a wide range of programming topics — strings, variables, method invocation, vector drawing, and much more.

Code Hunt

Code Hunt is a Sci-Fi-themed HTML5 game developed by Microsoft Research.

Code Hunt

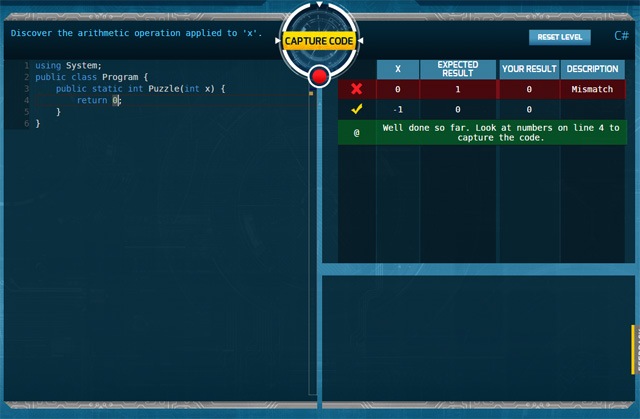
In this game, you play as a code hunter tasked with repairing code so that it returns the expected result. There are 14 levels, called Sectors in the Code Hunt nomenclature, for you to complete.

Code Hunt user interface

Code Hunt supports either Java or C#. Programming concepts you’ll learn include arithmetic, loops, and conditional expressions.

Teachers who would like to extend the game with additional Sectors can do so by first reading the Code Hunt Designer Manual.

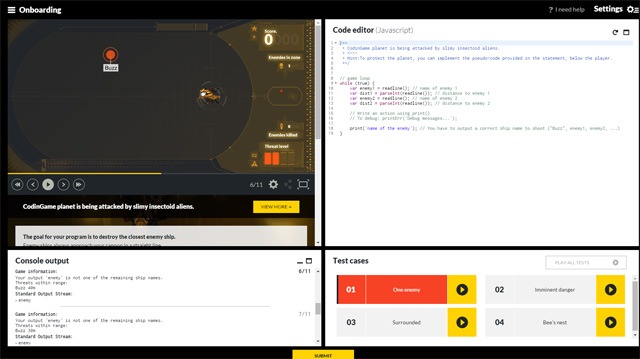
CodinGame

CodinGame is a huge suite of challenging games for programmers. If you want to improve your coding skills, playing CodinGame is a fun way to do so.

CodinGame

Over 20 programming languages including PHP, C, and JavaScript are supported by CodinGame. The user interface is feature-packed and can be customized. For example, you can choose your code editor’s style: "Emacs", "Vim", or "Classic" (the default theme).

CodinGame example

The game can be played on single player mode or multiplayer mode. In multiplayer mode, you can solve CodinGame challenges with other users.

Screeps

Screeps is a massively multiplayer online game (MMO) for JavaScript programmers.

Screeps

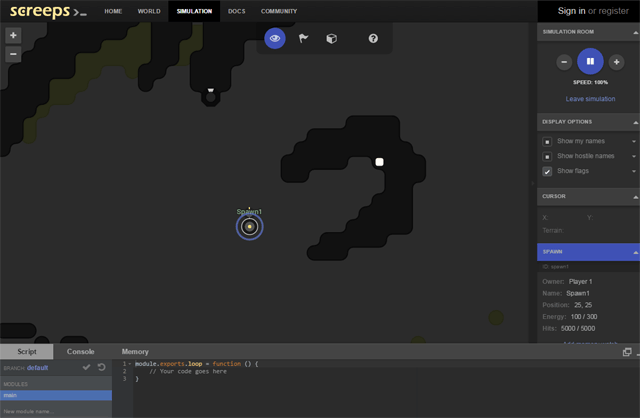
The game is an open-world strategy game where you control units, called creeps, that will help you mine resources, establish your territory, and so forth. Being a multiplayer online game means your creeps will be alongside the creeps of other players.

Screeps simulation

Controlling your creeps involves writing JavaScript. (Screeps = scripting your creeps.) To learn how to play the game, hit up the docs.

FightCode

In FightCode, the objective is simple: Create a robot that will defeat the robots of other players.

FightCode

How do you create a robot? By writing some JavaScript. For example, you can use the .rotateCannon() method to rotate your robot’s cannon by a certain number of degrees when a certain event happens.

FightCode demo

Before building your indestructible, world-dominating robot, the first step you’ll need to take is to read the docs to learn how to code a robot.

Read Next

10 Puzzle Websites to Sharpen Your Programming Skills

15 Free Books for People Who Code

5 Good Habits That Will Make You a Better Coder

Jacob Gube is the founder of Six Revisions. He’s a front-end developer. Connect with him on Twitter and Facebook.

The post 5 Games That Teach You How to Code appeared first on Six Revisions.

16 Sep 05:30

Charting Bitcoin Prices with D3FC - 2015 Intern Project

by rcaulcott-cooper@scottlogic.co.uk (Ruth Caulcott-Cooper)

Every year Scott Logic takes on a number of interns who spend 12 weeks writing code, working on projects and having a great time in the offices. My name is Ruth, and along with Chris Barrett, I am an intern in the Newcastle office; and this summer we’ve been working on creating a real-time financial charting application. The application is built on top of Scott Logic’s own open source d3fc library, which itself is built upon the increasingly popular d3.js (Data driven documents) library for javascript.

Our goal was to create an application similar to many commercial, mid-range chart offerings, and in doing so test the approach and capability of d3fc. Our chart has a number of typical features, including:

  • A range of graph types to choose from (i.e. Candlestick, OHLC)
  • A number of common financial indicators (i.e. Moving Average)
  • Optional Secondary Charts (i.e. RSI)
  • An interactive navigator chart
  • Ability to load and stream real data (in this case, data about bitcoin prices)
  • Pan and zoom functionality on every visible chart

What is D3?

D3 allows us to bind data to the DOM, which can then be accessed and used to manipulate the document. A simple example would be generating a HTML table from an array of data, but it’s not much harder to use the same data to generate a bar chart!

Each point of data gets paired with a DOM element, whose attributes you can set as functions of its corresponding datum. D3 also provides a neat way of dealing separately with nodes that need to be created, updated or destroyed as the data set changes (the enter, update, exit pattern).

If that sounds abstract, here’s an example using D3’s simple chainable:

d3.select('body')
  .selectAll('p')
  .data([4, 8, 16])
  .enter()
  .append('p')
  .text(function(d) { return 'My data is: ' + d; });

This will select the body of your HTML document, then select any paragraph elements within it, and bind a set of data to them – in this case, a short array of numbers. We use enter() to select the nodes which will need to be created, and add a new paragraph, whose text depends on the data paired with it. By default, the nodes and data are paired by index.

The output, then, is:

My data is: 4
My data is: 8
My data is: 16

View in jsfiddle.

So What is d3fc?

d3fc is an open source library based on, and influenced by, D3.js. It is built with a variety of re-usable components. There are relatively low-level examples like gridlines, or very many useful chart types, such as the line, bar or area series.

There also are higher level components made out of a number of sub-components, like linearTimeSeries, and components for financial indicators In these components, algorithms calculate new data - such as that needed for a set of Bollinger bands – and a separate renderer will draw it to the screen. Each component has options for customisation and many even allow customisation of the internal logic using the decorate pattern.

For an example of how simple it can be to create charts using d3fc:

var data = fc.data.random.financial()(50);
var chart = fc.series.candlestick();
d3.select('#an-svg-element')
    .datum(data)
    .call(chart);

More d3fc examples

And that’s it!

Our main reason for using d3fc was to develop upon the original code, discover improvements and criticisms as an external developer. Starting off using it was remarkably simple and accessible, with only the basic knowledge of d3.js required. One of the more miraculous properties of d3fc was the ability to handle multiple features at a time - yet still retaining the flexibility to prioritise features.

Finding a Websocket

One of our tougher jobs early on in the project was finding a source to use for our historic and real-time data. The original idea was to create a Websocket to the Yahoo Finance API, however this turned out to be an impossibility due to the privacy of the real-time information.

Finally we found a good API with the Coinbase exchange API reference Websocket feed, which gave us the real-time market data updates:

coinbaseSocket = new WebSocket('wss://ws-feed.exchange.coinbase.com');

Source of Websocket

To begin the feed messages we had to send in a subscribe message to the Coinbase server indicating which product type we wanted:

var msg = {
    type: 'subscribe',
    'product_id': 'BTC-USD'
};

Unfortunately the information came through in a format that was not suitable for our needs, with just the price of the latest transaction being shown along with the size. Therefore we inserted the data into ‘buckets’ of Open, High, Low and Close:

Bringing the data together

One of the more problematic tasks we faced, was when working with combining the live data stream from the Websocket with the historic data from Coinbase.

The Websocket gave individual transactions, whereas the historic feed gave its data in OHLC form:

[
    [ time, low, high, open, close, volume ],
    [ 1415398768, 0.32, 4.2, 0.35, 4.2, 12.3 ],
    ...
]

In comparison to the Websocket, this is a collection of transactions over a period of time. While this wasn’t in itself an incredibly challenging task, it highlighted the difference between the coding we’d previously done and what was expected in a professional environment.

We began by writing a large class which did everything, including the logic for combining individual transactions into OHLC form and combining this with the historic data, along with caching the results of historic API calls.

In practice the size of this class and the coupling of a few different elements made it difficult to test and hard to maintain or change, the caching especially being more trouble than it was worth - often introducing bugs when trying to change functionality.

Therefore we split up the Websocket class, to deal with streaming in live data and another separate class dealing with converting the individual transactions into a bucket of Open, High, Low and Close:

// Expects transactions with a price, volume and date and organizes into candles of given periods
// Re-call OHLC whenever you want to start collecting for a new period/product
// In seconds
var period = 60 * 60 * 24;
var liveFeed = sc.data.feed.coinbase.webSocket();
        
function updateBasket(basket, datum) {
    if (basket == null) {
        basket = createNewBasket(datum, datum.date);
    }
    var latestTime = datum.date.getTime();
    var startTime = basket.date.getTime();
    var msPeriod = period * 1000;
    if (latestTime > startTime + msPeriod) {
        var timeIntoCurrentPeriod = (latestTime - startTime) % msPeriod;
        var newTime = latestTime - timeIntoCurrentPeriod;
        basket = createNewBasket(datum, new Date(newTime));
    } else {
        // Update current basket
        basket.high = Math.max(basket.high, datum.price);
        basket.low = Math.min(basket.low, datum.price);
        basket.volume += datum.volume;
        basket.close = datum.price;
    }
    return basket;
}

function createNewBasket(datum, time) {
            return {
                date: time,
                open: datum.price,
                close: datum.price,
                low: datum.price,
                high: datum.price,
                volume: datum.volume
            };
        }

Creating the Chart

The key component of creating our Primary Chart was a fantastic and easy to use component from d3fc - multi. This gave us the ability to use multiple components from d3fc and our own code at the same time:

var gridlines = fc.annotation.gridline(); 
var candlestick = fc.series.candlestick(); 
var annotationLine = fc.annotation.line() 
	.orient('horizontal')	
    //annotation line is set at where the last price is
	.value(function(d) { return d.close; }) 
	.label('');
//use multi to bring everything together (see below)
multi.series([gridlines, candlestick, annotationLine]);

This would give us the chart with an x and y axis, gridlines in the background with the candlesticks of data in the front, and an annotation line pointing out where the last candlestick’s close point is.

Multiple Series

For our chart to become what we visualised at the start of the project, we needed the functionality to render, and change between, several different series:

var candlestick = fc.series.candlestick();
var line = fc.series.line();
var area = fc.series.area();
var multi = fc.series.multi()
	.series([area, line, candlestick])
	.xScale(xScale)
	.yScale(yScale);

This would give our simple chart 3 series, with the candlestick showing on top of the line and area.

The multi component has been a great help with many other things as well, giving us the ability to show all the aspects of the chart with one line of code:

multi.series([gridlines, currentSeries, closeLine, currentIndicator]);

Which would look something like this:

Bollinger bands chart example Assuming the currentSeries = candlestick and currentIndicator = bollingerBands.

Adding a Menu

For our chart to become interactive, it has to have a menu bar. In this bar we decided to include the functionality to change the series, indicators, secondary chart, data type and reset the primary chart to the latest transaction.

The main functionality to change between the series, indicators and secondary chart was done using a button group for each created with D3:

function layoutButtons(sel) {
    sel.selectAll('label')
        .data(sel.datum())
        .enter()
        .append('label')
        .classed('btn btn-default', true)
        .classed('active', function(d, i) { return (i === 0); })
        .text(function(d, i) { return d.displayString; })
        .insert('input')
        .attr({
            type: 'radio',
            name: 'options',
            value: function(d, i) { return d.valueString; }
        })
        //check the first button for each component
        .property('checked', function(d, i) { return (i === 0); }); 
}

function optionGenerator(selection) {
    selection.call(layoutButtons);

    selection.selectAll('.btn')
        .on('click', function() {
            var selectedOption = d3.select(this)
                .datum();
            dispatch.optionChange(selectedOption);
        });
}

d3.rebind(optionGenerator, dispatch, 'on');

return optionGenerator;

The buttons are styled as bootstrap buttons

The reset button was the first to enter the menu, as functionality to the end of the available data was necessary for a real time chart:

function resetToLive() {
    var data = dataModel.data;
    var extent = fc.util.extent(data, 'date');
    var timeExtent = (extent[1].getTime() - extent[0].getTime()) / 1000;
    var navTimeExtent = timeExtent / 5;
    var latest = data[data.length - 1].date;
    var navTimeDomain = [d3.time.second.offset(latest, -navTimeExtent), latest];
    onViewChanged(navTimeDomain);
}

function onViewChanged(domain) {
    dataModel.viewDomain = [domain[0], domain[1]];
    render();
}

container.select('#reset-button').on('click', resetToLive);

The indicators are added on to the multi.series when their corresponding button is active, giving a responsive interaction for the user. For both of these, a none button is originally checked on the menu, giving the user a wide range of options for the visualisation of the chart. The secondary chart (either RSI or MACD) are included through the render function when their respective buttons are activated.

To change indicators using the buttons, we created an option function:

sc.menu.option = function(displayString, valueString, option) {
    return {
        displayString: displayString,
        valueString: valueString,
        option: option
    };
};

This meant we could lay out every indicator and series in a similar manner, making the selection of each one simple and consistent:

//Use the sc.menu.option function to generate all the different series'
var candlestick = sc.menu.option('Candlestick', 'candlestick', sc.series.candlestick());
var ohlc = sc.menu.option('OHLC', 'ohlc', fc.series.ohlc());
var line = sc.menu.option('Line', 'line', fc.series.line());
var point = sc.menu.option('Point', 'point', fc.series.point());
var area = sc.menu.option('Area', 'area', fc.series.area());

Data Random

Finally, the most important button to be added to the menu is a dropdown for changing the data stream between randomly generated data, and real time data coming in through the Coinbase websocket. This functionality also included the ability to change which time period the chart was rendering on (either 1hr, 5mins or 1min):

function setPeriodChangeVisibility(visible) {
    var visibility = visible ? 'visible' : 'hidden';
    d3.select('#period-selection')
        .style('visibility', visibility);
}

var dataTypeChangeOptions = function(selection) {
    selection.on('change', function() {
        if (this.value === 'bitcoin') {
            setPeriodChangeVisibility(true);
        } else {
            setPeriodChangeVisibility(false);
        }
        dispatch.dataTypeChange(this.value);
    });
};

sc.util.filterDataInDateRange = function(data, dateExtent) {
    // Calculate visible data, given [startDate, endDate]
    var bisector = d3.bisector(function(d) { return d.date; });
    var filteredData = data.slice(
        // Pad and clamp the bisector values to ensure extents can be calculated
        Math.max(0, bisector.left(data, dateExtent[0]) - 1),
        Math.min(bisector.right(data, dateExtent[1]) + 1, data.length)
    );
    return filteredData;
};

Data time changed

Refactoring

One of our bigger hurdles in the project was having to refactor everything in our 3rd Sprint. The aspects of the chart so far had all been written into one main.js file for ease and access - however this discouraged from testing, developing and maintaining the code.

Due to the conflicts we were getting in git, we decided to take action and modularise the main.js into separate components (i.e. charts, navbar, series, zoom etc.). This was an essential, yet tough piece of work - requiring a lot of time and thought to complete with good quality code for when it was finished.

We created a global object class for the project, with references to every component we have worked on:

var global = null;
/* jshint ignore:start */
global = (1, eval)('this');
/* jshint ignore:end */

global.sc = {
    chart: {},
    data: {
        feed: {
            coinbase: {}
        }
    },
    menu: {
        generator: {},
        primaryChart: {},
        secondaryChart: {}
    },
    series: {},
    util: {}
};

We created a key rendering function in our main.js to bring the main components together. Namely the primary and secondary charts, the nav chart and their axis which was shared by all three:

var primaryChart = sc.chart.primaryChart();
var secondaryChart = sc.chart.secondaryChart();
var xAxis = sc.chart.xAxis();
var navChart = sc.chart.navChart();

function render() {
    svgPrimary.datum(dataModel)
        .call(primaryChart);

    svgSecondary.datum(dataModel)
        .call(secondaryChart);

    svgXAxis.datum(dataModel)
        .call(xAxis);

    svgNav.datum(dataModel)
        .call(navChart);s
}

Which would give us our original three standard charts just like they were before refactoring:

Primary chart, RSI chart, navbar and shared axis In this case the secondaryChart() is an RSI (Relative Strength Index) chart, and the primary chart’s indicator is the moving average.

Testing

During development it’s useful to be able to write unit tests for modules of code you’ve written before committing it into the shared codebase. This lets you test for sure that the code works as expected, and also forces you to define exactly what a piece of code ought to do and consider the edge cases. Often, if a piece of code is hard to unit test it’s a suggestion that the code isn’t modular enough. These tests will then provide advance warning if someone inadvertently breaks your code in the future.

We also did standard test, however without any testers for our cause we had to do them all ourselves. One of the greater challenges from this was producing our chart into one with good UX and UI. This had to be determined by our own perceptions and judgement; of course in our eyes the chart looks clean, simple and concise.

Project Development

We ran the project on an agile development regime (scrum). This was the first time for both us interns to work in this way, with our project being split into 4 sprints of 2 weeks long each - at the end of each sprint we would give our customer (in this case the head of development) a demonstration of our most recent release.

Each day we had a 15 minute session (stand-up) where each person would explain what they did yesterday, what they’re doing today and any issues that they encountered. The set routines of stand-ups everyday, sprint planning and reviewing, and demonstrations of the project was consistent, keeping the work at a steady rate.

We had some fantastic support from members of the company, they lead us in every meeting and helped us out with any part of the project we were on. No question was too silly, and they always explained everything in full which develop our knowledge further.

Development

This project has potential to develop a lot further than what we have begun. The need of a mid-range chart for developers who need something efficient, easy, flexible yet reliable is growing in this day and age of programming. Along with open source projects becoming the popular go-to, the d3fc-showcase is an excellent example of what the future for charts holds. With the ability to use d3fc to create a simple chart that can then be extended into something more complex in nature, yet simple in design.

One of the more intuitive outcomes of this project has been the inclusion of live streaming data in from an external source. We believe it would make a great additional feature to the constantly improving d3fc, and hopefully will be included in an upcoming build.

Conclusion

Scott Logic has provided an incredibly supportive atmosphere in which to learn new skills and develop this piece of software, and we are greatly in debt to our mentors for all the help they’ve provided us. As an intern, one is to expect to be treated more poorly in the work environment; however at Scott Logic being classified as an intern is disregarded (not entirely), and you are brought fully into the work ethics of the company - with the occasional game of foosball.

It has been a fantastic learning experience, from new languages, libraries and software to the experience of working with a team in a professional company. The culture of Scott Logic is diligent, yet relaxed, and the people have been extremely welcoming.

GitHub.

We’d like to give our special thanks to Drew Milley and James Leftley, for all their time and effort in helping us with the project. We’d also like to thank Tom Simmons, Simon Watson and Paul Schofield.

Chris Barrett and Ruth Caulcott-Cooper, Newcastle Interns 2015

08 Sep 18:34

The Loft · Amsterdam

by Charmaine Li

Leider ist der Eintrag nur auf English verfügbar. Der Inhalt wird unten in einer verfügbaren Sprache angezeigt. Klicken Sie auf den Link, um die aktuelle Sprache zu ändern.

Located near the Prinsengracht Canal in Amsterdam, The Loft is a modern conceptual showroom curated by Dutch studio The Playing Circle. The interior space is saturated with natural light and brought to life with products with character, most of which are made of natural materials, such as wood, leather or wool. From boudoirs and cushions to aprons and accessories, anything that can be seen and touched in the pop-up showroom, can also be purchased.

The Loft_Places_1

places collage

The Loft_Places_4

The Loft_Places_5

The Loft_Places_6

The Loft_Places_9

places collage2

The Loft_Places_8

The Loft_Places_10

The Loft
Prinsengracht 583-V, 1016 HT Amsterdam
Tues–Sat 10–18h / Sunday 12–18:00

All images © Aico Lind

17 Aug 08:42

Kurzüberblick: VS2015 Code Improvements und aktuelle Tools

by Benjamin Abt

Vor rund einem Jahr habe ich den Blogbeitrag Quellcode robuster umsetzen – mit Hilfe von FxCop und NDepend geschrieben und veröffentlicht, in dem es darum geht, wie und mit welchen Tools Quellcode verbessert werden kann.

Seit einem Jahr hat sich aber enorm viel getan. Visual Studio 2015 wurde veröffentlicht.

Ich möchte daher gerne den Vergleich zum letzten Blogbeitrag mit Hilfe der aktuellen Tools (VS2015, nDepend6..) fortführen.

Tooling

  • Meine Hauptidee ist weiterhin Visual Studio; dieses mal in der Version 2015 und dank meines MVPs im Funktionsumfang “Enterprise”.
  • Auch dieses mal war nDepend so nett und hat mir die aktuelle Version 6 zur Verfügung gestellt.
  • Meine Test-Anwendung, mit der die Tools geprüft werden, ist wieder mein Projekt QuickIO.NET
VS Code Analyze

Die Code-Analyse bzw. FxCop ist vollständig in Visual Studio 2015 integriert; der Funktionsumfang hat sich nicht sonderlich geändert:

Warnungen und Hinweise werden in das Error-Fenster integriert

VS2015 FxCop

…und die Code-Metrik werden in einem eigenen Fenster …

VS2015 CodeMetric

…mit den entsprechend erreichten Punkten (bis 100 als Maximum) dargestellt.

Die Punktezahlen sind bei mir in Visual Studio 2013 wie auch in Visual Studio 2015 vollkommen identisch, sodass auch Teams mit gemischten Versionen identische Ergebnisse erhalten werden.

Light Bulbs

Microsoft hat in 2015 Visual Studio ein neues Feature verpasst: Light Bulbs.

Wer ReSharper schon mal benutzt hat; der erkennt dieses Feature schnell wieder – denn es ist sehr ähnlich.
Hierbei werden einzelnen Code-Zeilen oder Code-Abschnitten Hinweise im Editor angehängt, die den Code vermeintlich verbessern sollen.

Vermeintlich deshalb: diese Tipps sind nicht wirklich immer Tipps.
Manchmal sind es “Verschlimmbesserungen”.

VS2015 LightBulbs

Hierbei wird nun vorgeschlagen, statt Boolean einfach bool zu nutzen. Aber kann man das wirklich als Tipp bezeichnen? Ich denke nicht.

Ich gehöre zu der Fraktion lieber Boolean statt bool zu schreiben.

Andere Fälle, u.a. weshalb ich ReSharper nicht mehr nutze – dass Schleifen in Linq übersetzt werden – haben oft die Folge, dass der Code aus Performance-sicht absolut identisch ist; der Code aber durch verschachtelte Linq-Queries praktisch unleserlich werden.

Trotzdem finde ich LightBulb ein enorm nützliches Feature und es wurde Zeit, dass es in Visual Studio von Haus aus integriert ist.

nDepend

nDepend ist kein Tool für Hobby-Entwickler.
Sowohl die Installation und die Nutzung gehört leider nicht unbedingt zu den Usability-freundlichsten Elementen.

Das Tools ist aber ungeheuer hilfreich und informativ, wenn es darum geht, dass man einen professionellen Blick auf den Quellcode hat (z.B. Code Coverage); und wie dieser sich (hoffentlich positiv) weiterentwickelt.

nDepend kann man über verschiedene Wege ausführen:

  • Als eigenständige Applikation
  • Integriert in Visual Studio
  • In Kombination mit einem Quellcode-System, z.B. TFS, TeamCity, SonarQube
  • Über die Konsole

Nachdem eine DLL oder ein Projekt ausgewählt wurde, erfolgt die Analyse dessen.

Anschließend erscheint eine Applikationsansicht, dessen Struktur man aus Visual Studio erkennt:
nDepend_Dashboard
Wir erhalten hier zum einen das Dashboard der Analyse, die Informationen wie Zeilenanzahl, Komplexitätsfaktor, Regelverletzungen und Coverage zeigen.

Die Regeln kennt man auch von FxCop:

nDepend_Rules

Sehr nützlich – aber eben vor allem für den professionellen Einsatz finde ich die Metric-Ansicht von nDepend

nDepend_Metrics

Fazit

Insgesamt hat sich das letzte Jahr besonders im IDE-Bereich viel getan. Das ist eben der neuen Version von Visual Studio geschuldet.

Microsoft hat erkannt, dass es für alle Entwickler enorm hilfreich ist, wenn generelle Verbesserungen angezeigt werden. Mit Hilfe von Roslyn haben sie die Möglichkeit geschaffen, dass dies direkt von Haus aus angeboten werden kann.

Das Nachgesehen haben die Hersteller von ReSharper, CodeMaid und Co, deren Funktionskern genau dies war.

Für den absolut professionellen Bereich reicht es aber noch nicht aus, was Visual Studio kann.
Hier kommt man um Tools wie nDepend und evtl. ReSharper dann am Ende doch nicht vorbei.

Der hohe Preis der einzelnen Tools rechtfertigt den Einsatz aber in der Regel. Denn Entwicklungskosten sind eben nicht nur initial, bis zum ersten Release; der Großteil macht oft die Wartung aus, die leider vernachlässigt wird.

Durch den geeigneten Einsatz kann aber dieser Faktor deutlich gesenkt werden.

Der Beitrag Kurzüberblick: VS2015 Code Improvements und aktuelle Tools erschien zuerst auf SchwabenCode.

20 Jul 06:46

Legacy Custom Menus Toolbars in Access2007

by a.p.r.pillai

You have spent a lot of time designing Custom Menus and Toolbars in your .MDB Database. You have upgraded to Microsoft Access 2007 Version. You opened your .MDB database in the new version of MS-Access. The menus and tool bars are different and don’t know where to locate the familiar Menu commands and Tool Buttons of Access 2003. 

Note: You can find a document published by Microsoft explaining how to find Access 2003 menu options  in Access 2007.  Download it from this Link: Access2003 Menu in Access2007 (Download)

Besides that the customized menus and toolbars you have designed for your application are disappeared. 

Your Custom Menus and Tool Bars are not gone anywhere, all you have to do is to find them.

Custom Menus and Toolbars are safely kept inside the Add-in Menu of Microsoft Access2007. Click on the Add-in Menu to find all of them there.  Check the sample image given below for reference.

Add-in Menu View

Have you noticed the group name Custom Toolbars appearing at the bottom of the Add-in Menu?

But, Access 2007 Menu Bars also appearing on the top.  You want to turn off the default Access2007 Menus and Toolbars from the top and replace it with your Custom Menus and Toolbars.

Ribbon and Menu Options

Do the following to get that done:

  1. Click on the Office Button (Top left corner).
  2. Select Access Options.
  3. Select Current Database.
  4. Move the scrollbar down to find the Ribbon and Toolbar Options as shown on the image given above.
  5. Select your Custom Menu Bar name from the drop-down list, replacing the text (Default).
  6. Select your Shortcut Menu Bar name from the drop-down list replacing the text (Default).
  7. Remove the check-marks from the next three options:
    • Allow Full Menus.
    • Allow Default Shortcut Menu.
    • Allow Built-in Toolbars.

    Ribbon and Menu Options

  8. Click OK to save changes and come out of Access Options.
  9. One more step to go:

  10. Close the database and open it again to register the changes.

Custom Menus Options

Now, your Menu Bars and Tool Bars are in complete control of your Application they will look like the image given above.

You want to restore Access 2007 Menus and Toolbars, then open .MDB file by holding the Shift-Key, to prevent Auto-Macro from running and to get control of the database window.  Go through Steps-1 to Step-9 and reverse what you did earlier.

13 Jul 18:54

10 Simple Self Improvement Hacks

by Elizar Caraecle

moving-forward-1445758-mAristotle once said that we are what we repeatedly do. Therefore, if you want to live a successful life, you need to have the right mindset and habits. On the other hand, it should be noted that human as we are, we have faults that prevent us from reaching our full potential. This is where the need to improve oneself comes in. With this, you can experience personal growth, pursue your passion, live a more meaningful life, help others, and so much more! Obviously, such task is not a walk in the park, but the good thing is: there are straightforward tips regarding the said matter. Some of which are elaborated below. 1. Go online and promote yourself Promoting yourself online is a must, especially […]

The post 10 Simple Self Improvement Hacks appeared first on Dumb Little Man.

06 Jul 07:29

Freebie: Smashicons Icon Set (500 Icons, 4 Styles, AI, PSD, Sketch)

by The Smashing Editorial


Today, we're happy to release a very large icon set: the freebie contains 500 icons in four editable variants: outlined, solid, webby and flat, covering all sorts of various categories. The icons allow you to customize the stroke width and style, not to mention that you can change the color of the elements. They’re carefully crafted on a 60px grid which gives each icon consistency and crispness on all displays.

Thumbnail

Smashicons come in several styles. The AI and Sketch formats come in four styles: outline for mobile use; solid for hover state; webby for web; and flat for any creative project. The PSD format comes in two styles: outline for mobile use, and solid for hover states.

The post Freebie: Smashicons Icon Set (500 Icons, 4 Styles, AI, PSD, Sketch) appeared first on Smashing Magazine.

06 Jul 07:25

Microservices – Strategie vor Taktik

by Nino Martincevic

Dynamisch, unvorhersehbar, schwer planbar, volatil, irrational – das sind nur einige Merkmale der heutigen Geschäftswelt. Und dann gibt es noch Software, die dabei helfen soll, diese Probleme zu vereinfachen. Doch sie bringt noch zusätzliche Effekte mit, wie die rasante Geschwindigkeit neuer technischer Entwicklungen, neue Endgeräte oder eine immer stärkere Vernetzung von Systemen.

Es funktioniert oftmals nicht mehr, ein bestimmtes Ziel mithilfe eines präzisen oder umfassenden Plans und Vorgehens erreichen zu wollen. Viel wichtiger ist die Eigenschaft, sehr schnell auf die sich ebenso sehr schnell ändernden Einflüsse reagieren zu können – die Organisation, die Methodik und die Softwaresysteme müssen wendig und wandelbar sein. Schnelles Feedback ist nötig, um einzelne Subsysteme bei bestehendem Bedarf optimieren oder ersetzen zu können.


“Deshalb sind wir ja agil!”

Eine Änderung einer für das Umfeld geeigneten Methodik kann helfen, doch in der Produktentwicklung führt sie fast zwangsläufig auch zu organisatorischen, architektonischen und technischen Änderungen. Dadurch bedingt ändern sich auch die Strategien der Umsetzung, denn viele bestehende Strukturen sind nicht mehr kompatibel.

Um maximale Anpassbarkeit erreichen zu können, strebt man mit strategischer Softwareentwicklung zu einem Design, das Charakteristiken und Vorteile von jederzeit wandelbaren Systemen zeigt. Ignoriert man dies, befindet man sich oft genug wieder im alten Sumpf der Abhängigkeiten und Seiteneffekte.

Agile Softwareentwicklung fördert die Entwicklung kleinerer Einheiten, weil sie die schnelle und kontinuierliche Auslieferung funktionsfähiger und wertvoller Produkte bevorzugt.
Doch das allein reicht nicht aus. Die Architektur und Implementierung muss diese Methodik auch sinnvoll und effektiv unterstützen. Der Schlüssel dazu ist, die Methodik und entstehende System so „geschmeidig“ wie möglich zu halten.

Strategie ohne Taktik ist der langsamste Weg zum Sieg. Taktik ohne Strategie ist das Geräusch vor der Niederlage. – Sun Tzu

Zu oft wird dabei die Strategie außer Acht gelassen oder vernachlässigt und man fokussiert sich auf die Taktik. Doch „wie“ und „warum“ sind entscheidender als das „Was“. Von daher ist es wichtig, sich frühzeitig über die Strategie und deren mögliche Auswirkungen Gedanken zu machen und diese so schnell wie möglich mit der Taktik zu verifizieren. Eine taktische Maßnahme mag Teilprobleme schnell lösen und ist leicht änderbar, aber die Änderung einer Strategie ist mit hohen Kosten und Schmerzen verbunden.


Am Anfang wissen wir am wenigsten über unser Produkt

In der agilen Softwareentwicklung versucht man die Ungewissheit in der Planung, die Vielzahl an “Anforderungen” und möglichen Lösungen mit anderen Ansätzen zu lösen als im traditionellen Projektmanagement. Beispielsweise ist man bemüht, Anforderungen in Epics und User Storys aufzuteilen, um die Komplexität jeder einzelnen Anforderung zu verkleinern, Prozesse zu verbessern und Abhängigkeiten zu minimieren.

Dazu gibt es auch einige sehr gute begleitende Ansätze, bspw. Impact Mapping, um die wichtigsten oder wertvollsten Anforderungen zu ermitteln und einen Hinweis auf einen möglichen Lösungsweg zu bekommen. Arbeitet man mit mehreren Teams an einem großen System, können Teams zudem nach Fachgebieten und Kontexten, fachlicher und organisatorischer Art, aufgeteilt werden.

Dabei geht man inkrementell und iterativ vor, d. h. man beginnt mit den Anforderungen, die den größten Nutzen (welcher Art auch immer) bringen, und baut sie schrittweise auf. Sollte sich die Richtung als nicht zweckdienlich erweisen, kann man sie aufgrund der geringen Größe leicht korrigieren. Oft entdeckt man auf dieser Tour auch, dass sich manche Annahmen als falsch erwiesen haben und daher bestimmte Anforderungen nicht mehr benötigt werden oder modifiziert werden müssen.

Monolithische Systeme und Planungen besitzen nicht die nötige Anpassungsfähigkeit, um schnelle und kontinuierliche Änderungen durchführen zu können, sie sind oftmals schlicht zu träge. Zumal sie meist auch in so genannten Silos gebaut werden und die organisatorische Struktur eine Anpassung nicht oder nur schwer zulässt.

Daraus lässt sich unschwer erkennen, dass schnell und leicht anpassbare Software nicht mehr mit herkömmlichen, allumfassenden Ansätzen designt werden kann, um diese zwingend notwendige Fähigkeit zu erreichen und mit den sich ständig ändernden Anforderungen mithalten zu können.


Am Anfang wissen wir am wenigsten über unsere Software

Wenn es in der Produktentwicklung vor allem darum geht, schnell auf Änderungen und neue Erkenntnisse reagieren zu können, dann in der Software erst recht. Das gelingt mit kleineren Einheiten wesentlich  einfacher und sicherer als mit einem großen System, das sehr viele Abhängigkeiten besitzt. Zudem können sie auch schneller in Produktion gehen und einen Mehrwert erzeugen.

Eric Evans stellte 2003 in seinem Opus Magnum “Domain-Driven Design [DDD]. Tackling Complexity in the Heart of Software” einen strategischen Ansatz dar, der darauf abzielt, Komplexität in Softwaresystemen besser in den Griff zu bekommen.

Neben den eher taktischen Patterns im ersten sind es vor allem die im zweiten Teil vorgestellten strategischen Ansätze für Architekturen und Systeme, die dabei helfen. Zusätzlich zur wichtigsten Vorbedingung, dass Software die Sprache und Struktur der Domäne spiegeln sollte (Ubiquitous Language), ist hier besonders das Prinzip Bounded Context hervorzuheben.

Analog zur agilen Produktentwicklung versucht man in DDD kleinere Einheiten aus den großen Blöcken herauszuschneiden, die spezialisiert sind und eine Einheit im Sinne der Datenintegrität darstellen, um damit die Komplexität der einzelnen Komponenten zu verringern.

Wie beim ständigen Verfeinern der Anforderungen im Produktmanagement werden Modelle und Kontexte in DDD ständig hinterfragt und verfeinert, umgebaut oder sogar entfernt. Dies ist ebenfalls ein kontinuierlicher Prozess. Evans nennt dies „Model Exploration Whirlpool“:

Model Exploration Whirlpool

Abb. 1: Model Exploration Whirlpool (PDF)

Anpassbarkeit aller Instrumente und Artefakte ist auch hier die Grundbedingung, um eine Produkt- und Softwareentwicklung erfolgreich zu gestalten.


Aufteilung und Verkleinerung

Je spezifischer Produkte und Anforderungen definiert werden, desto spezifischer muss die Software dies reflektieren. Agilität mit monolithischen Systemen wird zumindest stark erschwert, in vielen Fällen ad absurdum geführt. Das heißt nicht, dass nun Hunderte von eigenständigen Produkten entwickelt werden müssen. Sie können als Einheit nach außen durchaus monolithisch als ein Produkt erscheinen, doch im Kern bestehen sie aus kleinen, autonomen und anpassbaren Einheiten.

Für die Erstellung und Verwaltung von Anforderungen gibt es Instrumente (z. B. Hierarchical Backlog oder Story Maps), die eine ähnliche Zielsetzung auf fachlicher Ebene besitzen. Diese teilen ein System nach den fachlichen Bereichen auf und innerhalb dieser dann auf die entsprechenden Storys des jeweiligen Bereiches. So gewinnt man nicht nur einen Gesamtüberblick über das Produkt, sondern kann durch die Aufteilung auch einzelne Anforderungen und Fortschritte in Relation zum gesamten Produkt verfolgen. Dies können sehr mächtige Werkzeuge zur interdisziplinären Abstimmung sein, doch bei zu großen Produkten bzw. Kontexten kann es unübersichtlich werden. Von daher profitieren auch diese Werkzeuge von der Verkleinerung der Komponenten.

Story Map

Abb. 2: Beispielhafte Story Map eines E-Commerce Systems

Betrachtet man nun den eigentlichen Code und die technische Implementierung, geht es in den meisten Fällen um Modularisierung, Trennung von Belangen und Minimierung von Abhängigkeiten. Im Zuge von TDD, hoher Automatisierung, Continuous Delivery und heterogenen und verteilten Systemen und Teams ist man dazu fast schon gezwungen.

Doch dieser “Zwang” führt in den meisten Fällen zu langfristig besser wartbarer Software, da die Komponenten kleiner, autonomer und dadurch weniger anfällig sind. Sie können zudem iterativ und inkrementell erstellt werden, ganz im Sinne von Agilität.

Selbstredend hat das auch seinen Preis, wie z. B. ein erhöhter Test-, Monitoring- und Koordinationsaufwand, aber der Nutzen überwiegt diese Kosten in den meisten Systemen bei Weitem. Zumal in der heutigen Zeit Systeme nicht mehr nur auf einem Device oder einer Plattform laufen und häufig verteilt sind oder in der Cloud bereitgestellt werden.


Context Is King

Bestimmte Fachkonzepte und -Begriffe ergeben nur in bestimmten Fachgebieten einen Sinn und können in anderen Kontexten eine völlig andere Bedeutung haben. Ohne einen klar abgegrenzten Kontext sind Begriffe und Konzepte eines Geschäftsmodells missverständlich und führen langfristig zu Problemen. Deswegen ist ebenfalls keine vernünftige Modellierung, z. B. eines Domain Models, möglich.

Im Zusammenhang mit den Diskussionen um Modularisierung von Software (z. B. mit Microservices) ist DDD (und vor allem eines seiner zentralen Konzepte Bounded Context) aktueller denn je.

Bounded Context Map

Abb. 3: “Karte” eines E-Commerce-Systems mit Domänen und Kontexten

Innerhalb dieser Domänen des Problemraums existieren ein oder mehrere Kontexte, die ebenfalls klar abgegrenzt sind und ein Domain Model kapseln – hier allerdings im Lösungsraum, d.h. vor allem der technischen Implementierung (hin und wieder auch der organisatorischen Umsetzung). Das Zusammenspiel und die Abhängigkeiten der Komponenten werden in einer Context Map visualisiert. Hierbei werden nicht nur technische, sondern auch organisatorische Abhängigkeiten transparent gemacht.

Context Map

Abb. 4: Context Map eines E-Commerce-Systems mit den Beziehungen zwischen Kontexten und möglichen Schnittstellen

Das Prinzip des Bounded Context ist sehr geeignet, um die Korrelation eines Services und seiner Kontextgrenzen darzustellen. Eine autonome Komponente (bzw. ein Microservice) ist dann die konkrete Implementierung eines Bounded Context.

Arbeitet nur ein Team an allen Kontexten, ist dies wenig problematisch. Sobald allerdings die Kontexte auf einzelne Teams verteilt werden, kommt man nicht umhin, die Beziehungen und Abhängigkeiten untereinander möglichst frühzeitig klar zu definieren.
Wichtig dabei ist: Die Context Map bildet in erster Linie die organisatorischen Abhängigkeiten ab. Denn die entscheidet, wie die Arbeit an einzelnen Kontexten strukturiert sein muss, damit es langfristig nicht zu Problemen kommt. Zusätzlich kann sie visualisieren, wie die Art der Zusammenarbeit geregelt ist und welche (technischen) Schnittstellen dafür bereit gestellt werden, wenn nötig.

Zwei Beispiele für Beziehungen und Abhängigkeiten:

Beziehung Abhängigkeiten (organisatorisch)
Relationship Beide Teams arbeiten eng zusammen und stimmen Änderungen und deren Auswirkungen stets gemeinsam ab.
Conformist Der Kontext im Downstream ist passiv und muss auf Änderungen des Modells im Upstream-Kontext reagieren. Das kann z. B. auch bedeuten, dass der Downstream-Kontext auch Daten empfängt, die er nicht benötigt. Eine Steigerung davon ist, wenn der Kontext im Upstream oft seine Schnittstelen oder Strukturen ändert. Dann benötigt man in der Regel einen Layer, der dafür sorgt, dass der eigene (Downstream-)Kontext dadurch nicht kompromittiert wird. Oft wird das mit einem sog. Anti-corruption Layer (ACL) gelöst.

Prominentes Beispiel für Conformist aus vielen IT-Abteilungen sind DBAdmins alter Schule, die das Schema einer Datenbank ohne Vorwarnung ändern können. Oder Fremdsysteme, aus denen man Daten abgreift, bei denen man aber nicht mal weiß, wer dafür zuständig ist und – selbst wenn man es wüsste – keinerlei Einfluss darauf hat. Beispiele für Abteilungen, die ohne Absprache Schnittstellen und Systeme ändern, gibt es in der Praxis leider zuhauf.

Diese Beispiele zeigen, wie wichtig es ist, sich auf strategischer Ebene über die Beziehungen von Kontexten im Klaren zu sein. Ansonsten zahlt man einen hohen Preis.
Dies gilt umso mehr in Systemen, die relativ autonom sind und von verschiedenen Teams gebaut werden.
In einem Folgeartikel werde ich detaillierter auf den Nutzen einer Context Map eingehen.


Skalierung – in alle Richtungen

Ein in den letzten Jahren häufig diskutiertes Thema ist die Skalierung agiler Methoden und insbesondere Scrum, vor allem in größeren Unternehmen. Es gibt eine Reihe von mehr oder weniger bekannten und auch erfolgreichen Lösungsansätzen.

Conway’s Law besagt, dass ein Softwaresystem die Kommunikationsstruktur seiner Organisation kopiert. Das führt bei vielen Softwaresystemen großer Organisationen zu “interessanten” Strukturen. Die Fortsetzung dieser Aussage, in der Conway vorschlägt, wie man dies vermeiden kann, wird oft nicht mitzitiert: “[…] Therefore, flexibility of organization is important to effective design.

Man kann das Ganze auch umkehren: die Organisation passt sich einem flexiblen, modularen und aus vielen kleinen, autonomen und spezialisierten Komponenten bestehenden System an. Die Beziehungen untereinander, technischer und organisatorischer Art, können in einer Art Karte (z. B. einer Context Map) visualisiert und transparent gemacht werden.

Die Karte aller Kontexte und Komponenten und ihrer Beziehungen untereinander ist die Visualisierung der Kommunikation der Organisation.

Von daher ist in vielen Fällen nicht die Skalierung nach oben oder zu mehr die beste Lösung, sondern hin zur Verkleinerung der Anforderungen und Komponenten des Problem- und Lösungsraums. Also der Aufteilung eines nicht in voller Gänze überblickbaren Systems in kleinere und damit besser einschätzbare und beherrschbare Anforderungen, Einheiten, Belange oder Subsysteme. Selbst das bekannte Beispiel von Spotify kann man eher als Aufteilung in kleinere, spezialisierte Einheiten denn als Skalierung nach oben sehen.

Es ist effizienter, eine Komponente genau einem Team zuzuordnen, statt eine große Anwendung auf mehrere Teams aufzuteilen. Allein der Aufwand der Kommunikation und der Abstimmung bezüglich der Anforderungen und Abhängigkeiten ist enorm im Gegensatz zu den wesentlich unabhängigeren, kleineren Komponenten. Natürlich kann ein Team für mehr als eine Komponente verantwortlich sein, aber eine Komponente sollte nur von einem Team gebaut (und betrieben) werden.


Also Microservices?

Modularität von Softwaresystemen ist nicht revolutionär neu – viele Konzepte von Microservices und anderen Ansätzen, die die Entwicklung (in jede Richtung!) skalierbarer Software fördern, sind schon sehr alt. Das macht nichts, es ist trotz des Wirbels um den Begriff eine “natürliche” und fast logische Evolution der agilen Produkt- und der strategischen Softwareentwicklung.
Vielleicht unter neuem Namen, aber mit den gleichen Prinzipien.

Warum überhaupt ein neuer Name her musste und es nicht einfach (Autonomous) Component heißt, ist fragwürdig. Schon 1996 definierte die European Conference on Object-Oriented Programming (ECOOP) eine Komponente als: „A software component is a unit of composition with contractually specified interfaces and explicit context dependencies only. A software component can be deployed independently and is subject to composition by third parties.“
Das passt ziemlich genau auf die gängigen Definitionen von Microservices …

Zumindest ist es sehr empfehlenswert für Systeme, die häufigen Änderungen ausgesetzt sind, also maximale Anpassbarkeit in jegliche Richtung haben müssen. Systemen, die sich nur langsam oder selten ändern, schadet es in den meisten Fällen dennoch nicht, im Gegenteil.

Vor allem besitzen wir heutzutage endlich viele neue technische Möglichkeiten, die das Ganze stark vereinfachen oder vieles erst möglich machen, z. B. sind wir in der Lage, unveränderliche Infrastruktur einzusetzen, Server und Plattformen nach Bedarf zu skalieren und ein- und ausschalten zu können, ja ganze Schichten von Technologien in kürzester Zeit zu ersetzen.

Micro-, Nano-, Pico- oder Macroservices?
Die zahlreichen Diskussionen um den Namen und vor allem die ideale Größe von Microservices (ich benutze hier den gebräuchlichsten Namen) sind Zeitverschwendung. Die Größe des Kontexts (bzw. Bounded Context) gibt die Größe eines Microservices vor, und die kann sich auch ändern (ein anderer interessanter und lesenswerter Vorschlag ist: Es muss in deinen Kopf passen…). Dabei sollte möglichst die Regel 1 Bounded Context = 1 Team = mindestens 1 Model/Aggregat gelten. Ein empfehlenswerter Ansatz ist, dass man (zu) groß anfängt und dann weiter aufteilt und verkleinert.

Dass dieser Ansatz fast zwangsläufig zu einer Änderung der Organisation führt, liegt nahe. Dass er eben aus diesem Grund häufig nicht oder nur bis zu einem bestimmten Punkt gegangen wird, leider auch.

Zu guter Letzt noch ein Vergleich der Charakteristiken von Microservices mit Konzepten und Ideen der agilen Produktentwicklung (angereichert mit Konzepten aus DDD und anderen Bereichen). Es soll beispielhaft darstellen, welche Konzepte korrelieren und/oder hilfreich für die Umsetzung sein können und ist keinesfalls von wissenschaftlicher Präzision, sondern ein reiner Ideenpool zur weiteren Beschäftigung mit diesem Thema. Hierbei liegen die Kriterien aus dem bekannten Artikel des Chefwissenschaftlers von Thoughtworks, Martin Fowler, über Microservices als Grundlage vor:

Microservices Agile Produktentwicklung (+ DDD et al.)
Componentization via services Bounded Context
Autonomous Component
1 Context = 1 Team = 1 Component
Domain Eventing
Organized around business capabilities Domain Knowledge
Ubiquituous Language
Backlog & Model Grooming
Product Owner / Stakeholder
Story Map / Product Vision Board
Products not projects Product Backlog
Product Roadmap
Product Team
Domain Language
Feature Iterations
Smart endpoints and dumb pipes Clean Architecture
Ports & Adapters
Context Map
(RESTful) APIs
Decentralized governance Context Mapping
Use Cases + Coordination Context
1 Transaction = 1 Aggregate
Cloud, Docker, Virtualization
Event-driven architecture, CQRS
Infrastructure automation Separate deployment
Continuous Delivery
DevOps
“You build it, you run it”
Phoenix Server & Immutable Environment
Design for failure
Evolutionary design
Adaptability
Fail fast
Inspect & Adapt
Chaos Monkeys
Adaptable (Clean, Hexagonal) Architecture
“Fake it ’til you make it”


The post Microservices – Strategie vor Taktik appeared first on codecentric Blog.

03 Jul 08:11

5 Reasons to Stop Ignoring Negative Emotions

by Guest of TSN
Schiller

I’ll never forget the first time I allowed myself to say, “I hate him.” I discovered the feeling during my meditation time. Seeing it there in front of me made me realize I needed to stop pretending it wasn’t true.

My dearest friend heard it first.

“I hate him,” I said with a smile. Not exactly the hateful expression you’d expect, but it was the most liberating statement I’d ever made, and I was so happy about it!

Always before I’d tried to reconcile myself to his presence. To be the bigger person, and not harbor hate in my heart. But through all my striving, I hated him still, and I’d just been lying to myself about it.

So when I discovered my truth, I not only got to experience a piece of myself, but I was able to free my mind from his power.

We’ve all been told again and again about how to become happier, be more positive, create great habits and forgive.

A Missing Piece

These can be great approaches to improving our lives. In fact, I’ve used a lot of these techniques with great success. But what I think is missing in far too many strategies is the ability to first know and accept who we really are.

This is hard. We don’t want to look at our anger, hate, depression, hurt, anxiety, obsessiveness, fear or any general emotion that makes us feel negative. Or if we do look at these emotions, we want to immediately label them as “bad” and push them away.

I know, you’re probably thinking, “What’s wrong with that? I don’t like feeling negative.”

No one does. But when we ignore or push away these pieces of ourselves, there are consequences that go beyond feeling happy again. What are they?

1. We Miss Out on a Vibrant Piece of Our Personality

If we picture all our different emotions as each having their own color, like:

  • Yellow = cheerful
  • Blue = peaceful
  • Red = angry
  • Green = energetic

Accepting only one end of the color spectrum hides a whole piece of who we are. There’s no contrast between the positive and negative, and that contrast is what makes us interesting.

This is true whether we live entirely in the negative or entirely in the positive. And let me tell you, even happy can get boring.

2. We Run Out of Storage Space

Even though emotions are thought of as only existing as an idea, the truth is emotions take up physical space. Have you ever had a massage and when the knot in your shoulder was being rubbed out, you suddenly felt really emotional?

Or have you ever watched a sad movie and when you started to cry, the floodgates were opened and you just cried and cried until everything upsetting from the last month was out of your system? Then when that great cry was over, you felt so much lighter?

That’s because the emotions we have get stored in our bodies. They don’t just go away. I’ve even had certain yoga poses bring me to tears.

In fact, they’ll stay stored in there our entire lives if we let them, all the while affecting our decisions without us even realizing it.

Emotions can only be released after they’ve been acknowledged and heard. They have to be felt. And like I mentioned before, this can be an enjoyable way to experience a different color of ourselves.

But when we don’t acknowledge them and instead push them away as unhealthy or bad, they start to pile up. No matter how many good emotions we fill ourselves up with, those bad emotions just keep taking up space.

And then one day, when all the space is gone, we explode. No more happy. And chances are, the collateral damage around us is pretty severe.

3. We Continue to Expose Ourselves to Toxic People

When we don’t allow ourselves to be mad at someone or even hate them, we will be less likely to see when that person is hurting us. Instead, we’ll take on the negative emotions as our problem. We’ll see it as a weakness that we can’t rise above.

But there ARE toxic people out there. They may not even be toxic for anyone but us, but that’s enough of a reason to set some boundaries.

When we aren’t afraid to face negative emotions, we will be more likely to become aware when certain people make us feel bad. Then we’ll be able to take action on it.

4. We Keep Ourselves from Close Relationships with Others

Intimacy between two people is created when our hearts are exposed to each other. It’s birthed in the knowing, not the pleasing. Have you ever had someone tell you how much they love you and your first thought is, “But you don’t know me.”

I can’t tell you how many times I’ve felt that way. And you know what? Love doesn’t sink in if we aren’t known.

That’s because when someone loves all those great things about us, it doesn’t mean anything unless they’re real. Pretending we’re happy and okay all the time doesn’t expose our true heart.

I’m not saying we have to walk around miserably all of the time in order to be intimate, but I am saying we need to expose ALL of ourselves. Everyone has both negative and positive emotions. It’s part of being human.

5. We Feel Like Failures

The truth is no single human alive can exist solely in positive emotions. Thinking that we can is setting ourselves up for a major dose of feeling like a failure.

Because when we do feel anger, anxiety, hate or fear, we’ll follow it all up with another negative emotion: shame. Shame over being a negative human being.

But being negative is part of who we are. It’s okay. Everyone feels negative sometimes.

I love positive emotions! And I highly encourage them. But let’s free ourselves to live the entire spectrum.

If we do, we’ll feel more alive because we accepted more than happy in our lives. And chances are, we’ll be emotionally healthier too.

25 Jun 08:26

Moving and backing up your Access 2013 web apps

by Andrew Stegmaier

This post was written by Bob Piper, a Program Manager on the Access team.

When files live on your computer’s hard drive, there’s a risk that they could be damaged, lost, corrupted, or deleted. To protect against this, most savvy businesses make copies of important files in separate locations. In a similar way, Microsoft takes many precautions to make sure your Access 2013 web apps on Office 365 are backed up and always available. However, making your own backups is still a good idea. How can you make a copy of your apps that can be restored to a different location?

Access 2013 web apps, just like all SharePoint apps, can be stored in a special type of file known as an App Package. You can create backup copies of your databases in App Package files and restore them by uploading them to any SharePoint 2013 site. Knowing how to do this would also be useful if you wanted to move an app from one Office 365 account to another.

Saving your App

When you visit your Access app in the browser, you will see a gear icon in the upper-right corner of the screen.  Clicking this gear allows you to open the app in the Access 2013 client.  In the client you will be able to customize the app, or, in this case, save it as a package.

With the app open in the client, simply click on “File” in the upper left corner, and choose “Save as”.  Then click “Save as Package”. 

You will be asked to name the app package, and you can decide whether to include data. If you uncheck this box, the resulting app will contain all the views, tables, macros, and queries in your app, but none of the records that are personal to your business. This could be useful if you wanted to share the design of your app with another person without exposing your business’ data.

After you click OK, you can decide where to save the app.  A moment later, your app will be saved to that location.

Uploading your app to another SharePoint Site on Office 365

Now that the App Package file is saved to your machine, you can load it onto any SharePoint Online site. To do this you will be using the “App Catalog.” The App Catalog is a place that stores the apps that are available for someone to add to a SharePoint site. In order to make apps available on the catalogue, you’ll need to have Owner or Administrator permission for the site.

In the version of SharePoint included in Office 365 Small Business Preview, you’ll need to go to a special URL to access the catalogue. To find this location, go to any page on your site. You’ll notice that the URL in your browser will look something like this:

https://mycompany.sharepoint.com/_layouts/15/start.aspx#/SitePages/Home.aspx

Just remove the portion after “…sharepoint.com”, and replace it with “/sites/AppCatalog” so it looks like this:

https://mycompany.sharepoint.com/sites/AppCatalog

Then click “Apps for SharePoint” in the menu on the left:

On the Apps for SharePoint page, click Add new item, and upload your app using the dialog.  When complete, you’ll see the app in the list:

Your app is now available to add to your site. Go to the “Site Contents” page from the menu on the left. From there, when you click “Add an App”…

…you will see the app under “Apps you can add”:

Just click the app and then click Trust It:

You’ll be taken back to the Site Contents page, the app will load, and you are all set to begin using your app on the account.

Now that you know how to package your app and restore it on any site, you’ll be able to make backups of your Access 2013 web apps and the data inside. This will enable you to keep snapshots of your app at any given time. You’ll also be able to move the apps that you design using one account to any other account.

Try it out for yourself using the Office 365 preview. In order to try out Access 2013 web apps, be sure to choose one of the plans for business: Small Business Premium or Enterprise.

The post Moving and backing up your Access 2013 web apps appeared first on Office Blogs.

18 Jun 12:02

Hello Face API...

by Greg Duncan

Today's series comes from Coding4Fun Friend, Bruno Capuano, where he shows off one of our favorite subjects, facial recognition, with a cloud twist. Bruno is showing off Microsoft's Project Oxford, Face API's and how you can get started using them.

First, Project Oxford?

Project Oxford

Welcome to Microsoft Project Oxford

An evolving portfolio of REST APIs and SDKs enabling developers to easily add intelligent services into their solutions to leverage the power of Microsoft's natural data understanding

image

Software Development Kit (SDK)

Face
  • .Net

    Last Update: 5/8/2015

  • Android

    Last Update: 5/12/2015

Speech
Computer Vision
  • .Net

    Last Update: 4/29/2015

  • Android

    Last Update: 4/29/2015

Face APIs

Microsoft’s state-of-the-art cloud-based face algorithms to detect and recognize human faces in images. Your mobile and PC Apps will be powered with face capabilities.

image

Okay, okay, enough of that. Now Bruno's stuff (I know, finally!!)

Here's the current list. This list is growing, so please keep an eye on his blog for more;

Azure Machine Learning Face APIs series

  1. Face APIs in Azure
  2. Hello Face: Face APIs in a Console App
  3. Hello Face: Face APIs in a WPF App
  4. Hello Face: Face APIs in a Windows 8.1 App
  5. Hello Face: Frame in each detected face in Windows 8.1 App

ENG [#AZURE] Face APIs with #Azure (1) #MachineLearning

Every time I perform a Coding4Fun session, I always take the opportunity to talk a little about the progress in the process of face detection, facial recognition and detection of emotions, etc. If you like Azure, now is a great time to start testing something for this topic, since using Machine Learning experiments, there are a number of features available to perform these actions.

In this series of posts I’ll show you how to configure Azure for having an instance of Face APIs, how to active and publish it as a service and finally as consume it from an .Net app.

You should start adding a Face API instance from the Azure Machine Learning Market Place Gallery . Access the Market Place and add search for Face APIs .

image

The wizard is fairly simple, and it’s free. For now is only available in the West US region, although that doesn’t affect us much.

image

Once created the instance, it will appear in our list of items for the Market Place section. The next step is very important, since it is where to generate the key that we will identify to use this service from our apps. We must Access the portal Face APIs from the option “Manage”

image

...

ENG [#VS2015] Hello Face: #FaceAPIs in a Wpf App (3)

In the previous post I shared the 10 sample lines that we can user as a Face APIs basic functionality in a console app to :

  • detect faces
  • detect age on each face
  • detect sex on each face

Moreover, another option that does Face APIs provide is the ability to identify the region on the original image for each detected face. In the next example, I’ve added a WPF project and I have referenced the ClientLibrary. It is based on one of the examples in the Face APIs SDKs.

This project has 2 important files

lib \ FaceApiHelper.cs. This class is the one used for image processing using Face APIs service.

UserControls \ Face.cs. Represents a User Control, with an image to show the face, and also a series of labels to show the age and sex.

...

2015-06-02-face-api-wpf

[Click through for the entire post]

Finally make sure you check out his GitHub repo, elbruno/ProjectOxford

Hopefully you have enough to get started, so... Hello Face!

Follow @CH9
Follow @coding4fun
Follow @gduncan411

15 Jun 12:42

Dew Drop – June 12, 2015 (#2034)

by Alvin A.

Top Links


Web Development


XAML


Miscellaneous .NET


Design / Methodology / Testing


Other Mobile Platforms


Podcasts / Screencasts / Videos


Community / Events


Database


SharePoint


PowerShell


Miscellaneous


More Link Collections


The Geek Shelf


15 Jun 12:42

Plan to learn faster

by Brian Anderson

Download a free copy of Building an Optimized Business, a curated collection of chapters from the O’Reilly Web Operations and Performance library. This post is an excerpt by Jeff Patton from User Story Mapping, one of the selections included in the curated collection.

This is my friend Eric, standing in front of his backlog and task board in his team room. He's a product owner working hard with his team to build a successful product, but right now it's not. That doesn't worry Eric, though. He has a strategy for making his product successful. And so far it's working.

eric_wall

Eric works for a company called Liquidnet. Liquidnet is a global trading network for institutional investors. Long before Eric came to stand in front of the board in the picture, someone at his company identified a group of customers Liquidnet could serve better, along with a few ideas of how to do that. Eric is part of a team that took those ideas and ran with them. That's what product owners do. If you thought they were always acting on their own great ideas, well, you're wrong. One of the hard parts of being a product owner is taking ownership of someone else's idea and helping to make it successful, or proving that it isn't likely to be. The best product owners, like Eric, help their entire team take ownership of the product.

Start by discussing your opportunity

Eric didn't start his work by building a backlog of user stories. He started with the big idea someone had, and treated it like an opportunity for his company — because it was. He had conversations with leadership in his company to understand more. They discussed:

  • What is the big idea?
  • Who are the customers? Who are the companies we think would buy the product?
  • Who are the users? Who are the types of people inside those companies we think would use the product, and what would they be using it for?
  • Why would they want it? What problems would it solve for customers and users that they couldn't solve today? What benefit would they get from buying and using it?
  • Why are we building it? If we build this product and it's successful, how does that help us?

Eric needed to build shared understanding with others in his organization before he could take ownership of the opportunity. He knew he was going to need to tell the story of this product many times over the coming months, so he'd better get the big stuff right now.

Your first story discussion is for framing the opportunity.

Validate the problem

Eric trusts his leadership's intuition, but he knows that this big idea is a hypothesis. He knows the only way to be sure the idea will succeed is when they actually see it succeed.

He first spent time talking to customers and users directly to really learn about them. Along the way he validated that there really were customers who had the problem, and they really were interested in buying a solution. Eric talked to the people who'd likely use the product. They didn't have the product today, and had only poor work‐ arounds to address the problems the new product idea would solve.

Validate that the problems you're solving really exist.

While Eric's been talking with customers and users, he's been building up a pool of people he thinks are good candidates to try his new soft‐ ware. Some companies refer to these people as customer development partners. Keep track of this detail, because it's going to come up later in the story.

[caption id="attachment_77037" align="alignright" width="237"]Download Building and Optimized Business. Download Building and Optimized Business.[/caption]

Actually, during this stage, it wasn't just Eric. Eric was working with a small team of others who spent lots of time talking to their customers, and, in doing so, found that solving the problem wasn't so easy — and that there were other problems that needed to be solved first. The important thing for you to take away is that the more they learned, the more the original opportunity was changed — eventually, a lot. It's lucky they didn't just get to work building what they were told to. That wouldn't have served their customers or their organization.

By now Eric and his team, after talking to customers, had specific ideas for the type of solution they could build that users could use, and by doing so get the benefit their employers wanted. Now, here's where Eric and his team could have gone "all in" — where they could have bet it all. They could have built a backlog of stories that described their solution and set a team to work building it. Because they're smart people, they'd have used a story map to move from the big idea to the specific parts to build. But, because they're really smart, the last thing they're going to do at this point is to build software.

Prototype to learn

It's around here that Eric began to act as the owner for this product. He moved to envision his solution first as a bunch of simple narrative stories — user scenarios. Then he moved to envisioning the idea as a simple wireframe sketch. And then he created a higher-fidelity prototype. This wasn't working software. It was a simple electronic prototype, created with a simple tool like Axure, or maybe even PowerPoint.

All of these are learning steps for Eric. They help him envision his solution. Ultimately, he wants to put his solution in front of his users to see what they think. But he knows he first needs to feel confident it solves their problems before he puts it in front of them.

Sketch and prototype so you can envision your solution.

Now, I've hidden an important detail from you. Eric was actually an interaction designer. He's the kind of designer who's used to spending time with customers and users, and used to building these simple prototypes. But, for this new product, he's also the product owner — the one ultimately responsible for the product's success. There are other product owners in Eric's company who don't have his design skills, and they very sensibly pair with designers to help with both interviewing users and envisioning solutions.

Eric did eventually bring prototypes back to users. And I wasn't there, so I don't know what really happened for Eric. But I've been in these situation lots of times, and I'm always surprised about what I learn from the people who'll really use my solution. All I can tell you is, be prepared for surprises and bad news. In fact, celebrate the bad news, because you could have received the same bad news months later, after you'd built the software. That's when it really sucks. Right now, it's cheap to make changes, and you should. And Eric did.

Prototype and test with users to learn whether your solution is valuable and usable.

After iterating his solution many times and showing it to his customers, Eric was confident he had a pretty good solution idea. Surely now he could get that backlog built, and get his team of developers to work turning that prototyped solution into real working software. But Eric's not going to do that. Well, not exactly that. That's a bigger bet than he's willing to take.

Watch out for what people say they want

Eric has prototyped what he believes is a viable solution. But he's not really sure if it's minimal — because he showed people lots of cool ideas. And if you show people all the cool ideas, of course they'll love them. But Eric knows his job is to minimize the amount he builds and still keep people happy. How much could he take away and still have a viable solution?

Eric also knows something else that's a bit disturbing. He knows the people who said they'd like it and use it are just guessing, too.

Think back to when you've bought something yourself. You may have looked at the product. You might have watched a salesperson demonstrate the cool features. You may have tried out the cool features for yourself, and you could imagine really using and loving the product. But when you bought the product and actually started using it, you found the cool features didn't matter so much. What really mattered were features you hadn't thought about. And, worst of all, maybe you didn't really need the product that much after all. OK, maybe it's just me I'm talking about. But I've got lots of stuff in my garage that I wish I'd never bought.

Back to Eric. He knows his customers and users can imagine the product would be great to use, and knowing that gives him the conviction to up his bet. But the real proof is when those people actually choose to use it every day. That's the real outcome he's looking for — and the only outcome that'll get his company the benefit it really wants. And it's going to take more than a prototype to learn that.

Build to Learn

Now, here's where Eric gets to show how smart he really is.

Eric and his team actually do get to work building software. But their first goal isn't to build a minimum viable product. Actually, it's to build something less than minimal — just enough that potential users could do something useful with it. This is a product that wouldn't impress too many people, and they might even hate it. It's definitely not a product you'd want your marketing and sales people out there pitch‐ ing. In fact, the only people you'd want to see this product are people who may one day use the product, and honestly care about finding a product that solves their problem.

It just so happens that Eric has a small group of people just like that. It's the customers and users he worked with earlier when he was learning about and validating the problem. They're his development partners. They're the ones who gave feedback on early prototypes. And there's a subset of them that Eric believes can best help him learn. They're the ones he'll put this first, less-than-minimum—and definitely not viable—product in front of. He hopes they'll become his early adopters.

And that's what he did.

user_activities

This is Eric pointing out a slice of his current backlog. When this picture was taken, he'd already released software to his development partners. After he did, he made a point of talking to them to get their feedback. His team also built in some simple metrics so they could measure whether people were really using the software, and what they did in the software specifically.

Eric knows that people are polite. They may say they like a product, but then never use it. The "using it" is the real outcome he wants, and polite isn't helping him. Eric also knows some people are demanding.

They may list all the problems the product has, or complain about bugs, but the metrics may be telling us that they use it every day anyway. And that's a good thing, in spite of all their complaining. The complaining is good, too, because it gives Eric ideas about where his next improvements should be.

Eric's backlog is organized as a story map with the backbone in yellow stickies across the top. Those yellow stickies have short verb phrases on them that tell the big story of what his users will do in the product, but at a high level. Below it are all the details — the specific things they'll do and need to really use the product. While the details he and his team work on change from release to release, the backbone stays pretty consistent.

The top slice, above the tapeline, is the one Eric and his team are working on right now. This release will take Eric two sprints. He's using a Scrum development process where his sprints are two-week timeboxes. So two sprints equate to basically a month. Below that are slices running down the board. The next slice contains what they think the next release might be, and so on. To the left of each slice, just as with the Globo.com team, hangs a sticky note with the release name and a few words about what they want to learn in this release. Except for the top release, which has a Dilbert cartoon posted over it. It's an inside joke in their team that I wasn't in on.

highest_priority_stories

If you look closely, the top of that current slice is sort of cleaned out. I've drawn in some sticky notes where they used to be. But they're not there anymore because those things that were on the top are the first things his team will build. As the team members worked together to plan their work, they removed those sticky notes and placed them on a task board to the right of the story-mapped backlog. That task board shows the stories they're working on now in this sprint, along with delivery task—the specific things that the developers and testers will need to do to turn the ideas in the story into working software.

One finer point of Eric's story-mapped backlog, and one that proves he's smart, is the thickness of that topmost slice. It's twice as thick as the slices below it. When Eric and his team finish a slice and deliver it to their development partners — what they call their beta customers — they'll move the sticky notes up from the slice below. When they do, they'll have lots more detailed discussion about this next sliced-out release. They'll play What About to find problems and fill in details. They'll talk about some of the ideas in the next release, and this discussion may result in their splitting the big idea into two or three smaller ideas. And then, they'll need the vertical height in that slice to prioritize — to make choices about what to build first.

See how smart they are?

Iterate Until Viable

Eric may have started this whole process with an idea about what the minimum viable product might be, but he's purposely built something less than minimal to start with. He's then adding a bit more every month. He's getting feedback from his development partners — both the subjective stuff from talking to them, and the more objective stuff he gets from looking at data.

He'll keep up this strategy, slowly growing and improving the product, until his development partners actually start using the product routinely. In fact, what Eric's hoping for is that they become people who'd recommend the product to other people — real reference customers. When they do, that's when he knows he's found minimum and viable. And that's when the product is safe to market and sell like crazy. If Eric and his team had tried to sell it before, they'd have ended up with lots of disappointed customers — people a lot less friendly than those with whom he built personal relationships throughout this process.

How to Do It the Wrong Way

What Eric could have done is to take his last, best prototype, break it down into all its constituent parts, and start building it part by part. Many months later, he'd have had something to release. And he'd have learned then if his big guess was right. You'll need to trust me on this, but it wouldn't have been — because it rarely is.

not_like_this

This is a simple visualization made by my friend Henrik Kniberg. It beautifully illustrates a broken release strategy where at every release I get something I can't use, until the last release when I get something I can.

Henrik suggests this alternative strategy:

like_this

If I plan my releases this way, in each release I deliver something people can actually use. Now, in this silly transportation example, if my goal is to travel a long distance and carry some stuff with me, and you gave me a skateboard, I might feel a bit frustrated. I'd let you know how difficult it was to travel long distances with that thing — although it was fun to goof around with it in the driveway. If your goal was to leave me delighted, you might feel bad about that. But your real goal was to learn, which you did. So that's good. You learned I wanted to travel farther, and if you picked up on it, you also learned I valued having fun.

In Henrik's progression, things start picking up at around the bicycle release because I can actually use it as adequate transportation. And, at about motorcycle level, I can really see this working for me — and I'm having fun too. That could be minimum and viable for me. If I really love the motorcycle thing, maybe my next best step would be a bigger, faster Harley-Davidson, and not a sports car. I'm headed for a midlife crisis right now and that Harley is sounding pretty good. But it's after I try the motorcycle, and we both learn something from that, that we can best make that decision.

Treat every release as an experiment and be mindful of what you want to learn.

But what about other folks who need to travel longer distance, and who have kids? For that target market, none of these would be good choices.

Always keep your target customers, users, and the outcomes you're hoping for in mind. It's really tough to get the same great outcome from all types of users. So focus.

Validated Learning

What my friend Eric did is apply a validated learning strategy — one of the important concepts in Lean Startup thinking. Eric knew that the problems he was solving, the customers and users he was solving them for, and the solutions he had in mind were all assumptions. Lots of them were pretty good assumptions. But they were assumptions just the same. Eric set out to understand the assumptions and then validate them, moving from the problems customers and users faced to the solutions he had for them. At each step he did or built something with the explicit goal of learning something.

validated_learning_loop

What Eric did is the heart of the build-measure-learn loop described by Eric Ries. And by Ries's definition, each release that Eric shipped was a minimum viable product. But you can see that it wasn't viable in the eyes of his target customers and users — at least, not yet. For that reason, I like referring to Ries's MVP as a minimum viable product experiment — or MVPe for short. It's the smallest thing I could build to learn something. And what I learn is driving toward understanding what's really viable in the eyes of my target customers and users.

Eric used lots of tools and techniques along the way. But telling stories using words and pictures was always part of the way he worked. Using a map to organize his stories helped him keep his customers, users, and their journey in mind as he iteratively improved his product to viable.

I like using the term product discovery to describe what we're really doing at this stage. Our goal isn't to get something built; rather, it is to learn if we're building the right thing. It just so happens that building something to put in front of customers is one of the best ways to learn if we're building the right thing. I borrow my definition of discovery from Marty Cagan1. And my definition of discovery includes Lean Startup practice, Lean User Experience practice, Design Thinking practice, and loads of other ideas. And what I do during discovery continues to evolve. But the goal stays the same: to learn as fast as possible whether I'm building the right thing.

Really Minimize Your Experiments

If we recognize that our goal is to learn, then we can minimize what we build and focus on building only what we need to learn. If you're doing this well, it means that what you build early may not be production ready. In fact, if it is, you've likely done too much.

Here's an example: when I was a product owner for a company that built software for large, chain retailers, I knew my products needed to run on a big Oracle database on the backend. But the database guys were sometimes a pain for me to work with. They wanted to scrutinize every change I made. Sometimes simple changes would take a week or more. That slowed down my team and me too much. The database guys' concerns made sense, since all the other applications depended on that database. Breaking it was really risky for everyone. But they had a well-oiled process for evaluating and making database changes — it just took a long time.

The riskiest part for me was making sure my product was right. So we built early versions of software using simple, in-memory databases. Of course, they wouldn't scale, and we could never release our early versions to a large general audience. But our early minimum viable product experiments (we didn't call them that then) allowed us to test ideas with a small subset of customers and still use real data. After several iterations with customers, and after we found a solution we believed would work, we'd then make the database changes and switch our application off the in-memory database. The database guys liked us too, because they knew that when we made changes, we were confident they were the right ones.

Let's Recap

Gary used a map to get out of the flat-backlog trap and see the big picture of his product, and then to really start focusing on who it was for and what it should be.

The teams at Globo.com used a map to coordinate a big plan across multiple teams and slice out a subset of work they believed would be a viable solution.

Eric used a map to slice out less-than-viable releases into minimum viable product experiments that allowed him to iteratively find what would be viable.

There's one last challenge that seems to plague software development, and that's finishing on time. Suppose you're confident that you have something that should be built. And suppose others are depending on it going live on a specific date. There's a secret to finishing on time that's been known by artists for centuries. In the next chapter, we'll learn how to apply it to software.


  1. Marty first described what he means by product discovery in this 2007 essay. He later describes it in more detail in his book Inspired: How to Create Products Customers Love (SVPG Press).

08 Jun 14:59

Kaffeeküchengespräche – Microservices und Domain Driven Design

by Tobias Flohre

Neulich in der Kaffeeküche im Gespräch mit einem Kollegen, der gerade von einem zweijährigen Sabbatical im Dschungel Brasiliens zurückgekehrt ist.

Wenn man sich so die aktuellen Programme der Konferenzen ansieht, dann scheint dieses Microservices-Ding ja ganz groß zu sein. Worum geht’s dabei eigentlich?

Nichts davon gehört bisher? Microservices ist ein Architekturstil, der in den letzten zwei Jahren immer mehr an Fahrt aufgenommen hat. Im Prinzip geht’s darum, kleine, autonome Einheiten zu entwickeln, die sich darauf konzentrieren, eine Sache gut zu implementieren. So ein Microservice besitzt eine API, die nicht an eine bestimmte Technologie gekoppelt ist, also üblicherweise über HTTP oder Messaging läuft. Die Autonomie hat dabei drei Aspekte:

  • Ein eigener Prozess pro Microservice.
  • Freie Technologiewahl innerhalb des Microservices für den vollen Stack inklusive Persistenz.
  • Jederzeit mögliches unabhängiges Deployment.

Puh, also extrem verteilte Systeme. Das hört sich nicht nach Spaß an. Was verspricht man sich denn davon?

Ja, verteilte Systeme sind nicht trivial. Also, zum einen verspricht man sich Vorteile von der erwähnten Technologiefreiheit: Dadurch, dass jeder Microservice in einem eigenen Prozess läuft, die API technologieunabhängig ist und jeder Microservice den vollen Stack inklusive Persistenz umfasst, kann innerhalb eines Microservices frei gewählt werden, mit welcher Technologie er implementiert wird – Choose the right tool for the job. Das birgt natürlich auch die Gefahr, dass man schnell einen bunten Zoo von Technologien im Haus hat. Wichtiger ist vielleicht der folgende Aspekt: selbst wenn man sich für einen oder mehrere Standard-Stacks entscheidet, so kann man diese jederzeit ändern, ohne bereits bestehende Microservices anpassen zu müssen. Bei monolithischen Systemen hängt man häufig auf veralteten Stacks und Bibliotheksversionen fest, weil eine Migration der bestehenden Funktionalität teuer ist und keinen Businessvalue hat. Hier kommen wir direkt zu einem weiteren Vorteil von Microservices – da ein Microservice klein ist, kann man ihn ohne Probleme in einer endlichen Zeit komplett neu schreiben. Designed for Replaceability.

Das hört sich reizvoll an. Ich habe bisher keinen Kunden kennengelernt, der nicht irgendwo Technologien modernisieren wollte, das aber aus den genannten Gründen nicht getan hat.

Ja, das ist ein wichtiger Punkt. Der zweite, vielleicht sogar noch wichtigere Punkt betrifft das jederzeit mögliche unabhängige Produktionsdeployment. Das geht, weil wir keinen komplizierten, langwierigen Buildprozess haben, sondern kleine Einheiten, und es geht, weil wir den kompletten Stack in der Hand haben. Hier wären wir also beim Thema Continuous Delivery. Das bringt uns in erster Linie Reaktionsgeschwindigkeit. Warum Reaktionsgeschwindigkeit immer wichtiger wird, hat Uwe in einem sehr lesenswerten Artikel dargelegt: The need for speed – A story about DevOps, microservices, continuous delivery and cloud computing. Man will durch eine Microservice-Architektur nicht die Kosteneffizienz steigern, sondern die Geschwindigkeit, mit der man Änderungen, Updates, neue Produkte an den Markt bringen kann.

Ach, es geht mal nicht um die Kosten?

Nein, erst einmal bedeutet eine Microservice-Architektur Investitionen. Man muss schon echte Schmerzen mit der fehlenden Reaktionsgeschwindigkeit haben. Aber wenn ich die Wartungshölle von großen Monolithen betrachte, würde ich mal davon ausgehen, dass sich das auf mittelfristige Sicht auch positiv auf die Kosten auswirkt.

Okay, weitere Vorteile von Microservices?

Zwei technische Punkte habe ich gerade noch – Resilience und Scaling. In einem Monolithen kann ein außer Kontrolle geratener Thread die ganze Anwendung herunterreißen. In einer Microservice-Architektur stirbt erst einmal nur ein Microservice, der Rest läuft weiter. Das Thema Resilience birgt aber auch Herausforderungen in einer Microservice-Architektur, da in verteilten Systemen naturgemäß mehr schiefgehen kann. Falsch eingestellte Timeouts und nicht antwortende Anwendungen können auch leicht das ganze System zu Fall bringen. Zum Thema Resilience gibt es aber eine Reihe guter Patterns und mit Hystrix eine viel verwendete Open-Source-Implementierung, um das Thema in den Griff zu bekommen.
Der wichtigste Punkt beim Scaling ist, dass man den Monolithen nur komplett skalieren kann. Wenn man aber nur bestimmte Teile der Anwendung skalieren will, weil nur diese die Skalierung brauchen, so geht das nicht. Bei eigenständigen Microservices kann man natürlich einzelne Services beliebig skalieren.
Es gibt bestimmt noch mehr Punkte, aber mehr fallen mir gerade nicht ein.

Hört sich erst einmal ganz gut an, so wie du das hier erzählst, aber ob das so durchsetzbar ist. Du sagst mehrfach, dass der Microservice den vollen Stack umfassen soll, aber die Datenbank ist nun mal häufig in zentraler Hand…

Es geht nicht ohne eine Änderung der Organisationsstruktur. Ist ja klar: wenn man sechs Wochen im voraus Datenbankänderungen beantragen muss, ist der Geschwindigkeitsvorteil natürlich komplett dahin. Wenn man vier zentrale Produktionsdeployments im Jahr hat und davon nicht abweichen will, hat man auch keinen Geschwindigkeitsvorteil mehr.

Okay, noch eine Frage, die mir durch den Kopf geht: wie klein ist eigentlich klein? Mir ist das ganze bisher zu schwammig.

Ja, die Größe und der Schnitt von Microservices, ein wichtiges und nicht ganz einfaches Thema. Die Argumentationen, die ich bisher am schlüssigsten fand, bedienten sich bei Begriffen aus Domain Driven Design, dem Buch von Eric Evans.

Äh ja, das habe ich auch zu Hause im Regal stehen. Sollte ich vielleicht mal wieder reinschauen. Eins der Bücher, das ich jedem Junior-Dev empfehle, selbst aber vor sieben Jahren das letzte Mal gelesen habe.

Das geht wahrscheinlich vielen so. Die wichtigste Begriff ist vermutlich Bounded Context. Stell dir vor, du hast ein sehr großes Modell mit vielen Entitäten und ein potenziell großes Team, das dieses Modell in Software gießen soll, dann ist das Prinzip der Bounded Contexts ein Mittel, mit dieser Komplexität klarzukommen. Modelle haben immer einen Kontext, jetzt geht es darum, diesen explizit zu machen und zu klären, wie die Verbindung zwischen den Kontexten aussieht. In dem Beispiel in Fowler’s Bliki haben wir zwei Kontexte, einmal Sales und einmal Support.
fowlerboundedcontext
Sie beinhalten unterschiedliche Objekte, aber zwei von denen kommen in beiden Kontexten vor: Customer und Product. Wichtig ist zu verstehen, dass Customer und Product in den verschiedenen Kontexten unterschiedliche Dinge sind. Im Kontext Support hängt am Customer eine Liste von Tickets, während im Kontext Sales ein Territory dem Customer zugeordnet ist. Wir reden hier immer noch um Modellierung von Domänen, nicht um die technische Umsetzung, aber wenn wir mal den Umsetzungsaspekt betrachten, so kann man Systeme anhand von Kontextgrenzen schneiden. Ein Sales-System speichert die Customer-Attribute, die Sales-spezifisch sind, und ein Support-System speichert die Attribute, die Support-spezifisch sind. Um die Verbindung zwischen den beiden Systemen herzustellen, verwendet man in der Regel eine eindeutige ID zur Identifizierung des Customers.

Okay, okay, habe ich verstanden, aber was hat das mit Microservices zu tun?

So ein Bounded Context ist eine natürliche Obergrenze für einen Microservice. Wir wollen ja, dass er klein und fokussiert ist. Ein Microservice, der für mehrere Bounded Contexts verantwortlich ist, ist mit Sicherheit nicht fokussiert und sehr wahrscheinlich nicht klein. Dazu kommt, dass Kontexte ja nicht willkürlich gezogen werden, sondern implizit da sind und sich häufig auch in der Organisationsstruktur wiederfinden. Systeme, die mehrere Bounded Contexts verantworten, werden demnach häufig auch von verschiedenen Teams und Fachabteilungen weiterentwickelt. Eine weitere Obergrenze für einen Microservice ist die Teamgröße. Es ist wichtig, dass der Service von einem kleinen Team komplett entwickelt und betreut werden kann, inklusive Betreuung des vollen Stacks, Deployment nach Produktion und zumindest teilweise Betrieb.

Okay, gibt es auch eine Untergrenze für die Größe von Microservices?

Ja, hier kommt ein weiterer Begriff aus Domain Driven Design hinzu: Aggregate. Ein Aggregate ist quasi der Zusammenschluss von Entitäten, die in einer Transaktion gespeichert werden müssen. Es sollte keine Transaktionen geben, die Aggregatsgrenzen überschreiten. Wenn man Microservices schreibt, die nur Teile eines Aggregates schreiben, kommt man zwangsläufig zu dem Problem, entweder verteilte Transaktionen über Microservices hinweg implementieren zu wollen (was totaler Quatsch ist), oder komplizierte Kompensationslogik implementieren zu müssen. Zwei Anmerkungen dazu noch:

  • Hier geht es um sofortige Konsistenz nach Ausführen des Speicherns. Eventual Consistency, also die Sicherheit, dass irgendwann Konsistenz hergestellt ist, kann auch gut über Microservices-Grenzen hinweg sichergestellt werden. Das geschieht dann üblicherweise über Events. System A im Bounded Context Warenkorb speichert zum Beispiel die Bestellung des Kunden und schickt dann ein entsprechendes Event raus, und System B im Bounded Context Versand horcht auf dieses Event und bereitet den Versand der Ware vor.
  • Außerdem geht es bei der Aggregate-Betrachtung um das Schreiben von Daten, hier ist die Transaktion wichtig. Schreiben und Lesen können natürlich getrennt werden, das wird gerade in letzter Zeit mit CQRS ein immer größeres Thema. Man kann so Microservices schreiben, die auf das Lesen bestimmter zusammengestellter Daten spezialisiert sind. Und diese Zusammenstellung kann beliebig nach Anforderung geschehen. Wenn der Microservice beispielsweise Teile von Aggregate A und Teile von Aggregate B zusammen liefern soll, dann kann er auf die Events der beiden schreibenden Microservices für Aggregate A und Aggregate B horchen und genau die Teile, die er braucht, in seiner Persistenz duplizieren. Dieser Microservice bearbeitet also keine vollständigen Aggregates, aber das ist kein Problem, da es nur ums Lesen geht. Wichtig ist, dass es immer genau einen Verantwortlichen für das Schreiben der Daten gibt.

Ein Aggregate ist der Zusammenschluss von Entitäten, die in einer Transaktion gespeichert werden müssen. Wenn das so definiert ist, hat man da nicht schnell sehr große Aggregates? Es wird doch immer irgendwelche Anwendungsfälle geben, in denen zwei Dinge in einer Transaktion gespeichert werden müssen.

Hm, da würde ich erst einmal evaluieren, ob nicht Eventual Consistency doch ausreicht. Die Anforderung, dass Dinge sofort konsistent gespeichert sein sollen, kommt ja häufig von der GUI – ich löse irgendetwas aus und will das Ergebnis sofort sehen, auch wenn es zwei verschiedene Aggregates betrifft. Ich drücke auf „Kaufen“ und will das Produkt nach dem Aktualisieren der Seite unter „Meine Bestellungen“ sehen. Sagen wir mal,„Warenkorb“ und „Bestellungen“ seien zwei verschiedene Systeme. Aus Businesssicht wäre Eventual Consistency zwischen den Systemen okay – solange der Inhalt des Warenkorbs irgendwann zu einer Bestellung wird, bekomme ich mein Geld. Wir reden hier bei Eventual Consistency ja auch nicht von Tagen, sondern von Millisekunden. Aus GUI-Sicht wollen wir den Kunden nicht verwirren und seine Bestellungen direkt anzeigen. Um das zu gewährleisten, gibt es verschiedene Möglichkeiten – Polling der GUI auf Bestellungen, Eventing über Web-Sockets etc. Naja, du siehst schon, es kommt sehr auf den Anwendungsfall und die fachlichen Anforderungen an.

Könnte nicht einfach der Warenkorb-Microservice den Bestellungen-Microservice synchron aufrufen? Wenn dann der Warenkorb-Microservice an die GUI zurückmeldet, dass er fertig ist, sind doch auch die Bestellungen gespeichert.

Ja, aber das hat diverse Nachteile. Bei einer Kommunikation über Events schickt der Warenkorb-Service immer dann ein Event, wenn „Kaufen“ gedrückt wurde. Dieses Event beinhaltet alle wichtigen Daten. Jeder, der möchte, kann dieses Event abonnieren. Der Warenkorb-Service weiß gar nicht, welche Systeme das sind, es ist ihm völlig egal. In unserem Fall ist es der Bestellungen-Service, aber man kann sich gut vorstellen, dass noch andere Services an diesen Informationen interessiert sind. Vielleicht irgendwelche Services, die Statistiken über Käufe erstellen. Oder der Service, der Recommendations für den Benutzer erzeugt. Wenn der Warenkorb-Service aktiv aufruft, dann muss er den Empfänger kennen, muss dessen API verstehen etc. Es ist eine deutlich engere Kopplung und sorgt auch für mehr Kommunikationsbedarf zwischen Teams. Und dazu kommt noch der technische Aspekt. Ein Event kann man gut transaktionssicher verschicken und sich sicher sein, dass es nicht verloren geht. Ein synchroner HTTP-Aufruf kann leichter aus technischen Gründen schiefgehen, und was macht man dann? Kompensation? Zurückrollen der Warenkorb-Transaktion?

Verstehe ich ja. Trotzdem fühlt sich dieser Messaging-Kram noch ein bisschen nach Overhead an. Mir schwirrt etwas der Kopf.

Dann lass es mal sacken. Wichtig ist wie in allen Fragen in der IT, dass der gesunde Menschenverstand immer noch die wichtigste Ressource ist. Wir können ja gerne demnächst mal weiter diskutieren.

The post Kaffeeküchengespräche – Microservices und Domain Driven Design appeared first on codecentric Blog.

31 May 15:46

The Art Of The SVG Filter And Why It Is Awesome

by Dirk Weber

After almost 20 years of evolution, today’s web typography, with its high-density displays and support for OpenType features, is just a step away from the typographic quality of the offline world. But there’s still one field of graphic design where we still constantly fall back to bitmap replacements instead of using native text: display typography, the art of staging letters in illustrative, gorgeous, dramatic, playful, experimental or unexpected ways.

A filter that creates a liquid effect.1
Liquid type effect (demo2)

A Case For Display Text In HTML

Sure, we’re able choose from thousands of web fonts and use CSS effects for type, some with wide browser support (like drop-shadows and 3D transforms) and others that are more experimental (like background-clip and text-stroke), but that’s basically it. If we want really outstanding display typography on our websites, we’ll usually embed it as an image.

Woodtype style, created purely with SVG filters.3
Woodtype, a style created purely with SVG filters (demo4)

The disadvantages of using images for type on the web are obvious: file size, lack of feasibility for frequently altered or user-generated content, accessibility, time-consuming production of assets, etc.

Wouldn’t it be great if we could style letters the same way we usually style text with CSS? Apply multiple borders with different colors? Add inner and outer bevels? Add patterns, textures and 3D-effects? Give type a used look? Use multiple colors and distorted type? Give type a distressed look?

Sophisticated SVG Filters: CSS For Type

Most of this is already possible: The trick is to unleash the magic of SVG filters. SVG filters (and CSS filters) are usually considered a way to spice up bitmaps via blur effects or color manipulation. But they are much more. Like CSS rules, an SVG filter can be a set of directives to add another visual layer on top of conventional text. With the CSS filter property, these effects can be used outside of SVG and be applied directly to HTML content.

A 3D vintage effect5
3D vintage effect (demo6)

Talking about filters in CSS and SVG can be a bit confusing: SVG filters are defined in an SVG filter element and are usually applied within an SVG document. CSS filters can be applied to any HTML element via the filter property. CSS filters such as blur, contrast and hue-rotate are shortcuts for predefined, frequently used SVG filter effects. Beyond that, the specification7 allows us to reference user-defined filters from within an SVG. A further point of confusion is the proprietary -ms- filter tag, which was deprecated in Internet Explorer (IE) 9 and removed when IE 10 was released.

This article mostly deals with the first case: SVG filters used in an SVG document embedded on an HTML page, but later we’ll experiment with SVG filters applied to HTML content.

Using feImage to fill text with a repeating pattern8
Using feImage to fill text with a repeating pattern (demo9)

The illustrations in this article are taken from demos of SVG filter effects applied to text. Click on any one of them to see the original (modern, SVG-capable browsers only). I call them “sophisticated” SVG filters because under the hood these filters are crafted by combining multiple effects into one output. And even though the appearance of the letters has been altered dramatically, under the hood the text is still crawlable and accessible and can be selected and copied. Because SVG filters are supported in every modern browser, these effects can be displayed in browsers beginning from IE 10.

Applying a sketch effect to text10
A sketchy text effect (demo11)

Understanding SVG filters is challenging. Even simple effects like drop-shadows require a complicated, verbose syntax. Some filers, such as feColorMatrix and feComposite, are difficult to grasp without a thorough understanding of math and color theory. This article will not be a tutorial on learning SVG filters. Instead I will describe a set of standard building blocks to achieve certain effects, but I will keep explanations to the bare minimum, focusing on documenting the individual steps that make up an effect. You will mostly read about the how; for those who want to know the why, I’ve put a reading list at the end of this article.

Variations of posterized text effects12
Some variations of posterized text effects (demo13)

Constructing A Filter

Below is a sophisticated SVG fiter in action. The output of this filter is a weathered text effect, and we will use this for a step-by-step walkthrough:

Making text look grungy14
A grungy wall painting (demo15)

Let’s break down this effect into its building blocks:

  1. green text;
  2. red extrusion;
  3. text and extrusion are separated by a transparent gap;
  4. text has a grungy, weathered look.

Our SVG filter effect will be constructed by combining multiple small modules, so-called “filter primitives.” Every building block is constructed from a set of one or more primitives that are then combined into a unified output. This process is easier to understand when shown as a graph:

Image of an SVG filter graph
The processing steps that make up a sophisticated filter are illustrated best in a graph.

Adding A Filter

We’ll start with a boilerplate SVG that contains an empty filter and text:

<svg version="1.1" id="Ebene_1" xmlns="http://www.w3.org/2000/svg" xmlns:xlink="http://www.w3.org/1999/xlink">
  <defs>
    <style type="text/css">
      <![CDATA[
        .filtered{
          filter: url(#myfilter);
          …
        }
      ]]>
    </style>

    <filter id="myfilter">
      <!-- filter stuff happening here -->
    </filter>
  </defs>

  <g class="filtered">
    <text x="0" y="200" transform="rotate(-12)">Petrol</text>
  </g>
</svg>

The filter Element

We have to start somewhere, and the filter tag is the element to begin with. Between its start and end tag, we will put all of the rules for transformation, color, bitmap manipulation, etc. The filter can then be applied to a target as an attribute or via CSS. The target will usually be an element inside an SVG, but later on we will learn about another exciting option: applying SVG filters to HTML elements.

A handful of attributes exist to control the filter element:

  • x and y positions (default -10%);
  • width and height (default 120%);
  • an ID, which is necessary to refer to later on;
  • filterRes, which predefines a resolution (deprecated with the “Filter Effects Module Level 116” specification);
  • relative (objectBoundingBox is the default) or absolute (userSpaceOnUse) filterUnits.

A Word on Filter Primitives

As we’ve learned, filter primitives are the building blocks of SVG filters. To have any effect, an SVG filter should contain at least one primitive. A primitive usually has one or two inputs (in, in2) and one output (result). Primitives exist for blurring, moving, filling, combining or distorting inputs.

The specification allows us to take several attributes of the filtered element as an input source. Because most of these do not work reliably across browsers anyway, in this article we will stick with SourceGraphic (the unfiltered source element with colors, strokes, fill patterns, etc.) and SourceAlpha (the opaque area of the alpha channel — think of it as the source graphic filled black), which do have very good browser support.

How To Thicken The Input Text

The first filter primitive we will get to know is feMorphology, a primitive meant to extend (operator="dilate") or thin (operator="erode") an input — therefore, perfectly suited to creating outlines and borders.

Here is how we would fatten the SourceAlpha by four pixels:

Source fattened by 4 pixels
Source fattened by four pixels
<feMorphology operator="dilate" radius="4" in="SourceAlpha" result="BEVEL_10" />

Creating an Extrusion

The next step is to create a 3D extrusion of the result from the last primitive. Meet feConvolveMatrix. This filter primitive is one of the mightiest and most difficult to grasp. Its main purpose is to enable you to create your own filter. In short, you would define a pixel raster (a kernel matrix) that alters a pixel according to the values of its neighbouring pixels. This way, it becomes possible to create your own filter effects, such as a blur or a sharpening filter, or to create an extrusion.

Here is the feConvolveMatrix to create a 45-degree, 3-pixel deep extrusion. The order attribute defines a width and a height, so that the primitive knows whether to apply a 3×3 or a 9×1 matrix:

Using feConvolveMatrix to create an extrusion on the fattened input
<feConvolveMatrix order="3,3" kernelMatrix=
   "1 0 0 
   0 1 0
   0 0 1" in="BEVEL_10" result="BEVEL_20" />

Be aware that IE 11 and Microsoft Edge (at the time of writing) cannot handle matrices with an order greater than 8×8 pixels, and they do not cope well with multiline matrix notation, so removing all carriage returns before deploying this code would be best.

The primitive will be applied equally to the left, top, right and bottom. Because we want it to extrude only to the right and bottom, we must offset the result. Two attributes define the starting point of the effect, targetX and targetY. Unfortunately, IE interprets them contrary to all other browsers. Therefore, to maintain compatibility across browsers, we will handle offsetting with another filter primitive, feOffset.

Offsetting

As the name implies, feOffset takes an input and, well, offsets it:

<feOffset dx="4" dy="4" in="BEVEL_20" result="BEVEL_30"/>

Cutting Off the Extruded Part

feComposite is one of the few filter primitives that take two inputs. It then combines them by applying a method for composing two images called Porter-Duff compositing. feComposite can be used to mask or cut elements. Here’s how to subtract the output of feMorphology from the output of feConvolveMatrix:

Cutting off the fattened 1st primitive from the extrusion
Cutting off the fattened first primitive from the extrusion
<feComposite operator="out" in="BEVEL_20" in2="BEVEL_10" result="BEVEL_30"/>

Coloring the Extrusion

This is a two-step process:

First, we create a colored area with feFlood. This primitive will simply output a rectangle the size of the filter region in a color we define:

<feFlood flood-color="#582D1B" result="COLOR-red" />

We then cut off the transparent part of BEVEL_30 with one more feComposite:

Coloring the extrusion
<feComposite in="COLOR-red" in2="BEVEL_30" operator="in" result="BEVEL_40" />

Mixing Bevel and Source Into One Output

feMerge does just that, mix bevel and source into one output:

Bevel and source graphic mixed into one output
<feMerge result="BEVEL_50">
   <feMergeNode in="BEVEL_40" />
   <feMergeNode in="SourceGraphic" />
</feMerge>

Looks pretty much like the desired result. Let’s make it a little more realistic by giving it a weathered look.

Adding a Fractal Texture

feTurbulence is one of the most fun primitives to play with. However, it can melt your multicore CPU and make your fans rotate like the turbojet engines of a Boeing 747. Use it wisely, especially on a mobile device, because this primitive can have a really, really bad effect on rendering performance.

Like feFlood, feTurbulence outputs a filled rectangle but uses a noisy, unstructured texture.

We have several values on hand to alter the appearance and rhythm of the texture. This way, we can create surfaces that look like wood, sand, watercolor or cracked concrete. These settings have a direct influence on the performance of the filter, so test thoroughly. Here’s how to create a pattern that resembles paint strokes:

<feTurbulence baseFrequency=".05,.004" width="200%" height="200%" top="-50%" type="fractalNoise" numOctaves="4" seed="0" result="FRACTAL-TEXTURE_10" />

By default, feTurbulence outputs a colored texture — not exactly what we want. We need a grayscale alpha map; a bit more contrast would be nice, too. Let’s run it through an feColorMatrix to increase the contrast and convert it to grayscale at the same time:

Finally adding a fractal texture to the result
Finally, adding a fractal texture to the result
<feColorMatrix type="matrix" values=
   "0 0 0 0 0,
   0 0 0 0 0,
   0 0 0 0 0,
   0 0 0 -1.2 1.1"
   in="FRACTAL-TEXTURE_10" result="FRACTAL-TEXTURE_20" />

The last thing to do is compose the textured alpha into the letterforms with our old friend feComposite:

<feComposite in="BEVEL_50" in2="FRACTAL-TEXTURE_20" operator="in"/>

Done!

How To Apply SVG Filters To SVG Content

There are two methods of applying SVG filters to an SVG text element:

1. Via CSS

.filtered {
   filter: url(#filter);
}

2. Via Attribute

<text filter="url(#filter)">Some text</text>

Applying SVG Filters To HTML Content

One of the most exciting features of filters is that it’s possible to embed an SVG, define a filter in it and then apply it to any HTML element with CSS:

filter: url(#mySVGfilter);

At the time of writing, Blink and WebKit require it to be prefixed:

-webkit-filter: url(#mySVGfilter);

As easy as it sounds in theory, this process is a dark art in the real world:

  • SVG filters on HTML content are currently supported in WebKit, Firefox and Blink. IE and Microsoft Edge will display the unfiltered element, so make sure that the default look is good enough.
  • The SVG that contains the filter may not be set to display: none. However, you can set it to visibility: hidden.
  • Sometimes the size of the SVG has a direct influence on how much of the target element is filtered.
  • Did I say that WebKit, Blink and Firefox understand this syntax? Well, Safari (and its little brother mobile Safari) is a special case. You can get most of these demos working in Safari, but you will pull your hair out and bite pieces out of your desk in the process. At the time of writing, I can’t recommend using SVG filters on HTML content in the current version of Safari (8.0.6). Results are unpredictable, and the technique is not bulletproof. To make things worse, if Safari fails to render your filter for some reason, it will not display the HTML target at all, an accessibility nightmare. As a rule of thumb, you increase your chances of getting Safari to display your filter with absolute positioning and fixed sizing of your target. As a proof of concept, I’ve set up a “pop” filter effect, optimized for desktop Safari17. Applying feImage to HTML elements seems to be impossible in Safari.

Previous Demos, Applied To HTML Content

In these demos, the wrappers are set to contenteditable = "true for convenient text editing. (Be aware that these demos are experimental and will not work in Safari, IE or Edge.)

Structuring A Filter

Depending on its complexity, a filter can quickly become a messy thing. During authoring, you could be adding and removing rules and changing their order and values, and soon you’re lost. Here are some rules I’ve made for myself that help me keep track of what’s going on. People and projects vary; what seems logical and structured for me might be chaotic and incomprehensible for you, so take these recommendations with a grain of salt.

Grouping

I group my filter primitives into modules depending on their functionality — for example, “border,” “fill,” “bevel,” etc. At the start and end of a module, I put a comment with the name of this group.

Naming

A good naming convention will help you structure your filter and keep track of what’s going in and outside of a primitive. After experimenting with BEM-like schemas25, I finally settled on a very simple naming structure:

NAME-OF-GROUP_order-number

For example, you would have BEVEL_10, BEVEL_20, OUTLINE_10 and so on. I start with 10 and increment by 10 to make it easier to change the order of primitives or to add a primitive in between or to the beginning of a group. I prefer full caps because they stand out and help me to scan the source faster.

Always Declare Input and Result

Though not necessary, I always declare an “in” and a “result.” (If omitted, the output of a primitive will be the input of its successor.)

Some Building Blocks

Let’s look at some single techniques to achieve certain effects. By combining these building blocks, we can create new sophisticated filter effects.

Text Stroke

SVG filter outline26
<!-- 1. Thicken the input with feMorphology: -->

<feMorphology operator="dilate" radius="2" 
in="SourceAlpha" result="thickened" />

<!-- 2. Cut off the SourceAlpha -->

<feComposite operator="out" in="SourceAlpha" in2="thickened" />

This method is not guaranteed to look good. Especially when you apply dilate in conjunction with big values for radius, the result can look worse than the geometry created via stroke-width. Depending on the situation, a better alternative would be to store the text in a symbol element, and then insert it when needed via use, and thicken the instance with CSS’ stroke-width property. Be aware that stroke-width cannot be applied to HTML content, though.

Torn Look

Torn look27
<!-- 1. create an feTurbulence fractal fill -->

<feTurbulence result="TURBULENCE" baseFrequency="0.08"
numOctaves="1" seed="1" />

<!-- 2. create a displacement map that takes the fractal fill as an input to distort the target: -->

<feDisplacementMap in="SourceGraphic" in2="TURBULENCE" scale="9" />

Color Fill

Tornout look28
<!-- 1. Create a colored filled area -->

<feFlood flood-color="#F79308" result="COLOR" />

<!-- 2. Cut off the SourceAlpha -->

<feComposite operator="in" in="COLOR" in2="SourceAlpha" />

It should be mentioned that, besides feFlood, feColorMatrix is another method of altering the source input’s color, even though that concept is more difficult to grasp.

Offsetting

Offsetting the filtered element29
<!-- Offset the input graphic by the amount defined in its "dx" and "dy" attributes: -->

<feOffset in="SourceGraphic" dx="10" dy="10" />

Extrusion

Extrude the target30
<!-- Define a convolve matrix that applies a bevel. -->

<!-- Order defines the depth of the extrusion; angle is defined by the position of "1" in the matrix. Here we see a 45-degree, 4-pixel deep extrusion: -->

<feConvolveMatrix order="4,4" 
   kernelMatrix="
   1 0 0 0
   0 1 0 0
   0 0 1 0 
   0 0 0 1" in="SourceAlpha" result="BEVEL" />

<!-- offset extrusion: -->

<feOffset dx="2" dy ="2" in="BEVEL" result="OFFSET" />

<!-- merge offset with Source: -->

<feMerge>
   <feMergeNode in="OFFSET" />
   <feMergeNode in="SourceGraphic" />
</feMerge>

Noise Fill

Create a noise fill31

The feTurbulence filter primitive will create a noisy texture by applying the so-called Perlin noise algorithm (invented by Ken Perlin during his work on TRON in 1981). This will generate a rectangle filled with noise that looks like what you could see on old TV sets late at night before cable TV was invented.

The appearance of the noise structure can be modified by several parameters:

  • type in its default state will produce a liquid texture.
  • type can be set to fractalNoise instead, which will output a sandy result.
  • baseFrequency is there to control x and y pattern repetition.
  • numOctaves will increase the level of detail and should have a low value if performance is an issue.
  • The number to start randomization with is determined by seed.
<feTurbulence type="fractalNoise" baseFrequency="0.1" numOctaves="5" seed="2" />

Image Fill

Fill target with an image32

feImage‘s purpose is to fill the target with a texture. If we want to apply a repeating pattern, it must be used in conjunction with feTile.

<!-- The following code will create a 100 × 200-pixel square filled with "myfill.svg": -->

<feImage xlink:href="myfill.svg" x="0" y="0" width="100" height="200" result="IMAGEFILL"/>

<!-- We then use this fill as an input for feTile, creating a repeating pattern this way: -->

<feTile in="IMAGEFILL" resulte="TILEPATTERN"/>

<!-- Now we will use feComposite to "cut off" SourceAlpha's transparent areas from the fill: -->

<feComposite operator="in" in="TILEPATTERN" in2="SourceAlpha" />

The cool thing about this filter is that the specification allows us to use any SVG element as an input and to create a pattern fill from it. So, in theory, you could create pattern fills from symbols, groups and fragments within your SVG and then apply them as a texture, even to HTML elements. Unfortunately, because of an old bug33, Firefox accepts only external resources as input. If you prefer to keep things self-contained and want to avoid the additional HTTP request, there’s hope: Embed the pattern fill as an UTF-8 data URI:

<feImage xlink:href='data:image/svg+xml;charset=utf-8,<svg width="100" height="100"><rect width="50" height="50 /></svg>' />

Some browsers do not understand UTF-8 data URIs when they aren’t URL-encoded, so make URL encoding34 a default:

<feImage xlink:href='data:image/svg+xml;charset=utf-8,%3Csvg%20width%3D%22100%22%20height%3D%22100%22%3E%3Crect%20width%3D%2250%22%20height%3D%2250%20%2F%3E%3C%2Fsvg%3E' />

If you want to apply feImage to HTML content, be aware that size matters. The SVG that contains the filter must cover the area where it is being applied. The easiest way to achieve this is by making it an absolutely positioned child within the block element it is being applied to:

<style>
  h1{
    position: relative;
    filter: url(#myImageFilter);
  }
  h1 svg{
    position: absolute;
    visibility: hidden;
    width: 100%;
    height: 100%;
    left: 0;
    top: 0;
  }
</style>
<h1>
  My Filtered Text
  <svg>
    <filter id="myImageFilter">…</filter>
  </svg>
</h1>

Lighting Effect

3D Bevel35

This is one “Wow” effect that quickly becomes boring when used too often. This filter has a serious effect on performance, so use it wisely.

<!--We create a heightmap by blurring the source: -->

<feGaussianBlur stdDeviation="5" in="SourceAlpha" result="BLUR"/>

<!-- We then define a lighting effect with a point light that is positioned at virtual 3D coordinates x: 40px, y: -30px, z: 200px: -->

<feSpecularLighting surfaceScale="6" specularConstant="1" specularExponent="30" lighting-color="#white" in="BLUR" result="SPECULAR">
    <fePointLight x="40" y="-30" z="200" />
</feSpecularLighting>

<!-- We cut off the parts that overlap the source graphic… -->

<feComposite operator="in" in="SPECULAR" in2="SourceAlpha" result="COMPOSITE"/>

<!-- … and then merge source graphic and lighting effect: -->

<feMerge>
    <feMergeNode in="SourceGraphic" />
    <feMergeNode in="COMPOSITE"/>
</feMerge>

Conclusion

There is a gap between pure CSS layout and custom design elements created in software such as Photoshop or Illustrator. External assets embedded as background images, icon sprites and SVG symbols will always have their place in the design of websites. But sophisticated SVG filters give us more independence from third-party design tools and bridge this gap by enabling us to create visual styles directly in the browser.

In this article we’ve seen how SVG filters help us to create playful, decorative web typography. But nothing says we have to stop here. Soon, browser support will be good enough for us to use these effects on every HTML element as easily as we use CSS today. Even though the effects behave differently from native CSS techniques (an SVG filter will affect not only an element but all its children), it will be exciting to see how inventive web designers use these techniques in the near future.

Resources From This Article

Reading List

(ds, al)

Footnotes

  1. 1 http://media.mediatemple.netdna-cdn.com/wp-content/uploads/2015/05/splash-svg.html
  2. 2 http://media.mediatemple.netdna-cdn.com/wp-content/uploads/2015/05/splash-svg.html
  3. 3 http://media.mediatemple.netdna-cdn.com/wp-content/uploads/2015/05/extruded-svg.html
  4. 4 http://media.mediatemple.netdna-cdn.com/wp-content/uploads/2015/05/extruded-svg.html
  5. 5 http://media.mediatemple.netdna-cdn.com/wp-content/uploads/2015/05/3dneon-svg.html
  6. 6 http://media.mediatemple.netdna-cdn.com/wp-content/uploads/2015/05/3dneon-svg.html
  7. 7 http://www.w3.org/TR/filter-effects/
  8. 8 http://media.mediatemple.netdna-cdn.com/wp-content/uploads/2015/05/copperplate-svg.html
  9. 9 http://media.mediatemple.netdna-cdn.com/wp-content/uploads/2015/05/copperplate-svg.html
  10. 10 http://media.mediatemple.netdna-cdn.com/wp-content/uploads/2015/05/sketchy-svg.html
  11. 11 http://media.mediatemple.netdna-cdn.com/wp-content/uploads/2015/05/sketchy-svg.html
  12. 12 http://media.mediatemple.netdna-cdn.com/wp-content/uploads/2015/05/pop-svg.html
  13. 13 http://media.mediatemple.netdna-cdn.com/wp-content/uploads/2015/05/pop-svg.html
  14. 14 http://media.mediatemple.netdna-cdn.com/wp-content/uploads/2015/05/weathered-svg.html
  15. 15 http://media.mediatemple.netdna-cdn.com/wp-content/uploads/2015/05/weathered-svg.html
  16. 16 http://www.w3.org/TR/filter-effects/
  17. 17 http://media.mediatemple.netdna-cdn.com/wp-content/uploads/2015/05/pop-safari.html
  18. 18 http://media.mediatemple.netdna-cdn.com/wp-content/uploads/2015/05/copperplate-html.html
  19. 19 http://media.mediatemple.netdna-cdn.com/wp-content/uploads/2015/05/extruded-html.html
  20. 20 http://media.mediatemple.netdna-cdn.com/wp-content/uploads/2015/05/3dneon-html.html
  21. 21 http://media.mediatemple.netdna-cdn.com/wp-content/uploads/2015/05/weathered-html.html
  22. 22 http://media.mediatemple.netdna-cdn.com/wp-content/uploads/2015/05/splash-html.html
  23. 23 http://media.mediatemple.netdna-cdn.com/wp-content/uploads/2015/05/pop-html.html
  24. 24 http://media.mediatemple.netdna-cdn.com/wp-content/uploads/2015/05/sketchy-html.html
  25. 25 https://en.bem.info/method/
  26. 26 http://media.mediatemple.netdna-cdn.com/wp-content/uploads/2015/05/outline.svg
  27. 27 http://media.mediatemple.netdna-cdn.com/wp-content/uploads/2015/05/tornout.svg
  28. 28 http://media.mediatemple.netdna-cdn.com/wp-content/uploads/2015/05/colorfill.svg
  29. 29 http://media.mediatemple.netdna-cdn.com/wp-content/uploads/2015/05/offset.svg
  30. 30 http://media.mediatemple.netdna-cdn.com/wp-content/uploads/2015/05/extrude.svg
  31. 31 http://media.mediatemple.netdna-cdn.com/wp-content/uploads/2015/05/noisefill.svg
  32. 32 http://media.mediatemple.netdna-cdn.com/wp-content/uploads/2015/05/imagefill.svg
  33. 33 https://bugzilla.mozilla.org/show_bug.cgi?id=455986
  34. 34 http://meyerweb.com/eric/tools/dencoder/
  35. 35 http://media.mediatemple.netdna-cdn.com/wp-content/uploads/2015/05/lighting.svg
  36. 36 https://github.com/dirkweber/svg-filter-typeeffects
  37. 37 http://codepen.io/collection/ArxmyO/
  38. 38 http://www.w3.org/TR/filter-effects/
  39. 39 https://docs.webplatform.org/wiki/svg/tutorials/smarter_svg_filters
  40. 40 http://srufaculty.sru.edu/david.dailey/svg/SVGOpen2010/filters2.htm
  41. 41 http://tutorials.jenkov.com/svg/filters.html
  42. 42 https://pythonhosted.org/svgwrite/classes/filter_primitive.html
  43. 43 http://www.svgbasics.com/filters1.html
  44. 44 http://apike.ca/prog_svg_filters.html
  45. 45 http://de.slideshare.net/mullany1/cirque-du-filter-cssdevconf-2013
  46. 46 http://www.creativebloq.com/netmag/how-go-beyond-basics-svg-filters-71412280
  47. 47 http://ssp.impulsetrain.com/porterduff.html
  48. 48 http://graficaobscura.com/matrix/index.html
  49. 49 http://williamson-labs.com/convolution-2d.htm
  50. 50 http://matlabtricks.com/post-5/3x3-convolution-kernels-with-online-demo#demo
  51. 51 http://webstaff.itn.liu.se/~stegu/TNM022-2005/perlinnoiselinks/perlin-noise-math-faq.html
  52. 52 https://css-tricks.com/look-svg-light-source-filters/

The post The Art Of The SVG Filter And Why It Is Awesome appeared first on Smashing Magazine.

08 May 13:29

7 Ways to Stay Positive Around Negative People

by Guest of TSN
how to deal with negative people

Have you ever felt trapped in a negative, toxic environment? Did you feel overwhelmed by the negativity, and were you unable to shield yourself from it?

If so, you’re not alone.

Some time ago, I was in an environment that was so toxic that I almost quit my job. I was trapped among endless gossip, mean-spiritedness and backstabbing. I worked every day feeling like I was in self-preservation mode.

My character is strong, resilient and caring, but my work environment made me question that. I thought my positivity would spread to others and be enough to at least slightly improve their outlook — right?

Unfortunately, I was wrong.

And after several months of this toxic environment, I couldn’t stay optimistic about my situation any longer. My positive energy was depleted, and the negativity started to seep into my soul and poison me as well.

I didn’t want to feel defeated, but could I really continue to fight against this day after day? Staying in a slump was uncharacteristic of me, so I knew something had to change. I knew I had to rise above to stay true to myself or else be forced to work elsewhere.

The Night I Took Control

During a night of deep contemplation and feeling sick to my stomach for having to face another day, I decided to tackle the situation with a perspective change. I took myself out of the box and changed from fighting against the environment to logically facing it with objective understanding.

There had to be a reason why this environment sustained this amount of negativity for so long, even before I got hired. I began to look at it from an observer’s point of view.

The first step was to stop describing my day using words such as fighting, protecting and shielding and replace them with proactive words such as analyzing, observing and adapting.

It’s cliché, but the honest truth is that having balance in all things, including emotions, is a source of true happiness. And if someone or many people are keeping your emotions off balance and bringing you down to their dark side, it is crucial to learn how to handle them.

Here are ways to handle negative people so their negative energy doesn’t consume you:

1. Listen with Ears of Empathy

Consistently negative people are deeply pained. Instead of protecting yourself from them, change your perspective to understanding them. Something, whether it’s extreme self-consciousness, heartache, or a loss, is so deep that it consumes them.

In the end, they are just looking for comfort. Sure, they seek comfort in a twisted way, but it is a cry for help.

Instead of disdain, try to see through the negativity to reveal their pain, and turn the situation around by asking, “How are you?” or, “Is everything okay?” The result may lead to the person snapping back, or it could be just the outreach they need to know someone heard their cry.

I’ve experienced both but was better for it because that person stopped dragging me down into their misery since I had been the only person who had actually asked them how they were feeling.

You don’t have to be their best friend, but trust that sometimes the smallest gesture could be the biggest source of change.

2. Keep Things Brief

Negativity feeds off attention. Without attention, the negativity dies.

If you must deal with someone that is negative, keep things brief and to the point. Just being around a negative person’s energy alone can be draining.

So if you can’t get around it and you have to communicate with them, think of yourself as being a mere visitor in their space. Communicate, but don’t engage. Like visiting a foreign land, you observe and respect the culture but don’t necessarily adopt it as your own.

By keeping things brief, you’re respecting yourself by realizing that your time is precious too, with no room for unnecessary negative energy.

3. Tell Them the Truth

Tell the incessantly negative person in a calm, rational manner that you can’t continue to talk to them unless they stop being so negative. This is not for the faint of heart, and it might not work for all situations, but it does strengthen your nerves and empowers you to take charge of your own feelings.

Sometimes people need a mirror put in front of them to show them their ways. This is a way to actively set boundaries so that the negative person realizes you don’t want to be part of that space.

Again, this one isn’t for the meek, but regardless of the unpredictable outcome of the negative person’s reaction, celebrate the fact that you took control of your feelings by expressing how you felt.

Nobody can fault you for being true to yourself.

4. Focus on Positivity Triggers

For those who are especially empathetic (I’m one of them), sometimes self-talk and rationalization isn’t enough to eliminate the negativity. This is where having an arsenal of positivity triggers can quickly bring you back to your positive self.

For example, I love music, so when I listen to one of my favorite songs, it quickly eliminates the negativity.

Here are some other examples:

  • Having a list of self-empowering quotes to read
  • Reading or hearing something that makes you laugh or smile
  • Reading an inspirational person’s story
  • Talking to a positive friend

In a magic show it’s called misdirection; in life it’s called redirection. When you redirect your thoughts, you aren’t dismissing them but rather moving past them so they don’t consume you.

5. Realize Negativity is a Comfort Zone

I know this sounds absurd. Why would anyone want to be negative?

Strange as it sounds, some negative people find comfort in being negative. Sometimes people are brought up and raised in a negative home, so their reality is defined by negativity. They know no other way to be.

I worked with someone who unnecessarily stressed out everyone every day because it felt wrong to them when they didn’t have anything to stress about.

If they are unaware of what it feels like to be surrounded by positivity, it can be a foreign feeling. They will try to influence you subconsciously and pull you into their world.

Take comfort in knowing you don’t have to be part of that world, and be aware of your own reality. Again, think of yourself as a traveler experiencing someone else’s world, but always return to your positive home.

6. Don’t Engage in Conflict

Don’t waste your energy by being part of the conflict. I used to get involved every time someone was negative to try to diffuse or lessen their influence on others, but it drained my energy as well.

It’s okay to not get involved. In fact, not engaging in the drama saves you from expending energy unnecessarily. You have more important things to spend your time on. Nowadays, more energy is something we all need.

Save your energy. Don’t get involved. Politely walk away.

7. Grow Stronger From Negative People

In all experiences, there is a seed of wisdom. Look at negative people and grow from them.

Experiences with negative people can teach you to:

  • Solidify who is really important in your life and why
  • Learn to let go of people who bring you down
  • Be resilient to negativity

Most of us are hard-wired to feel emotion first rather than use logic to assess our experiences. Take a moment and find the lessons of your experiences that make life the interesting journey it’s supposed to be.

You Can Handle Negative People and Thrive

As a result of that night of deep contemplation, I was able to stay employed. I also realized the seven ways mentioned above that help me to maintain a positive outlook on life. Negative people don’t run your life.

You are in total control of how you feel if you can change your perspective on how you deal with them. Experiencing positive and negative emotions is a fact of life, but you don’t need to let someone else control how you feel.

Someone once said that experiencing life is like surfing. Whether it’s a good or bad day of surfing, you keep coming back to the beach to surf because it’s so damn fun. If you want to ride those waves with stride, don’t allow a negative person to steal your surfboard and your fun.

You have seven ways to thrive among negative people. Which one will you do right now?

08 May 13:25

Fahrrad-to-go boomt: Sechs Gründe für den Erfolg des Bike-sharings 

16 Apr 05:46

Great Free Resource to Learn Game Development

by Greg Duncan

The Microsoft Virtual Academy is a great and up-and-coming learning resource that provides tons of great content... free.

Since I like to highlight game dev stuff on Wednesday's, when I saw the latest crop of courses, well...

Advanced MonoGame for Windows Phone and Windows Store Games

Developers, want to add to what you know and love about MonoGame? ​Build on the Creating Windows Phone and Windows Store Games with MonoGame course, and expand your toolset in this advanced look at MonoGame, with ​experts Tom Spilman and Andy Dunn.

Explore advanced game development techniques and tools for writing custom effect shaders, learn to extend the content pipeline with custom formats, and check out optimization and debugging techniques. Plus learn about uses of Microsoft services and Windows store features. By the end of the course, you'll be ready to add the finishing touches to your latest MonoGame title.

(NOTE: To get the most out of this course, be sure you have Windows 8, the Windows Phone 8.0 and 8.1 SDK, Visual Studio 2013 Update 2+, and MonoGame.)

Instructors | ​ Tom Spilman - Sickhead Games Programmer and Co-Owner; Andy Dunn - ​Exato Game Studios Development Lead and Microsoft MVP

Creating 2D Games with GameMaker: Advanced Techniques

image

Making games with GameMaker? Ready to take your 2D game development skills to the next level? If you loved the Creating Your First 2D Game with GameMaker course and you're ready for more, dig deeper into the product features that make GameMaker such a powerful game development platform. Plus, see how to optimize your game for the Windows Store.

The dynamic team of Daniel Egan and Nathalie Goh-Livorness return to teach you how to use GameMaker Language (GML), the built-in scripting language, so that you can go beyond "drag and drop" and add your own custom functions to game objects or rooms. Explore animation, touch-screen controls, advertising and analytics, and much more. Don't miss this chance to get your GameMaker on!

(NOTE: To follow along with the instructors and get the most from this course, be sure to download these free tools ahead of time: GameMaker, InkScape, Audacity, and Visual Studio Express.)

Instructors | ​ Daniel Egan - Microsoft Technical Evangelist; Nathalie Goh-Livorness - Microsoft Technical Evangelist

Learn to Code with CODExist: Bot Levels Up

Want to add new elements to a game you've created in TouchDevelop? Build on Hour of Code with TouchDevelop and Learn to Code with CODExist: The Birth of Bot, and find how to make a mobile game more engaging and exciting!

In this mobile game development course, experience firsthand how to provide a player with instructions, make gameplay more challenging, add graphic effects and animations, use variables and cloud data, and publish and share a game. Each module of the course is independent of the others, so you can explore what most interests you in whatever order you like.

(NOTE: This course is intended for students who are new to programming but familiar with programming concepts, such as variables and data types, object properties and functions, for loops, and user-defined functions. Students should also have some experience with TouchDevelop.)

Instructors | Susan Ibach - Microsoft ​Technical Evangelist; Sage Franch - Microsoft Student Partner and Technical Evangelist

Want more? There's currently 32 more Game Development courses available!

Game Development Courses

Don't put it off any longer! Get the game development training you need to start developing that killer game app today. You know the one—you've been thinking about it for years. Game apps are fun and very popular in the Windows Store, and, with the tools now available, there’s no excuse not to get started. Our game development courses cover the tools and skills needed to start building games for Windows PCs and mobile devices right away. Taught by experts, all of our game development courses also include lots of practical demos. And stay tuned for game development training that focuses on using HTML5 for both 2D and 3D games, along with deeper looks at other game development topics.

image

Follow @CH9
Follow @coding4fun
Follow @gduncan411

15 Apr 17:56

Handgefertigte Pop-Up Arbeiten von Bozka Rydlewska

by Caroline Kurze

Die in Warschau lebende Künstlerin Bozena Rydlewska aka Bozka kreiert lebhafte, unglaublich detailreiche 3D Pop-Ups. Sie begann mit der Serie, nachdem sie ihre Arbeit 'New Botany' beendet hatte und neugierig war, wie ihre Illustrationen in dreidimensionaler Form wirken würden.

Sie war es leid immer am Computer zu arbeiten, stattdessen wollte sie mit eigenen Händen etwas erschaffen. Also recherchierte sie und belegte einen Pop-Up Kurs am West Dean Col­lege in Eng­land, bevor sie mit ihrer Arbeit begann. Jedes Pop-Up benötigt 3-4 Wochen bis zur Fertigstellung.

All images © Bozka | Via: Brown Paper Bag

20 Nov 09:53

Xamarin.Forms, oder: Knapp 100% Code-Reuse auf mobilen Plattformen

by codefest.at [MS]

Aus gegebenem Anlass möchte ich euch gerne den Einstieg in die mobile Entwicklung mit Xamarin und speziell Xamarin.Forms näherbringen. Ihr fragt euch möglicherweise, was denn dieser „Anlass“ sein könnte?

clip_image002

Nun, zum Ersten ist es so, dass die Visual Studio 2015 Preview den Android Emulator mitliefert, was die Entwicklung vereinfacht und die Developer-Experience merklich erhöht, mehr dazu findet ihr hier.

Zum Zweiten ist es so, dass ich nächste Woche wieder einen Xamarin Kurs abhalte und ich gerade wieder einmal meine Unterlagen überarbeite und ich dabei meine treuen Blog-Leser auch teilhaben lassen möchte.


Drittens, und das ist für euch bestimmt noch interessanter, ist die Draft-Version des Xamarin.Forms Buches von Charles Petzold in der Microsoft Virtual Academy als Gratis-Download verfügbar. Und zwar genau hier. clip_image003

Alles gute Gründe, sich Xamarin und Xamarin.Forms genauer anzusehen, aber zuvor sollten wir die Frage klären:


Was ist Xamarin und was kann es für mich tun?

Nun, jeder Entwickler, der mobile Applikationen mit

· C# und
· nativer Performance und
· nativem Look & Feel

für Windows Phone UND iOS UND Android erstellen möchte, sollte sich Xamarin genauer ansehen. Xamarin stellt 100% der nativen APIs für iOS, Android und Windows zur Verfügung.

Als Entwicklungsumgebung liefert Xamarin zwar auch das Xamarin Studio zur Entwicklung mit, aber es ist auch möglich, den gesamten Code in Visual Studio zu erstellen, allerdings benötigt ihr dann auch zumindest die Business-Lizenz. Der Vorteil ist, dass eure gewohnten Tools, wie z. B. Resharper, weiterhin verwendet werden können, ihr aber eben mit dem Xamarin SDK die mobile Plattform eurer Wahl anprogrammiert.

Es werden immer native und keine interpretierten Applikationen für die gewählte Zielplattform erstellt.

clip_image005

Dies wurde dadurch ermöglicht, dass 100% des Android SDKs und 100% des iOS SDKs auf C# gemappt wurden. Kurz gesagt: wenn man es in Java für Android programmieren kann, klappt das auch mit Visual Studio, C# und Xamarin.Android. Das Gleiche gilt eben genauso für XCode mit Objective-C und Visual Studio, C# und Xamarin.iOS.


Was benötige ich, um mit Xamarin zu entwickeln?

Das kommt jetzt ein klein wenig darauf an, auf welche mobile Plattform ihr mit eurer Entwicklung abzielt:

· Android: das Android SDK, optional eine Google Developer Subscription (einmalig $25), mehr dazu findet ihr hier – falls ihr die App veröffentlichen wollt, dann ist diese natürlich zwingend notwendig.

· iOS: einen MAC, der als sogenannter Build-Host dient, auf diesem muss XCode installiert sein und ihr benötigt ZWINGEND eine Apple Developer Subscription (jährlich €83), mehr dazu hier. Der Grund ist, dass die Erstellung nativer iOS Applikationen zwingend auf dem MAC mit den Tools von Apple erfolgen muss.

Dann natürlich noch Xamarin selbst, eine der 4 Editionen, oder die Trial Lizenz - diese ist 30 Tage ohne Einschränkungen lauffähig und findet ihr hier zum Download.


Was kostet Xamarin?

Es gibt 4 verschiedene Lizenzen:

· Starter (kostenlos, aber bez. Funktionen in sehr eingeschränkter Form)
· Indie ($25/Monat)
· Business ($83/Monat)
· Enterprise ($158/Monat)

Für Studenten gibt es die Indie-Version gratis, mehr dazu findet ihr hier. Für MSDN-Abonnenten gibt es ebenfalls spezielle Rabatte, momentan kostet die Business Edition $799/Jahr und pro Plattform.

Den genauen Unterschied in den Funktionen könnt ihr hier nachlesen, ich empfehle euch zumindest die Indie-Version zu verwenden, ich persönlich habe die Xamarin Business Edition für iOS und Android.


Wie funktioniert die Entwicklung mit Xamarin?

Es gibt zwei Möglichkeiten, um mit Xamarin eine native, mobile Applikation zu erstellen:

1. Die GUI wird für die jeweilige Plattform extra erstellt, die Applikations-Logik kann wiederverwendet werden
2. Die GUI wird mit Xamarin.Forms erstellt, damit kann im Idealfall auch die GUI nahezu zu 100% auf jeder der mobilen Plattformen wiederverwendet werden.

clip_image007

Ersteres wird auch der sogenannte Silo-Approach genannt: Drei Säulen – für jede Plattform eine unterschiedliche Implementierung der grafischen Oberfläche.


Was ist Xamarin.Forms?

Mit Xamarin.Forms ist es – im Gegensatz zum Silo-Approach – möglich, eine Applikation 1x zu entwickeln, auch die GUI, und zwar mit nahezu 100% gleichem Code. Das heißt, kaum extra Code-Zeilen für eine der drei führenden mobilen Plattformen (Android, iOS und Windows Phone). Möglich wird das, indem Xamarin.Forms die nativen Controls durch eine Zwischenschicht abstrahiert. So gibt es z. B. einen Xamarin.Forms.Button, dieser wird letztendlich ein UIButton, wenn es sich um eine iOS App handelt, zu einem Android Button bei einer Android App und zu einem Windows Phone Button bei einer Windows Phone App (aber dazu später noch genaueres).

clip_image009

Zusätzlich werden von Xamarin.Forms gewisse Unterschiede der mobilen Plattformen per Default eingebaut. So ist eine iOS-Applikation per Default weiß, eine Android App aber eher in schwarz gehalten. Das bedeutet, dass es eben z. B. per Default ein anderes Farbschema für Schriften und Texte verwendet werden muss. Das kann man zu Beginn getrost links liegen lassen, Xamarin.Forms kümmert sich darum.

Um Xamarin.Forms auch für Windows Phone einsetzen zu können, benötigt ihr zumindest eine Xamarin Lizenz für eine der beiden anderen Plattformen.


Wie wird eine Xamarin.Forms App erstellt?

Xamarin liefert in der Business-Edition Visual Studio Templates mit, wenn ein neues Projekt angelegt wird. Da eine Xamarin.Forms Applikation erstellt werden soll, sind 3 Templates von Interesse:

· Eine „Blank App (Xamarin.Forms.Portable)“,
· eine „Blank App (Xamarin.Forms.Shared)”,
· eine „Class Library (Xamarin.Forms.Shared)”

clip_image011

Also prinzipiell entscheidet man sich, ob man das Projekt als „Shared Project“, oder als „Portable Class Library“ aufsetzen möchte.

Eine Shared Application kompiliert die Klassen in jede einzelne App. Sollten Unterscheidungen für eine spezielle Plattform notwendig sein, wird häufig eine Kompiler-Direktive verwendet. Der Vorteil ist hier, dass nur eine einzige Quelldatei für alle drei Plattformen existiert.

clip_image013Quelle: Xamarin docs

Die Portable-Class Library vereint den kleinsten gemeinsamen Nenner aller verwendeten Plattformen, es ist also im Prinzip keine Unterscheidung für eine der drei mobilen Plattformen von Nöten, da diese PCL für alle drei Apps die Gleiche ist.

clip_image015Quelle: Xamarin docs

Aber warum eine Entscheidung treffen? Ich erstelle üblicherweise eine „Blank App (Xamarin.Forms.Shared)“ und füge danach eine „Class Library (Xamarin.Forms.Portable)“ hinzu. Damit kann ich alle Vorteile aus beiden Lösungen verwenden. Das sieht dann im Endeffekt so aus:

clip_image016

Es ist das Shared Project zu finden, die Android, sowie die iOS App, danach die PCL und am Ende die Windows Phone App. Die PCL wurde als Referenz zu den drei App-Projekten hinzugefügt.

Es lohnt sich, nach dem Anlegen der finalen Projektstruktur das Xamarin.Forms-Package auf die aktuelle Version zu aktualisieren.

clip_image018


XAML-Layout und Datenbindung?

Unter iOS und Android gibt es an und für sich keine MVVM-Unterstützung, wie sie in WPF existiert, aber Xamarin.Forms macht das nun für eben diese beiden Plattformen möglich. Inklusive XAML.

Um das in der Praxis zu testen, habe ich mir eine bestehendes MVVM Beispiel geholt, nämlich die „Simple MVVM and Windows Phone 7“-Applikation von hier und diese mit Xamarin.Forms umgesetzt.

Dieses ursprüngliche Beispiel zeigt die Verwendung von MVVM anhand einer Länderliste. Wenn ein einzelnes Land angewählt wird, so gelangt man zu den Details, bzw. erhält weitere Informationen über dieses Land. Da es sich um ein MVVM-Einführungsbeispiel handelt, verwendet es natürlich Models, ViewModels und Views und verwendet die zugehörige Datenbindung. Außerdem beinhaltet die Applikationen ein Verzeichnis mit Bilder, wo die zu jedem Land zugehörige Flagge enthalten ist.

Das Endresultat der Konvrtierung der Windows Phone 7 App mittels Xamarin.Forms sieht auf den drei Plattformen (Android, iOS; Windows Phone 8) so aus:

clip_image020clip_image022clip_image024

Das ist jetzt noch ganz ohne „Tweaks“ für eine bestimmte Plattform, d. h. eine Code-Basis für alle 3 mobilen Clients. Das gilt sowohl für die Business Logik, ALSO AUCH für das Frontend.

Ich möchte hier nur einige der Anpassungen aufgreifen, die gegenüber der originalen Windows Phone 7 App durchzuführen waren:

Generell gilt: WPF, bzw. Silverlight XAML != Xamarin XAML, das ist am deutlichsten an den Controls zu erkennen. Nachfolgend ein Beispiel:

Windows Phone 7 XAML:

image

Xamarin.Forms XAML

image

Auffallend, dass wir statt dem StackPanel ein StackLayout sehen, statt dem TextBlock ein Label und ich die Styles einfach entfernt habe. Erstens gibt es diese nicht mehr und zweitens haben wir hier es nicht nur mit einer Plattform zu tun, sondern mit drei verschiedenen – und da ist es erst einmal schwierig mit einem bestimmten Style „ins Rennen zu gehen“. Xamarin.Forms nimmt uns per Default schon einiges ab, wie es in den Screenshots zu sehen ist, konkret spiele ich auf die Hintergrundfarbe und die Vordergrundfarbe der Controls an.

Generell würde ich empfehlen, wenn es sich um eine Applikation, die mit Xamarin-für mehrere mobilen Plattformen entwickelt wird, eine Plattform als „führende“ zu definieren. Sobald diese einen Stand hat, der für den Test frei gegeben werden kann, kann man die zweite und danach die dritte Plattform anpassen, bzw. feintunen. Damit ist sichergestellt, dass zumindest eine Plattform quasi fertig ist und funktioniert. Die anderen beiden folgen in sehr kurzem Abstand. In dem oberen – zugegeben relativ einfachem - Beispiel wurde wie erwähnt absolut NICHTS angepasst.

Grund für diese eigenen Controls ist die Funktionsweise von Xamarin.Forms. Durch die Plattform-abhängigen Bibliotheken verwandeln sich die Xamarin.Forms-Controls in die jeweils passenden der jeweiligen Zielplattform, wie das nachfolgende Bild anschaulich zeigt.

clip_image026

So wird also aus einem Xamarin.Forms.Button ein UIButton, bzw. ein Android.Widget.Button unter Android und ein System.Windows.Controls Button unter Windows Phone.

Die Datenanbindung wurde von Xamarin gleich umgesetzt, wie wir das schon von WPF, oder der Windows Phone Entwicklung gewohnt sind. Das ViewModel und das Model habe ich nahezu ohne Änderungen übernommen, ich habe nur mit dem Bild getrickst und ein weiteres Property, um den Applikations-Titel nur unter Windows Phone darzustellen eingefügt.

Als Beispiel hier die Liste der Flaggen in der Windows Phone 7 App (der Trigger aus dem Originalcode wurde hier entfernt, da Trigger in Xamarin.Forms noch nicht offiziell unterstützt sind):

image

Und hier die Xamarin.Forms App:

image

Wichtig zu erwähnen ist noch, dass XAML mit Xamarin.Forms nur in einer Portable Class Library funktioniert und nicht in einem Shared Asset Project. Des Weiteren gibt es noch keinen XAML Designer, das könnte euch das Einarbeiten in Xamarin.Forms etwas erschweren, wenn ihr bisher eure XAML-GUI mit Blend, oder in Visual Studio mit dem Designer gebaut habt.


Zusammenfassung

Generell kann man sagen, dass Xamarin mit den Xamarin.Forms ein großer Wurf gelungen ist. Es ist zwar erst die erste Version, es lassen sich aber bereits hervorragend Business-Applikationen damit entwickeln. Wir dürfen gespannt sein, was das Xamarin-Team in den nächsten Monaten noch für Überraschungen für uns bereithält.


Berndt Hamböck ist seit 2007 MCT, darüber hinaus befasst er sich mit Lösungen für komplexe Anwendungsszenarien mit den neuesten Microsoft Technologien. Die Erfahrungen aus der Projektarbeit gibt er in Vorträgen und Trainings weiter und begleitet Entwicklerteams in Softwareunternehmen bei Projekten im Microsoft Umfeld.

Das ist ein Gastbeitrag. Die Meinung des Autors muss sich nicht mit jener von Microsoft decken. Durch den Artikel ergeben sich keinerlei Handlungsempfehlungen. Microsoft übernimmt keine Gewähr für die Richtigkeit oder Vollständigkeit der Angaben.

03 Nov 19:43

Expression Blend UX Guides

Es ist wahnsinnig einfach schlechtes Design zu entwerfen. Aber es ist auch relativ einfach gute User Interfaces zu bauen, wenn man die Grundregeln kennt. Um ein klares Layout (Clean Layout) zu erstellen braucht das UI ein Schema. Mit einem typografischen Grid Layout kann man die UI Elemente wie Text und Bilder strukturieren und ausrichten.

(Quelle Wikipedia)

Visual Studio 2013 erlaubt es ein Raster einzublenden und neu erzeugte Controls an den unzähligen Führungslinien auszurichten.

image

Expression Blend für Visual Studio 2013 kann da schon einiges mehr. Wenn man im Designer vom Lineal per Maus Drag und Drop auf das UI zieht entstehen blaue Führungslinien. Diese werden Rulers und Guides genannt.

image

Dieses UI Schema kann man sogar speichern um es später in anderen XAML Seiten wieder zu verwenden. Im Menü View – Manage Guides auswählen.

 image

Besonders praktisch, Blend bietet auch eine Reihe von vordefinieren Guidelines  zur Auswahl. Für eine Windows Store App (vormals METRO) sind das

  • BasicPage
  • FileOpenPicker
  • GroupDetailPage
  • GroupedItemsPage
  • HubPage
  • ItemsPage
  • SearchResultsPage
  • SettingsFlyout
  • ShareTargetPage
  • SplitPage

Die GroupItemsPage Vorlage

image

Expression Blend für Visual Studio 2013 ist der Nachfolger von Blend 4.0. Damit lassen sich WPF, Silverlight und WIndows 8.1 Apps (HTML und XAML) Designen. Expression Studio 4 wurde komplett eingestellt. Der Nachfolger ist direkt in Visual Studio integriert und benötigt keine separate Lizenz. Mehr zu UX Design gibt es auf der GUI&DESIGN Konferenz in Berlin. Der Autor gibt auch 2-tägige Blend Schulungen.

29 Sep 07:02

Angst verstehen, Angst auflösen

by Gastbeitrag

Um in Kontakt mit unserer Angst zu kommen, müssen wir uns ihr stellen. Ist sie fiktiv? Ist sie real? Wie wirkt Angst auf mich? Der Artikel stammt von Ruth Scheftschik, Therapeutin für Logotherapie und Existenzanalyse. © Ruth Scheftschik

Wer will nicht glücklich sein? – Ein großes Hindernis bei der Suche nach unserem Lebensglück ist die Angst, die uns immer wieder in die Enge treibt und die uns daran hindert, unser Leben kraftvoll zu entfalten. Verfolgt man statistische Untersuchungen, kann man erkennen, dass sehr viele Ängste unter der Oberfläche des Alltags verborgen liegen und von dort ihre Wirkung entfalten.

Gerade unsere komplexe Zivilisation hat eine ganze Reihe von neuen Ängsten hervorgebracht, die es in früheren Jahrhunderten nicht gab: insbesondere Existenz- und Versagensängste wie Angst vor dem Verlust des Arbeitsplatzes; Angst, den allgemeinen Lebensstandard nicht halten oder den beruflichen Anforderungen nicht mehr Folge leisten zu können; aber auch Angst einem körperlichen Schönheitsoder einem sozialem Leistungsideal nicht zu entsprechen.

Ein großes Thema unserer heutigen Zeit ist Angst vor Beziehungsverlust in partnerschaftlichen Verbindungen, da in diesem Bereich heute eine wesentlich größere Flexibilität besteht als zu anderen Zeiten. In größerem Rahmen findet sich Angst vor allgemeinen wirtschaftlichen Krisen, Angst vor Krankheiten insbesondere Krebs, Aids, Vogel- und Schweinegrippe; Angst vor Terrorismus, vor Atomkraft, usw. Ängste werden aber auch geschürt durch die Medien mit dem zentralen Fokus auf Negativmeldungen oder durch den Hinweis auf neueste Forschungsergebnisse, die alte, bisher als abgesichert angepriesene Erkenntnisse ablösen.

Werbung und wissenschaftliche „Neumeldungen“ enthalten in ihrer betonten Dringlichkeit häufig auch ganz subtil einen Unterton von Bedrohung, oft mit dem Ziel, dass weitere Medikamente, weitere Versicherungen, vermeintlich noch bessere und sichere Produkte verkauft werden können. Genau betrachtet ist unsere gesamte Gesellschaft einschließlich der politischen Führung besessen von dem Streben nach Sicherheit. Dahinter steckt die massive Angst vor dem Verlust des einmal errungenen Wohlstandes und damit auch Angst vor Wandel und vor dem Sich-Einlassen auf neue Möglichkeiten, die insgesamt dem System gut täten, und Ungleichgewichte, Ungerechtigkeiten und Missstände beseitigen würden.

Angst vor Wandel beinhaltet auch Angst vor Risiko. Lieber bewahrt man das Alte. Da weiß man, was man hat, auch wenn es nicht angenehm ist. Diese Einstellung betrifft die Gesellschaft im Ganzen als auch viele der einzelnen Teilnehmer in ihrem persönlichen Leben. Das Sicherheitsstreben erzeugt auf politischer Ebene immer neue Gesetze, die das Leben zunehmend in die Starre führen und neue Ängste schüren. Denn stehen die Gesetze erst einmal, folgt Angst vor deren Übertretung und somit werden Selbstbestimmung und Kreativität der einzelnen Mitglieder der Gesellschaft immer mehr gelähmt.

Auch das Gefühl für Eigenverantwortung und für eigene Möglichkeiten schwindet. Der Bürger fühlt sich durch die überzogene Gesetzgebung immer mehr kontrolliert, immer weniger frei und äußerlich immer mehr in die Enge getrieben. Die äußerliche Enge führt mit der Zeit auch zu einem Gefühl von innerer Enge, welches den idealen Nährboden für Angst darstellt. Zu viele Gesetze machen den Menschen unmündig, sodass er den Bezug zu seiner eigenen Stärke verliert. Das Gefühl für die eigene Stärke, aber, ist eines der wirksamsten Mittel gegen die Angst.

Die ‚modernen‘ Ängste stehen nicht immer unmittelbar greifbar im Vordergrund. Ab und zu treten sie deutlicher zum Vorschein bei akuten Anlässen, wie z. B. bei örtlich begrenztem Ausbruch von Tier-
Epidemien, Börsenschwankungen, Ereignissen wie in Fukushima, usw. Schaut man also genauer hin, kann erkannt werden, wie sehr unser Leben von Angst diktiert ist. Daneben gibt es eine unendliche Anzahl individueller Ängste. Sehr viele Entscheidungen, mehr als wir letztendlich ahnen und wahrhaben wollen, werden von uns aus tief liegender, unbewusster Angst heraus getroffen.

Sofern wir sie doch wahrnehmen, ist es in der Regel ein Tabu, über sie zu reden. In der Gesellschaft ist ein idealisiertes Bild vom Menschen im Umlauf, das ihn als starkes, souveränes Individuum hochstilisiert, welches sein Leben unter Kontrolle zu haben scheint. Ein solcher Mensch hat einfach keine Ängste zu haben. Das schickt sich nicht. Und wenn er sie trotzdem hat, ist es verpönt, sie zu zeigen, denn Angst geht tatsächlich zunächst einmal einher mit einem Gefühl von Hilflosigkeit, von eingeschränkter Handlungsfähigkeit.

Das bedeutet Schwäche und Verlust von Souveränität. Doch dazu muss gesagt werden, dass das Leben nun einmal unausweichlich seine zwei Seiten hat: Hell und Dunkel, Warm und Kalt, Stärke und Schwäche, usw. Wenn wir nur das Helle und das Starke akzeptieren, lehnen wir die andere Hälfte des Lebens ab und verneinen es somit in seiner Gesamtheit. Das führt dazu, dass es sich uns gegenüber verschließt. Das will heißen: setzen wir uns nicht auch mit dem Schwierigen und Unangenehmen auseinander, entstehen Blockaden.

Denn, wenn diese Aspekte des Lebens verdrängt werden, lösen sie sich nicht einfach auf und verschwinden, sondern sie wandern in den Untergrund, ins Unbewusste, von wo aus sie mit unverminderter Stärke ihre Wirkung entfalten. Sie beeinflussen unser Denken, Fühlen und Handeln und erzeugen dadurch nicht selten Probleme in unserem Umfeld oder in uns selbst, wie z. B negative Gedanken, Gefühle der Unruhe, inneren Druck.

Wenn wir den Verdrängungszustand dauerhaft ignorieren, kann sich die ihm innewohnende Kraft mit der Zeit intensivieren, ohne dass wir die eigentlichen Zusammenhänge noch erkennen können, mit deren Symptomen wir dann zu kämpfen haben. Ein sehr einfaches Beispiel ist „heruntergeschluckter“ Ärger. Er rumort im Untergrund und explodiert dann irgendwann unangemessen in einer Situation, in die er überhaupt nicht hinein gehört.

So steht es auch mit verdrängter Angst. Durch die Verdrängung ist sie nicht verschwunden. Im Gegenteil: sie wird im Unbewussten zum Nährboden für weitere Angst. Das Ausmaß kann so groß werden, dass die Angst unvorhergesehen zu vollkommen ungünstigen Zeitpunkten an die Oberfläche drängt, z.B. in Form von nicht verstehbaren Panikattacken oder von einem unterschwelligen dauerhaften Angstempfinden, das das gesamte Leben lähmt.

Wenn sich zu viel Angst anhäuft, haben wir irgendwann auch Angst vor der Angst. Je mehr wir versuchen Der Angst auszuweichen, desto mehr führt sie uns in innere und äußere Blockaden und macht sich bemerkbar, indem sie sich andere Kanäle sucht, durch die sie sich äußert, z.B. als Aggressivität, körperliche Erschöpfung, depressive Verstimmung, Schlafstörungen, psychosomatische Erkrankungen oder als Süchte in vielerlei Formen.

Unbewusste Konflikte und ebenso auch Ängste können nur aufgelöst werden, wenn wir sie hervorholen, sie uns anschauen. Nachdem wir uns ihnen zugewandt und sie soweit als möglich verstanden haben, können wir sie bewusst loslassen. Deshalb ist es so wichtig, nicht vor der Angst davonzulaufen. Sich diesem Prozess zu stellen ist nicht einfach, insbesondere, wenn es sich um massive Ängste handelt.

Wen die Angst erst einmal völlig in ihrem Würgegriff hat, den lässt sie so schnell nicht mehr los. Hier ist es unumgänglich, sich professionelle Hilfe zu holen. Wir sollten uns davor nicht scheuen, sondern uns bewusst machen, dass wir große Befreiung und einen ungemein hohen Gewinn für ein erfüllendes Leben daraus ziehen können, wenn wir uns auf den Weg machen, uns von der Angst zu befreien.

In der therapeutisch-beratenden Arbeit lässt sich immer wieder feststellen: Wer sich wirklich von Angst befreien will, der schafft es auch. Aber leider kommt auch immer wieder das vor: dass Menschen zwar einerseits die Angst nicht mehr wollen, aber andererseits die Mühe und Geduld scheuen, die damit verbunden ist, sich mit ihr auseinander zu setzen. Sie halten lieber aus Bequemlichkeit an der Angst fest oder weil sie sich schlichtweg an sie gewöhnt haben. So paradox das klingt: In diesen Fällen gibt die Angst diesen Menschen eine – wenn auch vermeintliche – Sicherheit. Es ist teilweise auch die Symptomatik der Angst selbst, die zu dieser grotesken Einstellung führt. Es gibt eine Angst davor, die Angst aufzugeben.

Somit ist es weder für den Therapeuten noch für den Betroffenen eine ohne weiteres einfache und bequeme Arbeit, massive Ängste aufzulösen. Wer jedoch die feste Entscheidung trifft: „Ich will da durch“, der wird die Erfahrung machen, dass hinter der Angst noch etwas Stärkeres liegt: da sind Mut zum Sein und Freude am Leben zu finden. Und so kann es gelingen, die Ängste zu überwinden.

Es hilft also nicht, Angst zu verdrängen, damit wir sie nicht spüren. Es führt nicht weiter, ihr auszuweichen, sie zu leugnen, sie zu betäuben oder sie auf die Dauer mit Medikamenten wegzudrücken. Mut, Vertrauen, Hoffnung und Glauben sind Eigenschaften, auf die wir uns ausrichten können, um Angst zu überwinden. Um diese Gegenkräfte in ausreichendem Maß hervorrufen zu können, ist es sinnvoll und gewinnbringend, sich erst einmal prinzipiell mit dem Wesen der Angst vertraut zu machen und ihre Struktur und Wirkungsmechanismen zu begreifen.

Darum soll es in diesem Beitrag gehen. Viele Bücher sind bereits über Angst geschrieben worden. Hier soll in kompakter Weise das Wichtigste dargestellt werden.

Grundsätzliche Aspekte der Angst

Wenn wir die Funktionsweise der Angst zu analysieren beginnen, müssen wir erstaunt feststellen: so eindeutig sie für uns spürbar ist, so vielschichtig ist sie, wenn wir sie verstehen wollen. Zunächst können wir auf alle Fälle einige grundsätzliche Eigenschaften entdecken:

Angst lässt sich nicht gänzlich vermeiden

Angst ist erfahrungsgemäß ein ständiger Begleiter unseres Lebens, ein immer wiederkehrendes, zentrales Erlebnis der Menschheit. Sie ist ein Grundphänomen des Lebens, ebenso wie es die Liebe ist in allen ihren Ausformungen. Liebe will das Leben erhalten und fördern; Angst jedoch stört und zersetzt Leben. Deswegen kann gesagt werden, dass das Gegenteil von Liebe Angst ist. Wut und Hass sind Folgen der Angst.

Sie sind sekundär und sind Abwehr- und Verteidigungsmechanismen, die aus Angst heraus entstehen. Liebe und Angst sind die beiden großen Grundkräfte, die unser Leben bestimmen. Alle anderen Emotionen, die wir erleben, gründen auf diesen beiden. Angst völlig aus der Welt verbannen zu können, ist eine Utopie.

Es ist aber durchaus möglich, sie auf ein Minimum zu reduzieren. Und darum sollten wir uns kümmern. Denn Angst schränkt elementar die intellektuelle Lernleistung ein und blockiert Neugier und Erkundungsverhalten und somit Entwicklungsmöglichkeiten des Lebens. Sie beeinträchtigt das Selbstwertgefühl. Sie ist ein Schatten, der alles blockiert: unsere Liebe, unsere wahren Gefühle, unser Glück, unser ganzes Sein.

Wann setzt Angst ein und was geschieht in diesem Moment?

Angst taucht unvermittelt auf, wenn etwas passiert, auf das wir keinen Einfluss haben. Verbunden damit ist, dass wir glauben, dass ein Verlust, Schaden oder Misserfolg eintreten werden. Angst tritt auf, wenn wir etwas, das uns sehr wertvoll erscheint, als bedroht sehen. Es kann sich auf unseren Körper beziehen – entweder auf seine Gesundheit oder überhaupt auf seine Existenz. Die Ängste können materielle Werte betreffen, Beziehungen zu für uns wichtigen Menschen, Situationen, Pläne, Ziele, usw.

Grundsätzlich gilt für Angst, dass sie ohne Ausnahme den negativen Ausgang der Situation festlegt. Das heißt, wir nehmen von vorne herein an und rechnen damit, dass ein Verlust oder Nachteil eintreten wird und dass wir keine angemessenen Reaktionen zur Verfügung haben werden, um das negative Ergebnis abwenden zu können.

Somit können wir erkennen, dass Angst immer auf die Zukunft gerichtet ist und sei es nur auf den nächsten Moment. Angst bezüglich Vergangenem gibt es nicht. Dabei ist die Vorstellung, dass neben dieser negativen Perspektive auch noch andere Entwicklungsmöglichkeiten bestehen könnten, vollkommen ausgeblendet. Angst ist somit eine einseitige gedankliche Vorwegnahme. „Gedanklich“ bedeutet, dass Angst im Kopf beginnt, auch wenn wir ihre Auswirkungen vorrangig körperlich spüren. Diese Tatsache stellt einen äußerst wichtigen Ansatzpunkt dar, um Angst ausschalten zu können. Dazu später mehr.

Auslösende Quellen

Angst hat zwei auslösende Quellen. Entweder wir reagieren auf Ereignisse außerhalb von uns oder auf ungelöste Konflikte, die in unserem Inneren bestehen. Letztere sind z. B. sich widersprechende Bedürfnisse, einander entgegengesetzte Gefühle, Schwierigkeiten in der Entscheidungsfindung aufgrund von nebeneinander gleichwertig existierenden Wertsetzungen.

Zeiträume des Auftretens von Angst

Angst entsteht entweder einmalig in einer einzelnen Situation oder sie kann sich auch in speziellen Situationen regelmäßig wiederholen. Oder sie taucht – wie bereits erwähnt – unvermittelt in Form von Panikattacken auf. Bei manchen Menschen zeigt sie sich aber auch in einer grundsätzlichen, konstanten Hintergrundschwingung im Leben, die sich frei und diffus hin und her bewegt. Durch solche chronischen Angstzustände können komplette Lebensentwürfe blockiert werden.

Angst kann sich aber auch in besonderen, zeitlich begrenzten Lebensphasen verstärkt zeigen oder bei Lebensumbrüchen, wenn also über lange Zeit Gewohntes zu einem Abschluss kommt und Neues, noch Unbekanntes, ansteht. Sie bildet aber auch fest umrissene Formen aus, die als krankhafte oder pathologische Störungsbilder definiert werden, wie z. B. die Panikattacken oder Phobien aller Art.

Formen der Angst

Angst nimmt die unterschiedlichsten Formen an. Sie verbirgt sich hinter sehr vielfältigen Masken, sodass wir nicht immer unmittelbar erkennen und wahrnehmen können, dass Angst mit im Spiel ist. Es gibt Menschen, die bewusst die Gefahr suchen – zum Beispiel im Extremsport – um damit ihre Ängste abzuwehren. Sie wollen diesen durch ihren Wagemut zuvorkommen.

Angst und Furcht

Angst wird häufig mit Furcht gleichgesetzt. Oder es werden beide Begriffe unterschieden in der Weise, dass Angst mehr allgemein und übergreifend gesehen wird und Furcht ein klares Ziel hat. Wir haben Furcht ‚vor‘ etwas, wie z.B. Furcht vor Spinnen, Furcht vor dem Fliegen, Furcht vor der Reaktion eines Menschen. Manchmal wird unklare Angst auch vom Unterbewusstsein in Furcht ‚vor‘ etwas umgewandelt. Dadurch können wir besser mit ihr umgehen, da wir „den Feind im Auge haben“. Das bedeutet in diesen Fällen, dass hinter der Furcht vor etwas Speziellem, Angst in einem größeren Zusammenhang steht.

Angst und Schmerz

Angst und körperlicher Schmerz liegen eng beieinander. Körperlicher Schmerz zeigt an, dass in unserem Körper Fehlfunktionen bestehen; Angst deutet auf Ungleichgewichte im seelischen Bereich hin. Bei körperlichem Schmerz sind wir darauf erpicht, ihn so schnell wie möglich loszuwerden, um frei, unbeschwert und kraftvoll unser Leben weiterleben und genießen zu können.

Ist das bei Ängsten auch so? Anscheinend ist Angst für uns so selbstverständlich, sodass wir ein großes Stück weit daran gewöhnt sind, mit ihr zu leben, sie als notwendiges Übel zu betrachten. Wollen wir körperlichen Schmerz grundsätzlich beheben und nicht nur die Symptome dämpfen, wird der Arzt nach den Ursachen suchen. Wollen wir Angst nicht nur betäuben, sollten wir ebenso versuchen herauszufinden, wo ihre Wurzeln liegen, selbst wenn wir auch hier möglicherweise fachliche Hilfe benötigen sollten.

Indem wir das tun, befreien wir uns von Blockaden, sodass m e h r aus uns selbst – also aus unserer Persönlichkeit – und mehr aus unserem Leben werden kann; wir also auch hier uns freier und unbeschwerter durchs Leben bewegen können. Wir sollten uns ebenso so engagiert um unser Wohlergehen kümmern, wenn wir mit Ängsten zu tun haben, wie wenn uns körperlicher Schmerz zusetzt.

Verhaltensmöglichkeiten bei Angst

Um mit Angst umzugehen, stehen uns vier verschiedene Verhaltensweisen zur Verfügung: Flucht, Angriff, Erstarrung, besonnenes Handeln.

Symptome der Angst

Die körperlichen als auch die seelischen Symptome, die Angst auslöst, sind sehr vielfältig. Auch wenn sie keinem fremd sind hier einige von ihnen in Aufzählung: Körperlich: Herzrasen, beschleunigte Atmung aber auch Atemnot, Schweißausbrüche, Halszuschnüren und Sprachprobleme, Zittern, Herzbeschwerden, Störung von Blasenfunktion und Verdauung, Schwindel, Bluthochdruck, Schlafstörungen, Appetitlosigkeit aber auch Heißhunger, gestörte Sexualfunktionen, Muskelverspannungen und einiges mehr.

Seelisch: Gefühl von ständigem bedroht sein, starke bis überstarke Sicherungstendenzen, Fluchttendenzen, chronifizierte Sorge, Nervosität, Unruhe, Fahrigkeit, Aggressivität, Entscheidungsschwäche, fortwährendes Kränkeln, Weinerlichkeit, schnelle Ermüdbarkeit und allgemeines Schwächegefühl, Mut- und Hoffnungslosigkeit, extrem verzerrte Realitätswahrnehmung, Grübeln über Vergangenheit und bzgl. Zukunft und vieles Weitere mehr.

Ängste als Folge von rein körperlichen Erkrankungen

Es kann auch vorkommen, dass Ängste bzw. Angstzustände ihre Ursache in rein körperlichen Erkrankungen haben. Eine psychotherapeutische Behandlung wird hier keine Ergebnisse erzielen. Mit der medizinischen Behandlung der Grunderkrankung verliert sich auch die Angst wieder.

Beispiele für organische Erkrankungen, die undefinierbare Ängste hervorrufen, sind z. B. Erkrankungen des Herzen und der Schilddrüse, Entgleisungen im Hormon- und Stoffwechselhaushalt. Etwas anderes ist es, wenn wir uns Sorgen machen um die äußeren Umstände und um die Zukunft, weil bei uns eine schwere
Erkrankung festgestellt wurde. – Manchmal können Ängste auch als Nebenwirkung von Medikamenten auftauchen und häufig bei Drogenmissbrauch.

Ängste als pathologisch definierte Störungsbilder

Als pathologische, psychisch bedingte Störungsbilder definiert sind folgende Ängste: Die generalisierte Angststörung, Panikstörungen, speziell die Agoraphobie, bei der der Betroffene sich letztlich nicht mehr aus dem Haus wagt; die Posttraumatische Belastungsstörung, Phobien aller Art.

Die Soziale Phobie – die Befürchtung vor negativer Bewertung durch die Mitmenschen – ist sehr häufig und sehr vielen Menschen aus eigener Erfahrung bekannt, ohne dass sie unbedingt als pathologisch bezeichnet werden muss. Es kommt jedoch auf den Ausprägungsgrad an, der sehr stark variiert. Die pathologischen Ängste gehören unbedingt in die Hände von professionellen Begleitern. Aber auch bei anderen psychischen Belastungen können parallel dazu Ängste auftreten. Depressionen z. B. können von Ängsten begleitet sein.

Individuelle Ängste

Darüber hinaus hat jeder von uns ganz individuellen Ängste. In ein und derselben Situation ängstigt sich der eine, ein anderer jedoch nicht. Dies resultiert aus unserer persönlichen Lebensgeschichte, mit den Prägungen und Erlebnissen in der Kindheit, mit unserem sozialen Umfeld, in dem wir aufwuchsen; auch mit unserer charakterlichen Grundstruktur. Manche Ängste können wir auch nur gelernt haben – von Eltern oder anderen uns nahe stehenden Menschen übernommen, da sie uns diese Ängste vorlebten.

Hier können wir wieder sehen, dass Angst ein gutes Beispiel für die Macht des Denkens über Seele und Körper ist, da viele Ängste letztlich auf Erinnerungen beruhen und mit der gegenwärtigen Situation nicht viel zu tun haben müssen. Oder sie resultieren aus falschen Schlussfolgerungen, die wir als Kinder selbst gezogen haben, da uns die Welt noch zu wenig vertraut war.

Gefühle und Angst

Ein kaum zu unterschätzender, angstauslösender Aspekt stellen unsere verdrängten Gefühle dar, nicht nur die negativen sondern ebenso die positiven. Selbst wenn sich in den letzten zwei bis drei Jahrzehnten einiges diesbezüglich verbessert hat, ist es in unserer verstandesbetonten Gesellschaft und insbesondere in der Arbeitswelt wenig oder auch überhaupt nicht erwünscht, Gefühle zu zeigen.

Es geht darum, möglichst gut zu „funktionieren“ und dabei sind Emotionen hinderlich, wie die hinter dieser Einstellung stehende Überzeugung unausgesprochen lautet. Und so beginnen bereits ganz früh in der Erziehung der Kinder die Abwertung und das Zurückdrängen der Gefühle zugunsten des Vernunftdenkens, sodass sehr viele Erwachsene kaum mehr Zugang zu ihrer Gefühlswelt haben und sich sogar vor ihr fürchten, da sie sie unbewusst als etwas Verbotenes empfinden.

Letzteres zeigt sich immer wieder ganz deutlich in der therapeutischen Arbeit, und es ist ein Prozess, der viel Geduld erfordert, bis die Betroffenen die Angst vor ihren Gefühlen loslassen und sie sie willkommen heißen können. Verdrängte, nicht wahrgenommene Gefühle sind Ursache für viele Schwierigkeiten und Blockaden im Leben und eben auch deutlich Ursache für Angst.

Angst als sogenannte „gesunde“ Angst

In der Literatur ist immer wieder zu lesen, es gebe auch eine sinnvolle, gesunde Form von Angst. Es handelt sich um die Angst bei realen Gefahren, Angst als Alarmsignal, das uns aktiviert, um uns zu schützen. Ich selbst sehe allerdings in der Formulierung „gesunde Angst“ einen fatalen Denkfehler. Ich betrachte es als alles andere denn als hilfreich, Angst
in irgendeiner Weise positiv zu bewerten, denn das verharmlost sie und schwächt unsere Bereitschaft, uns ihr zu widersetzen.

Mit einem anschaulichen Beispiel will ich meinen Standpunkt erklären. Ich nehme hierfür die Situation, wenn ich bei einer Bergwanderung auf einem schmalen Pfad gehe und dicht neben mir der Berg steil in den Abgrund fällt. Was ich da spüre, fühlt sich zwar wie Angst an, ist in meinen Augen jedoch keine Angst, sondern einzig eine erhöhte Aufmerksamkeits- und Bewusstseinslage. Sie ist die Voraussetzung dafür, dass ich extrem wachsam bin, da ich weiß, dass diese Situation einen schädlichen Ausgang für mich haben könnte.

Das muss sie jedoch nicht zwangsläufig! Meine Hoffnung ist es ja gerade, dass es nicht so eintrifft. Die erhöhte Bewusstseinslage verwandelt sich genau in jenem Moment tatsächlich zur Angst und wird dadurch extrem gefährlich, wenn ich den Fokus hauptsächlich auf den negativen Ausgang lege, wie es Angst ja grundsätzlich tut; wenn also ständig der Absturz in den Abgrund in meinen Gedanken vor mir auftaucht.

Angst fixiert meinen Blick auf das Schlimme, das passieren könnte, also hier auf den Absturz. Dadurch werden die typischen Angstsymptome, z.B. Zittern, weiche Knie, angespannte Atmung, Fahrigkeit, usw. aktiviert, was mich in ein Gefühl der Kraft- und Hilflosigkeit, also in die Schwäche treibt. Das bedeutet in besagtem Beispiel, dass das Risiko tatsächlich abzustürzen, sich durch Angst erhöht. Angst ist verbunden mit Unklarheit und vermindert meine Reaktionsfähigkeit.

Bleibe ich jedoch besonnen und konzentriert und lasse mich durch die Gefahrensituation nicht irritieren, so sind alle meine Sinne aktiv und ich kann bewusst auf meine körperlichen Ressourcen zurückgreifen und sie dann zum Einsatz bringen. Ich richte meinen Blick auf das sichere Ziel oder auf den positiven Ausgang. Auf diese Weise wird meine Kreativität angeregt, sodass mir sinnvolle Lösungsmöglichkeiten für die heikle Ausgangslage einfallen; Stärke und Stabilität werden mobilisiert, um die gefundenen Möglichkeiten umsetzen zu können.

Ich sehe es als gefährlich an, diese erhöhte Bewusstseinsqualität bzw. Aufmerksamkeitslage als Angst zu titulieren, dazu noch als „gesunde Angst“. Allein schon das Wort ‚Angst‘ in einer solchen Situation zu denken oder auszusprechen, birgt die Gefahr, sie zu aktivieren. Es schwächt uns und bringt unter Umständen einen Kreislauf in Gang, in den wir uns immer mehr hineinsteigern.

Die Gefahr, auf eine selbsterfüllende Prophezeiung zuzusteuern, wächst. Wenn wir diesen Zustand von erhöhter Aufmerksamkeit als einen solchen erkennen können und so auch bezeichnen, gelingt es uns eher, uns auf das rettende Ziel auszurichten und uns auf unsere Ressourcen zu besinnen. Insofern gibt es für mich keine „gesunde“ Angst.

Angst als Herausforderung zur Persönlichkeitsentwicklung

Eine zweite Aussage, die Angst als positiv bewertet, ist auch immer wieder anzutreffen. Auch sie will ich kritisch hinterfragen. Sie sagt, dass Angst uns zur Persönlichkeitsentwicklung herausfordere, wenn hinter ihr eingefahrene, ungünstige Verhaltensmuster liegen. Dass Angst auf diese Muster hinweist, ist richtig.

Dennoch hört es sich auch hier so an, als ob wir der Angst dankbar für ihr Auftauchen sein sollten, sie somit auch positiv sei. Ebenso hier wird Angst durch die Art der Definition aufgewertet und damit verharmlost. Abgesehen davon kann man immer wieder Menschen begegnen, die sich von den Begriffen ‚Persönlichkeitsentwicklung, Reifung und Wachstum‘ nicht besonders angesprochen fühlen.

Mancher fühlt sich dadurch sogar persönlich angegriffen und mag sie deshalb für sich nicht in Anspruch nehmen. Meine Infragestellung lautet: Sind wir für das Auftauchen von körperlichem Schmerz denn auch dankbar? Bewerten wir sein Auftreten auch als positiv? In der Regel wollen wir ihn schnellstmöglich wieder loswerden und kümmern uns auch in der Mehrzahl der Fälle darum, dass die Ursache des Symptoms behoben wird. Parallel dazu würde es bezüglich der Angst bedeuten, auch schnellstmöglich nachzuforschen, was es mit ihr auf sich hat, um die Ursachen auflösen zu können, anstatt verbal ihrem Auftreten zu huldigen.

Die Gefahr, sich schicksalsergeben an angstvolle Zustände zu gewöhnen, ist recht groß, weil es sich ja „nur“ um psychische Angelegenheiten handelt und „nur“ um Persönlichkeitsentwicklung. Nochmals die Frage: Sind wir bereit, uns ohne weiteres an körperlichen Schmerz zu gewöhnen? Die Mehrheit der Menschen wird das mit einem eindeutigen ‚Nein‘ beantworten.

In Bezug auf Angst hingegen sind wir träge. In unserem Alltagsleben sind wir so an Ängste gewöhnt, dass wir sie viel eher hinnehmen als körperlichen Schmerz, ohne zu erkennen welch begrenzende Auswirkungen sie auf unser Leben haben. Wir sind eher bereit, Einschränkungen unseres Lebens durch Ängste hinzunehmen, denn durch körperlichen Schmerz.

Hinzu kommt die eingangs genannte Scham, sich zu Ängsten zu bekennen. Es ist heutzutage immer noch so, dass es uns wichtiger ist, uns um unseren Körper zu kümmern als um unser seelisches Wohlergehen. Psychische Schwierigkeiten zu haben, ist in unserer „aufgeklärten“ Gesellschaft immer noch zu großen Teilen ein Makel, insbesondere Ängste. Dagegen wird – wie immer wieder mitzuerleben ist – über körperliche Erkrankungen und Operationen ausführlich und mit einem unterschwelligen Stolz berichtet. Besonders en vogue sind seit Jahren Sportverletzungen.

Ich sehe es so: dass seelisches Ungleichgewicht so massive Formen annimmt, dass sie zur Angst führen, ist genaugenommen tragisch und traurig genug. Besser wäre es eigentlich, sowohl im körperlichen als auch im seelischen Bereich, wenn wir unser Leben von vornherein so achtsam und bewusst führen könnten oder würden, dass weder körperlicher Schmerz noch Angst als Hinweis notwendig wären. So finde ich es nicht weiterführend, wenn an dieser Stelle von Angst so gesprochen wird, dass wir letztlich noch froh über ihr Auftreten sein sollten.

Ich erkenne zwar durchaus, dass die Formulierung, Angst dankbar als Herausforderung zur persönlichen Entwicklung anzusehen, als trostvolle Entlastung für massiv Betroffene gedacht ist. Ihnen wird dadurch jedoch subtil die Opferrolle untergeschoben. Sie sollten dagegen ermutigt werden mit dem Hinweis auf eine verdeckte Stärke in sich, die es zu finden gilt und die es ermöglicht, Ängste zu überwinden. Schmerz und Angst sind einzig Symptome, die Hinweis-Charakter haben. Der Fokus sollte nicht auf den Symptomen liegen, sondern sollte sich von dort unverzüglich auf den Ort, an dem die Ursachen zu finden sind, verlagern.

Ich weiß natürlich, dass das Leben nicht perfekt ist. Deshalb sind körperliche und seelische Schieflagen nicht gänzlich unvermeidbar, sodass zwangsläufig Schmerz und Angst entstehen. Aus einem wohlgesonnenen und achtsamen Mitgefühl für uns selbst heraus sollten wir uns jedoch unmittelbar auf den Weg machen, den Heilungsprozess auch bei Ängsten einzuleiten; gemäß den einleitenden Worten dieser Ausführungen: Wer will nicht glücklich sein? Am Ende des Beitrags werde ich einige Hinweise geben, deren Beachtung dazu beitragen kann, dass Angst weniger Raum in unserem Leben findet.

Existentielle Grundängste und grundsätzliche Existenzangst

Es gibt noch einen besonderen Angst-Bereich, der unbedingt der Erhellung bedarf: es sind die existentiellen Grundängste, mit denen ein jeglicher Mensch konfrontiert ist, als Erwachsener allerdings in unterschiedlicher Intensität. Es sind Ängste, die insgesamt eine große Tragweite haben. Sie hängen auf fundamentale Weise mit dem Menschsein als solchem zusammen und führen bei genauer Betrachtung zu der einzigen, sämtlichen Ängsten zu Grunde liegenden Angst, zu der Angst vor dem Tod (grundsätzliche Existenzangst).

Alle Ängste – auch die vielen kleinen Alltagsängste – haben ihre Hauptwurzel in dieser einen Angst. Andersherum formuliert: es geht bei jeder Angst prinzipiell immer um unser Überleben. Da wir grundsätzlich erst einmal nicht einverstanden sind mit der Endlichkeit unseres Lebens bzw. mit seinem Ausgang (Tod), ängstigt uns jegliche Entwicklung, in der der Verdacht enthalten ist, sie könne uns an die Grenze zum Tod führen. Das Gesagte wird gleich deutlicher werden.

Der Gegenpol zur grundsätzlichen Existenzangst ist der Selbsterhaltungstrieb. Er ist unser stärkster Trieb. Es ist bekannt, dass in extremen Lebenslagen die Sexualität, die ebenso eine höchst lebensbestimmende Kraft ist, dennoch zum Erliegen kommt zugunsten der Selbsterhaltung.

Selbsterhaltung ist biologisch wichtiger als Fortpflanzung. Ein großer Teil dieser Grundängste belastet insbesondere stark die zwischenmenschlichen Beziehungen, deshalb auch Beziehungsängste genannt. Diese Grundängste sind folgende:
a. Beziehungsängste: Trennungs-, Verlassenheits-/ Verlustangst, Liebesverlustangst, Angst vor Nähe,
Angst vor Individuation (Entwicklung der Individualität), Gegen-Aggressionsangst
b. Angst vor Veränderung
c. Angst vor dem Endgültigen
d. Kontrollverlustangst
e. Autoritätsangst, Gewissens-/Schuldangst und mit beiden verbunden eine tief unbewusste Angst
vor Bestrafung.
f. Selbstwertängste
g. Ängste bei Lebensübergängen (Verlassen des Elternhauses, Heirat, Ruhestand, Umzug, etc.)

Ohne den tatsächlichen Grund dieser Ängste in einer konkreten Problem-Situation zu ahnen – z.B. bei einem Partnerschaftskonflikt oder bei sozialer Angst – ist die Berührung mit der Todesangst hier besonders eng. Die vielfältigen kleineren Alltagsängste sind erst einmal oberflächlich bezogen auf konkret sichtbare Problemkonstellationen, sodass die Verbindung zur grundsätzlichen Existenzangst erst einmal ziemlich verdeckt ist.

Wenn wir die Spur nach ihren Ursachen aber tiefer verfolgen, erkennen wir eine Spirale, die sich hinab bewegt bis zur Angst vor unserer Vernichtung. Wenn wir das einmal verstanden haben, können wir auch an dieser Stelle einen Ansatzpunkt finden, an dem wir die Angst aushebeln können. Hierzu im Schlussteil mehr.

Da an den existentiellen Grundängsten die Verbindung zur Todesangst noch am deutlichsten nachvollziehbar ist, will ich anhand von ihnen die Angstspirale nach unten erklären. Speziell bei den Beziehungsängsten liegt dieser Zusammenhang noch deutlich an der Oberfläche. Die existentielle Bedrohung zeigt sich hier zunächst als ein Gefühl von emotionaler Vernichtung, wenn z. B. die Beziehung zu zerbrechen droht. In extremer Weise kann dieses Empfinden so stark werden, dass der Betreffende meint, daran sterben zu müssen. Oder aber er entwickelt in der ersten abgrundtiefen Enttäuschung die paradoxe Idee, selbst aktiv den Tod zu suchen, um der Schmach „der Vernichtung durch eine andere Person“ zu entgehen.

Der Ursprung der Beziehungsängste, mit denen wir erfahrungsgemäß auch im Erwachsenenleben zu tun haben, liegt in der Kindheitsentwicklung. Damals waren wir auf den Schutz, die Fürsorge und die emotionale Zuwendung durch die Erwachsenen unbedingt angewiesen, um wachsen und gedeihen zu können, ja, um überhaupt überleben zu können. Als Kind durchlaufen wir ab der Geburt genetisch festgelegte Entwicklungsstufen: von dem noch bestehenden Einheitsgefühl mit der Mutter in den ersten Wochen nach der Geburt verläuft die Entwicklung über die Krabbelphase zum Laufen und damit zum selbstständigen Erkunden der Welt.

Es folgt die Entwicklung der ‚Ich‘-Wahrnehmung bis hin zur Pubertät mit einsetzender Geschlechtsreife und Identitäts-Findung bzgl. des zukünftigen Erwachsenenlebens. Diese Stufen beinhalten immer mehr Eigenständigkeit und Individuation und somit genau genommen immer mehr Abtrennung von anderen Menschen, was immer auch ein gewisses Angstpotential enthält, trotz dem Wunsch nach Selbstständigkeit. Für ein Kind bedeutet Liebesverlust die Gefahr, verlassen zu werden, und den Verlust der wichtigsten Versorgungspersonen sowohl in körperlicher als auch in emotionaler Hinsicht.

Daran würden sich als nächstes anschließen Isolierung, Schutzlosigkeit, Hilflosigkeit und die Gefahr alleine nicht zurechtzukommen. Am Ende steht die Möglichkeit des Todes. Diese Ängste werden wieder aktiviert, wenn Beziehungen schwierig werden oder zu zerbrechen drohen.

Je reibungsloser wir diese Entwicklungsstufen in der Kindheit bewältigen konnten, je weniger einschränkende Einflüsse unsere Kindheit belasteten, desto weniger haben wir mit diesen Ängsten im Erwachsenenleben zu kämpfen. Sind wir als Erwachsene stark mit Beziehungsängsten belastet, dann deutet dies darauf hin, dass schwierige Kindheitserfahrungen diesbezüglich nicht aufgearbeitet und geheilt sind.

Dennoch stehen wir alle unser Leben lang in dem Spannungsfeld zwischen Individualität und der Sehnsucht nach Verbundenheit. Das ist immer wieder Nährboden für Angst, denn beide sind starke Kräfte, die an uns ziehen und ihr Recht fordern. Angst vor Nähe hat damit zu tun, dass das Empfinden besteht, dass zu große oder zu viel Nähe zu einem „verschlungen werden“ führen könnte, also zu einer vollständigen, dauerhaften Auflösung der eigenen Identität und somit auch zur Vernichtung.

Angst vor Individuation weist darauf hin, dass ein Mensch befürchtet, abgelehnt und aus der Gemeinschaft verstoßen zu werden, wenn er seine Individualität zum Ausdruck bringt. Daraus würde auch wieder Isolierung folgen mit allen möglichenBegleiterscheinungen bis hin zum Tod.

Auch bei den weiteren Grundängsten geht es letztlich wieder um die prinzipielle Existenzangst: Bei den sozialen Ängsten steht im Vordergrund, von anderen Menschen negativ bewertet und verstoßen zu werden. Die Angst redet uns ein, die Abwertung könne so massiv werden, dass wir dann von „Gott und der Welt“ verlassen da stehen würden, wiederum letztlich mit der letzten Folge der möglichen Vernichtung.

Autoritätsängste, Schuldängste und unbewusste Strafängste haben mit einer Selbstwertproblematik zu tun. Als Strafe droht letztlich auch wieder Ausschluss mit Tod.

Ängste an Lebensübergängen hängen damit zusammen, dass uns das Neue unbekannt ist. Es könnte Gefährliches beinhalten oder wir könnten scheitern, weil wir glauben, nicht die nötigen Ressourcen und Kompetenzen zu besitzen, um die neue Situation zu meistern, was in letzter Konsequenz auch wieder zum Tode führen könnte.

Ähnlich den Ängsten bei Lebensübergängen sind die Ängste vor Wandel und vor dem Endgültigen. Angst vor Wandel sagt uns, Veränderung könne Gefahr beinhalten, die zur Vernichtung führe. Wenn sich etwas endgültig anfühlt, steht neben einer positiven Bewertung des Gewohnten die Assoziation von Unveränderbarkeit, Unbeweglichkeit, Unlebendigkeit, was nicht weit entfernt liegt von der Vorstellung der Endgültigkeit des Todes.

Letztlich können wir alle Ängste herunterrechnen auf die Angst vor der existentiellen Auslöschung. Sie ist zutiefst in jedem Menschen verankert, auch in jedem Tier. Ich denke, bereits bis hierher wird deutlich erkennbar, in welchem Ausmaß Angst eigentlich unser Leben bestimmt und auch, dass wir sie nicht immer bewusst wahrnehmen. Daraus können wir schließen, wie enorm wichtig es ist, Angst in ihrem Wesen zu verstehen, damit wir sie so weitreichend wie möglich identifizieren können. Außerdem wird nun verständlich, dass wir Angst nicht gewohnheitsgemäß akzeptieren sollten, wenn uns eine sinnvolle und erfüllenden Lebensgestaltung lieb und teuer ist.

Theorien zur Entstehung

Sowohl die Naturwissenschaften als auch die Geisteswissenschaften setzen sich mit dem Phänomen der Angst auseinander, um verstehen zu können, was es mit ihr auf sich hat und wie sie entsteht. Es haben sich verschiedene Theorien entwickelt, wobei gesagt werden kann, dass keine die andere ausschließt, sondern jede Perspektive ihre Berechtigung hat. Die Entstehung der Angst hat verschiedene Komponenten.

Die Theorien stammen aus der Evolutionsforschung, Neuropsychologie, Kognitionspsychologie, Tiefenpsychologie, der Entwicklungspsychologie des Kindes, aus dem Bereich der Lerntheorien und aus der Philosophie. Genannt wird z. B., dass sowohl ungelöste Konflikte, frühere gefahrvolle Erlebnisse – die als Erinnerung abgespeichert sind -, Verhaltensweisen, die von anderen Menschen gelernt wurden, als auch irrationale, gedankliche Schlussfolgerungen, ebenso wie genetische und hirnphysiologische Gegebenheiten eine Rolle spielen. Auch die Religionen und spirituelle Lehren haben ihre Erklärungen bezüglich des Ursprungs von Angst.

Der gemeinsame Nenner aller Theorien ist jedoch, dass Angst damit zu tun hat, dass wir uns in unserer Existenz bedroht sehen.

Wie viel Angst ist wirklich nötig?

Wenn wir die erhöhte Bewusstheits- und Aufmerksamkeitslage in realen Gefahrensituationen nun – wie vorhin dargestellt – nicht mehr als Angst bezeichnen, dann bleibt letztlich nur ein grundlegender Wirkmechanismus, der Angst steuert, übrig, gleichgültig auf welcher Grundlage er entstanden ist. Es ist der, dass Angst gedankliche Vorwegnahme von ungünstigen Ergebnissen darstellt, in deren Folge sich körperliche und psychische Symptome einstellen, die in massiver Weise auch die Gefühlsebene beeinflussen.

Bei starken Angstzuständen greifen diese Ebenen auf vielfältige Weise ineinander, sodass sie sich kaum noch voneinander getrennt wahrnehmen lassen. Bezüglich der negativen gedanklichen Vorwegnahme vergessen wir, dass die Realität nicht zwangsläufig so aussehen muss und auch nicht so aussieht, wie die Angst uns das weismachen will.

Wenn wir genau hinsehen, können wir feststellen, dass die meisten Ängste letztendlich Fantasien und Einbildungen sind. In unserem Kopf spielt sich ein Gedankenprozess ab, der einem Horrorszenario in einem Film gleicht. Es gibt noch andere Perspektiven, doch wir lassen uns von der Filmhandlung völlig aufsaugen und gestatten der Angst in uns Platz zu nehmen. Wir glauben ihr auch noch ungeprüft das, was sie uns einflüstert. Angst ist manipulatives ‚Kopf-Kino‘. Deshalb können wir mehr gegen sie unternehmen, als wir ahnen, indem wir immer mehr lernen, die Angstbilder als Film zu identifizieren, aus dem wir jederzeit aussteigen können.

Und indem wir uns angewöhnen, uns gleichzeitig daran zu erinnern, dass es neben der Film-Story eine Realität gibt, in der auch noch andere Entwicklungsmöglichkeiten existieren. Angst ist also nicht notwendig. Sie wendet nicht die Not.

Wir können nach allem Gesagten feststellen: Angst an und für sich ist nicht notwendig. Sie wendet in keiner Weise die Not, sondern verstärkt sie nur. Angst ist ein weit verbreitetes Übel. Wir sollten uns nicht an sie gewöhnen. Sie ist, um ein glückliches Leben zu finden und zu gestalten, schlicht und einfach hinderlich.

Ich selbst habe viele Ängste durchkämpft, um zu dieser heilsamen Einsicht zu gelangen. Wir müssen uns Auf unsere Stärke besinnen, die auch in uns vorhanden ist und mit ihr weitergehen mit dem Blick auf die positiven Entwicklungsmöglichkeiten im Leben. Nur das hilft. Der Widerstand, der häufig dieser These entgegen gesetzt wird, lautet: „Ja, aber da ist doch gerade dieses und jenes und das ist einfach beängstigend. Es ist eben einfach so; da kann ich nichts machen.“ Wenn wir so tatsächlich denken wollen, dann wird es auch so sein: wenn wir der Angst Macht über uns geben, dann kann sie uns packen.

Und wenn sie das einmal umfassend geschafft hat, nützt aller Verstand nichts. Dann sind wir ihr erst einmal vollkommen ausgeliefert. Deswegen sollten wir uns in angstfreien Zeiten grundsätzliche Gedanken über sie machen, wozu dieser Beitrag anregen soll. Wenn wir das Wesen der Angst einmal verstanden haben, können wir ihr, wenn sie auftaucht, wesentlich kraftvoller entgegentreten als vorher. Sie kann uns dann nicht mehr in einer Weise packen, die uns im wahrsten Sinne des Wortes den Verstand verlieren lässt.

Wir sollten uns zudem um ein achtsames, bewusstes Leben bemühen, um Ängsten keinen Nährboden zu geben. Die häufige Nachlässigkeit, bei der wir der Angst zu viel Raum in unserem Leben geben, beruht darauf, dass wir dermaßen an sie gewöhnt sind, dass sie zu einer Selbstverständlichkeit geworden ist und sie uns deshalb – so widersprüchlich es klingt – damit ein Stück weit Halt gibt, eine Form von Identität. Wir können uns eine in weiten Strecken angstfreie Lebensperspektive kaum vorstellen.

“Wo kämen wir denn hin, wenn wir so gut wie keine Angst mehr hätten! Wären wir dann noch ‚normale‘ Menschen?“ Einer der Gründe, aber nicht der einzige, hierfür ist, dass unterschiedlichste Autoritäten – einzelne Menschen, Institutionen, Gruppierungen verschiedener Art – über die Jahrtausende hinweg Angst als Druckmittel eingesetzt haben. Sie tun es immer noch. Sie benutzen sowohl subtile als auch offene Drohgebärden und Einschüchterungsmaßnahmen. So manifestiert sich Angst als ein gängiges Lebensgefühl.

Selbst in der modernen Erziehung wird immer wieder unachtsam mit Angst gearbeitet. Ein kleiner Satz als Beispiel: „Wenn du jetzt nicht gehorchst, dann hat Mami dich nicht mehr lieb.“ Aber, was tun wir denn eigentlich gegen die Angst? – Wir machen Überstunden, um ausreichend Geld zur Verfügung zu haben, um einen Teil unseres Glückes kaufen zu können, wir rennen zu Ärzten, Masseuren und Physiotherapeuten, schlucken Medizin, suchen Fitnessstudios auf. Aber unsere Ängste nehmen wir schicksalsergeben hin!

Eine weitere Begründung für die These, dass Angst genau genommen überflüssig ist, lautet – und mancher wird sie empört zurückweisen – ‚Angst zu haben kann auch ein recht bequemer Weg sein‘. Sich von Angst bestimmen zu lassen, kann ein Ausweichen vor den Erfordernissen des Lebens sein, ein Ausweichen vor dem Leben selbst und vor der eigenen Stärke. Wir sind es gewohnt und wurden durch die Erziehung so geprägt, dass wir eher unsere Unvollkommenheiten wahrnehmen als unsere Stärken. Deshalb können wir oft unsere eigene Stärke nicht erkennen. Oder, selbst wenn wir sie erahnen, wollen wir sie nicht in Anspruch nehmen oder uns bemühen, sie wirklich zu finden. Uns in der Opferrolle zu sehen, ist einfacher und bequemer. Insofern übernehmen wir an dieser Stelle keine Verantwortung für unser Leben, wenn wir uns der Angst ausliefern.

Was können und sollten wir also tun?

Ich möchte noch einmal ausdrücklich betonen: Wenn massive Ängste vorliegen oder wir das Gefühl haben, schon zu sehr in angstauslösende Probleme verstrickt zu sein, werden wir es kaum schaffen uns alleine daraus zu befreien. Dann sind gezielte therapeutische Maßnahmen unumgänglich. Ich will hier keine konkreten Sofortmaßnahmen und Heilverfahren schildern. Es gibt unterschiedliche Herangehensweisen und Methoden. Diese sind durch den Therapeuten zu erfahren.

Wichtig ist mir, grundlegende Aspekte und Hinweise zu nennen, die uns helfen können, unseren Alltagsängsten allmählich eine Abfuhr zu erteilen, sodass sie überhaupt nicht die Chance bekommen, sich in umfassendem Maße in unserem Leben einzunisten. Es geht darum, dem Auftreten der Angst und ihrer Ausbreitung vorzubeugen.

Hilfreiche Hinweise gegen die Angst

Gedanken über Tod und Endlichkeit

Da uns nun bewusst ist, wie sehr alle Ängste mit der Todesangst verbunden sind, ist es von großem Nutzen, sich Gedanken über die persönliche Einstellung zu Tod und Endlichkeit zu machen. Wenn wir dahin kommen können, ruhig und gelassen den Tod zu akzeptieren, ihn nicht mehr zu fürchten und aus unserem Leben auszugrenzen, kann dies mit der Zeit allen Ängste die Kraft entziehen. Der regelmäßige Blick auf den Tod soll uns nicht ängstigen, sondern soll Anlass dafür sein, unsere Lebenszeit bewusst zu erkennen und als wertvoll zu betrachten, um sie mutig, kraft- und sinnvoll zu gestalten, solange es möglich ist. Und dabei ist die Angst nur hinderlich.

Kopf-Kino Angst

Ein ganz entscheidend wichtiges Hilfsmittel ist, uns immer wieder deutlich zu machen, dass die Angst weitgehend „Kopf-Kino“ ist. Es geht darum, wenn Angst zu spüren ist, ihr nicht einfach vorbehaltlos zu folgen, sondern innezuhalten – regelrecht einen Stopp zu setzen – und in sich hinein zu spüren, um den Film, der da läuft, zu identifizieren. Als nächstes sollten wir uns um eine realistische Sichtweise bemühen und unmittelbar nach einer positiven Gegenperspektive Ausschau halten.

Es gibt keine Regel, die besagt, dass ein Ereignis, das derzeit seiner Realisierung harrt, eine negative Richtung nehmen muss. Der negative Ausgang existiert nur als Möglichkeit in den Gedanken. Also sollten wir auch eine positive Entwicklung in Betracht ziehen. Dann steht es zumindest 50:50 und wir können die Angelegenheit entspannter angehen. Wir sollten auch gedanklich nicht zu viel mit der Zukunft
beschäftigt sein und diesbezügliches Grübeln vermeiden. Das öffnet der Angst die Türen. Besser ist es, sich immer wieder ins Hier und Jetzt zurückzuholen und sich auf das zu fokussieren und Freude daran haben, was gerade jetzt möglich ist.

Dialog mit sich selbst

Eine Möglichkeit, Ursachen von Ängsten auf die Spur zu kommen, kann ein mitfühlender Dialog mit sich selbst sein. Wenn wir Angst aufsteigen spüren, reden wir mit uns wie mit einem Kind oder wie mit Freund oder Freundin: „Da ist Angst. Meine Liebe/mein Lieber, was ist mit dir? Was macht dir so zu schaffen? In welchem Konflikt befindest du dich gerade. Wie sieht er aus? Was arbeitet da gerade in dir gegeneinander? Was verunsichert dich?“ Dabei hilft, sich selbst gegenüber der Angst einen Namen zu geben, sie zu benennen und dies durchaus laut auszusprechen. Dabei wird die Angst-Stimme mit den entsprechenden bildlichen Szenarien in unserem Kopf deutlicher, von denen wir uns dann distanzieren können, indem wir realisieren, dass da gerade ein Film in uns läuft.

Suche nach gelungenem Leben

Lohnenswert ist es, sich an bisherige Lebenssituationen zu erinnern, deren Ausgangslage schwierig war und die uns dennoch gelungen sind. Des Weiteren sollten wir uns auch offen und ehrlich diejenigen Situationen vor Augen führen, bei denen Ängste überflüssig waren, weil die von ihnen prophezeiten negativen Folgen nicht eingetreten waren.

Das eigene Leben leben

Angst kann auch viel damit zu tun haben, dass ich zu wenig mein eigenes Leben lebe; meiner Identität und meiner Individualität zu wenig Entfaltungsraum zugestehe. Dass ich mich zu sehr nach anderen Menschen ausrichte, mich abhängig von ihnen und ihrem Urteil mache. Dass ich mich zu sehr auf sie beziehe und konzentriere; dass ich zu sehr mein Glück durch sie erhoffe.

Damit gebe ich mich ein ganzes Stück weit selbst auf. Unbewusst erinnert mich diese teilweise Aufgabe einer eigenen Identität an Auslöschung. Irgendwo in mir ahne ich auch, dass ich mich nicht absolut auf die anderen Menschen verlassen kann, finde aber auch keinen Halt in mir selbst, da ich die Beziehung zu mir selbst verloren habe. Hier kann sich Angst ganz leicht einklinken.

Ähnlich ist es, wenn ich mich selbst zu wenig kenne, dass ich zu wenig weiß, wer ich eigentlich bin, was ich tatsächlich kann, fühle, denke, wünsche. Wir meinen häufig zu wissen, wer wir sind. Wenn dann aber etwas tiefer nachgefragt wird, fehlen schnell die Antworten. Dann sind da innere Leerräume und es bestehen Gräben zwischen dem eigenen (falschen) Selbstbild und der Beziehung zur Welt.

Wenn ich mir meiner selbst nicht sicher bin, mich nicht in mir selbst sicher fühlen, habe ich weder Vertrauen in mich noch in die Welt und habe Schwierigkeiten, mit den Anforderungen des Lebens zurechtzukommen. Daraus resultieren diverse Ängste. Damit kann Angst auch Zeichen sein, dass wir nicht mit uns selbst verbunden sind.

Andersherum: Mit sich selbst verbunden zu sein, führt in die eigene Stärke und vermindert so die Angriffsfläche für Angst. Mich auf die Suche nach mir selbst zu machen, mich in mir selbst gut auszukennen, führt zu einem stabilen Selbstgefühl und zu Selbstvertrauen. Meinen eigenen Weg zu gehen, mein Eigenes zu leben, mich nach dem Leben zu fragen, das in mir steckt, mich damit vertraut zu machen und es zur Sprache zu bringen, gibt meinem Leben Sinn und damit inneren Halt.

Wenn ich mutig mein Eigenes lebe, bejahe ich mich selbst und erlebe Freude. Ich wende mich damit dem Leben zu und erkenne, dass ich die Welt mit meiner Individualität bereichere. Dagegen kommt die Angst nicht so ohne weiteres an. Die Fragen an mich sollten an dieser Stelle lauten:“ Ist da ungelebtes Leben in mir? Welches Leben in mir lebe ich nicht aus?“

Es geht auch darum, sich nicht nur an materiellen Werten auszurichten, die jederzeit verloren gehen können, sondern auch innere Werte zu leben, geistiges Potenzial, das wir bleibend in uns tragen.

Den Rhythmus des Lebens erkennen und anerkennen

In den Jahrhunderten, in denen sich die Naturwissenschaften und in der Folge die Technik in all ihren Spezialgebieten in rasantem Tempo entwickelten, haben wir neben der natürlichen Welt eine künstliche Parallelwelt erschaffen, die unseren heutigen Alltag bestimmt. Die Natur hat weitgehend nur noch eine sekundäre Bedeutung als Erholungswert. Ansonsten dient sie zur Produktion von Nahrungsmitteln und zur Lieferung von Bodenschätzen und sonstigen Materialen, die wir weiterverarbeiten.

Wir haben uns zum größten Teil aus ihrem Rhythmus herausgenommen und uns unseren eigenen geschaffen. Wir arbeiten nachts, schlafen teils tagsüber, verbringen viel Zeit in virtuellen Welten, bewegen uns verhältnismäßig wenig, halten uns hauptsächlich in geschlossenen Räumen auf; wir essen unregelmäßig und ungesund – nur um ein paar Beispiele zu nennen.

Unser Körper konnte dieser Entwicklung bislang nur sehr begrenzt folgen und hat weitgehend die alte „Takt“frequenz beibehalten. So existieren wir in zwei Welten mit unterschiedlichen Rhythmen. Auch dieser Spagat ist ein Nährboden für Angst. Tief in uns spüren wir noch die Verbindung zur Natur und zu ihren ausgewogenen Rhythmen und unsere Sehnsucht danach.

Auf der anderen Seite leben wir gegensätzlich zu diesem Empfinden. Wir dürfen uns nicht wundern, dass in infolgedessen die medizinischen und psychotherapeutischen Praxen voll und Termine erst nach einigen Wochen zu erhalten sind. Unsere verstandesbetonte Welt denkt und handelt weitgehend nach dem Prinzip
‚Entweder – Oder‘. Wenn wir etwas genauer hinsehen und hin spüren, merken wir, dass es ein sehr einengendes, statisches Prinzip ist.

Das Leben selbst und die Natur bewegen sich jedoch in einem fließenden Prozess weiter, in dem die Regel ‚Sowohl – Als auch‘ gilt. Es wechseln sich periodisch Werden und Vergehen ab. Es gibt Zeiten der Aktivität und der Ruhe, des Einatmens und des Ausatmens; so entstehen eine gewisse Harmonie und ein Gleichgewicht. Dies zu erkennen und es auch anzuerkennen, und uns diesem natürlichen Rhythmus wieder etwas mehr anzuschließen, reduziert ein Stück weit die Tendenz zu Ängsten, weil wir uns dann mit unserer Existenz in den Kreislauf des Lebens eingebettet und in ihm geborgen fühlen können.

Uns wird dadurch gewahr, dass vieles im Leben sich auch selbst regulierten kann und wir nicht fortwährend kontrollieren und eingreifen müssen. Und so gilt es, das eigene Leben daraufhin zu durchsuchen, an welchen Stellen wir uns wieder mehr dem Prozess des Fließens hingeben können.

Entscheidung gegen die Angst

Eine sehr kraftvolle Maßnahme ist die radikale und konsequente Entscheidung, Angst nicht mehr zuzulassen. Es gelingt jedoch meistens erst, wenn Wesen und Wirkmechanismus der Angst begriffen worden sind. Es geht hier darum, sich von seiner Angst nicht mehr alles gefallen zu lassen und – eine Stufe weiter – sich eben prinzipiell gegen sie zu entscheiden, sobald zu spüren ist, dass sie sich anschleicht.

Ich mache mir bewusst, dass da Angst ist und weise sie entschieden vom Platz. Ich bleibe besonnen, konzentriere mich auf meine Stärke und richte mich auf eine positive Entwicklung aus. Die Vorstellung, sich erfolgreich gegen die Angst entscheiden zu können und ihr nicht hilflos ausgeliefert zu sein, mag zunächst befremdlich wirken. Vielleicht ist es nach folgenden Ausführungen besser nachzuvollziehen.

Uns entscheiden zu können, ist eine Fähigkeit, die wir den Tieren voraushaben, welche nur ihrem Instinkt folgen können. Wir benutzen sie leider viel zu wenig bewusst. Dennoch müssen wir sie von Minute zu Minute anwenden, da unser Leben sich sonst nicht vorwärts bewegen könnte. In der unermesslichen Vielfalt dieser Welt müssen wir ständig auswählen und entscheiden. Ob wir einen Kaffee kochen oder nicht, hängt ebenso von einer Entscheidung ab, wie, ob wir aufstehen oder sitzenbleiben, ja, sogar, ob wir einen Arm heben oder senken.

Sehr viele Entscheidungen laufen unbewusst ab. Bewusst entscheiden wir uns bei größeren Lebensveränderungen. So leben wir von Entscheidung zu Entscheidung und formen die Gestalt unseres Lebensweges. Nutzen wir doch auch hinsichtlich der Angst bewusst diese Möglichkeit! Nach allem, was wir bis hierher in Erfahrung bringen konnten, ist Angst überflüssig! Entscheiden wir uns also gegen sie –
immer und immer wieder, sodass sie uns immer weniger die Kraft und Lebensfreude nehmen und uns immer weniger in der sinnvollen Lebensentfaltung blockieren kann.

Spiritualität und Angst

Vergessen will ich nicht, dass auch in religiösen und spirituellen Lehren kraftvolle Unterstützung gegen die Angst gefunden werden kann, selbst wenn hier insbesondere in den institutionalisierten Religionen, aber auch in anderen spirituellen Ausrichtungen, und bis in die Familien und in die Erziehung hinein im Laufe der Jahrhunderte und Jahrtausende einiges fürchterlich schief gelaufen ist.

Angst wurde und wird immer wieder noch weltweit auch im religiösen Kontext als Druckmittel eingesetzt. Die Lehren erfuhren im Verlauf ihres Bestehens eine massive, Ängste auslösende Verzerrung, sodass damit Macht ausgeübt werden konnte. Doch haben sie ebenso das Potential, das Leben positiv zu unterstützen, es zu bejahen und der Angst damit entgegen zu wirken.

Aus der Kraft der Liebe leben

Wir stellten bereits zu Beginn fest, dass das Gegenteil von Liebe Angst sei. Somit ist andersherum das Gegenteil von Angst: Liebe. Gegenteile schließen einander aus. Wo das eine ist, kann das andere nicht sein. Das bedeutet dann, dass wir, je mehr wir in der Kraft der Liebe sind, Angst bei uns keinen Raum findet. Wie kann das konkret verstanden werden?

Neben den verschiedenen Formen der zwischenmenschlichen Liebe – Eltern-Kind-Liebe, partnerschaftliche Liebe, Geschwisterliebe, etc. – gibt es die Liebe zur Natur, zur Kunst, zu Tätigkeiten aller Art, zum Beruf, usw. Auch wenn uns abstrakte Werte wichtig sind wie z. B. Toleranz, Freundschaft, Humor, Authentizität, Freundlichkeit, etc., enthält diese Haltung Liebe, sonst würden wir sie nicht anstreben. Es gibt die Liebe zum Leben ganz allgemein, trotz dessen Gegensätzlichkeiten und Problematiken. Hieraus entstehen auch das Engagement und das Einstehen für das Leben, wenn Missstände auftreten.

Liebe bedeutet immer für das Leben zu sein und nicht dagegen. Wenn wir gegen Unangenehmes und Schmerzhaftes revoltieren, immer wieder unzufrieden sind mit dem, was wir gerade haben, immer mehr wollen und alles mit Kritik überhäufen, dann bedeutet das Widerstand gegen das Leben. Zum Widerstand zählen ebenso überzogene Selbstkritik und zu hohe Perfektionsansprüche an sich selbst, also mangelnde Selbstliebe.

Ich möchte nochmals zusammenfassen: Wenn wir nur die positiven Seiten des Lebens bejahen und nicht das Leben grundsätzlich in seiner Gesamtheit – mit seinen hellen und mit seinen dunklen Seiten – dann fehlt uns Liebe zum Leben, dann sind wir nicht bereit, uns voll und ganz auf es einzulassen und uns für es zu engagieren. Wir stehen in Opposition zu ihm. Dann werden die Welt und das Leben zu unserem „Feind“ und wir fühlen uns unsicher, bedroht und misstrauisch. Und das lädt Angst ein.

Dem Leiden und dem Unangenehmen des Lebens mit Liebe zu begegnen, bedeutet nicht, dass wir beides willkommen heißen müssen, sondern es heißt so viel, dass wir dies zunächst einmal annehmen und akzeptieren, so, wie es ist, um uns dann mit Mitgefühl und Besonnenheit so gut wie möglich um Lösungen zu bemühen. Daneben sollten wir auch das Positive, das schon in unserem Leben vorhanden ist, mit in den Blick nehmen. Das alleine schon bringt Beruhigung und Stabilität in die Situationen und trägt somit dazu bei, dass Angst keine Angriffsfläche findet. Liebe ist immer ein ‚Ja‘. Sie will das Leben. Angst ist ein ‚Nein‘ und lenkt den Blick auf die Vernichtung.

Deshalb ist es heilsam und Angst vermeidend, wenn wir dem Leben in seiner Gesamtheit mit Liebe oder zumindest mit Mitgefühl begegnen. Wenn wir immer mehr in alle Aspekte des Lebens unsere Liebe und ein mitfühlendes Gewahrsein fließen lassen können, wirkt und wird es versöhnlicher für uns. Wir können erkennen, dass es uns auch trägt und dass wir deshalb auch Vertrauen wagen können. Wo Liebe, Vertrauen, Hoffnung und Glaube an das Gute, welches auch immer neben allem Schwierigen und Schlimmen existiert, Raum gegeben wird, da findet Angst keinen Platz und hat keine Bedeutung mehr.

Ruth Scheftschik

www.sinnundwerte-praxis.de

Ruth Scheftschik ist Therapeutin für Logotherapie und Existenzanalyse. Weitere Schwerpunkte Ihrer Tätigkeit sind die Wertorientierte Imaginationsarbeit nach Dr. Uwe Böschemeyer und das Enneagramm der Persönlichkeiten. Bei Seminaren und Vorträgen legt Sie besonderen Wert auf die Bereiche Achtsamkeit, Selbstwert/Selbstbewusstsein, Sinn und Werte.

The post Angst verstehen, Angst auflösen appeared first on Leben ohne Limit.
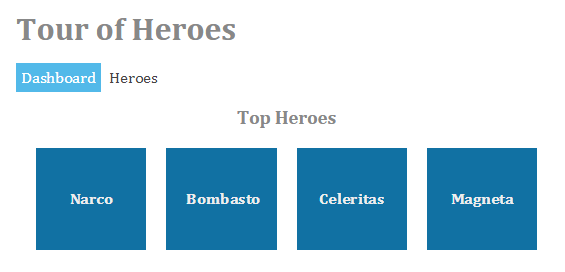
11 Sep 06:16

Tipps für gesunden Schlaf

Regelmäßiger erholsamer Schlaf ist für Menschen, die viel auf Reisen sind, oft nur ein Wunschtraum. Dabei ist er wichtig, um gesund zu bleiben und erfolgreich den (Arbeits-)Alltag zu meistern. Die Berufsgenossenschaft für Gesundheitsdienst und Wohlfahrtspflege (BGW) gibt Tipps, wie man ihn findet.
Schlafstörungen treten in unterschiedlichen Formen auf: Manche Betroffenen schlafen schlecht ein, andere liegen zwischendurch lange wach, wieder andere merken nachts gar nichts, fühlen sich aber trotzdem morgens schlapp. "Schlafmangel jeglicher Art führt zu Erschöpfung und beeinträchtigt die Konzentration", erklärt Dr. Johanna Stranzinger, Arbeitsmedizinerin der BGW. "Wer müde ist, macht schneller Fehler und hat eine höhere Unfallgefahr. Längerfristig schwächt ein Mangel an Tiefschlaf zudem das Immunsystem." Die Ursachen von Schlafstörungen liegen oft im Alltag: Typische Schlafkiller sind Stress, falsche Ernährung, Störquellen von außen und ein unnatürlicher Tagesrhythmus. "Wir kennen Schlafprobleme zum Beispiel von Beschäftigten im Schichtdienst", berichtet die Expertin der BGW. "Wenn es dunkel wird, schüttet der Körper das Schlafhormon Melatonin aus. Wer dann wachbleiben muss, arbeitet gegen seinen natürlichen Biorhythmus an." Nach der Nachtschicht setzt sich das Problem fort: Draußen wird es hell, der Körper fährt die Melatoninproduktion zurück und findet schwer zur Ruhe. Hinzu kommen als weitere Störfaktoren die typischen Geräusche des Tages aus der Umgebung. Und womöglich wirkt noch Kaffee oder schwarzer Tee aus dem Nachtdienst nach. "Wer unter Schlafstörungen leidet, sollte zunächst seine persönlichen Gewohnheiten und seine innerliche Haltung überprüfen", rät Stranzinger. "Oft helfen schon kleine Veränderungen im Alltag." Fünf Tipps für einen erholsamen Schlaf:
  • Viel Bewegung in den aktiven Tagphasen (aber mit genügend zeitlichem Abstand zum Schlafengehen).
  • Schlafzimmer abdunkeln, kühl halten und möglichst gegen Lärm abschirmen.
  • Mehrere Stunden vor dem geplanten Einschlafen auf anregende Getränke, Alkohol und schwere Speisen verzichten.
  • Persönliches Entspannungsritual finden: z.B. Lesen oder Musikhören.
  • Gelegentliches Aufwachen zwischendurch als normal akzeptieren: Kleine Wachphasen gehören zum gesunden Schlaf dazu. Sie sind nur meistens so kurz, dass man sich nicht an sie erinnern kann.
Quelle: BGW / DMM
23 Jul 08:04

StackOverflow Update: 560M Pageviews a Month, 25 Servers, and It's All About Performance

by Todd Hoff

The folks at Stack Overflow remain incredibly open about what they are doing and why. So it’s time for another update. What has Stack Overflow been up to?

The network of sites that make up StackExchange, which includes StackOverflow, is now ranked 54th for traffic in the world; they have 110 sites and are growing at a rate of 3 or 4 a month; 4 million users; 40 million answers; and 560 million pageviews a month.

This is with just 25 servers. For everything. That’s high availability, load balancing, caching, databases, searching, and utility functions. All with a relative handful of employees. Now that’s quality engineering.

This update is based on The architecture of StackOverflow (video) by Marco Cecconi and What it takes to run Stack Overflow (post) by Nick Craver. In addition, I’ve merged in comments from various sources. No doubt some of the details are out of date as I meant to write this article long ago, but it should still be representative. 

Stack Overflow still uses Microsoft products. Microsoft infrastructure works and is cheap enough, so there’s no compelling reason to change. Yet SO is pragmatic. They use Linux where it makes sense. There’s no purity push to make everything Linux or keep everything Microsoft. That wouldn’t be efficient. 

Stack Overflow still uses a scale-up strategy. No clouds in site. With their SQL Servers loaded with 384 GB of RAM and 2TB of SSD, AWS would cost a fortune. The cloud would also slow them down, making it harder to optimize and troubleshoot system issues. Plus, SO doesn’t need a horizontal scaling strategy. Large peak loads, where scaling out makes sense, hasn’t  been a problem because they’ve been quite successful at sizing their system correctly.

So it appears Jeff Atwood’s quote: "Hardware is Cheap, Programmers are Expensive", still seems to be living lore at the company.

Marco Ceccon in his talk says when talking about architecture you need to answer this question first: what kind of problem is being solved?

First the easy part. What does StackExchange do? It takes topics, creates communities around them, and creates awesome question and answer sites. 

The second part relates to scale. As we’ll see next StackExchange is growing quite fast and handles a lot of traffic. How does it do that? Let’s take a look and see….

Stats

05 Jun 06:05

Backup and restore your app on Windows Phone 8.1, Part 1: Start screen

by Windows Apps Team

This blog was written by Hector Barbera and Sean McKenna, Program Managers, Developer and Ecosystem Platform, Operating Systems Group


Windows Phone 8 introduced backup and restore as a way to ease migration from one Windows Phone to another. Windows Phone 8.1 improves on this by adding critical data sets that weren’t previously backed up, including the user’s Start screen. When the user chooses to restore a Windows Phone 8.1 backup to a new phone (or an existing phone that’s been reset) all the Start screen tiles are restored to their previous position and size.

We expect the majority of apps to work just fine following restore. However, because Windows Phone supports secondary tiles, and those tiles may point to data that no longer exists after restore, there are a few cases that developers need to think about. Let’s talk about those cases and look at ways to deal with them.

Background

When we initially looked at backing up the user’s Start screen, a fundamental question arose very quickly: how do we handle secondary tiles? By definition, primary tiles contain no launch context, so all you need to do to make them functional is to restore the associated app along with the tile’s size and position. Secondary tiles, on the other hand, are more difficult. In some cases, a secondary tile is just a deep-link to a specific page in the app. For instance, a news app might allow the user to create a secondary tile for international news, and assuming the page still exists in the restored app, everything will work fine once the app is reinstalled. However, apps can also create secondary tiles that depend on user-generated data unique to the device, such as a shopping list in a task-management app. That’s when things get interesting!

Ideally, we’d be able to guarantee that all the data associated with secondary tiles would also be backed up and restored, but that’s simply not possible. For a variety of reasons, we decided not to back up app data for apps targeting Windows Phone 8. But even if we had, users still have the option to turn it off without disabling Start screen restore. We could have chosen to simply not restore secondary tiles for Windows Phone Store apps, but this would lead to a poor user experience on a new device. Furthermore, our testing found that most app tiles work fine after restore even if the data wasn’t restored. And because there isn’t a consistent way for the platform to determine whether a particular tile depends on data on the device, we had to choose between restoring everything and restoring nothing.

In the end, we chose to back up just the data that is closely associated with tiles, such as tile properties and images. Having made that call, what makes backup and restore work with local data is you! That is, to create a seamless user experience we’re asking you to ensure that your apps do the right thing following restore.

Under the hood

Tiles and their metadata live in the Package Manager, which is responsible for carrying out app installs, updates, and uninstalls. More importantly for us, it manages the app metadata needed to render the app list and the Start screen.

The Start screen restore feature, or SSR, simply acts as another client of the Package Manager. When a backup is triggered–either an automatic nightly backup or an on-demand backup requested by the user–SSR queries the Package Manager to read all the tile metadata and to locate any images associated with the tile. All this data is then backed up to OneDrive.

During a restore, SSR is invoked during device setup if the user chooses to restore a backed-up image. SSR then retrieves all the Start screen data in the backup, and creates temporary app entries in the Package Manager to store the tiles and their metadata. These temporary entries are placeholders that are shown until the actual app is downloaded and installed; if the user taps on one of them, the system navigates to the download queue in the Windows Phone Store app. The system also keeps an eye on the restore progress: if a placeholder tile has no corresponding app entry in the download queue (for example when the app is not available anymore), that tile is marked with an exclamation mark badge and will show an error message when tapped.

When an app with restored tiles is successfully installed, the Package Manager updates the temporary tiles with the real functional tiles.

Preparing your app for Start screen restore

The key to preparing your app for Start screen restore is to handle navigation requests from restored secondary tiles. This might happen before your app has had the chance to run for the first time and do any required housekeeping.

For example, let's say you have a weather app that lets the user add multiple locations, where weather data for those locations is fetched and cached in a local database. Naturally, the app allows you to pin secondary tiles for each location where the navigation URI for each includes a reference to the location’s ID in the local database, as shown in Figure 1. When the user taps one of these secondary tiles, the app navigates to a page that shows that location’s weather.

clip_image002

Upon restore, the app is reinstalled and all those pinned tiles are recreated on the Start screen. However, it’s possible that none of the other data will come back–perhaps the app is not eligible for data backup or the user disabled it. When launched for the first time on the new device, then, the app will likely query for tiles on the Start screen and try to update them, but will be unable to resolve their location IDs in its (now empty) local database. At this point, the app either leaves the tiles alone or makes them blank as shown in Figure 2. Moreover, if the user taps a secondary tile, there’s the potential for an unhandled exception if the app doesn’t check correctly for invalid location IDs.

clip_image004

At the very least, then, your app needs to gracefully handle invalid navigation URIs, perhaps taking the user to a default page instead. Ideally, the app would recognize an invalid location ID, fetch the appropriate data to populate its local database, and then navigate to that location’s page as expected. The key to doing this seamlessly is to store an identifier in the tile’s navigation URI that’s relevant beyond the lifetime of your local app data. In the case of our weather app, this might be a postcode or a latitude/longitude pair, depending on the search parameters supported by the web service providing our weather data, as shown in Figure 3.

clip_image006

Of course, there will be cases where no amount of advanced planning can overcome the loss of your local app data. Consider an app that relies on user authentication to a cloud service for most of its functionality. If that app creates secondary tiles that navigate to experiences assuming the user is signed in, the app needs to handle the case where credentials are no longer available following restore. Ideally, it would redirect the user to the app’s login page and then navigate to the original experience following sign-in.

The bottom line is that you should never assume that a specific prerequisite has actually occurred when navigating into your app from a secondary tile. Always check for failure cases and handle them gracefully.

How to test your app with Start restore

Having followed our advice here and feeling confident that your app is ready to handle a Start screen restore, how can you test it without submitting an update to the Windows Phone Store and resetting your phone? Fortunately, you can simulate the Start screen restore scenario by clearing your app state and then launching it from secondary tiles:

1. Deploy your app to your developer device or emulator using Visual Studio.

2. Use the app to create any state associated with secondary tiles (log in with credentials, add locations, download content, etc.)

3. Pin every type of secondary tile your app supports.

4. Verify that invoking the app from secondary tiles navigates to the expected location.

5. Close the app.

6. Using the Isolated Storage Explorer tool, clear the local folder of your app. Do this by replacing its local app data with an empty folder as follows, recreating the conditions that follow first installation of the app:

  • Using the emulator:
    ISETool.exe rs xd <your app's product ID> <path to an empty folder on your PC>
  • Using a physical phone:
    ISETool.exe rs de <your app's product ID> <path to an empty folder on your PC>

7. Launch the app from each pinned secondary tile to make sure the app works and handles any exceptions correctly.

If everything works as expected, you should be good to go.

Final notes

Following a Start screen restore, you might notice that some tiles don’t seem to update until you launch the corresponding app for the first time. In this release, we weren’t able to restore push channels and background task registrations for apps. We debated whether to return secondary tiles to a default state during restore, but decided it was better to make the tiles look like they did before at the risk of having stale data for some time until the user launches the app. As the developer of such an app, make sure you’re refreshing your push channel registrations and background task registrations every time you launch…but you were already doing that, right?

The Start screen is the most distinctive part of the Windows Phone user experience and we’re excited to save user’s customization time when they move to a new device. By doing your part as described in this post, you’ll ensure that your apps pick up right where they left off.

22 May 06:53

XAML IntelliSense Presenter for Visual Studio 2013

by Karl

Current Version:  3.0 (21 May 2014)

The Visual Studio 2013 XAML Editor has really come a long way since Visual Studio 2010. You can read up on the new features in this blog post.

I originally released this tool in April 2010 and have rebuilt it for Visual Studio 2013.

FullControls FullProperties

FullNamespace

Features

  • Pascal case lookup
  • Optional narrowing list filter
  • Filtering based on item type
  • Toggle narrowing filter Hot Key (ALT + .)  (ALT PERIOD)
  • Toggle namespace filter Hot Key (ALT + ,)  (ALT COMMA)
  • xmlns IntelliSense options
    • Show/hide only solution assemblies
    • Show/hide schemas

Filter settings persist for the current Visual Studio session

Pascal Case Lookup

Pascal case lookup is always enabled regardless of the narrowing filter option.  When all of your text is upper case this feature kicks in to quickly locate the item you are looking for.  Note, this feature requires at least two upper case characters be entered before kicking in.

The feature locates entries that start with the first upper case character you entered, then matches on additional upper case characters.

The below image demonstrates the Pascal case lookup.

PascalLookupOne

Locating an assembly using the xmlns Pascal case IntelliSense is super fast.

PascalLookupTwo

Narrowing List Filter

When the narrowing list filter is enabled it provides two features. 

You can enable/disable this feature by clicking the Filter icon or by using the hot key (ALT + .) (ALT PERIOD).

  • Narrows the list of displayed items by only including items that contain your text
  • List item selection priority
    • Selects the first match that starts with your text
    • Selects the first entry that contains your text
Narrowing List Filter Enabled Narrowing List Filter Disabled
NarrowingEnabled NarrowingDisabled
With narrowing enabled, see how easy it is to locate Grid.Row or Grid.RowSpan.  
NarrowingEnabledTwo  

List Item Type Filter

This was my original driving force behind writing this extension.  Was found myself frustrated when a type in XAML has 2 properties, 4 events and 75 namespaces listed in the IntelliSense listing.  Problem solved.

New in version 2.0 is the addition of the namespace filter toggling hot key (ALT + .)  (ALT PERIOD).  This hot key is tied to the namespace icon, making it faster to show/hide namespaces.

Standard list of items, notice the multitude of namespaces that are listed.

Namespaces

Toggle the namespaces ToolBar button by clicking it and they are filtered for you.

NoNamespaces

The other ToolBar filter buttons work the same.  The gray background is the enabled state.  The white background with grayscale image is the disabled state.

xmlns IntelliSense

The below image demonstrates the two filter buttons in the xamls IntelliSense presenter.

  • Show only solution assemblies is enabled.
  • Remove schema entries is enabled.

xmlnsOne

Another way to locate your assemblies very quickly is demonstrated in the below image.  The two filter buttons in the default state and I entered WC to quickly find an assembly in my solution. 

This is another example of the Pascal case filtering.

xmlnsTwo

In the below image I’m taking advantage of the narrowing filter to locate all assemblies that have the word media.  When searching the text with this type of search, the entire entry line of text is searched including the assembly name inside the (…).

xmlnsThree

Extension Manager

To view your installed extensions use the Visual Studio 2010 menu, Tools, Extension Manager…

ExtensionManager

From here you can either disable or uninstall extensions.

 ExtensionManager

You can also configure settings for extensions using the Tools, Options dialog.

ToolsOptions

Requirements

Visual Studio 2013

Downloads

XAML IntelliSense Presenter on the Visual Studio Gallery

Close

Enjoy this XAML Editor extension.

Have a great day,

Just a grain of sand on the worlds beaches.


Filed under: IntelliSense, Visual Studio 2013, XAML, XAML Designer