PeterT shares his wisdom on a never-too-old topic.
Tuan.kuranes
Shared posts
24 Jan 17:42
Memory Bandwidth and Vertices
by graham
The post Memory Bandwidth and Vertices appeared first on OpenGL SuperBible.
Tuan.kuranes likes this
24 Jan 17:41
Migrating databases with zero downtime
Every article I’ve read and linked to that includes a data migration phase from one database to another tells the same story:
- forklift
- incremental replication
- consistency checking
- shadow writes
- shadow writes and shadow reads for validation
- end of life of the original data store
The same story for Netflix’s migration from SimpleDB to Cassandra and Shift.com’s migration from MongoDB/Titan to Cassandra. And once again, the same appears in FullContact’s migration from MongoDB to Cassandra. This last post also provides a nice diagram of the process:
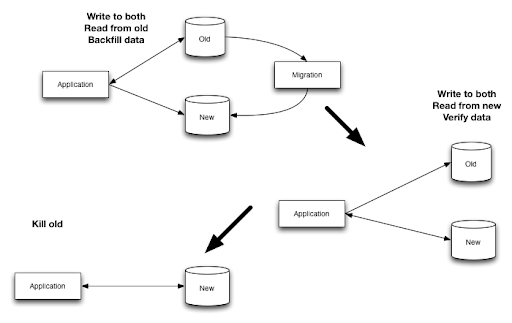
The key part of these stories is that the migration was performed with zero downtime.
Original title and link: Migrating databases with zero downtime (NoSQL database©myNoSQL)
Tuan.kuranes likes this
24 Jan 09:23
This post has been generated by Page2RSS%7Cutmcsr%3Dhttp%3A%2F%2Fwww%2Eiliyan%2Ecom%2Fpublications%7Cutmcmd%3Drss%3B%2B)

Path Integral Methods for Light Transport Simulation: Theory & Practice
Jaroslav Křivánek, Iliyan Georgiev, Anton Kaplanyan, Juan Cañada
EUROGRAPHICS 2014 Tutorial (date & time TBD)
This post has been generated by Page2RSS
Tuan.kuranes likes this
24 Jan 08:01
New Release
by mschuetz
The new source and converter are available here: potree_2014.01.22.zip
A small demo is included. The application has to be deployed on a webserver in order to run.
Tuan.kuranes likes this
23 Jan 18:32
Filed under: Asset pipeline, C++

Translating a human-readable JSON-like data format into C++ structs
by Stefan Reinalter
Even though Molecule’s run-time engine exclusively uses binary files without doing any parsing, the asset pipeline uses a human-readable non-binary format for storing pretty much everything except raw asset files like textures or models. This post explains the process behind translating data from such a human-readable format into actual instances of C++ structs with very little setup code required.
Why a human-readable non-binary format? Isn’t that slower to load?
A non-binary format is of course slower to load than a binary one, but it is only used for files that are being used by the editor and the asset pipeline. As such, those files are constantly changed, so they have to be easy to read, diff, and merge – and users should be able to spot errors in the file structure almost immediately.
Why not XML?
Much has been said about XML and XML vs. JSON already. Personally, to me XML is a human-readable language, but not one that can be parsed easily by humans. I find it hard to parse larger pieces of XML just by looking at the contents without any visual aid like e.g. coloring or syntax highlighting. Other formats tend to be much easier to read, and have less overhead and visual clutter.
Why not JSON?
If you take a look at the JSON example on Wikipedia, JSON is still a bit to verbose for my taste (I certainly don’t want to put everything in quotation marks). Hence, I use a slightly altered format that is unambiguous to parse, supports objects as well as arrays, and is easily understood just by looking at an example.
Why not use an existing parser?
We programmers really don’t like re-inventing the wheel, especially in tools code where there is usually a bit more leeway for things like e.g. the number of memory allocations made. Still, I don’t want to make a hundred calls to new and delete for parsing a measly options file.
Sadly, that rules out most parsers already. Most of them tend to have individual classes for objects, arrays, values of different kinds, attributes, and more, calling new all over the place every time they encounter a new value, stuffing it into a big tree-like data-structure like a map.
I would like to have a parser that reads the file exactly once, parses in-place, uses no dynamic string allocations for parsing (the strings are already there, no need to create tons of std::string!), and puts everything into a somewhat generic data structure, holding values of objects and arrays inside a simple array. Additionally, I would like to go from this data structure to any C++ struct I like, and make the translation process as easy as possible.
Molecule’s data format
Let’s start with a simple example file that shows almost everything that can be put into a data file:
AnyObject =
{
  # this is a comment
  stringValue = “any string”
  floatValue = 10.0f
  integerValue = -20
  boolValue = true

  intArray = [ 10, 20, 30 ]
  stringArray = [ “str1”, “str2”, “str3” ]

  aNestedObject =
  {
    name = “object1”
    someValue = 1.0f
  }
}
I would argue that just by looking at the contents of this file you can immediately parse all the information, without the need for any aid like syntax highlighting, color-coded keywords, etc.
Here is a more complete example: an options file specifying shader options with which to build a pixel shader for applying deferred point lights.
Options =
{
  # general
  warningsAsErrors = false

  # debugging
  generateDebugInfo = false

  # flow control
  avoidFlowControl = false
  preferFlowControl = false

  # optimization
  optimizationLevel = 3
  partialPrecision = true
  skipOptimization = false
}

# array of defines with their names and values
Defines =
[
  # toggles between different PCF kernels (2x2, 3x3, 5x5, 7x7). 0 means no shadow mapping.
  {
    name = "ME_SHADOW_MAP_PCF_KERNEL"
    values = [0, 2, 3, 5, 7]
  }
]
Parsing
Parsing is quite simple, really.
The general rules are:
- Every time a ‘{‘ is encountered, the definition of a new object starts. ‘}’ closes the definition.
- Every time a ‘[‘ is encountered, the definition of a new array starts. ‘]’ closes the definition.
- Every time a ‘=’ is encountered and there are non-whitespaces to the right, add a new value to the current object or array.
- Ignore everything after a ‘#’.
The parser essentially just parses the whole file line-by-line, and keeps track of its current state. Individual lines and values are parsed by using fixed-size strings on the stack. Disambiguating different value types is also straightforward if you try to identify types in the following order:
- If the value starts with a ‘”’, it must be a string. Else, go to 2.
- If the value ends with an ‘f’ or contains a ‘.’, it must be a float because we ruled out strings already. Else, go to 3.
- If the value starts with either ‘t’ (true) or ‘f’ (false), it must be a bool. Else, go to 4.
- The type is an integer.
Implementing the parser yourself also has the added benefit that error checking can be made a bit more robust with meaningful error messages. For example, telling the user that the parser “encountered an error in line 8” isn’t very helpful, and we can do so much better than that.
How does “Malformed data: Array was opened without preceding assignment in line 8. Did you forget a ‘=’?” sound? Much better.
All in all, the parser weights in at around 300 lines of C++ code, including comments, asserts, and error messages.
Generic data structure
Parsing is one thing, but how do we hold the values in memory? I settled for a straightforward implementation, using the following classes:
- DataBin: holds any number of DataObject and DataArray (both stored in an array)
- DataObject: holds any number of DataArray and DataValue (both stored in an array)
- DataArray: holds values or objects (stored in an array)
- DataValue: can either be a string, a float, an integer, or a boolean value (stored using a union)
Memory for the class instances is simply allocated using a linear allocator, so the data for a whole object or array is always contiguous in memory. This creates no fragmentation, you can allocate a reasonably sized buffer once and use that for all parsing operations (resetting the allocator after parsing a file has finished), and it also helps with the next step: translating the data into C++ structs.
Translating generic data into C++ structs
What do I mean by translation? We don’t want to access individual pieces of data using a name-based lookup as in the following example:
const bool value = dataBin.GetValue(“Options/warningsAsErrors”);
There are several reasons why I try to stay away from such an approach:
- It is error-prone. Every time you want to access a value, you risk misspelling it, and accesses are probably going to happen from several different .cpp files, making it harder to find the culprit.
- Every time somebody wants to access a value, it has to be retrieved from the generic data structure, which is some kind of search operation. That can be sped up by using hashes, binary search, or similar – but why do it on each access operation if we don’t have to?
- We want to be able to pass objects around to other functions. In many cases, we want to throw away the contents of a file and close the file handle in the meantime, and only keep the parts we need.
What we want is something like the following:
struct PixelShaderOptions
{
  bool warningsAsErrors;
  bool generateDebugInfo;
  bool avoidFlowControl;
  bool preferFlowControl;
  int optimizationLevel;
  bool partialPrecision;
  bool skipOptimization;
};

// assume dataBin is filled with generic data by the parser
DataBin dataBin;
PixelShaderOptions options;

// translates the object named “Options” from dataBin, putting all data into the given struct according to the translator
TranslateObject("Options", dataBin, translator, &options);
After the data has been translated, we can simply access it via e.g. options.optimizationLevel. We can pass it around to other functions and throw away the file in the meantime. Accessing values is fast, and checked at compile-time.
The remaining question is: how do we build such a generic translator using standard, portable C++? What info does the translator hold? What we need is a list that specifies which value goes into what struct member. In our case, struct members can be a std::string, a std::vector, and other non-POD types, so using offsetof is not an option.
C++ Pointer-to-member
Pointers-to-members is one of those C++ features that get used every once in a blue moon. Personally, this was the second time I used pointers-to-members in the last ten years of C++ programming.
What exactly is a pointer-to-member? In layman terms, a pointer-to-member in C++ allows you to refer to non-static members of class objects in a generic way, which means that you can e.g. store a pointer to a std::vector member, and assign values to members of any class instance using that pointer.
Similar to pointers-to-member-functions, those pointers also exhibit awkward syntax, and in order to access a member’s value of a class instance, you have to use either the .* or the ->* operator.
Using pointers-to-members, we can store a list of the names of values that we want to translate, along with their pointer-to-member. That is, we could do something like the following:
DataTranslator<PixelShaderOptions> translator;
translator.Add(“warningsAsErrors”, &PixelShaderOptions::warningsAsErrors);
translator.Add(“optimizationLevel”, &PixelShaderOptions::optimizationLevel);
// and so on...
The DataTranslator is a simple class template that holds pointers-to-members of a certain type, as shown in the following example:
template <class T>
class DataTranslator
{
  // single members
  typedef bool T::*BoolMember;
  typedef int T::*IntMember;
  typedef float T::*FloatMember;
  typedef std::string T::*StringMember;

  // array members
  typedef std::vector<bool> T::*BoolArrayMember;
  typedef std::vector<int> T::*IntArrayMember;
  typedef std::vector<float> T::*FloatArrayMember;
  typedef std::vector<std::string> T::*StringArrayMember;

public:
  DataTranslator& Add(const char* name, BoolMember member);
  DataTranslator& Add(const char* name, IntMember member);
  DataTranslator& Add(const char* name, FloatMember member);
  // other overloads omitted
};
For storing the pointer-to-member internally, we can either use one array containing some kind of pointer-to-member-variant (that we have to build ourselves first), or use separate arrays for storing the pointers to different types. In Molecule, I chose the latter approach because it makes data translation faster – it only touches the data it needs for translating a member of a certain type. For example, when translating an integer value, we don’t need to look at all the other members, but only at the pointers-to-int members.
One additional common trick we can use in the DataTranslator interface is to return a reference to ourselves in each Add() method. This allows us to define static, immutable translators like in the following example:
const DataTranslator<PixelShaderOptions> g_pixelShaderOptionsTranslator = DataTranslator<PixelShaderOptions>()
  .Add("warningsAsErrors", &PixelShaderOptions::warningsAsErrors)
  .Add("generateDebugInfo", &PixelShaderOptions::generateDebugInfo)
  .Add("avoidFlowControl", &PixelShaderOptions::avoidFlowControl)
  .Add("preferFlowControl", &PixelShaderOptions::preferFlowControl)
  .Add("optimizationLevel", &PixelShaderOptions::optimizationLevel)
  .Add("partialPrecision", &PixelShaderOptions::partialPrecision)
  .Add("skipOptimization", &PixelShaderOptions::skipOptimization);
Translating an object is now as simple as walking the DataObject that we are being given, and matching each DataValue stored in the DataObject with the corresponding pointer-to-member stored in the translator. Using some kind of hashing scheme such as quasi compile-time string hashes for the value names, we only have to search through our array of pointers-to-members corresponding to the type of the DataValue, which is a very fast operation.
Conclusion
The data format introduced in this post is used all over the place in Molecule’s asset pipeline. It is used for asset compiler options, resource packages, components, entities, and schemas. Schemas are an interesting thing when used in conjunction with an entity-component-architecture, and will be the topic of upcoming posts.
Filed under: Asset pipeline, C++
Tuan.kuranes likes this
23 Jan 13:15


Tips for Writing Accessible Games Analysis
by Daniel
This essay builds off the points I made in the On The Book’s Structure heading in the How to Read This Book section of Game Design Companion: A Critical Analysis of Wario Land 4. You don’t need to have read that section to understand this article.
Games Writing and Levels of Abstraction
Writing is the least ideal means for talking about games. The process involves using an abstract set of symbols to make comment on an abstract system of rules. For the reader, this means burrowing through two layers of abstraction just to understand what you’re saying.
(In saying this, I still believe that the written word is the way to go when it comes to serious games analysis. Video inevitably amounts to entertainment, as the stimuli created from moving images distracts the brain from, and therefore diminishes, the meaning of a text. And with audio, the linear flow of speech doesn’t give the listener the ability to naturally pause and absorb the information being given. It’s a bit like being on a content treadmill).
There’s also the problem of length and details. Because games are complex systems that are defined by their details, a writer must give a significant amount of background on the game in question before they can arrive at any sort of critique. By this point, the reader may have lost interest. So what’s a writer to do? How can we make games writing more accessible without sacrificing integrity?
A Narrow Focus
At some point, preferably before any writing takes place, the writer must decide whether they want their article to have a broad or narrow focus. Most games writers go for the broad option, even though it’s easier to have a narrow focus. Writing just about one particular aspect of a game not only affords the writer more accuracy, but also allows them to cut down on the preamble and jump straight to the chase. On the other hand, without a generous word limit, writing about an entire game can be a troubling task. Games are monolithic structures that, more often than not, cannot be critiqued within the confines of a 800-word review, so while game reviewers no doubt have plenty of opinions, the format offers minimal space for the writer to explain how they came to their conclusions. So unless you’re prepared to put in a few thousand words, it’s best to have a narrow focus.
Cutting Down on Words
Less is more. I often use writing as a means to get to what I want to say, but once I know what that is exactly, I cut everything else and just say it. Here are some techniques that I use to say more with less:
- Heavily edit the parts of the article that give context to the analysis/criticism. There should be little to no fat here.
- Use video or images in place of words. There are plenty of game reviews and Let’s Plays on YouTube which already do a good job of introducing games. Why write about it yourself when someone else can do the hard work for you and the reader gets to see the game in context?
- Use diagrams to explain ideas too complex or fiddly for words, or to reinforce a worded explanation.
- Use metaphoric language. This is something that I’m not so good at, but many games criticism bloggers are adept in. Analogies and metaphor are a great way to convey a lot by saying very little. This technique suits certain topics better than others (like game feel, for instance).
- Find a creative way to present the content. I’m working on this with Adventures in Game Analysis.
Chunk it Out
By chunking your writing out, you give the reader more room to breathe. Here are some more techniques:
- Use dot points where possible, especially to break up long sentences. Here’s a good example.
- Break articles up into a series. When I write about a game, I usually identify several key discussion points and then, given that I can write about them at length, I’ll write the articles individually. Game Design Companion is a great example of this: it’s just a bunch of individual essays.
Write a Story Instead
We’ve been sharing stories since the dawn of time and so the brain has developed quite a fondness for narrative. Stories allow us to ground abstract ideas in relatable situations. Writing story-based criticism, though, can be quite a challenge as critique doesn’t necessarily lend itself well to storytelling and you have to do more than double the work (write a good analysis piece, a good story, and have them seamlessly connect together). Here’s an example of a games analysis story done well
Other Tips
- Bold key sentences. I rarely do this, but it’s a good technique.
- If you’re interested in giving this writing thing a go, then write something and send it in to me. Like everyone else, I’m pretty busy, but I’d be happy to help out too. Writing about games is hard, so us writers need all the encouragement we can get.
Tuan.kuranes likes this
23 Jan 13:15
Computing oriented minimum bounding boxes in 2D
by geidav
Oriented bounding boxes are an important tool for visibility testing and collision detection in computer graphics. In this post I want to talk about how to compute the oriented minimum bounding box (OMBB) of an arbitrary polygon in two dimensions using the Rotating Calipers method. Minimum in this context refers to the area of the bounding box. Continue reading →
Tuan.kuranes likes this
23 Jan 13:14
Meet Stéphane, creator of SculptGL
Stéphane, who made SculptGL (the web sculpting tool we based Sculptfab on), just joined our team in Paris!We asked him to sit down for a quick interview, so the community could learn a bit more about him and our team! (past team interviews here).
> How long have you been with Sketchfab? How did you hear about it? What’s your role here?
I’ve been at Sketchfab since December 1st. I first heard about it when I was looking for an internship (around February 2013), but I didn’t apply at that time. Then, I met @trigrou when Sketchfab did Sculptfab, and a few months later I finally joined Sketchfab. I do 3D stuffs on the frontend.
me3D from stephomi on Sketchfab.
> How did you get into 3D? What interests you most about 3D?
Well, my love for 3D certainly comes from videogames, it’s as simple as that. As for the technical side, it’s not like I’ve been programming since I was a kid… I actually started at my engineering school pretty late. But when I was given the opportunity to carry out a 3D industrial project with my school, I didn’t hesitate and jump in. I especially liked the modelling/editing aspect of the 3D world, that partially explains why I made SculptGL.
> Do you do 3D modelling yourself? How would you get started?
No I am not an artist. I don’t really believe in the “I lack talent” excuse :). I think it’s (almost) all about experience/hard work, and I simply never tried hard enough.
> What do you do in your spare time?
Well, games, manga, movies and farting dogs on youtube. As for games, just to name a few : Skyrim, Shadow of the Colossus, Journey, Last of Us, LBA, Kingdom Hearts, Final fantasy, Secret of Mana, etc. If I had to name my favourite manga, it would be berserk; but I also like a lot Urasawa Naoki’s work (especially Pluto). I also read a lot of shounen stuffs, but usually, the seinen are those that stays the most in my memory. I am slowly starting to miss sports, just a bit…
> Favorite movie?
It’s honestly impossible to name one.
> What do you listen to while working?
It depends, many soundtracks from movies and games, but also some lyric-less music such as house, electro stuffs in order to focus.
> Favorite model on sketchfab?
I really enjoyed many entries from the VG remix contest, especially this one or this one. I also liked this one a lot.
God_of_War_III_Tactics_Advance from Duy Khanh Nguyen on Sketchfab.
> Where are you from? how old are you?
I am from Lyon, 25 years old.
> What would you have for your last meal on earth?
A “fondue” (melted cheese), should I be feeling stuffed, a trou normand might help. I hate cooking though.
> Craziest thing you’ve ever done?
I remember, one day I went to school, half asleep, and suddenly I realized that…. hem..well that’s more embarrassing than crazy, so I’ll keep it for myself :D.
> What are you most proud of?
Working in the 3D field, especially since I didn’t “land” in this world but really worked for it.

Tuan.kuranes likes this
23 Jan 13:14

Object-order ray tracing for fully dynamic scenes
by Sam Lapere
Today, the GPU Pro blog posted a very interesting article about a novel technique which seamlessly unifies rasterization and ray tracing based rendering for fully dynamic scenes. The technique entitled "Object-order Ray Tracing for Fully Dynamic Scenes" will be described in the upcoming GPU Pro 5 book (to be released on March 25, 2014 during the GDC conference) and was developed by Tobias Zirr, Hauke Rehfeld and Carsten Dachsbacher .
Abstract (taken from http://cg.ibds.kit.edu/ORTFDS.php)
This article presents a method for tracing incoherent secondary rays that integrates well with existing rasterization-based real-time rendering engines. In particular, it requires only linear scene access and supports fully dynamic scene geometry. All parts of the method that work with scene geometry are implemented in the standard graphics pipeline. Thus, the ability to generate, transform and animate geometry via shaders is fully retained. Our method does not distinguish between static and dynamic geometry. Moreover, shading can share the same material system that is used in a deferred shading rasterizer. Consequently, our method allows for a unified rendering architecture that supports both rasterization and ray tracing. The more expensive ray tracing can easily be restricted to complex phenomena that require it, such as reflections and refractions on arbitrarily shaped scene geometry. Steps in rendering that do not require the tracing of incoherent rays with arbitrary origins can be dealt with using rasterization as usual.
This is to my knowledge the first practical implementation of the so-called hybrid rendering technique which mixes ray tracing and rasterization by plugging a ray tracer in an existing rasterization based rendering framework and sharing the traditional graphics pipeline. Since no game developer in his right mind will switch to pure ray tracing overnight, this seems to be the most sensible and commercially viable approach to introduce real ray traced high quality reflections of dynamic objects into game engines in the short term, without having to resort to complicated hacks like screen space raytracing for reflections (as seen in e.g. Killzone Shadow Fall, UE4 tech demos and CryEngine) or cubemap arrays, which never really look right and come with a lot of limitations and artifacts. For example, in this screenshot of the new technique you can see the reflection of the sky, which would simply be impossible with screen space reflections from this camera angle:
Probably the best thing about this technique is that it works with fully dynamic geometry (accelerating ray intersections by coarsely voxelizing the scene) and - judging from the abstract - with dynamically tesselated geometry as well, which is a huge advantage for DX11 based game engines. It's very likely that the PS4 is capable of real-time raytraced reflections using this technique and when optimized, it could not only be used for rendering reflections and refractions, but for very high quality soft shadows and ambient occlusion as well.
The ultimate next step would be global illumination with path tracing for dynamic scenes, which is a definite possibility on very high end hardware, especially when combined with another technique from a very freshly released paper (by Ulbrich, Novak, Rehfeld and Dachsbacher) entitled Progressive Visibility Caching for Fast Indirect Illumination which promises a 5x speedup for real-time progressively path traced GI by cleverly caching diffuse and glossy interreflections (a video can be found here). Incredibly exciting if true!
Tuan.kuranes likes this
23 Jan 13:13
WebGL Deferred Shading
by Sijie Tian
WebGL brings hardware-accelerated 3D graphics to the web. Many features of WebGL 2 are available today as WebGL extensions. In this article, we describe how to use the WEBGL_draw_buffers extension to create a scene with a large number of dynamic lights using a technique called deferred shading, which is popular among top-tier games.
live demo • source code
Today, most WebGL engines use forward shading, where lighting is computed in the same pass that geometry is transformed. This makes it difficult to support a large number of dynamic lights and different light types.
Forward shading can use a pass per light. Rendering a scene looks like:
foreach light {
  foreach visible mesh {
    if (light volume intersects mesh) {
      render using this material/light shader;
      accumulate in framebuffer using additive blending;
    }
  }
} |
This requires a different shader for each material/light-type combination, which adds up. From a performance perspective, each mesh needs to be rendered (vertex transform, rasterization, material part of the fragment shader, etc.) once per light instead of just once. In addition, fragments that ultimately fail the depth test are still shaded, but with early-z and z-cull hardware optimizations and a front-to-back sorting or a z-prepass, this not as bad as the cost for adding lights.
To optimize performance, light sources that have a limited effect are often used. Unlike real-world lights, we allow the light from a point source to travel only a limited distance. However, even if a light’s volume of effect intersects a mesh, it may only affect a small part of the mesh, but the entire mesh is still rendered.
In practice, forward shaders usually try to do as much work as they can in a single pass leading to the need for a complex system of chaining lights together in a single shader. For example:
foreach visible mesh {
  find lights affecting mesh;
  Render all lights and materials using a single shader;
} |
The biggest drawback is the number of shaders required since a different shader is required for each material/light (not light type) combination. This makes shaders harder to author, increases compile times, usually requires runtime compiling, and increases the number of shaders to sort by. Although meshes are only rendered once, this also has the same performance drawbacks for fragments that fail the depth test as the multi-pass approach.
Deferred Shading
Deferred shading takes a different approach than forward shading by dividing rendering into two passes: the g-buffer pass, which transforms geometry and writes positions, normals, and material properties to textures called the g-buffer, and the light accumulation pass, which performs lighting as a series of screen-space post-processing effects.
// g-buffer pass
foreach visible mesh {
  write material properties to g-buffer;
}

// light accumulation pass
foreach light {
  compute light by reading g-buffer;
  accumulate in framebuffer;
} |
This decouples lighting from scene complexity (number of triangles) and only requires one shader per material and per light type. Since lighting takes place in screen-space, fragments failing the z-test are not shaded, essentially bringing the depth complexity down to one. There are also downsides such as its high memory bandwidth usage and making translucency and anti-aliasing difficult.
Until recently, WebGL had a roadblock for implementing deferred shading. In WebGL, a fragment shader could only write to a single texture/renderbuffer. With deferred shading, the g-buffer is usually composed of several textures, which meant that the scene needed to be rendered multiple times during the g-buffer pass.
WEBGL_draw_buffers
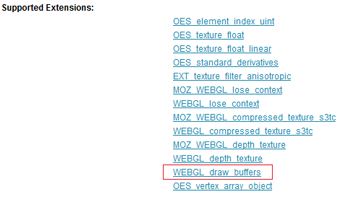
Now with the WEBGL_draw_buffers extension, a fragment shader can write to several textures. To use this extension in Firefox, browse to about:config and turn on webgl.enable-draft-extensions. Then, to make sure your system supports WEBGL_draw_buffers, browse to webglreport.com and verify it is in the list of extensions at the bottom of the page.
To use the extension, first initialize it:
var ext = gl.getExtension('WEBGL_draw_buffers');
if (!ext) {
  // ...
} |
We can now bind multiple textures, tx[] in the example below, to different framebuffer color attachments.
var fb = gl.createFramebuffer(); gl.bindFramebuffer(gl.FRAMEBUFFER, fb); gl.framebufferTexture2D(gl.FRAMEBUFFER, ext.COLOR_ATTACHMENT0_WEBGL, gl.TEXTURE_2D, tx[0], 0); gl.framebufferTexture2D(gl.FRAMEBUFFER, ext.COLOR_ATTACHMENT1_WEBGL, gl.TEXTURE_2D, tx[1], 0); gl.framebufferTexture2D(gl.FRAMEBUFFER, ext.COLOR_ATTACHMENT2_WEBGL, gl.TEXTURE_2D, tx[2], 0); gl.framebufferTexture2D(gl.FRAMEBUFFER, ext.COLOR_ATTACHMENT3_WEBGL, gl.TEXTURE_2D, tx[3], 0); |
For debugging, we can check to see if the attachments are compatible by calling gl.checkFramebufferStatus. This function is slow and should not be called often in release code.
if (gl.checkFramebufferStatus(gl.FRAMEBUFFER) !== gl.FRAMEBUFFER_COMPLETE) {
  // Can't use framebuffer.
  // See http://www.khronos.org/opengles/sdk/docs/man/xhtml/glCheckFramebufferStatus.xml
} |
Next, we map the color attachments to draw buffer slots that the fragment shader will write to using gl_FragData.
ext.drawBuffersWEBGL([ ext.COLOR_ATTACHMENT0_WEBGL, // gl_FragData[0] ext.COLOR_ATTACHMENT1_WEBGL, // gl_FragData[1] ext.COLOR_ATTACHMENT2_WEBGL, // gl_FragData[2] ext.COLOR_ATTACHMENT3_WEBGL // gl_FragData[3] ]); |
The maximum size of the array passed to drawBuffersWEBGL depends on the system and can be queried by calling gl.getParameter(gl.MAX_DRAW_BUFFERS_WEBGL). In GLSL, this is also available as gl_MaxDrawBuffers.
In the deferred shading geometry pass, the fragment shader writes to multiple textures. A trivial pass-through fragment shader is:
#extension GL_EXT_draw_buffers : require
precision highp float;
void main(void) {
  gl_FragData[0] = vec4(0.25);
  gl_FragData[1] = vec4(0.5);
  gl_FragData[2] = vec4(0.75);
  gl_FragData[3] = vec4(1.0);
} |
Even though we initialized the extension in JavaScript with gl.getExtension, the GLSL code still needs to include #extension GL_EXT_draw_buffers : require to use the extension. With the extension, the output is now the gl_FragData array that maps to framebuffer color attachments, not gl_FragColor, which is traditionally the output.
g-buffers
In our deferred shading implementation the g-buffer is composed of four textures: eye-space position, eye-space normal, color, and depth. Position, normal, and color use the floating-point RGBA format via the OES_texture_float extension, and depth uses the unsigned-short DEPTH_COMPONENT format.
Position texture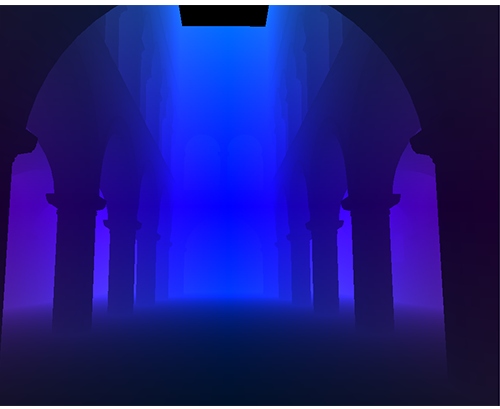
Normal texture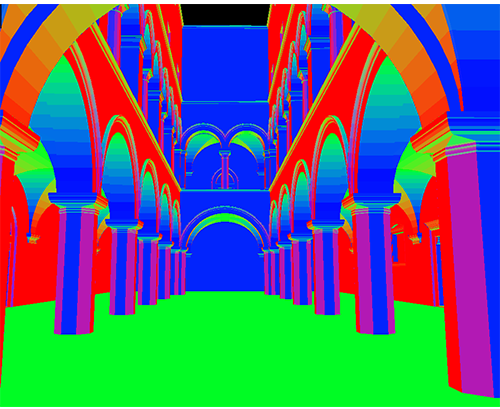
Color texture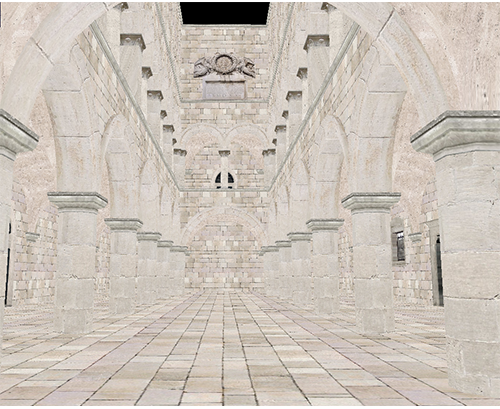
Depth texture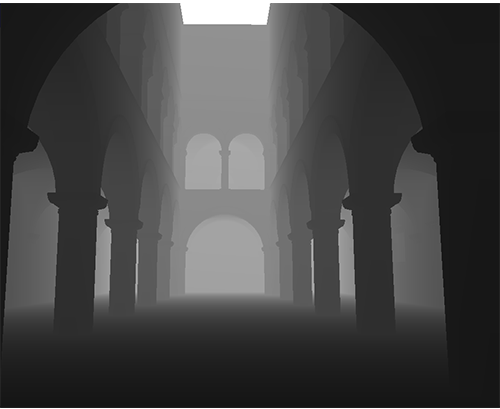
Light accumulation using g-buffers
This g-buffer layout is simple for our testing. Although four textures is common for a full deferred shading engine, an optimized implementation would try to use the least amount of memory by lowering precision, reconstructing position from depth, packing values together, using different distributions, and so on.
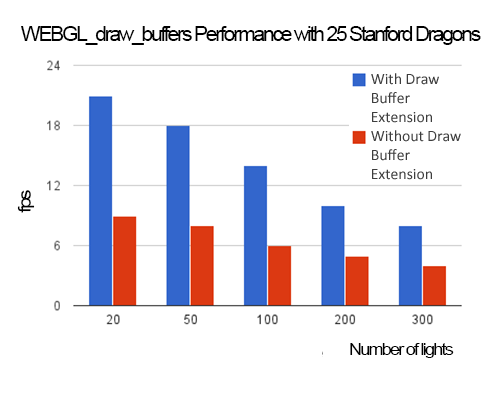
With WEBGL_draw_buffers, we can use a single pass to write each texture in the g-buffer. Compared to using a single pass per texture, this improves performance and reduces the amount of JavaScript code and GLSL shaders. As shown in the graph below, as scene complexity increases so does the benefit of using WEBGL_draw_buffers. Since increasing scene complexity requires more drawElements/drawArrays calls, more JavaScript overhead, and transforms more triangles, WEBGL_draw_buffers provides a benefit by writing the g-buffer in a single pass, not a pass per texture.
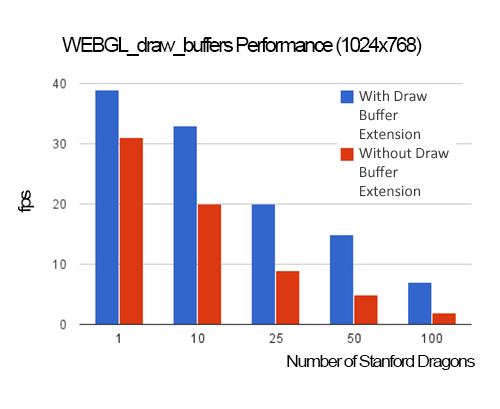
All performance numbers were measured using an NVIDIA GT 620M, which is a low-end GPU with 96 cores, in FireFox 26.0 on Window 8. In the above graph, 20 point lights were used. The light intensity decreases proportionally to the square of the distance between the current position and the light position. Each Stanford Dragon is 100,000 triangles and requires five draw calls so, for example, when 25 dragons are rendered, 125 draw calls (and related state changes) are issued, and a total of 2,500,000 triangles are transformed.
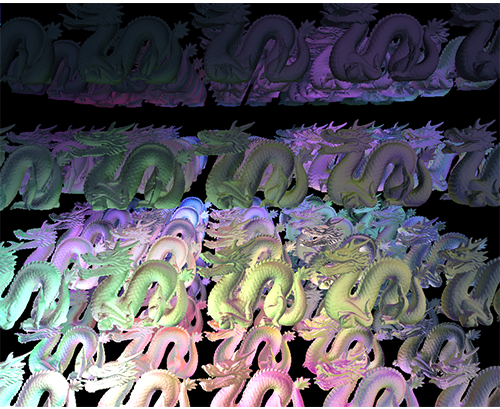
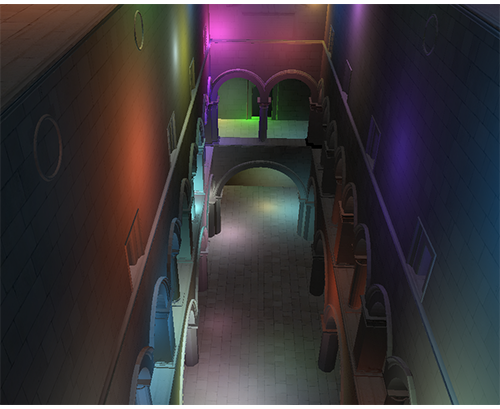
WEBGL_draw_buffers test scene, shown here with 100 Stanford Dragons.
Of course, when scene complexity is very low, like the case of one dragon, the cost of the g-buffer pass is low so the savings from WEBGL_draw_buffers are minimal, especially if there are many lights in the scene, which drives up the cost of the light accumulation pass as shown in the graph below.
Deferred shading requires a lot of GPU memory bandwidth, which can hurt performance and increase power usage. After the g-buffer pass, a naive implementation of the light accumulation pass would render each light as a full-screen quad and read the entirety of each g-buffer. Since most light types, like point and spot lights, attenuate and have a limited volume of effect, the full-screen quad can be replaced with a world-space bounding volume or tight screen-space bounding rectangle. Our implementation renders a full-screen quad per light and uses the scissor test to limit the fragment shader to the light’s volume of effect.
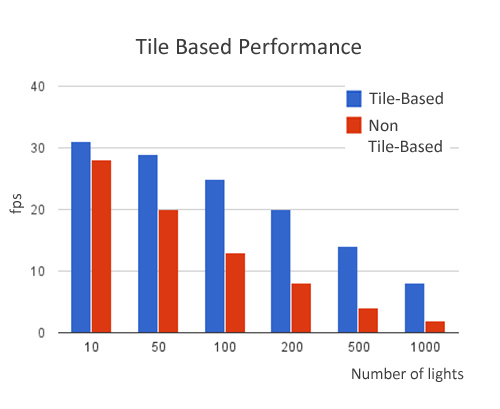
Tile-Based Deferred Shading
Tile-based deferred shading takes this a step farther and splits the screen into tiles, for example 16×16 pixels, and then determines which lights influence each tile. Light-tile information is then passed to the shader and the g-buffer is only read once for all lights. Since this drastically reduces memory bandwidth, it improves performance. The following graph shows performance for the sponza scene (66,450 triangles and 38 draw calls) at 1024×768 with 32×32 tiles.
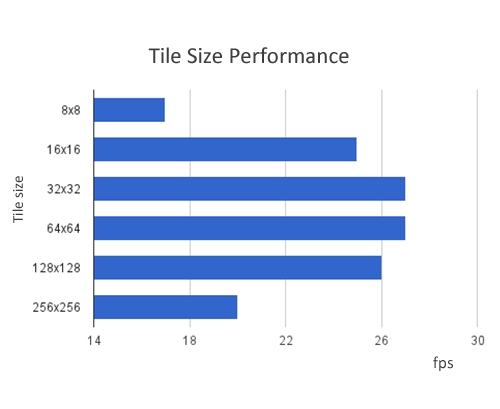
Tile size affects performance. Smaller tiles require more JavaScript overhead to create light-tile information, but less computation in the lighting shader. Larger tiles have the opposite tradeoff. Therefore, choosing a suitable tile is important for the performance. The figure below is shown the relationship between tile size and performance with 100 lights.
A visualization of the number of lights in each tile is shown below. Black tiles have no lights intersecting them and white tiles have the most lights.
Shaded version of tile visualization.
Conclusion
WEBGL_draw_buffers is a useful extension for improving the performance of deferred shading in WebGL. Checkout the live demo and our code on github.
Acknowledgements
We implemented this project for the course CIS 565: GPU Programming and Architecture, which is part of the computer graphics program at the University of Pennsylvania. We thank Liam Boone for his support and Eric Haines and Morgan McGuire for reviewing this article.
References
- Deferred Rendering in Killzone 2 by Michal Valient
- Light Pre-Pass by Wolfgang Engel
-
Compact Normal Storage for Small
G-Buffers by Aras Pranckevicius - Tiled Shading by Ola Olsson and Ulf Assarsson
- Deferred Rendering for Current and Future Rendering Pipelines by Andrew Lauritzen
- Z-Prepass Considered Irrelevant by Morgan McGuire
Tuan.kuranes likes this
22 Jan 10:56
GPU Pro 5 - Object-order Ray Tracing for Fully Dynamic Scenes
by Tobias Zirr
Ray tracing is a robust and flexible approach to image synthesis that elegantly solves many problems that are hard to solve using rasterization. Recent advances in the performance and flexibility of graphics processing hardware have made ray tracing a viable option even for real-time rendering applications. Yet, integrating ray tracing into existing rasterization-based real-time rendering solutions poses significant challenges. Modern rasterization-based rendering engines typically use the capabilities of modern GPUs to generate, transform and amplify geometry on-the-fly. In contrast, efficient ray tracing techniques typically depend upon pre-built spatial acceleration data structures that allow for fast random access to the scene geometry.
Our article presents a method for tracing incoherent secondary rays that integrates well with existing rasterization-based real-time rendering engines. In particular, it requires only linear scene access and supports fully dynamic scene geometry comprised only of triangle soups. All parts of the method that work with scene geometry are implemented in the standard graphics pipeline. Thus, the ability to generate, transform and animate geometry via shaders is fully retained. Moreover, shading can share the same material system that is used in a deferred shading rasterizer.
Consequently, our method allows for a unified rendering architecture that supports both rasterization and ray tracing. The more expensive ray tracing can easily be restricted to complex phenomena that require it, such as reflections and refractions on arbitrarily shaped scene geometry. Other rendering steps can be dealt with using rasterization as usual.
While our method of ray tracing works object-order, we still manage to limit the number of intersection tests that have to be performed: Using a coarse conservative voxel approximation of the scene, we first estimate potential hit points for each ray and subsequently only test triangles with rays that have potential hits nearby. Furthermore, we introduce a multi-pass intersection testing scheme that allows for early termination of rays on first hit (analogous to Z-culling optimizations), which is a recurring problem in methods that deviate from standard (depth-first) traversal of spatial data structures.
Our GPU Pro 5 article provides a detailed description of our ray tracing method as well as a sample implementation that demonstrates the tracing of incoherent secondary rays with reflection rays. Ray tracing is implemented in the context of a traditional rasterization-based deferred shading engine, everything besides reflection rays is rasterized as usual.


GPU Pro 5: Object-Order Ray Tracing for Fully Dynamic Scenes
Tobias Zirr, Hauke Rehfeld and Carsten Dachsbacher
Our article presents a method for tracing incoherent secondary rays that integrates well with existing rasterization-based real-time rendering engines. In particular, it requires only linear scene access and supports fully dynamic scene geometry comprised only of triangle soups. All parts of the method that work with scene geometry are implemented in the standard graphics pipeline. Thus, the ability to generate, transform and animate geometry via shaders is fully retained. Moreover, shading can share the same material system that is used in a deferred shading rasterizer.
Consequently, our method allows for a unified rendering architecture that supports both rasterization and ray tracing. The more expensive ray tracing can easily be restricted to complex phenomena that require it, such as reflections and refractions on arbitrarily shaped scene geometry. Other rendering steps can be dealt with using rasterization as usual.
While our method of ray tracing works object-order, we still manage to limit the number of intersection tests that have to be performed: Using a coarse conservative voxel approximation of the scene, we first estimate potential hit points for each ray and subsequently only test triangles with rays that have potential hits nearby. Furthermore, we introduce a multi-pass intersection testing scheme that allows for early termination of rays on first hit (analogous to Z-culling optimizations), which is a recurring problem in methods that deviate from standard (depth-first) traversal of spatial data structures.
Our GPU Pro 5 article provides a detailed description of our ray tracing method as well as a sample implementation that demonstrates the tracing of incoherent secondary rays with reflection rays. Ray tracing is implemented in the context of a traditional rasterization-based deferred shading engine, everything besides reflection rays is rasterized as usual.
Tobias Zirr, Hauke Rehfeld and Carsten Dachsbacher
Tuan.kuranes likes this
22 Jan 08:05
When a drop falls on a dry surface, our intuition tells us it...
When a drop falls on a dry surface, our intuition tells us it will splash, breaking up into many smaller droplets. Yet this is not always the case. The splashing of a droplet depends on many factors, including surface roughness, viscosity, drop size, and—strangely enough—air pressure. It turns out there is a threshold air pressure below which splashing is suppressed. Instead, a drop will spread and flatten without breaking up, as shown in the video above. For contrast, here is the same fluid splashing at atmospheric pressure. This splash suppression at low pressures is observed for both low and high viscosity fluids. Although the mechanism by which gases affect splashing is still under investigation, measurements show that no significant air layer exists under the spreading droplet except near the very edges. This suggests that the splash mechanism depends on how the spreading liquid encroaches on the surrounding gas. (Video credit: S. Nagel et al.; research credit: M. Driscoll et al.)
shayan rahat, Tuan.kuranes likes this
22 Jan 08:05
Pending Release
by dysis-arktos
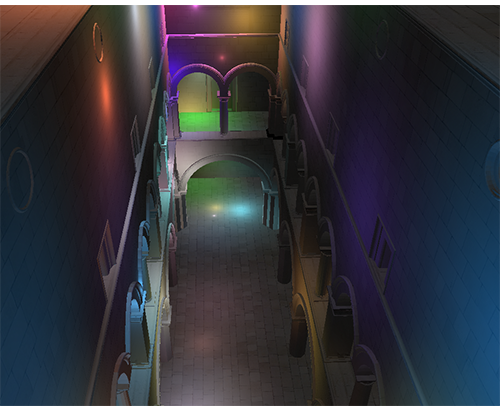
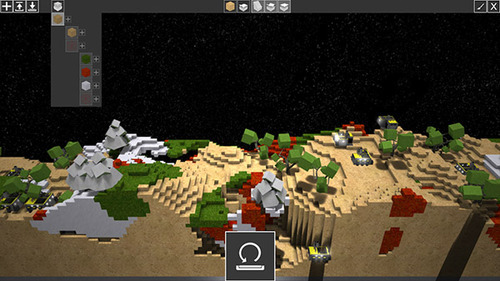
Dysis has come a long way since this time last year - and we are nearly ready for it’s public release!

The Dysis engine has been completely re-written in an attempt to make it fully compatible (and controllable) on a much wider variety of computers. The graphics components have been completely stripped down and re-written, all operations are now openGL 3+ compliant (minus some small specific vendor hacks). This means that the base engine runs much faster on every single graphics card. The biggest improvements have been seen on the lower end cards (mostly testing against the Intel HD 3000 here - we saw a jump from 7fps in the base engine to 450fps). This doesn’t reflect the full game fps with all post-processing and units+terrain visible, but it does mean that the game can run quite a bit better on those cards with everything visible.
The shading components in Dysis are completely new - they feature new smooth shadows that scale nicely and are actually more efficient than the old shading method. The biggest news is that Dysis will release with an exciting set of sandbox tools and multiplayer! We are considering this an alpha release - since the main campaign still isn’t in place, and there are many more assets to come (weekly) - however, the sandbox tools, multiplayer and steam interaction should provide hours of playtime!
Let’s take a quick look at the sandbox process flow:
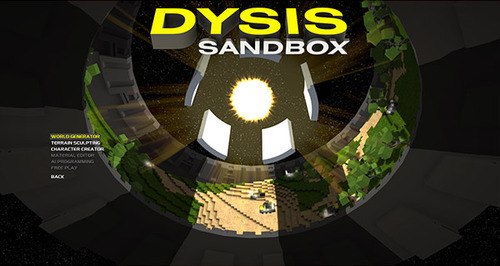
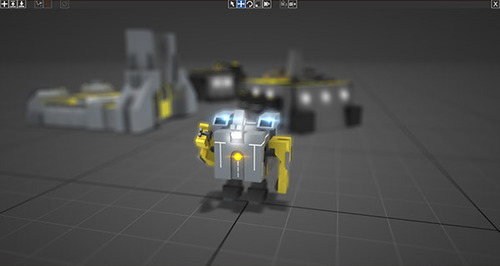
Character Builder
We’ll start here so that we can build some characters first and then place them into a world we build. The character builder gives you access to almost all of the models used in Dysis (anything previous used in any unit, structure or piece of foliage), plus all of the textures associated with them. You can mix and match textures (though you’ll notice that only textures designed to fit a model will look right - but you could tweak a texture and apply that to a model too).
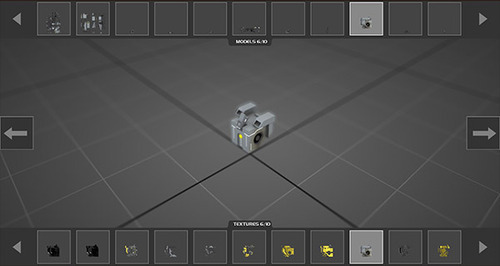
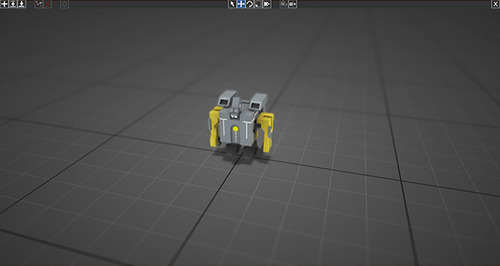
We’ll start out with a robot chassis and add joints from there.
You can add particle effects (flares, fire, smoke, etc.) here, which will make the models look cooler, but are purely aesthetic (users with low end cards may have to turn these effects off during the actual game - so keep this in mind when building your models).
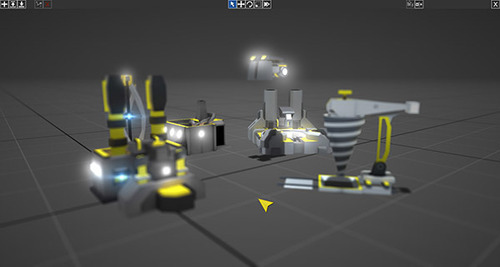
Once you’ve completely built you model, you can designate it’s design to be a structure, unit or piece of foliage. If it’s foliage, it’ll be easily placed on the maps, so I recommend keeping the model simple. Structures are going to be pretty simple too - however you’ll notice they have two animation slots - one for standby, and another for “working”. This is what they will be doing when they are producing units or doing research. Units are the most complicated - they need a whole set of animations, plus they need to designate which structure is capable of building them, and what other unit (if any) sits before them in the tech tree. Previous units and structures you have made will become available to you if you decide to make any.
As Dysis develops, the tech tree and current units and structures may change - so keep in mind that you may need to change your custom characters to keep them working (hopefully we can keep compatibility issues to a minimum though!).
Currently the animation and tech tree features are unfinished in the character builder - they are in progress and need to be finished before release, and then the character builder will be ready.
World Generator
Dysis maps will be available in two forms - randomly generated, and static. The static maps will start from randomly generated (however a user could completely strip down the world and redesign in - there will be a bare generator to be used just for that purpose). The world generator will allow you to design landscapes on a grand scale, determine how mountainous, and what materials you want to see spread throughout the map. You’ll be able to assign foliage to materials, however you won’t be able to choose exactly where it generates.
Everything built in the world generator is random - when you save a generator, the parameters are saved, not the specific map. When you launch a game, you’ll be able to seed the generator (so that you can play the same map again if you want), however it is encouraged to try out new and random seeds. If you design a generator you like a lot, and find a seed that looks really good - that’s what the terrain sculpting tool is for.
The world generator is nearly feature complete, it is missing only a few buttons/graphics to control material density, placement, and restrictions for materials based on height - however these features already exist in code underneath - so I count this as 95% complete.
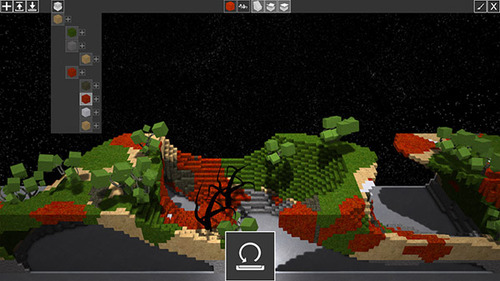
Terrain Sculpting
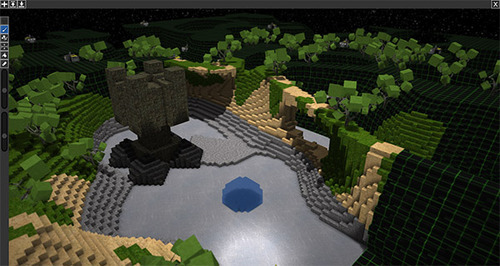
This tool lets you tweak randomly generated maps (you will start from a generator, pick a map size, and then start editing), alter the foliage and place your own foliage in specific places. This is effectively a 3D voxel painting tool that also allows for model placing. You will also have control over where the bases go (otherwise placed in the corners based on the number of players in the game), however this feature hasn’t been implemented yet.
There are a bunch of brushes/tools already part of the terrain sculpting, however we would like to finish up some smoothing tools, copy+paste and potentially undo/redo (though we don’t wan’t to get too bogged down making this perfect when there are more pressing matters).
AI Scripting
This feature is currently least complete and doesn’t have an interface yet. The idea here is that each type of unit will have several command protocols - it’s defaults, and it’s set given by you (if you so choose). You’ll be able to set a hierarchy of command protocols, including “finish command”, “evade fire”, “seek and destroy hostiles” and many other things here.
We consider this a very promising detail in Dysis, as this represents what robots may be like in real life. For example, if you have a working robot (gather resources) - in many games, if that unit comes under fire it is likely to be dumb and continue its job and be destroyed. In Dysis, you could set “finish and command” to be the highest command protocol, and the robot would do just that, but you could also tell working bots that “evade fire” is a higher priority, thus telling bots that come into range of hostiles to move away until they are safe (eventually returning to their job).
The base for this code is mostly in the path-planning, which is already integrated into the Dysis code. We believe that micro playing shouldn’t be difficult - you can give your bots a set of priorities and then an instruction, and trust it to carry out your command - hopefully :)
Multiplayer
Dysis has Steam integration! We have lobby creation, searching and matchmaking through Steam - but we are also working on matching that performance with the ability to play over IP/LAN. To keep multiplayer code smooth, we are trying to match (as much as possible) how Steam handles their network traffic and do that same. Dysis contains router hole-punching technology, allowing you to (hopefully) play without fiddling with too many router settings (server will most likely need to open a port to host). Since Dysis contains both RTS and FPS aspects, the multiplayer is definitely tricky, and we haven’t finished coding it yet.
Most (all?) FPS games run UDP network code, which allows for dropped packets, and packets to come in out of order - there are special techniques used to count packets and to ensure that the game plays fair on every computer - but this doesn’t work so well for an RTS game with many units (if a packet is dropped, it changes the entire game state). We therefore are looking to run both TCP and UDP simultaneously, syncing them to allow players to quickly run in with their first person bot, while also ensuring that the game state controlling all of the other units continues to stay the same across every computer playing. Until we are satisfied that this network code is working up to par, we have disabled FPS mode in multiplayer matches (sorry!).
Release
To get to release we would like to get the sandbox tools working really well (or at least work out any current bugs in them), and integrate player content into the game (allowing people to create units/structures/maps and share them with others). We also need to ensure that all sandbox content plays nicely in the game (and we have some in-game work to finish up on the user-interface side of things).
Each component of the sandbox (especially the AI scripting) has a couple days left of work left to be done on it, and the content integration will likely also take a few days. The user interface and some additional network code will likely also take a few days to finish up. At that point, Dysis will be pushed to Steam and I will request evaluation and release on that platform. I will also request keys on Steam, and push the game up to Desura.
Once the game is on Desura, I will issue an announcement, and make sure to send out any keys to people that don’t already have them. I believe I can generate special beta keys for steam (potentially even bypassing the Valve internal approving stage) - giving quick access to the game there (and achievements!). Once I release keys, I will discuss how to gain access to nightly updates, and weekly updates will happen on more secure code (nightly stuff will likely be buggy - but you can opt in/out at will). I also plan on holding polls on the Dysis forums to determine where people want to see the next set of improvements. I will build a quick dev map on the website in the next couple weeks, to show what I’m planning.
All in all, I would like to have a release version on Steam (and of course Desura) before the end of the month. I know that this has been a long time coming, and last year was a slow and hard year - however Dysis has come a huge distance, and I’m excited to say that it is nearly ready for prime time!
Tuan.kuranes likes this
22 Jan 08:03
A Quarter Century of Tcl
For 25 years, this unusual extension language has delivered magic.
Tuan.kuranes likes this
22 Jan 08:03
Custom Vector Allocation
(Number 6 in a series of posts about Vectors and Vector based containers.)
A few posts back I talked about the idea of 'rolling your own' STL-style vector class, based on my experiences with this at PathEngine.
In that original post and these two follow-ups I talked about the general approach and also some specific performance tweaks that actually helped in practice for our vector use cases.
I haven't talked about custom memory allocation yet, however. This is something that's been cited in a number of places as a key reason for switching away from std::vector so I'll come back now and look at the approach we took for this (which is pretty simple, but nonstandard, and also pre C++11), and assess some of the implications of using this kind of non-standard approach.
I approach this from the point of view of a custom vector implementation, but I'll be talking about some issues with memory customisation that also apply more generally.
Why custom allocation?
In many situations it's fine for vectors (and other containers) to just use the same default memory allocation method as the rest of your code, and this is definitely the simplest approach.
(The example vector code I posted previously used malloc() and free(), but works equally well with global operator new and delete.)
But vectors can do a lot of memory allocation, and memory allocation can be expensive, and it's not uncommon for memory allocation operations to turn up in profiling as the most significant cost of vector based code. Custom memory allocation approaches can help resolve this.
And some other good reasons for hooking into and customising allocations can be the need to avoid memory fragmentation or to track memory statistics.
For these reasons generalised memory customisation is an important customer requirement for our SDK code in general, and then by extension for the vector containers used by this code.
Custom allocation in std::vector
The STL provides a mechanism for hooking into the container allocation calls (such as vector buffer allocations) through allocators, with vector constructors accepting an allocator argument for this purpose.
I won't attempt a general introduction to STL allocators, but there's a load of material about this on the web. See, for example, this article on Dr Dobbs, which includes some example use cases for allocators. (Bear in mind that this is pre C++11, however. I didn't see any similarly targeted overview posts for using allocators post C++11.)
A non-standard approach
We actually added the possibility to customise memory allocation in our vectors some time after switching to a custom vector implementation. (This was around mid-2012. Before that PathEngine's memory customisation hooks worked by overriding global new and delete, and required dll linkage if you wanted to manage PathEngine memory allocations separately from allocations in the main game code.)
We've generally tried to keep our custom vector as similar as possible to std::vector, in order to avoid issues with unexpected behaviour (since a lot of people know how std::vector works), and to ensure that code can be easily switched between std::vector and our custom vector. When it came to memory allocation, however, we chose a significantly different (and definitely non-standard) approach, because in practice a lot of vector code doesn't actually use allocators (or else just sets allocators in a constructor), because we already had a custom vector class in place, and because I just don't like STL allocators!
Other game developers
A lot of other game developers have a similar opinion of STL allocators, and for many this is actually then also a key factor in a decision to switch to custom container classes.
For example, issues with the design of STL allocators are quoted as one of the main reasons for the creation of the EASTL, a set of STL replacement classes, by Electronic Arts. From the EASTL paper:
Among game developers the most fundamental weakness is the std allocator design, and it is this weakness that was the largest contributing factor to the creation of EASTL.
And I've heard similar things from other developers. For example, in this blog post about the Bitsquid approach to allocators Niklas Frykholm says:
If it weren't for the allocator interface I could almost use STL. Almost.
Let's have a look at some of the reasons for this distaste!
Problems with STL allocators
We'll look at the situation prior to C++11, first of all, and the historical basis for switching to an alternative mechanism.
A lot of problems with STL allocators come out of confusion in the initial design. According to Alexander Stepanov (primary designer and implementer of the STL) the custom allocator mechanism was invented to deal with a specific issue with Intel memory architecture. (Do you remember near and far pointers? If not, consider yourself lucky I guess!) From this interview with Alexander:
Question: How did allocators come into STL? What do you think of them?
Answer: I invented allocators to deal with Intel's memory architecture. They are not such a bad ideas in theory - having a layer that encapsulates all memory stuff: pointers, references, ptrdiff_t, size_t. Unfortunately they cannot work in practice.
And it seems like this original design intention was also only partially executed. From the wikipedia entry for allocators:
They were originally intended as a means to make the library more flexible and independent of the underlying memory model, allowing programmers to utilize custom pointer and reference types with the library. However, in the process of adopting STL into the C++ standard, the C++ standardization committee realized that a complete abstraction of the memory model would incur unacceptable performance penalties. To remedy this, the requirements of allocators were made more restrictive. As a result, the level of customization provided by allocators is more limited than was originally envisioned by Stepanov.
and, further down:
While Stepanov had originally intended allocators to completely encapsulate the memory model, the standards committee realized that this approach would lead to unacceptable efficiency degradations. To remedy this, additional wording was added to the allocator requirements. In particular, container implementations may assume that the allocator's type definitions for pointers and related integral types are equivalent to those provided by the default allocator, and that all instances of a given allocator type always compare equal, effectively contradicting the original design goals for allocators and limiting the usefulness of allocators that carry state.
Some of the key problems with STL allocators (historically) are then:
- Unnecessary complexity, with some boiler plate stuff required for features that are not actually used
- A limitation that allocators cannot have internal state ('all instances of a given allocator type are required to be interchangeable and always compare equal to each other')
- The fact the allocator type is included in container type (with changes to allocator type changing the type of the container)
There are some changes to this situation with C++11, as we'll see below, but this certainly helps explain why a lot of people have chosen to avoid the STL allocator mechanism, historically!
Virtual allocator interface
So we decided to avoid STL allocators, and use a non-standard approach.
The approach we use is based on a virtual allocator interface, and avoids the need to specify allocator type as a template parameter.
This is quite similar to the setup for allocators in the BitSquid engine, as described by Niklas here (as linked above, it's probably worth reading that post if you didn't see this already, as I'll try to avoid repeating the various points he discussed there).
A basic allocator interface can then be defined as follows:
class iAllocator
{
public:
    virtual ~iAllocator() {}
    virtual void* allocate(tUnsigned32 size) = 0;
    virtual void deallocate(void* ptr) = 0;
// helper
    template <class T> void
    allocate_Array(tUnsigned32 arraySize, T*& result)
    {
        result = static_cast<T*>(allocate(sizeof(T) * arraySize));
    }
};
The allocate_Array() method is for convenience, concrete allocator objects just need to implement allocate() and free().
We can store a pointer to iAllocator in our vector, and replace the direct calls to malloc() and free() with virtual function calls, as follows:
    static T*
    allocate(size_type size)
    {
        T* allocated;
        _allocator->allocate_Array(size, allocated);
        return allocated;
    }
    void
    reallocate(size_type newCapacity)
    {
        T* newData;
        _allocator->allocate_Array(newCapacity, newData);
        copyRange(_data, _data + _size, newData);
        deleteRange(_data, _data + _size);
        _allocator->deallocate(_data);
        _data = newData;
        _capacity = newCapacity;
    }
These virtual function calls potentially add some overhead to allocation and deallocation. It's worth being quite careful about this kind of virtual function call overhead, but in practice it seems that the overhead is not significant here. Virtual function call overhead is often all about cache misses and, perhaps because there are often just a small number of actual allocator instance active, with allocations tending to be grouped by allocator, this just isn't such an issue here.
We use a simple raw pointer for the allocator reference. Maybe a smart pointer type could be used (for better modern C++ style and to increase safety), but we usually want to control allocator lifetime quite explicitly, so we're basically just careful about this.
Allocators can be passed in to each vector constructor, or if omitted will default to a 'global allocator' (which adds a bit of extra linkage to our vector header):
    cVector(size_type size, const T& fillWith,
        iAllocator& allocator = GlobalAllocator()
        )
    {
        _data = 0;
        _allocator = &allocator;
        _size = size;
        _capacity = size;
        if(size)
        {
            _allocator->allocate_Array(_capacity, _data);
            constructRange(_data, _data + size, fillWith);
        }
    }
Here's an example concrete allocator implementation:
class cMallocAllocator : public iAllocator
{
public:
    void*
    allocate(tUnsigned32 size)
    {
        assert(size);
        return malloc(static_cast<size_t>(size));
    }
    void
    deallocate(void* ptr)
    {
        free(ptr);
    }
};
(Note that you normally can call malloc() with zero size, but this is something that we disallow for PathEngine allocators.)
And this can be passed in to vector construction as follows:
    cMallocAllocator allocator;
    cVector<int> v(10, 0, allocator);
Swapping vectors
That's pretty much it, but there's one tricky case to look out for.
Specifically, what should happen in our vector swap() method? Let's take a small diversion to see why there might be a problem.
Consider some code that takes a non-const reference to vector, and 'swaps a vector out' as a way of returning a set of values in the vector without the need to heap allocate the vector object itself:
class cVectorBuilder
{
    cVector<int> _v;
public:
    //.... construction and other building methods
    void takeResult(cVector<int>& result); // swaps _v into result
};
So this code doesn't care about allocators, and just wants to work with a vector of a given type. And maybe there is some other code that uses this, as follows:
void BuildData(/*some input params*/, cVector& result)
{
  //.... construct a cVectorBuilder and call a bunch of build methods
    builder.takeResult(result);
}
Now there's no indication that there's going to be a swap() involved, but the result vector will end up using the global allocator, and this can potentially cause some surprises in the calling code:
   cVector v(someSpecialAllocator);
   BuildData(/*input params*/, v);
   // lost our allocator assignment!
   // v now uses the global allocator
Nobody's really doing anything wrong here (although this isn't really the modern C++ way to do things). This is really a fundamental problem arising from the possibility to swap vectors with different allocators, and there are other situations where this can come up.
You can find some discussion about the possibilities for implementing vector swap with 'unequal allocators' here. We basically choose option 1, which is to simply declare it illegal to call swap with vectors with different allocators. So we just add an assert in our vector swap method that the two allocator pointers are equal.
In our case this works out fine, since this doesn't happen so much in practice, because cases where this does happen are caught directly by the assertion, and because it's generally straightforward to modify the relevant code paths to resolve the issue.
Comparison with std::vector, is this necessary/better??
Ok, so I've outlined the approach we take for custom allocation in our vector class.
This all works out quite nicely for us. It's straightforward to implement and to use, and consistent with the custom allocators we use more generally in PathEngine. And we already had our custom vector in place when we came to implement this, so this wasn't part of the decision about whether or not to switch to a custom vector implementation. But it's interesting, nevertheless, to compare this approach with the standard allocator mechanism provided by std::vector.
My original 'roll-your-own vector' blog post was quite controversial. There were a lot of responses strongly against the idea of implementing a custom vector, but a lot of other responses (often from the game development industry side) saying something like 'yes, we do that, but we do some detail differently', and I know that this kind of customisation is not uncommon in the industry.
These two different viewpoints makes it worthwhile to explore this question in a bit more detail, then, I think.
I already discussed the potential pitfalls of switching to a custom vector implementation in the original 'roll-your-own vector' blog post, so lets look at the potential benefits of switching to a custom allocator mechanism.
Broadly speaking, this comes down to three key points:
- Interface complexity
- Stateful allocator support
- Possibilities for further customisation and memory optimisation
Interface complexity
If we look at an example allocator implementation for each setup we can see that there's a significant difference in the amount of code required. The following code is taken from my previous post, and was used to fill allocated memory with non zero values, to check for zero initialisation:
// STL allocator version
template <class T>
class cNonZeroedAllocator
{
public:
    typedef T value_type;
    typedef value_type* pointer;
    typedef const value_type* const_pointer;
    typedef value_type& reference;
    typedef const value_type& const_reference;
    typedef typename std::size_t size_type;
    typedef std::ptrdiff_t difference_type;
    template <class tTarget>
    struct rebind
    {
        typedef cNonZeroedAllocator<tTarget> other;
    };
    cNonZeroedAllocator() {}
    ~cNonZeroedAllocator() {}
    template <class T2>
    cNonZeroedAllocator(cNonZeroedAllocator<T2> const&)
    {
    }
    pointer
    address(reference ref)
    {
        return &ref;
    }
    const_pointer
    address(const_reference ref)
    {
        return &ref;
    }
    pointer
    allocate(size_type count, const void* = 0)
    {
        size_type byteSize = count * sizeof(T);
        void* result = malloc(byteSize);
        signed char* asCharPtr;
        asCharPtr = reinterpret_cast<signed char*>(result);
        for(size_type i = 0; i != byteSize; ++i)
        {
            asCharPtr[i] = -1;
        }
        return reinterpret_cast<pointer>(result);
    }
    void deallocate(pointer ptr, size_type)
    {
        free(ptr);
    }

    size_type
    max_size() const
    {
        return 0xffffffffUL / sizeof(T);
    }
    void
    construct(pointer ptr, const T& t)
    {
        new(ptr) T(t);
    }
    void
    destroy(pointer ptr)
    {
        ptr->~T();
    }
    template <class T2> bool
    operator==(cNonZeroedAllocator<T2> const&) const
    {
        return true;
    }
    template <class T2> bool
    operator!=(cNonZeroedAllocator<T2> const&) const
    {
        return false;
    }
};
But with our custom allocator interface this can now be implemented as follows:
// custom allocator version
class cNonZeroedAllocator : public iAllocator
{
public:
    void*
    allocate(tUnsigned32 size)
    {
        void* result = malloc(static_cast<size_t>(size));
        signed char* asCharPtr;
        asCharPtr = reinterpret_cast<signed char*>(result);
        for(tUnsigned32 i = 0; i != size; ++i)
        {
            asCharPtr[i] = -1;
        }
        return result;
    }
    void
    deallocate(void* ptr)
    {
        free(ptr);
    }
};
As we saw previously a lot of stuff in the STL allocator relates to some obsolete design decisions, and is unlikely to actually be used in practice. The custom allocator interface also completely abstracts out the concept of constructed object type, and works only in terms of actual memory sizes and pointers, which seems more natural and whilst doing everything we need for the allocator use cases in PathEngine.
For me this is one advantage of the custom allocation setup, then, although probably not something that would by itself justify switching to a custom vector.
If you use allocators that depend on customisation of the other parts of the STL allocator interface (other than for data alignment) please let me know in the comments thread. I'm quite interested to hear about this! (There's some discussion about data alignment customisation below.)
Stateful allocator requirement
Stateful allocator support is a specific customer requirement for PathEngine.
Clients need to be able to set custom allocation hooks and have all allocations made by the SDK (including vector buffer allocations) routed to custom client-side allocation code. Furthermore, multiple allocation hooks can be supplied, with the actual allocation strategy selected depending on the actual local execution context.
It's not feasible to supply allocation context to all of our vector based code as a template parameter, and so we need our vector objects to support stateful allocators.
Stateful allocators with the virtual allocator interface
Stateful allocators are straightforward with our custom allocator setup. Vectors can be assigned different concrete allocator implementations and these concrete allocator implementations can include internal state, without code that works on the vectors needing to know anything about these details.
Stateful allocators with the STL
As discussed earlier, internal allocator state is something that was specifically forbidden by the original STL allocator specification. This is something that has been revisited in C++11, however, and stateful allocators are now explicitly supported, but it also looks like it's possible to use stateful allocators in practice with many pre-C++11 compile environments.
The reasons for disallowing stateful allocators relate to two specific problem situations:
- Splicing nodes between linked lists with different allocation strategies
- Swapping vectors with different allocation strategies
C++11 addresses these issues with allocator traits, which specify what to do with allocators in problem cases, with stateful allocators then explicitly supported. This stackoverflow answer discusses what happens, specifically, with C++11, in the vector swap case.
With PathEngine we want to be able to support clients with different compilation environments, and it's an advantage not to require C++11 support. But according to this stackoverflow answer, you can also actually get away with using stateful allocators in most cases, without explicit C++11 support, as long as you avoid these problem cases.
Since we already prohibit the vector problem case (swap with unequal allocators), that means that we probably can actually implement our stateful allocator requirement with std::vector and STL allocators in practice, without requiring C++11 support.
There's just one proviso, with or without C++11 support, due to allowances for legacy compiler behaviour in allocator traits. Specifically, it doesn't look like we can get the same assertion behaviour in vector swap. If propagate_on_container_swap::value is set to false for either allocator then the result is 'undefined behaviour', so this could just swap the allocators silently, and we'd have to be quite careful about these kinds of problem cases!
Building on stateful allocators to address other issues
If you can use stateful allocators with the STL then this changes things a bit. A lot of things become possible just by adding suitable internal state to standard STL allocator implementations. But you can also now use this allocator internal state as a kind of bootstrap to work around other issues with STL allocators.
The trick is wrap up the same kind of virtual allocator interface setup we use in PathEngine in an STL allocator wrapper class. You could do this (for example) by putting a pointer to our iAllocator interface inside an STL allocator class (as internal state), and then forward the actual allocation and deallocation calls as virtual function calls through this pointer.
So, at the cost of another layer of complexity (which can be mostly hidden from the main application code), it should now be possible to:
- remove unnecessary boiler plate from concrete allocator implementations (since these now just implement iAllocator), and
- use different concrete allocator types without changing the actual vector type.
Although I'm still not keen on STL allocators, and prefer the direct simplicity of our custom allocator setup as opposed to covering up the mess of the STL allocator interface in this way, I have to admit that this does effectively remove two of the key benefits of our custom allocator setup. Let's move on to the third point, then!
Refer to the bloomberg allocator model for one example of this kind of setup in practice (and see also this presentation about bloomberg allocators in the context C++11 allocator changes).
Memory optimisation
The other potential benefit of custom allocation over STL allocators is basically the possibility to mess around with the allocation interface.
With STL allocators we're restricted to using the allocate() and deallocate() methods exactly as defined in the original allocator specification. But with our custom allocator we're basically free to mess with these method definitions (in consultation with our clients!), or to add additional methods, and generally change the interface to better suit our clients needs.
There is some discussion of this issue in this proposal for improving STL allocators, which talks about ways in which the memory allocation interface provided by STL allocators can be sub-optimal.
Some customisations implemented in the Bitsquid allocators are:
- an 'align' parameter for the allocation method, and
- a query for the size of allocated blocks
PathEngine allocators don't include either of these customisations, although this is stuff that we can add quite easily if required by our clients. Our allocator does include the following extra methods:
    virtual void*
    expand(
            void* oldPtr,
            tUnsigned32 oldSize,
            tUnsigned32 oldSize_Used,
            tUnsigned32 newSize
            ) = 0;
// helper
    template <class T> void
    expand_Array(
            T*& ptr,
            tUnsigned32 oldArraySize,
            tUnsigned32 oldArraySize_Used,
            tUnsigned32 newArraySize
            )
    {
        ptr = static_cast<T*>(expand(
            ptr,
            sizeof(T) * oldArraySize,
            sizeof(T) * oldArraySize_Used,
            sizeof(T) * newArraySize
            ));
    }
What this does, essentially, is to provide a way for concrete allocator classes to use the realloc() system call, or similar memory allocation functionality in a custom head, if this is desired.
As before, the expand_Array() method is there for convenience, and concrete classes only need to implement the expand() method. This takes a pointer to an existing memory block, and can either add space to the end of this existing block (if possible), or allocate a larger block somewhere else and move existing data to that new location (based on the oldSize_Used parameter).
Implementing expand()
A couple of example implementations for expand() are as follows:
// in cMallocAllocator, using realloc()
    void*
    expand(
        void* oldPtr,
        tUnsigned32 oldSize,
        tUnsigned32 oldSize_Used,
        tUnsigned32 newSize
        )
    {
        assert(oldPtr);
        assert(oldSize);
        assert(oldSize_Used <= oldSize);
        assert(newSize > oldSize);
        return realloc(oldPtr, static_cast<size_t>(newSize));
    }
// as allocate and move
    void*
    expand(
        void* oldPtr,
        tUnsigned32 oldSize,
        tUnsigned32 oldSize_Used,
        tUnsigned32 newSize
        )
    {
        assert(oldPtr);
        assert(oldSize);
        assert(oldSize_Used <= oldSize);
        assert(newSize > oldSize);
        void* newPtr = allocate(newSize);
        memcpy(newPtr, oldPtr, static_cast<size_t>(oldSize_Used));
        deallocate(oldPtr);
        return newPtr;
    }
So this can either call through directly to something like realloc(), or emulate realloc() with a sequence of allocation, memory copy and deallocation operations.
Benchmarking with realloc()
With this expand() method included in our allocator it's pretty straightforward to update our custom vector to use realloc(), and it's easy to see how this can potentially optimise memory use, but does this actually make a difference in practice?
I tried some benchmarking and it turns out that this depends very much on the actual memory heap implementation in use.
I tested this first of all with the following simple benchmark:
template <class tVector> static void
PushBackBenchmark(tVector& target)
{
    const int pattern[] = {0,1,2,3,4,5,6,7};
    const int patternLength = sizeof(pattern) / sizeof(*pattern);
    const int iterations = 10000000;
    tSigned32 patternI = 0;
    for(tSigned32 i = 0; i != iterations; ++i)
    {
        target.push_back(pattern[patternI]);
        ++patternI;
        if(patternI == patternLength)
        {
            patternI = 0;
        }
    }
}
(Wrapped up in some code for timing over a bunch of iterations, with result checking to avoid the push_back being optimised out.)
This is obviously very far from a real useage situation, but the results were quite interesting:
| OS | container type | time |
|---|---|---|
| Linux | std::vector | 0.0579 seconds |
| Linux | cVector without realloc | 0.0280 seconds |
| Linux | cVector with realloc | 0.0236 seconds |
| Windows | std::vector | 0.0583 seconds |
| Windows | cVector without realloc | 0.0367 seconds |
| Windows | cVector with realloc | 0.0367 seconds |
So the first thing that stands out from these results is that using realloc() doesn't make any significant difference on windows. I double checked this, and while expand() is definitely avoiding memory copies a significant proportion of the time, this is either not significant in the timings, or memory copy savings are being outweighed by some extra costs in the realloc() call. Maybe realloc() is implemented badly on Windows, or maybe the memory heap on Windows is optimised for more common allocation scenarios at the expense of realloc(), I don't know. A quick google search shows that other people have seen similar issues.
Apart from that it looks like realloc() can make a significant performance difference, on some platforms (or depending on the memory heap being used). I did some extra testing, and it looks like we're getting diminishing returns after some of the other performance tweaks we made in our custom vector, specifically the tweaks to increase capacity after the first push_back, and the capacity multiplier tweak. With these tweaks backed out:
| OS | container type | time |
|---|---|---|
| Linux | cVector without realloc, no tweaks | 0.0532 seconds |
| Linux | cVector with realloc, no tweaks | 0.0235 seconds |
So, for this specific benchmark, using realloc() is very significant, and even avoids the need for those other performance tweaks.
Slightly more involved benchmark
The benchmark above is really basic, however, and certainly isn't a good general benchmark for vector memory use. In fact, with realloc(), there is only actually ever one single allocation made, which is then naturally free to expand through the available memory space!
A similar benchmark is discussed in this stackoverflow question, and in that case the benefits seemed to reduce significantly with more than one vector in use. I hacked the benchmark a bit to see what this does for us:
template <class tVector> static void
PushBackBenchmark_TwoVectors(tVector& target1, tVector& target2)
{
    const int pattern[] = {0,1,2,3,4,5,6,7};
    const int patternLength = sizeof(pattern) / sizeof(*pattern);
    const int iterations = 10000000;
    tSigned32 patternI = 0;
    for(tSigned32 i = 0; i != iterations; ++i)
    {
        target1.push_back(pattern[patternI]);
        target2.push_back(pattern[patternI]);
        ++patternI;
        if(patternI == patternLength)
        {
            patternI = 0;
        }
    }
}
template <class tVector> static void
PushBackBenchmark_ThreeVectors(tVector& target1, tVector& target2, tVector& target3)
{
    const int pattern[] = {0,1,2,3,4,5,6,7};
    const int patternLength = sizeof(pattern) / sizeof(*pattern);
    const int iterations = 10000000;
    tSigned32 patternI = 0;
    for(tSigned32 i = 0; i != iterations; ++i)
    {
        target1.push_back(pattern[patternI]);
        target2.push_back(pattern[patternI]);
        target3.push_back(pattern[patternI]);
        ++patternI;
        if(patternI == patternLength)
        {
            patternI = 0;
        }
    }
}
With PushBackBenchmark_TwoVectors():
| OS | container type | time |
|---|---|---|
| Linux | std::vector | 0.0860 seconds |
| Linux | cVector without realloc | 0.0721 seconds |
| Linux | cVector with realloc | 0.0495 seconds |
With PushBackBenchmark_ThreeVectors():
| OS | container type | time |
|---|---|---|
| Linux | std::vector | 0.1291 seconds |
| Linux | cVector without realloc | 0.0856 seconds |
| Linux | cVector with realloc | 0.0618 seconds |
That's kind of unexpected.
If we think about what's going to happen with the vector buffer allocations in this benchmark, on the assumption of sequential allocations into a simple contiguous memory region, it seems like the separate vector allocations in the modified benchmark versions should actually prevent each other from expanding. And I expected that to reduce the benefits of using realloc. But the speedup is actually a lot more significant for these benchmark versions.
I stepped through the benchmark and the vector buffer allocations are being placed sequentially in a single contiguous memory region, and do initially prevent each other from expanding, but after a while the 'hole' at the start of the memory region gets large enough to be reused, and then reallocation becomes possible, and somehow turns out to be an even more significant benefit. Maybe these benchmark versions pushed the memory use into a new segment and incurred some kind of segment setup costs?
With virtual memory and different layers of memory allocation in modern operating systems, and different approaches to heap implementations, it all works out as quite a complicated issue, but it does seem fairly clear, at least, that using realloc() is something that can potentially make a significant difference to vector performance, in at least some cases!
Realloc() in PathEngine
Those are all still very arbitrary benchmarks and it's interesting to see how much this actually makes a difference for some real uses cases. So I had a look at what difference the realloc() support makes for the vector use in PathEngine.
I tried our standard set of SDK benchmarks (with common queries in some 'normal' situations), both with and without realloc() support, and compared the timings for these two cases. It turns out that for this set of benchmarks, using realloc() doesn't make a significant difference to the benchmark timings. There are some slight improvements in some timings, but nothing very noticeable.
The queries in these benchmarks have already had quite a lot of attention for performance optimisation, of course, and there are a bunch of other performance optimisations already in the SDK that are designed to avoid the need for vector capacity increases in these situations (reuse of vectors for runtime queries, for example). Nevertheless, if we're asking whether custom allocation with realloc() is 'necessary or better' in the specific case of PathEngine vector use (and these specific benchmarks) the answer appears to be that no this doesn't really seem to make any concrete difference!
Memory customisation and STL allocators
As I've said above, this kind of customisation of the allocator interface (to add stuff like realloc() support) is something that we can't do with the standard allocator setup (even with C++11).
For completeness it's worth noting the approach suggested by Alexandrescu in this article where he shows how you can effectively shoehorn stuff like realloc() calls into STL allocators.
But this does still depends on using some custom container code to detect special allocator types, and won't work with std::vector.
Conclusion
This has ended up a lot longer than I originally intended so I'll go ahead and wrap up here!
To conclude:
- It's not so hard to implement your own allocator setup, and integrate this with a custom vector (I hope this post gives you a good idea about what can be involved in this)
- There are ways to do similar things with the STL, however, and overall this wouldn't really work out as a strong argument for switching to a custom vector in our case
- A custom allocator setup will let you do some funky things with memory allocation, if your memory heap will dance the dance, but it's not always clear that this will translate into actual concrete performance benefits
A couple of things I haven't talked about:
Memory fragmentation: custom memory interfaces can also be important for avoiding memory fragmentation, and this can be an important issue. We don't have a system in place for actually measuring memory fragmentation, though, and I'd be interested to hear how other people in the industry actually quantify or benchmark this.
Memory relocation: the concept of 'relocatable allocators' is quite interesting, I think, although this has more significant implications for higher level vector based code, and requires moving further away from standard vector usage. This is something I'll maybe talk about in more depth later on..
Tuan.kuranes likes this
22 Jan 08:03
Site last built: Tue Jan 21 13:35:54 2014
This post has been generated by Page2RSS%7Cutmcsr%3Dhttp%3A%2F%2Fgraphics%2Epixar%2Ecom%2Flibrary%2F%7Cutmcmd%3Drss%3B%2B)

A statistical framework for comparing importance sampling methods
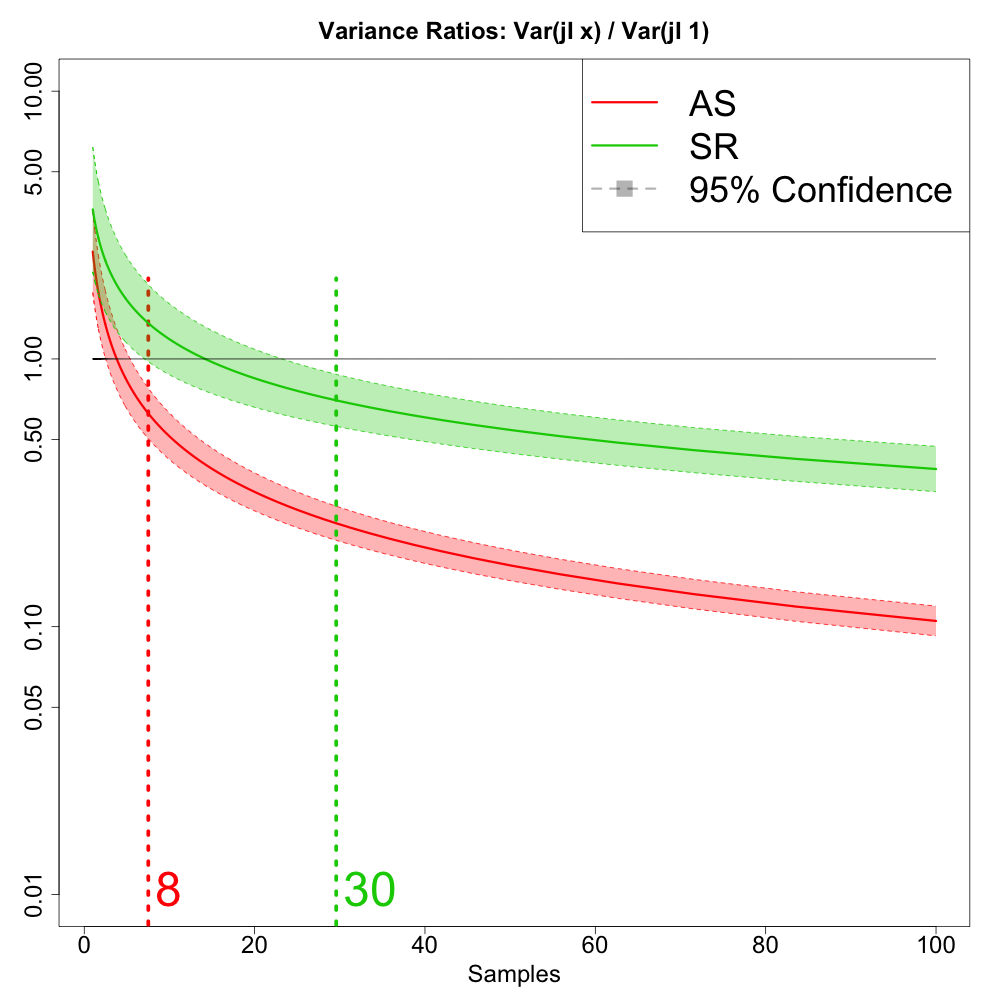 |
A statistical framework for comparing importance sampling methods, and an application to rectangular lights Leonid Pekelis, Christophe Hery January 2014 Importance sampling methods for ray tracing are numerous. One reason is due to the lack of a robust, quantitative method for comparison. This tech memo takes strides to provide a framework for comparing sampling methods on fair ground. We define a simple, mathematical notion of strictly preferring one method to ... [more] Available as Pixar Technical Memo #14-01 |
This post has been generated by Page2RSS
Tuan.kuranes likes this
18 Jan 08:52
How to Conquer Tensorphobia
by j2kun
A professor at Stanford once said, If you really want to impress your friends and confound your enemies, you can invoke tensor products… People run in terror from the symbol. He was explaining some aspects of multidimensional Fourier transforms, but this comment is only half in jest; people get confused by tensor products. It’s often […]
Tuan.kuranes likes this
18 Jan 08:49
2013 in 3D
2013 was an incredible year for us. Our community grew by 500%, our team went from 3 to 10 people, and we now operate from both Paris and NYC.
To help commemorate these milestones and more, we thought what better way to take a look back at the last year than through the work you guys contributed to the community; each model below embodies one of our 2013 milestones. Thanks to everyone who contributed to Sketchfab this past year, and here’s to many more!
Opening of our NYC office:
Citibike from Mestaty on Sketchfab.
Sketchfab is supported in Kickstarter:
Launch of the VG Remix contest with Polycount:
VG remix_Octopus from brenly on Sketchfab.
sketchfab.me, our portfolio service used by Josh Harker:
Anatomica di Revolutis from Joshua Harker on Sketchfab.
You can now publish models directly from Minecraft:
minecraft village from trigrou on Sketchfab.
PS4 hits 500k views in a week:
PlayStation 4 from JC Volumic on Sketchfab.
Leaked map of GTAV:
GTA V Terrain Mapping V1.0 from cbush on Sketchfab.
Sculptfab, a web-based sculpting tool:
Hessen Vitalis from JuanG3D on Sketchfab.
Android announces Kitkat:
Android Kitkat from Chaitanya Krishnan on Sketchfab.
JFK assassination 50th anniversary:
JFK-22-nov-1963 from lpdenmark on Sketchfab.
Launch of AfricanFossils.org:
Gorilla_Skull_1 from anvesoft on Sketchfab.
Taking Sketchfab to the next level:
Next level gold bar from Sketchfab on Sketchfab.
Tuan.kuranes likes this
18 Jan 08:49
Link collection of using spherical Gaussian approximation for specular shading in games
by hanecci
Good article
In games
- ”Real Shading in Unreal Engine 4” Brian Karis, Epic Games. SIGGRAPH 2013
- ”Crafting a Next-Gen Material Pipeline for The Order: 1886” SIGGRAPH 2013
- ”Calibrating Lighting and Materials in Far Cry 3” SIGGRAPH 2012
- ”Approximating Translucency Revisited; With Simplified Spherical Gaussian Exponentiation” Colin Barré-Brisebois 2012
- ”The Technology Behind the Unreal Engine 4 Elemental demo” SIGGRAPH 2012
- ”CryENGINE 3: Reaching the Speed of Light” SIGGRAPH 2010
- ”SPU-Based Deferred Shading in BATTLEFIELD 3 for Playstation 3” GDC 2010
Paper
- ”All-Frequency Rendering of Dynamic, Spatially-Varying Reflectance” Jiaping Wang, Peiran Ren, Minmin Gong, John Snyder, Baining Guo
- ”Interactive Indirect Illumination Using Voxel Cone Tracing” Cyril Crassin, Fabrice Neyret, Miguel Sainz, Simon Green, Elmar Eisemann
Others
Short introduction of Spherical Gaussian


Toni, Tuan.kuranes likes this
17 Jan 14:50
A better hash table: GCC
by Joaquín M López Muñoz
As a continuation of our previous entry in the performance of various implementations of C++ unordered associative containers, Thomas Goyne has run the measurement test suite in GCC 4.8.2 for Mac with the default standard library libstdc++-v3 and release settings -O3 -std=c++11. The machine used was a OS X 10.9.1 box with an Intel Core i7-3720QM running at 2.6GHz with Turbo Boost and SpeedStep disabled. Results are depicted below.
 |
| Insertion without rehashing, unique elements. |
 |
| Insertion with rehashing, unique elements. |
 |
| Insertion without rehashing, duplicate elements, Fmax = 1, G = 5. |
 |
| Insertion without rehashing, duplicate elements, Fmax = 5, G = 5. |
 |
| Insertion with rehashing, duplicate elements, Fmax = 1, G = 5. |
 |
| Insertion with rehashing, duplicate elements, Fmax = 5, G = 5. |
 |
| Erasure, unique elements. |
 |
| Erasure, duplicate elements, Fmax = 1, G = 5. |
 |
| Erasure, duplicate elements, Fmax = 5, G = 5. |
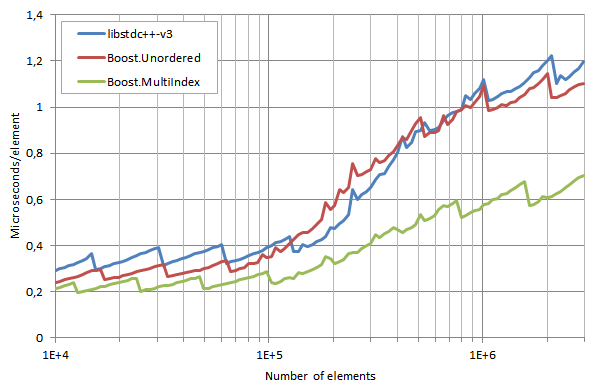 |
| Successful lookup, unique elements. |
 |
| Unsuccessful lookup, unique elements. |
 |
| Successful lookup, duplicate elements, Fmax = 1, G = 5. |
 |
| Unsuccessful lookup, duplicate elements, Fmax = 1, G = 5. |
 |
| Successful lookup, duplicate elements, Fmax = 5, G = 5. |
 |
| Unsuccessful lookup, duplicate elements, Fmax = 5, G = 5. |
Some general insights:
- Insertion times are very similar among the three libs for unique elements. As for the case of duplicate elements, the group skipping capabilities of Boost.Unordered and Boost.MultiIndex, while greatly improving lookup performance, do have a noticeable negative impact on insertion times.
- On the other hand, libstdc++-v3 performs surprisingly well in erasure with duplicate elements, despite its having to do bucket traversal to locate the node preceding the one to be erased. I don't have a clear explanation for this fact besides attributing it to a better CPU cache behavior due to element nodes in libstdc++-v3 being smaller (as this lib does not store hash values if these can be calculated on the fly): maybe readers can propose alternative interpretations.
- Boost.Multiindex highest locality shows up very clearly in its excellent lookup performance for unique elements.
At a later entry we will study libstdc++-v3, libc++, Boost.Unordered and Boost.MultiIndex in Clang.
Tuan.kuranes likes this
17 Jan 14:49

Adobe partners with Sketchfab bringing 3D WebGL publishing to Photoshop
Tuan.kuranes likes this
17 Jan 09:27
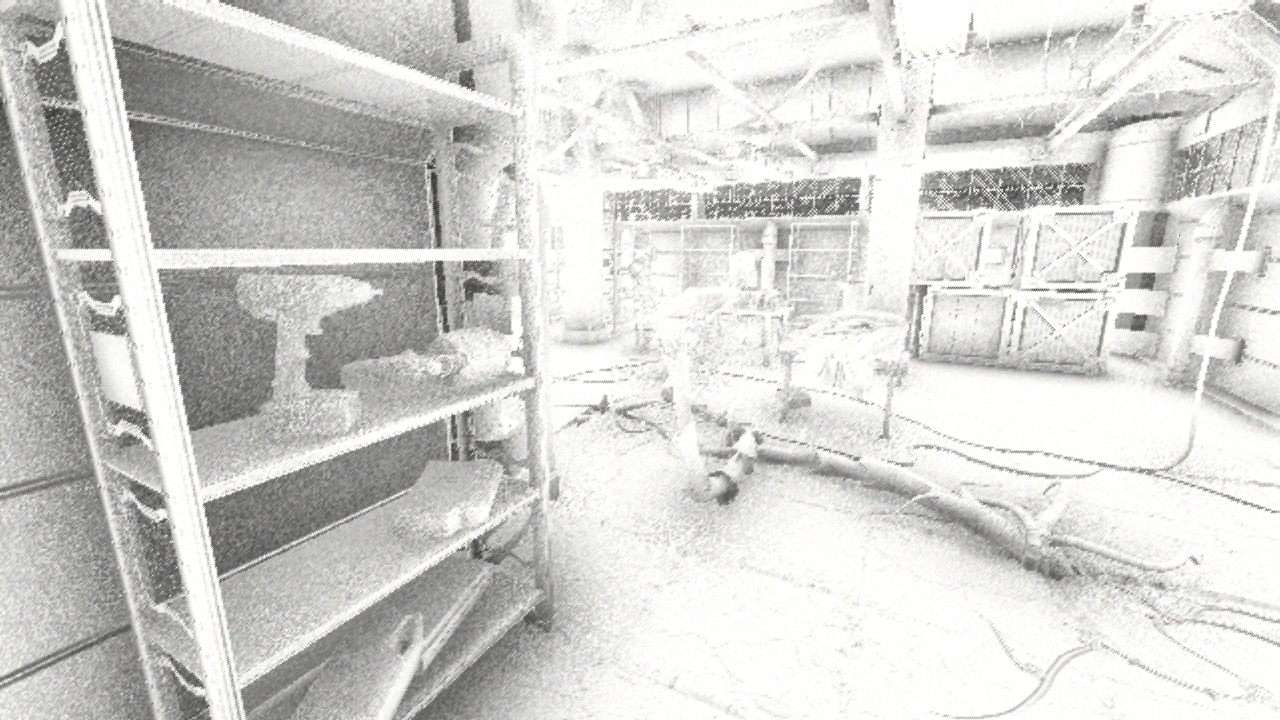
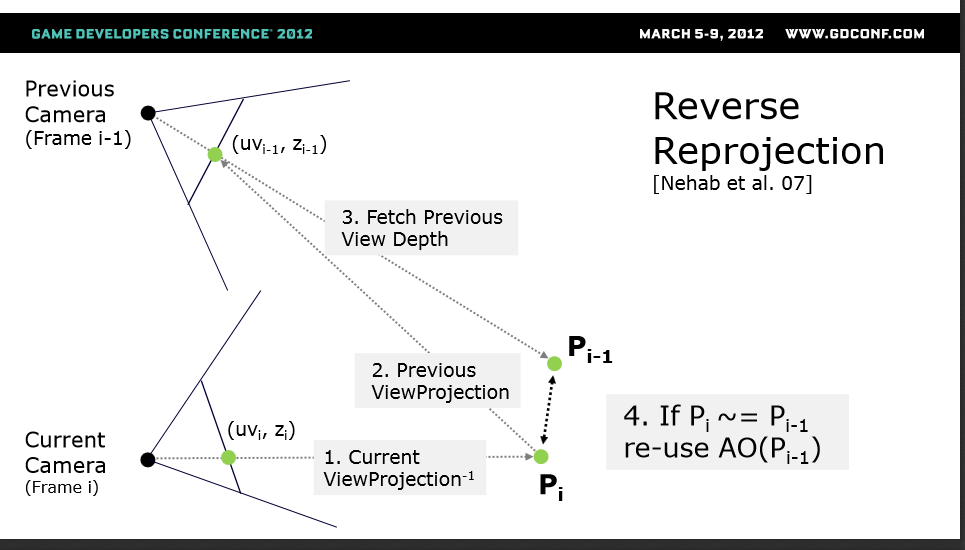

Ambient Occlusion is only one part of the rendering pipeline, and it should be combined with other lighting techniques to give the final look.
vec2 vClosest = floor(gl_FragCoord.xy / 2.0);
vec2 vBilinearWeight = vec2(1.0) - fract(gl_FragCoord.xy / 2.0);
float fTotalAO = 0.0;
float fTotalWeight = 0.0;
for(float x = 0.0; x < 2.0; ++x)
for(float y = 0.0; y < 2.0; ++y)
{
// Sample depth (stored in meters) and AO for the half resolution
float fSampleDepth = textureRect(aHalfResDepth, vClosest + vec2(x,y));
float fSampleAO = textureRect(aHalfResAO, vClosest + vec2(x,y));
// Calculate bilinear weight
float fBilinearWeight = (x-vBilinearWeight .x) * (y-vBilinearWeight .y);
// Calculate upsample weight based on how close the depth is to the main depth
float fUpsampleWeight = max(0.00001, 0.1 - abs(fSampleDepth – fMainDepth)) * 30.0;
// Apply weight and add to total sum
fTotalAO += (fBilinearWeight + fUpsampleWeight) * fSampleAO;
fTotalWeight += (fBilinearWeight + fUpsampleWeight);
}
// Divide by total sum to get final AO
float fAO = fTotalAO / fTotalWeight;
Tech Feature: SSAO and Temporal Blur
by Peter
Screen space ambient occlusion (SSAO) is the standard solution for approximating ambient occlusion in video games. Ambient occlusion is used to represent how exposed each point is to the indirect lighting from the scene. Direct lightingis light emitted from a light source, such as a lamp or a fire. The direct light then illuminates objects in the scene. These illuminated objects make up the indirect lighting. Making each object in the scene cast indirect lighting is very expensive. Ambient occlusion is a way to approximate this by using a light source with constant color and information from nearby geometry to determine how dark a part of an object should be. The idea behind SSAO is to get geometry information from the depth buffer.
There are many publicised algorithms for high quality SSAO. This tech feature will instead focus on improvements that can be made after the SSAO has been generated.
SSAO Algorithm
SOMA uses a fast and straightforward algorithm for generating medium frequency AO. The algorithm runs at half resolution which greatly increases the performance. Running at half resolution doesn’t reduce the quality by much, since the final result is blurred.
For each pixel on the screen, the shader calculates the position of the pixel in view space and then compares that position with the view space position of nearby pixels. How occluded the pixel gets is based on how close the points are to each other and if the nearby point is in front of the surface normal. The occlusion for each nearby pixel is then added together for the final result.
SOMA uses a radius of 1.5m to look for nearby points that might occlude. Sampling points that are outside of the 1.5m range is a waste of resources, since they will not contribute to the AO. Our algorithm samples 16 points in a growing circle around the main pixel. The size of the circle is determined by how close the main pixel is to the camera and how large the search radius is. For pixels that are far away from the camera, a radius of just a few pixels can be used. The closer the point gets to the camera the more the circle grows - it can grow up to half a screen. Using only 16 samples to select from half a screen of pixels results in a grainy result that flickers when the camera is moving.
Grainy result from the SSAO algorithm
Bilateral Blur
Blurring can be used to remove the grainy look of the SSAO. Blur combines the value of a large number of neighboring pixels. The further away a neighboring pixel is, the less the impact it will have on the final result. Blur is run in two passes, first in the horizontal direction and then in the vertical direction.
The issue with blurring SSAO this way quickly becomes apparent. AO from different geometry leaks between boundaries causing a bright halo around objects. Bilateral weighting can be used to fix the leaks between objects. It works by comparing the depth of the main pixel to the depth of the neighboring pixel. If the distance between the depth of the main and the neighbor is outside of a limit the pixel will be skipped. In SOMA this limit is set to 2cm.
To get good-looking blur the number of neighboring pixels to sample needs to be large. Getting rid of the grainy artifacts requires over 17x17 pixels to be sampled at full resolution.
Temporal Filtering
Temporal Filtering is a method for reducing the flickering caused by the low number of samples. The result from the previous frame is blended with the current frameto create smooth transitions. Blending the images directly would lead to a motion-blur-like effect. Temporal Filtering removes the motion blur effect by reverse reprojecting the view space position of a pixel to the view space position it had the previous frame and then using that to sample the result. The SSAO algorithm runs on screen space data but AO is applied on world geometry. An object that is visible in one frame may not be seen in the next frame, either because it has moved or because the view has been blocked by another object. When this happens the result from the previous frame has to be discarded. The distance between the points in world space determines how much of the result from the previous frame should be used.
Explanation of Reverse Reprojection used in Frostbite 2 [2]
Temporal Filtering introduces a new artifact. When dynamic objects move close to static objects they leave a trail of AO behind. Frostbite 2’s implementation of Temporal Filtering solves this by disabling the Temporal Filter for stable surfaces that don’t get flickering artifacts. I found another way to remove the trailing while keeping Temporal Filter for all pixels.
Shows the trailing effect that happens when a dynamic object is moved. The Temporal Blur algorithm is then applied and most of the trailing is removed.
Temporal Blur
(A) Implementation of Temporal Filtered SSAO (B) Temporal Blur implementation
I came up with a new way to use Temporal Filtering when trying to remove the trailing artifacts. By combining two passes of cheap blur with Temporal Filtering all flickering and grainy artifacts can be removed without leaving any trailing.
When the SSAO has been rendered, a cheap 5x5 bilateral blur pass is run on the result. Then the blurred result from the previous frame is applied using Temporal Filtering. A 5x5 bilateral blur is then applied to the image. In addition to using geometry data to calculate the blending amount for the Temporal Filtering the difference in SSAO between the frames is used, removing all trailing artifacts.
Applying a blur before and after the Temporal Filtering and using the blurred image from the previous frame results in a very smooth image that becomes more blurred for each frame, it also removes any flickering. Even a 5x5 blur will cause the resulting image to look as smooth as a 64x64 blur after a few frames.
Because the image gets so smooth the upsampling can be moved to after the blur. This leads to Temporal Blur being faster, since running four 5x5 blur passes in half resolution is faster than running two 17x17 passes in full resolution.
Upsampling
All of the previous steps are performed in half resolution. To get the final result it has to be scaled up to full resolution. Stretching the half resolution image to twice its size will not look good. Near the edges of geometry there will be visible bleeding; non-occluded objects will have a bright pixel halo around them. This can be solved using the same idea as the bilateral blurring. Normal linear filtering is combined with a weight calculated by comparing the distance in depth between the main pixel and the depth value of the four closest half resolution pixels.
Summary
Combining SSAO with the Temporal Blur algorithm produces high quality results for a large search radius at a low cost. The total cost of the algoritm is 1.1ms (1920x1080 AMD 5870). This is more than twice as fast as a normal SSAO implementation.
SOMA uses high frequency AO baked into the diffuse texture in addition to the medium frequency AO generated by the SSAO.
Temporal Blur could be used to improve many other post effects that need to produce smooth-looking results. SOMA uses high frequency AO baked into the diffuse texture in addition to the medium frequency AO generated by the SSAO.
Ambient Occlusion is only one part of the rendering pipeline, and it should be combined with other lighting techniques to give the final look.
References
- http://gfx.cs.princeton.edu/pubs/Nehab_2007_ARS/NehEtAl07.pdf
- http://dice.se/wp-content/uploads/GDC12_Stable_SSAO_In_BF3_With_STF.pdf
// SSAO Main loop
//Scale the radius based on how close to the camera it is
float fStepSize = afStepSizeMax * afRadius / vPos.z;
float fStepSizePart = 0.5 * fStepSize / ((2 + 16.0));
float fStepSizePart = 0.5 * fStepSize / ((2 + 16.0));
for(float d = 0.0; d < 16.0; d+=4.0)
{
//////////////
// Sample four points at the same time
vec4 vOffset = (d + vec4(2, 3, 4, 5))* fStepSizePart;
{
//////////////
// Sample four points at the same time
vec4 vOffset = (d + vec4(2, 3, 4, 5))* fStepSizePart;
//////////////////////
// Rotate the samples
vec2 vUV1 = mtxRot * vUV0;
vUV0 = mtxRot * vUV1;
vec3 vDelta0 = GetViewPosition(gl_FragCoord.xy + vUV1 * vOffset.x) - vPos;
vec3 vDelta1 = GetViewPosition(gl_FragCoord.xy - vUV1 * vOffset.y) - vPos;
vec3 vDelta2 = GetViewPosition(gl_FragCoord.xy + vUV0 * vOffset.z) - vPos;
vec3 vDelta3 = GetViewPosition(gl_FragCoord.xy - vUV0 * vOffset.w) - vPos;
vec4 vDistanceSqr = vec4(dot(vDelta0, vDelta0),
dot(vDelta1, vDelta1),
dot(vDelta2, vDelta2),
dot(vDelta3, vDelta3));
vec4 vInvertedLength = inversesqrt(vDistanceSqr);
vec4 vFalloff = vec4(1.0) + vDistanceSqr * vInvertedLength * fNegInvRadius;
vec4 vAngle = vec4(dot(vNormal, vDelta0),
dot(vNormal, vDelta1),
dot(vNormal, vDelta2),
dot(vNormal, vDelta3)) * vInvertedLength;
////////////////////
// Calculates the sum based on the angle to the normal and distance from point
fAO += dot(max(vec4(0.0), vAngle), max(vec4(0.0), vFalloff));
}
//////////////////////////////////
// Get the final AO by multiplying by number of samples
// Get the final AO by multiplying by number of samples
fAO = max(0, 1.0 - fAO / 16.0);
------------------------------------------------------------------------------
// Upsample Code
vec2 vClosest = floor(gl_FragCoord.xy / 2.0);
vec2 vBilinearWeight = vec2(1.0) - fract(gl_FragCoord.xy / 2.0);
float fTotalAO = 0.0;
float fTotalWeight = 0.0;
for(float x = 0.0; x < 2.0; ++x)
for(float y = 0.0; y < 2.0; ++y)
{
// Sample depth (stored in meters) and AO for the half resolution
float fSampleDepth = textureRect(aHalfResDepth, vClosest + vec2(x,y));
float fSampleAO = textureRect(aHalfResAO, vClosest + vec2(x,y));
// Calculate bilinear weight
float fBilinearWeight = (x-vBilinearWeight .x) * (y-vBilinearWeight .y);
// Calculate upsample weight based on how close the depth is to the main depth
float fUpsampleWeight = max(0.00001, 0.1 - abs(fSampleDepth – fMainDepth)) * 30.0;
// Apply weight and add to total sum
fTotalAO += (fBilinearWeight + fUpsampleWeight) * fSampleAO;
fTotalWeight += (fBilinearWeight + fUpsampleWeight);
}
// Divide by total sum to get final AO
float fAO = fTotalAO / fTotalWeight;
-------------------------------------------------------------------------------------
// Temporal Blur Code
//////////////////
// Get current frame depth and AO
vec2 vScreenPos = floor(gl_FragCoord.xy) + vec2(0.5);
float fAO = textureRect(aHalfResAO, vScreenPos.xy);
// Get current frame depth and AO
vec2 vScreenPos = floor(gl_FragCoord.xy) + vec2(0.5);
float fAO = textureRect(aHalfResAO, vScreenPos.xy);
float fMainDepth = textureRect(aHalfResDepth, vScreenPos.xy);
//////////////////
// Convert to view space position
// Convert to view space position
vec3 vPos = ScreenCoordToViewPos(vScreenPos, fMainDepth);
/////////////////////////
// Convert the current view position to the view position it
// Convert the current view position to the view position it
// would represent the last frame and get the screen coords
vPos = (a_mtxPrevFrameView * (a_mtxViewInv * vec4(vPos, 1.0))).xyz;
vec2 vTemporalCoords = ViewPosToScreenCoord(vPos);
//////////////
// Get the AO from the last frame
float fPrevFrameAO = textureRect(aPrevFrameAO, vTemporalCoords.xy);
float fPrevFrameDepth = textureRect(aPrevFrameDepth, vTemporalCoords.xy);
/////////////////
// Get to view space position of temporal coords
vec3 vTemporalPos = ScreenCoordToViewPos(vTemporalCoords.xy, fPrevFrameDepth);
///////
// Get weight based on distance to last frame position (removes ghosting artifact)
float fWeight = distance(vTemporalPos, vPos) * 9.0;
// Get to view space position of temporal coords
vec3 vTemporalPos = ScreenCoordToViewPos(vTemporalCoords.xy, fPrevFrameDepth);
///////
// Get weight based on distance to last frame position (removes ghosting artifact)
float fWeight = distance(vTemporalPos, vPos) * 9.0;
////////////////////////////////
// And weight based on how different the amount of AO is (removes trailing artifact)
// Only works if both fAO and fPrevFrameAO is blurred
fWeight += abs(fPrevFrameAO - fAO ) * 5.0;
////////////////
// Clamp to make sure atleast 1.0 / FPS of a frame is blended
fWeight = clamp(fWeight, afFrameTime, 1.0);
fWeight += abs(fPrevFrameAO - fAO ) * 5.0;
////////////////
// Clamp to make sure atleast 1.0 / FPS of a frame is blended
fWeight = clamp(fWeight, afFrameTime, 1.0);
fAO = mix(fPrevFrameAO , fAO , fWeight);
------------------------------------------------------------------------------
Toni, Tuan.kuranes likes this
17 Jan 09:27

Rough sorting by depth
TL;DR: use some highest bits from a float in your integer sorting key.
In graphics, often you want to sort objects back-to-front (for transparency) or front-to-back (for occlusion efficiency) reasons. You also want to sort by a bunch of other data (global layer, material, etc.). Christer Ericson has a good post on exactly that.
There’s a question in the comments:
I have all the depth values in floats, and I want to use those values in the key. What is the best way to encode floats into ‘bits’ (or integer) so that I can use it as part of the key ?
While “the best way” is hard to answer universally, just taking some highest bits off a float is a simple and decent approach.
Floating point numbers have a nice property that if you interpret their bits as integers, then larger numbers result in larger integers - i.e. you can treat float as an integer and compare them just fine (within same sign). See details at Bruce Dawson’s blog post.
And due to the way floats are laid out, you can chop off lowest bits of the mantissa and only lose some precision. For something like front-to-back sorting, we only need a very rough sort. In fact a quantized sort is good, since you do also want to render objects with same material together etc.
Anyhow, for example taking 10 bits. Assuming all numbers are positive (quite common if you’re sorting by “distance from camera”), we can ignore the sign bit which will be always zero. So you end up only using 9 bits for the depth sorting.
1 2 3 4 5 6 7 8 9 10 11 |
|
And that’s about it. Put these bits into your sorting key and go sort some stuff!
Q: But what about negative floats?
If you pass negative numbers into the above DepthToBits function, you will get wrong order. Turned
to integers, negative numbers will be larger than positive ones; and come sorted the wrong way:
1 2 3 4 5 6 |
|
With some bit massaging you can turn floats into still-perfectly-sortable integers, even with both positive and negative numbers. Michael Herf has an article on that. Here’s the code with his trick, that handles both positive and negative numbers (now uses all 10 bits though):
1 2 3 4 5 6 7 8 9 10 11 12 13 14 15 16 17 |
|
Q: Why you need some bits? Why not just sort floats?
Often you don’t want to sort only by distance. You also want to sort by material, or mesh, or various other things (much more details in Christer’s post).
Sorting front-to-back on very limited bits of depth has a nice effect that you essentially “bucket” objects into ranges, and within each range you can sort them to reduce state changes.
Packing sorting data tightly into a small integer value allows either writing a very simple comparison operator (just compare two numbers), or using radix sort.
Tuan.kuranes, chris likes this
15 Jan 21:12


Another interesting property of the logarithmic spiral is...
Another interesting property of the logarithmic spiral is revealed if you roll it along a horizontal line. This animation shows the curves traced by points on the spiral, and note that the very centre follows the path of a straight line. The angle between this line and the horizontal is called the pitch of the spiral, and for our spiral galaxy the pitch is around 12 degrees. [more] [code]
Jdinoto, Tuan.kuranes likes this
15 Jan 21:12
Introducing benchmark
by Stephanie Taylor
It is my pleasure to announce a new C++ library for running Microbenchmarks. Inspired by googletest and the xUnit architecture, benchmark supports value- and type-parameterized benchmarks, various options for running the benchmarks including multithreading, and custom report generation.
The framework is lightweight but powerful. An example portion of a run comparing the insertion of elements into a std::vector and a std::list is shown in the screenshot below.
 Unlike googletest, the benchmarks are not automatically discovered, but this allows greater flexibility in terms of how the benchmarks are run, and the parameters that are used by the benchmark.
The benchmark library is released as an open source project under the Apache license, and is available now on github. The repository includes some test code demonstrating various use-cases for the framework. If you’d like to send feedback, or have any questions, please open issues through github, or see our discussion group. I hope you find this useful.
By Dominic Hamon, Network Research Team


The framework is lightweight but powerful. An example portion of a run comparing the insertion of elements into a std::vector and a std::list is shown in the screenshot below.
The benchmark library is released as an open source project under the Apache license, and is available now on github. The repository includes some test code demonstrating various use-cases for the framework. If you’d like to send feedback, or have any questions, please open issues through github, or see our discussion group. I hope you find this useful.
By Dominic Hamon, Network Research Team
Tuan.kuranes likes this
15 Jan 13:12
Sketchfab – Unity Exporter
by Sean VanGorder

Send work from Unity directly to Sketchfab
Our friends at Sketchfab have just released a brand new exporter for the Unity engine, allowing you to transfer your work between the two with a click of the button. Head over to the Sketchfab Blog to read more about it and download the exporter.
Tuan.kuranes likes this
15 Jan 13:11

Creating more natural pathing for A.I.
 Grid-based pathfinding can look unnatural -- so Sven Bergstrom offers up some approaches he's tried to confront some of the issues he's faced when developing pathfinding routines. ...
Tuan.kuranes likes this
15 Jan 13:11
 In this serie explaining the behavior of Finite State Entropy, I find it interesting to make a quick comparison with Huffman entropy. It's a direct result from the description of its decoding principles, nonetheless I believe it's useful to clearly establish the equivalence since it will be illustrative for future articles.
To better grasp the similarities, let's have a simple example. We'll use the following probabilities, suitable for an Huffman tree :
A : 50% ; B : 25% ; C : 12.5% ; D : 12.5%
This tree only needs 8 values to be properly represented, and gives the following linear representation :

This representation uses the "high bit first" methodology, which means we are starting our node travel from the highest bit.
If it's 0, then we have an A. We stop there, shift left the register by one bit and load a new one at the bottom.
If the highest bit is 1, we now we are not done, and need to read the second bit. If this second bit is 0, we know we have a B. If not we continue reading. And so on.
The decision tree looks as follows :

But we could have done differently : we could have used "low bit first". In this case, the linear representation of the tree looks like this :

Which seems a lot messier, but it's not : we simply reversed the bit order of the decision tree :

The 2 decision trees are therefore completely equivalent.
Now, look again at the "low bit first" linear representation. It's important to state that this is what FSE would produce, but it also embeds a few additional properties :
- The "newStateBaseline" does not need to be calculated and stored into the decoding table : it can be automatically determined from the state itself : newStateBaseline = currentState & ~mask(nbBits);
- The "nbBits" is stable for a given character : for A, it's always 1, for B, it's always 2, etc. It simplifies the decoding table, which does not need to store this information.
So basically, an Huffman-low_bit_first table looks the same as an FSE table, and it guarantees a stable number of bits per character, and newStateBaseline is automatically deduced from remaining bits.
There is, however, a small but important difference.
An Huffman-low_bit_first would shift right the current state, and load the next bit(s) high. In contrast, the FSE decoder keeps them, and only reload the low bits. This creates a dependency on future state : basically, once you've reached state 2 with FSE for example, you can already guarantee that you won't see a D before you see a C. Which brings the question : how would the encoder select the right state, since it depends on future characters yet to be decoded ?
The answer : the encoder will work in backward direction, encoding characters from last to first, solving dependencies along the way.
To be continued...
Huffman, a comparison with FSE
by Yann Collet
To better grasp the similarities, let's have a simple example. We'll use the following probabilities, suitable for an Huffman tree :
A : 50% ; B : 25% ; C : 12.5% ; D : 12.5%
This tree only needs 8 values to be properly represented, and gives the following linear representation :
This representation uses the "high bit first" methodology, which means we are starting our node travel from the highest bit.
If it's 0, then we have an A. We stop there, shift left the register by one bit and load a new one at the bottom.
If the highest bit is 1, we now we are not done, and need to read the second bit. If this second bit is 0, we know we have a B. If not we continue reading. And so on.
The decision tree looks as follows :
But we could have done differently : we could have used "low bit first". In this case, the linear representation of the tree looks like this :
Which seems a lot messier, but it's not : we simply reversed the bit order of the decision tree :
The 2 decision trees are therefore completely equivalent.
Now, look again at the "low bit first" linear representation. It's important to state that this is what FSE would produce, but it also embeds a few additional properties :
- The "newStateBaseline" does not need to be calculated and stored into the decoding table : it can be automatically determined from the state itself : newStateBaseline = currentState & ~mask(nbBits);
- The "nbBits" is stable for a given character : for A, it's always 1, for B, it's always 2, etc. It simplifies the decoding table, which does not need to store this information.
So basically, an Huffman-low_bit_first table looks the same as an FSE table, and it guarantees a stable number of bits per character, and newStateBaseline is automatically deduced from remaining bits.
There is, however, a small but important difference.
An Huffman-low_bit_first would shift right the current state, and load the next bit(s) high. In contrast, the FSE decoder keeps them, and only reload the low bits. This creates a dependency on future state : basically, once you've reached state 2 with FSE for example, you can already guarantee that you won't see a D before you see a C. Which brings the question : how would the encoder select the right state, since it depends on future characters yet to be decoded ?
The answer : the encoder will work in backward direction, encoding characters from last to first, solving dependencies along the way.
To be continued...
Tuan.kuranes, klg likes this
15 Jan 13:09
Rendering flags for online users.
by Bram Stolk
So I've ported my Buggy Bang! Bang! game to Android, and released it under the name Six Wheels and a Gun or SWAAG for short. While doing this port I wrote a multiplayer networking system from scratch, including the lobby server. When doing online multiplayer, I thought it would be nice to render flags for the players based on the country associated with the IP number. I've open sourced this piece of technology as ip2ensign which is available at GitHub.
Tuan.kuranes likes this