No, I am not trying to pull a fast one on you. There is a bun in the oven. Like, the real kind!
I have been so, so excited to share the news with all of you that the love of my life and I are expecting our first baby, due this November! Today officially marks the halfway point, 20 weeks, and it’s hard to believe how soon this precious little sprout will be in our arms. It’s also hard to believe that I’ve kept the pregnancy a secret this long, but somehow I managed, even through cooking classes, lectures and press events. Whew! Not an easy task, I tell you.
I am sure there are many questions reeling through your mind at this point: How am I feeling? What am I eating? What am I doing to stay in shape? Am I still a vegetarian? etc. etc. The topic of conception, pregnancy, and giving birth, of course sparks countless queries. There is so much to learn and understand it can be overwhelming, even for a lady like myself if I allow it to be.
One of the most helpful things I’ve learned so far is to silence all the “noise” around me, ignore almost all advice I’ve been given, and just surrender to the supreme intelligence of my body. It is after all, creating this teeny being and can tell me what it wants as long as I am quiet enough. I know that if I trust my instincts and do what feels right, this baby will get what it needs. Some days it’s walnuts (okay, it seems like every day I’m binging on those), other days it’s cheese (yes! I am now a cheese fiend!), so I just obey.
That being said, my diet really hasn’t changed that much. Yes, I am taking supplements as I eat primarily vegan and know how important it is to make up for some missing elements, but other than that I am sticking to my same old ways because that is what feels right. Lots of fruit and veggies, beans, sprouts, whole grains, nuts and seeds, comprise the bulk of my diet, with the occasional egg and cheese slice thrown in for good measure. Many people told me when I conceived that I would surely crave meat, and although I know that is true for some vegetarians, I haven’t had the slightest inkling to eat animals. If I did, maybe I would grill up a steak, but for now I am living life and creating life on plant fuel and my baby is both healthy and happy.

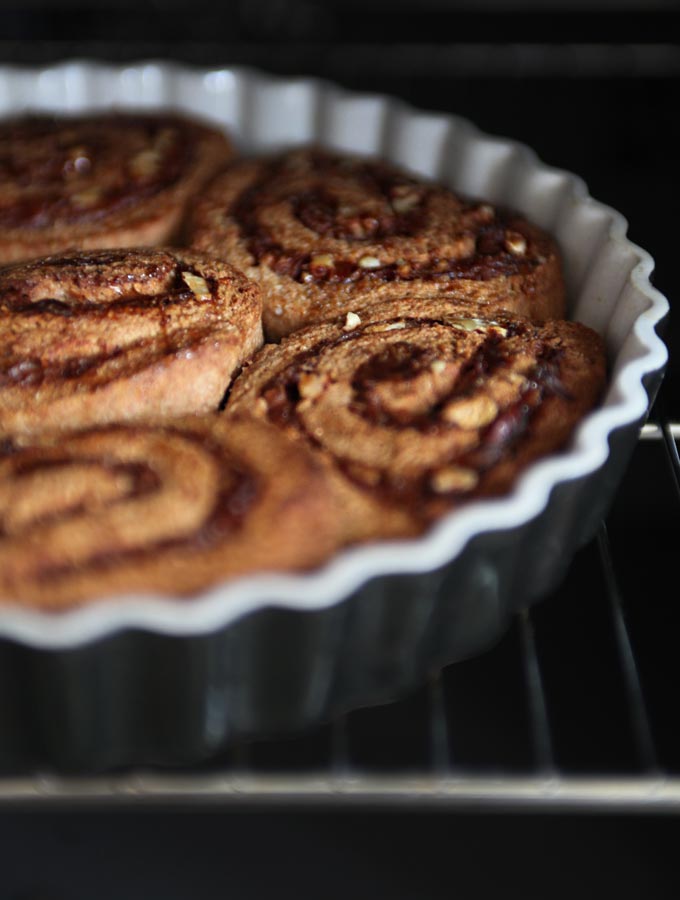
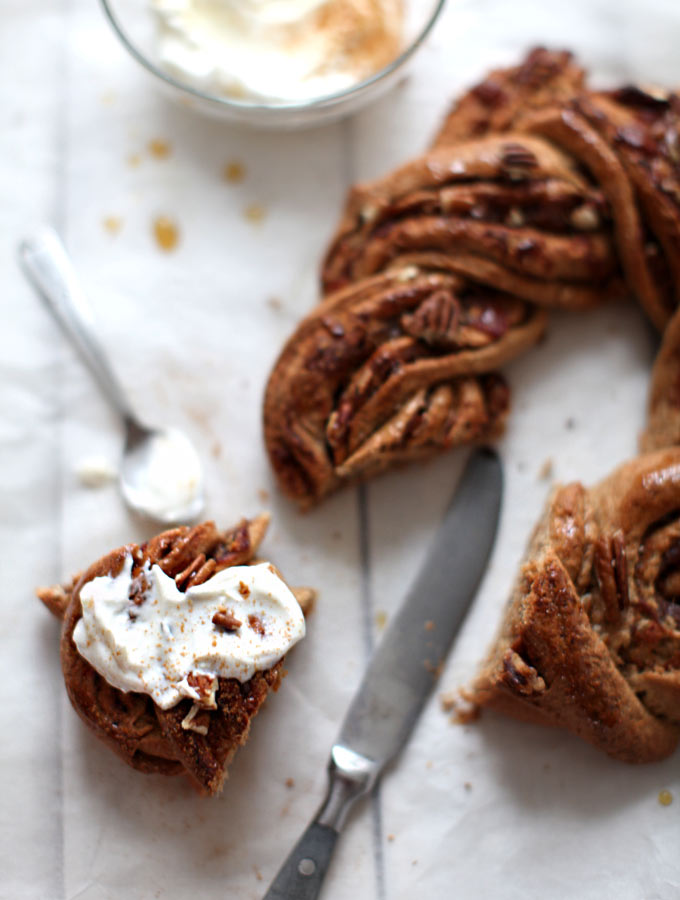
So the recipe. First of all I had to make something with a little cheekiness, ‘cause that’s how I roll, but also in tribute to the first trimester of this pregnancy when all I wanted were plain carbohydrates. Thankfully, I am over that hump now and have resumed eating green vegetables, but I still love biting into something warm, gooey, and comforting once in a while. Baby seems to like it too. Made with whole spelt flour, applesauce, and dates, this is one Sunday breakfast treat that also makes a delicious mid-week snack with tea. It is cinnamon-y, rich tasting, and not overly sweet. In fact the “frosting” for the cinnamon buns is made with yogurt, because I never really liked slathering sugar-y icing on top of already sweet rolls. I enjoy a little more balance in my life, but hey, you’re the boss of this one. If you’re vegan, the rolls are a perfect recipe for you, just leave the yogurt frosting off the top and replace with a cashew or coconut cream.
I made two varieties of this recipe because I wanted to see if I could in fact create a yeast-free version for those of you trying to avoid yeast. I must admit the yeasted version turned out to be my preference – it was much lighter and softer than the one that just used baking powder. Although it takes a little more time and planning, as you must wait a couple times for the dough to rise, I think it is worth the extra effort.
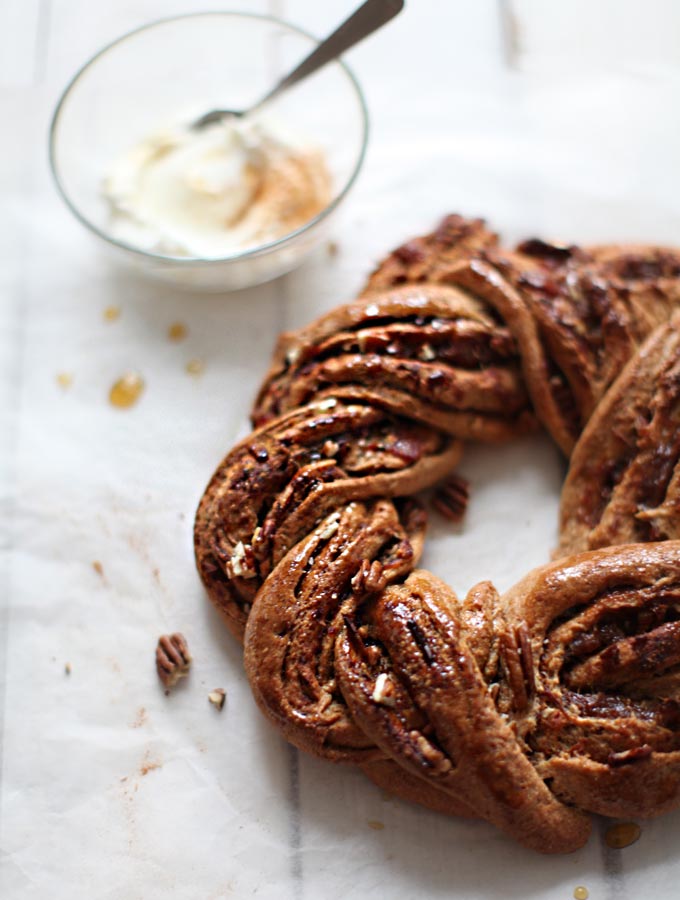
I also made two different shapes with the dough. One was a traditional cinnamon bun and the other was a braided wreath that looks so, so beautiful. Please note that either version of the recipe will work with both shapes, even though I made the traditional bun shape without yeast and the braided wreath with yeast – these can simply be interchanged.
Print recipe
Cinnamon-Pecan Buns or Braided Wreath
Serves 6-8
Dough:
2 cups / 300g whole spelt flour (plus extra for kneading)
4 tsp. baking powder or 1 Tbsp. dry active yeast
2 Tbsp. coconut sugar
1 tsp. sea salt
¾ cup + 1 Tbsp. unsweetened applesauce
3 Tbsp. coconut oil (or butter), softened
Filling:
1 ½ cups / 225g chopped dates
¾ cup / 175ml water
2 tsp. ground cinnamon
pinch ground cardamom (if desired)
¼ tsp. sea salt
¾ cup / 75g pecans, chopped (optional)
Glaze:
3 Tbsp. pure maple syrup
Frosting:
½ cup goat or sheep’s milk yogurt
2 Tbsp. maple syrup
pinch cinnamon
Directions for yeast-free Cinnamon Buns:
1. Start by making the filling. Pit and chop dates into chunks. Place in a saucepan with water, beginning with just ½ cup. Bring to a simmer and stir often to break up the dates and form a chunky paste. If your dates are dry, add more water. Stir in cinnamon, cardamom and salt. Add more water if necessary. Set aside to cool.
2. In a large bowl sift together the dry ingredients. Add coconut oil and mix with your fingers until the mixture is a slightly crumbly. Stir in applesauce until a dough forms; use your hands if necessary to bring dough together.
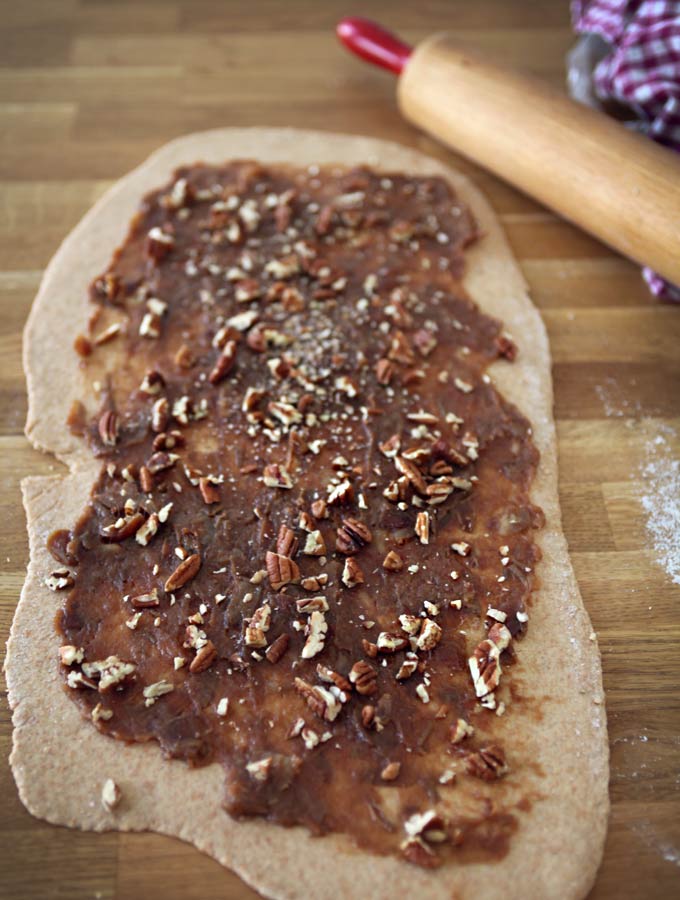
3. Turn out dough onto a floured surface and knead a few times into a ball. Roll out dough into a 6 x 18” (15 x 45cm) rectangle. Slather filling in an even layer over the dough and sprinkle with roughly chopped pecans, reserving a few for garnish.
4. Starting at the top, short end, roll dough until you have a large roll. Make six even slices to create seven rolls. Place rolls in a round baking dish (mine was 9.5”/ 24cm across).
5. Bake for 25-30 minutes in a 375°F / 190°C oven until golden brown. Remove from oven, let cool for five minutes, then brush with maple syrup and sprinkle with remaining pecans.
6. To make frosting, simply stir together frosting ingredients and spread on individual portions, just before serving (instead of frosting the entire batch and eating them later…)
Directions for yeasted Cinnamon Wreath:
1. In a large bowl sift together the dry ingredients.
2. In a small saucepan combine applesauce, and coconut oil until just warm and coconut oil is melted (do not overheat or you will kill the yeast when you add it to the dry ingredients). Add applesauce and coconut oil to flour mixture. Stir with a wooden spoon until the dough comes together.
3. Turn dough out onto a lightly floured surface. Knead in enough remaining flour to make a moderately soft dough that is smooth and elastic, 3 to 5 minutes. Shape dough into a ball. Place dough in a bowl lightly greased with coconut oil; turn dough once to grease surface. Cover with a tea towel and let rise in a warm place until doubled in volume, about 1 hour.
4. Make the filling. Pit and chop dates into chunks. Place in a saucepan with water, beginning with just ½ cup. Bring to a simmer and stir often to break up the dates and form a chunky paste. If your dates are dry, add more water. Stir in cinnamon, cardamom and salt. Add more water if necessary. Set aside to cool.
5. Punch dough down, turn out onto a lightly floured surface. Cover and let rest 10 minutes. On lightly floured surface, roll dough to a 10×20” (25x50cm) rectangle. Slather an even layer of filling across the dough and sprinkle with roughly chopped pecans, reserving a few for garnish. Roll the dough lengthwise into a log. Transfer to a piece of parchment paper. Slice vertically down the center of the log, leaving a few inches at one end. Carefully spiral the log halves around one another to create a sort of braid. Pinch the two ends together to form a wreath (to see helpful instructional photos, see here). Cover and let rise in a warm place for about 30 minutes. Slide wreath onto a baking sheet, keeping the parchment paper underneath.
6. Bake for 30-35 minutes in a 375°F / 190°C oven until golden brown. Remove from oven, let cool for five minutes, then brush with maple syrup and sprinkle with remaining pecans.
7. To make frosting, simply stir together frosting ingredients and spread on individual portions, just before serving (instead of frosting the entire batch and eating them later…)
I promise that My New Roots won’t turn into a baby blog. Seeing as this is a rather personal space, of course things may come up for me from time to time, but I am planning on keeping my pregnancy in the peaceful realm that it has been up to now. I have considered creating a separate page for Mamas, so if you’d be interested in reading my thoughts and advice please let me know in the comments and I’ll start setting something up.
It feels pretty amazing to be in my body right now, more so than ever. I am experiencing the kind of radical transformation that only nature can create, and it is blowing my mind every day! I feel so lucky to be a woman and experience this life beginning, growing and glowing inside me. What an honor to bring a soul into the world. What a gift to be a vessel of love and to share such a deep connection with another spirit.
Thank you to each and every one of you for your love and support during this powerful time.
With love, always,
Sarah B + sprout
** This post will inevitably stir up a lot of questions in some women wanting to conceive a child or for those of you that are already pregnant, but I’ll kindly remind you that I do not give personal health advice over the internet, nor will I respond to any emails with these inquiries. Please know how much I would love to help you, but for your safety and mine, I only treat clients face to face. Good luck on your journey and just remember to listen to your body and trust its wisdom. **


 '
'


