Shared posts

07 May 14:22

Downloading Your Email Metadata

by Nathan Yau

Downloading Email Metadata

We spend a lot of attention on how we interact with social networks, because so many people use Twitter, Facebook, etc every day. It's fun for developers to play with this stuff. However, if you want to look at a history of your own interactions, there isn't a much better place to look (digitally) than your own email inbox.

Before you can explore though, you have to download the data. That's what you'll learn here, or more specifically, how to download your email metadata as a ready-to-use, tab-delimited file.

Setup

I'm using a dated Python 2.5, but I think the code in this tutorial should work with newer versions. Please let me know if something breaks though.There are various ways to access your email. In this tutorial, you use Python, which provides libraries to handle email access and some useful functions to parse data. If you're on a Mac, you probably already have Python installed. For Windows computers, you can download and install Python if you haven't already.

The other thing you need: An email inbox accessible via IMAP and the server information. That's most modern email services, I think. Here's the information for Gmail and Yahoo Mail. I use Fastmail, and you can get their IMAP server information here.

Connect to the IMAP server

You can of course just follow along with the code in the tutorial's download. For smaller scripts like this, I like to type things out to make sure I get everything.All setup? Good. Open your favorite text editor to get started.

The first thing to do is import the necessary libraries. In this case that's imaplib, email, getpass, and getaddresses from email.utils.

import imaplib, email, getpass
from email.utils import getaddresses

It'll be clear what these are for soon.

Like right now. Enter your email settings for your server and username. You use getpass() for the password, so that you don't have to store your password in plaintext. Instead, when you run this script, you'll be prompted for your password.

# Email settings
imap_server = 'YOUR_SERVER_HERE'
imap_user = 'YOUR_USERNAME_HERE'
imap_password = getpass.getpass()

Now connect and log in.

# Connection
conn = imaplib.IMAP4_SSL(imap_server)
(retcode, capabilities) = conn.login(imap_user, imap_password)

If everything went well, the variable retcode should be 'OK'. Otherwise, you might want to check your server and log in information.

Next up: Select the folder you want to fetch your email from. The name of the folder depends on what you want and what service you use. To get the actual names (and they need to be exact), enter conn.list() and run the script that you have so far.

It might also be useful to do all of this in the Python interpreter, so that you get instant feedback. Open your terminal or equivalent, start Python (by typing 'python'), and you should be able to enter the code covered above.

Anyway, let's say the folder is called "INBOX.Archive". Here's how you select it. I've included the commented out lines for reference.

# Specify email folder
# print conn.list()
# conn.select("INBOX.Sent Items")
conn.select("INBOX.Archive")

Search for your email

Now that you're connected, you can search your inbox to fetch the email that you want. For example, you might only want email from 2013.

# Search for email ids between dates specified
result, data = conn.uid('search', None, '(SINCE "01-Jan-2013" BEFORE "01-Jan-2014")')

Or you might have email aliases setup and you only want email sent to a specific address, since the start of 2014.

result, data = conn.uid('search', None, '(TO "user@example.org" SINCE "01-Jan-2014")')

Or maybe you want all of it.

result, data = conn.uid('search', None, 'ALL')

Note that the only thing that changes is the query in the last argument of conn.uid().

A search yields a list of unique id numbers for each email that matches your search criteria. Split them, and then fetch the headers of the matching emails.

uids = data[0].split()

# Download headers
result, data = conn.uid('fetch', ','.join(uids), '(BODY[HEADER.FIELDS (MESSAGE-ID FROM TO CC DATE)])')

For the sake of simplicity you only fetch five header fields here, but if you want others, go wild.In fetch line, you essentially pass that command to the server with the unique ids as a comma-separated string, and you specify which header fields you want. The IMAP syntax isn't incredibly intuitive, but this mini manual is helpful. Or, if you're daring, you can look at the IMAP specifications direct from the source.

In any case, the fetch is the actual downloading of your email headers. This takes up the most time when you run the full script. Parsing takes less than a second. It took about 15 seconds for me to download 9,000 headers on a standard home cable internet connection, and the resulting file was 1.2 megabytes. Obviously, the more header fields and the more email you have, the longer it will take but not too bad.

I came across some examples that took way longer. As in minutes instead of seconds. The key is getting all the headers at once with one call to the IMAP server.

Parse the returned data

So you have the data now. But, it's not in a nice readable tab-delimited file yet. You have to iterate through each item stored in the data variable (from when you fetched the headers), parse, and then spit out the format you want.

Start by creating the file. We'll call it raw-email-rec.tsv.

# Where data will be stored
raw_file = open('raw-email-rec.tsv', 'w')

And write the header of the TSV to the newly created file.

# Header for TSV file
raw_file.write("Message-ID\tDate\tFrom\tTo\tCc\n")

Time to iterate and parse. The code below is a big chunk, but here's what you're doing:

  1. Start a for loop.
  2. Check if the length of current item is 2. Those of length 2 are email headers. Those that are not of length 2 are something else.
  3. If it is a message, use message_from_string() to parse. Use get_all() to get each header field (message id, date, etc.).
  4. Put together a tab-delimited for of data.
  5. Write the row to raw_file.

And here's the same logic in code.

# Parse data and spit out info
for i in range(0, len(data)):
    
    # If the current item is _not_ an email header
    if len(data[i]) != 2:
        continue
    
    # Okay, it's an email header. Parse it.
    msg = email.message_from_string(data[i][1])
    mids = msg.get_all('message-id', None)
    mdates = msg.get_all('date', None)
    senders = msg.get_all('from', [])
    receivers = msg.get_all('to', [])
    ccs = msg.get_all('cc', [])
    
    row = "\t" if not mids else mids[0] + "\t"
    row += "\t" if not mdates else mdates[0] + "\t"
    
    # Only one person sends an email, but just in case
    for name, addr in getaddresses(senders):
        row += addr + " "
    row += "\t"
    
    # Space-delimited list of those the email was addressed to
    for name, addr in getaddresses(receivers):
        row += addr + " "
    row += "\t"
    
    # Space-delimited list of those who were CC'd
    for name, addr in getaddresses(ccs):
        row += addr + " "
    
    row += "\n"
    
    # Just going to output tab-delimited, raw data.
    raw_file.write(row)

You finished iterating, so close the file.

# Done with file, so close it
raw_file.close()

Script done. Run the script (by typing "python fetch-raw.py" in the command line) and you should get a tab-delimited file called raw-email-rec.tsv in the same directory as your script.

Wrapping up

The email download can be broken into three parts.

  1. Connect to the IMAP server
  2. Search and download your email
  3. Parse and format

If you want to get headers for multiple folders, you can run the script multiple times changing the folder name each time. Don't forget to change the file name too, or you'll just be overwriting your data each time.

Finally, if you just want your email metadata and don't care about how to do it, download the code for this tutorial. Change the values for imap_server and imap_user to your own information. You might also need to change the value for the folder and the search. Once you have that in order, you should be able to run the script and get your data.
22 Aug 16:24

Do-It-Yourself GIS: 20 Free Tools & Data Sources for Creating Data Maps

by Ellyssa Kroski

The world of mapping and presenting data sets through geographical representations is no longer relegated to GIS librarians and highly trained technologists. New free and open source applications now make it possible to create complex and robust data visualizations in the form of maps that display statistics and poll results. Here’s a guide to 20 free applications and data sources.

    Data Visualization Tools

    tableau
    Click for Interactive map.

  1. Tableau Public
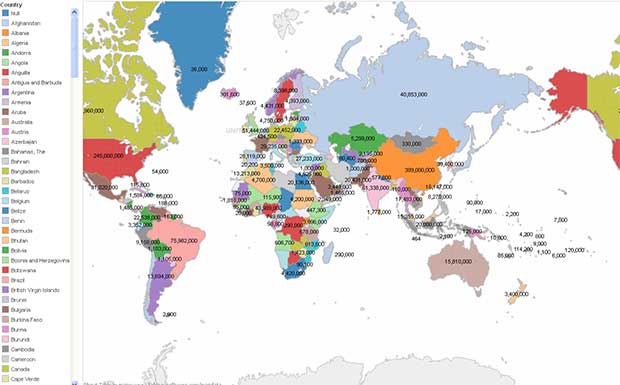
    This free, highly sophisticated software enables the lay person to create very complex graphical representations of data sets in minutes. The above image is actually an interactive map that I created in just a few minutes (after watching the tutorial video) with a data set I downloaded from the CIA World Fact Book comparing internet users in countries worldwide. Data can be uploaded in many forms including Excel spreadsheets, text documents, and Microsoft Access and can be displayed on a map, as well as bar, area, line, or pie charts, as tables, treemaps and more. See the gallery of visualizations here.
  2.  

    fusion_tables

  3. Google Fusion Tables
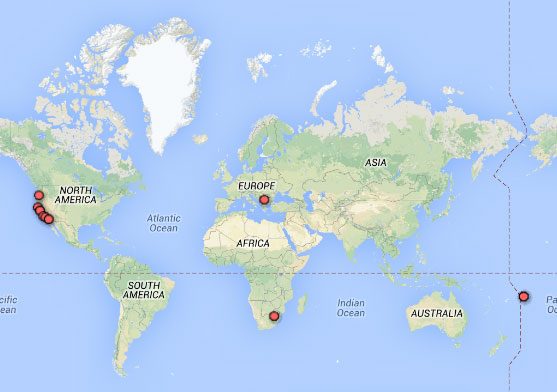
    Google’s experimental Fusion Tables functionality allows you to upload an Excel spreadsheet and instantly create charts and maps from the data set. It was incredibly easy to create the above map after searching the NOAA database for statistics on tsunami locations within the past 10 years.
  4.  

    heat_map
    Click for Interactive Map.

  5. Open Heat Maps
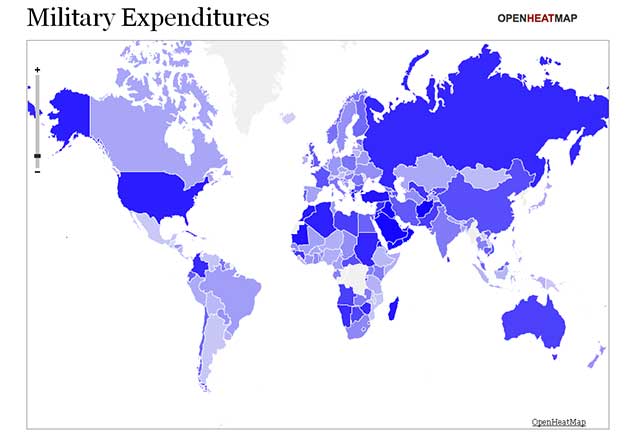
    This simple and straightforward map generator lets you quickly upload your Excel or Google Docs spreadsheet and adjust the colors and settings for your custom map. It took less than 5 minutes to create the above map with data on country military expenditures generated from the CIA World Fact Book. See the gallery of other heat maps here.
  6.  

    many_eyes
    Click for Interactive Map.

  7. Many Eyes
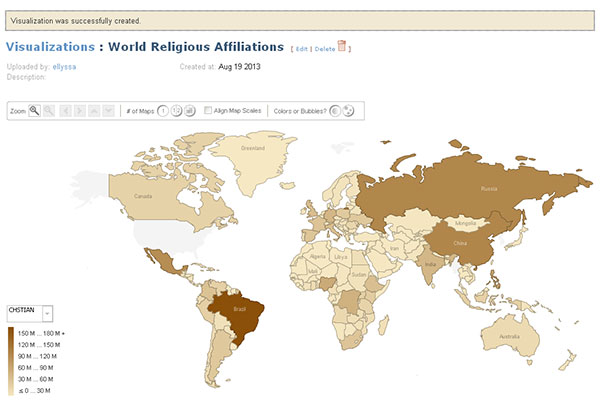
    This free Web-based application is a bit more sophisticated than some of the other tools available, and therefore has a steeper learning curve. Many eyes enables users to create detailed, interactive maps by uploading a spreadsheet and then specifying your preferred visualization type. This map of worldwide religious affiliations was created in just 20 minutes with a data set from ARDA. Additionally, simple maps can be created on the ARDA website in the GIS Maps section.
  8.  

    imf_data_mapper_001

  9. International Monetary Fund (IMF) Data Mapper
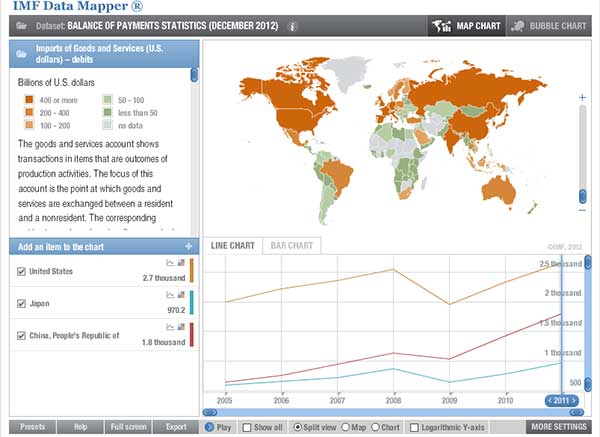
    Instantly create robust maps using the IMF Data Mapper tool on their website. Users cannot upload their own data sets, but instead can use any of the reports and data within the IMF site.
  10.  

    gunnmap

  11. GunnMap 2
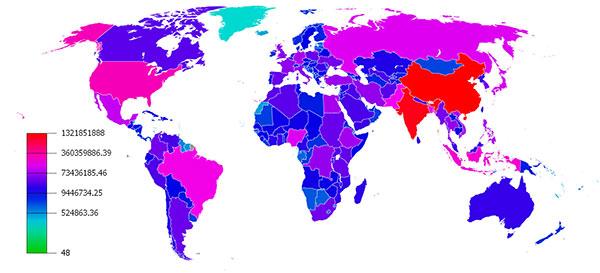
    This Web-based application is very straightforward and easy to use. Simply paste in your data set or use one of the example sets to create a robust, color-coded map. This worldwide population map took under two minutes to customize and the final map is clickable and interactive.
  12.  

    Data Sources

  13. Data.gov: The Data.gov website has 210,912 datasets that are open and freely available for download and use. Many of the data sets are viewable via interactive maps.
  14. ARDA - The Association of Religion Data Archives: This website has also got its own GIS Maps section where users can plot religious data sets over neighborhood and/or world maps.
  15. Census.gov: The US Census Bureau’s website holds the most recent version of the US census which is freely downloadable for visitors. They also have a data visualizations gallery where they spotlight infographics and maps in which Census Bureau data sets have been used.
  16. CIA World Factbook: The World Factbook, is prepared by the Central Intelligence Agency and provides information on the history, people, government, economy, geography, communications, transportation, military, and transnational issues for 267 world entities.
  17. Eurostat: Eurostat’s mission is to be the leading provider of high quality statistics on the European Union and candidate countries.
  18. Global Health Observatory: This collection has over 50 datasets on priority health topics including mortality and burden of diseases, the Millennium Development Goals (child nutrition, child health, maternal and reproductive health, immunization, HIV/AIDS, tuberculosis, malaria, neglected diseases, water and sanitation), non communicable diseases and risk factors, epidemic-prone diseases, health systems, environmental health, violence and injuries, equity among others.
  19. Harvard Dataverse Network: This is a repository for sharing, citing and preserving research data; open to all scientific data from all disciplines worldwide. It includes the world’s largest collection of social science research data.
  20. HUD.gov: The U.S. Dept of Housing and Urban Development offers quite a few downloadable data sets.
  21. International Monetary Fund (IMF) Data: The IMF (International Monetary Fund) publishes a range of time series data on IMF lending, exchange rates and other economic and financial indicators.
  22. NOAA: The National Oceanic and Atmospheric Administration: NOAA’s National Climatic Data Center (NCDC) is the world’s largest provider of weather and climate data. Land-based, marine, model, radar, weather balloon, satellite, and paleoclimatic are just a few of the types of datasets available.
  23. NYC Open Data: This collection has over 800 sets of data pertaining to New York City, most of which can be viewed as an interactive map. Sets include graffiti locations, locations of toilets in public parks, wifi hotspot locations, subway entrances, and more.
  24. The Roper Center: This open collection has 19,000 datasets reflecting public opinion and social trends including Gallup polls dating back to 1936, Roper Reports and more.
  25. UNdata: The United Nations Statistics Division (UNSD) of the Department of Economic and Social Affairs (DESA) launched a new internet based data service for the global user community to provide free access to global statistics.
  26. The World Bank Data Collection: The Data Catalog provides download access to over 8,000 indicators from World Bank data sets, searchable by country, indicators, or topic.

For even more..

Ten Places to Find and Create Data Visualizations

The post Do-It-Yourself GIS: 20 Free Tools & Data Sources for Creating Data Maps appeared first on OEDB.org.

16 May 13:30

How to replace a cracked or broken Nexus 7 screen and digitizer

by Clayton Ljungberg

brokenwelcomescreenN7

Sometimes the inevitable happens — you’re walking along using your Nexus 7, and right before your eyes your favorite Android tablet has a run-in with the sidewalk. As you pick it up you realize that you have cracked the screen, it won’t respond to touches either.

When both of these symptoms occur, it means that you have broken both the glass screen and the digitizer. On the other hand, if your tablet still responds to touches that means you have only broken the screen, and the following guide is not applicable.

Nonetheless, this guide will teach you, step-by-step, how to safely replace a broken screen and digitizer. Remember that this is somewhat of an in-depth process. You should only use this guide as reference, as there is always a chance you may damage your device even further by opening it up.

With that being said, read ahead to learn exactly how to breathe life into your broken Nexus 7! Make sure to also check out the video tutorial, which will make the process a breeze!


Tools needed  

The process of replacing the Nexus’ screen requires very few tools, and many replacement panels even ship with tools included.

  1. Mini Phillips head screwdriver, one with a magnetic tip will help greatly.
  2. A spudger, a tool which is usually static resistant and is used to pry or separate the components in the tablet.
  3. An anti-static workmat is suggested as well in order to protect the tablet’s internals from electrostatic discharge

tools needed

Repair process 

Step 1

After finding a suitable workspace, begin by separating the Nexus’ back shell from it’s bezel by lightly prying with a spudger or guitar pick. The shell is very easy to remove and does not require a great amount of force to come off of the N7′s body.

N7shell

Step 2

Disconnect the battery cable from the motherboard. You can do this by pushing forward and giving pressure to each side of the plug in a rocking fashion.

BatteryCableN7

Step 3

Remove the black tape that covers the LCD display cables. The tape can be folded backwards to remove it from your workspace, but try to let the tape retain its adhesiveness.

TapeLiftNexus7

Step 4

Unplug the LCD data cable and ribbon cables from the motherboard. The data cable can by lightly pried upwards to disconnect, the ribbon cables have two pressure clips that can both be pried upwards as well.

ribboncablesNexus7

Ribbon cables circled, with data cable unplugged to the left

Step 5

Unscrew the 15 perimeter screws that surround the Nexus 7′s body. They are all mini phillips screws, and as previously stated are best dealt with by using a magnetic screwdriver. Two black 4.25 millimeter screws will be removed, as well as thirteen silver 3.2 millimiter screws.

DSC_0241

Step 6

Separate the LCD panel and the aluminum body of the Nexus 7 by gently pulling them apart. There is a weak adhesive binding the two. It should split apart with minimal effort, aside from the large yellow data strip that runs down the middle of the body. Also make sure that the small  display data cable passes through its cutout with ease, and doesn’t catch and tear on any part of the body.

Nexus7bodies

Step 7

This is a tricky step, it involves heating up the broken screen in order to separate it from the plastic bezel that surrounds the Nexus. Now, a heat gun or hairdryer will do the trick just fine, but so will leaving the panel in the sun for about 30 minutes on a warm day. After the panel is nice and toasty, begin slowly lifting it from the black glass panel. The goal during this process is to keep the adhesive tape attached to the bezel and not the display when they are separate. If your tape is stuck to the display panel, you can either apply more heat to strip the tape and reseat it on the bezel. If that doesn’t work you will need to cut and install new double-sided adhesive tape to the bezel. Finally, remove any loose pieces of glass that remain attached to the bezel

BezelremovalN7

Step 8

Line up and set the new screen face up inside the bezel. Make sure the tape strongly sticks to the backside of the screen. You can then insert the data display cable into it’s clip connector. If your replacement screen/digitizer panel didn’t come ship with copper heat shielding you can transfer it on from the old display.

Step 9

Attach the bezel/screen combo to the chassis of the N7. You can lay the screen face down and set the aluminum body/motherboard on top of it. Feed the display data cable through the hole in the motherboard as you set the body down onto the screen.

chassisinstallN7

Step 10

Reattach the ribbon cables to the motherboard and lock them in place.  Reattach the black tape from step 3 to the motherboard. After doing this you can plug the battery cable into it’s socket once again.

Step 11

Secure the chassis in place using the screws removed in step 5. You can snap the back shell in place once again after tightening all the screws. You can then power on your tablet and use it once again!

Success!

finishedresoration

So, after following this guide you will have successfully installed a new screen/digitizer combo onto your Nexus 7. That wasn’t so hard!  Remember to comment if you need any help with the process, as we are willing to guide you through any rough patches.

Cost

As stated before, cost will vary due to differences in what might actually need to be replaced. Digitizers, panels, and combos can both be found on Ebay or Amazon, and are usually sold as spare parts from donor Nexus units. This effects the availability of such parts.  A combo can usually be purchased anywhere between $100-$140, with individual parts landing in the $70 area.

For the time being, here is a link to a Nexus 7 screen/digitizer combo from Amazon. You can find spare parts on Amazon using this link.

Good luck! Let us know how it goes!