This series covers basic formatting in LaTeX. Part 1 introduced lists. Part 2 covered tables. In part 3, you will learn about another great feature of LaTeX: the flexibility of granular document formatting. This article covers customizing the page layout, table of contents, title sections, and page style.
Page dimension
When you first wrote your LaTeX document you may have noticed that the default margin is slightly bigger than you may imagine. The margins have to do with the type of paper you specified, for example, a4, letter, and the document class: article, book, report, and so on. To modify the page margins there are a few options, one of the simplest options is using the fullpage package.
This package sets the body of the page such that the page is almost full.
Fullpage package documentation
The illustration below demonstrates the LaTeX default body compared to using the fullpage package.
Another option is to use the geometry package. Before you explore how the geometry package can manipulate margins, first look at the page dimensions as depicted below.
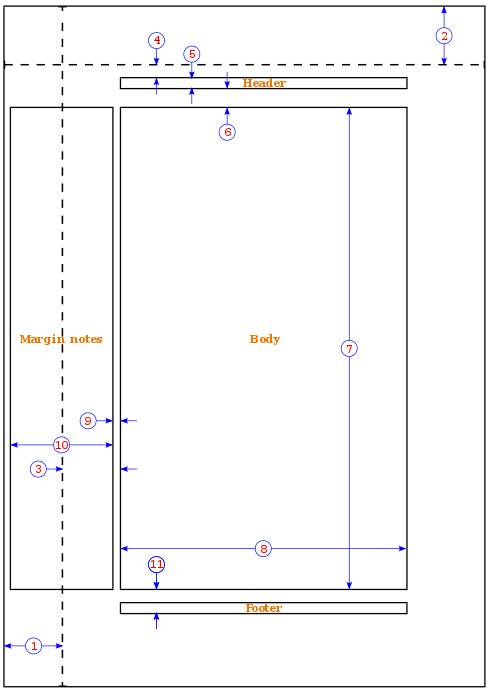
- one inch + \hoffset
- one inch + \voffset
- \oddsidemargin = 31pt
- \topmargin = 20pt
- \headheight = 12pt
- \headsep = 25pt
- \textheight = 592pt
- \textwidth = 390pt
- \marginparsep = 35pt
- \marginparwidth = 35pt
- \footskip = 30pt
To set the margin to 1 (one) inch using the geometry package use the following example
\usepackage{geometry}
\geometry{a4paper, margin=1in}
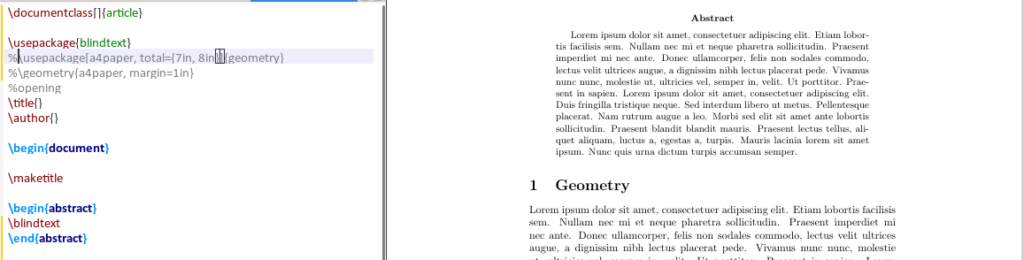
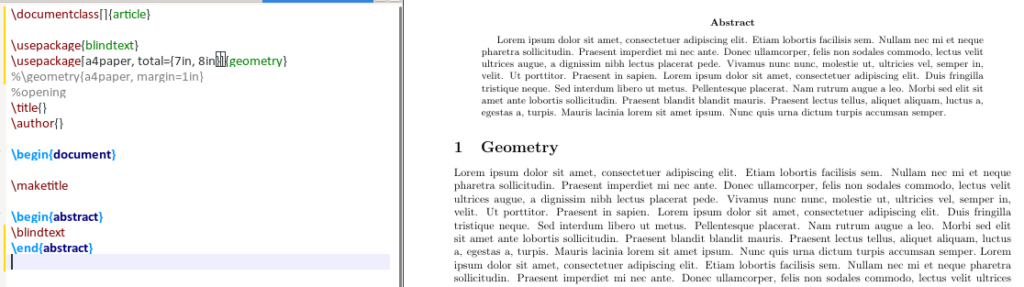
In addition to the above example, the geometry command can modify the paper size, and orientation. To change the size of the paper, use the example below:
\usepackage[a4paper, total={7in, 8in}]{geometry}
To change the page orientation, you need to add landscape to the geometry options as shown below:
\usepackage{geometery}
\geometry{a4paper, landscape, margin=1.5in
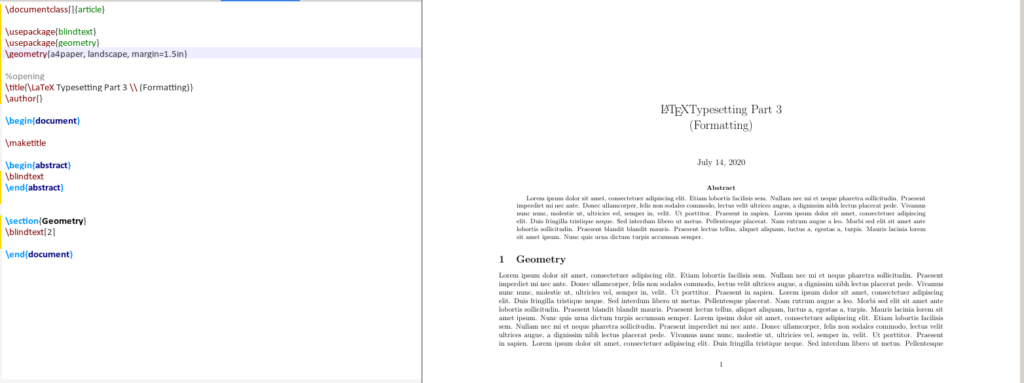
Table of contents
By default, a LaTeX table of contents is titled “Contents”. There are times when you prefer to relabel the text to be “Table of Content”, change the vertical spacing between the ToC and your first section of chapter, or simply change the color of the text.
To change the text you add the following lines to your preamble, substitute english with your desired language :
\usepackage[english]{babel}
\addto\captionsenglish{
\renewcommand{\contentsname}
{\bfseries{Table of Contents}}}
To manipulate the virtual spacing between ToC and the list of figures, sections, and chapters, use the tocloft package. The two options used in this article are cftbeforesecskip and cftaftertoctitleskip.
The tocloft package provides means of controlling the typographic design of the ToC, List of Figures and List of Tables.
Tocloft package doucmentation
\usepackage{tocloft}
\setlength\ctfbeforesecskip{2pt}
\setlength\cftaftertoctitleskip{30pt}
cftbeforesecskip is the spacing between the sections in the ToC, while
cftaftertoctitleskip is the space between text “Table of Contents” and the first section in the ToC. The below image shows the differences between the default and the modified ToC.


Borders
When using the package hyperref in your document, LaTeX section lists in the ToC and references including \url have a border, as shown in the images below.

To remove these borders, include the following in the preamble, In the previous section, “Table of Contents,” you will see that there are not any borders in the ToC.
\usepackage{hyperref}
\hypersetup{ pdfborder = {0 0 0}}
Title section
To modify the title section font, style, and/or color, use the package titlesec. In this example, you will change the font size, font style, and font color of the section, subsection, and subsubsection. First, add the following to the preamble.
\usepackage{titlesec}
\titleformat*{\section}{\Huge\bfseries\color{darkblue}}
\titleformat*{\subsection}{\huge\bfseries\color{darkblue}}
\titleformat*{\subsubsection}{\Large\bfseries\color{darkblue}}

Taking a closer look at the code, \titleformat*{\section} specifies the depth of section to use. The above example, uses up to the third depth. The {\Huge\bfseries\color{darkblue}} portion specifies the size of the font, font style and, font color
Page style
To customize the page headers and footers one of the packages, use fancyhdr. This example uses this package to modify the page style, header, and footer. The code below provides a brief description of what each option does.
\pagestyle{fancy} %for header to be on each page
\fancyhead[L]{} %keep left header blank
\fancyhead[C]{} %keep centre header blank
\fancyhead[R]{\leftmark} %add the section/chapter to the header right
\fancyfoot[L]{Static Content} %add static test to the left footer
\fancyfoot[C]{} %keep centre footer blank
\fancyfoot[R]{\thepage} %add the page number to the right footer
\setlength\voffset{-0.25in} %space between page border and header (1in + space)
\setlength\headheight{12pt} %height of the actual header.
\setlength\headsep{25pt} %separation between header and text.
\renewcommand{\headrulewidth}{2pt} % add header horizontal line
\renewcommand{\footrulewidth}{1pt} % add footer horizontal line
The results of this change are shown below:


Tips
Centralize the preamble
If write many TeX documents, you can create a .tex file with all your preamble based on your document categories and reference this file. For example, I use a structure.tex as shown below.
$ cat article_structure.tex
\usepackage[english]{babel}
\addto\captionsenglish{
\renewcommand{\contentsname}
{\bfseries{\color{darkblue}Table of Contents}}
} % Relable the contents
%\usepackage[margin=0.5in]{geometry} % specifies the margin of the document
\usepackage[utf8]{inputenc}
\usepackage[T1]{fontenc}
\usepackage{graphicx} % allows you to add graphics to the document
\usepackage{hyperref} % permits redirection of URL from a PDF document
\usepackage{fullpage} % formate the content to utilise the full page
%\usepackage{a4wide}
\usepackage[export]{adjustbox} % to force image position
%\usepackage[section]{placeins} % to have multiple images in a figure
\usepackage{tabularx} % for wrapping text in a table
%\usepackage{rotating}
\usepackage{multirow}
\usepackage{subcaption} % to have multiple images in a figure
%\usepackage{smartdiagram} % initialise smart diagrams
\usepackage{enumitem} % to manage the spacing between lists and enumeration
\usepackage{fancyhdr} %, graphicx} %for header to be on each page
\pagestyle{fancy} %for header to be on each page
%\fancyhf{}
\fancyhead[L]{}
\fancyhead[C]{}
\fancyhead[R]{\leftmark}
\fancyfoot[L]{Static Content} %\includegraphics[width=0.02\textwidth]{virgin_voyages.png}}
\fancyfoot[C]{} % clear center
\fancyfoot[R]{\thepage}
\setlength\voffset{-0.25in} %Space between page border and header (1in + space)
\setlength\headheight{12pt} %Height of the actual header.
\setlength\headsep{25pt} %Separation between header and text.
\renewcommand{\headrulewidth}{2pt} % adds horizontal line
\renewcommand{\footrulewidth}{1pt} % add horizontal line (footer)
%\renewcommand{\oddsidemargin}{2pt} % adjuct the margin spacing
%\renewcommand{\pagenumbering}{roman} % change the numbering style
%\renewcommand{\hoffset}{20pt}
%\usepackage{color}
\usepackage[table]{xcolor}
\hypersetup{ pdfborder = {0 0 0}} % removes the red boarder from the table of content
%\usepackage{wasysym} %add checkbox
%\newcommand\insq[1]{%
% \Square\ #1\quad%
%} % specify the command to add checkbox
%\usepackage{xcolor}
%\usepackage{colortbl}
%\definecolor{Gray}{gray}{0.9} % create new colour
%\definecolor{LightCyan}{rgb}{0.88,1,1} % create new colour
%\usepackage[first=0,last=9]{lcg}
%\newcommand{\ra}{\rand0.\arabic{rand}}
%\newcolumntype{g}{>{\columncolor{LightCyan}}c} % create new column type g
%\usesmartdiagramlibrary{additions}
%\setcounter{figure}{0}
\setcounter{secnumdepth}{0} % sections are level 1
\usepackage{csquotes} % the proper was of using double quotes
%\usepackage{draftwatermark} % Enable watermark
%\SetWatermarkText{DRAFT} % Specify watermark text
%\SetWatermarkScale{5} % Toggle watermark size
\usepackage{listings} % add code blocks
\usepackage{titlesec} % Manipulate section/subsection
\titleformat{\section}{\Huge\bfseries\color{darkblue}} % update sections to bold with the colour blue \titleformat{\subsection}{\huge\bfseries\color{darkblue}} % update subsections to bold with the colour blue
\titleformat*{\subsubsection}{\Large\bfseries\color{darkblue}} % update subsubsections to bold with the colour blue
\usepackage[toc]{appendix} % Include appendix in TOC
\usepackage{xcolor}
\usepackage{tocloft} % For manipulating Table of Content virtical spacing
%\setlength\cftparskip{-2pt}
\setlength\cftbeforesecskip{2pt} %spacing between the sections
\setlength\cftaftertoctitleskip{30pt} % space between the first section and the text ``Table of Contents''
\definecolor{navyblue}{rgb}{0.0,0.0,0.5}
\definecolor{zaffre}{rgb}{0.0, 0.08, 0.66}
\definecolor{white}{rgb}{1.0, 1.0, 1.0}
\definecolor{darkblue}{rgb}{0.0, 0.2, 0.6}
\definecolor{darkgray}{rgb}{0.66, 0.66, 0.66}
\definecolor{lightgray}{rgb}{0.83, 0.83, 0.83}
%\pagenumbering{roman}
In your articles, refer to the structure.tex file as shown in the example below:
\documentclass[a4paper,11pt]{article}
\input{/path_to_structure.tex}}
\begin{document}
…...
\end{document}
Add watermarks
To enable watermarks in your LaTeX document, use the draftwatermark package. The below code snippet and image demonstrates the how to add a watermark to your document. By default the watermark color is grey which can be modified to your desired color.
\usepackage{draftwatermark}
\SetWatermarkText{\color{red}Classified} %add watermark text
\SetWatermarkScale{4} %specify the size of the text

Conclusion
In this series you saw some of the basic, but rich features that LaTeX provides for customizing your document to cater to your needs or the audience the document will be presented to. With LaTeX, there are many packages available to customize the page layout, style, and more.
