Read more of this story at Slashdot.
Shared posts
15 Jul 12:56
Are Amazon Vine Reviews of Technical Books a Joke?
by timothy
First time accepted submitter jasax writes "As an Amazon frequent buyer, I rely quite a lot on reviews of the books I want. However, some caution is in order: the (bad) quality of Amazon's reviews and reviewers under the Amazon Vine program has already been news in Slashdot. Today I was shocked by a practical result of that program. This second edition (published in 2012) of a very specialized system identification book has 12 reviews: the oldest (dated 2007) certainly targets the first edition. The remaining 11 reviews are all from 'Vine Reviewers' (VRs). All seem to be ignorant of what 'System Identification in the Frequency Domain' really is. None of the reviews is tagged with a 'Verified Amazon Purchase'; most (if not all) are 'small talk reviews' peppered with technical phrases cloning the publisher's book description, and some of the reviews are ridiculous, to say the least. If this sample of reviewing by VRs really is the norm, then the bottom line is that the Vine program is totally irrelevant and unreliable — at least for technical books." 


12 Jul 23:36

What’s New in 2012 R2: Bring Your Own Device (BYOD) and Protecting Corporate Information
by Microsoft Server and Cloud Platform Team
Microsoft continues to evolve the products that are part of our Cloud OS vision. Microsoft Corporate Vice President Brad Anderson recently started a blog series to provide you keen insight into the strategy and direction. Today Brad blogged, “What’s New in 2012 R2: Making Device Users Productive and Protecting Corporate Information”.
In this post, Brad discusses the Bring Your Own Device (BYOD) trend, and how Microsoft is supporting the myriad of devices users have and want to use for work or play. People-centric IT (PCIT) is about helping people to work on the devices they choose. We’re providing users access to their apps and data on any of their devices in any location. The challenge this presents to IT teams is considerable: As soon as users are working on a device that IT does not manage (or even have any knowledge of), it becomes very difficult to retain control of sensitive corporate information and to be able to respond to situations such as the device being sold, lost, or stolen.
One important data point for us when we planned People-centric IT was the feedback we gathered from customers about the need to help reduce client management infrastructure costs and complexity. To do this, we worked hard to integrate Configuration Manager and Windows Intune. Our vision was for IT teams to use the Configuration Manager Administrator console to “manage devices where they live,” on-premise desktops and laptops can be serviced through existing on-prem infrastructure, and Internet-connected devices can be serviced through cloud infrastructure.
Sound interesting? Head on over to Brad’s blog post and get the full information on this important topic. To learn even more about the technical topics discussed today, check out these posts from our engineering teams:
-
Compliance Settings and Company Resource Access in Configuration Manager
This post outlines how System Center Configuration Manager and Windows Intune allows an administrator to provide VPN, WiFi profiles, and Certificates to permit users to connect to company resources. -
Protecting Corporate Data on Mobile Devices by using Configuration Manager and Windows Intune
This is an overview of how System Center Configuration Manager and Windows Intune provide the ability for the administrator or user to protect corporate data on mobile devices by leveraging retire and wipe functionality. -
User experience with Unified Device Management using System Center 2012 R2 Configuration Manager and Windows Intune
This post examines how System Center Configuration Manager and Windows Intune provide the user with a consistent enrollment and resource access experience across devices. -
Simplified, User-centric Application Management across Devices with System Center 2012 R2 Configuration Manager and Windows Intune
In this post, the team looks at how System Center Configuration Manager and Windows Intune allow administrators to extend application delivery to all major device types while still centrally managing application delivery across devices from a single console. -
Extending device support in Active Directory
An analysis of Active Directory in Windows Server 2012 R2 and its capabilities to enable People Centric IT -
Enabling Modern Work Styles using Windows Server 2012 R2 Remote Desktop Services
An overview of the improvements made to Microsoft VDI (Remote Desktop Services) reducing storage related costs, improving the end user experience, and administration improvements to both session and VM based VDI. -
Introducing Work Folders on Windows Server 2012 R2
Work Folders enables IT administrators to provide Information Workers the ability to sync their work data on all their devices wherever they are while remaining in compliance with company policies. This is done by syncing user data from devices to on-premise file servers.
12 Jul 23:36
What's new in Active Directory in Windows Server 2012 R2
by Uday_HegdeMS
Hello folks. This is Uday Hegde from the Active Directory product team at Microsoft. I’m the Group Program Manager responsible for Windows Server Active Directory.
Hopefully by now, you've downloaded your copy of the preview build of Windows...(read more)
12 Jul 23:36

Edge Show 67 - Networking with System Center 2012 R2 Virtual Machine Manager
by Symon Perriman
At [06:05] Symon Perriman meets with Greg Cusanza, a Senior Program Manager on the System Center team, to talk about new networking capabilities in the upcoming System Center 2012 R2 Virtual Machine Manager. Greg first gives an overview of the major networking enhancements and how they support the changes coming in Windows Server 2012 R2. Next Greg defines Software Defined Networking (SDN) and Network Virtualization, and then describes how they are related. The team then discusses forwarding extensions and centralized network management before they move to the first demo at [11:30] where they show the different VMM networking components, such as logical networks and switches. Next Greg talks about the networking isolation enhancements and how they can benefit large organizations and hosters. At [18:20] the team looks at a demo of a virtualized NVGRE gateway being deployed through VMM, and finally a network being deployed by a self-service user through the Windows Azure Pack.
News:
- [00:30] Complete the Edge Show Survey to improve the show and win some gift cards: http://aka.ms/EdgeSurvey
- [00:50] Attend the System Center 2012 R2 Jump Start online event with live Q&A on July 15th: http://aka.ms/SCR2JS
- [01:30] Microsoft Assessment and Planning (MAP) Toolkit version 8.5 just released: http://aka.ms/map
- [02:35] Gartner research has released their annual virtualization report showing Microsoft as a leader in the industry. Read it here: http://www.gartner.com/technology/reprints.do?id=1-1GJA88J&ct=130628
- [03:30] Download these new previews for upcoming products:
- Hyper-V Server 2012 R2: http://technet.microsoft.com/evalcenter/dn205299
- Windows Server 2012 R2 Essentials: http://technet.microsoft.com/evalcenter/dn205288.aspx
- RSAT for Windows 8.1: http://www.microsoft.com/en-us/download/details.aspx?id=39296
- [05:05] Check out the compatibility guide for moving apps from Windows 8 to Windows 8.1: http://www.microsoft.com/en-us/download/details.aspx?id=27416
Connect with the Edge Team: Facebook – Twitter - Email
12 Jul 23:36

July, the 31 Days of SQL Server DMO’s – Day 12 (sys.dm_os_performance_counters)
by Tamarick Hill
The sys.dm_os_performance_counters DMV returns information about SQL Server performance counters that are being collected on the server. The performance counters that you will find in this DMV are the SQL Server performance counters that you would normally find using Windows Performance Monitor.
Lets have a quick look at this DMV to view the columns that are returned from this DMV.
SELECT * FROM sys.dm_os_Performance_counters

The first column returned is the ‘object_name’ column which represents the category that the particular counter belongs to. The second column, ‘counter_name’, is the actual name of the counter. The third column, ‘instance_name’, is usually the database name that the counter is coming from, but sometimes can represent a more another category group name for certain performance counters that are instance scoped as opposed to database scope. The fourth column in the result set is ‘cntr_value’ which is the current value for a specific counter. The ‘cntr_type’ column is used to define the type of counter according to the Windows performance architecture. For many of the performance counters, this cntr_type column is necessary to properly calculate the value of a counter.
This DMV provides useful information about practically every SQL Server performance counter out there. I use it occasionally for very specific counters I am interested in such as Logins/Sec, Page Reads/Sec, or Memory Grants Pending but for most of my performance counter needs, I will still rely on the Windows Performance Monitor tool. I am in no way implying that you should not use this DMV, me personally, I just find the Windows Performance monitor tool a little easier to work with for my needs. Once I become more skilled with how to properly use the ‘cntr_type’ column to properly calculate by counter value, then this DMV will probably be more beneficial to me.
However, this is still a powerful and useful DMV that I felt you should at least know its out there.
For more information about this DMV, please see the below Books Online link:
http://msdn.microsoft.com/en-us/library/ms187743.aspx
Follow me on Twitter @PrimeTimeDBA
12 Jul 23:30
HP Keeps Installing Secret Backdoors In Enterprise Storage
by samzenpus
Nerval's Lobster writes "For the second time in a month, Hewlett-Packard has been forced to admit it built secret backdoors into its enterprise storage products. The admission, in a security bulletin posted July 9, confirms reports from the blogger Technion, who flagged the security issue in HP's StoreOnce systems in June, before finding more backdoors in other HP storage and SAN products. The most recent statement from HP, following another warning from Technion, admitted that 'all HP StoreVirtual Storage systems are equipped with a mechanism that allows HP support to access the underlying operating system if permission and access is provided by the customer.' While HP describes the backdoors as being usable only with permission of the customer, that restriction is part of HP's own customer-service rules—not a limitation built in to limit use of backdoors. The entry points consist of a hidden administrator account with root access to StoreVirtual systems and software, and a separate copy of the LeftHand OS, the software that runs HP's StoreVirtual and HP P4000 products. Even with root access, the secret admin account does not give support techs or hackers access to data stored on the HP machines, according to the company. But it does provide enough access and control over the hardware in a storage cluster to reboot specific nodes, which would 'cripple the cluster,' according to information provided to The Register by an unnamed source. The account also provides access to a factory-reset control that would allow intruders to destroy much of the data and configurations of a network of HP storage products. And it's not hard to find: 'Open up your favourite SSH client, key in the IP of an HP D2D unit. Enter in yourself the username HPSupport, and the password which has a SHA1 of 78a7ecf065324604540ad3c41c3bb8fe1d084c50. Say hello to an administrative account you didn't know existed,' according to Technion, who claims to have attempted to notify HP for weeks with no result before deciding to go public." 


Read more of this story at Slashdot.
12 Jul 23:22
Maybe Steve Ballmer Doesn't Deserve the Hate
by Soulskill
Nerval's Lobster writes "Who could forget Steve Ballmer's defining moment, that infamous 'Developers! Developers! Developers!' rant that became a YouTube hit? Or the reports of frighteningly accurate chair-throwing? Who could miss the tech media and investors blaming him for everything from Microsoft's largely stagnant stock price over the past decade to its inability to get in front of trends such as mobile devices? But tech columnist (and Kernel editor-in-chief) Milo Yiannopoulos talked to a bunch of Ballmer's friends and colleagues, picked through Microsoft's history, and came away with the argument that the man deserves a second look as an effective leader. 'He stands accused of running one of the greatest companies in American history into the ground, even as its stock price remains remarkably resilient and the company continues to turn a healthy profit,' he writes. 'The mature verdict on Steve Ballmer is that he has made only one major strategic error: not combining his own brilliance for sales and detail with a visionary product leader who has the authority to create bold new revenue streams for the company.' Do you agree? Or does Ballmer deserve his reputation as a bad CEO?" 


Read more of this story at Slashdot.
11 Jul 23:54
New Article on SQLPerformance.com: “Observer Overhead and Wait Type Symptoms”
My 7th guest blog post was published today on SQLPerformance.com:
Observer Overhead and Wait Type Symptoms
This article details seven test scenarios I performed in order to see what wait-type symptoms (if any) arise based on different types of “observer overhead” due to concurrently running SQL Trace and XE sessions.
The post New Article on SQLPerformance.com: “Observer Overhead and Wait Type Symptoms” appeared first on Joe Sack.
11 Jul 23:54
De-identification of Personal Health Information
by John Paul Cook
Many people have asked me various questions about Personal Health Information (PHI) which is covered by the Health Insurance Portability and Accountability Act ( HIPAA , not HIPPA). The process of removing data (de-identification or anonymization) that...(read more)
11 Jul 20:09

Server 2012 PKI Key Based Renewal Explained
by Doug Symalla
Hello everybody, Randy here. I am new to the PFE role, but have a number of BLOG Posts under my belt from my time as a CTS engineer for the Directory Services team. One of my first tasks as a PFE was to clarify some features available in Server 2012 AD Certificate Services. This BLOG Post focuses on the Key Based Renewal feature but also can be a refresher on the topics of the Certificate Enrollment Policy Web Service (CEP) and the Certificate Enrollment Web Service (CES).
The Windows Server 2012 Key Based Renewal feature offers non-domain joined computers the ability to automatically renew their certificates. You may be asking yourself “Why do we need Key Based Renewal to accomplish this?”
For auto enrollment and renewal of certificates to work, the CA requires a very important piece of information: The identity of the requestor. In an intra-forest or Trust scenario, we can leverage Windows Integrated security to achieve this goal. Key based Renewal considers that the ownership of the certificate can be your identity. With the certificate itself as the authentication, any subject with access to the private key will be able to renew the certificate prior to its expiration. Now let’s look at the components and their settings to better explain this concept and how it can be secure. First let’s look at the certificate template requirements.
The Certificate Template: Requirements for Key Based Renewal
· The first requirement is that the template be marked to require “CA certificate manager approval". This is an extra layer of administrative overhead to ensure the auditing of certificates issued with this capability.

· A parameter on the certificate template to identify its eligibility for key-based renewal. You (the PKI administrator) choose what templates can produce certificates that renew themselves by selecting this option under the “Issuance Requirements” tab of the template.

NOTE: Marking a certificate template as Allow Key Based Renewal does not restrict it from use by authenticated requestors and leveraging auto-enrollment or auto-renewal. This behavior would be controlled by your standard permissions on the template.
· A parameter on the certificate template allowing for the use of the existing subject name of the certificate to be used for auto enrollment renewal request. This option is under the “Subject Name” tab of the certificate template. You cannot leverage AD information to build the subject name because the requestor is not identified by a security principal that holds the certificate.

· The certificate itself is the identity of the requestor, therefore the key usage must include “Client Authentication.” This setting is on the “Extensions” tab and double click on “Application Policies.”

Now that we have our template, we need a way to get to it. We cannot use our default Enrollment Policy (which is LDAP.) LDAP would need authentication and the CA will just use that to identify the requestor. What we need is a Web Enrollment Policy Service that does NOT use Windows Integrated.
Here is a refresher on the concepts of CEP and CES Certificate Enrollment Web Services.
First we will take a look at the requirements for the Certificate Enrollment Policy Service. This service is responsible for querying Active Directory for a list of available certificates the requestor is permitted to enroll. This service will require some unique settings in order to process a request using only the previous certificate as identification. Fortunately, the setup Wizard will guide you through all these settings if you select the CEP for Key Based Renewal.
Certificate Enrollment Policy: Requirements for Key Based Renewal
· Authentication Type cannot be “Windows Integrated.” We are not authenticating in the traditional sense, so we must select either Username \ Password or Client Certificate. Client Certificate in this context means a certificate mapped to a specific security principal in Active Directory and does NOT mean Key Based Renewal. This setting identifies how the CEP will initially validate a connection when configuring a CEP target on a client. I was able to change the password of the account originally used when setting up the policy and was still able to renew my certificate.

· We need to Enable Key-Based Renewal on the Policy server. Pay close attention to the informational in the wizard. It indicates that this feature is “All or Nothing” so if you offer Key-Based Renewal on this Policy Server, it will only offer those templates where Key-Based Renewal is configured.

Certificate Web Enrollment: Requirements for Key Based Renewal
· Renew on Behalf of (ROBO) mode. When setting up a CES Server, you can configure it for both enrollment and renewal services, or (for the security conscious) only for servicing certificate renewal requests. I mention the security conscious because CEP servers are often public facing or in a DMZ, and therefore exposed to a greater attack surface. By configuring the CEP service in ROBO mode, an attacker would only be able to extend the validity of an existing certificate and not obtain fresh ones. Revocation checking can deactivate any certificate that has been compromised. The important point here is the requirement of this setting, meaning that enablement of Key Based Renewals now limits the CES to performing ONLY renewal requests.

· Selecting a Service account. This step is slightly more important when considering Key Based Renewal because this Service Account will be enrolling on behalf of the owner of the certificate. You will also need to register the http SPN to this account and use the same account for CEP if running both these services on the same machine. See the TechNet articles in the “Additional Resources” section for more information.

· Authentication Type must be Client Certificate Authentication. Although the Policy server can implement “User Name\Password” or “Client Certificate authentication”, the Web Enrollment Service requires that you use “Client Certificate authentication.” This setting coincides with the requirement of the Certificate Template EKU to have “Client Authentication”.

· And Last but not Least, enabling the Key-Based Renewal feature.

To summarize our requirements of Key-Based Renewal. This feature is only available through the Web Enrollment services and require that both of these Services be configured specifically for this purpose. This configuration limits the CEP service to only enroll requestors for Key-Based Renewal Certificate Templates and the CES service to only provide Renewal services to the certificate and only allow for the client certificate to be used in identifying the requestor.
Additional Resources
If you have read this information and feel something is missing, or ready to implement and need a more step-by-step approach, then here are some great resources on TechNet:
Certificate Enrollment Policy Web Service Guidance
Certificate Enrollment Web Service Guidance
Test Lab Guide: Demonstrating Certificate Key-Based Renewal
Certificate Enrollment Web Services Whitepaper
Renewing a Certificate
Now that we have all the configuration out of the way, my next step is comparing the Key Based Renewal Capabilities against a Windows Integrated CEP \ CES Authentication. To do this I set up two separate Servers; one hosting CEP \ CES in regular Windows Authentication mode and the other CEP \ CES server configured for Key Based Renewal. Now I can create two different Web Enrollment Policies on a Domain-Joined member and be able to toggle between the two for testing.

The First thing to point out is that my Key-Based enabled Certificates are also available for enrollment when going through the Windows Auth CEP (Adatum AD CEP.) I was able to enroll in the new certificate as well as any number of certificates currently available for a domain-joined computer.

So I select my KBWeb (Key Based Renewal Certificate Template) and enroll using my Windows Auth CES service (remember that the Key Based Renewal CES service can only do renewals.) I must issue the certificate and copy it to my client because of the template restriction of requiring CA Certificate Manager Approval. This step is a typical PKI trade-off. You are taking the security burdens away from your users and replacing it with the administrative burden of your CA administrators. The explanation of that for mentioned comment is as follows:
· The Website administrator does not need to worry about setting and protecting a secure password, or even now requesting a new certificate before expiration.
· The CA administrator now needs to perform potentially high assurance issuance measures to vet, track and monitor these self-managing certificates.
Now I have my new certificate on my domain joined member and I turn off my Windows Auth CEP / CES server and try “Renew Certificate with New Key…”

I ultimately receive an error that the “Windows Auth CES server” is unavailable (Not the Key Based Renewal Server.)

Keep in mind that because this machine is domain-joined, it will be able to present its identity and enroll in either of the CES servers that are defined in the msPKI-Enrollment-Servers attribute on the object “CN=, CN=Enrollment Services, CN=Public Key Services, CN=Services, CN=Configuration, DC=corp, DC=adatum, DC=com.” This is where the Policy server knows to direct the client to for Enrollment.
Another interesting point on the error above is the “Continue” button. If I press this it brings up a Certificate Selection Window with all of my certificates that include the EKU for “Client Authentication”.

I select this certificate and now it goes to the Key Based Renewal CES server. So ultimately what happened was:
· The Policy server identified the available template and iterated through each of the Web Enrollment Servers in order of Priority.
· The Windows Auth failed because it was turned off, so we went to the Key based Renewal CES and that server was only able to accept the credentials of the certificate.
To verify this behavior, I renewed again with the Windows Auth CES server online and it went through Windows Auth CES to process the request.
This can also be seen by looking in the CA database at the issued certificate requests and the identity of the requestor.

The first and last certificate was requested by the computer account which enrolled in the template Randt38$ and the one in the middle was my Key Based Renewed certificate and the requestor was identified as my service account running the Key Based Renewal CES (CESSvcKB.)
I then wondered if there was any auditing I could implement to identify the requestor for Key Based Renewals. I turned up security auditing and turned up the CEP and CES operational logging and received nothing that would indicate a name or IP address.
NOTE: Enabling Verbose Logging on the CEP and CES services: under the web.config file. For more information read the Certificate Enrollment Web Services Whitepaper
Your solution to audit this would be to query the Request IDs where the requestor name equals the CES service account name and give each certificate issued of this type a unique parameter in the “Subject Name” that would identify where it came from.
Summary
The example above shows how a renewal request can be serviced without supplying credentials to the CA. Certificates can perform a variety functions, including client authentication, which can now be leveraged in the renewal request. This reduces the administrative overhead involved with supporting certificates issued outside of the Windows Security Boundary. The behavior of my non-domain joined machine would be that I would not be offered the option to enroll with the Windows Auth CES because the machine account was unable to identify itself to the Policy (CEP) service. I would be offered a renewal of the existing certificate through my Key Based Renewal CES by selecting the certificate as my credentials. The auto enrollment services on my client will be able to detect the expiration of the certificate and locate the Policy (CEP) service as defined in the local GPO configuration of the non-domain joined client.
11 Jul 20:09

SAP, HP and Microsoft Set New SAP World Record Using Hyper-V
by BradAnderson
Back in May, I discussed how technologies such as Windows Server 2012, Hyper-V, and System Center 2012 SP1, provide the most scalable, reliable, and feature-rich platform to run key, tier-1 workloads like SQL Server, SharePoint and Exchange, at the lowest cost.
To help customers virtualize these workloads, we’ve recently published a number of best practice whitepapers for the virtualization and management of SQL Server, SharePoint and Exchange, and we’ve also shared some phenomenal performance testing results which underscore that the Microsoft platform is unequivocally the best platform for virtualizing tier-1 workloads.
But I’m realistic – I understand that there are organizations who also run other tier-1 applications within their environments, and Microsoft wants to ensure that our customers can virtualize those other workloads with the same confidence they have when virtualizing Microsoft workloads.
One of the most common workloads within enterprise environments is SAP Enterprise Resource Planning (ERP), which is a solution that provides access to critical data, applications, and analytical tools, and it helps organizations streamline processes across procurement, manufacturing, service, sales, finance, and HR. For a demanding workload like SAP ERP, many of our customers assume that they will need to run the solution on physical servers – and this assumption is backed up by the large number of existing SAP benchmarks which highlight the huge scale and performance on a physical platform.
So what does that mean for customers who want to virtualize SAP ERP? Can it be virtualized successfully and deliver the necessary levels of performance required for tier-1 applications?
The answer is unequivocally, yes.
I’m proud to announce that, on June 24th, 2013, through a close collaboration between SAP, HP and Microsoft, a new world record was achieved and certified by SAP for a three-tier SAP Sales and Distribution (SD) standard application benchmark, running on a 2-processor physical server.
The application benchmark resulted in 42,400 SAP SD benchmark users, 231,580 SAPS, and a response time of 0.99 seconds, showcasing phenomenal performance on just 2 physical sockets.
The best part? Not only was SAP ERP 6.0 (with Enhancement Package 5) running on SQL Server 2012, on Windows Server 2012 Datacenter, but the configuration was completely virtualized on Hyper-V. In addition, this is the first SAP benchmark with virtual machines configured with 32 virtual processors, and subsequently, the first with SQL Server running in a 32-way virtual machine. The result is also 30% higher than a previous 2-socket, virtualized configuration running on VMware vSphere 5.0.
It’s clear from this benchmark that with the massive scalability and enterprise features in Windows Server 2012 Hyper-V, along with HP’s ProLiant BL460c Gen8 servers, 3PAR StoreServ Storage and Virtual Connect networking capabilities, customers can virtualize their mission critical, tier-1 SAP ERP solution with confidence.
You can find the full details of the benchmark on the SAP Benchmark Site, and you can also read more information about running SAP on Windows Server, Hyper-V & SQL Server, over on the SAP on SQL Server Blog.
Note:
Benchmark performed in Houston, TX, USA on June 8, 2013. Results achieved 42,400 SAP Standard SD benchmark users, 231,580 SAPS and a response time of 0.99 seconds in a SAP three-tier configuration SAP EHP 5 for SAP ERP 6.0. Servers used for Application servers: 12 x ProLiant BL460c Gen8 with Intel Xeon E5-2680 @ 2.70GHz (2 processors/16 cores/32 threads) and 256GB using Microsoft Windows Server 2012 Datacenter on Windows Server 2012 Hyper-V. DBMS Server: 1 x ProLiant BL460c Gen8 with Intel Xeon E5-2680 @ 2.70GHz (2 processors/16 cores/32 threads) and 256GB using Microsoft Windows Server 2012 Datacenter on Windows Server 2012 Hyper-V using Microsoft SQL Server 2012 Enterprise Edition
VMWare ESX 5.0 based benchmark performed in Houston, TX, USA on October 11, 2011. Results achieved 32,125 SAP Standard SD benchmark users, 175,320 SAPS and a response time of 0.99 seconds in a SAP three-tier configuration SAP EHP 4 for SAP ERP 6.0. Servers used for Application servers: 10 x ProLiant BL460c G7 with Intel Xeon X5675 @ 3.06GHz (2 processors/12 cores/24 threads) and 96 GB using Microsoft Windows Server 2008 Enterprise on VMWare ESX 5.0. DBMS Server: 1 x ProLiant BL460c G7 with Intel Xeon X5675 @ 3.06GHz (2 processors/12 cores/24 threads) and 96 GB using Microsoft Windows Server 2008 Enterprise on VMWare ESX 5.0 using Microsoft SQL Server 2008 Enterprise Edition.
11 Jul 20:05
Understanding What sp_updatestats Really Updates
by Erin Stellato
Erin Stellato (@erinstellato) of SQLskills.com dives into what sp_updatestats is really doing, and why you should avoid relying on it for perpetual maintenance on your SQL Servers.
11 Jul 20:04

How to live debug a VM in Hyper-V
by Windows Server Core Team
For this example I am using a Windows Server 2012 Physical machine with Hyper-V installed. I will setup a live Debug session with a Windows 7 sp1 Virtual Machine residing on the same server.
- Win2012Debugger (Host) - This is the physical machine that will be used to do the debug
- Win7 client (Target) - This is the client VM being debugged
Configuring the physical machine:
1. Install the debug tools
http://msdn.microsoft.com/en-us/windows/hardware/hh852363
Click Next until you see the Select the features you want to install screen.
Select only the option named Debugging Tools for Windows and click the Install button. I typically install the tools to a directory named C:\debugger

2. Open Windbg with administrative privileges.
3. Configure the symbol path
a. From within windbg, click on file, Symbol File Path

b. In the Symbol Search Path insert the following:
.sympath SRV*f:\localsymbols*http://msdl.microsoft.com/download/symbols
(This will allow the debugger to use the public symbols that are available online)
4. From within Hyper-V manager, go to the settings of the Virtual Machine you are going to debug to configure the Namepipe for the debugger to connect. This is configured in the COM1 settings. For this example I'm naming my Namepipe DEBUGWIN7

Configuring the Virtual machine:
1. Logon to the Windows 7 VM that you are going to debug. If the machine is not booting you can run the commands from Winre or Winpe.
2. Open an administrative command prompt and enable debugging by running the following command:
Bcdedit /debug on
If you are running the command from Winre or Winpe it would be
Bcdedit /set {default} debug on
3. Configure the debugger to use the COM port specified by running the following command:
Bcdedit /dbgsettings Serial Debugport:1 baudrate:115200
4. You can check these settings by running bcdedit /enum all
You can see in the below diagrams that under Windows Boot Loader, debug is set to yes, and the debug settings reflect the last bcd command.

![]()
5. Restart the Windows 7 client VM
Remote Debugging:
Now that both machines are configured, we can start the remote debug session.
1. Launch windbg with administrative privileges.
2. From the file pull down menu select Kernel Debug:

Make sure the settings match the debug settings configured earlier.
a. Baud Rate = 115200
b. Port = \\.\pipe\DEBUGWIN7 this was configured during step 4 of Configuring the physical machine
c. Make sure the Pipe and Reconnect checkboxes are checked.
d. Click OK
3. You should now see the following screen:

4. One you see this screen go to the Debug pull down menu and select Break or Ctrl + Break to break into the debugger.

5. You can test the debug connection by running the !process 0 0 command. This will show you the running processes on the target Operating System.
11 Jul 20:02
A gentle introduction to transaction isolation levels and Hekaton tables
by Bob Beauchemin
I finished reading the Books Online and CTP1 whitepaper introduction to transactions and memory-optimized tables a couple of days ago. Although I know what the transaction isolation levels mean, I was sort of surprised by some of the descriptions and found them a bit confusing. So I decided to go back to basics and write some simple examples that demonstrated the transaction isolation levels.
Firstly though, I have to define some terms: Books online mentions differences with memory optimized tables between autocommit transactions and user/implicit transactions. “Autocommit transactions” refers to the fact that individual SQL statements are atomic by definition; they either commit or rollback as a unit. For example, if I issue a SQL UPDATE statement that updates 10 rows and 1 row fails update because of a constraint, the statement fails and 0 rows are updated at end-of-statement. In these examples, I’m using “user transactions” where 1-n statements are made part of a single transaction with the BEGIN TRANSACTION and the COMMIT/ROLLBACK TRANSACTION statements. Implicit transactions are another way to make multiple SQL statements transactional, I’m not using this here.
I’m using memory-optimized tables in a database named “simple”. To mention a bit more about the “environment”:
– The database simple snapshot_isolation_state and RCSI turned off at the database level (sys.databases)
– I’m running at default isolation level of read committed (dbcc useroptions)
– XACT_ABORT session setting is turned off (dbcc useroptions doesn’t have a row declaring it is on)
Memory-optimized tables support three transaction isolation levels in user transactions: SNAPSHOT, READCOMMITTED, and SERIALIZABLE. My first puzzle was the BOL describes SNAPSHOT as the “lowest” of the three. I’ve always considered SQL Server’s SNAPSHOT isolation level as most like Oracle’s SERIALIZABLE isolation level (SQL Server couldn’t use the word serializable because that is implemented by locking in SQL Server). But in the world of memory-optimized tables and user transactions, SNAPSHOT is indeed a lower isolation level than READCOMMITTED. Hmmm.
Also, all three of these levels, when used with memory-optimized tables, can fail the user transaction at commit time, if there’s a conflict detected. SQL Server’s SNAPSHOT against “traditional” tables fail during user transactions at the statement where the conflict is detected.
So, on the examples on the simplest user-transaction behavior… complete script is at the end for you to try. I execute the statements in SQL Server Management Studio, one statement at a time. I’m not using compiled stored procedures.
1. SNAPSHOT
begin tran
select * from dbo.t1 with (snapshot)
– update a row in another session here
commit — OK
begin tran
select * from dbo.t1 with (snapshot)
– update a row in another session here
select * from dbo.t1 with (snapshot) — sees old value
commit — OK
The only “strange” thing here is that you can use SNAPSHOT against memory-optimized tables even though snapshot_isolation_state is OFF at a database level. That’s because memory-optimized tables don’t implement snapshot isolation level the same way as regular tables (e.g. no version store for them).
2. REPEATABLE READ
begin tran
select * from dbo.t1 with (repeatableread)
– update a row in another session
commit — Msg 41305, Level 16, State 0, Line 39 The current transaction failed to commit due to a repeatable read validation failure.
begin tran
select * from dbo.t1 with (repeatableread)
– insert a row in another session
commit — OK
begin tran
select * from dbo.t1 with (repeatableread)
– insert a row in another session
select * from dbo.t1 with (repeatableread) — does not see new row
commit — OK
Repeatable read doesn’t block after reading rows (no locking for memory-optimized tables), but fails at commit time if repeatable read semantics have been violated during the transaction (e.g. any of the rows have changed since you read them). Note that the transaction starts at the first SQL statement, NOT at the same you issue BEGIN TRANSACTION.
begin tran
– update row in another session before reading
select * from dbo.t1 with (repeatableread) — sees new value (and tx starts here)
commit — OK
begin tran
select * from dbo.t2 with (repeatableread) — transaction starts with first SQL statement
– update row in t1 in another session before reading
select * from dbo.t1 with (repeatableread) — sees the old value
commit — Msg 41305, Level 16, State 0, Line 72 The current transaction failed to commit due to a repeatable read validation failure.
3. SERIALIZABLE.
Note that the READCOMMITTED transaction failed if you changed a row you’d read, but did NOT fail if someone else inserted a row during your transaction. Failing a transaction when someone else inserts a row inside a keyrange you’ve read (table you’ve read, if you’re reading all the rows) only happens in serializable isolation level.
begin tran
select * from dbo.t1 with (repeatableread)
– insert a row in another session
select * from dbo.t1 with (repeatableread) — does not see new row
commit — OK, commits in repeatableread
begin tran
select * from dbo.t1 with (serializable) — insert a row in another session
commit — Msg 41325, Level 16, State 0, Line 55 The current transaction failed to commit due to a serializable validation failure.
And there you have it!
However, it’s not always that simple. Here’s a couple of things that differ with respect to environment, right off the bat… 1. There are subtly different rules for “autocommit” transactions. 2. There are differences when you mix memory-optimzed and non-memory optimized tables in the same user transaction.
This is just meant to be a gentle introduction. The script is enclosed for your reference. For more information, refer to “Transactions in Memory Optimized Tables” topics in BOL.
Cheers, Bob
Here’s a hyperlink to the script:
The post A gentle introduction to transaction isolation levels and Hekaton tables appeared first on Bob Beauchemin.
11 Jul 20:02

What’s New in 2012 R2: Beginning and Ending with Customer-specific Scenarios
by BradAnderson
Over the last three weeks, Microsoft has made an exciting series of announcements about its next wave of products, including Windows Server 2012 R2, System Center 2012 R2, SQL Server 2014, Visual Studio 2013, Windows Intune and several new Windows Azure services. The preview bits are now available, and the customer feedback has been incredible!
The most common reaction I have heard from our customers and partners is that they cannot believe how much innovation has been packed into these releases – especially in such a short period of time. There is a truly amazing amount new value in these releases and, with this in mind, we want to help jump-start your understanding of the key scenarios that we are enabling.
As I’ve discussed this new wave of products with customers, partners, and press, I’ve heard the same question over and over: “How exactly did Microsoft build and deliver so much in such a short period of time?” My answer is that we have modified our own internal processes in a very specific way: We build for the cloud first.
A cloud-first design principle manifests itself in every aspect of development; it means that at every step we architect and design for the scale, security and simplicity of a high-scale cloud service. As a part of this cloud-first approach, we assembled a ‘Scenario Focus Team’ that identified the key user scenarios we needed to support – this meant that our engineers knew exactly what needed to be built at every stage of development, thus there was no time wasted debating what happened next. We knew our customers, we knew our scenarios, and that allowed all of the groups and stakeholders to work quickly and efficiently.
The cloud-first design approach also means that we build and deploy these products within our own cloud services first and then deliver them to our customers and partners. This enables us to first prove-out and battle-harden new capabilities at cloud scale, and then deliver them for enterprise use. The Windows Azure Pack is a great example of this: In Azure we built high-density web hosting where we could literally host 5,000 web servers on a single Windows Server instance. We exhaustively battle-hardened that feature, and now you can run it in your datacenters.
At Microsoft we operate more than 200 cloud services, many of which are servicing 100’s of millions of users every day. By architecting everything to deliver for that kind of scale, we are sure to meet the needs of enterprise anywhere and in any industry.
Our cloud-first approach was unique for another reason: It was the first time we had common/unified planning across Windows Client, Windows Server, System Center, Windows Azure, and Windows Intune. I know that may sound crazy, but it’s true – this is a first. We spent months planning and prioritizing the end-to-end scenarios together, with the goal of identifying and enabling all the dependencies and integration required for an effort this broad. Next we aligned on a common schedule with common engineering milestones.
The results have been fantastic. Last week, within 24 hours, we were able to release the previews bits of Windows Client 8.1, Windows Server 2012 R2, System Center 2012 R2, and SQL Server 2014.
By working together throughout the planning and build process, we established a common completion and Release to Manufacturing date, as well as a General Availability date. Because of these shared plans and development milestones, by the time we started the actual coding, the various teams were well aware of each dependency and the time to build the scenarios was much shorter.
The bottom-line impact of this Cloud-first approach is simple: Better value, faster.
This wave of products shows that the changes we’ve made internally allow us to deliver more end-to-end scenarios out of the box, and those scenarios are all delivered at a higher quality.
This wave of products demonstrates that the changes we’ve made internally allow us to deliver more end-to-end scenarios out of the box, and each of those scenarios are all delivered at a higher quality. This cloud-first approach also helps us deliver the Cloud OS vision that drives the STB business strategy.
The story behind the technologies that support the Cloud OS vision is an important part of how we enable customers to embrace cloud computing concepts. Over the next eight weeks, we’ll examine in great detail the three core pillars (see the table below) that support and inspire these R2 products: Empower People-centric IT, Transform the Datacenter, and Enable Modern Business Apps. The program managers who defined these scenarios and worked within each pillar throughout the product development process, have authored in-depth overviews of these pillars and their specific scenarios, and we’ll release those on a weekly basis.
| Pillar | Scenarios |
| Empower | People-centric IT (PCIT) empowers each person you support to work virtually anywhere on PCs and devices of their choice, while providing IT with an easy, consistent, and secure way to manage it all. Microsoft's approach helps IT offer a consistent self-service experience for people, their PCs, and their devices while ensuring security. You can manage all your client devices in a single tool while reducing costs and simplifying management. |
| Transform the Datacenter
| Transforming the datacenter means driving your business with the power of a hybrid cloud infrastructure. Our goal is to help you leverage your investments, skills and people by providing a consistent datacenter and public cloud services platform, as well as products and technologies that work across your datacenter, and service provider clouds. |
| Enable Modern | Modern business apps live and move wherever you want, and Microsoft offers the tools and resources that deliver industry-leading performance, high availability, and security. This means boosting the impact of both new and existing applications, and easily extending applications with new capabilities – including deploying across multiple devices. |
The story behind these pillars and these products is an important part of our vision for the future of corporate computing and the modern datacenter, and in the following post, David B. Cross, the Partner Director of Test and Operations for Windows Server, shares some of the insights the Windows Server & System Center team have applied during every stage of our planning, build, and deployment of this awesome new wave of products.
* * *
Historically, Microsoft’s approach to building quality Software and Services was to first focus on quality assurance techniques that were targeted to ensure the component and feature functionality behaved according to design specifications. The limitation of this approach was that it ignores the fact that customers do not use the components and features of products in isolation – they use combinations of them to fulfill the needs of their business. Understanding this important fact made it critically important to validate all the functionality within the product, and then ensure it met customer expectations for interoperability.
As we move to the cloud with a faster and more agile cadence, and combine this move with a more complex set of components and requirements, this uncertainty and dependence on long-term beta testing is no longer realistic. With the Windows Server 2012 R2 and System Center 2012 R2 engineering cycle, we dynamically evolved our engineering planning, execution, and quality validation processes by engraining an end-to-end focus on customer scenarios into all phases of the development lifecycle. Specifically, starting with Windows Server 2012 (and expanding in the Windows Server 2012 R2 release), we used customer-specific end-to-end scenarios to plan, prioritize, design, implement and validate the solutions we bring to market. This approach was analyzed and discussed in several sessions at TechEd 2013 a few weeks ago.
Our approach is to define scenarios from a customer point of view and develop a comprehensive understanding of both what they want to achieve and how they measure success. This scenario-centric approach to building the platform was the primary reason why our 2012 versions of Windows Server and System Center were so well received by our customers. This approach is now a critical part of how we build products and services going forward.
In the Windows Server and System Center division, we have applied this operational philosophy at every stage of development, and the result is a clearly defined value proposition for our customers and end users. The organizational principles we follow are simple:
- Customers can easily understand and have confidence in how various products and components work together end-to-end and no longer need to experiment in their private test labs to learn what might be possible.
- Customers learn from our internal experience and know the best practices, integration points for deployment, and the expected results (e.g. performance, scale, reliability, security, etc.) from the very start.
- Customers can easily validate the scenarios and quality metrics themselves to ensure the integration works in their environment and that these scenarios meet their needs end to end.
This engineering model goes well beyond processes and tools – it is a mindset that places an emphasis on becoming a customer advocate. Our engineers have shifted their attention from the perspective of “does this feature work?” to “will this scenario delight our customers?” Validation and quality are, therefore, not only measured from actual deployments and measurements of success criteria, but also from customer feedback and satisfaction metrics that are provided throughout the engineering cycle.
In all of our current operations we practice both interface validation as well as end-to-end integration testing to validate quality holistically. In addition to this, when moving applications, services and other functionality to the cloud, we must also test in-production or “live” under varying conditions and over time with real world customers. Also, in keeping with a long-standing Microsoft tradition, we still always start by eating our own dog food by deploying every new scenario internally to experience and validate the capabilities of our innovation first hand. We learn from our own internal Services operations and, based on our early deployments, we ensure that we are delivering powerful end-to-end scenarios that enable quick and reliable business solutions.
With this in mind, we are applying the following steps to drive this focus and process in our ongoing engineering cycles:
- Plan based on customer needs. Our mission is to determine what actions our customers can take to achieve their desired result and understand which metrics are used by customers to measure success. Each of these elements are critical to the scenario-definition process. Once these scenarios are defined, we can then choose and prioritize what we will engineer and validate through the use of CTQ (critical to quality) measurements.
- Design great products. We invest in developing great designs for the priority scenarios by specifying requirements, prototyping implementations, and actively validating end user feasibility/usability. Adding more to a product is not the right decision if it will result in a scenario that is incomplete in the end.
- Implement the software or service. This is naturally performed by coding, testing, and tweaking incrementally as we measure progress against the scenario goals throughout the engineering cycle.
- Review our scenarios frequently. We conduct assessments of the status of our scenario CTQs internally and with customers on a regular basis to ensure each scenario is refined based on feedback and deployments, and we are careful to never cut a dependent feature that will impact a scenario negatively. A scenario is only removed when we determine that it will be incomplete without the end-to-end integration of all dependent components. We believe that a few great scenarios are far better than a large number of partial ones.
- Stabilize the software or service. We must always ensure the scenarios survive the implementation phase intact, and that we meet our target CTQ goals in the process. We also continually engage and monitor our target customers to ensure that they will achieve their goals with the end product when it is released.
* * *
We currently follow each of these steps for every new solution, and the current wave of products is an example of this philosophy at work. Our cloud-first focus has enabled common/unified planning which has in turn allowed our teams to collaborate to deliver integrated customer-focused scenarios.
Customer success is the inspiration for our customer-focused engineering, end-to-end product integration, and scenario validation. Windows Server 2012 R2, System Center 2012 R2, and the rest of this amazing wave of products, are a concrete example of our vision and promise for the Microsoft Cloud OS.
– Brad
11 Jul 20:00

AlwaysOn in SQL Server 2014 CTP1
by Sanjay Mishra
Failover Cluster Instances as well as Availability Groups have some great features coming up in SQL Server 2014.
Take a look at Luis' post on what you can try out with publicly available CTP1: http://blogs.technet.com/b/dataplatforminsider/archive/2013/06/27/alwayson-in-sql-server-2014-ctp1.aspx
11 Jul 19:58
Stuff Their Databases Say
by Karen Lopez
If you’ve been to one of my “Stuff Your Database Says” sessions, you know I collect photos of how my data is messed up by information systems.
Many of my frequent flyer friends can confirm that integration between airlines, even alliance partners, is plagued with problems.
Here’s today’s boarding pass. I call this my “secret international alias”.

11 Jul 19:58
A more complex discussion of user transactions and memory-optimized tables
by Bob Beauchemin
In the last blog post, I tried out a simple example to show the difference between the three transaction isolation levels supported by memory-optimized tables. I only used user-transactions in T-SQL, and only showed the behavior of transactions consisting of SELECT statements, when INSERT/UPDATE/DELETE activity was taking place in other sessions running concurrently. But of course, things are not always *that* simple, and there are differences regarding:
1. Transactions that do concurrent INSERT/UPDATE/DELETE in multiple sessions
2. Transactions running in or using compiled stored procedures (which must be defined as atomic and declare their isolation level)
3. Autocommit transactions (i.e. single atomic SQL statements)
Today, I’ll expand the discussion to cover some additional cases.
One thing I did mention in the previous post is WHEN a user transaction fails. The previous post originally mentioned (as a simplification) that transactions with memory-optimized tables “…fail the user transaction at commit time, if there’s a conflict detected. SQL Server’s SNAPSHOT against “traditional” tables fail during user transactions at the statement where the conflict is detected.”
That’s not always true with concurrent *actions* in a user transaction. User transactions can fail at different points in a transactions lifetime, that is:
1. Normal Processing phase – during the lifetime of a transaction
2. Preparation phase – transaction decides whether it can commit or must abort
According to the definition in the whitepaper “High-Performance Concurrency Control Mechanisms for Main-Memory Databases” (sections 2 and 3), there are a total of 3 transaction processing phases:
Tx created
1. Normal Processing
2. Preparation
3. Postprocessing
Tx terminated
The preparation phase concludes with writes to the transaction log, if the transaction commits. The postprocessing phase consists of timestamp fix up, whether the transaction commits or aborts. It’s also good to remember that, in a T-SQL user transaction, the transaction begins with the first statement after “BEGIN TRANSACTION” that touches data, rather than during the T-SQL “BEGIN TRANSACTION” statement.
All of the conditions I looked at last week failed in the preparation phase.
It’s obvious that, if two concurrent INSERTS with the same primary key happen, one of them must fail. If the later insert happens during a transaction, that transaction fails at commit time (in the preparation phase), rather than normal processing time.
begin tran insert dbo.t1 with (snapshot) values(5, ‘Fred’)
– insert row with same primary key in another session and commit other session (insert, commit in other session works)
commit — Msg 41325, Level 16, State 0, Line 66 The current transaction failed to commit due to a serializable validation failure.
However, WRITE conflicts (transaction updates or deletes a row already updated/deleted by another session AFTER the transaction starts) fail at normal processing time. This is what we’re used to with conflict detection in SNAPSHOT isolation level with “ordinary” SQL Server tables. The previous post is rephrased from the simplified original “…fail at commit time” to “…CAN fail at commit time” to indicate that write conflicts fail the way that we’re “used to”.
begin tran
select * from dbo.t2 with (snapshot) — starts the transaction
– update row 2 in another transaction and commit other session
update dbo.t1 with (snapshot) set c2 = ‘Sam’ where c1 = 2
– Msg 41302, Level 16, State 110, Line 120
– The current transaction attempted to update a record that has been updated since this transaction started. The transaction was aborted.
– Msg 3998, Level 16, State 1, Line 120
– Uncommittable transaction is detected at the end of the batch. The transaction is rolled back.
commit — transaction already rolled back (above)
begin tran
select * from dbo.t2 with (snapshot) — starts the transaction
– update row 2 in another transaction and commit
delete dbo.t1 with (snapshot) where c1 = 2
– Msg 41302, Level 16, State 111, Line 130
– The current transaction attempted to update a record that has been updated since this transaction started. The transaction was aborted.
– Msg 3998, Level 16, State 1, Line 130
– Uncommittable transaction is detected at the end of the batch. The transaction is rolled back.
– The statement has been terminated.
commit — transaction already rolled back (above)
Just to confirm what I mentioned before, the following shows that the transaction starts when the first data is touched, rather than at BEGIN TRANSACTION. If I remove the SELECT from (unrelated) table dbo.t2 and update and commit row 2 in another session before accessing data at all, the transaction is consistent (you’re just updated already updated/committed data after the transaction starts) and the UPDATE succeeds.
begin tran
– update row 2 in another transaction and commit
update dbo.t1 with (snapshot) set c2 = ‘Sam’ where c1 = 2 — tx starts here, 2 is already updated/commited to new value
commit — OK
In traditional SNAPSHOT isolation, 2 INSERTers with the same primary key or 2 UPDATE/DELETEers when both sessions are in transactions cause the transaction with the last action to wait, but with multi-version memory-optimized tables, we don’t want to wait, and rather than wait transactions can take dependencies on other transactions, continuing but assuming the transactions “before” them will commit. These dependencies are resolved by waiting, if needed, during the preparation phase, rather than doing normal processing. A best practice with memory-optimized tables is to keep transactions short, to minimize waits for transaction dependencies. Refer to the whitepaper for a description of conditions that can cause transaction dependencies.
There are places where reading or writing inside a transaction can cause other sessions to wait, however. In repeatable read isolation level and above, but not in snapshot isolation level, a SELECT statement on a memory-optimized table WITH A T-SQL STATEMENT within a T-SQL user transaction will cause another session attempting to DROP the table to wait.
begin tran
select * from dbo.t1 with (snapshot)
– drop table t1 in the other session, it works
select * from dbo.t1 with (snapshot) — invalid object name dbo.t1
commit — OK
begin tran
select * from dbo.t1 with (repeatableread)
– drop table t1 in the other session, this waits
select * from dbo.t1 with (repeatableread) — OK
commit — OK, (and drop works after this tx committed)
However, reads from within a repeatable read isolation level COMPILED PROCEDURE and writes (INSERT/UPDATE/DELETE) from within a COMPILED PROCEDURE at any isolation level allow a DROP TABLE from another session statement to work, and cause a validation error at preparation time. Writes in a T-SQL statement at any isolation level cause the same validation error.
begin tran
insert into dbo.t1 with (snapshot) values(5, ‘Fred’)
– drop table t1 in the other session – the drop statement hangs
commit — OK, (and drop works after this tx committed)
go
create procedure dbo.insert_t1(@c1 int, @c2 varchar(10))
with native_compilation, schemabinding, execute as owner
as begin atomic with (transaction isolation level=snapshot, language=N’us_english’)
insert into dbo.t1 values(@c1, @c2)
end
go
begin tran
execute dbo.insert_t1 5, ‘Fred’
– drop procedure dbo.insert_t1 and dbo.insert_t1 and table t1 in the other session (this works without hanging/waiting)
–
– note that we must drop the procedure (and any other procedures that reference table t1)
– first, because compiled procedures are schemabound.
– attempting to drop the table without dropping the procedure would fail with a schemabinding error.
commit — Msg 41305, Level 16, State 0, Line 211 The current transaction failed to commit due to a repeatable read validation failure.
So we’ve succeeded in muddying the waters a bit by illustrating that:
1. With memory-optimized tables, transactions can fail during normal procession as well as the preparation phase
2. Transactional behavior can cause different behavior in other sessions depending on whether we use a compiled procedure or use a T-SQL statement.
With memory-optimized tables, these are not your mother’s/father’s traditional transactions. AND…we haven’t covered all the differences and edge-cases yet, either.
Cheers, Bob
The post A more complex discussion of user transactions and memory-optimized tables appeared first on Bob Beauchemin.
11 Jul 19:55

July, the 31 Days of SQL Server DMO’s – Day 11 (sys.dm_os_wait_stats)
by Tamarick Hill
The sys.dm_os_wait_stats DMV collects instance wide aggregations of all waits that have occurred on your SQL Instance since the last time the DMV statistics were reset. This DMV is useful when needed to determine the top waits that are occurring on your server so that you know where you should focus your tuning efforts.
To help illustrate this DMV, let run a quick query against it:
SELECT * FROM sys.dm_os_wait_stats WHERE waiting_tasks_count > 0

The first column, wait_type, displays each wait type that has occurred on your instance since the last time the DMV statistics were reset. The second column, waiting_tasks_count, give you the number of times that a particular wait type has occurred. The wait_time_ms column gives you the total time in milliseconds that a particular wait type has consumed. The max_wait_time_ms column gives you the maximum time in milliseconds that a wait type has waited for out of the X number of times it has waited. The final column returned by this DMV is the signal_wait_time_ms. This column represents the amount of time that a thread has spent on the Runnable queue. To help illustrate what this column represents, when a thread is executing, its status is listed as ‘Running’ and it is currently on a CPU executing. If the thread needs a resource that it cannot access yet, it will move to the Suspended Queue and have a status of ‘Suspended’. Once the thread acquires the resources it needs it moves to the Runnable queue and has a status of Runnable. This is when the signal_wait_time counter begins. The thread has all of the resources it needs and is simply waiting for its turn to get back onto the CPU. Once it moves back to the CPU, the status will change to ‘Running’.
**Note: Threads can also come off of the CPU even if they are not lacking any needed resources. This happens when there are other threads in a ‘Runnable’ state waiting to get on the CPU. In this case the thread currently on the CPU will yield so that other Runnable processes are not constantly waiting for their chance on the CPU. This is generally represented by a SOS_SCHEDULER_YIELD wait type and can often indicate CPU pressure. When threads yield, they go directly to the ‘Runnable’ queue.
As stated earlier, this DMV is very useful for tracking down the top waits on your server so you can formulate a plan for improving the server performance.
For more information about this DMV, please see the below Books Online link:
http://msdn.microsoft.com/en-us/library/ms179984.aspx
Follow me on Twitter @PrimeTimeDBA
11 Jul 19:55
Next-Level Parallel Plan Forcing: An Alternative to 8649
by Adam Machanic
" Even experts with decades of SQL Server experience and detailed internal knowledge will want to be careful with this trace flag. I cannot recommend you use it directly in production unless advised by Microsoft, but you might like to use it on a test system as an extreme last resort, perhaps to generate a plan guide or USE PLAN hint for use in production (after careful review)." So wrote Paul White in his often referenced article, " Forcing a Parallel Query Execution Plan ." His article focuses...(read more)
11 Jul 10:04

Is there more to using SQL in Azure than redirecting your connection string?
by Greg Low
At SQL Down Under, we've been working quite a lot over the past year with customers that are moving some of their applications to cloud-based systems, and mostly on Windows Azure. One message that I often hear about using Windows Azure SQL Database (WASD) is that all you need to do is point your application’s connection string to the cloud and all will be good. While there are occasional cases where that is true, that generally isn’t going to give you a great outcome. To really get a great outcome, you generally will need to check out how your application has been designed.
Here are the most common issues that I see:
1. Latency cannot be ignored. If you have ever run an application locally that’s connected to a database hosted anywhere else, you’ll realize that network delays can impact you. In Australia, we are eagerly awaiting the availability of local Azure datacenters as they will make a big difference regarding latency. But even when local datacenters are available, your customers might not all be in the same region.
When you are choosing a datacenter to use, it’s important to check the latency that you are experiencing. The easiest way to do that is to connect to a database in each datacenter using SQL Server Management Studio (SSMS), enable client statistics (from the Query menu, choose Include Client Statistics), then execute a query that will have almost no execution time, such as:
SELECT 1;
When the query is complete, on the Client Statistics tab, look at the value for “Wait time on server replies”. Make sure that you test this against other datacenters, not just the ones that seem geographically closest to you. The latency depends upon the distance, the route, and the Internet Service Provider (ISP). Last year I performed some testing in Brisbane (Australia), and the lowest latency was from the Singapore datacenter. However, testing from Auckland (New Zealand) showed the lowest latency when using a US-based datacenter, for the ISP that my customer was connected with.
2. Round Trips must be avoided. When using a remote datacenter rather than a database on your local network, it’s really important that you achieve as much work as possible in each call to the database engine. For example, last year I was working at a site where I noticed that an application was making 90,000 remote procedure calls between when the application started up and when the first window appeared for the user. It’s a tribute to SQL Server that this was pretty quick (around 30 seconds) on the local network. However, if the connection string for that application was pointed to a database server with 100ms latency, the first screen of the application would take nearly 3 hours to appear!
Years ago, I used to see the same issue with developers building web applications. Often, they would be developing the applications on the same machine that was hosting both the web server and the database engine. The applications appeared to be fast, but when deployed they could not cope with the user load. The best trick I ever found for that was to make the developers connect to the database via a dial-up 64KB/sec modem. They then realized where the delays were occurring in their code. If the application ran OK on a dial-up link, it then ran wonderfully on a “real” network. Based on that logic, it might be interesting to get your developers to work against a datacenter that has really high latency from the location they are working at. Alternately, consider using a tool that allows you to insert latency into network connections during development.
The most important lesson, however, is to work out how to reduce the number of round-trips to the database engine. For example, rather than making a call to start a transaction, another call to write an invoice header row, five more calls to write the invoice detail lines, and yet another call to commit the transaction, use techniques like table variables to let you send the entire invoice in a single call, and to avoid having your transactions ever spanning the network calls. Even better, see if you can send multiple invoices at once where that makes sense.
3. Code Compatibility needs to be considered. While WASD offers good capability with SQL Server, there are some differences. You need to check that your code is compatible. For example, WASD requires a clustered primary key on tables.
4. Backup and recovery are still important. The team at Microsoft do a great job of looking after your data. I have visited a lot of companies over the years. One of the concerns that I hear expressed about cloud-based systems is about how well the data will be managed. Ironically, from what I’ve seen and experienced of the Azure processes, on their worst day they’ll do a better job than almost any company that I visit. However, that doesn’t mean that you don’t need to be concerned with availability and recovery. You still need to put processes in place to perform periodic backups, and to have recovery plans in place.
5. Data and schema migration might need to be done differently. I recently took a small on-premises database that was about 14MB in size, scripted out the schema and the data and wanted to move it to the cloud. If I just pointed the script to WASD, it would have taken several hours to run. I found similar issues with using SQL Server Integration Services (SSIS). Once again, latency was the killer. However, exporting the database to a BACPAC in Azure Storage and then importing the database using the Azure portal took a total of about 2 minutes!
While your existing skills are important when working in these environments and in many cases will still work, there are often quicker more effective new ways to get things done. So keep learning! You might also find some interesting insights in the SQL Down Under podcast (show 51) that I did with Conor Cunningham from the SQL product team.
11 Jul 09:53

SQL Server and Programming Frameworks
by Greg Low
I have days where I can’t decide if I’m frustrated or sad about how I see SQL Server being used by applications, or if I’m happy that this keeps us in ongoing work.
Today I’ve been looking at a system that’s having performance issues. There are three key applications on the system. Each comes from a different vendor and when I look at how each one of them interacts with the server, it’s really frustrating. I’ve come to the conclusion that it’s mostly due to application frameworks that are being used. Here’s an example:
System A that I’m working with (name hidden to protect the guilty) never just issues a query to SQL Server. What it does instead is:
1. Issues a SET FMTONLY ON, then sends the command, then SET FMTONLY OFF
2. Creates a static cursor based on the command
3. Fetches from the cursor
4. De-allocates the cursor
This simply isn’t sensible. Apart from just slowing down the data access immensely, here are my issues with this:
SET FMTONLY ON returns the columns and data types for every code path through the code that you submit to it. That works ok for simple commands but is fragile for anything else. Regardless, I can only presume that it’s performing step #1 as a way of creating an empty dataset/recordset/rowset in the programming language, without having to specify the columns and data types. This is concerning for multiple reasons. First is that SET FMTONLY ON is now deprecated but more importantly, it means that the system is being constantly asked to evaluate something that isn’t actually changing. On the system I was monitoring, the application was asking SQL Server to do this over 60,000 times per hour, yet the answer isn’t going to change. And it is probably occurring just to simplify the creation of the rowset in code (i.e. a one-off one-time effort).
Creating a static cursor involves executing the query and materializing a copy of all of the data that was retrieved into tempdb. For almost all of the queries in question, tempdb has no need to be involved at all. The fetch command then retrieves the data from tempdb. The de-allocation then removes the copy of the data and the cursor structure from tempdb.
It’s a tribute to the product that it performs as well as it does, given how it’s often used or (more likely), abused.
11 Jul 09:53
De-identification of Personal Health Information
by John Paul Cook
S Many people have asked me various questions about Personal Health Information (PHI) which is covered by the Health Insurance Portability and Accountability Act ( HIPAA , not HIPPA). The process of removing data (de-identification or anonymization) that could violate someone’s privacy is complex. This is particularly true when there is unstructured data (i.e., free text). The U.S. Department of Health and Human Services has detailed guidelines on proper de-identification techniques, which...(read more)
11 Jul 09:36
Exposed SSH Key Means US Emergency Alert System Can Be Hacked
by timothy
wiredmikey writes "Recently discovered security flaws in the Emergency Alerting System (EAS) which is widely used by TV and radio stations across the United States, has made the systems vulnerable to remote attack. The vulnerability stems from an SSH key that is hard-coded into DASDEC-I and DASDEC-II devices made by Monroe Electronics. Unless the default settings were altered during deployment, impacted systems are using a known key that could enable an attacker with full access if the systems are publicly faced or if they've already compromised the network. By exploiting the vulnerability, an attacker could disrupt a station's ability to transmit and/or could send out false emergency information. 'Earlier this year we were shown an example of an intrusion on the EAS when the Montana Television Network's regular programming was interrupted by news of a zombie apocalypse. Although there was no zombie apocalypse, it did highlight just how vulnerable the system is,' said Mike Davis, a principal research scientist at IOActive. The DHS issued an alert on the vulnerability, and IOActive, the firm that discovered the flaw, has published additional technical details (PDF) on the security issue." 


Read more of this story at Slashdot.
11 Jul 08:41


Be carefull with VMware SSO Master password bug
by Gabrie van Zanten
This week I installed a fresh vSphere 5.1 Update 1 environment and I wanted to configure it will real world certificates to get rid of all those “Do you really really reeeeeally accept this insecure website” messages. Using the VMware SSL Certificate Automation Tool I generated all the new certificates and then started changing the certificate on the VMware SSO server. When doing this, you’ll be asked for the Master password. Since I learned a while ago in a very painful way that the Admin@System-domain password is not equal to the Master password, I had written down the Master password and was 100% sure I had the correct Master password. But updating the certificate failed with the error: Incorrect master password. Tried it a few times but it kept failing. Logged in with admin@system-domain in the vSphere Web Client and this was the correct password.
I switched to command line and tried to run some SSO Util commands to make sure my password worked and then everything became very clear. I have a bad character in the password. In the password I set during install, there is an “&” (ampersand) and in many console languages this has a special meaning. When running some rsautil commands using the master password VMware&77 I get messages like: “77″ is not recognised as a command.
In my homelab I installed a fresh new SSO just for this test. During installation I set the master password to: VMware@55. Then I tested my rsautil command: rsautil manage-secrets -m VMware@55 -a list. This worked, I got a list of … well things.

I then changed the master password using this command: rsautil manage-secrets -m VMware@55 -a change -N VMware&77. This should set the old password to the new password “VMware&77″. Check the output below and notice that the rsautil did perform the change, but also reports an error. Trying the list command with the ‘new’ password, didn’t work.
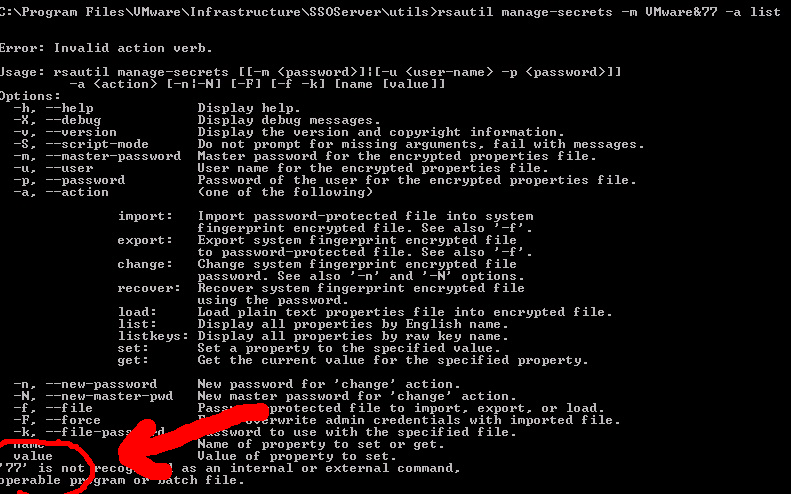
What had happened is that the master password was changed to “VMware” and everything behind the & was lost. Proof would be if the rsautil command would work with the “VMware” password and it did: rsautil manage-secrets -m VMware -a list.

I did a new test. I removed SSO and the SQL Express database and again installed SSO using the master password “VMware&123″ to see what would happen. Login through the Web Client works using the user admin@system-domain and password VMware&123 but the command line tools don’t work.
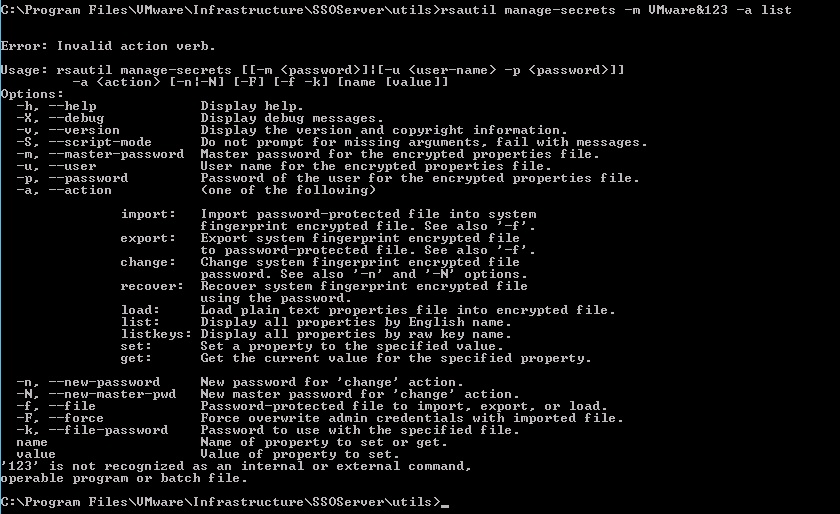
Conclusion
As long as you don’t have to use the command line tools to change anything in SSO or to recover a password, you’re fine and using the & ampersand in your password won’t hurt you. But if you ever need to change anything with the help of the command line tools, for example when you lost your admin@system-domain password, then you’re lost.
My advice is to use a master password that doesn’t have the & in it. I tested with @ and that works fine. Using the exlamtion point ! also has some issues sometimes, so I would stay away from that too. And the release notes already mention that a space in the password will also get you into trouble.
Update:
Seems my friend Christian Mohn is better in using Google than me. He found a mention of this issue in the following KB: “vSphere 5.1 Single Sign On (SSO) installation fails with error: Error 29133. Administrator login error. (2035820)“. The KB article mentions that this issue is resolved now, but as you can see, it isn’t.
Update 2:
In some situations it can be fixed with: rsautil manage-secrets -a change I’ve also tested this in my home lab and somehow it didn’t work, later on I tried it in production because everything else had failed and it worked !!!
See full post at: Be carefull with VMware SSO Master password bug
03 Jul 23:01

Speaker Idol 2013 at TechEd North America
by MVP Award Program
This year, TechEd North America, was held in New Orleans and featured four full days of sessions, exhibitions, certifications and networking. In all of these activities, MVPs had a prominent presence as presenters and attendees. One strong example of MVP involvement was in the Speaker Idol competition, a contest where speakers gave a five-minute presentation in front of an audience and a panel of judges. Contestants spoke on a wide variety of topics, ranging from ASP.NET to Network Monitor to Powershell.

ASP.NET/IIS MVP Richard Campbell was the host of the event and Enterprise Security MVP Paula Januszklewicz was one of the judges. Four of the twelve participants in the contest were MVPs. In the end, Windows Expert-IT Pro MVP Jessica DeVita, from Los Angeles, California, won first place in the competition after delivering a presentation on Office 365 Migrations. Her prize will be the opportunity to present during next year’s TechEd!
(DeVita, Campbell and Januszklewicz pictured, from left to right.)
“It was a really fun experience,” Jessica exclaimed, adding, “5 minutes really forces you to get to the point. I learned how to connect with my audience and relax, and also learned a few things not to do, such as look back and forth between your screen and the projection screen.”
Jessica credits the MVP Award with creating new opportunities and avenues for her talent. “I've had more opportunities to give technical presentations since receiving the MVP award, and conferences provide the best opportunity to talk with other MVP's and the community as a whole.”
Other Speaker Idol MVP contestants included Virtual Machine MVP Aidan Finn, Dynamics GP MVP John Lowther, and SQL Server MVP Karen Lopez.
Congratulations to all the participants, and watch for Jessica DeVita on the TechEd speaking schedule next year!
02 Jul 06:08
The Accidental DBA (Day 30 of 30): Troubleshooting: Transaction Log Growth
This month the SQLskills team is presenting a series of blog posts aimed at helping Accidental DBAs ‘keep the SQL Server lights on’. It’s a little taster to let you know what we’ll be covering in our brand new Immersion Event for The Accidental DBA, which we’ll be presenting for the first time in September 2013 in Bellevue, WA. You can find all the other posts in this series at http://www.SQLskills.com/help/AccidentalDBA. Enjoy!
For the final post in our 30-day series I want to cover one of the most common problems for Accidental DBAs to come across – uncontrolled transaction log growth.
I remember an email we were sent a few years ago, which basically said: I’ve got a 10-GB database and a 987-GB transaction log. What happened?!?!
The number 1 cause of uncontrolled transaction log growth is the following:
- Someone creates a database, where the default recovery model is Full; or someone changes the recovery model of a database to Full (remember I explained about these back on day 7 of the series.)
- Even though the recovery model is Full, the database behaves as if it’s using the Simple recovery model, where the transaction log will automatically clear (to allow reuse and help prevent growth) whenever a checkpoint occurs. This is called the pseudo-Simple recovery model. This situation continues until a database backup is performed.
- Someone performs a database backup, completing the transition of the database into the Full recovery model.
- This database backup provides a basis for further log backups to be performed, and so the log will no longer clear until a log backup is performed.
- Nobody performs log backups.
As no-one is performing log backups, and the database is properly using the Full recovery model, the log will never clear. As the log doesn’t clear, it will eventually fill up and then require more space for more log records, and so it will automatically grow. And grow, and grow, until the disk volume runs out of space.
The trick here is simple: perform regular log backups of databases using the Full (or Bulk-Logged) recovery model.
This is all well and good as long as you know why the log cannot clear, as you may be taking log backups and the log is still growing because it cannot clear. SQL Server knows why the log can’t clear, and you can ask it using the following code:
SELECT [log_reuse_wait_desc] FROM sys.databases;
GO
This will list the reasons why the log could not clear, for all databases, at the time the most recent log clearing was attempted. In the case I described above, the output for the database would be LOG_BACKUP, and there are a bunch of other reasons, including long-running transactions, unreplicated transactions, active data backups, and more. You can read the full list in SQL Server Books Online topic Factors That Can Delay Log Truncation.
Whatever the reason is that has made your database’s log grow, take corrective action to allow the log to clear, and then take preventative action to stop the log having to grow again. And if your log has already grown really large, you’ll want to shrink it down to a more reasonable size, and you can read more details on how to do that in Kimberly’s (old but still relevant) post here.
Apart from the log growing and potentially running out of space, log growth is problematic because:
- Every time the log grows, the new portion of the log has to be zero initialized, which takes some time and causes the write operations on the database to pause.
- Every time the log grows, more internal chunks are added to the log, and the more of these there are, the more performance impact there is on log operations (Kimberly’s post discusses this too).
- As the log gets larger, the potential for more downtime during a disaster increases. If the entire database is destroyed, restoring from backups involves recreating the data and log files. The larger the log file is, the longer this takes because of zero initialization again.
Careful transaction log management is required as part of being responsible for a SQL Server instance, whether as an Accidental or experienced DBA.
Finally, we really hope you’ve enjoyed reading our post-a-day series during June as much as we’ve enjoyed writing it, and we also hope you’ve learned a bunch of information that will help you increase your DBA skills. To continue your DBA education, make sure to follow our blogs, subscribe to our bi-weekly SQLskills Insider newsletter, check out our online training, and consider coming to one of our in-person training classes – for the ultimate learning experience!
Thanks – Paul & the SQLskills team
The post The Accidental DBA (Day 30 of 30): Troubleshooting: Transaction Log Growth appeared first on Paul S. Randal.
02 Jul 06:08
Updatable columnstore index, sp_spaceused and sys.partitions
by Michael Zilberstein
Columnstore index in SQL Server 2014 contains 2 new important features: it can be clustered and it is updateable. So I decided to play with both. As a “control group” I’ve taken my old columnstore index demo from one of the ISUG (Israeli SQL Server Usergroup) sessions. The script itself isn’t important – it creates partition function with 7 partitions (actually 8 but one remains empty), table on it and populates the table with 63 million rows – 9 million in each partition. So I used the same script...(read more)
02 Jul 06:07

July, the 31 Days of SQL Server DMO’s – Day 1 (sys.dm_exec_requests)
by Tamarick Hill
The first DMO that I would like to introduce you to is one of the most common and basic DMV’s out there. I use the term DMV because this DMO is actually a view as opposed to a function. This DMV is server-scoped and it returns information about all requests that are currently executing on your SQL Server instance. To illustrate what this DMV returns, lets take a look at the results.


As you can see, this DMV returns a wealth of information about requests occurring on your server. You are able to see the SPID, the start time of a request, current status, and the command the SPID is executing. In addition to this you see columns for sql_handle and plan_handle. These columns (when combined with other DMO’s we will discuss later) can return the actual sql text that is being executed on your server as well as the actual execution plan that is cached and being used. This DMV also returns information about various wait types that may be occurring for your spid. The percent_complete column displays a percentage to completion for certain database actions such as DBCC CheckDB, Database Restores, Rollback’s, etc. In addition to these, you are also able to see the amount of reads, writes, and cpu that the SPID has consumed.
You will find this DMV to be one of the primary DMV’s that you use when looking for information about what is occurring on your server.
02 Jul 04:45


Hitchiker's Guide to Leaving this Planet
Submitted by: Unknown
gary.mcmullen, Thomas.friis.poulsen likes this