ColorWare's Nintendo Switch Joy-Con Classic Controllers are pretty fly for a game guy. And also pretty pricey for a paint job. I don't care how precise and professional the controllers look, or how hard their red retro buttons tug at my heart strings, I'd have to pull at least a thousand weeds for my mama before she'd shell out $200 for this retro gaming gift.
And then another 4,000 so she'd get me the Nintendo Switch to go with it.
Obviously modeled after the OG, circa 1985 NES controllers, the Joy-Con Classics leave no hue or sheen to compromise. Is it very hard to replicate Nintendo gray, black, and glossy red? That I do not know. But the ColorWare scheme nails my nostalgia either way, with a single gaze taking me back to my days of Mario 3 and Fester's Quest in the basement.
Come on, don't tell me you don't remember Fester's Quest.
The Nintendo Switch Joy-Con Classic Controllers are part of a limited edition release, with the first 25 also having a number of authenticity.
I strongly believe that the documentation should be kept as close to the code as possible. Based on my experience, that's the only option that works well in the long term. External documents, notes, and wikis all eventually get outdated, forgotten, and lost.
Documentation is a topic that always bugs me. Working on poorly documented codebase is a ticking bomb. It makes the onboarding process a tedious experience. Another way to think of bad documentation is that it helps foster a low truck factor (that is, "the number of people on your team who have to be hit by a truck before the project is in serious trouble").
Recently I was on-boarded into a project with more than 1,500 pages of documentation written in… Microsoft Word. It was outdated and unorganized. A real disaster. There must be a better way!
I've talked about this documentation issue before. I scratched the surface not long ago here on CSS-Tricks in my article What Does a Well-Documented CSS Codebase Look Like? Now, let's drill down into the options for programmatically documenting code. Specifically CSS.
Similar to JSDoc, in the CSS world there are a couple of ways to describe your components right in the source code as /* comments */. Once code is described through comments like this, a living style guide for the project could be generated. I hope I've stressed enough the word living since I believe that's the key for successful maintenance. Based on what I've experienced, there are a number of benefits to documenting code in this way that you experience immediately:
The team starts using a common vocabulary, reducing communication issues and misunderstandings significantly.
The current state of your components visual UI is always present.
Helps transform front-end codebases into well-described pattern libraries with minimal effort.
Helpful as a development playground.
It's sometimes argued that a development approach focused on documentation is quite time-consuming. I am not going to disagree with that. One should always strive for a balance between building functionality and writing docs. As an example, in the team I'm currently on, we use an agile approach to building stuff and there are blocks of time in each sprint dedicated to completing missing docs.
Of course, there are times when working software trumps comprehensive documentation. That's completely fine, as long as the people responsible are aware and have a plan how the project will be maintained in the long run.
Now let's take a look at the most popular documentation options in CSS:
Knyle Style Sheets (KSS)
KSS is a documentation specification and style guide format. It attempts to provide a methodology for writing maintainable, documented CSS within a team. Most developers in my network use it due to its popularity, expressiveness, and simplicity.
The KSS format is human-readable and machine-parsable. Therefore, it is intended to help automate the creation of a living style guide.
Similar to JSDoc, in KSS, CSS components are described right in the source code as comments. Each KSS documentation block consists of three parts: a description of what the element does or looks like, a list of modifier classes or pseudo-classes and how they modify the element, and a reference to the element's position in the style guide. Here's how it looks:
// Primary Button
//
// Use this class for the primary call to action button.
// Typically you'll want to use either a `<button>` or an `<a>` element.
//
// Markup:
// <button class="btn btn--primary">Click Me</button>
// <a href="#" class="btn btn--primary">Click Me</a>
//
// Styleguide Components.Buttons.Primary
.btn--primary {
    padding: 10px 20px;
    text-transform: uppercase;
    font-weight: bold;
    bacgkround-color: yellow;
}
Benjamin Robertson describes in details his experience with kss-node, which is a Node.js implementation of KSS. Additionally, there are a bunch of generators that use the KSS notation to generate style guides from stylesheets. A popular option worth mentioning is the SC5 Style Generator. Moreover, their documenting syntax is extended with options to introduce wrapper markup, ignore parts of the stylesheet from being processed, and other nice-to-have enhancements.
Other sometimes useful (but in my opinion mostly fancy) things are:
With the designer tool you can edit Sass, Less or PostCSS variables directly via the web interface.
There is a live preview of the styles on every device.
Who knows, they might be beneficial for some use-cases. Here's an interactive demo of SC5.
GitHub's style guide (Primer) is KSS generated.
Unlike the JavaScript world, where JSDoc is king, there are still a bunch of tools that don't use the KSS conventions. Therefore, let's explore two alternatives I know of, ranked based on popularity, recent updates and my subjective opinion.
MDCSS
If you're searching for a simple, concise solution, mdcss could be the answer. Here's an interactive demo. To add a section of documentation, write a CSS comment that starts with three dashes ---, like so:
/*---
title:   Primary Button
section: Buttons
---

Use this class for the primary call to action button.
Typically you'll want to use either a `<button>` or an `<a>` element

```example:html
<button class="btn btn--primary">Click</button>
<a href="#" class="btn btn--primary">Click Me</a>
```
*/
.btn--primary {
    text-transform: uppercase;
    font-weight: bold;
    background-color: yellow;
}
The contents of a section of documentation are parsed by Markdown and turned into HTML, which is quite nice! Additionally, the contents of a section may be automatically imported from another file, which is quite useful for more detailed explanations:
/*---
title:  Buttons
import: buttons.md
---*/
Each documentation object may contain a bunch of properties like title (of the current section), unique name, context, and a few others.
Some other tools that have been on my radar, with very similar functionalities are:
Nucleus is a living style guide generator for Atomic Design based components. Nucleus reads the information from DocBlock annotations.
Atomic Design is a guideline to write modular styles, projecting different levels of complexity on a (bio-) chemical scale. This results in low selector specificity and allows you to compose complex entities out of simple elements. If you're not fairly familiar with Atomic Design, the learning curve may look a bit overwhelming in the beginning. The entities for Nucleus include:
Nuclides: not directly useable on their own styles (mixins, settings, variables).
Atoms: single-class element or selector rules (buttons, links, headlines, inputs…).
Molecules: one or more nested rules, but each of them is not more than an Atom
Structures: the most complex types, may consist of multiple molecules or other Structures.
The button example we use throughout this article here stands for an Atom - a very basic element of the stylesheet (single-class element or selector). To mark it as an Atom, we need to annotate it with the @atom tag, followed by the name of the component:
/**
 * @atom Button
 * @section Navigation > Buttons
 * @modifiers
 *  .btn--primary - Use this class for the primary call to action button.
 * @markup
 *  <button class="btn">Click me</button>
 *  <button class="btn btn--primary">Click me</button>
 *  <a href="#" class="btn btn--primary">Click Me</a>
 */
.btn--primary {
    text-transform: uppercase;
    font-weight: bold;
    bacgkround-color: yellow;
}
There is yet to be a clear winner in terms of a tool or a common syntax definition for programmatically documenting CSS.
On the one hand, it seems like KSS leads the group, so I'd say it's worth considering it for a long-term project. My gut feel is that it will last for a long time. On the other hand, different syntax options and tools like Nucleus and MDCSS look promising too. I would encourage you to try them on short-term projects.
It's important to note that all tools presented in this article might do the job well and seem scalable enough. So try them out and pick whatever makes the most sense to your team.
I'd appreciate it if you would share in comments below if you know or have experience with any of these or other tools worth knowing about!
Amabrush says it's the World's First Automatic Toothbrush, but watching the demo video makes me think it's just the first time someone thought to cross a Blizzident with a vibrator.
Why didn't I think of that?
The Amabrush mouthpiece contains an ultra-dense concentration of antibacterial silicone bristles "soft enough to prevent gum damage but strong enough to clean your teeth precisely." The bristles' 3D arrangement grants them access to all sides of all of your teeth at once, which is the first reason Amabrush says it can annihilate 99.99% of mouth bacteria and provide a full toothbrushing session in just 10 seconds.
The second reason is the Amabrush handpiece, a spherical, rechargeable devices that attaches magnetically to the mouthpiece. Push the button at the end of the handpiece and its 9.5G amplitude vibrations will begin, oscillating the mouthpiece bristles to actively clean your teeth.
The Amabrush also uses special (and proprietary, of course) toothpaste capsules. When activated, the handpiece shoots a bit of toothpaste in the mouthpiece, which has built-in micro-channels to distribute it amongst your teeth.
Amabrush was able to create its 10-second rule by cleaning all of your teeth, every exposed surface area, at once. Their data shows that using a standard toothbrush for the recommended 2 minutes averages only 1.25 seconds per tooth surface, so really, their sea creature mouthpiece way gets you brushed 8 times longer but 12 times quicker.
If you want to read more about the Amabrush system, or sink your teeth into one of your own, click here to check out the Amabrush Kickstarter campaign through August 5, 2017.
Chameleon Skinz duct tape throws it back to my Hypercolor days. Like the T-shirts of yore, their line of color changing adhesives is heat-sensitive, with each tape's primary hue taking a spectral glide into another when it warms up. Orange becomes yellow, army green becomes neon green, and, for all the little ladies and unicorns out there, purple becomes pink.
Though more appropriate for crafty than handy projects - think purdy bracelets and personalized backpacks over ripped tents and front bumper repairs - Chameleon Skinz says their Color Changing Duct Tape is sticky and waterproof just like the standard gray stuff. Color changes are activated by touch, or any increase in duct tape surface temperature, such as my laptop spontaneously getting 50 degrees hotter like it's enjoying the porn on my screen as much as I am.
Color Changing Duct Tape measures 1.88" wide, and comes in 10-yard rolls.
Go is a special language. It is very refreshing in its approach to programming and the principles it promotes. It helps that some of the language inventors were early C pioneers. The overall feeling of Go is 21st-century C.
In this tutorial, you'll learn about three of the features that make Go unique: its simplicity, the concurrency model via goroutines, and the error handling mechanism.
1. Simplicity
Many successful modern languages like Scala and Rust are very rich and provide advanced type systems and memory management systems. Those languages took the mainstream languages of their time like C++, Java and C# and added or improved capabilities. Go took a different route and eliminated a lot of features and capabilities.
No Generics
Generics or templates are a mainstay of many programming languages. They often add complexity, and the error messages associated with generics can sometimes be obscure. Go designers decided to just skip it.
This is arguably the most controversial design decision of Go. Personally, I find a lot of value in generics and believe that it can be done properly (see C# for a great example of generics done right). Hopefully, generics will be incorporated into Go in the future.
No Exceptions
Golang's error handling relies on explicit status codes. To separate status from the actual result of a function, Go supports multiple return values from a function. This is pretty unusual. I'll cover it in much more detail later, but here is a quick example:
package main

import (
  "fmt"
  "errors"
)

func div(a, b float64) (float64, error) {
  if b == 0 {
    return 0, errors.New(fmt.Sprintf("Can't divide %f by zero", a))
  }
  return a / b, nil
}


func main() {
  result, err := div(8, 4)
  if err != nil {
    fmt.Println("Oh-oh, something went wrong. " + err.Error())
  } else {
    fmt.Println(result)
  }

  result, err = div(5, 0)
  if err != nil {
    fmt.Println("Oh-oh, something iswrong. "+err.Error())
  } else {
    fmt.Println(result)
  }
}

2
Oh-oh, something is wrong. Can't divide 5.000000 by zero
Single Executable
Go has no separate runtime library. It generates a single executable, which you can deploy just by copying (a.k.a. XCOPY deployment). This is as simple as it gets. No need to worry about dependencies or version mismatches. It is also a great boon for container-based deployments (Docker, Kubernetes and friends). The single standalone executable makes for very simple Dockerfiles.
No Dynamic Libraries
OK. This just changed recently in Go 1.8. You can now actually load dynamic libraries through the plugin package. But, since this capability wasn't introduced from the get go, I still consider it an extension for special situations. The spirit of Go is still a statically compiled executable. It is also available on Linux only.
2. Goroutines
Goroutines are probably the most attractive aspect of Go from a practical standpoint. Goroutines let you harness the power of multicore machines in a very user-friendly way. It is based on solid theoretical foundations, and the syntax to support it is very pleasant.
CSP
The foundation of Go's concurrency model is C. A. R. Hoare's Communicating Sequential Processes. The idea is to avoid synchronization over shared memory between multiple threads of execution, which is error-prone and labor-intensive. Instead, communicate through channels that avoid contention.
Invoke a Function as a Goroutine
Any function can be invoked as a goroutine by calling it via the go keyword. Consider first the following linear program. The foo()function sleeps for several seconds and prints how many seconds it slept. In this version, each call to foo() blocks before the next call.
The output follows the order of calls in the code:
3s
2s
1s
4s
Now, I'll make a slight change and add the keyword "go" before the first three invocations:
package main

import (
  "fmt"
  //"errors"
  "time"
)

func foo(d time.Duration) {
  d *= 1000000000
  time.Sleep(d)
  fmt.Println(d)
}


func main() {
  go foo(3)
  go foo(2)
  go foo(1)
  foo(4)
}
The output is different now. The 1 second call finished first and printed "1s", followed by "2s" and "3s".
1s
2s
3s
4s
Note that the 4 second call is not a goroutine. This is by design, so the program waits and lets the goroutines finish. Without it, the program will immediately complete after launching the goroutines. There are various ways besides sleeping to wait for a goroutine to finish.
Synchronize Goroutines
Another way to wait for goroutines to finish is to use sync groups. You declare a wait group object and pass it to each goroutine, which is responsible for calling its Done() method when it's done. Then, you wait for the sync group. Here is the code that adapts the previous example to use a wait group.
package main

import (
  "fmt"
  "sync"
  "time"
)

func foo(d time.Duration, wg *sync.WaitGroup) {
  d *= 1000000000
  time.Sleep(d)
  fmt.Println(d)
  wg.Done()
}

func main() {
  var wg sync.WaitGroup
  wg.Add(3)
  go foo(3, &wg)
  go foo(2, &wg)
  go foo(1, &wg)
  wg.Wait()
}
Channels
Channels let goroutines (and your main program) exchange information. You can create a channel and pass it to a goroutine. The creator can write to the channel, and the goroutine can read from the channel.
The opposite direction works too. Go also provides sweet syntax for channels with arrows to indicate the flow of information. Here is yet another adaptation of our program, in which the goroutines receive a channel they write to when they are done, and the main program waits to receive messages from all goroutines before terminating.
package main

import (
  "fmt"
  "time"
)

func foo(d time.Duration, c chan int) {
  d *= 1000000000
  time.Sleep(d)
  fmt.Println(d)
  c <- 1
}

func main() {
  c := make(chan int)
  go foo(3, c)
  go foo(2, c)
  go foo(1, c)
  <- c
  <- c
  <- c
}
Write a Goroutine
That's sort of a trick. Writing a goroutine is the same as writing any function. Check out the foo() function above, which is called in the same program as a goroutine as well as a regular function.
3. Error Handling
As I mentioned earlier, the error handling of Go is different. Functions can return multiple values, and by convention functions that can fail return an error object as their last return value.
There is also a mechanism that resembles exceptions via the panic() and recover() functions, but it is best suited for special situations. Here is a typical error handling scenario where the bar() function returns an error, and the main() function checks if there was an error and prints it.
package main

import (
  "fmt"
  "errors"
)

func bar() error {
  return errors.New("something is wrong")

}

func main() {
  e := bar()
  if e != nil {
    fmt.Println(e.Error())
  }
}
Mandatory Checking
If you assign the error to a variable and don't check it, Go will get upset.
func main() {
  e := bar()
}

main.go:15: e declared and not used
There are ways around it. You can just not assign the error at all:
func main() {
  bar()
}
Or you can assign it to the underscore:
func main() {
  _ = bar()
}
Language Support
Errors are just values you can pass around freely. Go provides little error support by declaring the error interface that just requires a method named Error() that returns a string:
type error interface {
    Error() string
}
There is also the errors package that lets you create new error objects. The fmt package provides an Errorf() function to create formatted error objects. That's about it.
Interaction with Goroutines
You can't return errors (or any other object) from a goroutine. Goroutines can communicate errors to the outside world through some other medium. Passing an error channel to a goroutine is considered good practice. Goroutines can also write errors to log files or the database or call remote services.
Conclusion
Go has seen tremendous success and momentum over the last years. It is the go-to (see what I did there) language for modern distributed systems and databases. It got a lot of Python developers converted.
A big part of it is undoubtedly due to Google's backing. But Go definitely stands on its own merits. Its approach to basic language design is very different from other contemporary programming languages. Give it a try. It's easy to pick up and fun to program in.
I'd really like to have some time to try and make a game.
Over the past several years, we have seen HTML5 used to create many great online solutions. We have also seen it used to create some great fun! With the vanishing of Flash, HTML5 quickly became the universal platform to create browser-based games for both desktop and mobile devices.
Whether you have a game concept you would like to flesh out further or would like a fun way to learn more of the ins and outs of HTML5, here are the 20 best HTML5 game templates of 2017 to get you started towards making something awesome:
You're given a clue and a jumbled mess of letters. With the clue in mind, rearrange the letters until you've got the word right as the timer counts down.
That's how Rearrange Letters - HTML5 Game works.
“Rearrange Letters is an HTML5 game where you can arrange the letters and make the right word with the given description as a clue.”
Features include:
customize the text, game mode, and timer
social media high score sharer
mouse and touch control
1024x768 resolution
and more
With plenty of customizations and built using CreateJS, you can reimagine Rearrange Letters - HTML5 Game any way you like.
Going through this list may inspire you to reskin, tweak, or build something completely new—using one of these HTML5 games as a template towards success. Whether you publish a game arcade on your website, earn revenue with advertising, or would like to dig deeper in HTML5 using game templates, you're sure to find something you're looking for from the Envato Market.
75 Years Of DC Comics is the kind of Batman v. Superman Ben Affleck and Henry Cavill could only dream of making. This collector's book archives rare images and artwork from the major Ages of DC's history into a high-end (and equally high-priced*) compendium subtitled The Art Of Modern Mythmaking.
Eras covered in 75 Years Of DC Comics include Golden, Silver, and Bronze, with each kicking off with a 2-page printed spread, and including a 4-page pull-out timeline pinpointing key events in both the DC sphere and overall comic book history.
*Though still a chunk of change, at printing 75 Years Of DC Comics: The Art Of Modern Mythmaking was available for rent as well as purchase.
I bought this mug recently for use at work. Being a professional web developer, I decided it would establish me as the office's king of irony. The joke on it isn't unique, of course. I've seen it everywhere from t-shirts to conference presentations.
Most of you reading this have probably encountered this image at least once. It's a joke we can all relate to, right? You try and do something simple with CSS, and the arcane ways in which even basic properties interact inevitably borks it up.
If this joke epitomizes the collective frustration that developers have with CSS, then at the risk of ruining the fun, I thought it would be interesting to dissect the bug at its heart, as a case study in why people get frustrated with CSS.
There are three conditions that have to be met for this problem to occur:
The content can't shrink to fit the container
The container can't expand to fit the content
The container doesn't handle overflow gracefully
In real-world scenarios, the second condition is most likely the thing that needs to be fixed, but we'll explore all three.
Fixing the content size
This is little bit unfair to the box's content because the word AWESOME can't fit on one line at the given font size and container width. By default, text wraps at white space and doesn't break up words. But let's assume for a moment that we absolutely cannot afford to change the container's size. Perhaps, for instance, the text is a blown-up header on a site that's being viewed on an especially small phone.
Breaking up words
To get a continuous word to wrap, we have to use the CSS property word-break. Setting it to break-all will instruct the browser to break up words if necessary to wrap text content within its container.
In this case, the only way to make the content more responsive was to enable word breaking. But there are other kinds of content that might be overflowing. If word-wrap were set to nowrap, the text wouldn't even wrap in-between words. Or, the content could be a block-level element, whose width or min-width is set to be greater than the container's width.
Fixing the container size
There are many possible ways the container element might have been forced to not grow. For example: width, max-width, and flex. But the thing they all have in common, is that the width is being determined by something other than its content. This isn't inherently bad, especially since there is no fixed height, which in most cases would cause the content to simply expand downwards. But if you run into a variation on this situation, it's worth considering whether you really need to be controlling the width, or whether it can be left up to the page to determine.
Alternatives to setting width
More often than not, if you set an element's width, and you set it in pixels, you really meant to set either min-width or max-width. Ask yourself what you really care about. Was this element disappearing entirely when it lacked content because it shrunk to a width of 0? Set min-width, so that it has dimension but still has room to grow. Was it getting so wide that a whole paragraph fit on one line and was hard to read? Set max-width, so it won't go beyond a certain limit, but also won't extend beyond the edge of the screen on small devices. CSS is like an assistant: you want to guide it, not dictate its every move.
Overflow caused by flexbox
If one of your flex items has overflowing content, things get a little more complicated. The first thing you can do is check if you're specifying its width, as in the previous section. If you aren't, probably what's happening is the element is "flex-shrinking". Flex items first get sized following the normal rules; width, content, etc. The resulting size is called their flex-basis (which can also be set explicitly with a property of the same name). After establishing the flex basis for each item, flex-grow and flex-shrink are applied (or flex, which specifies both at once). The items grow and shrink in a weighted way, based on these two values and the container's size.
Setting flex-shrink: 0 will instruct the browser that this item should never get smaller than its flex basis. If the flex basis is determined by content (the default), this should solve your problem. be careful with this, though. You could end up running into the same problem again in the element's parent. If this flex item refuses to shrink, even when the flex container is smaller than it, it'll overflow and you're back to square one.
Handling overflow
Sometimes there's just no way around it. Maybe the container width is limited by the screen size itself. Maybe the content is a table of data, with rows that can't be wrapped and columns that can't be collapsed any further. We can still handle the overflow more gracefully than just having it spill out wherever.
overflow: hidden;
The most straightforward solution is to hide the content that's overflowing. Setting overflow: hidden; will simply cut things off where they reach the border of the container element. If the content is of a more aesthetic nature and doesn't include critical info, this might be acceptable.
If the content is text, we can make this a little more visually appealing by adding text-overflow: ellipsis;, which automatically adds a nice little "…" to text that gets cut off. It is worth noting, though, that you'll see slightly less of the actual content to make room for the ellipsis. Also note that this requires overflow: hidden; to be set.
The preferable remedy is usually going to be setting overflow-x: auto;. This gives the browser the go-ahead to add a scroll bar if the content overflows, allowing the user to scroll the container in that direction.
This is a particularly graceful fallback, because it means that no matter what, the user will be able to access all of the content. Plus, the scrollbar will only appear if it's needed, which means it's not a bad idea to add this property in key places, even if you don't expect it to come into play.
Why does this conundrum resonate so universally with people who have used CSS?
CSS is hard because its properties interact, often in unexpected ways. Because when you set one of them, you're never just setting that one thing. That one thing combines and bounces off of and contradicts with a dozen other things, including default things that you never actually set yourself.
One rule of thumb for mitigating this is, never be more explicit than you need to be. Web pages are responsive by default. Writing good CSS means leveraging that fact instead of overriding it. Use percentages or viewport units instead of a media query if possible. Use min-width instead of width where you can. Think in terms of rules, in terms of what you really mean to say, instead of just adding properties until things look right. Try to get a feel for how the browser resolves layout and sizing, and make your changes and additions on top of that judiciously. Work with CSS, instead of against it.
Another rule of thumb is to let either width or height be determined by content. In this case, that wasn't enough, but in most cases, it will be. Give things an avenue for expansion. When you're setting rules for how your elements get sized, especially if those elements will contain text content, think through the edge cases. "What if this content was pared down to a single character? What if this content expanded to be three paragraphs? It might not look great, but would my layout be totally broken?"
CSS is weird. It's unlike any other code, and that makes a lot of programmers uncomfortable. But used wisely it can, in fact, be awesome.
In the early days of web design, typography was somewhat overlooked. Font choices were quite limited and so the biggest decision made was often “serif vs. sans-serif”. How times have changed.
The modern web provides an enormous amount of fonts to choose from. Plus, design and CSS have evolved to the point where typography is often front and center of a site’s look and a key to its accessibility.
In short, we’ve gone from having almost no choice to a nearly unlimited palette of options. That means we need to make the right decisions early on in the design process. With that in mind, here are some best practices to consider when choosing custom fonts for your website. Alongside each tip, we’ll provide some examples using a selection of beautiful fonts available with a subscription to Envato Elements.
1. Readability First and Foremost
Whether we’re talking about typefaces for headings or body text, readability should be a top priority. This is especially important when it comes to mobile devices. While you might get a heading to look both attractive and easy to read on a large desktop screen, not every font is ideal for a phone or tablet. Try to avoid characters that are overly wide, unless you’re certain that headings will be kept to a minimum length.
Body text should be clean, with enough line and (where appropriate) character spacing to give content some room to breathe. Lines or characters that are too close together will result in content that’s difficult to read.
Overall, typefaces can be fun and stylish, but making sure they are readable is key.
One of the first things you should do when setting up a website is to think about your target audience. Demographic information such as age, gender, level of education and income should be prime considerations. Fonts define character, and are an important part of appealing to the people you’re looking to reach.
For example, a website for a luxury car dealership is going to benefit from a font that mirrors the luxurious presence of the product. A children’s entertainer, on the other hand, will be well advised to opt for something fun and informal.
If a page has several sections of text content, the use of a good header font can help users distinguish one from the next. A tried-and-true way to accomplish this is to use different font styles for header and body text. Often, we see websites that use a serif font for headlines and a sans-serif for content. While it’s perfectly acceptable to use the same type for both header and body text, you may want to consider a different font weight or color to ensure that headings stand out.
Another strategy to consider is the use of glyphs or icon fonts (though directly using SVG to decorate your web page does tend to give more control). For example, using an arrow icon next to a header will help it to stand out. This can be setup through a CSS pseudo selector to automatically display before a specific heading tag.
One aspect of great typography is that, while the fonts you choose can be different, they should fit together in some way. As an example, you probably wouldn’t want to use two opposing serif typefaces together for heading and body text. The unique way in which serifs are designed could cause a bit of a clash when multiple styles are combined.
Still, this is a bit of a subjective area. We all have different tastes and communicate in our own ways. When picking out fonts, use your own best judgement as to what goes together.
Pairing fonts can be a challenge. Selecting two or more fonts which work well is one thing - selecting two which work together to achieve your typographic...
With so many delightful choices, you might feel like the proverbial kid in a candy store when deciding which fonts to use. But to make the most impact, you’ll find it best to limit your designs with no more than two or three typefaces. That will help to create some balance in your design and generally make things easier for users to follow.
Furthermore, loading custom fonts does take up bandwidth and server resources–something which could have real impact on load times. So, to keep things looking and performing at a high level, limit the number of fonts used on your website.
The sheer variety of available fonts, coupled with the powerful methods to implement them, have brought web typography out of the shadows and into the spotlight. Type provides designers with the freedom to express their creativity through more than just graphics.
And, with over 1,300 available fonts, Envato Elements is a vast resource for keen typographers. For the price of a monthly subscription, you’ll have unlimited access to fonts and a whole lot more. It’s a great way to tap your creativity.
It can be quite useful to get a "full page" screenshot in a browser. That is, not just the visible area. The visible area is pretty easy to get just by screenshotting the screen. A full page screenshot captures the entire web site even if it needs to be scrolled around to see all of it. You could take individual screenshots of the visible area and use a photo editing program to stitch them together, but that's a pain in the but. Nevermind the fact that it's extra tricky with things like fixed position elements.
Fortunately browsers can help us out a bit here.
Chrome
As of Chrome 59, it's built into DevTools. Here's a video. You use "Responsive Design Mode", then the menu option to get the full page screenshot is in the menu in the upper right.
If you need a "mobile" full length screenshot, just adjust the responsive view to the size you want and save again. Handy!
There is a setting in the Firefox DevTools that you need to turn on called Take a screenshot of the entire page under Available Toolbox Buttons. Flip that on, and you get a button.
Safari
Safari has File > Export as PDF, but it's pretty awkward. I have no idea how it decides what to export and what not to, the layout is weird, and it's broken into multiple pages for some reason.
It's long been possible to be too lazy to get up to turn on the TV and change channels, but thanks to KlikR it's now possible to be too lazy to dig the remote out of the couch cushions too! KlikR is a little Bluetooth bug you can stick next to your TV (or any infrared RC device) to make it controllable pretty much instantly from your smartphone.
The KlicR app organizes all of your saved connected devices, pulls up the one you're currently commanding for navigation, and even allows for voice control. So can just tell the TV to turn itself on, or the circa 1996 stereo you can't part with to play "Hit Me Baby," and KlikR will crack the whip and make sure they do it.
Additional KlikR features include: QR code sharing with family and friends so others can share your home's setup; auto backup so your setup will restore when you trade in or lose your phone; and an insta-mute function that will pause or silence background noise when you get a call.
Get your KlikR universal remote control for 31% off for a limited time.
DAVE WEASEL WASHINGTON — After reports of Donald Trump plastering his Florida resort with fake Time Magazine covers of himself, Trump Magazine released its Sexiest Man Alive issue, and named Donald Trump as the title. “Uncle Donny came into the office and said he wants a ‘sexiest man alive’ volume,” a staff writer said. “He […]
NativeScript is a framework for building cross-platform native mobile apps using XML, CSS, and JavaScript. In this series, we're trying out some of the cool things you can do with a NativeScript app: geolocation and Google Maps integration, SQLite database, Firebase integration, and push notifications. Along the way, we're building a fitness app with real-time capabilities that will use each of these features.
In this tutorial, you'll learn how to integrate a SQLite database into the app to store data locally. Specifically, we'll be storing the walking sessions data that we gathered in the previous tutorial.
What You'll Be Creating
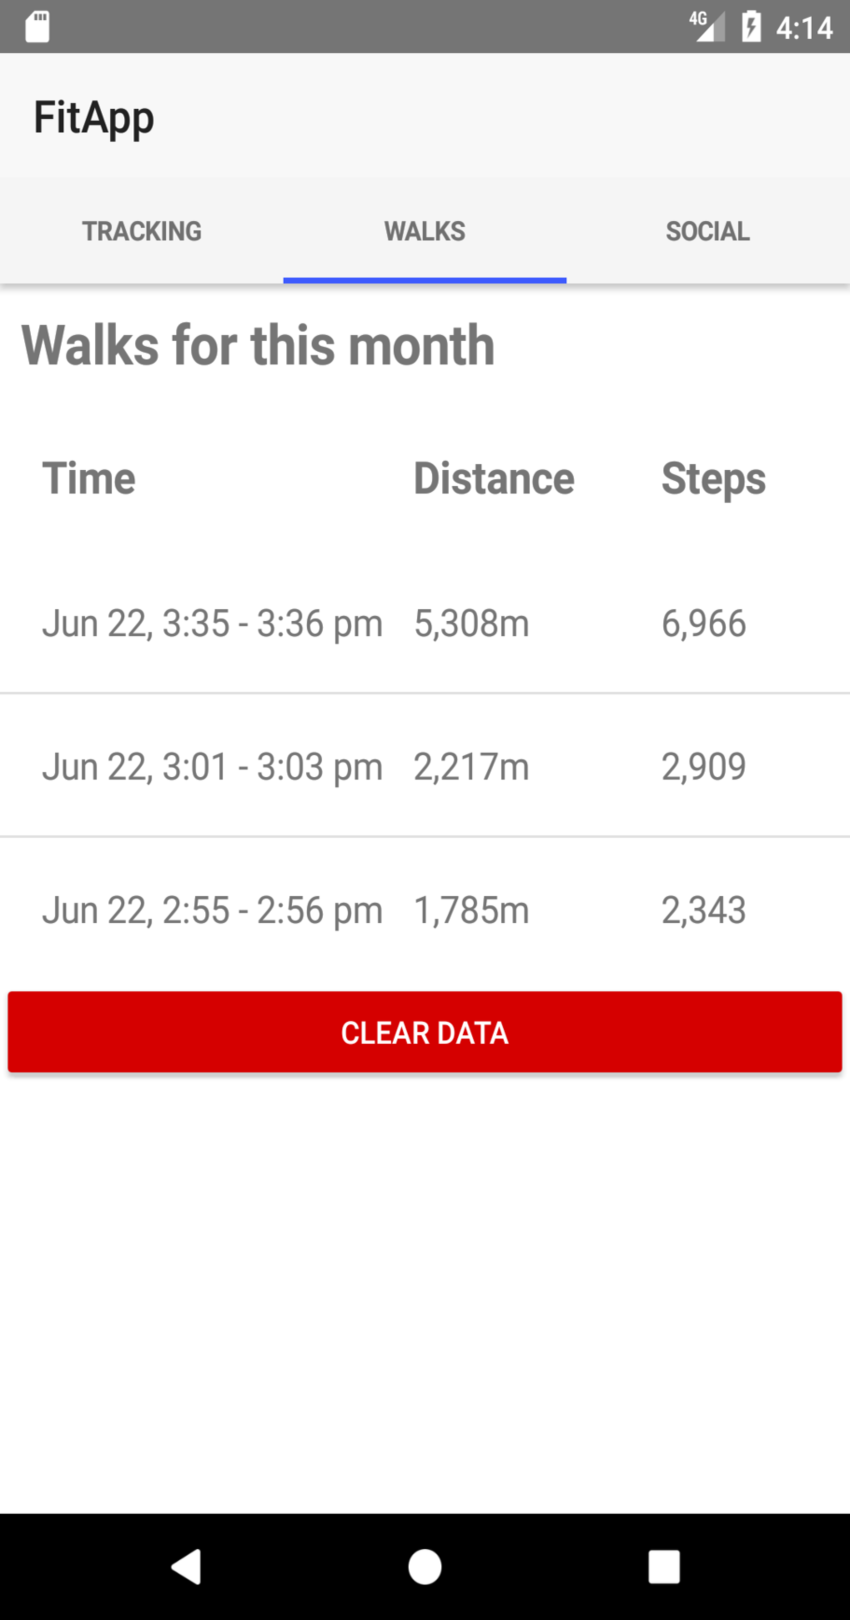
Picking up from the previous tutorial, you'll be adding a tab view for displaying the different portions of the app. Previously our app just had the Tracking page, so we didn't need tabs. In this post, we'll be adding the Walks page. This page will display the user's walking sessions. A new data point will be added here every time the user tracks their walking session. There will also be a function for clearing the data.
Here's what the final output will look like:
Setting Up the Project
If you have followed the previous tutorial on geolocation, you can simply use the same project and build the features that we will be adding in this tutorial. Otherwise, you can create a new project and copy the starter files into your project's app folder.
tns create fitApp --appid "com.yourname.fitApp"
After that, you also need to install the geolocation and Google Maps plugins:
Once installed, you need to configure the Google Maps plugin. You can read the complete instructions on how to do this by reading the section on Installing the Google Maps Plugin in the previous tutorial.
Once all of those are done, you should be ready to follow along with this tutorial.
Running the Project
You can run the project by executing tns run android. But since this app will build on the geolocation functionality, I recommend you use a GPS emulator for quickly setting and changing your location. You can read about how to do so in the section on Running the App in the previous tutorial.
Installing the SQLite Plugin
The first thing that you need to do to start working with SQLite is to install the plugin:
tns plugin add nativescript-sqlite
This allows you to do things like connecting to a database and doing CRUD (create, read, update, delete) operations on it.
Connecting to the Database
Open the main-page.js file and import the SQLite plugin:
var Sqlite = require("nativescript-sqlite");
You can now connect to the database:
var db_name = "walks.db";

new Sqlite(db_name).then(db => {
    // next: create table for storing walks data
}, error => {

});
The walks.db file was created from the terminal using the touch command, so it's just an empty file. Copy it into the app folder.
If it successfully connected, the promise's resolve function will be executed. Inside that, we run the SQL statement for creating the walks table. To keep things simple, all we need to save is the total distance covered (in meters) and the total steps, as well as the start and end timestamps.
Once the query executes successfully, we pass the database instance (db) into the page context. This will allow us to use it from the main-view-model.js file later on.
Fetching Data
Now we're ready to work with the data. But since we'll be working with dates, we first need to install a library called fecha. This allows us to easily parse and format dates:
npm install --save fecha
Once it's installed, open the main-view-model.js file and include the library:
var fecha = require('fecha');
Next is the code for checking if geolocation is enabled. First, create a variable (walk_id) for storing the ID of a walking record. We need this because the app will immediately insert a new walk record into the walks table when the user starts location tracking. walk_id will store the ID that's auto-generated by SQLite so that we'll be able to update the record once the user stops tracking.
var walk_id;
Next, get the current month and year. We'll use it to query the table so it only returns records that are in the same month and year. This allows us to limit the number of records that appear in the UI.
var month = fecha.format(new Date(), 'MM'); //e.g 07
var year = fecha.format(new Date(), 'YYYY'); //e.g 2017
We also need a variable for storing the start timestamp. We'll use it later on to update the UI. This is because we're only querying the table once when the app is loaded, so we need to manually update the UI of any new data which becomes available. And since the starting timestamp will only have a value when the user starts tracking, we need to initialize it outside the scope so we can update or access its value later on.
var st_datetime; // start datetime
Initialize the walks data that will be displayed in the UI:
var walks = [];
viewModel.walks = [];
viewModel.has_walks = false;
Get the data from the walks table using the all() method. Here, we're supplying the month and the year as query parameters. The strftime() function is used to extract the month and year part of the start_datetime.
db.all(
    "SELECT * FROM walks WHERE strftime('%m', start_datetime) == ? AND strftime('%Y', start_datetime) == ? ORDER BY start_datetime DESC",
    [month, year]
).then((err, rs) => {
    if(!err){
        // next: update the UI with the walks data

    }
});
Once a success response is returned, we loop through the result set so that we can format the data correctly. Note that the indexes in which we access the individual values depend on the table structure that was described earlier in the main-page.js file. The first column is ID, the second is the total distance, and so on.
The formatted data is then pushed to the walks array and is used to update the UI. has_walks is used as a toggle for the UI so that we can show or hide things based on its value.
Once the user starts tracking, set the current datetime as the start_datetime and insert initial values into the table using the execSQL() function. Just like the all() function, this expects the SQL query as the first argument and an array of parameters as the second.
If the query is successful, it should return the auto-generated ID for the inserted record. We then assign it as the value for the walk_id so it can be used later on to update this specific record.
After that, we once again we use the execSQL() function to update the record that we inserted earlier:
db.execSQL(
    "UPDATE walks SET end_datetime = ?, total_steps = ?, total_distance = ? WHERE id = ?",
    [end_datetime, total_steps, total_distance, walk_id]
).then(
    (err, id) => {
        if(!err){
           // todo: add code for resetting the tracking UI here
        }
    }
);
Be sure to move the code for resetting the tracking UI (to reset the total distance and steps) inside the promise's resolve function so you can easily test whether the update query executed successfully or not.
Clearing Data
Deleting data is done by clicking on the Clear Data button below the list of walk data:
In the main-view-model.js file, add the code for deleting all the data from the walks table. If you're used to MySQL, you might be wondering why we're using the DELETE query instead of TRUNCATE for emptying the table. Well, that's because SQLite doesn't have the TRUNCATE function. That's why we have to use the DELETE query without supplying a condition so that it will delete all the records that are currently in the table.
viewModel.clearData = function() {

    dialogs.confirm("Are you sure you want to clear your data?").then((agree) => {

        if(agree){
            db.execSQL("DELETE FROM walks", []).then(
                (err) => {
                    if(!err){
                        dialogs.alert("Data has been cleared!");
                        walks = [];
                        viewModel.set('walks', []);
                        viewModel.set('has_walks', false);
                    }
                }
            );
        }
    });

}
Conclusion
In this tutorial, you've learned how to locally store data in your NativeScript apps using the SQLite plugin. As you have seen, SQLite allows you to reuse your existing SQL skills in managing a local database. It's important to note that not all functions that you're used to in MySQL are supported in SQLite. So it's always wise to consult the documentation if you're not sure whether a certain function is supported or not.
If you want to learn about other options for storing data in NativeScript apps, I recommend you read this article on Going Offline With NativeScript.
In the final post of this series, we'll add push notifications to our app.
In the meantime, check out some of our other posts on NativeScript and cross-platform mobile coding.
For a comprehensive introduction to NativeScript, try our video course Code a Mobile App With NativeScript. In this course, Keyvan Kasaei will show you step by step how to build a simple application. Along the way, you'll learn how to implement a simple app workflow with network requests, an MVVM architecture, and some of the most important NativeScript UI components. By the end, you'll understand why you should consider NativeScript for your next mobile app project.
/r/Bananimals is a subreddit dedicated to the unholy union between beast and banana. Bananimals can be found anywhere in the world, in the jungle, under the sea, even at your local park.. We encourage you record these rare creatures and spread word of their existence to the world.
Until recently, the sub was a secret obsession of /u/battletooth's creation, revealed to the masses by some niche internet cooking show. Now there is a effort to MakeBananimalsActiveAgain. They've just started weekly contests where you can concoct your very own bananimal hybrids and post them! The possibilities are endless!
This is a serious sub, so no monkey business! We can't have newcomers going bananas when visiting this sub. I am not kitten you. We will ban you with our bear hands. If you can't follow the rules, then we suggest you split.
Oh, and try not to eat the bananimals laying around. They are friends, not food.


 Mobile AppCreate a Weather App With TypeScript and NativeScriptWernher-Bel Ancheta
 Mobile DevelopmentIntroducing Vue and Weex for Native Mobile AppsLawrence Turton
 IonicGet Started With Ionic Services: AuthWernher-Bel Ancheta
