Interesting. I always like the idea of Google Glass, but couldn't justify the expense. I'd like to see them revive it (and bring down the price).
Google Glass was released more than three years ago, but it’s been dormant for so long. The project disappeared from the public and we haven’t heard a peep since. The world wasn’t quite ready for Google Glass, so most people’s glasses have been lying around collecting dust.
Now, out of nowhere, both the device and its companion app are getting updates. Google Glass has been updated to firmware version XE23, which now supports Bluetooth mice and keyboards for wireless input. The companion app was updated to target Android 5.1 (up from 4.2) and now has a notification listener service. It no longer interferes with Android Wear, so you can use both at the same time. It also asks you to disable Doze mode for the app so it won’t be killed when the phone sleeps.
Is this a resurgence in Google Glass? We don’t know. It might be the start of something bigger, a precursor to a future announcement. It might also be a small update to make the $1500 glasses less useless for those who paid up. We’ll see, but Google Glass is not yet forgotten.
DAVE WEASEL WASHINGTON – In what Trump called a ‘big surprise’, the Grim Reaper was announced as a panel member in the healthcare reform bill the GOP is trying to have passed. “He’s a titan. Loads of experience. Great guy,” the president explained. “Times have been tough on him since Obamacare came out. Less people […]
If you thought that photoshopping the characters from the 90s TV Dinosaurs into scenes from Jurassic Park would be impossible, well, Jen Lewis found a way.
(FYI, I loved Dinosaurs. I just looked at when it started airing and it came out much later than I thought…I was a senior in high school and continued watching it after heading off to college. I have clearly repressed the memory of how deeply uncool I was then. (“Then? Then?!!” cackles the narrator.))
‘Tis the season for BBQs, family road trips, and days by the beach or pool. No matter how you spend your summer days, Google Play can be a part of it.
Starting today, you’ll be able to find your favorite movies, apps, games, music, TV and books at big savings. The sale runs until July 6 for apps, games, books and music, and until July 13 for movies and TV in select markets.
Take a break from the heat with a movie or TV show
Grab a beach chair and read some of the best-selling books of the year, from 50-80 percent off. There’s a wide variety of books to choose from, like thriller “The Freedom Broker,” romance novel “My Perfect Mistake” or sci-fi fantasy “Hellfire.”
Google Play Music can co-host your summer parties
While you’re taking care of the guests, Google Play Music will play all the right songs at the right time. This summer, you can get a Google Play Music subscription free for four months.
Try something new with lots of apps
If you’re six months late on your New Year’s resolution, take advantage of your time off this summer. Put your brain to use, learn a new language, start running, read the news every day! And do it on the cheap with a 50 percent discount for a new, one-year subscription for the services mentioned above and more.
As you take the time to relax, go vacation, and get outside, visit Google Play to find and share more fun entertaining moments with your friends and family.
Back in May during Google’s annual I/O developer conference, the company announced brand new features coming to Google Photos which aimed make sharing content even easier. Now the features are rolling out.
Google today announced that the new Shared Libraries and Suggested Sharing sheet are rolling out to users on Android, iOS, and the web. The new Shared Libraries feature will let users share their entire photo library, just certain photos, or even photos starting from a certain date with a person of their choice.
Once the photo library has been shared with that person, any new additions to the library will automatically populate. The person you share with will even get a notification that new content is there to look at. They can then choose to save the photos they want to keep around.
The other new feature is a new Sharing tab. With it, users will be able to see which photos and videos have been shared to them, and what they’ve shared, and Google Photos will even suggest some photos and/or videos that it thinks you’d like to spread out.
According to Google, this works by Google Photos recognizing an important event, automatically choosing the best photos that you took from that particular moment, and then determining who you might want to share those images with. The app will let users edit what is shared, too, either adding or deleting content and picking people. In addition, it will populate a new shared album, so your friends and family members that use Google Photos can even add their own photos or videos from the same event if they want. If they do, the originator of the album will get a notification that new content has been added.
A 63-year-old Jackie Chan kicking ass in a dramatic role as a father trying to avenge his daughter’s murder? Yes. Yes, please. The movie is based on the 1992 novel The Chinaman, is directed by Martin Campbell (Casino Royale), and co-stars Pierce Brosnan.
We’re used to our devices having night modes. That orange filter over the screen is a big improvement at night, where cool colors can strain the eyes and hurt your sleep. However, Chrome OS still doesn’t have such a feature.
Thankfully, Google is on it. A Night Light feature has been pushed to Canary, Google’s test version of Chrome. It allows you to set schedules manually or link it to the sunrise and sunset as well as adjust how warm the filter is.
It’s currently in the testing phase, but we see no reason for Google not to implement it into Chrome OS in the future. Even Windows 10 now has this feature built in. What do you think of the Night Light feature and others like it? Do you use them? Leave a comment!
"All the President is, is a glorified public relations man who spends his time flattering, kissing and kicking people to get them to do what they are supposed to do anyway."
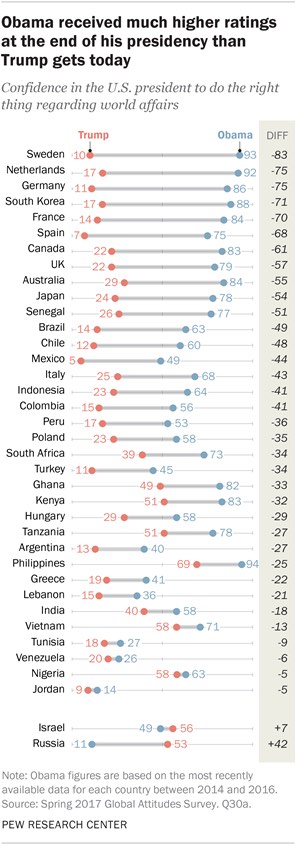
According to a recently conducted survey by the Pew Research Center, the election of Donald Trump has sharply eroded the confidence of other world nations in the United States and its ability to “do the right thing when it comes to international affairs”.
Confidence in President Trump is influenced by reactions to both his policies and his character. With regard to the former, some of his signature policy initiatives are widely opposed around the globe.
His plan to build a wall along the U.S.-Mexico border, for example, is opposed by a median of 76% across the 37 countries surveyed. Opposition is especially intense in Mexico, where more than nine-in-ten (94%) oppose the U.S. government erecting a wall.
Similar levels of global opposition greet Trump’s policy stances on withdrawing from international trade agreements and climate change accords. And most across the nations surveyed also disapprove of the new administration’s efforts to restrict entry into the U.S. by people from certain Muslim-majority nations.
Trump’s intention to back away from the nuclear weapons agreement with Iran meets less opposition than his other policy initiatives, but even here publics around the world disapprove of such an action by a wide margin.
Trump’s character is also a factor in how he is viewed abroad. In the eyes of most people surveyed around the world, the White House’s new occupant is arrogant, intolerant and even dangerous. Among the positive characteristics tested, his highest rating is for being a strong leader. Fewer believe he is charismatic, well-qualified or cares about ordinary people.
This chart is pretty remarkable:
It took George W. Bush more than half of his presidency to reach confidence rates as low as Trump has right out of the gate. Usually in these situations you say something like “there’s nowhere to go but up” but unfortunately there’s plenty of room at the bottom here.
Hey, please, under no circumstances should you pin social buttons
to the top or bottom of mobile screens. In an effort to try to
boost mobile use of share buttons, About.com experimented with
fixing them to screen bottom and separately to screen top, so that
the buttons were always visible when scrolling. While this did
modestly increase share-button usage, it also caused overall
session engagement to go down.
You read that right: adding a locked toolbar to the small-screen
experience shortened sessions and reduced page views. The very
small increase in share-button usage was far outweighed by reduced
site usage. (I can’t explain why this is the case, but I’ve seen
it elsewhere with locked toolbars, too. They chase small-screen
users away.)
Read the whole article. First, Clark’s advice is based on actual results, not just opinion and hunches (like mine). Second, he doesn’t advise against ever showing custom sharing buttons — but he does say only to show them to visitors coming from social media referrals. And but even then, don’t put them in fixed position dickbars.
As for why dickbars actually decrease site usage, I think the answer is obvious: when people see user-hostile fixed position bars at the top and/or bottom of their display, especially on phones, they’re annoyed, and the easiest way to eliminate the annoyance is to close the fucking tab and move on to something that isn’t annoying.
Editor's note: Over the last year, we’ve introduced new ways for students to develop important future skills with Chromebook tools, including active listening and creativity. Yesterday at ISTE we announced our latest bundles in this series, curated in collaboration with educators. In this post, we dive into the STEM tools on Chromebooks bundle, designed to help students become makers and inventors. Follow our updates on Twitter, and if you’re at ISTE in San Antonio, visit us at booth #1718 to learn more and demo these tools for yourself.
Students everywhere are exploring important concepts in science, technology, engineering and math (STEM), with a level of sophistication that’s rising every year. They’re also developing skills like problem solving and collaboration that they’ll need in higher education and, eventually, in their careers, while being exposed to real-world opportunities to be makers.
“If we want a nation where our future leaders, neighbors and workers have the ability to understand and solve some of the complex challenges of today and tomorrow, building students’ skills, content knowledge and fluency in STEM fields is essential,” the Office of Innovation & Improvement, U.S. Department of Education noted in a statement in January, 2017.
To help school districts provide more STEM opportunities to students, we’re now offering a bundle of STEM tools on Chromebooks, designed to to help students become inventors and makers. These tools are available at a special discounted price and may be purchased alongside Chromebooks or independently from U.S. Chromebooks resellers.
Let’s take a deeper look at the tools in the STEM bundle.
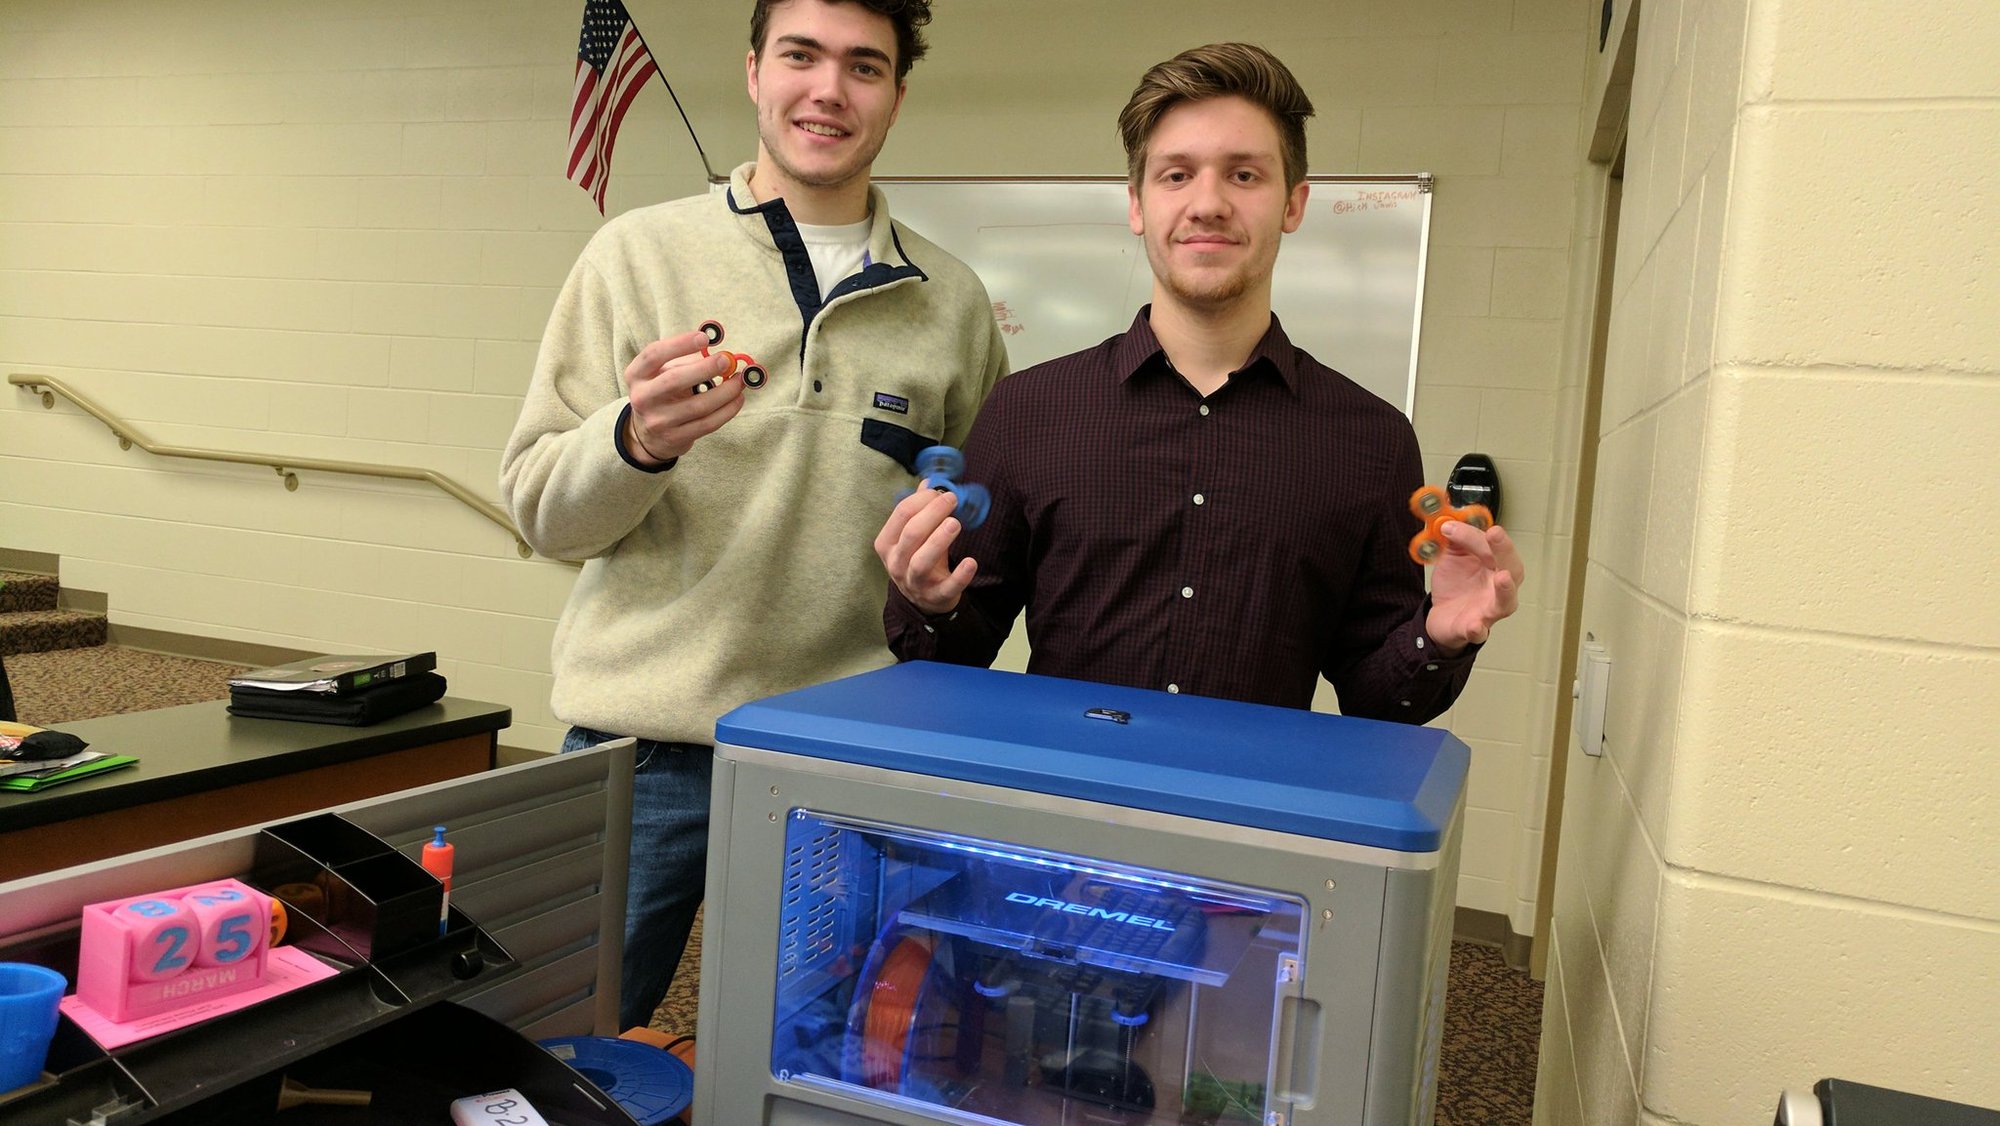
The Dremel 3D40 3D Printer was developed by Bosch, a company that has made reliable tools for builders and hobbyists for over 80 years. About the size of a microwave oven, a 3D printer “prints” solid objects, layer by layer. The 3D40 3D Printer supports design tools such as Tinkercad and BlocksCAD, that help students create three-dimensional versions of just about anything they can dream up.
Michael Miller is a K-5 technology teacher and high-school computer science teacher for Otsego Public Schools in Otsego, MI. “Students are being exposed to technology that’s now used in a lot of fields. Medical, dental, the food industry—they’re all using 3D printers,” he says. “It will definitely make students more future ready.”
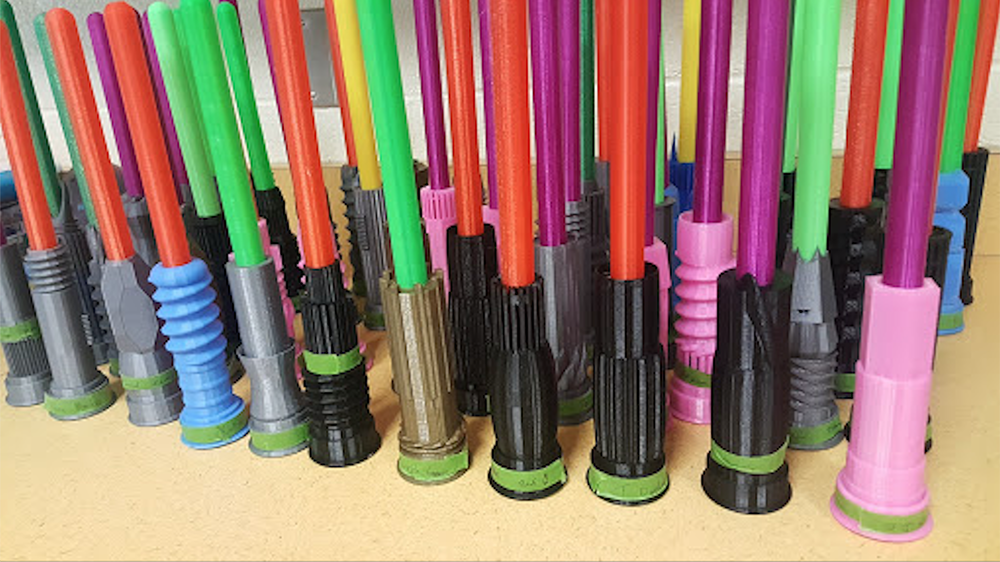
Miller uses a 3D40 3D Printer with Chromebooks in his elementary and high school classes. Depending on the class, students use the tools to create anything from a light saber to a miniature model of a Wright brothers’ airplane. From components for robots to mouthpieces for flutes, his students bring a range of personal interests to the design and printing process.
It brings what they imagine in their head into their lives.
Michael Miller
Technology teacher, Otsego Public School
Although students often work on individual projects, Miller encourages them to solve problems together as a team. “If they need help, I expect them to look to their neighbor first before coming come to me.” Miller also sees how 3D printing can be a way to engage female students, who are often underrepresented in STEM fields today, as well as students who are less likely to speak up in class. “I had a high school student—a very reserved student—and it helped him feel more ownership in the class. It gave him a greater sense of belonging when he could make something.”
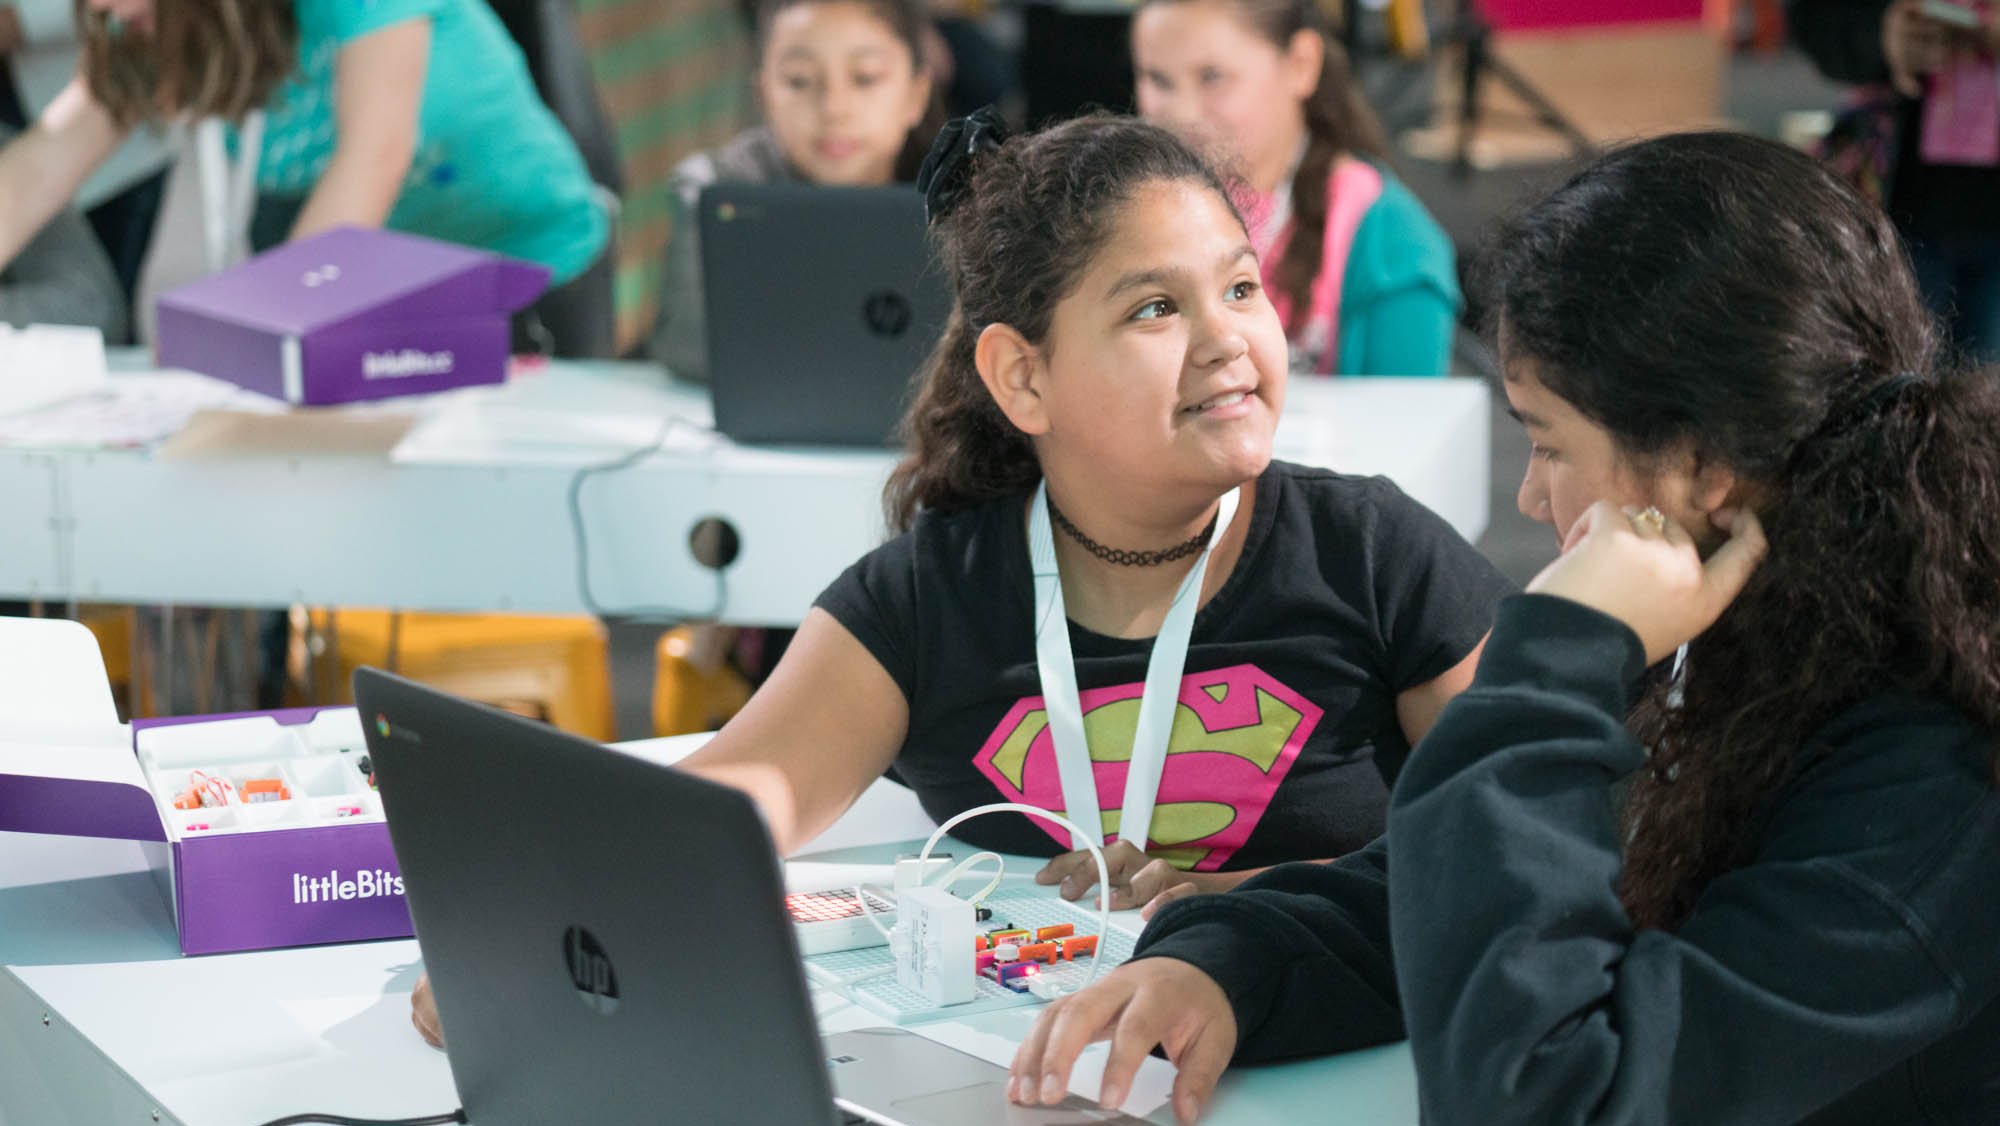
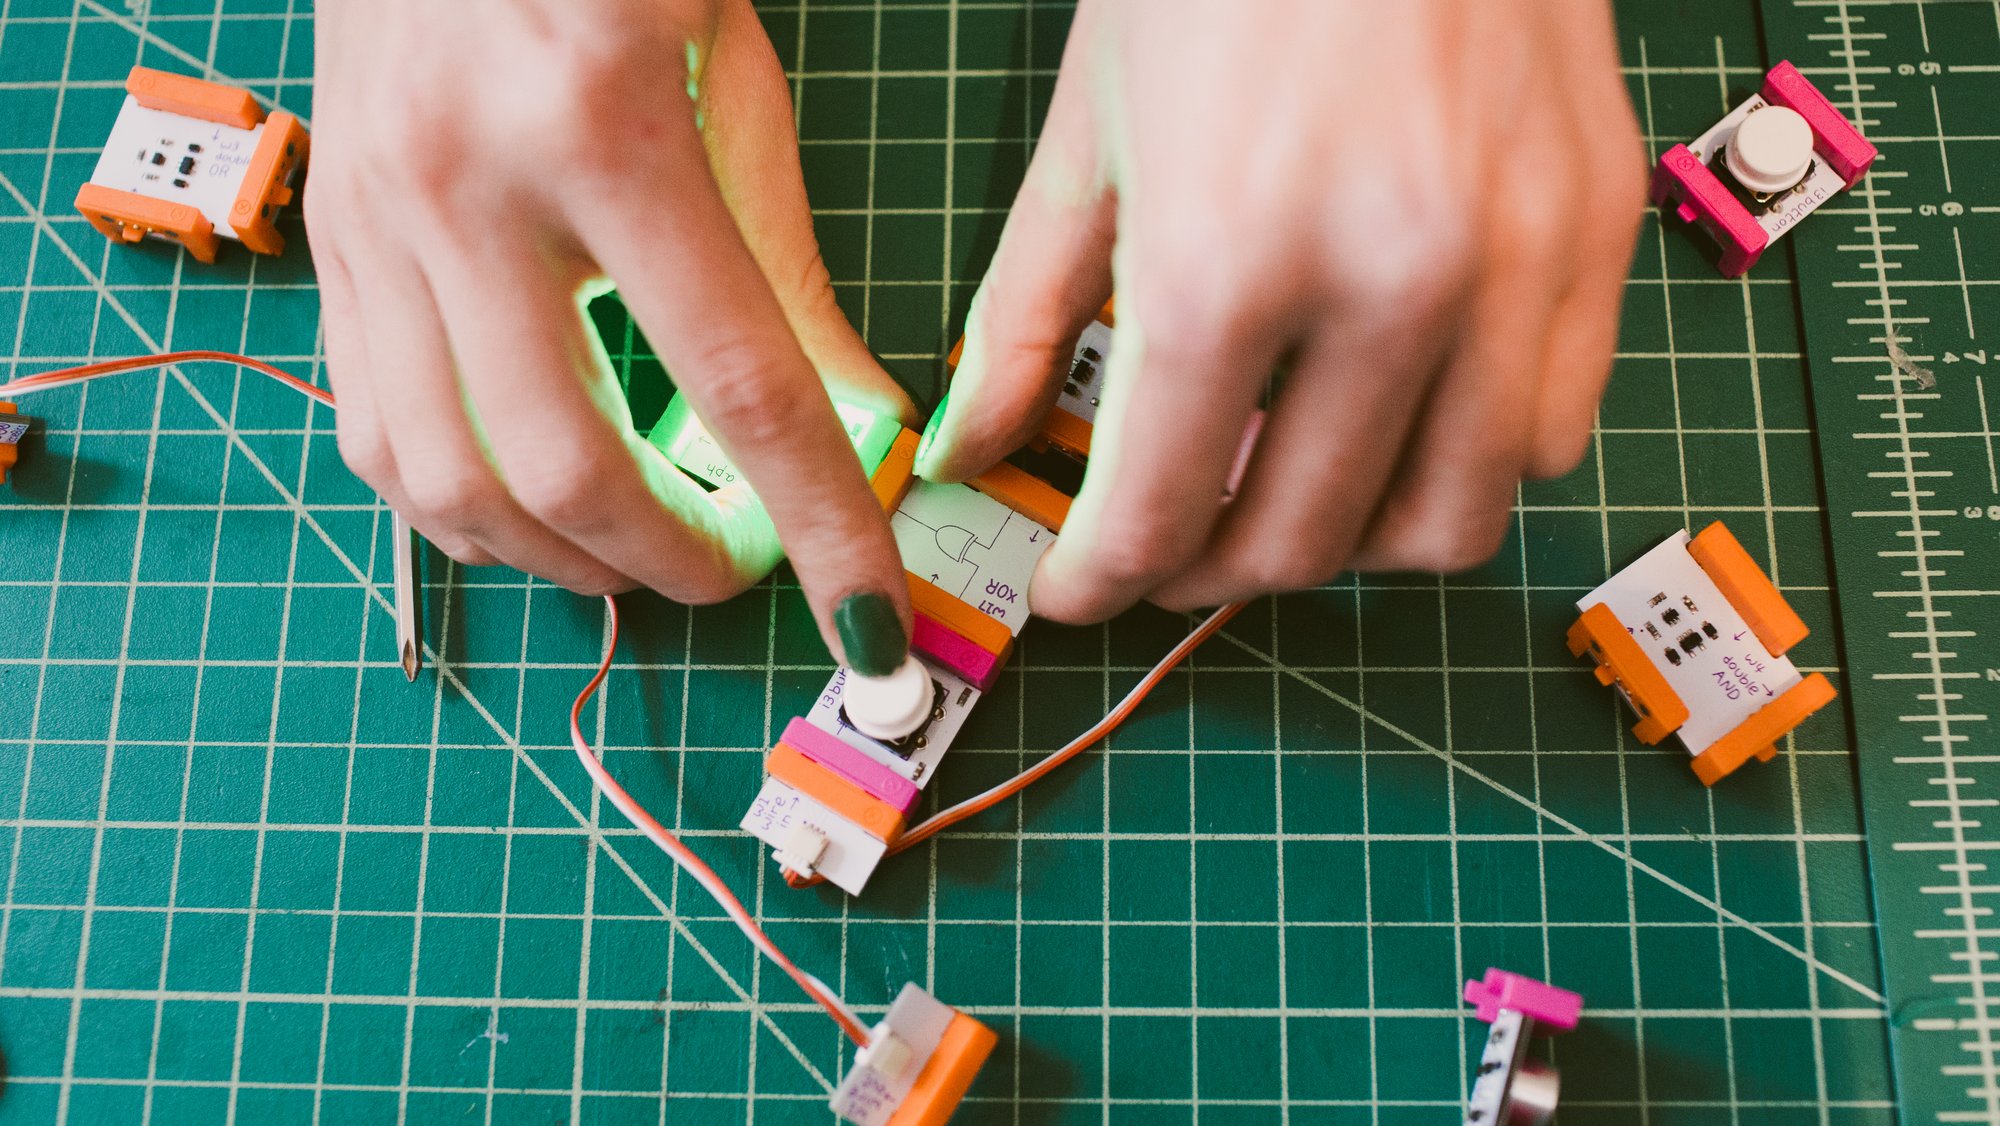
The littleBits Code Kit combines block-based visual coding, powered by Google’s Blockly, with programmable physical “bits” that are electronic color-coded building blocks that snap together with magnets. Using the Code Kit, which is designed to be accessible to a wide range of grades, students have fun building and coding games, all while learning the foundations of computer science. The kit also comes with lessons, video tutorials, getting started guides and other resources for educators and students.
Rob Troke, a computer science teacher at James Denman Middle School in San Francisco recently took a sixth-grade class to I/O Youth at Google’s headquarters in Mountain View, CA. There, his students used the littleBits Code Kit to program light and sound patterns on a physical Bit. They quickly learned about programming logic such as loops and variables.
“I was happy to see how engaged the kids were,” he says. “It maintained their interest the entire hour, whereas with other apps and tools, I’ve seen the novelty wear off after 15 minutes.”
For some students, having a physical object linked to a coding activity helps bring additional context to computer science. It also brings electrical and mechanical engineering, often overlooked subjects in K-12, into the classroom. “Having things to play with, to figure out what they are, what they do, is extremely helpful… it’s like robotics, but without the robot,” Troke says.
Dremel’s 3D40 3D printer and littleBits Code Kit, along with free programs created by Google—like CS First and Applied Digital Skills—help bring STEM concepts to life in creative and tangible ways. To learn more about these and other educational tools, please visit g.co/educhromebookapps, check out the websites, or contact your school’s Chromebook reseller. And follow @GoogleForEdu on Twitter to see all that's launching at ISTE.
In this tutorial we will take a look at creating a mobile application which displays the RSS content of a website. We will configure the RSS URL and the application will download it, parse it and display the posts from the RSS.
To create the mobile application, we will use the Ionic Framework v1 together with AngularJS. To complete this tutorial, you need to have some experience with JavaScript and HTML. Also, it helps if you've worked with AngularJS before.
If you have never worked with Ionic Framework before, I recommend at least taking a look at the Getting Started guide as it gives you a quick insight into how things work.
Let's begin!
Setting Up the Ionic Project
I will assume that you have installed Node on your system and you also have the npm (the Node package manager). Installing the Ionic framework is as easy as running the following:
npm install -g cordova ionic
This will install both Cordova and Ionic on your computer.
Cordova is the core technology for Ionic, and basically it allows us to have an embedded browser in our mobile application. In that browser we will be able to run all our HTML and JavaScript code. This is called a hybrid mobile application, as the application does not run native code, but runs inside the browser.
Next to Cordova, Ionic adds to that the possibility of using AngularJS for writing our code, and it also adds a very neat UI framework.
With Ionic in place, we can create our project using the Ionic CLI, a very useful command-line tool. Ionic provides three default project templates which can be used as a starting point:
blank: as the name says, it's an empty project with only the minimal necessary components in place.
tabs: an application using tabs for navigating through its screens.
sidemenu: an application using a standard mobile side menu for navigation.
For this tutorial, we will be using the tabs application template. To start our project, let's run:
ionic start myWebsiteOnMobile tabs
Ionic will download and install all components needed, and it will create the project folder named myWebsiteOnMobile. Go into the project directory by running:
cd myWebsiteOnMobile
Because our application is a hybrid mobile application, we have the advantage of being able to run the application inside a browser. To do this, Ionic provides a neat built-in web server which runs our application like this:
ionic serve
This will open a browser with our application loaded, and it will look like this:
To stop the server, use Control-C on your command-line screen. To get a better idea of how the application looks on a mobile, you can use:
ionic serve --lab
This will open the application in the browser, showing an iOS and an Android preview of the app side by side.
The tabs Ionic application template has three tabs: Status, Chats, and Account. In the next steps we will adjust the application to fit our needs.
How to Adjust the Default Ionic Tabs Template Application
For our application we will have two tabs:
Latest posts: showing a list of latest posts retrieved from the RSS feed.
Settings: where the user will be able to configure several aspects of the application.
From the Latest posts tab, the user will be able to click on any of the latest posts and see more information about the post, with the possibility of opening up the post in an external browser.
Since our Latest posts tab is similar to the Chats tab provided by the template, we will reuse that together with the Account tab, which will become our Settings tab. We can do all modifications with the Ionic webserver running, and Ionic will reload the app for us. This is a very neat feature which will speed up development.
As mentioned before, Ionic uses AngularJS, and the whole application is actually an AngularJS module. The module is defined in www/js/app.js, and here is also where the paths or routes of the application are defined. Each screen of the application has a corresponding route.
Let's remove the Status tab since we will not need it. To do this, we first need to change the default screen (or route) of our application to point to the Chats screen, which will become our main screen. The default screen is configured via $urlRouterProvider.otherwise(), so let's change that to:
$urlRouterProvider.otherwise('/tab/chats');
If we now reload http://localhost:8100 in our browser, we will see that the Chats tab will be loaded by default.
To remove the Status tab, we need to edit the www/templates/tabs.html file that holds the template for the tab component. We will remove the element:
When saving, we will see that the application now has only two tabs: Chats and Account.
While in the www/templates/tabs.html file we notice that there are some HTML tags that are not standard HTML, like ion-tabs, ion-tab, and ion-nav-view. These are actually AngularJS directives defined by the Ionic Framework. The directives are tags that pack functionality behind them, and they are very convenient ways to write more structured and more concise code.
In our case, the ion-tabs directive is the tabs component, which for each tab requires an ion-tab directive.
Let's change our tabs from Chat and Account to our required names Latest posts and Settings. To do this, we will modify several things in the www/templates/tabs.html file:
title attribute of the ion-tab elements which determines the text on the tab button. We will change that to Latest posts and Settings respectively.
href attribute of the ion-tab elements which points to the route or screen URL. We will change those to #/tab/latest-posts and #/tab/settings.
name attribute of the ion-nav-view elements to tab-latest-posts and tab-settings. These are the identifiers for the view templates used for the Latest posts and Settings screens.
As a result, www/templates/tabs.html should look like this:
After making these changes, we will get some errors. This is because we also have to adjust our routes to use the new identifiers we have used. In www/js/app.js, we need to change the state identifiers, the view identifiers and the url for each route according to what we have set above.
For each route (or screen), there is a controller defined. This is a basic MVC (Model-View-Controller) design pattern. Controllers are defined within the file www/js/controllers.js. For consistency purposes, we will change the names of the controllers in both www/js/app.js and www/js/controller.js:
ChatsCtrl becomes LatestPostsCtrl.
ChatDetailCtrl becomes PostDetailCtrl.
AccountCtrl becomes SettingsCtrl.
Also, for each route we have a view template defined, so let's change them too. Edit www/js/app.js and modify templateUrl like this:
Change tab-chats.html to tab-latest-posts.html. Also rename the file www/templates/tab-chats.html to www/templates/tab-latest-posts.html.
Change chat-detail.html to post-detail.html. Also rename the file www/templates/chat-detail.html to www/templates/post-detail.html.
Change tab-account.html to tab-settings.html. Also rename the file www/templates/tab-account.html to www/templates/tab-settings.html.
Finally, change the view that gets loaded by default to latest-posts by using $urlRouterProvider.otherwise('/tab/latest-posts').
If all went well then you should end up with the www/js/app.js file looking like this:
...
// Each tab has its own nav history stack:

  .state('tab.latest-posts', {
      url: '/latest-posts',
      views: {
        'tab-latest-posts': {
          templateUrl: 'templates/tab-latest-posts.html',
          controller: 'LatestPostsCtrl'
        }
      }
    })
    .state('tab.post-detail', {
      url: '/latest-posts/:postId',
      views: {
        'tab-latest-posts': {
          templateUrl: 'templates/post-detail.html',
          controller: 'PostDetailCtrl'
        }
      }
    })

  .state('tab.settings', {
    url: '/settings',
    views: {
      'tab-settings': {
        templateUrl: 'templates/tab-settings.html',
        controller: 'SettingsCtrl'
      }
    }
  });

  // if none of the above states are matched, use this as the fallback
  $urlRouterProvider.otherwise('/tab/latest-posts');
  ...
And our cleaned up www/js/controllers.js file looks like this:
Now that we have restructured the app to fit our needs, let's move on to the next part and add some functionality.
How to Retrieve an RSS Feed With Ionic
In order to display the list of latest posts, our application will need to retrieve the RSS feed from a URL. As a best practice, it is advisable that this kind of functionality reside in the service layer of the application. In this way we can use it more easily in our controller and then present it to the user by using a view.
The RSS service will make use of Yahoo's YQL REST API to retrieve the RSS of our website. To call on the REST API, we will use the $http provider offered by AngularJS.
Ionic services are usually defined in the www/js/services.js file, so that's where we will put ours too. The code will look like this:
angular.module('starter.services', [])
.service('RSS',function($http){
  var self = this;
  this.download = function(next){
    var feedUrl = "https://tutorials.tutsplus.com/posts.atom";
    var yql_query = "select * from xml where url = '"+feedUrl+"'";
    var url = 'https://query.yahooapis.com/v1/public/yql?q='+encodeURIComponent(yql_query)+'&format=json&callback=JSON_CALLBACK';
    $http
      .jsonp(url)
      .success(function(response){
        if (response.query.results["feed"]){
          next(self.parseAtom(response.query.results));
        } else if (response.query.results["rss"]){
          next(self.parseRSS(response.query.results));
        } else {
          throw "Unknown RSS format";
        }
      })
      .error(function(data, status){

      });
  }

  this.parseAtom = function(atomFeed){
    var posts = [];
    angular.forEach(atomFeed.feed.entry,function(item,idx){
      var post = {
        id:idx,
        title:item.title,
        description:item.content.content,
        link:item.link.href
      }
      posts.push(post);
    })
    return posts;
  }

  this.parseRSS = function(rssFeed){
    var posts = [];
    angular.forEach(rssFeed.rss.channel.item,function(item,idx){
      var post = {
        id:idx,
        title:item.title,
        description:item.description,
        link:item.link
      }
      posts.push(post);
    })
    return posts;
  }
})
We declare the service using the service() method provided by AngularJS. We then inject Angular's $http module so we can call it in our service.
The self variable is a reference to the RSS service so that we can call it from within the service's methods. The main method of the service is the download() method, which downloads the feed information and processes it. There are two main formats used for website feeds: RSS and ATOM. For our application, we have used the feed of tutorials from Tuts+ https://tutorials.tutsplus.com/posts.atom which is in ATOM format, but for completeness we have taken into account the RSS format too.
The download() method calls on the YQL API and parses the results using the parseAtom() or the parseRSS() methods depending on the type of feed. The idea here is to have the same output format which will be passed further via the callback next(). With the RSS service in place, we can move on to the controller.
Hooking the RSS Service to the Latest Posts Controller
In our www/js/controllers.js file, we need to load the RSS data and pass it to our view. To do that, we only need to modify our LatestPostsCtrl controller like this:
Using Angular's dependency injection mechanism, we only need to specify the $scope and RSS variables as method parameters, and it will know how to load those modules. The $scope module allows us to set variables on the model bound to the view. Any values set in the scope can be then retrieved and displayed inside the view associated with the controller.
When the view for latest posts is loaded, it will call on the LatestPostsCtrl controller, and this in turn will use the RSS service to download the feed information. The results are parsed and passed back as an array using the posts variable, which we store in the current scope.
With all that out of the way, we can now move on to the view part, displaying the list of posts retrieved from the feed.
Hooking the Latest Posts View to the Feed Data
We now need to modify our view for the latest posts. If you remember, this is configured in the www/js/app.js file via the templateUrl attribute, and it points to the www/templates/tab-latest-posts.html file.
What we will want to do is display the list of feeds. Since the feed information may contain HTML, and this will only clutter the list of latest posts, we need something to extract the text without the HTML tags from a post's content. The easiest way to do that is by defining an AngularJS filter that strips the HTML tags from text. Let's do that in www/js/services.js by adding:
We are using the Ionic list UI component together with Angular's ng-repeat directive, which will iterate through the posts set on the scope of our controller. For each post entry, we will have a list item with its title and with the description stripped of HTML tags by the use of the htmlToPlaintext filter. Also note that clicking a post should take us to the detail of the post because of the href attribute set to #/tab/latest-posts/{{post.id}}. That does not work yet, but we will take care of that in the next section.
If we now run the application using ionic serve --lab, we should get something like this:
Showing the Details of a Post
When clicking on a post in the list, we go to the post details screen of the application. Because each screen of the application has its own controller and therefore its own scope, we can't access the list of posts to display a specific post. We can call the RSS service again, but that would be inefficient.
To solve this problem, we can make use of the $rootScope directive offered by Angular. This references a scope that overarches all controllers in the application. Let's modify our LatestPostCtrl to set the posts in the $rootScope and then search for the specific post that the user clicked in the PostDetailCtrl. The resulting code in www/js/controllers.js will look like this:
We simply injected $rootScope in both controllers and used it for passing posts between the two controllers. Please note that we don't need to make any changes in our latest posts view as $rootScope and $scope are both accessible in the same way from the view.
Inside the PostDetailCtrl controller, we simply search for the post with the id passed in the link clicked by the user. We do that by comparing each post ID with the value in the URL passed via the $stateParams.postId variable. If we find a match then we set the post on the scope so we can use it in our view.
Let's now adjust our post detail view www/templates/post-detail.html like this:
We have placed the title of the post in the header of the screen.
We have placed an "Open" button in the header on the right. This button will open the post link in an external browser because of the attribute target="_system". We have to do this because the application is already running in a browser due to Cordova. If we didn't set that attribute, the post would have opened in the same browser as the application, and then we would not have a way to return to the application.
We display the description of the post as HTML by using Angular's ng-bind-html directive.
While running the application, I noticed that if the post description contains images, some of them fall off the screen. This might be the case with other HTML elements like videos. We can easily fix this by adding the following CSS rule in www/css/style.css.
ion-content *{
    max-width: 100%;
}
If we now take a look at the application and click on one of the posts, we should see something like this:
And our application is almost complete. In the next section, we will take a look at implementing the settings screen.
Adding Settings for Our Ionic Application
For our settings screen, we will implement a way to indicate how many posts to display on the main screen of the application. We will store this setting in the localStorage memory, which is not erased when the application is closed. Let's edit the controllers file www/js/controllers.js and change the SettingsCtrl controller like this:
The controller retrieves the setting myWebsiteOnMobile.maxPosts from the localStorage. If it does not exist, it will be null, and we will consider that there is no limit for the maximum number of posts.
We call the $scope.$watch() method to monitor changes of the settings.maxPosts variable, which is bound to the radio control in the settings screen.
With all this in place, every time we change the maximum number of posts on the settings screen, the setting will be stored in the localStorage, and it will be retrieved from there when the application restarts.
Now let's make use of this setting. This is as simple as adding this in the LatestPostsCtrl from www/js/controllers.js:
And adding a directive in the latest posts screen www/templates/tab-latest-posts.html:
<ion-item class="item-icon-left item-icon-right" ng-repeat="post in posts|limitTo:maxPosts" type="item-text-wrap" href="#/tab/latest-posts/{{post.id}}">
Notice the limitTo:maxPosts Angular filter. This will limit the number of posts displayed to the number taken from the localStorage. By default, this will be null, which will display all the feeds retrieved by the RSS service.
Congratulations! We now have a fully working application displaying an RSS feed.
Conclusion
In this tutorial, we have seen how to create a hybrid mobile application using the Ionic Framework and AngularJS. There is only one more thing to do: run the application on a mobile device or mobile emulator. This is very simple with Ionic. To run the application on an Android emulator, just run:
ionic platform add android
ionic run
If you want to download a premade Ionic application template for transforming any website to a mobile application, try the Website to Mobile Ionic Application Template from CodeCanyon.
Welcome to the second installment in our series exploring the world of creative software that lies beyond the realm of Adobe. In the last entry we went over tools available for those who use Photoshop as a photo manipulation program. In this article we’re moving into another specialized area of Photoshop use, and that is digital painting.
This article will stick with applications that check off a few boxes. Firstly, they all follow our series theme of being low or no cost–every piece of software in this list is either free or less than $100. Secondly, they all provide the option to secure a permanent license. And thirdly, they all have digital painting as their number one priority. There are several applications that can be used for digital painting as a secondary function, like Affinity Photo for example, but we won’t be touching on those here.
As I mentioned in our series intro, I have personally tried every application in this series in order to fill you in on included features as best I can. I’m sure there are other applications out there I haven’t yet encountered though, so if you use a great digital painting program not mentioned here, please do go ahead and let us know in the comments so others can check it out too.
1. Krita
Krita is an incredibly feature rich, dedicated digital painting application that also happens to be fully free, open source and cross platform. It’s developed as part of the incredible KDE project (who also make an entire operating system, by the way).
Krita has actually been in development for a very long time, originally as a general graphic design program, but once it started tightening its focus on painting it began to attract more and more artists and is now one of the most popular applications of its kind.
The real strength of Krita, as well as a workflow paradigm you’ll likely not be used to, comes from its powerful set of brush engines. The engines are fully accessible to allow you to create virtually any type of brush you could possibly require. Whether you want to sketch in pencil or charcoal, emulate traditional media or auto-paint in some special effects and textures, there’s a brush for that.
Krita’s currently available brush engines, through which you can also create your own brushes, are:
Bristle
Chalk
Clone
Color Smudge
Curve
Deform
Dyna
Filter
Grid
Hatching
Particle
Pixel
Quick Brush
Shape
Sketch
Spray
Tangent Normal
Where Krita is a little different to other software is that these brushes can also be made to take the place of tools you’d usually grab out of a typical application’s toolbar. Need to do clone stamping? There’s a brush for that. Need to blend, smear or deform? There’s a brush for that. Need to multiply in some shadows, lighten in some highlights, or dodge in some glow? There’s a brush for that too. In Krita there’s a brush for just about everything.
Krita’s in depth brush engine system
This brush engine also allows you to finely customize absolutely every aspect of the tools you use, as well as to create your own brushes for anything you might need. This level of control allows for a wonderful array of possibilities.
There is one thing I struggled to get used to with Krita’s brushes though: there is no setting for hardness (at least not that I’ve found) and varied brush hardness is something I use heavily in other applications. There is a blur setting, and you can work in other ways to achieve similar ends, but it’s different, and for that reason I found it to be a bit of a jolt to the system.
As a side note, a good tip to be aware of when painting in Krita is to open up the brush settings panel and check the box labelled “Temporarily save tweaks to presets” at the bottom (seen in the screenshot above). This way, when you select a brush preset then choose the brush size, opacity and angle you want, it will be remembered for the duration of the session. Otherwise when you switch to another brush and back you’ll have to set your brush size and so on all over again.
One of the most useful elements of Krita’s workflow is its excellent right-click pop up widget. Hit the rocker on your tablet’s pen and you’ll get an in-place color wheel, a history of your recently used colors, a selection of brushes, and control over your brush’s attributes.
Seen in this screenshot: Krita’s incredibly handy pop up widget and its awesome wrap around mode for seamless texture creation.
Probably my favorite part of the entire program, as someone who likes to create textures for games, is Krita’s wrap around feature for seamless tiling. By hitting the W key you’ll see your image tiled in both directions, then you can actually paint anywhere you like and your strokes will be recorded to the canvas accurately. So this means no more offsetting a texture by 50% and trying to paint out the seams. You can just freely paint right over the top of the seams as you go, making perfect tiling a breeze to create.
Another thing I look for in a digital painting application is some type of smoothing or stabilizing function. Krita delivers here with the ability to choose between basic smoothing, weighted smoothing and a stabilizer of varying strength. I feel it’s not quite as smooth as the stabilizers in Paint Tool SAI or MyPaint, (more on those later), but I’m sure that’s something that comes down to personal taste. Either way, Krita’s smoothing and stablizing functions are very helpful for people like me who may not have the world’s most stable drawing hand.
I could keep going on about how awesome Krita is, but then I’d never get to the rest of the software we’ll be talking about in this article! So here’s a quick list of some of Krita’s other awesome features:
Nine drawing assistant types including vanishing point, fisheye, perspective and others (these are great!)
PSD load and save support
HDR support
Mirroring
Multiple masks per layer
Clone layers (edit the source and the clones update in real time)
Command line exporter (great for batch exports at different sizes and in different formats)
If you’d like to give Krita a run I highly recommend trying out the awesome free brush set created by well known Krita artist David Revoy.
On a side note, Krita is working on further developing its vector tools, so look out, this might be a contender for all kinds of work in the future!
Rebelle is an incredibly intriguing and fun painting application, and by far its stand out feature is the amazing way it simulates wet media. It also includes dry media, but whether wet or dry the focus across the board is squarely on giving you as close as possible an experience to painting in the real world. You won’t find special effects brushes in Reblle - the categories of available brush all represent physical media:
Watercolor
Acrylic
Pastel
Pencil
Ink Pen
Marker
Airbrush
Eraser
What makes Rebelle so special is its ability to physically simulate the behaviour of liquid, or the lack thereof, on your piece. When you paint a stroke with a watercolor
brush you actually see the paint soaking into the paper and
blending naturally with nearby strokes as it would in real life. There’s
even a water tool you can use to lay down a wash and further control
how paints soak in, a “blow” tool with which you can blow water across
the paper, and a drying sponge to remove water once you’re done
Watercolor paint tipping across a page and soaking in as it goes
There’s also a “tilt” tool (depicted in the image above) you can use to simulate tipping your paper in different directions, so you can make your wet paints or water run down the page, up the page or in any direction you please. It’s
quite fascinating to watch taking effect on your screen, and not a little bit addictive.
If you use a display tablet things get even cooler. If your tablet has an accelerometer in it you can tip it around and Rebelle will respond to it like you’re moving a piece of paper in the real world. And while we’re used to the icon for “smudge” being a finger, in Rebelle that’s taken a step further because on a display tablet with the smudge tool active you can actually push paint around with your finger. It will feel like you’re back in your very earliest art classes doing finger painting.
And the simulation doesn’t stop there. When working with watercolor, acrylic and ink you have the option to set a “water” slider, to decide how dilute you want your paint or ink to be. When you use pastels it will build up layer on layer until you get a thick coating, just like with real pastels. And you can then smear around the excess pastel pigment, again just like the real thing. If you tap your pen on your tablet it will give you the same effect as that motion would with a brush and the bristles will be clearly visible in the mark left on the canvas, while moving in a stroke looks like a real brush stroke.
There’s also blending, smudging, transforming and selecting tools, as well as some handy stencils you can use to paint specific shapes.
If you are a lover of traditional wet media, you might be hard pressed to find another application that emulates them more realistically. And wow, is this thing fun to play with. I would say no matter what your painting style, you should at least experience the glee of taking Rebelle’s free trial out for a run.
ArtRage and Rebelle are comparable in that the focus of both is emulation of real world media. Like Rebelle, ArtRage provides a relatively short list of brushes, each one correlating with a physical counterpart:
Oil brush
Watercolor
Palette knife
Airbrush
Ink Pen
Pencil
Paint Roller
Felt Pen
Gloop Pen
Glitter Tube (yup!)
Paint Tube
Pastel
Artrage also uses a type of simulation in its painting style, however where the great strength of Rebelle is the simulation of liquid, I would say a great strength of Artrage is the simulation of three dimensional depth. This is particularly striking in the way its oil painting works, which is an absolute delight.
Artrage adds light and shadow to your piece, so you get the impression of layers of paint building up on the canvas. When you lay out oil painting brush strokes you can actually see the highs and lows left by the bristles of the brush. Those little peaks and valleys that are something of a hallmark of oil painting can be faithfully recreated here
You can even put great big globs of paint on your canvas with the Paint
Tube tool then smear them all around with the Palette Knife tool. You can see this blending of “globs” used as the basis for a painting
in the YouTube video above, and pictured in the top half of the screenshot below.
Globs
Top left: Globs of oil paint laid down with the Paint Tube tool. Top center: Two paint globs blended with the Palette Knife tool. Bottom right: Colors painted in with the Oil Brush. Note the light and shadow simulating brush strokes and the color variation where paints of different color have mixed together in a natural way.
ArtRage’s interface is very simple, yet everything you need is easily within reach in handy corner widgets. This is not trying to be a complicated application with panels chock full of tools. It’s aiming to give you the digital version of the kind of tools you’d pick up at an art supply store, and it does this very well.
However even though the interface is kept compact, behind the scenes is the ability to create custom brushes, with a great deal of options to work with. So you can start simply with the tools you see the first time you open up the program, but then you can get into as much depth as you like tweaking and customizing your tools as you go along.
If you are a fan of oil paints, or you love to see texture in art, ArtRage is a must try.
Paint Tool SAI is a very straight forward application with a simple interface that’s easy for artists with any experience level to pick up. But while it’s simple it’s also very good at what it does, which is support a drawing style with a leaning towards cartoons, comics and manga.
When you visit the Paint Tool Sai website you’ll see something that looks like it’s straight out of the nineties, and from that first impression it can be easy to suspect the application itself isn’t worth your while. But as much as web designer in me squirms, this is one case where judging the book by its cover would certainly lead to missing out!
Paint Tool SAI is a widely beloved art application, and for good reason. There’s something about drawing in this software that just feels right. When I first tried it I said, “I think this just made me ten percent better at drawing!” It has a very smooth feeling that makes sketching seem like a very natural process.
I was first compelled to try Paint Tool SAI after researching software for doing line art. Over and over, everywhere I looked, it seemed people had the same answer for their favorite application for line art, and that was Paint Tool SAI. After using the application I could see why: it has one of the best stabilizer functions available, and a fluent and intuitive vector drawing system.
When it comes to stablizers, several digital painting applications have them but each one feels a little different. The best one for you will likely come down to personal preference because everyone’s hand and drawing style is different. However for me, Paint Tool SAI’s stabilizer is my second favorite, and it’s at the top of the list for many artists.
The stabilizer helps to smooth out your raster drawing, but for an additional type of fine tuned control there is also SAI’s vector system. These aren’t really vectors like you would be used to in a typical vector drawing program like Illustrator or Affinity Designer. Rather, they are more geared towards making line art and sketching an easier process. When you use SAI’s vector tools they look very much like regular sketching lines, meaning you can draw naturally but with the ability to precisely adjust everything as required.
When you’re done drawing out lines with the vector tools you can easily go in and edit the position and curvature around points, and use a simple click and drag tool to adjust the “pressure” at each point, thereby making the line thicker or thinner there and achieving finely controlled tapering effects.
There are also several painting tools for coloring your work, including an airbrush, generic brush, watercolor brush, acrylic on canvas, acrylic on paper, and crayon.
There are some tricky points to working with SAI though. For example, there are no circle drawing tools in SAI so you have to find hackish ways to create circles, like pasting in images of circles and modifying them, or keeping your pen in one place while you rotate the canvas around it, or combining multiple curves together.
However, if you don’t mind the occasional work around, and you’re into sketching, line art, comics or Manga, Paint Tool SAI should definitely be on your list of prospects.
Price: 5400 Japanese Yen, which converts to about USD $48.50
Platforms: Windows
5. Clip Studio Paint Pro (Formerly Manga Studio)
You could arguably think of Clip Studio Paint as Paint Tool SAI’s big brother. It’s a very similar application, with a leaning towards Manga and comic art, and it has just about every tool SAI has. However it also has a series of extra tools as well.
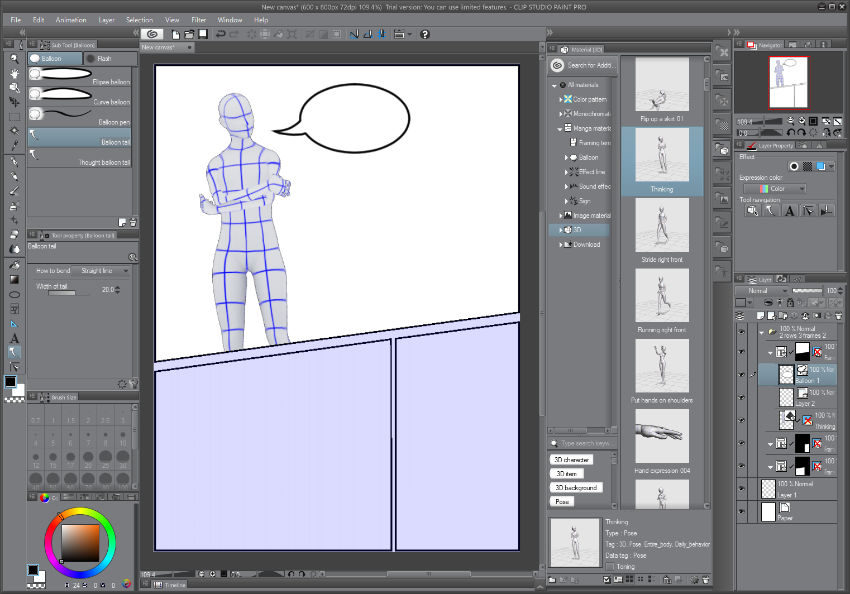
Clip Studio Paint changed its name from Manga Studio as a way to communicate its suitability for more than Manga alone. However if you do happen to be involved in Manga or comic production there are a lot of great tools here to help you along. For example, there is a tool to create comic frames in your document that act like individual canvases. There are also specialized tools for drawing speech and thought bubbles.
On top of that it also has a large collection of ready made, drag and drop comic page layouts and speech bubbles, motion and explosion lines, colored and monochromatic background patterns, clip art style image props, and full 3D models and scenes that can be positioned, scaled and rotated in your document.
The comic panels in this image were dragged and dropped from Clip Studio Paint’s library of ready made comic pages
An outstanding feature of Clip Studio Paint is the ability to
bring in 3D body pose references to help with your sketching. There are
pre-existing poses, but any body reference you add can subsequently be
posed into whatever stance you need to draw.
Like SAI, Clip Studio Paint has vector tools that are focused on drawing and line art. It also gives you the ability to adjust line weight at each point–I would say here SAI’s adjustment tool is easier to use, but Clip Studio’s gives you more settings to control the effect. Clip Studio Paint also has stabilizer functionality, though for my tastes SAI’s feels a little smoother. But where SAI leaves you to find workarounds to draw circles, Clip Studio Paint does have circle (and square) drawing tools.
Clip Studio Paint also has a larger number of painting tools out of the box than SAI, with a wider variety of painting styles available without the need for custom brush creation. Additionally, creating custom brushes is very easy in Clip Studio Paint. You just create some type of raster drawing on a transparent background, then go to Edit > Register as Material and specify some defaults. This is a very useful function you can use to create all kinds of interesting effects.
If you are creating comics or Manga, Clip Studio Paint is probably at the top of the heap, despite its name change. And if you want easy access to 3D body models as reference, this might be the drawing application for you.
MyPaint, in my opinion, is a seriously underrated painting application. To be honest I hadn’t even heard of it until I started looking into Linux compatible applications, but once I started using it, I loved it.
For my hand, MyPaint’s smoothing function is the best of
all the applications I’ve tried. I love SAI’s stabilizer, but I never feel more comfortable sketching than I do in this software. Another factor that makes it perfect for sketching, i.e. the earliest part of your art workflow, is its infinite canvas. You can start anywhere and are free to improvise in any
direction you please.
MyPaint also has a massive array of brush types from traditional media emulators to special effects brushes. It has pencil, charcoal, dry brush, knife, ink, calligraphy, wet knife, glow, leaves, fur, pixel, blur, blend, pastel, sponge smudging, acrylic, oil, watercolor, and several more.
A little sketch and painted “flame tree” I did while getting familiar with MyPaint’s brushes
The interface is designed to be very drawing tablet friendly. Everything is laid out so as to be an easy pen tap away, meaning keyboard shortcuts are not necessary. So if you don’t use a display tablet but you feel like sitting back on the couch with a laptop, holding your tablet like a drawing pad, you can do so without the awkwardness of trying to reach for keys to pan, zoom, undo, color pick and so on.
I find MyPaint to be the perfect place to dump all my ideas. I jot down notes, sketch out thumbnails, draw up diagrams and map out concepts. And there’s something about MyPaint that might sound a little wishy washy, but when I use it I feel more relaxed than with any other software. It gets out of your way and just lets you run with whatever is in your mind.
Even if MyPaint doesn’t become an application you use for end-to-end workflows, there’s a pretty good chance you’re going to find it useful in one way or another. And with it being free, open source and cross platform there’s nothing to stop anyone from slotting it into their workflow wherever it proves helpful.
There is definitely some cross over in the features of every single application we’ve covered in this list. But though they can all be used to create wonderful drawings and paintings, they seem to group themselves into pairs in the way they are strongest. Rebelle and ArtRage for emulating physical media. Paint Tool SAI and Clip Studio Paint for Manga and comics. Krita and MyPaint as digital painting "multi tools", both free and open source.
If you’re choosing between Rebelle and ArtRage, there are many
points on which both have pretty much equal footing. So to my mind the real separator is watercolor vs oils. If you love watercolors go with
Rebelle, and if you love oils go with ArtRage.
If you’re choosing between Paint Tool SAI and Clip Studio Paint, for effectively the same price Clip Studio Paint has pretty much everything SAI does plus a number
of extra features. However the drawing feel of Paint Tool SAI keeps a
lot of people swearing by it. In my opinion the only real way to choose is to put the feature set aside for a moment, download trials for both and see how you take to drawing and using vectors in each. You may love SAI’s feel enough that it outweighs the relatively limited tools, or you might prefer the simplicity of that smaller tool set. But if you enjoy the drawing
feel in Clip Studio Paint just as much you might go for the extra features instead.
And finally Krita and MyPaint. They’re both completely free so there’s really no need to choose between them. Rather, I feel they work well together at different points in your workflow. I like to use MyPaint and the conceptual and planning stage, then move on to Krita for the full production. But I’ve seen other artists who like to reverse that, starting their pieces in Krita then moving to MyPaint for finishing. Have a play around with them and you’ll soon figure out where they fit into your style.
Up Next: Vector Art
We’ve covered two of the specialty areas Photoshop is often used for: photo editing and digital painting. We still have one more group of specialists to touch on that is perhaps less populous, but equally awesome: pixel art.
However, before we get to that, we’re going to talk about applications for what is probably a larger group of artists at present, and that is vector artists. We mentioned a small amount of vector functionality in some of the applications in this article, but for serious vector work you’re going to need something a little extra.
You might be surprised just how many fantastic alternatives there are out there for vector art, each with their own unique perks and features. I’ll tell you all about them in the next article.
It's a weeding robot, not a weed robot, but the Tertill gets just as many props for helping out with the most tedious of yard work as it would for...what would a weed robot do, anyway? Roll joints and pack bowls? Turn oregano into herb? Nevermind. Joe Jones created this solar-powered Roomba for the backyard to help you keep your flower beds and pea patches solar-powered dandelion- and clover-free.
And I think Joe Jones would be cool with me calling the Tertill a "Roomba for the backyard" because he also created the Roomba.
Tertill, like some robotic lawn mowers, lives in your yard and does its weed-whacking work every day. It uses no herbicides, and requires no dock or manual recharging since its battery get its juice from the sun.
Tertill travels around the garden in search of weeds, hacking and chucking them off to the side when it finds one. Like this. It distinguishes between a weed and a plant you just spent 6 months cultivating largely by height; according to Jones and Franklin Robotics, "weeds are short, plants are tall." If Tertill hits a plant tall enough to hit its front shell, a built-in sensor makes it turn away. If the plant passes under its shell, a Weed! Weeeeeeed! sensor activates, and the robot tears it up.
If you have some short plants you're concerned Tertill will eat by accident, Franklin Robotics provides plant collars you can put around them to send it away until the plants are tall enough for Tertill to recognize.
Tertill uses a spinning string trimmer to clip off weeds near the ground, and since the robot is patrolling daily, none should ever grow too large. You can read more about Tertill on its Kickstarter campaign page, as well as pledge for a weeding robot of your own through July 12, 2017.


