Shared posts

29 Oct 12:55

Get 'The Walking Dead' Zombie Look With A... Blowdryer (VIDEO, PHOTOS)

by The Huffington Post News Editors

If your idea of dressing up for Halloween is more gore and less sex appeal, then it's only right that you transform into a zombie. The rotting corpses are popular costumes again thanks to TV shows like "The Walking Dead" and films such as "World War Z" and "Warm Bodies."

Watch the video above to see how HuffPost Live makeup artist Kari Bauce used latex paint, fake blood and a blowdryer to turn host Caitlyn Becker from beauty to beast.

Step 1: Cleanse your face and put on a wig cap to keep latex from sticking to your hair.


Read More...
More on Halloween
23 Oct 19:08

Awe-Inspiring Art: 14 More Masters of Paper Sculpture

by Steph
[ By Steph in Art & Sculpture & Craft. ]

Paper Sculptures Main

Most artists approach paper as a two-dimensional surface upon which to draw or paint. Others see it in an entirely different way, using it as an architectural material for the most unexpected of three-dimensional works. From wispy, dynamic cut-outs hovering in the air to replicas of entire cities, the works of these 14 (more!) paper artists astonish and amaze.

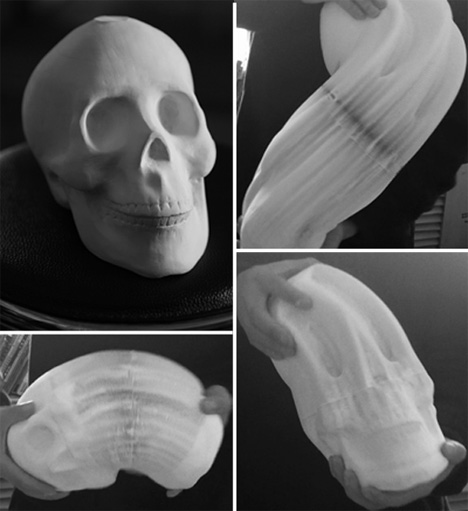
Eerie Flexible Paper Works by Li Hongbo

Paper Sculpture Hongbo 2

Paper Sculpture Hongbo 2

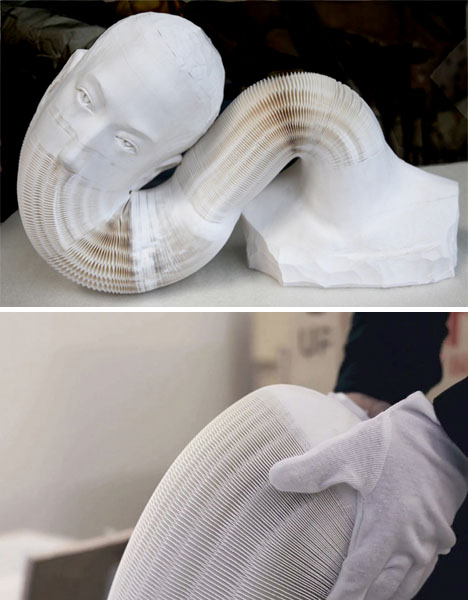
What appear to be porcelain or ceramic sculptures stretch and bend in ways you’d never expect – because they’re made from thousands of layers of paper, glued together into accordion-like configurations. Their true nature is only revealed when they are manipulated. Artist Li Hongbo got his inspiration from traditional Chinese toys made from folded and glued pieces of thin paper.

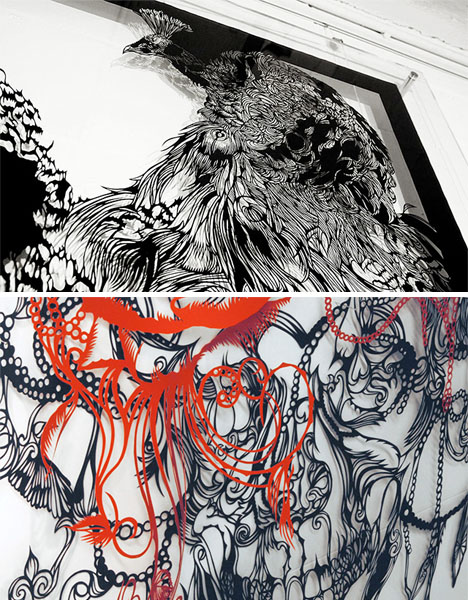
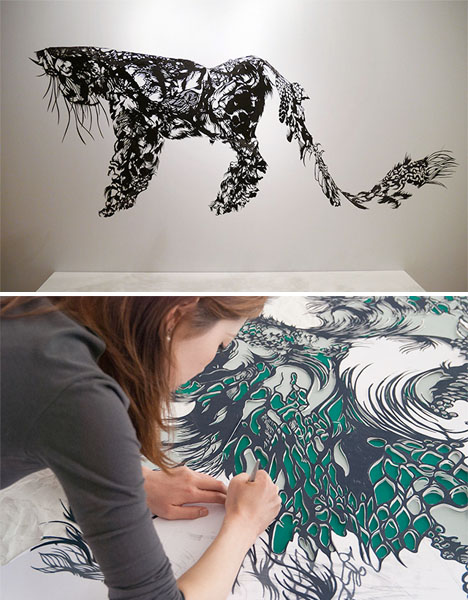
Hand-Cut Paper Sculptures by Nahoko Kojima

Paper Sculpture Nahoko 3

Paper Sculptures Nahoko 2

Paper Sculpture Nahoko 1

A single sheet of paper becomes a leopard, a peacock, a forest, a skull or a masterful life-sized swimming polar bear in the hands of Japanese paper artist Nahoko Kojima. A single piece can take up to six months to create. Byaku, the polar bear, is inspired by the forces of nature.

Amazingly Intricate Paper Scenes by Allen and Patty Eckman

Paper Sculptures Eckman 1

Paper Sculptures Eckman 2

Have you ever seen paper look so dynamic, so infused with life? Allen and Patty Eckman met at Art Center College and soon put their talents to work in collaborative efforts focusing primarily on Native American history. The artists make their own paper pulp, casting it in clay molds to capture this level of detail.

City Maps by Matthew Picton

Paper Sculpture Picton

Matthew Picton creates detailed paper street maps of cities, often using the delicacy of the material to remark upon traumatic events in each location’s past. London in 1940 after Waterloo, Dresden, and Hiroshima all bear the destruction of war in the form of burn marks and tears.

Next Page:
Awe Inspiring Art 14 More Masters Of Paper Sculpture

Share on Facebook

[ By Steph in Art & Sculpture & Craft. ]

[ WebUrbanist | Archives | Galleries | Privacy | TOS ]


22 Oct 20:25

Grab a Free Meal Plan

by Jessica

free-meal-plan

As you may know, I blog here and over on Life as MOM, my parenting and lifestyle blog.

What you might not know is that there are now 20 printable meal plans in the Life as MOM archives. That’s 20 weeks of healthy recipes and grocery lists. Just hit the store (or send your spouse) and come home with a plan in mind for suppers all week long.

That’s like 5 months of taking a break from chaos, late dinners, and food kids don’t like. Sounds pretty sweet, don’t it?

Here’s the list of all 20 weeks’ meal plans. Check them out, print a few, and enjoy some peaceful dinners this week.

Not convinced you even need a meal plan? Well, go here.

Grab a Free Meal Plan is a post from: Good Cheap Eats. All rights reserved © Jessica Getskow Fisher


22 Oct 14:48

A Costco Meal Plan & Shopping List

by Jessica Fisher

20 meals costco

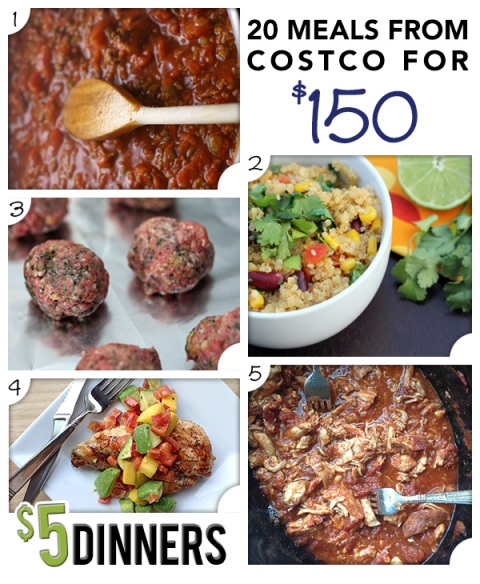
My friend Erin over at $5 Dinners has put together a great resource for Costco members. She’s compiled a menu plan of 20 meals that you can swing for 150 bucks at Costco. Hop on over to grab the recipes, meal plan, and shopping list.

A Costco Meal Plan & Shopping List is a post from: Good Cheap Eats. All rights reserved © Jessica Getskow Fisher


11 Oct 19:31

Halloween Costume Roundup

by admin
DIY Halloween costume, prop, and makeup tutorials!
02 Oct 17:35

Free DIY Furniture Plans to Build an Original Office Collection Shallow Cabinet

by Cher-Ann Texter
Original Office Shallow Cabinet
Project Image
Project Details

Free DIY Furniture Plans to Build an Original Office Collection Shallow Cabinet! All components from the Original Office Collection can be mixed and matched. The length of the top will be cut separately, and depends on the number of components used with at least 24” for leg room if using as a desk. Awesome-sauce right? Xx...Rayan

Dimensions
Dimensions for This Project
Tools


  • Tape Measure
  • Saw – Jig, Circular, or Miter
  • Drill
  • Brad nailer
  • Square
  • Sander
  • Kreg Jig 
Lumber


  • 1 sheet of ¾” plywood
Materials


  • 1-1/4” pocket hole screws
  • 1-1/4” brad nails
  • Edge banding for plywood
  • 1 set of hinges
  • Wood filler
  • Sandpaper
  • Wood glue
  • Finishing Supplies
Cut List


  • 2 – ¾” plywood at 9-5/8” x 27-1/4” – Sides
  • 1 – ¾” plywood at 1-1/2” x 26-1/8” – Upper Stretchers
  • 2 – ¾” plywood at 2-1/2”x 26-1/8” – Lower Stretchers
  • 1 – ¾” plywood at 9-5/8” x 16-1/8” – Bottom
  • 1 – ¾” plywood at 16-1/8” x 24” – Back
  • 2 – ¾”plywood at 8-7/8”” x 16-1/8” - Shelves
  • 1 – ¾” plywood at 10-3/8” x 17-5/8” – Top
  • 1 – ¾” plywood at 2-1/2” x 17-5/8” – Trim
  • 1 – ¾” plywood at 11-3/8” x 16-5/8” - Door
Instructions

Before beginning to build, always check in on my site to make sure you have the most up to date set of plans, I occasionally update and change the plans to make the building process easier or to allow for less expensive purchasing of materials! Read through the entire set of instructions and all comments before beginning this project. If you print out or save plans, be sure to check in on my site to be sure you have the most up to date set of plans, as I occasionally update things for ease of building or buying. If you are new to building, read through the GETTING STARTED section and other articles found under the BUILD tab in the menu on my site, it has valuable information about how to get started, tools and techniques. If you are unfamiliar with the finishing process, visit my Finishing school for some tips and tricks for painting like a pro and for special finishing practices. Use glue to secure your joints and Consider Painting or Staining individual sections prior to assembling. This makes the paint application virtually flawless. Coat with a spray on Poly or Wipe on Poly to protect your finish and your piece and it will last for ages. Adhere to all safety standards and guidelines, and be sure you follow safety protocol throughout your build. If you are unsure about whether you are building safely, run a quick online search for the tool or technique you are using, or contact me via email or post to the forum before you move ahead. My contact info can be found in the menu of my site.

Step 1


Edge banding will be applied to the exposed edges of the plywood before assembly.

 Cut the pieces for the sides and the lower stretchers. Set the Kreg jig for ¾” material and drill pocket holes in each end of the stretcher pieces, as well as the top edge of the sides. Assemble as shown using glue and 1-1/4” pocket hole screws.

Step 1
Step 2


 Cut the piece for the bottom and position as shown. Secure to the stretchers using glue and 1-1/4” brad nails.

Step 2
Step 3


 Cut the piece for the back and drill pocket holes in all four edges. Position as shown and secure using glue and 1-1/4” pocket hole screws.

Step 3
Step 4


Cut the pieces for the upper stretchers and drill pocket holes in each end. Position as shown and secure using glue and 1-1/4” pocket hole screws.

Step 4
Step 5


Cut the pieces for the shelves and drill pocket holes in the side and back edges. Position as shown and secure using glue and 1-1/4” pocket hole screws.

Step 5
Step 6


Cut the piece for the top. The front will overlap by ¾”. Secure using glue and 1-1/4” pocket hole screws through the holes drilled in the back and side pieces.

Step 6
Step 7


Cut the piece for the trim. Secure in place using glue and 1-1/4” brad nails.

Step 7
Step 8


Cut the piece for the door. The door will overlap the opening by ¼” on all sides. Attach the hinges to the door, then install on the cabinet.

Step 8
Finishing Instructions

Fill any Screw, Nail or Pocket Holes, Sand and Finish as Desired. For Finishing Tips and Tricks visit my Finishing School

Disclaimer

**Disclaimer: Some rights reserved. Private use only. Feel Free to link to any of my plans so long as you provide an adequate link back to the appropriate post! Plans from this page are not to be used for commercial purposes or republished without the express written consent of Rayan Turner, The Design Confidential I hope to provide accurate plans, however, I cannot guarantee each plan for accuracy. Not every plan that I post has been built and tested, so you are building at your own risk. It is recommended that you have a clear understanding of how the project works before beginning any project. Please contact me if you find an error or inaccuracy so that I might fix it.

26 Sep 21:16

THIS JUST IN: Ultimate Spock Baroo!

by Brinke

“My dog Spock got very concerned about this poor dog on Cute Overload who couldn’t pull the stick (aka tree root) out of the ground. Added a good deal of amusement to my sick day.” -Ailing Cuteporter Amy C., who we hope feels better soon.


Filed under: Uncategorized Tagged: Baroo
24 Sep 23:55

Art Nouveau Posters For Studio Gihbli Film Characters

studio-gihbli-posters-1.jpg This is a series of art nouveau style posters for some of Hayao Miyazaki's Studio Ghibli animated films. They were created by Pixiv user marlboro and NOT American Spirits like you were probably thinking. Look at you -- always jumping to conclusions. Me? I'm always jumping out of my second story window whenever the cops knock on my door because I ain't going back to jail. *KNOCK KNOCK KNOCK* Shit, gotta go! *dives out window, breaks leg* What the -- Domino's! I wrote SPECIFIC INSTRUCTIONS when I ordered online that you were supposed to CALL when you got here. And there better be a penis drawn on the inside of that pizza box. Continue for four more including everybody's favorite neighbor, Totoro.
24 Sep 23:40

Handmade Halloween: 10 Spooky Finds

by Kim Lucian

Little ole Halloween might not get the advertising dollars of some of the mega holidays, but boy is it fun. Here are a few spooky finds to get you in the "spirit" of the season.

READ MORE »


23 Sep 11:32

Kitchen Cheat Sheet

by Summer
Amy Cutting

Sweet graphic kitchen cheat sheet

I've been feeling rather domestic lately. It probably has to do with the fact that my life currently revolves around moving into my new apartment. All I want to do is decorate, clean and cook. And seeing as how I've got the decorating and cleaning thing down, cooking is my next obstacle to tackle. I've gotten pretty good at crock-potting, but I'm ready for bigger and better things. I'm confident this kitchen cheat sheet from SHELLSHOCK will help me out quite a bit. Get ready stove. Here I come!


23 Sep 02:03

i’m jealous of brittany schall

by the jealous curator


I can’t even make my real hair look like this, let alone draw hair that looks like this! Upswept, long n’ flowing, twists & braids…. these gorgeous hair studies are mixed media drawings on canvas by New York based artist Brittany Schall.  Do I want to become her BFF so that we could braid each other’s hair {and then have her draw it}… yes, yes I do.

23 Sep 00:00

i’m jealous of thomas darnell

by the jealous curator
Amy Cutting

Just beautiful

Ahhhh, peonies! Can you smell these from where you are?! I think I can! I saw these on The Artful Desperado last week and immediately fell in love. Here’s why…

1. Peonies are my most favorite flower ever.

2. These are paintings. PAINTINGS.

3. That’s all.

These insanely beautiful paintings are the work of Texas based artist Thomas Darnell. So gorgeous! Oh, if only they were really really really big…

YES ♥

{via the artful desperado}

22 Sep 23:38

i’m jealous of kiana mosley

by the jealous curator


Juicy gardens on thick white paper. Gah! These are not your grandmother’s floral watercolors! Nope, this fresh n’ modern take on the subject is the work of American artist Kiana Mosley. The vibrant colors flowing into eachother, the big juicy blooms, the use of white space in these contemporary compositions: Love, love, love!

ps. I also love that she has a few of these for sale as $28 prints in her Etsy shop

22 Sep 19:41

Get Organized Now, Not Later

by Janel

Tips to Organize Your Pantry

While I’m not quite ready to go back to the daily drill of homeschool, I am ready for the order and routine that the new school year brings with it. “Back to School” time is a fresh start and a great time to get organized.

Whether your kids go back to school this week or next month, getting organized now, not later can help you enjoy your life as MOM just a little more.

Check out these posts from the archives to help you organize your home, time, and meals:

Organizing Your Home:

School 2

Organizing Your Time:

Organizing Your Meals:

Do you have a goal for home organization this month?

Do tell. We’ll keep you accountable. Got a challenge? Share that as well. We’ll try to help.

Get Organized Now, Not Later is a post from: Life As Mom. © Jessica Getskow Fisher - All rights reserved.


21 Sep 11:59

Practically Free Family Night Ideas to Try with Your Kids

by Jessica Fisher

family-nights-free-printableFamily Night Ideas don’t have to be complex, expensive, or involve crazy stunts. Our kids mostly want to spend time with us that doesn’t involve laundry or dishes. This post does include Amazon affiliate links. If you make a purchase through those links, I am paid a small amount in way of advertising fees. Summer […]

© 2015 Jessica Fisher, Life As Mom. All Rights Reserved.

17 Sep 11:43

Video: Fall TV Reviewed - Every New Show in Just One Line!

by Becky Kirsch

We're in the midst of tons of TV series premieres right now, and to get you prepped, we're giving you our one-line reviews of every new show headed to TV this season. It's a fast-paced primer to help you figure out what you need you program into your DVR. And then don't forget to download our printable calendar with all of the big premiere dates!


View attached file (293 KB, video/quicktime)
17 Sep 11:25

Fujifilm unveils the X-A1

by Daniela Bowker

Fujifilm has unveiled the X-A1; a smaller, lighter camera that’s aimed at giving people who want to make the leap from a compact camera to an interchangeable lens camera a jumping-off point.

You’re looking at a camera that has been designed for single-handed use, with all the buttons, dials, knobs, and levers on the right-hand side. It has two command dials to allow for easy aperture, shutter speed and EV compensation adjustment as well as individual buttons to control white balance, burst mode, and macro. And there are its easier-to-use features such as full auto and in-camera filters that include toy camera, pop colours, high and low key, and miniature.

X-A1 line-up

Details-wise, it’s a 16 megapixel sensor powered by an EXR Processor II with a maximum sensitivity of ISO 25,600 and top burst mode of 5.6 frames per second. Video is 1920 by 1080 30 frames per second, there’s a tiltable LCD screen, wi-fi connectivity, and a pop-up flash that benefits from ‘Super Intelligent Flash Technology’. This adjusts the flash according to the scene. For example, when you’re indoors and taking portraits in low-light, or maybe food shots, it aims to reduce the highlight clipping. Or there’s ‘Perfect fill-flash’ for backlit conditions or strong sunlight.

From standard pop-up flash to Fujifilm's Super Intelligent Flash

From standard pop-up flash to Fujifilm’s Super Intelligent Flash

Just like the X-E1, it has a film simulation mode that allows you to apply five different effects give the impression you actually shot your photos on film.

The X-A1 is compatible with all of Fujifilm’s X-mount lenses, but being a smaller, lighter camera, Fujifilm is recommending the XC line-up, which are also smaller and lighter. A quick refresher: these are the 16-50mm (24-76mm 35mm equivalent) ƒ/3.5-5.6 and the 50-230mm (76-350mm 35mm equivalent) ƒ/4.5-6.7.

With the 16-50mm lens

With the 16-50mm lens

And to make it a bit less intimiating, it comes in red, blue, or black.

I am, however, inclined to think that £530 ($600) is quite steep for what Fujifilm is toting as a ‘step-up-to-interchangeable-lens-camera’ camera. To put things into perspective, you can pick up a Canon or Nikon dSLR for under £300, and a Samsung, Sony, Olympus, or Panasonic EVIL for under £400. Maybe it just bears out my earlier supposition that Fujifilm is the Apple of the camera world?

This article was originally posted at Fujifilm unveils the X-A1 , on Photocritic.

PLEASE NOTE -- The contents of the Photocritic blog is strictly copyrighted, and this feed is for personal, non-commercial use only. The use of this feed on other websites is a copyright infringement, so you should only ever be able to read this text in a feed reader. Digital Fingerprint: d07805f964d211dfdfe227d609f7448f

12 Sep 18:35

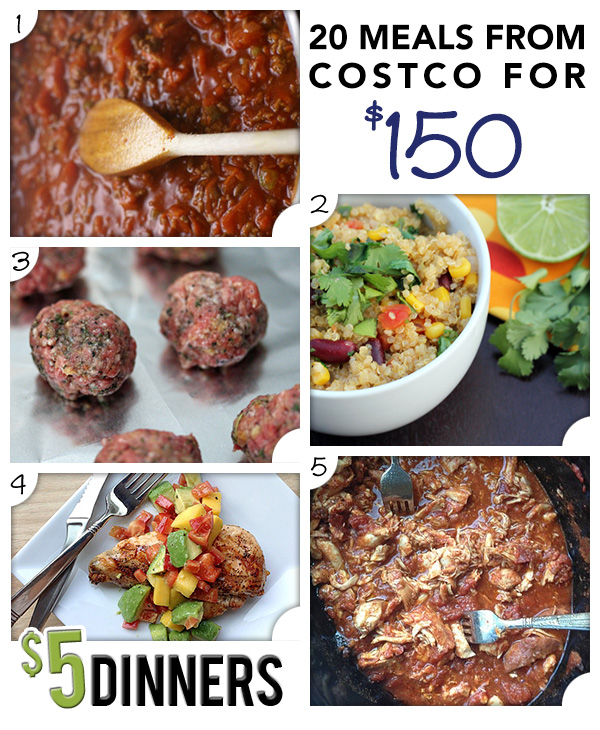
20 Meals from Costco for $150 – Recipes & Printable Shopping Lists

by Erin, The $5 Dinner Mom

costco 20 Meals from Costco for $150   Recipes & Printable Shopping Lists

Spaghetti with Meat Sauce Spicy Quinoa Recipe Herbed Meatballs Recipe Ranchero Chicken Recipe Grilled Chicken with Mango Avocado Salsa

Well, who knew that this idea would be so popular. I seriously thought a few of you would like it…but since there were a bazillion of you who thought it would be helpful, here it is…packaged up in more detail just for you!

Let’s get to it, shall we?!?

Disclaimers

  • Yes, I realize this makes for $7.50 dinners. Meat at Costco is more expensive than sale prices at grocery stores, and many argue that the quality is better. That explains that!
  • Produce prices may vary by region. And season.
  • Meals are for a family of 4. Larger families, or families with teenagers will need to adjust quantities.
  • Meals are as kid friendly, family friendly, and allergy friendly as I could make them. Hopefully you will enjoy them!
  • Mix and Match Meals – because of the bulk purchasing, this is really a game of mixing and matching ingredients. The ingredients are very common and work in a wide variety of recipes, so feel free to use them in other recipes besides those listed below.
  • I would expect you to have some ingredients needed for the different recipes in your pantry, like spices, soy sauce, etc. In the recipe/ingredient list below, I’ve only included the ingredients from the Costco purchase list.
  • Swap Idea – save a few bucks and get a 10 lb. bag of rice and not the quinoa. I just like quinoa, and I like that it has a higher protein content than rice. Make rice with corn, black beans, etc instead of the quinoa. You could also serve the rice alongside the taco/tortilla meals too.
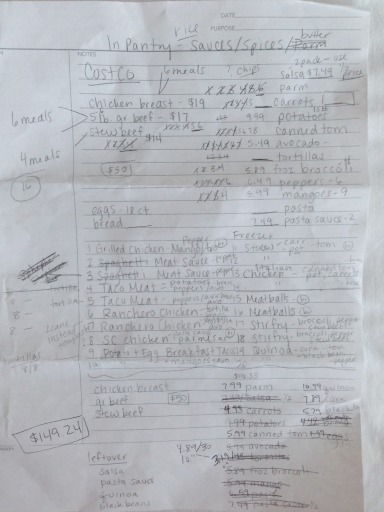
  • And lastly…as you’ll see if you really analyze this chicken scratch, I forgot to add the peppers to the bottom portion where I priced everything out. So I added them as optional as it would push the total cost to $155 if you added them.
  • Really, the last one…you MUST check the Costco Store Deals list, complete with updated store coupons and iBotta app coupons. This list is updated weekly…and will soon be available in the new Favado grocery savings app (launch date is October 15th!). I’ll keep you posted on those details!

20 Costco Meals 1502 20 Meals from Costco for $150   Recipes & Printable Shopping Lists

Recipe List

****PIN ALL THESE RECIPES! They can all be found on the 20 Meals from Costco for $150 Pinterest Board!

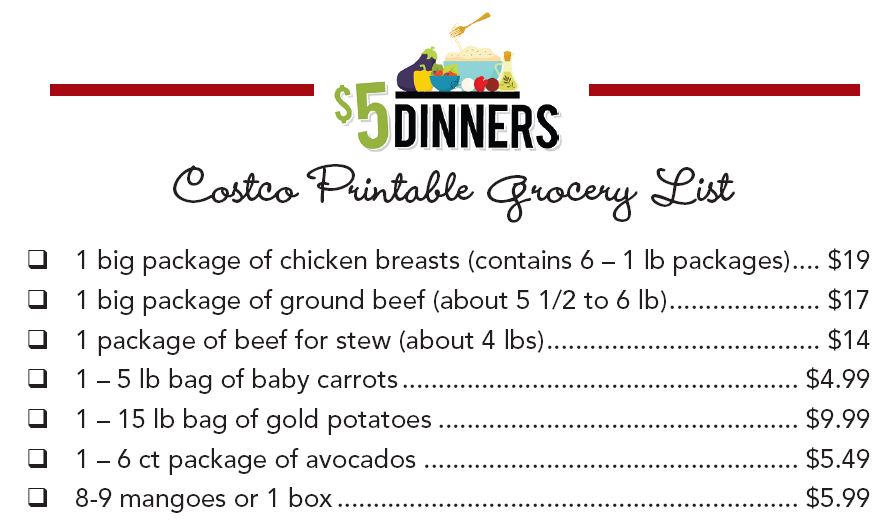
Ingredients & Price List

  • 1 big package of chicken breasts (contains 6 – 1 lb packages) ~ $19
  • 1 big package of ground beef (about 5 1/2 to 6 lb) ~$17
  • 1 package of beef for stew (about 4 lbs) ~$14
  • 1 – 5 lb bag of baby carrots $4.99
  • 1 – 15 lb bag of gold potatoes $9.99
  • 1 – 6 ct package of avocados $5.49
  • 8-9 mangoes or 1 box $5.99
  • 1 – 40 ct bag of 6″ tortillas $3.19
  • 1 – 36 ct bag of Costco bakery dinner rolls $4.49
  • 1 – 4 lb package of frozen broccoli $5.89
  • 1 – 18 ct package of eggs $1.99
  • 1 – 6 lb package of spaghetti noodles $6.59
  • 2 pack Prego pasta sauce $7.49 (MINUS $2.30 coupon!)
  • 2 pack Kirkland salsa $7.49
  • 1 – 24 oz. container Parmesan cheese $7.99
  • 1 – 4 lb bag of quinoa $10.99
  • 1 – 8 ct package of canned corn $7.89
  • 1 – 8 ct package of canned black beans $5.79
  • 1 – 8 ct package of canned tomatoes $5.99
  • Optional – a 6 pack fresh peppers $6.49

Total – $149.94

(or $156.43 if you get the peppers too!)

Leftovers – you will have lots leftover too…including a jar of spaghetti sauce, lots of quinoa, jar of salsa, several pounds of potatoes, a ton of Parmesan cheese, and smaller quantities of other ingredients. I did not reflect these “leftovers” in the total cost, so it would really be $10-$15 less than $150!!!

Coupon Alert - from 9/5-9/30, there is a $2.30 in-store savings on the Prego pasta sauce…this discount is reflected in the total.

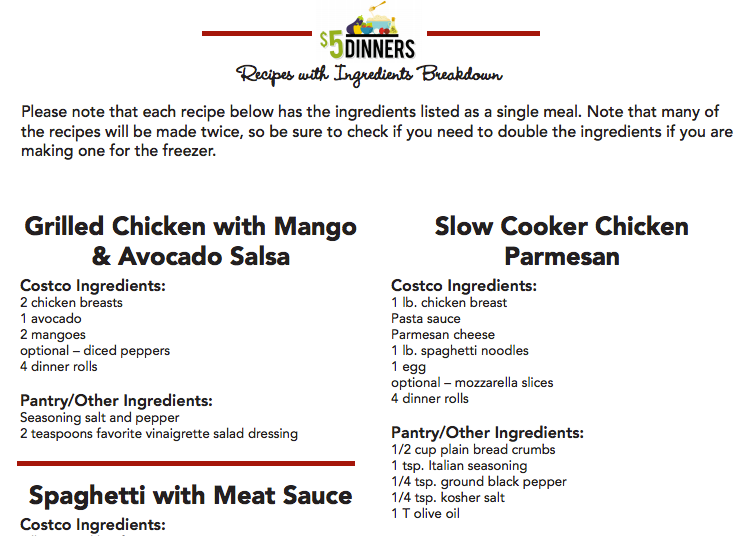
Recipes with Ingredients Breakdown

Please note that each recipe below has the ingredients listed as a single meal. Note that many of the recipes will be made twice, as noted above, so be sure to check if you need to double the ingredients if you are making one for the freezer.

Also, this ingredients list below is what you purchase from Costco. The other “pantry staples” and “optional toppings or garnishes” are listed on the Recipes & Ingredients printable, linked below.

Grilled Chicken with Mango & Avocado Salsa

  • 2 chicken breasts
  • 1 avocado
  • 2 mangoes
  • optional – diced peppers
  • 4 dinner rolls

Slow Cooker Chicken Parmesan

  • 1 lb. chicken breast
  • Pasta sauce
  • Parmesan cheese
  • 1 lb. spaghetti noodles
  • 1 egg
  • optional – mozzarella slices
  • 4 dinner rolls

Spaghetti with Meat Sauce 

  • 1 lb. ground beef
  • optional – diced pepper
  • 1/3 jar of Prego pasta sauce
  • 1 lb. spaghetti noodles

Beef and Bean Soft Tacos 

  • 1 lb. ground beef
  • 1 can black beans
  • 1 can tomatoes
  • 1 avocado
  • Salsa
  • 8 Tortillas
  • Rice or quinoa on side

Ranchero Chicken – makes 2 meals worth

  • 2  lb. chicken breasts
  • 2 cans diced tomatoes
  • 8 tortillas for 1 meal and rice/quinoa on side for other meal
  • Side dish, can black beans
  • Avocado, on side or mixed in

Note: to freeze, let the cooked chicken cool and then add to freezer baggie. Freeze, then thaw and use at a later time.

Potato & Egg Breakfast Tacos

  • 8 eggs
  • 4-6 potatoes
  • 8 Tortillas
  • Salsa
  • 1 Mango
  • 1 Avocado, on side or mixed in

Slow Cooker Beef Stew 

  • 1 lb. beef stew
  • 1 can diced tomatoes
  • 2 cups baby carrots
  • 4-6 potatoes
  • 4 dinner rolls

Note: to package for freezer, combine all ingredients except the dinner rolls and add to gallon size freezer baggie. Freeze. Let thaw overnight in fridge before adding to slow cooker. Add enough water to cover, then slow cook.

Slow Cooker Italian Chicken & Potatoes 

  • 1 lb. chicken breast
  • 1 can diced tomatoes
  • 2 cups baby carrots
  • 4-6 potatoes
  • 4 dinner rolls

Note: to package for freezer, combine all ingredients except the dinner rolls and add to gallon size freezer baggie. Freeze. Let thaw overnight in fridge before adding to slow cooker.

Meatballs & Spaghetti

  • 1 lb ground beef
  • 1 Egg
  • Spaghetti sauce
  • 1 lb spaghetti noodles
  • 4 dinner rolls

Note: to package the meatballs for freezer, see these details.

Beef & Broccoli Stirfry 

  • 1 lb. stew beef
  • 1 lb. frozen broccoli
  • Baby carrots on side, or cut up and mixed in with the stirfry
  • Quinoa or rice on side
  • Mangoes on side

Note: to package for freezer, combine all ingredients except rice/quinoa and add to gallon size freezer baggie. Freeze. Let thaw overnight in fridge before adding to slow cooker.

Quinoa with Corn & Black Beans 

  • Quinoa (or rice)
  • Can corn
  • Can tomatoes (subbed for the diced tomatoes and green chilies)
  • Can black beans
  • optional – diced pepper
  • Optional – garlic, lime, cilantro

Free Printables

costco printable grocery list.IMAGE  20 Meals from Costco for $150   Recipes & Printable Shopping Lists

Printable Recipes Ingredient Costco 150 20 Meals 20 Meals from Costco for $150   Recipes & Printable Shopping Lists

  • Recipe & Ingredients List – Please note that this printable will contain all the ingredients that the recipe calls for, including the  “pantry staples” and optional garnishes or toppings.


Related Stories

10 Sep 16:07

Halloween Roundup

by admin
Amy Cutting

Cute Halloween ideas

Halloween craft tutorials, printables, how-tos and diy activities!
26 Aug 19:52

How To Make A Concrete Pinhole Camera

by udijw

We've seen our share of weird/amazing pinhole cameras, made from everything: simple wood, cardboard or even a human skull. I have yet to see one made from solid concrete.

How To Make A Concrete Pinhole Camera

New Zealand based Instructable user amuu just changed that making a - not only functional - but amazingly stylish concrete pinhole camera (And a full set of instructions to go with that) - those are the highlights of the build, for the full tutorial visit the instructable page.

Home Studio Photography

read more

26 Aug 17:11

Things I Bring When I’m a Guest for a Weekend (or Week)

by David

A while back, someone posed the question on Twitter, asking it was okay to bring your own knives if you’re a houseguest for the weekend. It’s a question I didn’t think was all that odd, since I do it all the time. Then a friend of mine also noted recently that, like me, he brings red pepper powder with him, when he’s cooking in an unfamiliar kitchen. Which got me thinking about the mini-arsenal of equipment and foodstuffs I tote along with me when heading out to the country to stay with friends or family.

I try to be a good guest and bring food to take some of the burden off my hosts. I’ll usually prepare and freeze a few rolls of cookie dough, or maybe a disk of tart dough, which I’ll bring along to make a tart. I might take along a marinated lamb or pork shoulder (or loin) studded with garlic and rubbed with spices, ready to roast off with little fuss. And I always bring a couple of loaves of bread from Paris since it can be a challenge to find good bread in the countryside. (And I don’t like eating baguettes that can be tied in a knot.) And I always arrive with a couple of bottles of wine, because I don’t want to be known as the guest who drank his hosts out of house and home.

Continue Reading Things I Bring When I’m a Guest for a Weekend (or Week)...

26 Aug 17:11

Shelf Control: Easily Compare Online Retail Prices Of Books With BookScout

by Aldrin Calimlim

Shelf Control: Easily Compare Online Retail Prices Of Books With BookScout

There are many price comparison apps for different types of products. But if you’ve been looking for a price comparison app that’s focused on our favorite product type, i.e., books, then you’re in luck. That’s because in this week’s edition of Shelf Control, I’m delighted to introduce to you the recently released BookScout app for iPhone and iPod touch.

BookScout is designed to be your book-buying companion as it provides you with options to help you decide where to purchase a book online.

The app offers two modes of usage: barcode scanning and manual searching. With the former mode, you can simply scan the barcode of a book you’re interested in perfect for when you’re browsing the shelves of a brick-and-mortar bookstore. And with the latter, you can enter the title or author of a book and select the search result that’s most relevant to the book you have in mind.

BookScout barcode scanning

In both cases, BookScout displays information about and purchasing options for your book inquiry. Book information can be emailed with a single tap, and purchasing options can be viewed with a single tap as well.

Note that each of your book inquires is saved in the app for future reference. You can see a list of your scanned and searched books by tapping the app’s third tab. From this list, you can select items to email or delete.

At the moment, BookScout presents options for buying from Amazon, Barnes & Noble, or The Book Depository for a book’s print edition, or from iBooks, Amazon Kindle, Barnes & Noble Nook, or Kobo for a book’s electronic edition. Each option is linked to a corresponding webpage where you can proceed with your purchase.

BookScout searching

BookScout is currently available in the U.S. only. But more countries, along with more retailers, are already set to be supported in subsequent versions of the app. Improvements on inventory and price search which the app, in its initial version, is apparently in need of are already planned as well.

BookScout is available now in the App Store for free. The app is optimized for iPhone and iPod touch running iOS 6.0 or later.

The app is created by Singapore-based independent developer VoidWorks, which is also behind the recently released Emojify. You can read more about Emojify in our review here.

As always, if you have suggestions for Shelf Control, please feel free to email me at aldrin@appadvice.com or simply leave a comment below.

Shelf Control Banner BookScout 1 BookScout 2 BookScout 3 BookScout 4


23 Aug 00:42

DIY Built-In Bookshelves

by noreply@blogger.com (Rachel Paxton)
I've been meaning to share an update on these for a while... But I'm pleased to say that no "update" is needed, as they are finally finished!  I give to you our new office built-in bookshelves:

After leveling and installing hardwood flooring in Mr. Pax's office, I painted the room this beautiful charcoal gray.  And Mr. Pax got to work on some built-in bookshelves.  We considered converting Ikea Billy shelves (like we did in our master closet) as a base, but ultimately decided that a longer-lasting, real wood unit was better.  So he started from scratch.  Did he do an amazing job or what?!?!  The trim work makes the integration seamless.

I love the arched tops.


And the cozy window seat.

We plan to put doors eventually on the cabinets below the window seat, but for now, I'm he's just so glad he has his office back.  And better than ever, of course!  The rest of the room still needs some styling (actually, in the interest of full disclosure, the only "styling" I did on these bookcases was adding the photo of Mr. Pax and me - which I found in a closet - to fill an empty spot... these are purely functional shelves for our book hoarding problem love of learning).

So a reveal will come.  Eventually.  In reality, this is mostly a brag post.  Mr. Pax not only leveled the floor (seriously, this is what it was like before, it was a huge task!), but he built these things from scratch.  And. they're. beautiful.

I can't wait to show you how far this room truly has come.  And I'm so thankful Mr. Pax is not only willing to put up with encourage me in my DIY exploits, but he's willing to take risks and try some new things for himself.  I'd say it was a pretty successful first attempt at building cabinetry... wouldn't you?

Keep in touch!
Subscribe to Blog | Follow on Facebook | Follow on Twitter | Follow on Google+
Follow on Bloglovin | Follow on Pinterest | Follow on Instagram

23 Aug 00:40

How to Give Metal a Rich Vintage Patina

by noreply@blogger.com (Rachel Paxton)
I promised last week when I shared my vintage file cabinet makeover that I would share a tutorial...

A bit of background for you (since I believe everything should have a story behind it!): my church is renovating an old office building which had lots of really solid, old-school file cabinets.  Rather than throw them out, we decided to refinish them to go with the industrial-chic, utilitarian sort of style that the new building will have.  As there were 20 cabinets to update, I am SO glad to say that I had some help from other women in the church, but I did want to have a process in place before we all got together...  So I brought one of the extras home (yay for free furniture!) to experiment on.

Note: My cabinet started black.  If you cabinet starts another color, your process may differ...

Here are the necessary supplies:
  • 220 grit sandpaper
  • damp rag
  • Annie Sloan chalk paint in Graphite
  • lint-free rag (like an old t-shirt)
  • paste wax
  • Briwax dark wax
  • silver craft paint
  • buffing rag

Here is the process I developed:
Step 1: Sand down entire piece lightly with 220 grit sandpaper.
I used a sanding block and did it by hand, but a palm sander would have been quicker.  Do not use a circular sander (which is all I had on hand at the time) because it will leave circles in your paint.  The point here is to simply remove the sheen, not the color.
If you follow me on instagram (and if you don't, you can do so here), you saw my disease-ridden dust-covered arm from the process... Moral of the story: DO IT OUTSIDE.

Step 2: Lightly paint with ASCP graphite.
I know that ASCP doesn't officially require sanding, but I wanted to be sure the paint would really adhere.  If you don't have ASCP on hand (or it's not in the budget), I would imagine that homemade chalk paint in a dark dark gray would do the trick, as well.

Step 3: Using your old t-shirt, lightly wipe the paint just as it begins to dry.
This step will provide the most different results depending on the person...  I wanted to sort of rub the paint into the sanded metal, and I wanted the black underneath to show through in some places.  I found that a random swiping of the paint in various directions gave me just enough variation. Here you can see the body painted and wiped (in contrast to the drawer which had been neither sanded nor painted).

Step 4: Mix paste wax with Briwax dark wax (1:1 ratio) and add a squirt of silver craft paint.
Because we had 20 cabinets to redo for church and saving money was a major goal, we decided to cut cost by mixing paste wax (a much cheaper wax than AS or other boutique brands of soft wax) with Briwax.  Briwax runs $15-20/can and is a VERY soft wax (liquid above 65 degrees), so the combination of Briwax and paste wax create a nice, soft, paintable dark wax.  The squirt of silver craft paint is to give it that slight sparkle.  I probably only used a dime size of craft paint for every 1/2 cup of wax - just a little touch.

Step 5: Wax the entire piece, using your brush to smudge the paint where desired.
I know that sounds horribly vague, but wax can actually lift paint, so I purposefully worked my wax into the piece with significant pressure in some places to further add to the dimension and contrast of the black and gray portions.  That effect can be taken even further if you follow your brush with a rag in some places.  Here you can see the difference the wax makes (top half waxed, bottom half not).

Step 6: Buff and repeat wax if desired.

I also added new hardware to my cabinet.  Unfortunately, I found it enormously difficult to find cup pulls with 4" spacing at a reasonable price (I finally ordered these if you're curious).  And then when they arrived, the finish didn't match the label holders or lock mechanism perfectly (I had assumed they probably wouldn't), so I touched up all of them with a little silver rub 'n buff just to even out the finishes.

In the end, though the cabinet was free, I spent ~$30 on the hardware.  And if I hadn't already had the other supplies for the church project, they could have added up quickly... But I LOVE the result.  Don't you?

I think it would be beautiful on any old metal cabinet.  The options are endless!
 photo signature_zpse02c505b.jpg
Keep in touch!
Subscribe to Blog | Follow on Facebook | Follow on Twitter | Follow on Google+
Follow on Bloglovin | Follow on Pinterest | Follow on Instagram

18 Aug 18:37

Why You Should Know How to Meal Plan

by Jessica

why you should know how to meal plan

Meal planning is not rocket science, but it’s super helpful in the running of any household. Even as a sophomore in college, I practiced some kind of meal planning how-to. Back then it meant making a list of the kinds of meals I’d like to eat during the week and picking up the ingredients to go with. And no, I don’t know that I ever bought a package of ramen noodles. Weird. I wonder why not.

A meal plan can help you.

Anyway, having your meal plans for the week or month can help you in a number of ways. Here’s how:

1. You will know what to buy at the store.

If you don’t have a meal plan, your grocery shopping will be rather haphazard and based on your whims and your rumbling tummy. With a list, you can be more focused as you go about your shopping.

2. You will save money.

If you know how to meal plan, you will save money by eating at home instead of going out and paying more money to fill your belly. You’ll also shop more effectively at the store, meaning you won’t be throwing stuff in the cart and raising the price of your bill.

3. You will waste less.

Following your meal plan assumes that you will buy what you need and use it. You won’t have randomness languishing on the shelves of your fridge or pantry waiting for you to get a brainstorm of what to do with it.

4. Your people won’t bug you about “What’s there to eat?”

If you’ve got your meal plan ready and publicly posted, at least the literate folk in the house won’t need to ask you what’s for dinner. They’ll be able to read and anticipate a great meal.

5. Your people can help make dinner or do it on their own.

This weekend, FishPapa rode herd on the crew so I could focus on some projects. Since I had a meal plan and communicated it to him, he was easily able to take care of meals.

Learn how to meal plan.

meal-planning-101

Not sure how to put together an effective meal plan? Take Meal Planning 101, complete with a ton of free printables.

Want to have a meal plan but would rather someone else did the work for you? Download one of 20 free plans over here.

Why You Should Know How to Meal Plan is a post from: Good Cheap Eats. All rights reserved © Jessica Getskow Fisher


18 Aug 18:34

Simple Treefort

by kurtzepp
The following is a list of step I used in building a tree house or fort at least for this summer.  I took upon this endeavor because my son saw tree houses in some of his favorite cartoons.  I used the following sources for design and information: 1) Mike Swenson - friend who works with my wife 2) M...
By: kurtzepp

Continue Reading »
18 Aug 18:02

In the Best Interest of the Child - The Child Custody Evaluation

Today's fathers are more likely to seek custody. Many of them will need to prepare for a child custody evaluation.
18 Aug 17:25

How to Build a Doorknob 3-in-ONE Spinning Wheel (from Wood & Mixed Media)

by Gomi Romi
If you ever wished you could spin faster than a Drop spindle or a Mayan Spindle - this simple design is for you using things around the house. It spins like a thunderous train wheel! You could probably build it in a week. This is a great design if you cannot saw straight or hammer properly. I had ...
By: Gomi Romi

Continue Reading »
18 Aug 01:45

Quick and Dirty Light Box

by Jetpack5
A light box (I have heard it also called a shadow box) is an extremely handy tool for artists anywhere. It can be used like a Camera Obscura or Camera Lucida, which have been used as artistic aids for a very long time. The principle is that you put an existing image, such as a photograph, newspaper...
By: Jetpack5

Continue Reading »
11 Jul 12:56

'Agents Of S.H.I.E.L.D.': Meet Agent Grant Ward From ABC And Marvel's New Superhero Series (VIDEO)

by The Huffington Post News Editors

As the premiere for ABC and Marvel's hotly anticipated "Agents Of S.H.I.E.L.D." draws closer, the network has released an introductory, "declassified" video for Agent Grant Ward (Brett Dalton), a black ops specialist who isn't exactly a people person. (He ruins the set-up for one of Agent Coulson's jokes -- shun him!)

Check out the behind-the-scenes video below and tell us, are you excited for "Agents Of S.H.I.E.L.D."?


Read More...
More on Reality-Free