En attendant GPT-5.3, dont la sortie pourrait être moins imminente que prévu, OpenAI annonce une mise à jour majeure de sa fonctionnalité Deep Research, désormais capable de cibler des sites spécifiques. Une révolution pour l'exploration d'un site web.
Si vous avez déjà galéré à convertir un fichier .docx en Markdown propre, ou un document LaTeX en HTML sans que la mise en page explose... vous connaissez la douleur. Pandoc règle ça depuis des années en ligne de commande, mais pour ceux que le terminal rebute, y'a du nouveau. Le convertisseur universel de John MacFarlane tourne maintenant dans le navigateur, sans rien installer. Même pas un petit npm install ^^.
Pour ceux qui débarquent, Pandoc c'est un outil open source (licence GPL) créé par un prof de philo à Berkeley, qui gère une centaine de formats en entrée et en sortie... du .md au .docx en passant par le LaTeX, l'EPUB, le HTML, le reStructuredText et même les slides reveal.js. Bon, en gros, c'est la pierre de Rosette (non pas de Lyon) de la conversion de docs.
La version web (zéro install)
Alors pour ça, direction
pandoc.org/app
. L'interface est basique, vous glissez-déposez votre .docx ou .tex, vous choisissez le format de sortie dans le menu déroulant, et vous cliquez sur Convert. Et c'est terminé.
Et le truc cool c'est que rien ne quitte votre navigateur. Le moteur Pandoc tourne en WebAssembly directement dans l'onglet de votre navigteur, du coup vos fichiers ne transitent par aucun serveur. Vous pouvez vérifier ça dans les DevTools réseau... et après le chargement initial de ~15 Mo, c'est clean. Donc même pour des docs un peu sensibles, y'a pas de souci.
Attention, la version web a quand même ses limites. Elle peut générer du PDF grâce à Typst (embarqué en WASM aussi), mais les très gros fichiers vont faire ramer votre navigateur. Après pour le reste, ça fait le taf.
En ligne de commande (pour les power users)
Après si vous avez des gros volumes de fichiers à traiter ou des conversions récurrentes, la CLI reste imbattable. Sur macOS c'est un brew install pandoc, sur Linux un apt install pandoc et sur Windows y'a un .msi sur le site officiel. En deux minutes c'est installé.
La syntaxe ensuite est limpide :
pandoc monfichier.md -o monfichier.docx
Et là, magie, votre fichier .md se transforme en document Word propre avec les titres, les listes, le gras, tout y est. Dans l'autre sens ça marche aussi :
pandoc rapport.docx -o rapport.md
Pratique pour récupérer un vieux rapport.docx et le transformer en Markdown exploitable dans
Obsidian ou Logseq
.
Cas d'usage concrets
Allez, imaginons que vous ayez 200 fichiers .md dans Obsidian et vous vouliez les envoyer à quelqu'un qui ne jure que par Word ? Un petit convert.sh avec une boucle for f in *.md et c'est plié en 30 secondes.
Et si votre CV est en LaTeX (parce que vous êtes un vrai barbu, ahaha), mais que le recruteur veut un .docx parce que lui c'est pas un vrai barbu (ah le faible ^^), au lieu de copier-coller comme un sauvage, faites un petit pandoc cv.tex -o cv.docx et c'est au propre. Attention quand même, les tableaux LaTeX complexes peuvent casser à la conversion.
Ou encors si vous rédigez en Markdown (parce que c'est rapide et surtout versionnable avec git) et que vous exportez ça ensuite en PDF ou HTML selon le destinataire, avec l'option --css style.css ou un template perso en .yaml, le rendu sera propre.
Bref, vous l'aurez compris, Pandoc c'est flexible.
Web vs CLI, on choisit quoi ?
La version web c'est donc parfait pour les conversions ponctuelles. Vous avez UN fichier .odt ou .rst à convertir, pas envie d'ouvrir un terminal, hop vous allez sur
pandoc.org/app
et c'est réglé en 10 secondes.
La CLI, elle, assurera grave dès qu'on parlera d'automatisation. Scripts bash, intégration dans des pipelines CI/CD, conversions avec des templates perso, filtres Lua... Là c'est un autre monde. D'ailleurs, pas mal d'outils comme
MarkItDown
ou
ConvertX
utilisent Pandoc en backend.
Voilà, comme ça tout le monde y trouve son compte et Pandoc peut enfin régner sur le monde !!!
Exclure la viande de son assiette diminue-t-il les possibilités de devenir centenaire ? Une enquête réalisée en Chine indique que les individus de plus de 80 ans ne consommant pas de viande...
Une équipe de chercheurs en économie vient de poser des maths sur un truc que pas mal de devs sentaient venir... Le vibe coding serait en train de tuer l'open source. Pas au sens figuré, hein. Au sens "les mainteneurs ne pourront bientôt plus payer leurs factures". J'ai parcouru le papier ce midi, et je pense que ça va vous choquer...
En gros,
le document
modélise ce qui se passe quand des millions de devs arrêtent d'aller sur Stack Overflow et de lire la doc officielle pour plutôt demander à Claude, Copilot, Cursor ou Windsurf de tout faire à leur place. En fait, à cause de ces nouvelles habitudes, les projets open source qui vivaient de la pub sur leur site, des sponsors attirés par le trafic, ou de la visibilité communautaire... perdent tout. Le trafic baisse, les dons baissent, les revenus baissent.
Et les chiffres font mal !
Tailwind CSS, par exemple. J'ai regardé les stats npm de tailwindcss sur npmtrends.com... les téléchargements hebdo dépassent les 44 millions en janvier 2026, c'est du jamais vu. Sauf que les visites sur tailwindcss.com ont plongé d'environ 40%.
Côté revenus, c'est encore pire, puisque ça a chuté d'à peu près 80%. Adam Wathan, le créateur de Tailwind,
en parlait début 2026
et ça avait l'air de bien le déprimer.
Pendant ce temps, Stack Overflow a perdu un quart de son activité depuis fin 2022 avec l'arrivée de ChatGPT. Bah oui, plus besoin de poser des questions quand l'IA vous mâche le travail.
En fait, l'IA utilise MASSIVEMENT l'open source pour générer du code. Elle s'appuie dessus, elle recommande les packages, elle les intègre automatiquement. Mais elle ne renvoie personne vers les sites des projets. C'est un peu comme si Spotify jouait vos morceaux sans jamais afficher le nom de l'artiste... et sans le payer non plus !
D'ailleurs, les auteurs du papier font exactement cette analogie. Ils proposent un modèle "Spotify pour l'open source" où les plateformes d'IA (OpenAI, Anthropic, GitHub) partageraient leurs revenus d'abonnement avec les mainteneurs en fonction de l'utilisation réelle des packages. Leur calcul montre que sociétés d'IA devraient contribuer au minimum à hauteur 84% de ce que les utilisateurs classiques apportent, sinon c'est la spirale de la mort pour les projets.
Perso, ça me rappelle
la fameuse lettre de Bill Gates en 1976
qui gueulait déjà que personne ne voulait payer pour le logiciel. Cinquante ans plus tard, on en est toujours au même point, sauf que maintenant c'est l'IA qui fait le travail de sape. Et comme le disait
Linus Torvalds récemment
, le vibe coding c'est "horrible, horrible" pour la maintenance du code. Pas juste parce que le code généré est souvent bancal, mais parce que ça coupe le lien entre le dev et l'écosystème qui le nourrit.
Après, attention, ça veut pas dire que TOUS les projets open source vont crever du jour au lendemain. Ceux qui ont des contrats enterprise genre Red Hat ou du support payant à la Elastic s'en sortent... pour l'instant. Pareil pour les gros projets type Linux ou Kubernetes qui sont soutenus par des fondations. Le problème, c'est surtout les petits projets maintenus par une ou deux personnes qui vivaient de la visibilité. Vous savez, le mec qui maintient un package npm avec 2 millions de téléchargements hebdo depuis son appart, sans sponsor... ben lui, il est dans la panade. Sauf si le mec a un Patreon bien rempli ou un contrat de consulting à côté, mais ça c'est l'exception, pas la règle.
Et n'allez pas croire que les GitHub Sponsors suffisent... j'ai galéré à trouver ne serait-ce qu'un seul projet avec plus de 500$/mois via ce système.
Le plus flippant dans tout ça, c'est que même si l'IA rend chaque dev individuellement plus productif, le résultat net peut être carrément NÉGATIF pour tout le monde. Moins de projets open source viables, moins de diversité, moins d'innovation à la base. Et ces auteurs le démontrent mathématiquement avec leur modèle à deux canaux (productivité vs diversion de la demande).
Et sachez le, même dans le scénario le plus optimiste où les plateformes d'IA payeraient leur part, si ce ratio tombe en dessous de 84%... c'est foutu. Le modèle diverge et les projets meurent quand même.
Bref, si les plateformes d'IA ne trouvent pas un moyen de rémunérer l'open source qu'elles exploitent, on court droit vers un appauvrissement massif de l'écosystème open source.
MaKim Projects’ beautiful rotating desktop marble machine puts a clever twist on the classic marble run by rotating the track while gravity keeps the marbles moving.
Steel bearings roll downward naturally through twisting, spiraled ramps, then hop onto an illuminated corkscrew elevator that lifts them back to the top for another run. Because the build packs tons of small bearings into a compact space, there’s always something in motion: smooth, mechanical, and oddly hypnotic.
A LED running up the central screw lights the entire track, and swapping filament lets you customize the glow. And if all that motion gets a little loud, a built-in potentiometer lets you slow the rotation and calm things down.
La biotech Life Biosciences s'apprête à tester sur l'humain son traitement expérimental ER-100. En s'appuyant sur la reprogrammation cellulaire partielle, cette thérapie génique vise à inverser les dommages du nerf optique. Un saut technologique majeur qui ravive l'espoir de « remonter le temps » biologique, tout en soulevant des défis sanitaires cruciaux.
On Wednesday, Anthropic announced that its AI chatbot, Claude, will remain free of advertisements, drawing a sharp line between itself and rival OpenAI, which began testing ads in a low-cost tier of ChatGPT last month. The announcement comes alongside a Super Bowl ad campaign that mocks AI assistants that interrupt personal conversations with product pitches.
"There are many good places for advertising. A conversation with Claude is not one of them," Anthropic wrote in a blog post. The company argued that including ads in AI conversations would be "incompatible" with what it wants Claude to be: "a genuinely helpful assistant for work and for deep thinking."
The stance contrasts with OpenAI's January announcement that it would begin testing banner ads for free users and ChatGPT Go subscribers in the US. OpenAI said those ads would appear at the bottom of responses and would not influence the chatbot's actual answers. Paid subscribers on Plus, Pro, Business, and Enterprise tiers will not see ads on ChatGPT.
ElevenLabs CEO argued at Web Summit Qatar that voice is the next interface for AI, as OpenAI, Google, and Apple push conversational systems into wearables, new hardware, and everyday interactions.
n8n a confirmé la présence de « failles supplémentaires » dans une vulnérabilité qui avait, pourtant, déjà fait l'objet d'un correctif fin 2025. Un épisode de plus dans la série d'incidents cyber qui touchent la plateforme d'automatisation open-source.
Seeed Studio has sent us a sample of the XIAO ePaper DIY Kit EE02 for review. The kit is comprised of an ESP32-S3 board driving a 13.3-inch Spectra 6 color E-Ink display with 1600 x 1200 resolution. It supports Wi-Fi and Bluetooth 5.0 (LE) wireless connectivity, and features a USB Type-C port for power and programming, a battery connector with an on/off power switch, a built-in charging circuit, a Reset button, and three user buttons.
In this review, we will test the XIAO ePaper DIY Kit EE02 with the SenseCraft HMI platform and the Arduino IDE. But first, let’s go through an unboxing.
XIAO ePaper DIY KIT EE02 unboxing
We received the XIAO ePaper DIY Kit EE02 in a cardboard box with foam to protect the display.
The package includes the 13.-inch ePaper display, the XIAO ePaper Display EE02 board, an external antenna, and a set of two 60-pin adapters and two FFC cables.
The XIAO ePaper Display Board features a power on/off switch for the battery, a Reset button, three user buttons to refresh the display and switch to the next or previous page, and a charging LED (Blinking = No battery connected, Solid green = Charging battery). The PCB is fitted with an XIAO ESP32S3 Plus board featuring an antenna connector and a USB-C port for power and flashing the firmware.
The bottom side of the board features a 60-pin connector for the E-Ink display, and a 2-pin 2.0mm pitch battery connector can be found on the right side.
Review of the XIAO ePaper DIY Kit EE02 with SenseCraft HMI
Before we start testing the solution with the SenseCraft HMI platform, we’ll need to connect the XIAO ePaper board to the 13.3 E-ink display through the 60-pin FFC cable and connect the WiFi antenna to the XIAO ESP32S3 Plus module.
Let’s now connect the EE02 kit to the Khadas Mind mini PC using the provided USB Type-C cable. The display will automatically refresh and show a preloaded photo.
The display will soon refresh again to display the network setup screen in order to configure Wi-Fi. You’ll get the access point SSID (ePaper-DIY-Kit-xxx) and IP address (192.168.4.1), or you can scan the Wi-Fi Setup QR code to get started.
After connecting to the access point and accessing 192.168.4.1 in your web browser, you’ll be offered to configure Wi-Fi and enter your password. Since it’s based on ESP32-S3, it only supports 2.4GHz Wi-Fi, and not 5GHz.
After the board is successfully connected to your Wi-Fi router, the screen will refresh again and display the Pairing Code for connecting to the SenseCraft HMI platform.
This is the same procedure we followed for the reTerminal E1001/E1002 ePaper displays using the SenseCraft HMI Platform. Simply log in to the SenseCraft HMI platform, go to the device management menu, select “Add Device”, and enter the Pairing Code displayed on the ePaper screen. When pairing is successful, the XIAO ePaper DIY Kit EE02 device will appear in your device list in SenseCraft HMI.
We will now create a user interface in the SenseCraft HMI platform. The dashboard has changed since we tested it with the reTerminal E1001 and E1002 ePaper Displays last December. Within the Workspace section, users can choose to create various types of content, including New Design, New Image, RSS News, or Web Content.
We first did the easiest test by uploading an image. Once completed, click the “Apply” button in the top right corner and select the target device. The ePaper EE02 will receive the data and refresh the screen with the new image. Easy.
In the design page, we can select various templates, and we select the Weather option to get data such as temperature, humidity, and weather icons.
The RSS Feed component allowed us to load two elements from CNX Software’s RSS feed. You can select to show excerpts or the title only.
We eventually came up with a dashboard design including time, a calendar, weather data, and the RSS Feed from the CNX Software website.
Here’s the result.
Note that you can combine multiple dashboards automatically refreshed at scheduled intervals. As you can see from the video below, you use the above dashboard, a photo, and a shop promotion. We pressed the refresh button to manually switch the pages.
It’s all nice, but most people will likely need a frame to hang the display on a wall or place it on a desk. We asked Seeed Studio if they had made a 3D printed frame, but instead, we were told some users purchased photo frames from IKEA. We found and purchased the IKEA FISKBO 21x30mm photo frame on Shopee for 68 THB (about $2.15 US) shipped using a coupon.
It worked better than expected, and there’s an opening on the back to easily pass the USB-C cable through.
However, it can be difficult to close the back cover because of the board. One solution is to make use of one of the 60-pin adapters and FFC cables for extension. If we had used two sets, we could also have even placed the board outside of the frame, and it would have given access to the buttons. It all depends on whether you intend to press the buttons or not.
We also added some white tape on each side since the display is not quite as wide as the photo frame. The result is fairly nice, although black tape might have been better with the black frame. The FISKBO photo frames are also available in white if you prefer.
When shutting down the computer, the screen retains the last displayed content (expected without power). However, when turning the computer back on, it cannot continue to be used after accessing the Device page on SenseCraft HMI and clicking the “Apply” button, and we have a blank design. The only solution is to re-create the dashboard design and re-flash the firmware. The photo and the “HOT SALE” design are still there. We could reproduce the issue several times.
Using the XIAO ePaper DIY Kit EE02 with the Arduino IDE
The development kit also supports development via the Arduino IDE. You’ll need to download the Seeed GFX library from Seeed Studio on GitHub, and make sure you do not have the TFT library or any other display libraries with overlapping functions already installed, as they cannot be used together. After that, open the Arduino IDE, go to the menu Sketch -> Include Library -> Add .ZIP Library, and select the downloaded ZIP file.
After the installation is successful, go to File -> Examples -> Seeed_GFX and select one of the examples. We selected Bitmap_13inch30.
Sketch:
/*
 * Supported Colors:
 * - TFT_WHITE
 * - TFT_BLACK
 * - TFT_YELLOW
 * - TFT_GREEN
 * - TFT_BLUE
 * - TFT_RED
 */

#include "TFT_eSPI.h"
#include "image.h"
#include <cstdint>

#ifdef EPAPER_ENABLE
EPaper epaper;
#endif

void setup()
{
#ifdef EPAPER_ENABLE
  Serial.begin(115200);
  delay(2000);
  Serial.println("13.3\" Colorful E-Paper Bitmap Display Example");

  epaper.begin();

  // Clear screen to white
  epaper.fillScreen(TFT_WHITE);
  epaper.update();
  delay(1000);

  // Display color bitmap image using pushImage API
  // pushImage(x, y, width, height, image_data)
  epaper.pushImage(0, 0, 1200, 1600, (uint16_t *)gImage_13inch3);
  epaper.update();

  Serial.println("Color bitmap displayed successfully");

  // Put display to sleep to save power
  epaper.sleep();
#else
  Serial.begin(115200);
  Serial.println("EPAPER_ENABLE not defined. Please select the correct setup file.");
#endif
}

void loop()
{
  // Nothing to do here
}
Now, create a new file called driver.h and paste the following code for the EE02 display:
Set the board to XIAO_ESP32S3_Plus, and select the serial port (COM6 here).
Also, enable OPI PSRAM to support handling large image data for the ePaper display.
We can now compile the code and upload the firmware to the board.
The image defined in the gImage_13inch3 array will show on the screen.
Let’s try another sample of the Seeed_GFX menu: “Hello ePaper”.
#include "TFT_eSPI.h"

#ifdef EPAPER_ENABLE // Only compile this code if the EPAPER_ENABLE is defined in User_Setup.h
EPaper epaper;
#endif

void setup()
{
#ifdef EPAPER_ENABLE
    epaper.begin();
    epaper.fillScreen(TFT_WHITE);

    epaper.fillCircle(25, 25, 15, TFT_RED);
    epaper.fillRect(epaper.width() - 40,  10, 30, 30, TFT_GREEN);

    for (int i = 0; i < epaper.height() / 80; i++)
    {
        epaper.setTextColor(TFT_BLUE);
        epaper.setTextSize(i + 1);
        epaper.drawLine(10, 70 + 60 * i, epaper.width() - 10, 70 + 60 * i, TFT_BLACK);
        epaper.drawString("Hello ePaper", 10, 80 + 60 * i);
    }

    epaper.update(); // update the display

#endif
}

void loop()
{
    // put your main code here, to run repeatedly:
}
It will show “Hello ePaper” text with increasing font size, and that’s exactly what we got on the E-Ink display.
Conclusion
The XIAO ePaper DIY Kit EE02 with a 13.3-inch 6-color E-Ink Spectra display is easy to use with the SenseCraft HMI no-code platform, and advanced users can write code with the Arduino IDE, although what they can do is limited since the board lacks GPIOs.
Our review of the XIAO ePaper DIY Kit EE02 with the SenseCraft HMI platform shows it is very easy to use and offers a wide range of functions. However, the software still has a few bugs, and our dashboard design disappeared a few times in the SenseCraft HMI interface after we disconnected and reconnected the display.
We’d like to thank Seeed Studio for sending the XIAO ePaper DIY Kit – EE02 board and 13.3-inch Spectra 6 color E-Ink display for review. The board itself is sold for $14.90 with an antenna and FPC cable, but the full kit, as reviewed here, goes for $163.90 on the same page. It’s a pretty decent deal for the Spectra display. We used an IKEA FISKBO photo frame in our review, but Seeed Studio has just released the reTerminal E1004, based on similar hardware, but equipped with a built-in 5,000mAh battery, a 16GB microSD card, and an enclosure. It sells for $279.90.
Des chercheurs de l'université Texas A&M ont développé un nouveau matériau entièrement composé de métal qui possède les mêmes propriétés qu'un gel. Cette découverte pourrait faire progresser de façon spectaculaire le stockage de l’énergie.
Quentin, fidèle lecteur de Korben, développe en solo depuis presque un an un outil qui va parler à tous ceux qui cherchent un appart ou une maison et qui en ont marre de jongler entre quinze onglets pour avoir une vision claire d'un quartier.
1dex.fr
c'est une plateforme qui agrège un paquet de données géographiques et immobilières sur n'importe quelle adresse en France. Prix de vente au m², transactions DVF, permis de construire, qualité de l'eau, pollution de l'air, travaux à proximité, écoles... Le tout sur une interface cartographique plutôt bien foutue.
Concrètement, vous entrez une adresse, vous cliquez sur "Analyser cette zone" et hop, la carte se remplit de données. On peut alors visualiser les parcelles alentours, voir les dernières ventes, repérer les chantiers en cours, et même afficher les immeubles avec syndic de copropriété. Y'a même un système de calques pour switcher entre fond de carte classique, vue satellite ou mode sombre.
Perso j'aime bien ce genre d'outil qui met la data à portée de main sans avoir besoin de fouiller data.gouv.fr pendant des heures.
Son modèle est freemium mais rassurez-vous, l'essentiel est gratuit avec une limite journalière d'analyses. Si vous dépassez, soit vous revenez le lendemain, soit vous passez à la caisse pour un accès intensif. Quentin bosse aussi sur une API pour les pros et une extension navigateur qui ajoutera les données 1dex directement sur les annonces immo. Pas mal pour éviter les mauvaises surprises avant même de visiter !
Voilà si vous êtes en recherche de logement ou juste curieux de savoir ce qui se passe autour de chez vous, ça vaut le coup d'œil ->
1dex.fr
Savez-vous quel est le point commun entre les lunettes de vision nocturne, un défibrillateur, les capteurs de mouvement et une lampe de poche ? Réponse : la pile CR123A. Avec ses 17 grammes, cet accumulateur haute performance fournit suffisamment d’énergie pour sauver une vie ou assurer la sécurité.
Également appelée DL123A ou CR17345, la pile CR123A est un accumulateur de puissance au format compact. Elle a été inventée par Panasonic au début des années 80 pour les besoins énergétiques des appareils photo compacts de l’époque. Cet accessoire, disponible en version primaire ou rechargeable, équipe aujourd’hui une multitude d’appareils électroniques et d’équipements domotiques. Sa chimie au lithium assure une tension stable de 3V, gage d’une fiabilité exceptionnelle même dans les environnements les plus hostiles et exigeants.
Le secret du prix caché de la CR123A
Les entreprises spécialisées utilisent des matières premières très onéreuses aujourd’hui dans leurs usines. Le lithium pur compose la CR123A originale de qualité supérieure pour les professionnels de la domotique. Toutefois, le prix élevé reflète les contrôles de sécurité drastiques des sites modernes automatisés. Cette conception technique garantit alors une fiabilité totale pour l’utilisateur de matériel tactique précis. Les marques industrielles certifient chaque lot selon des critères de performance et de durabilité globale.
Chaque laboratoire fabrique ces accumulateurs avec une précision industrielle pour éviter les pannes graves dans certains secteurs sensibles. Dans le domaine de l’aviation par exemple, des techniciens hautement qualifiés installent notamment des sources de secours vitales dans les systèmes de survie des pilotes ou le GPS secondaire. Une puissance nominale justifie les tarifs élevés des modèles rechargeables vendus dans les boutiques. Plusieurs piles assurent une autonomie record pour les interventions en extérieur.
Le voltage dangereux entre une pile et l’accu
Chaque spécialiste vérifie la tension de trois volts sur cette CR123A pour les circuits. Par ailleurs, une cellule seize mille trois cent quarante diffère au niveau de sa chimie. Les experts mesurent quatre volts sur les accumulateurs lithium-ion après une charge complète électrique. Ce voltage électrique risque de détruire les lampes torches sans un régulateur de tension efficace. Plusieurs accumulateurs partagent pourtant la même forme physique cylindrique dans les rayons spécialisés.
L’expert certifie la compatibilité de chaque pile insérée dans l’objet de grande valeur pécuniaire. Les pros privilégient la CR123A pour les systèmes de visée laser des chasseurs alpins aguerris. Cependant, cet accumulateur rechargeable séduit par son prix de revient bas à terme pour l’utilisateur. Les piles demandent une lecture de la notice technique du constructeur de matériel. Une connaissance pointue protège vos objets précieux contre les courts-circuits ou les pannes.
La CR123A ne craint jamais le grand froid
Sa chimie au lithium brave le gel sans aucune perte de puissance électrique pour l’appareil. Les piles CR123A conservent leur flux stable malgré les températures glaciales très extrêmes des sommets. Cet accumulateur fiable fonctionne aussi sous la neige épaisse lors des expéditions alpines des grimpeurs. Une température négative ne bloque pas les ions au sein des cellules performantes de pointe. Les explorateurs utilisent des piles pour les missions par grand froid sans crainte.
Le froid intense paralyse les piles alcalines classiques dans la nature sauvage hivernale. Toutefois la CR123A maintient une tension fixe malgré les conditions climatiques rudes de la saison. Les secouristes emploient ce format robuste pour les missions nocturnes de sauvetage en forêt dense. Plusieurs accumulateurs assurent une lumière forte au sommet des montagnes mondiales par nuit. Cette résistance accrue aide les secours durant les tempêtes sur les sommets du globe actuel.
La pile CR123A possède un port de recharge
L’innovation technologique équipe désormais la pile CR123A moderne pour les usages fréquents des professionnels. Un port usb se cache sur cet accumulateur miniature de manière très discrète et maligne. Les utilisateurs rechargent les accumulateurs sans utiliser de boîtier mural externe dans l’équipement de voyage. Cette charge directe facilite la vie des voyageurs en expédition dans des zones totalement isolées.
Le circuit interne occupe une place réelle dans la pile cylindrique de format industriel actuel. Toutefois cet accumulateur lithium simplifie les missions de terrain grâce à sa polyvalence de branchement. Le professionnel connecte les accumulateurs sur un ordinateur portable ou une batterie de poche légère. Les piles CR123A adoptent ce format pour une utilisation simplifiée quotidienne des techniciens. Une autonomie optimale définit ces piles rechargeables de nouvelle génération pour les outils de communication.
Pourquoi les piles périment seulement après dix ans
La durée de vie de la pile CR123A impressionne les experts de l’énergie portable mondiale. Les techniciens stockent ces piles sans craindre une décharge naturelle trop profonde. Cet accumulateur rechargeable reste prêt pour une urgence vitale au fond d’un tiroir sec. Une longue conservation évite les mauvaises surprises dans le sac de survie des randonneurs aguerris. Plusieurs piles gardent leur énergie interne intacte pendant une décennie de repos total.
Le boîtier scellé protège chaque accumulateur de la corrosion provoquée par l’humidité de l’air. La CR123A ne coule jamais d’acide corrosif dans les contacts du ressort métallique de l’appareil. Aussi l’accumulateur rechargeable demande moins de maintenance que les anciens modèles lourds au cadmium.
Votre source CR123A résiste aux vibrations des armes
Les lampes montées subissent des chocs sur la CR123A lors des tirs de gros calibre. Le tireur installe cet accumulateur tactique pour les exercices de tir en extérieur par tous les temps. Les piles et accumulateurs résistent aux fortes secousses du recul de l’arme automatique de poing. Une enveloppe rigide empêche la rupture des contacts électriques lors des impacts physiques répétés. Chaque accumulateur supporte les vibrations des armes modernes sans interruption du faisceau de lumière blanche.
Le ressort interne maintient la pile CR123A bien droite au sein du tube métallique robuste. Les armées préfèrent les piles et accumulateurs pour le combat en zone urbaine ou forêt. Mais cet accumulateur spécifique offre aussi une solidité mécanique pour les entraînements intensifs de la gendarmerie. Chaque pile et accumulateur certifié subit des impacts de tests dans les laboratoires de balistique. Un corps robuste protège les sources d’énergie pour les pros de la défense et sécurité.
La face cachée du recyclage pour chaque accumulateur
Le lithium de la pile CR123A pollue les sols sans un traitement adéquat en usine. L’industrie recycle les piles avec un soin extrême dans des centres de tri. Cet accumulateur moderne contient des métaux rares comme le cobalt pour sa structure de base. Le tri sélectif aide à fabriquer de nouveaux objets pour la transition énergétique de demain. Piles et accumulateurs rejoignent les filières de traitement pour une seconde vie utile industrielle.
Les centres de tri récupèrent chaque pile usagée pour protéger la planète des toxines chimiques. Le technicien traite l’accumulateur rechargeable dans des fours étanches à très haute température pour métaux. Les piles CR123A servent de ressources pour les batteries futures des véhicules électriques. Chaque pile usée doit quitter vos poubelles pour rejoindre les bornes de collecte de ville. Une valorisation utile préserve la nature des toxines chimiques dangereuses pour la santé humaine et l’environnement.
Le risque d’explosion pour tout accumulateur rechargeable
Le lithium de la pile CR123A réagit avec l’air après une perforation accidentelle du boîtier. Les professionnels manipulent cet accumulateur puissant avec une prudence totale lors du chargement électrique long. Les piles et accumulateurs exigent des boîtes isolantes pour le transport dans les bagages des avions. Un court-circuit déclenche une montée de chaleur vive capable de brûler les tissus des vêtements. Chaque pile et accumulateur possède une valve de sécurité pour évacuer les gaz sous pression.
La protection thermique surveille chaque accumulateur pendant la phase de charge sur le secteur domestique. L’expert vérifie la pile CR123A avant toute utilisation de forte puissance en forêt très sèche. Aussi, l’accumulateur rechargeable gonfle parfois si la cellule subit un stress électrique intense ici. Plusieurs piles et accumulateurs CR123A demandent une veille visuelle de la part du propriétaire du matériel. Cette prudence vitale écarte les accidents de feu dans le sac de transport des voyageurs.
Pourquoi les piles primaires surpassent toujours les accus
La densité de la pile CR123A surpasse les autres formats de piles bâtons du commerce. L’industrie utilise les piles et accumulateurs pour éclairer les zones sombres avec une force totale. Cet accumulateur ordinaire offre moins de capacité brute que la version primaire non rechargeable de qualité. Une énergie brute caractérise les piles au lithium pour leur excellence technique mondiale actuelle maintenant. Chaque accumulateur et pile CR123A livre un flux intense constant pendant son usage dans l’appareil.
Le rendement des piles et accumulateurs varie selon la chimie interne de chaque marque internationale. Le randonneur préfère la pile CR123A pour les sorties sans accès aux prises de ville. Toutefois cet accumulateur lithium convient pour les usages fréquents des agents de sécurité privée urbaine. Une puissance nominale assure un faisceau blanc pur dans l’obscurité pour l’œil humain averti.
Le milieu marin exige une pile CR123A très fiable pour les balises de détresse vitales. La marine équipe les gilets avec des piles scellées contre l’humidité du large. Cet accumulateur étanche alimente les dispositifs sans faute lors d’un naufrage de nuit par tempête. Une lampe flash sauve les marins en guidant les hélicoptères de secours au large sauvage.
Le contact humide active la pile CR123A sans délai pour envoyer un signal de détresse. Le pilote utilise l’accumulateur rechargeable pour les radios portatives lors d’un crash marin très isolé. Plusieurs piles et accumulateurs assurent la survie humaine en milieu marin par gros temps de pluie. Chaque accumulateur doit fonctionner dès la première seconde de l’urgence pour les secours maritimes. Ce secours immédiat dépend de la qualité des sources embarquées sur les navires de commerce.
[XYZAiden]’s concept for a flexible robotic gripper might be a few years old, but if anything it’s even more accessible now than when he first prototyped it. It uses only a single motor and requires no complex mechanical assembly, and nowadays 3D printing with flexible filament has only gotten easier and more reliable.
The four-armed gripper you see here prints as a single piece, and is cable-driven with a single metal-geared servo powering the assembly. Each arm has a nylon string threaded through it so when the servo turns, it pulls each string which in turn makes each arm curl inward, closing the grip. Because of the way the gripper is made, releasing only requires relaxing the cables; an arm’s natural state is to fall open.
The main downside is that the servo and cables are working at a mechanical disadvantage, so the grip won’t be particularly strong. But for lightweight, irregular objects, this could be a feature rather than a bug.
The biggest advantage is that it’s extremely low-cost, and simple to both build and use. If one has access to a 3D printer and can make a servo rotate, raiding a junk bin could probably yield everything else.
DIY robotic gripper designs come in all sorts of variations. For example, this “jamming” bean-bag style gripper does an amazing, high-strength job of latching onto irregular objects without squashing them in the process. And here’s one built around grippy measuring tape, capable of surprising dexterity.
– Article invité, rédigé par Vincent Lautier, contient des liens affiliés Amazon –
En mai dernier, je vous parlais de mon coup de cœur pour le
Revodok Max 213, un dock très complet
, Thunderbolt 4, qui faisait déjà des miracles sur mon bureau. Sauf que voilà, les mois ont passé, et je suis un geek bien trop relou pour accepter de continuer à utiliser un ancien modèle, alors qu'il a été mis à jour ! Entre une promotion indécente sur Amazon et mon envie de préparer le terrain pour mon future MacBook Pro, j'ai fini par sauter le pas pour le UGREEN Revodok Max 2131, la déclinaison Thunderbolt 5, et je suis bien content.
Soyons honnêtes deux minutes : mon MacBook Air M4 actuel ne gère "que" le Thunderbolt 4. En branchant cette nouvelle version, je ne gagne clairement pas de vitesse de transfert immédiate par rapport à mon ancien modèle. C’est même techniquement surdimensionné pour mon usage actuel, mais l'investissement est en fait stratégique. Je prévois de passer au prochain MacBook Pro M5 dès sa sortie, et avec ce dock, je suis certain que mon setup sera prêt le jour J pour exploiter la pleine puissance du TB5. Et puis surtout, à 315 euros au lieu de 450 euros, je n'avais pas trop à hésiter.
Alors sur le papier vous le savez, l'intérêt du Thunderbolt 5 c'est surtout sa bande passante délirante. On passe de 40 Gbps à 80 Gbps bidirectionnels, et même jusqu'à 120 Gbps via le mode "Bandwidth Boost" pour l'affichage. Pour ceux qui travaillent avec des écrans haute résolution, c'est quand même sympathique. Ce modèle permet de gérer un double affichage 8K à 60 Hz sur les puces Pro et Max, ou de saturer des SSD externes ultra-rapides sans ressentir le moindre ralentissement sur le reste des ports. Zéro compromis donc.
C'est aussi un monstre de charge.
On passe de 90W sur l'ancien modèle à 140W de Power Delivery sur celui-ci. Pour mon MacBook Air, c'est toujours inutile, mais pour les utilisateurs de PC portables gaming ou de MacBook Pro gourmands en ressources, vous pouvez mettre le chargeur d'origine de votre ordi à la poubelle. La station gère intelligemment la distribution d'énergie, envoyant même du jus supplémentaire sur les ports de façade pour charger un smartphone ou une tablette en charge rapide simultanément.
Il a plutôt une bonne tête en plus, avec un châssis en aluminium pour bien dissiper la chaleur. La connectique est complète avec 13 ports, dont du RJ45 en 2,5 GbE pour les amateurs de réseaux rapides et des lecteurs de cartes microSD et SD 4.0 pour les photographes comme moi. Point important quand même, il faut obligatoirement être sous macOS 15 Sequoia ou Windows 11 pour en profiter pleinement, mais bon, si vous lorgnez sur ce genre de produit, c'est que vous êtes à jour.
Bon, vous l'avez compris, si vous aimez avoir du bon matériel sur votre bureau, ça se considère clairement, surtout avec la promo actuelle sur Amazon. Et oui, même si votre ordinateur du moment est limité au Thunderbolt 4, vous gagnez quand même en puissance de charge, et vous êtes déjà prêts pour votre prochaine évolution matérielle. Dispo ici sur Amazon !
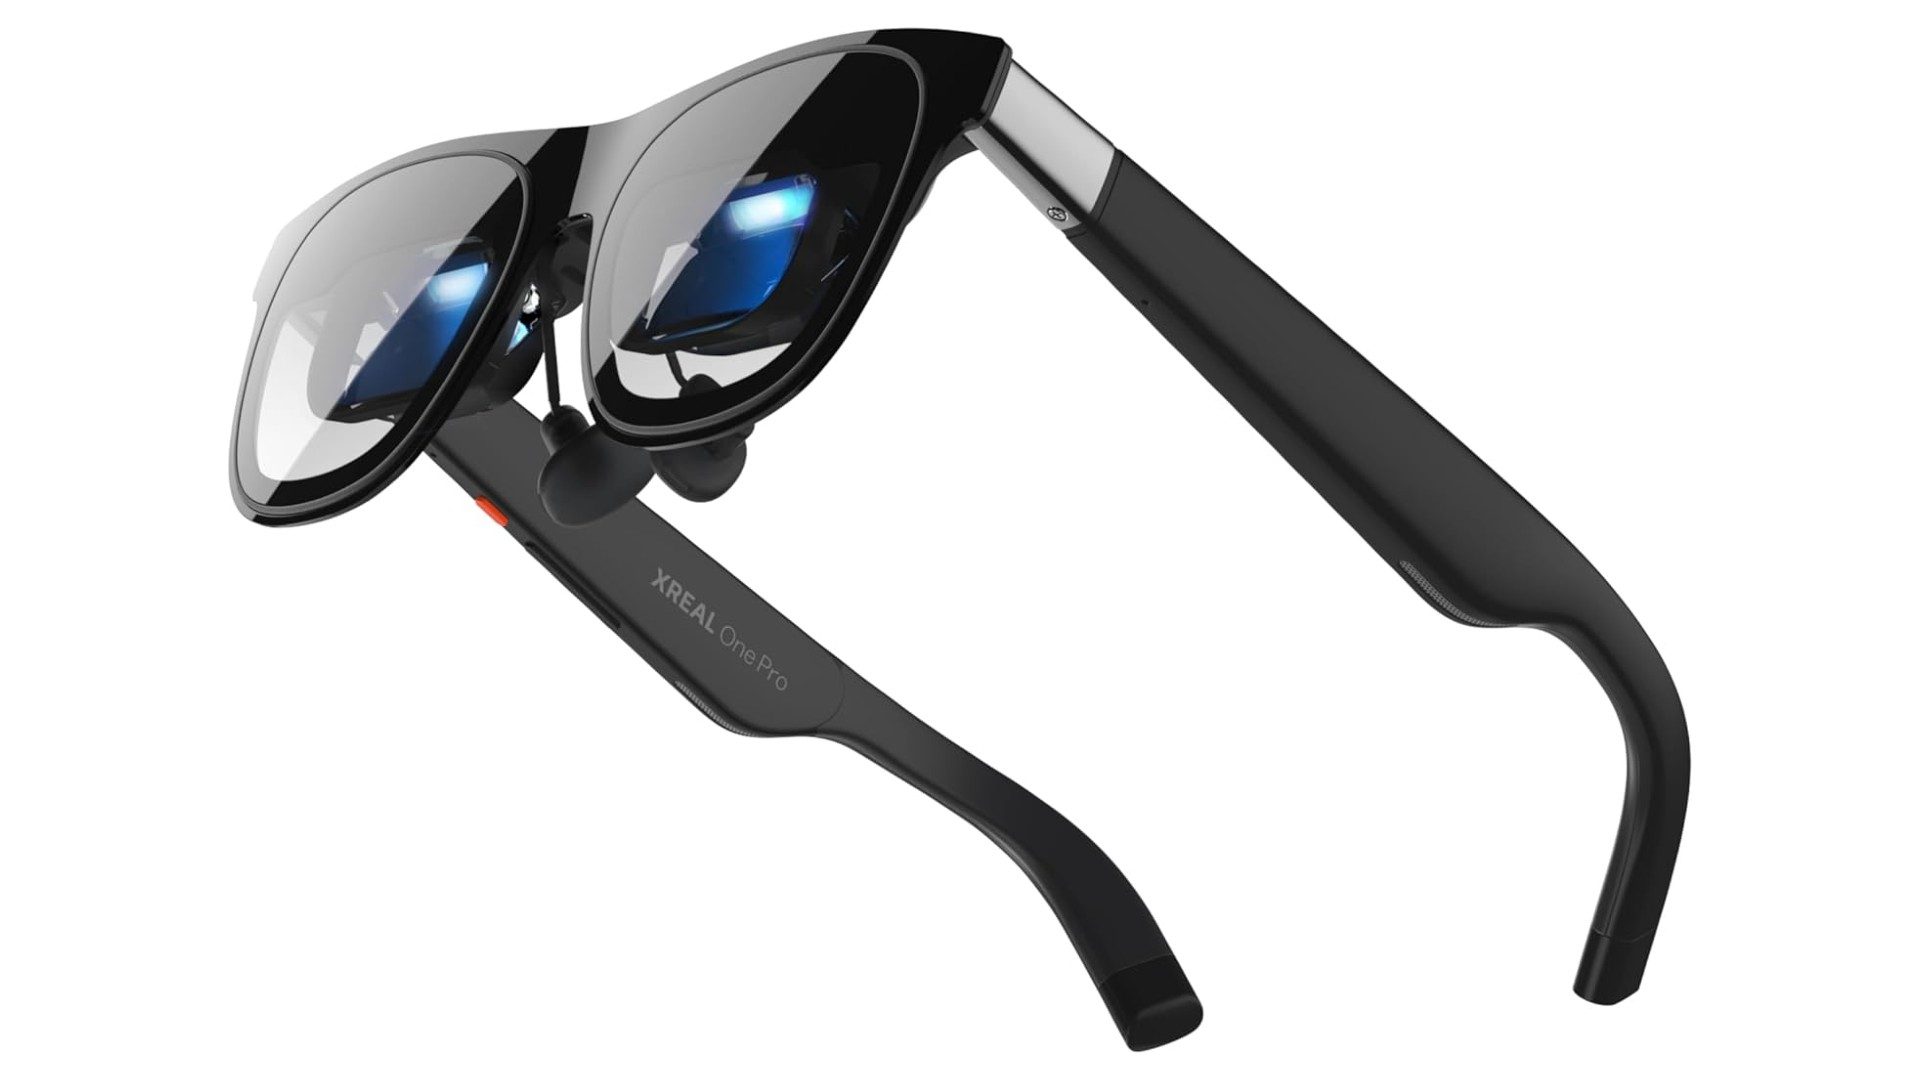
XREAL has rolled out a real-time 3D conversion feature to its flagship AR glasses, which the company says converts any 2D content to 3D.
Xreal initially launched its ‘Real 3D’ software on Xreal 1S AR glasses earlier this month, however now the company has rolled out an update to Xreal One and One Pro that brings optional real-time 3D conversion to 2D content.
The company says Real 3D doesn’t require special video files, apps, DRM-protected content, or external software. All of the conversion is done in real-time on device via the company’s X1 spatial computing chipset built into the One series glasses.
XREAL One Pro | Image courtesy XREAL
“Because it doesn’t depend on proprietary players or formats, Real 3D works across connected desktops, consoles, phones, and other devices,” the company says, noting that content includes movies, streaming videos, locally stored media, and games.
Xreal tells Road to VR it does this by using the X1 chip’s NPU (neural processing unit) to perform depth estimation inference on every incoming frame and to generate the corresponding left- and right-eye views with depth relationships.
The company says it’s still investigating Real 3D’s latency. Notably, the company says that when compared to other display modes, its real-time 3D conversion results in “slightly higher power consumption,” something Xreal says is around 300mW.
Additionally, Xreal tells Road to VR that its Real 3D technology is entirely developed in-house.
“We trained a highly compact model that balances performance and power consumption specifically for integrating into the X1 chip. While real-time 3D conversion is relatively straightforward on high-end GPUs, we have not found any comparable solutions in the industry that can operate effectively on low-power platforms like X1.”
The Beijing-based AR glasses maker sells a fairly wide range of AR glasses, all of which target traditional content consumption, such as flatscreen games, TV and film running on its own Android-based operating system.
Alongside the announcement it had secured a $100 million financing round, Xreal also recently became Google’s lead AR partner following a multi-year extension of an agreement initially initially started in late 2024.
As a result, Xreal aims to bring Google’s Android XR operating system to its AR glasses over the next few years, which is slated to kick off with Xreal’s Project Aura when it launches at some point this year. In the meantime, you can check out our recent hands-on with Project Aura here.
As Russia’s invasion of Ukraine enters its fourth year, remotely-operated ground robots have become a startlingly common sight on the battlefield.
According to the defense policy think tank, the Jamestown Foundation, Ukraine has turned into a world leader in unmanned ground vehicles (UGVs), allowing the country’s military to coordinate robotic warfare while reducing casualties.
Now, a video making the rounds on social media appears to show three Russian soldiers emerging from a building with their arms raised and surrendering to a robot armed with a machine gun. One of the soldiers appears to be covered in blood, adding to the sense of surreal darkness. A separate drone appears to be trained on the soldiers as well.
According to the Ukrainian military news outlet Militarnyi, the robot was a reconnaissance-strike ground unit dubbed Droid TW, built by Ukrainian defense company DevDroid. The washing machine-sized platform uses AI to autonomously identify targets and can shoot 7.62mm caliber rounds. The robot was developed at the request of the First Medical Battalion of the Ukrainian army, which was seeking a way to evacuate wounded soldiers under heavy fire — but considering the footage, the army may have found a different use for it as well.
A ground-based robotic complex captures three Russian soldiers. Zero Ukrainian casualties.
This is how Ukraine fights in 2026.
During a combat mission, Ukraine deployed the Droid TW-7.62 ground robot and forced 3 Russians troops to surrender. — Militarnyi. pic.twitter.com/dEDMpECZoB
The Jamestown Foundation noted that Ukrainian UVGs are “increasingly replacing infantry in high-risk missions, providing sustained firepower, engineering support, and resilience against electronic warfare, terrain challenges, and prolonged deployments.”
Other robots can lay down anti-tank mines, transport tons of materials for infantry on the front lines, or provide cover from the air under heavy artillery to exfiltrate injured soldiers. Some are outfitted with dozens of pounds of explosives to self-destruct near fortifications or bridges.
In short, the frontlines of the Russia-Ukraine war are a weird laboratory for modern warfare, which, against all odds, has given Ukraine a considerable tactical edge over its much larger adversary.
When it comes to electromagnetic waves, humans can really only directly perceive a very small part of the overall spectrum, which we call “visible light.” [rootkid] recently built an art piece that has perception far outside this range, turning invisible waves into a visible light sculpture.
The core of the device is the HackRF One. It’s a software defined radio (SDR) which can tune signals over a wide range, from 10 MHz all the way up to 6 GHz. [rootkid] decided to use the HackRF to listen in on transmissions on the 2.4 GHz and 5 GHz bands. This frequency range was chosen as this is where a lot of devices in the home tend to communicate—whether over WiFi, Bluetooth, or various other short-range radio standards.
The SDR is hooked up to a Raspberry Pi Zero, which is responsible for parsing the radio data and using it to drive the light show. As for the lights themselves, they consist of 64 filament LEDs bent into U-shapes over a custom machined metal backing plate. They’re controlled over I2C with custom driver PCBs designed by [rootkid]. The result is something that looks like a prop from some high-budget Hollywood sci-fi. It looks even better when the radio waves are popping and the lights are in action.
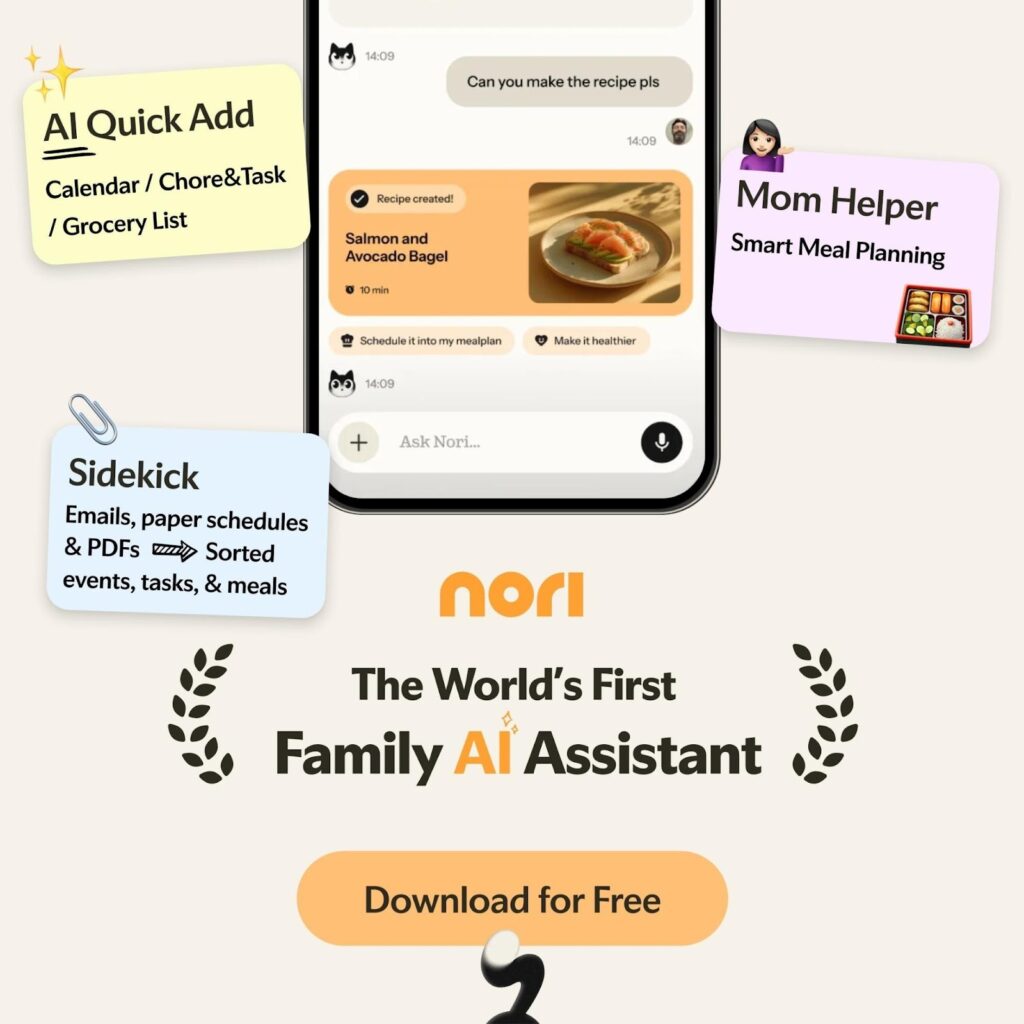
For decades, technology has promised to simplify modern family life. Calendars became digital. Shopping lists moved to apps. Meal planning lived in the cloud. Reminders buzzed on phones. And yet, for most households, reducing mental load only grew heavier.
The problem was never a lack of tools. It was fragmentation.
Family life became a patchwork of apps, notifications, group chats, and half-remembered mental notes. A calendar here. Groceries there. Meals planned in someone’s head. Tasks buried in chat threads. Each tool worked in isolation, forcing parents—usually one parent—to act as the human glue holding everything together.
Download Nori on Android or iOS or experience on the web and learn what AI-native family infrastructure feels like in everyday life.
Image Credits: Nori
Not a productivity layer. Not a smarter to-do list. But something closer to infrastructure.
Nori represents a new category: AI-native family infrastructure—a system designed to understand how homes actually function, and to quietly coordinate life inside them.
The Idea Behind Nori: Isaac Long and the Question of Home
Nori’s origins trace back to a deceptively simple question posed by its founder, Isaac Long:
Why does the most important system in our lives—the family—have the worst technology stack?
Workplaces had operating systems. Businesses had CRMs and ERPs. Even cities had smart infrastructure. But homes—where logistics are emotional, dynamic, and deeply human—were left with disconnected tools never designed to speak to each other.
Isaac Long’s insight wasn’t that families needed better productivity. It was that families needed contextual intelligence.
Nori wasn’t envisioned as an app you “use.” It was designed as something that understands—a layer that sits quietly between intention and action, translating everyday language into coordinated outcomes.
That philosophical starting point matters, because it explains why Nori feels fundamentally different from traditional family organizers.
You don’t tap through menus. You don’t decide which feature to open. You simply speak—or type—like a human.
“Nori, what’s today’s plan?”
“We’re running low on dog food.”
“I don’t eat dairy—can you make this vegan?”
“Let’s plan a Disney trip this summer.”
Behind the scenes, Nori determines whether that request belongs to a calendar, a task list, meal planning, shopping, or reminders—and then connects those systems automatically.
This is a crucial distinction.
Nori is not:
A shared calendar with AI added later
A meal app duct-taped to a task manager
A chatbot that talks but doesn’t act
Nori is designed to execute, not just respond.
Image Credits: Nori
A Unified System That Actually Thinks in Systems
Most family apps claim to be “all-in-one.” Few actually behave that way.
Nori does—because every feature shares a single intelligence layer.
Add a family event → everyone’s calendar updates
Plan meals → ingredients flow into shared shopping lists
Note a low pantry item → a task is created automatically
Schedule a trip → reminders, checklists, and timing sync across the household
Nothing exists in isolation. Everything carries context forward.
This is where Nori begins to feel less like software and more like infrastructure—a quiet backbone that holds daily life together without demanding constant attention.
Voice-First, Conversation-Driven—Because Families Are Busy
Family life rarely happens at a desk.
It happens while cooking. Driving. Managing kids. Switching between work and home in the same hour.
Nori’s voice-first, conversational design acknowledges this reality. A casual sentence becomes a structured action. A question becomes a coordinated plan.
And importantly, Nori doesn’t trap families inside a single platform.
It works across:
Web
iOS and Android
Tablets and desktops
Email
Messaging platforms like WhatsApp (with more integrations coming)
This omnipresence is intentional. Families don’t live in one ecosystem—and neither should their home infrastructure.
Image Credits: Nori
Meal Planning as Cognitive Relief, Not Just Recipes
Where many apps stop at inspiration, Nori goes further into execution.
Meal planning isn’t treated as a hobby—it’s treated as logistics.
Nori adapts recipes based on dietary needs, allergies, and preferences. It recommends meals based on what’s already at home. It helps reduce waste by suggesting ways to use leftovers. And once meals are planned, the system does the rest—automatically.
Ingredients become shopping items. Shopping lists sync across family members. Anyone can pick things up without duplication.
This isn’t about food content. It’s about decision fatigue reduction—one of the most under-acknowledged stressors in modern family life.
Tasks, Routines, and the Subtle Power of Automation
Households don’t break down because of big events. They break down because of small, repetitive ones.
Laundry. School prep. Sports gear. Chores. Supplies.
Nori handles these through shared task systems combined with intelligent timing and flexible reminders—sent via calls, texts, or emails, depending on what works best for each family member.
That flexibility matters more than it sounds. It’s what allows Nori to work across:
Busy couples
Multi-generational homes
Families with older kids
Caregivers coordinating remotely
Nori doesn’t demand behavioral change. It adapts to how families already communicate.
Software First—But Built for a Larger Vision
Today, Nori lives primarily as software. But its logic is hardware-ready.
The system is designed to become a gateway to the home—a future where ambient devices, smart displays, speakers, and sensors can plug into a shared family intelligence layer instead of operating independently.
In that sense, Nori mirrors what we’re seeing in broader AI movements: smaller teams building more efficient, deeply integrated systems that rethink how intelligence is deployed—quietly, contextually, and at scale.
The ambition isn’t louder tech. It’s invisible coordination.
Adoption Without Friction
Nori’s pricing strategy reflects its philosophy.
The core platform is free. AI enhancements are optional, with free credits included. Families can start with something small—a shared calendar or grocery list—and let the system grow with them.
There’s no forced optimization. No pressure to “set everything up.” Nori earns its place gradually, by being useful.
That restraint is rare—and refreshing.
Where Nori Still Has Room to Grow
Nori’s ambition is substantial, and it shows.
Some advanced users may want deeper customization or niche integrations. Certain messaging platforms are still marked “coming soon.” And as with any AI-native system, trust and transparency will continue to matter as adoption grows.
But these feel like evolution points—not foundational gaps.
Final Verdict: A Calm Backbone for Modern Family Life
Nori doesn’t try to fix families. It fixes fragmentation.
By treating family life as a system—one that deserves real infrastructure—Nori quietly reframes what home technology can be.
This isn’t a productivity theater. It’s not another app competing for attention.
It’s a calm layer beneath the chaos—one that connects plans, meals, tasks, and people without demanding center stage.
For families tired of juggling, Nori doesn’t promise perfection. It promises coherence.
Download Nori on Android or iOS or experience on the web and learn what AI-native family infrastructure feels like in everyday life.
Waymo espère déployer sa flotte de robotaxis à Londres dès septembre 2026, grâce à une modification de la loi par le gouvernement anglais. Londres deviendrait la première ville en dehors des États-Unis avec les taxis de Google.
Le mouvement Stop Killing Games dénonce les éditeurs qui rendent des jeux vidéo légalement achetés injouables à l’arrêt de leur support et défend la préservation du patrimoine vidéoludique. Un enjeu soutenu par plus de 1,5 million de signataires, désormais porté devant la Commission européenne.
On a tous gardé notre âme d'enfant, notamment en ce qui concerne les LEGO. Je connais d'ailleurs pas mal d'adultes qui achètent et montent encore des boites pour le kiff. Et c'est cool parce que ça fait travailler les doigts et l'esprit !
Seulement, si à un moment, il se passe un petit drame et que vous égarez une pièce LEGO, votre vie peut vite être gâchée. Rien que ça oui. Parlez-en à ceux qui font des puzzles par PASSION... Oui y'en a !
Évidemment, il y a plein de sites web où vous pouvez racheter des pièces comme
je vous l'expliquais dans cet article sur la restauration d'anciens sets LEGOs
. Mais si vous avez une imprimante 3D, vous pouvez franchir le pas de la contrefaçon copie privée à but non commercial et produire vous-même la pièce manquante !
Comment ? Et bien grâce à
Printable Bricks
qui vous propose plus de 5000 pièces de LEGO au format STL à imprimer directement et bien sûr compatible avec de vrais LEGO.
Après même si le site a survécu aux menaces DMCA et reste toujours en ligne, prenez quand même le temps de sauvegarder ce dont vous avez besoin, on ne sait jamais ;-)
Et si vous voulez aller plus loin dans la personnalisation, y'a maintenant
MachineBlocks
qui permet de générer des briques sur mesure directement depuis votre navigateur. Vous pouvez ajuster les dimensions, choisir le type de brique, et même utiliser leur outil de calibration pour que ça s'emboîte parfaitement avec vos LEGO originaux. Hop ensuite un export en STL ou 3MF et c'est parti !
Dans le même genre,
le générateur de Lapinoo
vous permet aussi de dessiner la forme de votre brique à la souris sur une grille. Vous voulez une pièce en L bizarre qu'aucun set n'a jamais proposé ? Pas de souci, vous dessinez, vous ajustez les plots et la cavité inférieure, et boum, le fichier STL est prêt.
The human body is remarkably good at handling repairs. Cut the skin, and the blood will clot over the wound and the healing process begins. Break a bone, and the body will knit it back together as long as you keep it still enough. But teeth? Our adult teeth get damaged all the time, and yet the body has almost no way to repair them at all. Get a bad enough cavity or knock one out, and it’s game over. There’s nothing to be done but replace it.
Using an antibody treatment to suppress USAG-1 in ferrets led to the development of supernumerary teeth. In regular speak, that means “more teeth than you would typically expect a ferret to have.” Credit: Research paper
In the course of normal development, humans grow a set of baby teeth, followed by a set of adult or “permanent” teeth. Conventional wisdom tells us that this second set is all we get, and that we should properly care for them if we hope to hang on to them for life. Physical injury can knock them out, and a lack of dental hygiene can see them badly damaged to the point where they have to be removed. Thus, there are plenty of incentives to take care of one’s teeth, given that there is little to be done beyond replacing them with clumsy dentures if they fail us.
Researchers in Japan may have figured out a workaround, however. A gene called uterine sensitization–associated gene-1 (USAG-1) was identified to play a role in stopping the growth of teeth in small mammals like mice and ferrets. In turn, it was determined that by inhibiting the interaction between proteins generated by USAG-1 and bone morphgenetic protein (BMP) molecules, it was possible to make dental growth resume. The perceived link is relatively simple—suppress USAG-1, and kickstart the tooth generation process. The hope is that using an antibody to do this would then lead to the spontaneous development of healthy adult teeth.
Research suggests that humans may have an extra set of teeth “buds” lurking in the jaw that normally lay dormant; it could be as simple as activating them to produce new teeth as needed. Thus, the concept is sometimes referred to as growing “the third tooth”—in that a regenerated tooth would be the third tooth after the original baby and adult teeth. Particularly as human lifespans grow longer, the ability to produce a third set of teeth becomes more valuable. However, the technique won’t just be useful for people that break a tooth or lose one to excessive acid wear or associated damage. Indeed, an early focus of the work is to help individuals with conditions like congenital anodontia, wherein a patient never grew a full set of mature permanent teeth. The aim is that the treatment could stimulate the growth of strong, adult-grade teeth to improve the quality of life for those with the condition.
It’s believed humans may have buds for a third set of teeth already lurking, just waiting to be activated. Credit: research paper
With early stage trials in mice completed some time ago, the treatment remains in early stage clinical trials for humans. An initial trial tested the treatment on adult males from 30 to 64 years old who were missing at least one tooth. This was with the hope that if growth did occur, it would ideally be limited to the missing slot, rather than causing new growth in areas that would push out existing healthy teeth. The next stage of trials will involve young children from ages 2 to 7 who are missing at least four teeth, to test the treatment on those with a congenital tooth deficiency. It’s likely that testing will also aim to determine just how USAG-1 suppression influences tooth regrowth. Ideally, it would only occur in specific areas where teeth were missing. It would be a great disaster if the treatment led to widespread tooth regrowth, which could cause crowding issues or loss of healthy teeth.
Right now, taking a pill or injection to regrow entire teeth seems like science fiction. However, if it does turn out that merely supressing some proteins is enough to get the body’s own tooth factory rolling again, it could be a game changer. There’s hope yet for all, except perhaps those that make their business in selling dentures.
Des chercheurs viennent de trouver un truc complètement dingue. Un modèle de langage entraîné UNIQUEMENT sur de l'anglais, du texte humain basique quoi, est capable de comprendre la biologie moléculaire sans jamais avoir vu une seule séquence de protéines durant son entraînement.
En gros, GPT-2 qui fait de la paraphrase d'ordinaire est, sans le savoir, un expert en détection d'
homologie protéique
. Je vous jure que c'est vrai !!
Liang Wang, chercheur à l'Université de Wuhan (les pangolins, tout ça tout ça, loool), a publié
une étude sur bioRxiv
qui remet en question pas mal de certitudes. L'idée, c'est que la "grammaire" du langage humain et celle du vivant partagent une structure profonde commune. Du coup, un modèle qui apprend à distinguer des phrases qui ont le même sens mais avec des mots dans un ordre différent... développe aussi la capacité de reconnaitre les protéines qui sont de la même "famille".
Perso, ça me retourne le cerveau parce qu'à la base, on parle "juste" d'un petit GPT-2 de 124 millions de paramètres, entraîné sur le dataset PAWS (des paires de phrases anglaises adverses), qui atteint 84% de précision sur la détection d'homologie protéique. Sans jamais avoir vu d'acides aminés ! C'est comme si votre chat, après avoir appris le français, se mettait soudainement à comprendre le chinois.
Et ça devient encore plus fou quand on scale. Les gros modèles comme Qwen-3 atteignent quasiment 100% de précision sur les benchmarks standards, mais le plus impressionnant, c'est leur performance dans la "zone crépusculaire" de l'évolution, là où les séquences protéiques ont moins de 25% d'identité entre elles. Dans ce régime où même les outils spécialisés comme
ESM-2
peinent à maintenir leurs performances, les LLM généralistes maintiennent 75% de précision.
Ils raisonnent là où les autres mémorisent !
D'ailleurs, si vous aimez l'actu IA et biologie, vous avez peut-être déjà lu mes articles sur
Evo 2
ou
SimpleFold d'Apple
. Ces outils-là sont entraînés sur des montagnes de données biologiques alors que dans le cas que je vous expose ici, c'est l'inverse. C'est un LLM tout ce qu'il y a de plus classique qui n'a pas BESOIN de ces données spécifiques pour comprendre la structure du vivant (enfin, ça doit encore être bien validé par d'autres équipes mais on verra bien).
Alors vous vous en doutez, curieux, les chercheurs ont analysé ce qui se passe dans la tête du modèle. Certaines "
têtes d'attention
" du transformer deviennent des détecteurs universels de différences. La même tête qui repère une inversion sujet-objet dans une phrase anglaise va spontanément repérer les mutations d'acides aminés dans une protéine. Et voilà comment la syntaxe du langage humain et la syntaxe de la vie se retrouvent projetées sur le même "manifold" c'est à dire dans la même "surface" géométrique dans l'espace latent du modèle.
Et quand on demande aux gros modèles d'expliquer leur raisonnement via Chain-of-Thought (enchainement de pensées comme ce que propose ChatGPT 5.2 en mode thinking par exemple), ils font du "mental folding". C'est à dire qu'ils imaginent la structure 3D des protéines à partir de la séquence 1D. Le modèle identifie explicitement des motifs structurels comme "
Hélice-Coude-Hélice
" versus "
Tonneau TIM
" pour déterminer si deux protéines sont apparentées. Et tout ça sans jamais avoir reçu de coordonnées 3D en entrée.
Pour formaliser tout ça, l'équipe a donc créé BioPAWS, un benchmark qui évalue la capacité des modèles à transférer leur compréhension syntaxique du langage vers l'ADN, l'ARN et les protéines. Le dataset est dispo sur
Hugging Face
pour ceux qui veulent jouer avec.
Bref, si la grammaire humaine et la grammaire biologique sont vraiment des manifestations d'une même structure universelle, ça change pas mal de choses sur comment on pourrait faire de la découverte scientifique à moindre coût. Plus besoin de datasets monstrueux pour chaque domaine, les patterns abstraits sont peut-être déjà là, encodés dans le langage qu'on utilise tous les jours.
Hiwonder has introduced the WonderLLM, an ESP32-S3-based smart chat module that combines a 2MP camera, a 2.0-inch touch display, a speaker, and a microphone array to support both offline computer vision tasks and cloud-based Large Language Models (LLMs) via the XiaoZhi AI platform.
The device ships with a dedicated voice chip (CI1302) that enables always-on wake-word detection, and a 4-pin I2C interface allows it to act as a smart vision/voice sensor for external controllers like Arduino, STM32, or other ESP32 boards. Typical applications include small robots, STEM education kits, interactive assistants, and vision-enabled projects where this device handles perception and interaction, and another MCU manages motion and control logic.
CPU – Dual-core Tensilica LX7 up to 240 MHz with vector extension for AI/ML workloads
RAM – 512KB SRAM
Storage – TBD
Wireless – WiFi 4 and Bluetooth LE 5
Antenna – PCB antenna
Display – 2.0-inch LCD screen
Camera – 2MP fixed-focus camera with 123° Field of View (FOV)
Audio
Built-in high-fidelity microphone
Built-in speaker for voice feedback
Dedicated Voice Chip (CI1302) for low-power wake-word detection
USB – 2x USB Type-C ports
Top port – ESP32-S3 firmware flashing and power
Bottom port – Voice chip (CI1302) firmware flashing
Expansion – 4-pin I2C connector (HY2.0-4P style) for external MCU communication
Misc
Mode switch button
Wake-up button
M3 mounting holes (34mm x 50mm spacing on back)
Power – 5V DC via USB-C
Dimensions – 60 x 54 x 22 mm
Weight – 46 grams
WonderLLM InterfacesWonderLLM internal structure
The LLM in the name suggests that it does local processing, but the ESP32-S3 obviously doesn’t have the RAM to run models like Qwen or DeepSeek locally. Instead, the module acts as an intelligent client, handling wake-words and audio processing locally before offloading queries to the cloud. However, it does support offline AI/computer vision workloads like face detection, color tracking, and line following directly on the device.
In terms of software support, WonderLLM comes with both factory and customizable firmware for the CI1302 speech chip and the ESP32-S3 controller, along with various tools for flashing, debugging, and further development. It supports offline speech recognition, offline vision processing, and cloud-based large model features, using Arduino for vision tasks, I²C for hardware control using ESP32, Arduino, STM32, and BBC micro:bit, and JSON for Model Context Protocol (MCP) integration. Detailed documentation (in source/docs), firmware images, protocol lists, utilities, and example projects are available on the relevant GitHub repository.
WonderLLM connected to an ESP32 board with a 6-servo expansion board
The WonderLLM AI Vision Module is available now on the Hiwonder online store for $29.99. There is also a bundle option with mounting brackets and a USB cable that sells for $35.99. It’s also available on AliExpress, but at a ridiculously high price tag of $88.45, and the bundle option costs $93.07.
Alors là, on touche au sublime les amis ! Parce que si vous pensiez avoir tout vu en matière de boot insolite, genre clé USB, PXE, disquette 5 pouces 1/4... Pffff, vous n'êtes qu'une bande de petits joueurs.
Jozef Bogin,
ce bidouilleur de génie
, que dis-je, ce GOAT, a réussi à faire booter un IBM PC (le modèle 5150, une légende !!) directement depuis... un disque vinyle. Oui, un bon vieux 45 tours.
Regardez-moi ça comme c'est beau :
Pour réussir ce tour de force, il a gravé une image disque de 64 Ko (contenant un noyau FreeDOS minimal) sous forme de signal audio analogique sur le disque. Grâce à une ROM personnalisée (une puce 2364 insérée dans le socket d'extension du BIOS) qui remplace le code de boot habituel, le PC récupère le son via son interface cassette. Les routines du BIOS se chargent ensuite de la démodulation du signal pour charger le tout en RAM. C'est un peu comme
émuler une disquette avec une clé USB
, mais en version hardcore analogique.
Techniquement, c'est un boulot de dingue. Il a dû adapter l'égalisation audio pour compenser la
courbe RIAA
du vinyle, gérer les niveaux au millimètre et coder ce fameux bootloader spécifique pour que la magie opère.
Perso, je trouve ça assez poétique et le son n'est pas sans rappeler celui de nos bons vieux modem 56k. Bref, si vous avez une platine et un PC IBM 5150 qui traînent, vous savez ce qu'il vous reste à faire.
Gemini can now help students prepare for the SAT using realistic mock tests, moving beyond generic AI questions and closer to the format and pressure of an actual standardized exam.