
Visit Uncrate for the full post.
Danny Lynch – the Great Stromboli © Muir Vidler
Muir Vidler: Longwinded, pretentious artist statements. A couple of sentences about the theme or intent can be useful, but if you have to tell me why your photos are good or what you’re trying to say with them, then they’re not doing their job very well. More and more I like photographers, or any artists, writers, musicians, who do work that is very simple yet powerful and doesn’t require an explanation.
Ed Kashi: Talking about photography too much.
Leon Borensztein: Too many to list: Stupid questions, annoying people. But the biggest antidote to that is pet-love, love everything about pets. That people think great shots are a matter of luck in capturing that special moment in time. I know it is accurate, but I hate it when others know the truth.
Christopher Rimmer: My biggest pet peeve is being interviewed on breakfast radio shows, especially in the U.S. They always seem to be hosted by lame comedians who try to keep the discussion light weight and jocular. Every time I do one I swear it will be the last.
© Bruce Gilden
Bruce Gilden: People who assume that they know what they are talking about when they don’t.
Ed Templeton: Stretched ears. I avoid shooting people with them. Whatever floats your boat, but aesthetically it’s not for me.
Tony Mendoza: How frustrating it is to show work to galleries. Initially, it was due to the fact that I was a nobody. Now, it’s due to the fact that I’m a 75-year-old with a modernist past.
Richard Tuschman: Having to chase clients to get paid. I hate it.
Robin Schwartz: With all the advantages I have because of digital technology, my pet peeve is that I miss the access I had before email in contacting curators and knowing who to contact. For the most part, my photographs in museum collections grew out of written correspondence.
Tealia Ellis Ritter: My biggest pet-peeve photographically is images that are not emotionally or formally charged with something under the surface.
Ami Vitale: Ingratitude and lack of empathy.
Andi Schreiber: My pet-peeve is that I cannot enlarge the photographs on Instagram. I know that people love it and in theory I would, too. I think I’d spend more time there but I find the whole experience to be visually frustrating.
Lucky © Brent Stapelkamp
Brent Stapelkamp: In wildlife photography, you have a moral duty not to disturb the animals that you are photographing. All too often I see photographers whistling or banging on the sides of vehicles to get that sleeping lion to put its head up, etc. Let’s give these animals the respect they deserve.
Gabriele Galimberti: Almost every morning when I wake up, I have a new idea for a new project, then an hour later I go to my office, I open my computer; I go on the web, and I realize that at least other five photographers made the same project years before!

© Carolyn Marks Blackwood
Carolyn Marks Blackwood: People say things like, “It looks like a painting.” or “Oh, I am going to paint that.” I guess I should be flattered but it just annoys me. The photograph for me, is the end result.
Lissa Rivera: When other photographers are more interested in your equipment than your art.
Henry Hargreaves: Tripping on the teather cable.
Traer Scott: My biggest pet peeve is when people use my images without a photo credit. I’m very willing to let people use my work in almost any credible context, so long as they respect my rights and use a photo credit.
Benjamin Fredrickson: Only getting offered free work, and shoots with no budget.
Lori Nix: Not being able to see all the tiny mistakes until I’ve printed the photo really large. Little things like cat hair, straight pins, a thumbprint in the clay aren’t always apparent when I’m shooting. It’s only after I’ve committed to the final image, broken down the scene, and printed the image large that I see them.
Gretchen Robinette: My biggest pet peeve is when a band/band manager emails me saying they just LOVE my photography style and want me to take portraits of them for their album, but they have NO money. Four people in a band with zero money expecting hand outs should seriously reconsider their dream of being in a band, because even Wayne Coyne worked as a fry cook for the first seven years of The Flaming Lips; Tom Waits worked at a pizza shop where he wrote many of his early songs, and Kurt Vile recorded all night then got up at 5:30am to drive a fork lift every day.
If you don’t want to work hard for your career, it’s not on my dime to make you look good.
Some people think we just press a button, like a button on an elevator. I know how hard it is to make an album. I also know how hard I have worked as a photographer for years to even be asked this question on Feature Shoot. I guess my pet peeve is people who devalue professional photographers because they think it’s as easy a pressing a camera app on an iPhone or its not something they should spend money on. Try going in to recording studio and asking for free studio time ’cause you just LOVE the way their studio sounds.
The post 21 Photographers Divulge Their Pet-Peeves appeared first on Feature Shoot.
The Steppin Stones
Appearing at Caledonia Lounge (Athens, GA) on Saturday, September 10, 2016


Paying Tribute to Iran
Matt Fitzgibbons, PatriotMusic.com
Recently, the President of the United States was discovered to have secretly organized a shipment of $440 million to Iran which happened to coincide with the release of four American prisoners held in Tehran. It was paid in foreign currency, ostensibly because it is illegal to pay U.S. Dollars to Iran. At least two more Americans have since been arrested. Was it a ransom or a tribute to Iran?
For a thousand years (from the 9th to the 19th centuries) the four nation states of Morocco, Algeria, Tunisia, and Libya, were known as the Barbary states. During this period, they were widely feared by anyone travelling by sea throughout the Western Mediterranean. From the cliffs above their ports, they would identify passing ships from miles away and ambush them with as many as 80 corsairs to kill, steal their cargo, crew and passengers and either hold them captive for ransom or sell them into slavery. They would, of course, pay a pre-negotiated sum to the State’s leader, and divide the rest amongst themselves, keeping the healthy and killing the rest. From the 16th to 19th centuries, Barbary Pirates sold as many as 1.25 million souls into slavery, raiding Italy and Spain so often that coastal villages there were considered too dangerous. At various times, their attacks reached as far as Iceland and Ireland. Algiers alone was said to have had as many as 20,000 captives at one time. Prisoners of wealth might secure their freedom through ransom but those less fortunate were doomed to a life of slavery.
The more powerful European nations eventually negotiated treaties which required them to pay annual bribes (referred to as tributes) to enable their ships to be left alone. Periodically, the Barbary Pirates would break the treaties as an effective means of negotiating more money. But since the smaller nations were unable to afford the bribes, their ships were regular targets, which effectively reduced competition, driving up the value of the wealthier nations’ goods. It was simply the cost of doing business. Benjamin Franklin is said to have heard London merchants say, “if there were no Algiers, it would be worth England’s while to build one.”
By the early 18th century, Great Britain’s Royal Navy had become so powerful; they could negotiate more modest tributes. If the pirates didn’t like it, England would sink enough of their ships or shell their ports until they agreed on a price. Up until the American War for Independence, America benefitted from this arrangement as a British Colony. During the War, she was protected as an Ally of France under their treaties with the pirates. Afterwards, the Treaty of Paris officially ended America’s war with England, and then it was a very different story.
In 1777, Morocco was the first nation to publically recognize the United States and in 1784, it became the first Barbary state to seize an American vessel and its crew. While in England, having been commissioned by Congress to seek commercial treaties with that nation and Portugal, John Adams met the envoy from Tripoli. He said at the time that the man was either a saint or the devil himself but didn’t know which. American merchantmen in the Mediterranean were regularly murdered and sold into slavery but the envoy told Adams that “his only interest in life was to do good and make other people happy”, assuring him that Americans would be free to travel by sea unharmed for a million dollars or so. Adams would have preferred war over tribute, but knew that Congress neither had a Navy for war nor money for tribute. The then Minister to France, Thomas Jefferson, successfully negotiated a treaty with Morocco arranging for the return of the captured merchant ship Betesy and its crew. However, the treaty included an expensive tribute amounting to 1.5 million dollars, or 10% of the U.S. Federal Government’s annual expenditures each year for the next 15 years. The other three Barbary states saw an opportunity and attempted to extort exorbitant sums from the new republic through treaties which proved to be too expensive. In 1785 Algerian pirates captured the schooner Maria and Dauphin, demanding $600,000 each for the return of the ships and their crews. In 1786, when Jefferson and Adams went to London to negotiate with Tripoli’s envoy, they asked him why his people were making war with a nation that had done them no harm. Jefferson later wrote of the ambassador’s response as,
“It was written in their Koran, that all nations which had not acknowledged the Prophet were sinners, whom it was the right and duty of the faithful to plunder and enslave; and that every mussulman who was slain in this warfare was sure to go to paradise.”
The two crews languished in prison for over a decade. Jefferson advised Congress against paying tributes as he believed it would only lead to more attacks. Writing to his friend John Jay, Secretary of State to the Continental Congress, Jefferson said,
“Weakness provokes insult and injury, while a condition to punish it often prevents it. This reasoning leads to the necessity of some naval force, that being the only weapon with which we can reach an enemy. I think it to our interest to punish the first insult: because an insult unpunished is the parent of many others. We are not at this moment in a condition to do it, but we should put ourselves into it as soon as possible.”
Adams’ experience with the envoy from Tripoli directly lead to the creation of the U.S. Navy in 1794 with 6 frigates and it’s continued funding when he was elected the second President. And while Thomas Jefferson, the third President, did not share Adam’s commitment to expanding the expensive Navy, Adams had had the foresight to create a Navy which was now at Jefferson’s disposal. So on Jefferson’s inauguration when the Pasha of Tripoli demanded $225,000 up-front from Jefferson’s new administration, and an additional $50,000 per year, Jefferson refused. He would not allow the United States to sacrifice its honor by paying bribes, no matter what it was called or however old a tradition it was for European nations. The Pasha declared war.
In 1801, the American schooner Enterprise, commanded by Lieutenant Andrew Sterret defeated the much larger 14-gun Tripolitan corsair Tripoli in a three-hour battle without a single American casualty. In 1802 Jefferson sent America’s best ships as part of a larger force to the region and ordered that all prisoners be treated humanely. In 1803, Commodore Edward Preble blockaded the Barbary ports and sent a small detachment of U.S. Marines to burn the captured U.S. Philadelphia which had run aground and been set up against them as a gun ship. British admiral, Horatio Nelson, purportedly referred to the episode as “the most bold and daring act of the age.” The American naval force attacked the Tripoli harbor while 8 Marines led by 1st Lieutenant Presley O’Bannon, with an army of 500 mercenaries, captured the city of Derna after a march from Alexandria across the desert. The pirates soon requested peace and $60,000 for the return of the American prisoners. This allowed Jefferson to make the distinction between paying ransom for prisoners and tribute as a bribe.
In the early 1800s our young Republic had only 6 frigates, a small force of Marines and no standing Army. What they accomplished would be unbelievable had it not actually happened. But then, that is often the case when Americans are motivated by honor. Today, the United States have the most powerful military in human history but our allies don’t trust us and our enemies don’t fear us. Our current President announces a line and our enemies promptly cross it. When he negotiates with them, it emboldens them just as it did when our young nation naively paid tribute to the Barbary Pirates. Whether our President’s recent payment to Iran was a tribute or a ransom is irrelevant. The distinction no longer matters. The United States are in a far different position than we were in the early 1800s. Both are dishonorable. As Jefferson so wisely stated, “an insult unpunished is the parent of many others.”
The post COMMENTARY: Paying Tribute To Iran appeared first on DailySurge.
It’s sloppy, and the onions take some time, but man is it worth it when you have this traditional fast-food-but-better In-N-Out style burger with that crazy animal sauce in your hands.
Complete this burger with our French Fries recipe, and finish with a our Drumstick Milk Shake recipe, inspired by the Nestle Drumstick from the ice cream truck.
— Adapted from a Food Network recipe.

Each year, Grand Canyon National Park sees close to 5 million visitors. From wildfires to helicopter rescues to lost tourists, a park ranger dishes on what really goes on behind the scenes at a national park.
There's a saying about park rangers: "You get paid in sunrises and sunsets." That's really true. You don't do this job for the pay. Sometimes you have to wonder why we work so hard to get these federal positions. The people who are attracted to the job are outsiders—they enjoy solitude, they enjoy nature. It's the most unlikely group of people you'd expect to want to work with the federal government. And you have to give up a lot. It's extremely difficult to have a family or meet someone. You work seasonal positions for years until you finally get a permanent spot, only to realize you like a seasonal girl who's not going to be around in six months.
I've had moments where the job is as exciting as anything you can imagine. You're fighting wildfires, getting lowered from helicopters on a rescue, chasing someone down with a gun on your side, going out on a manhunt. Then sometimes you're directing traffic or dealing with the bureaucracy of the federal government.
It doesn't matter which park you're working, people are like deer in the headlights. They're totally out of their element, they don't know where anything is, and half the time they haven't done any research before their trip. At the Grand Canyon, people will show up on the North Rim only to find out they're on the wrong side—and then they're shocked that they have to drive all the way around the canyon to get to the South Rim. I had one lady bawling when I told her it was a five-and-a-half-hour drive to the other side. She was like, "There's no bridge?!"
There's no shortage of stupidity when it comes to what people will do. They'll sit right at the edge of the canyon, where there are no guardrails and it's a 1,000-foot drop. And people forget that they're at 8,500 feet. They wonder why they're having chest pains. They think they're having a heart attack, and we have to remind them it's the altitude. Then there are always people who hike down into the canyon and are totally unprepared—no water, no idea how long it will take. They don't realize there's a big change in temperature and conditions when you drop from 8,500 feet to 2,200 feet. That's one of our most common rescues. They always say they were so in awe of the beauty that they didn't realize how far they'd gone.
It's absolutely astounding what people will do just to prove they saw something. They'll jump from rock pillar to rock pillar—nothing below—just to get the right angle for a shot of the canyon. Sometimes someone's camera falls over the edge and they're crawling over to try to get it. Or they'll stop in the middle of the road, with cars behind them, just to get a picture of a deer (you know, we've all seen deer, but these are deer with the Grand Canyon in the background).
I've seen far more interest from foreigners in our national parks than by Americans. You'll be talking to someone from New Zealand and they're asking you about the geography, the culture, the history. And then an American asks you where the burger stand is.
People are always asking where the best place in the park is, or where they should go to watch the sunset. If I can tell someone is really interested, I'll probably tell him. But if it's some entitled jackass who rushes up to me like, "Hey, man, I got 20 minutes in the park. What's the absolutebestspot?"—no way. And then sometimes you do share, and it backfires. Someone once told me I ruined his vacation because I gave him the wrong place to watch the sunset.
In any profession, you're going to get certain privileges, but I try not to take advantage of my position. But yeah, there have been times when I've gotten pulled over, and I made sure my badge was right next to my driver's license so the cop sees it. There's kind of an understanding.
There's something about national parks. You're in an unbelievably romantic place. It gets your juices flowing, creates a spark. Things happen. There are definitely times when a ranger has to approach a car because the windows are a bit steamy. But sometimes we turn a blind eye to it. We're all human.
SEE MORE FROM BUDGET TRAVEL:
15 More Places Every Kid Should See Before 15
Secret Hotels of Florida's Gulf Coast
12 Elevators You Have to See to Believe
Tax Refund = Vacation! 7 Amazing Trips That You Can Afford Right Now
See More From Budget Travel:
Confessions of a Singing Tour Guide
Confessions of a Sommelier
Confessions of a Travel Nanny
Shocking Confessions From Travel Pros!
Keeping your hands off the mouse and on the keyboard can be a big time saver, but only if you know the shortcuts that make navigating the web easy in the first place. This cheat sheet is packed with keyboard shortcuts for common features on Facebook, Twitter, Tumblr, YouTube, Google+, and even a few for Ello.
The graphic speaks for itself, but most of the shortcuts cover common features, like creating a new post, jumping to the top of a newsfeed, quickly replying to other people’s posts, liking or favoriting posts, or jumping up to a search bar or opening a search tool. There are plenty of site-specific shortcuts worth remembering, like G+M jumps to your Twitter DMs from any Twitter stream, or Ctrl+Arrow Key to jump forward or backward 10 seconds in a YouTube video.
Check out the full graphic below.
2016 Social Media Keyboard Shortcuts Cheat Sheet | Make a WebsiteHub

Some of Anderson's influences (Charlie Brown?) might surprise you.
The Concourse Weak-Ass Bureaucrats To Heroic Philly Citizens: Stop Turning Dumpsters Into Swimming Pools | The Slot GOP Strategist Calls Donald Trump a ‘Loudmouthed Dick’ on Live TV | Gizmodo Consumers Allege Venmo Swiped $3,000, Even Though They Never Had Accounts | Gawker Police Say Instagram Posts May Have Contributed to Korryn Gaines’ Death |

When you send a text message to someone else, there’s a long, complicated path from your phone to theirs. If you’ve ever wondered just how that network works, this video breaks it down.

Productivity isn’t just about getting things done. At its core, it’s about being resourceful with your time. In a recent interview with author Charles Duhigg , he told us, “You can spend your entire day being busy and not get anything important done. Productivity is about getting important things done.” In his new book, Smarter Faster Better, Duhigg explores this fuller meaning of productivity and how to achieve it.
This is part of Lifehacker’s book review series. Not every life hack can be summed up in a blog post, so we’ve decided to review some of our favorite life-changing books for deeper dives into life’s most important topics.
Duhigg is a Pulitzer-prize winning journalist at the New York Times and author of the bestseller The Power of Habit. The book spent over 60 weeks on the New York Times Bestseller List and we’ve discussed it here a number of times. We even interviewed Duhigg for our How We Work series and excerpted part of his new book here.
http://lifehacker.com/the-power-of-m…
In Smarter Faster Better: The Secrets of Being Productive in Life and Business, Duhigg uses research and science to explain how all of our productivity habits work, but he intertwines those points with real-world examples, many of them notable events in history, to illustrate how those behavioral concepts work in practice. The result is a book that guides us through the relationship between psychology and productivity while suggesting ways to use that information for the reader’s own benefit.
Most of us have been stuck in the Cult of Busy. We’re all stressed. We all have a lot on our plates. We’re all busy. “Busyness” keeps us from getting the important things done, and as Duhigg points out:
To get important things done you have to give yourself enough time and space to figure out what’s actually important.Prioritizing your time seems to be the overarching theme of the book, and its Introduction lays this idea out in detail, explaining that our busy, stressful culture can sometimes make it difficult to take a step back and pay attention to the right things.
If any of that sounds vaguely familiar, you’ll get something out of the book. You’ll learn how to use the psychology behind motivation, focus, goal-setting, and decision-making to work in your favor. In short, the book is for anyone who wants to manage time better or optimize their work.
http://lifehacker.com/5896846/the-ri…
Each chapter of the book tackles a different productive habit and fully breaks down how that habit works. Typically, the chapter starts with a story about something familiar: the cast of Saturday Night Live or the Yom-Kippur War, for example, using the story to illustrate how those productivity habits work in practice. From there, Duhigg not only cites interesting studies that show exactly how our brains work, he digs deep into those studies, describing the stories and the subjects behind them. For example, in a chapter on Focus, Duhigg tells the story of a neonatal nurse named Darlene who was able to predict that an infant in her unit was experiencing the early stages of sepsis, saving the infant’s life. Duhigg writes,
There was nothing specific she could point to, but this baby simply didn’t look like Darlene expected her to. Darlene found the attending physician and said they needed to start the child on intravenous antibiotics. All they had to go on was Darlene’s intuition.
The story comes from researcher Beth Crandall, who co-authored the 1991 study, Guide to Early Sepsis Assessment in the NICU. Throughout the chapter, Duhigg interviews Crandall on her research, characterizing her work with the real-world stories behind it.
Beyond the stories and research, the book also peppers in actionable advice so the reader can apply each concept. Here’s a glimpse of what you’ll find in every chapter:
Some of us have an internal locus of control versus an external one. In basic terms, an internal locus of control is the belief that your actions affect your destiny. People with a strong internal locus of control tend to be less stressed, more motivated, and have greater academic success. To build your own internal locus of control, focus on choices. Duhigg told us:
What we know is that you can definitely teach to it and you can train to it...You don’t ever tell anyone that they’re a natural born leader because that signifies that they don’t have a choice in being a leader. Instead what you say is, “I saw how hard you worked and you earned that leadership.” That way you keep the internal locus of control is that you point out, you make clear to people how their choices, how their actions are having these positive outcomes.
Then you put them into situations where they actually have to make controlled choices and in doing so they learn.
Decisions play a crucial role in self-motivation, and Duhigg suggests a two-step process for motivating yourself: give yourself a choice, then tie that choice to a greater goal.
http://lifehacker.com/motivate-yours…
No matter how smart each individual is, they probably won’t work well as a team if they don’t have “psychological safety.” This basically means, in order to thrive, each member of the team has to feel accepted, respected, and free to share their craziest ideas. Duhigg writes:
“In general, the route to establishing psychological safety begins with the team’s leader. So if you are leading a team...think about what message your choices send. Are you encouraging equality in speaking, or rewarding the loudest people?”
To cultivate this safety, team leaders have to give members control. They must ask for their opinion and put stock in their judgment.
Automation is convenient, but when we put too many important things on autopilot, we risk cognitive tunneling. In other words, when faced with stress, we focus on and act according to the systems in place rather than reality or common sense. You’ve probably seen this in action when someone doesn’t know how to handle the unexpected because they have no policy or procedure for it, and can’t think on their feet. Duhigg told us:
We all know that when we’re in a cognitive tunnel because we feel ourselves just reacting to things. Like when you’re driving down the freeway, you’re not speeding but you see a cop car and you slam on your breaks. That’s a cognitive tunnel. That’s you being reactive rather than thinking or being thoughtful.
The solution is to develop mental models: envision the outcome of possible events. While you’re driving, for example, imagine passing a cop car or finding someone in your blind spot or approaching a car with an erratic driver. When you put yourself in these hypothetical situations, you give yourself the capacity to make choices. In simple terms, you pull yourself out of autopilot.
In this chapter, Duhigg talks about cognitive closure, or our desire to solve a problem rather than allow our minds to wander and leave a problem open-ended. Cognitive closure feels productive, so we often make hasty decisions for the satisfaction of getting something done. We can rush our goal and lose sight of the bigger picture. Duhigg told us:
The question is how can you just make sure that the things that you’re checking off are the right things to do? That you’re not just doing the easy things because it feels so good to check them off?The key is to combine “stretch goals”—our bigger, maybe more long-term goals—with traditional SMART goals. SMART goals are goals that are Specific, Measurable, Achievable, Relevant, Time-Boxed. When we break goals down that way, they’re easier to digest, but you risk losing sight of the bigger picture. Productive people keep their stretch goal in mind when making monthly, weekly, or daily goals. With your stretch goal in mind, you can channel the need for cognitive closure to your top priority.
http://lifehacker.com/5345211/achiev…
Duhigg helps you absorb all of the data in the book with a “Reader’s Guide to Using These Ideas” in his Appendix. If you want to speed read the book, you could check out that section to see the actionable takeaways. The book is chock-full of useful information, though, so you’d barely scratch the surface.
Duhigg’s two-step process for motivation is hard to beat. Personally, though, his tip for combining stretch goals with SMART goals helped the most.
It’s pretty simple: write your long-term stretch goal, or your overarching ambition, at the top of your daily to-do list. When you make a SMART goal, write your stretch goal at the top of the list. The idea is to keep that goal in front of you so you can focus on what matters to you most.
I do this every morning when I write my daily task list. It keeps my long-term goal front of mind. This motivates me, yes, but it also helps me prioritize tasks and weed out the tasks that get in the way of my long-term goal.
Smarter Faster Better doesn’t just tell you how to be more productive, it clarifies what productivity is in the first place and why it’s important. Obviously, we’re no strangers to that topic. One criticism of productivity is that it turns you into a robot. You become so concerned with optimization and efficiency that you forget to just live and enjoy life. This misses the mark, though. As Smarter Faster Better explains, productivity is simply using your time in the best way possible so you have more time to enjoy life.
Duhigg knows his stuff—the book is packed with an intimidating amount of knowledge and research. However, this research only complements and supports his larger, more relatable lessons. Duhigg takes our most subtle habits and breaks them down in a way that’s obvious and digestible.
For example, I’ve had issues with cognitive closure my entire life, but up until now, I didn’t even know it had a name. And I certainly didn’t understand how it worked. Now that I understand it, I can combat it—or better yet, make it work in my favor.
You can buy Smarter Faster Better: the Secrets of Being Productive in Life and Business in hardcover or on Amazon Kindle for about $15.

Trees are connected to other trees around them by a network of fungi underground called a mycorrhizal fungal network. Chemicals are sent from tree to tree through the fungus, in a kind of communication that can take hours to detect and centuries for humans to even notice. If this were only a transfer of chemicals, we wouldn’t call it communication, but new research led by Dr. Suzanne Simard of the University of British Columbia shows that trees send different chemical messages to each other depending on conditions. For example, when researchers shaded one tree, a nearby tree of a different species began sharing nutrients with it. But trees prefer to share with their close kin.
"If you're a mother and you have children, you recognise your children and you treat them in certain ways. We're finding that trees will do the same thing. They'll adjust their competitive behaviour to make room for their own kin and they send those signals through mycorrhizal networks," says Simard.
"We found that the biggest oldest trees had more connections to other trees than smaller trees. It stands to reason because they have more root systems," she says.
"So when a seedling establishes on the forest floor, if it's near one of these mother trees it just links into that network and accesses that huge resource network."
Read more about this fascinating research on tree communication at ABC Science. -via Metafilter
(Image credit: ŠJů)

My friend Lee Meirowitz is one of those people who can do anything. Of all your buddies, you would pick Lee to be stranded on an island with – you know you're going to survive with him around. He's an incredible surfer, lifeguard, spear fisherman, and all-around cultivator of awesome.

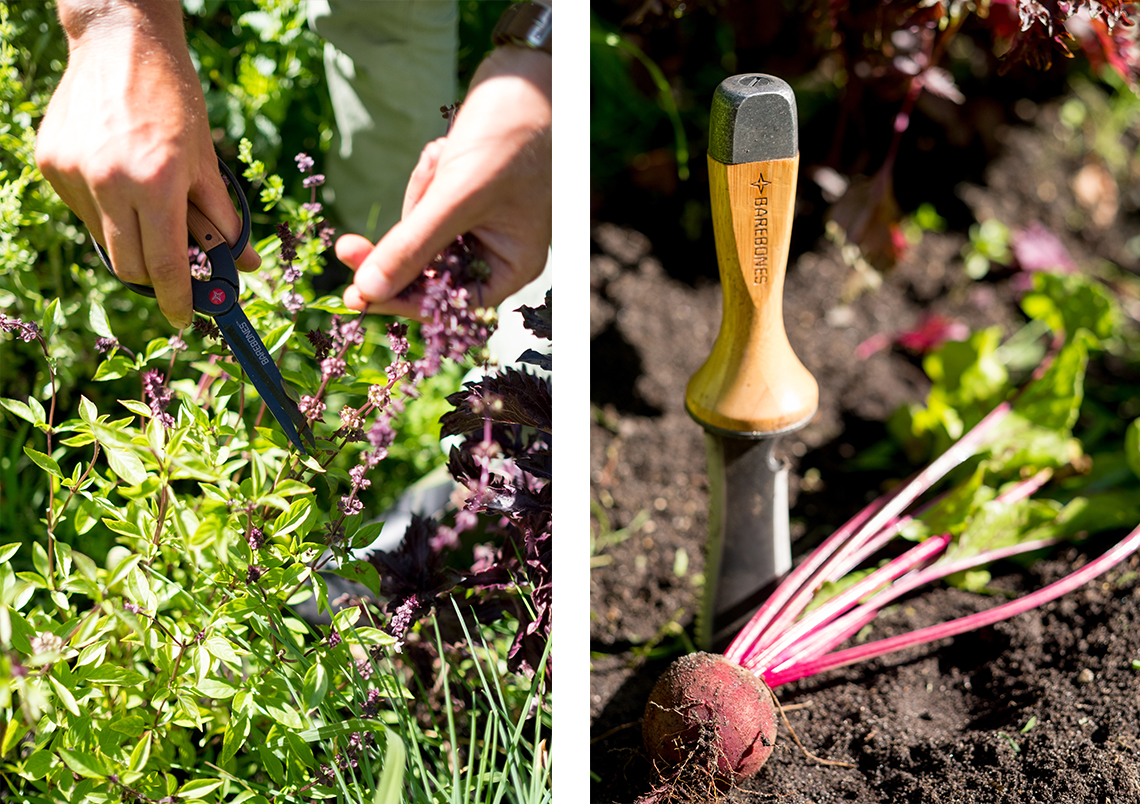
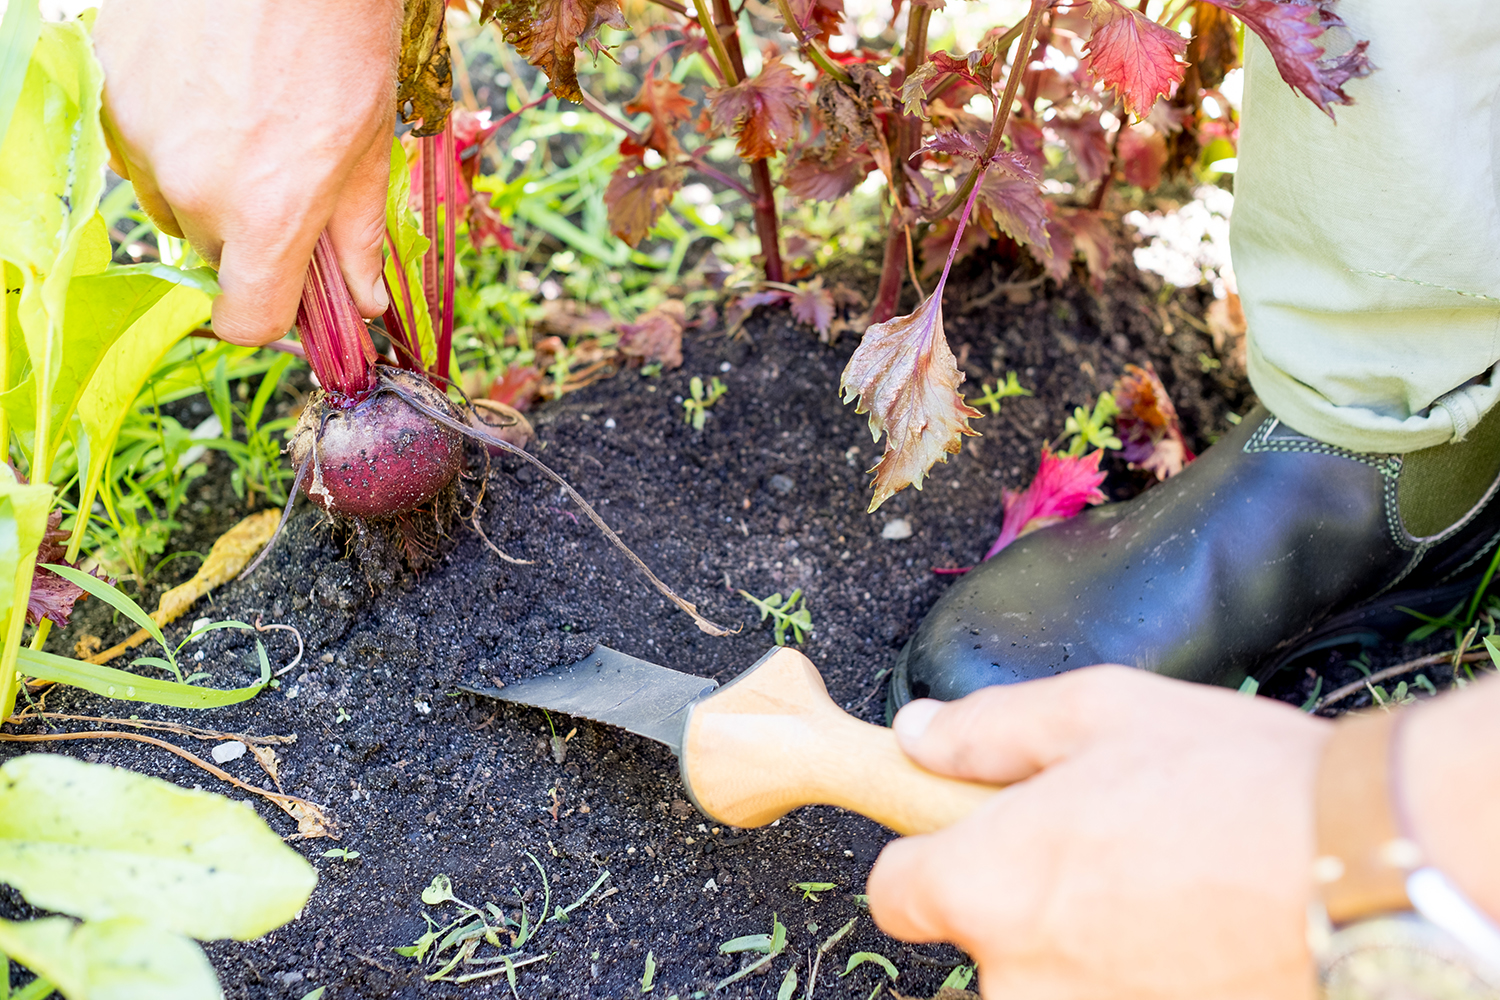
He also has a serious passion for cooking and his creations in the kitchen have taken on a whole new life from the seriousness of his backyard garden. Here are Lee’s tips for getting your own veggie patch up and running – with the help of a few handy tools.
"I am in no means an expert gardener," says Lee. "At very best, I consider myself an amateur. However, I do really enjoy it, and have been doing it for a long time now, so here goes nothing – a list of a few tips that I think will be helpful when setting up a garden at home. I am sure there are people who would disagree with some of my techniques but these are things I have learned from my experiences that have helped me out the most."
![]()

Do a little research online and find out what planting zone you live in.
Start with good soil.
"It sounds obvious, but soil composition is extremely important to a thriving garden. Every year, the soil should be turned or tilled. Additionally, it is important to add organic compost, fertilizer, and more topsoil every year. A sprinkler system working off a timer will also make your life a lot easier."
Know your ideal planting time.
"Do a little research online and find out what planting zone you live in. Plants have different dates for ideal planting depending on what zone you live in. Proper timing will give your garden its best window to thrive."
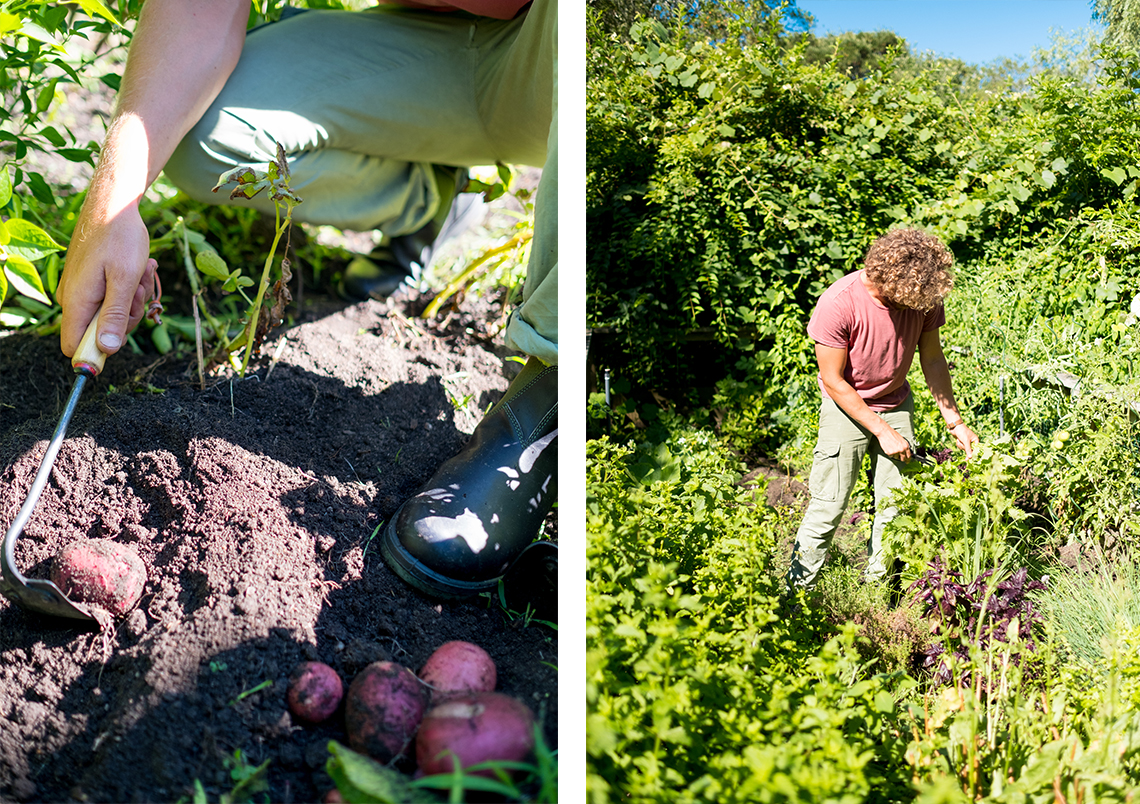
Consider the space to benefit ratio.
"If your space is limited then you should be aware of what the plants will look like when they’re mature. For example, a melon or squash will run along the ground as they grow and take up a great deal of space. It may not be worth it to you to lose half of the space in your garden for only a few of them. You may be better off planting many varieties of herbs in that space that you can use frequently throughout the growing season."
Plan out your layout before you plant.
"I try to consider the sizes of plants when laying out my garden. Ideally you do not want to have to climb over bigger plants such as tomatoes to get to your radishes. By keeping the smaller plants up in front of the garden it will be much easier to navigate. Also consider where the sun will be throughout the day so that the bigger plants are not blocking light for the smaller plants."
Your garden should only be reserved for your most favorite foods that will bring you joy when you harvest them.
Plant things you love.
"I know it sounds simple, but it is true. The real estate in your garden is special. Your garden will have countless hours of labor put into it. It should only be reserved for your most favorite foods that will bring you joy when you harvest them."
Draw a map of where everything was planted.
"When all the sprouts start to pop through the soil they all look the same. Different plants need to be thinned out to different spacing so it is important to know what you have where. It also nice to have for the next year so that you can look back and see if there is anything you would change or adjust."
Rows help maintain order.
"There are many reasons to use rows in a garden, one of the main reasons why I like them is for organization. Having the plants placed on mounds makes weeding and walking easier. You know that the valleys are safe to place you feet because all the plants are up on the mounds. It also helps with weeding, because you know that anything not on a mound can be pulled."
Stagger your planting of vegetables.
"Rather than plant all your seeds at the same time, aim to space it out. You do not want to end up with thirty beets and five pounds of kale and then have nothing for the next month. By spacing out plantings by a couple weeks, you will have plants at different stages which will ensure a steadily available harvest well into the fall." [H]


Mikey DeTemple is a professional surfer and filmmaker from Long Island, NY. He splits his time between Brooklyn and Montauk.
Check out his Ambassador Shop here.

The following article is from Uncle John’s Factastic Bathroom Reader.
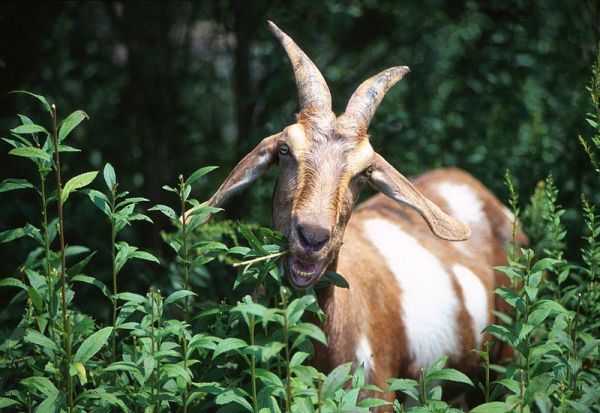
These proverbs date back to a time when the world was more agrarian, but we think they still make a lot of sense… even if they are all about goats.
“The more the billy goat stinks, the more the nanny goat loves him.” Belgium
“If you put a silk dress on a goat, he’s still a goat.” Ireland
“It’s out of ignorance that a goat will attend a leopard’s party.” Africa
“The goat must browse where she is tied.” Romania
“When you give a friend a goat, you have to let go of the leash.” Kenya
“It don’t take a genius to spot a goat in a flock of sheep.” Old West
“He who lets the goat be placed on his shoulders will soon have to carry the cow.” Italy
“Where there are no sheep they call the goat princess.” Turkey
“A man accused of stealing a goat should not entertain his visitors with goat meat.” West Africa
“Look for a black goat while it is still daytime.” Nigeria
“You are correct, but the goat is mine.” Corsica
“The goat that has many owners will be left to die in the sun.” Haiti
“Don’t approach a goat from the front, a horse from the back, or a fool from any side.” Russia
“Even an old goat likes to lick salt.” Hungary
“By candlelight a goat looks like a lady.” France
“If wisdom were measured by the size of the beard, the goat would be a philosopher.” Denmark
“A man and a goat may be friends, but don’t expect the goat to pay the first visit.” West Africa
“If you’re short of trouble, take a goat.” Finland
_______________________________
 The article above is reprinted with permission from Uncle John’s Factastic Bathroom Reader. The 28th volume of the series is chock-full of fascinating stories and facts, and comes in both the Kindle version and paper with a classy cloth cover.
 Since 1988, the Bathroom Reader Institute had published a series of popular books containing irresistible bits of trivia and obscure yet fascinating facts. If you like Neatorama, you'll love the Bathroom Reader Institute's books - go ahead and check 'em out!

Something as simple as holding your hand a certain way can speak volumes. Holding up your index finger means something different from holding up your middle finger. As if it’s not all complicated enough, the meaning of hand gestures change in different parts of the world. Something that’s friendly in your country can be incredibly offensive in another. Don’t worry, though, because today we’re going to take a trip around the world to learn how your hand gestures will be interpreted many countries. Via WorkTheWorld Click To Enlarge
Read the full article: What Do Hand Gestures Mean in Different Parts of the World?

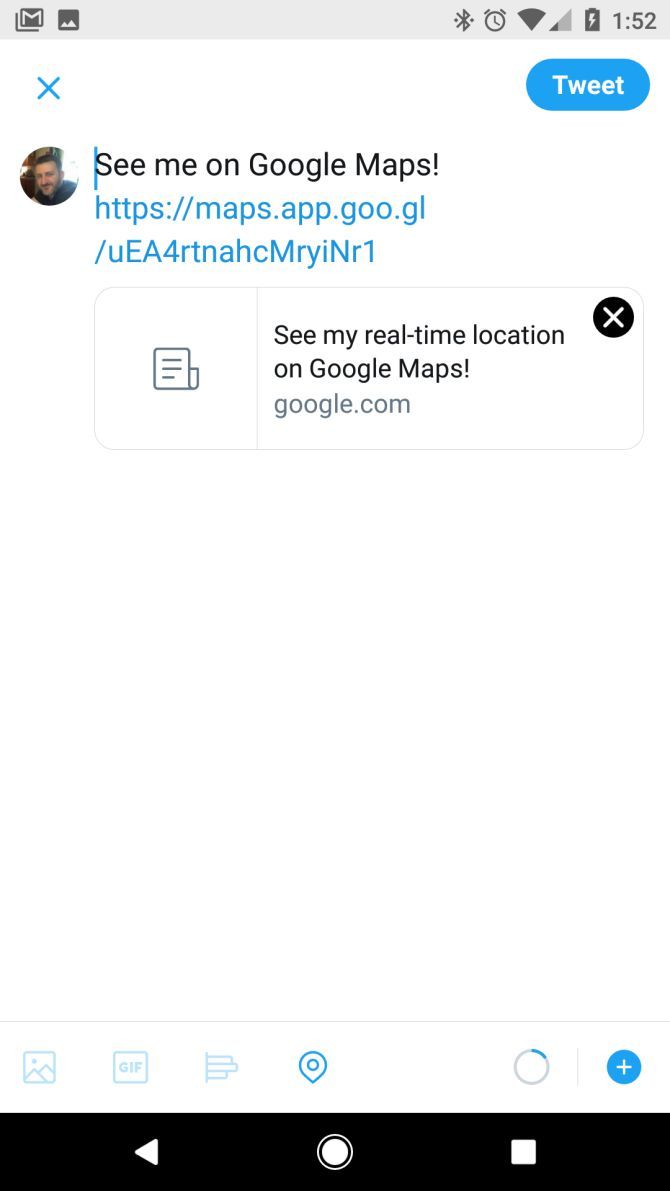
Google Maps is so ubiquitous that you probably don’t even worry about finding directions anymore. All you need is an address to get yourself anywhere in the world.
But as Google Maps has grown over the years, so have its features. There are some tricks hiding under the surface that’ll change the way you navigate.
Let’s look at both basic and advanced tricks to getting more from Google Maps navigation with your Android phone. Many of these work on iPhone, too.
We begin with some basic tips you might not be familiar with if you’re new to Google Maps. They’re easy to integrate into your regular use.


Google Maps has a handful of features to help you avoid getting pulled over for speeding. While in navigation mode, the app will tell you both your vehicle’s speed and the road’s speed limit. All you need to do is begin driving and Google Maps will add little information bubbles on the left side to keep you informed.
Plus, in select areas, Google Maps can warn you about speed traps and cameras reported by other users. When you’re browsing directions, you should see icons that indicate a speed trap. The feature works verbally as well. So when you’re closing in on a trap, the app will warn you.
These tools are enabled by default. But if you don’t see them, try manually turning them on from Settings > Navigation Settings > Driving options.


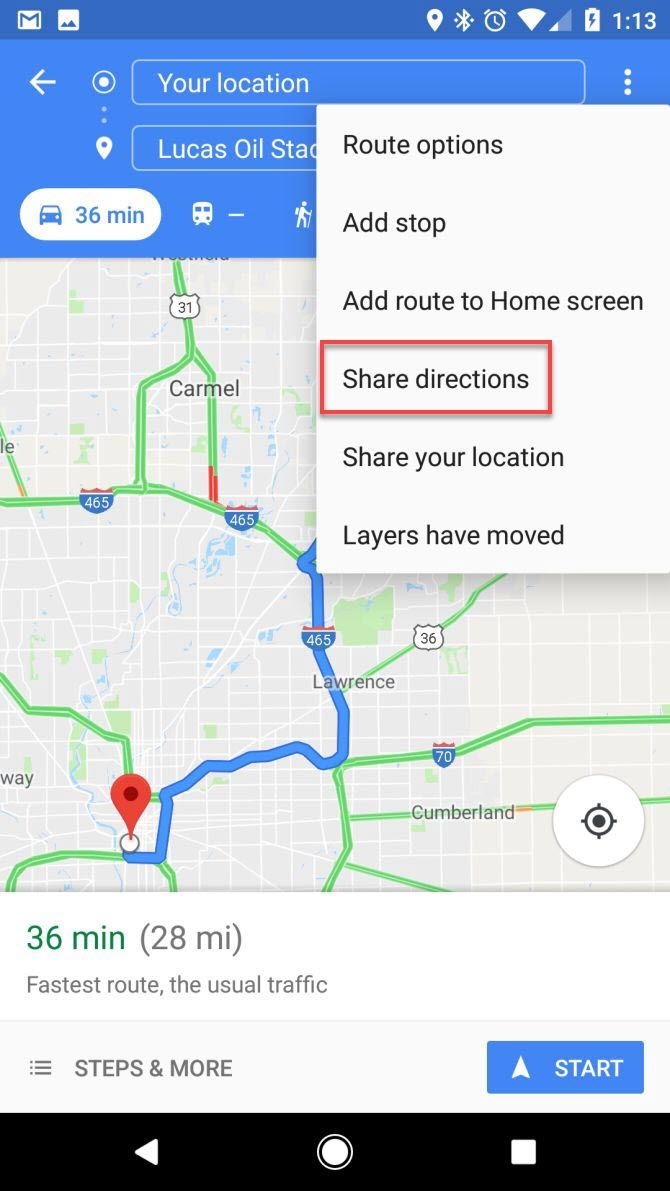
Once you’ve started navigating somewhere, you can tap the Search button (the magnifying glass) to look for another location and add it as a pit stop. Or if you know you’ll need to stop somewhere in the middle of your trip before you leave, tap the three-dot icon in the upper-right and choose Add stop.
Even more useful, if you search for gas stations, it’ll show you the gas prices at different locations so that you can save a few bucks on your next fill-up.


Ever wondered how quick public transportation will be at a certain time in the future when planning out a journey? Google Maps can tell you.
Start by pulling up directions from one location to another as normal. Tap on the public transportation tab (which looks like a bus), then hit the Depart At button. It will automatically jump to the current time, but you can change it to another time, set Arrive By, or even choose to take the last available transit.
These estimates are usually pretty close, since public transportation runs on a schedule. Unfortunately, for estimating car trips ahead of time, you’ll still need to use Google Maps on the web.

Google Maps offers great options for bookmarking locations. This is thanks to the lists feature, which gives you the option to favorite places and separate all of them into different groups. So for instance, you can build one for all the restaurants you’d like to try, and another for a trip you plan to take soon.
There are two methods to build a list. You can either go to Left Navigation Drawer > Your Places, or tap the Save button in a particular location’s information card.
In addition, Google Maps has a dedicated tool for collaborating on lists with your friends called Shortlists. To start a new one, simply share a place with another Google Maps user.
The Shortlists interface will appear as a floating icon, and you can tap it to view the list or include more before sharing. Members can share their thoughts on a location by hitting the upvote or downvote icons, then preview all of them on the map by tapping the little map icon situated at the top.
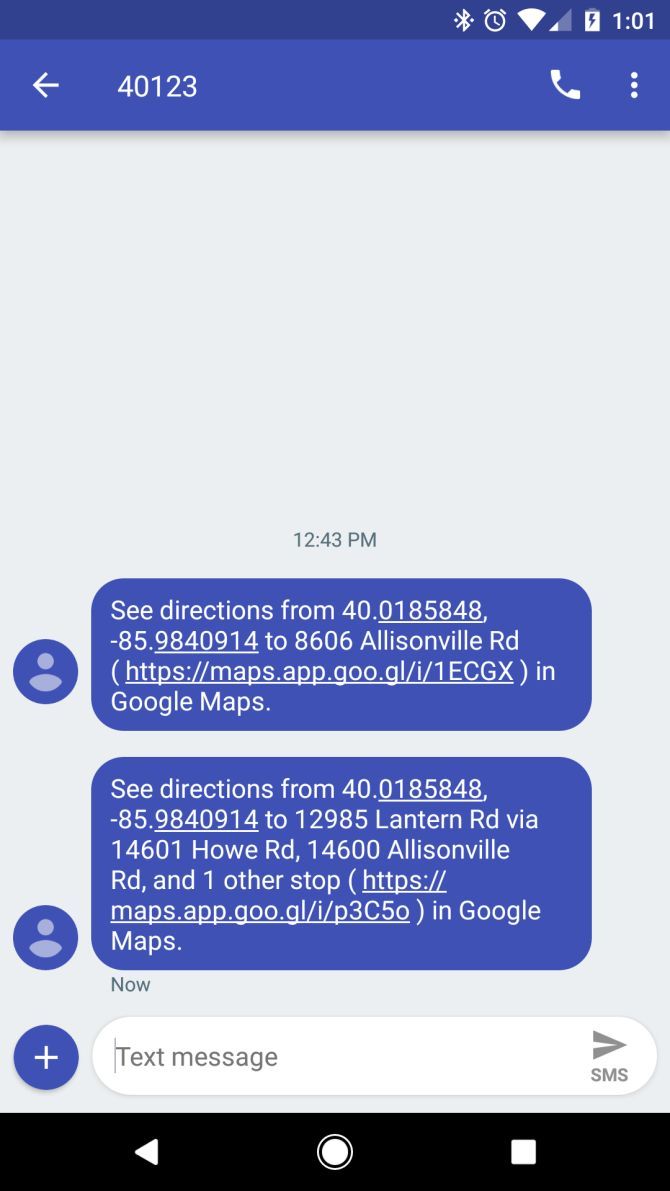
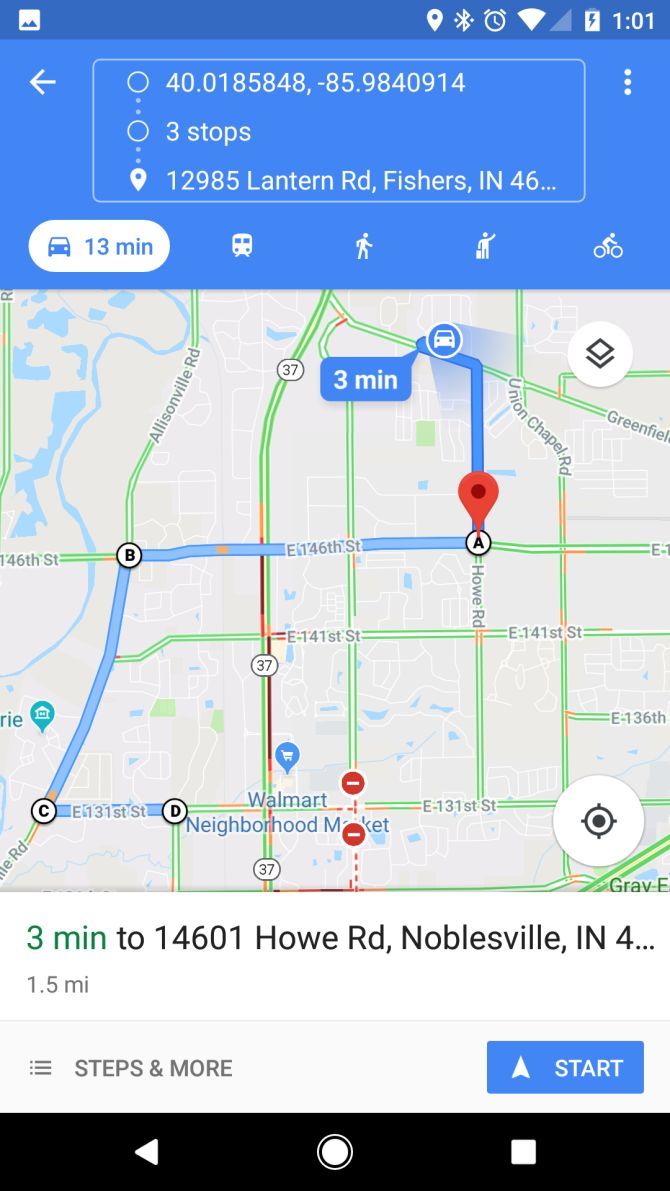
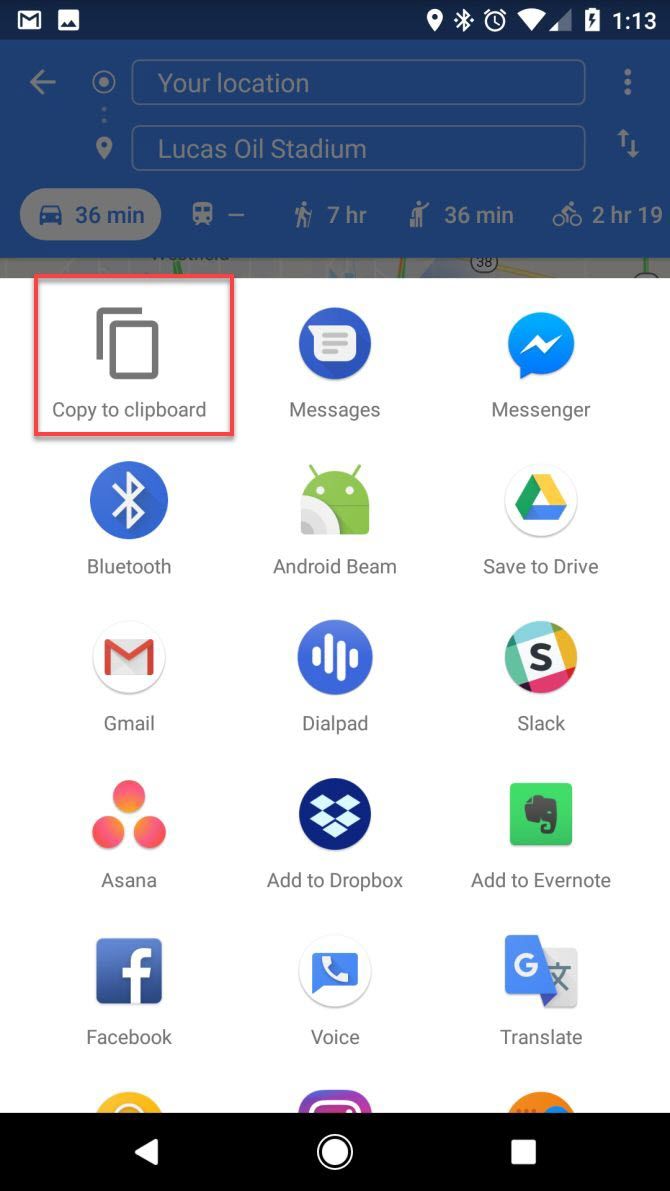
Ever look up directions using Google Maps on your computer, only to realize that you actually need them on your phone to navigate?
If you’re signed in to the same Google account on both your computer and phone, you can just choose Send directions to your phone. You’ll get a notification that takes you right to navigation in Google Maps on your device.
Google Maps isn’t only for roads; in fact, it works for some malls. If you’re near a major mall, zoom in to see the layout of that mall. You can find specifics stores, locate the restrooms, and even navigate through separate floors.
Want to step into the past? Open the three-bar Menu in the upper-left of the screen and choose Your timeline. Here, you can navigate to any day in the past and see exactly where you went.
If you find this too creepy, you can always delete your Maps location history (or disable the feature entirely). You can also add notes to certain days to remember what you did.
This isn’t perfect, though. Mine seems to think I went biking to the grocery store a few days ago, even though I don’t own a bike.
This is a simple one, but it’s a game-changer for one-handed usage. Next time you want to zoom in, just double-tap the screen quickly. Hold your finger on the screen after the second tap, then drag it down. To zoom out, do the same procedure, but drag up.
If you’ve ever fumbled with your phone attempting to do a one-handed pinch-to-zoom, this should help you in the future.


Switching apps or pulling down the notification shade to control music playback while driving can be risky. Luckily, Google Maps lets you access your music inside its app. You can view your queue and play/pause music from Apple Music, Google Play Music, or Spotify right in Google Maps.
To enable this function, head over to Settings > Navigation Settings and switch on Show Media Playback Controls. Now on an active navigation screen, you will have a music icon. Tap it to reveal the controls and hit Browse in the prompt to view tracks from your library.
Google Maps' AR mode is truly the most futuristic feature I've tried in the last year. And it can even detect tilts. So you can quickly go back and forth between the AR and regular view. pic.twitter.com/TSdd112MHI
— Shubham Agarwal (@phonesoldier) July 12, 2019
Google’s walking directions can often make you scratch your head when you’re trying to figure out which of the many turns you need to take. A better and more natural alternative is Google Maps’ Augmented Reality mode.
The feature superimposes the next instruction onto the real world so that you know exactly where to go. To use it, tap the Start AR button when you’re viewing walking directions.


Google Maps can also keep you informed about your daily commute’s traffic conditions before you need to leave. On top of that, it can even read your calendar and adjust the notifications based on, for instance, a meeting you’ve scheduled.
Before you can take advantage of these features, you need to define your commute times and locations. You will find those options under Settings > Commute Settings. Once you’ve configured the prerequisites, head over to Settings > Notifications > Commute.
Want to dive deeper? Check out some of these more advanced tricks you can try in Google Maps.
Pair them with other lesser-known features in Google Maps for Android and the app will become more useful than you ever thought possible.

One of the benefits of applying labels to your frequently visited locations is that it makes voice-controlled navigation much easier.
On Android, Google Maps supports powerful Google Assistant voice commands. You can ask Assistant to navigate to any place by speaking commands like “Navigate to the nearest coffee store.” If you have set up your Work and Home locations, you can also say more natural phrases such as “Take me to work.”
What’s more, the Google Maps app comes built-in with Google Assistant. So even if you’re on iOS, you can talk to the Google Assistant during an active navigation. Invoke it with the “Hey, Google” or “OK, Google” launch phrases.
Through the experience of living in a specific area, you may already know that around a specific time every day the traffic backs up at a particular stoplight. Because of this, you avoid taking a certain main road to work when traffic is bad.
However, when Google Maps creates a route for you, it usually tries to stick to main roads or highways. It will revert to smaller roads to bypass a highway with high rush hour traffic, but it’ll rarely take you across neighborhoods or smaller roads.
Unfortunately, there’s no way to plot out your own routes on your phone, but there’s a workaround. Using Google Maps on your PC, you can plan out your entire route by adding in several destinations, one after the other. Make each destination another turn in your entire route.
Once you’re done creating your turn-by-turn route, just click on Send directions to your phone at the bottom of the route, as mentioned earlier.
This will send a link to your route which you can save to a note-taking app. Then the route will always be available on your phone with a single tap. Hitting it will open Google Maps with the entire route ready to navigate.
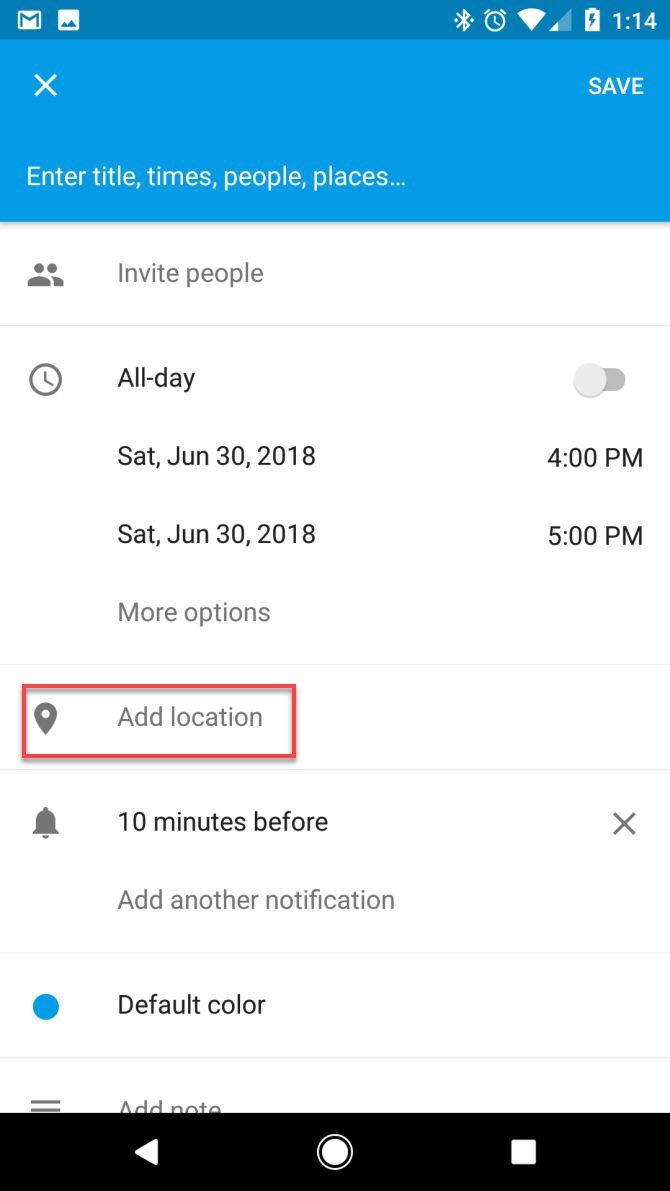

When you have a trip or event to get to, you definitely don’t want to waste time sitting in your driveway trying to find the correct address.
To save time, when you’re planning for an event, open Google Maps on your phone and pull up the event’s address. This is most convenient when you first get an invite from a friend or you’re buying tickets and already on the website that has the address. Once the map is up:
Now, when it’s time to leave for the event, all you need to do is open your calendar reminder, select the route link in the location field, and you’re on your way.
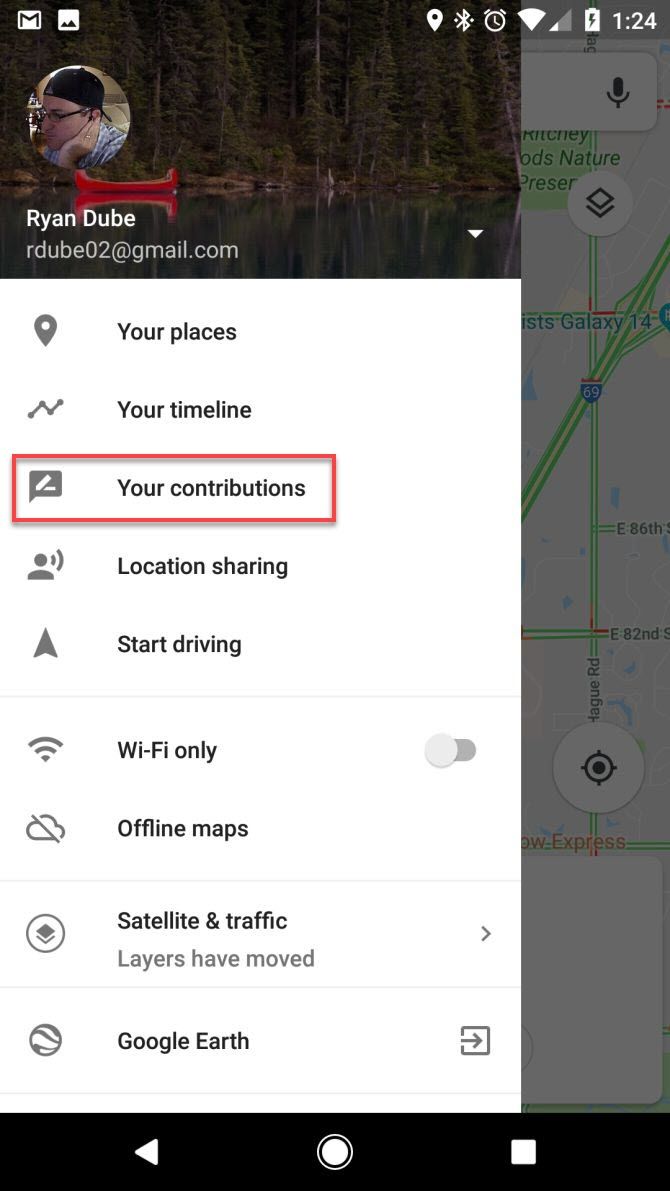


If you like contributing to the experience other people will have at restaurants and other businesses you’ve visited, Google Maps makes this easy. All you have to do is visit Your contributions in the Google Maps menu.
As mentioned previously, Google keeps an entire timeline of the locations you’ve visited. So in this section, Google provides a convenient page you can scroll through and quickly rate the businesses you’ve been to. This is much more convenient than trying to search for the business to provide a review.
In addition to leaving reviews, the Photos section gives you the opportunity to add your photos to Maps. These come from your Google Photos account (synced with your phone), with the location identified based on where you were when you took the photos. In this section, you can select them and tap the Post button to publicly add them to Google Maps for the world to see.
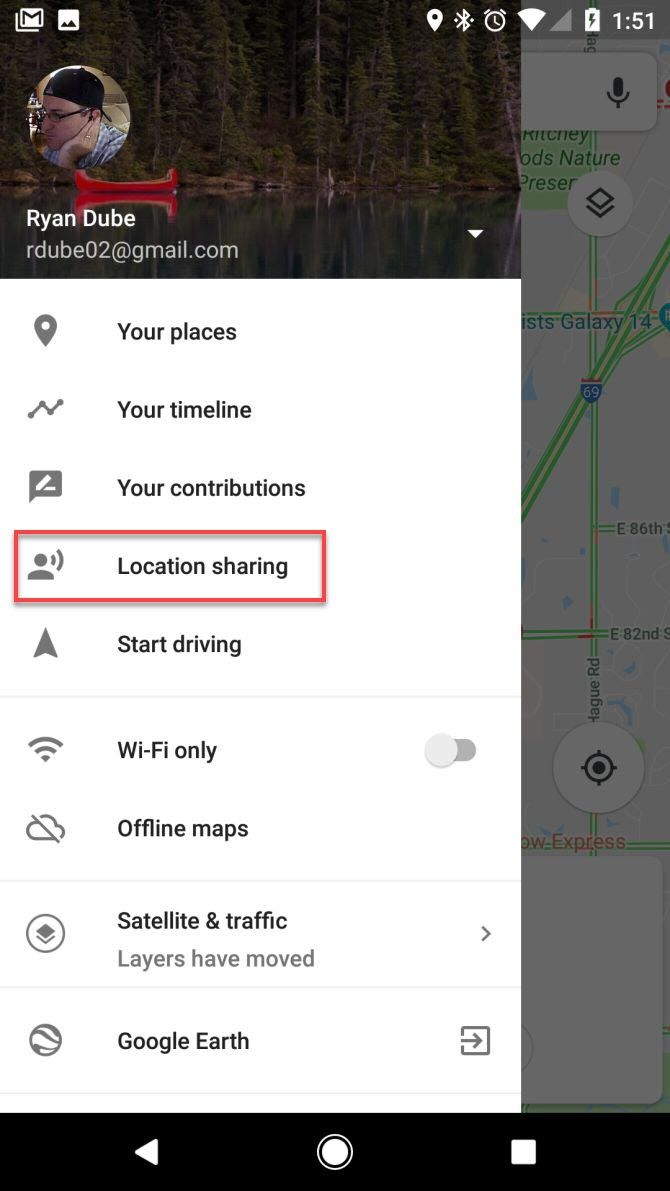
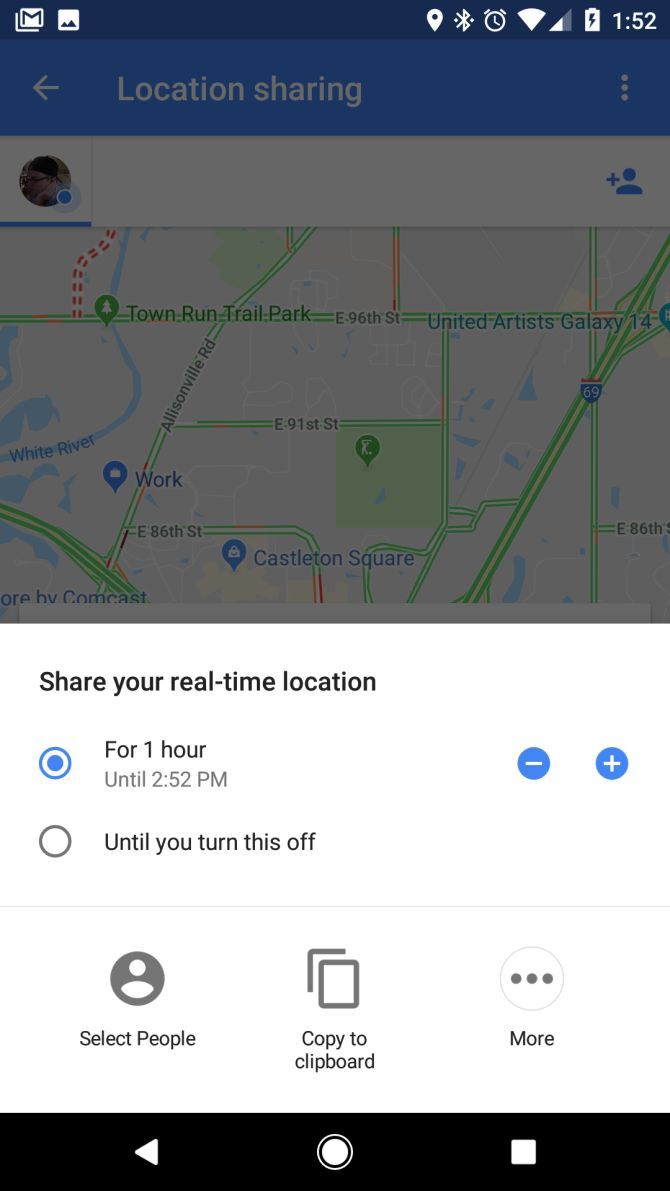
One of the hardest parts of traveling, whether you’re on a college road trip or traveling for business, is being away from the ones you love. But thanks to Google Maps location sharing, you can let your family and friends keep tabs on where you are during your entire trip.
To enable this:
You’ll find a lot of fun uses for this feature. It’s perfect if you’re a traveling writer and want to let your fans follow your path in real-time. It’s also great if you want your family to always feel like they’re only a click away from you while you’re traveling.
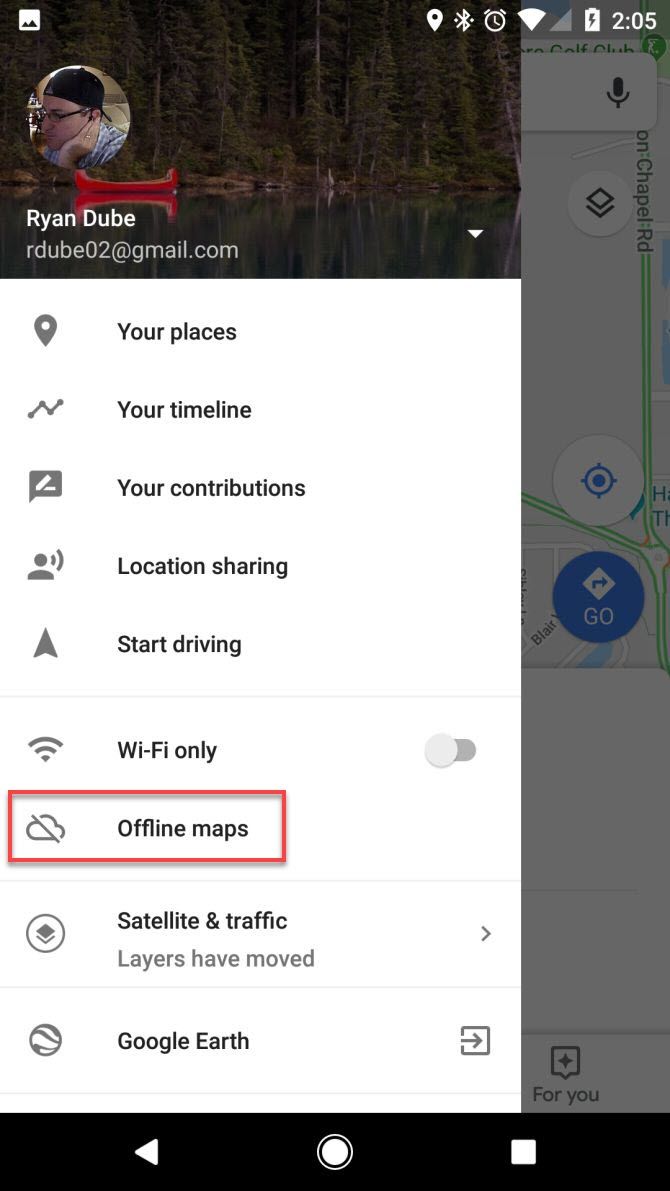
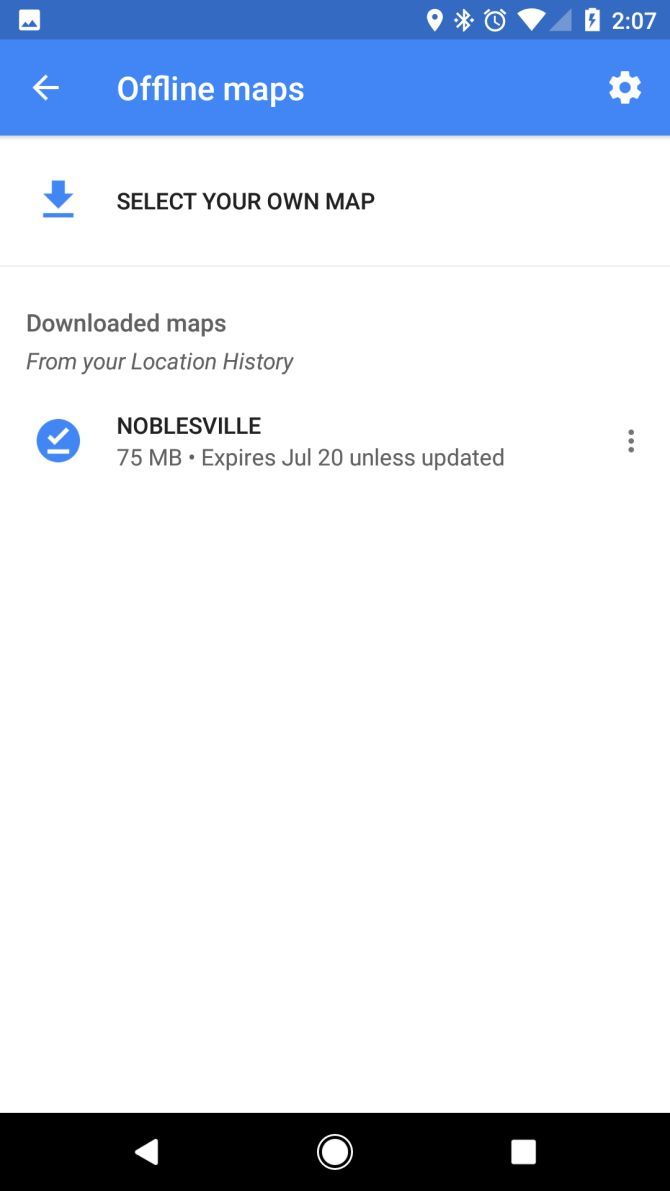

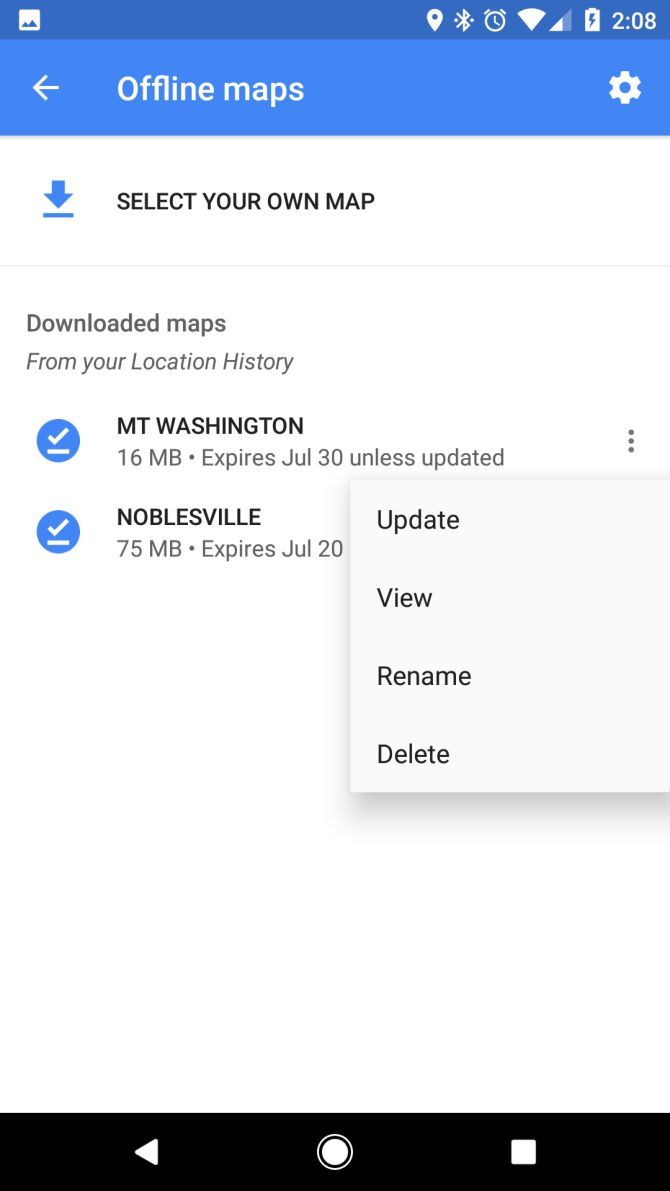
Hitting a “dead spot” without cellular service is miserable when you’re using Google Maps. This is common when traveling in remote locations, like when you’re on a camping trip.
The solution to this is downloading an offline map of the area before you head there. You can do this on your phone by following these steps:
Now when you’re on your trip and visit the area, you can use Google Maps without any cellular data service. Keep in mind that the downloaded map will require at least 10MB of space on your phone, and larger areas can require much more than this.
These are some of our favorite tricks, but even this isn’t an exhaustive list. Google regularly adds more great features to Maps.
If you often travel internationally too, take a look at the best apps to download for trips to other countries.
Read the full article: 17 Google Maps for Android Tricks That’ll Change How You Navigate

When you think of keychain flashlights, you might think of small, flimsy designs with barely enough output for everyday tasks. If you need something that's solid with more power, your only option is usually a much bigger, bulkier light.
With the SureFire Sidekick, you get stunning performance from a flashlight that's easy to carry on your keychain. Its ultra-portable 2.5” form factor weighs just 2 ounces thanks to its polymer body construction. This material makes the Sidekick light enough to live on your keychain or off a carabiner, yet rugged enough to withstand daily wear and tear.
A top-side, push-button interface gives you easy access to its 3 levels: a 5 lumen low that lasts 45 hours, a general use 60-lumen medium, and an unprecedented 300-lumen max for a flashlight of this size. With these specs, the Sidekick outclasses lights that use much larger batteries and higher voltages.
It uses a built-in micro-USB port to charge its integrated Li-ion battery, making it as easy to charge as your phone while sparing you the weight and hassle of carrying extra cells. And while it might look like just another key fob, the Sidekick takes keychain lights to new levels. Pick up this portable pocket rocket from Surefire at the link below.
This is a sponsored post presented by SureFire.
“Hey, don’t take our picture!” a young woman yelled out from her group to me a few days ago. I told her I didn’t take their photo—and it was true, I was just facing them playing Pokémon Go on my phone as many others were also doing in the park that day. But, often I am doing just that.
“If your pictures aren’t good enough, you’re not close enough.” — Robert Capa
As an active street photographer and generally a private person myself, the question of what is a fair subject for my lens is constantly on my mind. And in the age of social media, what is fair or ethical to share to the public.
I’m often asked about this by friends or people who see my work. On Twitter recently, a follower asked me about it, and I was glad for it as it made me put my freeform thoughts about it into words:

Then he asked: Do people ask about seeing the outcome? And I responded: Sometimes, rarely. I will always gladly delete or send it to them if requested. I also would not post if clearly an unwelcome capture.
In the United States, public space photography of pretty much anything is legal. And as far as identifiable faces, there is no need for model releases so long as a photo is not used for commercial ends (such as advertising or stock photography). But none of this is what I’m talking about here.
“I’m known for taking pictures very close, and the older I get, the closer I get.” — Bruce Gilden
Bruce Gilden is a well-known and controversial street photographer whose in-your-face-with-a-flash-bulb signature style produces striking results.
While I find some of his work intriguing, I’ve seen videos of him shooting on the streets and share Joel Meyerowitz’s sentiment: “He’s a fucking bully. I despise the work, I despise the attitude, he’s an aggressive bully and all the pictures look alike because he only has one idea—‘I’m gonna embarrass you, I’m going to humiliate you.’ I’m sorry, but no.”
That is one end of the spectrum, and the other is being so timid that your camera roll is full of dogs and sleeping homeless people and the backs of people walking. Between these extremes is the intersection of empathy and taking vivid and captivating pictures that tell the story of a person or a place or a moment in time.
Is it voyeuristic? Yes, in that it is about seeing. And there are as many ways to do that as there are to live. You can be creepy or curious, aggressive or gracious.
Bill Cunningham, the beloved and celebrated fashion street photographer for The New York Times, devoted his life’s attention and considerable talents to capturing people being fully themselves in their natural habitats. It is clear in his decades of work and in his own words (in this great documentary) that he was there to bear witness to beauty and style. He was all about respect and admiration and celebrating his subjects, and by every evidence people enjoyed seeing him coming with a camera.
Why do I do it? So many reasons. People are fascinating. I can look at street photos endlessly—from any time or place. I spend many many hours a week traveling the world through Instagram hashtags like #everybodystreet or #lensculture or #streettog. I love the magic of fleeting everyday moments that will never happen again. I love cities and especially my city and my neighborhood and want to capture its citizens and energy, right now and forever. I love to capture all the different things that happen on that one same street corner over the years. I love the theater and chaos of an ever-changing cast of characters, how they look and how they look at each other. I love big shows of audacity and the small quiet moments in the eye of the storm. Endless fascination.

But however good my intentions or avid my interest, people have a right to their privacy wherever they are. It comes down to tuning into their cues, reading their signals, and then coming closer or moving away. Empathy, instinct, and generosity of spirit.
People have a greater or lesser sensitivity depending on the environment. In big busy cities, there is not much personal space—bodies are side by side, and there are cameras everywhere and nobody cares. It’s a different story on a quiet day on a sparsely-populated street. Or at a music festival where bodies are against and on top of each other and wanting to be seen and practically jumping in front of your lens.
Every photographer of people in the wild, whether an amateur “streettog” or a world-class photojournalist, has their own internal compass on what they will they will capture and how they will do it. The “how” is as interesting to me as the “what” and is the challenge that drives many of us to hit the streets.
In the beginning, I’d approach people and ask to take their photo, which most of the time would result in a yes and, of course, a posed photo. Not what I wanted. Street portraits are fantastic but not what I find compelling to shoot.
… the majority of photographs I take of people—people are either charmed by it, honored, or find it humbling. However it depends on how you do it. If you do it in a sneaky manner and get ‘caught’—people are going to be pissed off. If you do it openly, honestly, and smile a lot—people won’t feel any negativity towards you. Sure you are going to get some people who look at you funny or some people who ask you to delete the photo—but that’s pretty much the worst that ever happens. — Eric Kim
As a physically small female, I am no big swaggering Bruce Gilden. My default street awareness is the same as any woman: low-level vigilance for potential threats, dialed up or down by location or time of day. And I generally fear confrontation. The anecdote I start this article with couldn’t have been a more harmless scene: sunny afternoon in well-populated park, shouted at me by a tipsy young woman sitting with a group of friends. But it still made my heart race and my cheeks flush. It is somewhat for this reason that I operate with a low profile.
Here’s how I work these days: I hold my camera in my right hand with its strap wrapped around my wrist. I shoot from hip level, rarely bringing it up to my face; partly this is my overall unobtrusive style and partly it’s the fact that my camera doesn’t have a viewfinder (just a backscreen), which I prefer. (It’s something of a modern-day Rolleiflex camera, which Vivian Maier used.) I use a fixed 28mm wide-angle lens which captures whole scenes unless I am very close. I set it to a high-speed sports mode and shoot as I walk, rarely stopping. As I walk, I get in a meditative mode, responding instinctively to sudden sounds, clamor, activity or flashes of light. I don’t overthink it. Shoot now, delete later.

If someone sees me taking their photo, I smile and nod and say hello if they are close enough to hear it. If they look like they’d rather me not be there, I’ll walk away. Sometimes I walk up to people if they look like they want to engage or would like to have the photo. Getting over the fear of directness and potential confrontation is my biggest challenge in photography, and I am evolving these skills. Openness of spirit and action is everything.
There are many beautiful photos that I’ve taken but won’t publish, because they fall outside my own guidelines. They include tender moments of love or anger or vulnerability that seem too intimate to share. Sometimes they are not-quite-illegal activity that nevertheless might not be professionally helpful. In all this, I am mindful of the emerging and widespread use facial recognition technology. The same wide-open world that makes street photography more globally accessible and immediate than ever also, not surprisingly, can make it more sensitive than ever.
I always gut check and ask myself: Why am I drawn to this person or scene? Why do I want this photo? Would I mind if someone took or publicly shared this photo of me?
For the record, I love when people take pictures of me on the street. Knowing how I myself operate, I think that I must look cool or some other vain thought, or that if I’m hideous or doing something terribly wrong then at least it’s interesting.
“The problem is I’m not a good photographer. To be perfectly honest, I’m too shy. Not aggressive enough. Well, I’m not aggressive at all. I just loved to see wonderfully dressed women, and I still do. That’s all there is to it.” — Bill Cunningham
Goodwill and curiosity and appreciation. Amen.
About the author: Jill Corral is a Seattle-based photographer and UX designer currently on sabbatical to travel the world. You can find more of her photography on her website or by following her on Instagram, Twitter, or Facebook. This article originally appeared on Medium.

Plotagraph Pro is an incredible new photography tool that can take any still image and animate it into a beautiful looping GIF or video file. No need to shoot a video or capture multiple frames, a single JPEG is all this Web-app needs.
Plotagraph Pro was created by photographer and artist Troy Plota, and it’s basically being marketed as a simple alternative to time-intensive Cinemagraph creation.
“Cinemagraphs originate from video footage and requires specific video production which adds considerably to the costs. This also greatly limits the amount of available footage,” it says on the Plotagraph Pro website. “Plotagraphs are free from the constraints of video which makes Billions of images available to bring to life at a fraction of the price of any other process.”
Any single JPEG can be turned into a flowing animation and exported as a GIF, MP4, or MOV file through a patent-pending combination of specialized imaging algorithms.
Photographer Trey Ratcliff has been playing around with Platograph Pro for a while, and today he released a BTS video that shows you a few of his favorite examples and illustrates how easy the software actually is to use:
The interface itself seems pretty simple and the results speak for themselves. Of course, given the single JPEG source, there are limitations, but there are also a ton of possibilities. Here are a couple of examples that Trey has posted online:

We have to admit, the ability to take any existing still image and “breathe new life” into it is pretty enticing, and it seems we’re not the only ones that think that. According to Digital Trends, Plotagraph Pro has already been used by big guns like Chevrolet, Coca-Cola, Pepsi, and Airbnb. All that’s left is to release it to the rest of us mere mortals.
Speaking of which, Plotagraph Pro is now available as a pre-release beta to a limited number of users before it goes live for all. You can learn more about the service on the Plotagraph Pro website where you can also sign up for one year of access + 10GB of online storage for the special introductory price of $300.
Tempted? Curious? Meh? Let us know what you think in the comments down below. And if you want to see more Plotagraph examples, head over to the company’s Instagram.
Image credits: Plotagraphs by Trey Ratcliff and used under CC license.
It’s time for a long overdue post. Looking back through my archives, I realized that I’ve covered topics like film selections and scanning film but to date I’ve skipped one really important part: metering and exposing color film.
This is something I get quite a few questions about so bear with me while I try to be very thorough and cover topics from different lighting conditions and how I would meter with the various film types, both color negatives and slides. While graduated neutral density (GND) filters deserve an entire post for themselves, I’m going to have to touch on that topic as well since they are a critical part of my film exposures.
As a disclaimer, I’m going to be covering my methods for metering. These may not be the methods you’ll read about in most books but I’ve found them to be both effective and extremely quick which is crucial when the light is changing dramatically.
It’s come to a point where metering is mostly second-nature to me and takes up a very small portion of my workflow. When using large sheets of film, every mistake gets very expensive so my goal is to nail each exposure in one try and only take “duplicate” images as the incredible light show progresses throughout sunrise or sunset. Very rarely do I bracket exposures—only if the light is some insane condition I haven’t yet encountered—instead I count on proper metering, film choice, and filter usage to produce an image. My goal here is to help you do the same.

While I may be a die-hard film user, I think this process has been sped up greatly with the help of a small digital camera to meter light with. Yes, that’s right, I may never show any images from a digital camera but for the past 5 years it has played a very important role in my exposure. Just as some traditional photographers would have used a Polaroid to check exposure on the scene, I have become a big fan of using the histogram and LCD display on a digital camera. I’m not going to encourage anyone to go spend a chunk of money on a digital camera, but there’s a good chance many of you already have one.
If you don’t want to carry a digital paperweight in addition to your film camera, you can use one of many smartphone apps that also meter light. I have used LightMeter for Android and found it to be accurate and quick. There are many others and some that cost just a few bucks will also show you a histogram so you can check exposure. You can also use the old tried-and-true spot meters from the film days to make your measurements. Maybe you’ve got a fancy enough film camera that it even has a light meter built into it. Perfect! I’m all about using what you have and making the best of it!
If you don’t have a light meter and have come to this article looking for advice on a purchase, then I will make a few quick arguments for using a small digital camera.
I started metering with an Olympus EP-1 Micro 4/3rds camera years ago. Previously I had been using a 35mm camera for metering so this thing was a huge step down in size for me. At that time, the EP-1 had already been out for a few years and they were only a couple hundred bucks used so I picked one up. Today, they can be had for about $100 with a lens on KEH.com which is cheaper than you’ll likely find a spot meter for and also about the same size/weight. You could even use a newer model if you desire, but the main features I would look for is something that lets you choose exposure settings manually and a lens that lets you stop down to f22 or so.
I wouldn’t recommend getting a point and shoot camera because they don’t have great controls and won’t let you select smaller apertures like f22 that you’ll use a lot with medium and large format film. My biggest downside with using a digital camera is that I am really hard on photographic gear. In five years I have destroyed two of these cameras and the third one is on its way out. Don’t be like me and try to keep from smashing your cameras on rocks and you should be fine. I think that might be a big reason I’ve stuck with the old durable film stuff…

Ok, so we’ve got some sort of accurate light meter, now lets get to measuring exposure for film!
I’m going to break this down into several types of lighting conditions you might find while shooting landscapes and give you metering options for both color film types. Keep in mind that metering is an area where you have a lot of say in how you want the image to look. Do you want the bark on that tree to be dark or light in tone? Do you want realistic light or are you going for a certain mood that may call for a brighter or darker look? Do you want the snow to be bright white or would that take away from the colorful sunrise sky above?
Don’t go from my word on all of this, look into your own artistic vision and decide from there. All of that is up to you but I’m still going to give you all sorts of advice to help you meter quickly in any condition. Alright then, here we go:
I tend to think in aperture priority. I don’t really care if that’s your personal preference or if it’s right or wrong, it’s just been how my mind works ever since I’ve started in photography. It just makes sense with landscapes because aperture is the aspect of exposure control that affects your image the most when you’ve already got the camera on a tripod. We need to know how much of the image we are going to get in focus, and since we’re on a tripod it typically does not matter if the shutter speeds get slower unless you’re dealing with wind, water, or other moving subjects.
Using large format film I tend to be in the f22 or f32 range, which will always result in a relatively long exposure. Since I know my desired aperture, I like to set my digital light meter camera to that aperture and have it tell me the proper shutter speed. I then use the exposure compensation dial for artistic adjustments such as making sure snow is white or a shaded rock is dark, and I use a little bit of simple math to determine the needed GND filters.
If you have a different method you use that is completely fine, as long as you’re able to get a good result in the end. To help clear this up for everyone, in the rest of the article I will use some visual samples that show you what my light meter camera would have read while metering around the scene.
I wanted to make a quick note about film types here, for a more in depth look take a look at my film choices article.
Color positives (also called slide or transparency film) will give you a positive image with the real colors that you saw when shooting the image. Color negative film (also called print film) will give you a negative where highlights are dark and shadows are light and the colors are all inverted and wacky. You then invert negative film during scanning or traditional darkroom printing.
The main differences for the sake of this article is that color negatives (like Kodak Portra or Ektar) will give you a significantly higher amount of dynamic range, or the amount of contrast the film can handle between extremely bright areas and the darkest shadows. While they can handle a huge amount of contrast, they will have softer colors than slide film. Slide film (like Fuji Provia or Velvia) has a very narrow dynamic range and must be exposed carefully, but the results are an image with incredibly rich colors.
For that reason, there may be different times you would want to use positive vs negative film and you would likely want to meter them differently. I will also add that color negative film will get less color saturated as you overexpose it, and you can gain a little additional saturation (at the cost of some extra grain) by underexposing it a bit.

Alright, I’ll start with the tricky one. The one I get the most questions about, the one that has the most room for artist interpretation. Furthermore, I’m going to break back lighting down into two categories: back light with open sky beyond the subject, and back light in a forest. These both need to be treated differently because you’ll likely be unhappy if you use GND filters in a forest.

I’ll start with back lighting with open sky, like the example image above. With this scene I instantly knew the important part of the image, the tractor, and it needed to be exposed in a way that lets all the details show properly.
Within the tractor itself you’ll notice that there are many different tones from the white lettering to the red paint to the deep black tires. In this situation, I wanted all these to be exposed in a way that makes sense to your eye. It’s important to know that our eyes can see in a significantly greater range of brightness than any film or digital sensor can, so we need to choose the parts we want to be exposed “correctly” in high-contrast lighting situations. It’s also important to know that in even light, most subjects will have tones within the reasonable dynamic range of any film. It’s the variation in light throughout the scene that causes exposure problems, and not typically the variation of tones within a particular subject. Read that last sentence again if you need to.
With that in mind, the tractor and the majority of the foreground have the same light falling on it aside from a few hot spots like the where the sun is hitting the very top of the tractor’s hood. Our only extreme contrast in the scene comes from the sky, and that contrast is indeed a big difference in light—more than any film can handle.
What we need to do first is meter the most important part of the scene, the subject. Since my experience has shown that most subjects under the same light will fall into a reasonable exposure range, I’m a big fan of average metering. It’s quick and effective. If spot metering is your style then by all means continue that method. I will occasionally spot meter something that’s very important to make sure it’s within a film’s range, such as the brightest white water in a waterfall or the bright gap of sky between the clouds and horizon at sunset. For a scene like this I will average meter the entire foreground, pointing my meter downward and making sure that none of the sky is in the frame.
Remember I’m using a small digital camera as a meter so I will zoom the lens as needed for spot metering or point the camera to ensure only the area I want is average metered. If the sun is flaring into the meter, make sure to cover it with your hand so it doesn’t throw the reading off. If I’m concerned about excessive contrast within the foreground I’ll move the meter around a bit and check several areas.
In a scene like this with a good variety of middle tones in the subject, I would set my exposure to this reading. Sometimes it may be a good idea to underexpose the foreground by just a tad to keep the scene looking natural, our eyes want the sun and sky to look brighter than a field and a tractor.

Now that I know how I want the exposure set, I will meter the sky and see just how much brighter it is than the subject. To do this, I will point the meter upward and ignore the ground for this reading. I’ve found in a typical back light situation like this, the brightest area of the sun and sky will be about four or five stops brighter than the average of the foreground. That’s a huge difference.
As you aim the meter higher away from the sun you’ll likely notice that this part of the sky is a actually bit darker than the area just above the horizon. This can make for a bit of a challenge with traditional GND filters because they are darkest on top and lightest on the bottom, but you can still make do if that’s all you have.

So we’ve measured about a four stop difference between our foreground and the bright sky, so we should use a four stop GND filter to make up for the difference, right? Not so fast! Remember that a bright sky with the sun beaming through it should look bright. To me, the point of a back lit image is that it appears very full of light and everything almost glows. We don’t want the sky to end up a middle tone so don’t over-filter it.
If I measure a sky that is about four or five stops brighter than the ground, I would use a 3 stop GND filter. If you have a flat horizon like this, grab your hard-edge three stop filter and place it carefully, making sure to stop the lens down to the desired aperture while fine-tuning the placement of the filter. Better yet, if you’re lucky enough to have a reverse GND filter, it’s time to pull it out for the one and only situation I use it in.
A reverse GND filter is darkest in the middle, clear at the bottom and less dark towards the top. This filter is specially designed just for shooting into the sun while it is near the horizon like this image. I find a three stop reverse GND to be the most handy and it’s the only reverse one I have. This means it darkens the area just above the horizon by three stops but gradually darkens the higher parts of the sky by less, leading to a very even and pleasant sky exposure.

I would typically tackle a scene like this with a color negative film like Kodak Ektar (or Portra if you wanted more subtle colors). While you certainly can do this on slide film you’re going to have to give up some details, most likely in the bright spot around the sun.
In the image above I used Velvia 50, a wonderful slide film. This was before I had a reverse GND so I stacked my two 2 stop GND filters to darken the sky. While some of the highlights are a bit hot and some of the shadows a touch dark, the overall feel of the image works nicely and you can enjoy the rich colors of slide film.
I would meter and expose rather similarly for this situation between the two film types. Just keep in mind that slide film can’t handle as much in the highlights so be careful not to overexpose anything too greatly. Again, start by metering the foreground and setting your exposure, then meter the sky and decide how strong your GND filter needs to be.
Just to clarify, here’s a basic breakdown of my metering process for using GND filters:
Don’t worry, I love to cheat the system and come up with hacks. A quality set of GND filters will cost you some money but there’s still some things you can do if you don’t have them handy. I’m using large format film so my apertures are commonly around f22 and f32 which results in exposures of several seconds around sunrise and sunset. Since this is a significant amount of time to work with, you can experiment with dodging a dark item in front of the lens over the sky area for a portion of the exposure time.
You could use a black cloth (or glove), but I like to use the dark slides that come out of the 4×5 film holder while I’m shooting. Whatever you use, just make sure to wiggle and move it continuously to keep it from showing up as an obvious edge in the image.
I actually use this trick a lot. Sometimes the light is changing so quickly that there’s no time to fiddle around with filters, or sometimes I want to darken a sky that is in a shape that filters don’t come in. Think of the “V” shape in a valley or if there’s a mountain protruding into the sky, you can use your dark object to dodge over the lens in that shape.
Just keep some simple math in mind when calculating how long to dodge for. If your foreground exposure is calculated at 8 seconds, then dodging over the sky for 4 seconds would darken it by one stop. If you held it over the sky for 6 seconds, then it would have been darkened by 2 stops. This trick has a lot of potential and can help you out while you decide on a GND filter system.
Now this can be a very special lighting condition. Back light will make foliage glow brilliantly and just fills the whole scene with pleasant tones. It can also be a bit tricky to expose for. You will typically be looking at a lot of contrast in this situation, so I would typically go with a color negative film that can hand it all. Here’s an example on Kodak Ektar below.

Notice that the sky still holds blue, the aspen trunks appear bright white, and the leaves are still full of color and not blown out. Part of this is due to the magic of films like Ektar but it’s still a good idea to meter very precisely.
Again, you must think about what aspects of the image are the most important to you. How bright do you want certain parts of your image to appear?
In the above example, I knew it was crucial that the aspen trunks appear bright because they are a brilliant white tone in real life. Now I knew this would be a challenge to make them appear white against a backlit blue sky, but I wanted to do my best. Notice that if you compare them to the pure white of this web page, they are actually nowhere near that bright. But that’s ok, they still appear naturally brilliant compared to the rest of the scene. The aspen trunks would become my metering anchor for this exposure and everything else would fall into place naturally.
Since I knew that I wanted the aspen to be brighter than just a middle grey, I metered them for about a half stop of overexposure. This put the foreground shadows about one stop underexposed which was perfect. But as I spot metered the shimmering yellow leaves and the blue sky behind the trunks things got tricky. The leaves in the sky were about two stops overexposed and the sky near the center of the image metered out to be at least 5 stops over.
You can’t use a GND filter in this situation so you just need to have faith in a color negative film like Ektar, it can handle this situation. The overexposed blue will be pale and low on saturation but still very pleasant to they eye.

For this scene I would started with an average metering of the area where the aspen trunks hit the ground and added a half stop or so. Then I would have zoomed in the lens on my “light meter camera” to take closer readings of the aspen, the sky, and the shadows. This works similarly to putting a meter on spot mode but is a little easier than fiddling around with menus in a camera.
The image above gives you an idea of what I would have seen while metering. I still wouldn’t have spent too much time on metering. The average readings give you a good start and a few spot measurements usually reaffirm what I suspect will be a correct exposure. From there, you must trust the film and take the shot.
You can most definitely create some stunning backlit forest images with slide film even though it has a much lower dynamic range. Don’t expect a blue sky behind your trees, so look for different situations where there may be less open sky in the image and you’ll be rewarded with wonderful colors and the rich contrast of slide film. I think Provia can typically handle these situations better than Velvia so keep that in mind.
In this example image below, you can see I chose a scene where most of the bright areas are leaves and not open sky. Unless you underexpose the image excessively, there’s no way you’re going to have blue sky behind a tree like this. However, you can end up with bright and properly exposed leaves so choose a scene where your sky would be filled with foliage. Also notice how the extra contrast of slide film makes the backlit grasses in the foreground really glow.

I would meter a scene like this rather similarly to the last image. Once again, the tree was my critical metering point because I wanted it to look accurate. After that, the bright golden leaves were my second priority because I wanted to keep them from getting overexposed to the point where they disappear into the sky.
For slide film, you’re going to want to keep any important highlight details from being more than two stops overexposed. Some of the brightest leaves are even more than that but that’s ok, this is supposed to be a very bright image. This cottonwood tree trunk is a good bit darker in nature than an aspen, so make sure to expose accordingly.
I spot metered on the tree and set it at a half stop underexposure. From there, I metered around the scene to make sure nothing would be too bright and that everything would fall into place. The shadows in the bottom were a full stop or even more underexposed, but the backlit grassy areas were a great mix of contrast. Don’t worry about the brightest parts of the sky. There’s no saving them, they are going to be pure white.
It doesn’t really get much easier than side light, especially if it’s during the day while the sun is still high up in the sky. Either film type will be just about the same in these conditions, I would most likely make my film choice based on the types of colors I’m going for in this situation, or if there was significantly high contrast I would lean towards negative film.
In the image below, I happened to take an exposure on Ektar and on Provia. They both turned out rather similar in tones and color but I preferred the clouds and light on the Ektar version.

When metering for something like this, I would pretty much just point my light meter at the scene and average meter the whole thing. I added about 1/3rd stop to keep things like the aspen looking properly light, but you can’t go too bright or you’ll lose the deep blue sky. Sure, you could point a meter all around the place and take notes and measurements, but in the end it all just works out nicely. Using the histogram display on the back of my digital camera really helps to make sure that nothing will be too far out with exposure so I didn’t need to check the entire scene. I did give a quick look at the sunlit rocks, but they fell nicely into about a stop brighter than the sunlit aspen so they would appear properly brilliant.
A quick note about polarizing filters. I like to put one on my light meter camera so I know what the exposure should be. If you’re using a handheld meter you’ll need to add the proper amount of exposure for the filter, usually about 1 and 2/3rds of a stop.
This is a very common situation when shooting north or south during sunrise and sunset. While the sun is still below the horizon you will likely have a sky that is full of colors but quite a bit brighter than your foreground.
This is another time to pull out the GND filters. I still consider this condition to be side light, because you’ll notice your subjects glow softly on one side compared to the other. Most of the light is coming from the sky, especially from the clouds that are glowing strongest from the sunrise. This creates soft shadows and colors that spill onto the landscape. I will likely try to use slide film during these special moments to really take advantage of the soft light and bring out the intense colors. This is a great time to pull out some Velvia if you want the strong sunrise hues to shine.
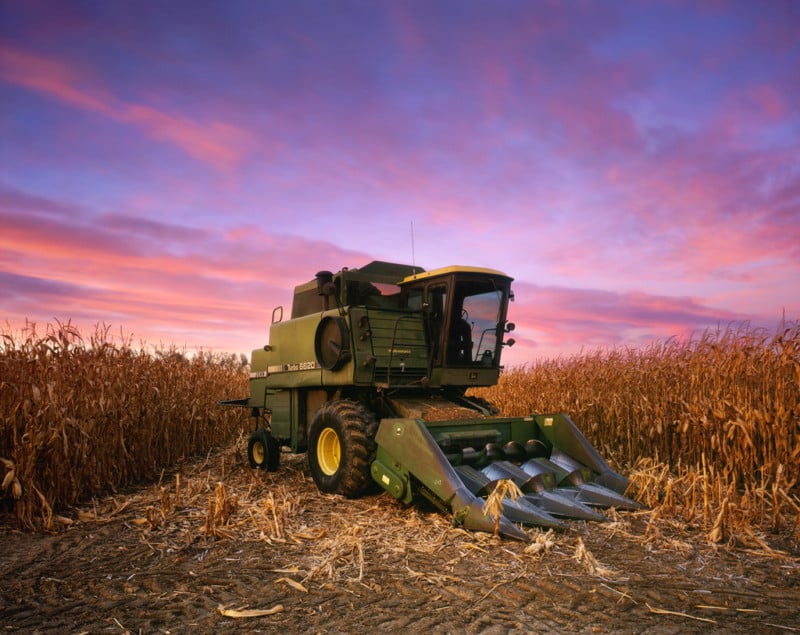
Metering is going to be rather easy for this and similar to my very first section on back lighting. First I will meter the subject and foreground, this will be my exposure. In a scene like the one above, the combine makes a good midtone reading and the dried up late harvest corn should be about 1/3rd overexposed. I will then set my lens to this exposure. Now it’s time to meter the sky.
Quick tip: I’ve found that during sunrise and sunset, the sky is almost always two stops brighter than the ground. In nearly 99% of the times of metered this situations a 2 stop GND filter almost always does the trick. I’ve found that a soft edged GND filter is best because I usually have my subject sticking up into the sky.
Where in the backlit scenes I wanted the sky to appear a whole stop or more overexposed, I may try to avoid that during a side lit sunrise. I try to maintain the maximum color in the sky during these crazy sunsets, so I’ll likely just have it about half a stop overexposed to protect the saturation. Again, if you don’t have any GND filters try the trick I mentioned earlier about dodging a dark item in front of the lens over the sky. Do it, I dare you.
Snow is bright, and you need to make it bright. No matter what kind of light meter you’re using, it doesn’t care that you’re pointing it at snow. It wants it to be a middle-grey which would just look horrible when you’re going for a bight wintry scene. However, snow comes in many flavors especially as the light changes during sunset and twilight so there is some careful things to consider. I’m going to touch the surface on this topic but it may require a blog post of its own.

When the sun is above the horizon, snow should generally look bright white or perhaps with a hint of blue. By bright I mean about a full stop overexposed for slide film, sometimes even more with negative film. If the scene is mostly full of snow and frosted subjects, then metering is typically quite easy and a quick average meter reading set to +1 stop of overexposure will typically do the trick. That’s exactly what I did for the image above.
I love Provia for these types of scenes because it tends to render them a pleasant blue which brings out the winter feel for me. Be careful that it doesn’t get too blue particularly in open shade lighting, I use the daylight white balance setting on my digital camera to check if I need to use a warming filter. Your eyes can fool you when it comes to color.

Snow around sunrise and sunset can be a different challenge. Since it’s so reflective, it tends to pick up all sorts of hues from the colors in the sky along with the blue tones from being in shade. You’ll likely lose some of the reflected colors if you add the full stop of overexposure in these conditions, so I tend to tone it down a bit and only add half a stop.
In these scene above you’ll want to spot meter around the scene a bit. An average reading would likely get you in trouble here because the trees are so dark compared to the snow and sunlit peaks.
My personal preference is to have the pine trees appear dark so the rest of the scene can fall into place. I would have started by metering the snow in the foreground and adding half a stop, then checking the brightest part of the peaks and making that a full stop brighter as they are in sun. With a difference of 3 stops between the foreground snow and the sunlit peaks, I used a two stop GND filter to allow the peaks to be a full stop brighter. Again, I like the extra color and contrast you get from slide film for these types of images. Slides really pick up on the reflected sunlight colors that bathe the snow in unique hues.
I would most likely shoot a snow scene on negative film if it doesn’t have much color but a lot of sunlight and contrast. A scene like this would be all about the subtleties and should overall appear high-key and very brightly exposed. I may even not have any true blacks in the image and even the shadows may be close to a “middle exposure.”
If you look at the image below you’ll see it is incredibly bright, much of the image falls very close to a pure white. This was a very simple scene to meter. I didn’t want to fiddle around with spot metering as I was using Kodak Portra, a film that can handle a ton of contrast so I knew everything would expose. The Portra I was using is ISO 160 speed film, but I always meter it at 100 which is already 2/3rds of a stop overexposed. I think this gives it a very pleasant look that is soft on saturation and has tones that fade into highlights wonderfully. I then added an additional stop exposure to really make sure the snow was bright.
I did not spend more than ten seconds metering this scene, it was a no-brainer and completely easy with average metering.

Almost every time I post a silhouette image I get a question about how I meter for such a scene. Silhouettes are actually incredibly easy to meter for.
First, you need to look for a scene where a shape is jutting up into the sky and said shape is significantly darker than the sky. You don’t need a meter to determine how dark it needs to be, you’re eyes will know right away. I’m talking about dark rocks jutting up into a coastal sunset like the image below. A scene that you can silhouette is going to be very obvious.

As far as metering goes the principle is no different than any other image. You meter the most important part (which in this case is the sky) and decide how bright you want it to be. A sunset is supposed to be bright, but typically a silhouette is all about the color. If you overexpose that sunset by too much you’ll lose some of the saturation so keep it close to a standard exposure.
I usually add about 1/3rd or a half stop to make it a bit brighter while maintaining the deep colors. You typically won’t need a GND filter for silhouettes, but I did use one for the above example because I wanted the sunset to appear equally bright in both the sky and the water. Either way, the rocks are pure black and have no detail whatsoever. The image below shows you how I metered this scene.

I would typically use slide film for a silhouette. The colors are stronger and the dynamic range narrow so you know the rocks will be black. If you decided to use negative film I would meter just the same, but possibly underexpose a tad to make sure the rocks don’t end up with detail and bring some extra color into the sky.
No matter what kind of film you’re using, I’ve found a GND filter to be handy for mountain lake reflections around sunrise and sunset. After metering a lot of reflections, you’ll likely come to the same conclusion I have.
Almost all reflections are two stops darker than than the actual object being reflected. A two stop GND filter works wonders in this situations, but be very careful not to over-filter. If you have a bright sky you may be tempted to use a three stop filter and you’ll quickly end up with an image where the reflection of the mountain is brighter than the mountain itself which will instantly look unnatural. If you want to meter for yourself (which is still a great idea), just average meter the reflection and then average meter the mountain or sky and you should come up with a 2 stop difference.
Be careful not to overexpose your reflections, there are limits with these types of images and you may have to let the vegetation or rocks around the lake appear dark.

These types of scenes are where you can go crazy with making sure everything is perfect! The light typically isn’t changing fast so you’ll be able to play around with your meter and make measurements around the whole scene, really dialing in the key components.
I would typically use slide film in these situations because there won’t be too much contrast without any direct light and the color accuracy is phenomenal.

In this image of bright autumn aspen against a dark boulder, I had lots of metering choices. First of all, it was important that the aspen trunks be brighter than anything else, about one full stop overexposed. After making this measurement, all I had to do was make sure all the other elements fell into place. They did, and they did very well.
The colorful leaves metered out to be about 1/3rd to 2/3rds over which ensured they would be bright and colorful, while the large bulk of the boulder was about 1/2 a stop underexposed which made for a great dark background that really made the leaf colors pop. I was lucky that all the tones fell into place so well, but you’ll often find this is the case with soft light.
Just determine your most critical area and the rest should work well. You would meter this just the same if you decided to use negative film.
I’m just adding this one because I get a lot of questions about night sky star trail exposures. First of all, you’re not going to meter this. Good luck with that. All I can say is that it takes a lot of light to really make a good star trail image.
I’ve found that if there is no moon, just do the exposure for the entire night at f8. Start an hour after sunset and close the shutter an hour before sunrise. Even if the moon will come up halfway through the night, I would recommend giving the exposure another hour with the moonlight unless it will be directly in the lens.
It’s quite hard to overexpose night shots on film so really go for it!

I believe that covers most of the metering challenges I get questions about on a regular basis. If you have any questions or thoughts please leave a comment below! Perhaps I’ll even make another blog post to cover some of these situations in greater detail.
About the author: Alex Burke is a large format landscape photographer from Greeley, Colorado. You can find more of his work on his website, or by following him on Facebook, Instagram, 500px, and Flickr. This post was also published here.

The router is a troubled gadget. Despite its importance, a router is often the most boring device you can usher into your home. The Amplifi solves that by being one of the fastest, easiest to use, and most attractive routers available. But you’ll need $200 to invest in this guy.
The price might seem steep compared to other routers out there. And indeed, if you live in a tiny apartment with clear lines of sight from the router to your computer, the $70 TP-Link TL-WDR3600 might be better. However, most people have at least one dead zone in their home, and most people don’t want another big ugly machine with antennas sprouting out the top that looks like a sharp-angled cockroach.

The router is attractive, with a sleek design in the style favored by the new class of crowdfunded routers flooding the marketplace. Despite the soft-touch plastic and gentle curves of the cube, this guy isn’t from some flashy startup out to “disrupt” the router industry. It’s from Ubiquiti Networks, an enterprise networking company that supplies Wi-Fi gear for corporations and the huge radios that give much of rural America its internet. There’s no crowdfunding, no waiting on supply chains. You just buy the router and enjoy 24/7 support, which I pestered at 2am without incident.
For $200, the Amplifi includes a small, unobtrusive router with a touchscreen which can display either the time, throughput, or IP address, as well as two mesh router extensions that plug directly into the wall and require next to no effort to set up. Surprisingly, the small router, which is free of garish antennas, has fantastic range. It deftly filled spotty holes in my home that my previous router, the Asus RT-AC68U, could never fill and The Wirecutter’s own testing backed up my experience, with the device hitting 20 Mbps on Wirecutter’s most strenuous test, and 150Mbps in general use. The Eero, for comparison’s sake, managed .75 Mbps and 135 Mbps respectively.

Plugging in the mesh points improved that already impressive connectivity further. Without them I could make it to the end of my block, about 100 feet away, and hover between one and two bars of Wi-Fi service on my phone. With the extension, I still had the coveted three bars, and that was through a foot of brick! Our friends at The Wirecutter did notice one issue with the Amplifi—if you’re in a railroad style apartment you may have some issues using the meshpoints, as the router had trouble distinguishing between them when they’re placed in a straight line.
But that’s a solution easily solved with a software patch, and one of many the Amplifi could see this year. The pre-release version of the Amplifi that I tested didn’t have a way to adjust settings on the router via the web. (I’m told that feature will be there when it ships to consumers August 1.) So everything is done on your phone, and setting up and maintaining a router using a mobile app can often be a cruddy slog.

Apart from a few hidden menus that only the power users will want to hunt down, the Amplifi app is easy to use and attractive. It’s got a built-in method of testing speeds and quickly diagnosing issues, and it connects to your phone not just via wi-fi, but also via Bluetooth. That means there are no hang ups when you first set the router up, and you can always access it, even if it stops broadcasting wi-fi.
The Amplifi is an AC router running 2x2 MIMO. That means it runs very fast and works very well with any and all tech you need to connect via wi-fi. However some people use a lot of tech, and they need significantly more bandwidth. So there’s also an Amplifi HD equipped with 3x3 MIMO that goes for $350. How do you know if you need to go up $200 in price? Here’s a rule of thumb—if you have no idea what the difference between 2x2 and 3x3 is, then you do not need the Amplifi HD.

For most people the $200 Amplifi is a perfect router. It’s a little pricier than some of the competitors, but when you factor in the included mesh points, great design, and the excellent tech support, it’s a no-brainer. If you need a new router, this should be at the top of your list. Both the Amplifi and Amplifi HD are available for sale now from their website, with the Amplifi shipping August 1 and the Amplifi HD shipping in September.
[Amplifi]
CORRECTION: The review originally stated the price was $150. It has been updated to note the actual price, $200.

Let’s say you’re new to web design, but you’re intent on learning how to build a site from start to finish. It can be a lot of info to take in, but this interactive tool can at least help get you started with the design.
This is not your standard prepared pimento cheese at the grocery store. This is so much better. It’s fresh and has more complexity than those less ready-made versions. Also called pimiento, pimentos are red cherry peppers, about 3 to 4 inches long and are more succulent, sweet, and aromatic than red bell peppers. Serve this pimento cheese dip with crackers, peppers, carrots, and celery sticks — or even make a grilled cheese sandwich with it.
Make your own crackers, using our Homemade Herb Crackers recipe or our Crispy Rye Crackers recipe.
The following article is from Uncle John’s Factastic Bathroom Reader.
Here’s something to think about next time you open a box of crayons. We take it for granted that the pigments used to color our clothes, dishes, and art supplies are clean and safe— but as these colors of the past reveal, that’s not necessarily so.
 (Image credit: Zubro)
Color: Mummy Brown
Made From: Actual mummies
How Did That Become a Thing? Long before there were art stores, the most reliable source of powdered chemicals of all kinds was the apothecary. Europeans had gotten it into their heads that Egyptian mummies were powerful medicine, and from the 1300s to the early 20th century, ground mummies were prescribed for everything from headaches to gout to epilepsy. Adventurous artists discovered that when mixed with oil paint, powdered flesh from mummies made an excellent light brown color. It was used extensively from the 1700s into the mid-1920s.
True Colors: Despite the belief that mummies were indestructible, it turned out that flesh in paint tended to shrink and crack with time. But the thing that really doomed Mummy Brown was the dwindling supply of mummies. By 1964, it was officially as dead as a pharaoh; an article in Time magazine quoted a representative of a major art supply house as saying, “We may still have a few limbs lying around somewhere, but not enough to make any more paint.”
Color: Chrome Yellow
Made From: Lead chromate
How Did That Become a Thing?In the 1790s, French chemist Nicolas Vauquelin identified a new element in the mineral lead chromate, which had been discovered 35 years earlier in Siberian caves. The new element, dubbed “chromium,” was used to make a rich yellow paint that covered other colors in one coat. It was not only bright— it was also cheap to make, leading it to become a favorite of Vincent van Gogh. Unfortunately, van Gogh had a peculiar habit: he liked to nibble on his paints. In fact, he liked Chrome Yellow so much that he once emptied a tube of it into his mouth. Many of the symptoms of insanity the artist exhibited, including the halos around lights that appeared in his paintings, can be caused or exacerbated by heavy metal poisoning.
True Colors: Unfortunately, Chrome Yellow was not only toxic but also unstable. When exposed to sunlight, it tended to fade and turn brown or green; exposure to sulfur (an ingredient in some paints) hastened that process. In fact, many of van Gogh’s paintings have been affected. Although artists can still buy leaded paints, Chrome Yellow has been largely supplanted by the safer, more permanent Cadmium Yellow.
 (Image credit: H. Zell)
Color: Royal Purple
Made From: Sea snails
How Did That Become a Thing? When Cleopatra became fond of a very expensive purple dye, she started a long tradition. The color was expensive because making it was difficult and unpleasant. You started by crushing the mucus out of 250,000 sea snails (known as the spiny dye murex) and soaking it for weeks in stale urine. Worse, a quarter million snails could make only half an ounce of dye— enough to color a single toga, a piece of tapestry, or a ceremonial flag or two. The stench was so bad that dyers were required to do their work far outside the city walls. The nauseating smell clung to them even after washing; in fact, the Talmud granted an automatic divorce to women whose husbands became dyers. Yet all that trouble and expense —and even the smell— only made it more attractive to those who wanted to show off their money and power.
True Colors: You’d think that overharvesting of that sea snail would kill the dye. It didn’t. Neither did the horrible stench that clung to the fabric. The hue remained a status symbol worn by the royal and the wealthy for many centuries. And it might still be stinking up the place if an 18-year-old chemist named William Perkin hadn’t accidentally invented the first synthetic dye in 1856. The color of Perkin’s dye was a rich purple he called “mauve.” It was also inexpensive, which made it accessible to almost anybody… and that’s what killed Royal Purple.
 (Image credit: Chris Goulet)
Color: Emerald Green/Paris Green
Active Ingredient: Arsenic
How Did That Become a Thing? Until 1775, green paint was commonly made from copper carbonate— the rust you see on copper building trim and the Statue of Liberty. That year Carl Scheele, the brilliant Swedish chemist who discovered chlorine, invented a beautifully bright green pigment from an arsenic compound. He called it Scheele’s Green, and it quickly replaced the older paints. Unfortunately, nobody was yet aware of how poisonous arsenic was, and Scheele —who had a habit of sniffing and tasting his discoveries— succumbed to heavy metal poisoning from exposure to arsenic, mercury, lead, and other chemicals, and he died in 1786. In 1814 a slightly improved version of his recipe became commercially available as Paris Green or Emerald Green. These arsenic-based pigments became popular among artists and manufacturers of cloths, candles, wallpaper, printing ink, and even candies. Of course, in the 1800s, sudden unexplained deaths weren’t unusual, so the Paris Green deaths weren’t immediately recognized. Especially dangerous was its use in wall paint and wallpaper: when moisture degraded the pigment, it released deadly arsine gas. (Napoleon, who died in a bright green room with mildew on the walls, was found to have an unusually high amount of arsenic in his hair and bones.)
True Colors: In the 1890s, Italian authorities became aware of a disturbing trend: more than 1,000 apparently healthy children had died mysteriously in recent years. A chemist investigated their homes and discovered that virtually all of them played in rooms with mildew and Emerald Green wallpaper. Arsine gas, heavier than air, tended to stay close to the floor, where kids sat and played. Countrywide removal of the green wallpaper prevented further deaths.
 (Image credit: Flickr user Sarah Barker)
Color: Uranium Yellow
Active Ingredient: Uranium oxide ore
How Did That Become a Thing? Unlike equally dangerous radium, which was used in paint on clocks and airplane dials because it glowed, uranium ore’s appeal was its bright yellow-orange color. Used in artworks as far back as ancient Roman times, uranium-based pigment is so bright that it almost seems lit from within. Added to glass water pitchers or kids’ marbles, uranium glows with a ghostly translucent yellow or green, and in pottery glazes, a festive yellow or orange. One popular example: Between 1938 and 1943, and then again from 1959 to 1972, the manufacturer of a popular line of ceramic dinnerwear called Fiesta used a glaze that contained trace amounts of uranium oxide pigments in its “Fiesta Red” orange-red plates and bowls.
True Colors: Slowing sales— not fear of radiation— caused the manufacturer to discontinue the entire Fiesta line by 1973, including Fiesta Red. When the line was reintroduced in 1986, new glazes were used that did not contain uranium oxide. But because uranium oxide has a half-life of 4.5 billion years, if you hold a Geiger counter up to a vintage Fiesta Red plate or bowl, the radiation can still be detected. Because of this, the Environmental Protection Agency cautions collectors of vintage orange-red Fiesta ware against using them to serve food or drink, and to dispose of any cracked or broken pieces.
_______________________________
The article above is reprinted with permission from Uncle John’s Factastic Bathroom Reader. The 28th volume of the series is chock-full of fascinating stories and facts, and comes in both the Kindle version and paper with a classy cloth cover.
Since 1988, the Bathroom Reader Institute had published a series of popular books containing irresistible bits of trivia and obscure yet fascinating facts. If you like Neatorama, you'll love the Bathroom Reader Institute's books - go ahead and check 'em out!
Move over Mike’s Hot Honey and Bees Knees Spicy Honey, you can make your own chile-infused honey. It’s only the hottest new condiment, that’s all. Drizzle it over pizza, ribs, chicken, fruit, and even vanilla ice cream.
Your chile-infused honey would be great on this Roasted Pepper and Spicy Sausage Grilled Pizza recipe.

.jpg)
.JPG)