


Job interviews are extremely draining experiences, even moreso if you’re shy, or if you’re introverted and spend a ton of energy just putting yourself out there and trying to sell yourself proactively. There’s no getting around the norms of the interview, but this graphic does offer some tips for people who find it…

Gav and Dan, the Slow-Mo Guys, are always looking for something to film with their high-speed cameras. Something that people will find interesting, but more important, things that will look good in a video. Explosions? Yeah! Pretty colors? Yeah! So they gathered bags of paint powder and vehicle airbag devices and headed out to a quarry, far from anyone who would be bothered.
They do it three times! That must've cost a fortune in airbags. The result is not as educational as some of the other videos they'd done, but it sure is pretty! -via Laughing Squid
See more from the Slow Mo Guys.

Keep your hands free and your eyes on the trail with these capable headlamps. You'll never use a flashlight again.
...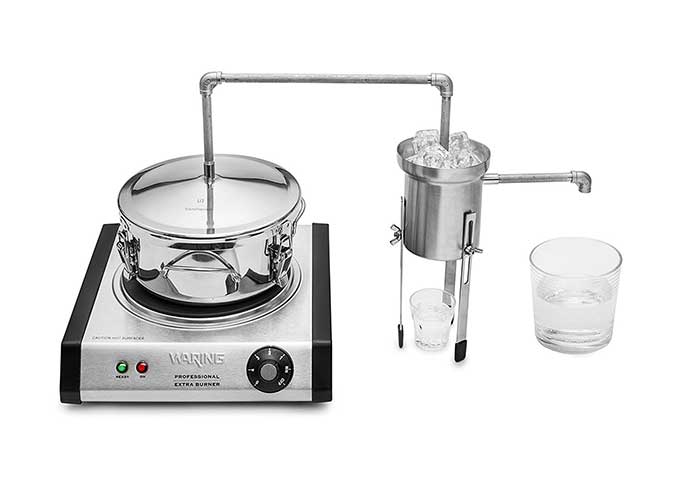
A couple of years ago, I spent a very enjoyable summer visiting local craft distilleries and tasting their yummy concoctions. It made me want to try my own hand at distilling. I was happy to stumbled upon the EasyStill here on Cool Tools and it has been a lot of fun.
But about a year ago, I found another alcohol still called TableTopStill, and I think it’s even better than EasyStill. Now don’t get me wrong. EasyStill works well: it distills alcohol and it is easy to use. But the problem is that it doesn’t really give the experience of craft distilling. Distilling involves slowly heating a low alcohol content solution (called mash) so that the alcohol vapors boil off. And then you cool those alcohol vapors back into liquid alcohol, resulting in a much higher alcohol content.
With craft distilling there is always a separate boiling pot to heat up the mash and a separate cooling mechanism to cool down the resulting hard alcohol vapors. With the EasyStill, the heating and cooling are all contained in one unit. You just flip a switch and don’t have any control over it. Kind of like plugging in a Mr. Coffee maker. The TableTopStill gives more of the experience of craft distilling because it separates out the heating and cooling functions. It uses a boiling pot to heat up the mash and a separate cooling pot to cool down the vapors. Similar to the way they do with at any traditional craft distillery.
There are many alcohol stills on the market that do the same — i.e., separate the boiling and cooling functions. (Simply Google “moonshine still” or “alcohol still” to see a huge array for sale.) But all of them require some sort of complicated running water hookup. You have to find a coupling to hook up to your faucet. Or you have to use a pump mechanism for the running water. That’s a big hassle and takes a lot of extra time to set up and run. This is where TableTopStill is so nifty — the cooling pot takes ice cubes straight from your kitchen freezer. No need to use a separate pump or find a coupling for your faucet. I can get the experience of craft distilling without the hassle and pain of the typical alcohol still that needs running water.
For some people, a downside will be that TableTopStill is small. The boiling pot has a ½ gallon capacity which produces about 6 to 7 ounces of hard liquor. (Perhaps 50% or 60% alcohol.) For me that works out fine — it’s perfect for a few drinks with friends. But if you want to produce a lot more than that, you should look at larger stills on the market. However, keep in mind that distilling is an inherently slow process. So the upside of TableTopStill’s small capacity is that the distillation run is quite short — a run takes about 45 minutes. If you had a large capacity alcohol still it would take correspondingly longer. For example, a distillation run with a five gallon still would take about 7.5 to 8 hours. With TableTopStill, I’ve gotten a great feel for what craft distilling is all about. But without the hassle and trouble of running water hookups required by other stills and without a huge time commitment. I just open my freezer, take out my ice cube trays, and I’m ready to make some liquor. 45 minutes later I have a nice batch.
[The hot plate in the photo is not included.]
-- Josh Richardson
Stainless Steel Alcohol / Moonshine Still ($250)
Available from Amazon

Amazon Warehouse Deals is a division of Amazon that liquidates all of their open-box and ding-and-dent inventory. You can often find them under the “Used & new” link on a product page. But if you want to search only their inventory, go to the Warehouse Deals home page. I have gotten some amazing deals through them, including an open-box AV receiver for 50% off new price, and open-box Apple MagSafe (original) MacBook power adapters for less than $10. More typically you can get something for 10-20% off just for having damaged or missing packaging, and up to 40% for cosmetic flaws. I’d say about one third of my Amazon purchases these days are from Warehouse Deals.
-- Dave Cortright
Amazon Warehouse Deals
Available from Amazon

Browser trick:
If you type something in the URL bar and then press control + enter, whatever you type will be surrounded by www. and .com. — MF
Changing your mind:
You are only as young as the last time you changed your mind. Cass Sunstein compiled 10 great books. Here are 5 books to change liberal minds. And 5 books to change conservative minds. Read and see if you can change your mind. — KK
Followable:
At My Morning Routine, you can search the morning routines of 215+ interesting and successful people by profession, age, wake-up time and more. Their stats page has some interesting insights and is updated weekly (like 66% of those interviewed wake up and meditate, and the majority of them prefer to drink water before coffee and eat fruit for breakfast). — CD
Security:
For internet security pay extremely close attention to the url bar in your browser. For just reading it’s not so important, but if it is a site that you want to log into with a password you should see a green lock icon before the url in Chrome, and the phrase “https” should also be in green. There’s a gray lock in Safari. Firefox, and IE. No lock? Beware. If you click on the lock in your browser it gives you security details about that site. — KK
Compatibility:
Google Keep on iPhone (Free) makes it painless for me and my Android partner to stay synced-up on shopping lists and reminders. Also useful is Emojipedia, so I can make sure the emojis I’m sending aren’t lost in translation. — CD
Deal:
I’m a very happy Amazon Prime customer. The free shipping and other benefits make the $99 annual fee well worth it. I also have the Amazon Prime Rewards Visa Signature Card, which I use to make all my purchases on Amazon, because you get 5% on every purchase you make on the site. Amazon is offering a $70 Amazon.com Gift Card instantly upon credit card approval when you apply for a card. — MF
Get the Recomendo weekly newsletter a week early by email.
-- Kevin Kelly, Mark Frauenfelder, Claudia Dawson
For some photographers, filters seem redundant in a digital age. Because everything can be simulated with Photoshop, right? Not exactly. Properly used, filters protect your lens, produce some masterfully cool effects, adapt to unsavory conditions, and help manage light. Take a look at these five filters to help build your accessory arsenal.

Just like polarized sunglasses help reduce glare for your eyes, a polarizing filter reduces reflections and glare for your lens. Sunlight naturally polarizes from electrons reflecting off of air molecules, but a polarizing filter absorbs that polarized light to prevent photographs from appearing ‘hazy.’ As a result, these filters are great for sunny day outdoor photography.

UV filters are another great option for super sunny days. They block annoying UV light that creates a blue-ish tint in photographs taken in bright conditions. This is especially crucial for film cameras, but much less for digital. There is some evidence that UV lenses are still worth using with your DSLR because they also reduce the purple fringing caused by longitudinal chromatic aberration. You can also use UV filters for simple lens protection.

Neutral Density Filters are great for landscape photography and water. They prevent light from reaching your sensor, which lets you slow the shutter speed down slightly, or use a wider aperture than you would usually. This is great for capturing subtle movements like water flowing over rocks because it creates a slight blur for a silky look.

Graduated neutral density filters come in two types: hard and soft. Both feature dark glass at the top of the filter and clear glass at the bottom. Hard filters mark a sharp contrast, while soft filters transition softly between extremes. They’re useful for balancing the very bright sky against the less bright earth in horizon shots like sunrises or sunsets. You may need to fine tune your shot to ensure that the dark glass doesn’t accidentally cover the top of the earth as well, but if you can get it right, then the effects are beautiful.

Okay, cards on the table: warming and cooling filters are almost totally irrelevant in a digital age. If you’re still in love with film, then they’re a lot of fun - but in the same way that an antique typewriter is ‘fun.’ Warming and cooling effects let you change your camera’s white balance to correct or add an unrealistic color contrast. Today, we call this Instagram.
There are certainly valid reasons to avoid filters. As with any additional layer of glass over your lens, filters may unintentionally reduce image quality. If you stack too many on top of one another, it creates an opaque edge around the photo. However, filters are also a really great way to adapt the unnatural eye of your camera to the natural world. Experiment! You may find a filter or two that works for you.
Focus Camera is an online retailer specializing in camera gear and electronics. With over fifty years experience, Focus is committed to helping the next generation of artists reach their fullest potential with helpful guides, videos, and more. To read more from Focus, visit their blog.

Portrait photography is perhaps one of the most rewarding types of photography.
It’s fun, too. Certainly more fun than reading the camera’s owner’s manual!
Don’t get me wrong...reading your camera’s owner’s manual is one of the very first things you should do.
It’s boring, sure. BUT, by familiarizing yourself with all your camera’s bells and whistles you’ll be in a much better position to create portraits that leave people’s jaws dropped open.
But, there’s more to creating those kinds of portraits than simply brushing up on what all the camera’s buttons do.
That’s not to say that creating a gorgeous portrait is something that only professional photographers can do, though.
Quite the contrary, it’s a matter of mastering the appropriate set of skills, which is something virtually anyone can do.
Just imagine if you could create a portrait like the featured image of this article. That would be amazing, right?!
Well, with these five steps in mind, you will be well on your way to mastering portraiture - it just takes some time and practice.
Let’s get started!

One thing that gets photographers of all skill levels and abilities off track is concentrating too much on the “right” camera settings to use to take a portrait.
Though you certainly need to work with the appropriate camera settings to get a good exposure, there is no hard and fast rule that says you have to shoot in manual mode with a specific aperture, shutter speed, and ISO.
In the end, your creativity is what will shift a portrait from the realm of being good to the realm of being great, and sometimes that means casting the suggested camera settings aside and going with your gut.
Something you can do to facilitate your creativity while keeping a handle on the camera settings is to shoot in aperture priority mode and exposure compensation. If you aren’t sure what those means, give the video above a quick view. In it, Jana Williams gives us a few pointers for using this all-important setting to our advantage.
Basically, aperture priority means you pick the aperture and ISO, and the camera picks a shutter speed to match. By taking some control for yourself and giving up other control the camera, you have more time to focus on things like composition and framing because you have less technical stuff to worry about.
The beauty of aperture priority mode is that you can adjust the aperture to change the depth of field, if desired, and the camera will adjust the shutter speed accordingly. There will be times, though, when the shutter speed needed is just too slow. In those cases, use exposure compensation to correct the problem.

Composition is one of the most fundamental aspects of any photo, and a portrait is no exception. After all, a strong and unique composition will enhance the photo and help bring the viewer’s attention to the subject of the portrait. Conversely, poor composition can do the opposite and result in a photo that totally falls flat.
Though there are plenty of compositional elements to bear in mind, two have added importance: depth and framing.
When speaking of depth, this is what I mean: an image is a two-dimensional representation of a three-dimensional space. Your challenge is to figure out ways to give that two-dimensional photo a greater feeling of depth.
But how?
One way is to use a shallow depth of field to blur the background, as was done in the image above. Doing so accomplishes a couple of things, namely, it helps make the subject the center of attention and it helps negate anything that’s distracting or off-putting about the background.
Just open up the aperture to minimize depth of field (remembering to adjust shutter speed and ISO to maintain a good exposure), reduce the distance between you and the subject, and enjoy a nice, blurry background.

Another option that’s helpful for improving depth in your photos is to frame your subject. Using a frame within a frame is a topic we’ve discussed at length in other articles. But, in short, not only does a frame within the frame direct the eye toward the primary subject, but it also gives you an opportunity to introduce a greater level of depth.
In the image above, notice how the vertical columns serve to restrict our eye from wandering around in the image. What’s more, the repeating nature of the columns gives this image a greater sense of depth. As a result, the portrait looks more like a three-dimensional representation of the scene than a flat, two-dimensional space.
Posing is perhaps one of the most difficult aspects of portraiture to master.
There are plenty of reasons for this, but primary among them is that something as simple as the angle of head tilt or the placement of a subject’s hands can elevate the photo or cause a huge distraction.
There are a lot of things you can do regarding posing to improve the overall impression of the shot:
For additional posing tips, check out the video above in which portrait photographer Julia Kelleher offers her advice for photographing families, couples, and newborns. Though the techniques are presented specifically for these groups, there are plenty of great tips that are applicable to all kinds of portraiture.
Another aspect of posing that’s integral to the success of your images is the facial expression of the subject.
The problem with a lot of unsuccessful portraits is that the subject simply doesn’t have a genuine, honest expression on their face. Things like forced smiles and squinty eyes quickly reduce the value of the shot and make it difficult for viewers to connect with the subject in a real way.

A great way to get more genuine portraits is to focus your attention on candid shots. Here, candid doesn’t necessarily mean silly, but instead means unposed in an environmental or documentary portraiture kind of way.
In looking at the image above, we see several rules of thumb for candid shots:
As a consequence of the features listed above, the posing then becomes much more natural. There’s no real direction needed here - just give the kids some fruit to eat and the scene unfolds naturally.

It goes without saying that the success or failure of your portrait also rests on the lighting used to create the portrait.
For many photographers, using natural lighting for portraits is the number one way to go. But, because you’re at the mercy of the sun, it takes some added time, effort, and patience to master the art of natural light portraiture.
For starters, don’t fall into the trap that the light has to fall directly on your subject’s face. Instead, move around to determine the best light for the portrait you wish to take.
In fact, try this: position your model, then rotate 360-degrees around them as you view them through your viewfinder to determine which direction of light is the most pleasing.
Using the image above as an example, note how placing the sun over the model’s shoulder results in a wonderful glow that accentuates her red hair. The result is a portrait with tons of visual appeal that also highlights the uniqueness of her red hair. Now imagine the same photo had the sun illuminated the model’s face directly. It doesn’t seem as impactful, does it?
It’s also necessary to consider the time of day that you’re taking the portrait, assuming you’re photographing the model outdoors. Mid-day light is very direct and harsh, which can be troublesome for portraits due to the harsh shadows.
Shooting during Golden Hour, however, can result in a much more pleasing photo because the light is soft, diffuse, and has a warm color temperature that complements most skin tones.
That said, if you wait until Golden Hour, there are opportunities to take advantage of direct sun on the model’s face and even backlit portraits. In the video above, Jessica Kobeissi gives us an overview of using these and other lighting techniques for portraits during Golden Hour.

When people hear the word “portrait” they likely think of a picture of a person’s face.
Yet, our faces aren’t the only things about us that can be used to convey emotions, moods, or who we are as a person.
Take the image above as a prime example of this concept. The man’s face is obscured from the photo, but his outstretched hand says it all. He’s in need, and has had a rough go of it judging from the dirty and unkempt nature of his fingernails.
Those details make the shot. His face needn’t even be visible because of all the details we can see in his hand.
There are other ways to create faceless portraits. Highlight a person’s feet. Give them a prop to hold. Focus on a documentary or environmental portrait so you can highlight the surroundings the person finds themselves in.
In short, it’s that creativity, the desire to make something new and interesting that will have an enormous impact on the portraits you create. The technical stuff is important too, and with time, you’ll master things like camera settings and what lens is best to use. In the meantime, work on some of these creative aspects of portraiture and watch as your images begin to change for the better!

Looking for a new camera?
As I’m sure you’ve discovered, there are a lot of cameras on the market today.
And by a lot, I mean A LOT.
That being said, it can be tough to know what camera might be best for you let alone where to even start looking.
That’s where this list comes in.
Within the domain of entry-level cameras, there is a group of cameras that provides you with advanced controls, like manual adjustments of aperture, shutter speed and ISO, without as many bells and whistles as professional cameras.
These entry-level models also come at a much cheaper price, making them attractive for folks like you that want a solid camera that they can grow into.
If you need a place to start your search for a powerful, yet relatively inexpensive camera, this is it! Below, you’ll find 12 of the best entry-level models broken down by manufacturer.

The first entry-level model from Nikon you might consider is the D3400. With a 24.2-megapixel APS-C CMOS sensor, it has a larger sensor than many of the comparable Canon models listed below. With EXPEED 4 processing, the camera has good, quick performance for a beginner’s camera as well.
That processing power enables shooters to take photos at 5fps, which is pretty quick for an entry-level camera. Low-light shooting capabilities are solid as well, with an expanded range to ISO 25600. You can also create full HD videos at 1080p.
The 11-point autofocus system works well for most applications, though like many entry-level cameras, it won’t be something you’d want to use if your subjects will be engaged in fast-moving action.
A unique feature for a camera at this price point is the absence of an optical low-pass filter. Without it, the D3400 produces images that have improved sharpness and resolution, which is a benefit that any photographer will appreciate. Chris Winter gives an overview of other unique features of the D3400 in the video above.
On back is a 3-inch 921k-dot LCD for viewing your photos and shooting in live view. It’s not the most robust display, but is certainly more than adequate for beginning photographers. Other features beginners will appreciate is Bluetooth connectivity to transfer photos from the camera to another device and a Guide Mode that walks you through the different features of the D3400.
This model can be found for under $500, and that includes an 18-55mm kit lens.
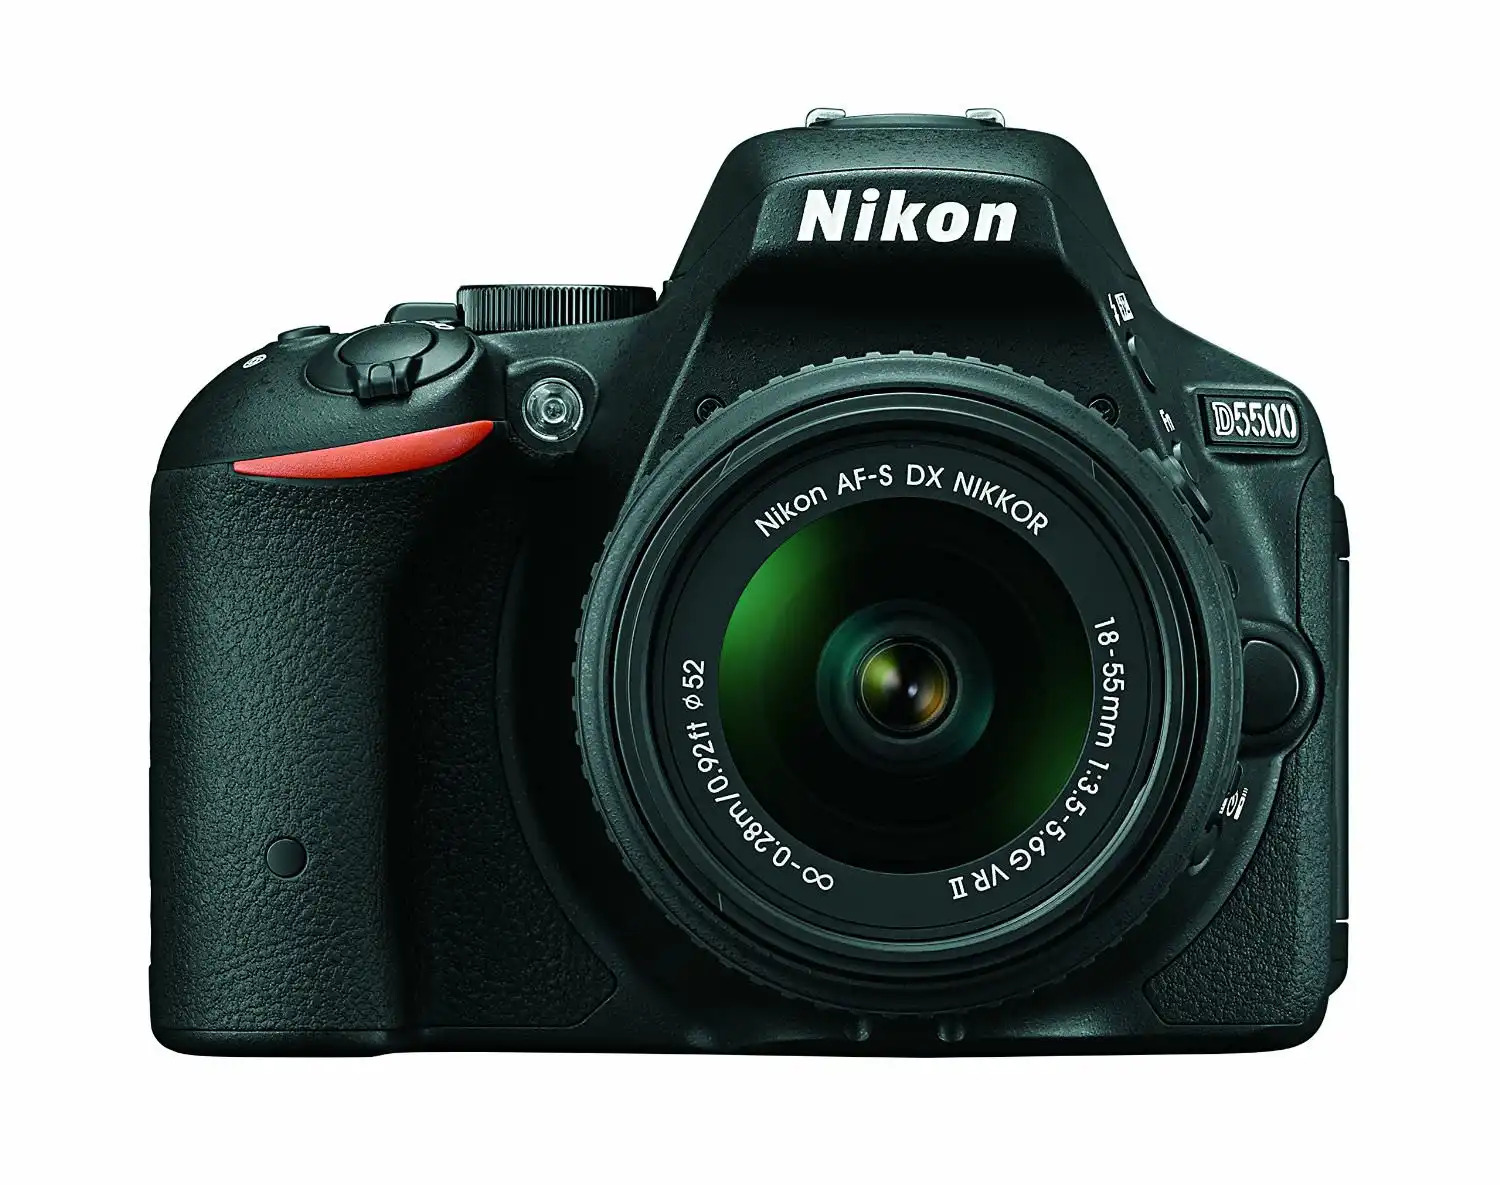
A step up from the D3400, the Nikon D5500 has a more robust set of features that make it a more functional option for some photographers.
The D5500 shares the same 24.2-megapixel APS-C CMOS sensor and EXPEED 4 processor with the D3400. The 5fps continuous shooting and HD video capabilities remain the same as well.
However, where the D5500 sets itself apart from the D3400 is in the improved 39-point autofocus system, which has nine cross-type sensors. That makes the D5500 a better option for shooting subjects on the move.
Also improved is the 3.2-inch 1.04m-dot touchscreen LCD, which articulates for improved viewing. This camera also incorporates Wi-Fi for expanded image sharing possibilities. Get a hands-on review of these and other features in the video above from DigitalRev TV.
Those added features come at a price, though. Where the D3400 is less than $500, the D5500 with a kit lens is in the $700 range.
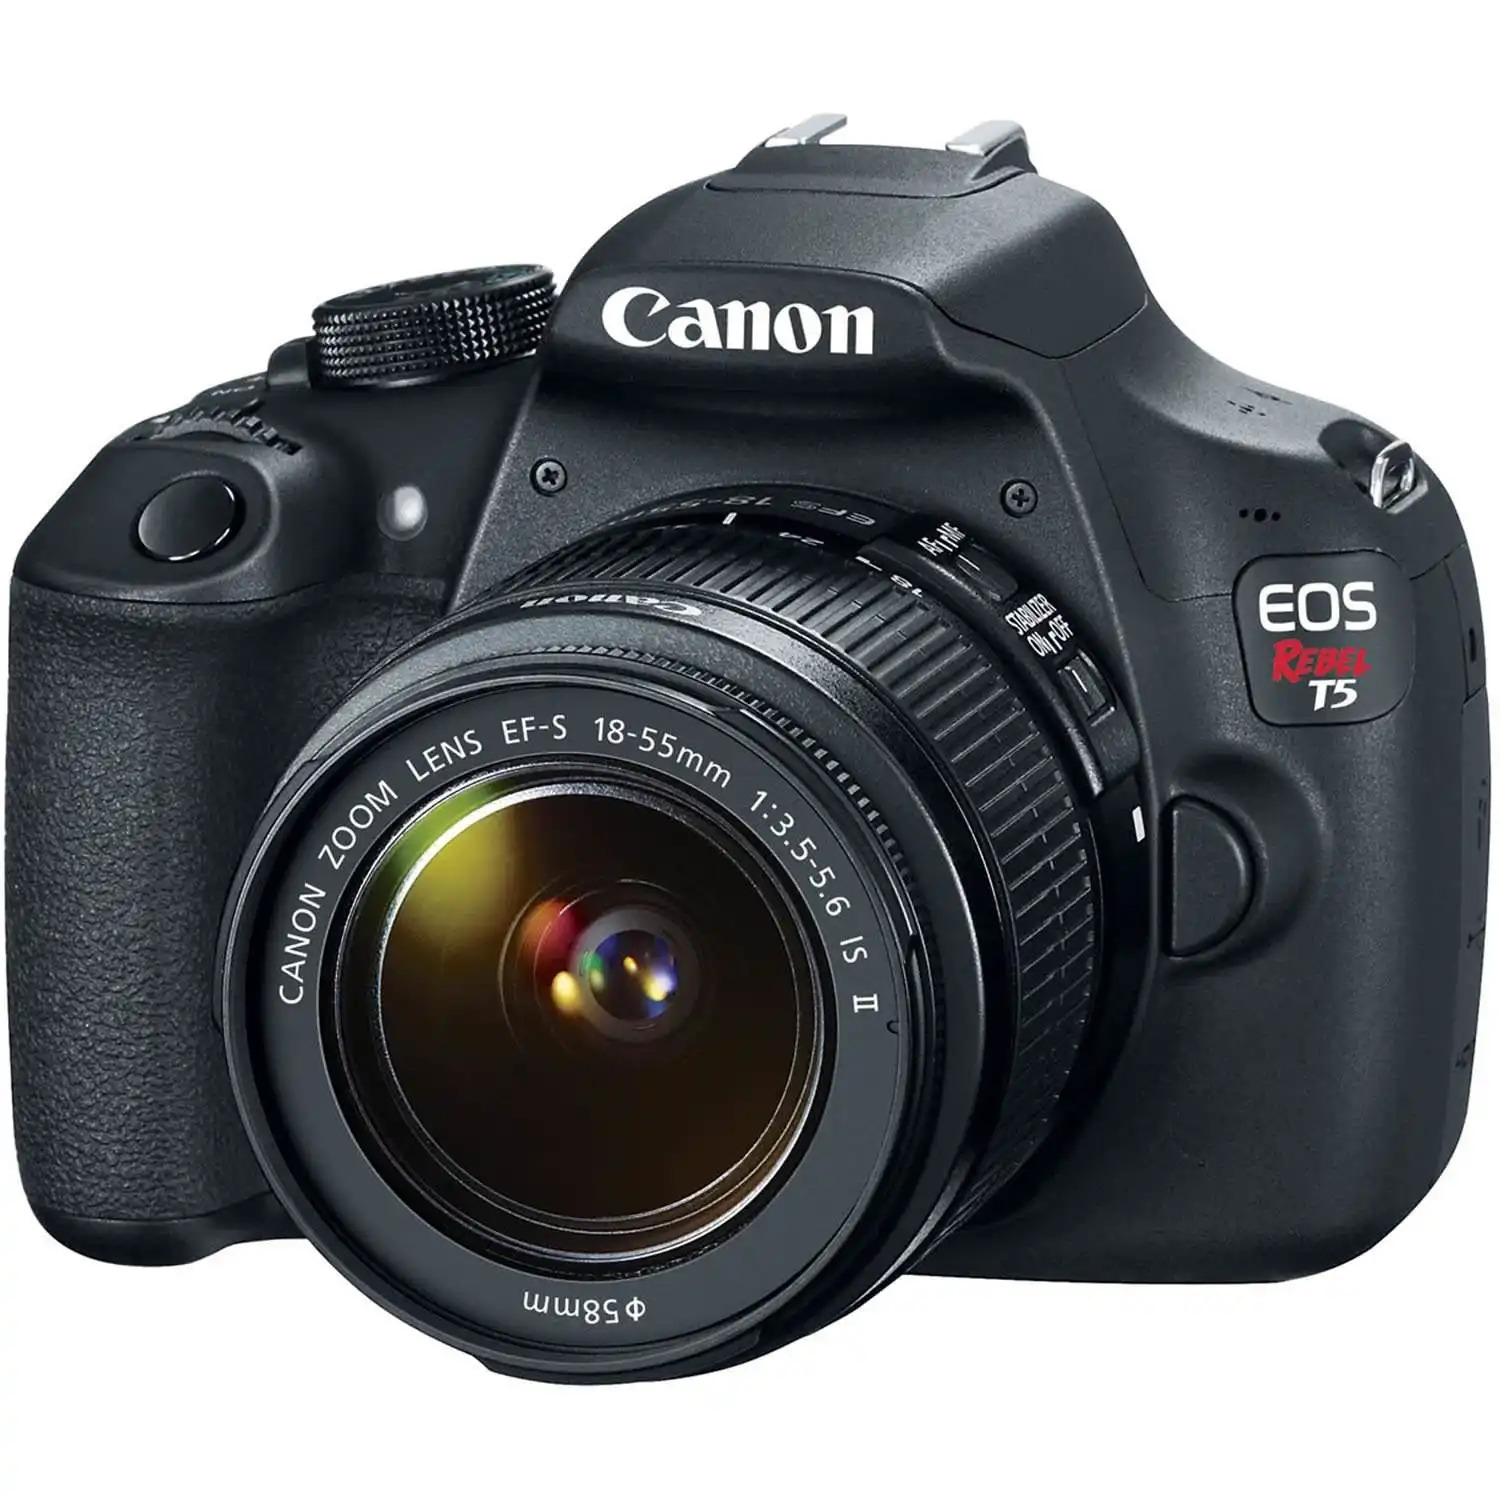
The Rebel T5 has excellent imaging options for a beginner. Equipped with an 18-megapixel APS-C CMOS sensor, it doesn’t have the resolution of higher-end cameras, but it’s still plenty to get quality images. The DIGIC 4 processor allows for quick processing speed as well as full HD 1080p video recording.
With a possible continuous shooting speed of 3fps, this camera isn’t going to be ideal for shooting sports, wildlife, or other fast-moving subjects, but for traditional images like portraits or landscapes, it’ll do the trick. The expanded ISO range reaches to 12800, giving you solid options for shooting in low light situations.
On back is a 3-inch 460k-dot LCD that pulls triple duty as a way to shoot in live view, review your images, and make menu selections. There’s even a Feature Guide that will help you work your way through the different functions and modes of the camera. That’s not a bad package for under $400, which includes a lens!
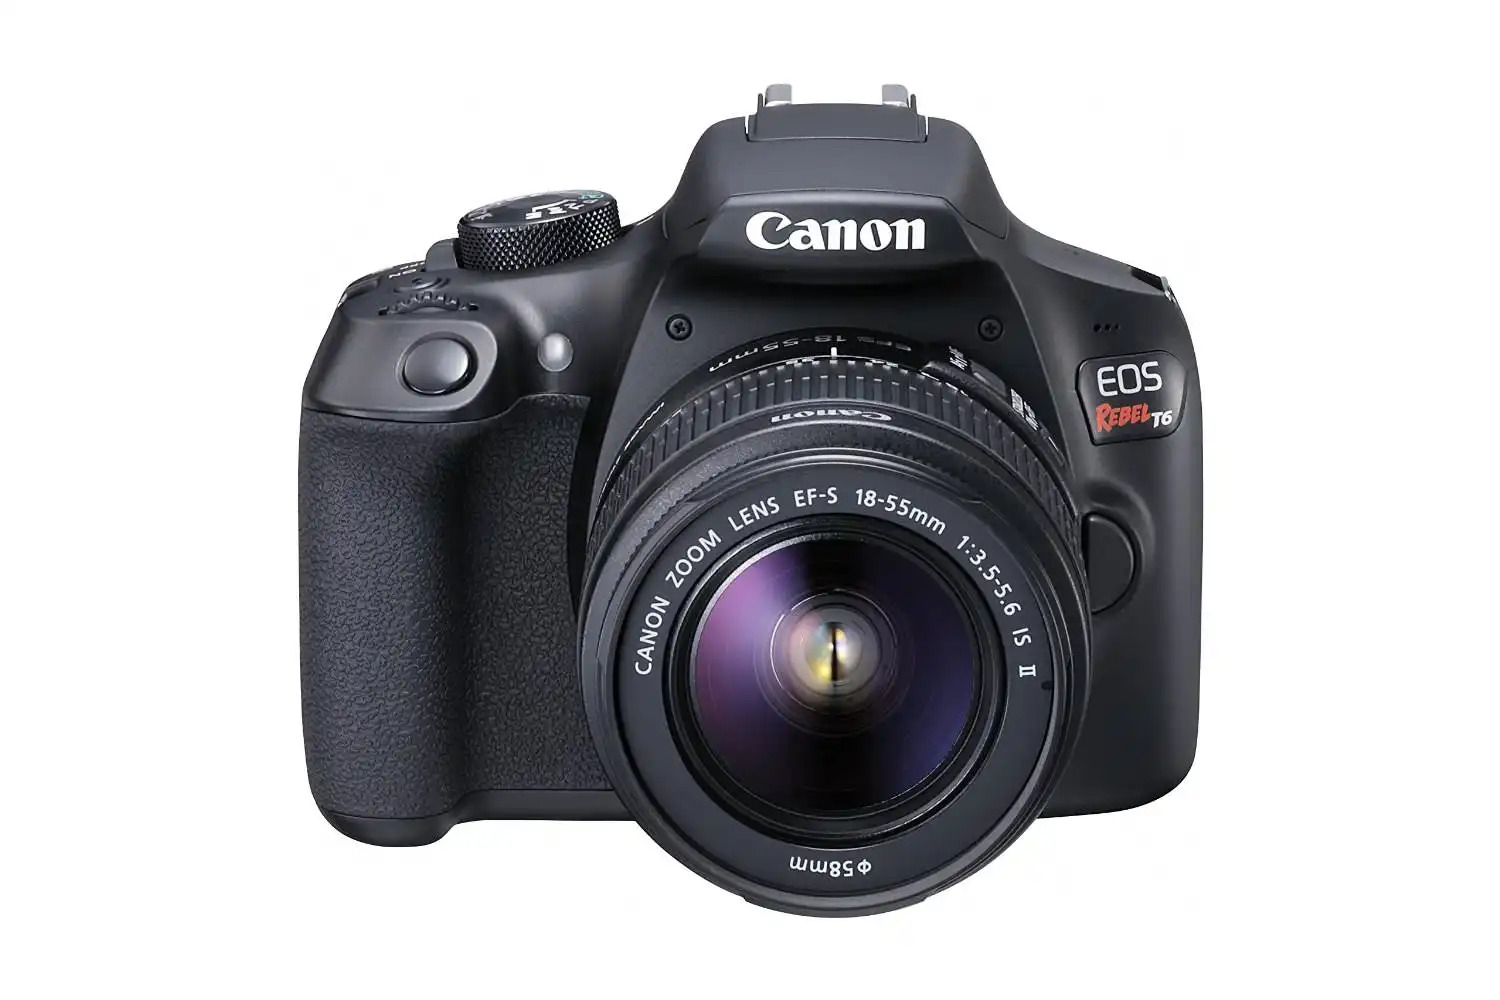
A step up from the Rebel T5 is the EOS Rebel T6. Though the T6 shares many of the same components as the T5, it has improved features that make it a more attractive camera for beginners that want a bit more functionality.
The T6 comes with a DIGIC 4+ processor, which provides faster performance over the DIGIC 4 found in the T5. Additionally, the Rebel T6 has an improved 3-inch LCD screen with 920k-dot resolution for an improved visual experience when shooting in live view or reviewing the shots you’ve already taken.
The T6 also sports modern technologies like built-in Wi-Fi and NFC, which allows you to share photos and videos wirelessly. That also means that you can control the camera with a compatible smartphone, making it easy to fire the shutter, start and stop movies, and so forth, all without having to even touch the camera.
Perhaps the best part is that the T6 is priced aggressively just above the T5. Despite having more robust features, you can find a Rebel T6 with a kit lens for about $450.
If you have trouble deciding which of these cameras to get, check out the video below in which TbonesTech offers a quick side-by-side comparison between the Rebel T5 and Rebel T6:
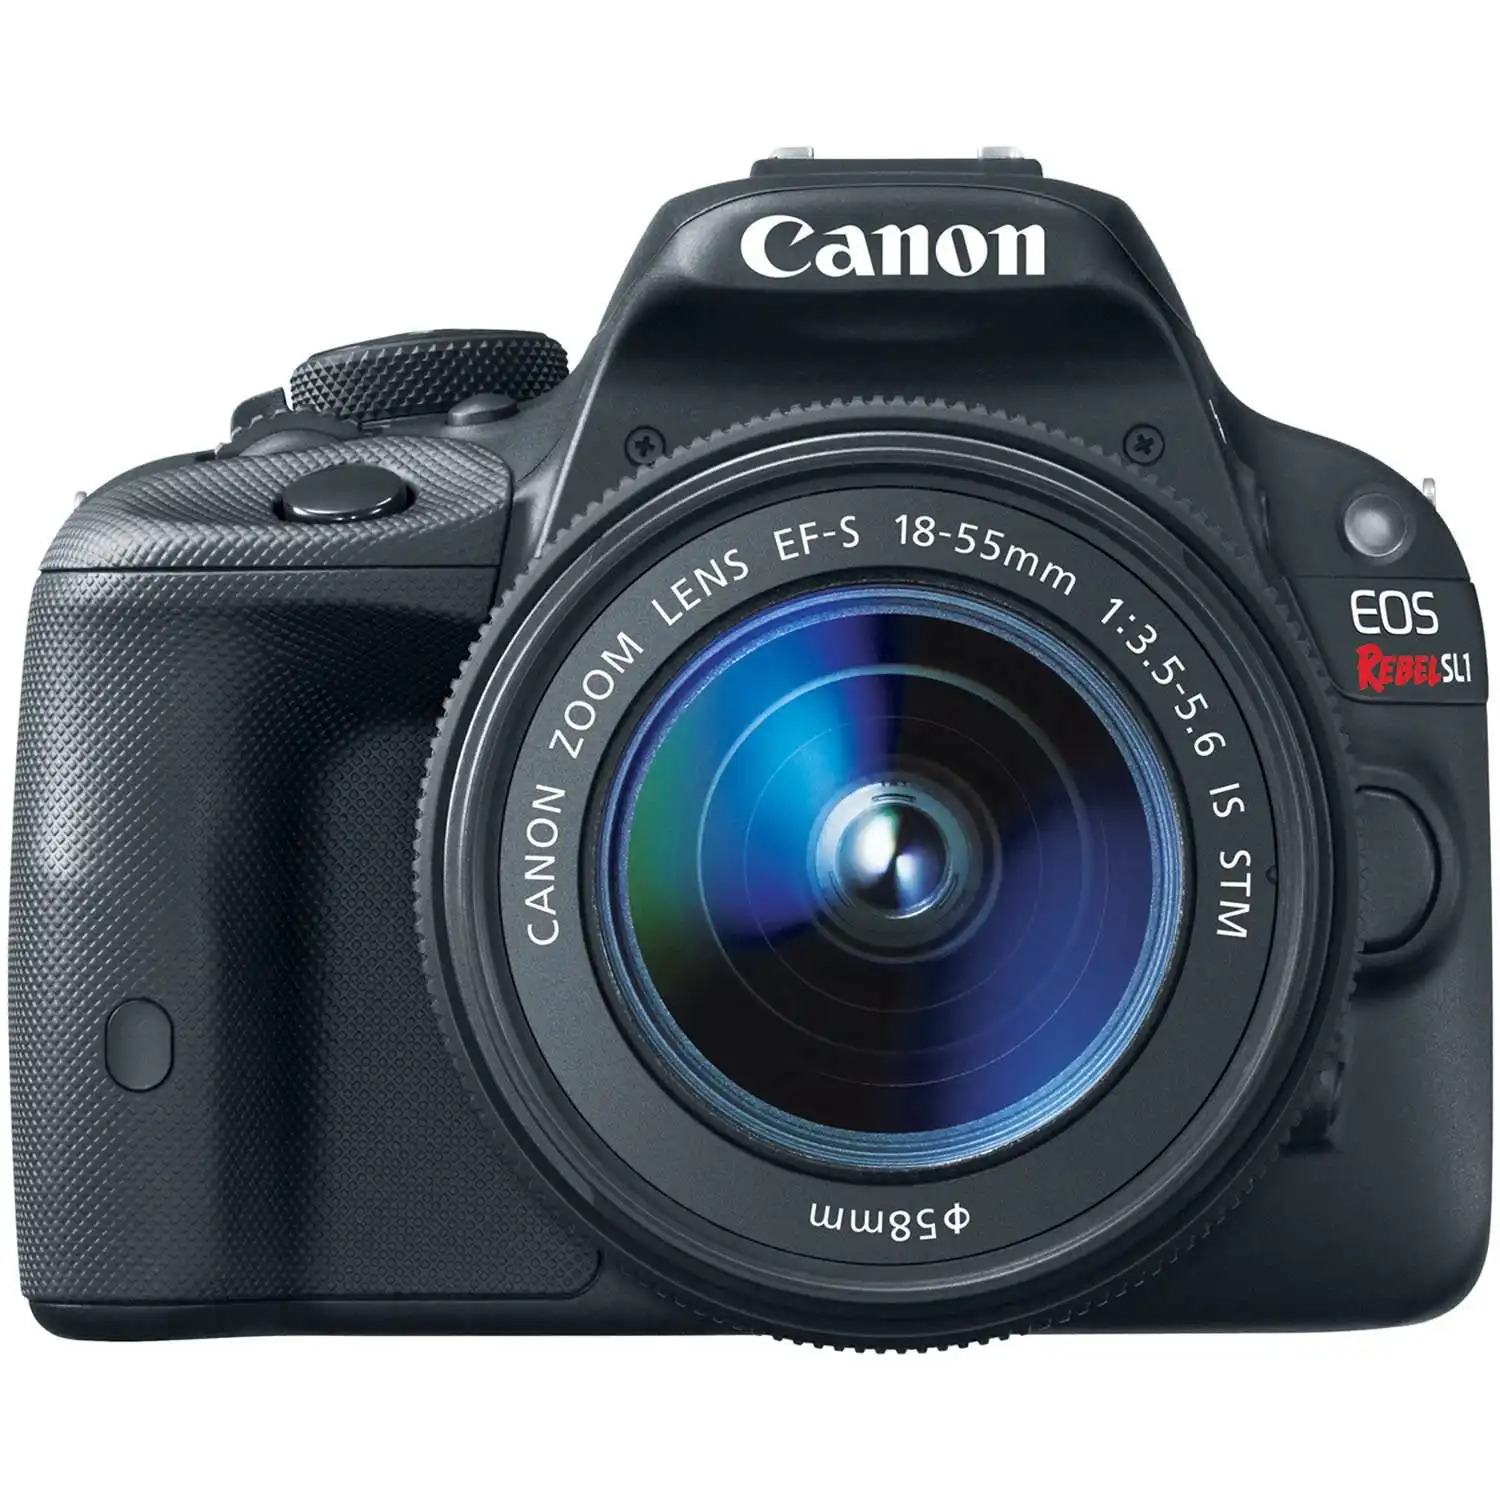
Yet another step up in the Canon line of entry-level cameras is the Rebel SL1.
Like the first two models, the SL1 sports the same 18-megapixel APS-C CMOS sensor, expanded ISO range of 12800, and HD video shooting at 1080p.
However, the SL1 is paired with a DIGIC 5 processor, giving it improved performance over the Rebel T5 and Rebel T6. That includes improved continuous shooting at 4fps, and with a 9-point autofocus system with central dual cross points, it has better performance when tracking moving subjects.
Another benefit of the SL1’s autofocus system is that it is hybrid, meaning when you record video or use live view, the system uses phase-detect and contrast-detect focusing to give you much-improved focusing and speed of focus over the previous two Canon models reviewed above.
The SL1 also has an improved LCD - a 3-inch Clear View II with 1.04m dots of resolution. The screen is touch-enabled as well, making it a more convenient and intuitive way to navigate through menu systems. Get a look at the LCD and other features of the SL1 in the video above from AdoramaTV.
Lastly, the SL1 is one of the most petite DSLRs on the market today. It weighs in at just 13 ounces and is less than 5 inches wide. That means it’s a camera that you can easily carry with you just about everywhere you go.
Even with these expanded features, the SL1 can be purchased with a kit lens for under $500.
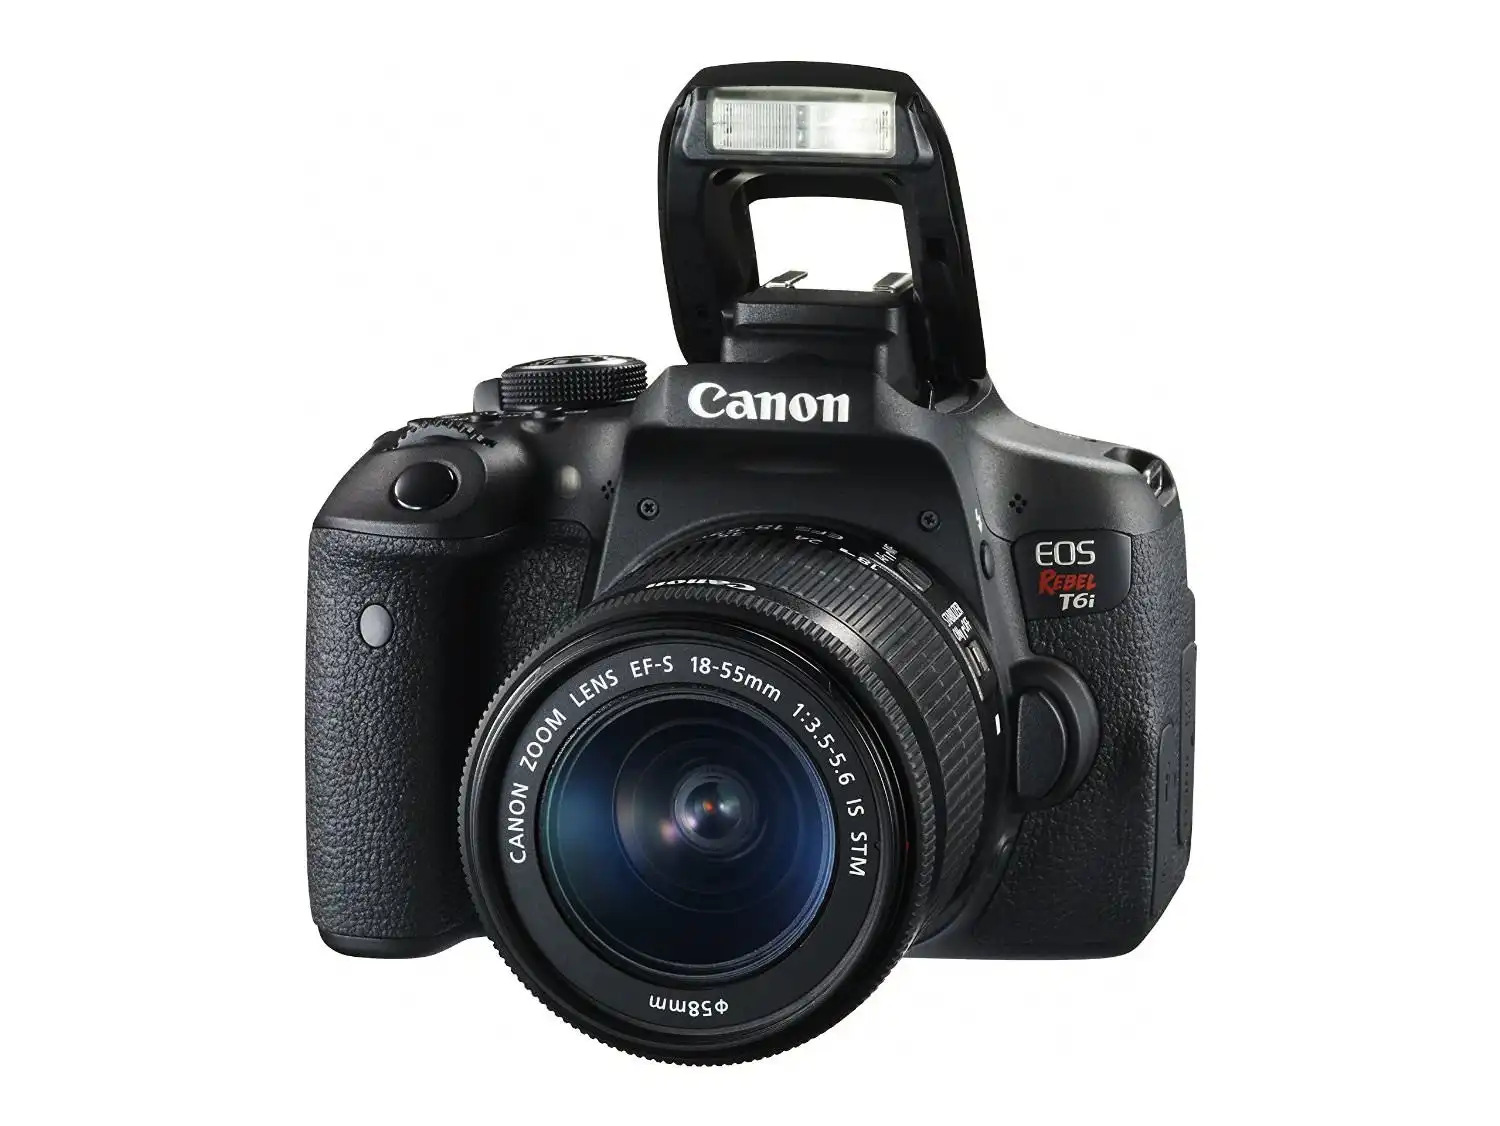
If you want even more features available to you that will help you learn and grow (without outgrowing your camera) you might consider the EOS Rebel T6i.
Though the T6i looks a lot like the previous Rebel models, it comes with a much larger set of features that is more on par with enthusiast photography, but without being so complicated that it would cause a beginner to throw their hands up in the air in confusion.
The T6i has an improved 24.2-megapixel APS-C CMOS sensor with DIGIC 6 processing. That means not only higher resolution images, but the fastest performance of any of the Rebel cameras reviewed thus far. It also sports a vari-angle 1.04m-dot touchscreen, which folds out and articulates for improved viewing.
Additionally, the T6i has 5fps continuous shooting, an expanded ISO up to 25600 for better low-light shooting, and a 19-point autofocus system that has the hybrid performance of the SL1. Get a broad overview of this and other features of the T6i in the video above by ArtoftheImage.
Because the T6i has a bigger slate of features, it also has a bigger price. You can purchase a bundle with the camera and a kit lens for around $750.
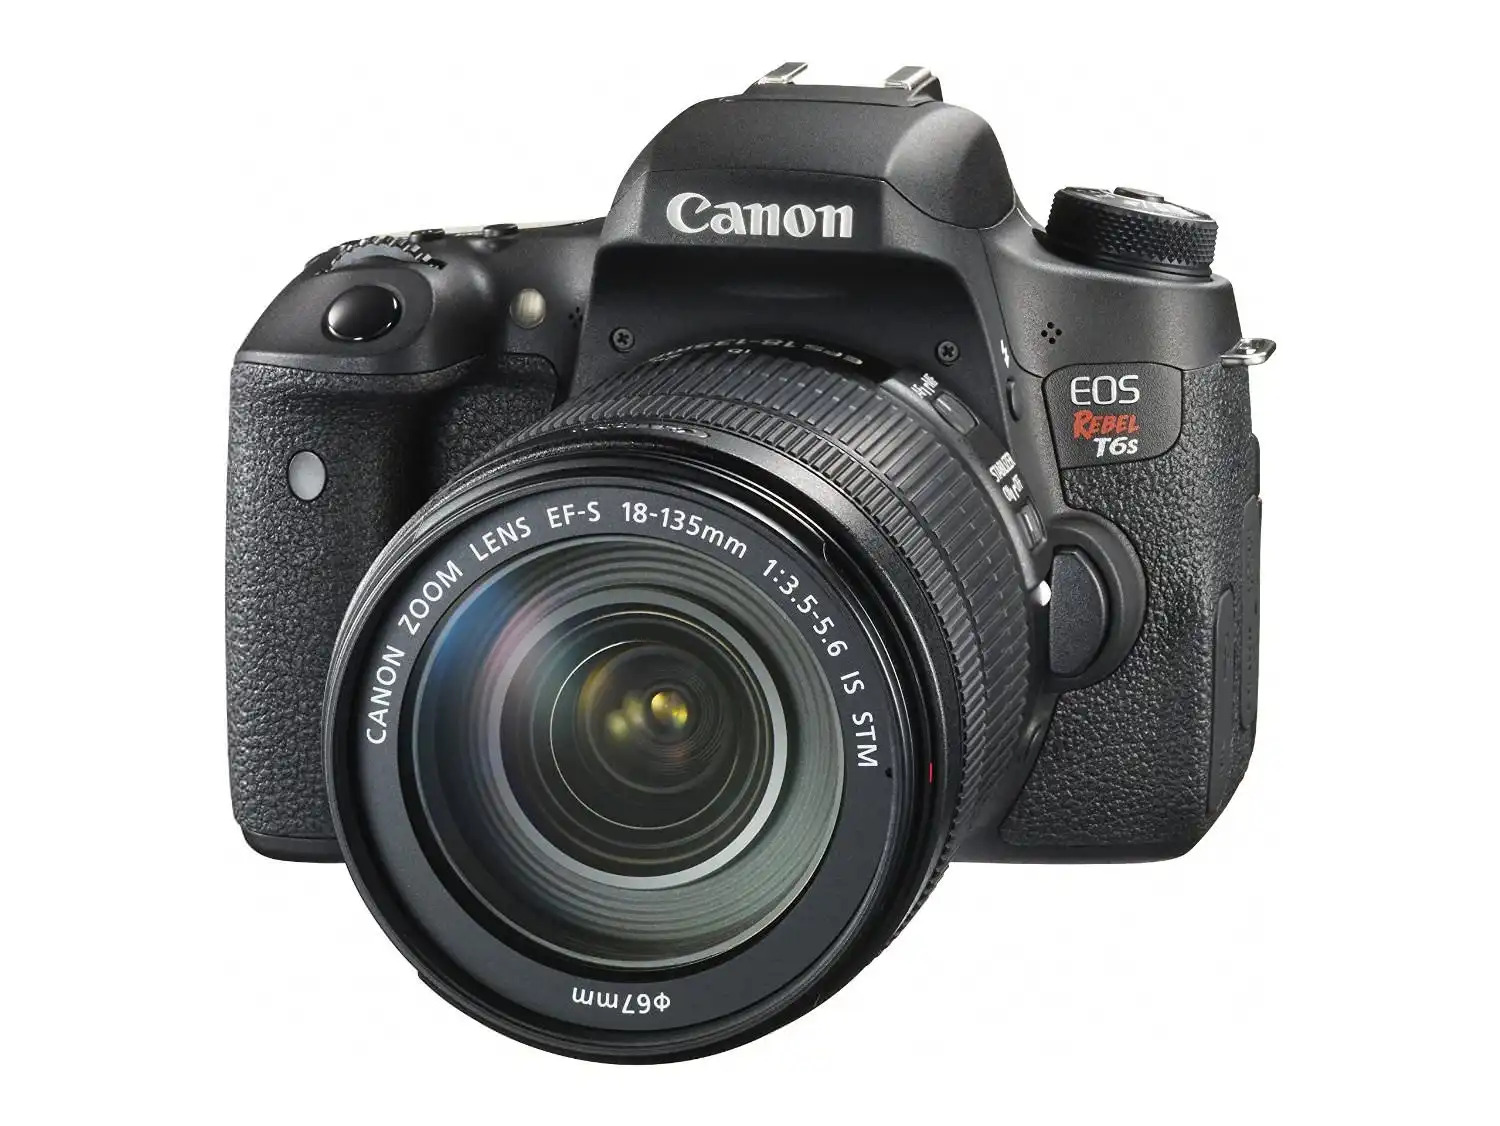
A step up from the T6i is the EOS Rebel T6s.
These cameras share a wide-range of features, including the same sensor, image processor, and touchscreen LCD.
The T6s also sports the same HD video capabilities, 5fps shooting rate, and ISO range to 25600, as well as the same Wi-Fi and NFC features of the T6i.
However, where the T6s improves upon the T6i is in functional additions that improve the workflow and your ability to get better images. Namely, the T6s incorporates a quick control dial that allows you to make on-the-fly adjustments to your camera settings with greater speed and ease.
The T6s also has an LCD panel on the top of its body (like more high-end DSLRs) so you can quickly review your settings. There is also a built-in horizontal level, that way you can keep the horizons straight when taking photos. Have a look at the T6s in the in-depth field review of the camera by Maarten Heilbron.
Those added features add quite a bit to the price tag, though. At $1,050 (which includes a kit lens), it’s one of the most expensive cameras on this list.

The basic entry-level model from Pentax is its K-S2 camera. Featuring a 20.1-megapixel APS-C CMOS sensor with PRIME M II processing, this camera is comparable to others on the list in terms of image quality and speed of operation.
Also similar are features like 5.5fps continuous shooting, HD video at 1080p, and an 11-point autofocus system that falls short of other models like the Sony a68 but is comparable to many of the Canon models on this list. The K-S2 has an expanded ISO range of 51200, making it one of the better options for low-light shooting.
See the camera in action in this hands-on review video by TheCameraStoreTV:
With a 3-inch 921k-dot LCD panel that articulates, you can get low to the ground or hold the camera over your head for more interesting angles of view and still be able to see the LCD. The K-S2’s onboard image stabilization system ensures your photos are sharper, especially when considering the camera does not have an optical low-pass filter.
The Pentax K-S2 is a good buy as well. Priced at under $550 for the camera and an 18-50mm kit lens, it’s right in the middle in terms of cost of the cameras on this list.
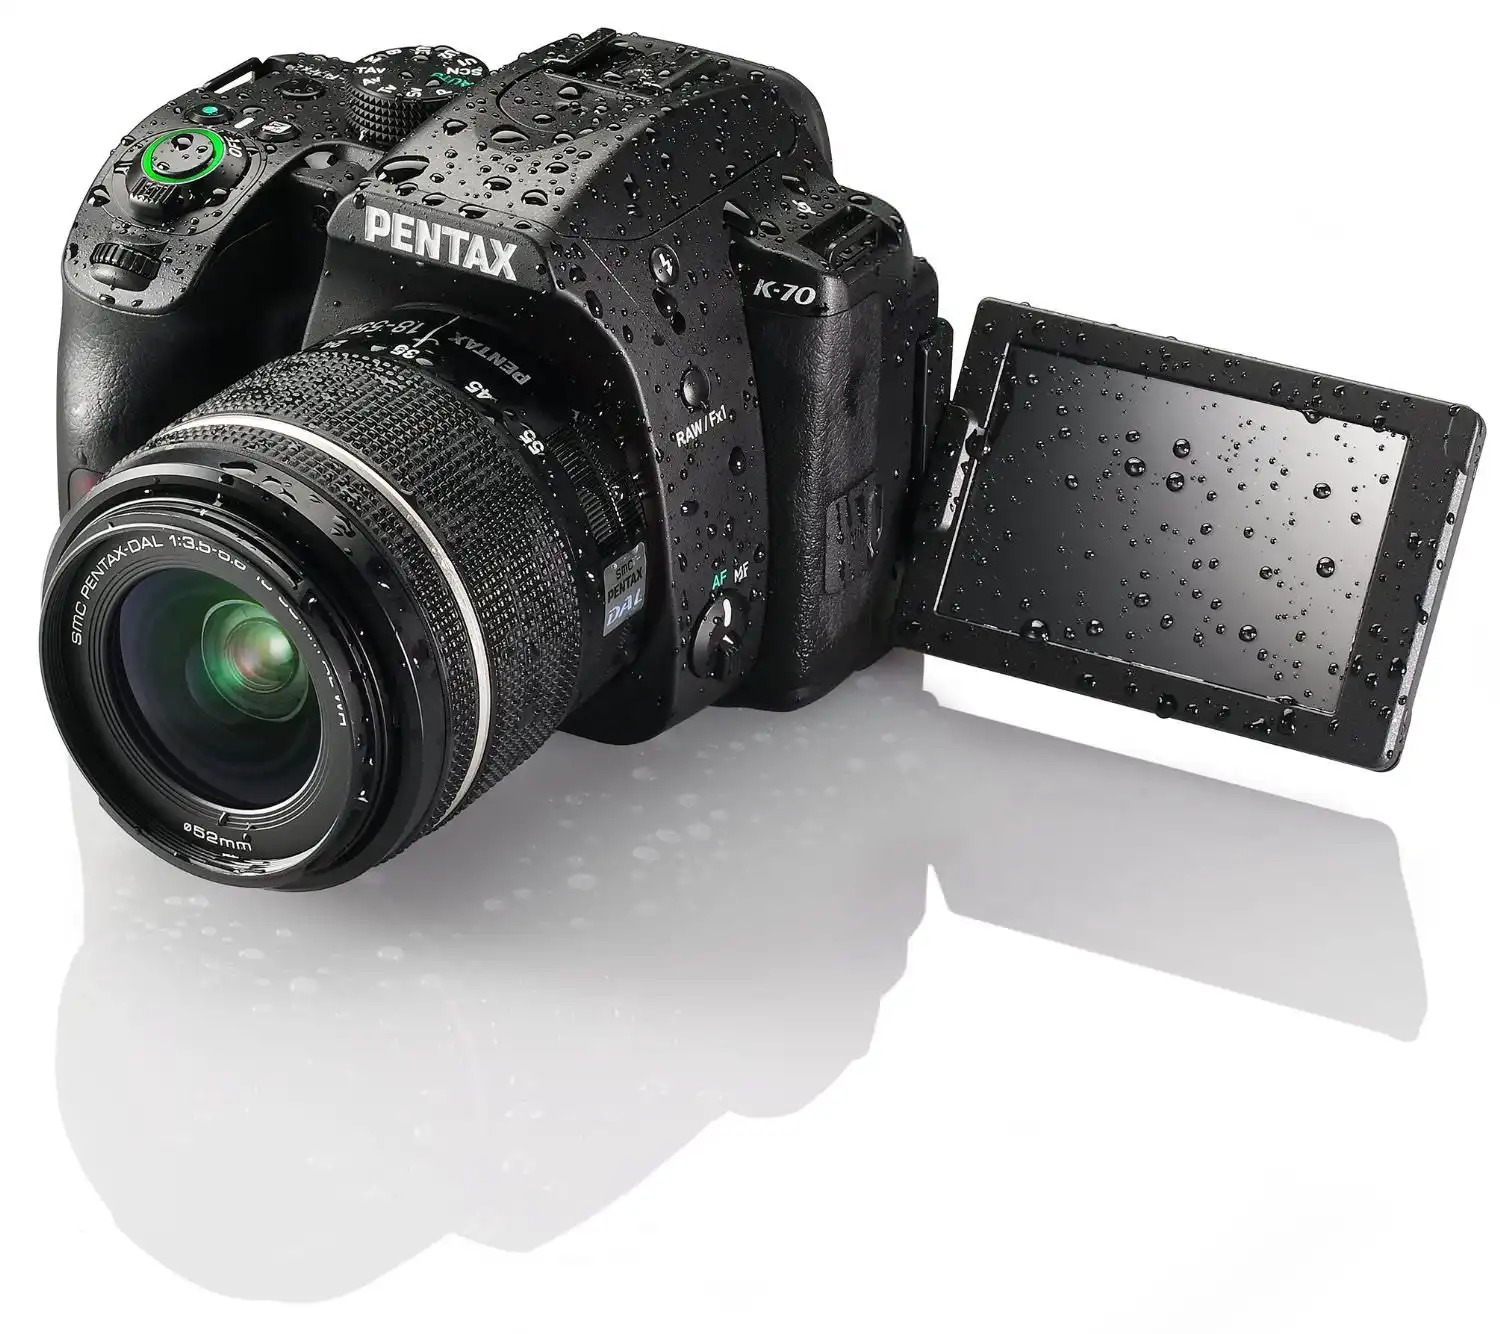
A more recent release from Pentax is the K-70 DSLR. With a 24.2-megapixel sensor and a PRIME II processor, it has improved resolution and performance over that offered by the K-S2.
Also of note is that the K-70 has an astounding expanded ISO range that reaches 204800, something that no other camera on this list can claim, making it one of the best options for shooting in low-light situations.
With 6fps shooting, the K-70 is a better option for action shots. Though the K-S2 is weather sealed, the K-70 beefs up that weather sealing for a camera that’s ideal for working in less-than-ideal weather situations.
The K-70 includes Wi-Fi for easy photo sharing, and you can take control of the camera using your smartphone. Check out other handy features in the video above from AdoramaTV.
Other features of the K-70 are shared with the K-S2: it has the same video recording capabilities, the same 11-point autofocus system, the same image stabilization system, and the same 3-inch articulating LCD.
All these features come at a cost, though. At nearly $900, the K-70 is pricey, but it represents excellent value for beginner photographers that have that kind of budget.
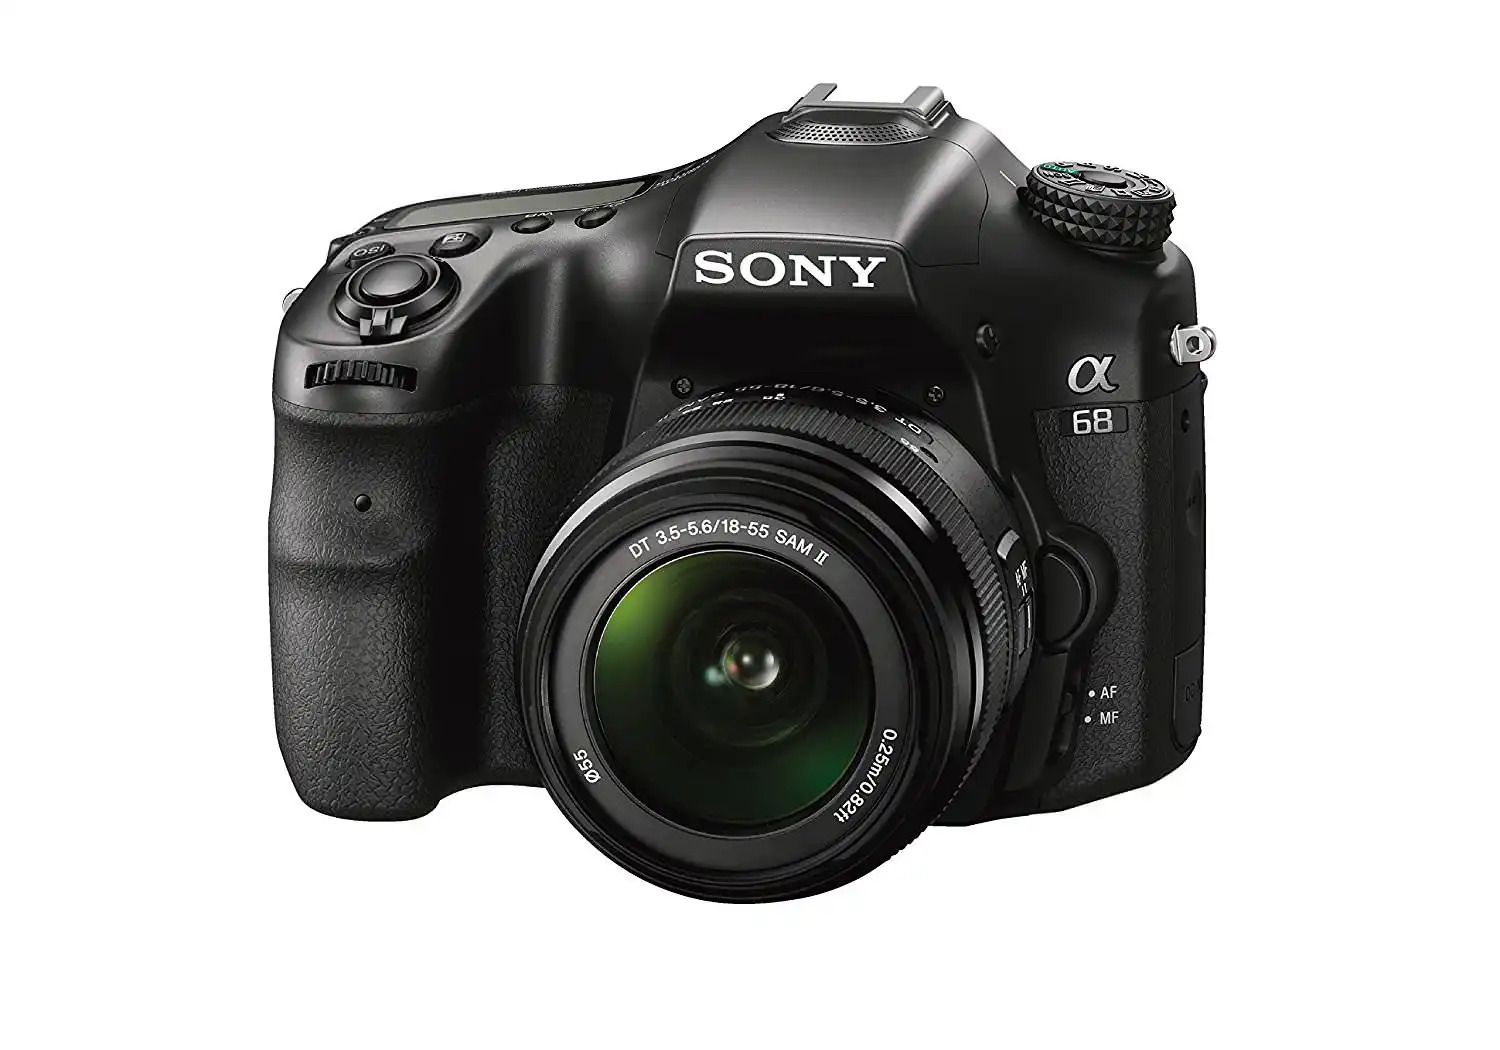
Though some beginners might not consider Sony to be a manufacturer of entry-level cameras, that is a misnomer. Their Alpha a68 DSLT camera is a solid choice for new photographers.
What sets the Alpha a68 apart from other cameras from Nikon and Canon is that it has a translucent mirror (thus the DSLT designation). That means the mirror stays in place rather than swinging up and down in traditional DSLRs.
Another feature that’s interesting is the electronic viewfinder, which replaces the more traditional optical viewfinder. With 1.44m-dots and an OLED display, the electronic viewfinder on the a68 is among the very best on this list.
What’s more, you can look at the effects of your exposure settings before you actually take the photo. Additionally, you can use contrast-detection autofocus as you’re shooting, and if you shoot video, you can view the recording through the viewfinder rather than having to use the LCD.
On top of that, this little Sony has a 24.2-megapixel APS-C Exmor CMOS sensor with BIONZ X image processing. These components allow excellent continuous shooting at 8fps with full HD 1080p video at 50MBps. See sample photos and videos and get more details on this camera by viewing the video above from Nothing Wired.
The a68 also has excellent low-light shooting capabilities with a top ISO value of 25600. The 79-point autofocus system makes it a good choice for action shots, particularly with the 15 cross-type points spread over the frame that allows for easier tracking of moving subjects.
If you think the a68 will be vastly overpriced compared to the other cameras on this list, you’re wrong. You can find one with a kit lens for under $650.

The FujiFilm X-T10 isn’t a DSLR like the previous cameras on this list; it’s a mirrorless camera. Nonetheless, I’ve included it in this list for beginners because it’s a great all-around camera for someone just getting into photography (and for enthusiasts and even professionals too).
In terms of features, the X-T10 is comparable to the DSLRs on this list in many ways. It has an X-Trans CMOS II APS-C sensor, though at 16-megapixels it has less resolution than other models on this list. The EXR Processor II is quick and allows for fast operation.
Similar to other cameras in this price range, the X-T10 has native ISO up to 6400 with an expanded range up to 51200. It has a 3-inch 920k-dot LCD, which articulates for improved viewing.
What sets the X-T10 apart (along with the Sony a68) is the OLED electronic viewfinder with 2.36m-dots for a gorgeous viewing experience through the eyepiece. Additionally, the autofocus system features both contrast-detect and phase-detect capabilities with multi-area and center focus as well as selective single-point with face detection. See these unique features in action in the video above from Joe Allam.
HD video recording at 1080p is on par with other cameras on this list, though it records at 60p, where other cameras record at half that.
Priced at around $900 with a 16-50mm lens, the X-T10 is one of the pricier models on this list. However, for that price you get robust features and a mirrorless system, which might be a draw for many beginning photographers.
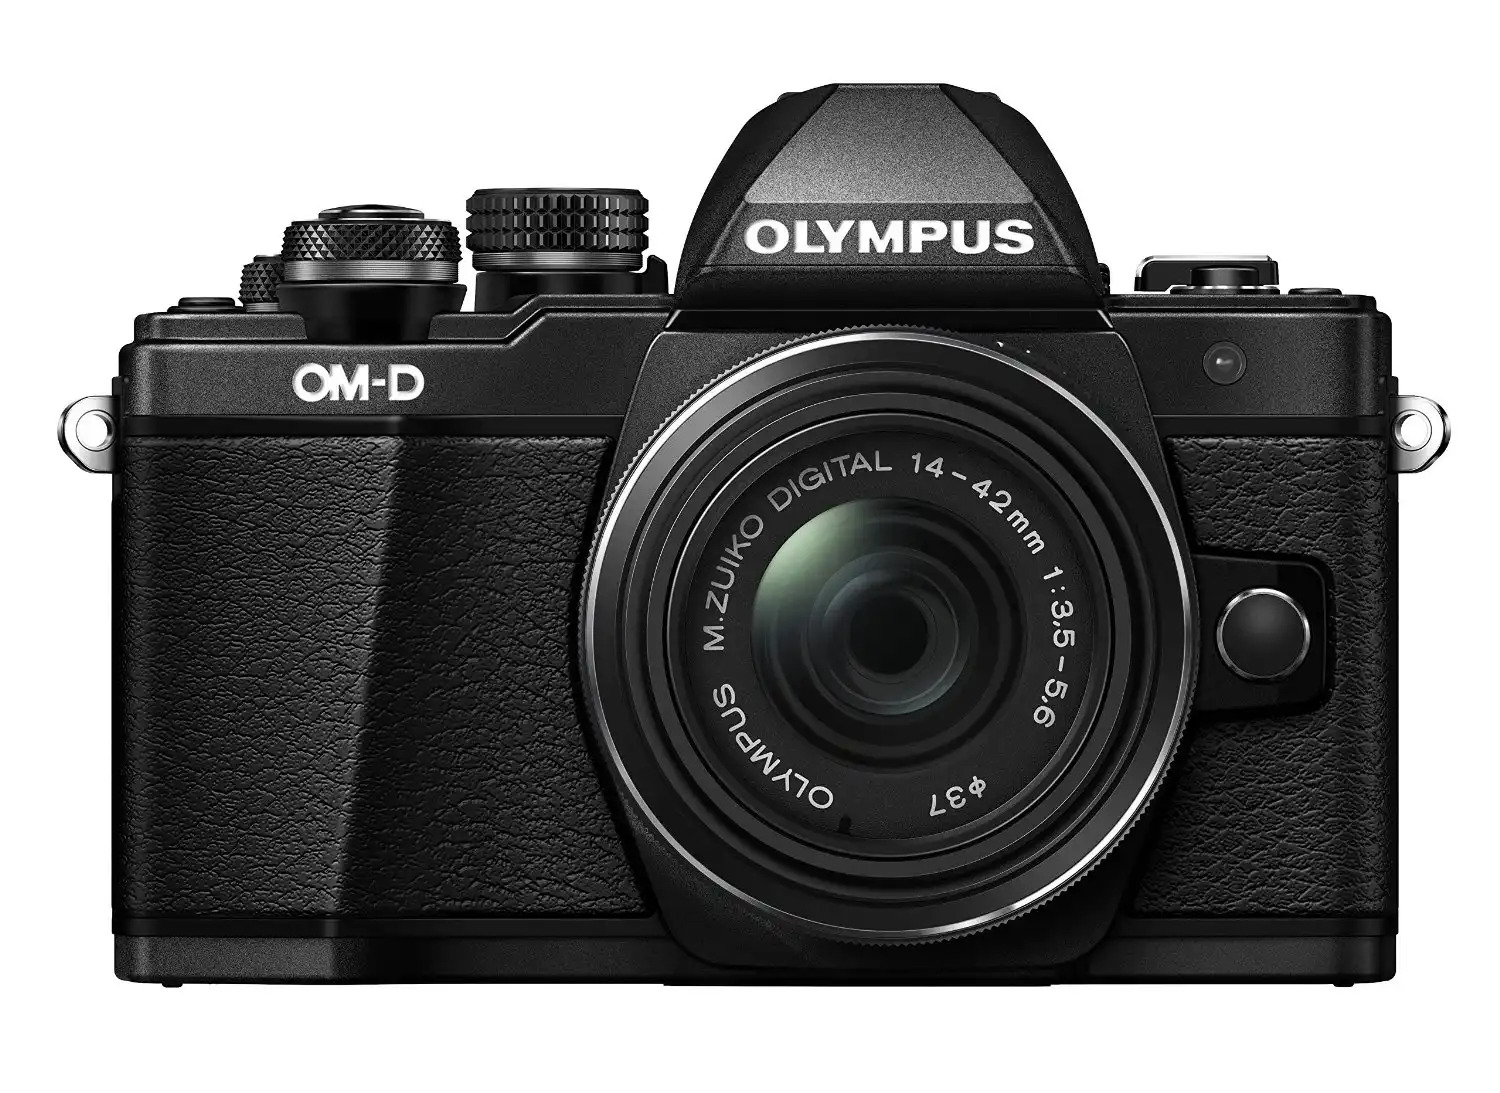
Another solid mirrorless choice for beginners is the Olympus OM-D E-M10 Mark II.
Along the same lines as the FujiFilm X-T10, the OM-D E-M10 Mark II has a smaller sensor at 16-megapixels, and is four-thirds at that (compared to APS-C on all the other cameras listed here). It has a TruePic VII processor which enables fast operation and allows for 1080p HD video at 60p and a continuous shooting rate of 8.5fps.
Also like the FujiFilm camera reviewed above, the Olympus features a 2.36m-dot OLED electronic viewfinder. The 3-inch touchscreen LCD takes up most of the back of the camera body, and with a tilting feature makes it easier to see when shooting at odd angles.
Built-in Wi-Fi gives you improved control over the camera and allows for easy photo sharing, and with an optional grip, the camera becomes easier to hold by adding a little beef to its tiny body. Integrated 5-axis image stabilization also helps you create images and videos that are clearer and sharper. See this camera in action in the video above from David Thorpe.
For a mirrorless camera, the Olympus is priced quite aggressively. You can pick up the model shown above for under $600, including a 14-42mm lens.
With that, you’ve got 12 top choices for entry-level cameras. Give these specs a second look, check out each video, and use those details to make an informed decision about which camera is right for you.


More and more, museums around the world are opening up their vast archives for free on the internet. We can browse broad collections, or dig down deep into collections and examine individual works, or we can download hi-resolution jpgs of famous works and slap them on our new desktop as wallpaper. (Discussion: does this trivialize a work or help us appreciate it?)
Indeed, OpenCulture has linked to many of these and I’ve followed. And I’ve often returned overwhelmed or disappointed, not by the art, but by bad web design. Good intentions are one thing, but institutions often turn to coders first, not designers. And there’s a difference.
Recently we told you how the Metropolitan Museum of Art has put most of its nearly 90 years of exhibitions online. Our own Colin Marshall said:
The archive offers, in the words of Chief of Archives Michelle Elligott, “free and unprecedented access to The Museum of Modern Art’s ever-evolving exhibition history” in the form of “thousands of unique and vital materials including installation photographs, out-of-print exhibition catalogues, and more, beginning with MoMA’s very first exhibition in 1929.”
Yet the interface is quite lacking, showing a blank search bar with no clue to how much lies beneath. Where to start, if you just want to browse?
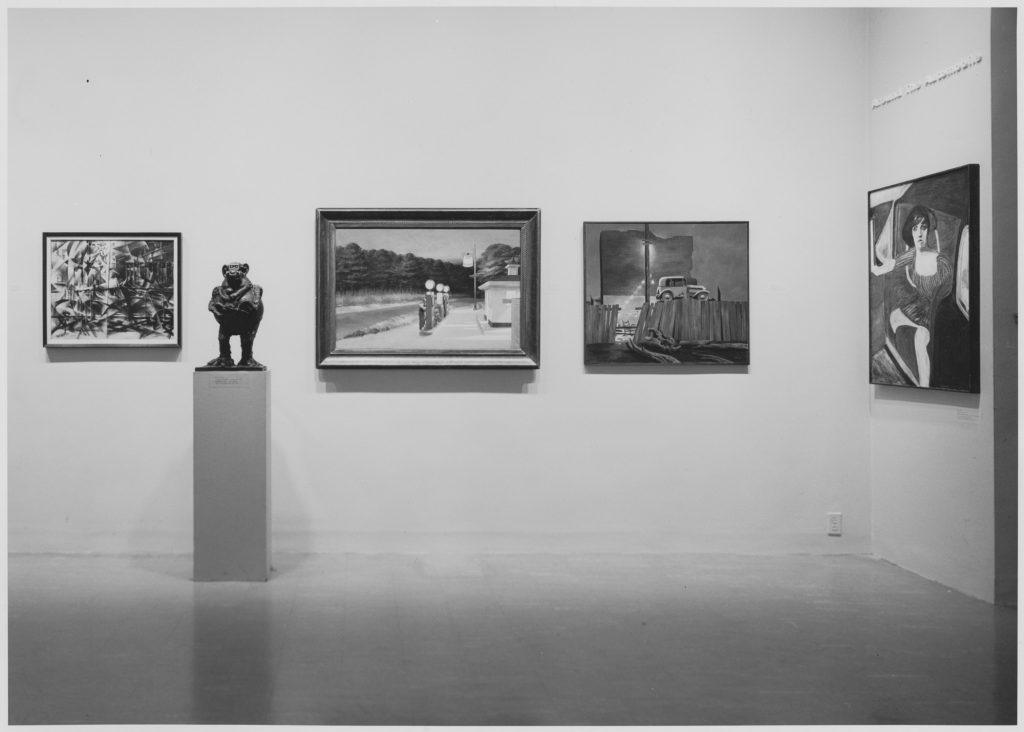
Enter the data visualization firm of Good, Form & Spectacle, who excel at presenting archives in different ways. Commissioned by MoMA to make something from the data, the firm’s “MoMA Exhibition Spelunker” offers 60 years of exhibition data that can then be searched by “curators, arrangers, designers, artists, and others” with connections available at every level.
For example, the second ever MoMA exhibit, “Painters by 19 Living Americans” (1929 – 1930), featured Edward Hopper. The official archive will show you the exhibition catalog and press release. But go spelunking and we discover that up until 1989 (the end of the archive for now), Hopper was featured in 61 exhibitions, including 1943 where he was featured in four exhibits in one year. What were those exhibits? Well, down the rabbit hole you go.
Coder (and, full disclosure, friend since high school) Phil Gyford spoke about his work on the page:
A spelunker, according to Chambers, is “a person who explores caves as a hobby” and we aimed to explore MoMA’s raw data and make it more visible and penetrable by everyone else. It’s hard to get a decent sense of the shape of lists of data so we set off to explore.
Good, Form & Spectacle have worked on other sleek and minimal sites, including a Netflix recommendation engine, a smaller spelunker for the Victoria & Albert Museum, and a larger one for the British Museum.
But if you’re interested in exploring a century of exhibitions at MoMA, then spend as much time as you like with the “MoMA Exhibition Spelunker.”
Related Content:
1.8 Million Free Works of Art from World-Class Museums: A Meta List of Great Art Available Online
Download 464 Free Art Books from The Metropolitan Museum of Art
Google Art Project Expands, Bringing 30,000 Works of Art from 151 Museums to the Web
Download 397 Free Art Catalogs from The Metropolitan Museum of Art
The Museum of Modern Art (MoMA) Puts Online 65,000 Works of Modern Art
Ted Mills is a freelance writer on the arts who currently hosts the FunkZone Podcast. You can also follow him on Twitter at @tedmills, read his other arts writing at tedmills.com and/or watch his films here.
Browse Every Art Exhibition Held at MoMA Since 1929 with the New “MoMA Exhibition Spelunker” is a post from: Open Culture. Follow us on Facebook, Twitter, and Google Plus, or get our Daily Email. And don't miss our big collections of Free Online Courses, Free Online Movies, Free eBooks, Free Audio Books, Free Foreign Language Lessons, and MOOCs.


As a photographer, there is a huge amount of information which is easily available to you in your image file. Every single photograph is accompanied by a mass of information, the EXIF (Exchange Image File format) or metadata. However, I think there is more information, which very few photographers acknowledge at all. For a long time, I have been calling it Photographer’s Metadata. In this article, we’ll look at what that means, and how you can use it in your photography.
As the word metadata has emerged into more common use, this has not necessarily been accompanied by a full understanding. Just to clarify a little, data’ is simply information. It might be presented in different ways, with words, numbers, pictures even. Broadly, metadata is defined as data about data. The photograph is the data, and the Exif is data about the photograph, Exif is therefore, metadata.
Making use of the Exif can be very helpful, but it is a big topic, and it is worthy of a bigger discussion.

With any photograph, there is a huge amount of information which is known to only one person. Truly, there is a lot which is known only to you, the photographer, the person who made the photograph. You may like to use some other term like “emotional baggage” or “personal context”. You can choose to think of it in whatever terms you like, but I think this is massively significant information, which needs to be grasped as a truth, BUT probably needs to be handled very carefully. All that additional information that only you know is what I call Photographer’s Metadata.
A large number of people on the planet will know that this is the Taj Mahal (below). That data is hardly unique to the photographer. A subset of those people may know that it was taken from the opposite side of the river which runs at the back of the Taj Mahal site.
 Some photographers, meteorologists, keen geographers, or others, may start to guess what time of day it was taken, the time of year, etc. They may be able to check some of that, and other technical details in the Exif, and start to come to conclusions based on that data and their thoughts about it all. Their thoughts will have varying degrees of truth, and varying degrees of effect on the perception of the photograph.
When I was sat in the back of the taxi approaching the Taj Mahal, with all my senses being assaulted, I thought, “It is the Taj Mahal! How the heck can I take a photograph which offers anything different, anything worthwhile, a photograph which has not been done a thousand times before?” No one else knows that I had that thought. Now, I hesitate to use the word “unique” but I have never seen another photograph like the one above. We are now getting into the territory of what I have termed Photographer’s Metadata. Things that only you, the photographer, know about the photograph which you took. Only I know the conversation I had with myself in the back of a taxi, and that original question changes the way I see this photograph.
Only the photographer (yes, me!) knows that I walked away from the groups of people, that I was very much on my own when the photograph was taken. I was temporarily in a small oasis of still calm. Likewise only the photographer (still me) knows that I needed to go back over the river, to the site of the Taj Mahal itself, before sunset and the gates being closed. So, I had to work quickly. It was moderately cool and breezy. The crows were indeed crowing. Only I know how many shots were taken to achieve this one photograph, that this one was chosen for the position of the crow in flight.
A man appeared about three meters ahead of me, was talking to me, holding out his hand for money.

The point is quite simple, really. However, I believe that it is very complex in its consequences. The point is that ALL of this, all the information, and probably more, has an influence on my perception of the image. All of the things which only you know will affect your perception of your photographs.
Photographer’s Metadata is part of the joy of taking photographs, of adding to your cache of memories. However, you might be well served by examining it very carefully, considering what it is that only you know. Then, you need to try to make some judgments. Firstly, how does the Photographer’s Metadata change the way you look at the photograph? Secondly, how will everyone else, without the benefit of that information, see the photograph?
Please take a few moments to consider one or more of your own photographs. Think about all the circumstances of that image, try to relive the context of it being taken. No one else on the planet knows what is in your head, your thoughts, memories, and feelings in respect to the photograph. Again, how does all that change the way you perceive the photograph? What is that others do not know and which, therefore, cannot have a similar effect on their perception of the photo?
Thinking of a typical photographic expedition. Only you, the photographer, would know that you had done some research using The Photographer’s Ephemeris. That you had put the alarm on for 4:30 a.m. to get to the identified spot at the optimal time. Only you know that you couldn’t manage to get around the barbed wire fence and that your choices were restricted by keeping the fence out of the frame.
Only you know about the over-zealous security guy who was nagging at you; that it was very hot; that the lens you had on the camera was not ideal; the wind blasting the sand around did not encourage you to change it; only you know that there was an ugly building just out of the shot; that the last time you were there, camels had been strolling through the frame. This time you were unusually blessed by a few wisps of clouds in the sky, your stomach is rumbling, and you are going to have to respond to the call of nature soon, and is this light going to get better or worse?!

Only if you are able to acknowledge the Photographer’s Metadata, can you then make decisions as to what you want, or need, to do with this information. Grasping this additional truth could be a massive help in letting you make judgments regarding your photographs. I will try to give you some practical help.
It is all the things which you, the photographer, know about the making of the photograph which, very likely, no one else on this planet has any idea about.
It is knowing that your passport has been stolen, that you think you met the girl of your dreams a week ago, but she has no interest in photography. If you hurry back, the hotel will still be serving breakfast. Look at the detail on those columns, you must photograph those later. But which angle would be best? That entrance archway, is someone please going to walk through it soon? Please, someone, walk through it soon, or should I just move on? All this and more encompasses the Photographer’s Metadata.

What does all this matter? I think it matters a great deal that you are at least aware of Photographer’s Metadata. Only if you are aware of it, can you then decide whether you need, or want, to do anything about it.
A few months ago, I was so happy to listen to the very talented wedding photographer Ian Weldon being interviewed. It was early in 2016, on The Photography Xperiment Podcast with Andrew Hellmich. I’ve heard others dance around the edges of the topic of Photographer’s Metadata, but Ian Weldon fully embraced everything that I have been thinking about for several years.
He was asked about his workflow and he proceeded to describe how he downloads the photographs after he gets home from a wedding shoot. Nothing too shocking there yet. He then said:
” … and usually I leave them for two weeks and don’t look at them at all … the whole wedding, don’t look at it, don’t even entertain looking at it. I do that to take myself away from any emotion that I had at the wedding. The thing is it’s kind of that guy who I was talking to, that I had a really great conversation with, that photograph of him might not be a great photograph, I might just think it was because he was a nice guy.”
Of course, I was happy! You are bound to be happy when someone articulates the same ideas as you, aren’t you? Particularly so when that person is a very individual and successful photographer who has clearly given his craft a great deal of thought.
Ian Weldon then went on to say, “So I have to kind of take a step back from it, and distance myself from the wedding somewhat, so then I can make a judgment on the photography, rather than the relationships I had with the people while I was there. I’d leave it six months if I could! But I don’t really think the clients are going to be happy about that.”
I must have been paying some attention in physics classes because I have often thought of the lingering effect of Photographer’s Metadata as being something like an atomic half-life. That is the time an isotope takes to decay, to lose half its radioactivity.

A professional wedding photographer is talking about the effect that his emotional investment in the taking of the photographs has on his judgment of those images. Ian Weldon has arrived at a time of two weeks as being sufficient for enough decay of those emotions. He said he would leave it six months before looking at the photographs again, before starting to edit them, if he thought the clients would accept that. But what Ian Weldon is saying, I think, is that the emotions from the wedding have sufficiently decayed enough for him to be reasonably objective by the time two weeks have elapsed.
Do you recognize this process with yourself whatsoever? It is difficult to speak with confidence about the perceptions of others, and it may well be argued as a positive thing, that Ian Weldon is more than commonly in touch with his emotions. Without wishing to encourage you to be prone to being on the psychiatrist’s couch, I suggest that might be why he is such an interesting photographer.

If you think that this is all a load of tosh, I don’t think there is much which I can do or say to convert you to this particular religion. On a psychological level, perhaps you have never noticed that you respond differently to the same photographs on different days. On a physiological level, it has been demonstrated that we even perceive colors differently at different times of the day.

As important as I think it might be to acknowledge the truth as I see it, I do also fully acknowledge that there is a massive range of ways in which we individually perceive and process our experiences. The classic old/young lady still makes the point well.

With the Alcoholics Anonymous recovery program, the recognition of reality, by stating your name and, without equivocation, that you are an alcoholic, is a very good start. Probably an essential one. Of course, it is completely up to you if and how you choose to take on this information.
However, I would suggest that if you simply acknowledge Photographer’s Metadata you will have taken the first couple of steps towards handling it. “My name is Richard, and I know things about this photograph which no one else knows.” On its own, simply acknowledging that truth is a good couple of steps. It might help you decide which shot to post to your favorite social network(s). Or help you to choose which one to give further, time-consuming, detailed post-processing. It might help you decide which one to enter into a contest.
In short, awareness of Photographer’s Metadata will give you a chance of being more objective in your assessment of your own photographs.
The post Photographer’s Metadata – What it is and How to Use it by Richard Messsenger appeared first on Digital Photography School.


Filed under: Lamborghini,Coupe,Classics,Luxury,Performance
 One of the earliest Lamborghinis gets a stunning restoration.
Continue reading Lamborghini shows off beautifully restored 350 GT
Lamborghini shows off beautifully restored 350 GT originally appeared on Autoblog on Wed, 08 Feb 2017 17:10:00 EST. Please see our terms for use of feeds.
Permalink | Email this | Comments
Strawberries are delicious no matter how you eat them, but there’s actually a way to make their sweetness even more flavorful. You’ve probably been eating strawberries backwards the whole time.

1. Having really well filled in and “fleeked” if you will, eyebrows. Good eyebrows are something to be proud of.
2. Finding a piece of jewelry you were just convinced you lost forever (probably after a few glasses of champagne, not that i’m referring to myself) and immediately putting it on.
3. Getting through a really intense workout and coming on the other side of it feeling your muscles getting stronger and stronger.
4. Standing up to someone who is being irrational with a level, fair, firm, and pragmatic response.
5. Remembering to mail out thank you notes in a reasonable time so they don’t have an “I’m sorry I know this is so late!!!!” attached to them that makes you slightly embarrassed.
6. Getting enough sleep at night, and then waking up without feeling like you just dozed off.
7. Looking at your bank account and realizing that you haven’t spent nearly as much money as you thought you had.
8. Fulfilling a commitment that you really, adamantly do NOT want to do, but recognizing that it’s not cool or responsible of you to be a flake so you suck it up and stick to your commitments.
9. Getting all the way to the end of using a tube of chapstick. (Which tbqh I don’t think is possible so I would 1010% celebrate the HELL out of.)
10. Seeing that your favorite musician is coming to your city and being able to snag tickets for the show for you and your friends.
11. Being able to genuinely say that you surround yourself with people who get you, support you, and you know – want what’s best for you. ~*Find your people*~
12. Learning the first chords or notes on an instrument you’ve finally committed to learning to play.
13. Making it literally anywhere on time when you are a chronically late human being.
14. Figuring out that you subconsciously fought your internal clock and either woke up earlier, or were able to sleep in later, than you typically do on a day to day basis.
15. Wearing your favorite article of clothing and feeling that “damn I look great” feeling that comes from everything being on point.
16. Getting unexpected mail or a package that turns out to be something exciting and fun and really anything other than spam snail mail or a bill.
17. When you finally finish the listicle that you were writing and said to yourself, “Hey self. Imma finish this before dicking around on Twitter.” Or you know, whatever task you know you REALLY need to complete. Either or. 

Marathons are already intimidating, so the more you know about training, preparation, and what to do after the race the better. If you want to run a marathon, but you’re feeling lost, this visual guide can help get you started.
Color in images from the archives of the Smithsonian Libraries, JSTOR, and more.
Family economics research focuses on how individuals and families obtain and use resources of money, time, human capital, material resources, and community services. The research also explores the relationship between individuals and families and the larger economy and studies the impact of public issues, policies, and programs on family economic well-being.
This area provides research summaries of current research in family economics (with links to the complete article, if available).
Consumers' Accuracy in Estimating Their Credit Ratings
Convenience Use of Credit Cards
Credit Card Ownership by High School Seniors
Forbearance Plans for Credit Card Accounts
Completing Debt Management Plans
Consumer Debt Repayment and Bankruptcy
A Profile of Grandparents Raising Grandchildren as a Result of Parental Military Deployment
Parental Influence and Teens’ Attitude Toward Online Privacy Protection
Teacher Training in Personal Finance and Student’s Test Scores
Teens' Financial Knowledge and Behavior
Effects of Personal Financial Knowledge on College Students' Credit Card Behavior
Financial Information and Its Relationship to Knowledge and Behavior of Teens
Financial Behavior and College Performance
Fiscal Support for Financial Education in Schools
Financial Values of Middle School Students
Educating Widows in Personal Financial Planning
Factors Related to Being in Higher Income Categories
Financial Planning Personality Type
Financial Risk-Taking Behavior
High School Economic Education and Access to Financial Services
How Financial Assets and Consumer Debt Influence Marital Conflict
Impact of Financial Literacy Education
Impact of Personal Finance Education
Teachers’ Preparation for Teaching Personal Finance
Wealth and the Acquisition of Financial Literacy
Wills, Trusts and Charitable Estate Planning
Women in Business-Owning Families
Asset Ownership by Black and White Families
Consumer Empowerment and Welfare with Respect to Mortgage Servicers
Housing Costs and Economic Hardship for Low-Income Families
Identifying Weaknesses in Practitioners’ Housing Affordability Indices
Mortgage Professionals' Perspectives on Abusive and Predatory Lending
Assessing Farm Households’ Investment Education Needs
Automated Saving and Investing Strategies
Decrease in Stock Ownership by Minority Households
Effects of Capital Accumulation Ratio on Wealth
Effects of Information on Consumers' Perceptions of Mutual Funds
Measuring Financial Risk Tolerance
Racial/Ethnic Differences in High Return Investment Ownership
Risk Tolerance and Investments of Business Owners
Women’s Investment Decision-Making
Couples’ Money Management Behavior and Relationship Satisfaction
Spousal Differences in Financial Risk Tolerance
Linking Financial Strain to Marital Instability
Gendered Meanings of Assets for Divorce
Behavior Change Among Savings Program Participants
Encouraging Savings by Low-Income Individuals
Financial Education for Bankrupt Families
Food Insecurity of Low-income Families
Impact of Social and Financial Resources on Hardship
Social and Financial Capital Resources Can Lessen Hardships
Determinants of Asset Allocation Strategies for Retirement Saving
Impact of Health on Financial Security of Older Americans
Managing a Retirement Portfolio: Do Annuities Provide More Safety?
Renters’ Preparation for Retirement
A Framework for Promoting Retirement Savings
Automated Saving and Investing Strategies
Banking Experience and Individual Development Accounts
Behavior Change Among Savings Program Participants
Effect of Expressing a Quantitative Goal on Savings Behavior
Encouraging Savings by Low-Income Individuals
Gender Differences in Personal Saving Behaviors
Saving for Children’s College Education

Natures dream catchers / photo:@mishkusk #nature #light #australia
In the years leading up to the Second World War, isolationist sentiment coursed pretty strongly throughout the United States. Some Americans feared that immigrants were a threat to the country. Sound familiar? Then you'll have no trouble understanding the reasons why the map below, titled America–A Nation of One People From Many Countries, was published in 1940 by the Council Against Intolerance in America.
“With the exception of the Indian, all Americans or their forefathers came here from other countries,” the illustrator Emma Bourne inscribed on the map. The Council Against Intolerance commissioned Bourne's work in an effort to remind Americans that the U.S. had always defined itself as a country of varied national origins and religious backgrounds.
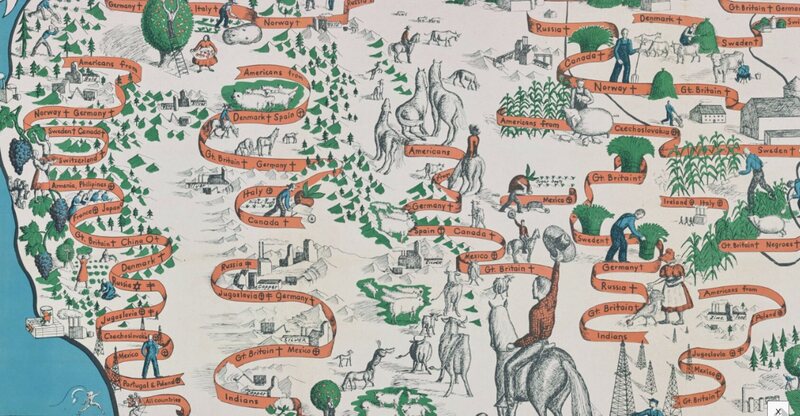
Bourne illustrates America's unique ethnic and religious diversity by erasing state borderlines and showing the nation as one unit. Long red ribbons weave through the landscape to show clusters of immigrant groups and where they settled, from Japanese in the West to Italians in the East. At the bottom left is an inset scroll listing famous Americans in literature, science, industry, and the arts alongside their ethnic backgrounds, including George Gershwin and Albert Einstein, who became a U.S. citizen the year the map was published. At the time, the map served as an educational poster in line with the Council Against Intolerance’s argument that prejudice could undermine national unity during wartime.
The map is “a relatively early example of an idea that’s become popular in recent decades,” as Dara Lind writes over at Vox. “That diversity itself is what makes America strong, and that difference is something to be celebrated rather than eliminated.”

“Maps of this kind were not particularly common and especially not at this scale,” says Ian Fowler, the director of Osher Map Library at the University of Southern Maine, who notes that the physical map itself is quite large. “While this map does borrow stylistic elements from pictorial maps produced during the 1920s and ‘30s, it is very unique in its emphasis and display of information.”
Between the late 1930s through the mid-1940s, the Council Against Intolerance’s educational department produced an array of materials, including books, manuals, and posters used in adult reading groups. Founded by the left-leaning Jewish author James Waterman Wise, the New York City-based organization fought against “prejudice by calling attention to American ideals, heroes, and traditions.”
“The map accomplishes these objectives by showing a United States without state boundaries,” says Fowler. “It uses the history of immigrants to heighten awareness of the strengths of cultural diversity and to show visually the diversity present in the country.”

Bourne also emphasizes the range of religions present during this era, along with staple industries in each state, including a giant potato in Idaho, a huge fish in Washington, and large lobster in Maine. Detailed figures of people at work are meant to show how immigrants are active in creating a prosperous America, explains Fowler.
“It’s important to note that everyone on the map is engaged in industry or labor, which I conjecture is on purpose to show that immigrants are not ‘lazy,’ which was (and unfortunately still is) a damaging stereotype used by nativists and isolationists,” he says.

For all its strengths, the map struggles to represent African American populations, and leaves no space for Native American populations. This aspect of the map compelled the poet Langston Hughes to annotate his copy with a burning cross and a reference to the Ku Klux Klan near the cotton workers in the South. The map and the Council Against Intolerance’s activity also caught the attention of Eleanor Roosevelt, who later wrote about both favorably in her newspaper column, My Day.
“Unfortunately, the depiction of the immigrant as evil and as a scapegoat for the problems facing the United States is something that has persisted throughout our history and still pollutes our social and political discourse,” says Fowler.
Map Monday highlights interesting and unusual cartographic pursuits from around the world and through time. Read more Map Monday posts.
The following article is from the new book Uncle John’s Uncanny Bathroom Reader.
If you make it to the ripe old age of 100, hardly a day will go by that someone won’t ask you what’s the secret of living to such a ripe old age. There’s only about a 1 in 1,000 chance that a 100-year-old person will become a “supercentenarian” —live to see their 110th birthday. So how did these folks make it that far? Here’s how these old-timers answered the question.
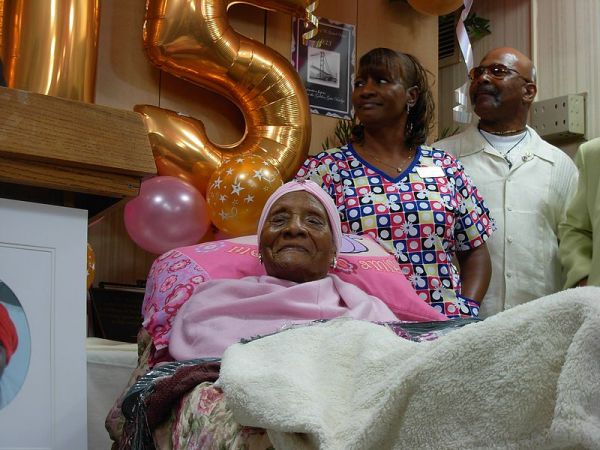 (Image credit: Johnrabe)
Gertrude Baines, Los Angeles, California (115)
Ate plenty of bacon, fried chicken, and ice cream, but “she never did drink, she never did smoke, and she never did fool around.”
Dolly Saville, Wendover, England (100 years old)
The world’s oldest barmaid began “pulling pints” (pouring beer) at the Red Lion pub in 1940 and was still at it until shortly before her death in 2015. It’s estimated that she pulled more than 2 million pints over those 75 years. “I love my work and I love the people, it keeps me going and stops me from sitting around,” she said. Fauja Singh, London, England (105)
Singh, also known as the “Turbaned Tornado,” took up marathon running in his 80s and was still competing at the age of 104. “To me, the secret is being happy, doing charity work, staying healthy, and being positive,” he says. “If there’s something you can’t change, then why worry about it? Be grateful for everything you have, stay away from people who are negative, stay smiling, and keep running.”
Pauline Spagnola, Plains Township, Pennsylvania (100)
“Drink a lot of booze!”
Hidekichi Miyazaki, Tokyo, Japan (104)
The world’s oldest competitive sprinter attributes his longevity to the fact that he “exercises daily, eats in moderation, and chews his food properly.”
Dorothy Howe, Saltdean, England (100)
“I put my health down to whiskey and cigarettes,” Howe told England’s Daily Mail newspaper after hitting the century mark in November 2013. She prefers Bell’s Scotch whiskey and has smoked 15 Superking Black cigarettes every day since picking up the habit at the age of 16. That comes to more than 460,000 cigarettes over 84 years. “I keep telling myself that I’m going to quit smoking when they put the prices up, but that’s just not going to happen now.”
The Melis Family, Sardinia, Italy
The nine Melis siblings, age 78, 80, 81, 89, 91, 93, 97, 99, and 105, had a combined age of 818 years and 205 days in 2012, making them the world’s oldest living siblings. “We eat genuine food, meaning lots of minestrone soup and little meat, and we are always working,” said Adolfo Melis, who, at 89, was still tending bar in a local café.
Frank Huff, Marion, Illinois (100)
“Hard work, booze, and women,” Huff told an interviewer in 2015. When he was in his 90s, he had both knees replaced so that he could continue going to dances every Monday, Wednesday, and Friday night. “I just live it day by day. I don’t make any plans 30 minutes ahead of time,” he said.
Marian Cannon Schlesinger (101)
“Just go ahead and do your thing no matter what,” Schlesinger, the ex-wife of historian Arthur Schlesinger, told the Atlantic magazine in 2013. “My mother had said, ‘It doesn’t really matter if your house is that dirty. Go ahead and do your thing. Don’t pay too much attention to housekeeping.’ Of course, she did have a maid who came in every day.
Elizabeth Sullivan, Fort Worth, Texas (105)
Sullivan drinks three cans of Dr. Pepper every day. “Every doctor tells me it’ll kill me. But they die and I don’t, so there must be a mistake somewhere.”
Yisrael Kristal, Haifa, Israel (112)
Kristal, the world’s oldest living male in 2016, had no idea why he lived so long. “I believe that everything is determined from above, and we shall never know the reasons why,” he told Guinness World Records.
Peter Reilly, Saltcoats, Scotland (100)
Reilly, the world’s oldest altar “boy,” has served Mass every day for 91 years. “I don’t think I’ve missed Mass a day in my life,” he told the Scottish Daily Mail in 2015. “It must be one of my secrets for a long life,” along with “a healthy diet, saying your prayers, and moderation in everything.”
Tecumseh Deerfoot Cook, King William, Virginia (103)
Before his death in 2003, the retired chief of the Pamunkey tribe advised people that they should “eat plenty of raccoon and muskrats and drink Pamunkey River water…but lay off the possum.”
Thomas Spittle, Ipswich, England (100)
“Betting on horses, a pint a day, a puff on a pipe, and a fry-up (eggs, bacon, and fried tomatoes).”
Misao Okawa, Osaka, Japan (117 years old)
She ate lots of her favorite foods (mackerel sushi, beef stew, and spaghetti) and got plenty of sleep. “Eat and sleep and you will live a long time,” she said in 2014. “You have to learn to relax.”
Daisey Bailey, Detroit, Michigan (113)
Bailey took nips of bourbon whenever possible, ate lots of vegetables, and avoided beef. “She didn’t eat nothing but pork,” her granddaughter, Helen Arnold, told the Detroit News. Emma Morano, Verbania, Italy (116)
Morano, the last living human born in the 1800s, has a glass of homemade brandy every day, and on doctor’s orders she’s eaten two raw eggs and one cooked egg daily since 1920. (That’s more than 105,000 eggs in all—70,000 of them raw.) She has only milk for dinner. One more factor she credits with giving her a long life: after divorcing her violent husband at the age of 38, she never remarried. “I didn’t want to be dominated by anyone,” she says.
Besse Cooper, Monroe, Georgia (116)
“I mind my own business and I don’t eat junk food.”
Susannah Mushatt Jones, Brooklyn, New York (116)
Jones, who died in May 2016, never had children, slept 10 hours a night, and ate four strips of bacon every day at breakfast. “I never drink or smoke. I surround myself with love and positive energy. That’s the key to long life and happiness.”
Bernice Madigan, Cheshire, Massachusetts (115)
“No children, no stress, and a spoonful of honey every day.” Madigan also ate her favorite breakfast—Eggo waffles smothered in banana slices, and four glazed donut holes—every day.
Tomoji Tanabe, Miyakonojo, Japan (113)
“Not smoking and not drinking,” and a diet of fried shrimp, miso soup, pickled vegetables, and bananas, washed down with plenty of milk.
Gertrude Weaver, Camden, Arkansas (116)
“Trusting in the Lord, hard work, and love everybody…Just do what you can, and if you can’t, you can’t.” Jose Aguinelo dos Santos, Sao Paulo, Brazil
Dos Santos claims to be 126, but that’s unconfirmed. He has smoked a pack of cigarettes every day for 50 years and says there’s no secret to his long life: “The truth is you just keep getting older,” he told an interviewer in 2014. “If I got to this age it’s because I’ve lived a lot, that’s all.” (Image credit: Sedesol)
Benjamin Harrison Holcomb, Carnegie, Okla. (111)
Big breakfasts and small dinners. “All his life, Daddy didn’t smoke, he didn’t drink. But he did have a huge breakfast. Just huge. Eggs, sausage. And just cornmeal mush for dinner,” Holcomb’s daughter, Leola Ford, told the Washington Times in 2000.
Leila Denmark, Athens, Georgia (114)
Denmark was the world’s oldest practicing pediatrician when she retired at the age of 103; by then she was treating the great-grandchildren of her first patients. (Her other claim to fame: co-developing the whooping cough vaccine in the 1930s.) Denmark avoided milk, fruit juice, junk food, and sweets, including her many birthday cakes because they contained sugar, which she hadn’t eaten in 70 years. She drank only water.
Tuti Yusupova, Karakalpakstan, Uzbekistan
Yusupova, who died in 2015, claimed to be 134, but this is unconfirmed. “The secret to a long life is to do lots of work in the fields and to live an honest life,” she told the BBC in 2009. “Having lived through so many wars I would also tell the children of today to try and live their lives in the company of good people and to appreciate times of peace.”
_______________________________
 The article above is reprinted with permission from Uncle John's newest volume, Uncle John’s Uncanny Bathroom Reader. The 29th volume of the series is chock-full of fascinating stories, facts, and lists, and comes in both the Kindle version and paperback.
 Since 1988, the Bathroom Reader Institute had published a series of popular books containing irresistible bits of trivia and obscure yet fascinating facts. If you like Neatorama, you'll love the Bathroom Reader Institute's books - go ahead and check 'em out!

Do you love using templates for your business documents? Whether you are preparing a professional letter, company presentation, or a business plan, templates make it easy. Now, you can add these business form templates to your collection, so they are at your fingertips when you need them. 1. Business Expense Form Formats: XLS When you or your employees have business expenses to submit for reimbursement, this template from TidyForms is perfect. You can quickly complete the basic payee information at the top and then add items per section. The Microsoft Excel template includes areas for meal expenses, miscellaneous items, and automobile related...
Read the full article: 10 Free Business Form Templates You Should Keep Handy
 (
(


