KWBaker
Shared posts
Cox BusinessVoice: "Uber For Personal Assistants" Launched By Woman Who Once Worked As One

You're Killing Your iPhone With These 7 Charging Mistakes

Now that the latest iPhone will set you back a cool grand, it's time to review some ways to avoid damaging it. My phone needs to be recharged every two or three days, but the customer rep at my phone company said she had to recharge hers two or three times a day -she has an iPhone. If you use your phone constantly, and have to charge it often, you may as well do it correctly. Just hooking it up to the charger every night without thinking won't get it. Thrillist has the seven most common charging pitfalls you need to know for keeping your iPhone in working order. -via TYWKIWDBI
(Image credit: Gregory Varnum)
Insta360 One 360 Camera Review

How Jim McCann Built 1-800-Flowers Into A $1 Billion Business And Why He Thinks Alexa Is The Future

Have We Lost Our Identities?

Buck Knives Adds New Materials to Custom Knife Builder
Perfect for Parties: Yakitori, A Hot Grilling Trend
Trolling for new menu ideas for fall and winter parties? Look no further than the grill masters of Japan.
Trending now among American chefs is yakitori. The word literally means “grilled chicken,” but the simple name doesn’t begin to describe the variety, complexity, and deep cultural significance of Japan’s favorite grilled meat. These small but elegant skewers (chicken, usually, but other meats and vegetables, too) are the epitome of Japanese barbecue, and some of the best in Asian fast food. In fact, they are very similar to Indonesian sates, but are usually prepared without rubs or marinades.
In a diminutive example of snout to tail eating (beak to tail?), nearly every part of the bird is utilized, from the skin to that prized nugget of meat just above the tail feathers, the oyster. (There are two per chicken.) Of course, you can use breasts, thighs, wings, and leg meat when making yakitori at home.
Yakitori parlors dot Japan’s gastronomic landscape, ranging from noisy holes-in-the-wall where commuters can grab a quick snack and a few beers before embarking on the long trip home, to local neighborhood hangouts where local singles might come for dinner several times a week, to small but exclusive restaurants where a seat at the counter around the grill is as hard to come by as a ticket to a Springsteen concert.
One of the most well-known yakitori parlors is Birdland, named for New York’s iconic jazz club, in Tokyo’s Ginza district—specifically, at the Ginza stop of the Tokyo Metro. Its famously temperamental chef-owner, Toshihiro Wada, has been known to refuse to serve customers he doesn’t believe are sophisticated enough to appreciate his distinctive style of grilling or who might recoil when served medium-rare chicken. During one visit, a fellow diner described him as otaku, meaning “very fussy,” or less politely, a PITA—an acronym I trust won’t get lost in translation.
The grill yakitori is traditionally cooked on is a rectangular clay box approximately two feet long and just a few inches wide with a wire grid as a grate—the perfect size for cooking small kebabs without burning the exposed part of the bamboo skewers. (Below, see a unit we used at a recent session of Barbecue University.) But they can be cooked on a conventional charcoal or gas grill—especially a tabletop hibachi. Clean-burning binchotan charcoal is the fuel of choice, but high-quality natural lump charcoal will work, too.

Instead of rubs or marinades, yakitori is usually served with a flavorful soy and rice wine dipping sauce called tare (pronounced TAH-re). The skewers are dipped twice: the first dip takes place halfway through the grilling and serves to glaze the meat; the second dip coats the meat like a sauce. The process lacquers the yakitori with a glaze that is sweet, salty, silky, and absolutely irresistible. In Japan, the tare is used over and over, acquiring more concentrated flavor with each dipped skewer. (The sauce is replenished at the end of each grill session.)
The appeal of yakitori as party fare is multifaceted:
- It’s the ultimate finger food, easily managed by guests who are standing and/or holding beverages;
- Skewers can be assembled up to 24 hours in advance and quickly grilled on demand;
- Yakitori is relatively economical, as potential combinations can include vegetables (mushrooms, scallions or leeks, asparagus, pearl onions, cherry tomatoes, zucchini, etc.). You can even set up a yakitori bar where guests assemble their own skewers;
- The delicacy accommodates many diets, including low-carb, paleo, gluten-free, and even vegetarian (think tofu and shiitake mushrooms);
- Preferences for light or dark chicken meat can be accommodated. But don’t stop with breasts, tenders, or thighs: offer chicken hearts, livers, or gizzards, parts many people consider treats. I personally love to skewer small chicken meatballs, called tskune (for a recipe, see my book Planet Barbecue.)
- Yakitori can be served as an appetizer as they are light enough to precede a more substantial main course;
- The skewers can be cooked on limited grill space.
To get you started, here’s one of my favorite yakitori recipes.
The post Perfect for Parties: Yakitori, A Hot Grilling Trend appeared first on Barbecuebible.com.
5 Camera Settings Every New Photographer Needs to Know
The first time you pick up a camera it can be pretty confusing. With all the bells and whistles crammed inside even entry-level DSLRs nowadays, knowing where to start is anyone’s guess. Teaching yourself, through trial and error, is one of the best means-tested ways to come to grips with your camera and learn how to use it. But sometimes that takes a while, so here are some of the camera settings that I think every photographer needs to know about when they get their hands on a DSLR.

1. Live View Stops Mirror Slap
That satisfying, reassuring “clunk” sound you hear when you press the shutter button isn’t actually the shutter firing on the camera. In fact, that is the mirror moving up and down to expose the sensor to the world. But that relatively aggressive motion of the mirror can introduce camera shake into your images.
It’s something you might notice if you’re shooting a long exposure, but there’s an easy way around it. Switch the camera into Live View mode, forcing the mirror to raise permanently (until you turn off that mode) so that you can see the image on the LCD screen. This means that when you do actually press the button, only the shutter itself is moving – no need to worry about that mirror thudding up and down anymore.

2. Auto ISO and Manual Mode Helps You Learn
Lots of photographers stay in Automatic mode because of the fear of missing images when they switch to Manual mode. To remove this fear, try shooting in Manual mode with Auto ISO enabled. This means that the camera is still in control of one of the three factors affecting exposure (aperture, shutter speed, and ISO) so that it can balance out the settings with the ISO. But now you get to control the aperture and shutter speed yourself, changing them around to see what effect they will have on your photo.

Use Manual mode and Auto ISO to experiment safely with the other camera settings.
Try slowing down the shutter speed, or narrowing the aperture of the lens, safe in the knowledge that auto ISO will do a pretty good job at balancing the exposure (unless you slow your shutter down a lot). Being able to experiment freely like this will help you to get a practical knowledge of the exposure triangle and how it works.
3. Disable Area Autofocus Modes
The first thing you should do is disable any Area (zone) Autofocus modes. This is where the camera picks and chooses where it focuses, as it will rarely be at the point you would want. Instead, try using single-point focus. This allows you to be precise and line-up the black square over the target area in the scene.

Here I used single-point focus to nail the focus on the eye.
If you were taking a photo of a dog, for example, it’s much better to focus on the eyes than to rely on the camera to find that spot for you. Most likely, the camera would be focused on the end of the dog’s nose – not very good for an impactful shot.
4. Mute Your Camera
As a wildlife photographer, one of the really annoying things to hear in a quiet hide or nature reserve is the beep of someone’s camera. Whenever I get a new camera, it’s not long before I dive into the menu and disable all of the autofocus beeps, menu selection beeps, and any other noises the camera might feel so inclined to make.

Mute your camera to avoid disturbing sensitive animals – or people!
Not only is it pretty pointless, it could alert an animal to your presence! So, wildlife photographers, don’t do it.
5. Pay Attention to the White Balance Setting
The White Balance setting is one that can totally transform your images in a second, but it’s one that most people ignore for quite a while and just leave in auto mode.
If you’re shooting in JPEG file format, and not raw, then the White Balance choice you make in the camera does matter. If you’re shooting raw, you can adjust this later during post-production.

Adjust your white balance for proper color replication.
Why not Auto White Balance? I find that it never gets things right. Colors always look much flatter and dull, whereas the daylight or cloudy presets add an immediate punch to your shot. Try it, and you’ll probably find things really do change for the better.
You can also look at the manual White Balance setting (measured in degrees Kelvin) if you want to have a much more fine-tuned control over this setting.
Summary
Hopefully, these five tips will help you to navigate through the minefield that is a new DSLR camera. There are of course so many more things to know – and that’s where Digital Photography School can help you, of course. But these are some things that I think will make life easier for you as a new DSLR user.
Let me know in the comments if you have any other great tips or camera settings for new DSLR users!
The post 5 Camera Settings Every New Photographer Needs to Know by Will Nicholls appeared first on Digital Photography School.
Landlording Has Never Been Easier Thanks To This Company

Speedy Stitcher Sewing Awl
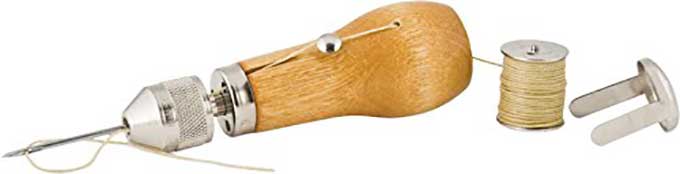
One of the world’s oldest tools, but one that is often overlooked. This Speedy Stitcher Sewing Awl is a heavy-duty needle with its eye at the working end, mounted in a handle. For mending leather, shoes, bags, sewing canvas, or stitching heavy materials, there’s no better tool. I don’t use mine often, but it has a place in the essential toolbox. Kit includes tool, extra needles, and waxed thread.
-- KK
[This is a Cool Tools Favorite from 2004]
The Speedy Stitcher Sewing Awl Kit
Available from Amazon
This is a Cool Tools Favorite from 2017
How to Cheat on a Lie Detector Test

Polygraph machines, better known as lie detectors, are bullshit. They can’t tell whether you’re lying, just whether your body is doing some of the things that bodies do when we’re nervous: sweating, for example. But there are a few tricks that, according to rumor, can let you mess with the results.
The Best Careers for People Who Want to Work Outside

Indoor work is not for everyone. Some people need to move around frequently to be happy, others need to commune with nature, still others just don’t like cubicles or fluorescent lighting or the “somebody’s got a case of the Mondays” culture.
Universal Paperclips Guide: 3 Tips for Beating the Addictive New Clicker Game

The best video game of the year might just be Universal Paperclips, a browser-based clicker that explores the dangers of unchecked artificial intelligence. It’s kind of like FarmVille, but instead of growing vegetables you’re making paperclips—and (spoiler alert) you might just end up destroying the world in the…
Search for Your Email Address to See If Your Password Has Been Stolen

No doubt you’ve Googled yourself at least once to see what comes up (or to see what embarrassing photos and blog posts you need to purge from the web before your boss finds them). While doing a search for yourself might yield some predictable results—your LinkedIn page, any mentions of you in the local paper,…
The Minister Who Invented Camping in America

William H. H. Murray was a wealthy Congregationalist minister and an outdoors enthusiast. Every summer he went to the Adirondack Mountains, often with his wife, sometimes with several friends, to enjoy hunting, fishing, canoeing, and commmuning with nature. He also kept a journal, writing humorous and informative essays on his experiences.
Murray never intended his “narrative exercises” for publication—but when a good friend encouraged him in 1869 to publish a book on any subject with the prestigious Boston publisher of Osgood, Fields, and Company, Murray, who liked the idea but did not have a manuscript, bundled the exercises with an introductory chapter and submitted them. Initially publisher James T. Fields declined Murray’s manuscript, but not wanting to embarrass the minister, he reluctantly agreed to read the submission. Two days later, he called Murray to his office with exciting news: He wanted to publish Murray’s book that spring. “Your method of interpreting nature and your humor are unlike anything that we have ever seen, ” Fields said. “This little book, I am confident, is destined to a great career.”
Adventures in the Wilderness was met with mixed reviews. The Overland Monthly dismissed Murray’s writing as “gorgeous French, badly translated” while The Nation found his practical advice to be “sensible and worth taking.” Nonetheless, the book was immediately popular with the public and a tremendous commercial success, making Murray both famous and wealthy by June. We do not know exactly how many copies were sold, but the numbers probably rose into the tens, and perhaps hundreds, of thousands. The book was in its tenth printing by July 7. Years later, Murray recalled that for a long time Adventures had sold at a rate of approximately 500 per week.
The Adirondacks saw a boom in camping immediately after the publication of Murray's book. It wasn't just Murray's inspiration. His book was the catalyst of many factors that led Americans to go outdoors and camp in the 1860s. Read about how and why camping gained its popularity at Smithsonian. -via Strange Company
How to Get Started With Fly Fishing
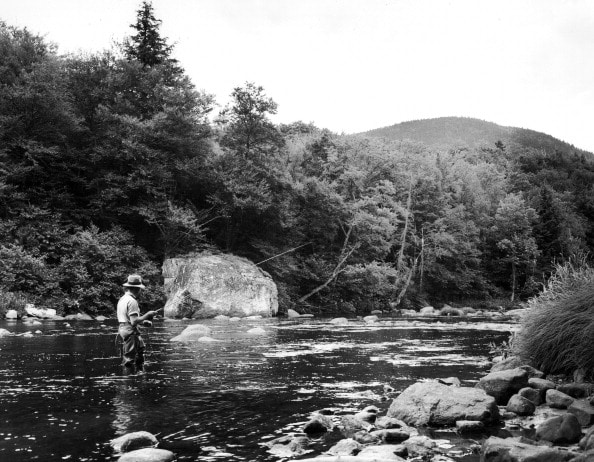
Fishing with a rod and line, and an artificial lightweight lure made to imitate fish prey — that is, fly fishing — was first recorded around the year 200. And while modern innovation has improved the quality and durability of the materials, the basics of the sport and pastime have remained largely the same. Attach a lure (or “fly”) to a line, cast it in the water, and see what happens.
Growing up, I fished in a boat with my uncle every now and then, but didn’t take it up on my own beyond that. Ever since moving to Colorado 5 years ago, though, I’ve been intrigued by fly fishing. You see fishermen in nearly every stream you pass by, and our family often encounters them on the trails we traverse. It seems like such an elegant way to pass the time and settle your mind, while also fulfilling the ancient role of Provider.
So over Labor Day, I finally decided to hire a guide and learn the ropes. Below, I’ll share those ropes with you: why you’d choose fly fishing over other methods, gear to look for, fly and casting basics, and finally some concrete tips on actually getting yourself started with this age-old pursuit. Keep in mind this is a guide for folks who have either never fly fished, or have only done so a small handful of times and with little knowledge. It’s for men who’ve wanted to get into fly fishing, but haven’t known where to begin.
If that’s you, I hope this guide can point you in the right direction.
Why Fly Fish? What Distinguishes It From Other Types of Fishing?
“To go fishing is the chance to wash one’s soul with pure air, with the rush of the brook, or with the shimmer of sun on blue water. It brings meekness and inspiration from the decency of nature, charity toward tackle-makers, patience toward fish, a mockery of profits and egos, a quieting of hate, a rejoicing that you do not have to decide a darned thing until next week. And it is discipline in the equality of men — for all men are equal before fish.” —Herbert Hoover, avid fly fishermen
While spin casting with a spinning reel is a great introduction to fishing, many anglers would argue fly fishing elevates this pastime into a real art.
Why is this? What are the differences?
When it comes to the practicalities, the differences are many. To name just a few, in fly fishing:
- the rods are lightweight and much longer
- the bait (or “fly”) is super lightweight, artificial, and meant to imitate food (rather than using live bait or heavy lures)
- the line itself is heavier, and is what provides the weight to cast, versus the bait or lure itself
- you’re typically fishing in moving water (and often in the water) vs. the still water of lakes
- you’re almost constantly in motion rather than just sitting on a boat waiting for a bobber to dip; your arms get a good workout
Beyond the practical differences, fly fishing is often labeled as the purer form. It requires craftsmanship and true skill to cast your line, the flies themselves are works of art, and as we’ll see, you become a true master of the environment. When I asked my guide why fly fish, he grinned like the answer was obvious and said, “Why wouldn’t you?”
With spinning reel fishing, the goal is often a combination of relaxation and volume — catching as many fish as you can while having a nice outing on a boat or sitting in a chair on the shoreline. It’s just easier.
With fly fishing, it’s more of a challenge. Can you trick the fish into biting onto your fly/hook? Not only that, can you successfully get the fish hooked at the right moment, and tease it into your hands/net? Can you navigate the stream, and know exactly where to place (or “present”) your fly, so the fish are most likely to bite?
All of this is why you see romantic stories (and even philosophy books!) about fly fishing; it’s just a more poetic and artful form of the sport.
Now that we know the “why,” let’s get more into the “how.”
What Kind of Gear Do You Need?
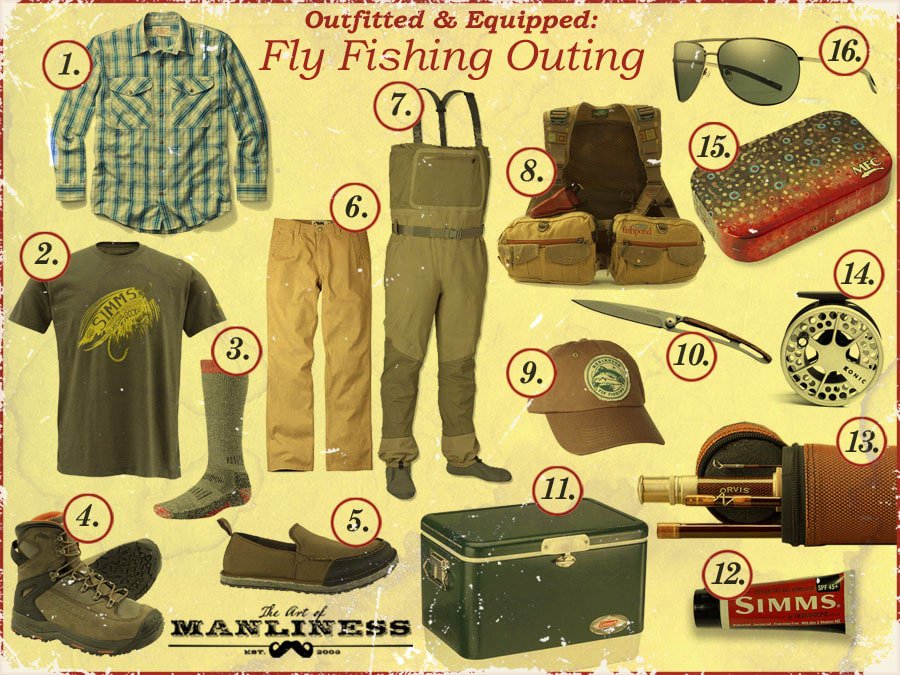
While you don’t need everything pictured above when you’re first starting with fly fishing, this gives you a general overview of the kinds of things you’ll likely eventually acquire and take with you as you get more into it. For a full description of each item pictured, click here.
When you think of fishing, and especially getting started with it, you likely think of all the stuff you’ll need to be successful. When I first got to the fly fishing shop and my guide was walking through all the gear we’d be taking advantage of, I was a little bit intimidated. There were multiple types and weights of line used, a case full of flies (ranging in size from a pinky nail to finger-length), gel to coat and waterproof the fly, tools and cutters for knot-tying and knot-untangling, not to mention waders, vests, and other clothing essentials.
I think my guide saw my wide eyes, because he then said, “Really, you don’t need this much stuff to start. Grab a pole, some line, and some flies, throw it in the water, and see what happens.” He then told me the story of a kid in town he knew who would tie some line to a stick, tie on a fly, and drop it in the water — and he’d catch some fish to boot. Like with anything, when you embrace fly fishing you’ll likely end up with plenty of specialized gear, but you don’t need all that when you’re first starting out.
Flies
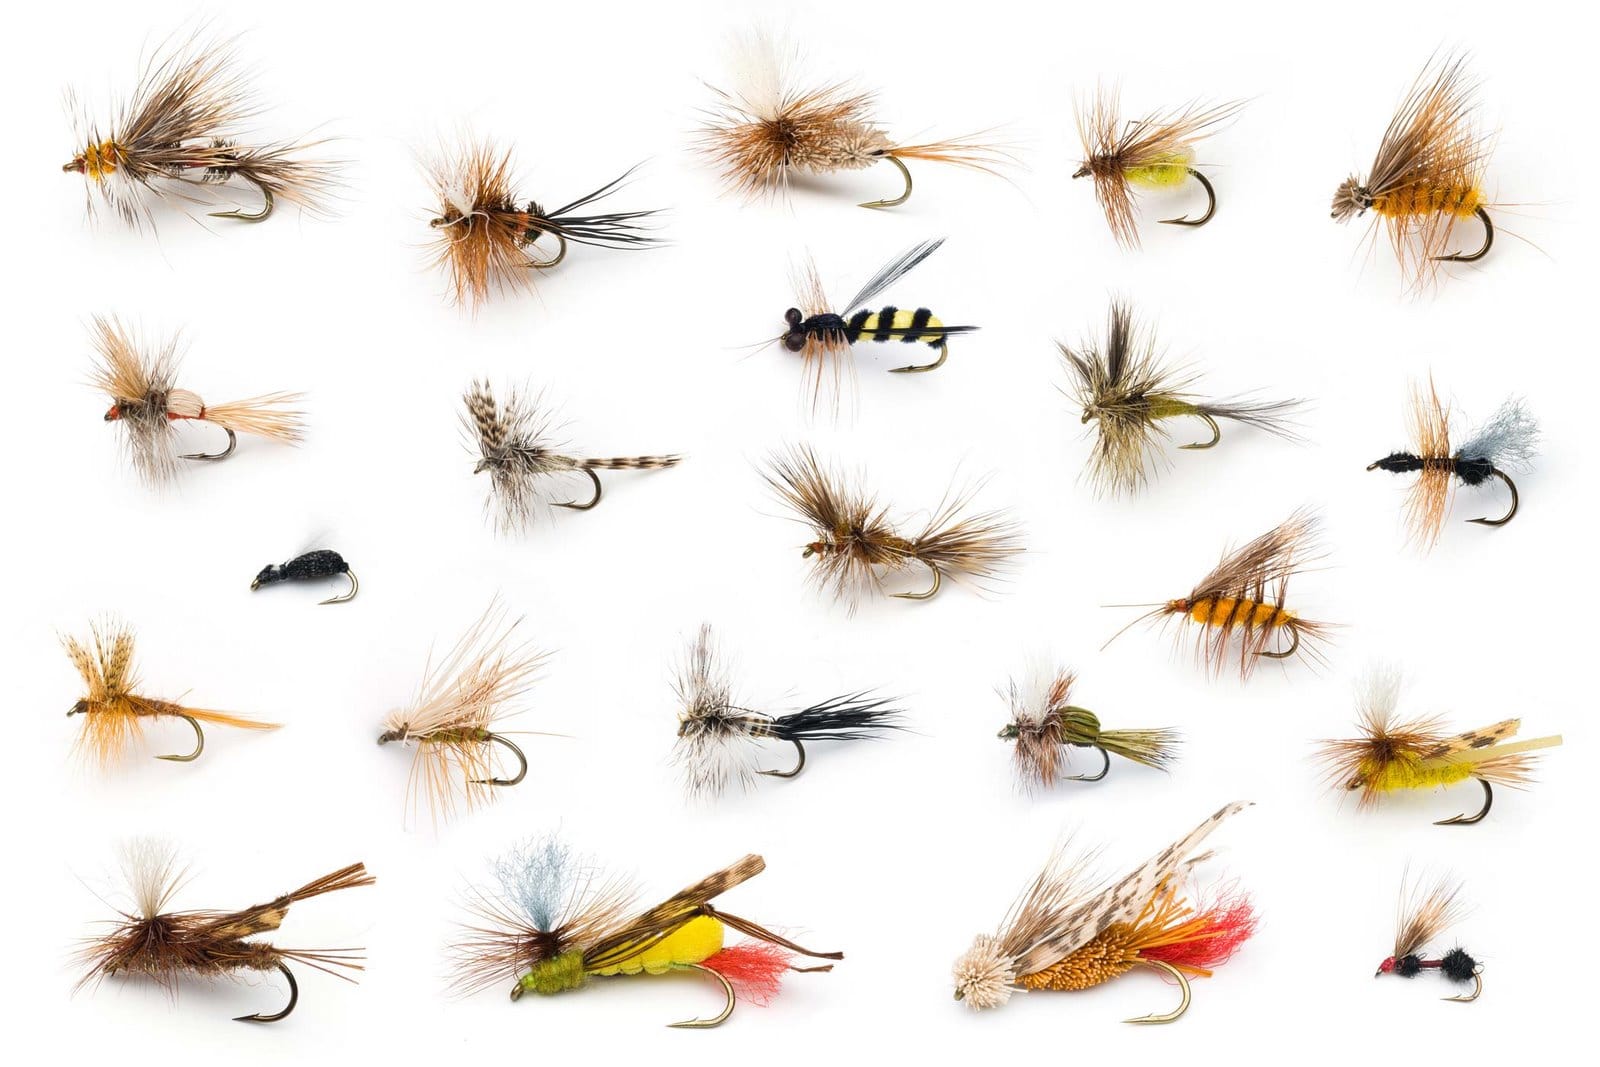
Fly fishing gets its name from the bait that is used: artificial “flies” made to imitate what the fish are eating — bugs usually (like various types of . . . you guessed it, flies!), but sometimes even small rodents and other creatures.
There are numerous types and sizes of flies — dry flies, nymphs, streamers — and what you use will depend on the fish you’re trying to catch and your setting. If the fish aren’t biting, you’ll often change out a fly and try to intuit what they might be after that day or season. This is why fly fishermen are often amateur ichthyologists (fish scientists) and entomologists (insect scientists). They know types of fish, what those fish eat in what season, what the bugs look like at different times of the year, etc. My guide’s biological knowledge after years of fishing was truly astounding.
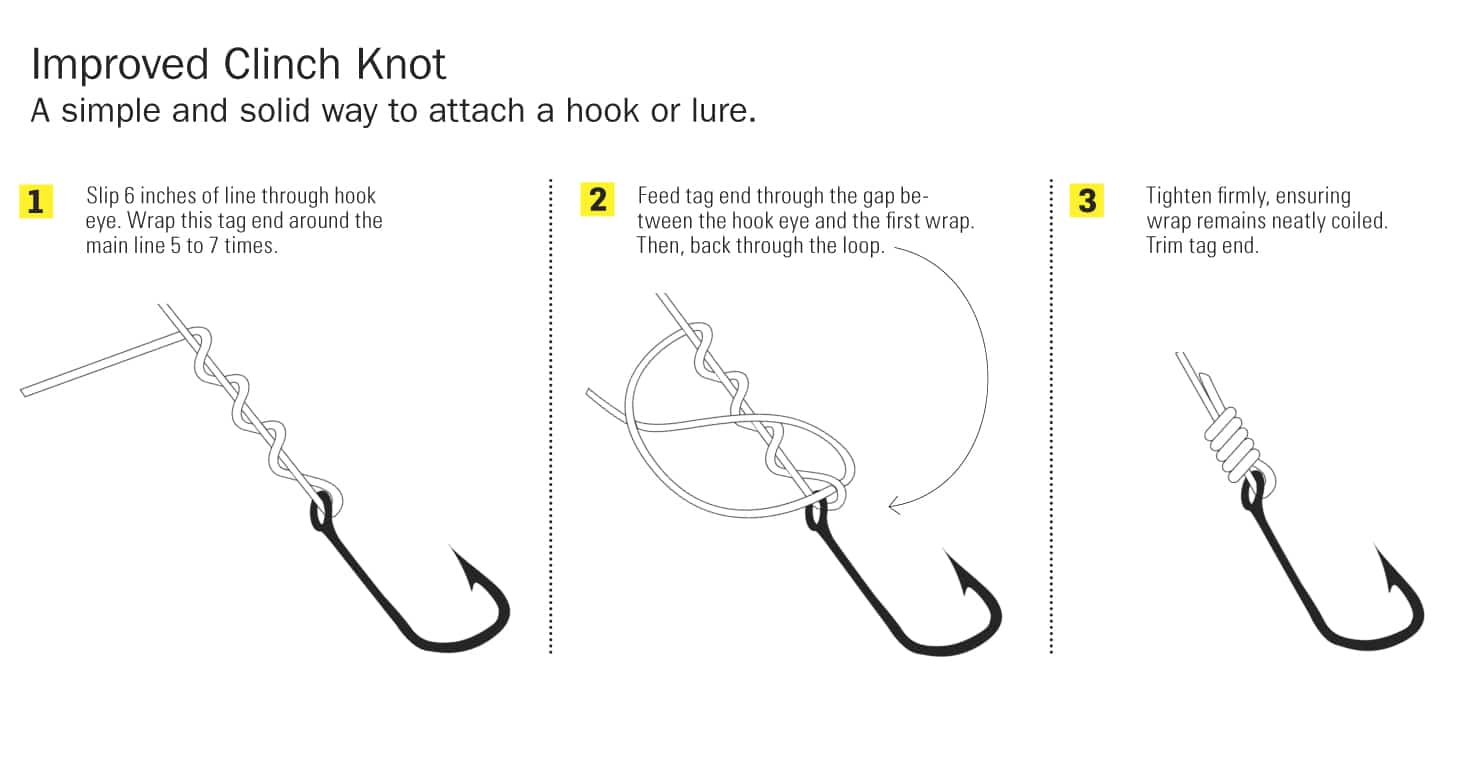
Once you can determine the right fly to use, there are a couple different acceptable knots for attaching that fly to your line, but the “improved clinch knot” seems to a favorite among a lot of experts. Check out this guide to not only that knot, but a handful of others used in fly fishing as well.
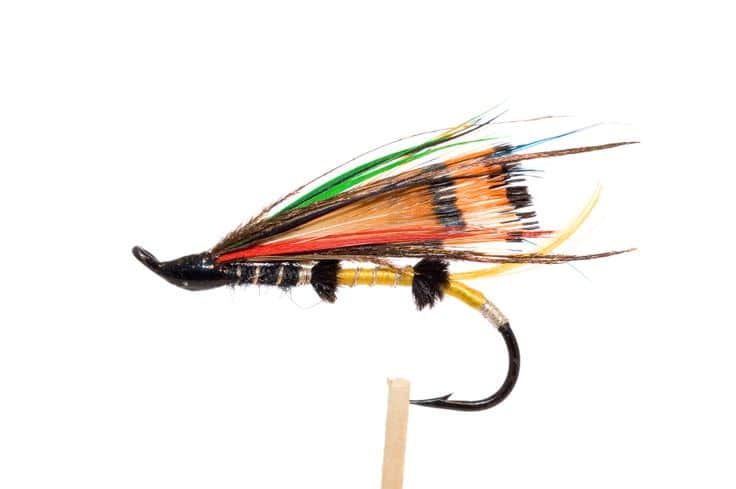
A great closeup of a homemade fly. You can see the colored thread carefully wrapped about the hook, with feathers and hairs attached to create that bug-like look.
Once you explore fly fishing, you’ll likely hear about folks who are “fly tying.” This is not a term for tying your fly to your line (as I initially and very naively thought), but rather a term for making your own flies rather than buying them. You’d do this to possibly save money (flies are easy to lose in trees or to rowdy fish), but also for the art of it. Flies truly are works of art, created with various materials like beads, foams, animal hairs, and much more. The beginner angler will not be fly tying; there are literally books written on the craft, and it requires a whole other set of tools and skills. This is something to look into after you’ve gotten the hang of the fishing itself.
Casting and Catching
The GIF above is from an Orvis instructional video. They have dozens of fly fishing videos for you to peruse.
Once you have your gear and fly all set, it’s time to cast. When you watch seasoned fly fishermen in action on the stream, it’s like seeing art in motion. The way the arm moves, followed by the line and fly, so delicately placed on the water exactly where it’s wanted. Let me tell ya, that’s not what it looks like for the rank beginner.
So here’s the scoop on fly casting: find someone to teach you. That’s truly the key. I could try to describe in text and illustrations how it happens, but that’s just not going to work. For this article, I actually researched the viability of putting together an illustrated guide on casting. But when I saw other guides that were out there and folks trying to describe it, I actually got more confused than when I was with my guide and trying it out with a rod in hand.
There are too many types of casting, too many subtle motions and arm movements, and too many ways to make mistakes for me to try to relate that all to you here on a website. Of all the projects and skills I’ve written about for the Art of Manliness, this is the one that most needs to be learned in the flesh, either from a friend or family member who fishes, or from an expert who you’ve paid to help guide you along.
The same goes for hooking and ultimately catching the fish. There’s a whole terminology that goes into casting and catching:
- Presentation
- Monofilament
- Strike
- Indicator
- Setting the hook
- Leader
- Tippet
- Riffle
And this is just a small sample. You don’t want to be wading into those waters on your own — literally or metaphorically.
So, how does the beginner actually go about getting started? Let’s take a look at that next.
Tips for Getting Started: A Linear Progression
Take a class. Chances are high that no matter where you live, some outfitter is offering a class on fly fishing. Be it a sporting goods store, a dedicated fly fishing shop, or even a community college, there are a lot of places putting on free (or low-cost) classes to learn the art. Orvis is a great place to look — they offer free classes in 42 states. They tend to start with a lecture portion on what I’ve covered above (but more in-depth), followed by hands-on instruction about lines, knots, flies, and casting. Depending on the shop, they’ll also have next-level classes, which sometimes include practicing in a stocked pond.

Casting a line into the East River near Crested Butte, CO. I had a great experience with Almont Anglers; give ’em a shout if you’re in the area!
Hire a guide. After you’ve taken a class or two, hire yourself a guide to take you on a half-day or full-day outing on the water. (If, that is, you don’t have an experienced friend or family member willing to take you and show you the ropes.) You can only learn so much in a classroom setting, even if there is some hands-on instruction involved. There’s nothing like being in the stream and seeing what a seasoned vet does in regards to which flies to use, where to cast, how he troubleshoots things, etc.
I would recommend going in that order of taking a class first before hiring a guide. I did not do that, and about half of our half-day together was spent teaching me the ropes and practicing in a pond, which likely could have all been accomplished beforehand.
A guide can be expensive — look to spend $150-$500 depending on your location, and whether you’re doing a full-day or half-day outing. Makes for a great gift to save up for if that’s a little out of reach.
Practice tying your knots and casting. While not on the water, you can practice a few things at home. First, work on your knots; lines and flies (which are often tiny) need tying together, and it’s only with plenty of practice that you can do so deftly and efficiently. My guide could rig up a fly in less than 30 seconds, while I was fumbling with what felt like sausage fingers for a couple minutes before getting it just right. That doesn’t seem like much time, but when you’re out in the river, it adds up. Plus, if you’re fumbling with your fly in the water, dropping it means losing a couple bucks right then and there.
Along with the guide listed above in the “Flies” section, Orvis also has a good encyclopedia of knots that one might use while fly fishing. (They truly are a gold mine of fly fishing info and instruction.)
You can also practice casting at home, though it’s admittedly a little tougher because you need adequate room to do it. If your driveway or backyard is long enough, start there. If you don’t have room at home, go to a large park, or even a lake to practice your casting, with actual fishing being a secondary pursuit to your practice efforts.
Start in lakes. While fly fishing is generally pictured as taking place in streams, plenty of fishermen practice their craft in lakes. Especially here in Colorado, it’s rather common to see guys (and gals) wading into cold mountain lakes. For the beginner, that’s going to be the easier route to go for one main reason: it’s just easier to keep an eye on your fly when the water is still.
When fly fishing, there’s no bobber or super obvious jump on the line to cue you into a fish being hooked. Rather, you have to carefully watch your fly and line, and tug up when you see or feel slight movement in order to hook the fish (called “setting the hook”). In a flowing river or creek, when your fly and line is drifting and undulating with the current, it’s really hard to tell if that gentle tug on the line is a fish, or just a rock, or even the tug of the water itself. Start in lakes to really get the hang of things.
Prepare to practice. A lot. I asked my guide about how long it took him to really master all this stuff, and he said it happens in phases. First you get good at casting and tying your knots, then you get good at noticing when a fish has shown interest in your fly, then you get good at setting the hook, then you get good at successfully reeling in and nabbing your fish, and finally once you have all that stuff taken care of, you can pay attention to the science of the fish and bugs, and know how to read the water and your environs. So, be prepared to try a lot, and fail a lot, before getting to a point of truly being comfortable in the water.
The post How to Get Started With Fly Fishing appeared first on The Art of Manliness.
10 Security Checks Everyone Should Perform Regularly

Security often feels like a daunting task. Who has time to spend hours locking down accounts and obsessing over everything on your phone or PC? The truth is that you shouldn’t be scared of security. You can perform important checkups in a matter of minutes and your online life will be much safer because of them. Here are ten vital checks you can work into your schedule — do these every once in a while and you’ll be ahead of 90 percent of people. 1. Apply Updates for Everything Everyone has clicked “remind me later” when prompted about an update....
Read the full article: 10 Security Checks Everyone Should Perform Regularly
How to Safely Delete Your Google or Gmail Account for Good

There are plenty of reasons why some people are choosing to cut the Google cord. Maybe you prefer to go the open source route or have privacy concerns that are pushing you to find Google alternatives. No matter what your reason, the first step to walking away from all things Google is to delete your Google or Gmail account. Google gives users two easy options for deleting accounts. The first option is to delete just your Gmail account. If you choose to do this, you will need to have another email address handy in order to continue with Google services...
Read the full article: How to Safely Delete Your Google or Gmail Account for Good
5 Best Sites for Photo Essays and News in Pictures

You know that you can read the news in a paper, listen to it on the radio, or watch it on TV. But not many know that you can also see what’s happening around the world as photos or slideshows. Journalistic photo essays have been around for some time now. Life magazine revolutionized this new style of consuming news and information. But now that Life has stopped, where should you go to see the news in an interesting new way? 1. Time’s LightBox for News, Life for Archives Before we go further, you should know that all the archives of...
Read the full article: 5 Best Sites for Photo Essays and News in Pictures
How to Send Email to Any Cell Phone (for Free)

You’re at your computer, and your friend is out with their phone. You want to send them a message, and your phone is dead.
You could send an email, fire off a Facebook message, or hit them up on Twitter. They use iMessage, right? All of these methods are available on a desktop. But if you’re talking to someone who isn’t carrying around a smartphone, these options don’t work. What then?
Simple—send an email to their phone number. This works with virtually any SMS-capable phone, whether it runs apps or not, thanks to SMS gateways.
What Is an SMS Gateway?
An SMS gateway converts an email into SMS, enabling you to send emails to a phone from a PC.
Sending an email to a phone number is the same as writing any other email. All you need to know is the recipient’s gateway address. If you know which mobile network they connect to, finding out their address shouldn’t be a problem.
SMS gateways are typically free to use. But while you can send an email for free, it may still cost money for the person on the receiving end. An SMS that originates from email isn’t any different from any other as far as cellular plans are concerned.
Uses for an SMS Gateway
SMS gateways aren’t useful only for sending a text from your PC to a phone. Sure, that may be technically all that a gateway does, but that’s not being imaginative enough. Here are some other uses.
1. Notify Yourself When an Email Arrives
On smartphones, a notification appears whenever a new email lands in your inbox. On a feature phone without this feature, forwarding an email to your phone is one way to keep tabs on who’s reaching out to you. The entire message won’t fit in a single SMS, but you will at least know that the desired package has shipped or that a colleague has pinged you about the current project.
Using filters, you can opt to only forward certain emails. This is beneficial even if you’re a smartphone user. Receiving a text only for the most important mail is a nice balance between being always online and disconnecting from the web entirely.
Forwarding email to SMS doesn’t require anything special on your part. Forward to a gateway address the same way you would a standard email address.
2. Transfer Files
Sending text messages makes for an easy way to get files from your phone to a computer. This method works for sending pictures that you take yourself or forwarding images received from others, allowing you to view them on a larger screen. This saves you the effort of plugging your phone into a computer and figuring out how to transfer files that way—if you even can.
To make the magic happen, all you have to do is type in an email address instead of a phone number when sending a picture message.
3. Make a Feature Phone Smart Using IFTTT
Many of today’s smart gadgets assume you have a smartphone. Some won’t even do anything without the ability to install a companion app to your device. Fortunately, in some cases, there is a workaround.
IFTTT is a web service that can perform certain tasks in response to particular actions. With IFTTT, you can make your feature phone smart or compatible with smart devices.
IFTTT recipes let you perform many actions simply by sending a text. Adjust lights or play music. If you’re working with limited storage on your device, you can use IFTTT to back up SMS messages to a spreadsheet. Or you can receive an SMS message whenever a package arrives.
4. Send Bulk Messages
SMS gateways aren’t just here to make our lives more convenient. Companies turn to them as a way to messages thousands of phones at once. Though this service isn’t always free.
When you receive an impersonal message from a carrier, a company, or a political organization, they’re probably using an SMS gateway. This is also a way employers in large companies can communicate with all of their employees, regardless of where they are in the world.
How to Send Email to a Phone Number
To email a phone number, you’re going to need to know the recipient’s gateway address. Let’s say they use AT&T. In that case, just type in their ten digit phone number followed by @txt.att.net. Do not use dashes.
The result should look like this: 1234567890@txt.att.net. This is the same regardless of which carrier or MVNO you use.
US Carriers and MVNOs
Here is a list of gateway address for major US carriers as well as MVNO. Use the first address to send SMS and the second for MMS. Note: some carriers don’t use separate addresses.
Alltel: sms.alltelwireless.com | mms.alltelwireless.com
AT&T: txt.att.net | mms.att.net
Boost Mobile: sms.myboostmobile.com | myboostmobile.com
Cricket Wireless: txt.att.net | mms.att.net
MetroPCS: mymetropcs.com | mymetropcs.com
Project Fi: msg.fi.google.com
Republic Wireless: text.republicwireless.com
Sprint: messaging.sprintpcs.com | pm.sprint.com
Ting: message.ting.com
T-Mobile: tmomail.net
US Cellular: email.uscc.net | mms.uscc.net
Verizon Wireless: vtext.com | vzwpix.com | mypixmessages.com
Virgin Mobile: vmobl.com | vmpix.com
International Carriers
Most people don’t live in the US. We could undergo the effort of trying to compile a list carrier-by-carrier, country-by-country, but other people have already done that heavy lifting. If you live outside of the US, check out these links to see what your carrier’s SMS gateway might be.
How Do You Use SMS Gateways?
Back in high school, emailing friends’ mobile phones was how I sent SMS messages back before I had a cellular phone of my own. Thanks to our conversations, there were periods when my inbox had more phone numbers than email addresses. All of this took place a decade ago.
Since then, I’ve mostly turned to SMS gateway to occasionally forward a picture message or web address from a feature phone to a computer. But if you’re not using a dumbphone, there are other ways to transfer files from an Android phone (or an iPhone) to a PC.
Read the full article: How to Send Email to Any Cell Phone (for Free)
Greatest Hits: 10 Recipes from Barbecue University™
Barbecue University™—still going strong after 17 years! The professor, yours truly, has lost track of how many students he’s personally escorted up the ladder of grilling enlightenment. Suffice it to say, the answer is “thousands.”
And I can’t say how many recipes have been featured over the years, because while each student receives a leather-bound notebook that includes that session’s menu and recipes—always 8 to 10 a day—I often go off script and give them extras. During the first couple of years, most of the recipes for the classes came from the Barbecue! Bible and How to Grill. The pond I fished from deepened considerably with the publishing of BBQ USA and Beer Can Chicken, followed by others, including Planet Barbecue and Project Smoke.
While brainstorming an all-new menu for BBQ U 2018, I reminisced about the most popular recipes—the ones students couldn’t wait to make for friends and family once they returned home. Here, I’m sharing ten of the “greatest hits” with you.
Green Lightning Shrimp Tacos
Maple-Sriracha Glazed Drumsticks
Thai Grilled Beef Salad
Pastrami Bacon
Caveman T-bones with Hellfire Hot Sauce
Big Bad Beef Ribs
Smoked Planked Trout with Caper Dill Sauce
Smoked Creamed Corn
Smoked Chocolate Bread Pudding
Bacon-Apple Crisp
What is your favorite Raichlen recipe? Please share it with us on Facebook, Twitter, or Instagram.
The post Greatest Hits: 10 Recipes from Barbecue University™ appeared first on Barbecuebible.com.
The Best Chicken Wings to Make For Fall
From time to time we offer guest blogs on Barbecuebible.com. This one comes from a chef that we at BarbecueBible.com admire greatly, Matt Jennings, author of Homegrown: Cooking from My New England Roots. His restaurant Townsman in Boston garners significant acclaim for its bold, New England-inspired flavors. We think you’ll see why when you try his recipe below for Grilled Chicken Wings with Cider Barbecue Sauce. Matt, an avid football fan, knows from experience that they’ll make you a winner at any tailgate party this fall.
I’m going to let you in on a secret: contrary to what every sports bar in America asserts, the best chicken wings don’t come out of the deep fryer, but off the grill. These wings are marinated overnight in spiced citrus juice, which tenderizes and flavors the meat, and the sugar in the marinade caramelizes when the chicken is cooked.
Though the wings are flavorful enough on their own, serve them with a tangy apple cider and molasses barbecue sauce alongside, since every wing deserves a dip. Because the marinating and sauce-making are done ahead (and because wings are crowd-pleasers for adults and kids alike), this is a great recipe for a party.
Grilled Chicken Wings with Cider Barbecue Sauce
Serves 6
2½ cups fresh orange juice
1 cup pineapple juice
¾ cup fresh lime juice
½ cup rice vinegar
½ cup plus 2 tablespoons kosher salt
8 garlic cloves, smashed
2 tablespoons brown sugar
2 tablespoons shoyu (white soy sauce)
2 sprigs oregano
2 sprigs thyme
1 tablespoon whole black peppercorns
2 lemons, halved
1 teaspoon cumin seeds, toasted and ground
5½ pounds chicken wings, wing tips removed
1 tablespoon freshly ground black pepper
1 teaspoon cayenne pepper
¼ cup fresh cilantro leaves, for garnish
Cider-Molasses Barbecue Sauce (see recipe), for serving
- In a large pot, combine the orange juice, pineapple juice, lime juice, vinegar, ½ cup of the salt, the smashed garlic, brown sugar, shoyu, oregano, thyme, peppercorns, lemon halves, cumin, and 2 cups water and bring to a boil. Remove from the heat and let cool to room temperature. Pour the marinade into a gallon-size zip-top plastic bag or large bowl. Add the chicken wings to the cooled marinade, cover, and refrigerate overnight.
- Prepare a gas or charcoal grill for direct, medium-high-heat grilling. Line a rimmed baking sheet with paper towels.
- In a small bowl, combine the remaining 2 tablespoons salt, the ground black pepper, and the cayenne. Remove the chicken wings from the marinade and lay them on the paper towel–lined pan; blot them dry with more paper towels. Sprinkle the wings with the salt mixture on all sides and grill, turning often, until charred and cooked through, about 20 minutes.
- Transfer the chicken wings to a serving platter and sprinkle with the cilantro. Serve with the barbecue sauce alongside.
Excerpted from Homegrown by Matt Jennings (Artisan Books). Copyright © 2017. Photographs by Huge Galdones.
The post The Best Chicken Wings to Make For Fall appeared first on Barbecuebible.com.
Revisiting Beer Can Chicken
Recently, friends and I met up at a neighborhood eatery for an early dinner. Perusing the menu, I was delighted to see beer can chicken—this one served with carrot top chimichurri sauce. Sold. For me, beer can chicken is a sentimental favorite.
I actually owe my long working relationship with Steven to the dish. Back in the summer of 2002, he was on tour promoting his latest book, Beer-Can Chicken. Steven’s publisher, Workman, hired me the afternoon before his Ohio visit to handle food styling duties and drive him to local media and bookstore events, the first of which was occurring at 6 a.m. the following morning. Printed recipes in hand, I rushed to the supermarket to find the most comely-looking roasters they had, worthy beer, and the spices needed for Steven’s ever-popular All-Purpose Rub. I spent a sleepless night preparing for his live demos and barbecuing the “swap-outs,” i.e., the finished camera-ready chickens.
Though he literally wrote the book on the subject, Steven did not invent beer can chicken, sometimes called “chicken on a throne.” He was first introduced to it in 1996 at Memphis in May by a competition barbecue team called the Bryce Boar Blazers—though they didn’t claim credit for it, either, as it was already popular in Louisiana. Like nearly everyone, Steven was captivated by the wacky, indecorous technique. He explains it thus:
The idea is startlingly simple: You grill a chicken upright over an open can of beer. What results is the moistest, most succulent, and most flavorful chicken you’ve ever tasted.
Though some food writers have thrown shade on the technique recently, there really are benefits to barbecuing chicken (or turkey, duck, quail, or Cornish hens) this way:
• The vertical position facilitates even browning, crisp skin, and juicy meat without need of a rotisserie
• Excess fat drips off
• The legs and thighs are closer to the heat, meaning the dark meat can be cooked to a higher temperature (170 to 175 degrees) than the breast meat, which tends to dry out if overcooked
• Smoke (from wood chips or chunks) can circulate freely, subtly flavoring the bird
• It’s a conversation starter
The dish is also infinitely customizable—Beer-Can Chicken proved that—and once you have the basics down, it can be adapted to any barbecue culture. Jamaican jerk. Oaxacan mole. Chicken tikka or tandoori. Simply vary the rub, the marinade, or the beer or other liquid.
One of my favorite variations was a winner years ago in an extreme grilling contest sponsored by our website, barbecuebible.com. It was submitted by Louis Kiss, then (and maybe still) a special effects artist in California. It’s perfect for fall, and especially appropriate for Halloween parties; you still have time to audition it for the latter. To make it, follow the instructions for Steven’s basic beer can chicken, but use your favorite pumpkin beer or ale (if bottled, transfer to an empty beer or soda can) and the Pumpkin Spice Rub below.
Here are our tips for beer can chicken success:
• Buy organic or Certified Humane chickens. (For help in deciphering labels on poultry, click here)
• For more flavor and succulence, brine the chicken before cooking. Start with 1 gallon of water or other liquid, such as apple juice, and 1/2 cup of salt, adding aromatics (citrus peels, onion, whole spices, etc.) as desired. Cover and refrigerate for 8 to 12 hours.
• Do serve with an interesting sauce. For inspiration, see Sauces, Rubs, and Marinades.
• The recipe above directs you to pour half the beer out of the can before perching the chicken on it. Drink it, soak wood chips in it, or pour it in a shallow heatproof dish, like a pie tin, to maintain a moist environment in your grill or smoker.
• To avoid rubbery skin, smoke-roast the chicken at temperatures high enough (325 to 350 degrees) to render the fat. Add smoke with wood chips that you have previously soaked in water or other liquid, then drained.
• For stability on the grill grate, invest in a beer can chicken roaster. Otherwise, steady the chicken in a baking dish or disposable foil pan.
• Never roast a chicken on bottled beer (transfer to an empty can) or an unopened beer or soda can.
• To encourage even browning, rub the chicken all over with vegetable oil, olive oil, or melted butter before applying a barbecue rub.
• Once the chicken is positioned on the grill grate, plug the neck cavity with half a lemon, lime, or small onion. This helps retain moisture in the bird.
• For extra crisp skin, place the chicken, breast side up, on a wire rack over a rimmed baking sheet. Refrigerate, uncovered, for several hours.
• Insulated rubber gloves are a big help when transferring the chicken from the grill to a cutting board and extricating the steaming hot can.
• For a more professional-looking presentation, fold the wings behind the chicken before smoke-roasting.
PUMPKIN SPICE RUB:
1 1/2 tablespoons of prepared pumpkin pie spice
2 teaspoons sweet paprika
1 teaspoon freshly ground black pepper
1 teaspoon coarse salt
1 teaspoon granulated sugar
1/4 teaspoon ground nutmeg
Ground cayenne pepper to taste
Combine all the ingredients in a small bowl and mix with your fingers to break up any lumps. Makes enough rub to season one chicken.
Have a favorite beer can chicken recipe or tip? Tell us about it by leaving a comment here or tagging us on Facebook, Instagram, or Twitter.
The post Revisiting Beer Can Chicken appeared first on Barbecuebible.com.
How Long To Nap For The Biggest Benefits

A daily nap becomes ever more necessary as we get older, and yet they're also a bit of a gamble- nap for the right amount of time and your batteries are recharged, but sleep too long and you become a groggy mess.
So now you're probably wondering "how long is too long?", since nobody likes to wake up from a nap feeling groggy.
Well, according to this infographic the Wall Street Journal created a few years back the best naps are about twenty minutes or an hour and a half long, because half hour and hour long naps cause the most grogginess.

-Via Geeks Are Sexy
7 Photography Exercises To Help You Be a Better Photographer
Photography is like most other professions or hobbies in that you will improve and get better with training. But, like other skills, you need to try and set yourself a structure and actively try and improve the areas that you may not be good at. Sure, like anything else, there are those that are naturally skilled at seeing a scene and pre-visualising a shot, but the following photography exercises will help anyone become a better photographer.

#1 – Use a Film Camera
Like most photographers who grew up in the 90s, my first introduction to photography was at college and university using film. I spent hours in the darkroom developing the photos I had taken. Whilst, like most, I love the romantic notion of shooting with film, the reality is that digital photography offers so much more freedom.
However, the one downside of digital photography is that it also allows you to snap away without really having to worry about the number of photos taken. Not like using film where literary every photo taken cost a few cents.
But also, without the ability to review the photo instantly on the back of your camera, it meant that you had to trust your instincts and ability for capturing a great photo. All of this combined to ensure that you really had to think before taking a photo – thus meaning you had to be better at seeing something and capturing it.

If you have been photographing for a while and want to take your skills to the next level, get or rent a film camera and spend a while using it. You may find yourself pleasantly surprised when you go back to your DSLR camera.
2 – Set Yourself a Limit of Six Photos
Another way that you can train yourself to make every shot count is by setting yourself a limit on a photo session. Say you are planning on photographing a local market, set yourself a limit of six shots for the day only. So if you reach six you’ll need to delete one before taking any more.
The reason for this is that you will have to become really analytical about your photos. Setting yourself a small shot list can help ensure you capture six photos with variety that capture the whole experience rather than just a small element.

As an example, if you were photographing a market you could set out your six shots as such:
- A great portrait of a market vendor.
- An environmental portrait (i.e. when a vendor is making/cooking something or making a sale).
- A close up of the produce on sale.
- Wide-angle shot of the venue.
- Other people at the market (i.e. tourists enjoying their day out, a performer, etc.).
- Something unique about the market (i.e. it could be a unique plaque or sign, or a famous old stall).
You would then work through your shot list and aim to capture the best photo that you can for each one and in theory replacing each shot you have taken with something better. You will then end up with six fantastic photos from a shoot rather than 300 mediocre ones. Do this enough times and you’ll notice that your “great” photos from a shoot will begin to rise.
Do this enough times and you’ll notice that your number of “great” photos from a shoot will begin to rise.

3 – Photograph What is Least Uncomfortable
Every photographer has something that they are the least comfortable with photographing. For you, it might be something technical like photographing in low light conditions. For others, it might be capturing landscapes or a fear of photographing people.
Whatever you are least comfortable with, you should aim to improve that. Not necessarily because it is something you will use in your branch of photography, but because it will teach you new skills that will become useful in your genre of photography.
For example, you may be a wedding photographer and decide that you are going to improve your sports photography. That genre requires you to work fast as the action moves quickly, so learning skills that can help you do that will no doubt come in useful at weddings.
Trying a new aspect of photography will also give you a glimpse into something different and you never know, you may end up loving it.

4 – Work With a Managed Stock Agency
New photographers often ask me what I would recommend they do when starting out in travel photography. I always respond that I think they should get a portfolio together and approach a managed stock agency. The key word in the previous sentence is “managed”. So what is a managed stock agency? Fundamentally there are two types of stock photo agencies. There are ones that you simply upload photos and as long as they pass technical quality checks (i.e. there are no chromatic aberrations, they are sharp, no nudity, etc.) they will be accepted regardless of composition or subject.
Then there are managed stock photo agencies where not only do your photos go through the same rigorous quality checks, but someone at the agency also edits them. This means someone might look through the 100 photos that you have submitted and choose 20 to go up for sale on their site. They obviously choose photos that they feel will sell and this is a really good way to gauge how sellable your photos are and also if you are improving over time.

For example, for your first few submissions, you may find that the agency accepts an average of 10 photos but by your 20th submission that average might be getting to 30 or 40. This shows that you are improving.
5 – Shoot in Difficult Conditions
The general rule of photography is that you photograph certain subjects at certain times to be able to capture the best photos. For example, landscape shots will be shot during the golden hour, portraits on overcast days, food outdoors in the shade, and so on. While there is a reason for these rules and wherever possible you should aim to follow them as you will capture great photos, sometimes breaking them will give you far more dramatic photos.
But photographing in harsh conditions like midday for outdoor photography, low light conditions or backlit for portraits, will also mean you have to think outside the traditional photography box and work out how you can tackle the difficult conditions. Not only will this help you gain valuable skills but it may also come in handy when you are on a real shoot and encounter these conditions.

6 – Work on a Brief
Another great exercise to improve your photography is to work on a brief. You can either set yourself a brief or you can ask someone you know to set you one, but treat it as a real-life brief that you might get from a client. Get the person setting the brief to give you as much detail as possible and when you have taken the photos, present them to him as if he is the client.
Get their feedback and if you need to shoot things again, do so. The great thing about working on a brief is that you have a very specific remit of what is needed and as such you will find yourself being much more focused. If you work with a stock photo agency then you can always ask them for a brief as they will often have specific photo needs that they will be more than happy to share.

7 – Don’t do any Post-Production
I have lost count of the number of times I have heard someone say, “I’ll fix that in post-production”. The purpose of post-production should be to enhance your photos rather than create them. You should always aim to get as much right when you are taking the photo rather than trying to fix it in post-production later.
By setting yourself a photography exercise that you won’t use any post-production you will have to try and get the photo right at the time of shooting. So if there’s a rubbish bin (garbage can) in your frame you’ll need to try and find a way to crop it out. Or if the light isn’t great you’ll need to wait until it is.
By removing the safety blanket of post-production you will find yourself getting better at taking photos.

Conclusion and Time for Action
The exercises above are not the only options. As you progress through your photography journey whether that is a profession or a hobby you will come up with your own photography exercises that you can do. The key is to constantly look to improve and never stop learning.
Have you got any other good photography exercises? Please share them below.
The post 7 Photography Exercises To Help You Be a Better Photographer by Kav Dadfar appeared first on Digital Photography School.
Bonus Recipe: Cranberry Margarita
Spice it up with a Tex-Mex Thanksgiving and a Cranberry Margarita!
This month’s Tex-Mex Fiesta was inspired by my niece in San Diego. She spent Thanksgiving at her Latino boyfriend’s home and was delighted with the family tradition of making enchiladas, rice and beans the next day with the leftovers from the Thanksgiving feast. She kindly shared her notes with me.
“While cranberry sauce is great on a sandwich, it is also lovely used in parfaits or when liquefied, makes a unique holiday Margarita.”
Cranberry Margarita
Ingredients:
1 Tbsp. cranberry juice
¼ cup granulated sugar, spread on a plate
Ice
1 ½ cups cranberry sauce
3/4 cup tequila
3/4 cup cranberry juice
3/4 cup fresh lime juice
½ cup orange liqueur (such as Triple Sec or Cointreau)
1/3 cup sugar
¼ cup orange juice
¼ cup club soda
Thin-sliced lime rounds
Directions:
Dip rims of 4 (8-oz.) glasses in cranberry juice, then sugar to coat. Fill glasses with ice. Process cranberries, tequila, cranberry juice, lime juice, orange liqueur, and sugar in a blender for 30 seconds then strain mixture into a large pitcher. Stir in club soda and orange juice. Pour into glasses. Garnish with lime wheel.
By Lori Ross, Southern Boating November 2017
The post Bonus Recipe: Cranberry Margarita appeared first on Southern Boating & Yachting.
14 Best Shotguns of 2017, Tested and Reviewed

We tested 14 new shotguns to find the year’s top new models for both the uplands and the waterfowl blind

4 Lessons Learned From a Waterfowl Hunt in Argentina

An Argentina waterfowl trip packs a full season’s worth of lessons into a week of lights-out hunting

Ten Tips for Traveling Alone

Honda builds 100 millionth Super Cub bike
Filed under: Honda,Automotive History,Motorcycle
 The Super Cub was crucial for Honda's brand to get started in the U.S. market.
Continue reading Honda builds 100 millionth Super Cub bike
Honda builds 100 millionth Super Cub bike originally appeared on Autoblog on Mon, 23 Oct 2017 10:15:00 EDT. Please see our terms for use of feeds.
Permalink | Email this | Comments