KWBaker
Shared posts
24 Apr 15:01
Sears Catalog Mishap House in Savannah, Georgia

Savannah, Georgia, may have been the first planned city in the state (which was technically still a colony at the time), but not all of its historic homes were quite as well thought out. Take for example, the peach-colored house with green shutters at 32 Habersham Street.
Look at the house, and you'll notice its windows have a unique decorative style to them. Peer a bit closer, and you'll realize it's because they were installed upside-down.
How did this oddity occur? Blame it on the Sears catalog craze. Long before the advent of the internet, the Sears catalog provided people all over the United States with a single source for all of their mail-order shopping. You could purchase just about anything through the catalog, including, apparently, DIY home construction kits.
Clearly, the builder of this particular Sears catalog home misread the instructions, installing all of the windows on the front upside-down. But thankfully, what might have been an architectural embarrassment has instead been embraced by the city as another quirky point of interest.
Baker likes this
24 Apr 13:09


How I live with a tiny fridge
by Kate Dries on The Takeout, shared by Alice Bradley to Lifehacker
The apartment was small, as studios are—about 250 feet, or so I was told. It was trapezoidal, making it difficult for me to imagine how my furniture could be shoved into its non-90-degree-angled corners. It was on a major thoroughfare, so I stood in the room with the windows wide open for several minutes, awkwardly…
Baker likes this
24 Apr 13:07
Evan Davis
"Someday we'll look back on this moment and plow into a parked car."
Baker likes this
24 Apr 12:39
Missing From Your Job Description
by swissmiss
– Add energy to every conversation
– Ask why
– Find obsolete things on your task list and remove them
– Treat customers better than they expect
– Offer to help co-workers before they ask
– Feed the plants
– Leave things more organized than you found them
– Invent a moment of silliness
– Highlight good work from your peers
– Find other great employees to join the team
– Cut costs
– Help invent a new product or service that people really want
– Get smarter at your job through training or books
– Encourage curiosity
– Surface and highlight difficult decisions
– Figure out what didn’t work
– Organize the bookshelf
– Start a club
– Tell a joke at no one’s expense
– Smile a lot.
As someone who runs companies with a high level of trust and as someone who cares about people stepping into their own, this list of missing items from your job description makes my heart sing. Thank you Seth Godin.
Tyler Sellhorn, Baker likes this
24 Apr 12:35
 The overarching trend of the past few years has been that the manual transmission is on the way out. People like automatics, they can be faster than manually shifting, and they're frequently better at saving fuel. But there's still a sizable enough minority of manual fans and buyers that automakers continue to offer a manual in nooks and crannies of the automotive market. And you might be surprised at some of the offerings. We certainly were, so we thought we'd compile a list of cars with an ava
Shift list: All the new cars you can buy with a manual transmission
by Joel Stocksdale
Filed under: Car Buying
The overarching trend of the past few years has been that the manual transmission is on the way out. People like automatics, they can be faster than manually shifting, and they're frequently better at saving fuel. But there's still a sizable enough minority of manual fans and buyers that automakers continue to offer a manual in nooks and crannies of the automotive market. And you might be surprised at some of the offerings. We certainly were, so we thought we'd compile a list of cars with an avaContinue reading Shift list: All the new cars you can buy with a manual transmission
Shift list: All the new cars you can buy with a manual transmission originally appeared on Autoblog on Tue, 24 Apr 2018 08:00:00 EDT. Please see our terms for use of feeds.
Permalink | Email this | Comments
Baker likes this
23 Apr 17:43


Warrior Workout: The Roman Legion
by Veronica Seder
We teamed up with the guys at Myles Apparel to bring you a modern re-boot of the training regimen of one of history’s most hardcore military: the Roman Legion. Hats off to you if you make it through this one.

2000 years ago you could travel from Morocco to Northern England using one currency and carrying one passport. The men routinely making that trek (protecting the land in grueling conditions while hauling weighted packs) were some of the fiercest warriors of all time: the Roman Legion.
The Romans’ knack for technological innovation, renowned physical perseverance, and incomparable military strategy set up the unstoppable empire to rule the entire Mediterranean region for thousands of years. No small feat.
So what made these guys so powerful? To start, the Roman Legion’s absolute baseline for entry was an incredibly strenuous, arduous routine. “The green recruits who were successfully enlisted as legionaries had to go through a training period of 4 months. During this training ambit, each soldier was given the unenviable task of marching [18 miles] in five hours with regular steps, and then [21.7 miles] in five hours with faster steps – all the while carrying a backpack that weighed 45 lbs.” (More facts like this at Realm of History.)

Photo: Beasts of War
Part of the Roman Legion’s military strategy was to normalize this type of grueling effort — covering long stretches of land with back-breakingly heavy loads — so that when, say, Julius Caesar planned to seize the final city standing between him and conquering France, his team of Romans were more than ready. And we all know how that battle ended (if you don’t, here’s a quick refresher of the Gallic Wars).
It’s not hard to connect the dots from the Roman Legion’s rigorous rounds to today’s military boot camps. From the Chronicles of Fitness: “If we look at combat athletes today we see a similar way of training. These folks do a lot of wide ranging foundation work and focus it toward their specific skills of combative arts. Regardless of being a specialist, these folks work on expanding their base, sealing cracks from the ground up.”
For the Roman Legion, it was all about creating a strong foundation — sealing up the cracks in order to create an impenetrable force. Read on for our modern take on the Roman Legion workout, designed to set you up with the moves you need to keep your personal foundation in check.
The Roman Legion Workout

Here’s how it works. You’ll go on a run or hike and level it up by stopping every two minutes to complete a series of exercises, all while wearing a weighted pack. There are three exercises total, and you’ll cycle through them one at a time (one every two minutes).

To get started, load up a backpack with anything heavy you have handy (we like to fill up a few water bottles). The legionaries marched with 45 pounds on their backs, but you may want to start with less than that. When in doubt, start with about 20 pounds and add more if that’s not challenging enough.
Begin with a brisk walk or light jog, and stop every two minutes to perform one of the exercises below, cycling through the circuit as you go.
Figure out a distance that works for you and feel free to mix it up — the workout can be done as part of a hike, run, or even a walk.
1. Weighted Push-Up
• Complete 10 reps while wearing your backpack
• To make it more challenging, elevate your feet on a bench or rock
• Continue on your run for two minutes before stopping for exercise 2
2. Squat & Press
• Hold your backpack at chest level and complete a squat
• As you return to a standing position, lift the pack over your head
• Complete 10 reps
• Continue on your run for two minutes before stopping for exercise 3
3. Lunges
• Complete 10 reps alternating legs (5 reps per leg) while wearing your pack
• Continue on your run for two minutes before stopping for exercise 1
[Editor’s note: Looking for more military-inspired workouts? Check out The Challenge from our friends at GORUCK. Need a break from all the sweating? Listen to this Art of Manliness podcast episode about how the Romans’ veneration of their mythic past played out on the battlefield.]


Baker likes this
23 Apr 17:33


How to Make Picon Punch
by Veronica Seder
As a native of Reno, Nevada, I distinctly remember the first time I ever ordered a Picon Punch. The drink is foreign to even niche cocktails bars, but in northern Nevada the notoriously bitter cocktail is an unquestioned tradition from the area’s vibrant Basque heritage. Nowhere is the drink more celebrated than at Louis’ Basque Corner, which has served them in downtown Reno since 1968, and the spot where I had my first Picon a few years ago.


As a novice, I downed the last of the rich reddish-brown concoction and an old-timer watching across the bar beamed as I grimaced. “The first two are the Picon, the third is the punch!” he hollered. Not one to break from tradition, I ordered another two and spent the rest of the night (and the next morning) taking the saying to heart.
Picon Punch gets its name from its use of Amer Picon, an herbal orange peel liqueur (once touted as a treatment for Malaria) that originated in France, and is especially popular in the Basque country between France and Spain. Mixed with grenadine and brandy, the drink is tart, earthy and bracing — equally suited to fighting off a winter chill as it is refreshing in the summer — and has a surprisingly long history in the American West.
Mixed with grenadine and brandy, the drink is tart, earthy, and bracing — equally suited to fighting off a winter chill as it is refreshing in the summer — and has a surprisingly long history in the American West.
“There were Basque coming in around the early 1900s,” said Gaven Sarratea, a bartender at Louis’ whose father immigrated to America from the Basque country in 1968 as a sheepherder. “They basically took that aperitif and added more booze to it and hence comes the Picon Punch. It started in Basque boarding houses but which one started it is where the argument comes in.”
As Basque immigrants came to the West Coast throughout the last century, Basque restaurants and boarding houses became their de facto winter lodgings. It’s believed that the Picon Punch was created in one such boarding house in San Francisco — although no one’s sure which one — making it a specifically American cocktail.

Louis’ was also once a boarding house for Bascos tending to livestock amongst the mountains and high deserts of the Sierra Nevadas, and still serves traditional Basque cuisine like sweet bread, oxtails, and paella, and maintains its own unique punch recipe.
“You start with a traditional Picon glass,” Gaven said, referring to a short-stemmed glass with a curved lip. “A lot of places have gone away from this, but this where it started. Fill it to the top with ice.”
Every Basque restaurant in Nevada wants to claim its Picon Punch recipe is authentic, and minor regional variations foster a lively dialogue about who exactly has it right. The Louis’ recipe, for instance, uses grenadine whereas the Star Hotel in Elko doesn’t.
“We hit it with a touch of grenadine, and then we fill it about three quarters with the Picon liqueur,” said Gaven. “Then soda water spritz, brandy floater, lemon twist.”
The herbal qualities of Amer Picon and its high-alcohol content give Picon Punch its distinctive burn and a savory bitterness like coffee or black licorice. Soda water adds effervescence to the syrupy texture while grenadine and a lemon garnish accent the subtle citrus aftertaste.
You either love it or you hate it, but you’ve got to try it.
The common consensus among most Nevadans when trying Picon Punch for the first time is: you either love it or you hate it, but you’ve got to try it. The drink is so well known that it has even been considered for Nevada’s official state drink.
“I think Nevada and all these places that have Basque people, they're kind of obsessed with the Basque culture," Gaven said. “They find it intriguing, they find it interesting and when they come to Louis' they want a Picon.”
If Louis’ is too far out of your way, Picon Punch is simple to recreate at home. Authentic Amer Picon hasn’t been exported from France for decades now; Torani handles most of the domestic American production making it somewhat of a specialty order. But once procured, Picon makes a challenging cocktail that, like the Bascos, has been at home in the American West for over 100 years.

Ingredients
• 2 ounces Amer Picon
• 1 tablespoon Grenadine
• ½ ounce Brandy
• soda water
• lemon peel
Directions
1. Fill Picon glass to the top with ice and add grenadine. Use a long-handled spoon to gently toss the ice and grenadine.
2. Add Amer Picon and a spritz of soda water. The glass should be mostly full at this point.
3. Float ½ ounce of brandy on top. Twist a lemon peel over drink and place on top to garnish.

Baker likes this
23 Apr 17:13


Kind of Obsessed: This Mexican Spirit Smells Like Pickles and Tastes Incredible In Pretty Much Everything
Wild-fermented from naturally-grown sugar cane in a cloud forest in central Mexico, this centuries-in-the-making Oaxacan rum is truly something special.

Baker likes this
23 Apr 15:37


‘The Rarest Steak on the Planet’ Is Coming to the United States
Where's the beef? Here in the US, finally.

Baker likes this
23 Apr 15:36


How to Reduce Stress Like a Navy SEAL
An insanely simple, five-minute trick.

Baker likes this
19 Apr 18:19

How to Test Your Wi-Fi Speed (And 7 Mistakes You Should Avoid)
by Andy Betts
When your internet starts feeling slow for no obvious reason, the best way to see if you’ve got a problem is to test your Wi-Fi speed. It’s easy to do, and there are lots of Wi-Fi speed test services online that run in any web browser. They’ll show you how fast your internet connection really is.
Here’s how speed tests work, and how to make sure you have the best Wi-Fi speed.
How a Wi-Fi Speed Test Works
Doing a Wi-Fi speed test is simple. Pick a service (see #1, below, for our recommendations), hit the big Go or Run Test button, then wait for it to finish. You won’t be waiting long—the whole thing takes 10 to 20 seconds, tops.
When you check your Wi-Fi speed, the test measures three elements:
- Ping rate or latency
- Download speed
- Upload speed
Here’s what they mean.
Ping Rate or Latency
The ping rate measures the latency on a network. But what is latency? It’s the time taken for a data packet to travel from the sender to the receiver, and back again.
High latency causes lag, which is something you definitely want to avoid in multiplayer gaming. A ping rate of more than 150 milliseconds could cause lag in gaming, while under 20ms is considered very low latency.
Download Speed
Download speed is the most important figure. It signifies how fast data downloads to your computer, measured in megabits per second (Mbps).
The test works by downloading multiple chunks of data, adjusting their size and the number of connections as it goes. This maximizes the speed of your connection, ensuring it works at its fastest.
To judge the results, you need to know what speed of service you’re signed up for, then compare them. For reference, Netflix requires 25Mbps for 4K streaming or 5Mbps for 1080p HD.
Upload Speed
A Wi-Fi test also measures the upload speed. This shows how quickly you can upload data, such as when you’re backing up files to a cloud service. Compare your speed test result to your provider’s quoted speed to see how well you’re doing.
The upload test works the same as the download test, just in the other direction. Your browser uploads chunks of data, with adjustments made to ensure it uses the full extent of your connection.
Between them, the three tests will give a complete picture of how your wireless setup performs, and why your Wi-Fi speed drops.
You can use the results to find out if your internet speed is as fast as your provider promised, if it’s fast enough for how you want to use it, and if you’ve got your router set up properly. But when you run a Wi-Fi speed check, make sure to avoid these common mistakes.
1. Don’t Use the Wrong Speed Test Tool
When thinking about how to test your Wi-Fi speed, the first question to ask is which is the best speed test service to use? Some internet service providers, including Comcast, offer their own tool. If yours does, that’s a good place to start.
If you want to check that your Wi-Fi is fast enough for TV streaming, try Netflix’s Fast.com. It’s no-frills, but connects to the Netflix servers so is accurate.
For the other options, choose an HTML5 service over an older Flash one. While every modern web browser supports HTML5 natively, Flash represents another system overhead that could impact your speeds.
Alternatively, forego the online speed test and use a dedicated app instead. The desktop app from Speedtest.net is available for both Windows and Mac and makes the service a whole lot more accessible.
2. Don’t Test the Wi-Fi Speed Only Once
To get an accurate picture of your Wi-Fi speed you need to perform the speed test more than once.
Speeds can be quite volatile. You could do the test twice in the same conditions and get different results. By doing it at least three times, perhaps over a series of days, you can create an average of the results. This gives you a more accurate reflection of your actual internet speed.
3. Don’t Test Wi-Fi at the Wrong Time of Day
One of the biggest factors affecting internet speeds is the number of your fellow users that are logged on at the same time. During “peak hours”, like a Sunday evening when everyone’s watching Netflix, you’ll probably experience slower speeds than other times. Your speed test results will reflect this.
If you’re trying to judge the performance drop-off during busy periods, then run the test at both peak and off-peak times and compare the results. If you just want to test your overall speed, stick to off-peak hours for testing.
4. Don’t Do the Test in the Wrong Place
Doing the test in the wrong place will affect your Wi-Fi speed test results. But how do you choose the right place? It depends what you’re hoping to find out.
- When you just want to measure your Wi-Fi speed: Run the test with a close line of sight connection to your router. In other words, do it in the same room with no physical obstacles to block the signal.
- If you’re trying to find the best position for a router in your home: Run a speed test in every room, then compare the results. That will reveal any rooms that the signal is struggling to reach.
- If you’re trying to identify Wi-Fi dead spots or areas of weak coverage: Do the test in that spot and compare the result to one performed in perfect conditions. If this confirms a problem, you can then take steps to extend your Wi-Fi coverage.
5. Don’t Leave Other Devices Downloading
A Wi-Fi speed test can only measure the speed attained by the machine you’re testing on. For this reason, you should try to maximize the bandwidth available to that device.
Most of us have countless devices connected to our wireless networks, and the bandwidth from our internet connection is split between each of them. This causes the network to slow down, or at least appear slower on each device.
For best results, turn off or disconnect as many of your devices as you can, or make sure that none are downloading or uploading large files. You might want to learn how to pinpoint what’s using up the bandwidth on your home network.
6. Don’t Forget to Reboot Your Computer
You can test your Wi-Fi speed on pretty much any device with a browser—from your laptop to an Amazon Fire Stick—but whatever you choose, you should always reboot it first.
Devices that haven’t been restarted in a long time will have residual processes running in the background that can slow them down. This might affect your ping rate in particular.
Restart your machine and don’t launch any other apps before you do the test. Keep an eye on what apps you’ve got set to launch on startup (a cloud app, for example, will go online to sync its data). You could even temporarily disable your antivirus software until it’s done.
7. Don’t Test While Using a VPN
Finally, make sure you aren’t using a VPN, proxy, data-saving app, or anything else that sits between your computer and the internet. They can, and often will, slow down your connection, so using them while testing will not provide accurate results.
The exception is if you’re looking for the best VPN and are trialing a few to see how fast they are. In that case, go right ahead.
What to Do With the Wi-Fi Speed Test Results
A Wi-Fi speed test is useful for many reasons. The results will help in the following cases and more:
- Making sure you’re getting the speed you’re paying for
- Shopping around for a new provider
- Setting up a new router and checking coverage throughout your home
- Testing that your speeds are fast enough for your needs
- Checking that your Apple TV, Fire Stick, or games console is getting good speeds
- Finding peak and off-peak hours
When you’re done, you might find that your internet is not as fast as it should be. And if your results aren’t up to scratch, it’s time to find out what’s causing your slow Wi-Fi and how you can fix it.
Read the full article: How to Test Your Wi-Fi Speed (And 7 Mistakes You Should Avoid)
Baker likes this
18 Apr 17:38


The Ethics of Photographing Slums
by Nils Heininger

My eyes are filled with tears because of the smoke. The plastic particles in the air are irritating my lungs. I’m climbing this mountain with my two friends.
The ground under my shoes feels funny. It softly cushions my steps, like fresh and loose soil, but it also tangles my feet every now and then. It is an awkward mass, this mountain of pressed trash. It consists of very different materials and yet is an entity. A mountain of poison. Not only for the body but also for the soul.


And pigs everywhere! I don’t think I’ve ever seen so many pigs walking freely in the wild. Is that appropriate husbandry? I feel as though I’m starting to understand why some religions refrain from eating pork. If, by eating pigs, I eat what pigs ate, then abstaining might be a better choice.
These are my thoughts as I am climbing this giant mountain. I am cold, numb, and have to keep up my emotional wall up to be able to bear what I see. Children are climbing everywhere on this mountain to collect plastic bottles in giant trash bags to later sell them for a starvation wage, which is, even in an Indian context, far too little to justify the health hazard of the work.
Women in colorful Saris walk around and create an abstract contrast to the brown-grey mass of garbage. Three young men fill a bag with trash and I ask them “Ey Bhaya, kya main aapka tasvir kheech sakta hun?” Can I take a picture of you?
“Nahin!”
I am baffled. It rarely occurs that Indians reject your request for a picture. But I also understand why. The feeling of shame sits deep in the members of the Safaikarmchari community. The self-esteem suffers from the vicious cycle in which those people are trapped. People who were born at the wrong time at the wrong place.
My companion tells me: “Don’t need to ask. If you ask, they will say no. Just make picture.”


Tutorials for Photography
Tips and tutorials for travel photography are diverse and numerous. I have read books, watched videos, listened to TED-talks, and researched on blogs. My favorite YouTuber is Thomas Heaton. He does photography in a very calm and focused way. His videos taught me how to set up my camera for landscapes, how to find the right light by getting up early and how a good composition works. My images are probably not as good as his, but I am on a good trajectory.
But I am more interested in people. I am fascinated by the closeness of the photos of Oded Wagenstein, whose books, TED-Talks, and podcast-interviews I read and listened to. His portraits tell stories and that makes them outstanding. I also love the portrait of Winston Churchill by Yousuf Karsh because it also tells a story. Before shooting it, Karsh pulled the cigar out of Churchill’s mouth, to break down the guard of that famous world politician.
My idol however is Sebastiao Salgado, whose project Genesis was my first step towards photography. I remember how I saw his images in the souvenir shop in the London Natural History Museum, regretting that I did not have the time to visit his exhibition. But I finally got his book as a present and a little flame started to burn. When I finally (accidentally) saw his exhibition in Ljubljana, I became fascinated. I already understood a little more about photography, but what I found there was unimaginable for me. Salgado’s book Exodus made me cry, while the story of his life showed me that photography is more than just taking pictures. It’s taking stories.


Travel Photography and Ethics
All these people and experiences have taught me how to shoot good pictures. But they did not tell me one thing: how do I deal with my position as a photographer? Photography can be just aesthetic. Portraits, fashion, and landscapes. People join for a project and then walk away. Or you hike up a mountain at the right time and shoot. That is one thing. But it is a different thing to take pictures of the life of humans. Especially in travel photography.
I don’t like the term “travel photography”, by the way. It is a western term and often means that a white man goes out and takes pictures of exotic people and places. What is travel photography for us is generally the everyday life of others. You will hardly ever find a portrait of a German with the hashtag #travelportrait. But the business is big. Travel hashtags run crazy on Instagram.
But the debate about that title leads us to another topic: the asymmetry of power between photographer and photographed. In most non-western countries, the rights regarding one’s own image are widely unknown. And if it is known, it is hardly implemented. I could theoretically upload pictures of anyone here and no one could complain. The photographed people would struggle to file an action even if there was rule of law. I could do what I want, without consequences. Do I want this? How do I get consent in photography? I did not find a tutorial for that.
I am quite straightforward in the communities in which I live, though. It’s a kind of exchange for me. I am permanently forced to take selfies. There are videos of me dancing at weddings that are shown to me by complete strangers. In India, do like the Indians do. These are my friends whom I take pictures of and put online and who take pictures of me and put them online. At least I try to take care that people don’t look bad in my photos. But what about strangers?


Photographing the Slum
I have now been living with the Safaikarmchari community for more than four months. I know their stories and know the lethargy that influences their life. The doubts, the alcoholism, the work with trash and dirt, and the vicious cycle in which the people are trapped.
I know that the people are smart, friendly, and, most of all, unimaginably hospitable. They are open for talks, are inviting, and love selfies.
I have found my own project. We have visited a slum in Kolkata. A friend of my friend Vimal. The scenery was impressive from a photojournalist’s perspective. I have seen a lot in India. That happens when you live with the lowest subcaste of the lowest caste. I have seen families whose houses consisted of nothing more than a cupboard, a TV, and a bed on which all seven family members slept.
But the Belgachia slum was different. It showed the situation from its most inhuman side in images that spoke for themselves. I am still coughing from the burning plastic that invaded my lungs two weeks ago. The slum is located directly next to a giant dumping ground that burns day and night. The smell, smog, and trash are the main part of people’s everyday life. And yet, guests are welcome, cared for in the best way, and treated with care. It is easy to make friends here if you want to make them.


Conscious Photojournalism
A week after my first visit, I decided to go back to Belgachia to take pictures. I want to visually capture the life of the communities that I have already theoretically captured in the past months. My project would have a topic: the lives of the lowest caste in India. No travel photography, but instead photojournalism. One topic, many pictures. Maybe a message to the people who see the images. But how do you capture misery with respect? How do you get consent for images that some people might see as shameful?
First of all, I must not listen to my companion and “just shoot,” but I have to ask or at least take a picture so obviously that it would be easy for people to reject the picture. If people say no, they say no. Then I have one image less, but I can sleep better at night knowing I did something good. That’s the most important rule.
The argument that I only get staged images that way doesn’t hold water with me. With a little bit of patience and experience, you can take pictures without any posing. Or you use the pose as a form of character and narration. That is the art of portraiture.
The second thing that I can do is to listen to the people, to get in touch. Not to go to the scene, shoot, and run away, but to stay overnight, drink tea with the people, and talk. That is wondrous and provides trust, which will also affect the quality of the images. I cannot get to know all the people in my photographs, but if I deal with the community, I have done my best.


Poverty Tourism vs. Photojournalism
There is a risk of becoming a poverty tourist. Or worse, to exploit it for business purposes. It became quite obvious to me during a conversation at a tea stall.
“You know, many people come here in a car, get out and shoot many pictures. This slum is very famous. They just come, shoot, leave, and sell the pictures. This is why many people here are suspicious about people with cameras.”
I felt bad. Was I one of many who used their position to take good pictures? Yes and no. My position definitely is of great use. But my motivation is different. I do not want to sell images of poverty, I want to present stories. I sit with people and try to find out more. I do not want to picture them as poor as possible, to sell the image to fundraisers. I want to meet people with respect. Maybe I do not always achieve that, but to try is all I can do. Somehow it is important to show these stories. We need to permanently be reminded of the realities of hunger, war, and modern slavery.


I will definitely shoot images that people will not like afterward. That also happens without photojournalism, with snapshots by friends or passport pictures, for example. I am not perfect, and I can only do my best. But when I consciously act and decide that I did not abuse my position, I can say that I acted in a morally good way.
Every situation is different and there aren’t many tutorials for ethics and morality. I want to meet people with respect. I show them my images, check if they are happy and try to get a feeling of what they like and they don’t. That is often difficult because their ideas of aesthetics often differ from mine. I am happy when I hear comments like “Wow! Hero pic.” Or when people see my images and want to be photographed themselves. Then I know that I have consent and that people trust me.
And as long as I am aiming for that, then I know that I’m doing it right.
The photos in this article were a glimpse into my two days in the Belgachia slum. I would love to read your comments, suggestions, and critique.
About the author: Nils Heininger is a photographer, author, anthropology student, and camel lover. The opinions expressed in this article are solely those of the author. He is currently working on his Anthropology M.A. thesis, exploring the culture of India. He lives with the Balmiki community and enjoys the simple life. You can find more of his work on his website. This article was also published here.
Baker likes this
18 Apr 17:37
GM's Marketplace Allows Gas Purchase and Starts to Create Car-Retail Ecosystem
by Mike Ramsey, Contributor
You can now buy gas through GM's Marketplace application, giving a window into a new web or retail opportunities using the car as a platform. It's evidence of a real shift in the money-making capability of the connected car.

Baker likes this
17 Apr 15:03


This Is the Absolute Cheapest Hiking Pack You Can Buy
It's durable and reliable — two things we search for in every backpack.

Baker likes this
17 Apr 13:56

How to Make Money on YouTube: 6 Monetization Strategies Used by Pros
by Ben Stegner
While anyone can enjoy uploading videos to YouTube for fun, the time might come when you want to actually earn an income from your content. If you’re thinking about spending serious time on your channel, you’ve probably wondered how to make money on YouTube.
The truth is that very few people will earn millions of dollars on YouTube. However, as a YouTuber, you have several options for monetizing your content. Let’s take a look at how to make money on YouTube by listing the most popular methods.
1. Advertising
Like most free services, YouTube is powered by advertising (unless you pay for YouTube Premium). Before you watch most videos, and sometimes in the middle of longer ones, you’ll have to watch a short ad. Some of the money from this goes to the channel, and the rest goes to YouTube itself.
YouTube has certain guidelines for when your channel is eligible for monetization (meaning ads show on your videos). At the time of writing, YouTube requires a channel to have 4,000 watch hours in the prior 12 months, plus 1,000 subscribers, for monetization. See the YouTube Partner Program overview page for more details.
This means you won’t be able to make money from ads until you start building a fanbase. When eligible, you’ll want to visit your Creator Studio, then click the Channel tab on the left. Under Status and Features, select Enable under Monetization to get started.
From there, you’ll need to link your AdSense account, choose what types of ads you’d like on your videos, and go through a review.
Unfortunately, there’s no simple formula for how much you can make through ads. It depends on how many people watch the full ad, how many viewers use an ad-blocker, and other factors. In addition, YouTube has experienced a lot of problems in the past few years with advertisers pulling their ads from the platform. This has led to the site demonetizing videos for a variety of reasons.
Overall, this means that when you’re starting out, ad revenue is not guaranteed. To deal with YouTube’s monetization issues, many creators are looking at other methods to make money on YouTube.
2. Product Placements
Product placement is an age-old advertising technique that’s common in TV shows and movies, and works for making money off YouTube as well. It essentially boils down to using specific brands in order to promote them. For example, a movie from Sony Pictures may include someone playing a PlayStation on a Sony TV.
On your YouTube channel, you may be able to strike a product placement deal with a company that’s relevant to the kind of content you produce. Of course, you’ll likely need to build a following before a brand will want to advertise with you.
The product placement doesn’t have to be the entire focus of your video—just part of it. Mentioning or using a brand in your video in a natural way is all that’s required. The Rhett and Link video embedded above is an example of product placement done well, as the music video stands on its own aside from the Buick promotion.
This is a solid advertising tactic because people can’t skip it. Additionally, viewers often feel a connection with their favorite content creators. This lends more authenticity to your recommendations, but you have to take care that this doesn’t backfire.
If you don’t make it clear that you’ve been paid for the promotion, or don’t actually like the product you’re reviewing, it could negatively affect your viewers’ opinion of you. Thankfully, YouTube includes a checkbox that lets people know a video contains sponsored content.
3. Sponsored Videos
Sponsored videos are similar to product placement, but with a few key differences. While product placement involves integrating a brand into an existing video, a sponsored video is entirely based around a brand.
If you run a gaming channel (one of the most popular types of YouTube channels) for instance, a developer might approach you to make a video about its game. Since you likely wouldn’t have played this game otherwise, you’ll let your viewers know that the developer paid you to make the video.
Sponsorships come in less drastic forms, too. Many YouTubers include a short sponsor message at the start of their videos. This is essentially a quick advertisement for a brand that’s separate from YouTube ads. Sometimes, these include a discount code for viewers to save a bit of money if they sign up for the service.
Like product placement, sponsored videos are a good alternative for making money, but you should be careful with them. If you don’t come across as genuine, your audience might find these videos in poor taste. Thus, you should try to avoid advertising sponsored content you’ve never actually used or don’t endorse.
4. Affiliate Links
You’ve probably heard of affiliate links, as many websites use affiliates to make money. Basically, affiliate links allow you to create a unique URL to a website. When anyone follows that link and buys a product, you get a small percentage of the sale.
These are pretty easy to set up, and don’t require sponsorship deals from brands. If you talk about a certain product in your video, you can include an affiliate link to its Amazon page in the description. Or you could add an affiliate link for services like Audible, where you’ll make some money if someone decides to sign up.
Affiliate links are a good passive source of income. After all, if someone is going to buy a product anyway, it doesn’t make any difference to them if they buy it through your affiliate link. Like the other methods, it’s a good idea to clearly disclose when you include affiliate links to your audience.
5. Fan Funding/Subscriptions
Many have turned to fan funding as an alternative way to make money. This involves joining a service like Patreon or SubscribeStar that lets fans donate some money each month to support their favorite channels.
Most creators who use a service like this offer tiers of rewards in exchange for their fans’ support. You might list their names at the end of each video, host a video chat with them every month, or provide behind-the-scenes clips. It’s a great way to connect the biggest fans with their favorite channels, and provides a fairly steady form of revenue not reliant on ads.
YouTube now offers its own way to do this through the Channel Membership feature. Once your channel meets certain guidelines, you can allow viewers to sponsor you monthly through YouTube in exchange for a few perks. It’s up to you if you’d rather do this on or off YouTube.
If you livestream on your channel, you can also use the Super Chat feature. This allows viewers to donate money in exchange for highlighting their message for a time during a stream.
6. Selling Merchandise
Another monetization option is creating merchandise to sell to your fans. Websites like TeePublic let you create custom designs for T-shirts, wall art, mugs, and more. Many creators offer designs featuring popular catchphrases, jokes, or art from their videos.
Once you’ve created some cool designs, let viewers know about them in a few videos. Include a link to your merchandise page in video descriptions, and anyone who’s interested can support you and get some cool swag at the same time.
Now You Know How to Make Money on YouTube
While you have many monetization options available to you, remember that making money from YouTube is not easy. You’ll have to produce quality content for some time in order to build the viewership required for ads, sponsorships, and more.
If you’re just starting out, focus on making awesome videos and do what you can to make YouTube a better place. And hopefully, over time, your audience will come. You can then look deeper into these monetization options once your channel becomes more popular.
Read the full article: How to Make Money on YouTube: 6 Monetization Strategies Used by Pros
17 Apr 13:56
Cooking for Beginners: 5 Essential Sites for Newbies in the Kitchen
by Mihir Patkar
Most recipe sites assume you have a basic level of understanding how to cook. But for the absolute beginner, things need to be even simpler, like what these five sites offer.
This is a mix of learning the techniques needed to cook, as well as some quick-meal recipes for anyone without cooking knowledge. Start with the guides, and move on to the recipe outlets. And the free cookbook is the best.
1. CookingLight’s Fundamental Techniques (Web): Learn the Basic Skills

Cooking Light magazine is all about how to eat and cook healthy. That’s usually the whole point of eating more at home, so they have put together a guide on the fundamental techniques you will need for any type of cooking.
The whole section is divided into styles: braising, boiling and simmering, sauteing, steaming, grilling, marinating, curing and pickling, stir-frying, caramelizing, roasting, and pan-frying. Click any for a series of videos explaining each aspect of that style, along with recipes to practice it.
The see-and-do style of learning works really well in this case since you can tell what you should or shouldn’t be doing. It’s one of the best online guides for beginner cooking that we have seen.
2. The Kitchn’s Cooking School (Web, Email): 20-Day Course to Learn 20 Basics

The Kitchn is one of the best cooking sites, telling you everything from food basics to cooking with leftovers. It turned some of its best posts for beginner cooks into a custom 20-day course called the Cooking School.
The Kitchn goes beyond techniques to include a deeper understanding of the food you cook with. A new lesson is mailed to you every day on topics like knife skills, vegetables, seafood, herbs and spices, sauces, broil, and so on. Each comes with a homework assignment to test what you are learning.
I’d recommend signing up for the Cooking School to get a daily newsletter to learn something new. Not only does this stave off information overload, but it also gets you into the habit of cooking every day.
3. Cooking Crash Course (eBook): 13 Essential Skills (and Cheat Sheets) in a Free eBook

Chef Gui Alinat has written several cookbooks, but he also knows that some people need more basic help. So he released a free cooking crash course for beginners as a 51-page ebook, teaching what he calls the 13 essential skills for anyone in the kitchen.
Alinat goes through every aspect of what you will encounter in a kitchen and turns it into easy-to-digest information. For example, he has a massive infographic of all major vegetables, and which styles of cooking you can use with each. Similarly, there is a large “spice guide” to say which spices to use on which produce.
It’s astounding that the Cooking Crash Course is available for free. It’s better than most of the online cooking and baking classes out there. Print out the ebook, it’s a great resource to have in your kitchen. The cheat sheets are especially handy to have at a moment’s notice.
4. /r/CookingForBeginners (Reddit): An Invaluable Subreddit and Wiki for Beginners

As a beginner, you might have some stupid questions that you’re afraid to ask. Reddit has a tendency to be seen as a time-waster. But some of the kinder subreddits end up being of great help to those who have questions that experts can’t be bothered with.
The Cooking for Beginners community goes out of its way to answer any queries you might have, no matter how silly. A quick search might actually find you the answer before you even ask it, but even if you don’t, the community is forgiving of repetitive questions.
The best part, though, is the Cooking for Beginners Wiki. Here, the subreddit collects the best links and posts for any novice cook. This has infographics, cheat sheets, and detailed posts by other redditors with their favorite tips and tricks. Sign up and subscribe, this is one place where your silly questions will get an answer.
5. One Pot Chef (YouTube): The Best “Easy Recipes” Channel
I’ve been a fan of the One Pot Chef for years now, and am always surprised when more people don’t know about it. David Chilcott shows the easiest ways to make delicious food, often with as little cleaning up as possible.
The One Pot Chef’s best section is on the instant pot or slow cooker. If you haven’t got one yet, go grab the best instant pot for your budget. It will change the way you cook. Chilcott has an array of recipes for this essential kitchen instrument that reduce your clean-up, are healthy and nutritious, and dead simple to cook.
Apart from that, check out the other recipes and the Quick Tips section. The One Pot Chef has some of the best kitchen hacks to reduce the burden of cooking or cleaning up, and some ingenious cheats for leftovers.
Ready to Level Up Your Cooking Skills?
These sites and guides should help any newbie in the kitchen feel more comfortable in the space. From techniques to recipes, you will get a bit of everything.
Once you feel ready enough to do more than these basics, try these fun culinary challenges to improve your cooking skills. It keeps you going with the habit of cooking regularly, while also helping you learn more or refine what you know.
Baker likes this
17 Apr 13:55
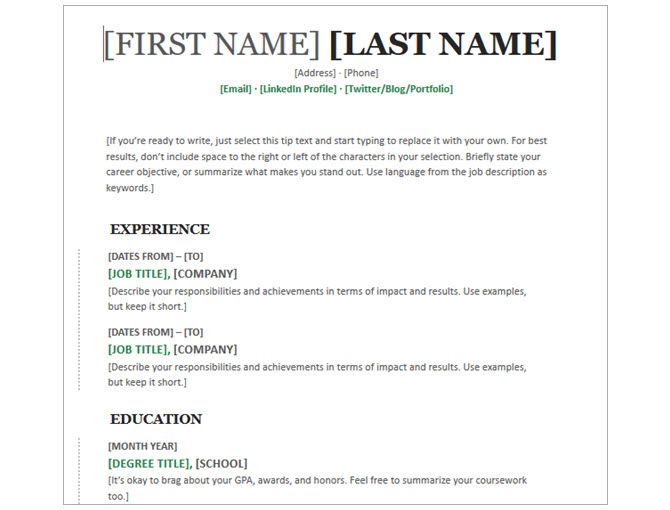
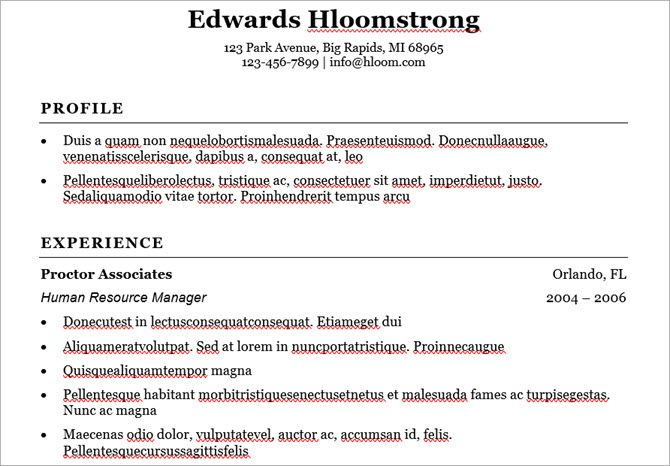
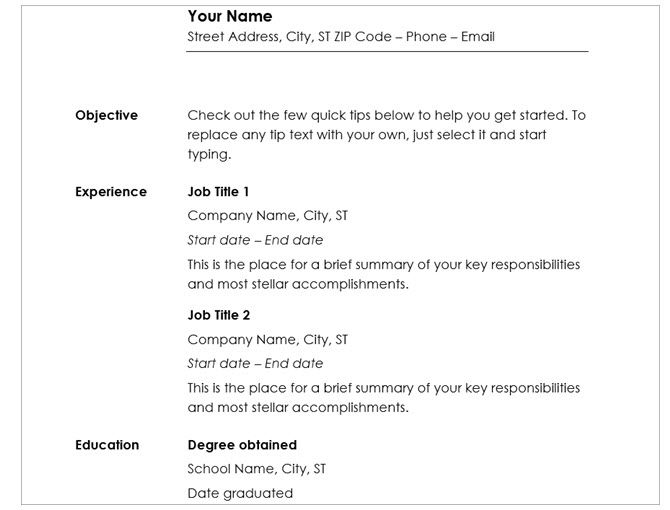
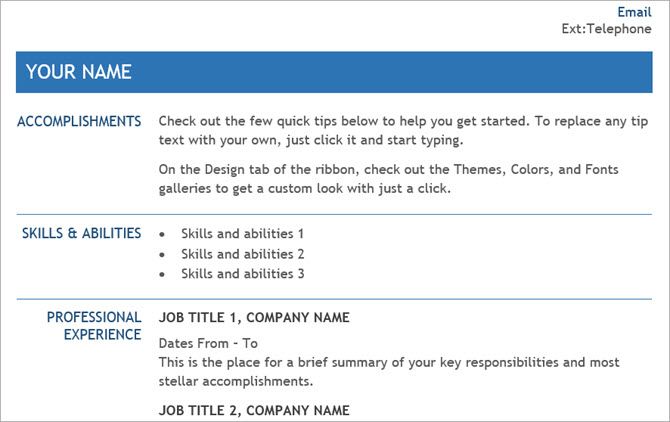
20 Free Resume Templates for Word That’ll Help You Land a Job
by Sandy Stachowiak
An impressive resume can be the difference between landing your dream job and someone else getting it instead of you. The details you include on your resume are extremely important. But you also need to be sure that the appearance is clean and professional.
These free Microsoft Word resume templates will get you off to a great start. They each provide you with the layout, fonts, and formatting you need to create a standout resume that fits you.
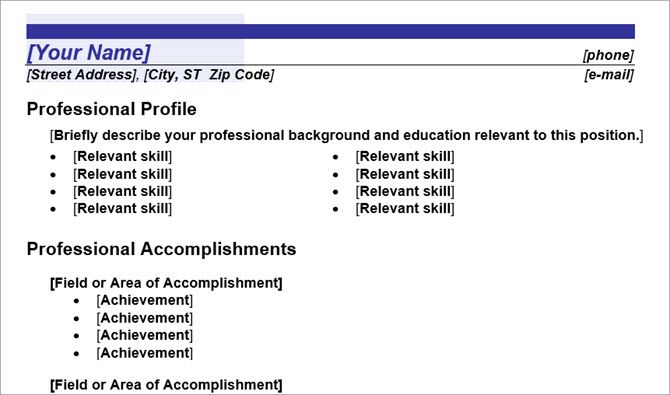
1. Simple Resume Template
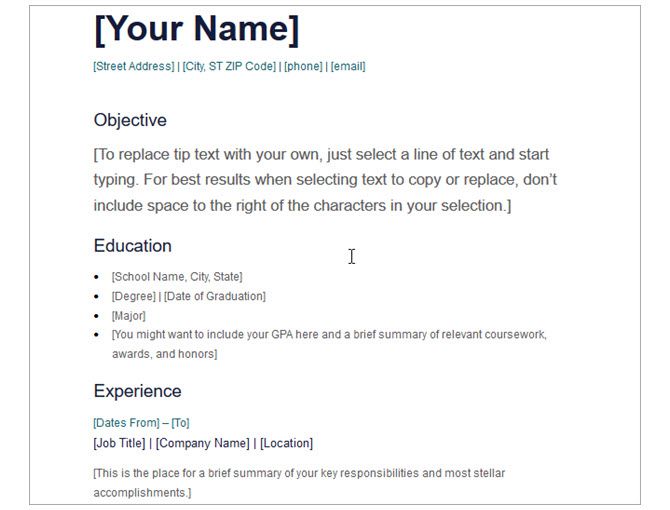
With four basic sections, this template is suitable for anyone but ideal for those just entering the job force. If you have limited educational and professional experience, you can list those items easily. And for accomplishments, you can add any special recognition at the bottom.
This resume template is neat, clean, and simple.
2. General Resume Template
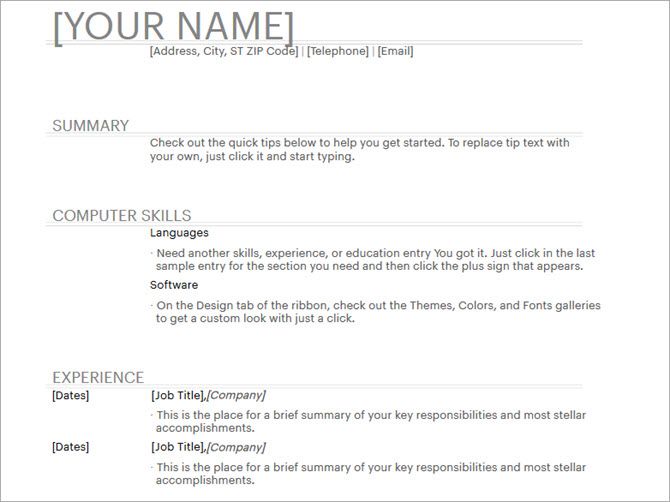
Here is another basic, free resume template for Microsoft Word with just a few sections. You can include a summary with your experience and education in a clear, attractive way.
The template has a fourth section labeled Computer Skills which you can use to add yours. But you can also use this area for highlighting other job skills or accomplishments.
3. Keep It Simple Resume Template
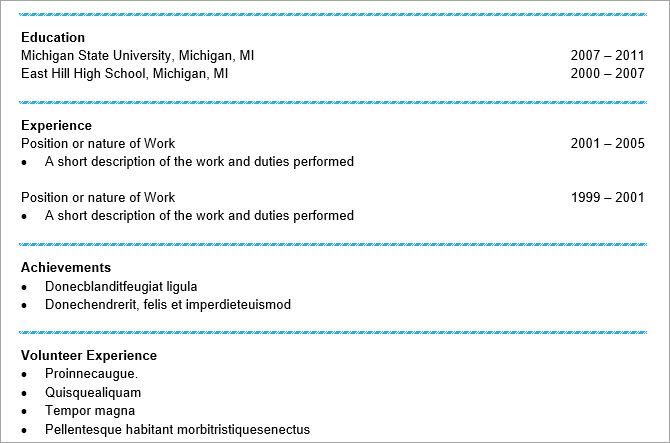
For one more simple resume template, this one offers the basics with additional sections. You will see places for your education and experience at the top. Then, you can use list formats for achievements, volunteer work, and job skills.
This is a nice template to use if you need those extra sections but want to keep them short and sweet at the same time.
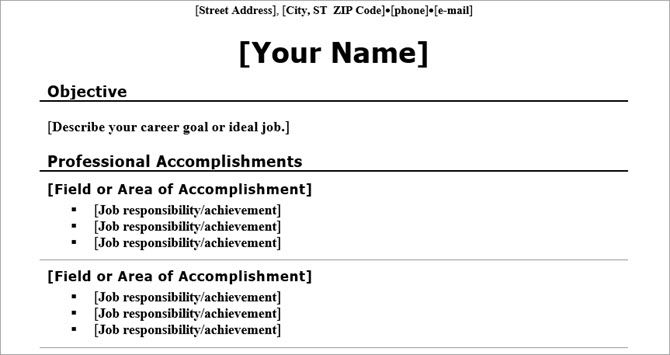
4. Resume for Recent College Graduate
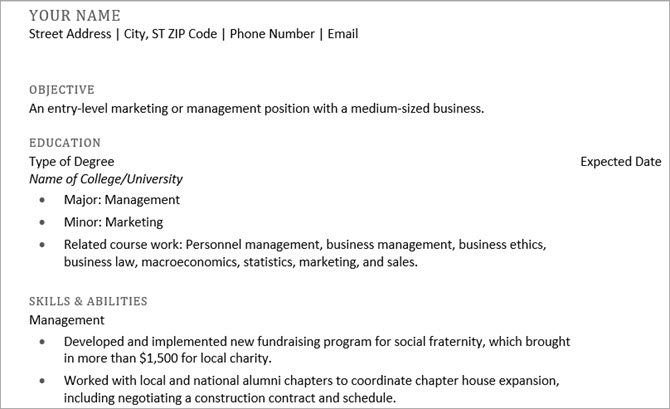
Appropriately named, this free resume template is perfect for those just beginning their career. The emphasis is on education with spots for the degree type, major, minor, and related coursework. The next section covers your job skills and then comes your work experience at the bottom.
So if you just graduated or are about to, check out this option.
5. Chronological Resume Template, Modern Design
This next Microsoft Word resume template gives you space at the top for a summary or objective if you like. Then, you can add your experience, education, and skills. Use the activities area at the bottom for anything additional that you want to highlight.
For those who want a chronological resume template with a small splash of green color, you will like this option.
6. Chronological Resume Template, Traditional Design

Maybe you like the chronological template but prefer a traditional appearance without color. If so, this is the template for you. Each of the sections is separated nicely with a bold line and heading.
Most notable about this option is the formatting for experience which uses an almost column-like layout.
7. Traditional Elegance Resume Template
For a chronological resume template with a sophisticated appearance, this option is titled as elegant. Of course, it begins with a section for your work experience and your education comes after that. But you can use the profile area at the top to highlight your skills.
The template has nice section dividers and bullet points which add to its appearance, making it suitable for any professional.
8. Chronological Resume Template, Minimalist Design
This free chronological resume template offers a modern font with a classic look. Each section heading is out to the left, making it simple for your potential employer to view. You can take advantage of the additional sections for objective, communication, and leadership or simply remove those you don’t need.
This is another great template for almost any job type or industry.
9. Functional Resume Template, Blue Line Design
If you believe a functional resume is more effective for you, then this template is a good choice. It has a small amount of blue at the top with a bold line which makes it stand out. Then, you simply list your skills, accomplishments, work experience, and education in that order.
10. Functional Resume Template, Legal

Another excellent functional resume but without color is this next template. You can start with a summary at the top and then move on to list your key competencies with attractive bullet points. Your work experience and education come after that, making this a good functional resume template option for most anyone.
11. Functional Resume Template, CV Traditional Design
This functional, free resume template offers a classic design. Group your professional accomplishments by field or area and then list more details underneath with bullet points. Then, add your work experience with simple dates, titles, and locations along with your education.
When you need to emphasize your skills and accomplishments, this functional resume template helps you do it easily.
12. Combination Resume Template, Economic

While this template appears to be functional with skills listed at the top, the work experience section also stands out. So, this is a great option when you really want to highlight both. As with many other templates, you can include an objective or remove that section if you prefer.
Overall, this is a practical format that might be just what you’re looking for.
13. Photo Resume Template, Median Theme
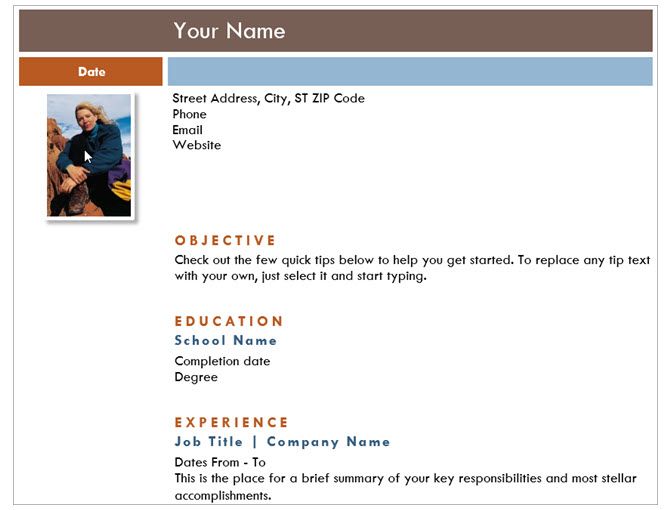
For something more modern that includes a photo, take a look at this resume template. It has a nice layout with the basic sections, attractive color scheme, and spot at the top for your photo. While most resume templates you see don’t include photographs, this may be the perfect option for someone in the creative industry.
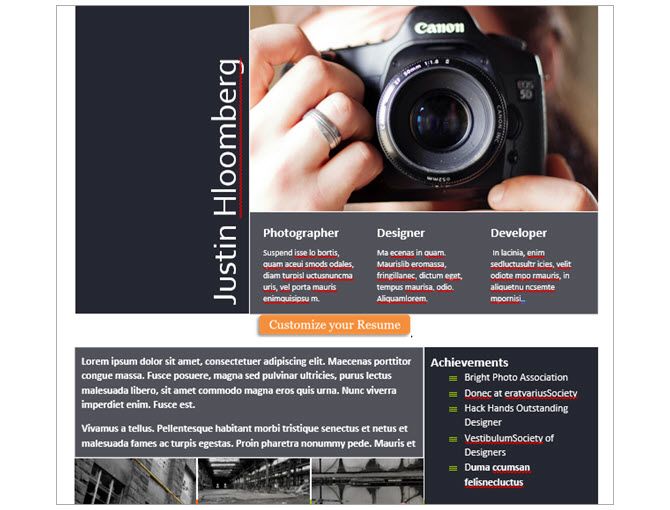
14. Film Strip Resume Template

Another super option for those in the creative field is this film strip themed resume template for Microsoft Word. For graphic designers or photographers, just add your own images to the strip along the side. Then pop in your details like a professional profile, work experience, and skills.
This template gives you a great modern way to showcase your work.
15. High Impact Multi Colour Resume Template
If you like displaying your designs or photos, here is another terrific resume template. You can add one large image at the top with your name and titles. Include work experience right below it and then put more images at the bottom with your achievements.
16. Presentation Slide Resume Template

Maybe an infographic resume is something that interests you. This one offers an attractive layout with a few colors and spot for a photo. With each position in your work experience a different colored heading, this one is easy for potential employers to scan. It also gives you a place for a timeline to show your employment dates and a rating scale section for your skills.
If this is the way to go for you, then take a look at these additional infographic resume templates for more options.
17. Resume for Internal Company Transfer
When you need a resume specific to your job move, like an internal transfer, this one is ideal. It allows you to highlight your accomplishments at the top, list your skills, and then include work experience and education. It’s clean and to the point.
18. Veteran Elementary Teacher Resume Template
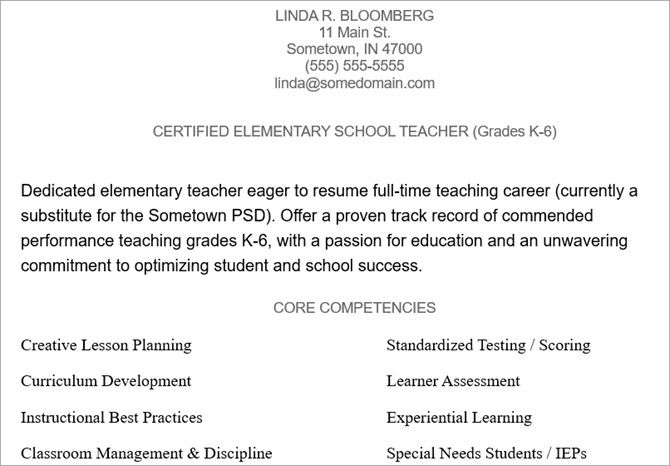
Don’t be fooled by the name of this free template because it can be used for various teacher or professor positions. You can include a brief introduction and then highlight your core competencies. List your work experience and then finish it off with your key contributions.
This is a great option to really make your accomplishments in the education field shine.
19. Computer Programmer Resume Template
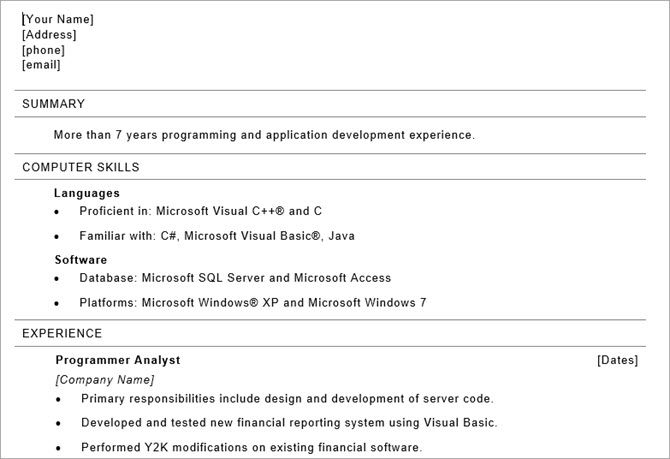
For those in the technology industry, this free resume template gives you a simple way to show off your skills. You can start with a summary if you like and then move onto your computer skills. Next list your work experience with bullet points to highlight your duties and then finish with your education.
And you might take a look at these tips for creating your programming resume too.
20. Executive Resume Sample Template
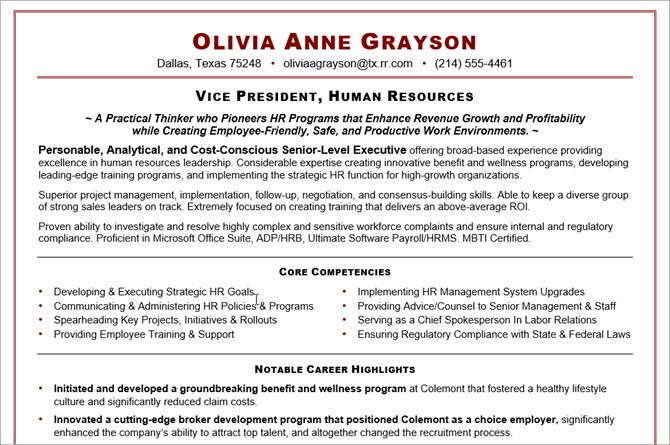
If you are applying for an executive position, then you likely need a resume that allows for a lot of details. This two-page template gives you plenty of room and sections for making your experience and skills stand out from the crowd.
Add core competencies, career highlights, work experience, education, and affiliations. Remember, you can remove any section that you don’t want or just to keep the resume shorter.
Best of Luck in Your Job Search
Now that you have these free Microsoft Word resume templates, you are one step closer to getting that perfect position.
And for additional options, you can check out resume templates for Google Docs as well as resume building websites. Or jump right into Microsoft Word and create your own resume template. Best of luck to you in your endeavors!
Baker likes this
17 Apr 13:49
How to Identify Mac Issues With Apple’s Hardware Diagnostics Tests
by Tim Brookes
Apple hardware is often cited for reliability, but you can end up with an expensive fix when something goes wrong. That’s why it’s great if you’re able to perform your own hardware tests before approaching an Apple professional about a potential fix.
Thankfully, testing your Mac at home is free, simple, and takes only a matter of minutes.
Apple Hardware Test or Apple Diagnostics?
Which version of Apple’s hardware test you’ll use depends on the age of your Mac. Computers released before June 2013 will use Apple Hardware Test. Computers released after June 2013 will use Apple Diagnostics instead.
The older Apple Hardware Test (AHT) doesn’t provide as much information about your system as Apple Diagnostics. It runs cursory tests on components and determines whether they are present and operable. The results are fairly easy to interpret, but not particularly detailed.
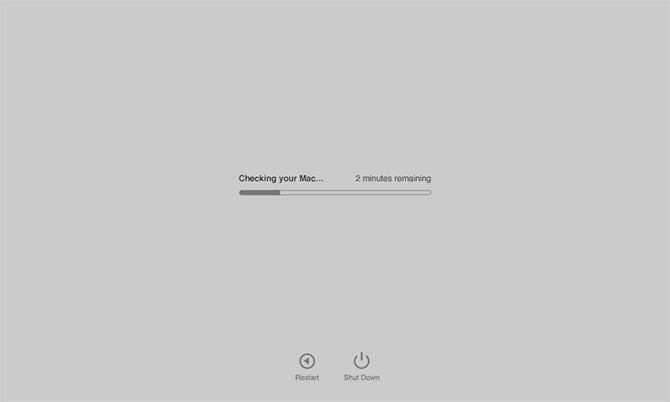
Apple Diagnostics provides more information about your Mac’s hardware than AHT. At the end of the test, you’ll get an error code which you can use to help decide which hardware components are having an issue and what to do about it.
Neither of these tests are as conclusive as Apple Service Diagnostics (ASD), which is Apple’s own in-house testing. If you take your Mac to an Apple Store for a Genius Bar appointment, they’ll hook up an Ethernet cable and run ASD to get far more detailed results about the status of your machine.
My iMac is having some serious issues with the HD. Found Apple Service Diagnostics to run on it. I have a feeling that I’ll need to buy a new HD.
— David Rogers (@davidjrogers) April 9, 2018
While there’s no official support for ASD beyond that provided to Apple’s technicians, you can download 25GB of diagnostics discs from the internet Archive.
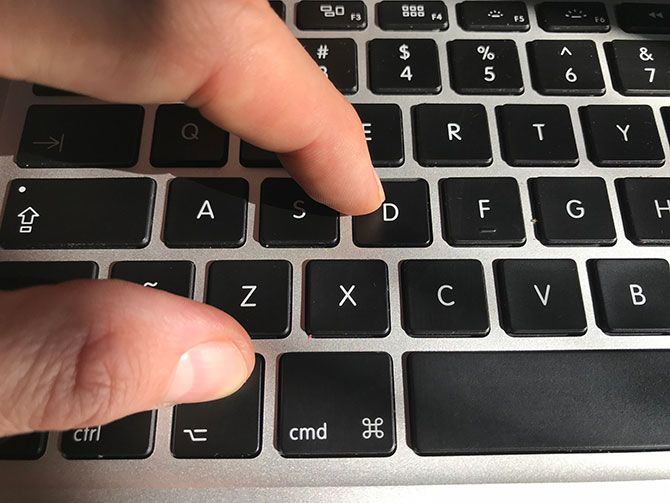
How to Test Your Mac
Regardless of which diagnostic tool you’re using, the method for testing your Mac is the same:
- Shut down your Mac.
- Disconnect all external devices except your keyboard, mouse, display, wired network connection (if you have one), and power cable.
- Turn on your Mac and immediately press and hold the D key.
- Release the D key when the Hardware Test or Diagnostics tool appears onscreen.
- Select your language.
If you’re using the older Apple Hardware Test there’s one more step: press the T key to begin the testing procedure. You can also check Perform extended testing to run a more thorough and time-consuming diagnostic. If you’re using Apple Diagnostics, you only need to specify your language.

You will see your results onscreen once the scan is complete. Make a note of any reference codes you receive, since you’ll use those to interpret your results in the next section.
Help! My Mac Won’t Run Diagnostics
It’s possible your older Mac doesn’t include the diagnostic tool on its disk. If your disk or startup partition is damaged, this may cause the diagnostic test to not run at all. In this instance you’ll need to run the diagnostic via the internet.
It’s easy to do, but it will take longer since you’ll need to download the relevant tool before you can begin the procedure. In order to run a diagnostic test from the internet, follow the same procedure outlined in the section above but hold the Option + D keys instead of just D.
You’ll need access to the internet via a wired or wireless connection for this to work.
Interpreting Your Diagnostic Results
Apple Hardware Test should provide some fairly easy-to-understand diagnoses, including reference codes. I tested an old MacBook Air that has no battery in it, and the AHT report and reference code matched up.
If you’re using Apple Diagnostics, you’ll have a greater array of codes at your disposal. You can cross-reference them using the Apple Support reference codes list. Some notable reference codes include:
- ADP001: Good news! This means no errors were detected.
- NDD001: Possible problems with USB hardware; make sure all USB devices are disconnected.
- NNN001: No serial number detected; are you running a Hackintosh?
- PFR001: Possible problems with firmware.
- PPM001-015: Possible problem with computer memory.
- PPR001: Possible problem with CPU.
- PPT001: Battery not detected.
- VFD006: Possible problem with GPU.
- VFF001: Possible problem with audio hardware.
While these codes only provide a limited amount of information, it might be enough to point you in the right direction. If you’re getting battery errors, it’s probably time to replace your battery. You might even be able to save a few bucks by fixing it yourself.
Others codes might raise more questions than answers. If you’re getting memory errors, it’s probably worth following up with a more in-depth testing tool. We recommend a free tool called memtest86, which you can run from USB for a detailed scan.

Other problems are tricker to resolve. If you’re getting errors about your Wi-Fi or Bluetooth hardware, it might be worth spending a small amount of money on a USB adapter that offers a workaround for dodgy internal hardware.
Problems with your main processor or graphics processor are harder to isolate and resolve. Further, you might find that your computer passes Apple’s tests but still has issues. At this stage, it’s probably worth talking to a professional or considering a replacement model.
Fix Your Own Mac Hardware for Free
While it’s not as easy as repairing a Windows PC, you can fix Apple hardware at home. Be aware that if your machine is old, the cost of Apple’s expensive parts might not be justified when you take the price of a new machine into account.
Even if your old Mac is dying, you might be surprised what you can get for it if you choose to recycle or sell second-hand. If it’s time to say goodbye, you can put that money toward a replacement model.
Baker likes this
17 Apr 13:22
Randomly Pick Your Next Travel Destination With These 5 Sites
by Mihir Patkar
When you can’t decide where to travel next, let fate pick the destination. You could spin a globe and stab your finger at a place to stop it. Or you could use these cool sites to tell you where to go just as randomly.
This isn’t the ideal solution for those who travel infrequently or are not adventurous. A random pick isn’t for the faint of heart. But it’s a journey, an adventure into the unknown, a kind of unresearched romance that you don’t easily get in the modern world.
1. Earth Roulette: Click a Button, Find All the Research You Need

Earth Roulette is for the confused wanderer who doesn’t want to think. Click a button and you’ll get a suggestion for a country to visit, along with all the research you would need for it.
You start off with a quick introduction about the country and why you should go there. Next, there is a slideshow of photos of the country, sourced from users of 500px. After all, you need to see if you like it. The rest of the page is filled with the major cities and attractions in any recommended country, all powered by Wikivoyage, the Wikipedia-run travel site.
Earth Roulette also gives quick links to book a flight or a hotel with SkyScanner, the best flight ticket app, and Booking.com, the best hotel search engine. And just in case you don’t like the recommended country, click “Spin Again” to find a new random destination.
2. Travel Spin: Vacation Destinations and a Journey Planner

Travel Spin works just like Earth Roulette, but focuses on recommending cities or locations instead of countries. The page is filled with pictures from 500px, along with a small introduction to the place.
What sets it apart is the built-in journey planner. The first time you visit, grant Travel Spin access to your location or enter your city of departure. Now, every time you spin, the site will generate all the ways you can reach the destination from where you are. This includes a combination of flights, ships, trains, buses, and taxis.
You get total travel time, the cost of travel, and the distance as a snapshot. It also expands how this was calculated in each leg of the journey. Travel time and cost is an important factor in deciding where to go, so this summary is quite helpful.
3. Destination Darts: Throw Darts at a World Map to Get Multiple Destinations

I wish I had a large map of the world to throw darts at, which decides the country or city I travel to next. Destination Darts is the next best thing without that apparatus.
Select the whole world map or a region: Africa, Oceania, Europe, Asia, North America, South America, Antarctica. You can even select countries as sub-regions if you want. Then click the “Throw Dart” button and the site will randomly plant a dart on the map. On the left, you can see the exact name of the city, country, and its coordinates.
But here’s the cool part. You can keep clicking “Throw Dart” as many times as you want, and Destination Darts will track a history of all your darts. It’s a nice way to get multiple random destinations quickly. After that, you can safely research your holiday destinations before booking.
4. Atlas Obscura’s Unusual Trips: Cheat Sheet to Offbeat Ideas

Cliched travel destinations often sound boring, which is why you skip them. Atlas Obscura specializes in finding offbeat travel ideas in popular cities or countries. And its packaged Unusual Trips is a cheat sheet to offbeat ideas.
Unusual Trips is a paid tour, so you are free to buy it from them and go with other people. Otherwise, if the dates or cost isn’t working out for you, you can check out the entire itinerary of each Unusual Trip to plan your own trip there. These cheat sheets are the easiest ways to plan your travels.
Browse through both upcoming trips as well as tours already concluded. There are enough travel ideas here to satisfy the desires of every wandering soul.
5. Adioso: Pick Dates and Type of Destination for an Array of Flight Deals

Adioso started off as an essential site for backpackers to find cheap flight deals. But today, it has morphed into something much more useful any type of traveler.
Visit the main page and start selecting from the criteria. Pick your departure city, departing date, and a type of destination. Types include cities, countries, continents, or just “anywhere” in the world. Adioso also has customized “wanderlists” such as destinations for active travelers, family friendly vacations, wildlife experiences, and so on. Check these out, it can be a good way to filter your travel options.
Once you have your criteria, Adioso’s search engine will spit out all the travel options. And this is where the randomness takes over. You will find so many places that you have never even heard of, as well as those you’ve heard of but always thought to be expensive. But since Adioso has already taken care of finding the cheapest flights for you, half your troubles are over.
Let Someone Else Make the Decision for You
A couple of new travel agencies actually try to bring an element of surprise into your travel. Both Pack Up + Go and AnyWhr require a few details from you, after which they’ll mail you flight tickets, a custom itinerary, foreign exchange, electronic visa papers, and all other such details. All you have to do is show up at the airport. Cool, eh?
Of course, if randomness is not your thing, you can still try out other decision-making tools for travel destinations.
Baker likes this
16 Apr 16:54


Frank Zappa Debates Whether the Government Should Censor Music in a Heated Episode of Crossfire: Why Are People Afraid of Words? (1986)
by Ted Mills

“The biggest threat to America today is not communism. It's moving America toward a fascist theocracy, and everything that's happened during the Reagan administration is steering us right down that pipe.”
That’s Frank Zappa, a self-declared “conservative” battling a theocrat and two establishment pundits on this clip from a 1986 episode of political debate show Crossfire. It was one of many TV interviews Zappa did during the mid-‘80s when the “Parent Music Resource Center” headed by what he called “Washington Wives” got themselves overly concerned about rock music lyrics and, as usual, thought of the children. (One of those Wives was Tipper Gore, then-wife of Al Gore). There were congressional hearings, one of the only times Zappa was on the same team as Twisted Sister’s Dee Snyder and soft-folkie John Denver).
The whole kerfuffle was one and a piece with the rise of the Religious Right under Reagan’s administration, and eventually boiled down to a “Parental Advisory” sticker slapped on LP and CD covers. Zappa saw the move as a cynical ploy to introduce moralistic censorship to the arts while burnishing the careers of up-and-coming senators like Al Gore (and that certainly worked out for him).
The 20 minute clip is notable for the differences compared to the present. Watching this contentious debate between four men all sitting very close to each other is rare nowadays—the closest we get is on Bill Maher’s weekly show, whereas the rest of cable news is a collection of talking heads beaming in from separate studios. The mendacity and vitriol directed towards Zappa is also surprising, especially as Zappa’s own lyrics weren’t the ones being attacked—those of Madonna and Prince were instead. The hotheaded blather out of religious zealot John Lofton is a wonder to behold, a man so theocratic he later railed against Ann Coulter and Sarah Palin for leaving the kitchen and getting into politics. “I love it when you froth” quips Zappa, although even his stoicism is undone at one point. “Tell you what—kiss my ass!” Zappa blurts out after Lofton calls him an idiot.
Both Tom Braden and Robert Novak are stodgy beltway brothers, ostensibly on the left and right, and can’t help crack up a bit when Zappa points out Lofton’s lunacy. Nobody wins the debate; America and your own brain cells lose.
Zappa would later dedicate several songs and a whole album (Frank Zappa Meets the Mothers of Prevention) to the charade. The music industry acquiesced and required warning labels that probably had zero percent effectiveness apart from uglying up album artwork, and a decade later mp3s would implode the industry.
Nobody frets about lyrics any more—how quaint!—but fear mongering and moral panic continue, including the recent non-starter issue over video game violence. Words are just words, Zappa says. That battle now appears to be taking place on Twitter instead between the left and the right, and Republicans have dropped all pretenses over foul language having nominated Trump. (Even the evangelicals seem to be okay with it.)
And then there’s this brief moment from the clip, which feels like part of a radio signal beaming into the present:
“What I tell kids, and I’ve been telling kids for quite some time,” says Zappa, “is first, register to vote, and second, as soon as you’re old enough, run for something.”
If that doesn’t sound like 2018 to you, I’ve got a W.A.S.P. CD to sell you.
Related Content:
Hear the Musical Evolution of Frank Zappa in 401 Songs
Frank Zappa Explains the Decline of the Music Business (1987)
Animated: Frank Zappa on Why the Culturally-Bereft United States Is So Susceptible to Fads (1971)
Ted Mills is a freelance writer on the arts who currently hosts the FunkZone Podcast. You can also follow him on Twitter at @tedmills, read his other arts writing at tedmills.com and/or watch his films here.
Frank Zappa Debates Whether the Government Should Censor Music in a Heated Episode of <i>Crossfire</i>: Why Are People Afraid of Words? (1986) is a post from: Open Culture. Follow us on Facebook, Twitter, and Google Plus, or get our Daily Email. And don't miss our big collections of Free Online Courses, Free Online Movies, Free eBooks, Free Audio Books, Free Foreign Language Lessons, and MOOCs.
Baker likes this
11 Apr 16:11
This Little-Known Defense Contractor Should Be In Your Portfolio
by Jon Markman, Contributor
We imagine future military conflicts will be resolved with the surgical precision of next-generation aircraft. Or, better yet, remote-controlled drones. It does not work quite that way.

Baker likes this
11 Apr 15:58
Trash Talking At The Masters: Why Mental Strength Is The Key To Success
by Don Yaeger, Contributor
I’m a huge fan of trash talking, gamesmanship, and head games. Over the years, I’ve learned that true competitors have a truckload of mental strength and the ability to both give and take a little verbal jousting. That’s why I loved the trash talking at this year’s Masters.

Baker likes this
10 Apr 14:27
Sewing Thread Art by Cvern
by Alex Santoso

Image: @cvernart
This is neat: Slovenian artist Sašo Krajnc (AKA Cvern) creates amazing portraits with only a single sewing thread.
Krajnc is able to create shadings by overlapping black threads - the more black threads overlap in a certain part of the image, the darker the shadow.
Visit Krajnc's Instagram for more examples - via Oddity Central
Baker likes this
10 Apr 14:26

5 Apps and Sites Every Freelance Professional Should Check Out
by Mihir Patkar
The freelance life can be tough. Negotiations with clients, deadlines and time-tracking, invoices to file and follow up, can all bog you down. So try these best freelance apps and guides that can relieve the burden a bit.
None of the tools in this article are freelance job apps to help you find a gig. There are specialist sites and apps for freelance jobs for that. What we are concentrating on are productivity tools for freelancers and resources that make you more efficient.
1. Freelancers Union’s Resource Stack (Web): Everything You Need to Know
The Freelancers Union is a New York-based freelance organization that seeks to protect and empower freelancers with anything they might need. You will need to sign up for free membership, and then you can check out the free resource stack they offer.
While some of it is New York or US-related, most of the resources are things anyone can use. There’s an invoice template, financial apps for freelancers, a guide to taxes, answers about health insurance, and a guide to the small claims court. As an independent worker, you need to be prepared for any and all eventualities, which is what the Freelancers Union covers in this stack.
The Freelancer’s Union can also help you find a freelance-friendly lawyer in case things go bad. But if you follow the guides in their resource stack, hopefully it should never reach that stage.
2. Your Rate (Web): Find Your Weekly, Daily, and Hourly Rate
You need to figure out your rate before you ever approach a job because that’s the make-or-break question in most situations. Your Rate is a simple web app to calculate your worth.
The app asks you to state how much you want to earn annually, how many hours a week you want to be billable, and how many weeks you want to take a vacation. Currency doesn’t matter, put in a number.
The smart thing Your Rate does is to multiply your rate by two. If you did the same math yourself, you might forget to account for taxes or savings. These are the hidden costs you won’t account for, and which makes several independent workers eventually think they aren’t making the money they should be making.
It’s a much more real-world view of what your rate should be, and an invaluable tool for those who are new to freelance. Your Rate is an essential part of the best apps for freelance jobs because if you don’t know your rate, you might apply to the wrong low-paid jobs.
3. And.Co’s Freelance Contract (Web): Get an Airtight Contract for Free
Being a freelancer can mean getting into legal issues over copyrights and other things. To protect yourself, make use of the Freelancers Union’s contract creator, made in association with And.Co. It’s one of the best freelance apps out there.
In a step-by-step process, the guide takes you through the process of creating a contract so that there are no misunderstandings later. The Freelancers Union has created this new standard so that it’s a familiar document for both you and your clients. Just key in information where asked, and you’ll have a new contract in no time. Give it a digital signature and send it to your client, who can then sign and approve it.
In general, And.Co is one of the best productivity tools for freelancers. It mixes invoicing, time tracking, project management, and other freelance needs into one app. It can also be a bit overwhelming at first, so give it a try.
4. TopTracker (Windows, Mac, Linux): Free Time-Tracker With Automatic Screenshots
Freelancers often need to charge your clients by the hour, and so you have to track how much time you are spending on their work. A time tracking software is an easy way to do it. And TopTracker is perhaps the best free time tracking app for freelancers.
It includes everything that some of the other good time tracking apps have, but with one difference: it automatically takes a screenshot while you’re working. This is legitimate proof that you were doing your client’s work, in case they ever doubt you. It’s a choice, so you can switch off screenshots, delete them, or blur them to protect privacy. But this simple feature makes it one of the best apps for freelance jobs that might require you to submit proof of your effort.
Apart from that, the other thing I really liked about TopTracker was that it is free for an unlimited number of projects. Most other time-tracking apps will limit how many projects or users you can add before needing to pay to unlock the full software.
TopTracker is limited to being the best time-tracking freelancer app for PC, but if you want more, check out Toggl, which many people reckon is the best time-tracking app for mobile and desktop.
Download: TopTracker for Windows | Mac | Linux Debian | Linux RPM (Free)
5. Invoice.to (Web): Quick Invoice Generator and Tracker
I have been freelancing for several years and looked at a lot of invoice generators. Invoice.to might be the best app for freelancers looking to easily create an invoice and send it to a client.
Sign in with your Google ID if you want to record your invoices, or don’t sign in and use it as a no-registration tool to quickly generate a bill. Fill in the blanks where required for your name or company’s name, the client’s name and address, payment methods, and the rest of the details. You can even connect Invoice.to to your Stripe or Paypal account to track payments.
Once you’re done, click the little green arrow at the bottom for an auto-composed email from your Gmail. Attach the new invoice as a PDF and send it to your client. Easy-peasy.
Take a Freelancer Course, It’s Worth It
It’s tempting to download freelance job apps and start browsing for opportunities. But before you take that leap, take some time to assess whether working independently is the right decision for you. As a freelance professional, you have to manage much more than your work alone.
You are now your own boss, and you are basically running your own company with you as the employee. While the aforementioned best freelance apps will help, they won’t magically make you great at it. If you’re a newly independent worker, it can be worth your while to take one of these courses that will change your freelance life.
Read the full article: 5 Apps and Sites Every Freelance Professional Should Check Out
Baker likes this
10 Apr 13:46
How to Track and Locate Your iPhone Using Location Services
by Tim Brookes
Your smartphone’s ability to pinpoint your exact location goes way beyond simple navigation. GPS is used for web searches to deliver relevant local results, in dating apps to find you a nearby date, and as a safety net when you lose your device.
Knowing how to customize your location settings is important, since location tracking presents a real privacy risk. Today we’ll look at how you can manage those settings, as well as sharing your location and finding your friends.
How to Turn On/Off Location Services on iPhone
To turn on Location Services on your iPhone:
- Launch Settings, scroll down the list, and tap Privacy.
- Tap Location Services and make sure the toggle is set to On.
Every app that has requested access to your location will appear below this option. It’s here you can easily revoke access, or grant access to an app you have previously denied. It’s a good idea to periodically check this list, since many apps can check on your location in the background.

While GPS used to consume a large chunk of battery power, location technology is way more efficient than it once was. Motion co-processors reduce the reliance on a “GPS fix” by reducing the number of satellite requests your device has to make.
It’s also required to use most mapping apps, exercise trackers, food delivery services, and ride sharing apps. There’s no need to disable Location Services on your iPhone anymore.
How to Send Your Location Using Your iPhone
To share your location using Messages:
- Launch Messages and find the contact you would like to share your location with (you may need to create a new chat).
- Tap the Info button in the top-right corner of the screen.
- Tap Send My Current Location to instantly acquire and share an Apple Maps link.

To share your location using Apple Maps:
- Launch Maps and wait for the app to acquire your location.
- Tap on the blue flashing location pin to bring up the My Location pane at the bottom of the screen.
- Select Share My Location followed by your sharing method: AirDrop, Messages, Mail, Facebook, or another medium of your choice.

To share your location using Google Maps:
- Download and launch Google Maps for iPhone.
- Wait for the app to acquire your location, then tap on the blue location pin.
- Choose to share with select individuals, via Messages, or hit More to reveal the full sharing menu.

Note: Google Maps creates a real-time sharing link which others can use to track your location, rather than a link to a static location.
How to Permanently Share Your Location on iPhone
To share your location permanently from an iPhone, you’re best off using Apple’s own Find My Friends service. This service only works within the Apple ecosystem, so your friends will need iPhones too.
You can also share with non-Apple devices using Google Maps, but it won’t be as reliable.
To permanently share your location using iMessage:
- Launch Messages and find the contact you want to share your location with (you may need to start a new chat).
- Tap the Info button in the top-right corner of the screen.
- Tap Share My Location then choose between One Hour, End of Day, or Indefinitely.

To permanently share your location using Find My Friends:
- Download and launch Find My Friends.
- Tap Add in the top-right corner.
- Specify a contact with whom you want to share your location (they will need to approve the invitation with their Apple ID).

To permanently share your location using Google Maps:
- Download and launch Google Maps for iPhone.
- Let the app determine your location then tap the blue location pin.
- Choose Share My Location then choose Until you turn this off.
- Tap Select People and specify who you want to share your location with.
Note: Find My Friends is a feature integrated into your iPhone’s operating system, so it functions as a service rather than a third-party app. Google Maps, on the other hand, is restricted to Apple’s approved background processes like any regular app.
As a result, Google Maps likely won’t be as reliable as Apple’s baked-in technology.
How to Check Who Can See Your iPhone Location
To see who can detect your device location using Find My Friends and iMessage:
- Launch Settings, scroll down, and tap Privacy.
- Select Location Services followed by Share My Location.
- Browse the list to see who can track your location.
- Tap on a contact, scroll to the bottom of the page, and select Stop Sharing My Location where necessary.

If you have set up location sharing in Google Maps, you’ll need to disable it within the app:
- Launch Google Maps and tap on the blue location pin.
- Select Share My Location then Until you turn this off.
- Tap Select People and revoke access to your location as you see fit.
How to Locate Your Own iPhone
If your iPhone is missing, you can locate it provided Find My iPhone is turned on. This feature is automatically enabled when you activate your iPhone, so unless you’ve specifically turned it off you should be able to locate your device:
- Visit iCloud.com in a web browser and log in with your Apple ID and password.
- Click on Find iPhone and wait while the location request goes out.
- Select All Devices at the top of the screen and select your iPhone (or any other device you want to locate).
Find My iPhone lets you play a sound to try and locate your device, enable Lost Mode, or initiate a remote erase. You can also see your current battery level. When your battery dies, Find My iPhone will report the last known location.

If you have another iOS device like an iPad, you can locate all of your Apple devices with the Find My iPhone app.
How to See Someone Else’s iPhone Location
Provided your friends have already invited you to track their location, use any of the following methods to find them:
- Download and launch the Find My Friends app. Anyone currently sharing their location (and any invitations) will show here. Simply tap on them to see their current location on a map.
- Open the relevant Messages chat and tap on the Info button in the top-right corner. Your contact’s location will appear on a map.
- Login with your Apple ID at iCloud.com and click on Find My Friends.

How to Set Up iPhone Location Notifications
You can choose to receive a notification when a contact either leaves their current location or nears another, provided they are already sharing their location with you.
- Download and launch Find My Friends on your iPhone.
- Select a contact and wait for their location to update.
- Tap Notify Me at the top of the page and specify your notification criteria (tap Other to adjust the location and geofence).
- Hit Done to finalize the alert.

Location Sharing Is Caring
The perks of using your iPhone’s GPS abilities to share your location with friends and family vastly outweighs the battery life you’d save by turning off Location Services. Just be mindful of which apps and contacts you grant access to your location, and review the list periodically to avoid any nasty surprises.
Baker likes this
10 Apr 13:46
Chatbots for Job Searches: 8 Tips for Finding Jobs and Getting Hired With a Chatbot
by Kayla Matthews
Searching for a job is significantly more high-tech than it once was. People used to buy newspapers, search the help wanted section, and highlight ads of interest.
Now, it’s possible to tweak your resume with intelligent algorithms and get job alerts based on preferences. Chatbots have also become useful for boosting job searches. Keep reading to learn how and why to use them.
What Are Chatbots and How Do They Help Find Jobs?
A chatbot is a programmable browser-based or smartphone application that mimics human conversations. Many businesses use them to handle the most frequently asked questions, especially outside of business hours.
Some chatbots act as screeners for in-demand positions. They can determine if you’re a good fit for a job based on your responses to questions.
There are also chatbots that give details about the kinds of work available at a company. Marriott uses one called MC. Advertised as a Career Concierge, the chatbot assists job seekers in determining appropriate career paths. It also lets you explore whether the positions you want most are currently available in your area.
While applying for a job, you may have a simple question, such as the closing date for the position. A chatbot can answer it for you, helping avoid mistakes that might hurt your chances of success.
Ready to get started? Keep reading to learn a step-by-step process.
1. Start With the Right Expectations for a Chatbot
The chatbots used for hiring are getting sophisticated. However, the technology has limitations and chatbot developers know it.
For example, don’t expect a chatbot to answer every question you have. There will likely be times when the bot’s responses are inaccurate or too flat. Fortunately, some developers and employers regularly review questions people pose and update the chatbots accordingly.
2. Be Precise About Role and Location Preferences
Chatbots are smart, but they work best when you provide the most specific information possible. Before you start using one, think about the kind of job you want. Also, consider your geographic range. Are you up for moving to take the right position or is relocation out of the question?
Jobo is a chatbot that searches for available positions based on your parameters. It also prompts you to set up a career profile. After that, you can apply for jobs via Messenger or the company’s website.
Whether using Jobo or another chatbot, the more concise you can be, the better. Otherwise, the search results generated might not apply to your needs.
3. Decide Whether You Want to Make a Career Change

Some people use chatbots to find familiar types of work. Others feel ready to make a major move into another field and might realize they need guidance. If you’re pondering a change of career, a chatbot called Wade & Wendy could help. It recognizes the career growth journey and aims to learn more about you during the job search.
Wade responds to your job ideas and opens new chats as opportunities arise. You can review the details and let Wade know if you’d like to take the next step and interview.
Using Wade requires building a LinkedIn profile. It’s also still in the beta-testing phase, so the chatbot might have a few quirks.
4. Tweak the Notification Settings
One advantage of job-seeking chatbots is that they can look for jobs while you sleep. Most let you choose how often to receive notifications. Be sure to go into the settings of any chatbot you use and change the notification settings if necessary. Doing that eliminates the frustration of near-constant notifications as new postings arrive.
5. Type Your Responses Carefully
The informal nature of a chat window might make you write responses without thoroughly choosing your words. But chatting with a recruitment bot is not the same as a lighthearted conversation or small-talk with your friend. That’s because some employers use chatbots to replace or supplement phone interviews.
The Wendy chatbot handles the recruitment end and works with the Wade bot described above. It encourages informative and naturally-flowing conversations. Therefore, Wendy lets employers spend less time organizing phone interviews so that they can devote more time to other parts of the hiring process.
With that in mind, take all your chatbot conversations seriously. Before hitting send, proofread for spelling and grammar mistakes. Furthermore, re-read the entire response to ensure maximum clarity. You never know if those proactive steps could lead to in-person interviews.
6. Keep Reference Material Nearby While Chatting

Another positive factor about chatbots is you don’t need to rush while using them. You won’t risk annoying a human by taking your time to write thoughtful responses.
It’s in your best interests to keep reference materials close by before starting to talk with a bot. For starters, have your resume handy as a PDF or printed copy.
Some chatbots, such as Mya, check people’s qualifications during conversations. You might think you know your job history by heart, but why take chances? You’ll feel more at ease by having materials to check as needed.
When using Mya, applicants were over three times more likely to hear from an employer. That’s a strong reason to try it. But remember, accurate responses will improve your success.
It’s a good idea to have a calendar nearby, too. Provided you get far enough along in the screening process, some chatbots offer available interview slots.
7. Don’t Be Discouraged by Initial Rejections
It’s essential to give your best shot when talking with a chatbot in hopes of getting a job. If things don’t go your way, though, stay positive.
Stella is a chatbot with a shared talent network concept that recommends jobs based on what your career profile says. If you don’t land a job, Stella automatically considers you for all others in the system. More possibilities appear each day. You just need to log in at least once every 45 days to stay active.
If Stella determines a newly added job is a good fit, you get notified via email or text message alert. Additionally, the companies using Stella do not see your details unless you confirm interest in a position.
8. When to Use Chatbots to Find Your Next Job
Chatbots are undoubtedly convenient but aren’t appropriate in all job-seeking cases. For example, if efficiency is your primary goal, you probably won’t see instant results in your job search. That’s because many of them learn from the ways you reply to potential options. They get smarter from your interactions. If you’re only casually looking for a job and aren’t in a rush, chatbots are great solutions.
Also, consider only using chatbots for the lower-priority positions on your list. Then, you can devote more time to the most-desirable roles.
Maybe you feel you’ve exhausted all traditional resources and still haven’t found a place to work. If so, chatbots could revitalize your search by improving your access to recruiters.
If you haven’t nailed down the ideal characteristics of a new job, it might be too early to interact with a chatbot. As described earlier, the chatbots learn from the feedback they get.
Are you thinking, “I know I want a new job, but I’m not sure what kind”? Figure out the basic details first and rest assured you’re giving a chatbot worthwhile information.
Chatbots: The New Universal Recruitment Tool?
Chatbots could make your job search more streamlined, but only if you’re tech-savvy.
According to a small survey from Allegis Global Solutions, chatbots make some people nervous. Just over a third reported feeling slightly or very uneasy about using chatbots. Talking to one could make you overwhelmed if chatting is not a communication method that comes naturally.
By depending on the tips above, you could let chatbots fuel your job search. They’re not universally advantageous, but you could find they help you make meaningful progress.
Chatbots are just one of many tools you can use to help you find work. Consider using these big job search engines to further assist with your job search.
Baker likes this
10 Apr 13:22
Calendly/Mark hard to reach places/Website status check
by claudia
Free calendar scheduling
I use Calendly to manage Kevin’s calendar. Calendly connects to Google calendar, blocks off the times you are busy and creates a unique and permanent url to share so people can self-schedule. The scheduled event is then automatically added to your Google calendar. There is a basic, free plan that does this and paid plans with more features. — CD
Long-nosed precision marker
In my workshop I use a Dixon needle-nosed marker for maximum accuracy. This is like a wire-thin sharpie that can reach deep into holes or tug close along edges to make a thin indelible line or dot. The handle is fat for your grip, but the business end is only 2mm wide and several inches long (like a hummingbird beak) making it perfect for precision marks on fabric, plastics, metals and wood. This Dixon is a slightly cheaper version of a similar Pica brand marker recommended by Adam Savage. — KK
Website status checker
If you’re getting a 404 error while trying to view a website, it’s not always clear where the problem is coming from. If you enter the URL at https://downforeveryoneorjustme.com/ you’ll find out if the website is actually down for everyone else or the problem is somewhere else. — MF
Bose Noise Cancelling Headphones
For years, many friends have been telling me how much they like their Bose Noise Cancelling Headphones. I had a 17.5 hour flight from LA to Singapore earlier this week and so I decided I’d treat myself to a pair, especially because the price was lower than I expected (about $170). They did a remarkable job of squelching the engine noise, and I was able to clearly hear Link running across fields of dried leaves while playing Zelda: Breath of the Wild. — MF
Treating nasal congestion
I struggle with sinus issues, and it’s easy to mistake a sinus infection for a cold. When over-the-counter meds aren’t working for me, I go back to using a nasal rinse. It instantly relieves pressure and makes me feel better. This is the one I use. I started feeling symptoms this week, and again it felt like a cold, then I read this article and remembered the only that really works for me is drinking water and rinsing daily. — CD
Get PDF first
Owner manuals and installation guides contain far more information about a product than either the sales brochure, the online descriptions, or even Amazon reviews. The manual will have exact dimensions, all the parts, and caveats about what it can’t do. So my rule of thumb these days is to always download the product’s manual before I purchase the item. Impossible in the old pre-internet days, it’s a no-brainer today. It has saved me many times. Regrettably, not 100% of product have manuals PDFs that are findable, but the better products do. — KK
Baker likes this