Since higher-capacity iPhone models add to the price tag of a phone that’s already expensive, lots of people opt for the version with the least amount of storage to save money.
But what happens after a couple of years? You’re still using the same device, but now you’re hitting its storage limits. And even if you have space to spare, you should still keep your storage organized. It will help you find everything quickly when you need it.
Bottom line: You need to learn how to manage the storage on your iPhone.
How to Check Your iPhone Storage
Before you start making any changes, it’s prudent to know exactly where you stand—how much memory have you used, and how much do you have left?
You can easily check the status of your iPhone storage. To get started, open the Settings app and navigate to General > iPhone Storage.
At the top of the screen, you’ll see a colorful bar with a category-by-category breakdown of what’s using up your storage space.
For example, in the image above, you can see that photos are responsible for the majority of used space on my device. The only other significant category is apps.
What you see in the bar should help to guide your next steps.
How to Manage Storage for Apps on iPhone
In iOS 11, you can control your storage for individual apps in a more granular way than ever before. Of course, the nuclear option of deleting the app is still available, but now you also have the option to offload apps.
Offloading an app will delete the app from your phone, but it will retain the app’s documents and data. This makes it quickly available if you ever decide to re-download the app in the future.
For apps that store data in the cloud—like Gmail and OneDrive—it might not make much difference. However, if you use a lot of local apps like games and productivity software, it’s a great way to reactively manage your storage without losing your data long-term.
To offload apps on a case-by-case basis, go to Settings > General > iPhone Storage. Next, scroll down to the list of apps and tap on the one you want to offload. Once the information screen opens, tap on Offload App.
Alternatively, if you want your iPhone to automatically offload apps when you get close to the storage ceiling, navigate to Settings > General > iPhone Storage and select Enable next to Offload Unused Apps.
How to Manage Photo and Video Storage on iPhone
We’ve already covered lots of the Photo app’s hidden tricks. However, when it comes to managing your photos’ storage on the iPhone, there are a few options left to discuss.
To see what’s available, navigate to Settings > General > iPhone Storage and tap on the Photos app.
You’ll see three options:
iCloud Photo Library
“Recently Deleted” Album
Review Personal Videos
For each of the three entries, your phone will tell you how much space you can save.
The second option will remove all old photos from your Recently Deleted album. This will save you a lot of space if you find yourself often deleting tons of memes and other clutter.
Lastly, you can review your videos. You iPhone will scan for video files and tell you which are taking up the most space. You can then delete them at your leisure.
Note: The longest videos aren’t always the largest file; it depends on what quality settings you used while recording.
How to Manage Contacts Storage on iPhone
Lastly, you can check out your contacts list.
Individually, each contact takes up a minuscule amount of space. However, if you’ve been in the Apple ecosystem for many years, your list of contacts could be huge. You probably have lots of old friends whose details are out of date, former colleagues from previous jobs who you will never contact again, and all manner of tradesmen and services you don’t need anymore.
It’s worth going through and deleting all the junk. Not only will it save you space, but you’ll also end up with a more refined, streamlined, and useful contacts list.
First, turn off contact syncing for any accounts you don’t need. That will instantly save some space. You can prevent contacts from syncing by going to Settings > Accounts & Passwords, tapping on the correct account, and sliding the toggle next to Contacts into the Off position. You iPhone will delete them without any further input from you.
To delete a contact that’s saved locally or synced via iCloud, use the following instructions:
Open the Contacts app.
Tap on the contact that you want to remove.
Select Edit in the upper right-hand corner.
Scroll down and tap on Delete Contact.
Use a Third-Party App to Manage Storage on iPhone
You can also use third-party apps to manage the storage on your iPhone. Here are three of our favorites:
1. iExplorer
iExplorer lets you move content from an iPhone, iPad, or iPod onto a PC or Mac using drag and drop. It’s a great way to manage storage across lots of different file formats without needing to fiddle with each one on a format-by-format basis.
Not only does it work with music, photos, and videos, but it also lets you manage the storage used by content such as voicemails, contacts, calendar events, reminders, notes, and more.
iMazing sells itself as a backup and restore app that’s better than Apple’s native backup tools, but you can also use it to manage your iPhone’s storage.
The app works with backups, photos, music, ebooks, messages, contacts, and apps. You can move your content onto a PC or Mac and delete it off your phone’s storage.
It connects to a PC or a Mac via USB and allows you to manage your apps, photos, music, ringtones, videos, voice memos, and other multimedia files.
iFunbox also includes a tool that lets you use your iPhone as external storage; you can use it to carry important documents and other data that doesn’t naturally fit under an existing app’s umbrella.
Lastly, iFunBox will let users who’ve jailbroken their device browse the root filesystem.
Paul Rand's modernist philosophy wasn't just in his work. The graphic designer's signature aesthetic continued into his Connecticut home. It was designed in 1951 by Rand himself along with his...
Whether you’re looking to create a beautiful intro for your YouTube channel, an explanatory animation, or give a presentation, a video can be an excellent way to illustrate your points.
But creating impactful videos isn’t easy. Aside from video editing skills, you usually need powerful hardware and expensive software to craft a video. But not anymore.
Renderforest is here to provide you with a way to create broadcast quality videos in no time at all. Let’s take a look at what the service offers and how you can use it to make amazing videos.
Meet Renderforest
Head to the Renderforest homepage and you’ll see some basics about the service. Right below the main banner, you can check out templates it offers, including YouTube intros, professional slideshows, and music visualizations.
If you’re interested in one of those, click the Create button underneath to view templates in that style. Else, click Create a video to get started.
Have a look at the Trending templates if you want to see what’s hot with other users. You can also use the tabs along the top to filter by categories like Intros, Promotional, Slideshow, Presentations, Music Visualizations and more.
Once you’ve selected a template, you’ll see a brief description of its use case and other information. Below this, you can check out videos others have made with the template.
You’ll need to create an account on Renderforest to make a video with the template, but the process is painless.
Creating a Video in Renderforest
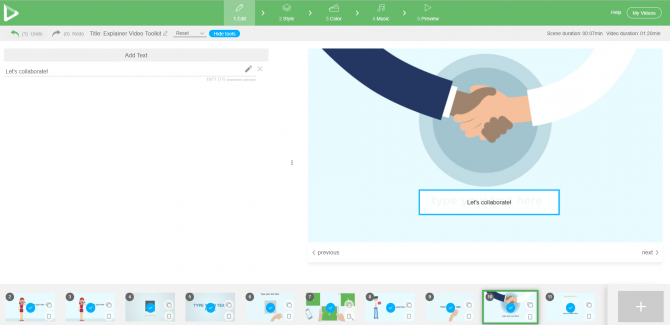
Click Create now on a template to start editing. You can choose Add a scene to grab something from the video library, or Load a Preset to use a ready-made story.
After proceeding with either option, you’ll see the editor. It uses a standard interface, with the timeline at the bottom, options on the left, and preview on the right. In the example we used, we were prompted to enter text and add images at various points.
If you want to add additional scenes to your video, you can use the Plus button at the bottom and import a new animation or stock footage available from Renderforest.
Once you’re done, jump to the Style tab. This lets you choose between several animation styles to give your video the right feel. Similarly, the Color tab allows you to choose a color palette, or custom colors, for the perfect look.
Move onto the Music tab to add stock music, your own uploaded music, or even a voice-over to the video. Finally, check it all out on the Preview tab.
Renderforest Pricing and Plans
You can use Renderforest to export as many videos in 360p as you like for free. The free plan limits you to three minute videos with watermarks, but it’s a good way to see if the service is right for you. This also includes one-click uploading to YouTube and Facebook when the video is done.
If you need HD video downloads, take a look at Renderforest’s subscription plans. The most popular is the Pro plan for $29/month, which allows you to export 30 720p videos per month. Each can be up to 15 minutes, and you get much more storage space. It also gets rid of the watermark
You can also pay per export if you only need a video from time to time, and these start at $9.99 each.
Beautiful Videos Made Easy With Renderforest
We’ve taken a quick tour of Renderforest. It offers anyone who wants to make high-quality videos without a ton of work a powerful editor and easy tools.
If you need to create videos for your business, YouTube channel, or similar, you should definitely give it a look.
There’s a lot to consider when you decide to choose an expense manager. Do you want to manually track your expenses or do you want to connect your bank account to an online account? Do you prefer to keep the info entirely offline? Are you looking for an app that takes all that data and turns it into a visual chart? No matter what your needs, there’s a system out there for you.
Clarity Money takes a very simple approach to tracking expenses.
When you first connect your bank account to the app, your dashboard will instantly be full of useful information. You can view a list of your transactions and view your spending trends in the current and previous month or week, broken down by category.
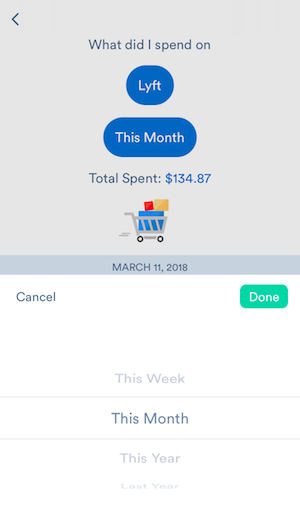
One of Clarity Money’s best features is the ability to see how much you’ve spent this year on specific subscription services, restaurants, and more. (This appears to be informed by the services or shops/restaurants you frequently spend on):
When you first sign up for Clarity Money, you’ll need to spend some time re-categorizing your expenses, and marking recurring expenses as such. This will allow you to get far more out of the app.
And as you use Clarity Money, the app will identify recurring subscriptions and payments you may want to cancel.
Download: Clarity Money for Android (Free) | iOS (Free)
Dollar Bird differentiates itself from other services listed here by relying on an online calendar interface for tracking your expenses. It’s also one of the options where you have to manually enter your transactions. As you add transactions, you can categorize them and add recurring payments.
You’ll begin by entering your balance, and then you can add expenses, accompanied by a label. Dollar Bird will use this label to auto-categorize expenses, but you should review categories to make sure the app got them right. You can also create custom categories.
Dollar Bird is pretty barebones. But the calendar view is useful for gaining a sense of understanding of balance at any given time. In addition to the calendar view, you can also see your spending trends over any given period of time.
Other similarly simple apps include Fudget (which lists your transactions rather than presenting them on a calendar),
For the report type, select Items if you want specific details on each item you’ve purchased. If you’re only interested in an overview, you could select Orders & Shipments to see the data broken down by orders. (This means you won’t see what specific items were included in each order.)
Once the Excel spreadsheet is ready, you can download it to your computer. You’ll find a lot of unnecessary information you can delete. Just keep order date, title, category, and item total. (The total includes tax and other charges so you get a sense of exactly how much you spent on any given time.)
You can scroll down to the end of the spreadsheet and under item total, use Excel’s Auto Sum feature to quickly calculate how much you spent on Amazon in that time period.
Keeping the category listed will also allow you to filter your spreadsheet and see how much you’re spending on any given category of items. On the Data tab click the Filter button to toggle the feature on. (You may have to fix or add some categories first.)
If you tend to make most of your online payments using Paypal, you can track your online expenses and subscriptions by going to the Activity tab and clicking Statements. Select Custom Statements, and under Transaction Type, select Completed Transactions and enter the time period you’re interested in, and Paypal will generate a CSV file of your expenses.
Where else do you do your online shopping? Think about where you spend most of your money online and see if they offer a way to track your order history.
4. Keep It in the Bank: Online Bank Account
Most major banks offer online budgeting tools, so if you’re uncomfortable with the idea of connecting your banking accounts to a third party, you probably have access to expense tracking tools from your bank.
My bank allows me to view expenditures from my checking account, savings account, and credit card. I can choose which accounts to view in my overview as a pie chart broken down by category. And of course, I can see my expenses listed as individual transactions.
Many online banking tools will automatically categorize expenses, but it’s not always 100 percent accurate, but reviewing and fixing them should resolve future miscategorizations.
If you have multiple accounts across different banks, chances are you can add all accounts to the online banking tool that offers the best features and use that as a central tool for tracking your expenses.
If you’re completely against the idea of using online tools for your expenses, you could use a spreadsheet instead. Excel has a template for every occasion and expense tracking and budgeting are no exception.
Alternatively, you can also look for Google Sheet Templates and save the file to your computer. Google Templates include a monthly and annual budget tracker with space for you to track your expenses in a pretty detailed fashion.
The spreadsheets are prepopulated with formulas that will take the daily information you input:
And create an overview to give you a better grasp on your spending:
Smartsheet also has a variety of spreadsheet budget templates that you can open in Google Sheets. If you want to log expenses, you can modify the Expense Budget Report template or if you want to include a budget planner in your spreadsheet, you can opt for the Simple Budget Template.
There are plenty of budget planning apps but two, in particular, are consistently recommended: Mint and YNAB. These popular budgeting apps connect directly to your bank account, automatically tracking your spending habits.
Mint is free, while YNAB is $6.99/month after a 34-day free trial.
When you first connect your bank accounts, past transactions will not be included in YNAB, whereas Mint will pull in the past 90 days worth of transactions. This means you won’t be able to dive right into YNAB’s spending tracker.
Mint also offers a search functionality that is useful when looking back on your expenses.
Both platforms make it easy to review your spending habits.
With Mint, you can see a list of your expenses under the Transactions tab and see an overall view of your spending habits under the Trends tab.
YNAB’s Spending Reports also show how you spend on each category, your spending trends, and more:
If your main concern is expense tracking, Mint is likely to best serve your purposes. If you really need a robust budget tool with a comprehensive dashboard, YNAB might be more your speed.
YNAB and Mint are undoubtedly popular. But, other online budgeting tools like Personal Capital and Mvelopes with expense tracking baked in are also worth considering.
You probably look to Google when you need to reserve hotels and flights, but Bing isn’t too far behind. Microsoft’s own search engine can aggregate prices from multiple booking sites and help you book the right hotel with its intelligent search.
Here’s how you can make smarter decisions using the intelligent features built into Bing Search.
How to Use Bing Search for Smarter Hotel Bookings
Try these Bing features the next time you are planning a trip and want to grab the best hotel at the lowest price. The features have rolled out in the US.
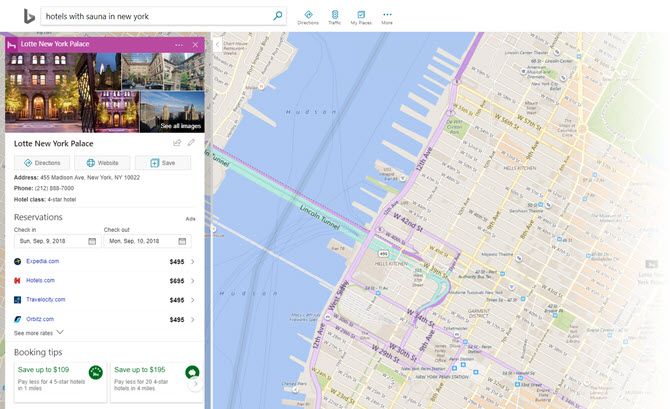
Use Bing to search for a specific hotel in the US and look at the information cards on the right, or on the Map view, as in the screen below.
Basic information. Bing will display information on the hotel like the average room tariff, amenities, and popular check-in times.
Booking tips for the best decision. Bing will also show booking tips around competing options you may not have considered. For instance, click the Booking Tips will prompt you tocheck out other hotels that may be rated higher but have similar room tariffs. You can save money with the price discounts mentioned.
Price trends. Bing displays historical price trends for the date range you’re exploring to help you save money or get your money’s worth.
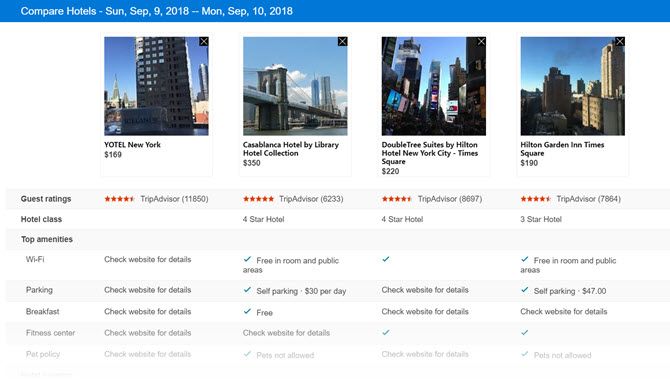
Compare hotels side-by-side. Click the map on the search results page. Then, click the Compare button on the left sidebar which allows you to select the checkbox for specific hotels. Click the Compare button again to bring up the detailed breakdown of the amenities in each hotel. This view makes it easier to make a decision.
Bing aggregates the information from sites like TripAdvisor, Yelp, Foursquare, and even Facebook to help you get to the right hotel. And maybe save some time and money on every hotel you book on your trips.
While it may be popular and easy to call out high CEO pay in an era when ordinary workers are seeing their wages rise slowly, CEO pay really has nothing to do with what average workers earn. CEO pay just isn't enough money to make a difference to average workers.
In 1994, Iron Maiden's Bruce Dickinson brought his solo band Skunkworks to perform an intimate concert in Sarajevo, Bosnia, which was then an active war zone. The new documentary 'Scream for me Sarajevo' tells the story.
The balsamic vinegar in your kitchen cupboard probably isn't even balsamic, at all. Learn what defines this condiment through the words of an artisanal producer from an unlikely corner of the country.
The podcast revolution is under way. Every walk of life is now covered and while podcasts are relatively new, it is difficult to find quality content amid the noise. Curio is a London podcast startup that is trying to change the dial.
While many visitors to southern Italy have taken to sipping the mouth-cloyingly sweet citrus liqueur known as limoncello, fewer have come into contact with the appetizingly herbaceous liquore all’alloro. With its vivid green color, the laurel-based liqueur resembles France’s green chartreuse and usually packs a similar amount of alcohol (about 40 percent). However, while the French concoction uses 130 plants and can be made only by Carthusian monks, liquore all’alloro requires four simple ingredients and is often made at home.
The bay laurel’s pervasiveness as a wild-growing shrub likely led to the leaf liqueur's popularity. The plant also holds an important place in Italian history: In ancient Roman culture, laurel symbolized victory, peace, and imperial status (hence the phrase, “resting on laurels,” or prior achievements). Even Julius Caesar brashly adorned himself in the laurel wreath at public events when the sacred plant-crown was meant to be reserved for days of triumph after battle.
Today, bay laurel makes its main appearance in the kitchen and at the table. While it can still be foraged, many Italians grow the plant in their home gardens and use it to flavor classic Italian and Mediterranean dishes. To make liquore all’alloro, the leaves are infused in high-proof grain alcohol for at least a month, turning the liquid a vibrant green. After the leaves have been stripped of their color, the liquid can be strained and a sugar syrup added to dilute the aromatic infusion. Stored away from light (some recipes even recommend coating the bottle in foil), the liqueur can be kept for many years. However, given Italian hospitality, stores can deplete quickly, as the after-meal offering is often shared with neighbors and guests.
Everyone knows that the best place to be at a concert is on the floor, right in front of the stage. This area is commonly referred to as “the pit,” and there usually isn’t a better spot to see all the action that happens on stage. You’ve probably heard of “mosh pits” before, but don’t worry: Unless you’re at a hard rock show, you likely won’t see one of those in your pit. Pits are usually PACKED, and since you’re going to be around so many other people, here’s some concert etiquette that you can follow in the pit to ensure you and your fellow concert-goers have a good time.
Tip #1 – Move your feet, lost your seat
If you plan on being anywhere in the pit (especially the front,) you need to know that if you leave your spot, you’re not getting it back. Before you head to the pit, make sure you’ve had your bathroom break, you’ve got an extra drink or two if they’re available (more on that in a moment), and that you’re good to stay in that spot for awhile. Don’t be that person who is angrily/forcefully trying to make their way back through the crowd in the pit. Once you’re out, it’s time to find a new spot to enjoy the concert.
Concerts are always more fun when you can sing along, but please, please, please know the words to the songs if you’re going to be singing along down in the pit! You don’t want to be the one in the pit singing “Hold me closer, Tony Danza.” Make sure you do your research before you go to a show and at least know the words to a few of the songs that are going to be performed.
*PRO TIP: If you know you’re going to a show well ahead of time, you can check out SetList.fm. Here, you can search for the artist/band you’re seeing perform, and find out what songs were on their last set list. Artists/bands usually stick to roughly the same set list when they go on tours, so you can find out EXACTLY what’s going to be played!
It gets REALLY hot down in the pit, because there are so many people moving around at once in such close proximity. Make sure you drink plenty of water both before and after the concert, but more importantly, stay hydrated during the concert as well. Grab a bottle (or even multiple if you can) to take with you in the pit to sip on throughout the concert.
I don’t care who you are: You don’t want anybody else’s sweaty, stinky, smelly armpits all up in your face when you’re trying to enjoy your favorite band/artist. Unless you’re at a Nirvana concert, it does not need to Smell Like Teen Spirit. Make sure you take care of your own pits, before you head to the pit.
Let’s face it — As much as we wish everyone was nice, not everyone who is attending a concert in the pit is going to be courteous. There will be people who don’t heed any of the advice we’ve given above, but that’s no reason to flip your lid and make the situation worse. When the pushing and shoving starts, just try to keep your cool and remember that you’re all there for the same reason — to have a good time!
One of the largest supervolcanoes in the world sits underneath California, lying dormant for the past 100,000 years. Now, researchers have gotten a clearer glimpse into what lies below the Long Valley supervolcano, uncovering 240 cubic miles of magma sitting beneath California.
by A.A. Newton on Skillet, shared by A.A. Newton to Lifehacker
Noodles don’t need a lot of stove time to taste good, which is why they’re a no-fail summer standby. As much as I love cold peanut noodles, sometimes I crave a bowl of silky-sauced pasta laden with vegetables and cheese—without spending an hour simmering that sauce.
The first time I saw one of these finely crafted grills was on a ranch I visited back in the late ’70s. They’ve changed very little over time: the one I have now that is a few years old is essentially the same as the first one I saw almost 30 years ago. Being cast iron, it absorbs and retains heat, radiating it evenly, so the whole stove is part of the heat source — not just the coals.
It’s cast iron instead of stamped tin or steel, so it’s heavy, but substantially built. And it’s a hibachi, not a lidded grill, so it’s not a smoker. It is small enough to put in the trunk or chuck box and take camping, or to use on the patio (about 20″ x 10″ x 9″ and the legs lift the bottom about 4 inches off the ground). But what I like best is it fits in the fireplace, so you can grill in wet or cold weather indoors.
It is lower in profile than most charcoal grills, but about twice as big as most hibachis. If you are cooking for 8 or more people, obviously it will stretch its capabilities, but for the two of us or when we have a couple of friends over for kabobs, it can’t be beat. It is just about perfect for a couple or small family.
The grate you place the food on is not welded wire — it is cast iron like the rest, so the cross pieces are as wide as the slots in between. They hold food well, hold heat well, and when you sear your food, you can see the wide dark sears on the food. The grate is also strong enough to hold pots, pans, coffee pots, etc., — thus, it can function as a small stove.
There is a door that opens down on the front to add coals or help the dampers to adjust the heat. The damper doors adjust by sliding side to side so you can adjust the draft perfectly. The grill disassembles for cleaning. It’s only four parts: the base with the front door, pin-hinged at the bottom, the top grate, the bottom grate, and the sliding damper.
Again, the lower grate the coals rest on is cast iron, so it won’t burn out or warp over time. The whole grill is really well made. I burned out several imported hibachis before getting this grill. It should last a lifetime.
The uproar over periodic resistance to reciting the pledge typically originates with Constitution-waving, Tea Party conservatives. Ironically, the pledge itself (which was written by a socialist) is not only un-American but antithetical to the most important principle underpinning the Constitution as originally ratified.
Kenyan auto startup Mobius is building SUVs for the East African market with one philosophy in mind — it needs to be able to handle Africa's legendary terrain. The Mobius...
Natural peanut butter is delicious, but the initial stirring causes a mess. The minute you put in a spatula, the oil on top overflows everywhere. Instead, try this stirrer integrated into a screw-on lid ($10). With a few quick turns, the peanut butter is completely mixed with zero spillage. Plus, when you remove the stirrer from the gasket once you’re done, it automatically cleans the stirrer! These days, my husband actually sneaks in a new jar of peanut butter just so he can mix it up before I get to.
by Claire Lower on Skillet, shared by Claire Lower to Lifehacker
Happy weekend, and welcome back to 3-Ingredient Happy Hour, the weekly drink column featuring super simple yet delicious libations. Today we are going to be playing around with a sweet and tart three-ingredient icon: the margarita.
Shubnum Khan is a South African author and artist who’s going public with a warning she learned the hard way: be very careful to read the fine print when signing a photographer’s model release.
Khan says that about six years ago, a friend of hers spotted an ad promoting immigration in a Canadian newspaper. The woman in the ad looked strangely like Khan. Studying the photo more closely, Khan realized that it was her.
So today I'm going to tell you the story of How I Ended Up with my Face On a McDonald's Advert in China – A Cautionary Tale. Six or so years ago, a friend in Canada posted a pic on my FB wall to say she found an advert of me promoting immigration in a Canadian newspaper. pic.twitter.com/QJ0nWpYNmQ
After being confused for a while as to why her face would appear in an immigration ad on the other side of the world, Khan was reminded by a friend that they had done a photo shoot a few years prior with a photographer who had promised free professional portraits.
The unnamed photographer had said he was working on a project called “100 Faces Shoot” that involved creating portraits of people of all ages and races. Khan posed for three photos: a straight-faced one, a smiling one, and a “crazy” one.
“[My] young friends and I were excited,” Khan writes. “We signed a release form at the start (I thought it was to give him permission to use the photos for his portfolio). We didn’t read the small print. I know. It was stupid.”
“It’s very quick – you sign a piece of paper, you go in, the photographer says smile for a picture,” Khan tells BBC News.
What Khan says she wasn’t told verbally was that the photos would be sold as stock photos. While she was initially amused about the idea that her face was being used all over the world, she soon felt differently when she saw how often the images were being licensed without her having any control over their use or receiving any money from it.
Through reverse image searches, Khan has discovered her face being used in countries across the globe for a countless range of products and purposes.
Some are more innocent…
A sedation dentistry ad.
Others involve Photoshopped versions of Khan’s face to sell things like skin brightening complexes:
Khan’s face now appears on the covers of books and magazines:
But other ads and uses aren’t as innocent: Khan was told by the photographer that she had signed away rights to “distortion of character including false names.”
Khan is Seng Bonny, a leader of Cambodian tours.Khan is Phoebe Lopz, a campaign manager in San Francisco.
Khan has also discovered how prevalent fake testimonials are online and in advertisements. She has found herself being presented as a foster carer and child tutor.
Khan on a French dating website. The text roughly translates to: “I’m here, do not click too hard I’m fragile. Here I am looking prince charming of my dreams, who comes on his white horse to steal my heart…”
“The testimonials are the most shocking for me,” Khan tells BBC News. “I thought I understood how stock images work, you know, like having a picture of a house to illustrate a house. But it was so dishonest, I never knew you could use stock images with false testimonials and fake names.”
“So beside the fact that all of us were never paid for ANY of these advertisements, there’s also the misleading and downright dishonesty of promoting these products,” Khan writes. “Eventually I contacted the photographer and said I didn’t know I signed up for any of this.”
The photographer explained that it was all legal, but he agreed to take the photos of Khan down from his websites.
“The thing is I’ve laughed over the years about this and it’s a great party story and I do find some of the images hilarious and I still laugh when people find me randomly advertising for teeth implants while browsing a paper in New York,” Khan concludes, “but now that I’m older and more assertive and aware of power plays and manipulation I can easily see how we were all used – a whole gallery of free photographs for this photographer to sell and we haven’t made a cent for all the things WE’VE advertised. […]
“Also this could have gone badly – my photo could have come up in a wrong place […]
“So, if anything use my story as a cautionary tale. Don’t sign up for free photoshoots, read what you sign and also don’t believe most of the things you read on the internet.”
Redditors are sharing their favorite “life pro tips” in an AskReddit thread, and we’ve collected the best below. (Some will be familiar to Lifehacker readers.) Strung together, they feel like a mundane modern Art of War: briefly worded tactics and strategies for fighting the good fight. Learn tricks for falling…


 Paul Rand's modernist philosophy wasn't just in his work. The graphic designer's signature aesthetic continued into his Connecticut home. It was designed in 1951 by Rand himself along with his...


 Dollar Bird is pretty barebones. But the calendar view is useful for gaining a sense of understanding of balance at any given time. In addition to the calendar view, you can also see your spending trends over any given period of time.


 Kenyan auto startup Mobius is building SUVs for the East African market with one philosophy in mind — it needs to be able to handle Africa's legendary terrain. The Mobius...


 Cris of Get Hands Dirty demonstrates how she sharpens her tools.
 Learning basic knife-making from a pro.