
G Suite apps include Google Documents, Sheets, Slides, and Drawings. These apps can provide shareable links. Shareable links can be used for publishing a document or for collaboratively editing a document.

Documents are only accessible by you (the owner) unless you turn link sharing on. One way to turn on link sharing is by clicking the Share button in an open document. Then you'll see an option to Get shareable link. Clicking that option turns link sharing on and copies the link to your clipboard. The link is set to Anyone with the link can view. You can change this to Anyone with the link can comment or edit.

Once you have the shareable link copied, you can paste it into a document, webpage, link shortener, Twitter, Facebook, etc. By replacing /edit in the URL, you can do some pretty nifty tricks. You can transform a shareable link into a Preview, Copy, Template, or PDF link.
Below are glanceable graphics for each kind of link. Scroll down for detailed descriptions and tips.
View fullsize
View fullsize

View fullsize
View fullsize

View fullsize

View fullsize

Preview Link
Share a clutter-free view of your document
→ Replace /edit with /preview
Publishing what’s created in Google Docs, Sheets, Slides, or Drawings as a Preview link presents the document without menu bars and buttons. A Preview link declutters the web page, which emphases your content over the tool you used to create it. In fact, your audience may not know you created the document in G Suite.
Preview links are good for newsletters, flyers, and instructional materials. It's also great for when you want to present a Google Slides presentation full screen. A preview link shows slides in presentation view, and it keeps your browser tabs visible (making it easy to switch between the presentation and other webpages).
Example: Classy Graphics Manifesto
Previewed documents load faster and work much better in mobile browsers than the standard shareable version. This is particularly true with Google Drawings, which does not have a mobile app.
Comments and anything that is off the slide or canvas is not displayed in a previewed document. Furthermore, a Slides presentation does not have the slide sorter—the presentation is shown in Presentation view.
The audience for a Preview link does not see editing in real-time. However, a recent version of the document is shown each time the page is loaded. There’s no need to republish or reshare the document to update the Preview version. Note that the preview might take several minutes to update.
Your shareable link from Google documents might have some additional characters after /edit. Don’t worry about them. Simply replace /edit with /preview. You can either keep or delete what was after /edit and your link should work just fine.
Changing /edit to /preview?rm=minimal in Google Slides presents the slideshow without the navigation bar at the bottom. This is handy when you do not want your audience to skip slides. (Thanks to Shaun Creighton in the comments for this tip!)
Since a Preview link removes menus, viewers of your document will not have the ability to choose File → Make a Copy to add a copy to their own Google Drive. However, if you encounter a Preview version of a document and wish to make a copy, try this: Replace /preview with /edit in the URL. You’ll then see the version with menus and you can then access the File menu to make a copy.
Adding a Preview URL for a document to a Google Classroom post ends up reverting to the original version, not the Preview version. If you want to add a Preview link, first paste the Preview link into URL shortener like Bitly. Copy the new link Bitly provides. Adding the shortened link to a post in Google Classroom will end up opening the Preview version. Alternatively, you could paste the Preview link into the body of the post (instead of using the link button to add the link).


Make a Copy Link
Force others to make a copy before viewing your document
→ Replace /edit with /copy
You’ve probably clicked a link to a Google Docs, Slides, Sheets, or Drawings file and had to click a Make a Copy button before proceeding. This method of sharing forces a user to make a copy of the original, and the copy is now fully owned by the user and placed in her Google Drive.
Make a Copy links are good for when you have created a document in G Suite and want students to have their very own copy. Students can fill in blanks, finish a slideshow, label a drawing, annotate text, or complete some task in their own document (and then possibly share it back with the teacher). Sharing this way is also useful for sharing templates with other teachers. They can simply click to make their own copy and customize it without affecting your original.
Example: Notes of Encouragement (for printing on 1.5 x 2 inch sticky notes)
Google Classroom automates this process when teachers post assignments that include a Google document. Classroom gives the option to make a copy for each student.
Your shareable link from Google documents might have some additional characters after /edit. Don’t worry about them. Simply replace /edit with /copy. You can either keep or delete what was after /edit and your link should work just fine.
Comments will not be copied over when you change /edit to /copy. If you want to include comments, see Make a Copy with Comments Link below.
When students and teachers make a copy, they have full ownership of the copy and the original document owner is no longer associated with the copy. If the first document owner makes changes to the original document, those changes be reflected in future copies, but will not change copies already made of the document.


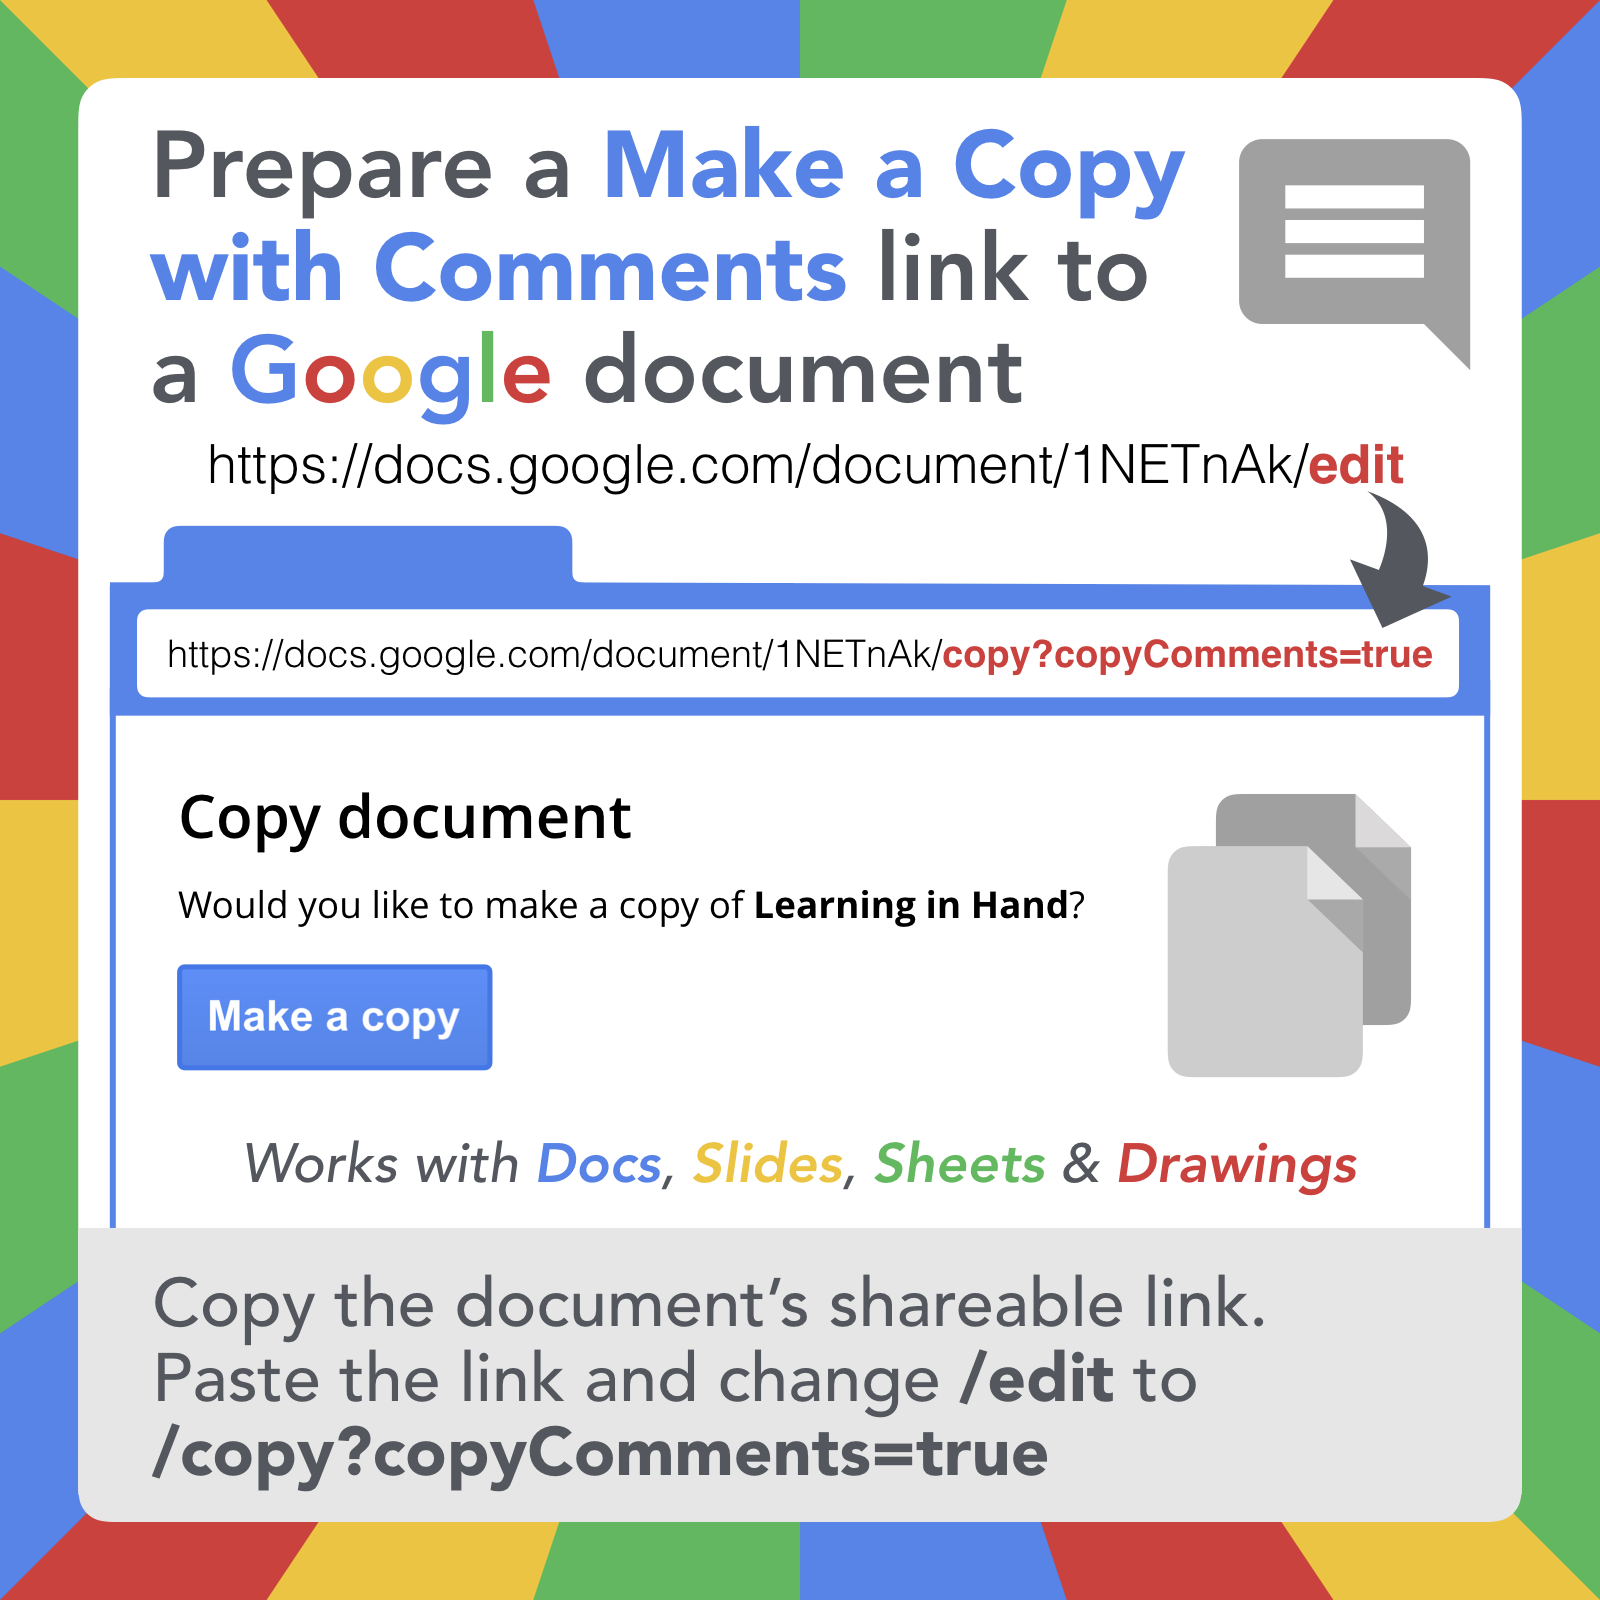
Make a Copy with Comments Link
Force others to make a copy that includes comments from the original before viewing your document
→ Replace /edit with /copy?copyComments=true
This link works just like the regular Make a Copy link, but it also copies any comments from the original document into the copy. This can be handy if there are comments you want viewers to see and possibly reply to. Comments may include additional information, instructions, checklists, and hyperlinks.
Example: Lines of Symmetry by Eric Curts
Comments that are copied from the original document include the notice, "Comments above copied from original document."
For more information about this kind of link, read Eric Curt's post How to Force a Docs Copy WITH Pre-Loaded Comments to Help your Students.
If you highlight text or select an image before clicking the Comment button, the comment will be associated with that selection.
Adding a Make a Copy with Comments URL for a document to a Google Classroom post ends up reverting to the original version, not the Copy with Comments version. If you want to add a Copy with Comments link, first paste the link into URL shortener like Bitly. Copy the new link Bitly provides. Adding the shortened link to a post in Google Classroom will end up opening the Make a Copy with Comments version. Alternatively, you could paste the Make a Copy with Comments link into the body of the post (instead of using the link button to add the link).


Template Link
Share an easy-to-copy preview of your document
→ Replace /edit with /template/preview
Use a Template link to share the contents of your document with the option to make a copy—it's a combination of a Preview link and a Make a Copy link.
A Template link presents a clutter-free version of your document. It also displays a Use Template button. Clicking this button makes a copy of the original document, and the copy is now fully owned by the user and placed in her Google Drive.
Template links are good for allowing others to see the document before copying to Google Drive. These kinds of links are usually preferred over Make a Copy links when posting on websites and social media since they allow the document to be seen before blindly being copied.
Example: Magnetic Poetry
Unlike clicking the Make a Copy button, clicking Use Template does not put "Copy of" in the newly copied document's file name.
The audience for a Template link does not see editing in real-time. However, a recent version of the document is shown each time the page is loaded. There’s no need to republish or reshare the document to update the Template version. Note that the document's preview might take several minutes to update.
Your shareable link from Google documents might have some additional characters after /edit. Don’t worry about them. Simply replace /edit with /copy. You can either keep or delete what was after /edit and your link should work just fine.
iPhones and iPads are a little quirky when it comes to Template links. After clicking Use Template, the freshly copied document does not automatically open in the Documents, Sheets, or Slides app. However, when the app is opened, the new document is there. Sorting by Last modified can make finding the document easier.
Adding a Template URL for a document to a Google Classroom post ends up reverting to the original version, not the Template version. If you want to add a Template link, first paste the Template link into URL shortener like Bitly. Copy the new link Bitly provides. Adding the shortened link to a post in Google Classroom will end up opening the Template version. Alternatively, you could paste the Template link into the body of the post (instead of using the link button to add the link).


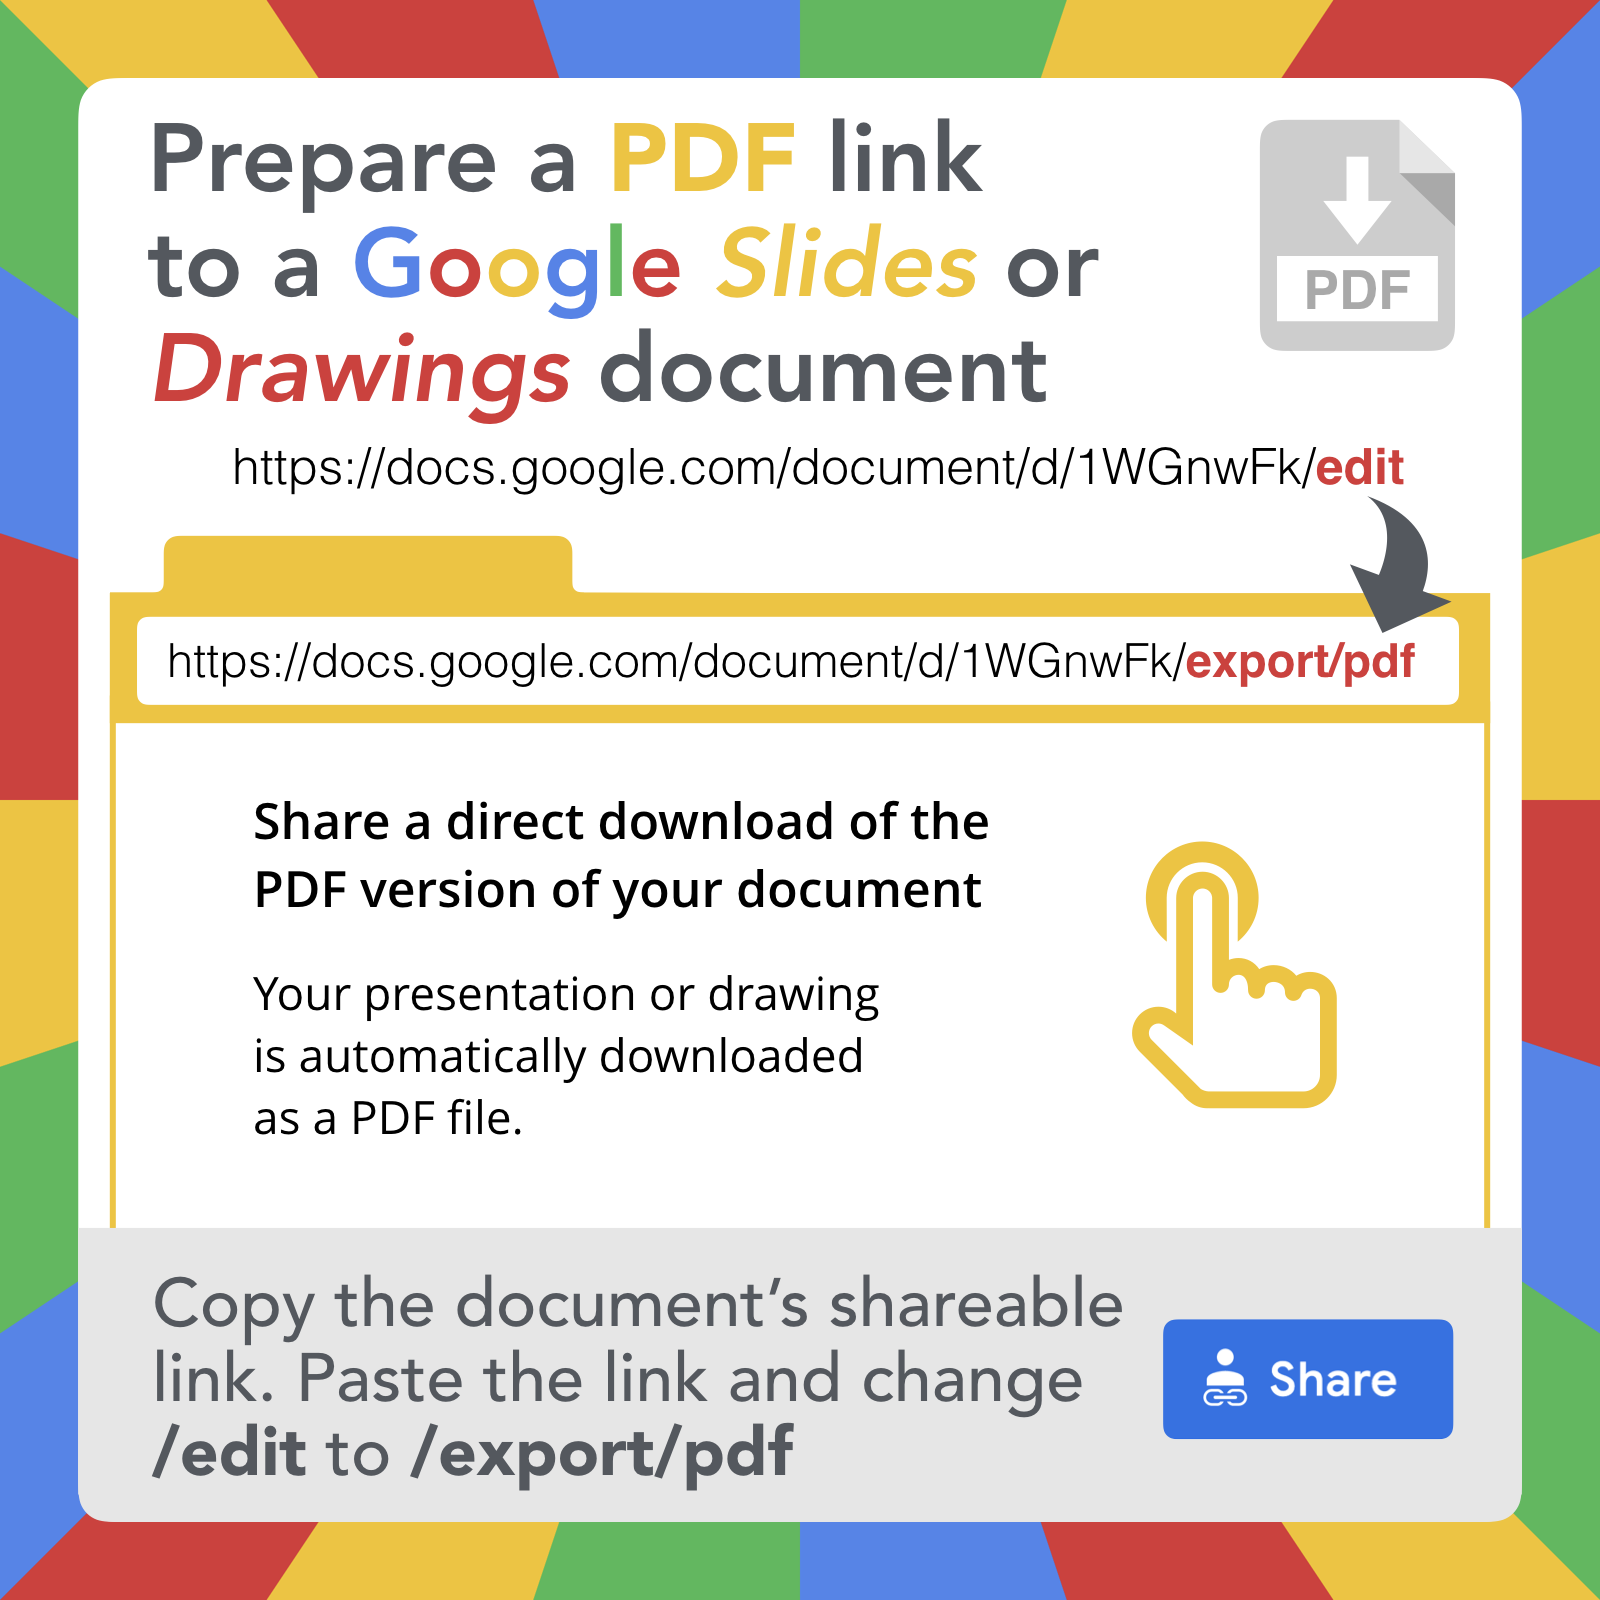
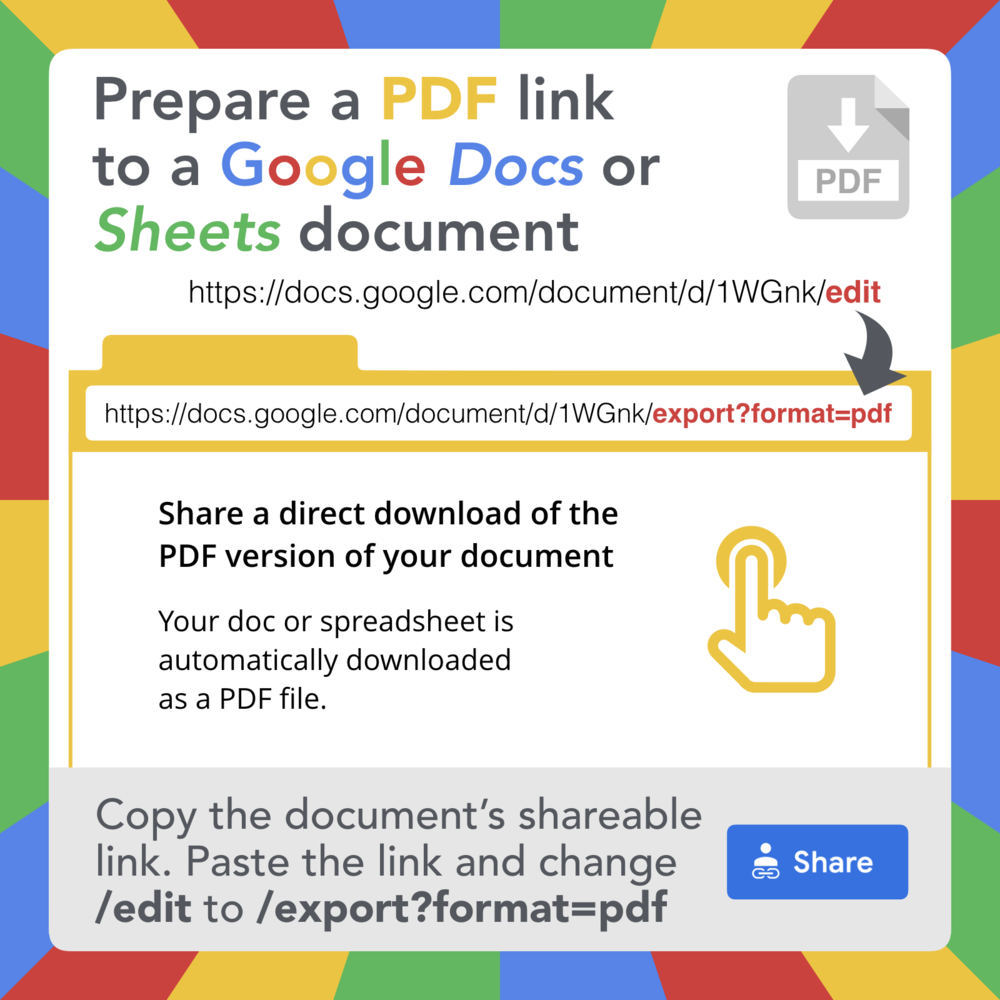
PDF Link
Share a direct download of a PDF version of your document
→ Google Docs & Sheets: Replace /edit with /export?format=pdf
→ Google Slides & Drawings: Replace /edit with /export/pdf
Have the web browser download a PDF version of your document with a PDF link. Instead of displaying the document in Google's viewer or app, a PDF is automatically downloaded when the link is clicked.
PDF links are good for when you want others to print or save your document. They are handy for sharing posters, infographics and cheat sheets.
Example: Google Classroom Post Options
Since a PDF is a universal format, a Google account is not required to download and not necessary to open the file.
PDF files may open in any number of apps: Adobe Reader, Preview, Google Drive, Foxit Reader, Explain Everything, etc.
Automatic downloads do not appear in the browser window on computers. It is easy for someone to miss that a file was downloaded when clicked. Be sure to label your PDF link so that others know that a file will be downloaded.
Downloads go to different places, depending on the browser, computer, and settings. The recipient might be prompted to rename the file and choose a location. Or, a downloaded file might automatically be placed in a Downloads folder or on the desktop.
Hyperlinks do work in PDFs. Any text, images, or shapes that you have hyperlinked in your document will remain linked in the PDF version.
Direct downloads are not limited to PDF. Other file types also work. Instead of using pdf in URL, try png, jpg, pptx, xlsx, docx, html, or txt.
Your shareable link from Google documents might have some additional characters after /edit. Don’t worry about them. Simply replace /edit with /copy. You can either keep or delete what was after /edit and your link should work just fine.
If you'd like the PDF to display in the browser, you can use Google's online document viewer. Add https://docs.google.com/viewer?url= to the beginning of the PDF link. Click to see an example.


Bonus Tip
Come across someone else's tricked out link? You can reverse engineer a Preview, Make a Copy, Template, or PDF link to see the document in the regular way by replacing /preview, /copy, /template/preview, /export?format=pdf, or /export/pdf with /edit.
Bonus Bonus Tip
The Sir Links-a-Lot extension for Google Chrome will generate a preview, copy, template, or PDF URL for a document you have open. You then click a button to copy the generated link. You do need to manually set the document's sharing setting so that anyone can view.


 In my newest book,


