
This is what happens when you have a beard and look straight up.
This is what happens when you have a beard and look straight up.

This minimalist looking Cord Keeper makes sure your power cables stay on top of your desk or nightstand instead of flying off the back every time something is unplugged. Made by hand in Madison, Wisconsin from reinforced concrete.

I used to love live model drawing at university. Frédéric Forest’s Instagram feed makes me want to pick it back up.

Airplane neck pillows do nothing for me. I don’t understand why they are so popular. This head hammock on the other hand might be useful.
And yeah, I couldn’t care less that it looks silly. That’s what happens when you reach your 40s.

Would it be safe to suggest that we should file these Mosquito Netting Socks under ‘products the world doesn’t need’? They definitely made me laugh tough…
Now, this is a fragrance commercial that made me look. Thanks for breaking the mold, Spike Jonze.

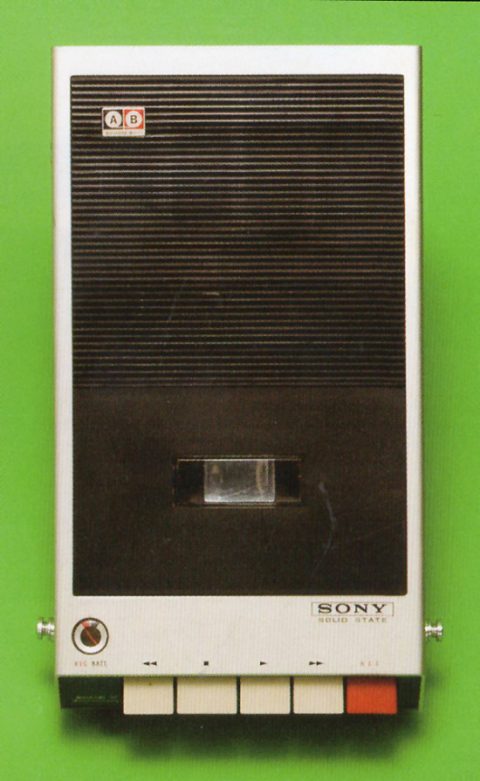
Spoon and Tamago’s post on Retro Japanese Boom Boxes made me smile.
One of the best things about IKEA pieces is the myriad ways you can tweak, hack, tinker with, and customize them to create beautiful, unique pieces on a reasonable budget. And the changes you make don't have to be big, time-consuming ones — sometimes all it takes is just a little effort (and a little ingenuity) to turn a piece into something you'll be proud to show off. Take a look at these seven super-simple IKEA hacks.
Danica's new house came with an old kitchen, and she knew it had to go. With a nice layout and some Craigslist luck on her side she was able to DIY her way to a gorgeous updated kitchen.
Shh.listenbut whose under sink actually looks like this. this makes me mad
The area under your kitchen or bathroom sink can sometimes feel like an island of lost products. And it will never get any better, until you actually take the steps to sort it out and install some (potentially temporary) organization solutions.
Shh.listenDang yo that pencil holder

Looking for your not-so-basic office or school supplies? We put together this roundup of ultra-stylish binders, staplers and beyond to outfit your backpack or desk this fall. Click on each item for purchasing information!
Storage is always at a premium in a small space, but nowhere is that more true than in the bathroom. There are so many little odds and ends — makeup, razors, hairbrushes, toilet paper — that you just have to have, but where in the world do you put all that stuff? If the clutter in your bathroom is getting a little out of control, it might be time to check out these 10 ways to squeeze a little extra storage out of a small bathroom.
 In the storebought food realm: These are evil. And they must be destroyed. Have you seen them? Have you tried them? Well, don’t. They’re that good.
They’re a cross between a cookie, a cracker, and heaven.
 Now. On the homemade food realm: These are even more evil, and are making me question everything. I’ve become obsessed with marshmallow-type frostings and icings. In my dreams, I make them every day and jump into pools filled with them. I bathe in them. I eat them—-not particularly in that order.
That made no sense.
 What I’m saying is, marshmallow frosting is my life.
 Because look! You can toast it. What mere buttercream allows you to do THAT?
Buttercream is dead to me.
 Pawhuska’s first scrimmage was last Friday night! It was so much fun, and got me all excited about football season. Todd sat next to me and kept asking me for money so he could go get a snack, which I didn’t understand considering I never have cash on my person (or in my purse…or in my car…or at my house) ever, ever, ever. I didn’t have a dollar bill to give Todd. I didn’t have a quarter. I didn’t have a penny.
Are you like this?

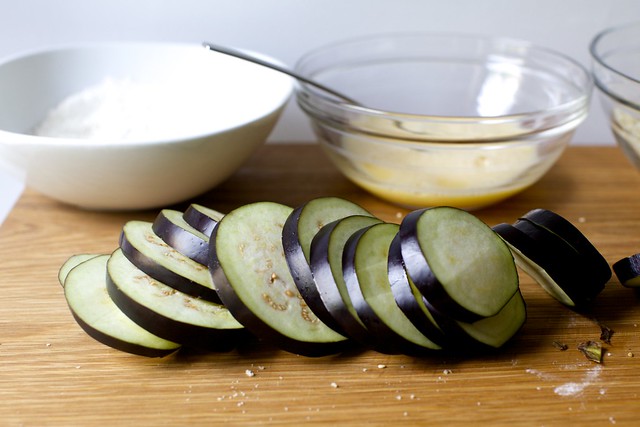
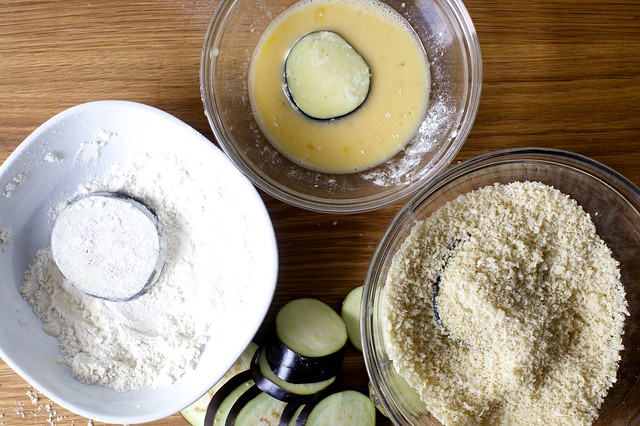
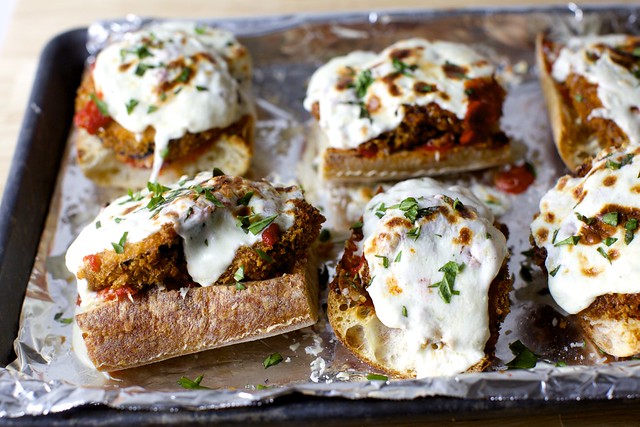 A thing I have learned over the last 10 years (!) here is that people have fairly bifurcated opinions of eggplant. Some find it to be the greatest, especially when it is at its most eggplant-y, others don't care what you do with it, they're never going to be converted, but even the most eggplant-equivocal agree on one thing: eggplant parmesan is the bee's knees. I am, however, the one that's ambivalent about it. To take beautiful coins of eggplant, batter and fry them to a profound and well-seasoned golden crisp just to bury them in texture-killing amounts of sauce and melted cheese feels wrong to me, disrespectful of the labor involved and calories embedded in gloriously deep-fried foods. (I feel the same way about fries smothered in sauces and gravies. Unfollow me now!)
 All of these concerns go out the window when making a sub, however, which is what we called hoagies/heroes/grinders in my half of New Jersey growing up. The eggplant parm sub is in a way-too-small category of Great Vegetarian Sandwiches*, and I don't know when they went out of style, but I don't see them around very often anymore. The eggplant's texture is less compromised than it gets in casserole form, and so much extra from a seeded roll (it must be seeded; don't even ask), I find you can even make compromises with the eggplant itself (baking instead of frying breaded eggplant or roasting coins without breading at all) and not feel like you're missing a thing.
As a mostly vegetarian, fajitas is a go-to order of mine when at a Mexican or Southwestern style restaurant. It's an easy thing to get vegetarian. It usually consists of stir fried peppers and onions, maybe with other vegetables thrown in if I'm lucky. Add some beans and guac to this, and I think it's a pretty satisfying meal. At home we make fajitas often since it's one of those meals that can come together really easily and I can use pretty much whatever vegetables I have on hand. But, I especially like this version.
I love tempeh in all sorts of recipes, so if it's a new ingredient to you, I highly recommend you give it a try. Some people think of tempeh and tofu as "meat substitutes", and I get that, but I think of it as its own thing all together. I mean, imagine people are expecting you to be just like your sister, but you're like, "Hey, man, I'm a totally different person. We're not substitutes for each other. Geez."
Oh wait, is that oddly specific. Never mind.
(Also I'm totally kidding, just so we're all clear.) :)
One thing I love about it is it can take on all sorts of flavors with the addition of a good marinade or sauce, which is exactly what this fajita recipe is all about! You will have to let the tempeh sit in the marinade for at least 2 hours, but if you throw it together in the morning or over lunch (if you go home for lunch), then you'll be ready to go at dinner time without any waiting.
Easy Chipotle Tempeh Fajitas, serves 2-3
8 oz. tempeh, one package
2 chipotle peppers (the kind that come in adobo sauce)
2 tablespoons olive oil
1 tablespoon sesame oil
1 tablespoon apple cider vinegar
1 clove of garlic (or two if your cloves are on the small side)
1/2 of a small red onion (about 2 oz.)
1/2 teaspoon cumin
1/2 teaspoon salt
1-2 bell peppers
1 avocado
6-8 corn tortilla shells
1-2 tablespoons oil for cooking (I use olive oil most of the time.)
lime, cheese, or sour cream to serve
Cut the tempeh into strips, kind of like skirt steak, and set aside.
In a food processor, combine the chipotle peppers, 2 tablespoons olive oil, sesame oil, vinegar, garlic, 1/4 of the onion (about 1 oz.), cumin, and salt. Pulse until a thick paste forms. In a large ziplock bag, or two small ones if you realize you are out of large size bags, combine the tempeh with the marinade. Seal the bags, removing any air, and gently mash it around so the tempeh gets completely coated. Refrigerate for 2+ hours (overnight would be OK too).
Slice the pepper and remaining onion into small strips and stir fry in a little oil over medium heat. Once those have softened, remove to a plate. Then lightly pan fry each tortilla just until they begin to puff on each side. Place those on serving plates folded in half so they will keep their shape for a few minutes. Last, stir fry the tempeh for 3-5 minutes until each piece has browned on each side.
Divide peppers, onions, and tempeh among your prepared shells.
Top each with a slice of avocado and a squeeze of lime. If you want to add cheese or sour cream, feel free. Enjoy! xo. Emma
P.S. If you don't end up consuming all the tempeh just save it in a ziplock and use in scrambled eggs, a BBQ grilled cheese, or on top of a salad. I've done all three before—I love this tempeh!
Credits // Author and Photography: Emma Chapman
It's that time of year again! Back-to-school shopping was always the dreaded event as a kid or teenager as it signified the end of summer freedom, but at least you got to pick out some extra cute notebooks and a Lisa Frank Trapper Keeper to ease the pain. Just because you're an adult now, who says you can't join in on the fun and treat yourself to some goodies anyway?
1. Keep your papers safe in this adorable pink folio.
2. Who says your pens can't have a little bling too?
3. Love these ampersand push pins for a bulletin board.
4. This stapler is clearly a winner!
5. This ruler certainly isn't short on charm!
6. Keep your files upright and organized with this file sorter.
7. Speaking of files, this patterned one is just too cute to be tucked away in an unseen cabinet.
8. Pack your essentials in style with this cutie backpack.
9. These gold scissors are to die for!
10. If gold isn't your thing, these babies come in several different colors to match your office scheme.
11. Study in style at this modern desk.
12. Keep your space neat with this desk organizer.
13. Love this file sorter too!
14. This alligator letter opener is ready to get to work!
15. Orange you glad this stapler exists?
16. Keep your spirits high with these rainbow compliment pencils.
17. There's plenty of space to doodle your crush's name in this notebook.
Makes you kind of wish you were headed to 8th grade art class right now, doesn't it? Whether you just need an excuse to buy something fun for your craft room/office or you really are hitting the books this year again for higher education, this list ensures that you'll feel like the head of the class!
 Although I will happily eat burrata -- that lush mozzarella-on-the-outside, creamy-ricotta-center cheese from Puglia's Razza Podolica's cows by way of skillet craftsmen -- with a knife and fork, quartered on a plate, drizzled with olive oil and balsamic, flaky sea and pepper with or without a few tiny tomatoes all around and sometimes even some basil from this day until the end of days and never want for anything else, two small things about this will forever plague me: this is an expensive undertaking and when I'm done, I will still probably be hungry for dinner.
 What's a girl to do when she likes fancy things but doesn't have the trust fund to support it? I may approach the subject jokingly, but as any of us who has attempted grocery shopping on a budget knows, the struggle is real. Do you save your favorite ingredients for special occasions? Do you save it for cooking-for-one nights, to limit the financial hit of it all? My way is instead to try to stretch things, forever looking for ways to turn luxurious appetizers like this into a full, actually sating, meal.
Lately it seemed that every improvement I made to our living room was eclipsed by the plastic toy storage bins that lined the entry to the room. Sure, they kept the toys at bay, but they definitely detracted from our enjoyment of the space. You see, we have just one room in our home to relax together as a family, so just one chance at creating a pleasant space for reading, working, hosting gatherings, watching television, and, if you're a 4-year-old, playing with toys. I figured it's only fair to let the kids keep a lot of toys in our living room, but you know what they say about when Mama's happy! So I set out to make our toy storage situation much easier on the eyes. Ikea provided a great starting point, and after a few tweaks, I now have a credenza that I'll enjoy using in any room in the future! Lots of style and loads of storage. Win/win!
I started out with a row of plain white upper cabinets from the Ikea Sektion system and chose the least expensive door option. There are quite a few size options, and by combining cabinets, you can completely customize the size of your credenza. Change up the colors, knobs, and top material, and you can make this Ikea restyle easily fit in with your own style and home!
I'm so pleased with how sophisticated this cabinet looks after the restyle! Sure, it could have been a more dramatic change with different paint colors or some funkier knobs, but this is exactly what I wanted, and it fits our space (and our budget!) perfectly. Check out how I did it below.
Materials:
-1/4" plywood sheet cut into rectangles*
-2 1x8 pieces of lumber cut to the total length of your cabinet (I used clear pine.)
-cabinet knobs with screws (I used these.)
-construction adhesive
-paintable caulk (Optional if you are very picky or do not have good clamps or weights for step one. I didn't end up using caulk.)
-120 grit sandpaper
-400 grit wet/dry sandpaper (not pictured)
-0000 grade steel wool (not pictured – for polyurethane finished pieces only)
-paint + primer for cabinet doors
-stain + sealant of choice for countertop finish (I used diluted white paint and satin polyurethane.)
Tools:
-power drill
-caulk gun
-sanding block (I used one of my children's play blocks with stick-back sandpaper)
-spring clamps (these are good) or heavy weights (cinder blocks, bricks, paint cans, weights, etc.)
*Cutting the Plywood
The amount of plywood sheets you need depends on the size of your credenza. The orientation of the grain is unimportant for the final piece (unless you're staining your doors), so feel free to cut your rectangular pieces along the grain or against the grain as needed in order to get the most out of the sheet. Plywood sheets measure 48" x 96", but you should consider the 1/8" thickness of the saw blade when figuring how many rectangles you can get out of one sheet.
You will need two rectangles for each cabinet door. The first rectangle should be exactly two inches smaller than the dimensions of your cabinet door (W-2" x L-2"), and the second rectangle should be exactly four inches smaller (W-4" x L-4"). I was able to use one sheet of plywood to get all of the rectangles I needed for my project.
Step One: Apply construction adhesive to the back of your plywood rectangles and place them centered perfectly onto the front of your cabinet doors. I recommend that you measure as you go, or else place one-inch scrap pieces of wood around the border, ensuring the panels are perfectly centered. Did I do this? No. I just eyeballed it, chiding myself throughout the entire project, though at the end I was very pleased to see that they all seem pretty perfectly centered!
Place pressure along the entire surface of the panels, causing the glue to spread in between the layers. Then clamp all around the edge of the panels until the glue sets up completely. I couldn't find information about the setup time for the adhesive I used, so I left my clamps on for a few hours, then took them off to work on the next door. (I have enough clamps to do three doors at a time. Most normal people probably do not have so many clamps, so this step might be more drawn out for you as you wait for each door's glue to set up.)
Step Two: After the glue has completely set up, use a sanding block to sand each level of the paneled door, including the factory-finished surface. I slightly rounded the corners of the plywood panels, just in general making sure that everything was smooth, chip-free, and not sharp. I recommend using a block for this for a more precise sanding job. An orbital sander is not a good choice for this step, because it is too powerful and difficult to control.
If your panels do not sit perfectly flush all around the edges, this is the point where you will want to apply caulk to fill in any cracks. Allow the caulk to cure before continuing to the next step.
Step Three: Paint and prime or stain and seal all components of the cabinet.
I edge glued my two 1x8s that I used for a countertop, sanded it down on the top and sides, and white-washed it with a diluted white paint I already had on hand. Then I sealed it with a few coats of satin polyurethane. After the first coat of polyurethane, I sanded lightly with 0000 grade steel wool. I also lightly sanded with 0000 grade steel wool after the last coat of polyurethane.
For the painting process of the doors, I first sprayed them liberally with two coats of primer, and then wet sanded all the crevices and surfaces with 400 grit wet dry sandpaper. Wet sanding is simply a process of frequently dunking your sandpaper into water and using the wet sandpaper to sand down the primed surface using the water as a lubricant. This process creates an amazingly silky smooth finish, free of any tiny bumps or roughness that naturally occur during the priming process (whether you've sprayed or brushed it on). Because some areas will no longer be primed after wet sanding, you'll want to spray with another coat or two of primer, and then just lightly wet sand once more before painting with your finish paint. I used a satin finish spray paint for my two coats of paint.
During this time I also painted my door knobs because they were unfinished wood. They were primed and wet sanded just like the doors.
Step Four: I waited for the door paint to cure overnight before drilling into them to add the knobs. I marked the center of the doors on their backside and drilled the hole for the screw. I made sure to find the center on the non-paneled side in case my panels weren't perfectly centered, so at least my knobs would be exactly centered and in line with the adjacent doors. Then I screwed the knobs into place and returned the doors to the cabinet, but not without a little squeal and hand clap, maybe.
Note: You may want to countersink your screw holes so the screw head will be flush with the cabinet door. I didn't do this, and a couple of the containers that fit perfectly into my cabinet actually don't let the doors close all the way because the screw head is too big! Gah! Now I have to take off the doors and the knobs and countersink the holes. Bummer, dude.
Because this credenza is currently functioning solely as a toy storage unit, I opted not to add legs to the bottom. Elevating the cabinet would just create a difficult-to-reach space where toys can easily become trapped, along with spiders and dust bunnies. But the cabinets are easily anchored together, making this a sturdy piece to attach a set of stylish legs to the bottom. I did add thick felt pads to the bottom four corners of each cabinet in order to lift them slightly, keeping the doors from scraping the floor as they open. We decided not to bolt the cabinets together because we wanted them to remain hole-free, should we decide to reconfigure this piece in our next space.
I'm already enjoying this room so much more, without a row of plastic toy bins greeting me upon entry. Bonus: My kids don't pull out as many toys at once because there is now a door between them and all the toy bins. I guess it's the same principle I apply with candy in the kitchen. (Don't tell the kids about my super secret candy hiding spot out of sight in our upper cabinets!)
Another successful Ikea restyle for the books, I'd say! Check out Laura's easy TV cabinet restyle she did recently too. So many options – I love it! -Mandi
Credits//Author and Photography: Mandi Johnson.
Is there anything better than warm pasta topped with fresh tomato sauce and a little melty cheese? I love many, many food combinations (understatement of the year?), but there is just something so perfect about simple pasta dishes. This is comfort food at its very best.
Where I live, tomato season is in full swing. I don't currently garden; it's one of those hobbies that I admire but just am not sure I want to dedicate the time to. Not to mention I have a hard time keeping my house plants alive. :) But, I love opening my CSA box to see what goodies we got for the week, and lately it's been full of tomatoes! So I've been experimenting with lots of different tomato recipes.
This sauce is very much inspired by a delicious soup I had at Cherry Picker recently. It was a tomato soup that included a bright pop of orange flavor, which I thought was just PERFECT for summer. And that's exactly what this fresh tomato sauce is all about. I def think it would still be completely delicious in the winter months, but the citrus just makes it feel a bit more summery to me.
If you've never made homemade tomato sauce from fresh tomatoes before, do not be intimidated. It's not hard! It does take some time though, as we'll be cooking the tomatoes for quite a while so our sauce will become thick and flavorful. You don't need to stand over the pot the whole time though by any means, so just plan to get some laundry done or listen to a podcast or something. I wouldn't leave your pot completely unattended, but you certainly don't need to hover. So don't be intimated by the cooking time here.
Also, if you happen to garden (high five to you!), feel free to double or triple this based on how many tomatoes you have. This is just how many I had on hand, and it will make about 2 heaping cups of sauce. Feel free to make more and freeze if you like.
Zesty Orange and Tomato Sauce, makes 2 heaping cups
3 lbs. and 10 oz of tomatoes, any variety that you like or have is fine
1/2 white or yellow onion
1 orange
salt, pepper, and a big pinch of cayenne
First heat a large pot of water to boiling. Have another bowl of cold water with ice set to the side. Remove the stem area and slice a small X in the bottom of each tomato.
Blanch the tomatoes in the boiling water for 30-45 seconds, until you see the skin beginning to peel off. Remove to the cold water.
Repeat until you've blanched all the tomatoes. Then peel off the skins.
Cut a whole onion in half, and the half you plan to use, remove any papery skin but leave the onion intact so it's all one big piece (if it falls into two pieces over time, that's fine). Peel the skin from the orange. I use a potato peeler to do this and it works well. You're looking to get big, long pieces of orange skin, but not much of the white pith underneath. A little bit is OK, but aim to get mostly the orange skin and not the white pith as it can be a little bitter. Give the tomatoes a rough chop or blend for a couple seconds in a blender.
In a large pot combine the tomatoes, onion, and orange skins. Season with just a little salt and pepper, but don't go crazy as we'll add more later. Cook over low/medium heat for 1 hour to 1 hour 15 minutes. The tomatoes will break down and much of the liquid will reduce.
Remove the onion and orange skin pieces from the pot. Add the juice from half the orange (about 2 tablespoons). Taste and add salt and pepper plus a big pinch of cayenne.
Serve this over pasta, gnocchi, or use as pizza sauce. You can refrigerate anything you don't use that day in an airtight container for up to three days. If you plan to store this for longer, I would freeze in a ziplock bag or other airtight container. Enjoy! xo. Emma
Credits // Author and Photography: Emma Chapman
Just a few weeks ago I made a version of this dish at my brother's birthday party. He hosted a taco night at his place, and since he knows that Trey and I eat a mostly vegetarian diet, he wanted to have a veggie taco option for us. So he asked me what I thought about fried avocado tacos, and I think the emojis I texted back were surprised face followed by clapping hands.
He enlisted my help in preparing the avocado, and since my six-year-old niece was around and wanted my attention, I quickly enlisted her help too. :) The avocados we had that night were not quite ripe yet (which actually works well if you plan to fry them), so I sliced them up and put Penelope (my niece) in charge of adding the batter. I showed her what to do, and she cautiously got to work while also letting me know when I was going too slow on cutting the avocados. Ha!
She did not much care for getting the flour and egg mixture on her fingers, but it's pretty unavoidable. Towards the end she turned to me and in a very serious tone said, "Aunt Emma, just so you know, this is the grossest thing I've ever done."
I about died laughing!
Now I don't advocate (or maybe it should be avocado-cate... heh) deep frying all that often since it's not the healthiest cooking method. But, every now and again it is really fun. I just LOVE a thick, crunchy breading. Growing up I loved fried chicken, so it's fun to deep fry every now and again (although I prefer avocado to chicken these days, but that's just me). In this version, I've added mushrooms, and I have some suggestions for what to top it all with. But honestly, tacos are one of those things that you can easily customize to whatever you have on hand or whatever you prefer, so feel free to change it up. This recipe is just a jumping off point. :)
Fried Avocado and Mushroom Tacos, serves two generously
1 avocado (it can be quite firm still)
4-6 oz. bunapi mushrooms (Other mushrooms can work too, but if they are large, cut them in half before battering.)
salt and pepper
1 cup all-purpose flour
2 eggs
enough oil to fill a medium to large pot with an inch or so deep
4-6 corn tortillas
2-3 radishes
2 tablespoons chopped red onion
1 small tomato
1 tablespoon chopped cilantro
1-2 limes
1 jalapeño, sliced thin (leave the seeds in if you want it very hot, otherwise discard)
shredded cheese, sour cream, or hot sauce
First set up, what I like to call, the deep fry station. For this you'll need three large bowls (can be large cereal/soup bowls), two large plates, a few paper towels, a cutting board and knife, your pot or deep frying vessel, and a deep frying thermometer if using. Divide the flour between two of the bowls. In the third bowl add the eggs and a tablespoon or two of water and whisk well. Add the oil to your pot, set your thermometer in, and turn the heat up to medium/high so that can begin to heat.
Slice the avocado in half and remove the skin. Slice into 8 pieces total and season with a little salt and pepper. Remove the bunapi mushrooms from their base (usually they are sold so that a large section is all attached to a base, so you're just looking to separate them here). Now dip each item into the first bowl of flour, then into the egg mixture, and then into the second bowl of flour. Place on a clean plate. Repeat until you've battered everything.
Add paper towels to the second plate and check your oil's heat. You're looking to reach right around 350°F. Yes, you can just eyeball it if you are too cheap to buy a thermometer. But honestly, it does make it a lot easier, and you can use it to make all sorts of things like candy and marshmallows. Man, you'd think I owned stock in deep fry thermometers. Well, I don't. They just really are pretty useful so I figured I'd just give it to you straight. :)
Once your oil is ready, add all the avocado pieces to the oil. Cook for about 30-45 seconds (until golden brown), then remove to the plate lined with paper towels. Do the same with the mushrooms.
Warm your tortillas and assemble those tacos! I know I say you can top these with anything, and you really can, but I do really love the flavor and texture that the red onion, radish, and cilantro add. I always squeeze a lime over tacos just before eating. So serve them with the wedges ready to go if you want to be a professional about it. Oh, and you can totally keep these dairy-free by skipping the sour cream and cheese and just add a little hot sauce. Or you can add the cheese and sour cream. Live your life. Happy taco making! xo. Emma
Credits // Author and Photography: Emma Chapman.

Swiss meringue buttercream is a glorious thing to behold. Ah, look at that silky texture. Look at how it holds its shape. So elegant, so beautiful. Swiss meringue buttercream doesn’t discriminate—it’s a favorite among all, whether you’re on Team Cake or Team Frosting.

I’m squarely in the Team Frosting category. Cake, to me, is a vehicle for frosting. I love all frosting, even what I call “grocery store frosting.” You know, the kind that people say makes their teeth hurt? Not me, sister. I’m always scanning the cake table for the corner piece with the big honking frosting rose. More frosting, more better.
Swiss meringue buttercream is more refined. It’s not tooth-achingly sweet (not that there’s anything wrong with that). It’s smooth, silky, sweet, but not cloyingly so. It’s luscious enough for Team Frosting, but sophisticated enough for Team Cake.

So simple to make, Swiss meringue buttercream only takes a handful of ingredients and can be flavored however you like. Use it to frost cakes, cupcakes, or cookies.
You might have guessed from the name that SMB (you might see that acronym on baking websites) starts with a meringue.

You’ll begin by heating up egg whites and sugar in a bowl placed over a simmering pan of water. Make sure to use a metal bowl. Glass holds heat and you’ll eventually want this mixture to cool.

Once it’s heated to 160ºF, whip the mixture until stiff peaks form.


Now you have meringue! It’s so thick and glossy!

After you have stiff peaks and the bowl has cooled, it’s time to add the butter. Lots of butter.

Make sure your butter is at room temperature. You’ll add it one tablespoon at a time, beating with the paddle attachment.
Once all of the butter has been added and incorporated, beat in the flavoring and a bit of salt.

DO NOT PANIC if your frosting looks clumpy or soupy. (The first time I made Swiss meringue buttercream, it looked lumpy and I didn’t know what to do, so I just frosted my cupcakes with it anyway. They were the ugliest cupcakes ever, even though they were still yummy.)

Keep beating the frosting. Just keep mixing, just keep mixing until it is smooth and glorious.

Now it’s time to tint the icing if your heart desires. Either use the mixer, or stir by hand. I use gel paste food colorings and if mixing by hand, you might get an arm work out.

For these watercolor rose cookies, I tinted all of the icing a soft rose color. Before filling the piping bag, I painted lines of electric pink food coloring inside the bag to give that watercolor effect.

The cookies I used are these: my perfect-every-time cut-out cookies. This is the recipe I typically use for royal icing-decorated cookies, but using Swiss meringue buttercream takes them to another level.

The recipe you’ll find below is a vanilla-almond Swiss meringue buttercream. SMB is easily adaptable; really, you’re only limited by your imagination. Here are a few variations to get you started:
So, tell us: Are you Team Cake, or do you hang with Team Frosting?


There is always great excitement each year when our veggie beds start bursting with fresh produce. Zucchini, yellow squash, tomatoes, peppers and fresh herbs start spilling over the sides of the raised beds by the middle of the summer. Even though we find plenty of uses for all of the vegetables, the tomatoes are the most coveted of the lot, particularly by my youngest son.

Ever since we started growing our own summertime vegetables, my son declared himself the official tomato picker of the family. There is an up side and a down side to that. The up side is that he saves me the trouble of searching for the ripe tomatoes and plucking them from the stems. The down side is that half of the cherry tomatoes end up tucked inside his cheeks rather than in the bowl that returns to the kitchen half-full. I suppose I shouldn’t complain. At least the boy enjoys his veggies!

This will be the first year in a long time that we won’t have a vegetable garden. Just after school ended for the year, we packed up our house and moved to a different state. While we hunker down in a temporary townhouse and search for a house, we have room for little more than a basil plant or two. Thankfully, our new hometown hosts a fantastic farmer’s market every weekend and we have taken to stocking up on local, fresh produce.

Once tomato season hits, we’ll be hitting the farmer’s market to search for heirlooms, cherry, Roma and any other kind of tomato we can get our hands on. Often, we enjoy them in caprese salads and in sandwiches, but beefsteak and heirloom tomatoes also make a fantastic side dish when baked with Parmesan cheese and herbs.

This recipe is very easy to put together, and works well as a last-minute side dish for any summertime meal. If you keep a few basic ingredients on hand, you can whip this up at a moment’s notice any night of the week.
Start by coring the tomatoes, then cutting them in half crosswise. Arrange them on a baking sheet or in a baking pan. A baking pan is probably best, as the tomatoes like to slide around a bit, which I quickly found out when carrying the baking sheet from A to B.

Brush the cut tomatoes with olive oil, then top with minced garlic and a mixture of Parmesan cheese, oregano and parsley. Fresh basil would also make a really nice addition. Pop them into the oven for 15 minutes, or until the cheese is melted and the tomatoes are tender.

These tomatoes are best straight out of the oven, so try to time your meal so that you can enjoy them piping hot. I usually throw the entrée on the grill as I pop the tomatoes into the oven so that everything is done at the same time.

In the 1940s and 50s, bathrooms with colorful plumbing fixtures — sinks, toilets, and tubs in shades of blue, green, yellow, and even pink — were all the rage. Then, mysteriously, the tide of fashion turned, and people have been ripping out those candy-colored fixtures ever since. But a few brave souls have preserved the pastel fixtures in their vintage bathrooms (or added vintage ones to new bathrooms), and, as it turns out, in the right setting, those funky vintage fixtures can actually look really, really great.

Weeknight dinners can be the most difficult to cook. After a long day of work, I don’t want to spend too much time in the kitchen figuring out what to make for dinner.
That’s why Sunday meal prepping can be a beautiful thing, and these easy BBQ Chicken Burrito Bowls are a perfect example.
Continue reading "BBQ Chicken Burrito Bowls" »
Shh.listenooooooo magaaawwwwwww

It’s too hot to even leave the house for ice cream, but it’s easy to make it yourself with this Cuisinart soft serve machine. The ICE-45 even includes three mix-in dispensers that automatically add sprinkles, chocolate chips, or other small extras to your treat. The sweetest part? $71 is the best price Amazon’s listed in 2016.
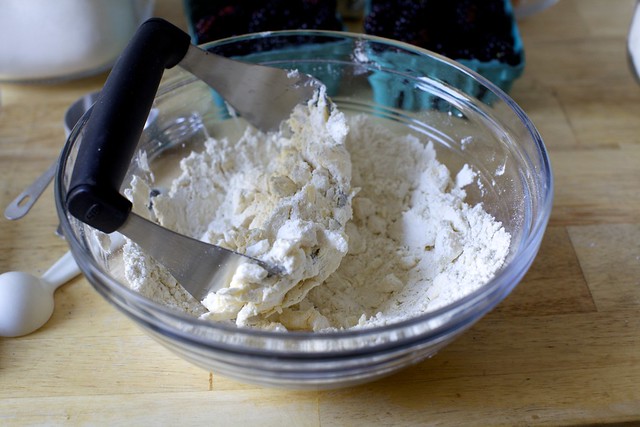 Common cooking theory goes that galettes are a lazy person's pie, except one person's lazy is might just be another person having life priorities that do not include lattice-weaving, I'm just saying. Galettes don't need to throw shade to be awesome. They're no frills, no fuss and you cannot mess them up. Leaky? No, pretty. Lopsided? You mean inviting. Barely sweet? Breakfast!
 But if there could be a singular limitation of galettes, it's volume. Because they're baked flat on a sheet, you can't fill them too much of anything. They are not a cup; they cannot hold water. However, when working the kinks out of a cookbook recipe this spring, I realized that if you take you galette and drape it inside anything with walls -- a pie plate, a cake pan, a tart pan, anything, you create just enough wall that you can pour in a slightly messier filling and have a good chance of your galette holding onto it through the baking time. Uh, "Doesn't that just make it a pie Deb?" you might ask. But you're still skipping the trimming, the crimping, the parbaking and lid-having noise so yes, you're still coming out ahead.

Au Studio, on aime tout ce qui rime avec été ! Y compris les vendredis de juillet-août, qui nous donnent le plaisir incommensurable de pouvoir commencer nos week-ends un peu plus tôt que d’habitude. Et franchement, quoi de mieux pour déclarer le WE ouvert que de siroter un délicieux cocktail ? On vous a réuni quelques-uns de nos breuvages préférés en les associant à leurs recettes, telles qu’on peut les déguster dans nos bars de prédilection… à vous de jouer !
Santé, et vive le week-end !
_____________
Garance – Tequila on the rocks avec citron vert, Casa Mezcal
Ingrédients:
45 ml de tequila ou Mezcal Los Amantes
3 rondelles d’orange
Sal de gusano (sel épicé traditionnel d’Oaxaca)
Assemblage :
Remplissez un verre de glaçons
Versez le mezcal par-dessus
Servez accompagné de quelques rondelles d’orange saupoudrées de sel

Erik – Campari Orange, inspiré par son récent voyage en Italie
Ingrédients :
60 ml de Campari
60 ml de jus d’orange (fraîchement pressé)
Glaçons (plein)
Assemblage :
Remplissez votre verre préféré de glaçons
Ajoutez le Campari
Ajoutez le jus d’orange
Garnissez avec une rondelle d’orange

Emily – Watermelon Cooler
Ingrédients :
1/2 concombre pelé en tranches
75 ml de morceaux de pastèque
Le jus d’un citron vert
3 tranches de piment jalapeño
Menthe
Assemblage :
Mélangez les ingrédients au blender
Versez sur des glaçons
Garnissez de menthe fraîche !

Brie – Margarita épicée, Comme au Loosie Rouge
Ingrédients :
30 ml de Tequila
15 ml de Mezcal
15 ml de sirop d’agave
15 ml de Chartreuse verte
30 ml de jus de citron vert
Un soupçon la Loosie’s hot sauce à votre convenance
Assemblage :
Mélangez bien tous les ingrédients au shaker
Servez sur des glaçons
Garnissez d’une tranche de concombre

Natalie – Lower East Side, comme Russ & Daughters Cafe
Ingrédients :
15 ml de jus de citron vert
15 ml de sirop de sucre
60 ml de gin Tanqueray
Concombre pelé
Aneth fraîche
Assemblage :
Ecrasez quatre tranches de concombre
Ajoutez l’aneth, le jus de citron vert, le sirop et le gin
Mélangez au shaker
Passez deux fois
Servez immédiatement et décorez avec une petite branche d’aneth

Elle – Ruby’s Spritz, du Ruby’s Cafe
Ingrédients :
30 ml de vermouth Mavro Vergano Americano
60 ml de prosecco
30 ml de San Pellegrino
30 ml de jus de pamplemousse
Assemblage :
Servez sur des glaçons
Garnissez d’une demie-rondelle de pamplemousse
Alison – Caipirinha, comme chez Miss Favela
Ingrédients :
4 quartiers de citron vert
1 c.s. de sucre
50 ml de Cachaça
Assemblage :
Remplissez votre verre préféré de glaçons
Ajoutez la Cachaça, le citron vert et le sucre
Garnissez d’une rondelle de citron vert

Carie – Vermut Preparado, comme El Quinto Pino
Ingrédients :
Vermouth sucré
Olives vertes fourrées au piment de qualité
Un gros glaçon
Une rondelle d’orange de Valence non pelée
Assemblage :
Mettez le glaçon dans le verre
Ajoutez le vermouth, les olives et la rondelle d’orange
Garnissez de quelques olives supplémentaires selon votre goût
Shh.listenLet's consider this for future house!
 My husband Jim and I have lived in our 1962 ranch house for six years now. The previous owners had readied the house for sale by painting every wall greige and installing new light beige carpeting in all three of the bedrooms and the hallway, which I suppose created a blank canvas for potential buyers to start with. Right away we started painting all of the walls different colors, but since the carpet was brand new, we didn’t feel like it was a priority to replace it right away, so we lived with it. Our beloved dog Leo is not easy on carpeting, so after this amount of time, there were many dog related dirt stains and wear paths on the wall to wall carpet — especially in the hallway and at the foot of our bed, where he sleeps each night. Jim and I decided it was time to replace the carpet — so we took a cue from 1962 and looked into cork.
The goal for any remodeling and decor project in my 1962 ranch house is always to choose as period appropriate materials as the budget and availability will allow. Cork was a popular flooring choice in midcentury America, and one that was definitely used in our retro ranch — a few examples still were in place.
Besides being period appropriate for the era of our house, cork is a fantastic option because of its durability and ease of care, and because it is easy — somewhat resilient — and warm to walk on. It is really quite comfortable. You can read more about the benefits of cork, specifically the brand we purchased here.
 In the photo above, you can see the original cork flooring that is in the closets in each bedroom (top). The cork in the closets were still in like-new shape, so we left it as is. We really liked the look of the original cork, so we searched for a cork flooring option that would be as similar as possible to it. Wicanders CorkComfort Originals Rhapsody (0225002) vinyl backed cork flooring was the closest we could find in pattern and coloring.
 The second reason we chose Wicanders was because I liked the fact it came with a protective pre-finished coating, which seemed to help it perform well in the quality test I came up with. In my test, which I used on a variety of brands of samples we had collected, I scratched the edge of a quarter across the sample with some pressure and after about 10 minutes, checked to see if the cork had “bounced back.” On the Wicanders, I could not tell where I had performed the quarter test at all. This is important for someone who lives with a large dog like Leo, whose nails have scratched our hardwood floors. And so far, he’s been unable to inflict any damage to the Wicanders cork! It could be that the Wicanders performed well because it has a protective pre-finished coating on it. This also means that I didn’t have to apply any sealer, and the flooring will not need to be periodically waxed or coated with anything to maintain it. Just vacuuming and damp mopping once in a while is all that is needed — much easier to clean up that doggy dirt! Note: It could well be that other brands that require you apply your own sealer after installation would do just as well on my quality test — do your own research on this — there are a lot of options to weigh!
We also notice that the cork hides dirt quite well, so even if the floor is in need of a cleaning, it doesn’t look bad at all.
 Wicanders flooring is available in both glue-down and snap-together plank flooring options, but this particular style — CorkComfort Originals Rhapsody — was only available in 12″ x 23.75″ glue down tiles. While that type of installation is more challenging than snap-together planks, we were okay with it because the thinner, glue down tiles would line up evenly with our other flooring, allowing for smoother transitions between our tile bathroom floors and wood flooring in the rest of the house.
Once we decided to go with the Wicanders flooring, ordering it was a challenge. It took calls to several different local flooring showrooms before we found one that could make the order for us and even then they noted that the particular style we wanted had been discontinued! Ack! I explained that I had my heart set on this particular style and the flooring representative was luckily able to find the eight boxes of flooring we needed for our project and have it shipped to their store for pick up. Crisis averted! One bonus to us picking a discontinued style: We got a nice discount on the price per square foot!

 Since I am well versed in DIY and the flooring itself was not inexpensive, I decided to install it myself. I started in our office first. It was quite a job and took several days, but the end results are fantastic! Of course, I followed all the installation instructions carefully and used all the safety and ventilation equipment and guidance recommended — do your homework on this — Be Safe / Renovate Safe!

 Next came our bedroom. By this time I had the installation process figured out, so the hardest part was moving all of the furniture around. Broyhill Brasilia is not lightweight stuff! Once the flooring was down, Jim and I thought about getting a small area rug to go under the bed for further warmth underfoot, especially in the winter. But, we found that the cork really doesn’t get that cold, even during January in Wisconsin. On bare feet it feels much warmer than our hardwood floor in the main part of the house. We just love it!
 The third bedroom got the royal cork treatment… and then…

…We wrapped up the job in the hallway. Another reason we picked this particular cork — look how well the color matches the hardwood flooring and the original oak trim. Keeping the flooring in the same color family makes the whole house blend together and avoids a choppy feeling.

 I also love how the cork looks next to our tile bathroom floors.
 Once the floor was installed, it blends together and looks like one big piece of cork — the individual tiles can only be discerned at certain angles with the light hitting them just right. I think that is part of what helps our hallway look bigger than it did before.
We’ve been living with our new cork flooring for about six months now, and we are still in love with it. It fits our lifestyle well, is easy to clean and maintain and fits the era of our house perfectly. It was not an inexpensive project — even with our discount and my doing the installation — but we think that with proper care, it should last a lifetime, whereas if we had recarpeted, our dog would have destroyed it in another 5-8 years, necessitating another major flooring project.
The verdict: If I had it all to do again, I’d pick cork every time.
Link Love:
The post What’s new at Kate’s retro ranch — Cork flooring! appeared first on Retro Renovation.
Yep, I'm still on a homemade sushi roll kick. In case you missed my last installment of sushi-hating-girl-makes-sushi, check it out here (still LOVE this flavor combo).
I'm exaggerating a little there though, as I couldn't actually say that I "hate" or "hated" sushi. But it wasn't really my favorite food. So this has been a real lesson in never say never because I truly never would have thought that I'd be getting into homemade sushi rolls. And yet, here I am. I guess I'm eating a slice of humble pie along with my sushi. :)
This roll is all about pickled beets, crunchy spouts, and then a toasted coconut sesame topping that puts it over the top! Don't skip the crunchy topping; it adds so much flavor and texture to these. I love a little crunch in my sushi to balance out the soft, chewy rice. But this is a great alternative if you don't want to tempura deep fry anything.
These rolls are mostly made of items I usually have on hand anyway, expect sprouts. That's not something I buy every week, but I do love them in this, on sandwiches, or just on top of dishes to add a little more nutrition and some crunch. These are also shockingly easy to make! Before I got into this, I thought homemade sushi would be too difficult and time consuming to make. But these rolls took me about 30 minutes to put together, and I'm not even very good at rolling. I guess what I'm saying is – this is easy, delicious, a little bit unexpected, and a fun way to eat a plant-based meal.
Plus, I love beets. But that could be a whole other paragraph, so I'll spare you. For now. :)
Crunchy Beet and Sprouts Sushi, makes 4-5 rolls (each 6-8 pieces). Could easily feed 2-3 people, maybe 4 with a side dish.
1 cup uncooked sushi rice
2 tablespoons rice vinegar (or apple cider vinegar)
3-4 small pickled beets
1/2 cucumber
1/2 cup sprouts
soy wrappers or Nori
For the topping:
1 tablespoon Panko
1 tablespoon coconut flakes (unsweetened)
1 tablespoon sesame seeds
soy sauce, Tamari, or coconut aminos for serving
First get your rice going. Following the directions on the package. This will probably mean rinsing the rice, then combining in a small pot with 1 1/4 cups water. Bring to a boil, cover, and reduce the heat to a simmer. Cook for 18-20 minutes until most of the water has absorbed. Remove the rice from the pot to a medium size mixing bowl and stir in the vinegar so that all the rice gets coated. Allow to cool enough to handle before use (this won't take but 5-10 minutes).
While the rice is cooking, prep your vegetables: thinly slice the cucumber, beets, and have the sprouts ready. You can also prep the topping at this time. In a dry pan combine the Panko, coconut, and sesame seeds. Cook over medium/high heat until the coconut begins to look very toasted. Stir every now and again with a wooden spoon so that nothing burns. Once the mixture looks toasted and smells fragrant, remove to a plate and allow to cool until you need it.
Once the rice is ready, get your sushi rolling mat out, or you can use plastic wrap and a clean kitchen towel. Place a sheet of the soy paper or Nori on the wrap, cover in rice (it's quite sticky, so this may take some getting used to), then place the filling vegetables on one edge. Roll up and gently press as you do so everything sticks together. Remove from the plastic wrap and slice into pieces. I will sometimes lightly coat my (clean) fingers or my knife in a little oil so it doesn't stick as much to the rice, but don't over do it or things can get too oily.
Top the rolls with the crunchy coconut topping.
If you have wasabi paste or pickled ginger to serve with this, then you'll really make it feel like a fancy night at home! I recently picked up this sushi serving board that has built in chopsticks (they are stored underneath) and a little spot for soy sauce – I thought it was too cute! I got mine at T.J.Maxx, but I also like this one. xo. Emma
Credits // Author and Photography: Emma Chapman. Photos edited with A Beautiful Mess actions.
Well, I think I’ve done it. This may be my master jello shot creation, and I may have to hang up the apron and quit while I’m ahead. I present to you my masterpiece – the deviled egg jello shot!! Now, I know you probably have so many questions, and I’m here to answer all of them. YES, this is actually a totally sweet jello shot and not a savory one. YES, it actually tastes delicious! And YES, your brain will be completely confused as you eat it!!
I actually thought of this idea this winter for some reason (maybe dreaming of summer picnics and deviled eggs I guess), and I couldn’t wait for summer season to finally get here so I could bring the dream to life! This may be the most fun I’ve ever had making novelty food, and I think you’ll love it too…
Deviled Egg Jello Shots, makes 12 half egg servings
1/2 cup white chocolate Godiva liqueur
½ cup cake-flavored vodka
1 cup heavy cream
2 packets of unflavored gelatin
box of instant custard or pudding (like lemon or banana pudding so it’s yellow)
cinnamon
silicone egg mold (you’ll want two unless you want to make a half batch at a time)
Heat your vanilla vodka over medium heat (don’t let it boil!). Slowly stir in your gelatin packets until they are dissolved. You may have to give them a minute to fully melt in the warm liquid. Pour the vodka and gelatin into a bowl, and then stir in your cream and white chocolate liqueur.
Lightly oil your silicon mold and place it on a tray or plate so you can move it easily when full. Pour your liquid into each mold and place your mold in the fridge to set (about 4 hours).
While the eggs set, make the pudding with a little less liquid than it indicates so that the filling is thicker than usual and will keep its shape. Refrigerate until cool and somewhat firm.
Once the eggs have set, use a spoon or melon baller to scoop out the middle where the egg yolk would normally be. (I used a small cookie cutter to make the circle and then scooped it out with a grapefruit spoon – HA!)
Spoon some pudding into a pastry bag and use a star tip at the end to make the classic deviled egg filling shape. Fill each egg cavity with the pudding and sprinkle with cinnamon on top to recreate the look of paprika. Keep in the fridge if not serving right away or serve to your guests immediately!
I made these again and took them to surprise some friends on the 4th of July, and they loved them! We were laughing so hard because they are just too cute and the whole idea is too ridiculous not to love. The other best thing about these is that the set jello feels just like a real hard boiled egg in your hands, so it’s such a confusing fun surprise to your brain once you bite into the egg! The egg will mostly taste like the pudding flavor you choose since the egg base is mostly a sweet vanilla flavor. I think I’ll try the banana cream pie flavor next time! If you have been trying to find the perfect summer picnic party treat, I think this is egg-actly what you are looking for! xo. Laura
Credits// Author and Photography: Laura Gummerman, Photos edited with A Beautiful Mess actions.


