I would gladly give these posters by Daniel Freytag a home.
I would gladly give these posters by Daniel Freytag a home.
I have always hated to iron. So imagine my surprise when a co-worker told me that the most relaxing part of his day was coming home, drinking a beer or two, and doing a little ironing. As someone who deeply detests ironing, I would never have dreamed of anyone finding it relaxing. As the daughter of two strict teetotalers, I would never have dreamed of mixing drinking and household chores. This was my first introduction to the wonderful world of drunk cleaning.
If you've been looking for a place to set up your very own Westworld-like theme park (Eastworld?), let us suggest Johnsonville, Connecticut, a small, abandoned mill town in East Haddam that's now on the market for $1.9 million.

Elise’s Dad makes an awesome potato salad. The salad is studded with lots of crunchy chopped vegetables, and the simple dressing (just mayo, mustard, and pepper) is perfect. As far as the ingredients go, there isn’t a whole lot to improve upon!
The classic stove-top method works just fine, of course, but I couldn’t wait to convert this classic recipe to be made in the pressure cooker!
Continue reading "Pressure Cooker Potato Salad" »
Shh.listenThis. Is. Amazing.
May I Have This Dance – Francis and the Lights feat. Chance the Rapper
(via Chris)

While I love all the various flavors and spices found in Mediterranean food, one of the things I find that like most about this cuisine is the way textures, colors, and even temperatures are often combined a single dish.
I’ve made these vegan and gluten-free bowls in this same spirit. They showcase some of my favorite Mediterranean ingredients all in one bowl, like spiced chickpeas, cucumbers, tomatoes, and tahini, as well as an awesome mix of hot and cold, crisp and creamy!
Continue reading "Mediterranean Chickpea Bowls with Tahini Sauce" »
Shh.listenYES PLEASE

A couple of years ago, I had a major bumper crop of zucchini. I found a million ways to eat it and cook with it, but this simple meal of shrimp with zucchini noodles and lemon-garlic butter was one I went back to again and again.
Continue reading "Shrimp with Zucchini Noodles and Lemon-Garlic Butter" »
Shh.listenI would like these
 Raise your hand if you’ve found yourself a wee bit houseplant obsessed. Now, keep your hand raised if you’ve brought home a new plant in the past month. If your hand it still raised, I’d wager that you could use a new plant stand (or two, or three? We won’t judge!).
Spring always inspires me to bring home some new plant babies, but they can seem a little dowdy in just their plain Jane pots. Not to worry! This plant stand DIY is pretty simple and really elevates the look of your favorite potted plants.

 Tools:
–jig saw
–clamps (that extend to at least 12″)
-hammer (not pictured)
–orbital sander (optional, but super helpful!)
-staining brush or rag
Materials:
–1×12 lumber* (length at least 3.5′)
–sandpaper in 80 and 180 grit (bonus points if you use 120 grit in between!)
–wire brads or finishing nails in .75″ length (not pictured)
–wood glue (not pictured)
–iron-on veneer edgebanding (optional if you use plywood)
*Recommended Wood Species: If you are staining your wood, I recommend using maple. Rift sawn oak is also nice, but quarter sawn is more prevalent in lumber yards and showcases a busy grain—not my favorite. Beware of using pine, which doesn’t stain well and dents easily. I used poplar, which also doesn’t stain that well and tends to have yellowish streaks in it. But poplar does take paint nicely. You can always use plywood and use matching iron-on veneer banding if you’re not a fan of the layered look of the plywood edge.
Cost of Project: A 1x10x6 board will yield two plant stands and costs about $35 if you are using a higher quality wood species. Many of you already have sandpaper, nails, glue, and wood finishers (stain, poly, or paint) on hand. You can purchase stain, polyurethane, or paint for around $5 each if you don’t already have some. That puts the total around $45 for two plant stands, a price which can be lower if you use pine lumber.
 Step One: Use a circular object or compass to draw a 10″ circle at the end of your lumber. Cut out the circle with a jigsaw. (Cut two circles if you’re making two stands.)
Never used a jigsaw? You can purchase a jigsaw for about $23 on Amazon. To use it, hold the wood firmly on top of a table or surface as you cut the overhanging edge with the jigsaw blade (use a fine cutting blade), stopping the saw to adjust which part of the wood overhangs as you go along. I like to cut with a jigsaw on a lower height surface like a bench, and use my body weight (pressing down with my knee) on top of the wood to keep it steady as I move the blade slowly across the surface.
 Step Two: Cut the wood for the x-bases of the plant stands.
As I mentioned earlier, you can get two plant stands out of a 6′ long board. Cut out two circles, and the rest of the board length will give you the wood for the x-base. The measurements below all hinge on the diameter of the circle you cut, so determine that measurement first.
D– Diameter of your circle (mine was 10″)
A– Height of your x-base (I think higher than 6″ looks awkward.)
B– This measurement should be the diameter of your circle plus 2″.
C– This measurement should be half of measurement B minus half of your board thickness.
 Step Three: Thoroughly sand all surfaces of your wood pieces. Begin with 80 grit sandpaper to shape the edges of the wood, particularly the edge of your wood circle. Then move up to 120 grit to sand out scratch marks from the lower grit sandpaper. Then, finish with 180 grit sandpaper to make it nice and smooth. If you do not take time to properly sand your wood, it won’t take the stain nicely and will be blotchy and rough after staining.
Step Four: Use wood glue to assemble the x-base of your stand, which are measurements B + C + C from step two. Only use wood glue on unstained wood, as stained wood will not absorb the wood as it should, decreasing the strength of the glue. If your wood is already stained at this point, use something like Gorilla Glue instead.
 Step Five: Clamp together the x-base tightly, and immediately wipe away all wood glue that seeps out of the seams. Any visible wood glue will repel stain and appear yellow. It is very difficult to sand away.
Step Six: After the wood glue has dried, glue and affix the circular piece on top of the x-base. Clamp the top into place and, if desired, use finishing nails to add further strength to the finished piece. If you’re clamping the pieces together with wood glue on unfinished wood, however, I believe the nails aren’t completely necessary to the stability of the plant stand.
If you choose to use nails on your plant stand, use a nail setter or something similar to tap the finishing nails beneath the surface of the wood and cover the hole with stainable wood filler (sanding it smooth after it dries).
 Step Seven: Finish the wood as you desire. If you use stain as I did, I recommend finishing with polyurethane to protect the wood from inevitable water splashing. To properly finish the wood, spray with two light coats of poly, then sand with 0000 grade steel wool, and finish with one last coat of poly. This will smooth down the roughness of the little wood hairs that stick up when the wood is moistened by the initial coats of poly.
If you choose to use paint, I recommend spraying with one coat of primer, lightly sanding with 400 grit wet sandpaper to smooth down the rough wood hairs that stick up when the wood is moistened by the primer, and then spraying with one last coat of primer. Then finish with as many light coats of your finish color as needed.
 I think the finished stands look great with all shapes of pots, but I particularly love how it looks with this vintage planter that used to belong to my grandmother before she passed away ten years ago. I think she’d be happy to know how much I love using it today!

 This project ended up being so simple that I think I’ll make another larger one out of plywood to give a little height to my beloved ficus tree. I’m thinking maybe white lacquer for that one? Let us know if you make your own—we’d love to see it! –Mandi
 The only thing I love more than cocktails is probably cupcakes. That’s why I love turning cupcakes into little bite-sized boozy treats. I’ve made regular champagne cupcakes for holidays like New Year’s Eve and Valentine’s Day, but switching it up to rosè makes these perfect for warmer weather and would be a great dessert to serve for Mother’s Day, a birthday, bridal or baby shower. Let’s face it, I will get my dose of rosé anyway I can, and it doesn’t hurt that they’re pink too. There can never be enough PINK!
 Rosé Champagne Mini Cupcakes, serves 48 mini cupcakes or 1 dozen regular cupcakes
1 cup sugar
1/2 cup unsalted butter, room temperature
2 eggs
1 tsp. vanilla extract
1 3/4 cups all-purpose flour
1/2 tsp. baking soda
1/4 tsp. baking powder
1/4 tsp. salt
1/2 cup sour cream or greek yogurt
1/2 cup sparkling rosé wine
5 drops of red food coloring
Set your oven to 350°. In the bowl of your stand mixer, cream together the sugar and butter until fluffy. Add eggs and vanilla extract and mix until combined.

 In a separate bowl, whisk together flour, baking soda, baking powder, and salt. In another bowl whisk together sour cream, rosé, and food coloring. Slowly add rosé mixture and flour mixture into sugar and eggs.
 Distribute batter evenly with a tablespoon among lined tray and place in oven. Bake for 15-20 minutes or until toothpick inserted in center comes out clean.
 Let cupcakes cool about 15 minutes. Since they’re small, they should cool down pretty fast. While they are cooling, make the icing.
 Rosé Champagne Frosting
1/2 cup unsalted butter, room temperature
4 cups powdered sugar
1/4 cup sparkling rosé wine
1 tsp. vanilla extract
5 drops red food coloring
sprinkles
 In a large bowl or bowl of your stand mixer, combine all frosting ingredients and beat until smooth. Fill a pastry bag and frost the cupcakes. Decorate with sprinkles. I used white pearl and pink sparkle sprinkles.


 Not only are these cupcakes pretty, but they’re so delicious. They are light and fluffy from the sour cream and bubbles in the rosè. Sometimes when you cook or bake with booze, the flavor diminishes a bit, but these definitely taste like rosé! The best part about making these is you get to drink the rest of the bottle afterward or during (I won’t judge). Either way, make sure you pour yourself a glass while you’re enjoying them. -xo Natalie

Up your burger game and be the hero of your next barbecue with Greek lamb burgers and homemade tzatziki!
I season these lamb burgers with some of Greece’s most-loved flavors – like garlic, dried lemon peel, and oregano – before grilling them up and serving them on toasted buns.
I like to set out a little buffet of Greek-inspired toppings near the grill for everyone to help themselves. Some of my favorites are fresh tomatoes, lettuce, feta, red onion, and of course, that tzatziki.
Continue reading "Greek Lamb Burgers with Tzatziki Sauce" »


1 / 2 / 3 / 4 / 5 / 6 / 7 / 8 / 9 / 10 / 11 / 12 / 13
Statement earrings are kind of like Hansel from the movie Zoolander in that they are “so hot right now.” Whether you are wearing an outfit that is already bold and your ears are just trying to keep up or you choose to keep everything simple so that the earrings are the star, well, we are big fans of either direction. Some boast geometric shapes to keep the eyes interested (like numbers 5, 9, and 10) while others rely on pom poms or tassels to bring some texture and movement to the jewelry. A lot of the statement earring trends have a bit of a 60s or 70s flair to them, which is the perfect excuse to pair them with some teased hair and a solid liquid liner cat eye for a night on the town. And since gold and bright colors are the name of the game, they are the perfect summer accessory too—and just in time! If you are a “jewelry by the pool” kind of glam girl, then a statement earring with a cute swimsuit and sunnies may be just what your vacation suitcase needs…

“You want a social life, with friends.
A passionate love life and as well
To work hard every day. What’s true
Is of these three you may have two
And two can pay you dividends
But never may have three.There isn’t time enough, my friends–
Though dawn begins, yet midnight ends–
To find the time to have love, work, and friends.
Michelangelo had feeling
For Vittoria and the Ceiling
But did he go to parties at day’s end?Homer nightly went to banquets
Wrote all day but had no lockets
Bright with pictures of his Girl.
I know one who loves and parties
And has done so since his thirties
But writes hardly anything at all.”– Kenneth Koch

This made me laugh and think of the good old mixtape days.
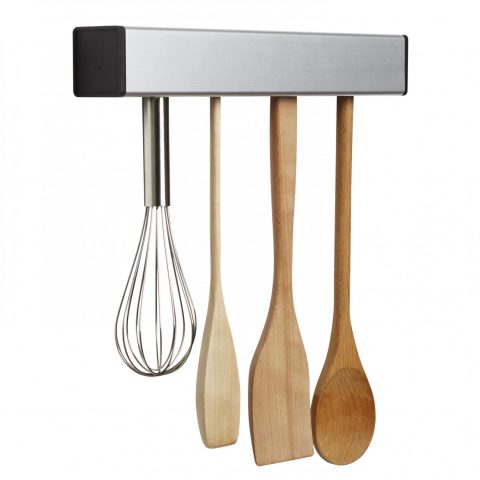
Float is a multi-functional kitchen utensil holder that can be mounted underneath your cabinet or on the wall, accepting a wide range of kitchen tools for easy accessibility.
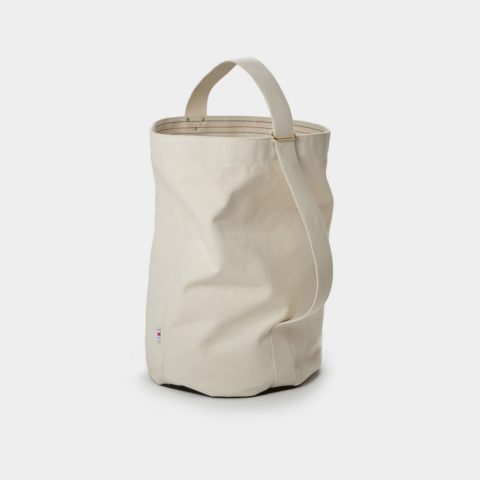
I like this Big Bucket Bag by Best Made Co. Would make for a nice hamper, no?

Spring is here, even if it hasn’t quite gotten the memo that that might mean bringing warmer temperatures along with it. (I walked to to work with my socks off last week and nearly froze to death, so you know.) Still, in recognition of the shift in seasons and the accompanying yen for a fresh start, here’s a little post about welcoming Spring with an eye toward being good stewards of our planet and ourselves.
Freshen your sheets, two ways:
+ Consider investing in a new thoughtfully made set.
+ Stick a lavender sachet into the place where you keep what you have. We store our sheet sets in bags and or pillowcases to keep them organized (you might recall), and I recently started tucking lavender sachets into each bag for seriously good smelling sheets.
Clean your fridge, two ways:
+ Examine the shelves on your fridge door. Throw away what’s nasty, keep what you love (and pledge to use it). Add something yummy.
+ For just a week, challenge yourself to buy nothing at the grocery store that comes in a plastic package. See what you come up with and what your stumbling blocks might be. (For me, it’s dairy. Always.)
Wash your face, two ways:
+ Book yourself an appointment at Heyday—or at a place nearby to you—and treat yourself to a clean face, courtesy of an expert.
+ Go through your cosmetics bag and get rid of anything that’s expired, grody, or otherwise unloved. Try something new. (And swap your disposables while you’re at it.)
Scour your sink, two ways:
+ Consider a special sink scrubber set to make the job a little more—dare I say?—fun.
+ Break out the baking soda and a lemon. Coat the kitchen sink in baking soda, douse it with lemon juice, scrub it all into a paste, make yourself some tea, come back later to rinse. Admire the shine.
Brighten your evenings, two ways:
+ Nights are getting shorter, but you still might want to read by lamplight. Try swapping incandescent bulbs for LED ones. I’m curious to try these LED Edison bulbs.
+ Try star gazing instead of phone gazing. Thanks to light pollution, we can only see twelve stars from Faye’s bedroom window but you better believe that we hunt them all out every single night.
Purify your water, two ways:
+ Make sure the stainless steel water bottle you tote everywhere is clean. Let it sit overnight with hot water and baking soda. Scrub in the am and drink cleaner water.
+ If your water’s tasting funky, try a purifying pitcher, or, you know, a hunk of charcoal.
Sweep under your rug, two ways:
+ Roll up your rugs. (Try not to get too grossed out by what you find underneath.) Give them a good beating (or throw them in the wash) and lay them back down on a freshly cleaned floor.
+ Invest in a moody broom.
Filter your indoor air, two ways:
+ Track your indoor air quality with a fancy new device aimed to teach you more about what you’re breathing in.
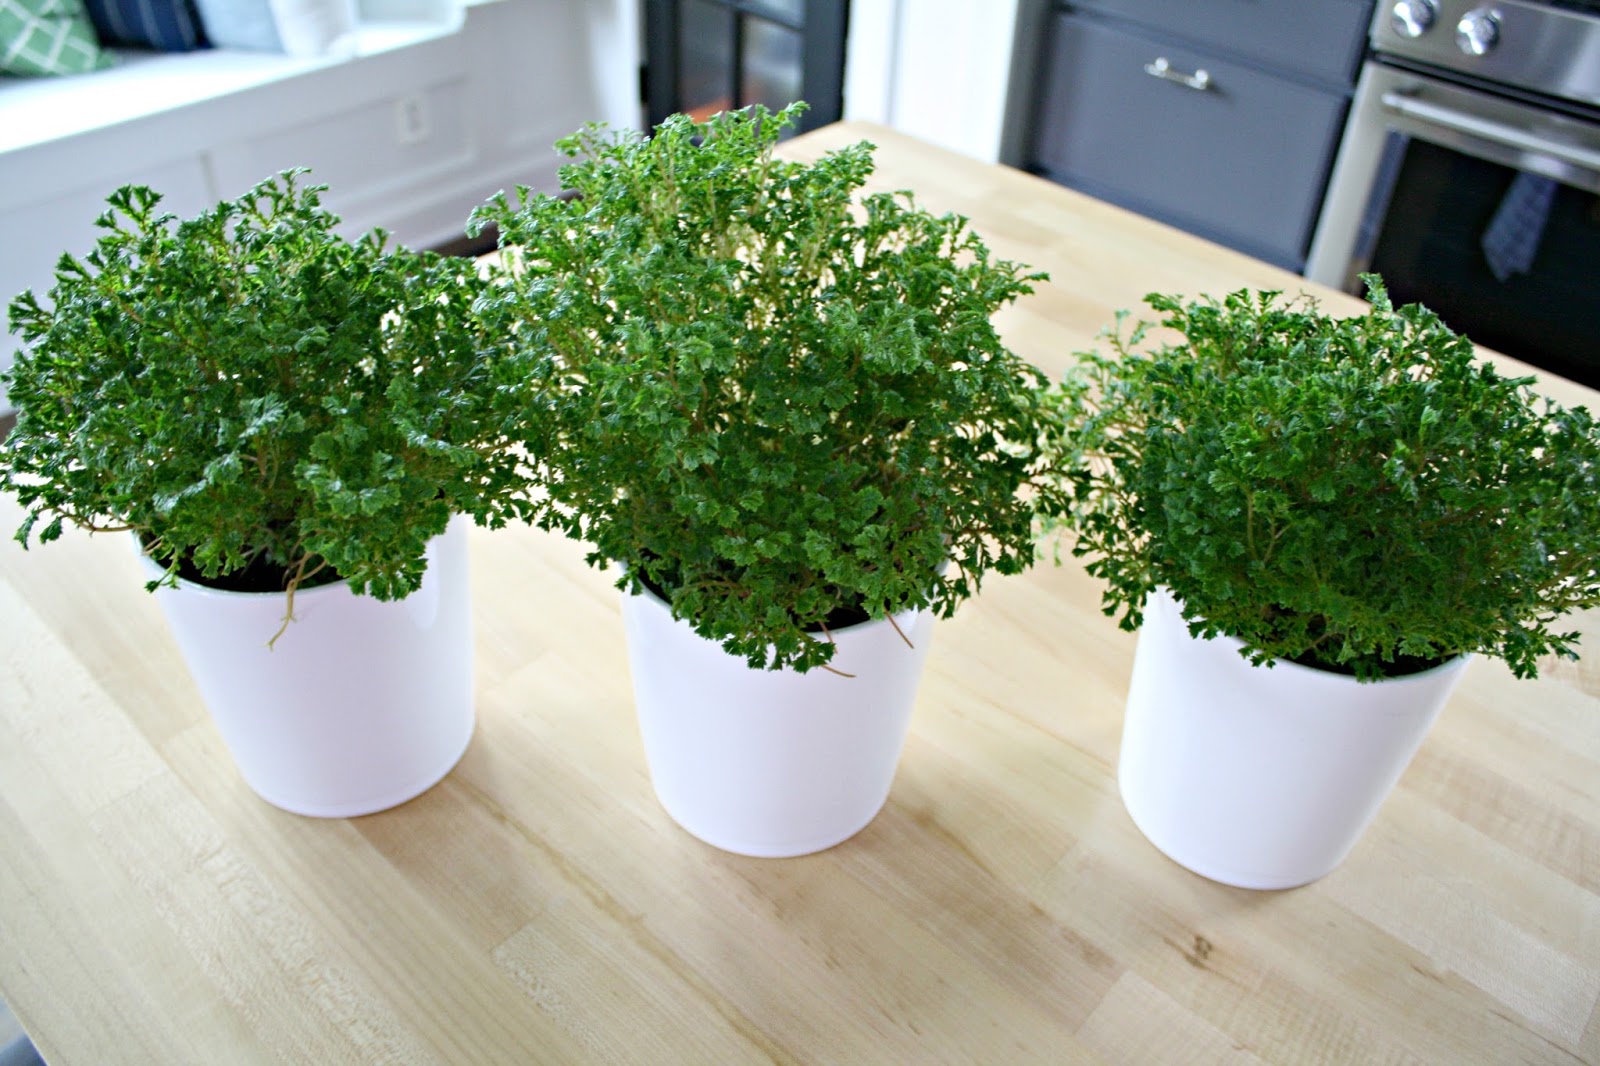
+ Get a potted plant—like a snake plant or a peace lily—known for removing indoor air toxins.
Bring in blooms, two ways:
+ Cut a forsythia branch or a cherry branch or a dogwood branch (or any flowering branch you can find), mash up the end of it with a hammer or a pair of clippers, stick it in water so it can drink its full, and watch those buds unfurl over the next few weeks. (City slickers like me can often luck out at the farmers’ market. Head to the fruit sellers to see if they sell their extra shoots.)
+ Rest your head in a flower meadow.
Mind your flower pots, two ways:
+ Prepare your flower pots for a little seasonal planting by taking a scrub brush and hot water to the insides to get rid of last year’s gunk. (If you’re feeling especially ambitious, rinse them with white vinegar and water solution to get them extra sparkly.)
+ If you buy plants in plastic pots from a farmers’ market or nursery, bring the pots back that way after planting. Growers can reuse them (and a lot of municipalities can’t otherwise recycle them).
What about you? Favorite ways to welcome a new (warmer) season?
Shh.listenSaving for the drawers
Pretty decorative boxes are one of my favorite things to have around the house (usually in little groupings with other candles or figurine type things). A lot of the time though, I love a box or container, but I'm not sure what to actually store in it! It occurred to me that most decorative boxes are actually the perfect size to be a jewelry box, and with a few quick tweaks, they can be really useful around the house as well as pretty!
Supplies:
-decorative box with lid (I used this one, but this one would be great too.)
-1/4 yard velvet fabric (this is a good pink option)
-straight pins and sewing machine
-hot glue gun or fabric glue
-cotton batting
-fabric scissors
-cutting mat, rotary cutter, and ruler
First you'll want to double over your batting and cut a piece that's as wide as your box and long enough to make a 1" thick roll when all rolled up. If you make them about 1" wide, then you can know how many you need to make to fill your box (a 5" wide box would need 5 rolls, etc.).
Cut and roll all your pieces and pin in place for now.
Use a cloth measuring tape to measure the circumference of your batting rolls and add 1/2" to your measurement (this will give you a 1/4" seam allowance when you sew it later). Cut your velvet fabric into a rectangle that's 1" longer than the length of your batting roll and as wide as the circumference width found in the first step above.
Fold your fabric lengthwise (right sides facing each other) and pin in place. Sew down the open side with 1/4" seam allowance and turn your velvet tube right side out.
Stuff your cotton batting into the tube (don't forget to take that pin out!), and repeat the sewing and stuffing process for each batting roll.
To close the ends, put a dollop of hot glue (or quick dry fabric glue) directly onto the middle of the batting end inside the velvet tube and fold the bottom of the velvet up into the glue. Add more glue to fold in the sides one at a time, and then use a final drop of glue to fold the top flap down in place. Repeat process on the other side of the tube, and then with each additional tube.
Place your velvet tubes snugly into your box, and you just created a new jewelry box!
Not gonna lie, I love that marble, pink, and gold combo together, but of course you can do whatever box or color velvet you like! I have a lot of dainty gold stacking rings, so I have to keep ring dishes and boxes all over the house or they get lost really fast! As you can see, it's pretty easy to make your own jewelry holder with whatever box you happen to love, and if you vary the size of the batting rolls, then you can have more or less rows to add your jewelry into. Hope this DIY is just what you need to keep your space useful and pretty! xo. Laura
Credits // Author and Photography: Laura Gummerman. Photos edited with the NEW A Beautiful Mess actions.
Shh.listenThere's SO MUCH about this house that i LOVE. Mostly it's how there's cute/quaint things all over, but it doesn't feel cluttered or stuffed. That bedroom is amazing. There's got to be a better way for our room not to feel so heavy/full?
Our longtime friend and ABM contributor, Katie Shelton, is giving us a tour of her home today! We couldn't be more excited to share how she's transformed our former studio house into a home for her family.
Wallpaper/Wallpaper Direct, Table/Hobby Lobby, Family Portrait/Pop Pop Portraits.
"Many of you may recognize this house from when it was the ABM studio house. My family and I were living in Springfield, MO when we found out the previous house we were renting was being sold. The home had too many issues for our budget for us to purchase, so we frantically began searching for a new place. The stars somehow aligned, and Elsie and Laura were moving to Nashville (*sniff* miss you guys), and the studio house was being sold around this same time. After much consideration, we decided that our family belonged in this 1870s historic house. I now live here with my husband, Johnny, my two daughters, Hope and Poesy, and our two cats, Google and Moonstone.
Table and Chairs/Amazon, Rug/eSale Rugs.
"I decided to keep the dining room chandelier that Laura made over, but was afraid of my style not working in such a classic space. I thrifted a beautiful vintage painting of a woman in a gorgeous gold frame and, yes, glued a bunny head over her face. I don't know where that idea came from. It just seemed like fun! The hutch is a vintage score that fits perfectly, and the pink shelf from the old Red Velvet store houses my ever-growing skunk collection!
Chair/Article, Chandelier/Wayfair, Rug/RugsUSA, Curtains/Target, Bison Head/White Faux Taxidermy, Pillows/Society 6.
"Our living room is my favorite space in our home, with my bedroom coming in a close 2nd, and entryway (that wallpaper—SWOON) coming in 3rd. I made the decision to flip-flop what was originally the traditional living room (which is now our music room) and the study because the lighting in the study was so serene and peaceful. I doubted my decision for months as custom pieces such as cabinet doors and a window seat unit were being built and we had big, blank walls. Eventually it all came together, it just took some time.
"Our wallpaper on the large built-in shelving was the first to give this room the vibe I was going for. The door in the corner of the room isn't functional, and after MONTHS of wracking my brain with how to make it less awkward (seriously, I would just sit and stare at that door), a light bulb finally went off! I had some acrylic shelving cut and painted some cheap hardware store brackets gold. Voila! The plant shelving on the door was the perfect touch behind my favorite green velvet chair from Article. It is the coziest for cuddling up and snuggling. Another favorite piece in this space is our crazy gold chandelier. I have a pretty eclectic style, and I love the quirkiness of it in this space!
Bed Frame/West Elm, Bedding/Urban Outfitters, Rug/Uncommon Goods, Dresser/Amazon.
Makeup brush holder/Target.
"I'm obsessed with picking up unusual trinkets that give a home personality, so you can probably imagine how many favorite pieces I have around the house! My vintage Playboy bunny chair that sits at my vanity is so fun. My husband saw it in a thrift store window one day while he was out running errands and rushed home to pick me up to check it out. What can I say? He knows my style!
"My family has been in what we now call 'the Skunkboy house' for a little over a year, and it feels like HOME. It's a space for gathering friends for dinners, craft nights, band practices, and backyard parties. I've always dreamed of having a place like this. A place where my girls have their unique rooms to play and grow. A place where I sit down after a long day of working in my studio and doing all the mom things, and just look around and continue to be in awe that we live here. I'm sure our home will continue to evolve over the years, but I'm so happy with how far its come in this short time we've lived here."
You can find more of Katie on her blog, Skunkboy and Instagram. And be sure to check out a Mixtapes show if you live nearby! :)
Author: Katie Shelton. Photography: Elise Abigail Randolph.

I’ve always been a big fan of my slow cooker, but I recently got a pressure cooker, despite my fears of blowing up my kitchen. I AM IN LOVE.
I’m not a devout meal prep girl, but one thing I do sometimes is make a big batch of shredded meat and either freeze it for future meals or use it throughout the week. Already having seasoned, cooked protein is such a timesaver on busy weeknights!
Today I’m going to give you a basic shredded pot roast recipe and show you three easy meals to make with it.
I realize that not all of you have a pressure cooker, so I’ll give slow cooker directions as well. You have a slow cooker, right? If not, you can have one of mine. I’m somewhat of a slow cooker hoarder.

Okay, start off with a 4-5 pound beef roast. The cut doesn’t really matter as long as it’s got a lot of meat on it. I prefer boneless roasts, but you can use a bone-in roast if you like.
If you’re using a pressure cooker, you’ll need to cut the roast into large chunks. For slow cookers, this step is optional, but it will cut down on some cooking time if you cut it up.
I also showered the roast with a few generous pinches of sea salt and cracked black pepper.

There’s a big “to sear or not to sear” debate. Many recipes will ask you to sear the meat on both sides before pressure cooking or slow cooking to add flavor to the meat, and I do it occasionally if I think that I’ll really need a flavor boost. In this case I’ll let you make the call. Personally, I didn’t think that this recipe needed it.
Plus, it’s an extra step and and extra dirty pan. I don’t blame you if you want to avoid that.

We want this meat to be versatile so I seasoned it very neutrally—like a classic pot roast. Mushrooms are optional but I found that they gave the pot juices more substance, and slow-cooked mushrooms are to die for.
In that little bowl is a mixture of flavor-boosting ingredients: garlic, onion powder, crushed pepper flakes, and Worcestershire sauce (you can substitute coconut aminos if you happen to be eating paleo or Whole30 compliant).

Add the mushrooms and the bowl o’ flavor along with some beef broth to the pot.
If you’re using a pressure cooker, it’ll need to process on high pressure for 2 hours. If you’re using an Instant Pot, set it to Manual for 120 minutes.
If you’re using a slow cooker, close the lid and cook it on low for 8–10 hours (for a whole roast) or 6–8 hours (for a cut-up roast).
By now your house will smell pretty amazing and you’ll have fall-apart tender beef to pull out of your pot. Shred it with a couple of forks.

Divide the beef, mushrooms, and pot juices into three containers. You may want to put the lids on quickly in case you have a 2-year-old climbing around. They love stuff like this.
You can either freeze these portions or use them in meals during the week! Either way you’ve got a big chunk of dinner prep done.
Here are 3 meals to get you started!


And yes, this recipe has ranch dressing, too. I’m six years old, okay?

What would you do with a giant pot of shredded beef? I’d love to have more meal ideas to add to my arsenal!


Shh.listenCalled it

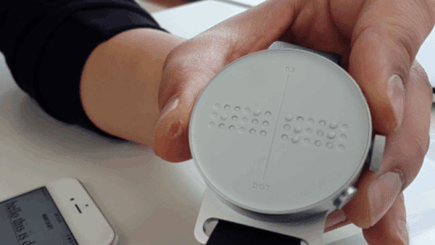
This beautifully designed Braille Smartwatch lets blind people feel messages on screen.
Ok, I admit it, I am completely obsessed with any kind of crunchy, baked cauliflower recipe. I am still WAY into this version of Springfield-style cashew cauliflower and also this Hot Cauliflower Pizza. And I can't stop, guys!
These Spicy Pimento Cauliflower Bites are crunchy, spicy and go oh-so-well with the creamy pimento cheese dip I made alongside them. This is vegetarian comfort food at its best if you ask me.
The pimento cheese dip is prefect for, well, dipping the cauliflower bites into. Although I think I like it equally as well on top of celery sticks. And I don't usually like celery sticks. :)
The recipe below is a good size for two as a meal or you could totally serve this as a fun and different appetizer or at a party. Maybe Super Bowl food? I don't know. If you mention the Super Bowl weeks after it happened will you give yourself away as the barely aware non-fan that you might be? Hmm... I guess we'll see.
Spicy Pimento Cauliflower Bites + Pimento Cheese Dip, serves 2 as a meal or more as an appetizer
1 head of cauliflower
1/3 cup flour
1/3 cup milk
1 tablespoon diced pimento (from a 4 oz. jar)
2 tablespoons hot sauce, divided
2/3 cup bread crumbs
For the dip:
4 oz. cream cheese
2 oz. sharp cheddar
2 tablespoons mayo
remaining pimentos from 4 oz. jar
1/4 teaspoon onion powder
1/4 teaspoon garlic powder
1/4 teaspoon black pepper
1 teaspoon salt
2 tablespoons honey, for the tops
celery sticks to serve
Preheat the oven to 400°F. Remove the bottom leaves and stem from the cauliflower head and cut into small florets. In a food processor blend together the flour, milk, pimento, and 1 tablespoon of hot sauce. In another bowl, place the bread crumbs. Dip the cauliflower pieces in the flour mix, then in the bread crumbs. Then place on a baking sheet lined with parchment paper and coated in the olive oil. Once you've dipped all the cauliflower pieces, bake for 20 minutes.
While those bake, prepare the pimento cheese dip. In a food processor combine the cream cheese, cheddar, mayo, pimentos, onion powder, garlic powder, black pepper, and salt. Blend to combine well, then remove to a small bowl.
Once the cauliflower bites are done, remove from the oven. In a small bowl or cup, stir together the remaining 1 tablespoon hot sauce and the honey. Brush or drizzle over the baked cauliflower bites.
Serve alongside the dip with some celery sticks. Here's just a few notes:
-I used white whole wheat flour, almond milk, and 100% whole wheat Panko bread crumbs for my version. But you can use virtually any flour, milk, and bread crumb situation that you prefer.
-You can also use any hot sauce that you like. I used Tapatio this time, but I also really love Cholula. :)
Enjoy! xo. Emma
Credits // Author and Photography: Emma Chapman. Photos edited with the NEW A Beautiful Mess actions.

While comfort cooking and speed don’t usually coexist, this mildly spicy soup is an exception to the rule.
If you made a New Year’s resolution to eat a little better this year, this soup will keep you on track. It’s not health food — just good, healthy food!
Continue reading "Soba Noodle Soup with Chicken and Bok Choy" »
Continue reading "Sour Cream Chocolate Cake" »