×You need to sign in to continue.

Shared posts

29 Feb 17:28

15 DIY Projects That Will Convince You to (Finally!) Get a Jig Saw

by A Beautiful Mess

15 DIY Projects That Will Convince You To (Finally!) Get A Jig Saw (click through to see all of them)OK, this is another edition of me begging and pleading with you fellow DIYers to get into the jig saw game. I know, I know, it has a motor and it makes a relatively loud noise, so you're convinced that it's too terrifying or assume it's too expensive to go near. Well, I'm here to swear to you that you are wrong. First of all, you can get a jig saw for under $25. TWENTY FIVE DOLLARS! That coffee phrase sweatshirt you just bought from Etsy cost almost double that, didn't it? Of course they range up to higher prices (like this one) for added speed, etc., but I've been using that inexpensive one for the last two years, and it's gotten all the jobs done. Second, I'll agree with you for a moment and concur that it IS a little scary the first time you use one, but it literally took two cuts to realize that it's pretty much just noisy and that's really the scariest part about it. Trust me on that one.

Why on earth am I so adamant about you guys overcoming a jig saw fear you ask? Well, it's simply because I have been thrilled with how much wider my DIY options have become since I learned to use one, and I want the same for you! They are small and inexpensive compared to a larger power saw (and way less scary), can do curves and shapes instead of just straight lines, and there are so many things you can do with it. To prove my point, I'll show you 15 projects that you can make with the help of a handy dandy jig saw, and I think the projects will do the convincing for me.

First is this adorable mid-century plant stand that Mandi made. She's been using a jig saw for longer than I have and was definitely part of the reason I wanted to learn to use one—I was totally jealous of all the things she was making with it!

15 DIY Projects That Will Convince You To (Finally!) Get A Jig Saw (click through to see all of them) This leather magazine rack is actually the first project that I learned to use the jig saw on. Our profesh builder, Josh, was on our team at the time, and he convinced me to give it a try. So we made this project together, and I'm so glad he talked me into it!

15 DIY Projects That Will Convince You To (Finally!) Get A Jig Saw (click through to see all of them) Now, Elsie's dining room table DIY wasn't made with a jig saw, but it could have been pretty easily. The whole thing is just a series of small straight cuts—perfect for a jig saw!

15 DIY Projects That Will Convince You To (Finally!) Get A Jig Saw (click through to see all of them) Not every project has to be on a large scale. I made these hanging planter boxes out of small wooden jewelry boxes, but I needed an easy way to cut the boxes in half. Jig saw to the rescue!

15 DIY Projects That Will Convince You To (Finally!) Get A Jig Saw (click through to see all of them)   This wooden cutting board DIY is another great small project for a jig saw. And since a jig saw can do curves, you can do whatever shape you want!

15 DIY Projects That Will Convince You To (Finally!) Get A Jig Saw (click through to see all of them)   This DIY metal edge marquee would have been completely impossible without a jig saw. But with one, I could make whatever phrase or font I wanted!

15 DIY Projects That Will Convince You To (Finally!) Get A Jig Saw (click through to see all of them)   How cute is this mini horse bookshelf?? Whether you are making it for a kiddo's room (or just one for yourself!), you'll need a jigsaw to get the job done. And, I just realized that all you have to do is cut out a horn for the forehead and you've got yourself a unicorn shelf instead!

15 DIY Projects That Will Convince You To (Finally!) Get A Jig Saw (click through to see all of them)        This jewelry storage mirror is another project that only needs a few small straight cuts to complete. I still absolutely LOVE this in my bedroom. So helpful for organizing everything!

15 DIY Projects That Will Convince You To (Finally!) Get A Jig Saw (click through to see all of them)        This adorable house-shaped shelf can also be done with a jig saw and would look cute in any kitchen. You could also make it to store nail polish or makeup in a bathroom instead. Love it!

15 DIY Projects That Will Convince You To (Finally!) Get A Jig Saw (click through to see all of them)        Using a jig saw to add trim to closet doors takes the custom look factor to a completely different planet. These doors are totally one of my favorite things in our house!

15 DIY Projects That Will Convince You To (Finally!) Get A Jig Saw (click through to see all of them)           Using the jig saw's ability to cut curves came in handy when I made this plant chandelier for our backyard a few summers ago. The plants grew to hang beautifully by the end of summer, and it was one of my favorite outdoor features for sure.

15 DIY Projects That Will Convince You To (Finally!) Get A Jig Saw (click through to see all of them)           Give your speakers a clean look with these speaker covers (you can make them whatever size you need). It's the perfect solution to blend unsightly electronics into your space.

15 DIY Projects That Will Convince You To (Finally!) Get A Jig Saw (click through to see all of them)           OK, this is probably my favorite use for a jig saw at the moment—a Palm Springs kitty scratch house! For me, this alone is worth the jig saw investment.

15 DIY Projects That Will Convince You To (Finally!) Get A Jig Saw (click through to see all of them)           Making your own custom shape is what a jig saw is all about, so this starburst ceiling medallion DIY is easily done with the right tool (spoiler alert: the right tool is a jig saw). Love it!

15 DIY Projects That Will Convince You To (Finally!) Get A Jig Saw (click through to see all of them)           And just to remind you that a jig saw isn't just useful for wood-related projects, I've included this hanging flower heart decoration. Jig saws are also useful for cutting other types of material like dense foam or styrofoam (it can even cut sheet metal!). It took me only seconds to cut out this giant heart with the saw. I would have been hacking away at it forever with a hand saw or bread knife.

It is true that you can ask some home improvement places to make cuts for you (which will work in a pinch), but to be honest, since I have a jig saw, I usually do it myself so I can be in control of the cuts and make sure they are right (it really sucks to get home and find out they aren't...). A few other tips—sawhorses are really helpful to set your wood on when using a jig saw. (You can get foldable sawhorses that take up way less space.) I use them for lots of outdoor projects, so they are just generally handy to have. Clamps also keep the wood secured to the sawhorse while you cut so it doesn't wiggle around (again, you'll find lots of other uses for those too). Make sure to use eye protection and the right blade for whatever you are cutting (buy a variety pack). If you want a more general beginner's guide to using a jig saw, watch this video to get started! Like I said, the DIY options really open up once you can use a saw that does straight and curved cuts easily—don't be afraid! So, what do you think? Did I convince you to give it a try? xo. Laura

16 Feb 19:58

Palm Springs Kitty Scratch House (OMG!)

by A Beautiful Mess

How cute is this!?! Palm Springs style scratching house (click through for tutorial)                         If you have pets of any kind, you already know the struggle between pet items that are necessary to have around but are not necessarily your favorite thing to look at everyday. I realized that we had a "scratcher" cat pretty quickly once we got our second cat Mac. At some point I noticed that more and more often he'd been trying to scratch up different rugs or furniture pieces. He needed an outlet for his animal instinct to sharpen his claws—a scratcher! I originally made this scratching post for him, which he used right away (which thrilled me of course), but after only a few weeks, he wouldn't use it anymore and back to the floor and rugs he went. I eventually realized that different cats have different scratching "preferences", and he likes to scratch in a horizontal position the best (rather than up a pole). So I got him a scratcher that sat on the floor, and he used it several times a day for months. I could tell how much he loved it. The only thing I didn't love was the look of having the scratcher out in our living room (near the rug he usually liked to scratch on the most). I bought one that was shaped like a little cardboard house (the cutest one I could find), but, eh, it just looks OK for something that sits in my living room. One day when I was lamenting and wondering how I could improve the little cardboard house, I realized that instead of adding to that house, I should make the perfect house (A PALM SPRING HOUSE) for his scratcher instead! If I built a wooden structure that would fit a standard scratching pad, I could replace the pad as needed but keep the adorable house forever! Problem solved.

How cute is this!?! Palm Springs style scratching house (click through for tutorial) Supplies:
-½” thick plywood sheets
-craft paper for template
-jig saw
-ruler
-clamps
-wood glue
-nails and hammer
-paint of choice for house
-removable wallpaper (optional)
-scratching pad insert
-balsa wood
-X-Acto knife and cutting mat
-metal wire and small wooden ball
-hot glue gun

First I had to decide what shape of house I wanted. There are lots of cute Palm Springs house shapes, but I thought a slightly asymmetrical ranch style would work best for this project. Since Mac already has a scratch house, I took a look at his current house to get an idea of the minimum measurements the house and opening would have to be (once I knew it was a size he would fit in, I could adjust the shape aesthetically from there). I used some craft paper to mark out the minimum size the front of the house would have to be, and then proceeded to add the house details from there. I knew I wanted the side opening to be 9.5" tall and 7.5" wide and the floor of the house had to fit the 9.5 x 17.75" cardboard scratching insert. When thinking of how tall to make the sides of the house (so that the roof would still be tall enough for Mac once completed), I also had to take into account the thickness of the 1/2" plywood piece for the floor of the house and the scratching pad height as well.

How cute is this!?! Palm Springs style scratching house (click through for tutorial)   Since the house is too big to give you a template, I'll give you the dimensions of the pieces instead.

A. 19" long and 12" at highest peak and 9.5" at the lower peaks (back wall)
B. Same but reversed and with windows cut (front wall)
C. 9.5" x 9.5" (closed side)
D. 9.5" x 1.75" (piece on open side to keep scratcher in place)
E. 18.5" x 9.5"  (bottom)

Once I had the pattern for each piece, I used my handy dandy jig saw to cut out each piece. JIG SAW TIP: To make a straight cut with your jig saw, clamp a ruler to your wood (parallel to the line you want to cut) so the metal side guide of your saw can run right up against it and give you a perfectly straight line.

How cute is this!?! Palm Springs style scratching house (click through for tutorial)     How cute is this!?! Palm Springs style scratching house (click through for tutorial)     How cute is this!?! Palm Springs style scratching house (click through for tutorial)     When my shapes were cut, I lined up all the pieces to make sure they fit together, and then used wood glue and clamps to glue the pieces together. Once the glue was dry, I nailed each piece into place. It's a little hard to describe in words exactly how the parts fit together, but seeing the photos should make it self-explanatory.

How cute is this!?! Palm Springs style scratching house (click through for tutorial)       How cute is this!?! Palm Springs style scratching house (click through for tutorial)         You can see that I added a recessed front door area simply by cutting out a strip from the front piece a few inches wide where the door should go and adding another piece behind it that was slightly wider than the opening. Pretty neat, huh?

When I went to cut the two pieces to make either sides of my roof, I realized that by making the roof "slightly asymmetrical", I had apparently made the job of creating the roof a lot harder. If I had made the roof a right angle, I could have had the two boards join up quite nicely with one simply overlapping the other where they came together, but an odd angled roof sent me down to my miter saw to try and figure out what weird angle I had created to try and get them to meet up. I eventually got close enough, but it took a few tries!

How cute is this!?! Palm Springs style scratching house (click through for tutorial)           How cute is this!?! Palm Springs style scratching house (click through for tutorial)           How cute is this!?! Palm Springs style scratching house (click through for tutorial)                        I wanted to add some removable wallpaper to the inside of the house to make it feel more finished, and I should have added the wallpaper before I nailed the roof on. Whoops. Made my job a lot harder later! Once my roof was glued and nailed on, it was time to paint! I chose Valspar Tea Rose and Sherwin Williams Dorian Gray for the paint colors and worked on making and painting some window frames and a door out of balsa wood in between coats.

How cute is this!?! Palm Springs style scratching house (click through for tutorial)            How cute is this!?! Palm Springs style scratching house (click through for tutorial)            Once all the paint was dry, I glued the windows and door to the house and made a tiny globe light for the entryway out of a wooden craft ball and some metal wire? I just painted the ball and drilled a small hole into the ball and into the underside of the roof for mounting (a little super glue in each hole will keep it in place). Such a cute detail! I also painted some pin heads gold, cut the pins in half and hammered them into the front door for tiny doorknobs.

My house was almost done, but what's a Palm Springs house without some giant agave plants flanking the front door, right? A few pieces of balsa wood later, I had the entryway of my dreams! 

How cute is this!?! Palm Springs style scratching house (click through for tutorial)              I measured and cut a little notch into the scratching pad (because of the recessed entryway), inserted the pad, and my scratch house was in business! Now, where's Mac to test it?

How cute is this!?! Palm Springs style scratching house (click through for tutorial)                How cute is this!?! Palm Springs style scratching house (click through for tutorial)                    How cute is this!?! Palm Springs style scratching house (click through for tutorial)                How cute is this!?! Palm Springs style scratching house (click through for tutorial)                 How cute is this!?! Palm Springs style scratching house (click through for tutorial)                     How cute is this!?! Palm Springs style scratching house (click through for tutorial)                       Can you even with this house!?! The pink exterior, the wallpaper inside, the hanging globe light and agave—I love it all! As you can see, Mac totally approves of the house, and it's extra adorable when he takes naps in the house in between scratching sessions. He thinks he lives there. Obviously this is now totally something I don't mind having out in the main living space for all to see. So I would consider this project a success for sure. My only problem is that Mac keeps complaining about the lack of a kidney-shaped pool in the back (to drink out of, of course). So I may have to start on an expansion soon! Would your little kitty like one of these? xo. Laura

 Credits // Author and Photography: Laura Gummerman. Photos edited with A Beautiful Mess actions.

09 Feb 21:01

Creating an Open Closet System

by A Beautiful Mess

DIY open closet system- for those with tiny bedroom closets!When my husband and I purchased our small ranch home, we knew the bedroom closet wasn't big enough for the both of us. So instead of having a showdown at high noon, or doing something even crazier like becoming a wardrobe minimalist, I decided to implement an open closet system onto one of the bedroom walls. What really happened, though, was that we lived with a hodge-podge bedroom for three years, making us feel like we were actually sleeping in a messy closet each night. Not exactly relaxing at the end of the day.

This January I felt super motivated to start fresh on the opposite side of the room with a neater attempt at creating a nice looking closet system. We also finally changed up the light green walls that came with the house for a calmer color scheme to help make our bedroom a more enjoyable place to relax.

DIY open closet system- for those with tiny bedroom closets!Check out how I went about installing and organizing the closet system below!

DIY open closet system- for those with tiny bedroom closets!Step One: Decide where to place the closet system. I originally had mine on a wall with no windows, which didn't end up working well for our room's arrangement. The reason I had decided to place it there was because it gave me more space for my clothes. But recently I decided to downsize my wardrobe and move the closet system to the opposite wall, incorporating my husband's dresser and space for the window into the arrangement.

DIY open closet system- for those with tiny bedroom closets!Step Two: Determine the height for your top shelf by deciding what's important for your shelf spacing.

Option One: Do you have objects you plan to place on the top shelf? If so, use those to space the top shelf brackets from the ceiling. (Be sure to leave a little bit of breathing room!) Or if you are planning to hang dresses, be sure your longer dresses don't drag on the floor. If you have maxi dresses, I recommend making the lower row of clothes shorter than the top row, so long dresses can be hung on the top rod and hang down alongside the clothes on the bottom rod.

Option Two: If you don't have any specific items you plan to place on the top shelf, then grab a hanger and see what your comfortable reach is. Mark your bracket screw holes where you are comfortable reaching, and move onto hanging the brackets.

DIY open closet system- for those with tiny bedroom closets!Step Three: Align your bracket marks with the studs in your wall. Your wall studs will be approximately 16" from the corner of the wall, or evenly spaced 16" apart from each other. Use a stud finder to be sure you're drilling into a stud. You must fasten the shelf brackets into a stud or their will not be stable. The last thing you want is for your entire closet system to come tumbling down in the middle of a peaceful night's sleep!

Tip: Use a level to make sure each bracket's drill holes are spaced perfectly level with each other.

Step Four: Drill into the marks you made with pilot holes a bit smaller than the size of your screws. (Don't worry, I was only posing for the above photo after I had drilled the holes. Baby wanted held, so baby was held for the posing of this picture! No drywall dust fell on this angel face, but this is a pretty realistic look into how I manage to get a lot of things done with a baby!)

DIY open closet system- for those with tiny bedroom closets!
Step Five: Screw the brackets into place, making sure to only tighten the screws once you've made sure the brackets are level with each other. (You can do this by placing a shelf with a level on top of them.)

Step Six: Trim the rods to fit your allotted space using a pipe cutter. I used aluminum conduits for my rods because they were less expensive than the chrome ones at the store. Twist the (black) end of a pipe cutter as you circle it around the circumference of the pipe, making the blade go deeper into the pipe with each round until the pipe is cut.

At this time, you can cut your shelf boards to the same size as your pipes, or note their lengths to have them cut at the hardware store where you plan to purchase the shelving material. My shelves are standard laminate coated particle board, which is inexpensive and perfectly suited for closet shelving.

DIY open closet system- for those with tiny bedroom closets!Step Seven: I used iron-on banding to finish off the cut edges of my shelves. Super simple, and no trimming needed, since the banding came in the same width as my laminate shelves.

Repeat this entire process with as many closet sections as you need or have the wall space to accommodate. I did one section on either side of my window. Hey—the racks of clothes are like added insulation, right?

DIY open closet system- for those with tiny bedroom closets!Step Eight: Fill the rods and shelves with your clothes and storage accessories. I used white baskets to store items that aren't hung, such as purses, scarves, and other less frequently used items up top, and gym clothes and knits down lower for easy access. It's important for me that this system looks nice, so I used the same style of basket for a neat, organized appearance.

DIY open closet system- for those with tiny bedroom closets!Here you can see a bit how small our bedroom is, with the bed in the photo. The doorway off to the right is my husband, Phil's, closet. I'll share more about what space-saving ideas I used on the opposite wall in a later post. But taking advantage of the entire window wall for a closet system has been such a sanity saver!

DIY open closet system- for those with tiny bedroom closets!Creating this open closet system was also a great opportunity to reevaluate which items in my wardrobe needed to go and which of my favorites could stay. Now the trick is to not be so tempted by the clearance rack in stores so my bedroom doesn't become overwhelmed with more clothes than I need. I've noticed the items I rarely wear will eventually acquire dust, which is a great indication that they probably should be ousted from the gang.

So what do you think? Would you ever install an open closet system in your bedroom? -Mandi

Credits // Author and Photography: Mandi Johnson. Photos edited with A Beautiful Mess actions.

04 Feb 03:33

Organization Inspiration: Small Hallway Storage Projects That Make a Big Difference

by Dabney Frake
(Image credit: Hajattamolla)

Hallways are awkward spots in our homes, both overlooked and undervalued —they're weird in-between places that we pass through multiple times daily, but we don't actually spend a lot of time there. What they don't have to be is a waste of space. With a little time and effort they can be storage powerhouses.

READ MORE »

03 Feb 18:12

How To Pare Down Everything Just Like You Pare Down Your Wardrobe

by Adrienne Breaux

If you've tried a few different ways of decluttering your stuff — from home decor to paperwork to furniture to cleaning supplies and more — but still find yourself struggling with feeling like you need more room in your home and life, you might find success with this method. It's a good process, particularly if you're someone with a love and mind for fashion. Approach paring down your other belongings like you pare down your wardrobe and you just might find streamlining all your things easier.

READ MORE »

03 Feb 18:09

How To Edit Your Bookshelves and Start Loving Your Space

by Taryn Williford
Shh.listen

Bookshelves!

Quite like beautiful jewelry, a well-styled bookshelf will always catch your eye. Every bookcase offers an opportunity to display your favorite books and objets in a perfectly styled gallery of sorts. But–again, just like jewelry–too much can definitely be a bad thing. Overloaded shelves will begin to look cluttered and messy if you're not careful.

READ MORE »

02 Feb 18:58

4 Reasons the Julienne Peeler is a Tiny Kitchen Superstar — The Kitchn

by Apartment Therapy
02 Feb 16:14

Homemade Potato Bread

by Elise
Potato Bread

Do you like potato bread? Potato bread is essentially wheat bread with a mashed potato worked into the dough. It has the most wonderful crust, and the light but firm structure, with generous craggly holes make for the most fantastic toast. (All those nooks and crannies? Perfect butter and jam receptacles.)

With all of the artisan breads available at the markets these days it’s a wonder anyone makes their own bread anymore. But I have yet to find freshly baked potato bread at the market, and making it at home is easy, especially if you have a mixer or bread machine.

Continue reading "Homemade Potato Bread" »

02 Feb 14:47

Next Level Vegan Enchiladas

by Angela (Oh She Glows)

20160129 - Vegan enchiladas with cashew cilantro cream sauce (blog) 00756

Before I get to this insanely delicious recipe, I want to let you know what I’ve been up to this month! Some of you have seen on Snapchat that I’ve been behind the lens each day for a very special photography project—which includes shooting more than 60 brand-new recipe photos! It’s been pretty crazy around here and I haven’t had a day off in ages, but it’s really coming together beautifully. Eric even helped me create a dedicated photography space in our empty dining room and it’s been nice to have a set area to shoot (why did it take me so long to do this?). We’re gearing up to share this new project with you late winter, and I appreciate your patience as things will continue to be a bit slower around here as I complete the photography project this month. If you want to see all the behind-the-scenes action, follow along on Snapchat (username: angelaliddon).

I’m also happy to announce that we’re gearing up to kick off a brand-new newsletter! It’s going to be packed with all kinds of beautiful photos, recipes, life updates, tips/tricks, and sneak peeks/insider info (such as on the aforementioned project!). Since it has been so long since I sent out a newsletter (probably 1.5 to 2 years), we’re starting fresh and asking you to sign up again. This is because we want to make sure our subscribers truly want to receive our newsletter; the goal is to connect with you in a meaningful way — not to spam unsuspecting inboxes! I’m all about quality over quantity. Once you’ve signed up you will get an email asking you to confirm your subscription, and you’ll need to click the link to activate the fun. The first newsletter is expected to go out this month with a special Valentine’s Day theme (va va voom!), so keep your eyes peeled! Sign up here:

For those of you who have been asking if my next cookbook has a release date, I’m thrilled to tell you that it will release on September 6, 2016. Not too long to go now! You can now pre-order the book in Canada via Amazon.ca and Chapters/Indigo (many more retailers to come). We don’t have a cover yet, but of course I will share the preview with you as soon as I can!

As you can see there are a lot of fun things coming up in 2016. More on all of this very soon…

This recipe is honestly one of my favourite entrees in a very long time and I’m so excited to share it with you. This is the recipe to make when you want to blow your friends and family away. Trust me on this one. It’s a spin-off of my favourite vegan enchilada recipe from way back in 2011. Why the heck has it taken me so long to make another? Well, to be honest, I didn’t think I could improve upon that recipe, but I was wrong…very wrong. This version is even more flavourful, satisfying, and robust thanks to the addition of smoky roasted red peppers, umami-rich sun-dried tomatoes, and my favourite homemade enchilada sauce. I top it all off with a decadent cashew cream that’s flavored with cilantro, garlic, and lime. Yowza. This is winter comfort food at its best!

veganenchiladas

Next Level Vegan Enchiladas

Vegan, refined sugar-free, soy-free

These mild- to moderate-heat enchiladas will change your life! A delicious homemade Enchilada Sauce smothers a sweet potato, roasted red pepper, sun-dried tomato, and black bean filling wrapped in soft tortillas. After baking, I top it all off with a decadent Cilanto-Lime-Garlic Cashew Cream, green onion, cilantro, red pepper flakes, and chopped avocado. This dish will blow your taste buds away, I can promise you that! Please note that the prep time includes making the enchilada sauce and cashew cream in addition to the enchiladas. Yes, it's a labour-intensive recipe for sure, but you can save time the day of by prepping the cashew cream and enchilada sauce the day before.

Yield
5 to 6 enchiladas
Prep Time
1 Hour
Cook time
45 Minutes
Total Time
1 Hour, 45 Minutes

Ingredients:

For the enchiladas:
  • 2 cups (260 grams) peeled and chopped (1/2-inch dice) sweet potato
  • 1 tablespoon plus 1 teaspoon extra-virgin olive oil
  • 1 medium red onion, diced (2 to 2 1/2 cups)
  • 3 large garlic cloves, minced
  • 1 cup jarred roasted red pepper, drained and chopped
  • 1/2 cup oil-packed sun-dried tomatoes, drained and finely chopped
  • 2 cups baby spinach, roughly chopped
  • 1 (14-ounce) can black beans (about 1 1/2 cups), drained and rinsed
  • 2 1/2 cups Homemade Enchilada Sauce (1 batch)
  • 1 tablespoon fresh lime juice
  • 1 teaspoon chili powder
  • 1 teaspoon ground cumin
  • 1/2 teaspoon fine sea salt, or to taste
  • 5 to 6 medium/large soft tortilla wraps
For the toppings:

Directions:

  1. Prepare the Homemade Enchilada Sauce and soak the cashews for the Cilantro-Lime-Garlic Cashew Cream before you begin.
  2. Lightly grease a large rectangular baking dish (at least 8x12 inches). Set aside.
  3. Add the chopped sweet potato into a medium pot of water and bring to a boil. Reduce heat and simmer for 9 to 15 minutes, uncovered, until fork tender. Drain and set aside. You can also steam the potatoes until tender, instead of boiling.
  4. In a large skillet, stir together the oil, onion, and garlic and sauté over medium heat for around 3 to 5 minutes until the onion softens. Season with a pinch of salt and pepper.
  5. Preheat the oven to 350°F.
  6. Add the chopped roasted peppers, sun-dried tomatoes, cooked/drained sweet potato, spinach, and black beans. Cook for 3 to 5 minutes over medium-high heat, until the spinach is wilted.
  7. Stir in 1/4 cup plus 2 tablespoons of homemade enchilada sauce, followed by the lime juice, chili powder, cumin, and salt. Adjust seasonings to taste, if desired.
  8. Add 3/4 cup of Enchilada Sauce onto the bottom of your casserole dish and spread it out evenly.
  9. Scoop 3/4 cup of the sweet potato and black bean filling onto each tortilla. Roll up the tortilla and place it, seam side down, in the casserole dish. Repeat for the rest. If you have any leftover filling, you can spread it on top of the tortillas. Spread all of the remaining enchilada sauce on top of the tortillas until they are completely covered in sauce.
  10. Bake the enchiladas, uncovered, at 350⁰F for 20 to 25 minutes, until the sauce is a deep red colour and the enchiladas are heated through.
  11. While the enchiladas are baking, prepare the Cilantro-Lime-Garlic Cashew Cream.
  12. When enchiladas are ready to serve, add half of the cashew cream into a baggie, snip off the corner, and “pipe” the sauce all over the enchiladas. Alternatively, you can simply spread or dollop the sauce on top of each enchilada. Garnish with chopped cilantro, avocado, red pepper flakes, and green onion. Serve any remaining cashew cream on the side with a spoon.

Tips:

  • Make it kid-friendly: Omit the cayenne and red pepper flakes.
© copyright 2016 Oh She Glows. All Rights Reserved.
01 Feb 21:50

taco torte

by deb

the taco torte

I have forever seen recipes on TV and around the web for something called Mexican Lasagna, a giant layered casserole that contains pretty much everything we love and cannot get enough of — tortillas, beans, salsa, cheese and then some — but couldn’t bring myself to make one because I make bad decisions based on trivial things, such as the name, which made me cringe (must we blame the people of Naples or Mexico for the unholy ways we Frankenstein their cuisine?) and the fact that I hadn’t exactly run out of excuses to eat tortillas, beans, salsa and cheese yet and thus didn’t need to enlist another one. Don’t worry, Deb is going to see the error of her ways in the next paragraph.

... Read the rest of taco torte on smittenkitchen.com


© smitten kitchen 2006-2012. | permalink to taco torte | 111 comments to date | see more: Appetizer, Beans, Photo, Tex-Mex, Vegetarian, Weeknight Favorite

01 Feb 19:41

Pom Pom Oversized Floor Pillow Tutorial

by A Beautiful Mess
Shh.listen

For Junie? I'm thinking a reading corner with the rug and big pillows!

Make your own comfy floor pillows with this easy tutorial over at www.aBeautifulMess.comI spend a lot of time on the floor at my house! If I'm not crafting on the floor, I'm crawling after a child or reading a story. This can make for sore knees or a numb rear end. So we've recently added a few floor pillows to make things a little cozier. As much as I appreciate a soft place to perch, I also love an excuse to sew something that makes our space even prettier and thought you might want to know just how easy it is to create a few oversized pillows, too.

Floor Pillows with Pom PomsWhen picking out fabric for your floor pillows, you want to think about color and durability. I used quilting weight cotton because I loved the patterns and colors they came in, and I knew the cotton was pretty durable. The navy print is from one of Alison Glass' collections and the black and white is by Melody Miller for Cotton + Steel. These were purchased online from Indeed Fabric if you're interested in some great print options.

If you know your pillows will get put through the ringer, you might want to check out the print options available in canvas or upholstery weight fabrics. You can also make these from canvas drop cloths and print or paint your own designs if you're not finding something you love on the market. 

Floor Pillow SuppliesSupplies for a Rectangular Floor Pillow:
-1 yard of printed cotton fabric
-1 skein of yarn (130 yards)
-2 lbs of polyester fiber fill
-sewing machine
-straight pins
-scissors
-needle and thread
-pom pom maker (optional)

Supplies for a Square Floor Pillow:
-1 1/2 yards of printed cotton fabric
-1/3 skein of yarn (40 yards)
-2 lbs of polyester fiber fill
-sewing machine
-straight pins
-scissors
-needle and thread
-pom pom maker (optional)

FP1If you're making a rectangular pillow with pom poms on the short ends, make twelve pom poms using a designated pom pom maker or another method. Make sure you leave at least three inches of tail length to stitch to your fabric later. If you're making a square pillow, you'll only need four pom poms.

Fp2Fp3Rectangular Pillow

Find the shorter end of your yard of fabric and fold it in half with wrong sides together to create a rectangular shape. Pin your pom poms just to the top layer of fabric with the tails sticking out to the edge and pom poms sticking in about 1" from the edge. Repeat for the opposite end. Again, be sure to only pin them to the top layer of fabric.

Square Pillow

Cut your fabric to get two pieces that measure 27" x 27". Place one of the cuts of fabric on the floor with the right side facing you and pin a pom pom in each corner with the tail facing out and the pom pom facing in. 

FP4For the rectangular pillow, unfold your fabric and stitch a line down the pom pom edge so that you're stitching about 1/2" from the edge. I suggest backstitching (stitching in reverse) over the yarn tails to add extra security. Remove your pins. Repeat for the opposite end.

For the square pillow, stitch over the pom pom tails in each corner a few times using the backstitch button (or reverse), but you don't have to stitch all the way around the perimeter.

FP5For the rectangular pillow, fold your fabric in half with the right sides facing each other and carefully match up your two sides. Pin them together. Be sure your pom poms are tucked in and out of the way. Repeat with opposite end.

For the square pillow, place the second cut of fabric on top of the first with the right sides (printed sides) facing together. Match up your corners and edges and pin together. 

FP6For the rectangular pillow, stitch a second line down the length of your edge but stitch it between the first line and the pom pom so that your first line of stitching doesn't show when you turn it right side out. Trim your tail ends, remove pins, and repeat on the opposite end.

FP7For the rectangular pillow, line up your two long sides to match and pin them together. Stitch down from the top corner about 1/3 of the way and backstitch. Then stitch from the bottom corner up about 1/3 of the way and backstitch. This will leave you about 7" of space open near the center to add stuffing.  

For the square pillow, start in the center of one edge and stitch all the way around about 1/2" from the edge. Stop stitching when you get about 6" away from where you started so you have space to stuff your pillow. 

FP8For both pillows, remove your pins and turn right side out. Be extra careful with your pom poms as you move them through and then push out the corners with your thumb. Fill with polyester fiber fill and stitch closed using a blind stitch with a needle and thread.

Floor Pillow 2Floor Pillow or Bed PillowFLoor Pillow DIY for A Beautiful MessFluff your pillows a bit for an even shape and then find a good book or a craft project to keep you busy and test them out! The rectangular pillow does double duty as an oversized bolster pillow for a queen or king-sized bed but is also really fun on a twin. Not only are these great for extra company or impromptu lounging, they instantly add that extra layer of something special to help a room feel even more inviting. If you've been wanting to learn to sew so you can make even more lovely things for your home and wardrobe, check out our sewing e-Course, Sew With Us. -Rachel

Credits//Author and Photography: Rachel Denbow. Photos edited with A Beautiful Mess actions.

29 Jan 17:32

Cloud

by swissmiss

Cloud-Toilettenpapierhalter

This Cloud Toilet Paper Shelf made me smile.

(via)

28 Jan 23:26

Look We Love: Vintage Details in the Kitchen

by Nancy Mitchell

While super-modern kitchens are also very lovely, lately we've been seeing a lot of stylish kitchens that incorporate one or more vintage elements. Whether it's a vintage-style stove or refrigerator or a antique pie safe, adding something old (or something that just looks old) to your kitchen will give it an intriguing dose of texture and history.

READ MORE »

28 Jan 16:44

Slow Cooker Asian Chicken Lettuce Cups by Heather

by Heather

Slow Cooker Asian Lettuce Cups

With winter here and cold temperatures prevailing, I am really getting into my slow cooker again. I love to throw everything into the crockpot and then walk away and get on with whatever else I have going on that day. Even more so now that we are in the new year, and I’m trying hard to eat in a healthful way but don’t always have tons of time to prepare it.


Slow Cooker Asian Lettuce Cups

These Slow Cooker Chicken Lettuce Cups are just perfect for that. They’re so easy and addictively delicious! The chicken slowly braises in a mixture of Asian flavors until it is falling-apart tender. Then you add water chestnuts for a little crunch.


Slow Cooker Asian Lettuce Cups

I like to pile the shredded chicken and water chestnuts into lettuce cups piled high with fresh veggies like cucumbers and bell peppers, as well as fresh herbs like mint, Thai basil and cilantro.


Slow Cooker Asian Lettuce Cups

Then you just wrap them up like a little taco and eat to your heart’s content. Perfect for weeknights, or even as an appetizer for a party!


28 Jan 15:21

5 Reasons Why Getting Rid of Stuff Actually Saves You Money

by Dabney Frake

Getting rid of things in order to save money certainly feels counterintuitive. But purging household items sets you up to waste less and spend less down the road. Here's why.

READ MORE »

28 Jan 15:20

5 Ways to Step Up Your Soup Game — The Kitchn

by Apartment Therapy
28 Jan 14:45

Shrimp, Lemon, Spinach Linguine

by Elise
Shrimp Lemon Linguine

The concept is simple. Sauté shrimp with shallots, garlic, lemon, and toss with spinach and linguine. Pretty straightforward, right?

Here’s where it gets interesting. Instead of just squeezing some lemon juice over the pasta, or grating lemon zest, we are sautéing thin slices of lemon until they are well browned and caramelized. Those sautéed lemons slices get minced and added to everything else. 

Continue reading "Shrimp, Lemon, Spinach Linguine" »

28 Jan 03:24

Skinny Planter Stand DIY

by A Beautiful Mess

Skinny Planter Stand DIY (click through for tutorial)             You can call it a coping mechanism, but the colder it gets in winter, the more plants I add to my house. Adding tropical or desert plants into my space totally tricks my brain into thinking warm and happy thoughts. So I've been looking for any excuse to add more. We are getting pretty close to completing our front sitting room, but I had an area of open wall space that was too narrow to add furniture but really needed a little something-something. Since plants are making me so happy right now, I thought a tall narrow planter would be just the ticket to fill the space and add a little more greenery as well. Large planters can get crazy expensive, so of course a DIY version was in order!

Skinny Planter Stand DIY (click through for tutorial)             Supplies:    
-36" window box
-window box insert
-36" square aluminum tube (x4)
-paint for window box (I used Baby Blush by Valspar)
-gold paint for legs
-drill and metal drill bits
-brass machine screws (1 1/2" long) and nuts
-peel and stick felt for bottom of legs
-clamps (optional but helpful)

Skinny Planter Stand DIY (click through for tutorial) Depending on how tall you want your planter to be, you can adjust where you mount your legs to the window box. It was helpful for me to use small clamps so I could stand back and see different heights, but I ended up having the bottom edge of the window box be 10" down from the top of the square tube leg.

Skinny Planter Stand DIY (click through for tutorial) Once I had the measurement of leg placement, I unclamped the legs and used a metal drill bit to drill two holes through the aluminum tube (just use a bit that's big enough to fit your machine screws through). It may sound complicated to drill through metal, but aluminum is really soft, so it's actually easier than drilling through some hardwoods.

Skinny Planter Stand DIY (click through for tutorial) I re-clamped the legs back in place on the planter and used the same drill bit to drill into the two holes and through the wood of the window box behind the metal tube (that way the holes would line up exactly). If you don't have clamps, you can just lay the box facing up on the floor and have someone help you hold the leg in place. The clamps make it easier to do it by yourself if needed.

Skinny Planter Stand DIY (click through for tutorial) I would normally use gold spray paint to paint the legs, but it's a high of 28 degrees today (too cold to spray paint outside). So I used my favorite gold paint instead. Just make sure to keep track of which leg goes on which spot on your planter so you know the holes will line up exactly when you go to put them back on (I put a post-it next to the legs to mark which was which). Once the paint is dry, cut to size 4 squares of peel and stick felt for the bottom of the tubes so the metal doesn't scratch your floors.

Skinny Planter Stand DIY (click through for tutorial) I painted the box with a pale pink called Baby Blush by Valspar (it's the same color as our pink dining room on the other side of the sitting room).

Skinny Planter Stand DIY (click through for tutorial)      Use your machine screws and corresponding nuts to attach the legs back onto the planter. Make sure to tighten the nuts well on the inside so you don't have wobbly legs.

Skinny Planter Stand DIY (click through for tutorial) Add your plants to your window box insert and your planter is in business!

Skinny Planter Stand DIY (click through for tutorial) Skinny Planter Stand DIY (click through for tutorial) Skinny Planter Stand DIY (click through for tutorial) It's such a simple shape, but I really love the clean lines of the long legs with the wide skinny planter box. The gold, pink, and shades of green feel really fresh together, and it's versatile in that you could also buy a bigger box and the next thickness of legs to make a bigger version if desired (a bunch of tall snake plants would look awesome in one of these!). No matter what the climate is where you are, I bet this planter is a good decision for your space too! xo. Laura

Credits//Author and Photography: Laura Gummerman. Photos edited with A Beautiful Mess Actions

28 Jan 03:24

Vintage Charm™ Inspired by Pyrex® collection

by Kate
Shh.listen

!!!!!!

vintage charm pyrexThanks to a tip from reader Nancy, we discovered that the company that makes Pyrex — which recently celebrated their 100th anniversary with a special collection  has released yet another vintage revival collection. Vintage Charm™ Inspired by Pyrex® — is a new brand and features sets of three decorative, nesting prep and serving bowls — each inspired by the Popular Patterns of Pyrex® Opal Glass from the 50’s and 60’s. Super cute!

Note these aren’t for use in ovens. The company news release says: “All bowls are dishwasher, freezer and microwave safe for ease and convenience while entertaining” — and the company confirmed via email:

“To confirm, these bowls are microwave, freezer and dishwasher safe but should not be used in the oven.”

6 charming vintage-inspired designs

vintage charm pyrexAbove: Vintage Charm Rise ‘n Shine: Inspired by Butterprint, one of the most popular vintage Pyrex® opal patterns of all time, this set of bowls pays tribute to the heydays of the 1950’s.

vintage charm pyrexAbove: Vintage Charm Golden Days: Inspired by the Butterfly Gold pattern of 1971. Also known as the pattern found in almost every American kitchen in the 1970’s and 1980’s. Welcome home!

vintage charm pyrexAbove: Vintage Charm Birds of a Feather: Inspired by the popular Friendship pattern from 1972, grab some friends and throw a party with these Friendly Birds.

vintage charm pyrexAbove: Vintage Charm Memory Lane: Come back down to earth with these bowls that were inspired by the 1964 pattern, Terra. Cheerful, new colors instantly brighten up your kitchen table!

vintage charm pyrexAbove: Vintage Charm Spot On: Over the past 50 years, we’ve learned a lot. People love vintage Pyrex® glassware and
Dots never, ever go out of style. Inspired by the New Dots pattern from 1967.

vintage charm pyrexAbove: Vintage Charm Tickled Pink: Inspired by 1956’s Daisy pattern, Tickled Pink bowls are the sugar to your spice. Mix up something nice!

Press release:

WORLD KITCHEN UNVEILS NEW VINTAGE CHARM™ BRAND
Inspired by the Popular Patterns of Pyrex® Opal Glass from the 50’s and 60’s

ROSEMONT, Ill. – October 14, 2015 – World Kitchen, the company behind iconic housewares brands such as Pyrex®, Corningware®, Corelle®, Snapware®, Bakers Secret® and Chicago Cutlery®, is introducing a new line of vintage-inspired prep and serve bowls called Vintage Charm™ Inspired by Pyrex®.

Taking a cue from the beloved designs of the classic Pyrex “opal glass” bowls from the 50’s and 60’s, the Vintage Charm brand puts a modern twist on the popular patterns that evoke feelings of nostalgia. These vintage-inspired pieces come in six patterns including: Birds of a Feather, Spot On, Rise & Shine, Golden Days, Memory Lane and Tickled Pink – trendsetters can add a little flair to their home décor to achieve a retro-style entertaining experience.

vintage charm pyrex

“There are countless examples in today’s marketplace of nostalgic design making a comeback with consumers, especially with the millennial target,” said Carl Warschausky, CEO of World Kitchen. “The Pyrex brand’s iconic patterns of the past bring back memories of our mother’s and grandmother’s kitchens. The fun patterns from the new Vintage Charm line are a fresh twist for younger generations to fall in love with and create their own memories with family and friends.”

The Vintage Charm bowls are available in select housewares and grocery stores now, and will be available at mass retailers in time for the 2015 holidays. The patterns will be sold separately and as a three piece set including one small, medium and large bowl for MSRP: $29.99. The patterns will also be sold as a six piece set including one small, medium and large bowl with lids for each for MSRP: $39.99. Open stock products range MSRP: $6.99-14.99. All bowls are dishwasher, freezer and microwave safe for ease and convenience while entertaining.

To learn more about the Vintage Charm line and for classic retro-style design tips inspired by the patterns, check out VintageEntertaining.com.

vintage charm pyrexAbove: Mega thanks to reader Nancy for spotting these at her local Kroger grocery store and snapping a picture for us.

Where to find Vintage Charm™ Inspired by Pyrex® collection:

  • To purchase >> You can find these on  Amazon (affiliate link) … Or, check your local houseware or grocery store (I saw “Dots” in my Stop and Shop)…  or visit World Kitchen.

The post Vintage Charm™ Inspired by Pyrex® collection appeared first on Retro Renovation.

28 Jan 03:23

4 new retro barkcloth designs from Jessica Jones and Cloud 9 Fabrics

by Kate
Shh.listen

I like the idea of a good pattern on the low armchair by your desk

retro barkcloth patternsLast fall, designer Jessica Jones released her ‘Time Warp’ collection of retro inspired barkcloth patterns. It was so popular that she’s doing it again. Jessica’s ‘In Theory’ collection — due to go on sale at the end of January 2016 — includes four new retro barkcloth patterns, each available in two colorways. The colorways are related, so  you can mix-and-match patterns — if you dare! 

retro barkcloth

‘Zenith Gold’

retro barkcloth

‘Zenith Blue’

We reached out to Cloud9 Fabrics with some questions, and Jessamyn Dukes, Creative Assistant, told us:

Time Warp was quite successful indeed and has nearly sold out completely. Much like Time Warp, In Theory features 4 retro inspired prints in 2 color ways each. For those looking to mix and match, the two collections coordinate quite well and share many of the same colors. The barkcloth itself is 100% organic cotton, 54-55” wide, and weighs about 9 oz. per square yard. It is quite soft and wonderfully textured and would make great accessories and apparel in addition to the usual home decor.

retro barkcloth

“Meridian Brown’

retro barkcloth

“Meridian Blue’

Here’s the feature blurb that Jessica Jones wrote for us:

It will begin shipping to shops at the end of January 2016, suggested retail price is $17/yd.

retro barkcloth

‘Wavelength Gold’

retro barkcloth

‘Wavelength Red’

retro barkcloth

“Half Life Blue’

retro barkcloth

“Half Life Brown’

retro barkcloth patternsNote: We particularly see this fabric as working well for window treatments and pillows. Pam says that it’s her experience that barkcloth is not durable for upholstery projects — for those we prefer wovens that have been abrasion-tested (Martindale or Wyzenbeek-tested.) Of course you can upholster with barkcloth, just know that it will wear faster.

retro barkcloth patternsSee more information on Cloud9 Fabrics’ website — The “In Theory” barkcloth collection will be available at various retailers beginning later this month.

retro-inspired-barkclothAnd: Remember to check out the other collection: Time Warp, shown above and profiled here.

The post 4 new retro barkcloth designs from Jessica Jones and Cloud 9 Fabrics appeared first on Retro Renovation.

27 Jan 16:19

How to Cook Fresh From the Pantry — The Kitchn

by Apartment Therapy
Shh.listen

I want you to make me all of these recipes, please

27 Jan 16:17

Star Wars Fans, This Death Star-Shaped Grill Is a Thing That Exists — Design News

by Tara Bellucci

Why settle for a plain old charcoal grill when you can display your power over the backyard with one shaped like a Death Star?

READ MORE »

21 Jan 16:01

5 Quick Weeknight Grain Bowls — The Kitchn

by Apartment Therapy
21 Jan 15:28

30th Birthday Cake!

by A Beautiful Mess

30th birthday cake 30th birthday cake Happy Birthday to me! Today is a big one for me—I'm 30 years old. I'm saying goodbye to my 20s and welcoming my 30s with open arms... and cake. :) 

For the last two years, I've shared my birthday cakes with you, so I guess this really makes it a tradition now. You can see last year's here. 

Emma Chapman's birthday cakeToday is my actual birthday, so this cake was made a little bit before so I had time to photograph and share it with you all. I sort of love that I have "a thing" I do to celebrate with all of you, my online friends. But of course, I also promptly ate a piece of this cake and shared it with Janae who was helping me photograph that day. So in that way, I kind of get to spread out the celebration, too. 

Best birthday cake Emma Chapman's birthday cake  So what is this cake? It's actually really simple. It's Joy's Everybody's Birthday Cake. I saw this recipe on her site recently, and with my birthday coming up, I thought it looked just perfect. At the moment I'm knee deep in cookbook development, regular stuff for ABM, and a little bit of menu development for our soon-to-be-open bar... so it was sort of a relief to just read someone else's work and follow it. The end result being a truly delicious cake! If you're in need of an excellent yellow buttermilk cake with creamy chocolate frosting (a true classic), then I highly recommend you try Joy's recipe. 

And then I decorated it with gourmet, colorful popcorn. I kept seeing bags of this at my grocery store, and I really just wanted an excuse to buy it. So I thought I'd use it to decorate my cake. :)

Best birthday cake  Emma Chapman's birthday cake 30th birthday cake  Guys, I'm really excited about my 30s. For real! I feel like the first half of my 20s was filled with self-doubt, worry, a lot of hustling just to make rent, failure, multiple broken heart moments, but a few great friendships. Then the second half of my 20s turned out MUCH better as I finally felt like I found my stride with a career path, I fell in love and got married, I bought my first and then second house, and I got to travel and see some truly amazing places. 

If my 30s are going to be anything like the second half of my 20s, then I am ALL IN! I have no doubt this decade will also hold plenty of challenges and difficult moments, and I certainly don't think I'll always know how to navigate it all, but I feel cautiously confident and hopeful. And I just keep thinking that if on my 20th birthday someone had showed me a glimpse of what my life was going to be like by the time I turned 30, I think I would have seriously jumped for joy. (I'm really thankful for my life, if you can't tell!) So I'm hoping something similar is true by the time I reach 40, ten years from now. 

Blah, blah, blah birthdays. Sorry to ramble so much. It just feels like a big one this year and I'm really excited about it. :)

To all my fellow Aquarians out there—happy birthday to you too! xo. Emma

Credits // Author: Emma Chapman. Photography: Janae Hardy.

19 Jan 21:38

it’s not you, it’s me: greek vegetable stew with dill

by kickpleat

greek vegetable stew with dill | everybody likes sandwiches

Here it is 2016 and I’ve made a resolution to make a resolution about my blog (to post or not to post, that is the question). But it’s already nearing the end of the month, late going as usual, I guess. Within the past year or so, I’ve been getting nudges and questions via email and in person….what’s going on with your blog? Can you post more regularly? Are you quitting? And honestly, I have no idea. I’ve thought about letting this site go and just keeping it as is, an online archive of my recipes and life for the past 11 years or so (yes, eleven freaking years). Blogging isn’t as interesting to me as it once was. Readership is down, people don’t comment on blogs, and if you’re jonesing for comments, you have to be a social media rockstar or take a helluva great photograph or be an amazing wordsmith (and that’s just not me or my skillset). Instagram and Facebook and SnapChat are where people communicate and have conversations online and who knows what new social media outlet will come next to grab everyone’s attention. I’m not saying that blogs have become antiquated, but the atmosphere has certainly changed a lot in the past 3 or 4 years. There’s not a lot of commenting going on in the comment section. It’s chirp city and I get it, I do. I’m not on Facebook (publicly) or SnapChat but Instagram has picked up the online conversation for me. So it’s left me to wonder what’s up with this space anyway? Do people care if I update? And more importantly, what am I getting out of this little corner of the online universe? I can certainly point out all the things that this site has given me, from an ego boost and recognition to some seriously amazing lasting friendships. Not a bad haul, really. So will I continue hobbling along? Who knows, maybe! I still have things to share every at least for the time being.

greek vegetable stew with dill | everybody likes sandwiches

In the meantime, I have a recipe to share….this is a food blog after all! The best thing is that the inspiration for this recipe comes from one of my long-time blog readers and friend who I follow on Instagram. Way back in December she made a stew with potatoes, carrots, peas and dill and I was intrigued. And when the excess of Christmas was over and I needed something comforting and a little austere, I thought about this dish.

greek vegetable stew with dill | everybody likes sandwiches

The thing that stood out for me was the use of frozen peas. You don’t toss them in at the end to add pops of brightness. Instead, you cook them down with the potatoes and carrots to get stewy and oh-so-flavourful. They do not turn into mush. They remain peas, but darker, softer orbs of delightful pea-ness (that’s a good thing). I fed myself for several days with this dish (my husband wasn’t as keen as I was) and I was happy with every single bowl.

greek vegetable stew with dill | everybody likes sandwiches

As you can see from the photo above, there’s a lot of liquid and after sending a message or two to Joanne during cooking, I decided to scoop up about 1/2 a cups worth of liquid (I drank it like a savoury tomatoey tea). You can play around with the liquid and go for something very saucey or more reduced. I wanted something more akin to stew, not soup. Your call.

Thanks Joanne!

greek vegetable stew with dill | everybody likes sandwiches

greek vegetable stew with dill
Joanne’s version is a bit different than mine – she adds a quarter cup of olive oil to sauté the onions and then simmers the potatoes first in water before adding the rest of the ingredients. Here, I use less oil, add in garlic, add in some dried herbs, and use stock instead of water. You can add more or less of most anything….this is rustic and simple cooking. The leftovers reheat well.

2 T olive oil
1 small onion, diced
5 cloves garlic, chopped
2-3 large potatoes, cut into large chunks
2 carrots, sliced into coins
1 c of diced or broken up canned tomatoes (use your hands to really smoosh them up)
2 c frozen peas
1/2 t kosher salt
2 t dried dill
1 t dried oregano
2-3 c vegetable stock or water
several sprigs of fresh dill, chopped
fresh black pepper, a few good grinds
feta, as a topping (optional)

In a large pot, heat the oil over medium heat and add in the onion. Let it sweat for a few minutes, do not let it turn brown. Add in the garlic and let that cook for a minute before adding in the potatoes and carrots and tomatoes. Give everything a big stir and then add in the peas, salt, dried dill, oregano and stock or water. Stir again, gently and cover. Simmer over medium-low heat for 45 minutes, stirring occasionally and adding in more water or stock if needed or leave the lid off if you need to reduce the sauce further. You may want a more saucey stew or something with more body. Remove from heat when vegetables are tender. Add fresh dill, a hammer of black pepper and give the mixture a final stir before serving into deep bowls. Top with crumbled feta and have plenty of crusty bread on hand.

18 Jan 18:49

Still in production after nearly 70 years: Acme Chrome Dinettes made from 1949 to 1959!

by pam kueber

vintage dinette set
Are acme chrome dinettesyou looking for a vintage dinette but are having trouble finding just what you want? How about: Order a new dinette — made by a company using its original designs produced from 1949 to 1959. Yes: Acme Chrome Furniture Ltd. was established in March 1946 — and will celebrate 70 continuous years of business in two months! — and they are still making these dinettes today!

vintage dinette set

1950’s vintage catalog page illustrating products that have been included in Acme/ACCRO’s Classic Chrome Retro Dinette series re-launched in 1995.

I spoke with Acme Chrome’s owner and president, Terry Clark, who was extremely generous with information and images about the history of the company — so we have a typically-epic Retro Renovation story to follow! Note, today the dinettes are officially made by ACCRO Furniture Industries, which is a subsidiary of Acme Chrome. I use the two names interchangeably in this story — but tend toward Acme, because it was the original name — and oh so retro!

vintage dinette set

1950’s vintage catalog page illustrating products that have been included in Accro’s Classic Chrome Retro Dinette series re-launched in 1995.

Clark told us that the production of these vintage dinettes actually paused in 1959, when consumer demand for these styles started to wane. But, the company made other varieties of metal furniture for other markets, so at no time did metal furniture production ever cease at the company.

But good news: Although the original tool-bending dies went unused for the next 35 years, they remained in Acme’s possession (thank goodness for ginormous warehouses!)

vintage dinette set
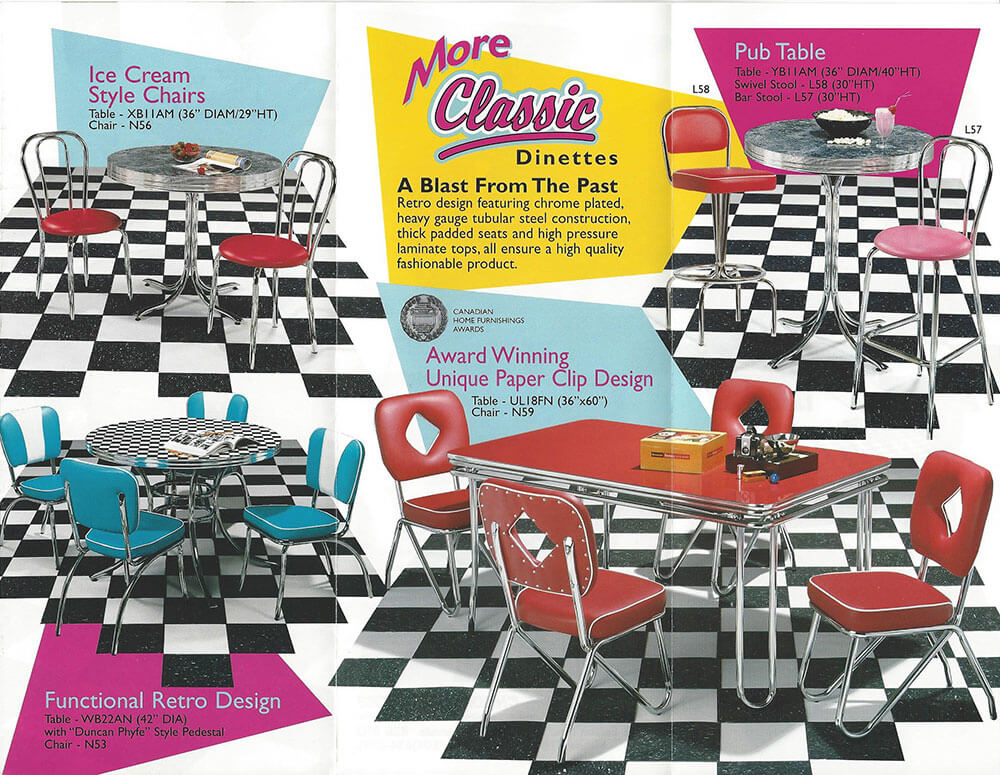
Then, in 1995, when the company was preparing for a move and had to pull the original tooling out of storage, enough years had passed that yes — what’s old was new again. Retro design was starting to get more attention — Clark pointed to the reintroduction of Volkswagen Beetles — so Acme decided to put their dinette designs back into production.

So hey, I don’t think we should call these “reproductions”! They are the same, real-deal designs from the heyday 1950s — still being cranked out today.

vintage dinette setA pause to give kudos to reader Kevin for sending this tip. He emailed us:

Hi Pam,

I’ve read your blog for several years now – love it. We just ordered a brand new retro-style dinette set (aqua boomerang laminate table and dark blue sparkly vinyl chairs!) from a Canadian company that has been making them ever since 1946, and I wanted to pass on the info to you and any of your readers who might be interested. We ordered through Anmarcos Furniture in Courtenay, BC, but the manufacturer is ACCRO Chrome in Winnipeg, Manitoba.

(Continue reading — we give links and info on other retailers in the U.S., Canada and Europe at the end.)

A history of Acme Furniture of Winnipeg

vintage dinette set

1950’s vintage catalog page illustrating products that have been included Acme’s Classic Chrome Retro Dinette series re-launched in 1995.

When we do epic history stories like these, there’s generally a lot of email back and forth. Terry Clark followed up with at least two detailed emails to clarify some of our question. We edited and combined them to piece it all together:

Our company was founded in 1946, and the primary products manufactured in the early years included metal dinette sets for post-war residential demand.

Our furniture product evolution actually followed the consumer demographic, initially from their homes to their work places, commercial restaurants, and then to schools, and eventually into health care facilities. As the decades passed, furniture for classrooms and extended care homes eventually became replaced with products mainly for public occupancy such as the quick service restaurant, hospitality, and gaming industries.

After discontinuing their dinette production after 1959, Acme continued in business, though. The company’s mainstay business then — and now — is in the commercial arena, supplying restaurants, educational facilities, other commercial spaces — even casinos, where you may be sitting on an Acme stool when you are playing the slots!

Acme, Daystrom and Chromcraft — a brief timeline of their retro dinette revivals

Clark started as Sales Manager with Acme in 1968, so he lived through all the machinations of this market. He recalled that at that time, there were still quite a few dinette manufacturers in North America. For example, Daystrom and Chromcraft — big names, for sure — were still in the market. Regarding retro dinettes, he said:

Former U.S. manufacturer Daystrom also re-launched a version of retro dinettes in the 1990’s similar to what they had produced in the 1950’s.

Daystrom was purchased by Stoneville in the late 1990’s, but then Stoneville closed in 2002, and some of their former employees established Now & Then Furniture in Martinsville, Virginia.

Our company purchased most of the assets of Now & Then Furniture when it closed in 2007.

Chromcraft re-launched a retro dinette line at the end of the last century, which they produced until 2013 when they eliminated their U.S. manufacturing facilities.

“Designs replicated from our 1949 – 1959 product line,
but manufactured with current technology and materials”

Not conclusive, a selection:

vintage dinette setvintage dinette setvintage dinette setvintage dinette setvintage dinette setvintage dinette setvintage dinette setvintage dinette setvintage dinette set

More details about the Acme dinettes made today

While the designs for Acme dinettes today are the same, some of the technology to build them has been improved, Clark said:

In the mid-1990’s we re-introduced our Classic Chrome Retro Dinette product line for which we have developed niche markets in North America and the U.K.

The Classic Chrome Retro Dinette program features designs replicated from our 1949 – 1959 product line, but manufactured with current technology and materials.

Today, aluminum profiles we use have been bright-dip anodized and do not oxidize or leave residue on hands or clothing; proprietary extrusion dies are used to form the aluminum edge trim designs. [The popular aluminum edge trim applied on tables in the post-war era was not anodized, so it would leach aluminum oxide (grey metallic residue) on to clothing, aprons, etc. much as newsprint can do to your hands. The home maker’s solution was to wipe the aluminum regularly with vinegar to stay ahead of the oxidation process.]

High-pressure laminate of the ’50s (Arborite, Formica, etc.) was available mainly in a high gloss finish, which was susceptible to scratching from dishes, appliances, and normal everyday use. Today the laminates we obtain have suede finishes or protective surfaces which are much more durable and scratch resistant.

The vinyl upholstery of the 1950’s was of a lighter weight than current materials, and usually did not have reinforced jersey backing like our vinyl does today. The result was that chair seats could split in transit due to extreme cold weather. The chairs of that era used cotton padding, not nearly as comfortable as the polyurethane foam used today.

vintage chrome furniture

Products from the early contract or commercial furniture line, for the hospitality, office, and educational sectors.

vintage chrome furniture

Commercial furniture products manufactured by the Acme company in the 1950’s following the successful launch of the residential dinette program.

vintage chrome furniture

New factory the company moved in to in 1967.

And get this: Available laminate table tops today include discontinued Formica boomerangs in aqua, coral and blue! All the glossy finish stock is gone, you can only get matte, but hey! Seems like Accro grabbed up a bunch when it was discontinued and still can put it on their tables. They also have nice vinyl options for the chairs.

There are a bundle of option, including small, medium and large dinettes in various designs. There are chairs in several designs — you can choose your vinyl, even get two-tone design. There are tooths and bar-height tables and stools. This is so epic, I got a little OCD and tried to make a list, and gave up. Tip: Look at the AnMarcos gallery, it’s pretty amazing (first, scroll down for some photos from AnMarcos as story continues.)

These dinette sets are are not inexpensive, but Clark said they are built to last, just like the 1950s models were. He told us:

Our tubular steel is specified only in cold-rolled version for best nickel/chrome bright plating results. Less expensive hot rolled steel is used for powder coated (painted) finishes.

The chair and stool frames are all welded to provide maximum stability and durability, versus the mechanically fastened import products which are usually shipped KD [unassembled, “Knock-Down”] for consumer assembly.

He also said that the company’s steel features 67% recycled content — from old railroad boxcars. Note: We are not Consumer Reports experts – so do your own research.

To be sure, you may be able to find a vintage dinette set that’s less expensive. But: It’s our experience that it’s becoming more and more difficult to find them, and even when you do, those chairs in particular took a beating and likely need to be upholstered, which is gonna cost you a pretty penny. So in this sense: We think the prices for Acme dinettes are very fair — providing a product built to your specifications.

Dinettes on display at AnMarcos Furniture in B.C.

Yowza, looke the Acme Dinettes available for sale at AnMarcos Furniture in Courteney, B.C. — they really tell the story best:

vintage-style-dinette1950s-dinettered-dinetteround-dinetteaqua-dinettecompact dinettechrome-stoolsPam talked to MarcTardif, co-owner of AnMarcos Furniture, and he said that he first bought one of these dinettes in 1997, when he and his wife were newlyweds. Ten years later, they sold it when they moved to a new home with a different color scheme. Now they have another dinette. “The quality is FAN-TASTIC,” he told Pam. “These dinettes are a best-kept secret!”

Marc also noted that one of the seat cushions, which had taken a beating, was easily replaceable, too — he just ordered a new one from Acme and swapped it out.

Marc said that over the past four years, the store has sold about 250 dinettes, mostly locally, because people like to touch and feel. But, he can also arrange for shipping anywhere in Canada — he’s sold a few more that way. He said they’re selling more and more every month — retro style continues to grow in popularity.

Thanks to Marc for letting us grab some photos to show in our story. You can see more wonderful photos of dinettes on their showroom floor here, and also watch AnMarcos Furniture’s Facebook page, where they post new configurations when they come into the showroom.

Where to find Accro Furniture Acme Dinettes:

Acme Dinettes are sold via retailers (not by Acme/Accro Furniture directly, they the manufacturer and wholesaler.) Here are some places identified where you can buy them:

In the U.S.:

In Canada:

In Europe:

Thank you, Kevin, for this fantastic product tip. And many thanks Terry Clark, for all the terrific info and photos — we LOVE your company!

What do you think of this awesome find, readers?
Which design is thrilling you?

The post Still in production after nearly 70 years: Acme Chrome Dinettes made from 1949 to 1959! appeared first on Retro Renovation.

18 Jan 18:44

Jewelry Storage Mirror DIY

by A Beautiful Mess

Totally Need This! Jewelry Storage Mirror DIY (click through for tutorial)                  While there are lots of pros and cons about moving from one place to another, it certainly becomes clear very quickly what you miss about your old place. For example, I didn't realize until we started the moving process that we had an extraordinarily large walk-in closet in our last home. I mean, it was bigger than the bathroom it was connected to! I got used to having the extra space and I even made a little jewelry station in the old closet that kept all my accessories organized. I. Loved. It. However, the days of my walk-in closet are gone in our new 60s ranch, so I have to be a little more creative when it comes to organization. A jewelry station hidden behind a full length mirror was just the fix I needed! It takes up only inches more space than just the mirror would, but it keeps all my jewelry neat and tidy. Wanna make your own?

Totally Need This! Jewelry Storage Mirror DIY (click through for tutorial)                  Supplies:
-6' x 3 1/2" boards (I used 3 boards that were 3/4" thick)
-full length mirror
-wood screws
-super glue
-paint
-D-Ring hangers (x2)
-cabinet catch
-2 1/2" brass hinges (x4)
-cup hooks
-removable wallpaper and X-Acto knife (optional)

So, basically you are going to make a frame that is the exact same size as your mirror, and your mirror will act as the door to the shelves inside. You can either have your wood cut at the home improvement store or use an inexpensive jig saw if you don't have access to a miter saw. Cut two pieces of wood that are the exact length of your mirror. Cut four pieces of wood that will measure out to the exact width of your mirror once placed between the two long boards. (So if your wood is also 3/4" thick, your short board measurement would be the width of mirror minus 1 1/2" that accounts for the two 3/4" boards on either side). Two of the boards will go at the top and bottom to complete your rectangle, and the other two can be placed anywhere in between to divide the space into three areas. If you want more shelves, just cut more boards!

Totally Need This! Jewelry Storage Mirror DIY (click through for tutorial)                  Totally Need This! Jewelry Storage Mirror DIY (click through for tutorial)                  Once the boards are cut to size, use a power drill and wood screws to screw the boards into place from the outside edges of the long boards (you may want to pre drill the holes first if using hardwood to make it easier). Once your frame is complete, you can paint or stain your frame with as many coats as needed.

Totally Need This! Jewelry Storage Mirror DIY (click through for tutorial)                  For hanging purposes, install your two D-ring hangers on the back of your wood frame about 4" from the top of the frame.

Totally Need This! Jewelry Storage Mirror DIY (click through for tutorial)    Before you hang your frame, install the right side of your brass hinges onto the left front edge of your wooden frame (or reverse the side if you want your door to open the opposite way). Close the hinges and place a few dollops of super glue on the top of each hinge. Quickly place the back of your mirror on top of the frame and let the glue set. The super glue will keep your hinges in place when you open the mirror as you would a door. The glue is only temporary, so once you know the mirror is placed right and the "door" opens well, screw the hinges into the back of the mirror to fully secure. Now you can hang your frame!

If you use a line of painter's tape at the top (use a level to keep it straight) you can measure down 4" from the top so you know where to put the drywall screws to hang the frame on. 

Totally Need This! Jewelry Storage Mirror DIY (click through for tutorial)                    To give the storage cabinet more personality, I added this adorable removable wallpaper to the back of the mirror. I used an X-Acto knife to trim around the hinges and cut parallel to the outside edges.

Totally Need This! Jewelry Storage Mirror DIY (click through for tutorial)                   Now that your cabinet is up, you can install your cup hooks into each shelf and a cabinet catch on the side to keep your mirror door closed when not in use. Add all your jewelry to the new hooks and pat yourself on the back!

Totally Need This! Jewelry Storage Mirror DIY (click through for tutorial)            Totally Need This! Jewelry Storage Mirror DIY (click through for tutorial)                Totally Need This! Jewelry Storage Mirror DIY (click through for tutorial)              Totally Need This! Jewelry Storage Mirror DIY (click through for tutorial)               Totally Need This! Jewelry Storage Mirror DIY (click through for tutorial)                 It's amazing how little space this system takes up on the wall, and yet when you open the door, there's a whole world of accessories inside! I was excited to do this project to simply solve my necklace clutter problem, but I have to tell you that once it was all put together, it came out even better than I hoped it would. Hooray! I love that it's also really customizable for how many compartments you want, how big each one is, how many hooks there are, etc. If you could use a little more storage space and organization in your bedroom, definitely give this one a try! xo. Laura

Credits // Author: Laura Gummerman, Photography: Laura Gummerman and Todd Gummerman. Photos edited with A Beautiful Mess actions

18 Jan 18:10

Lemon Chicken Chickpea Soup

by Elise
Lemon Chicken Chickpea Rice Soup

Now here’s a soup to brighten up a cold winter day! I looked to the flavors of Morocco for inspiration for this lemon chicken chickpea soup. The soup is seasoned with turmeric, cumin, and ginger—spices that not only warm the belly but give the soup its vibrant golden hue.

Continue reading "Lemon Chicken Chickpea Soup" »

13 Jan 16:24

1000drawings: by めんつゆ

12 Jan 14:56

Ginger Honey Chicken Wings

by Elise
Ginger Honey Chicken Wings

I really wanted to save some of these ginger honey chicken wings to share with my loved ones. Buhhht, it didn’t happen.

That’s the problem when you are alone in the kitchen and you have in front of you something irresistibly good, and imagine that, you can’t resist!

Continue reading "Ginger Honey Chicken Wings" »