Tifmurray
Shared posts
peanut butter crispy treats
I can’t even follow my own recipes. I set out to remake this pistachio goji granola in bar form (thanks to a reader suggestion). I thought it was a great idea, especially because I’ve been looking for healthy grab-and-go breakfast … Go to the recipe...
easy pita lunch ideas
There’s a category that’s seriously underrepresented here, and that is: lunch. Lunch, for me, is the meal that happens in between all of these recipe posts. It’s usually a quick throw-together meal that utilizes a previous night’s dinner and/or an … Go to the recipe...
HB 1147 – Appealable Summary Judgment Orders
HB 1147 is a bill I am sure is going nowhere and probably raises separation of powers issues. But it would be generally favorable to most of my clients. The bill would make orders on summary judgment and motions to dismiss appealable orders if the amount in controversy is over $100,000. The court of appeals would have discretion to review such orders in matters involving less than $100,000.
Currently the way it works is that if you file a motion to dismiss or a motion for summary judgment and the judge rules against you, you usually can’t appeal that ruling until the entire trial is over. So, for example, I recently had a case involving a personal trainer who had his client sign a liability waiver. The client got hurt while lifting weights and sued the trainer. I filed for summary judgment based on the liability waiver. The judge denied the motion without explanation, but presumably because he did not believe the language of the waiver was effective. I believe the judge was incorrect in that determination and think I could have gotten the Court of Appeals to see things my way. But I couldn’t go directly to the Court of Appeals. I had to go to a jury trial. Fortunately, we prevailed with the jury finding that the trainer wasn’t negligent anyway. We, therefore, never had to go to the Court of Appeals on the waiver question.
From the Court of Appeals’ perspective, that’s how things should work. They were spared a case, and we got a judgment for the defendant. But, my client had to spend a lot of money on litigation. The client and the insurance company had to put up with a lot of pressure to settle the case before we got to trial. And my client was entirely deprived of the value of that waiver.
On the other hand, plaintiffs with legitimate cases don’t want to have to jump through yet another hoop before they can get paid. The Court of Appeals certainly can’t be excited about the potential for all of those extra cases.
I like the idea of this bill, but I don’t see it going anywhere.
Make It! Wine-Enriched Broth
I’m a huge fan of homemade chicken and vegetable broths and hope that you guys make stock yourselves, at least sometimes. But this tip applies equally to homemade broths and supermarket stocks–it’s a way to spruce up something plain so that it stands out at dinner, perhaps in dishes like Miso-Soba Chicken Bowls or Really Good Vegetable Soup. One easy way I’ve found to turn that broth–homemade or, yes, store-bought–into something special to slurp is to pour in some wine.
As the broth simmers, the (preferably dry) white wine begins to boil off, leaving behind a toothsome, umami-rich remnant. At first, you’ll smell booze strongly, but after 10 minutes or so, you’ll be left with a broth that’s richer than when you started–without having the taste of wine at all.
From there, add whatever you love to bulk out your soup with, or enjoy a steaming bowl of plain broth that’s ultra flavorful thanks to one secret ingredient.
Make It! is a series of smart tips for prepping, making, and presenting food in the easiest possible way. See tips from previous columns, like how to bring cold eggs up to room temp–fast–and how to keep lettuce fresh in the fridge.
Foes of $25M Broad Ripple project go to court
NiSource's pipelines make it a prime takeover target
Manning, Omaha Boost Indiana Charity
At Home With Patricia Goijens
We are so happy to welcome Patricia Goijens to the blog today to share her lovely home with us! I live in the centre of Antwerp, Belgium in a big bright apartment from the 1930s together with my boyfriend. My flat is on the 9th floor, which you don't see a lot over here. It's mostly low-rise buildings. I absolutely love the view, the amazing light, my walk-in wardrobe, the hardwood floors and original details. I've mostly decorated the space with vintage pieces (a lot of them from my family) and travel souvenirs, which to me adds so much sentimental value to the space. Both my boyfriend and I work from home, so it’s very important our space is inspiring, because we spend a lot of time there! I have a lot of pieces that I cherish, most of which I got from my grandmothers and parents. One thing I really love is the silver fish on our fireplace, It’s the first gift my mother gave to my father back in the seventies! It ended up in the attic, because it didn’t fit their decor anymore. And I was very happy to give it a second life!
The rocking chair in the living room is another piece that always draws attention when we have people over. Everyone loves it! I have a video of me falling out of it when I was a toddler (I was fine), and I love that I got to take it with me from when I was a little girl until now! Three years now, and we will be moving soon to a new apartment that we bought. All the big pieces have been here from the start. We went on a shopping spree at flea markets, antique stores and thrift shops before we moved in. Our elevator is too small for big items, so we had to make sure we had most things before we moved in. That’s when we bought our Chesterfield sofa and the sideboard in our living room. But it’s definitely gotten more like home over the years! We’ve added more plants and painted some of our furniture pieces like the rocking chair to tidy the place up a bit and make it feel more "grown up”, and somehow, we keep buying chairs. It’s kind of an addiction! We have a big living room that’s great for dinner parties and having friends over! I can’t count the hours we’ve spent chatting the night away with a bottle of wine. We’ve even had dinner with over 20 people here! The space also serves as a great blank canvas for the photo shoots we do each season for the webshop and various other projects. We’ve even climbed on our roof a couple of times with great results. I’ll definitely miss this place when we move! Thank you so much for sharing your home with us, Patricia! You can find more of Patricia over on her blog No Glitter No Glory or her web shop. xo.
Abstract Crib Quilt Tutorial
TifmurrayI want this for our bedspread! Seems like a big task, though.
I made new quilts for the kids' bunk beds before Thanksgiving last year as part of their shared room mini makeover (details still to come) and loved the graphic look so much that I decided to make a crib quilt with the leftover squares. The three of these kids will likely share a room later this year so it was another way to help their small space remain cohesive and a chance to experiment with a new idea.
I started in on this crib quilt the night before Thanksgiving and then finished it up in between getting the turkey in the oven and starting the sides and was in such a hurry that I didn't bother to take step-by-step photos as I went. What I've shared below are the step-by-step photos I took to show how I was making the larger quilts (as I was making them in black and white squares) and then I've added in steps I took to get the abstract look using gray and white. I didn't make it to the same scale or use the same amount of squares but I think it gets the idea across on how you can create this kind of abstract pattern.
It turned out to be a little smaller than a standard crib quilt measuring at 27" x 38". Since we're waiting to find out the baby's gender until he/she is born I have been purchasing and making a lot of things in black and white with mint and citron yellow. I really love the graphic pattern but it's also nice to know the contrast of black and white is stimulating to babies. Perfect for tummy time!
I had originally cut 10" squares for the kids' quilts and ended up using eight black squares paired with eight off-white squares. Once stitched together and cut this turns into 16 squares measuring about 9.75" squared.
Supplies: To make this same size you'll need 3/4 yard of black cotton and 3/4 yard of off-white cotton. You'll also need batting (I always go with organic cotton but used two layers of it in this blanket knowing it'd be used on a hardwood floor), fabric for your backing in your preference measuring 1 yard, four yards of binding for your edge, straight pins, sharp scissors, a cutting mat, a rotarty cutter, an acrylic ruler, a pen, and of course a basic sewing machine.
1. Cut out your 10" squares and place a white one on top of a black one so the edges match up. Pin in opposite corners to keep them together and trace a line from one corner to the opposite corner as shown. Shown in this image are two different squares but the rest only show one square. 2. Stitch about 1/4" on either side of your line. 3. Cut on your line to get two pieces that have been stitched together. Remove your pins. 4. Open each piece to get two new squares and iron flat. Each 10" square stitched and cut in half will yield two new black and white triangle squares measuring about 9.75".
5. After you've created all of your triangle squares (16 total) you'll stitch them together in rows. Always be sure the triangles are facing the same direction before you stitch them together or you'll get a different pattern than the one shown. Fold one square on top of the other and line the edges up as best as possible. Pin near the edges you are going to stitch together. Stitch along that edge about 1/4" in (this is called seam allowance). 6. Fold open, iron flat and repeat with the next square. 7. Finish stitching all of your rows. I only show three squares stitched together here to give you the idea of a row but you'll want four to get the same sized blanket as the one shown. 8. Start stitching your rows to each other by folding one over the other and lining up the edges as best you can. Pin along the edge that will be stitched together. Stitch in about 1/4" from the edge as you did with your squares. 9. Remove pins, fold open, iron flat. 10. Your back side will have lots of turned hems. Some people like to iron them open flat but I usually fold them all to the same side. It's up to you.
After this step what you'll have is a 16 square grid of black and white triangles that all face the same direction. These are the basic steps for making any size quilt in this pattern just on a smaller scale. I finished up two twin sized quilts in this pattern but used much more fabric. To take things a step further to get the abstract quilt you'll want to get your rotary cutter and cutting mat back out.
11. Remember this example isn't to scale but accurately represents the process. Cut your quilt top into uneven strips measuring about 1.5" - 2.5" wide. I made sure one or two of my strips included the natural hem lines between rows because it adds to the pattern. 12. Rearrange your strips so that no two are next to each other that were originally next to each other. You can reverse the direction they faced as well. 13. Once you're happy with your design, stitch your strips together along the long edges with about 1/4" seam allowance (distance from edge to your stitching so it won't unravel as mentioned above). Iron each new row flat before you add another to make it easier to work with. 14. Once you've stitched all of your rows together you'll notice it's shrunk up a bit. Trim off the wonky edges to get a rectangle. Now you've got your quilt top and you're ready to stitch things together!
NOT SHOWN: I wanted to add a little more area to my quilt top so I cut four more strips of off-white. Two measured the width of my quilt top and two measured the length plus 6". They were about 3" wide. I stitch the sashing to the width of my quilt top first and ironed flat and then added the two strips along the long sides. I ironed everything flat and then trimmed my edges.
Here's a link that shows how to quilt your quilt top to your backing and batting.
Here's a link on how to make your own quilt binding. For this quilt I used pre-made binding that I found at JoAnn's because it really is the nicest shade of minty blue.
Here's a link on how to machine stitch your quilt binding using the process shown above. It's not the traditional way of doing it but makes quick work of things.
You can see the extra sash around my quilt top here. It helps frame your design and adds some area at the same time. My method of quilting was just to stitch on either side of the major seams but you could also quilt a more detailed pattern or hand-tie things together depending on how much patience (or lack of it) you have!
What you'll end up with is something quite unique and any mistakes in lining up corners can easily be forgotten as they only lend to the interestingness of the design.
I'd love to see what you end up with if you try this design and thanks for always linking up to any tutorials you use to make your own version!
All this quilt needs now is a squishy baby to wrap up and snuggle!
-Rachel
p.s. I can't remember who makes the fabric I used on the back. If you're familiar with it please feel free to share in the comments and I'll add it in to the post. Thanks!
Lemony Kale Salad
Kale is one of those vegetables that is both loathed and loved. That must be hard on ole' Kale. Everywhere you show up people are either excited to see you or act like your a punishment to be around. I actually fell into the category of strong dislike (hate's just too strong a word) the first time I tried kale. It was so tough and, leafy. I'd prefer romaine. Hardly anyone has a strong preference about romaine. It's easy.
Kale is undeniably good for you though. Just look how green it is! And as I've tried numerous kale salads over the years now I've found a few things that make it good for me. First, pair it with something creamy or lemony (or both!). I am a sucker for anything citrus soaked. Second, really chop up those leaves and be sure to remove the steams. Here's my favorite super easy and super delicious (not to mention good for you!) kale salad.Lemony Kale Salad, serves four as a side or two as a meal.
1 bundle of Kale, about four heaping cups once chopped
1/2 cup shredded Parmesan cheese
2/3 cup sliced almonds
1/4 cup mayo (I used homemade but store-bought is good too)
1/4 cup fresh lemon juice (juice from one lemon, might be slightly less than 1/4 cup)
3 tablespoon olive oil
1 tablespoon sugar
1 tablespoon poppy seeds
salt + pepper to taste
First we prep the kale.Thoroughly rinse and pat dry the kale. Then remove the leaves from the middle vein. Some larger leaves may have additional tough veins throughout, remove these as well. Chop the kale leaves into small, bite-sized pieces. Use your hands to press the leaves together as you move them all into a large bowl. This is a quick and easy version of "massaging" the kale. Many kale salad recipes encourage you to do this as it will help to soften kale's tough leaves.Stir together to last six ingredients listed above. Add just a little salt and pepper at first. Taste, and add more to your liking. I usually end up adding quite a bit of salt and pepper plus a sprinkle just a bit more on at the end, right before serving.In a large bowl toss together the kale, almonds, cheese and dressing so that everything gets coated evenly. You can store this salad in a container (in the refrigerator) for a few hours, but it's best served the day it's made. If you want to make this way ahead, I would recommend making the dressing. But don't toss everything together until you're ready to eat. Happy salad days! xo. Emma
Credits // Author and Photography: Emma Chapman
Beautiful, Silent Woods Photographed by Daniel Kovalovszky
Longing for a deeper quiet than our contemporary world can provide, Hungarian photographer Daniel Kovalovszky retreats into nature in his series Green Silence. The images are arresting in their surprising stillness, each unique landscape awash with a beauty and calm untouched by humanity. It is in these distant spaces where Kovalovszky seeks solace from the noise and anxiety ever present in city life. Recognizing our preoccupation with the miniscule and mundane, Green Silence explores locations where time seemingly stands still, anchored in place yet slowly evolving with the larger, more infinite world.
This post was contributed by photographer and Feature Shoot Editorial Assistant Jenna Garrett.
The post Beautiful, Silent Woods Photographed by Daniel Kovalovszky appeared first on Feature Shoot.
Emma Lipscombe
‘Frank’s Paper Basket’ – Tessellated oil painting on timber board by Perth based artist Emma Lipscombe
‘Mlle Margot’ – Tessellated oil painting on timber board by Perth based artist Emma Lipscombe
Various paintings by Emma Lipscombe
Emma Lipscombe is a Perth based artist whose work has recently caught our eye. She creates these striking mixed media works, by first laser cutting timber board, then painting each piece individually using oil paint. Interestingly, she paints with her fingers (!!), often layering over and over until the colour is just right.
‘I began creating geometric works on paper some years ago but discovered a passion for paint and puzzles about two years ago; it felt right and I found it enabled better control over the play of colour’ she says. The texture of the paint is also important for Emma, providing a contrast with the precise hard-edges of the individual laser cut blocks. Once dry, the pieces are put back together, and only then does the finished piece really come together. ‘The design process is quite instinctive and intuitive; the pattern tends to emerge in a very organic manner’ says Emma. ‘It is less about planning, per se, and more about enabling the pattern to arrive’ she says.
Emma describes her work as ‘simple, formal, playful and considered’. She is influenced by a myriad of sources, including Enid Marx’s designs for London Underground, Bauhaus textile workshop patterns, Scandinavian carpet design, Hecker Guthrie’s amazing interiors, Studio Dimore and Isle Crawford, Faye Toogood sculptural forms, Lubna Chowdhary ceramic art among many other things!
Though originally from Western Australia, Emma spent many years living and working abroad, before settling down again in Perth. She originally studied Landscape Architecture at the University of Western Australia, then spent time working in Ireland, the UK, Europe and the Middle East. Now back in Perth, she works at Tierra Design, owned by Argentinian Architect / Landscape Architect Martin Palleros, who Emma greatly admires – ‘he is a minimalist and brilliant designer, who taught me the magic of restraint in design, and the value of treading lightly’ she says.
Though she does adore her day job as a landscape architect, Emma says her true passion is her painting, and the way that she is able to reference things seen and experienced in her travels. ‘I believe my background in design inspired my interest in pattern and colour’ she says. ‘It underlines the ordered rhythm of reduction and repetition that characterizes my work…. and sometimes I also wonder whether the act of creating a sense of order through art is a response to the delightful chaos of having two small children in the house!’.
Emma’s works start at around $400 (framed) and she can be contacted via her website.
‘Editor and Planner’ – Tessellated oil painting on timber board by Perth based artist Emma Lipscombe
‘Frances and Gabriel’ – Tessellated oil painting on timber board by Perth based artist Emma Lipscombe
Sydney Home · Suzanne Gorman, Jon McCormick and Family
TifmurrayI like the high contrast kitchen/DR.
The bold dining room of Suzanne Gorman and family! Tub chairs from Orson & Blake – ‘These are vinyl – truly!!’ says Suzanne, ‘we’ve had then for 15 years/they still look contemporary’. Oak dining table by Zuster, Kilim in Chevron stripe by Cadry, Mirror Ball pendants by Tom Dixon, from De De Ce. ’August’ acrylic painting on canvas by Belynda Henry, ‘Pot of Gold’ pot by Pop and Scott on sideboard, with Birds Nest fern by Garden Life. Photo - Sean Fennessy, production – Lucy Feagins / The Design Files.
Dining room details. Top shelf – ‘Sydney Harbour’ oil on ply painting by Robert William Reid, from The Egg and Dart Gallery, Thirroul - a favourite gallery of Suzanne and Jon’s on the South Coast of NSW, which will be exhibiting more of Reid’s art next month, as it happens. Lime vase on top shelf from Dinosaur Design, hand made wooden apple vessel with brass leaf on middle shelf by Suzanne’s daughter Sami, Origami ball by Hideyo, Bottom shelf - ’Middle harbour’, oil on canvas by Craig Parnaby, inky blue ceramic lamp with indigo linen shade designed by Suzanne, fabric from No Chintz, Chubby oak bird by Vedel, from Great Dane. Oak dining table by Zuster, Tub chairs from Orson & Blake, Kilim in Chevron stripe by Cadry, Mirror Ball pendants by Tom Dixon, from De De Ce. Photo - Sean Fennessy, production – Lucy Feagins / The Design Files.
Beautiful kitchen! Kitchen benchtop in Super White Grain by Stone Italiana, joinery in Dulux Fair Bianca Half and Dulux Domino, Angle Leg Stool in white & oak from Mark Tuckey, MHY pendant lamp in yellow by Muuto, Large Catalina vase on bench top by Country Road. Photo - Sean Fennessy, production – Lucy Feagins / The Design Files.
Detail from the open plan living area at the rear of Suzanne’s home. Cocoon Chiminea hanging fireplace from Top3 By Design, Pottery duck, a much loved object made by Suzanne’s clever daughter Sami. Mater Bowl Table in ‘natural’ from Cult, Wall sculpture by Kenya - from Small Spaces, Vintage 60′s style pottery lamp, with shade designed by Suzanne in Acid Yellow Awning Stripe from No Chintz, Pewter & brass vases from Country Road, Nimbu rug in yellow/cream – from Bholu, Screenprint with stripes, small ‘Discus Surus’ by Rachel Castle - a birthday gift from Rachel Castle, Suzanne’s friend and mentor, Acrylic on canvas painting, ‘Navy Flower Spot’ also by Rachel Castle…. ‘no words for how much I love the colours in this piece!’ says Suzanne. Photo - Sean Fennessy, production – Lucy Feagins / The Design Files.
Suzanne graciously poses for a portrait in her beautiful kitchen! Angle Leg Stool in white & oak from Mark Tuckey, MHY pendant lamp in yellow by Muuto, Suzanne wears Gorman. Photo - Sean Fennessy, production – Lucy Feagins / The Design Files.
The home of a interior designer is always a bit special, and today’s fabulous family home in Sydney’s leafy suburb of Willoughby is certainly no exception. It belongs to designer Suzanne Gorman, her husband Jon McCormick (an engineer working in corporate property services), and their children, Harry (17 yrs), Sami (14 yrs) and Joe (11 yrs)… and Ivy their sweet little dog.
The McCormick family have been here a long time, almost 15 years. They first moved here from Bondi Beach in 1999 when Harry (now 17) was only 2 – at the time, of course, theirs was a tiny family of just three, but in the years that have passed, the family has grown, and they’ve renovated along the way to accommodate each new addition.
‘When we bought our house, we liked the potential of both the home, an unrenovated, 1924 Californian Bungalow, and the area too’ explains Suzanne. ‘The house was quite reminiscent of my maternal grandparents’ house in country NSW – also a Californian Bungalow with a large date palm in the garden just like ours, so the decision was partly sentimental’ she says.
Suzanne and Jon have renovated their home in stages, starting in 2002. ‘We started by landscaping, replanting the garden and building the pool’ says Suzanne. The garden is now very established, and the tall trees and foliage make for a beautiful, lush and very private outdoor area. Major internal renovations commenced four years later, in 2006. ’By that time, with three children, space was getting pretty tight inside – the only shower that worked was in the tiny laundry’ recalls Suzanne. The original four room bungalow was retained, out of respect for the history of the home and surrounding streetscape, whilst a significant contemporary addition comprising kitchen, study and living room on the ground floor, and three bedrooms/two bathrooms upstairs was added.
Initially, Suzanne took on the interior design of these new rooms on her own (before she had formally trained as a designer) but soon realised that the project would benefit from the input of an experienced design team, and so revered Melbourne interior design firm Doherty Lynch were engaged to assist. Suzanne worked closely with Mardi and Fiona to realise the project, which eventually inspired her own career change. ’I loved the process so much that I went on to study design, and now have my own interior design studio, Suzanne Gorman Projects‘ says Suzanne, who has been working in the industry for six year now.
Last year, Suzanne gave the home a major restyle, introducing deep indigo paint in the dining room, a yellow front door, new wallpaper in the bathrooms and laundry, a ceiling mural for Sami’s bedroom and of a few special pieces of art. It’s clear that Suzanne really treasures these creative opportunities that her home has given her, starting with the original impetus to study interior design. ’I am lucky that I am given a lot of liberty to test my creativity her at home, from my family’ she says. ‘Last year I was up a ladder painting a mural on my daughter’s ceiling while she slept under me. I painted through the night (above her) and when she half woke up in the middle of the night, she gave me a sleepy thumbs up!’
Despite its generous proportions, there’s something unmistakably friendly, relaxed and ‘real’ about this home. It’s clear this is a space used and loved by all members of the family. ’Ultimately we are homebodies, very content to be at home, and I think part of that comes from having pulled this house together over many years’ says Suzanne, by way of explanation. ’It has become something that represents us quite well and that tells our story’. Suzanne says her home feels (mostly!) complete now, and nothing else major is planned…. ’a huge relief for Jon’, she says!
HUGE thanks to Suzanne and family for sharing their stunning home with us today! For more of Suzanne’s work do pop over and check out her website here.
Downstairs study nook, adjoining kitchen. Wallpaper by Cloth by Julie Patterson. Oak + natural papercord Wegner CH53 stools by Carl Hansen & Sons, from Cult. Drawers from Ikea, Paper art on middle shelf ‘Home in Monochrome by Suzanne Gorman, pottery dragon on top shelf – ‘Dragon from the East’ made by Suzanne’s son Joe, pottery king on top shelf – ‘King Regenald’ by Suzanne’s son Harry, Felt embroidery art on top shelf -’Black Sun’ by Rachel Castle. Top right is a print of a Steve Ormandy painting, ‘I intend to own one of these one day as an original…. definitely on the dream list is an Ormandy painting!’ says Suzanne. Suzanne’s favourite piece of art that she owns is by David Band, ‘The Moment’, 2009 – it’s pictured on her screen saver here, and the original is hanging on her stairs, unfortuntely we couldn’t get a good angle on it and so it’s not pictured here, sorry Suzanne! Photo - Sean Fennessy, production – Lucy Feagins / The Design Files.
Suzanne and Jon’s master bedroom is so calm and beautiful and oh so ‘grown up’! It also overlooks the beautiful pool! Ivory linen quilt cover by Miss Molly, from Temple & Webster, Texidors grey cashmere throw from Mark Tuckey, Charcoal spot & natural spot pillow slips by Rachel Castle, charcoal linen sheets & euro pillow slip by Sheridan, Lanterne Wall Lamp by Pierre & Charlotte, black + white resin container on shelf above bedside by Dinosaur Designs. Photo - Sean Fennessy, production – Lucy Feagins / The Design Files.
Linen armchair from Lived In Coogee, handmade knitted patchwork throw on chair by Judi Cox Handknits & Suzanne Gorman Project, textile art (on left wall) by Be Gunn from Unravelled Textiles, vintage linen curtains with silver ricrac trim, designed by Suzanne Gorman Projects, made by No Chintz, Ivory linen quilt cover by Miss Molly, from Temple & Webster, Texidors grey cashmere throw, from Mark Tuckey, Charcoal spot & natural spot pillow slips by Rachel Castle, Lanterne Wall Lamp by Pierre & Charlotte. Photo - Sean Fennessy, production – Lucy Feagins / The Design Files.
Ensuite. Cararra marble penny round tiles, American oak vanity, basin & taps from Roger Seller. Photo - Sean Fennessy, production – Lucy Feagins / The Design Files.
Suzanne’s home studio, from where she runs her interior design consultancy. Handcrafted ply tressel table with yellow cord, by Tressel Table Co (…after seeing Patrick on The Design Files, apparently!). ’Live What You Love’ print, framed, from Heartfish Press, Etsy. Vintage pottery lamp base with spotted shade, designed by Suzanne, made by No Chintz, wooden tray from Country Road, twig sculptures by Twiggargerie, from Mark Tuckey. Photo - Sean Fennessy, production – Lucy Feagins / The Design Files.
Ivy, the family pooch, poses for a photo on 17 year old Harry’s bed! Wall banner by Pony RideR, Handmade velvet + felt cushion by Unravelled Textiles, Charcoal velvet pillow slip by Rachel Castle, framed world map wrapping paper, from Nest Homewares, Thirroul. ‘Plaid’ handloomed woollen throw on ladder at left by Texidors, from Mark Tuckey. Photo - Sean Fennessy, production – Lucy Feagins / The Design Files.
‘The Blue Room’ – a smaller lounge room / TV room near the kids’ rooms. Oil on canvas on back wall – ‘Women 2′ by Sarah Nicotra, Oil on canvas in centre left – ‘North Bondi’ by Craig Parnaby, Enamel on canvas – Graffiti by Justin Feurring, Rug – ‘Segments’ by Suzanne Gorman from Designer Rugs, handmade velvet & knitted stripe cushions by Judi Cox Handknits & Suzanne Gorman Projects, Mini Zaishu stools by Spacecraft, ‘Fly’ acrylic pendant in ‘petrol blue’ by Kartell, Sofa by King Furniture. Photo - Sean Fennessy, production – Lucy Feagins / The Design Files.
14 year old Sami’s bedroom. Aquarius cushion by Jonathon Adler, embroidered heart cushion from No Chintz, handmade patchwork cushion by Unravelled Textiles, fluoro pink spot pillow slip & quilt cover by Rachel Castle, fluoro coral ‘Necklace Cushion’ by Spacecraft, fluoro pink hand screen printed cushion by Bonnie & Neil, steel frame mirror by Mark Tuckey, feather juju hat on wall from Table Tonic, teal blue limited edition Componibili side table by Kartell, Muuto Dot Wall Hook, Wall mural painted by Suzanne Gorman (top right), acrylic on canvas Rainbow by Sami McCormick, seen in reverse of mirror! Photo - Sean Fennessy, production – Lucy Feagins / The Design Files.
11 yr old Joe’s bedroom. Pine Eggcup Stool / sidetable by Mark Tuckey, Watermelon + yellow velvet quilt cover (no longer available) & blue velvet pillow slip from Rachel Castle, Paper garland from Pomtree, Etsy, ‘Van Day Out’ wall decal by Clair & Jeremy Weiss for Pony Ride, Rhino cushion from Bo Concept,handmade felt + velvet cushion by Unravelled Textiles. Photo - Sean Fennessy, production – Lucy Feagins / The Design Files.
11 yr old Joe’s bedroom. Love the sky blue walls and RED details! Wall behind desk is painted ‘Ocean Surf’ by Dulux. ’Desk 51′ & ‘Humble Red Hot Mesh Chair’ from Blu Dot Australia. Framed embroidered handkerchief from Third Drawer Down. Photo - Sean Fennessy, production – Lucy Feagins / The Design Files.
Now that’s a backyard to aspire to! ’We built the pool and garden 10 years ago, before we renovated, and did the design ourselves’ says Suzanne. The Date Palm is reminiscent of one Suzanne’s nan Gorman had in her back garden, so is quite sentimental. There are a lot of Californian bungalows and date palms in Willoughby – they go together’ says Suzanne. This tree is in fact the only original plant left in the garden – the rest she and Jon planted. Photo - Sean Fennessy, production – Lucy Feagins / The Design Files.
tomato chickpea & coconut soup
This is the perfect pantry soup. I’m even betting that most of you have these ingredients on hand already. We’re all about fresh eating around here, but there’s nothing wrong with opening up a few cans from time to time… … Go to the recipe...
Ind. Law - "Bill that tweaks expungement law headed to full House"
Ind. Decisions - Still more on: Supreme Court decides Indiana Gas (Rockport) case
Ind. Gov't. - Still more on: Pipeline bill showing signs of rebirth (as is CWIP for nuclear power plants)
Modern Stained Glass
Outside of beautiful cathedral windows, I feel like stained glass gets a bad rap. When it’s not done well, it can feel a bit dated, but I’ve so enjoyed watching contemporary artists and designers reinterpret this classic craft. From minimalist stained glass windows in the new Ace Hotel to light-filled glass homes on top of city buildings and hillsides, it’s hard to resist the colorful light that comes from stained glass. While it’s not the easiest craft to tackle on your own (without a few lessons and special tools), it’s a fun look to replicate using window films or colored plastic. Hopefully these 10 spaces will inspire you to consider a colorful panel or two at home, or just to visit some of these incredible spaces! [Image above, Ace Hotel Los Angeles Lobby. Photo by Bri Emery] xo, grace
Image above: Solarium at Storm King, Photo by William Lamson
Click through for more examples of modern stained glass after the jump…
Obama revamps U.S. surveillance
Packing Facility Set to Close
Breathtaking Aerial Photographs of Colorful African Landscapes
Far surpassing common aerial photography, Brooklyn-based photographer Zack Seckler transforms southern Africa into living landscapes pulsing with color and wonder in his series Botswana. Using an ultra-light aircraft, Seckler photographed the entire series less than 500 feet above ground. The low elevation allows Botswana to blossom with exquisite detail while painting a poetic whole, each image bursting with a roaming vitality. The photos feel fluid and moving, each creature dotted across a textural abstraction of vegetation and glassy waters. Here we are given an omnipresent vision, examining a lush world with fresh perspective when captured at this bird’s-eye view. A delicate balance that is both miniscule and infinite, Seckler allows the terrain of Africa to breathe free, each magical landscape running wildly into the blue.
Botswana premieres as Seckler’s first photographic exhibition at Robin Rice Gallery in New York City from January 15th to February 23rd, 2014.
This post was contributed by photographer and Feature Shoot Editorial Assistant Jenna Garrett.
24 Hours in Atlanta with Ginny Branch
This week we’re continuing our “24 Hours In” series (click here if you missed Grace’s guide to Brooklyn last week!) with a guide to Atlanta from the talented prop stylist, and D*S alum, Ginny Branch. Ginny lives, works and plays in the Atlanta area and today she shares with us her ideal day in the city she calls home. Thanks for helping to plan a perfect 24 hours in Atlanta, Ginny! -Stephanie
Illustration by Libby VanderPloeg
Click through for the full guide after the jump…
Everyday People Digitally Transformed Into Bodybuilders
© Kurt Stallaert / Bodybuilders World
Belgian fashion and advertising photographer Kurt Stallaert invites us to explore a fantastical world where unlikely superheroes are around every corner. In his series Bodybuilders World, even the smallest of his subjects pose a threat, each bored hotel maid and African schoolboy digitally transformed to pack a serious punch. The work is both surreal and disarming, showcasing common civilians suddenly armed with massive muscles and a vacant gaze that demand a double take. A seamless digital masterstroke, Bodybuilders World functions as a tongue-in-cheek imagining of everyday champions lying in wait to defend the world around them.
Stallaert’s solo exhibition is currently on view at Bratislava City Gallery through February 16th, 2014.
© Kurt Stallaert / Bodybuilders World
This post was contributed by photographer and Feature Shoot Editorial Assistant Jenna Garrett.
Deal may extricate Pacers from costly TV-rights deal from ABA days
11 of the Easiest Dinners You Can Possibly Make
There are no excuses right now. The year is new, and if you resolved to cook at home more, you can’t disasppoint yourself just yet. Like you, I sometimes get home at night and don’t want to cook. But I remember, almost always, that dinner doesn’t have to be fancy and that there are myriad meal possibilities that use only a few ingredients and dirty just a pan or two. At those moments, I re-resolve to cook, and in order that you can share in this minor triumph, I put together 11 dinners that take almost no effort, each with a mini summary of what to do so that you don’t really have to read the instructions.
**11 of the Easiest Dinners You Can Possibly Make**
1. Za’atar Roasted Salmon with Greens. Sauté greens and garlic in some olive oil. Turn on the oven, put the salmon on the greens, bake, sprinkle za’atar if you have it and then squeeze on some lemon.
2. Chicken Sausage & Ravioli Soup. Brown sausage, onion, and garlic. Add tomatoes and chicken stock, then simmer away. Cook ravioli and spinach right in the pot. Eat.
3. Grilled Swiss & Roasted Fennel Sandwich. Roast fennel. Pile onto a sandwich with Swiss and Parmesan. Toast in a pan with melted butter.
4. Nachos. Melt cheese on top of refried beans and nachos. Garnish with guacamole and tomatoes.
5. Roasted Caponata Salad with Goat Cheese. Cut up vegetables into small pieces and roast them. Toss with chickpeas and goat cheese.
6. Coconut Curry Mussels. Cook up some aromatics. Add curry powder and coconut milk, then add mussels. When they open, dinner is done. Serve with bread.
7. Bulgur & Cauliflower Salad. Roast cauliflower. Boil water and pour over bulgur wheat. Make a salad dressing and chop lots of parsley. Put everything in a bowl.
8. Open-Faced Avocado Grilled Cheese. Melt cheese on baguettes, in a toaster oven or covered frying pan. Mash avocado with lemon and salt and spread on top of cheese. Dollop with harissa.
9. Braised Lentils with Sausage. Brown sausage. Add carrots, celery, onion, then put in garlic, lentils, red wine, and water. Simmer for a while. Melt in spinach at the end.
10. Sweet-and-Sour Tofu with Bok Choy. Cube firm tofu and toss it with flour, then fry in a little oil. Make a sauce from honey, lemon, and soy. Wilt some bok choy if you want to eat a vegetable.
11. Creamy Blue Cheese Rotini with Spinach. Sauté garlic, add cream, let simmer, dissolve in some blue cheese. Boil pasta, add spinach, combine with the sauce.
House of Cheung
Lacinato Kale Spanokopita
TifmurrayA way to tolerate kale?
After baklava, I think spanokopita–spinach pie–is the most crave-worthy of the Greek phyllo-wrapped specialties. The handheld savory pastries contain well-seasoned bits of chopped spinach, and they’ve always struck me as one of the most perfect light lunches or afternoon snacks in the world.
In my slightly updated recipe, you’ll find, inside layers and layers of olive oil-brushed phyllo, these delicious things: blanched kale, umami-rich parmesan, and a touch of lemon zest. It’s the perfect proportion of indulgent to healthful. Today I’m over at Phyllo.com talking about this classic.
Click over to check out the full post and get the recipe.
I wrote this sponsored post in partnership with Athens Foods. Thanks for reading!
in my dreams, i live here: a hollywood bungalow.
TifmurrayI like: white walls with bright, patterned floors and the hairpin table.
when i lived in los angeles, i used to fantasize about living up in beachwood canyon — a charming old hollywood neighborhood. in fact, it’s a hidden gem tucked up in the hills just beneath the hollywood sign, developed in the 1920′s and sometimes called Hollywoodland. it’s funky and feels quite european — the architects and landscapers who developed the enclave drew inspiration from the southern regions of France, Italy and Spain and it feels exactly like that. i imagine myself living in one of those cozy 1920′s spanish-looking bungalows, with arched doorways, and tiny verandas. in my dreams, i live in a hollywood bungalow.
the bedroom will have a very california bungalow feel, with colorful throw pillows and tall white stuccoed walls and interesting crown molding. i’ll keep it simple and spare to let the architecture of the room speak for itself. a mid-century dresser and just two bentwood chairs repurposed as nightstands and a mural on one wall of california palm trees.
the entrance to the apartment will be colorful and welcoming, with a bright coral door, and an open tiled entryway with bougainvillea growing wild in the sunshine streaming in from shuttered windows.
the living room will be painted bright white and sunny, too and i’ll decorate simply with mid-century modern furnishings and kilim rugs and pillows patterned in bright colors. a few desert cactus seem appropriate for the space, too.
i like the idea of keeping the dining room furnished quite simply and sparsely with a great hairpin leg dining table and drawing the eye to the large picture windows looking out to the small terrace. the kitchen, though i’m going to have fun with and keep it pretty eclectic and welcoming, with a mismatched bunch of chairs in the breakfast nook and pretty spanish tiles adorning the floors. just the kind of place you want to putter around it, whipping up fresh salsa and margaritas for friends stopping by for sunday dinner. yes, i could settle in here quite nicely!
• images in order of appearance: wallpaper minikani lab; dresser via hilda grahnat; bedroom via arkpad; orange door via eduardo romero; patio via mi casa; living room via milk magazine; fireplace mantel via coffeeklatch; bertoia chair via the marion house book; dining room via milk magazine; Kitchen design by Montse Esteva, Photos via Nuevo Estilo.
Kitchen : The Big Reveal
TifmurrayI'm really starting to get sick of our kitchen. When I dream about what I'd rather have, I totally see a subway tile backsplash with dark grout and butcher block counters. I'd also like to paint our cabinets (maybe just on the inside at first? black?) and ideally, re-paint the entire kitchen and add seating in the breakfast nook. I think this redo is pretty amazing.
Okay guys! I am so happy to share with you the finished kitchen!
I hope you don’t hate me for taking so long with this post, and maybe you happened to see it yesterday on Design*Sponge. It was all a matter of timing, the light fixture took forever to arrive, and then those crazy holidays happened. So here we are, months after the project started, at the finish line.
I cannot describe to you how great it feels to have invested the time and work to make this kitchen feel like it was a part of our home. This is especially true due to the sheer amount of time I spend in the kitchen as a stay-at-home mom. This space feels like a reflection of me and my family, and functions so much more efficiently for our day-to-day uses. I’m not sure if I have even been more proud of one project than I am of this.
It’s been awhile, I know, but you guys may remember me starting this project back at the end of the summer when I started to get the itch for an indoor interior project, I was so over gardening. Renovating the kitchen had been on my list for a while, but over the last month of summer I was able to really solidify a plan for how I was going to tackle it. As with most of the projects around this place, I tried to throw it all together on a tight (not tyte) budget, and ended up doing pretty decent job of staying close to what I had anticipated. I had planned for $1,500, but then we had a few additions as the project progressed – the kitchen cabinets, microwave and light fixture – that knocked it up to a grand total of $2,358. I’m not mad at that total.
All right, enough of me jabbering, check out some of these Before-and-Afters!
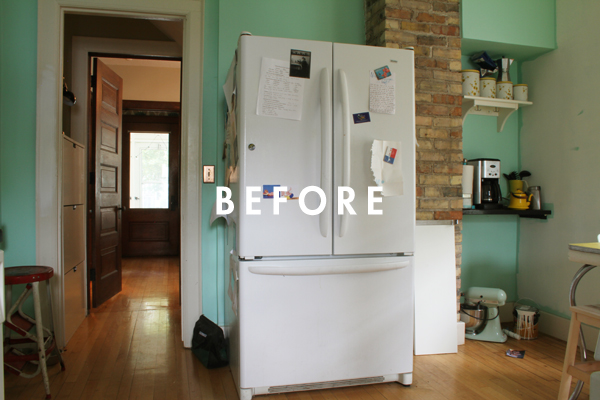
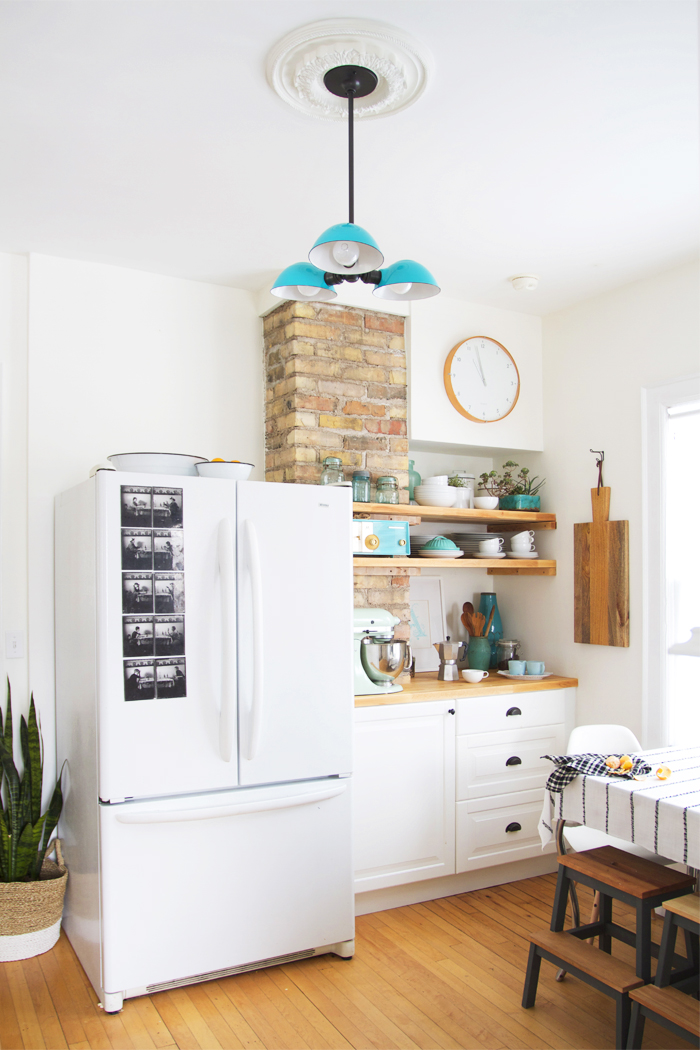
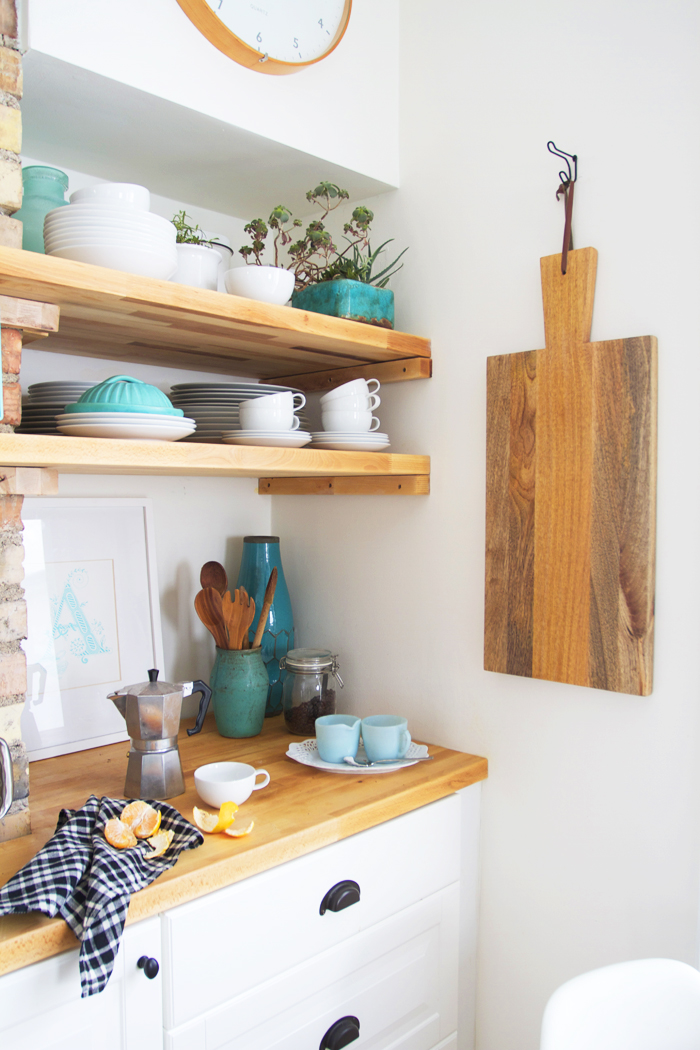
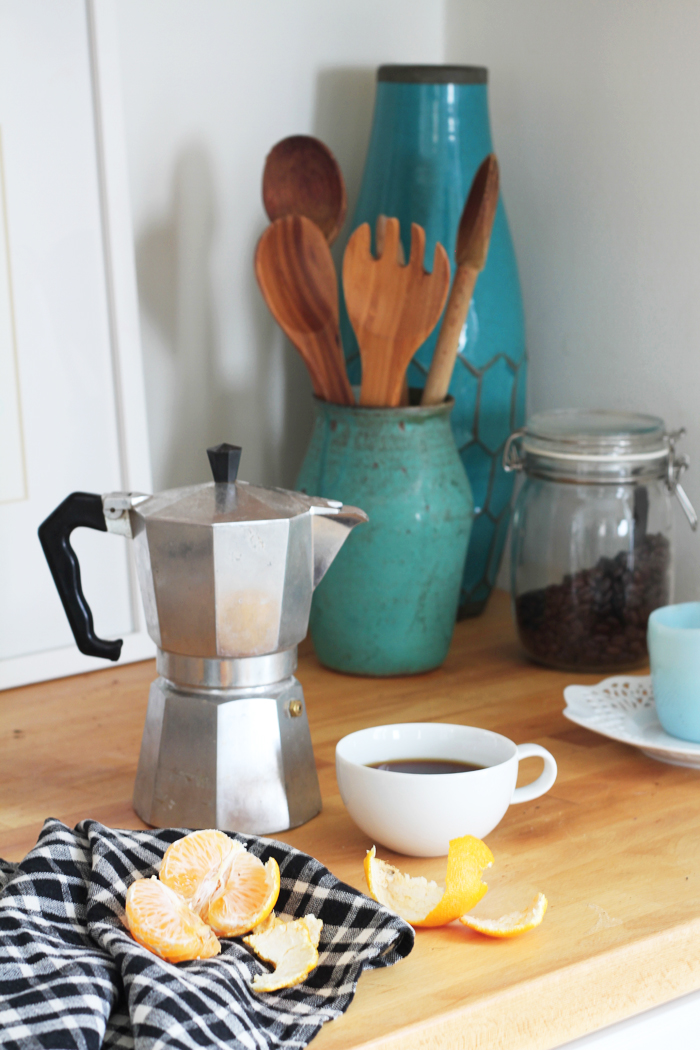
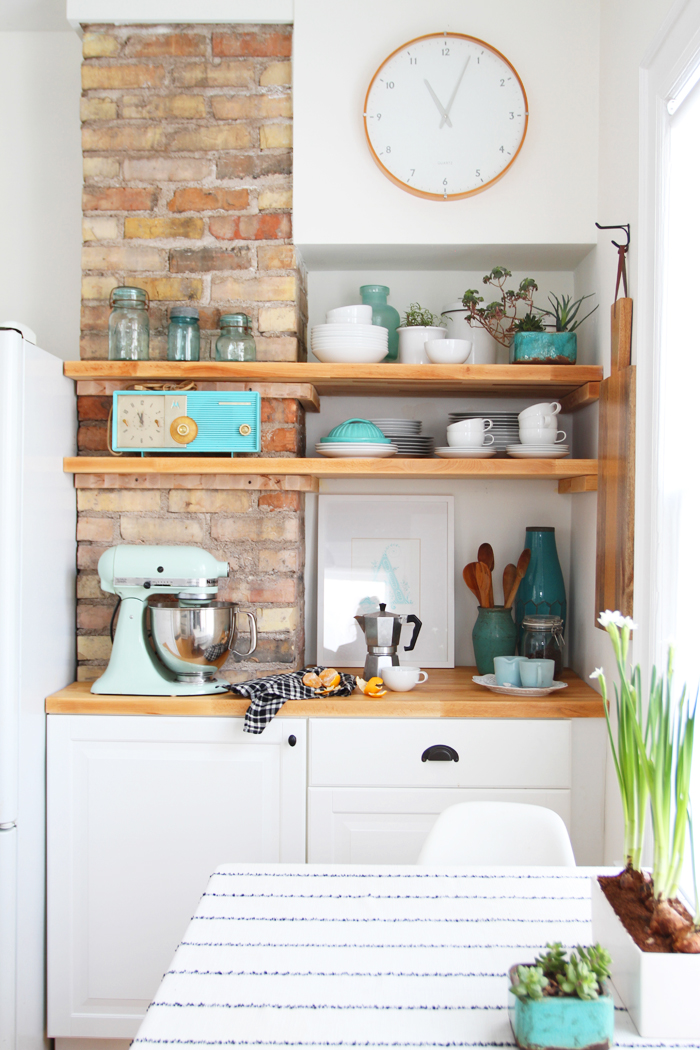
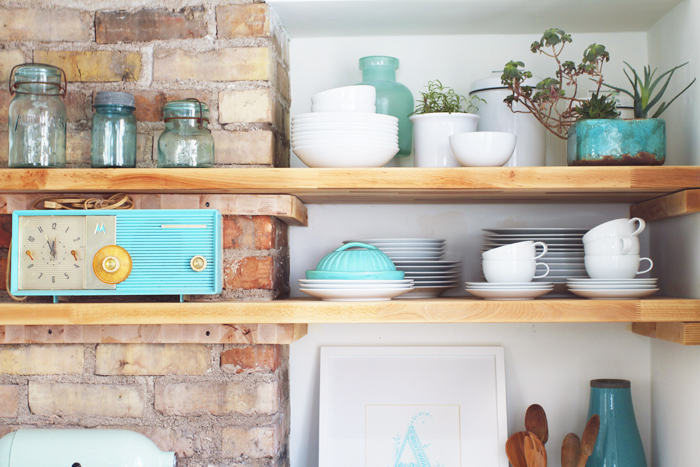
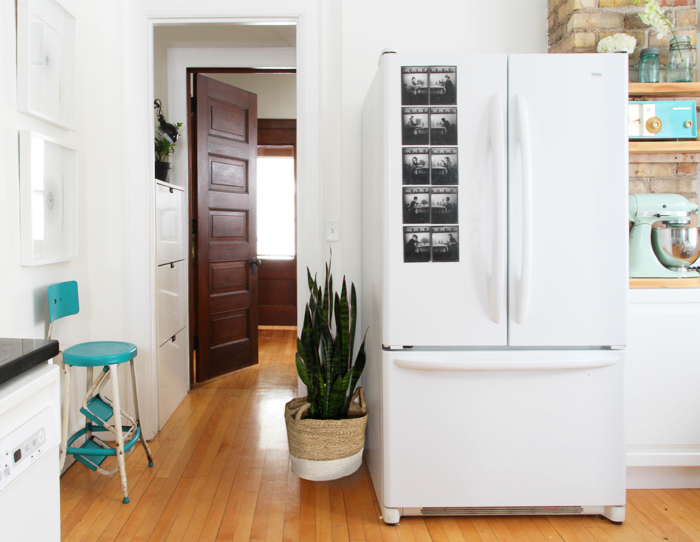
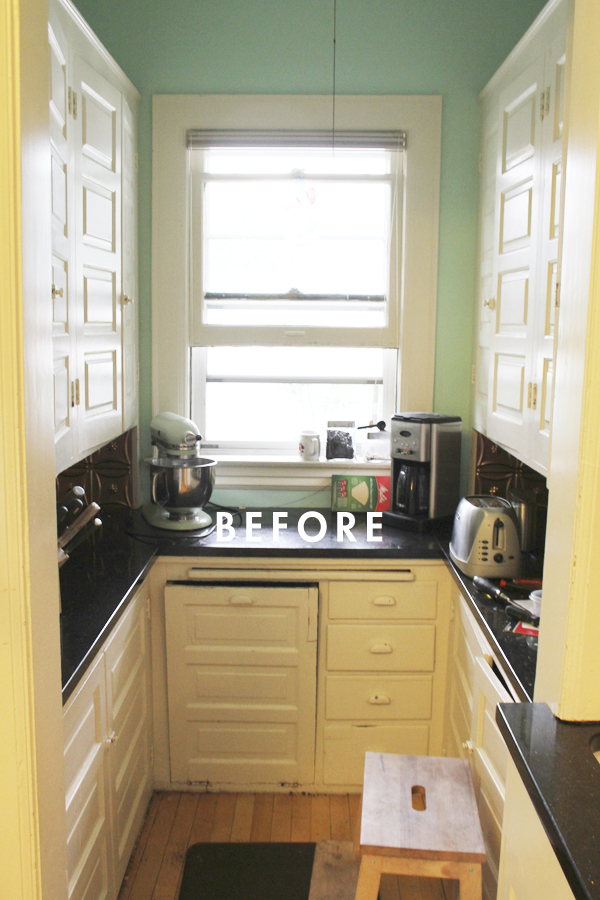
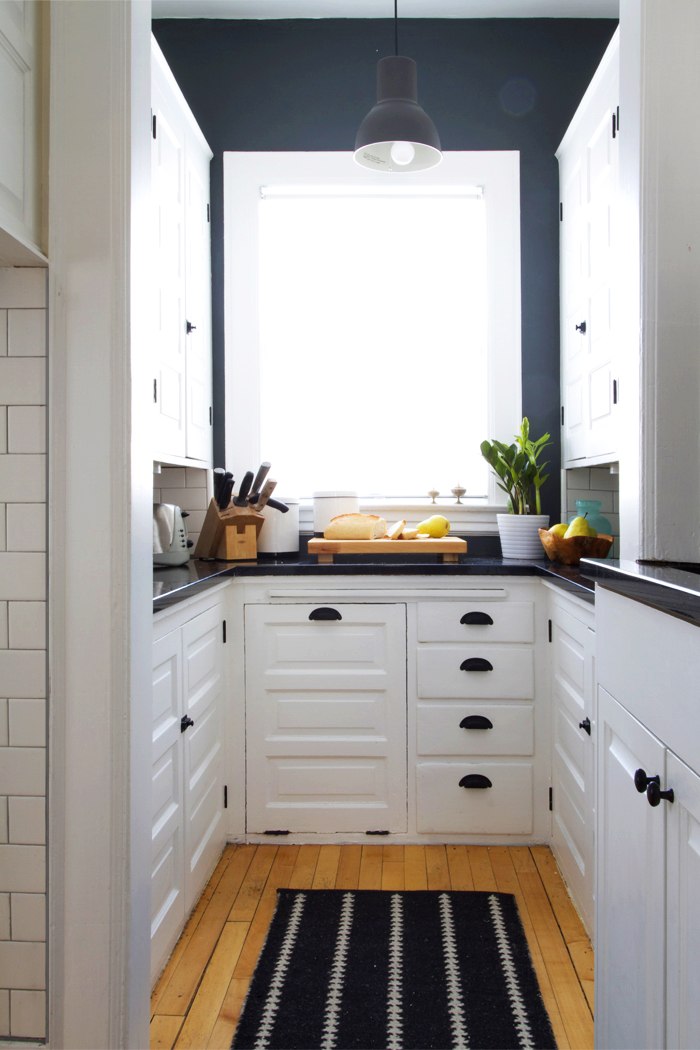
Without a doubt, the part of the kitchen I am most proud of is the transformation (below) of the weird corner space. This whole area was an almost completely-non-functional, junk-holding eyesore (above). Someone before our time had attempted to make it a bit more functional by adding one floating shelf and an outlet. I give them credit for the outlet, it has allowed us use the space as a place to make coffee in the mornings, but it just wasn’t pretty. From left to right (above), we have a huge ginormous fridge that just floated out in the middle of the space, then the brick chimney which had nice texture, but didn’t connect with any of the rest of the space, and then the cove which at some point had been the “utility” staircase. The stairs have been removed long ago and the “coffee nook” was all that was left. The entire wall of space had troubled me ever since we moved in, and I had no idea what was the best way to attack it. I went through a few different sketches for the space before coming up with a solution of custom fitting some Ikea cabinets in the cove and chimney space and finishing it off with some inexpensive butcher-block counters and shelves.
Not only does this look awesome now, but it also anchors, and minimizes the size of the fridge, which looks actually built into the space without overwhelming the nearby kitchen table. I love it. The cabinets house all our baking stuff, coffee accessories, and a very critical rack of paper towels inside the cupboard door – perfect for getting messy 2-year olds clean after their afternoon meals. Guess what else? Inside the top cabinet drawer is all of our silverware which used to make its home in the dining room buffet because there were not enough drawers in the kitchen previously – life changing, you guys. It has been so great to have a space dedicated to all these kitchen activities. Making pancakes is super easy, and Christmas cookies were not a chaotic mess. I am in love with the beauty and usefulness of this space.
Oh and also guys, part of the reason it looks so pretty is because my good friend Nicole Ripplinger (aka Colz) helped me style it all. She’s got a highly cool website called Middle North Creative if you’re interested in her styling skillz.
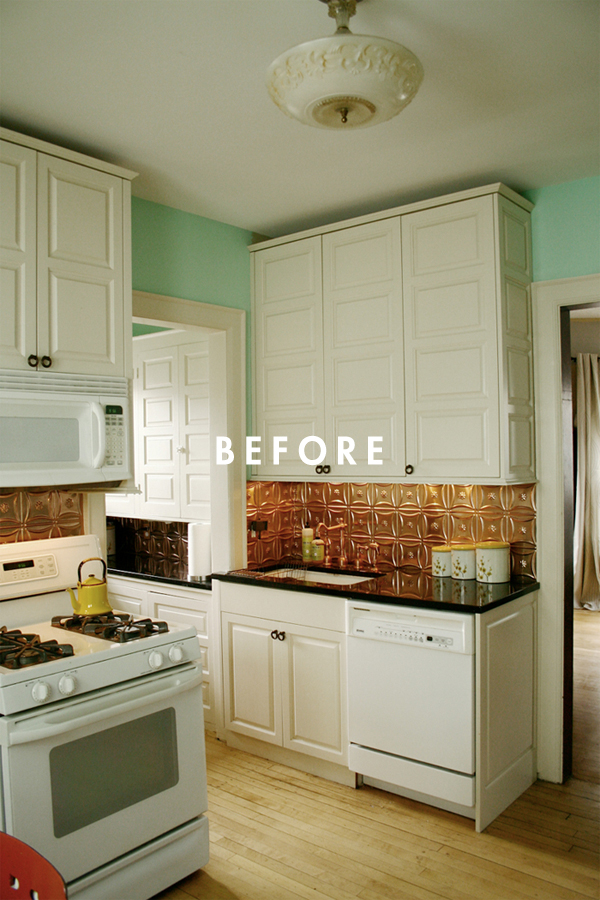
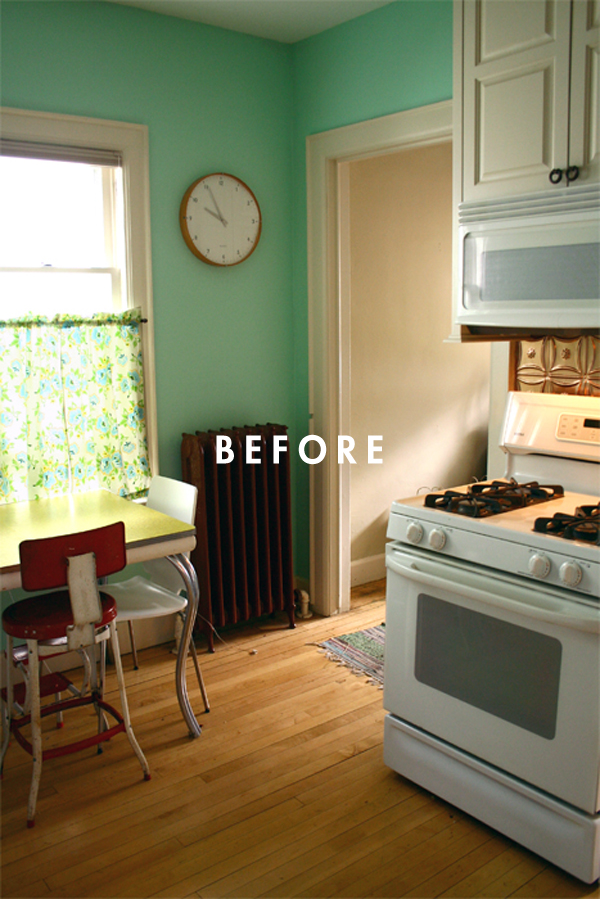
When we bought the house we inherited this metal copper backsplash (above). It wasn’t the worst thing in the world, but it was totally not my taste. I decided to live with it and tried to embrace it. In the end, I just couldn’t. It needed to go, and one warm September Sunday I just started ripping it out. There was no way it was staying any longer. One of the best things I’ve done to this house, for sure, dawgs.
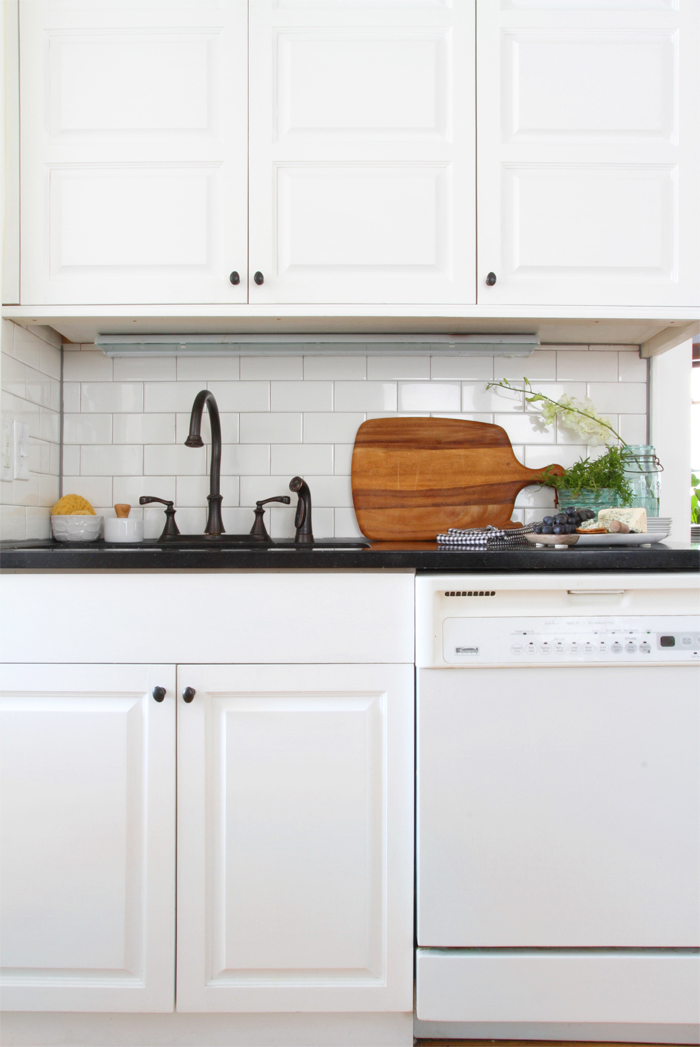
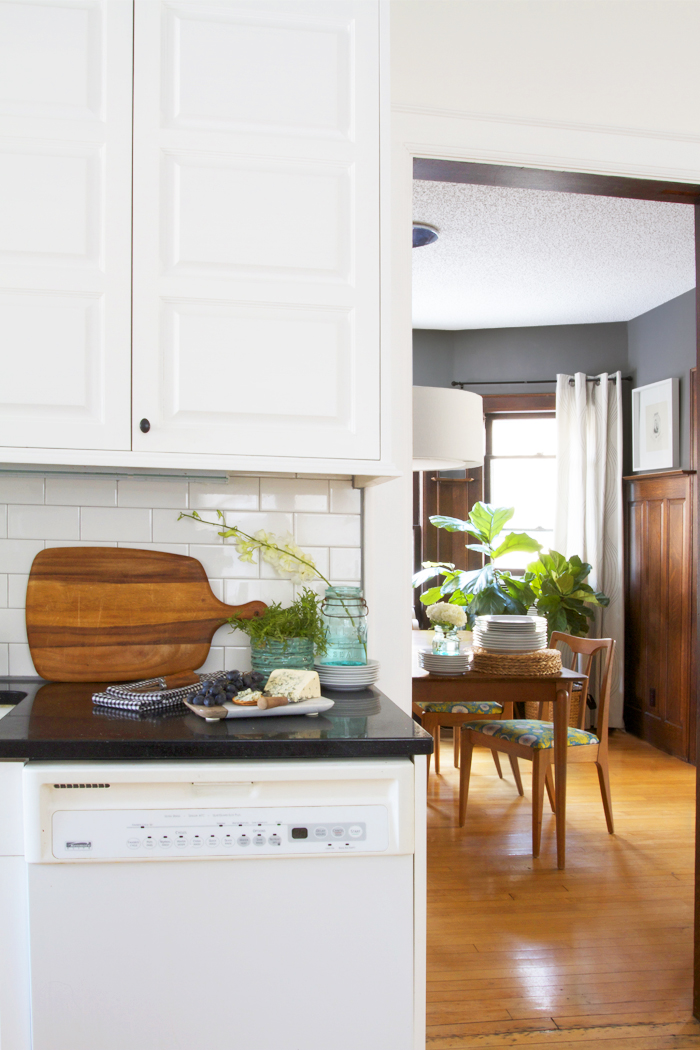
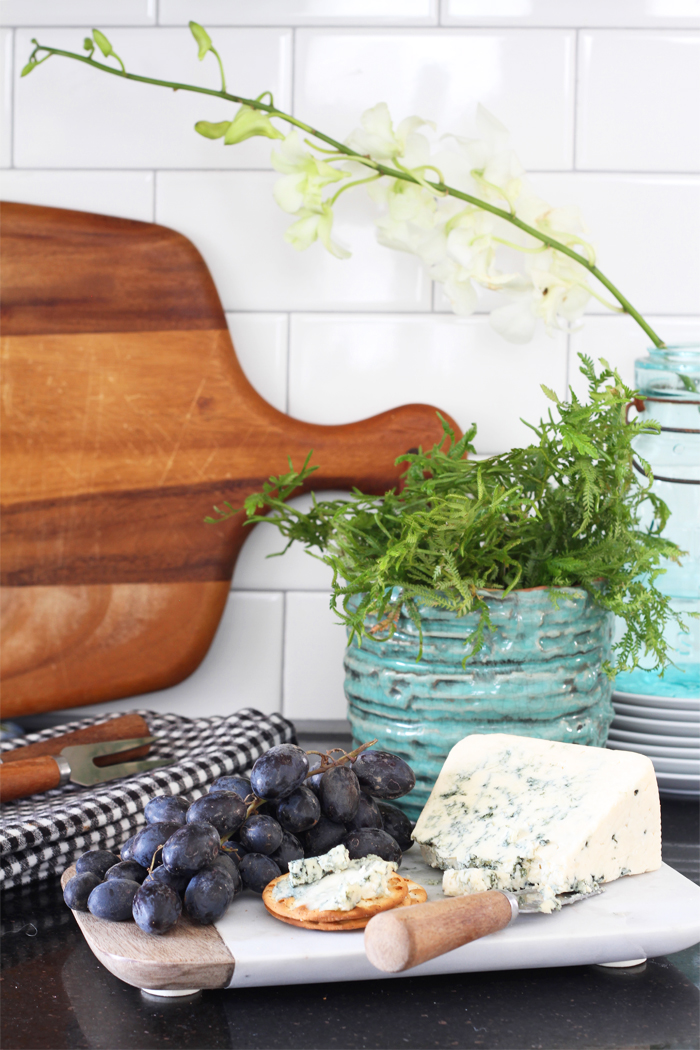
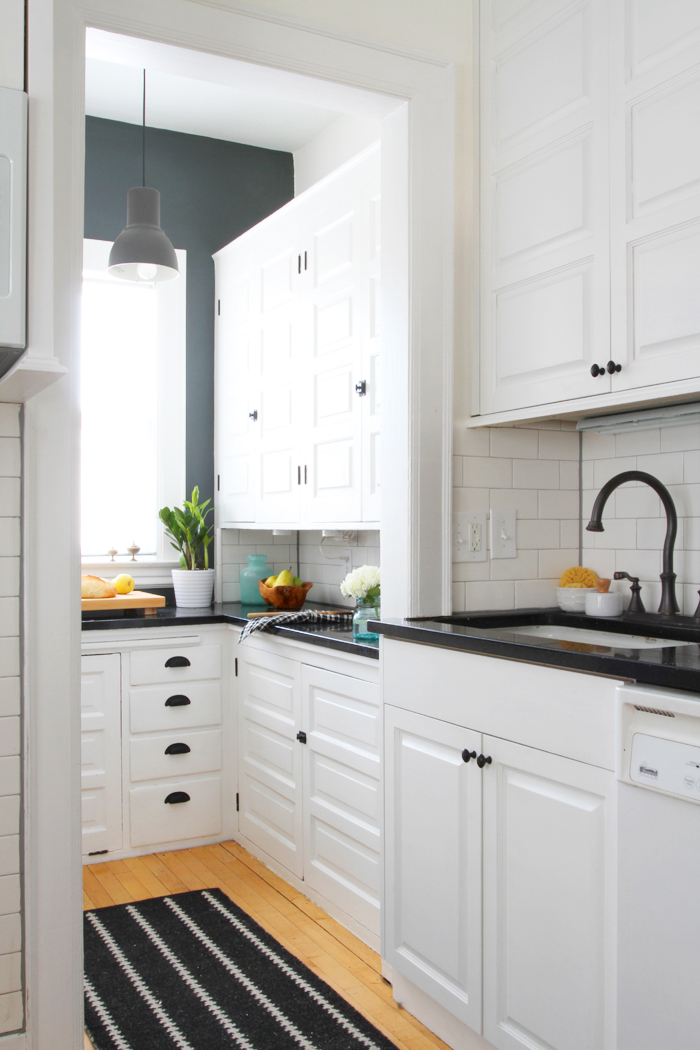
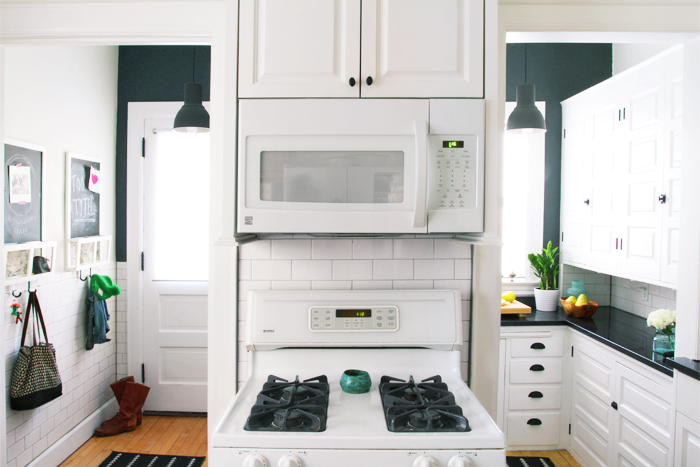
Can we talk about the backsplash yet? Can I tell you how much I love the new subway tile? Can I tell you how it makes such an amazing and dramatic difference in the space? Can I tell you how much I love it? I can? Thank you! Using subway tile as a back splash is a classic move, and yet so inexpensive. I love how clean and tidy everything is. Nothing seems messy and splattered anymore and I am so thankful for that. It also brings together the newer, more modern cabinets in the main part of the kitchen with the original pantry cabinets – tile is their common language.
I wanted to take a minute and let you guys know about a few of things I would do differently if I could do it all over again. Yes, most of them are barely noticeable and very small, but still, I am a GD perfectionist.
First of all, I would’ve waited to paint the cabinets until after the temperature started to drop and the air became drier. Like all things wood, they expand and contract. The cabinets contracted and minimally shrunk after I painted them in the warm fall weather, and now there are cracks in the paint at many of the seams. I can go back and fix this, yes, it’s just finding the motivation to do it now that the project is done.
Secondly, I would’ve trusted my gut on the color of the grout. I originally wanted black grout because it looks awesome. But I wimped out, thinking that it might not be the best option for a first time tiler like myself, as I thought a darker color might highlight imperfections. I had to play a little game of “What would piss you off more?” Having black grout and seeing all the screw ups, or having a shade lighter and not seeing as many of the screw ups. I determined that seeing the screw ups would piss me off more. I decided to go a shade lighter with the grout, and I was totally cool with this choice. But then when confronted face-to-face with grout options at the hardware store, I went even one more shade lighter. “Oops – Stick with your gut, Scoops” (cool new rap). This isn’t a major crisis or anything, but I do regret it. I wish the grout was just a shade darker. I shouldn’t have second guessed myself.
Thirdly, when measuring the butcher block counters I allowed for an overhang of 1/2″, but I measured just the cabinet bases without the drawers or door front being considered, which were 1/2″ deep. I now have a counter that is totally flush with the front of my cabinets. This could be much worse – I could’ve forgotten to add any depth to the counters at all. So I am thankful for that. However, if I had to do it all over again, I would add an additional 1/2″ overhang (1″ deeper than the base cabinets).
Other than that, I am over the moon with how the kitchen turned out. Please, if you have any questions, or need tips on a project, leave a comment below and I will try my best to give you advice based on what I have learned.
When I started this renovation the biggest motivation was to get these original cabinets and hardware whipped into shape. Our house was originally built in 1910 (that’s more than 100 years ago, dawgs) and I’ve done my best to honor and highlight all of the unique eccentricities of the house and draw out that original character while still ensuring that it speaks to our style.
Our kitchen is oddly set up (seen in the post). I’m fairly certain all the walls and the layout are original to the house, but I don’t understand why it was set up this way. This house was built with this pantry back in 1910. Was it used as a pantry then? I dunno, but it’s still here and tucked back in this little area of the kitchen. I have no idea how the original kitchen was laid out, but it has to be similar to how it functions now – just with an older stove, an ice box and definitely no dishwasher. I wanted to make sure I honored that history in some way, so I made restoring the cabinets a major focus.
I started by stripping all the hardware, which had at least of 5 layers of paint on them. Then I spent weeks sanding and painting and sanding and painting and sanding the cabinets, making them look as perfect and pristine as I could manage without losing my mind. After 100 years, the cabinets had adjusted to the natural settling of the house; in other words, not one of them closed properly. With a lot of sanding, I was able to get each cabinet door to hang properly in its cabinet box and I now get to enjoy the click of closed cabinet latch.
It doesn’t look like much, but I really put a lot of heart and soul into this old pantry, and I’m really proud and happy with how it turned out. It functions as a traditional pantry – keeping all our canned and boxed goods – and as a place to also store pots and pans, some bakeware, and I have a few cabinets that still have room for more stuff. I’m good on storage now! I also built the big butcher block cutting board, added under-cabinet lighting and now use this space for all my meal prep. It’s great for chopping and I love that this space now has more purpose then just storing all my kitchen junk!
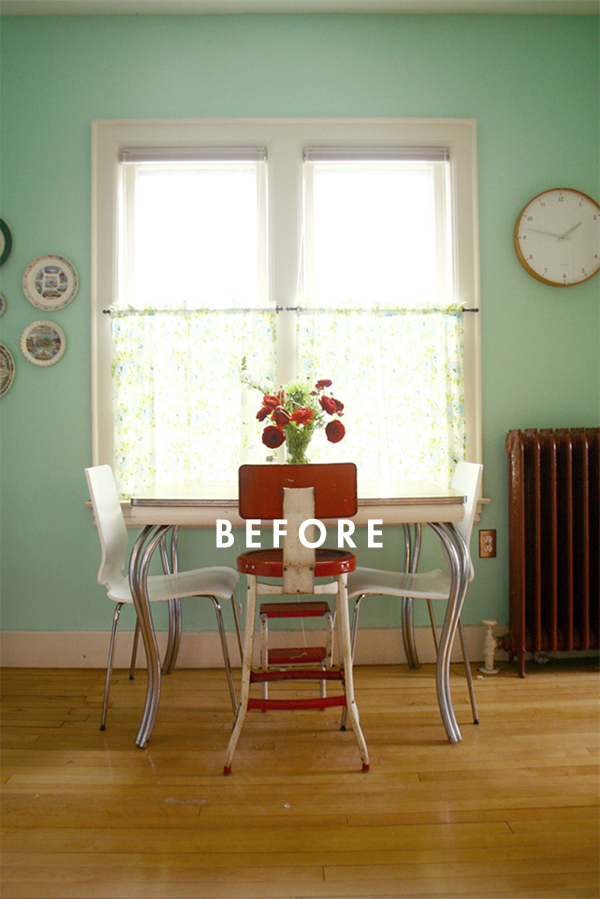
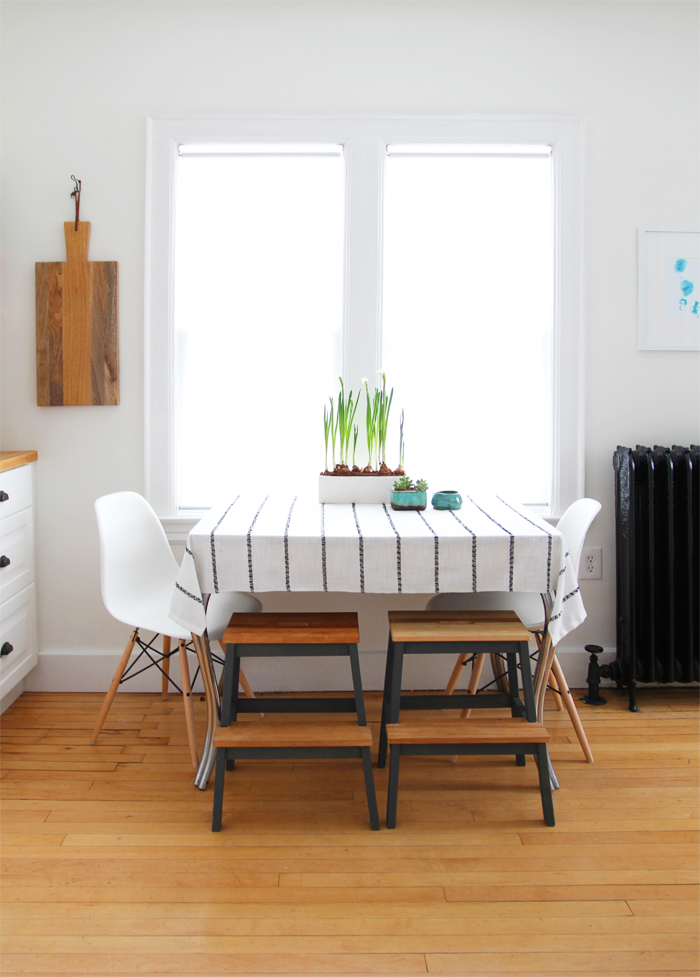
So I told you guys in my renovation updates that I was having trouble with this table. It was really pulling at my heart strings as well as my creative problem-solving strings. The table has been with me since I was 18. It’s lived with me and Jeff at all our old rentals, our loft, and now here at our house. Our kids eat all their meals here, and both Jeff and I are way sentimental about it. I also am a big believer in having your home being a museum of objects you love. So the table was staying. And although we loved the crap out of it, it was hard to make it look it good in our new “vintage industrial” kitchen with turquoise accents. This table has a bright yellow formica top and curvy chrome legs. Although it’s vintage, it’s not the vintage I had in mind.
After trying different ways to disguise its existence – none of which were really that successful – it came down to an extra piece of curtain paneling made into a table cloth. Although Jeff isn’t entirely convinced that this tablecloth is cool, I kind of love it. I think the table looks great, I love the kids’ stools painted to match the grey wall in the pantry and mudroom, and I think the Eames chairs with their dowel bases look great with all the cutting boards and butcher block. I like that it just sinks into this space, right between the new cabinets and the radiator (that I painted black), and I love how it gets bathed in winter light pouring through our kitchen windows. It’s good, yah?
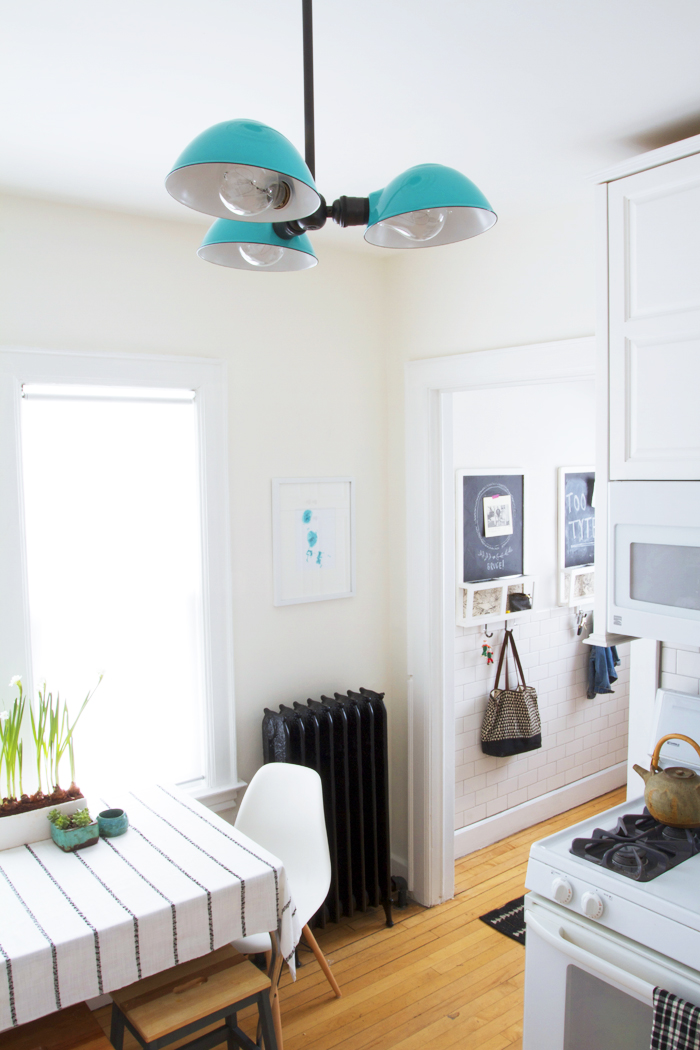
This photo is here to show you how totally amazing this aqua light fixture from Schoolhouse Electric is. I had to close my eyes when I clicked the “order” button on the net. Nearly $400 bucks on an seriously-aqua light fixture is not something that I normally go for, but fer realz guys, in this space, it is 100% amazing. I’m so glad Jeff talked me into it after I suggested this crazy scheme to him once in passing.
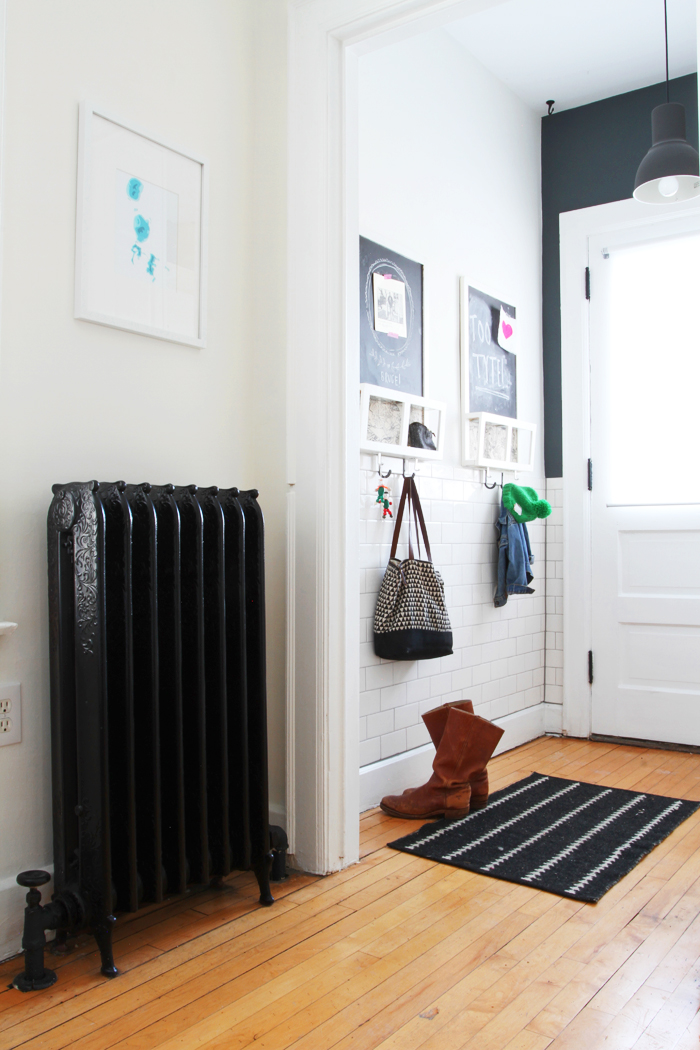
You guys! Guess how much money I spent on the tile in this mudroom? Would you be surprised if I told you that all this wonderfulness cost less than $100 and 2 days worth of work?
I was just sitting in the living room one day, staring at my handy tile job in the kitchen when it occurred to me that tiling the mudroom would be the best idea ever. I’d tile it so that it would be an identical height to the height of the tile in the pantry. It would go around the entire room and it would be totally awesome. Jeff was not convinced at all that this would be a good idea. We were already weeks into the kitchen project and he was definitely over having me spend all my waking time focusing on it. I had to convince him that this wouldn’t add on that much time or money and that it would be so awesome. 48 hours later, and blamo, it was done. This is probably the best $100 bucks I’ve ever spent.
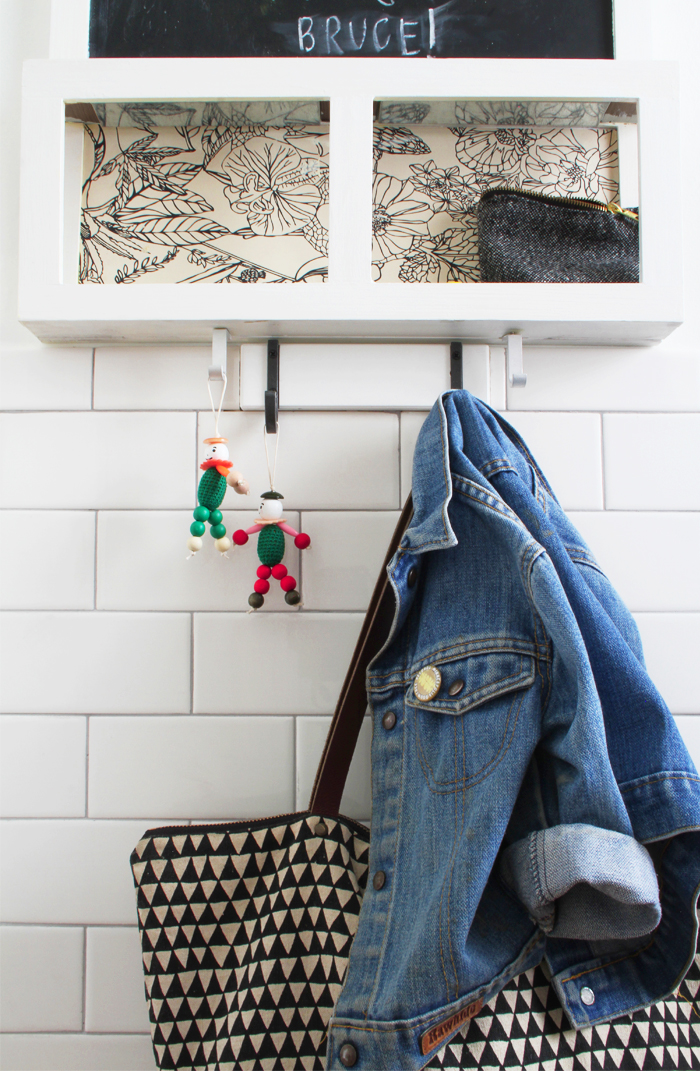
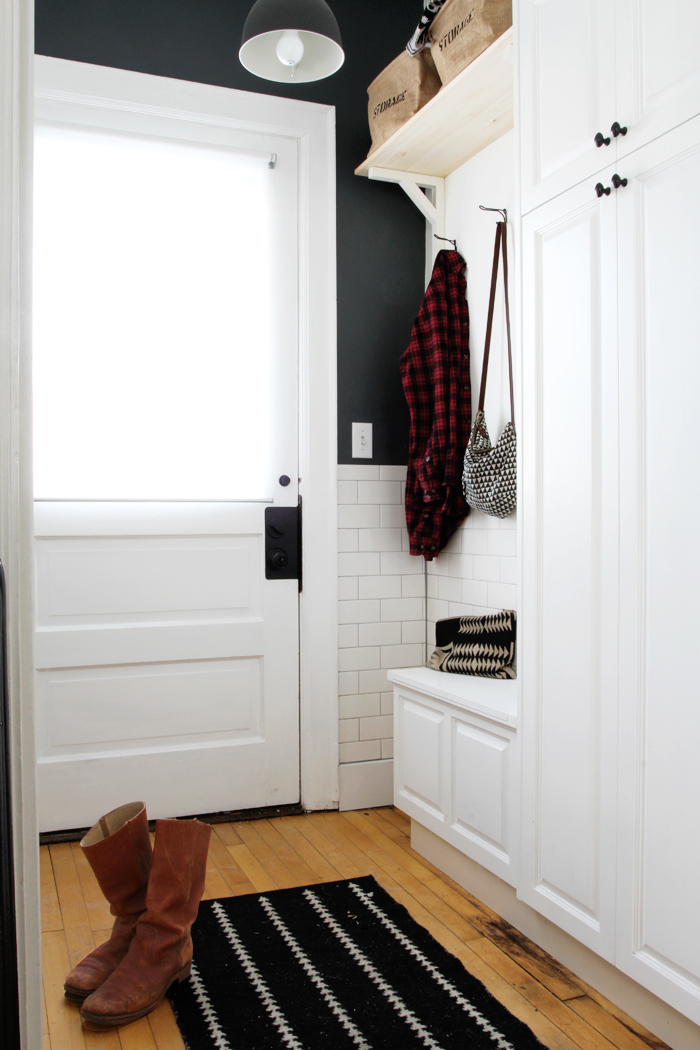
I added the magnetic chalk message boards a few years ago. I painted and wallpapered them way back then, to add a bit of function and a little bit of pretty to this space. When I tiled the mudroom I added built-in hooks for the kids to hang jackets and backpacks. It has become an essential part of our house, so much so that I don’t think I could design a new more modern kitchen without including a space like this. We had problems with a “landing space” forever. Keys, coats, shoes, hats and mittens were taking over our house. It probably took us 3+ years of living in the home before we really figured it out and started utilizing the mudroom. This space is organized; everything has a place. Towels for summer backyard pools, car keys, gardening shears, gardening gloves, canning gear, bubbles and bubble accessories, scarves, hats, mittens, snowpants and all that good wintery stuff. It’s basically all the stuff we need for the outdoors – all in one place, no matter what time of year. Plus we have the shoe storage right off the kitchen, which by the way, has entirely changed our clutter and our lives – couldn’t recommend it enough.
I mentioned it in my 2013 post from last week, but this has seriously been such a great project for me. I’ve learned that I am capable of doing most home repairs! I know I can’t do everything, but I can do a lot. I have the skillz and every time I tackle a new unknown project I get an education on what I need to know to accomplish the next home renovation waiting around the corner. The satisfaction I feel from this project is pretty great, and it doesn’t hurt that the end result turned out so amazing (I must humbly say).
I honestly think we could live with this kitchen for a long time. We had originally scheduled a kitchen gut job and renovation around the 10-year mark of owning the house. But as of this moment, I don’t envision that happening because it really doesn’t need it. This old kitchen is so pretty and functional for us now with these tiny renovations, and has maintained the original character of the house. Owning an old home is a special thing. Although all of them need renovating and updating, it’s important to respect the age and history of these places whenever possible.
Thanks for all the support and comments throughout the project, guys. It really helped motivate me to see it through. You’re the best!
Paint
▽ White Wall Paint : Clark & Kennsignton – Casual White
▽ Dark Gray Wall Paint : Behr – Paramount
▽ Trim and Cabinets : Farrow & Ball – All White
▽ Radiator Paint : Rustoleum Universal : Satin Black
▽ Hardware Paint : Rustoleum Universal : Flat Black
Decor
▽ Light Fixture : School House Electric – Factory Satellite 3 in Aqua Shades
▽ Ceiling Medallion : House of Antique Hardware 16″ Medallion
▽ Enamel Basin & Bowl : West Elm
▽ Lidded Atlas Canning Jars : Etsy Vintage
▽ Aqua Waterscape Vase : West Elm
▽ Kitchen Aid Mixer in Pistachio : Kitchen Aid
▽ Butter Dish : Antrhopologie
▽ Utensil Pottery : Crooked Creek Studio on Etsy
▽ Raw Wood Large Cutting Board : West Elm
▽ Tall Hive Vase : West Elm
▽ Coffee Canister : Ikea
▽ Black and White Kitchen Towel : Anthropologie
▽ Clock : Crate and Barrel
▽ Vintage Clock Radio : Good Bones Vintage Co on Etsy
▽ Vintage Fire King Sugar Bowl and Creamer : Etsy Vintage
▽ Enamel Canisters : West Elm
▽ Plant Hanger : Handmade – Tutorial Here
▽ Marble Cheese Board : West Elm
▽ Wooden Cheese Board : West Elm
▽ Cheese Knife Set : West Elm
▽ Dish Scrub Brush : Honest Company
▽ Sponge Bowl : Target Threshold
▽ Footed Butcher Block Cutting Board : Handmade – Tutorial Here
▽ Wood Bowl : Target Threshold
▽ Mortar and Pestel : Ikea
▽ Mudroom Chalk Boards : Ikea
▽ Black Light Fixtures : Ikea
▽ Table Cloth : Ikea (Curtains turned Table Cloth)
▽ Tea Pot : Warren Mackenzie
▽ Beaded Ornaments : Fox & Owl
▽ Storage Bins : H&M Home
▽ Arrowhead Rugs : Nate Berkus for Target
Artwork
▽ Spiral Artwork : Kalie Eckerson via the MCAD artsale
▽ Chain of Lakes Topographic Art : Crafterall on Etsy
Furniture
▽ Chairs : Eames White Side Chairs with Dowel Base
▽ Step Stools : Ikea
Styling
▽ Nicole Ripplinger @ Middle North Creative
Paint & Paint Supplies
▽ Paint Brush – $15.99
▽ Radiator Roller – $4.99
▽ Paint Roller – 2 @ 3.99 = $7.98
▽ Masking Tape – $7.99
▽ 1″ Brush – $7.58
▽ Builder’s Paper Roll – $10.97
▽ Wall Paint | Clark & Kennsington Paint 2 gallons @ 25.99 = $51.98
▽ Wall Paint | Behr 1 Quart – $11.23
▽ Trim and Cabinet Paint| Farrow & Ball – 1.5 gallons – Free
▽ Spray Paint Black – 3 @ 5.76 = $17.28
Total = $135.99
Tile and Tiling Supplies
▽ Tile Adhesive – 3 gallons @ 20.18 = $60.55
▽ 3×6 Subway Tile 4 boxes @ 22.00 = $88.00
▽ White Bullnose Cap Tile 30ct for $22.20
▽ Grout Float: 11.97
▽ Quarter Round Tile 13 for $12.74
▽ Wedge Spacers $5.97
▽ Delorean Gray Non-Sanded grout $13.27
▽ Delorean Gray Caulk – 2 @ 11.97 = $23.94
Total = $238.64
ElectricalL & Lighting:
▽ Light Switch – $1.59
▽ Switch Covers – $7.16
▽ Hecktar Pendant Lamp – 2 @ 29.99 = $59.98
▽ Grundtal Under Cab Lighting System – 2 @ 24.99 = $49.98
▽ Schoolhouse Light fixture – $359.00
▽ Halogen Bulbs – $27.35
▽ Ceiling Medallion – $42.99
▽ Liquid Nails – $4.99
▽ Paintable Caulk – $1.99
▽ Dimmer Switch – $12.97
Total = $568.00
Window & Wall
▽ Ekby Shelf – $9.99
▽ Ekby Brackets – 2 @ 4.00 = $8.00
▽ Enje Rollers – 4 @ 19.99 = $79.96
Total = $97.95
Hardware
▽ Sash Lift – 2 @ 3.99 = $7.98
▽ Anchors and Screws $4.94
▽ Shims – $2.49
▽ Plant Swag – $2.99
▽ Staples – $4.99
▽ Lampholder – $3.99
▽ Cabinet Knobs 13 @ $8.10 = $105.39
▽ Vintage Repo Pulls 3 @ 9.09 = $27.27
Total = $160.04
TOOLS
▽ Mouse Sander – $29.97
▽ Steel Square – $7.90
▽ Magnetic Torpedo Level – $4.47
▽ Mouse Sand Paper 3 @ 5.97 = $17.91
▽ Sand Paper 6 @ 4.47 = $26.82
Total = $87.07
Cabinets and Counters
▽ Ikea Lidingo White Cabinets – $486.93
▽ Ikea Butcher Block Counters – $324.00
Total = $810.93
Appliances
▽ Over the Range Microwave – $259.98
Total = $259.98
Grand Total = $2,358.60
Previous Kitchen Updates:
▼ Kitchen Plans
▼ Kitchen : Week 2 Progress Report
▼ Kitchen : Week 4 Progress Report
▼ Kitchen : Week 6 Progress Report
▼ Kitchen : Week 8 Progress Report
▼ Kitchen : Week 10 Progress Report
▼ Kitchen : Week 16 Progress Report