Three things I am obsessed with: chickpeas, avocado, and all things MINI… mini pizzas, mini tacos, mini pies, mini skillets. I had these cute little pretzel buns last week so that’s how this recipe started. (Although you could use any kind of … Go to the recipe...
Recently we went to Cincinnati with some friends to see a Reds game. Ok, the men wanted to see the game—I was looking forward to trying a new restaurant beforehand, and am easily convinced to do whatever if I know this is in the cards (incidentally though, if I am going to watch a sport live, it’s going to be baseball).
One of the friends is picky picky about food (I’m talking about you Pat) so we agreed to find a fried chicken place. I asked around and was told to try The Eagle. And I know one of these is planning to open up in Indy in the future, so I thought it sounded like a good idea. Sadly, we were told when we got there that there was at least an hour and a half wait for a table, so we had to go elsewhere (even though they called like 40 minutes later to say we could have a table, but by then we had already gone somewhere else. Too bad, because if they had told us 40 minutes to start, we might have waited.) Anyway, after walking by packed restaurant after packed restaurant on Vine Street, we scored one of the last available tables at Krueger’s Tavern, which as it turns out, is owned by the same group that owns the Eagle and Bakersfield. The men chose this place and it is a very manly menu consisting of mainly burgers and sausage platters. I was a teeny bit grumbly at this point (the women were pushing for Taste of Belgium), but settled down when I saw the hot Gruyere dip ($6) on the menu. We ordered that as well as the hot beer cheese ($6).
Both of the dips were good—my favorite was the Gruyere dip though. It had the cheese as well as bits of bacon, caramelized onions and scallions and was served with really nicely crunchy slices of baguette that were brushed with olive oil. The bread was done perfectly. And the salty nutty cheese was complemented perfectly with the bacon and green onions. It was intensely rich, but delicious. The beer cheese was also good, but they just served this with hunks of rye and white bread that were soft, which wasn’t as exciting (although made sense with the runnier beer cheese). The consistency was much thinner on this one. It tasted good, but just didn’t have the same depth.
I split the Krueger’s burger ($9) with one of my friends, as well as a side of the frites ($4). They grind their own beef in-house and I have to say, even though the two patties were cooked pretty well through (they didn’t ask), the beef was very good quality and very moist. The patties were topped with American cheese, shredded lettuce, onion, special sauce and pickles. The whole lot was served on a Challah bun. It was a tasty burger—apparently was named one of the top 5 burgers in Cincinnati (#4 to be precise I think) and I could see that. If it were in Indy, I could see it being the 4th or 5th best burger. It was good. A little pinkness and it could have been outstanding. The frites were also very good. I liked the malt vinegar aioli that came with it. It was almost like combining my two favorite sauces at Brugge into one, which I think is sort of genius (I always get the aioli and the sherry vinegar with salt at Brugge). Creamy, yet super tangy too. The fries were pretty crisp and dusted generously with salt and pepper.
Hubby had the Cuban sandwich, which I got a couple of bites of—it was very good as well. He loved it. I thought the stuff inside it—the braised pork shoulder, ham, Gruyere, Dijon, black bean puree and homemade pickles were all very well done and in just the right proportions (you gotta be able to taste the pickles!), but I thought the bread was a little too dense for me—it overpowered the stuff inside a bit. Usually it seems like Cubans are a bit more flat. This one was pretty fat. Hubby raved about it though.
This place has a ton of beer choices—tons of random beers in cans especially, and I was happy they had a couple of fairly decent wine choices for a place like this. All in all, I was pleased with the overall quality of this place. I’m pretty sure it would likely do well in Indy too. The place was very busy, but I would say the service was pretty good, and the food exceeded my expectations based on looking at the menu (and no research).
Incidentally, since we didn’t get our fried chicken fix in Cincinnati, we stopped at Wagner’s in Oldenburg on the way home for lunch. I have written about this place before but here’s a lovely picture of our fried chicken lunch.
Pale pink walls is a hot new color trend for living rooms (okay just about any room) but while it's a versatile color, it's also an uncommon one. To see if your living room can handle it or see if it's the kind of color you might like to add to your home, check out these eight bold and blush pink living rooms pulling off the look perfectly.
Black and white and gold is a striking color combination, and nowhere is that more true than in the bathroom. Gold fixtures in the bathroom is a look we're seeing more and more of, and paired with a black and white color scheme, they add a pleasing bit of drama to a humble space.
Part of a new development in south London, a glass-bottomed swimming pool will be suspended between two ten-story apartment blocks. Modeled after an aquarium, the sky pool will connect the two buildings, slated for completion in 2017.
There is some pretty great stuff at IKEA. But it's hard not to be jealous of IKEA shoppers from the 70s and 80s when you see some of the amazing stuff that used to line the retailer's shelves. Here are eleven favorite vintage pieces that we'd love to see make a comeback.
United States Supreme Court Justice Sonia Sotomayor will speak next month at the University of Notre Dame. She will take part in a discussion with NBC News correspondent Anne Thompson and U.S. Court of Appeals Judge Ann Claire Williams, who are both Notre Dame graduates and trustees.
Over the weekend, Republican presidential hopeful Carly Fiorina followed up her much-lauded debate performace with a CNN appearance in which she came out against any federal mandate regarding paid pare
Netflix will offer new moms and dads “unlimited’ paid leave. Employees can take off as much time as they want in the first year after their child’s birth, a poli
For most of us, it's just not practical to stash everything away in a drawer or closet. Bins and baskets are a great way to keep things handy, but also contained. Whether you're looking for an attractive way to store some toys in the living room, a place to stash your knitting project or your favorite magazines, here are fifteen stylish options that will look good in any room:
in the 80’s i was obsessed with these colors! i painted white shirts with kooky neon pastels and accessorized my apartment in full tilt new wave splendor — hey, don’t judge, it was my very first apartment! but this kitchen — this is done to perfection and not one bit as cheesy as my first place. Polished pine plywood, pastel paired with bright bold paint, with laminate counters and perforated pegboard is stunning, and so happy at the same time! designed by dries otten interior architects, you can see the full tour and more of their beautifully bold and inventive work on their website.
Today we are welcoming Paula Passini to the blog to share her amazing apartment with us!
"I moved to this apartment in 2011 after taking a sabbatical year to travel around the world with my boyfriend. At the time, it took me a few months to find a perfect spot to live–we wanted an old realty because their structure is better, with larger windows and high ceiling. As usual with old realty, the place was in bad shape. So we had to make a huge makeover: knocking down walls, opening up spaces and exposing the original bricks in the living room. I love the living room because it's where I host my friends, relax, listen to some music and spend most of my day. It’s also where I display the objects that I love.
"Most of my objects came from a long trip that I took with my boyfriend and that lasted almost a year. We avoided traditional tourists’ destinations and visited exotic countries such as Laos, China, Morocco, Lebanon, Mongolia… Those objects are special because they can’t be found easily, they’re unique and they remind me of those lovely places that I had the privilege to visit. I also have a family heirloom that I really love: my grandpa's record player—it reminds me of him listening to operas every Sunday morning.
"I've lived in this apartment for four years now and it definitely goes along with my inner changes. Once I moved in I started working on an Interior Designer degree, so my home kind of became a place where I could try out my ideas and see what would work and what wouldn’t. Even today my home continues to change, just like myself."
Thanks for sharing, Paula! You can find more of Paula on her blog and Instagram. xo.
Credits// Author: Paula Passini. Photography: Igor Giroto.
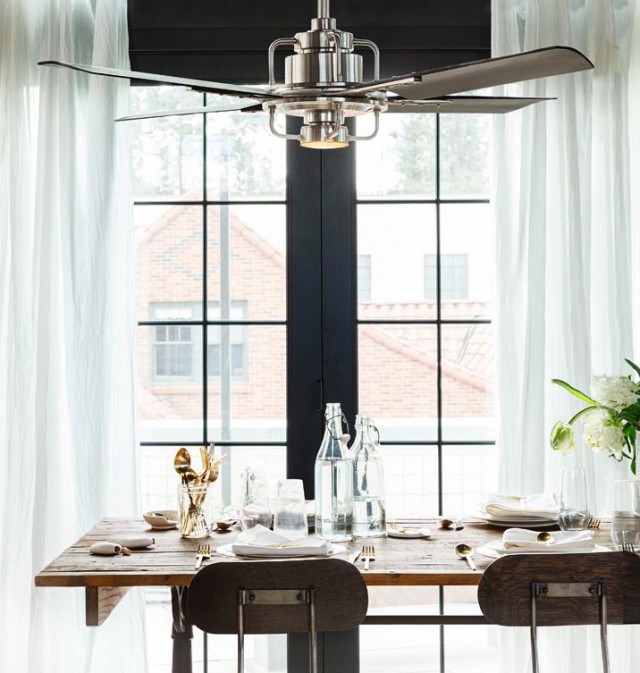
Our house does not have central air, and Chicago summers are hot and humid. I was a little concerned that we would be uncomfortable as the temperatures rose, but it hasn’t been too bad. A shady porch for enjoying a breeze helps. 10′ tall ceilings inside and transom windows above the bedroom doors help. Window A/C units help. Portable fans help, and though I’d rather choose fixtures for looks alone, ceiling fans help. There are four in the house already, and we’re planning to add at least two more.
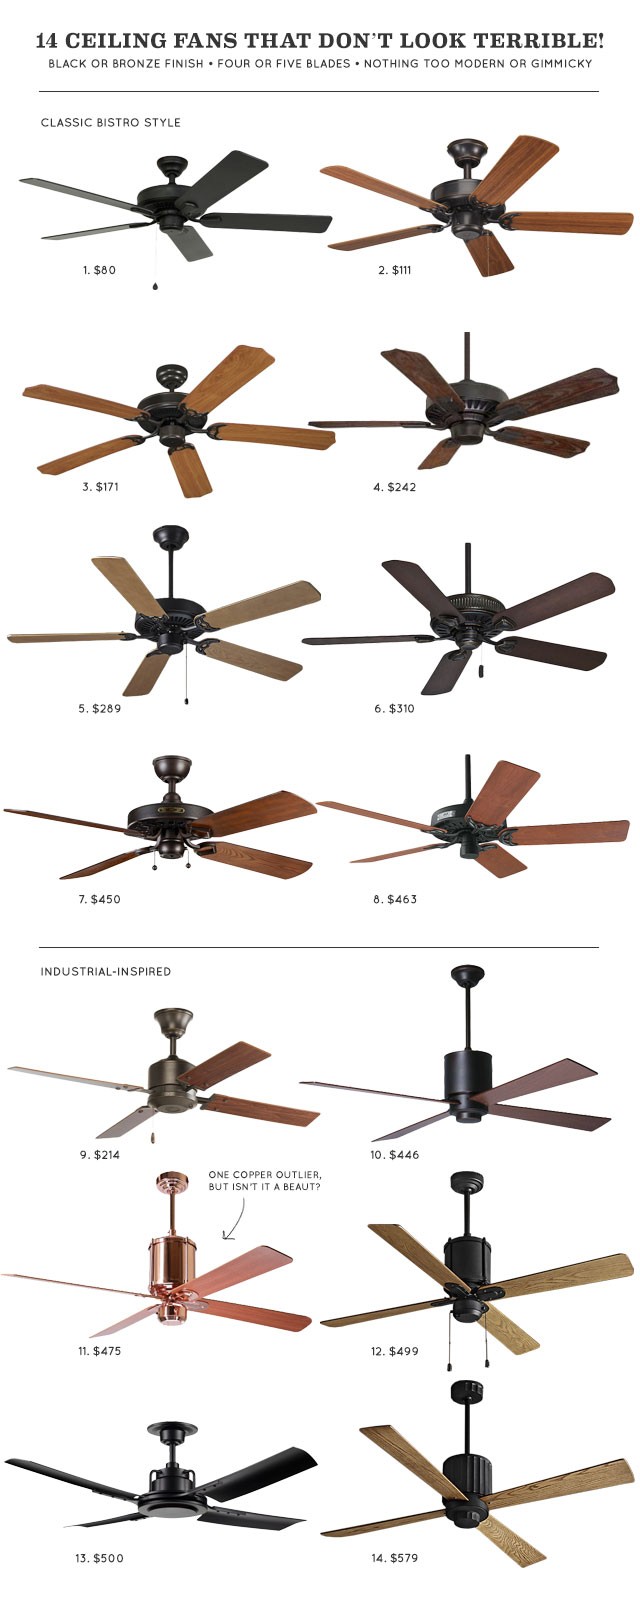
Here’s what I’ve been looking for in a fan:
simple and classic, early vintage style, or industrial-inspired
nothing too modern or so simple that it looks cheap
light kit optional (depends on the room — lamps/sconces are adequate in bedrooms)
four or five blades
no gimmicks (gyro fans, palm leaves, etc.)
black, bronze, or brass (in another house I might prefer white, but here I don’t think the color works as well)
roughly 48″ across, give or take a little
Some of these are available in several finishes, but I tried to stick to black or dark bronze for the roundup so they could be compared more readily by shape and style than by color. Many are also adaptable to house a light kit, and the down rod can often be adjusted for height.
I need a mirror for my new office space and I’m trying to find a fun one that would add something interesting to our decor. I looked around the web for inspiration and then I thought to myself it might be easier just to buy a vintage mirror at a flea market and jazz it up a little! Here are a few ideas that have caught my eye. Do you have a favorite? –stephanie
Indiana Department of Environmental Management Commissioner Thomas Easterly has announced his retirement. He has served as the department's top official since 2005 and has held the position longer than anyone else in state history.
Hubby and I wanted a kind of light, early dinner the other night after traveling all day and he mentioned Mexican food (not exactly light) and Sangrita popped into my mind. I didn’t know a ton about it, but I knew it was more of a cocktail place (saloon they call it) with small dishes and a somewhat limited menu, so we headed over there. Plus, it’s NEW!
First of all, as I said, it isn’t a huge menu—a few appetizers and 4 kinds of tacos and sides pretty much, but I really appreciate the fact that the kitchen is focusing on these things and not trying to do too much. The drink menu in this is way bigger. They have a huge list of Agave-based choices.
We did get a couple cocktails because, you know, research and all. Hubby started with the Margarita classic ($7) and I got the Margarita Jardin ($9) just to be different. Both were very good—lots of fresh juice and nice quality booze being used here. I liked the addition of the grapefruit and basil in mine—it really did make it sort of taste like my garden, which is full of basil. I can’t stand mint in drinks, and this was a nice variation. The only knock I have for either was that they were on the small side (lots of ice) for the price. But it didn’t stop me from ordering a second. And they were very good drinks.
The food, though, wow, I really enjoyed it. Especially the tacos. We started with a bowl of the queso fundido ($6) plus Smoking Goose chorizo ($2). I liked their version of cheese dip—it had a nice flavor from the sautéed onions and poblano peppers that were mixed into the queso blanco. They then throw some pieces of the sliced chorizo in there. I liked the taste of the chorizo in there, although I would probably prefer more, smaller pieces, rather than the 4 or so slices that were in there. I just cut mine a little smaller to make them go farther. It’s not a super spicy chorizo, but added some heft and smoke to the cheese. Then the top was drizzled with red chili oil. We added a bit more of the chili sauce they provided on the table and we really enjoyed it. The chips are also good—light and crisp, but hold up well to the cheese. I would like to try the salsas as well next time.
They have a selection of 4 types of tacos. The way they are listed on the menu, you choose two (of the same type) and get 2 sides with them (the meal is $12 for the meat tacos and $10 for the veggie version). I really wanted to try more than just one type of taco, so we ordered them a la carte and got one each of the meat varieties. I think they charged us like $3-4 bucks per taco this way.
The tacos were really, really good. The meat is the star here, as it is supposed to be in straightforward traditional tacos, but they really know what they’re doing. My favorite was actually the chicken ones, and after we tried them all, I got a second one of these. The chicken thigh meat is marinated in tequila, citrus, garlic, and jalapeno and is wonderfully tender and you can really taste the marinade. It isn’t dry at all, and then with the addition of crema, onions and cilantro, it was just the perfect combo of creamy with the meat shining through. Loved them.
Our second favorite (and hubby’s first favorite and the one he got a second one of) was the pork—it was spiced Coca Cola braised pork belly and shoulder with Pasilla salsa, onions and cilantro. The salsa was a little spicy, but mostly smoky and added even more moisture to already super tender meat (like I said, they’re killing it with the meat here).
Second round--1 chicken, 1 pork
We also had the skirt steak taco, and don’t get me wrong, it was mighty tasty too—it was super tender and is marinated in Chipotle seasoning, which gave it nice depth of flavor too. This taco is topped with poblano crema, charred scallions, cilantro and radish. I liked the variation of toppings in each version, and I liked that they all added not just extra flavor, but extra moisture to the tacos. They were small, and only used one corn tortilla shell (which I prefer so it doesn’t dominate the flavor of the meat so much).
They’re a cross between very traditional tacos with just the meat, cilantro and onions and the super gooey ones with all kids of stuff added. For me, it’s the perfect middle ground—not overwhelming (or hiding) the meat, which here is wonderfully seasoned and cooked, but also adding just some complimentary things that just take it to another level of deliciousness.
We also sat outside on a gorgeous day—they have a lovely deck (it’s not huge though) right on 64th Street in Broad Ripple. Our service was very attentive and the food and drinks arrived promptly. Seriously, this is one of my favorites of the new places that have recently opened in Indy (that I have been to, of course). I can’t wait to go back and try the other things on the menu. And next time, I will likely get a platter so I can try the sides now that I have a favorite taco. Although, I really need to try the veggie taco too….
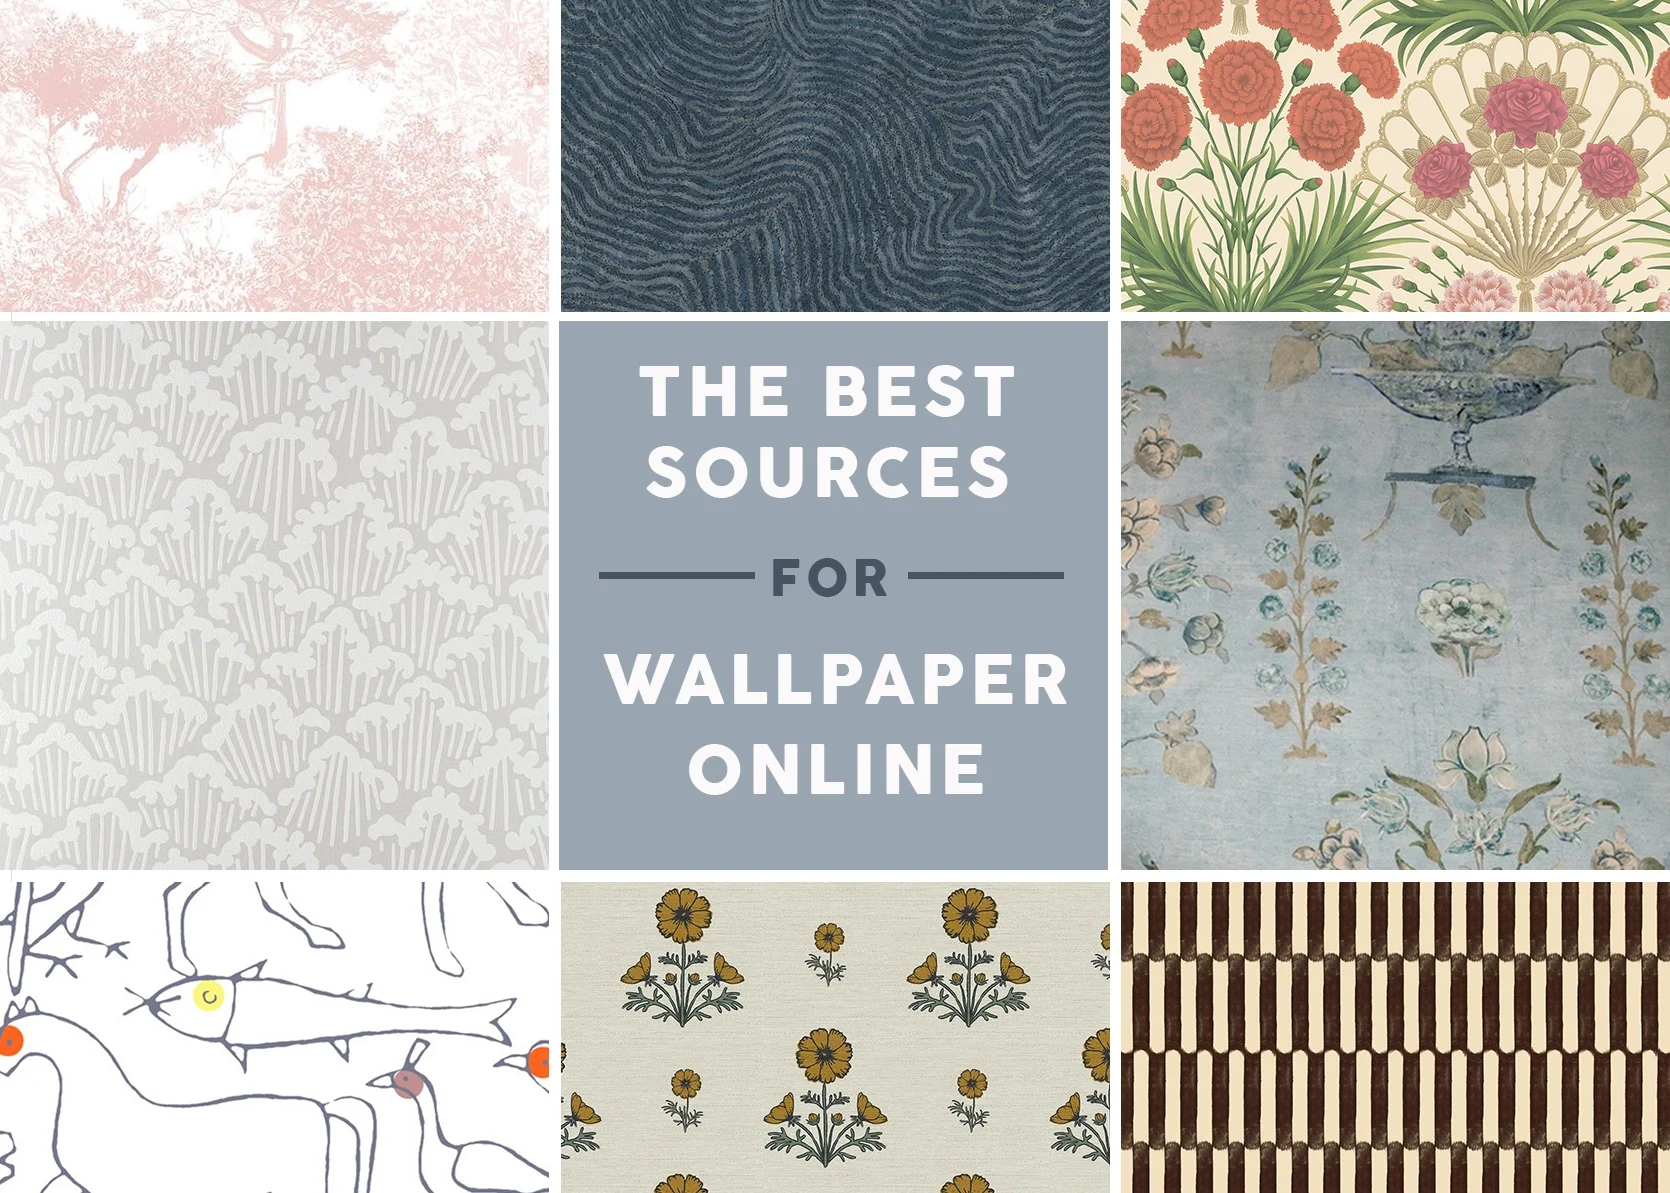
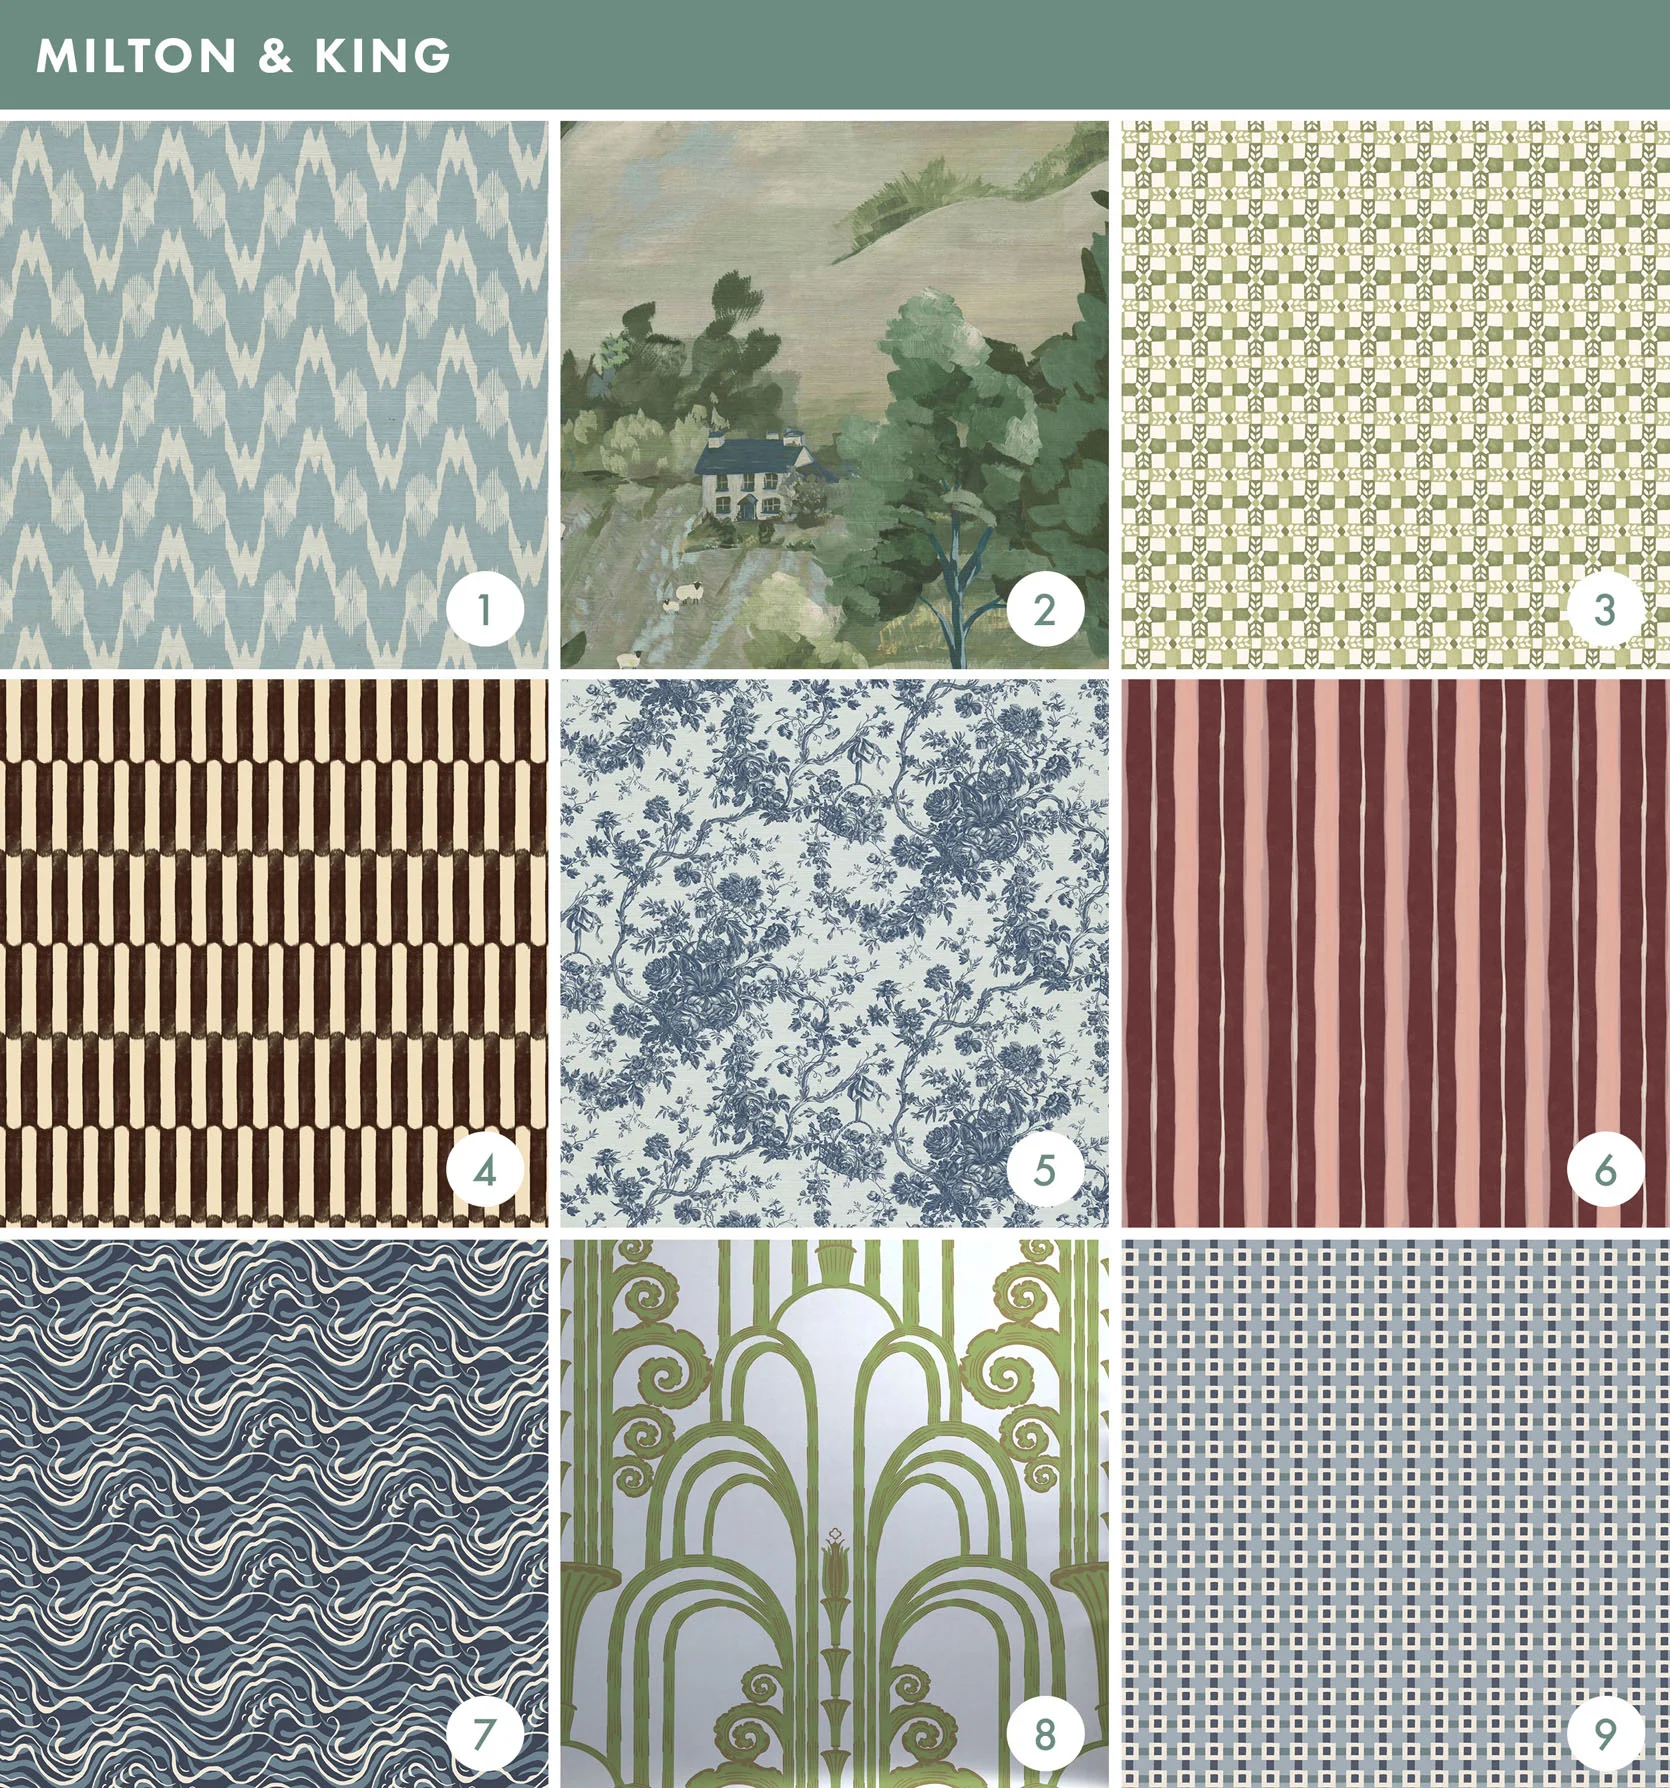
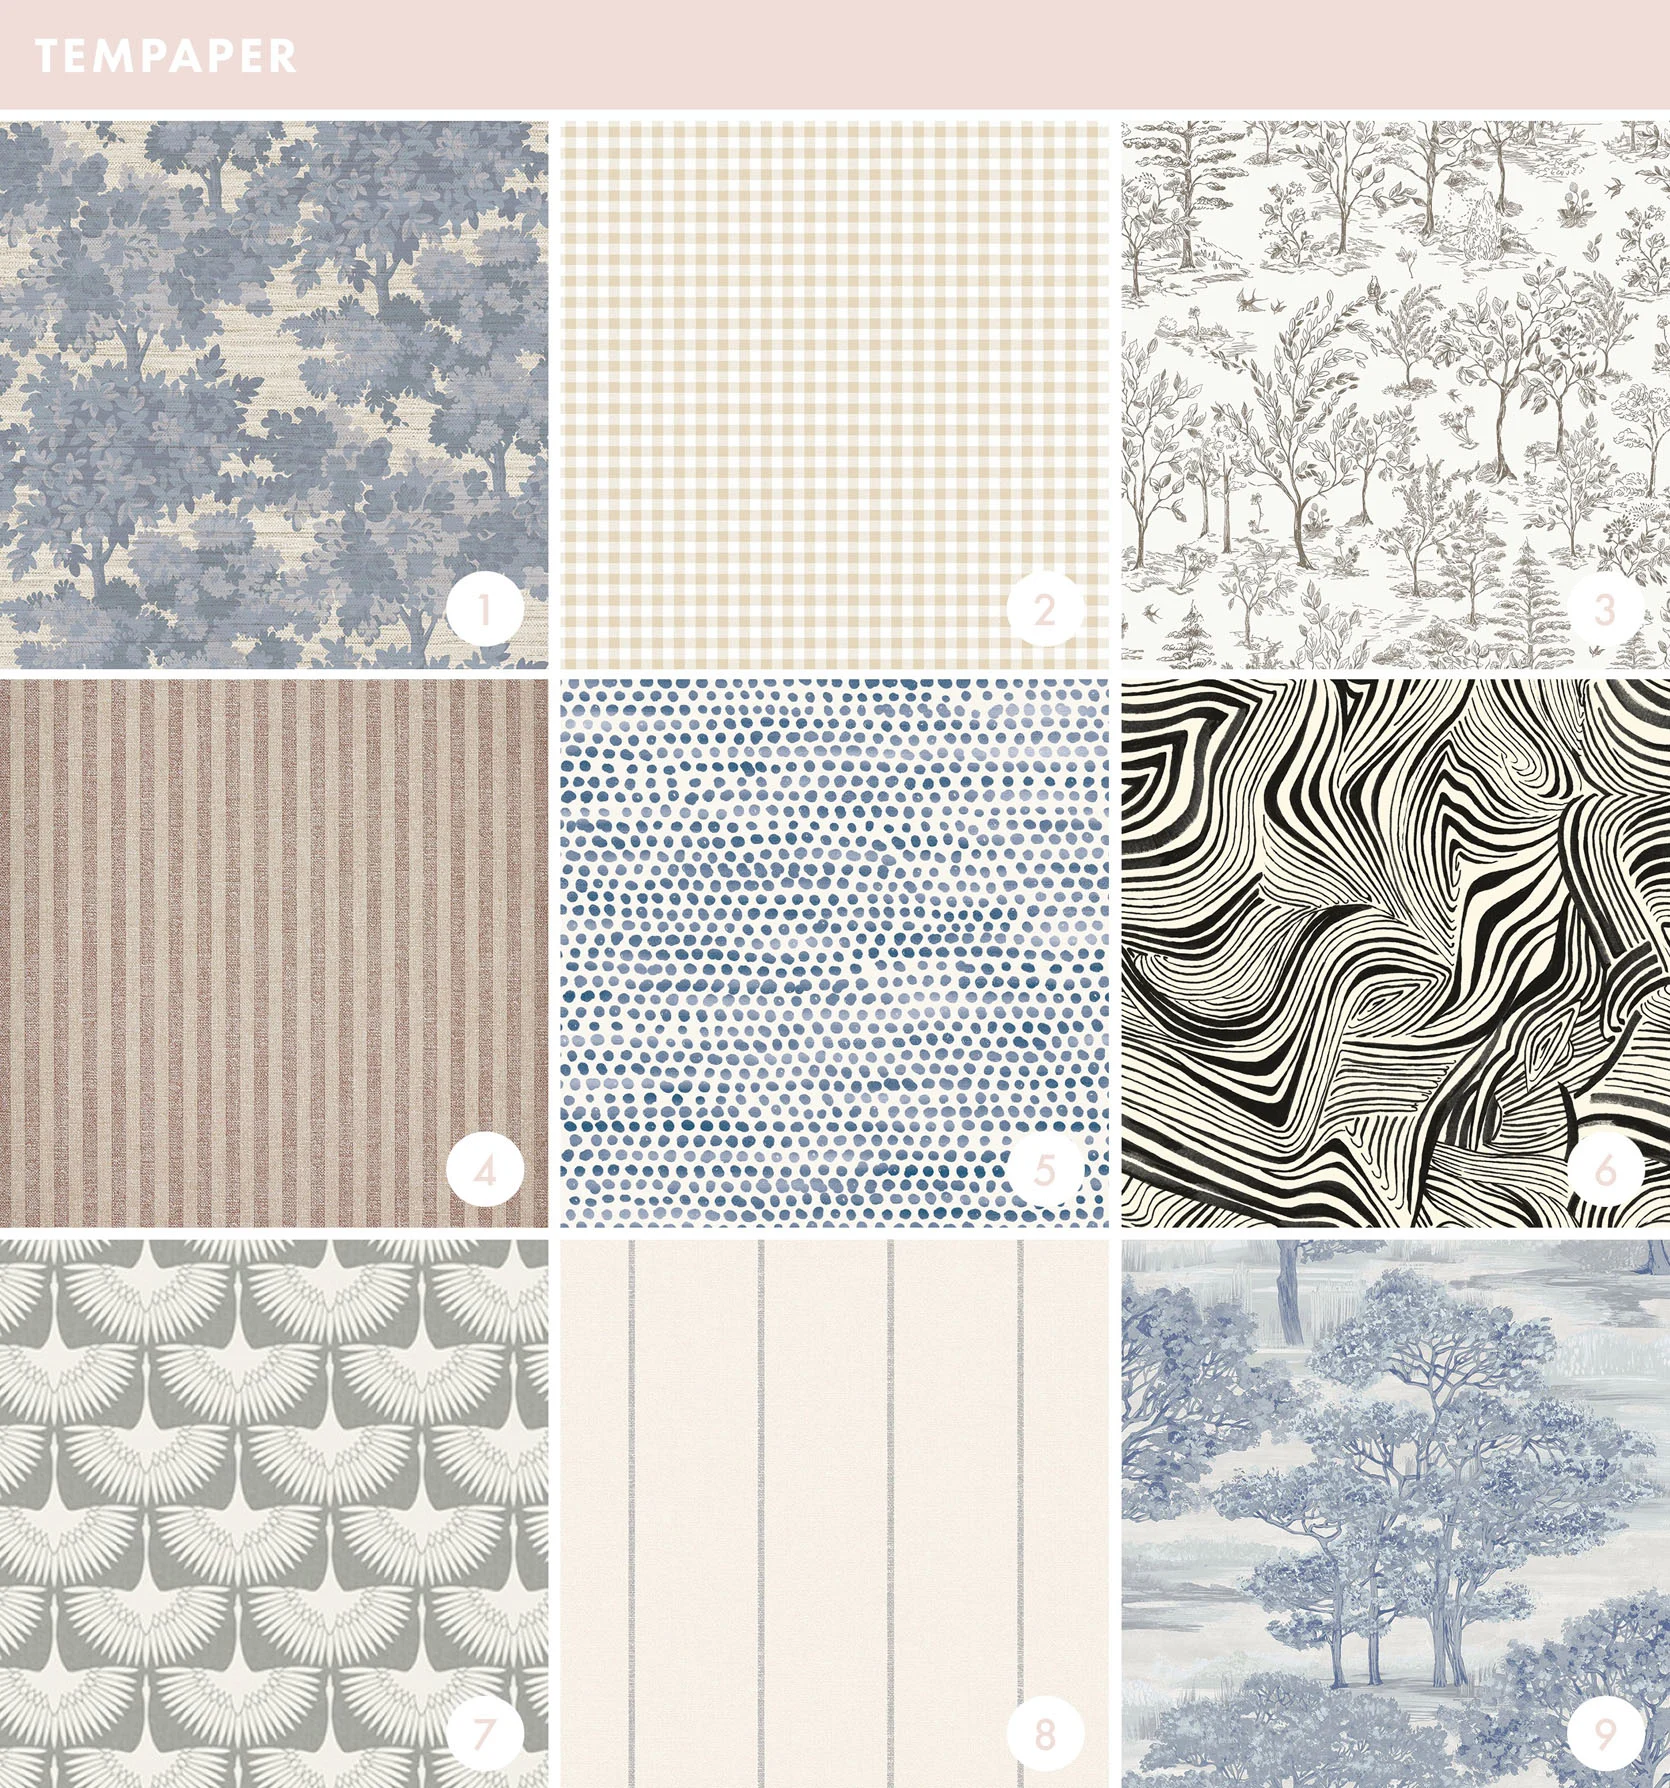
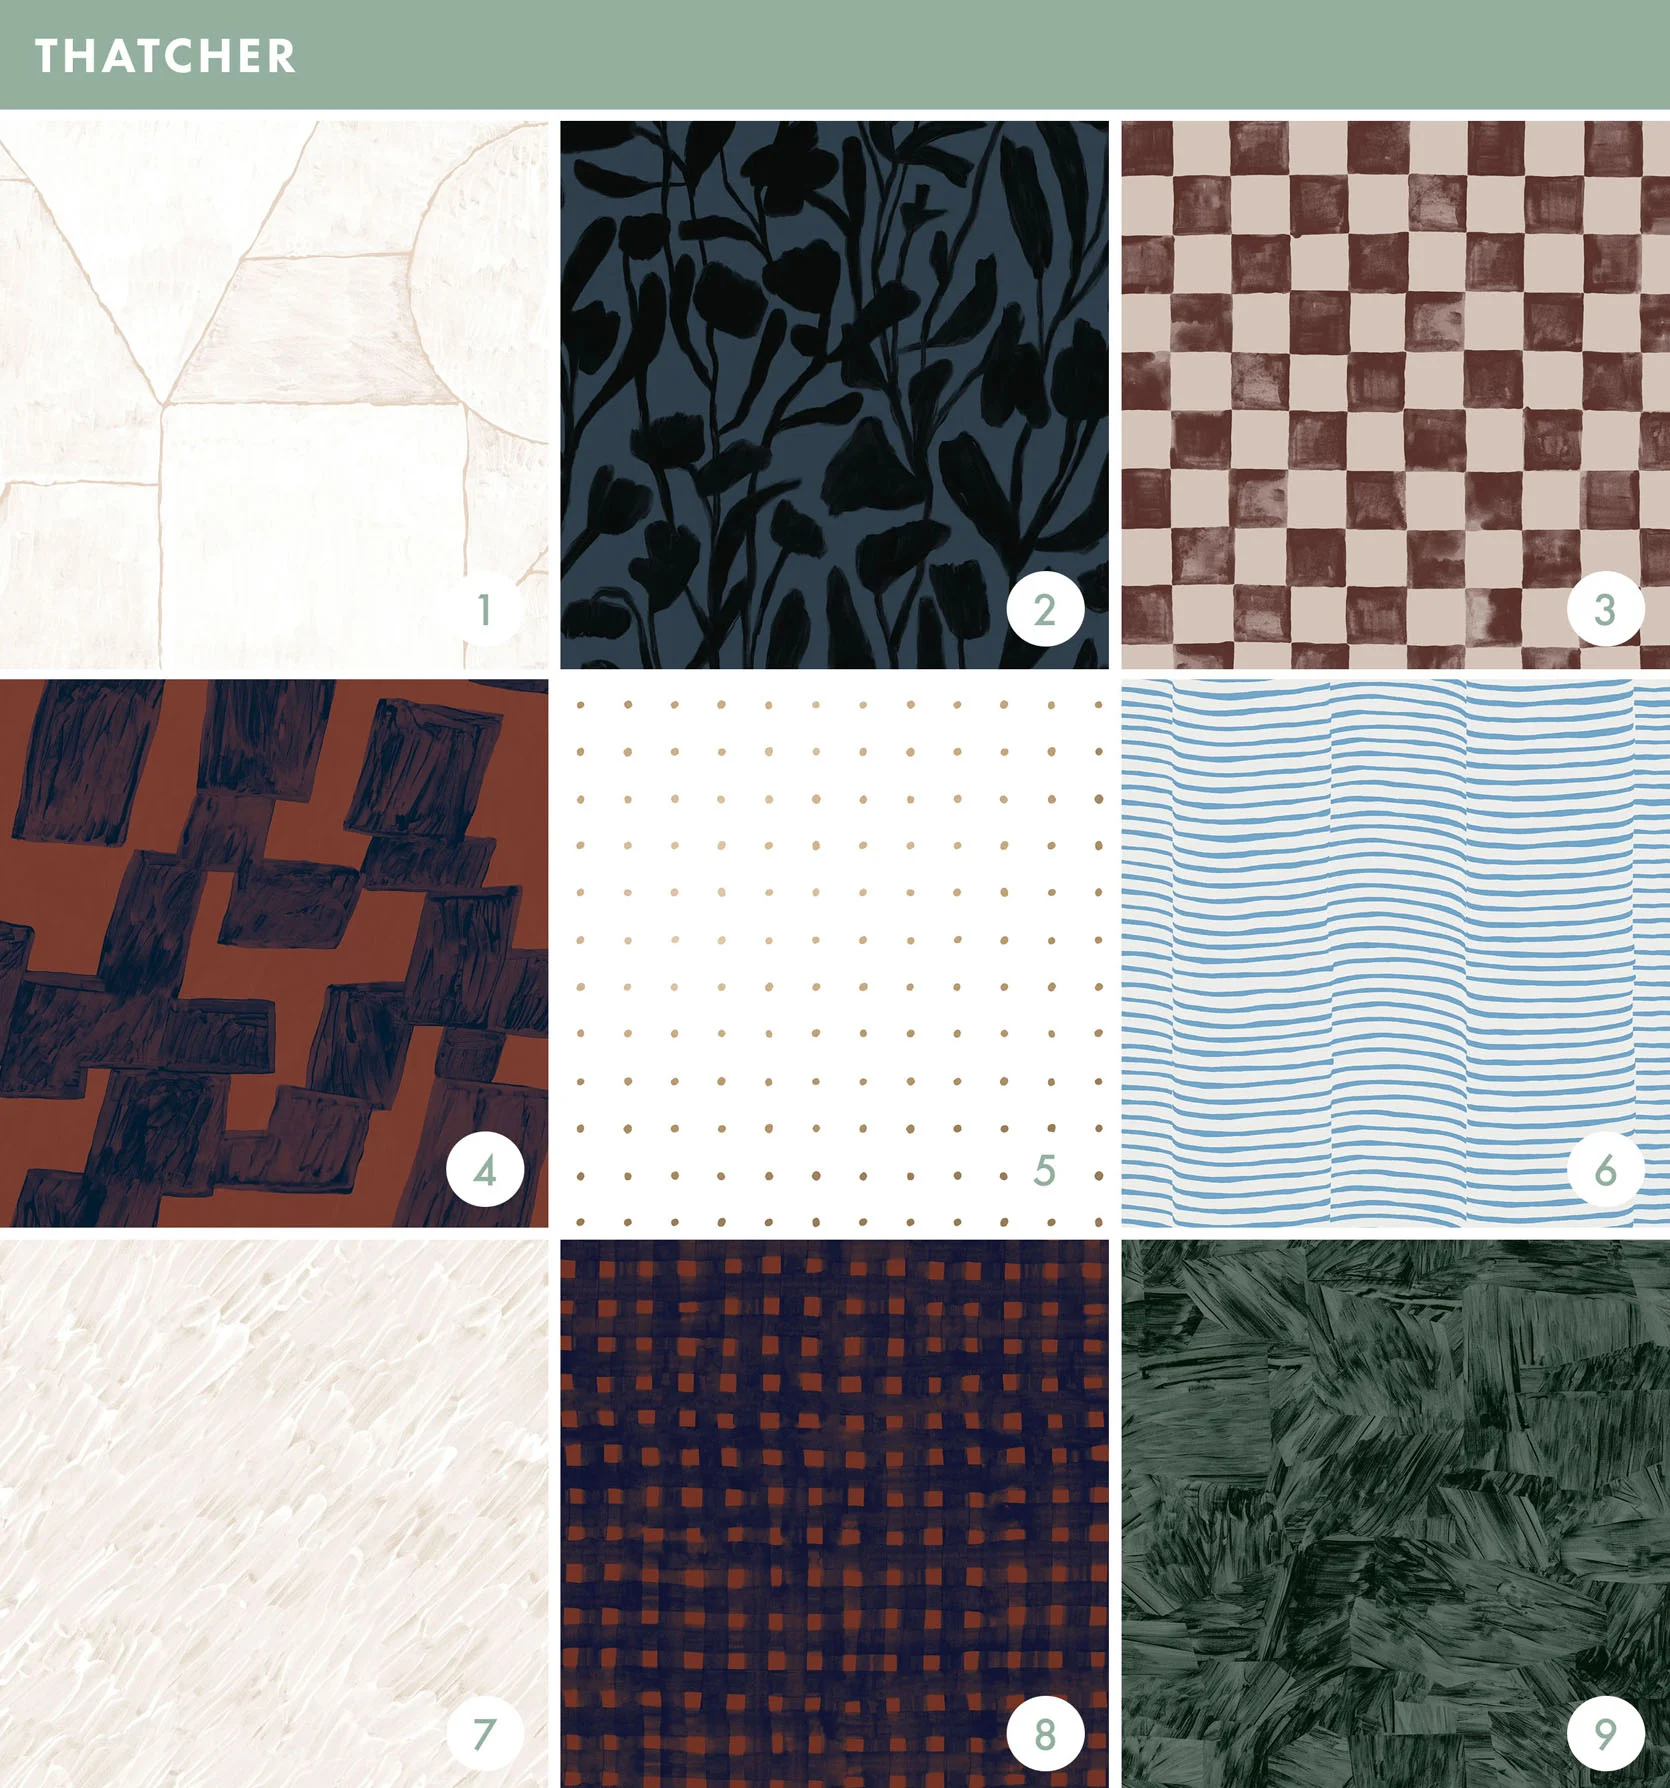
We realized it had been A WHILE since we did a proper “best wallpaper” update, so we are fixing that today. We combed through and deleted companies no longer in business, added some new favorites, and updated each and every brand graphic with new selections!We are big wallpaper believers, so if you are contemplating adding some to your home, we hope this post is a huge help.
Wallpaper can be daunting to shop for, commit to, and hang. But when you do it correctly, it really MAKES a room. It not only provides a big pattern that creates impact, but it actually makes the rest of the room easier to design because you have a pattern, color, motif, or design that leads the rest of the room. A few years back we scoured the internet pulling together some of our favorite sources (both the ones that we use time and time again and a few that were new to us), but with some of the patterns being discontinued, some new ones being introduced to the market, and so many new artisans creating beautiful prints that we love, we figured it was time to update the roundup and highlight some of our favorites in a massive roundup. So, folks, here are 354 of our favorite and wallpaper patterns in alphabetical order. Just what you needed for a Wednesday morning pick me up.
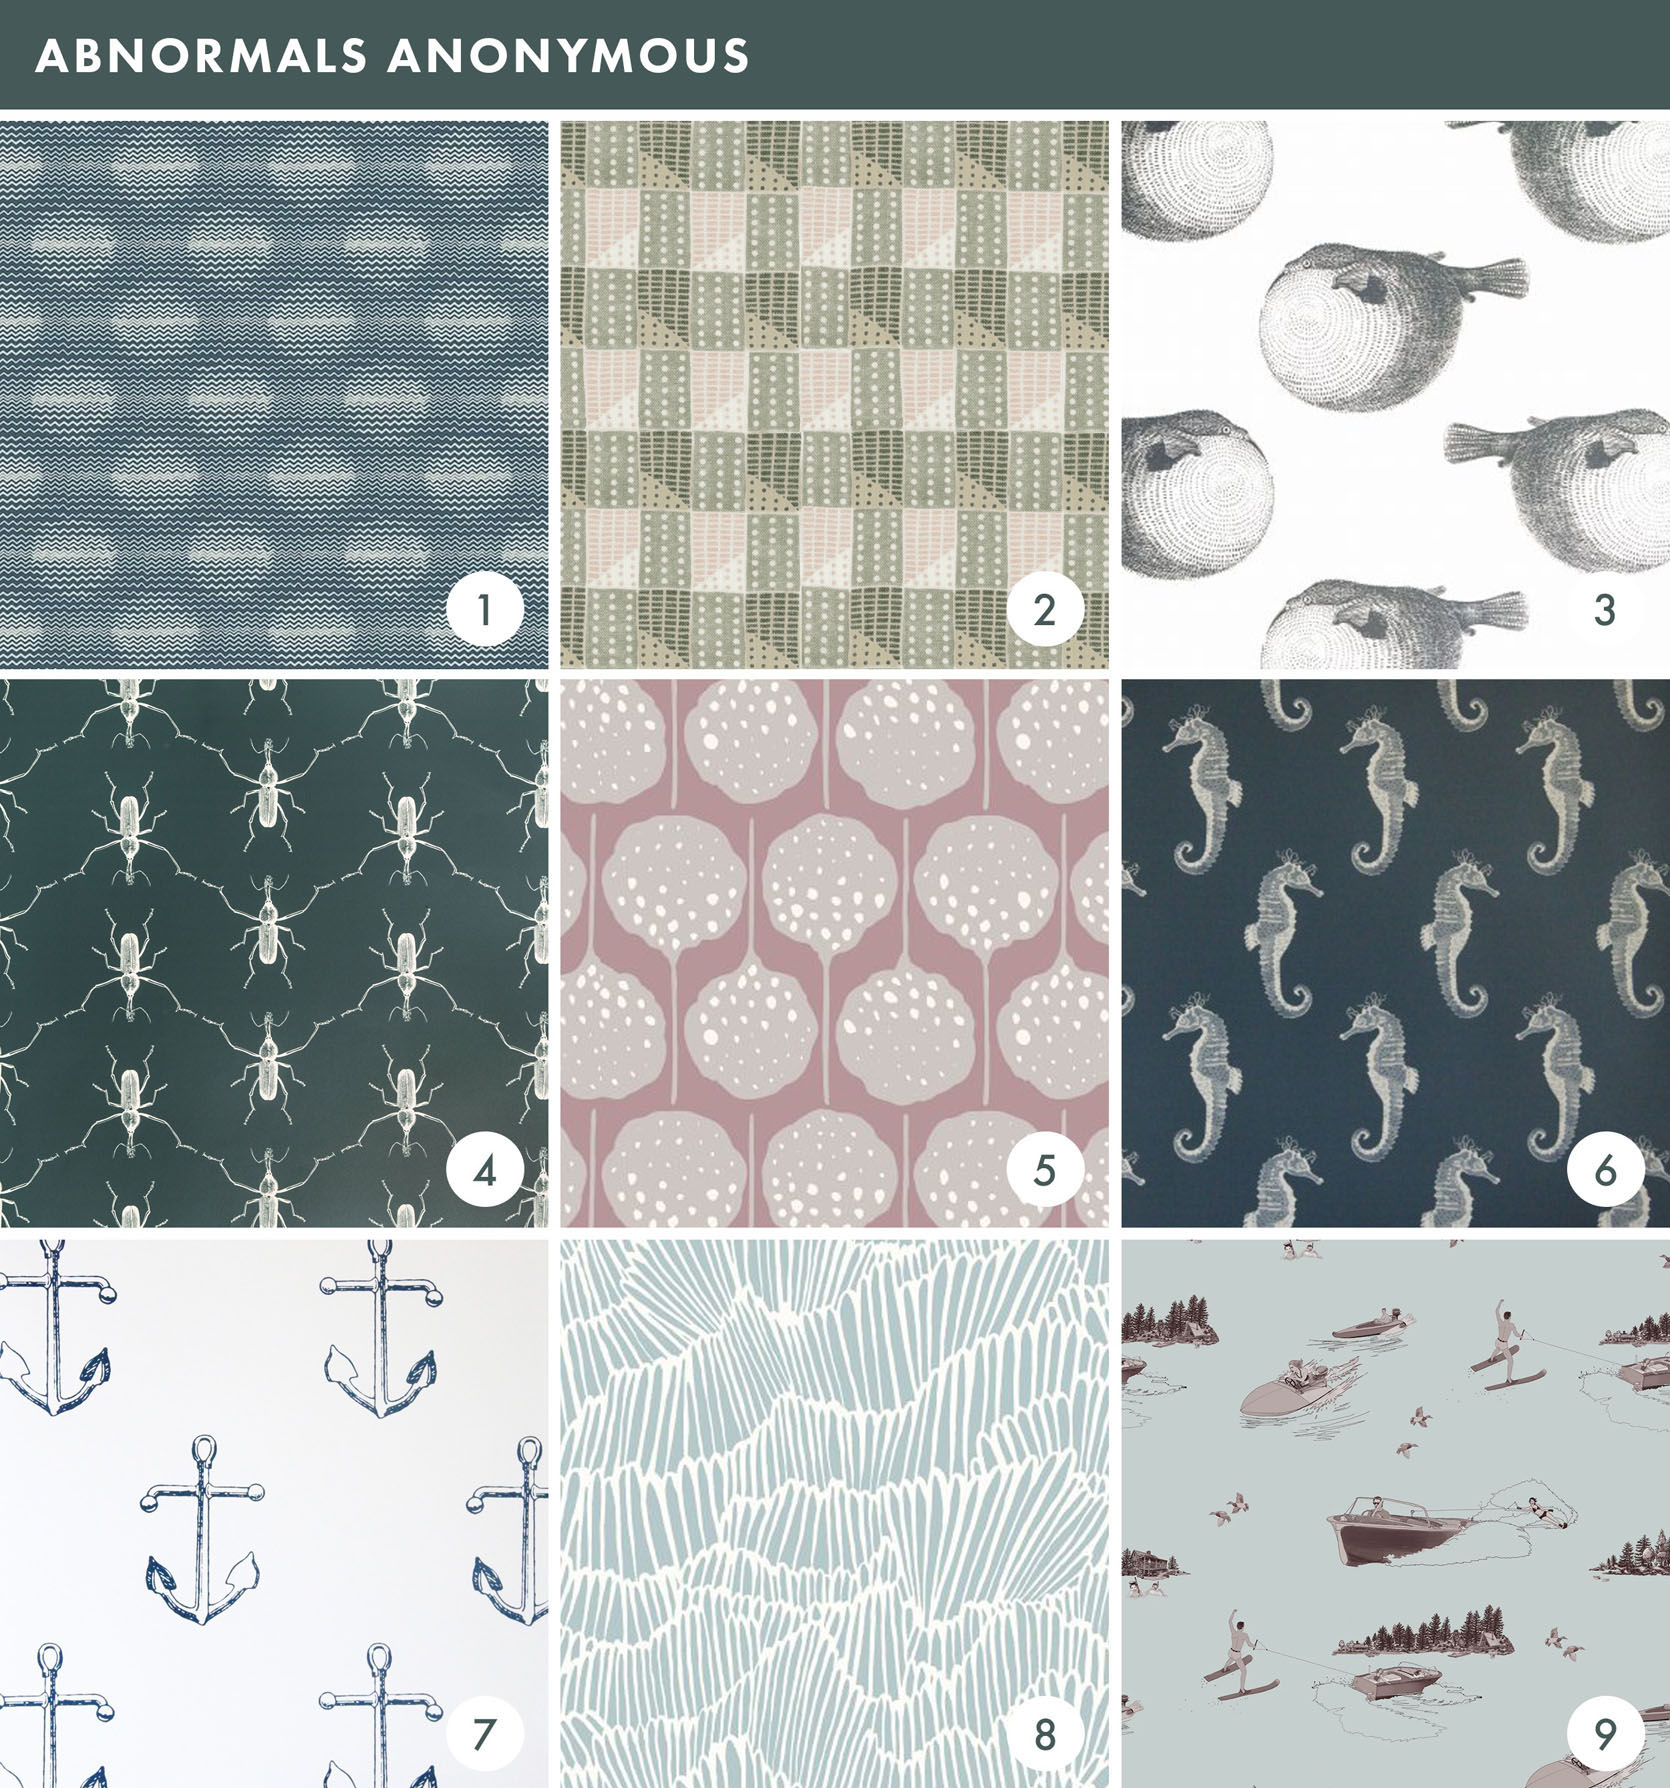
These guys are exactly what they say they are: a little bit abnormal and a little bit amazing. I hung quite a handful of these in our old office for our opening party, and everyone couldn’t get enough of them. They have reintroduced a lot of the classics in some more muted colors, and I love the playful aspect of them.
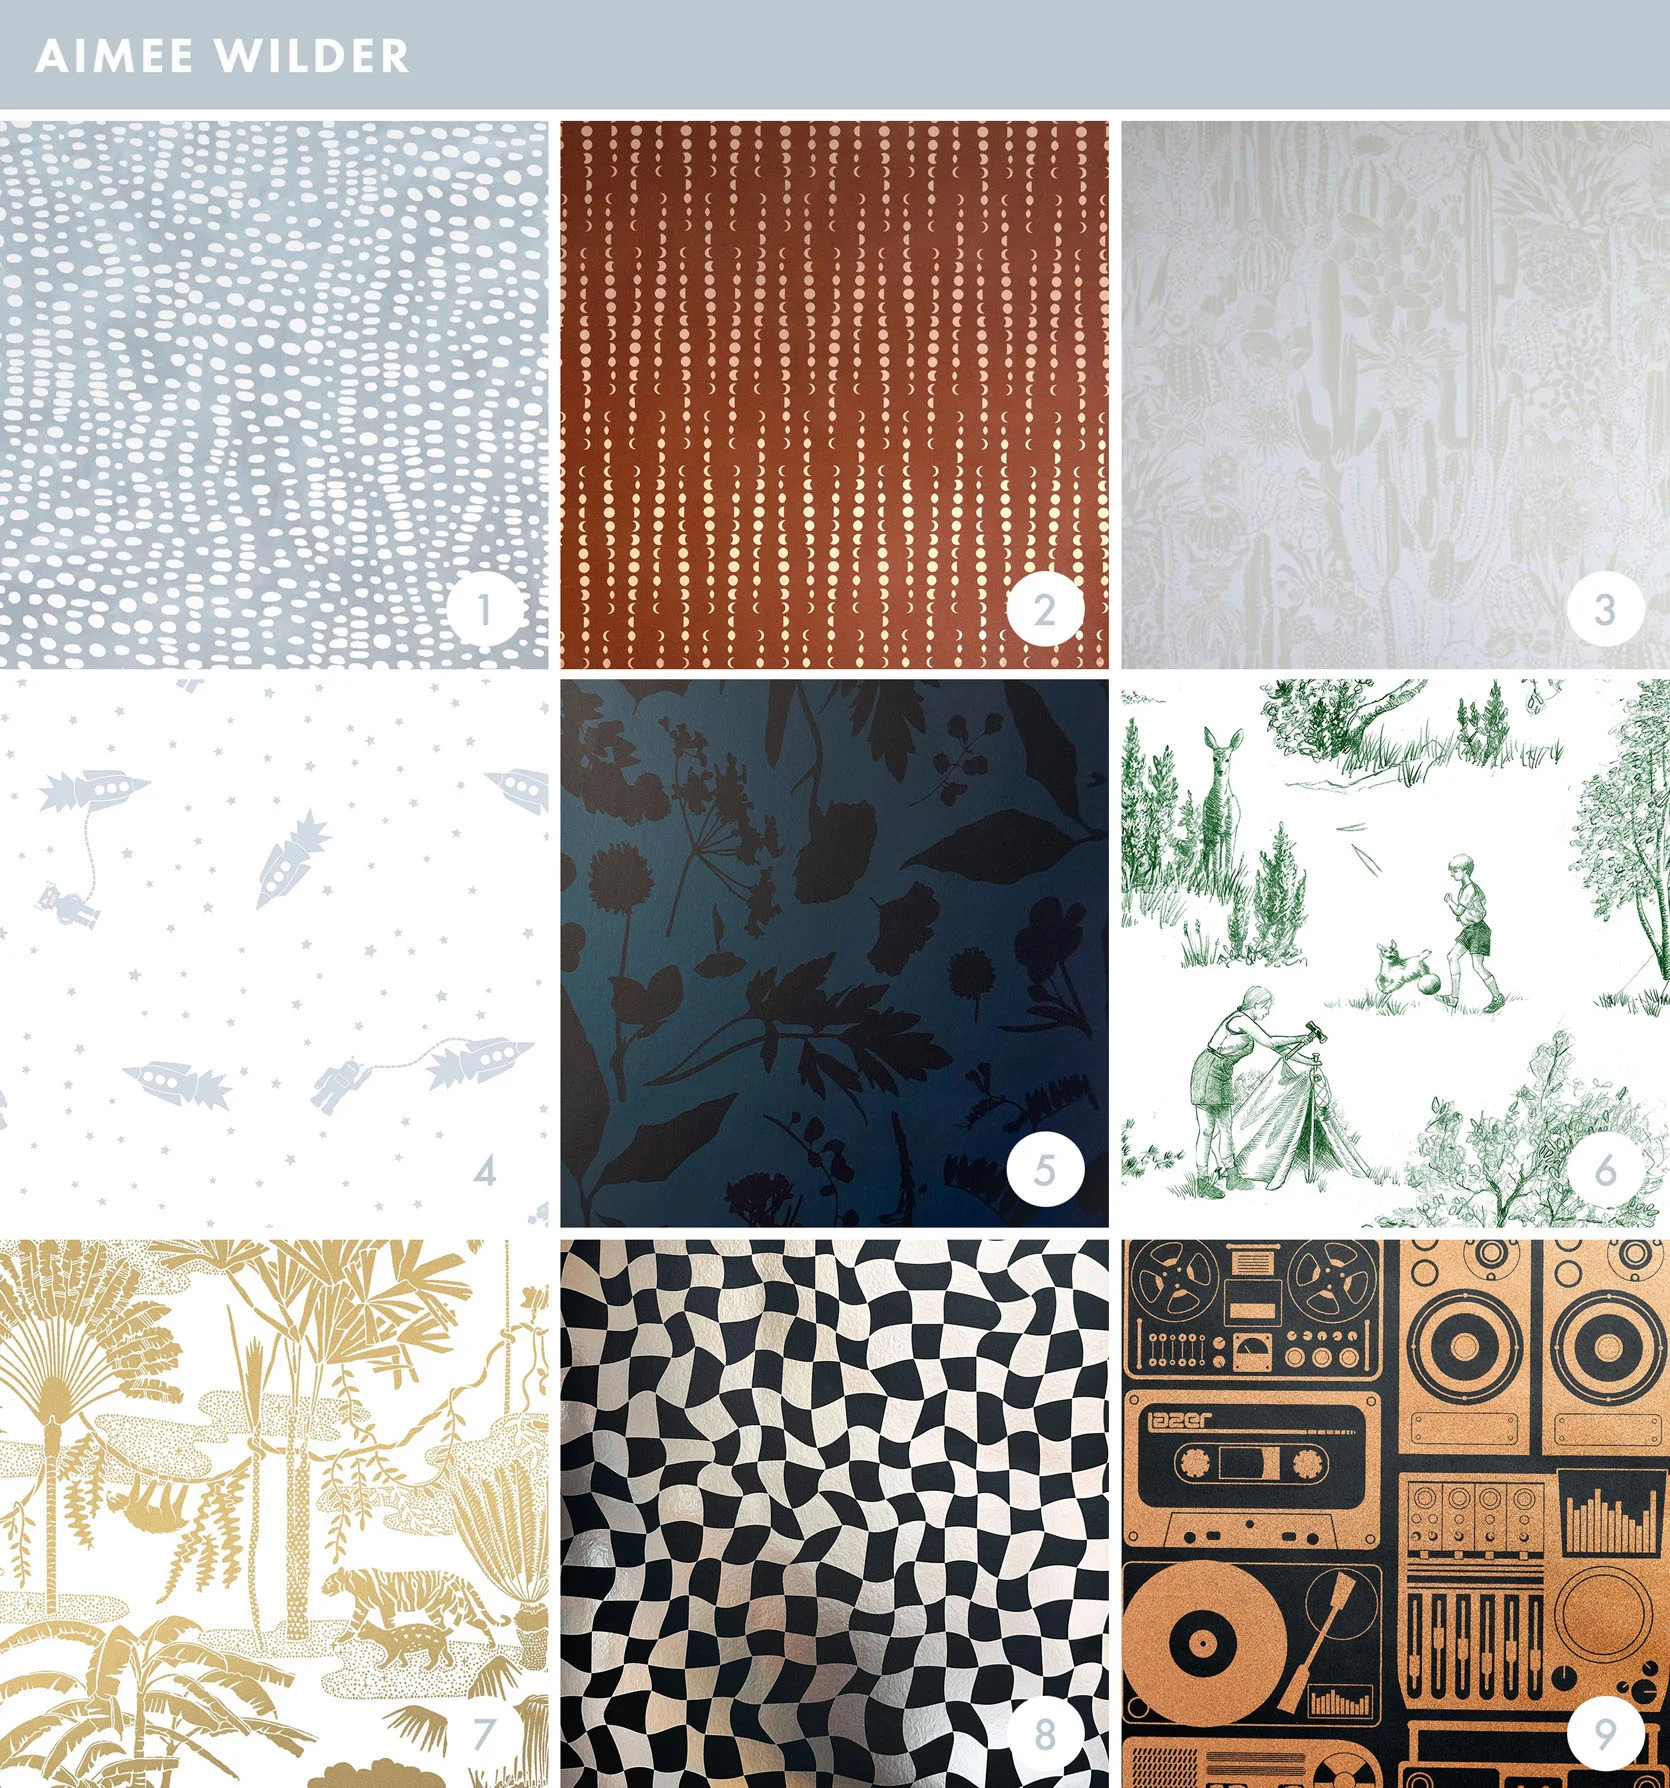
This has been one of my favorite sources for fun, fresh, and playful patterns. They all come in a variety of color ways, and I loved her Shadowcat pattern so much that I used it in the Cattery project I did a few years back. Looking back on that project is so much fun, and I am still very into the pattern of the paper.
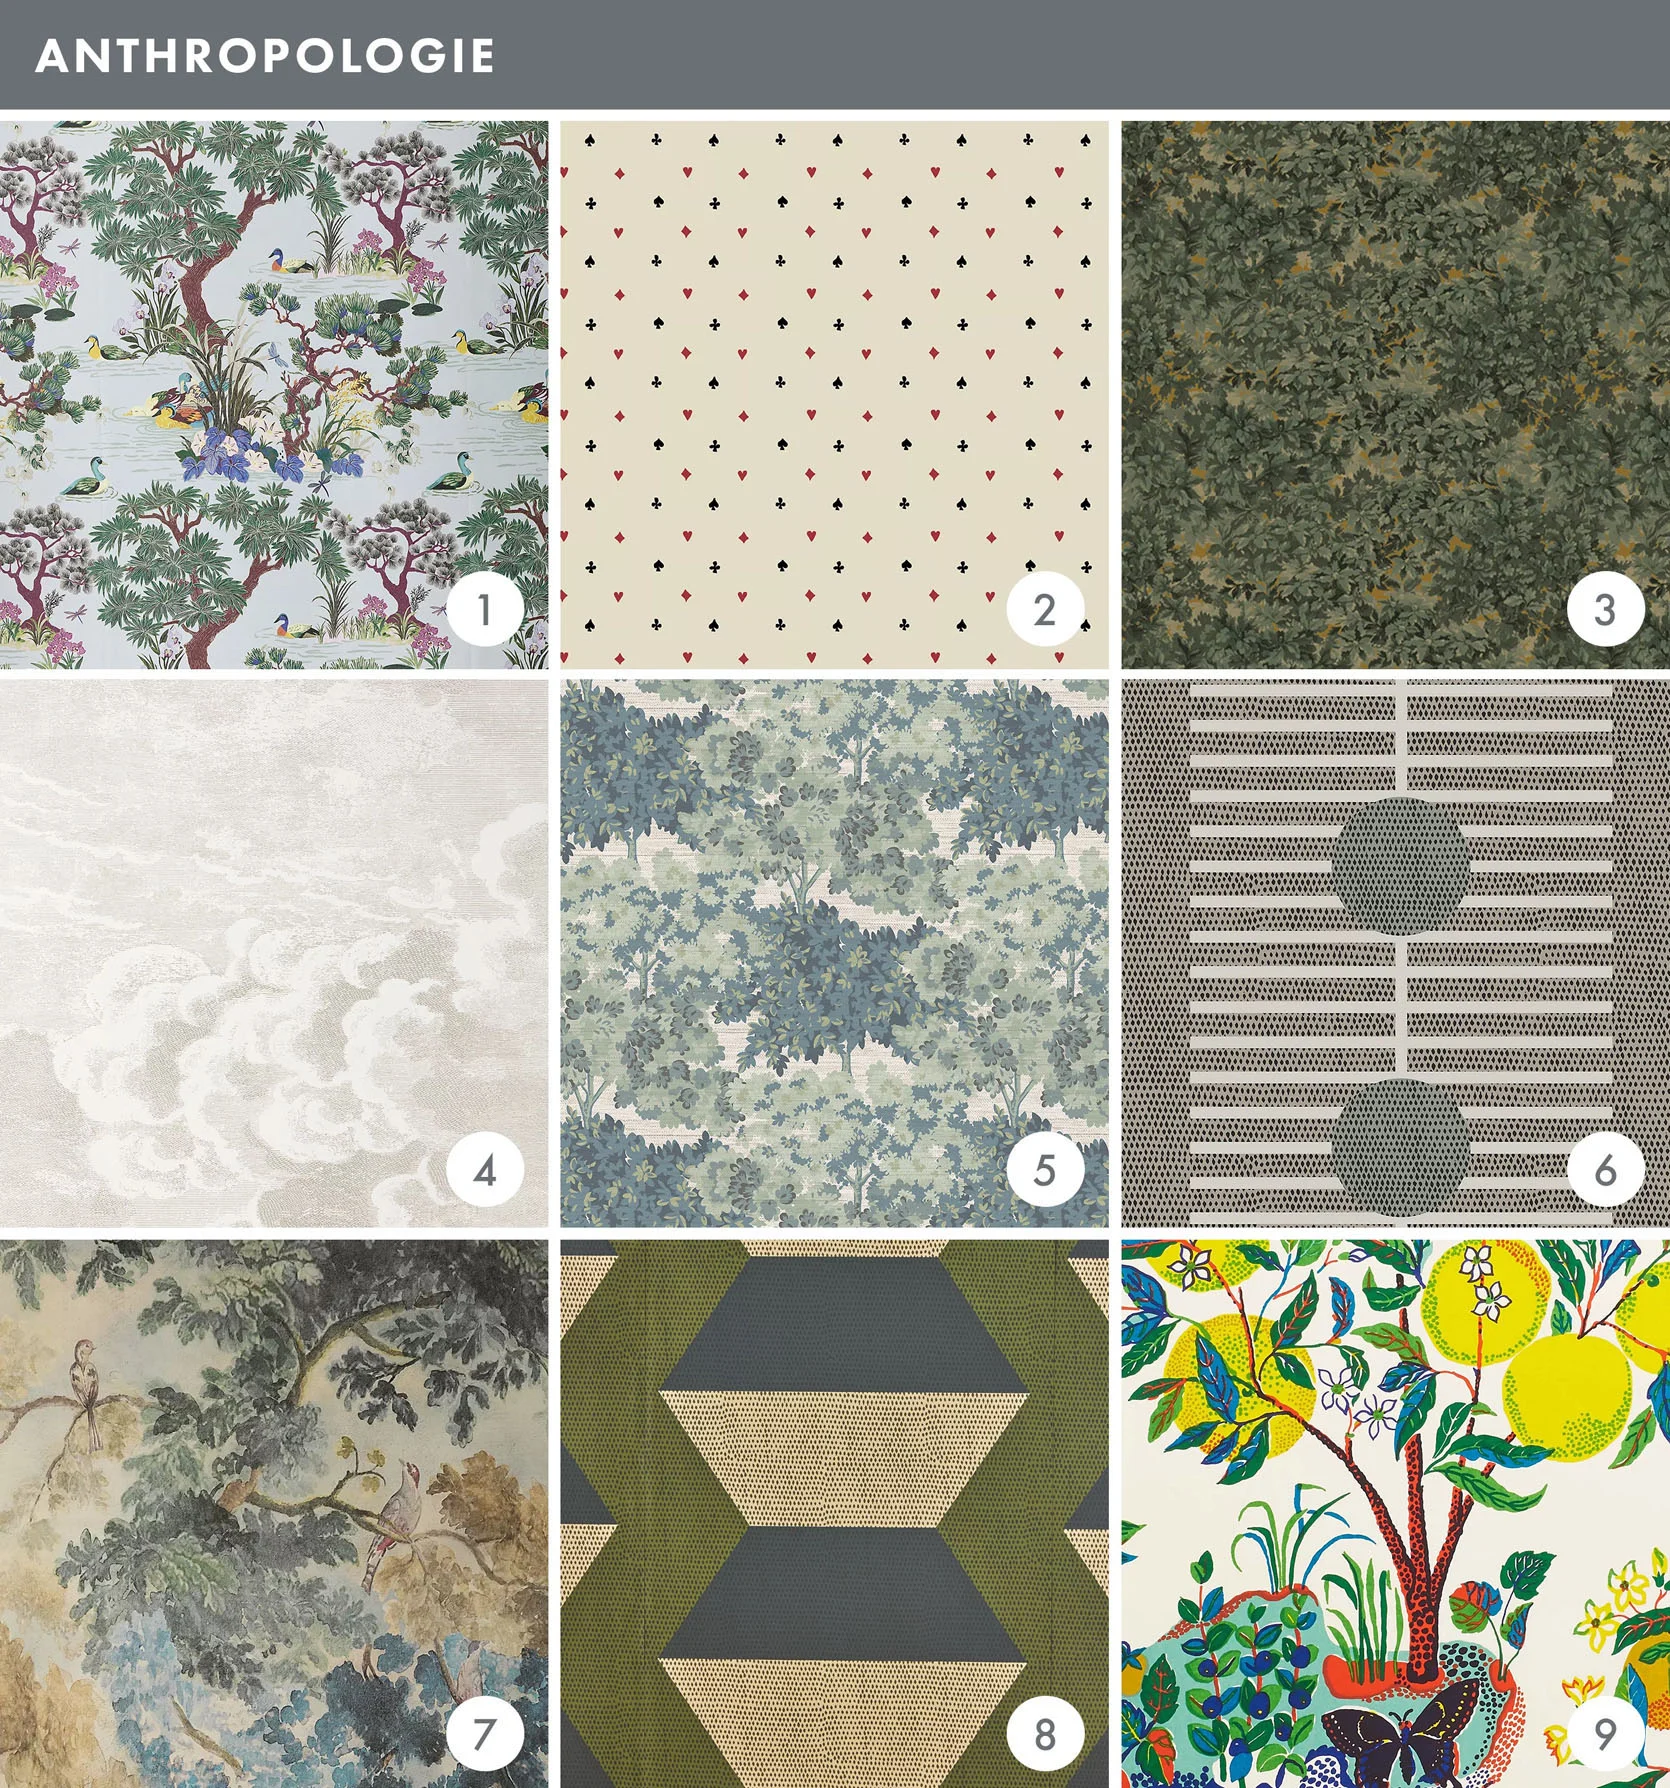
It might not be a secret to you, but if it is…here is my big secret – Anthropologie sells wallpaper, and their patterns are SO good. They really pick the creme de la creme of patterns and designers to sell online in a really curated collection. Their patterns rotate with each season, so if you find something you love, snag it up before it’s gone. They don’t sell in-store, but some of the stores do use them in some of their installations.
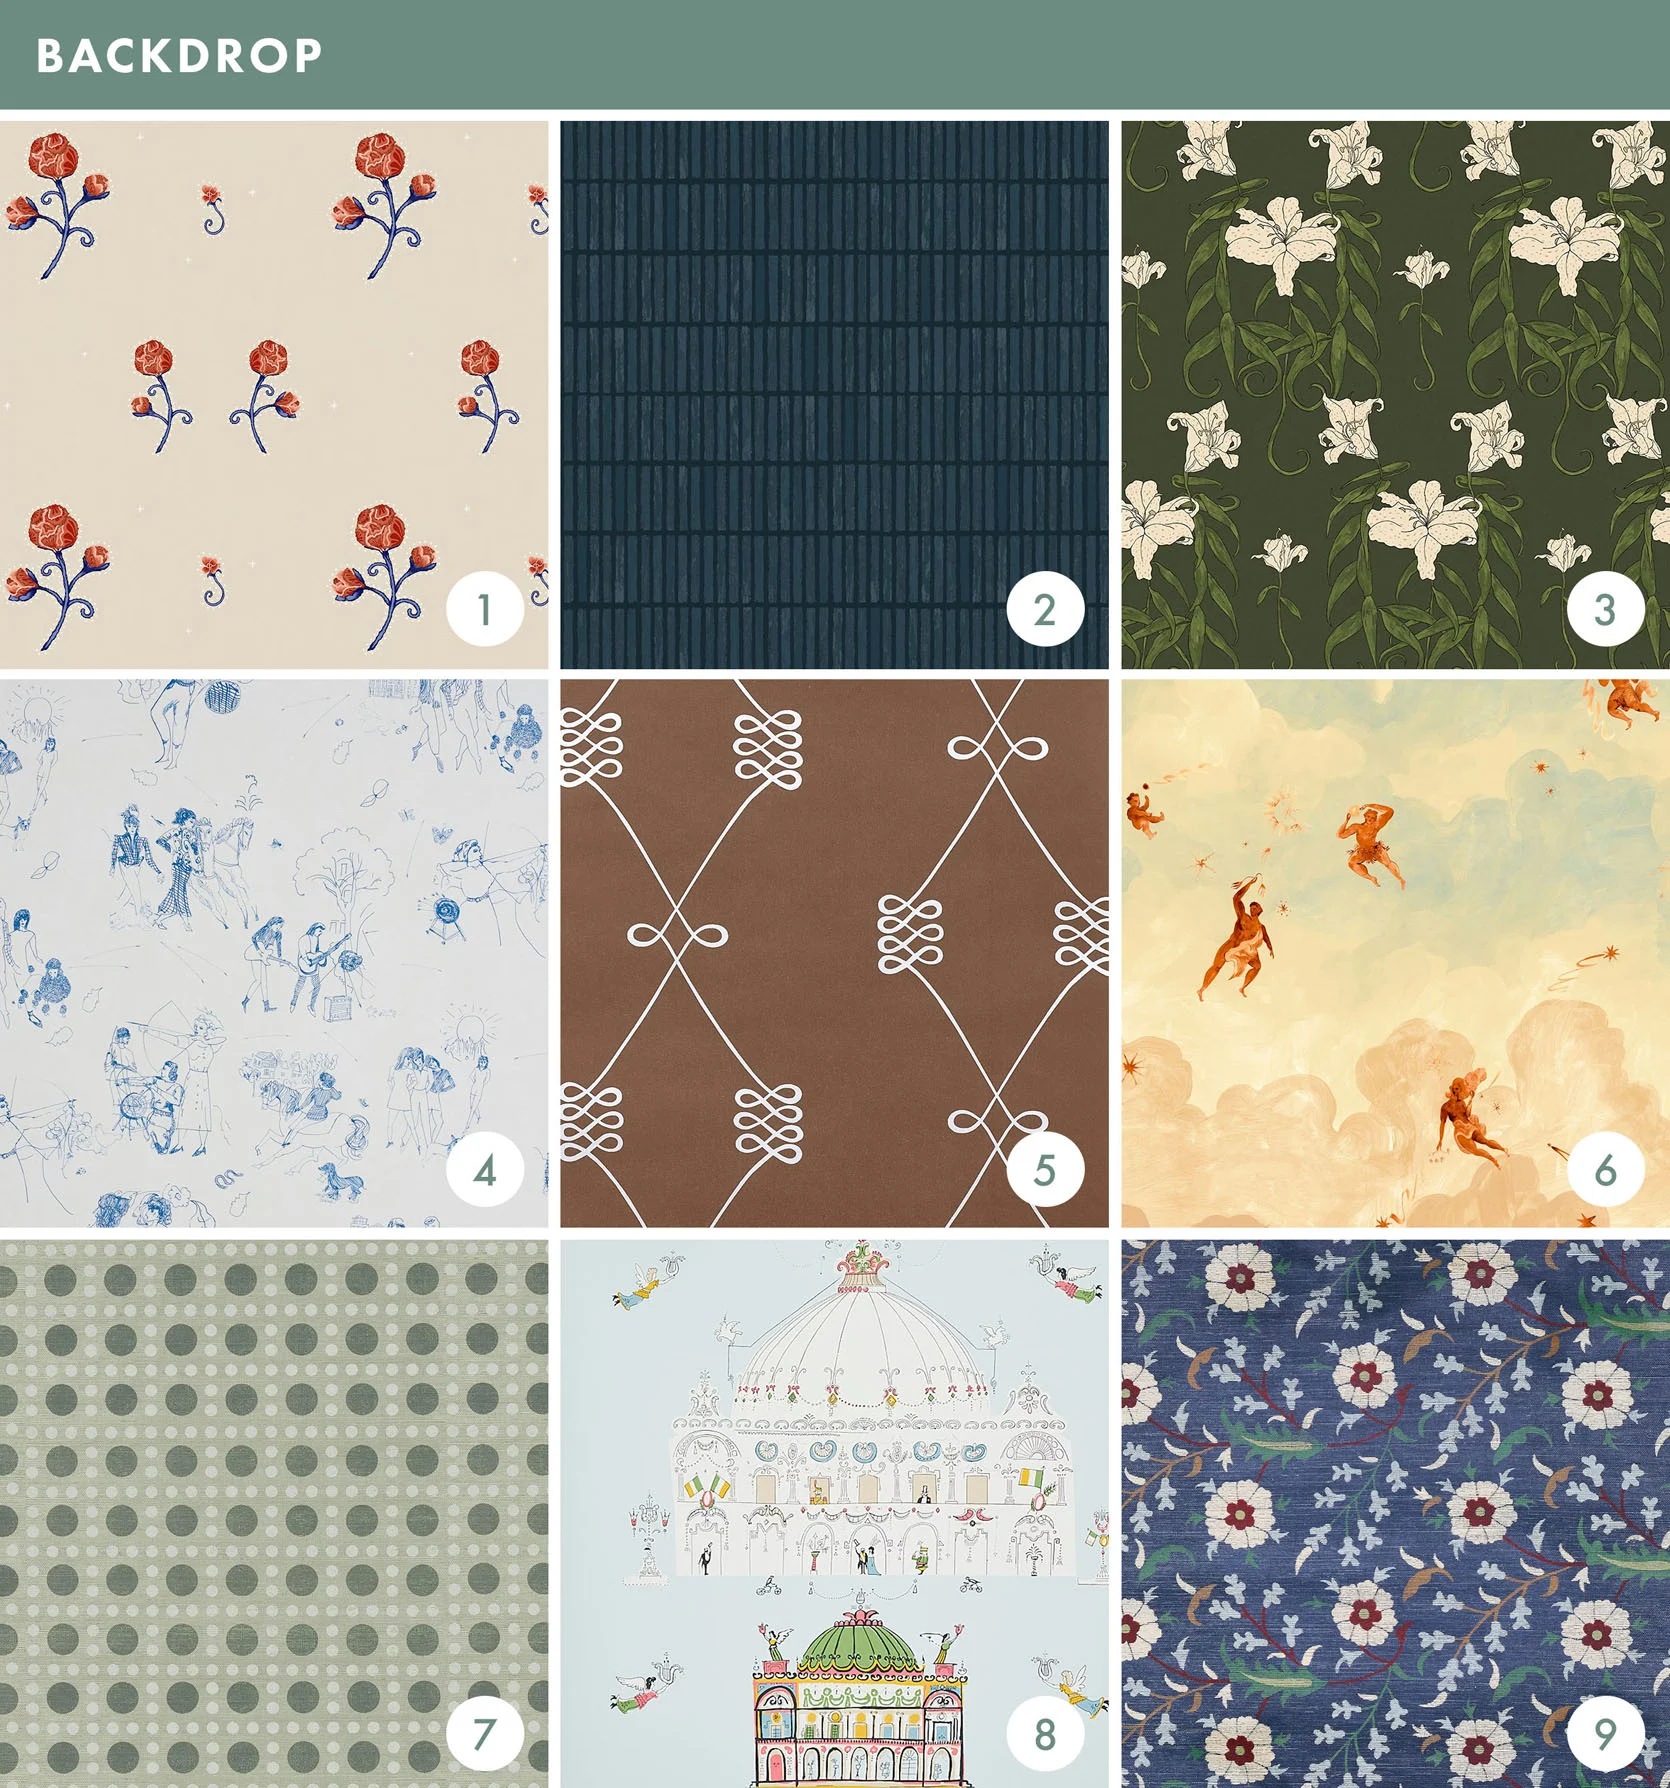
While we haven’t used these yet, Backdrop has been coming out with incredible and original prints. Modern but whimsical! Aside from their own designs, they also carry other brands.
I am a HUGE Beata Heuman, so it’s no surprise that I love her wallpapers. This is her whole selection, but it’s a pretty beautiful one if you are looking for great wallpaper.
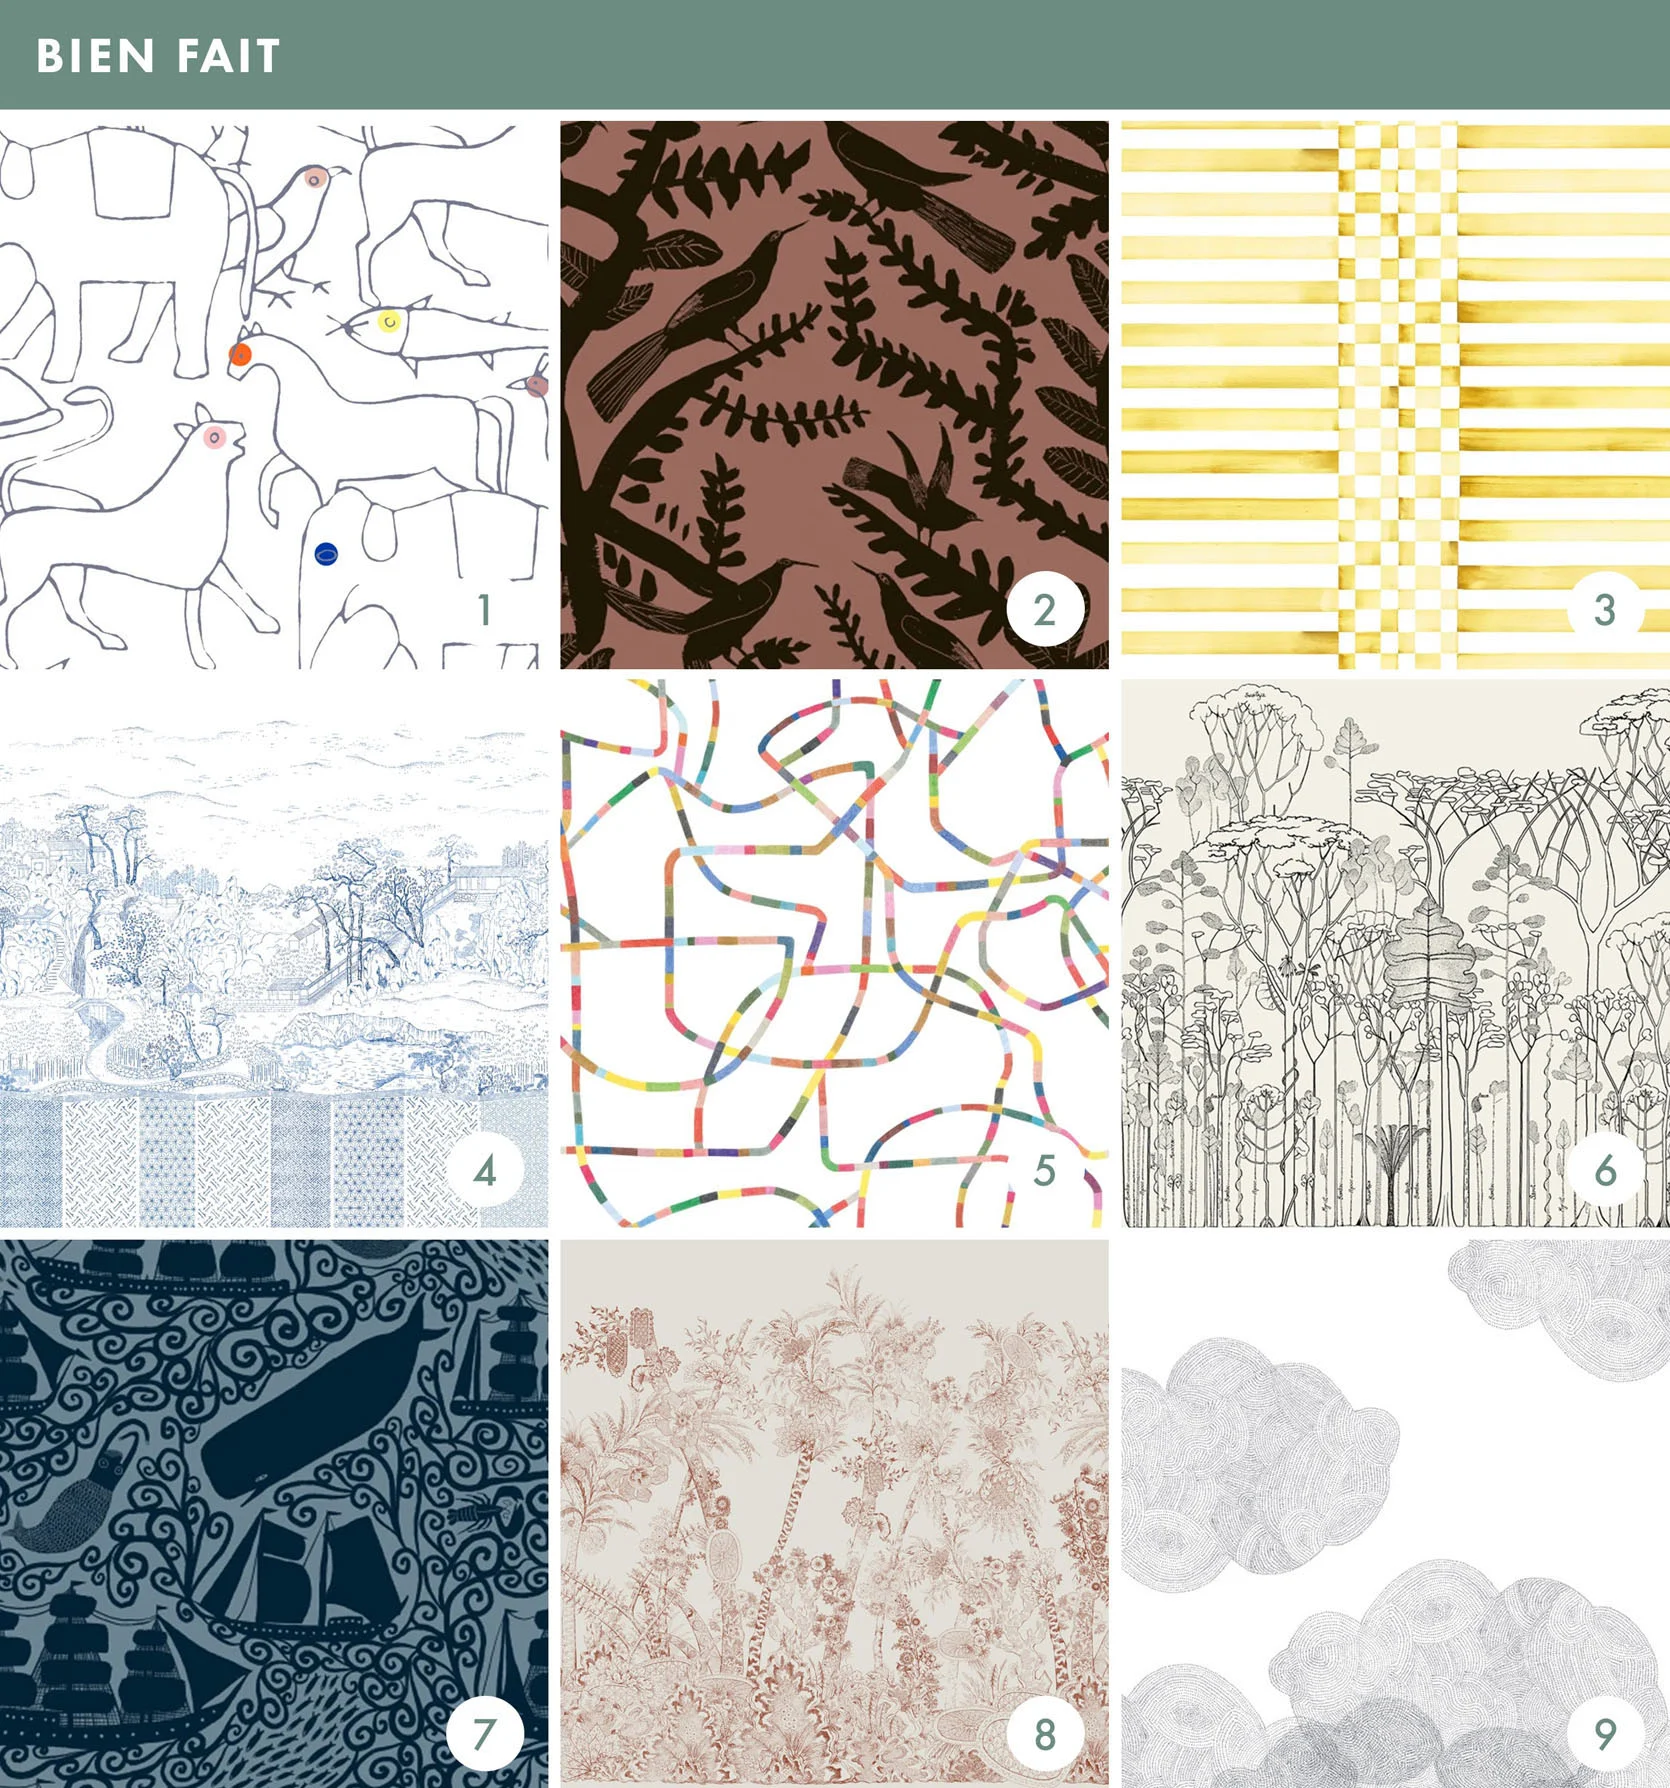
These guys are not for the faint of heart. I used their Animal pattern in Charlie’s nursery in our old house, and although I love our home now, I do miss that beautiful wallpaper so much. Their patterns are all custom-made for your room so that their murals fit the space perfectly and really feel like they are made for the room (which they are).
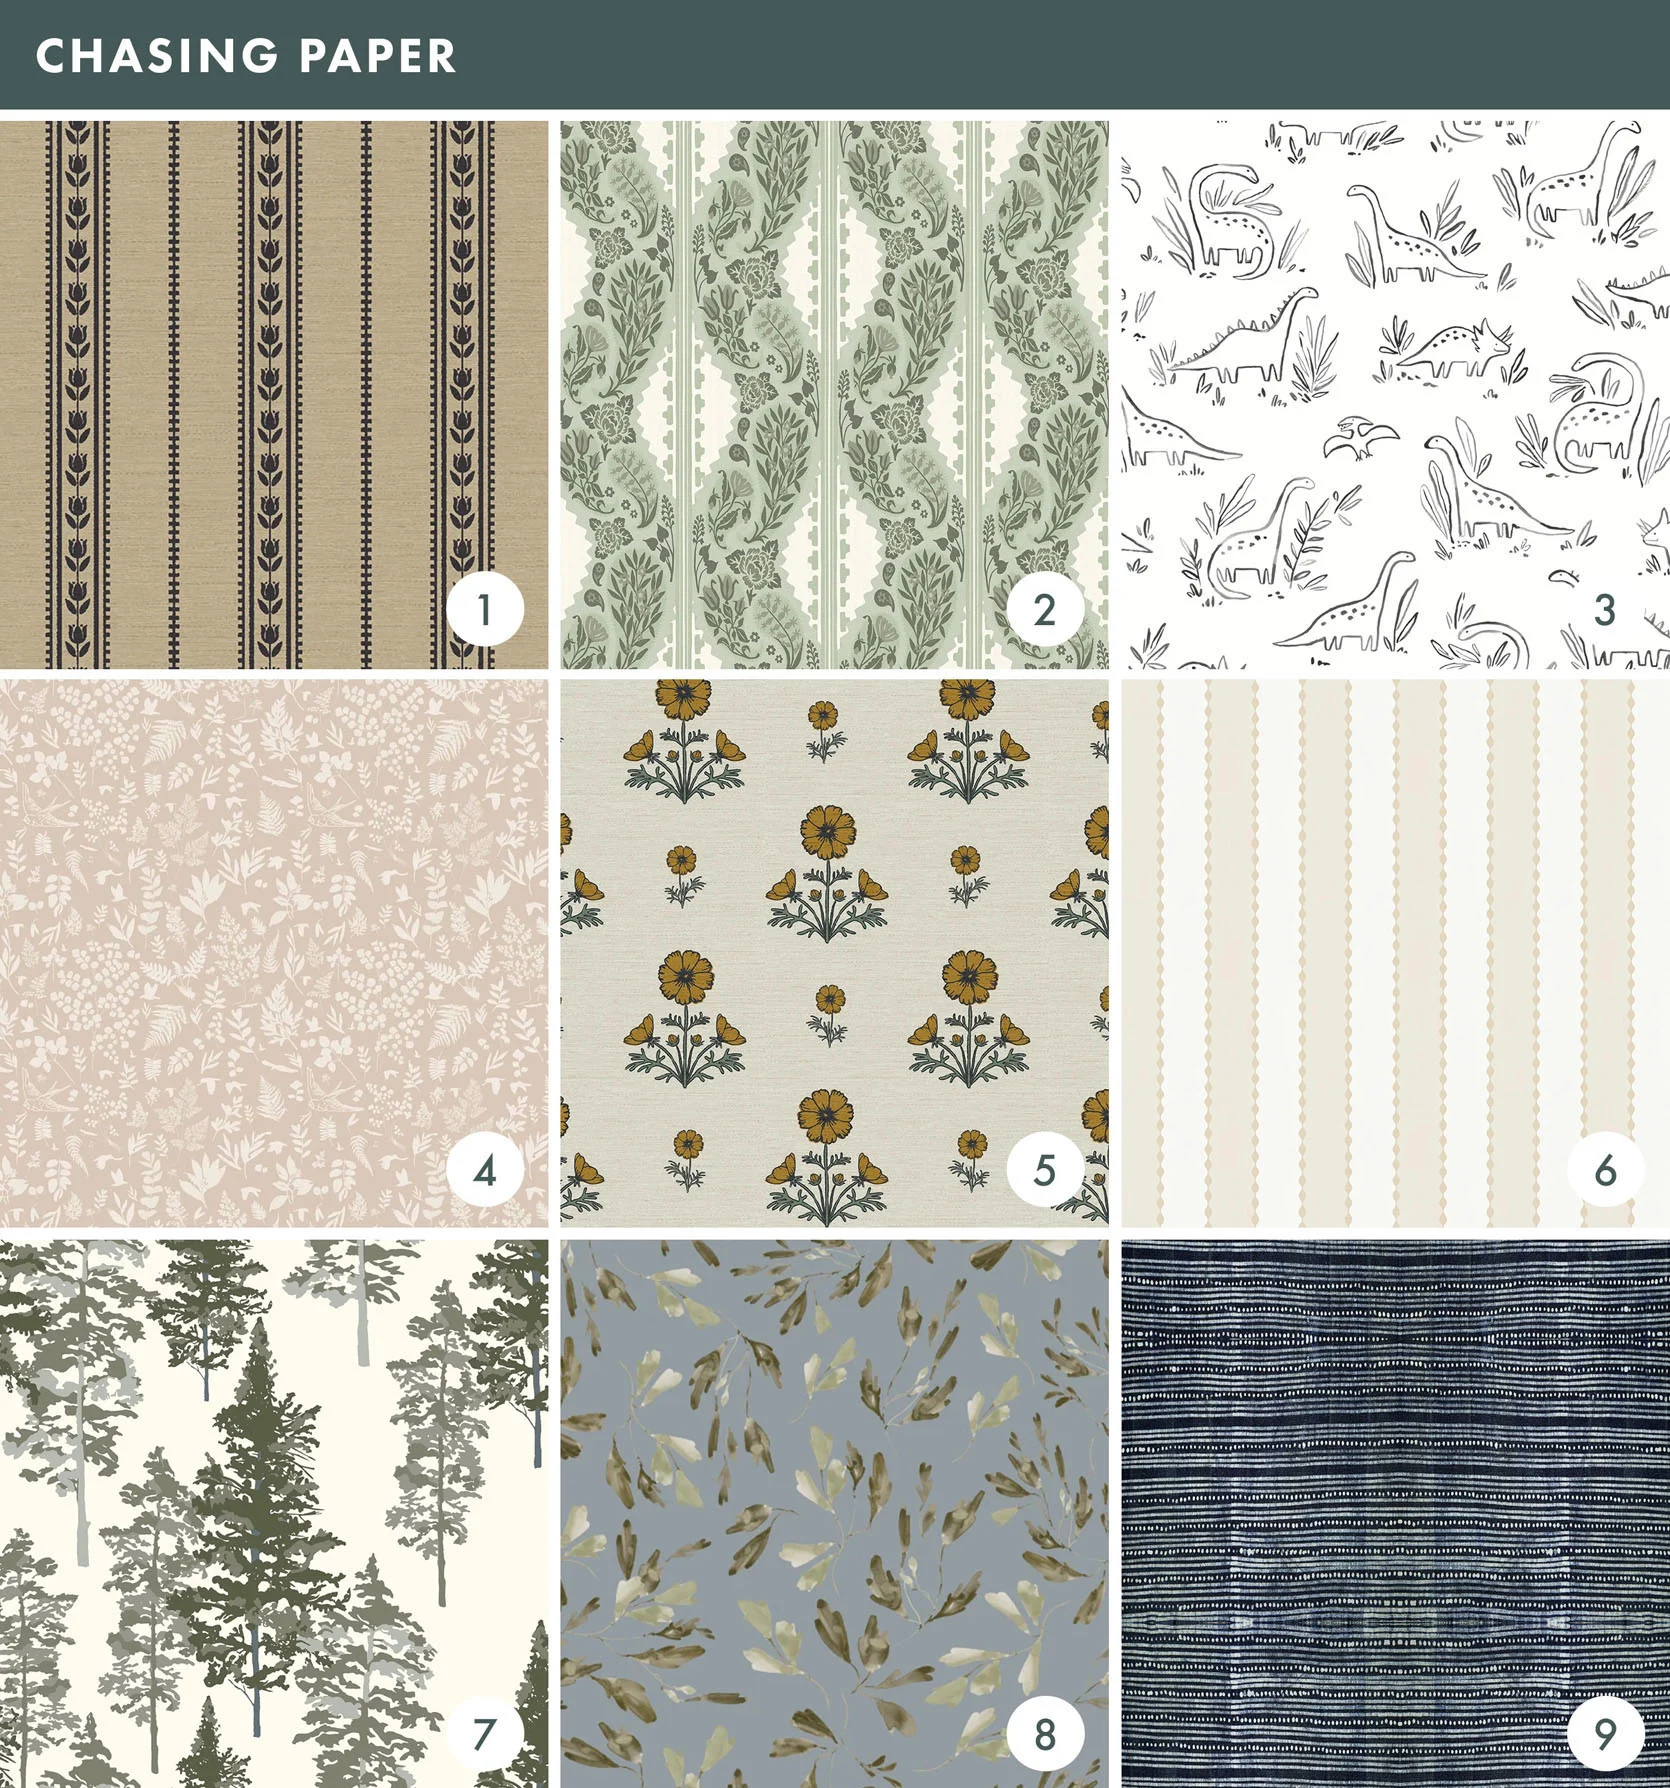
These guys make GOOD peel-and-stick wallpaper in such great patterns (but also offer traditional wallpaper too!). Arlyn used the Cosmo Block Print in her last rental kitchen (she says it came off so easily when they moved out). They have so many wonderful prints and do really amazing collaborations with designers and artists.
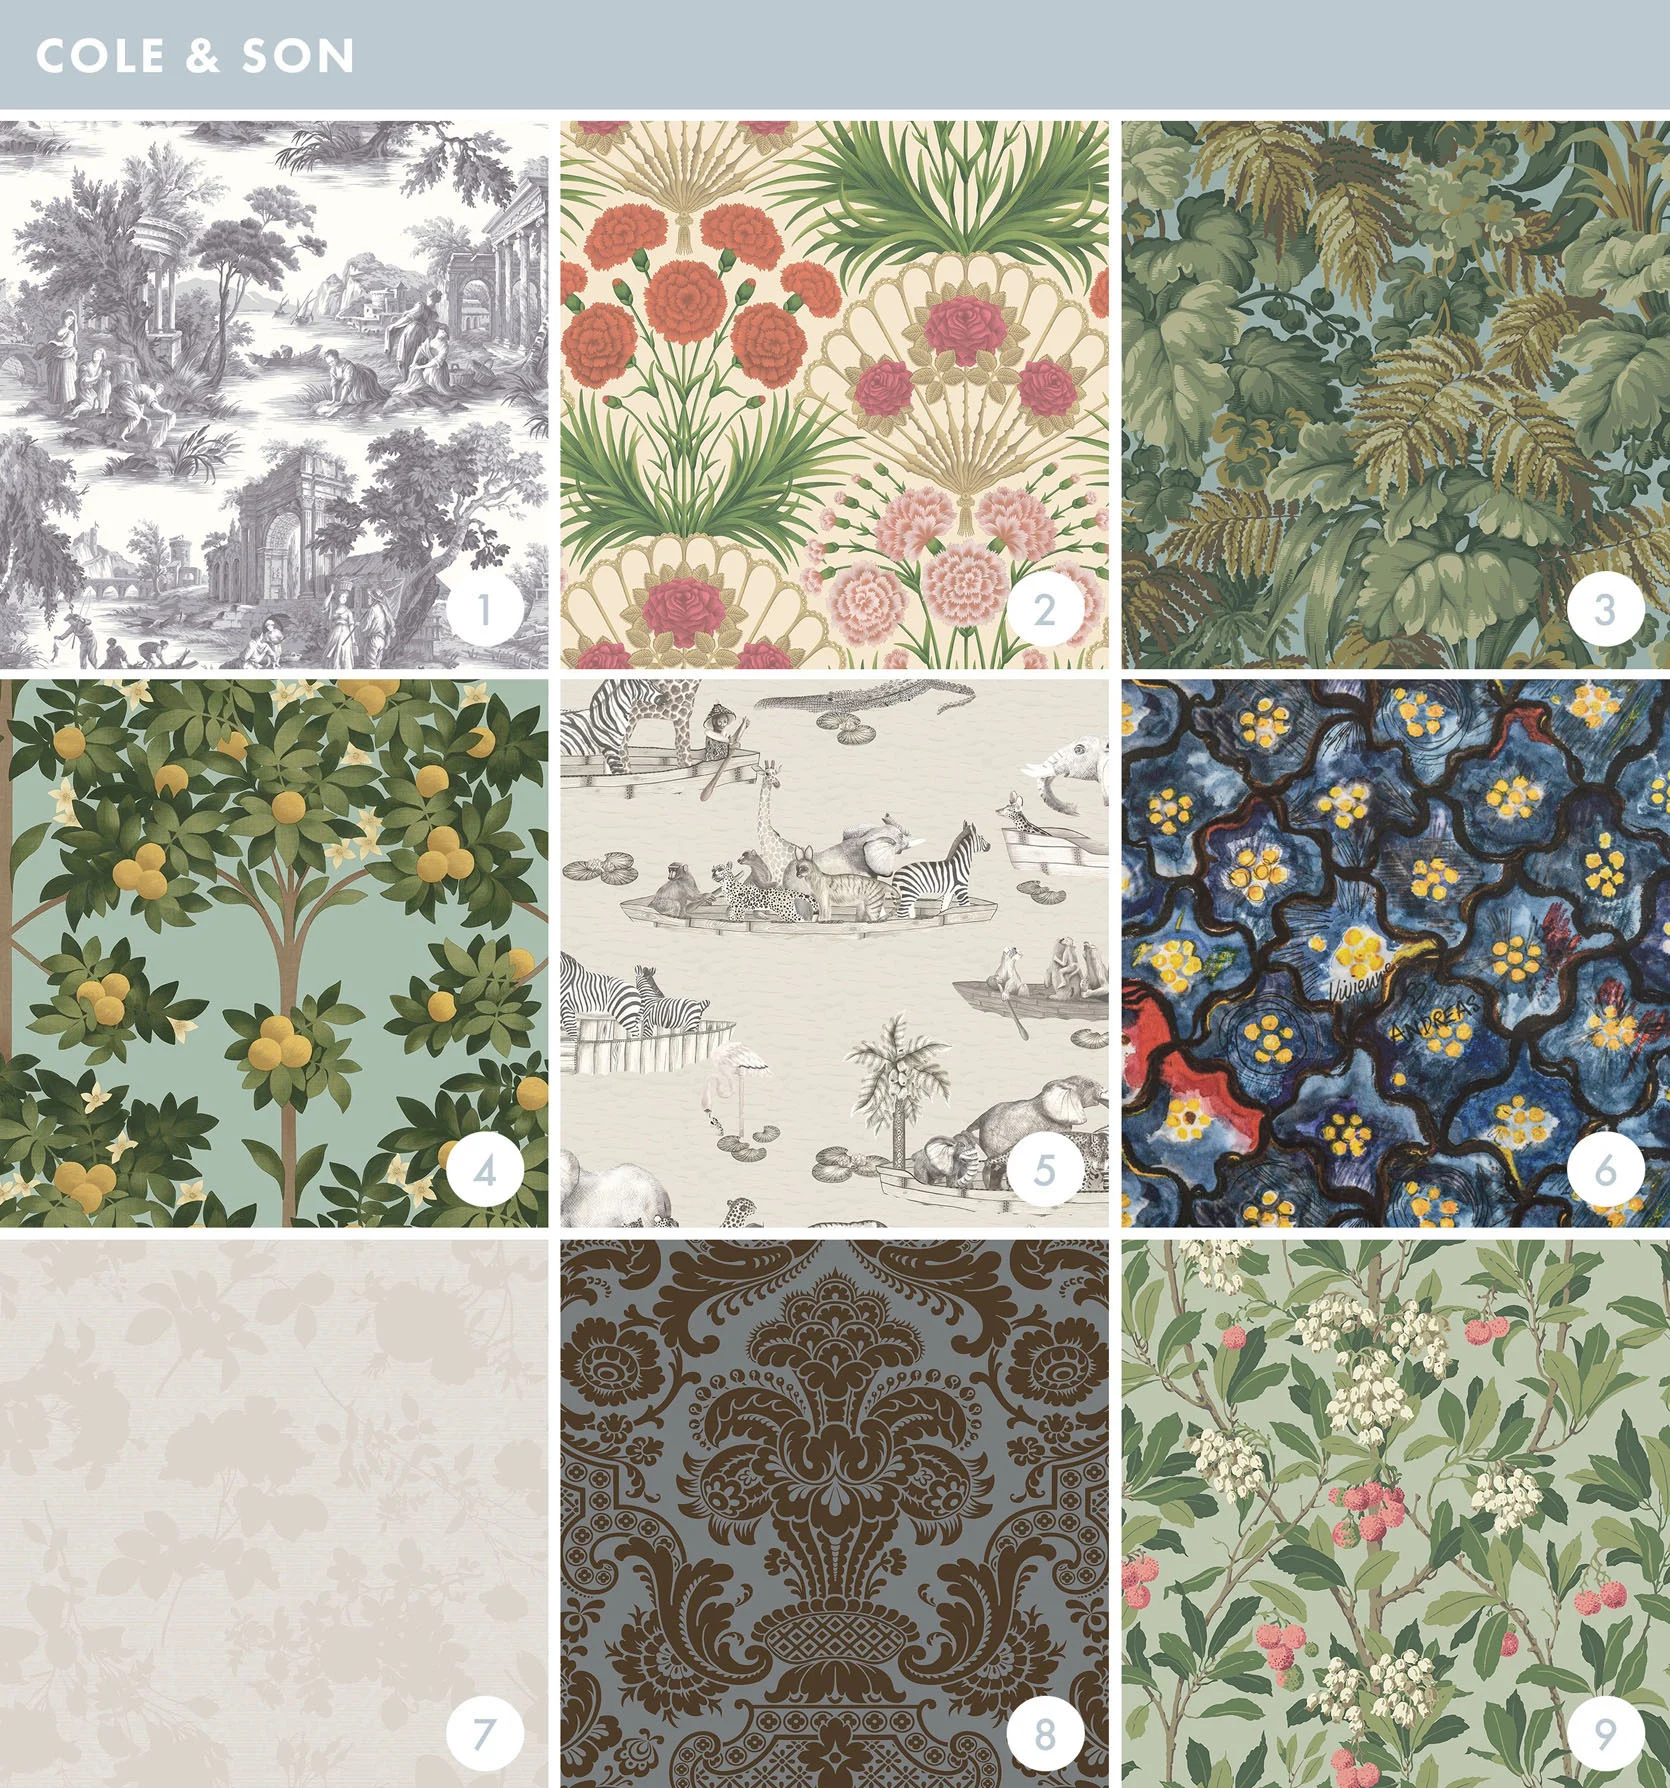
Fruit, Trees, Poppies, Fish, and Parrots… these guys have it all, and I love their saturated but not crazy prints. Their patterns are classics and feel painstakingly hand-drawn by artists. Caitlin used their Flamenco Fan in her dining room and Orange Blossom in her kitchen! They look so incredible and really elevated those spaces in such a whimsical way.
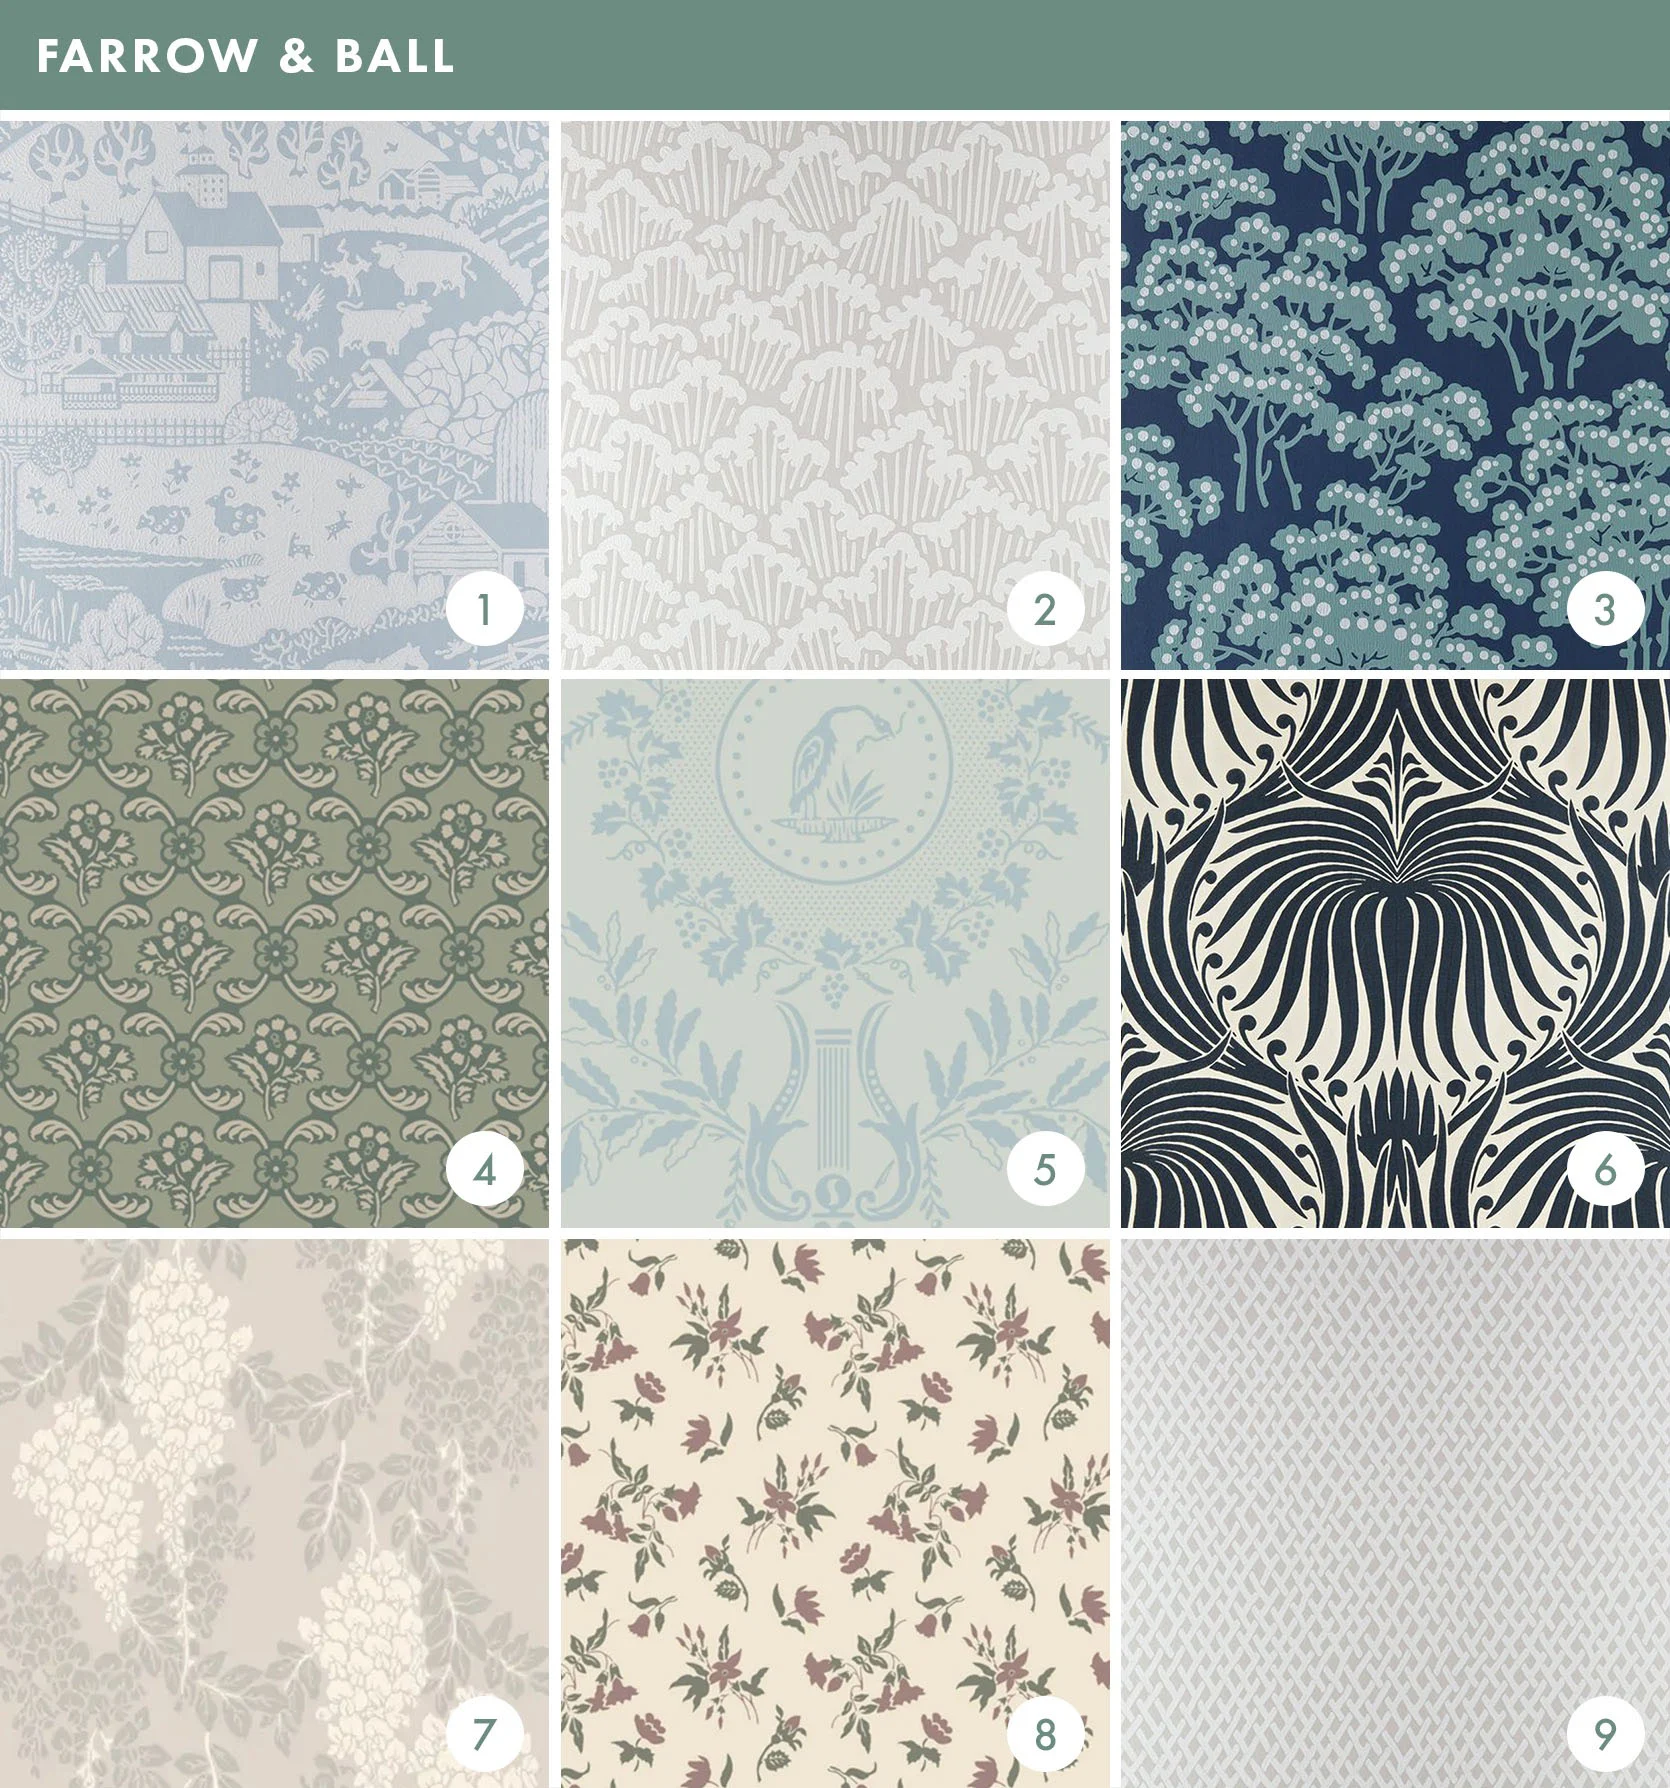
Farrow & Ball has long been the king of the best paint colors, but they also carry wallpaper, and my, it is beautiful. They are all printed using Farrow & Ball’s own paint, giving them a stunning, slight texture. They do lean more to the traditional side, but I love some of their prints so much. I have used quite a few of them in my Los Feliz house, and they made every room they were installed in feel so special (and also so much easier to design).
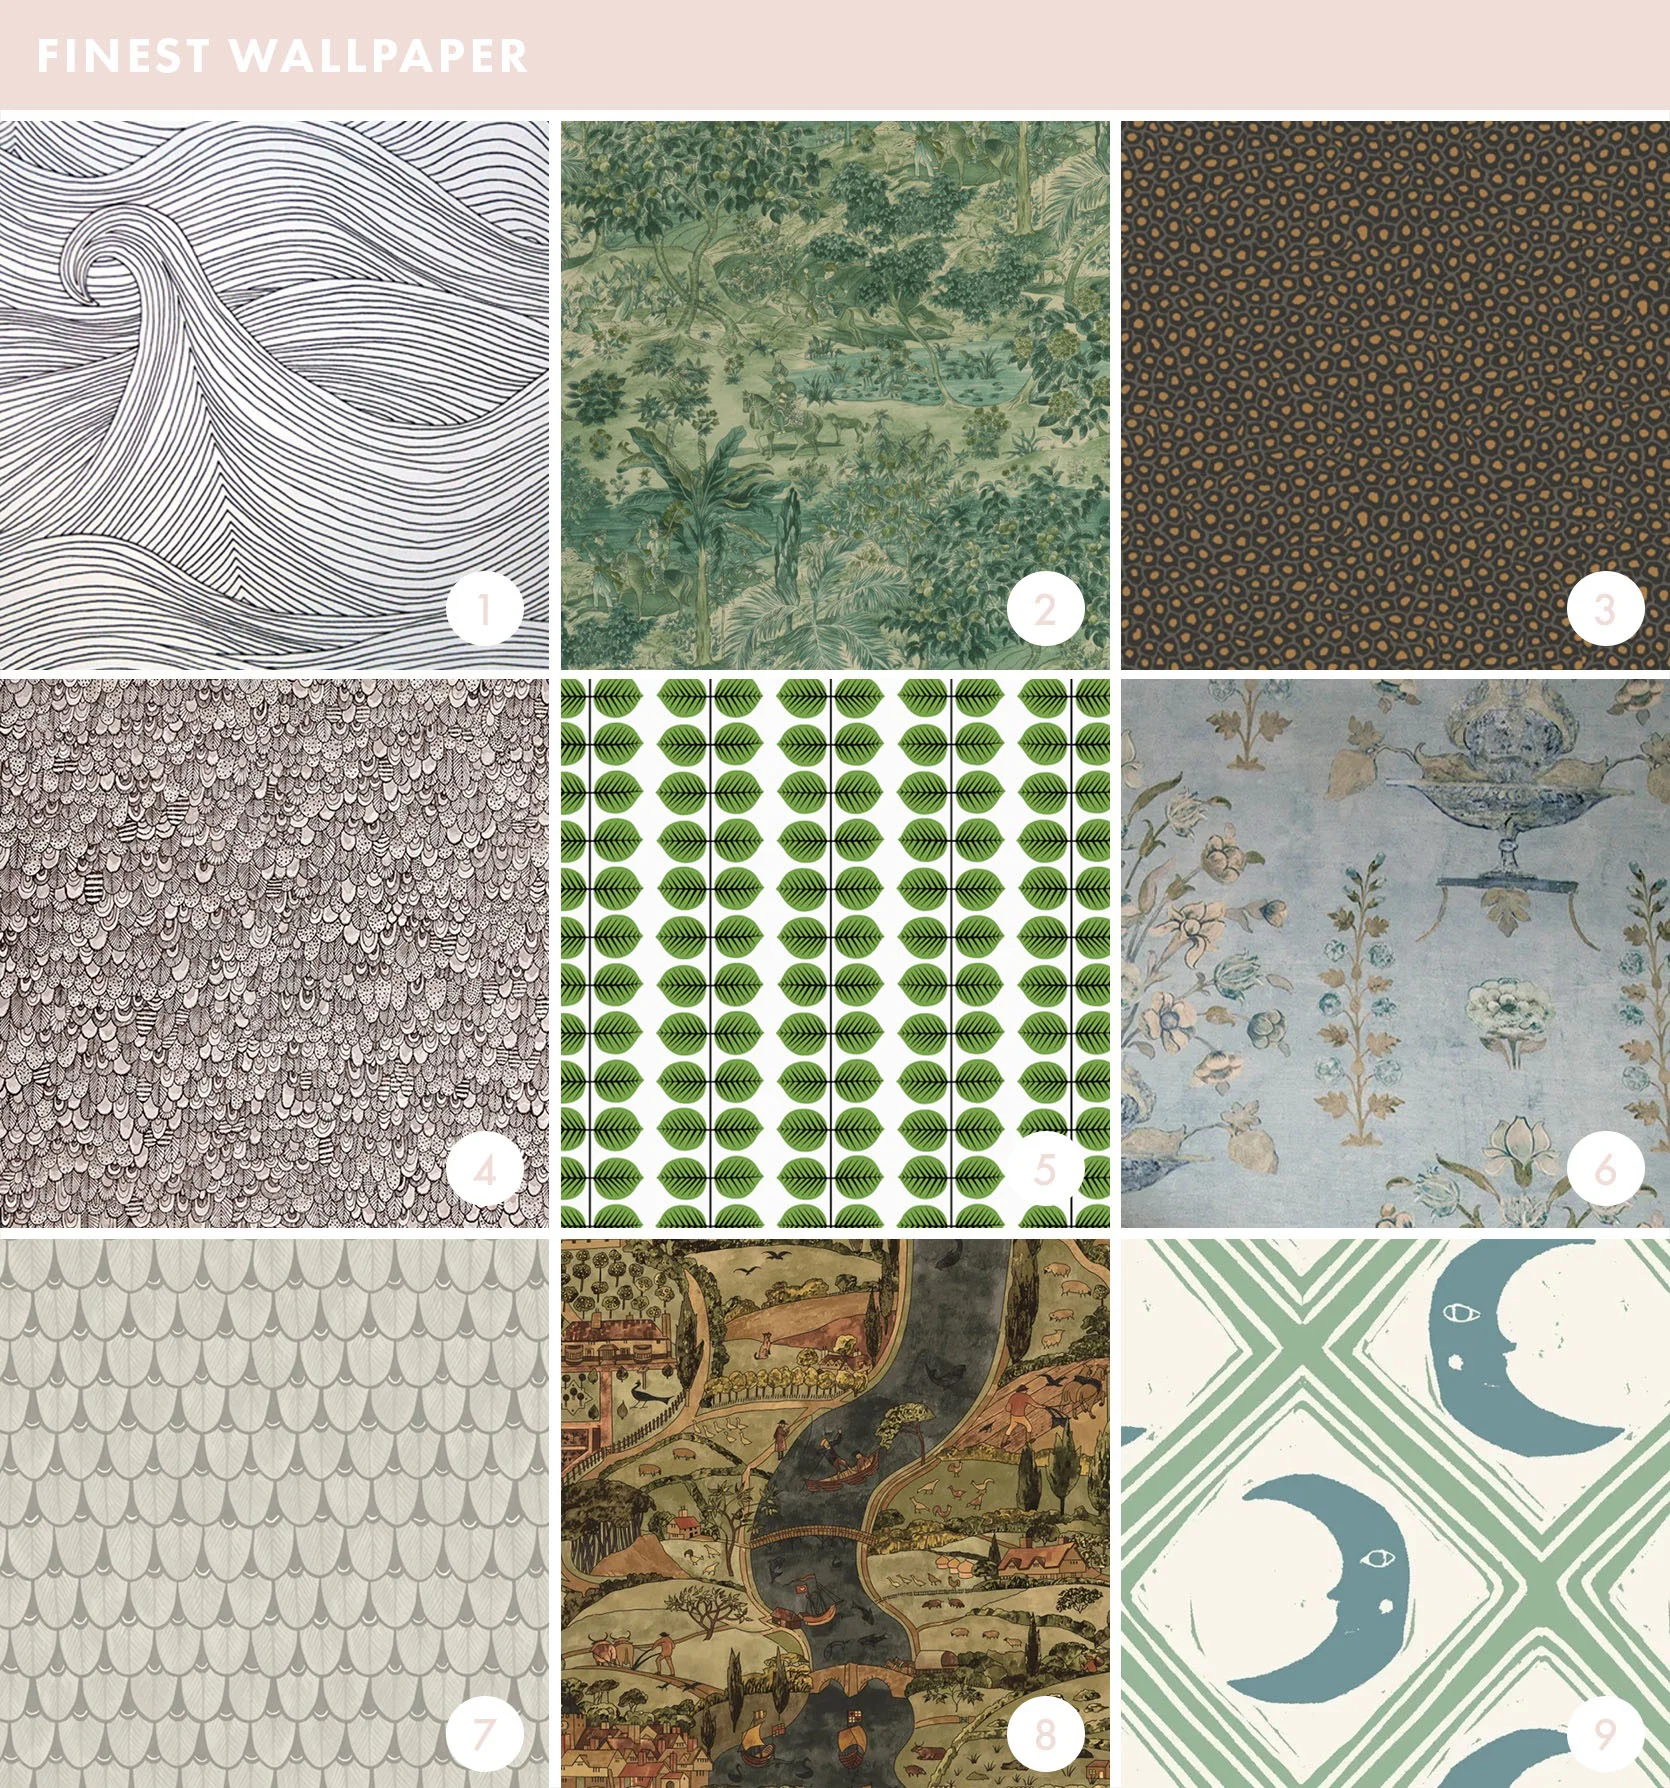
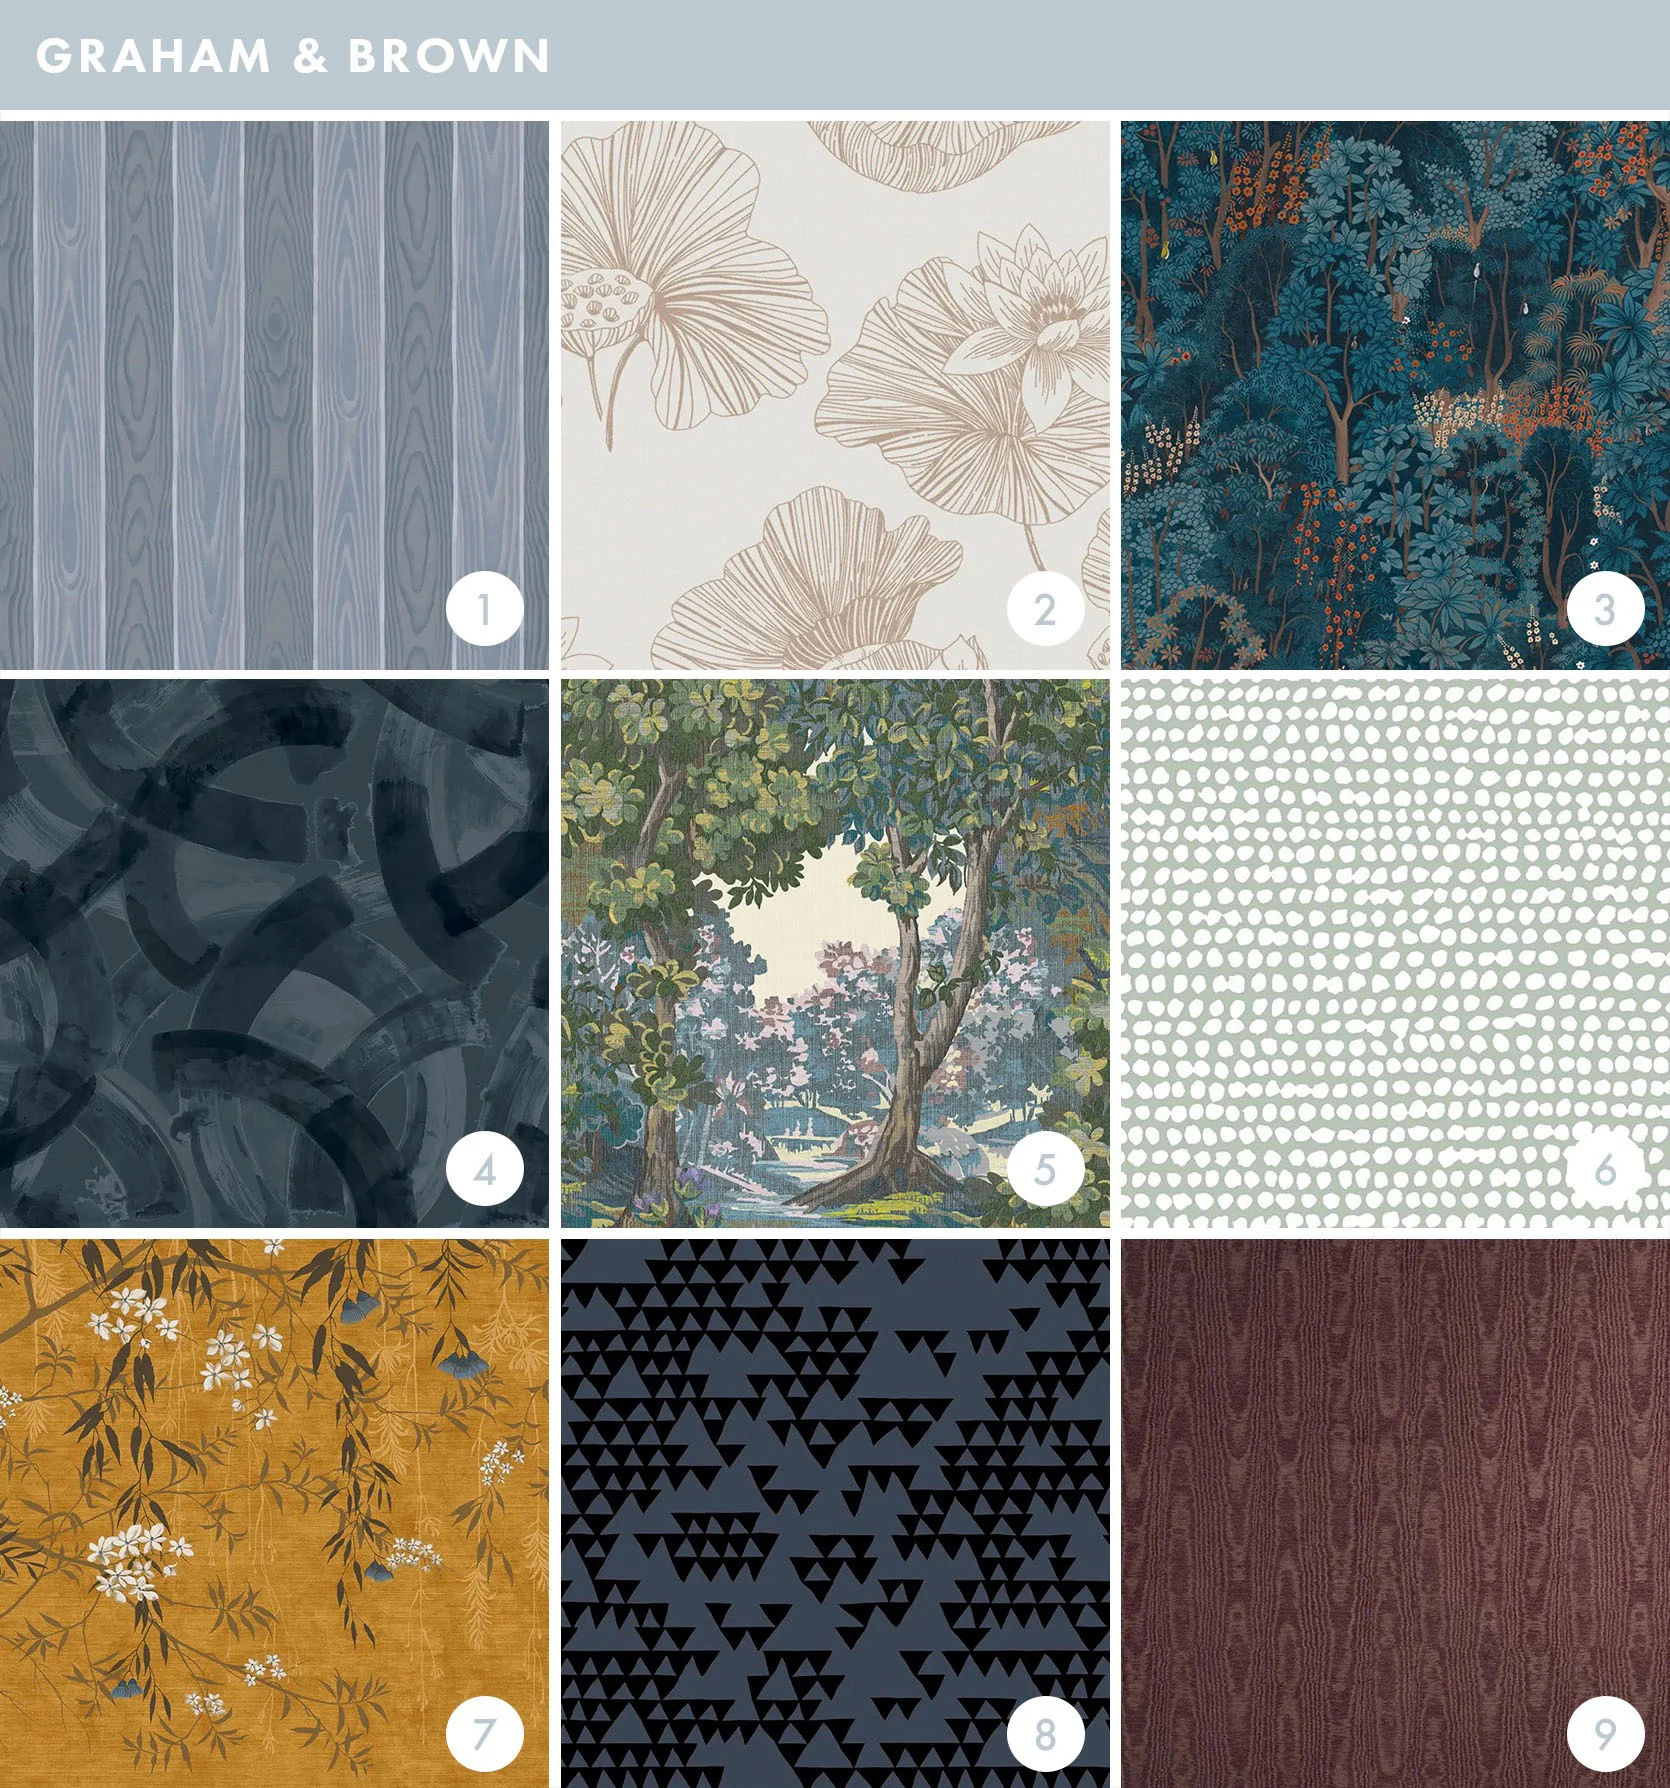
Artful and fun patterns in a variety of color ways. Some of theirs are pretty busy, so they might not be the best for the bedroom, but man, I could be very into using #1 in a smaller space like a powder room.
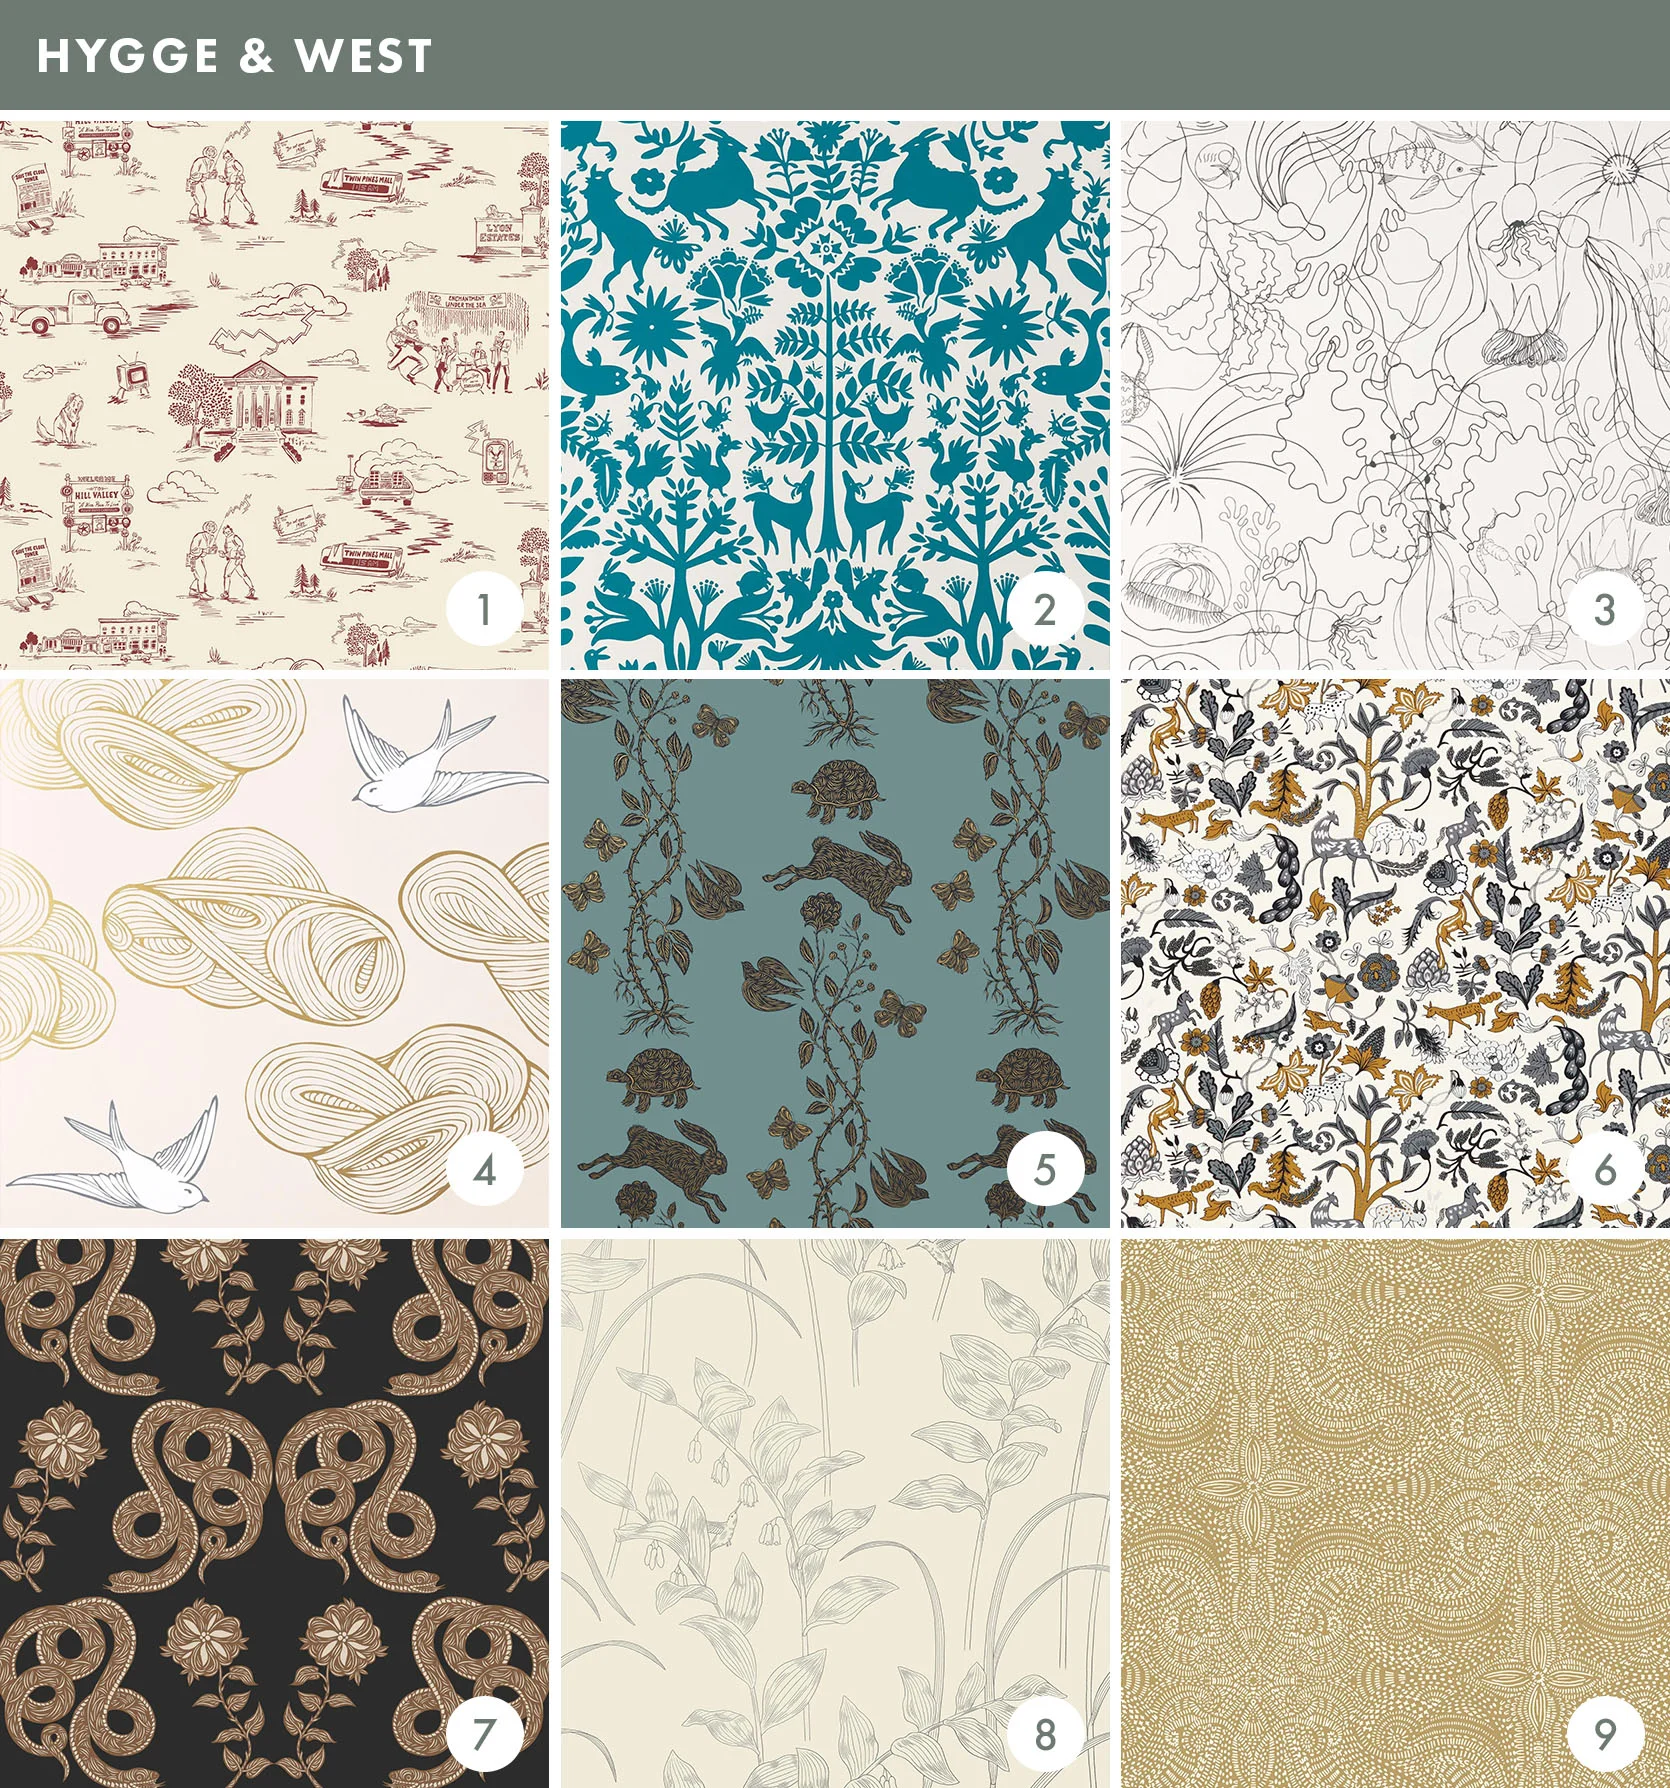
Hygee & West carries some of my favorite patterns that I seem to go to for inspiration each time I need a new wallpaper for a project. They have a range of styles from old world, to modern traditional, to a little bit kitchy. I love all their stuff.
You have heard me say it before, but I love designing nurseries and playrooms, and I could be completely satisfied with so many of their prints in any and all nurseries/playrooms that I design. They are fun, fresh, and totally modern in a way that will stay current for years to come.
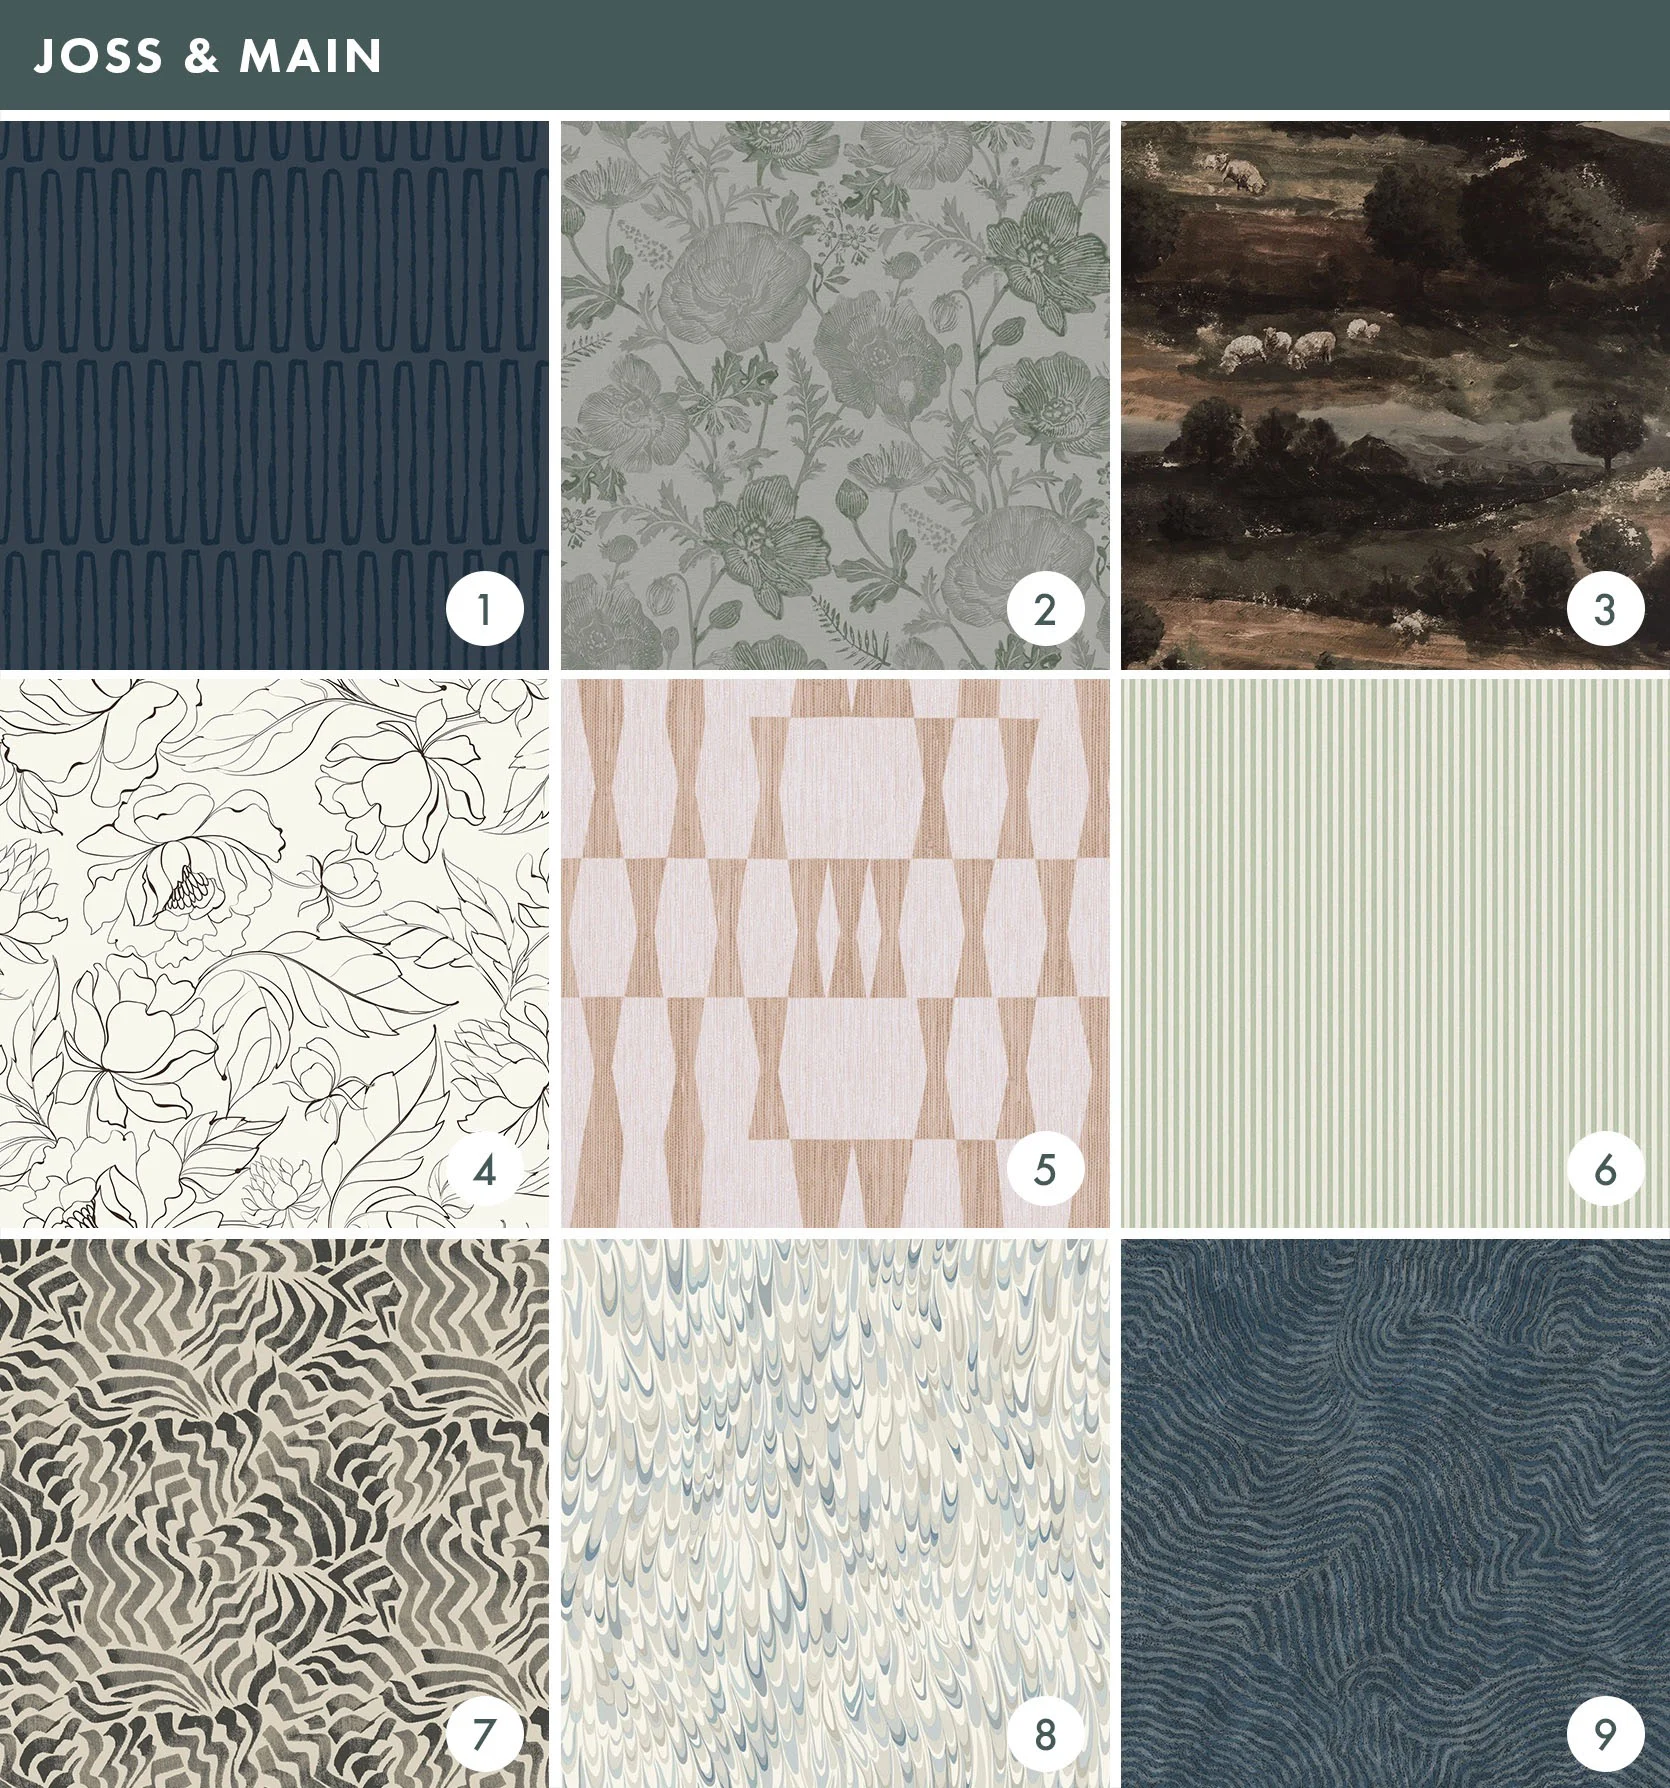
Yep, one of your favorite online retailers also carries wallpaper now. They have a large selection that you might have to dig through, but we did find some really good ones.
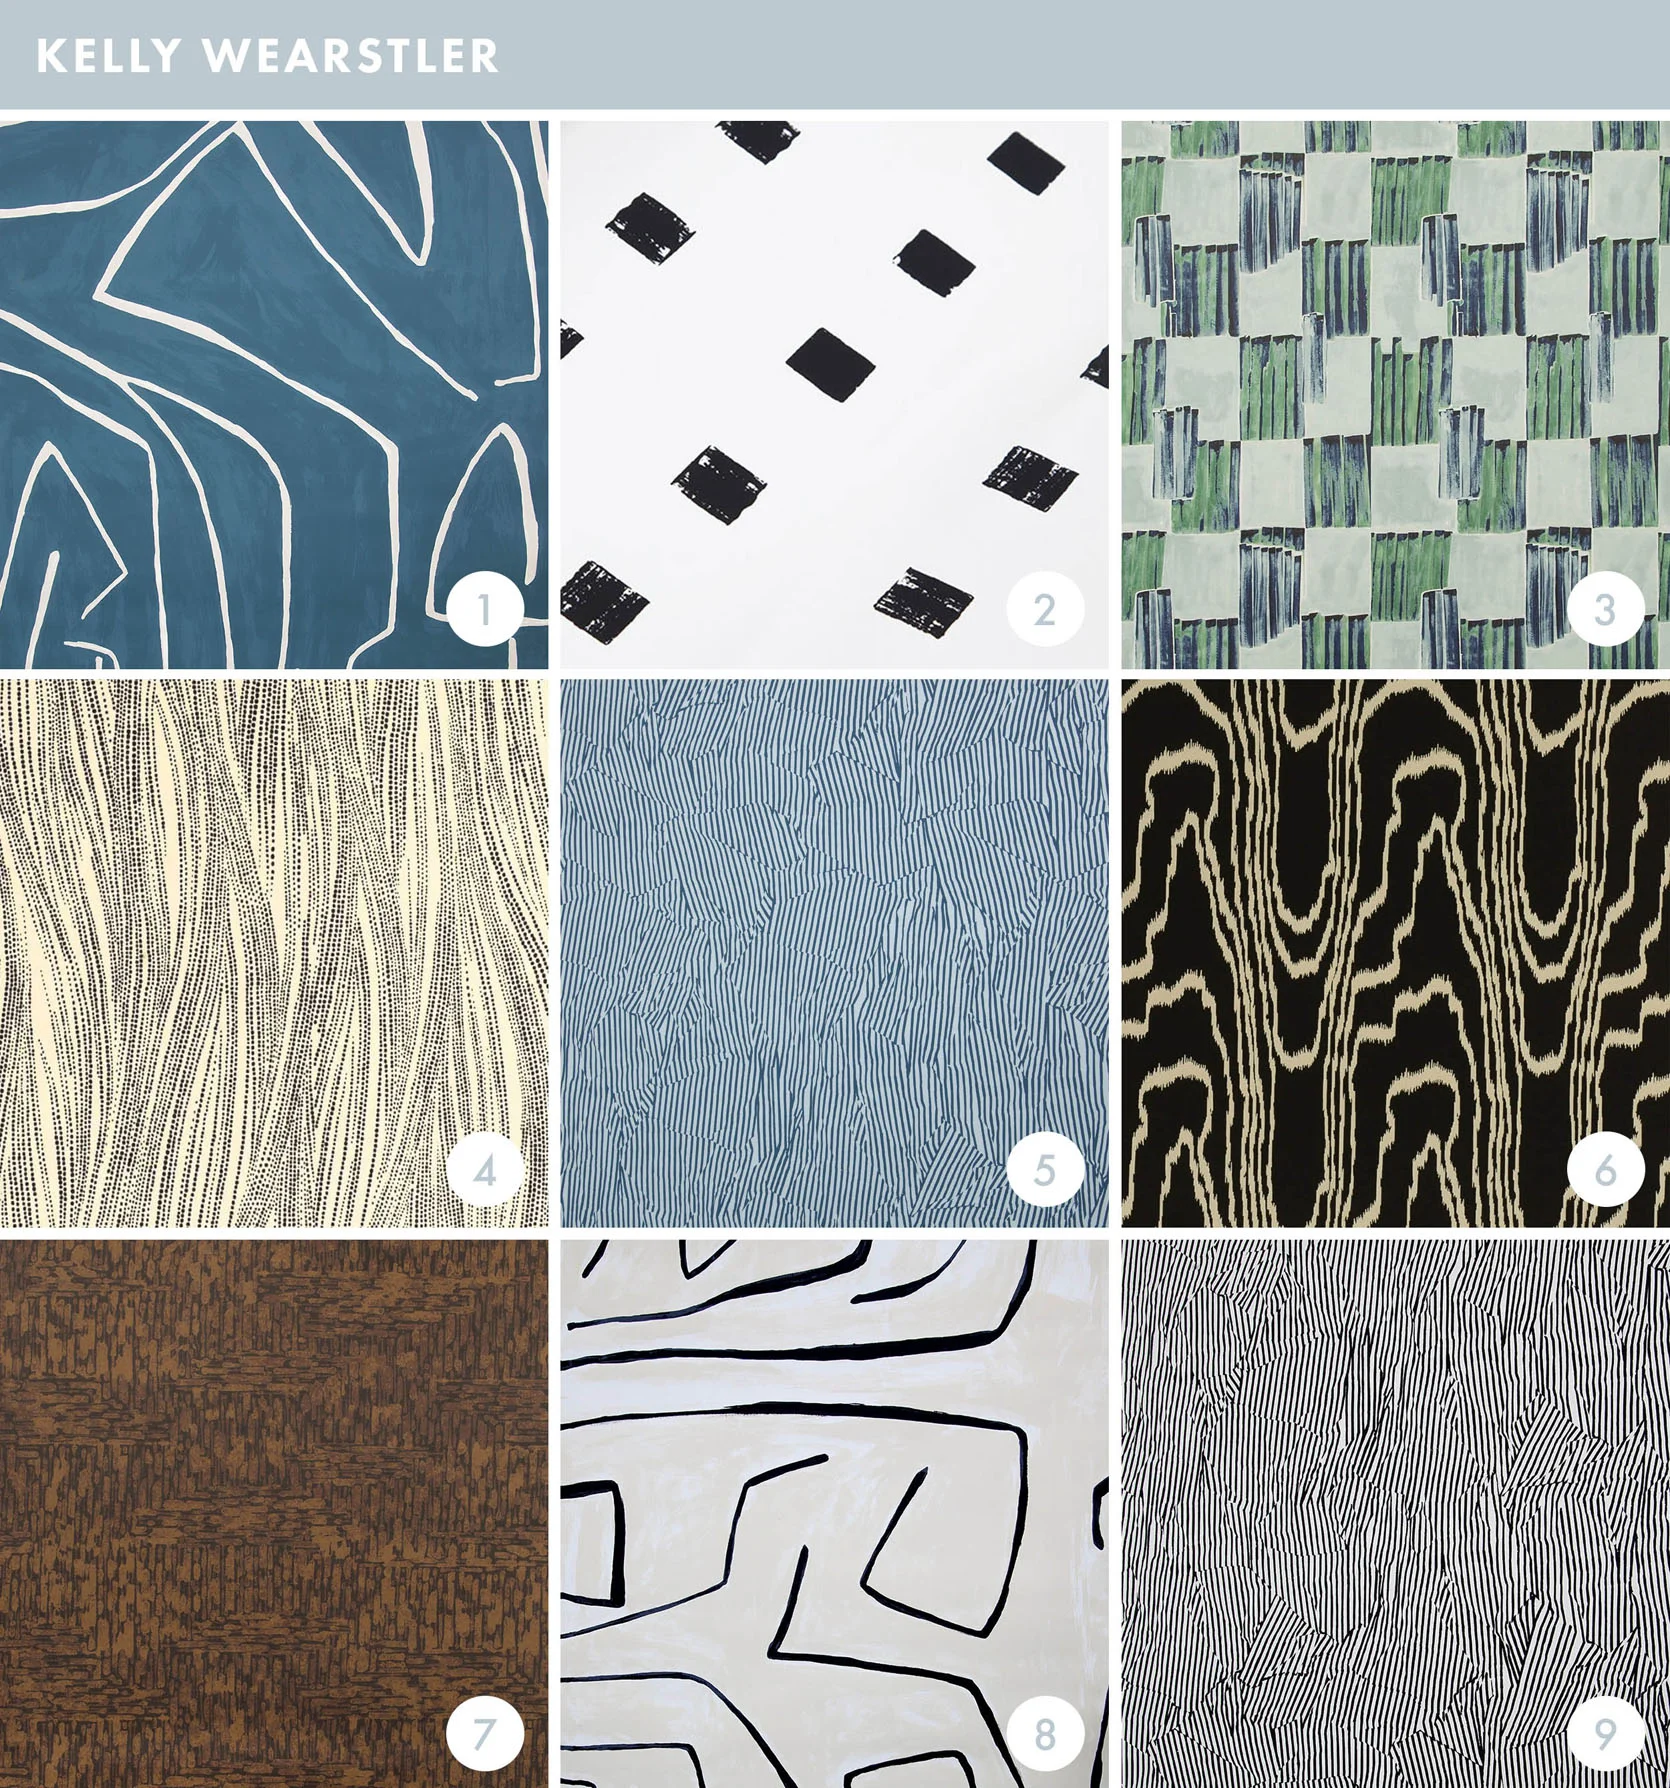
What doesn’t Kelly do? First interiors, then chocolate, and now beautiful wallpapers. The prices aren’t for the faint of heart, but these patterns are worth every penny.
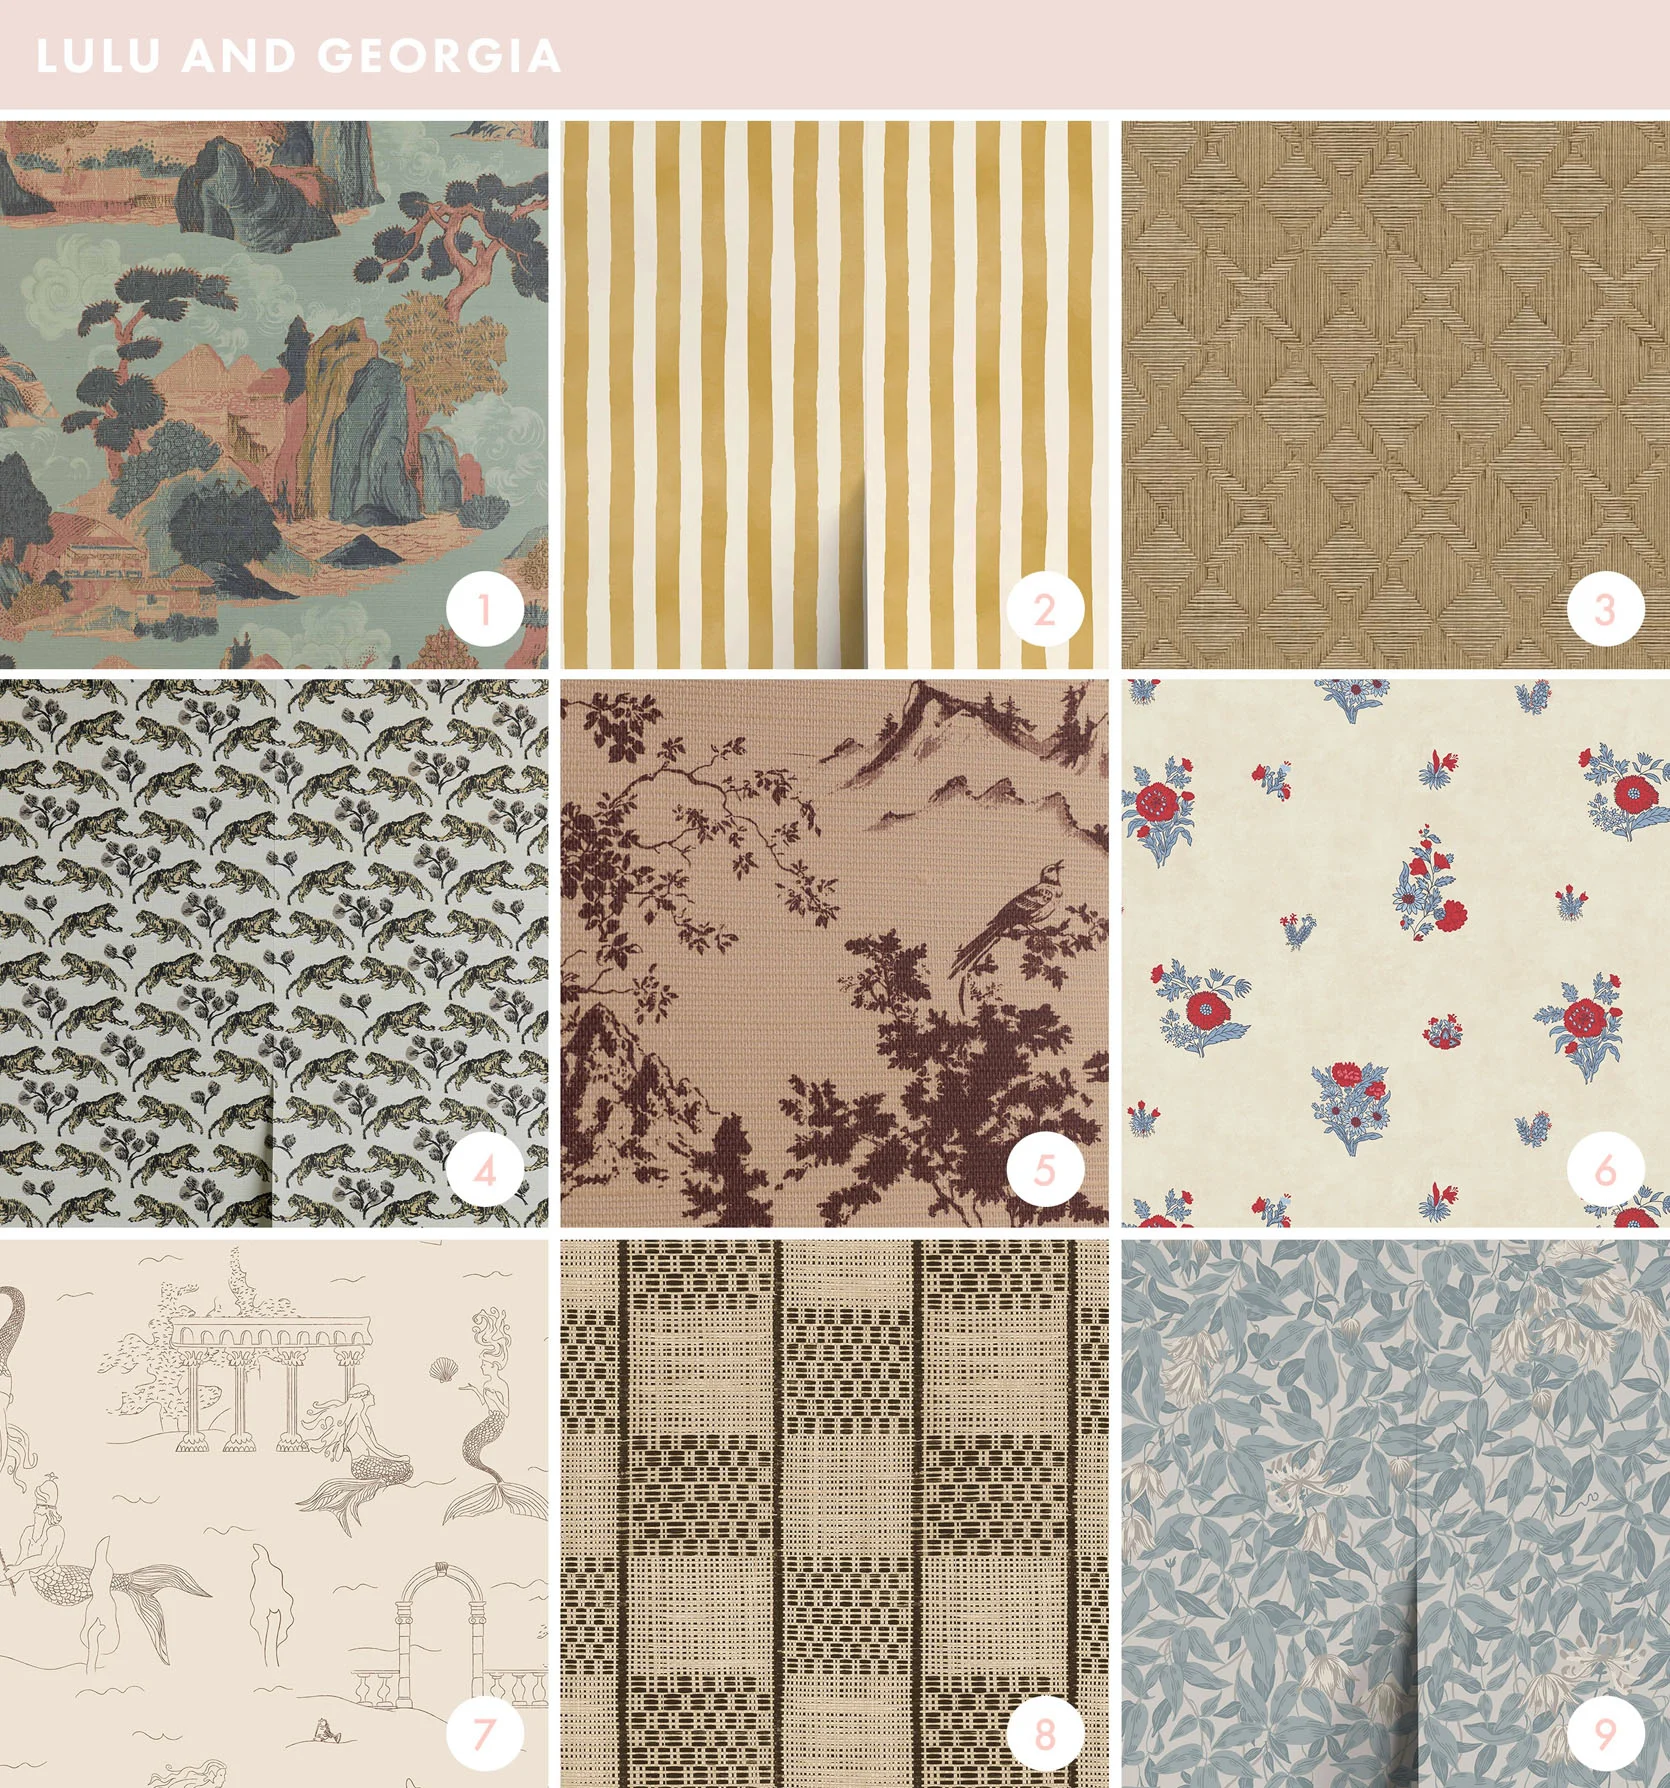
Another one of our favorite online retailers has some fun and fresh wallpapers that will give life to any room. The selection they have, along with their collaborations (like Sarah Sherman Samuel, Heidi Callier, and Jake Arnold, to name a few), is one of our favorites.
Blue flowers, green playful toile, and anything else that your little Alice in Wonderland Heart could desire. They have a fun mix of botanicals, modern graphic prints, and well, mushrooms if that is your sorta thing.
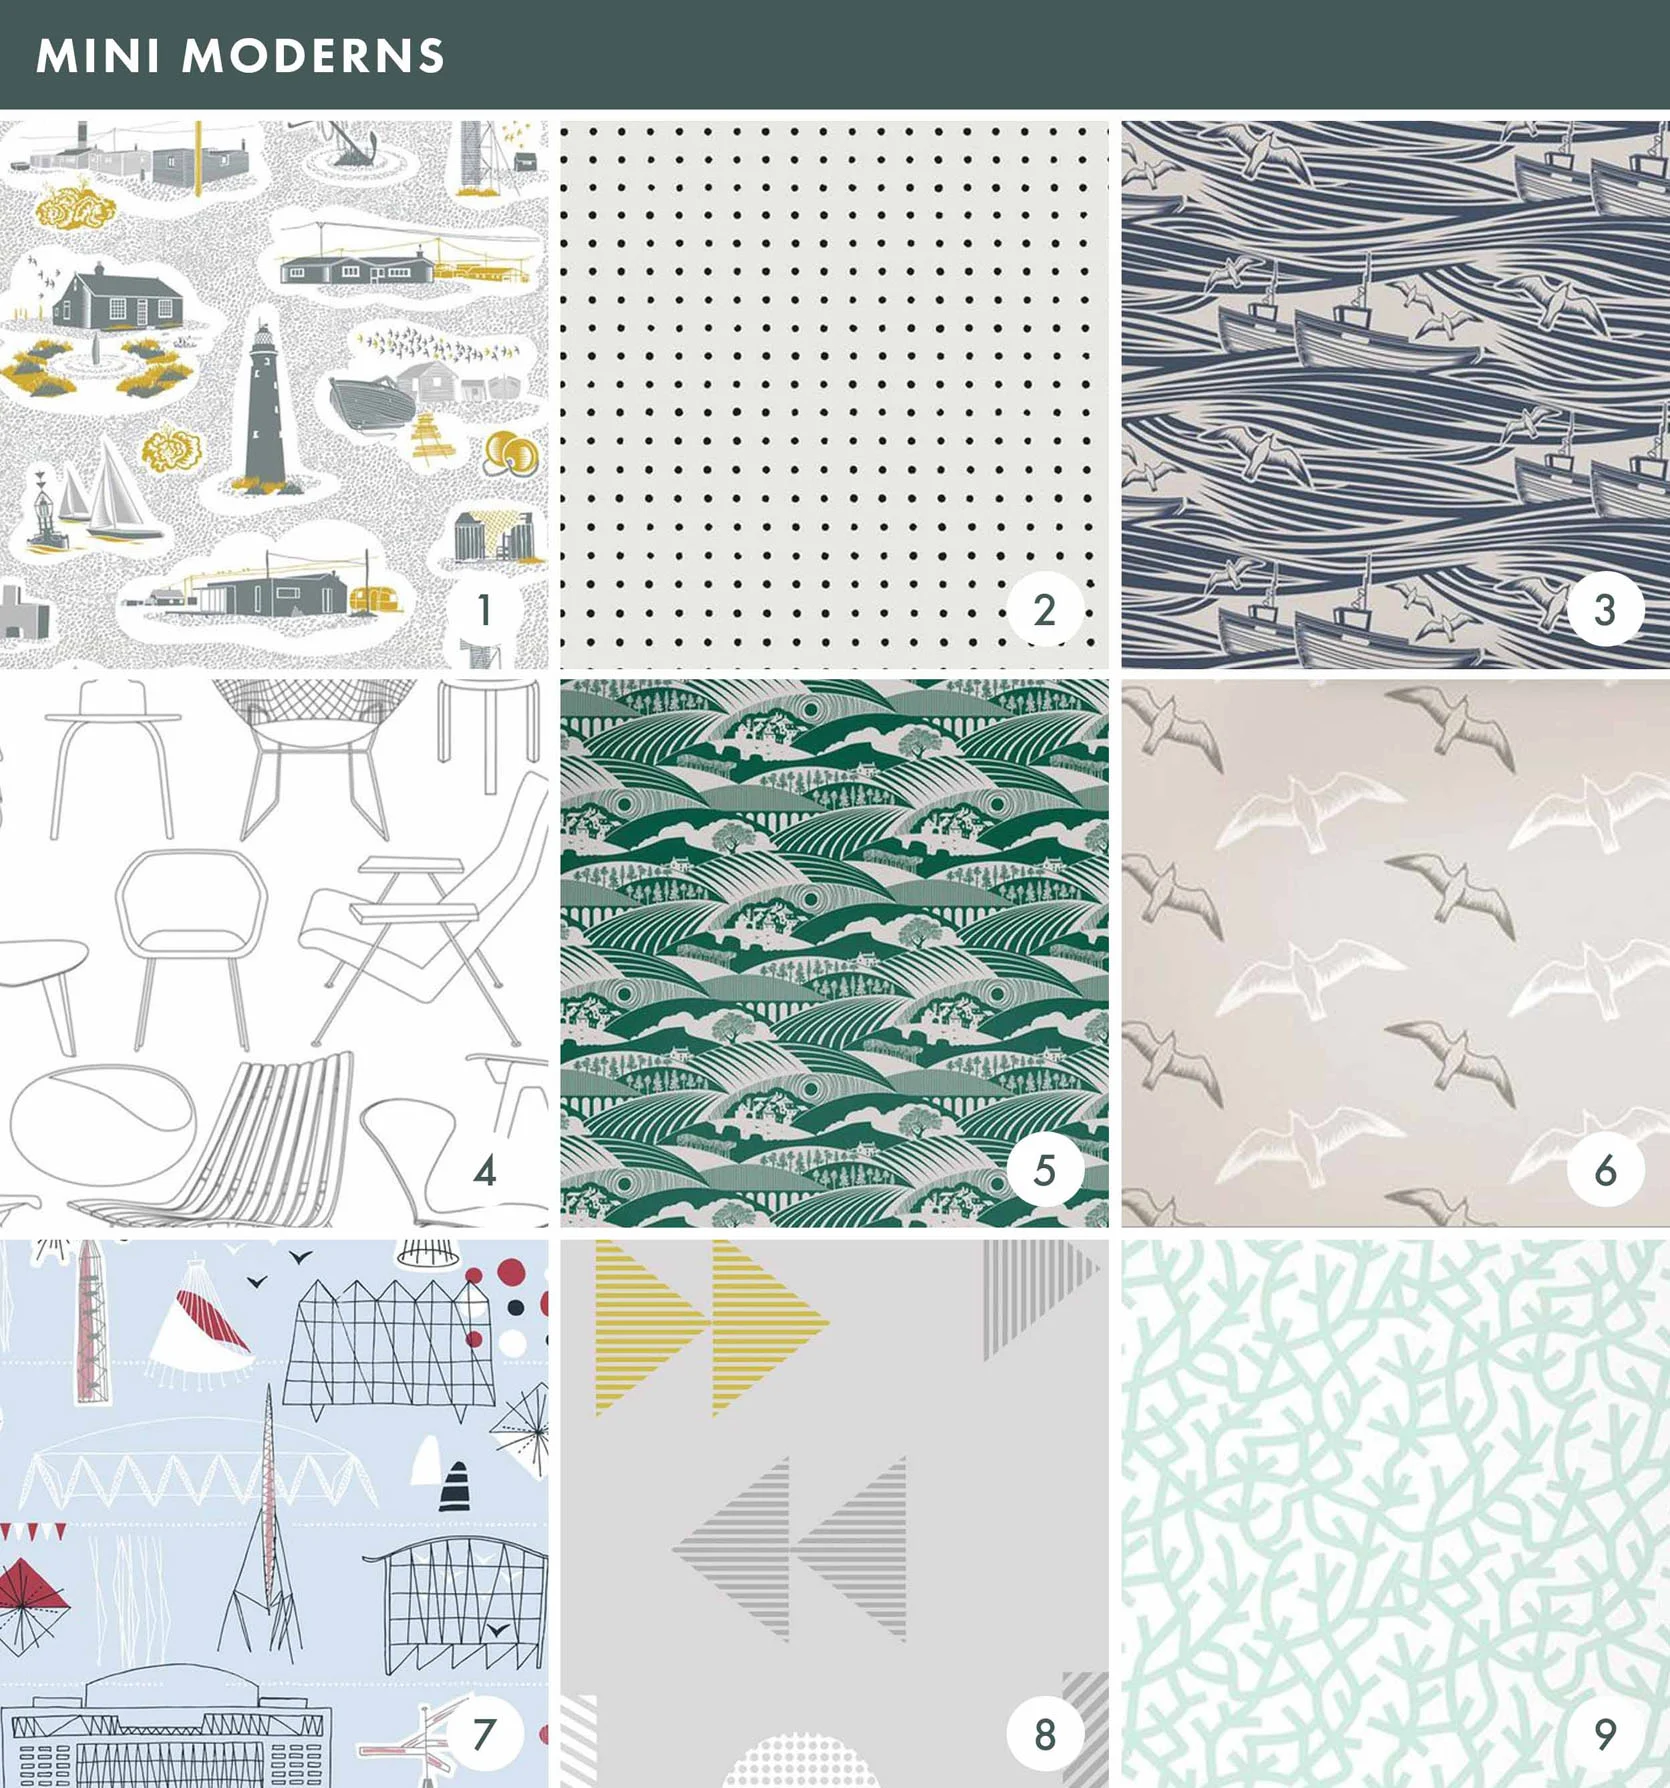
Anyone who has a wallpaper print with vintage midcentury modern chair silhouettes is bound to be on my roundup of the best wallpapers online. They have some very fun, playful prints to feast your eyes on.
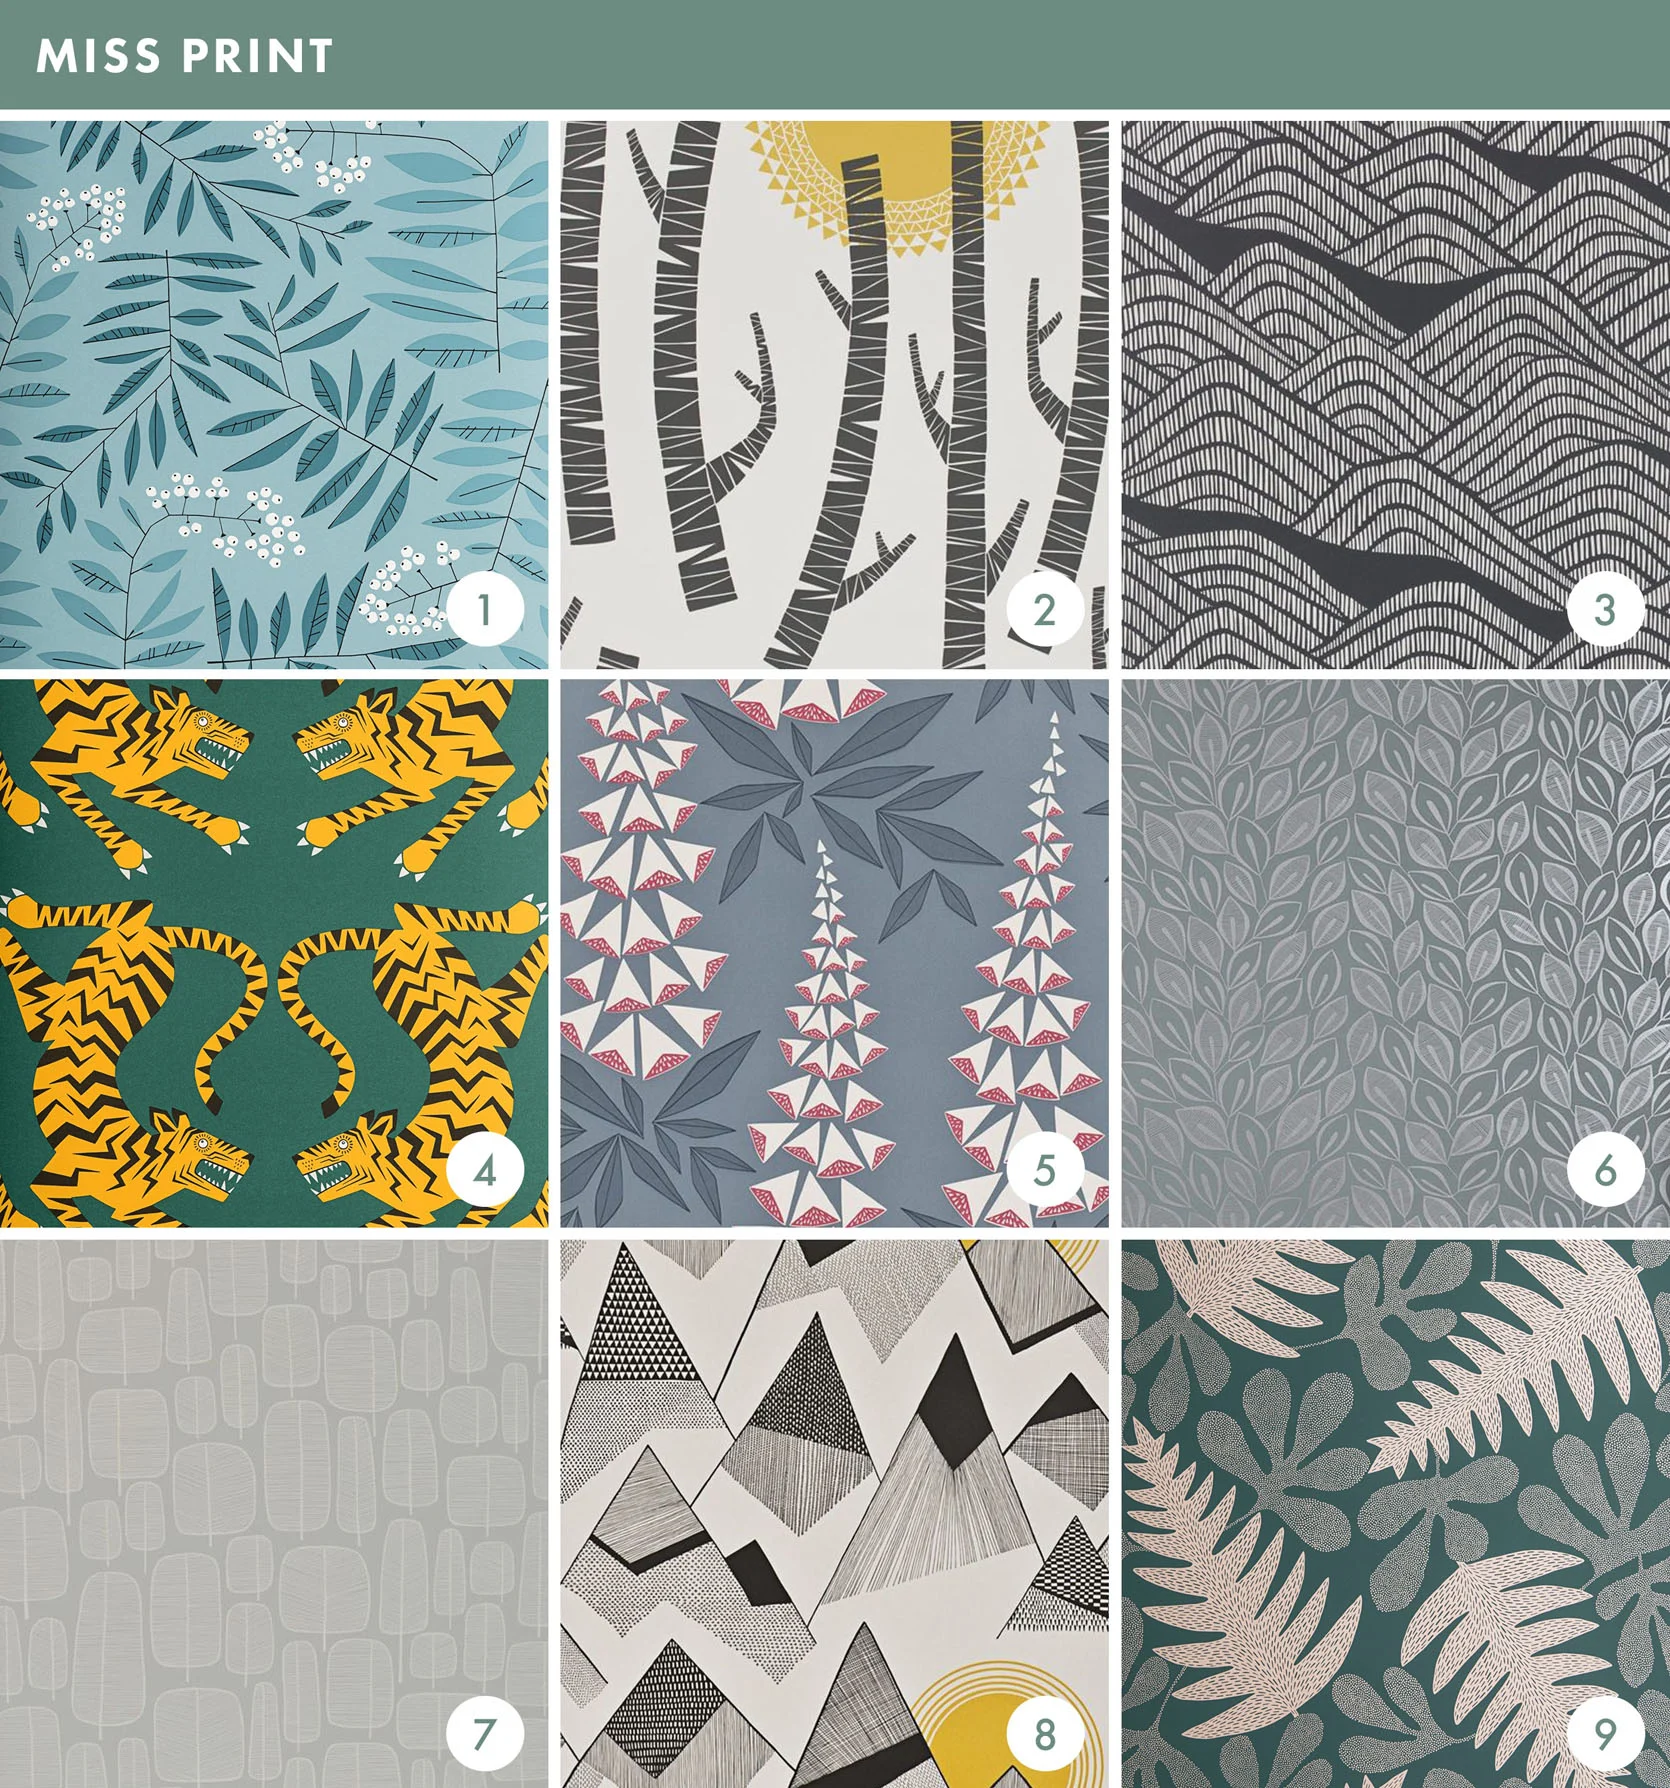
They have got some fun and crazy patterns that would be great to add some serious drama to any room. The saturated colors and bright patterns might not be for everyone (or every room), but for the right space, they could really make it special.
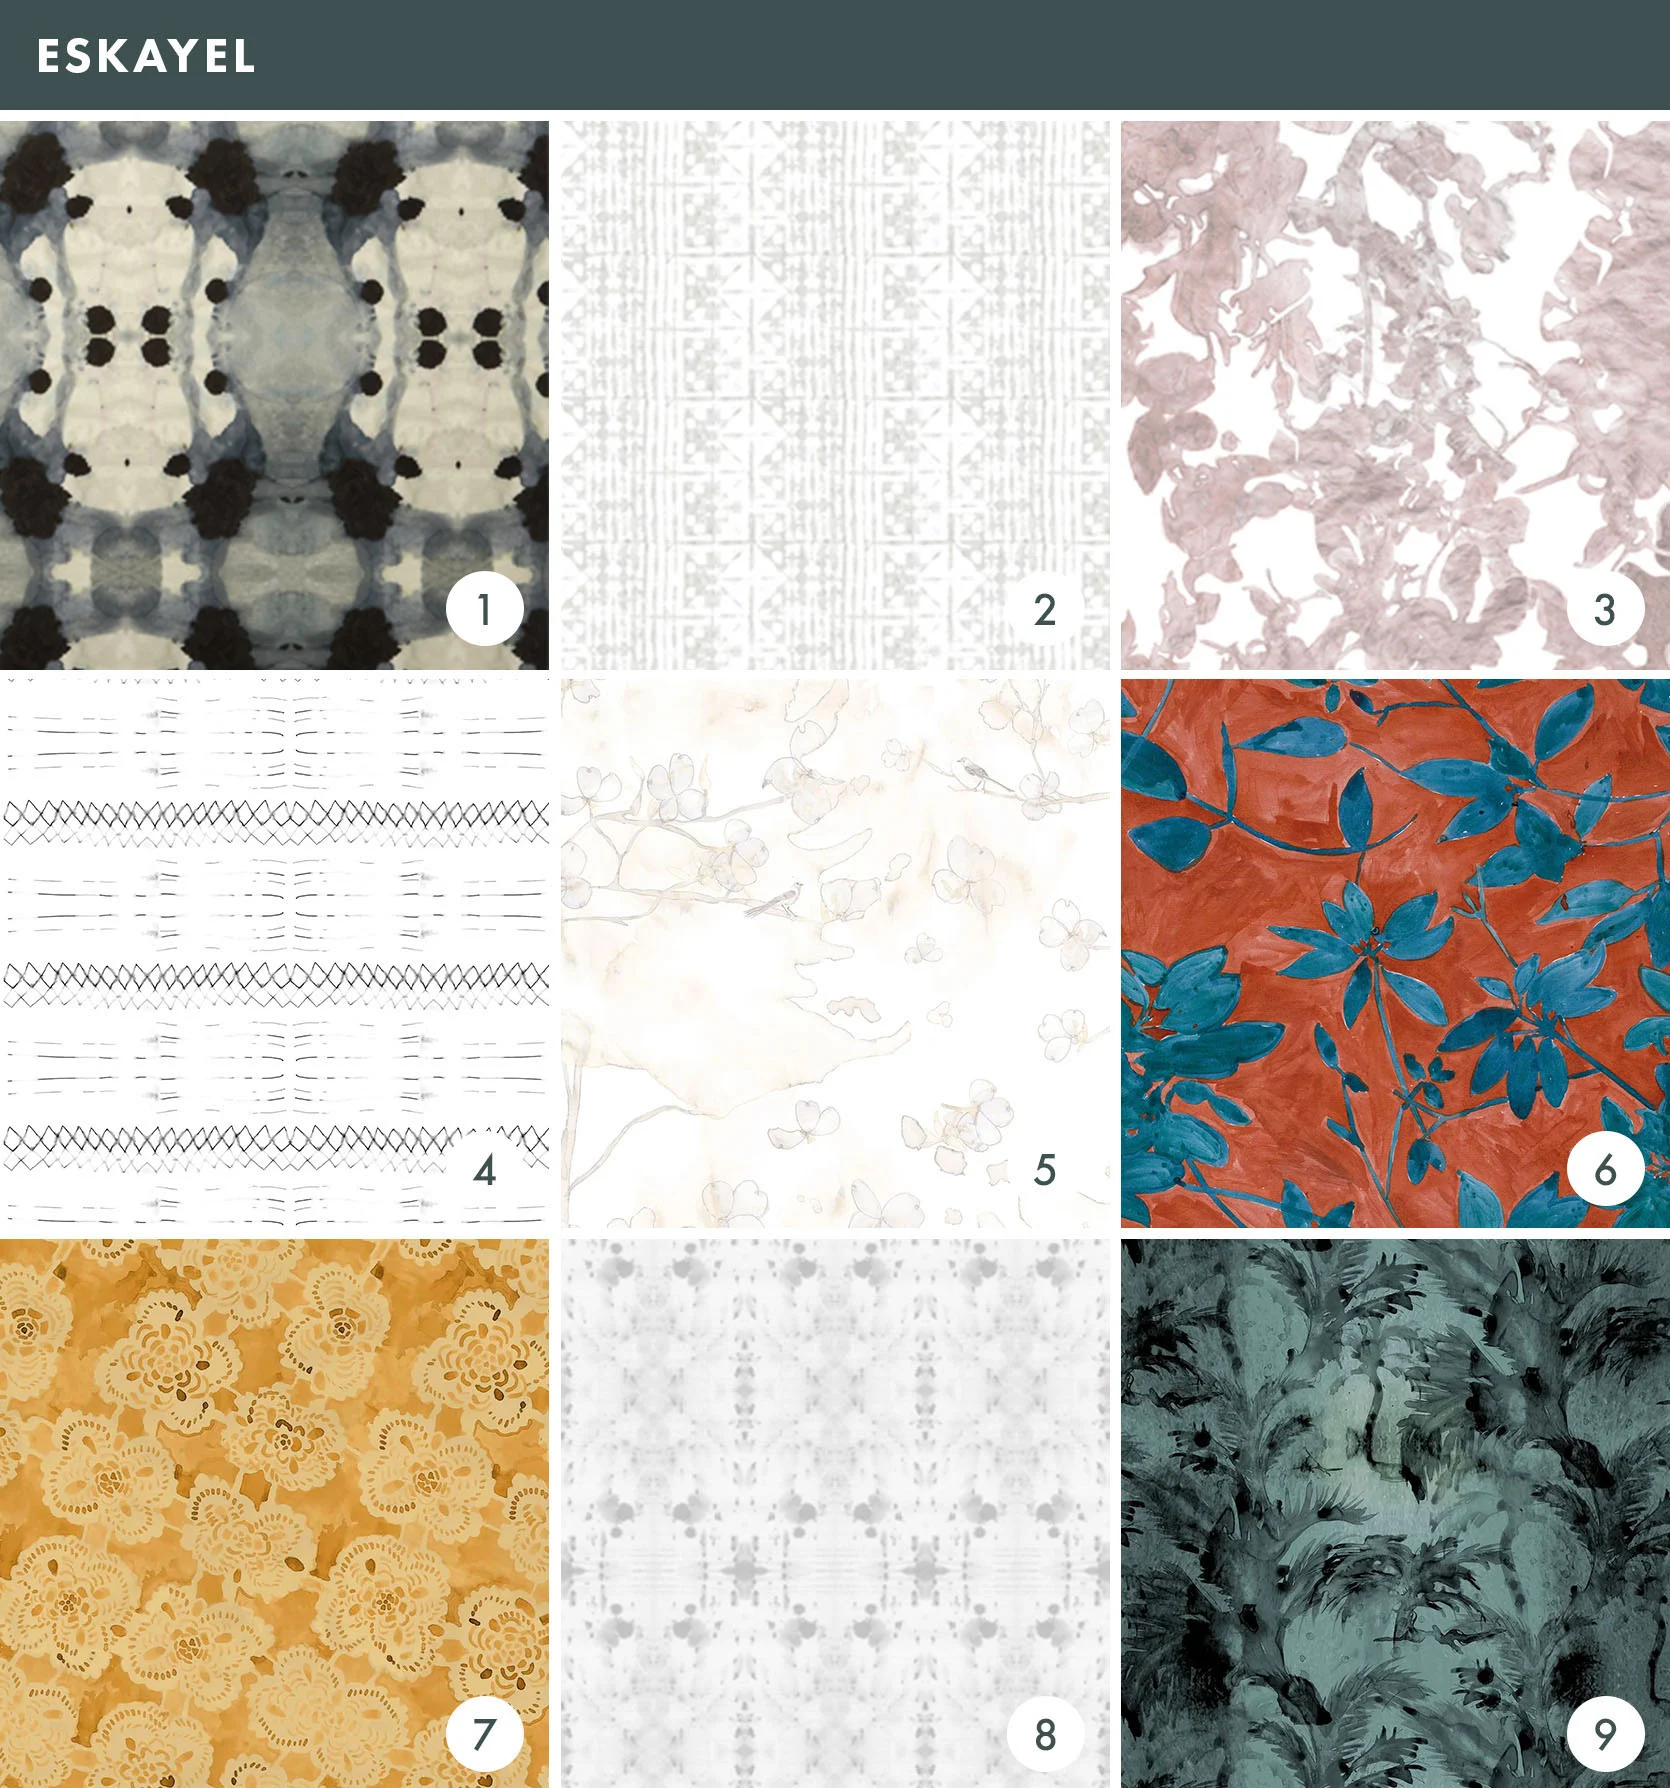
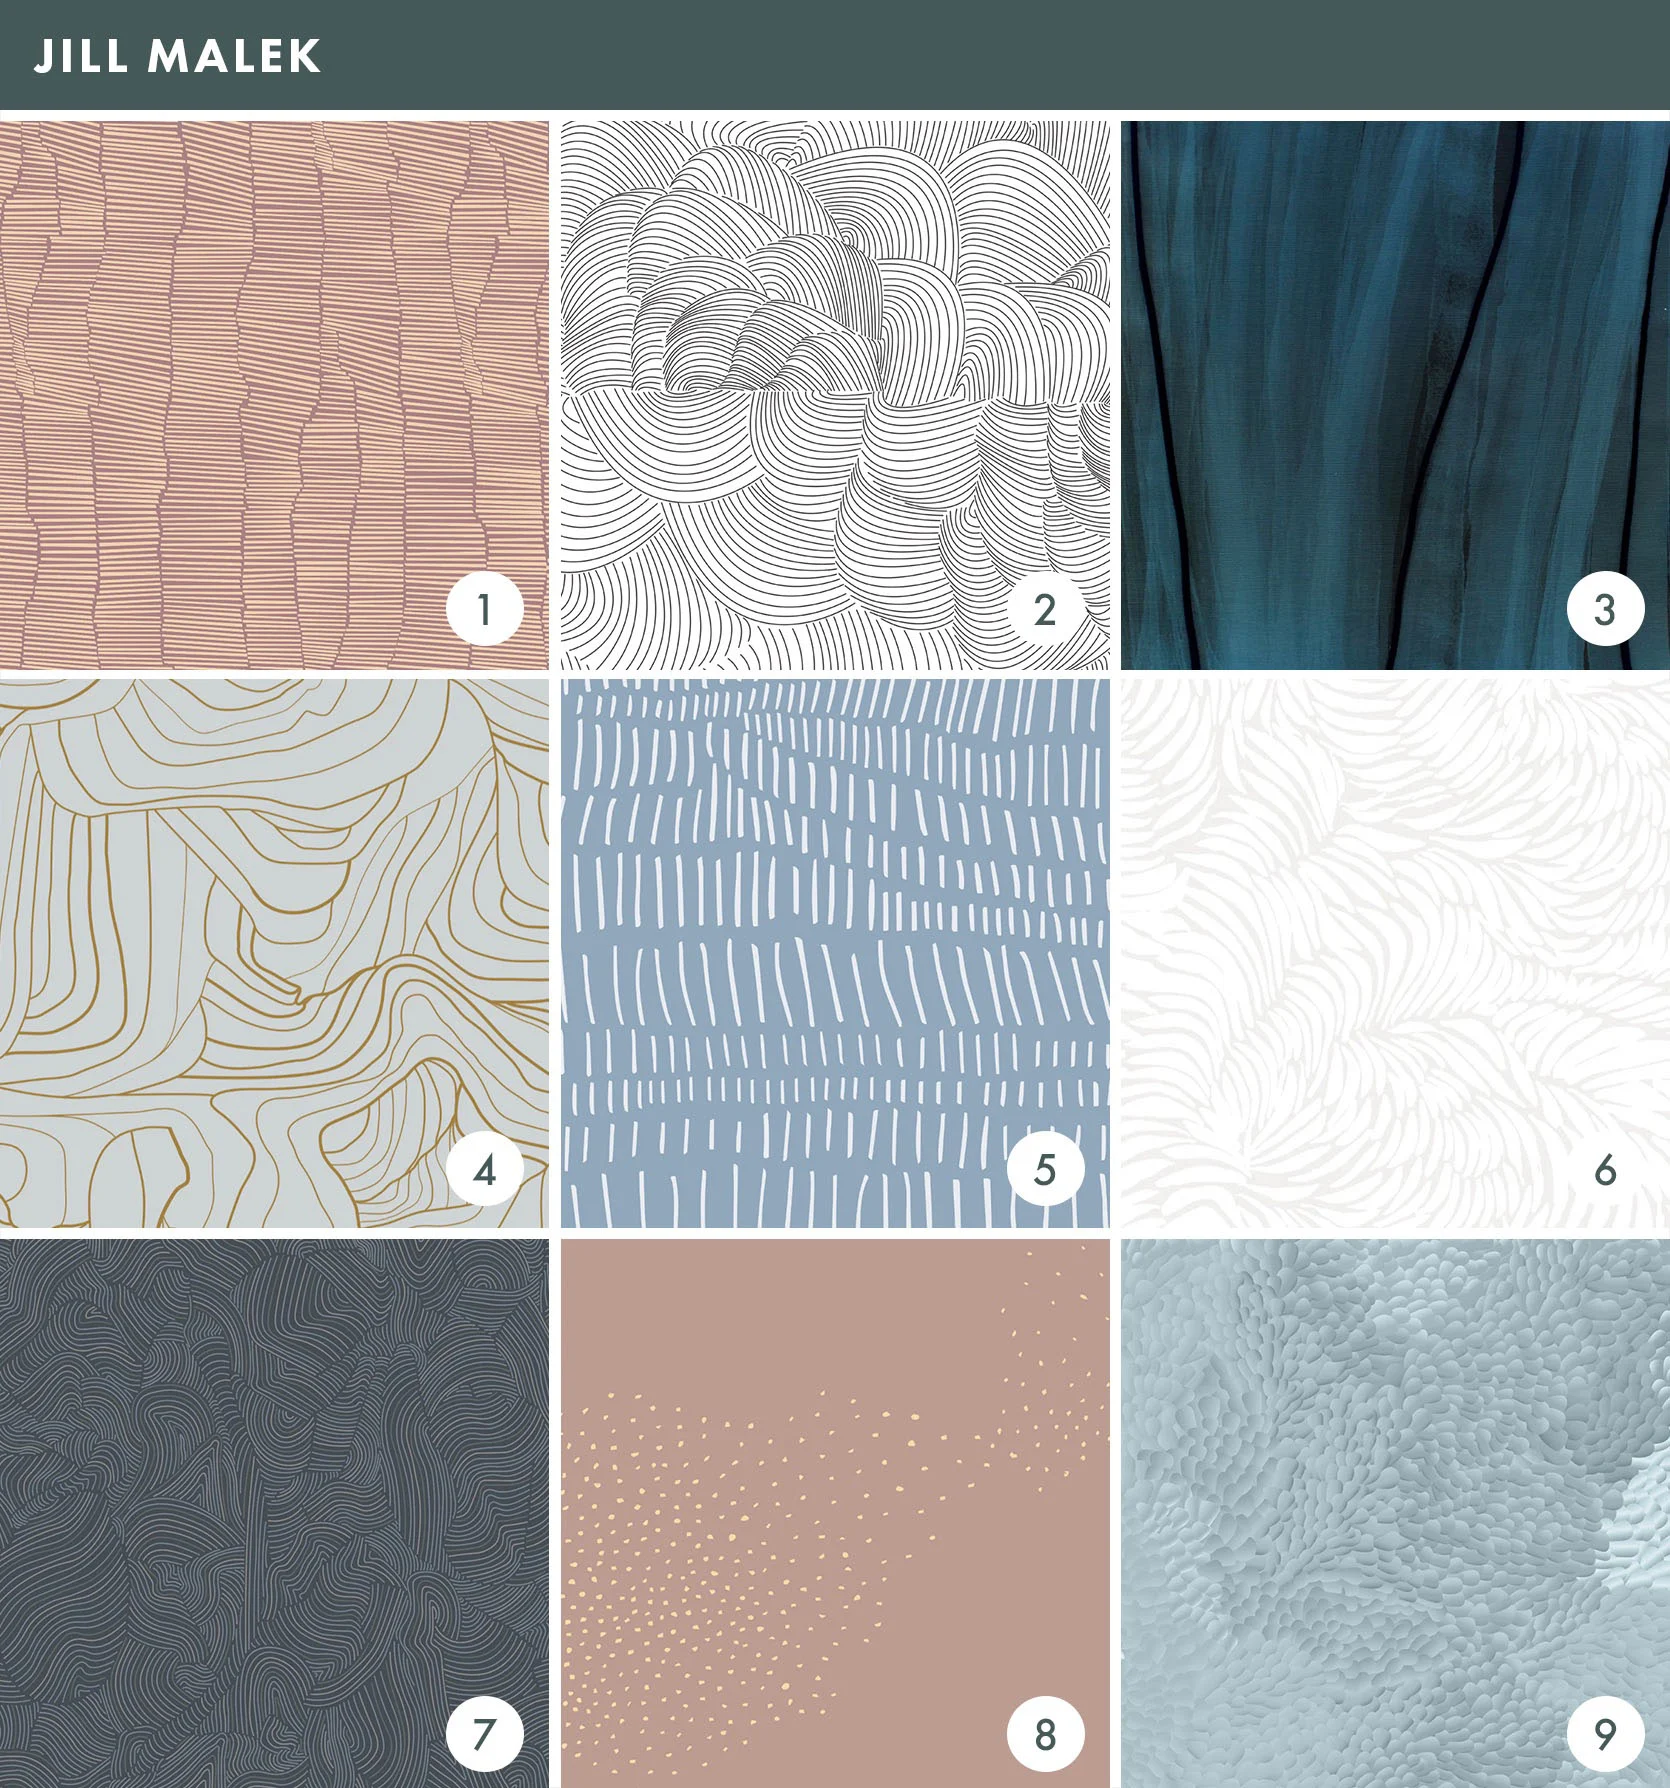
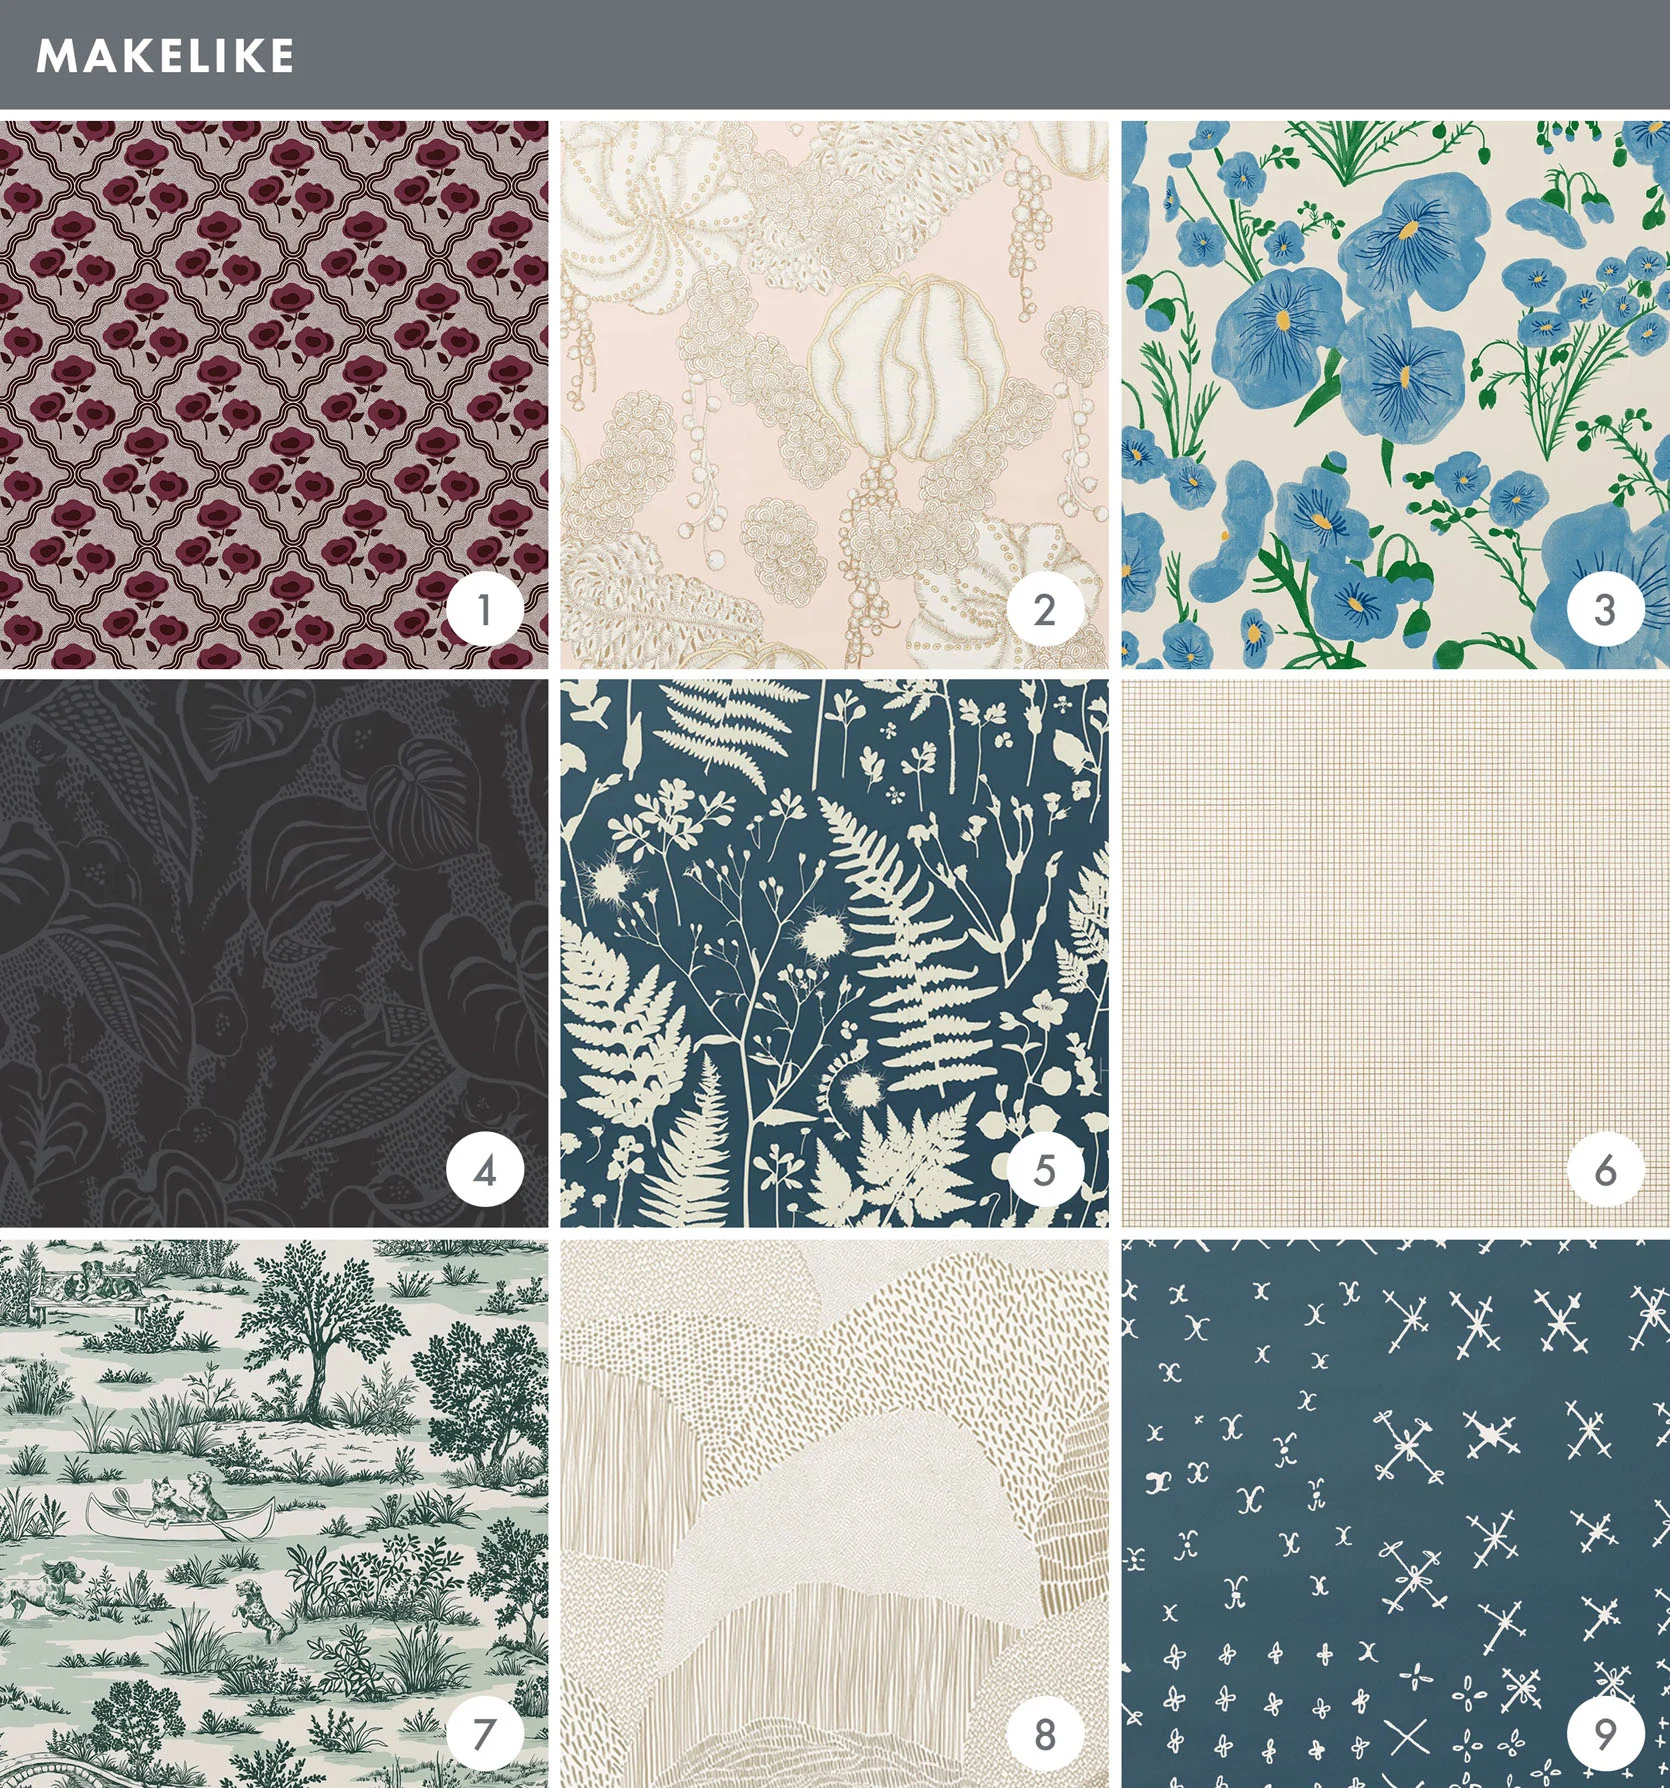
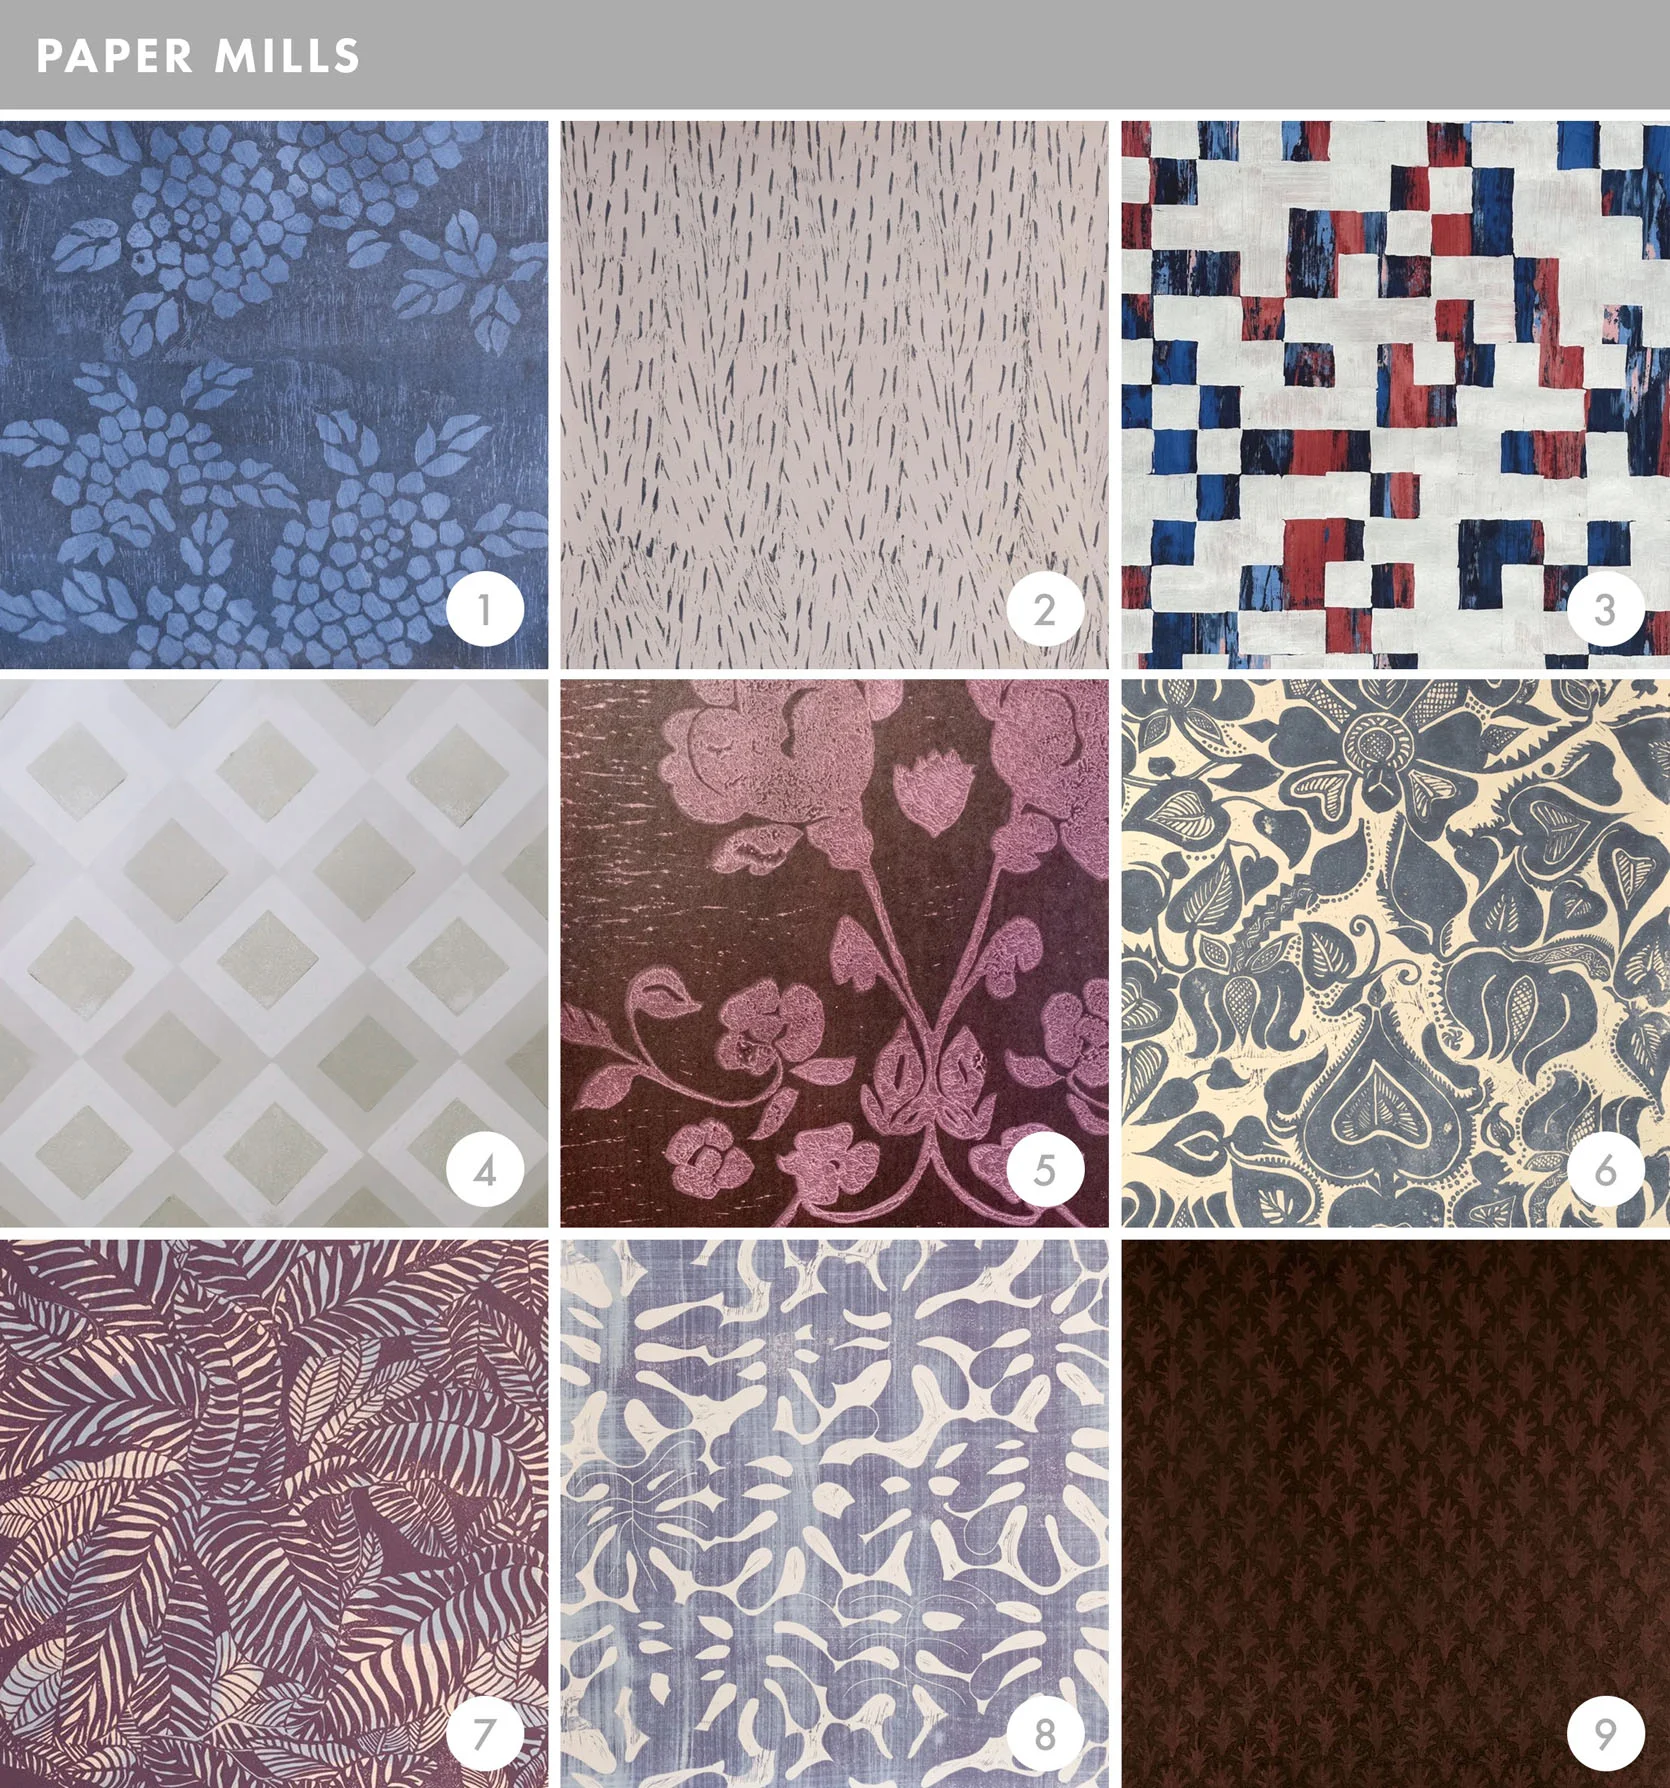
These guys take abstract wallpapers to a whole new level. Some of their prints even look like they have been block printed, so it really makes your walls look custom and much better than any old, bland beige paint that you could slap on.
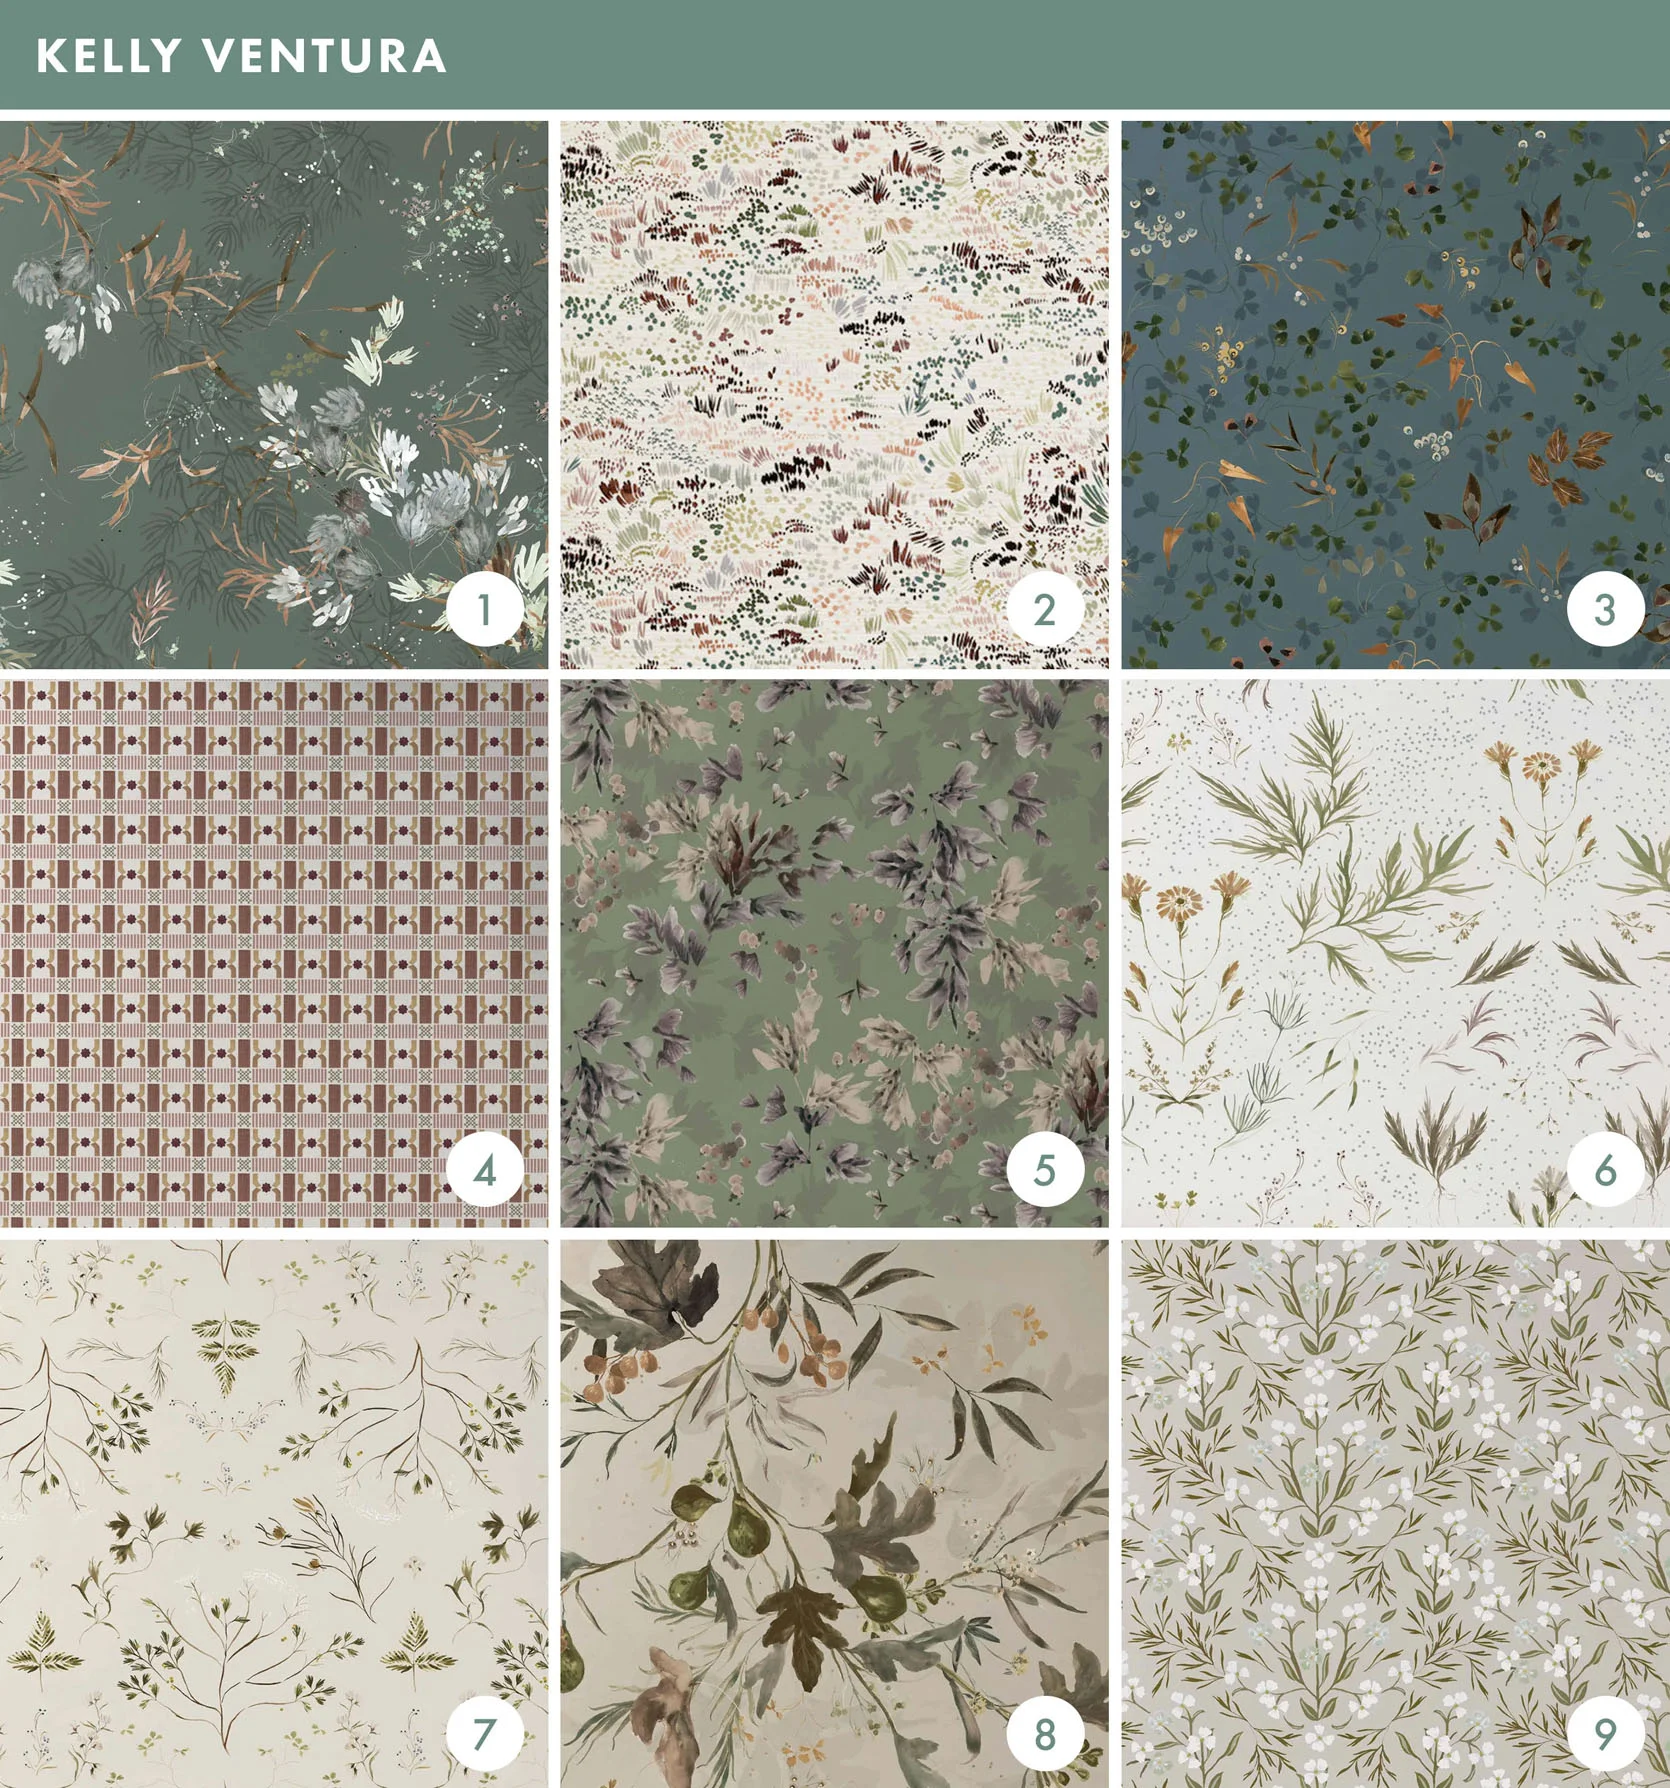
Their wallpapers will take your room to a whole different level. Each pattern is designed after hand-painted pieces, which means your room will look as if the most skilled artisan came in and transformed your room.
I’ve been a fan of Rebecca Atwood for YEARS! I’ve used her fabrics for years, but I also put the Dashes wallpaper in the Portland Project’s powder bath. The quality is incredible, and she is also wonderful.
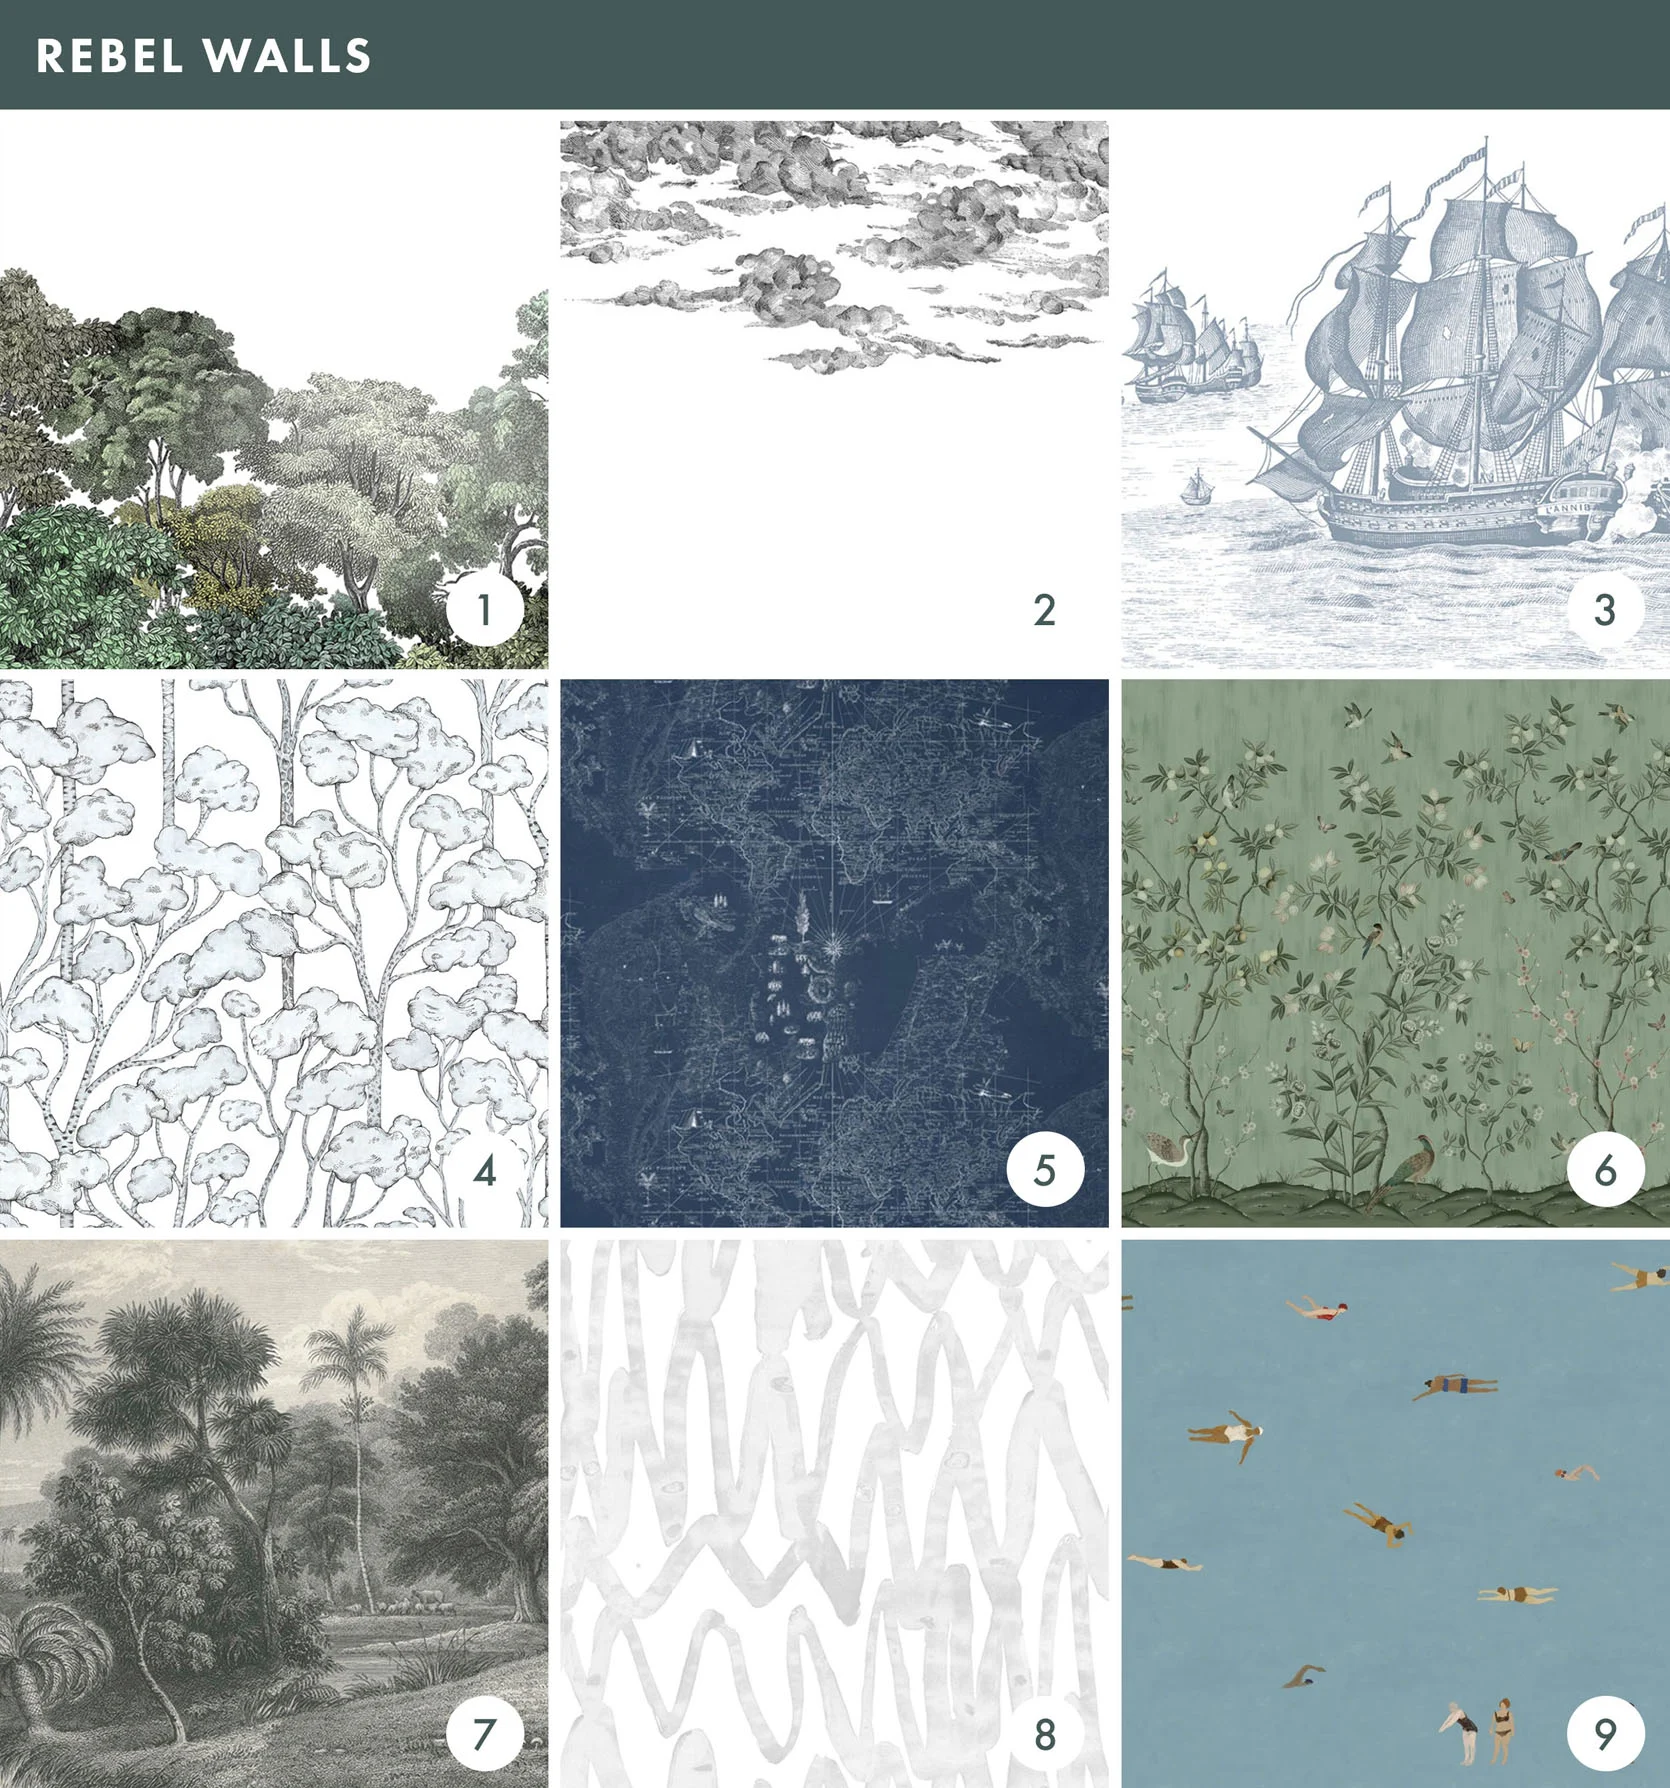
I originally stumbled into these guys when I was sourcing tree mural wallpaper for Elliot’s old room (yes, I know she has had tree mural wallpaper in both rooms) and fell in love with so many of their prints. Some of them are a bit wild and bright, but they do have a great selection, and the tree mural that I used could not have been more perfect for Elliot’s first nursery. I also used the High Seas mural in our LA kids’ playroom, and Jess used their Chinoiserie Chic mural for her friend’s bedroom.
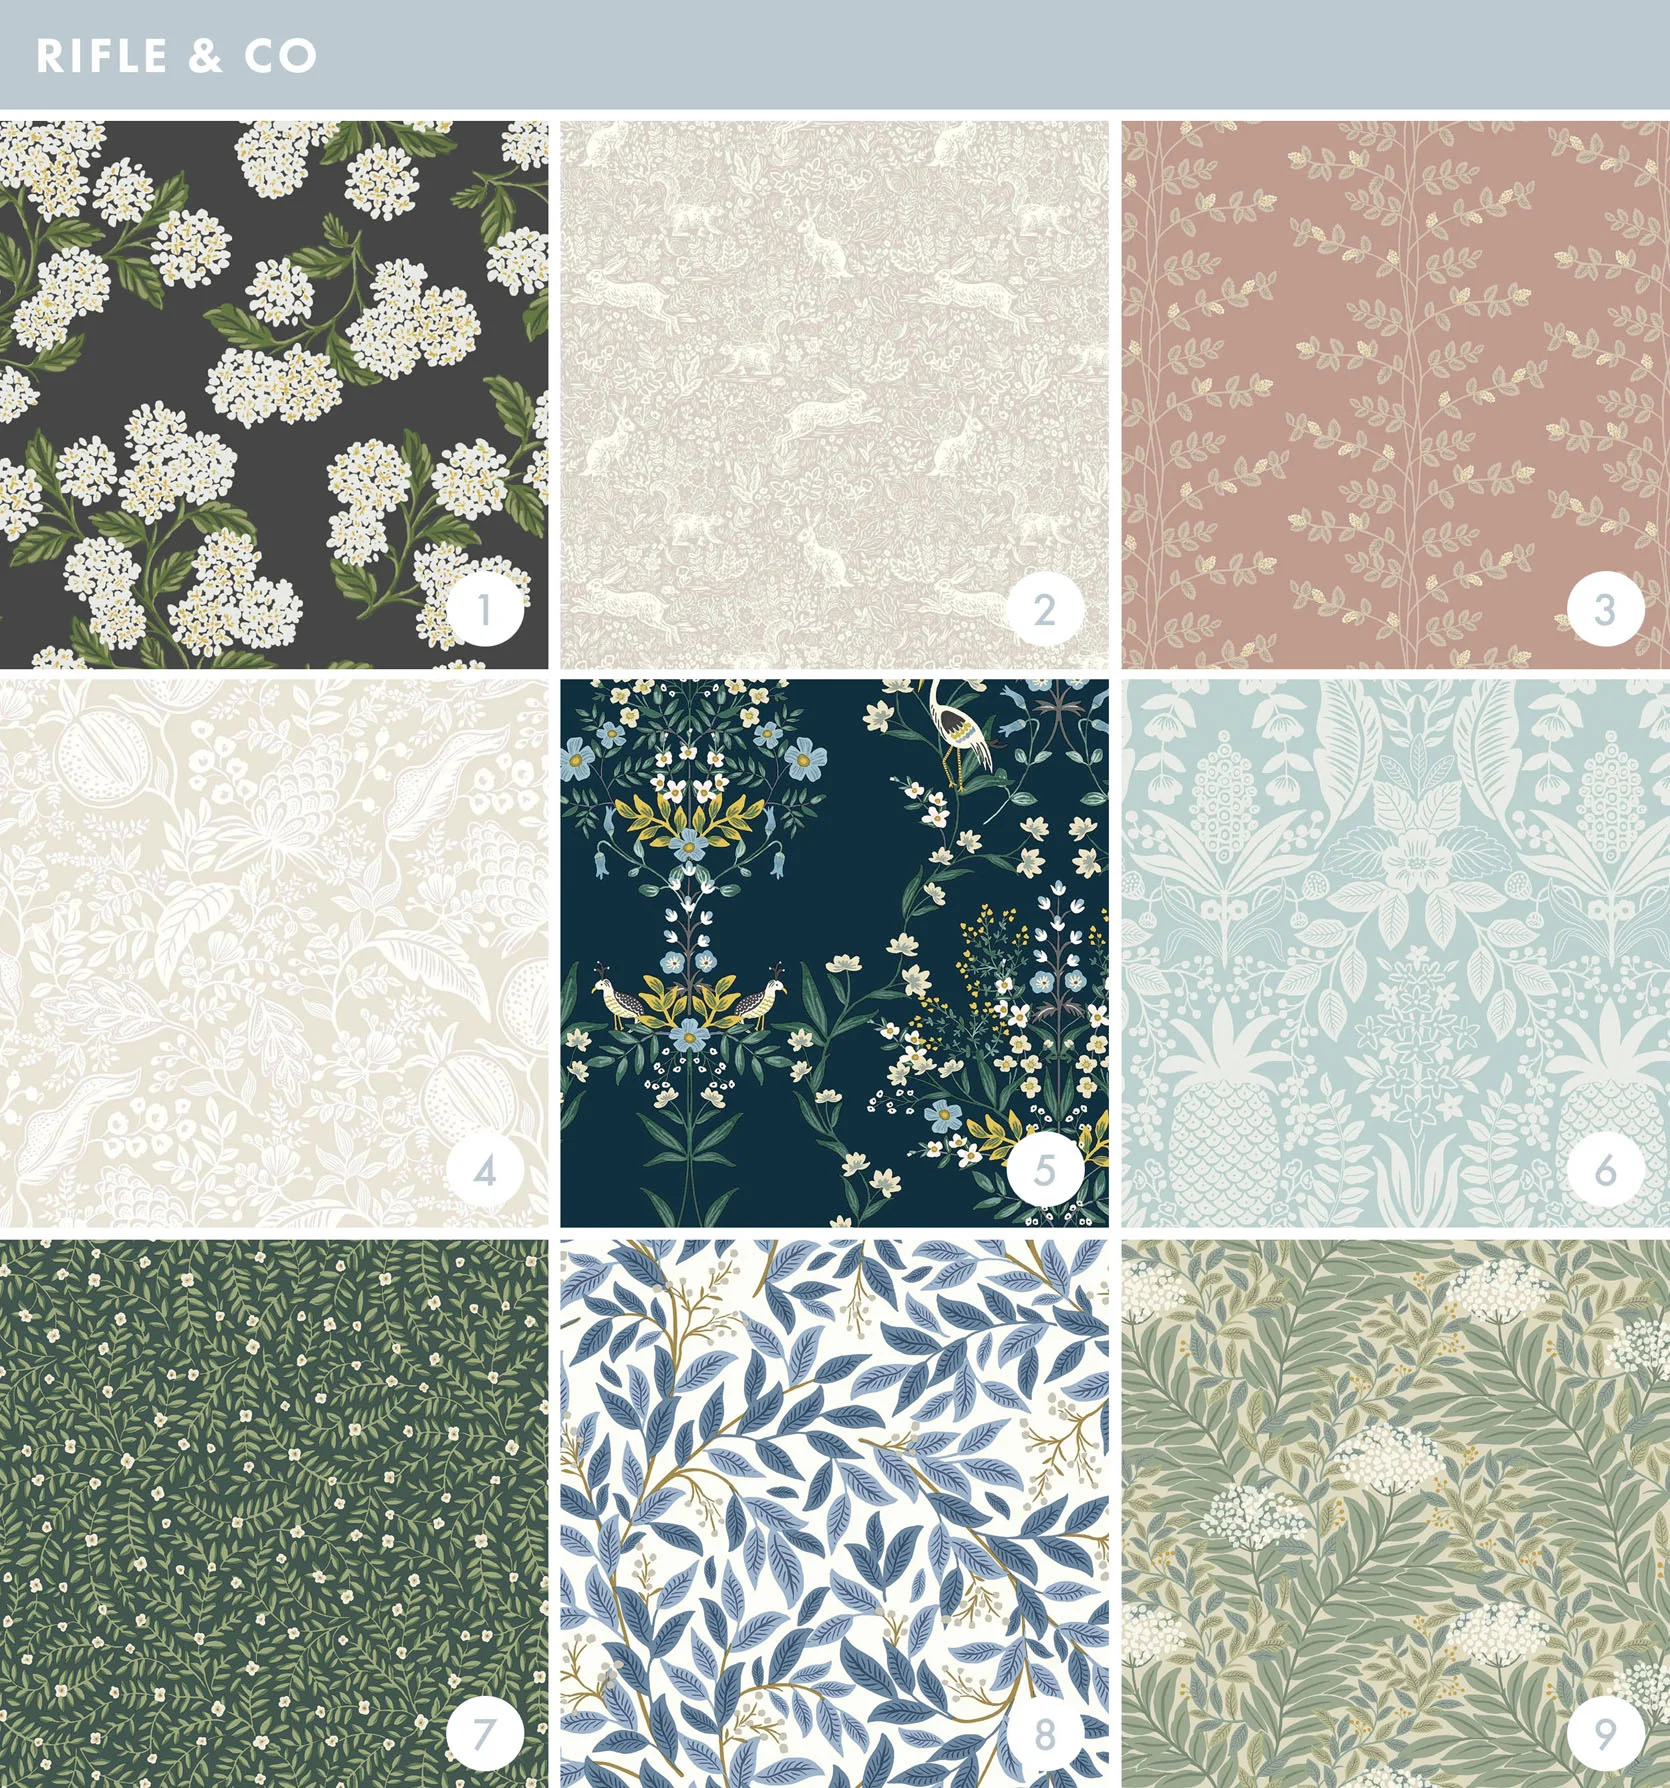
You might be familiar with their stationery, but these guys make some pretty joy-inducing wallpaper patterns as well. They come in peel-and-stick, too!
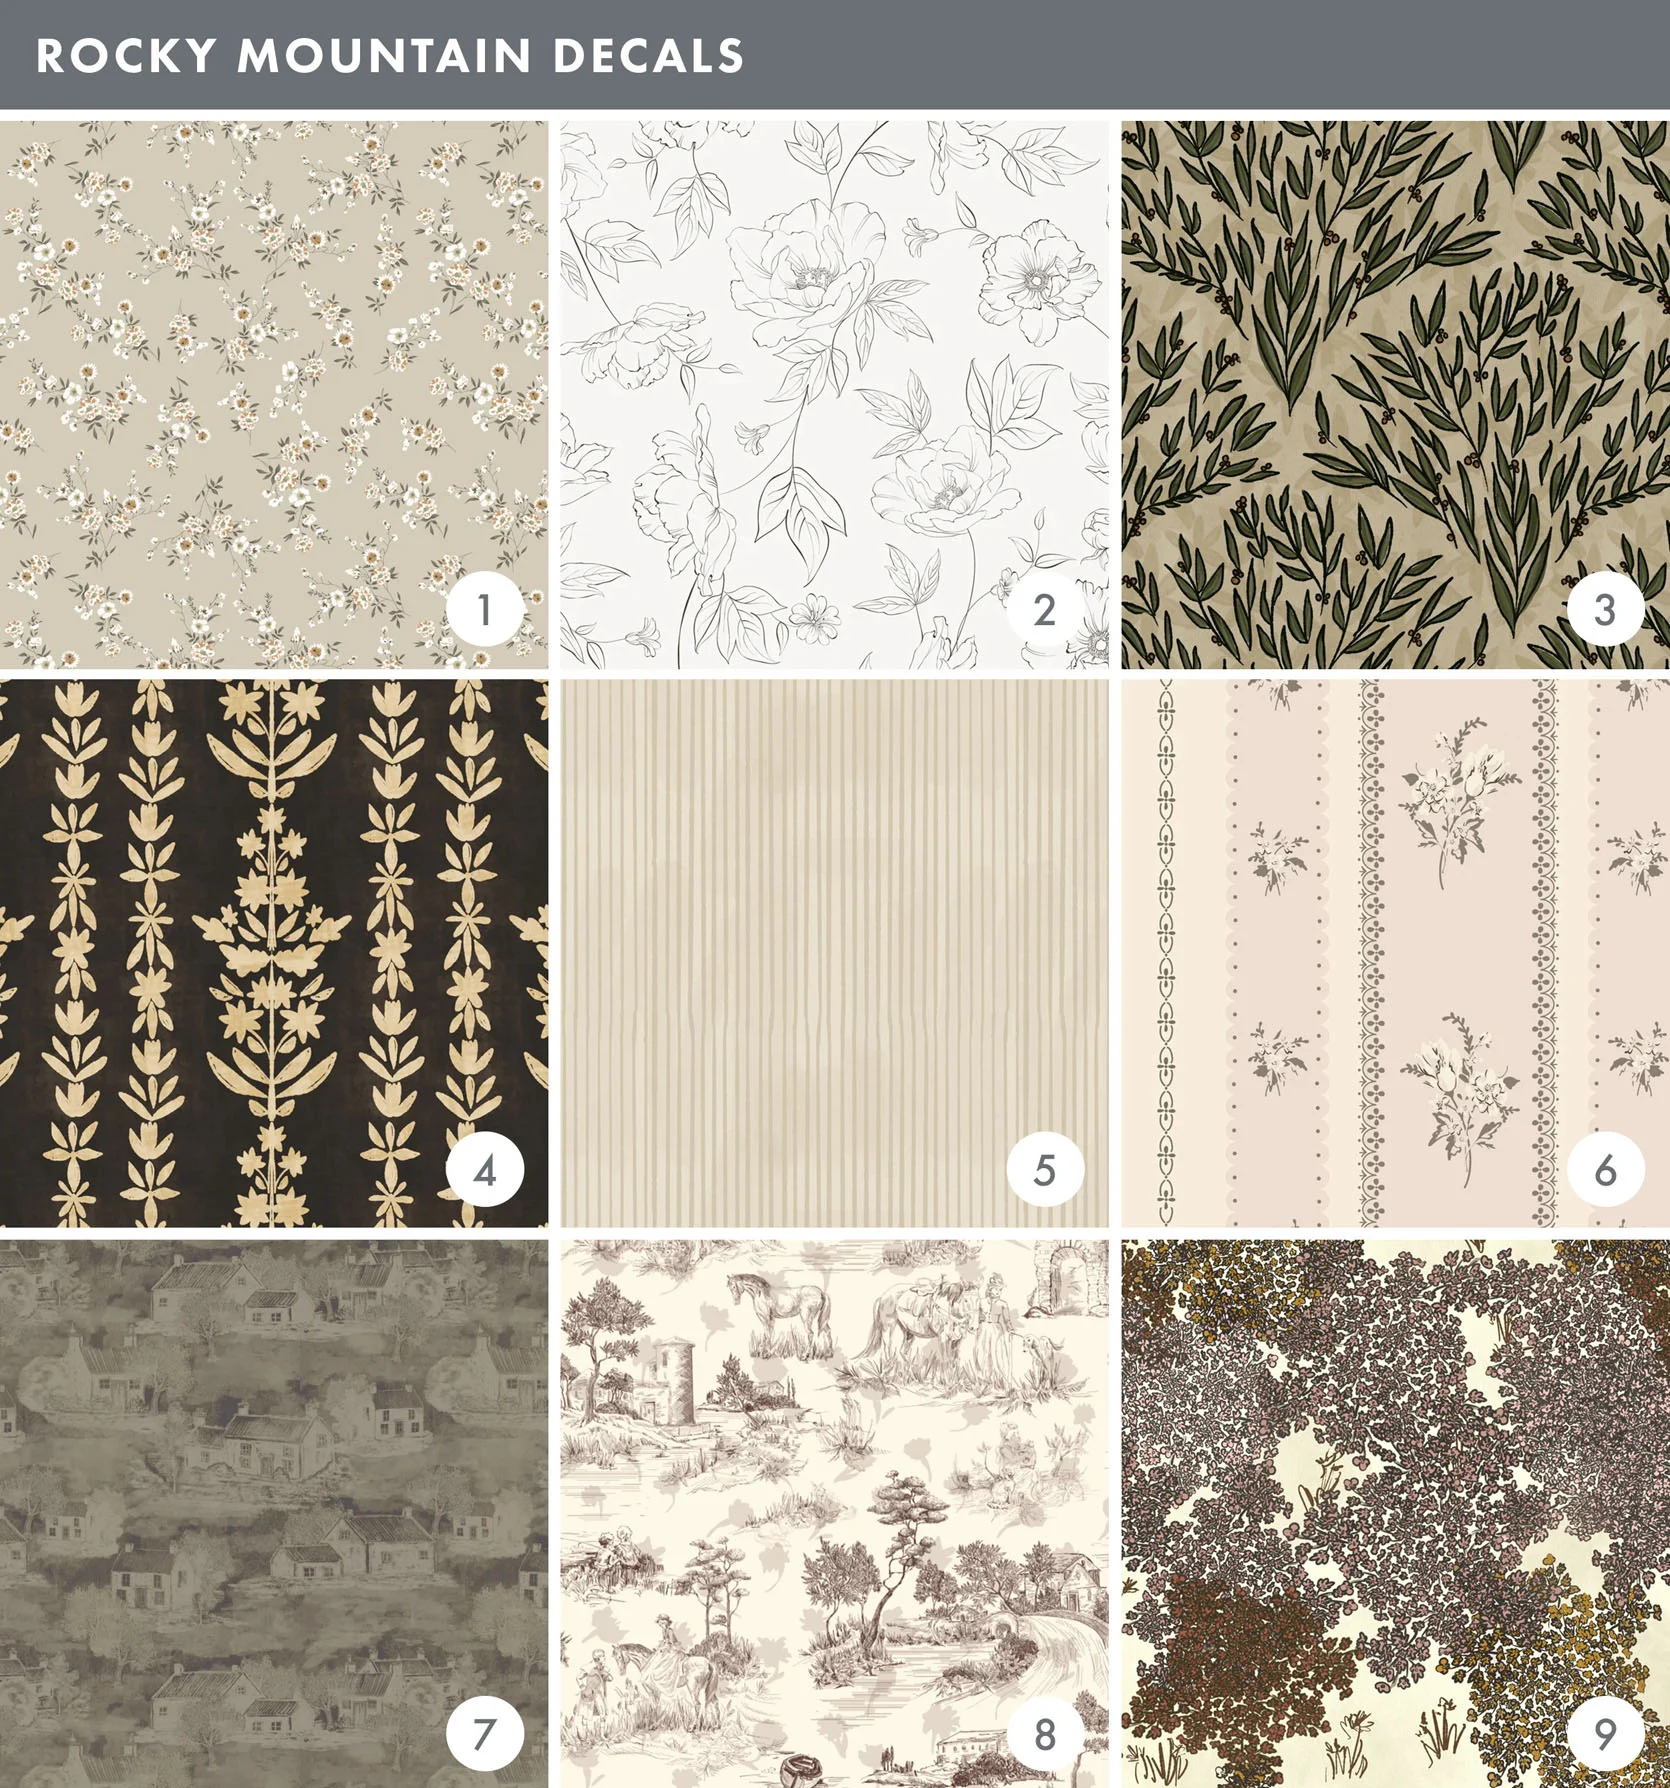
Haven’t tried these guys out in person, but they do have some pretty cute temporary wallpaper options. We chose very neutral options here, but they have a ton of colorful options too!
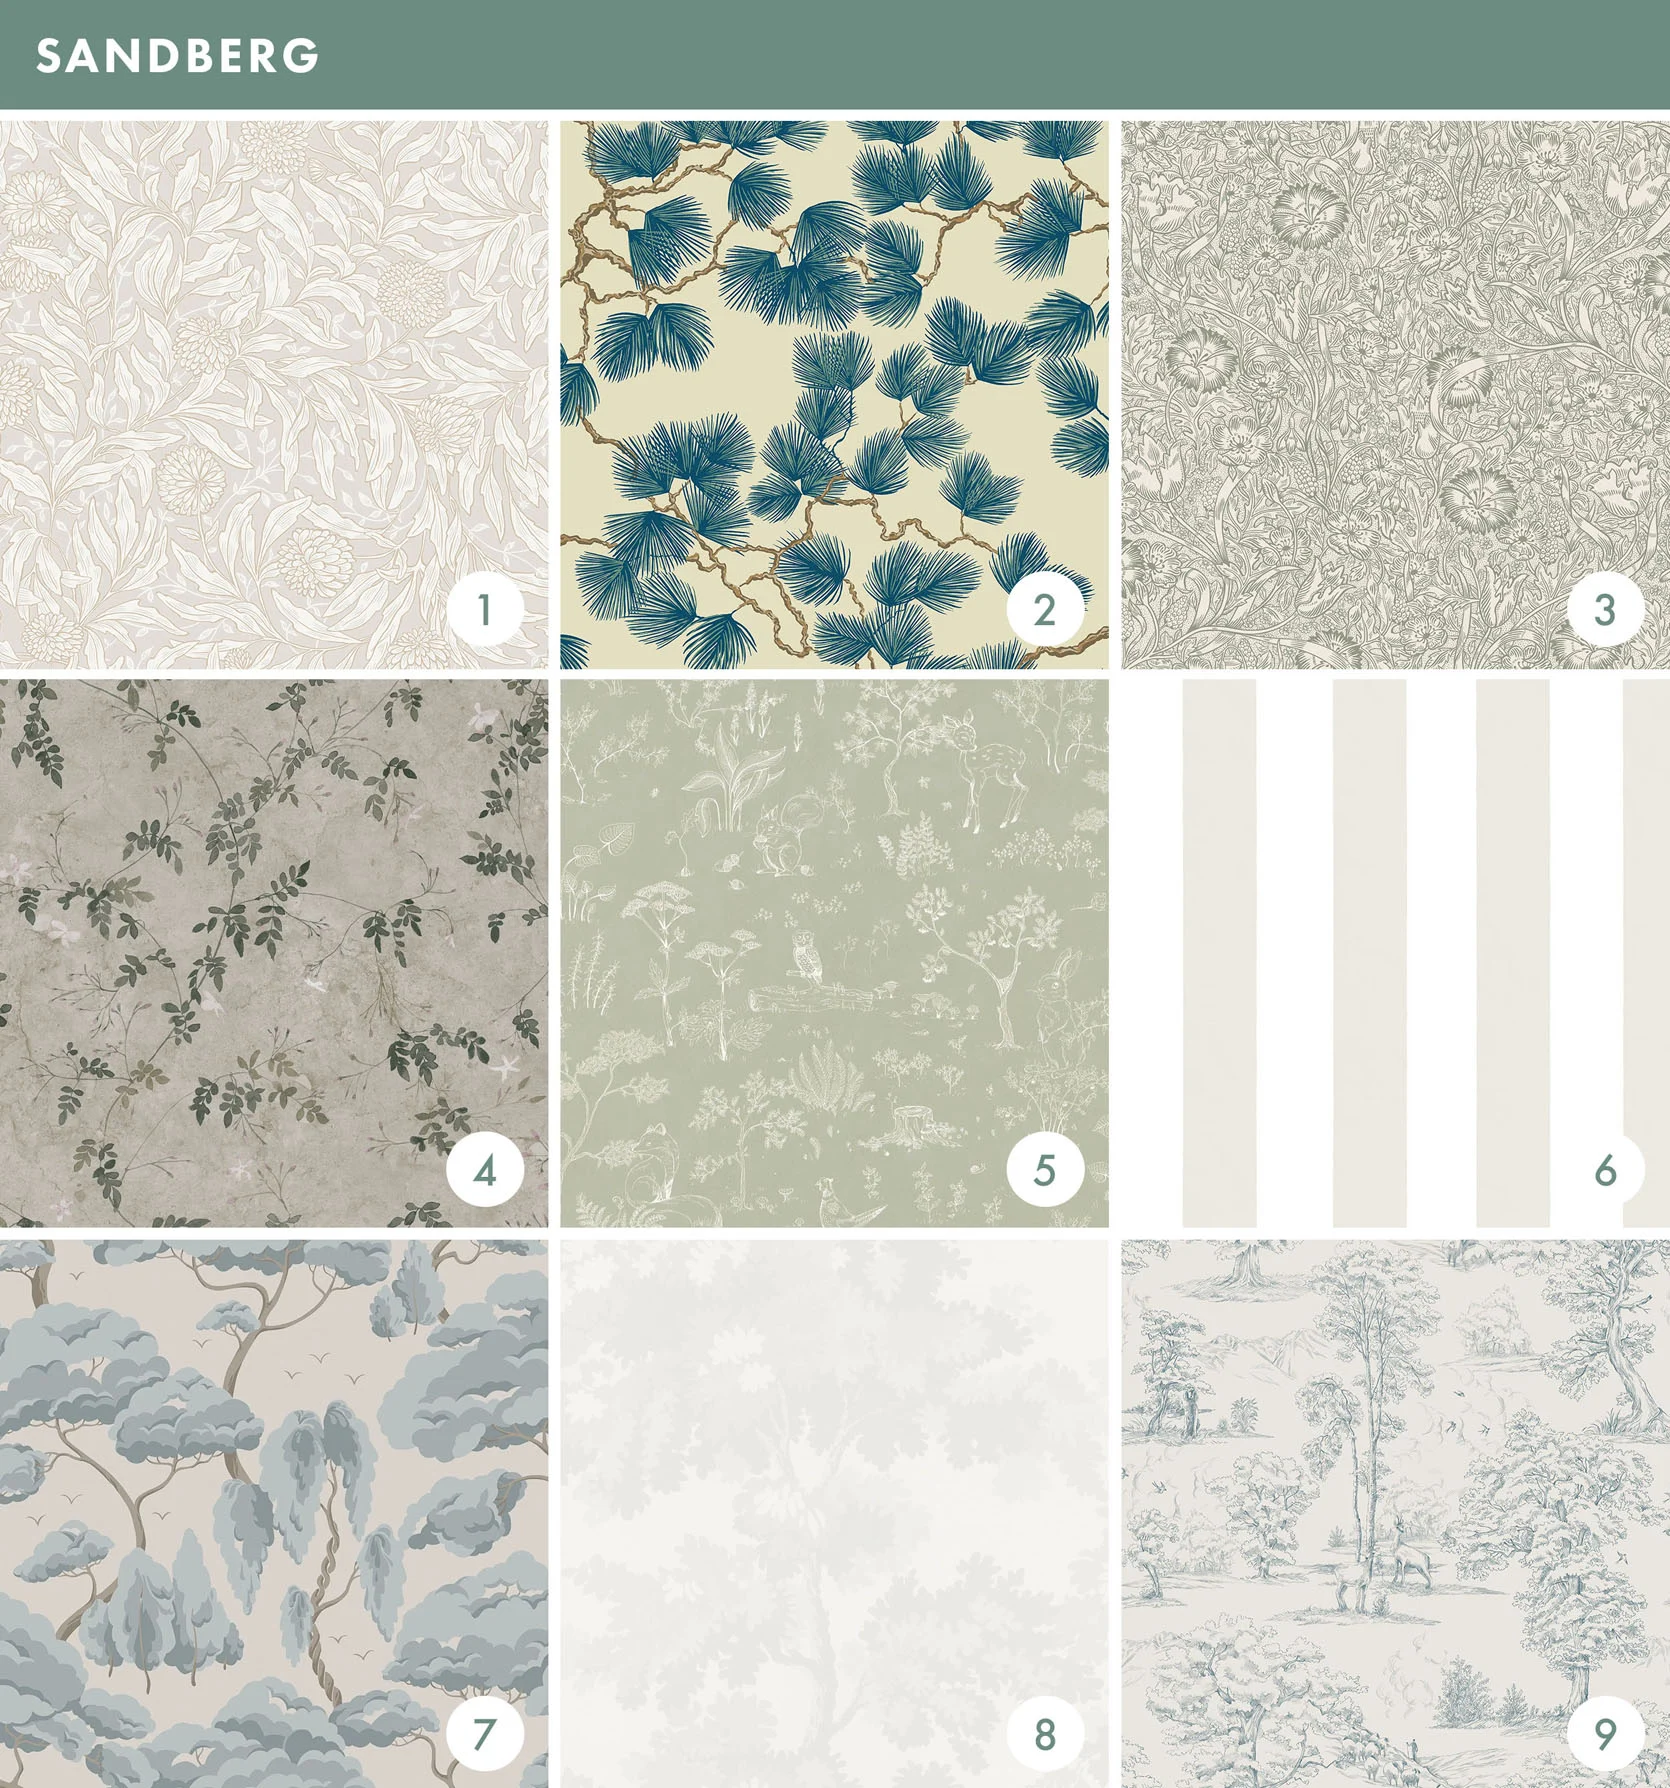
The wallpaper company of my Scandi dreams:) I love their designs so much, and the famous Raphaël is in my entryway – a quiet neutral that has so much beautiful movement.
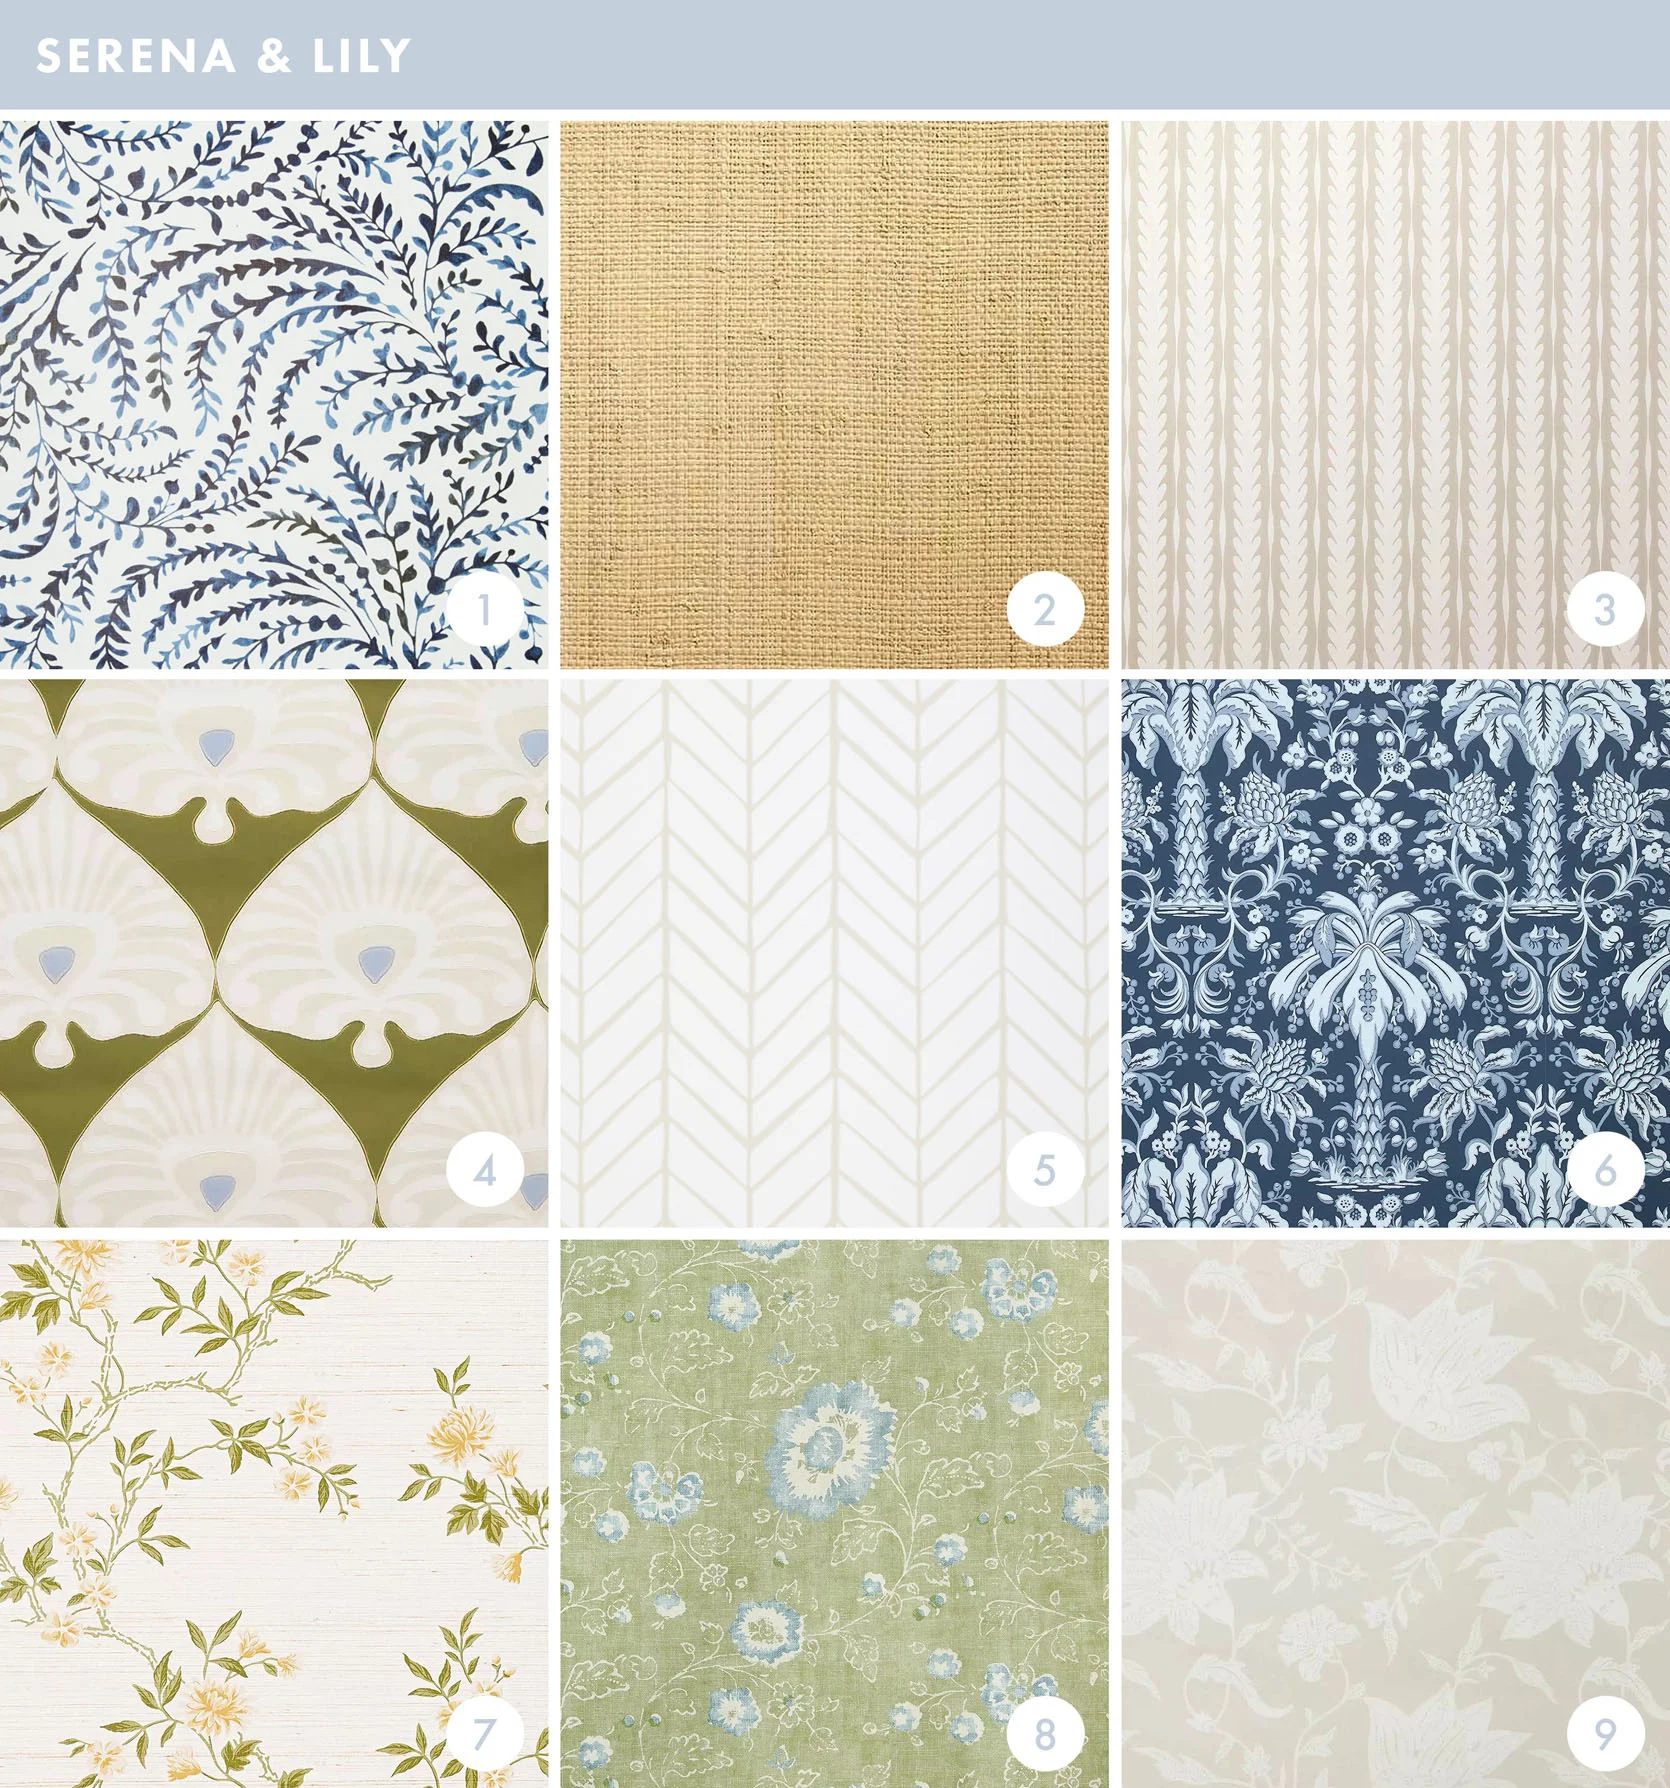
We are long-time fans of everything Serena & Lily does, and their wallpapers are no exception. I love some of the simpler and subdued patterns like #5 and #8.
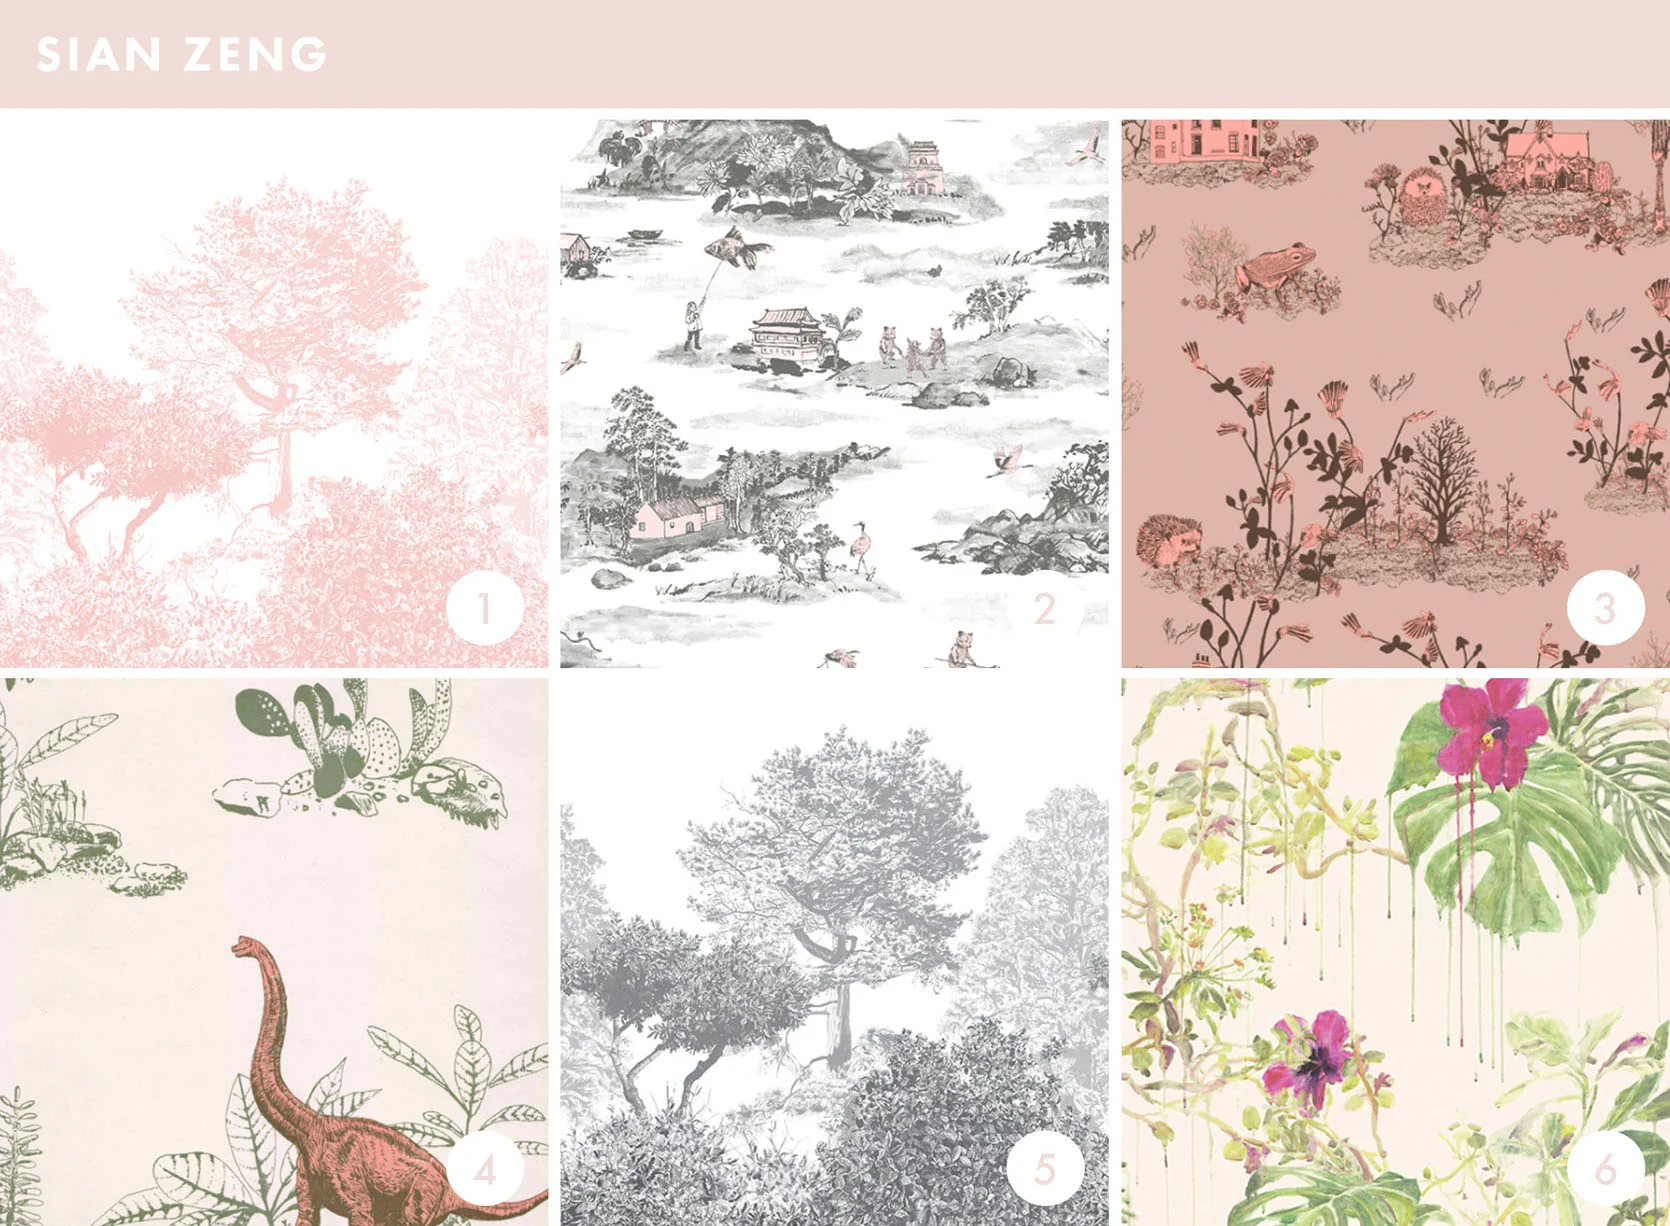
Found this company when designing Elliot’s nursery and fell in love with their prints and patterns. I used #1 in Elliot’s bedroom because who doesn’t need a pink tree mural in their room? I cannot say enough good things about the details, quality, and coloring of their stuff.
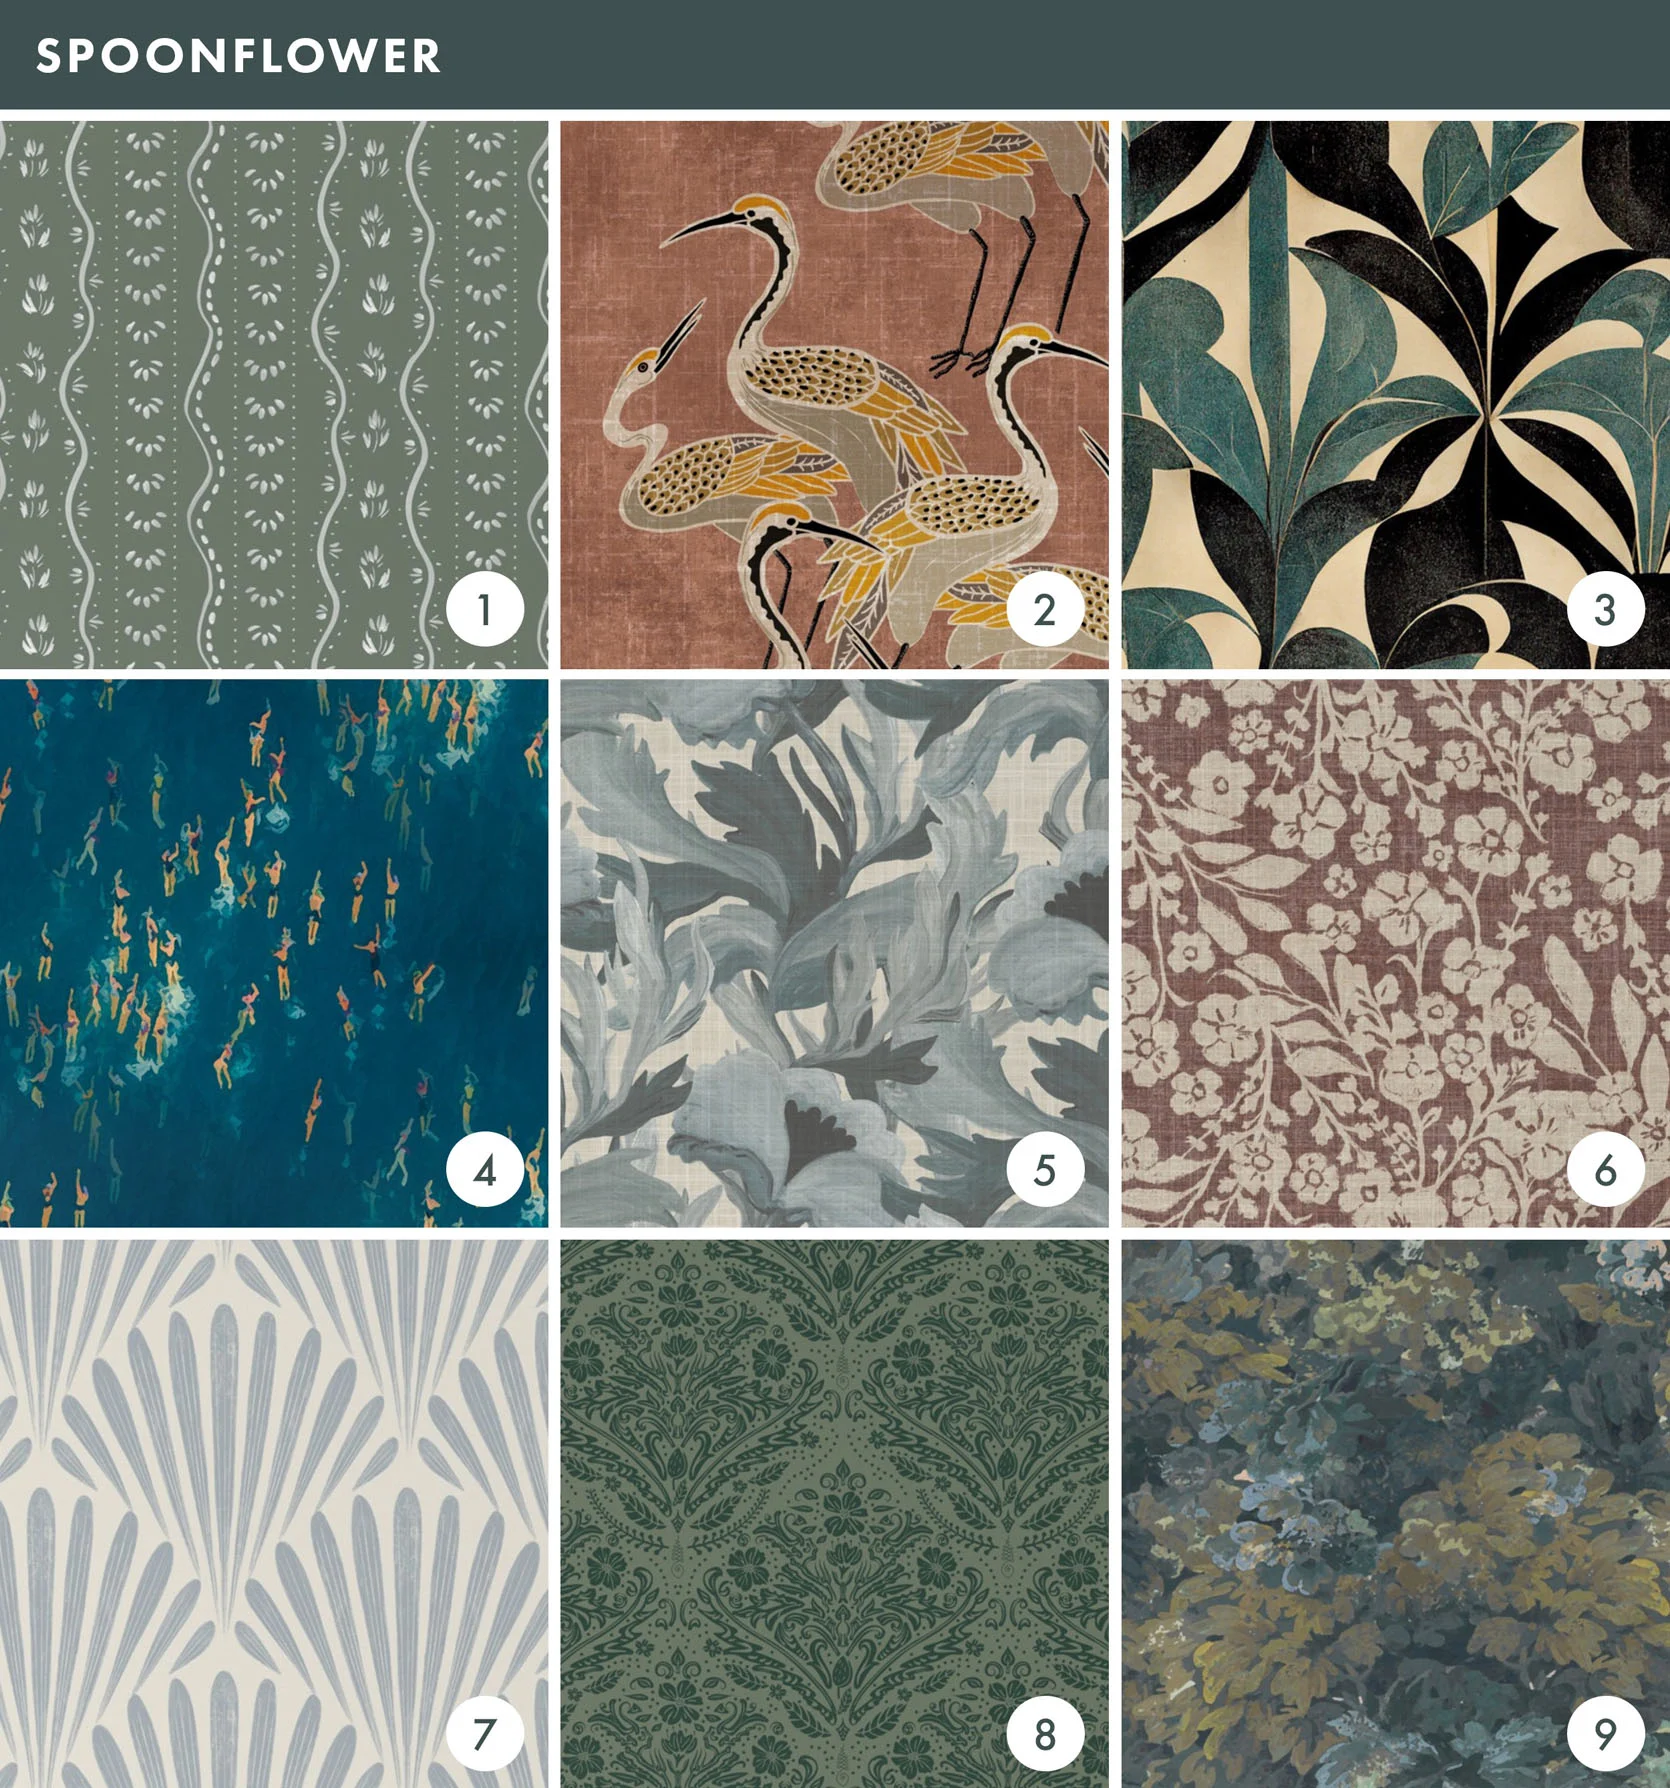
I have been working with Spoonflower for a few years now and truly love their product. I used #1 in the upstairs laundry closet, and I did it myself (and with Gretchen:)). Most, if not all, of their papers come in eight different types, like peel-and-stick, pre-pasted, grasscloth, etc. They have it all.
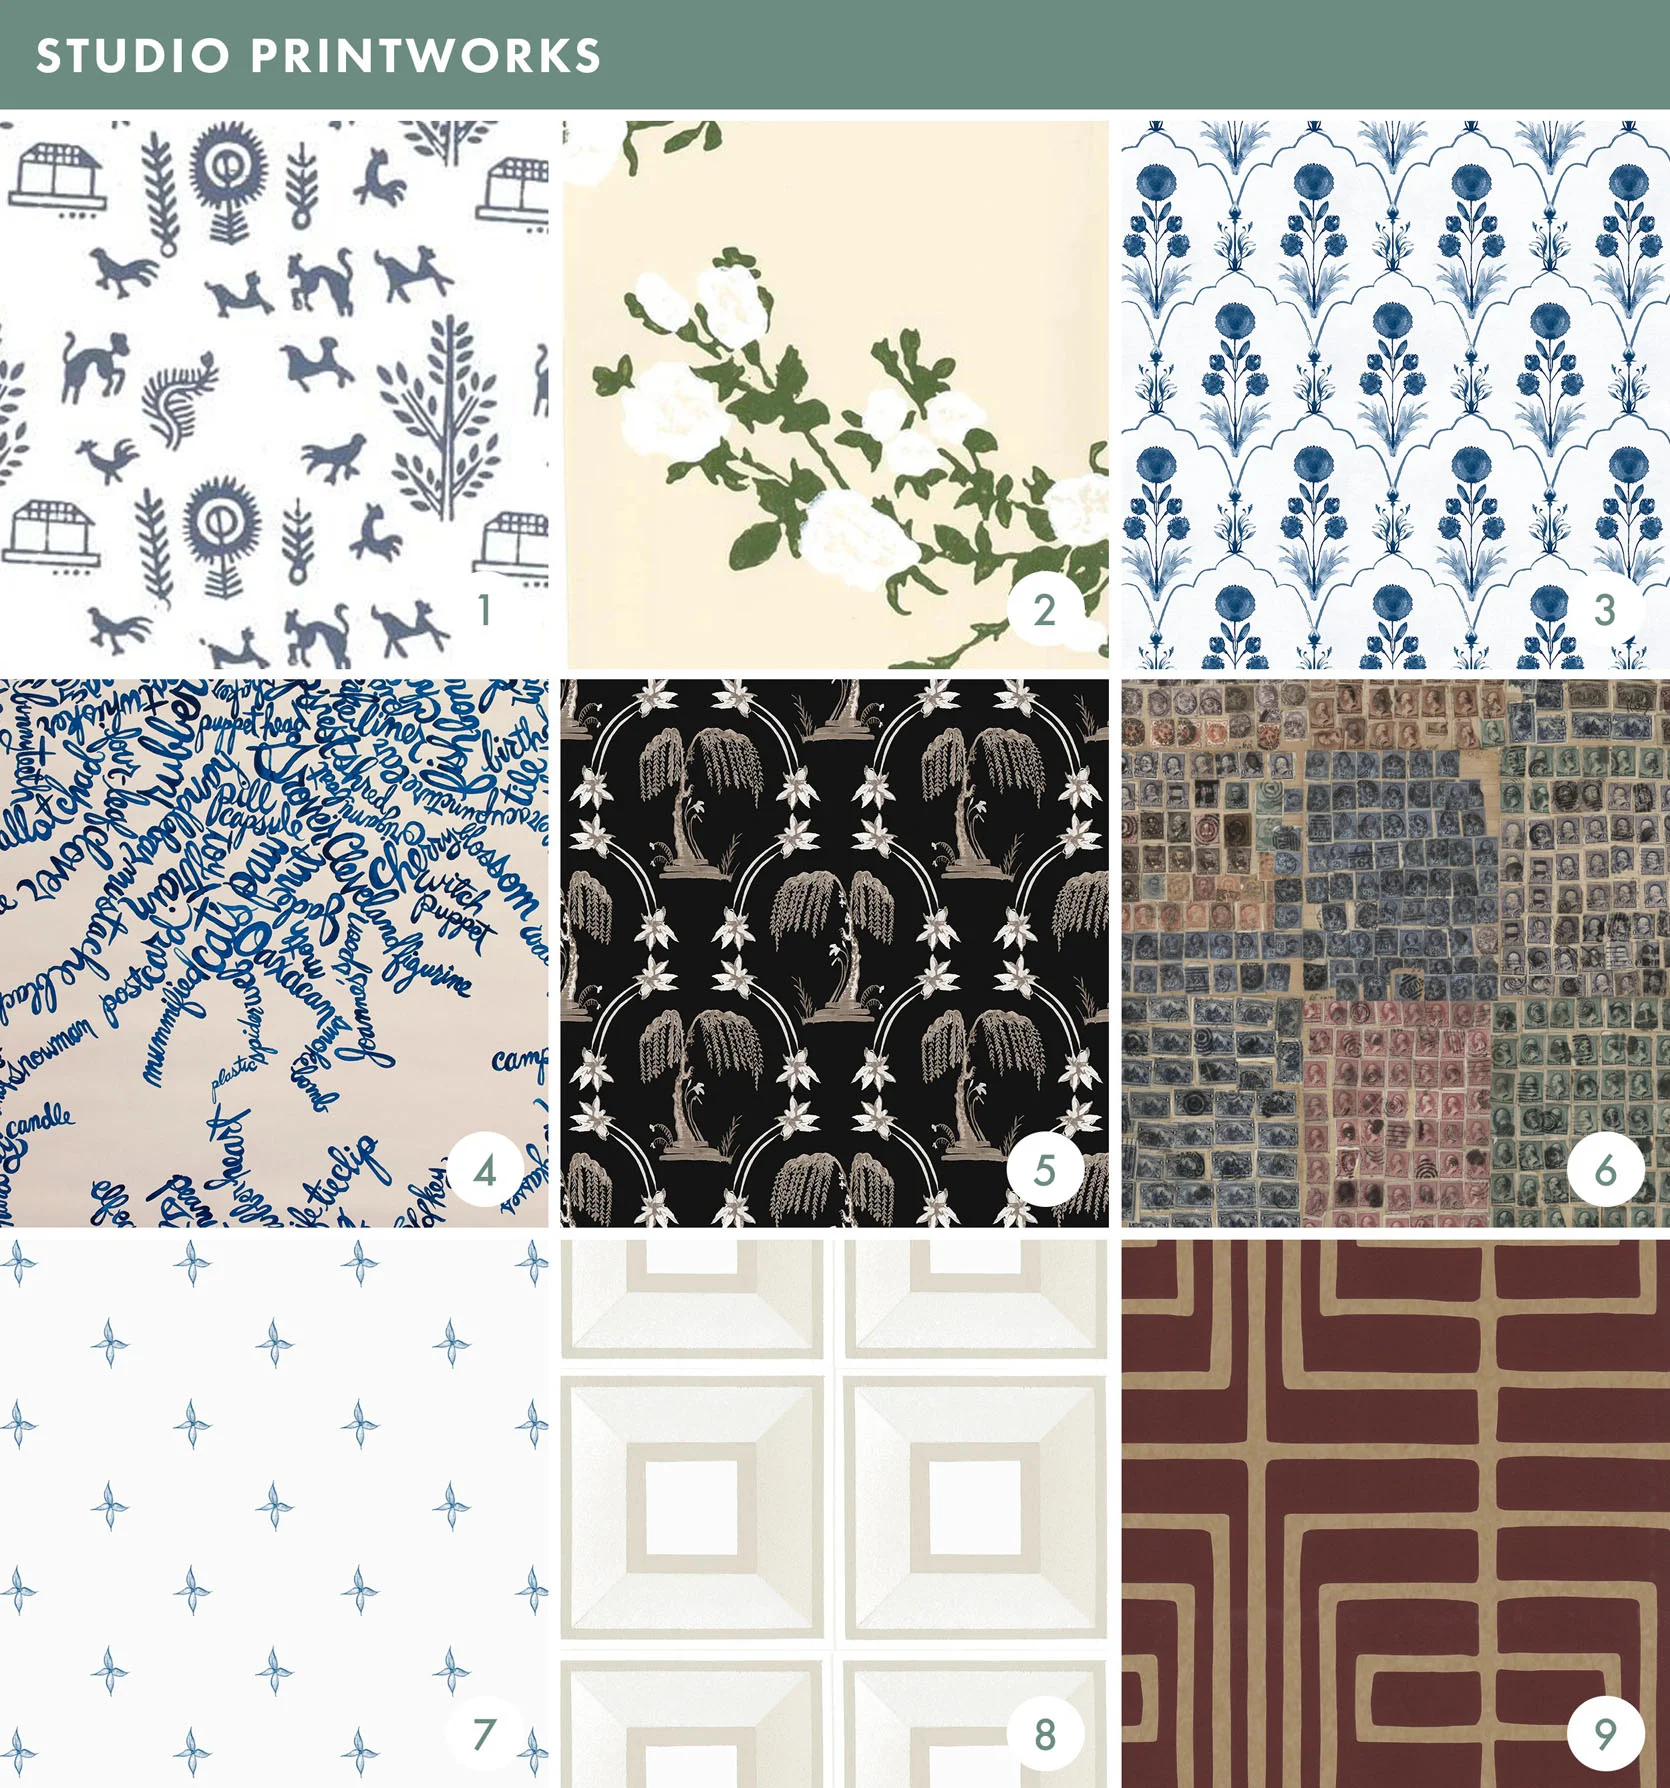
They have got some very off-the-wall patterns and narrative murals that are bound to make your friends, and your walls talk (literally), and if that is not your thing, then you can find some beautiful geometrics and florals in their shop as well.
I feel sort of bad because I don't have anything red, white and blue to share with you before our Fourth of July weekend begins. Total fail on that. I'm pretty sure you can click around and find plenty, but still.
No, instead I decided to fill your mind with thoughts of chocolaty goodness—total weekend food no matter what you're celebrating this weekend.
Before we jump into how to make these deceptively easy cookies, I just need to point out a possible serving option. I HIGHLY recommend you slice these in half and fill with Nutella and fresh strawberries (or raspberries). It's the tops! You go from just a good cookie to A TOTALLY AMAZING WHOOPIE PIE.
Just saying.
Chocolate & Orange Madeleines, makes one dozen standard size madeleines.
4 eggs 2/3 cup sugar 1/4 teaspoon salt 1/2 teaspoon vanilla extract 3/4 cup flour 1/4 cup cocoa 1/4 cup melted, cooled butter zest from one orange
In a bowl beat together the eggs, sugar and salt until well combined and the batter begins to slightly change in color. Stir in the vanilla.
Stir in the flour and cocoa. Then stir in the melted and slightly cooled butter. Stir until just combined and nearly no lumps remain in your batter (you do not need to over mix here).
Excuse me, but your rind is showing.
(Lame naked fruit joke.)
Now add in the orange zest. Then spoon the batter into your buttered madeleine pan. Bake at 375°F for 8-10 minutes, until a toothpick inserted into the center of a cookie comes out clean. Allow to cool for just a few minutes before removing from the pan to a cooling rack.
If you've never had madeleines before, they are dense and cake-y. Great for making little whoopie pies (as already explained) or you can serve one or two along side a scoop of ice cream. You can also just eat them warm out of the oven by yourself while still wearing your dusty apron. Maybe you can guess which one I did. :) Enjoy and happy 4th of July weekend! xo. Emma
Guys, I love crème brûlée. It's just awesome. You probably guessed this based on the fact that we already have four different crème brûlée recipes and one creme brûlée donut post on this site. It's probably overkill.
With that said, guys, I made crème brûlée cinnamon rolls. And overkill or not, they are so yummy that I just had to share. :)
What do I mean by crème brûlée cinnamon rolls? Well, these are the classic topped with a thin layer of eggy custard that gets a brûlée shell just before serving. So they are basically crème brûlée topped cinnamon rolls. You know, dessert topped with more dessert. Normal stuff.
Crème Brûlée Topped Cinnamon Rolls, makes 12-14 (depending how you slice them).
For the rolls: 1/2 cup butter 1 cup milk (I used whole milk) 1/4 cup sugar 1 tablespoon yeast (instant dry) 1 egg + 1 egg yolk 1 1/2 teaspoon salt 3 1/3 cups flour (all-purpose)
For the insides: 3 tablespoons melted butter 1/4 cup sugar 1/2 teaspoon cinnamon
For the custard: 3 egg yolks 1/2 cup heavy whipping cream 1/2 teaspoon vanilla extract 2 tablespoons sugar 1/2 teaspoon corn starch 2-3 tablespoons baker's sugar (or regular granulated is OK too)
In a saucepan, melt the butter over low heat. Once melted, remove the saucepan from the heat and stir in the milk and sugar until the sugar dissolves. Pour in the yeast and give that a good stir (it does not need to dissolve). Allow that to sit for 6-8 minutes to allow the yeast to start working.
Mix together the flour and salt. Pour the yeast mixture into the flour and stir to combine. Stir in the eggs. Knead for 3-4 minutes. Place the dough ball in a lightly oiled bowl, cover and allow to rise in a cool, dry place for 2 hours (or until doubled in size).
Roll the dough out on a lightly floured surface so that it's about 1/4 to 1/2 inch thick. Brush the butter all over the surface. Sprinkle on the sugar and cinnamon. Roll the dough up and slice into 2 to 2 1/2 inch thick pieces. Place in a well-buttered baking dish.
Now use the end of a spoon or fork (or your clean fingers) to create a small well inside each of the cinnamon rolls. So unconventional! This is where our custard batter needs to be poured.
To make the custard batter, simply whisk together the egg yolks, heavy cream, sugar, vanilla and corn starch. Pour into the wells. You may not need all the custard batter, but it'll probably be close.
Bake at 350°F for 28-30 minutes. The dough should begin to look brown on top while the custard will have likely moved around some, but the deeper parts will still have some jiggle. Allow to cool for 10-15 minutes.
Then add the baker's sugar to the custard areas and brûlée with a torch.
I decided to add a little glaze, made by whisking together 1/4 cup powdered sugar and a tablespoon or two of water. You don't need a ton of glaze since these rolls around have a fun topping. :)
you know what we think there’s a shortage of in the world? stylish animal beds! natalie took on the DIY cat bed challenge and her little kitty fell in LOVE with it. the stacked pillows would look good on a couch, on the floor…pretty much anywhere. i love that you can use fabrics that match the decor in your home. we used these beautiful rebecca atwood fabrics in different shades of blue…
supplies:
• 4 yards of fabric, we used approx. 1 yard per textile patter
• 6-8 yards of super loft batting
• yarn
• yarn needle (with a sharp point)
• fabric marker
• scissors
• pins
• large piece of sketch paper
• pencil
• ruler
• sewing machine
*this project is great for novice sewers, if you have a sewing machine and have been intimidated to try a project this one is perfect. it is as easy and straight forward as sewing a pillow. if you are not familiar with sewing terms we recommend the “SEW U” book by Wendy Mullins or the myriad of youtube tutorials. sewing gets easier and easier with practice and this project is a great place to start.
how to:
• the first thing you’ll want to do is make a pattern for the cushions you want to stack. our model cat is on the petite side and we made our cat bed 18 x 22 inches but you can make yours larger for bigger cats (or dogs). add a 1/2 inch seam allowance to all 4 sides. on one one the long sides mark a 4 inch opening in the middle so that you can stuff the batting inside
CLICK THROUGH TO SEE HOW TO MAKE IT!…
• cut 2 pieces of each fabric, be sure to weight your pattern down, we like to use large washers from the hardware store but soup cans work just as well
• next, trim the 1/2 inch seam allowance from your pattern and cut out batting for each cushion. we used 3 pieces per cushion to achieve the thickness we wanted for for our cat bed, set the paper pattern aside
• place fabric with “right sides” in and pin, taking care to note the opening space on your pattern, we used different colored pins to make it easier to see
• starting at one end of your opening sew around the entire cushion ending at the other end of your opening. trim excess fabric off of your seam except at the opening that you haven’t sewn, clip the corners at 45 degrees to minimize the amount of fabric bulk in the corners and turn you sewn cushion inside out taking care with your corner points
• iron to make your seams crisp
• roll the batting up to fit through the opening and reach your hand inside the pillow to smooth out. add as many layers as you like until you feel the cushion is thick enough, we used 3 pieces of batting per pillow
• tuck the seam inside and sew shut
• repeat this process for each cushion
• take your paper pattern, fold it into quarters and mark where the folds intersect. use your yarn needle to poke a hole through the paper at each mark
• lay your paper on top of each cushion and poke a fabric marker through each pin hole
• stack all the cushions on top of each other with the marked sides facing up
• with a yarn threaded needle sew through all of the cushions from top to bottom taking care to go through each mark, it is easiest if you start in the middle and work your way towards the edges. leave long tails on your yarn as you go
• after you have yarn sewn through all your marks double knot all the yarn on the bottom of your cushion
• flip over and starting in the middle pull the yarn tight enough so that the fabric puckers a bit. double knot and trim
we hope your pets love this project as much as we do. let us know if you make one!
In a move aimed at addressing growing concerns about the regions future water needs, Indianapolis-based Citizens Energy Group has unveiled plans for central Indianas largest water reservoir in more than four decades. An 88-acre quarry along Olio Road, adjacent to Geist Reservoir, is being developed into Citizens Reservoir. It will be capable of storing 2.7 billion gallons of water, or about 40 percent of the storage capacity of Geist.
I don't think I'm alone in saying that ironing is not one of my favorite tasks. I try to use a steamer on everything I can or just spritz things with water to ease wrinkles, but sometimes you just can't get around bringing out the ol' iron for a job. I think part of not wanting to iron is the fact that a full size ironing board usually takes up all of the space in a laundry room (if you even have a separate room for laundry). So you have to cart everything a few rooms away to really have enough space to do the job. If you've had that problem, you may have your eye on one of those fold up ironing mats that you put on top of your washer/dryer so you can iron smaller items without having to get out the ironing board. The mats usually have magnets on them and some sort of non-slip bottom layer so it will stay put while you iron, and you can fold it up for easy storage when you're done. What's not to love! And being able to make it yourself so you can customize size and color? Double win! This seemed like the perfect project for our ongoing Jo-Ann Fabric and Craft Stores collaboration since I was able to find all the needed supplies in their online store.
First you'll want to cut a rectangle of fabric that is 39" x 18" from your top fabric, bottom fabric and your Insul-Bright (so you'll have three rectangles of matching size from each).
NOTE: These dimensions will make a finished mat that is 38" x 17". If you need a mat that is longer or shorter to fit your washer, just adjust the measurements accordingly.
Cut two rectangles out of your bottom fabric that are 4.5" x 18". Space out four magnets on the lower half of each rectangle and fold the top half down on top of them. Use straight pins around the magnets to keep them in place, and then hand sew closely around the magnet to secure it.
Place one of the fabric magnet strips on the wrong side of your bottom layer of fabric about 3" from the end. Pin in place. Repeat the process with your second magnet strip on the opposite end. Sew your strips around the outside edges with a sewing machine to secure.
Now you'll want to layer your three rectangles in a specific order so that when you turn your fabric right side out after sewing, it will be in the correct order. First place your Insul-Bright lining down first (doesn't matter which side faces up). Then place your bottom layer of fabric on top with the wrong side of the fabric (the side with the magnets) touching the Insul-Bright. Finally, lay down your top layer of fabric with the right side of the fabric facing down. Pin layers together all around the edges.
Sew around the edge with a 1/2" seam allowance, but make sure to leave a 4" gap so you can pull your fabric right-side out through that hole later. I would also sew with the Insul-Bright facing up rather than down so it doesn't get caught in your sewing machine feed.
Use scissors to snip off the corners of your rectangle.
Using the gap you left when sewing the edges, separate the top layer of fabric from the bottom and Insul-Bright layer. Then reach in to grab the fabric and pull it through until the mat is right side out.
Press all your seams with an iron and use a blind stitch to close the gap by hand. For a non-stick surface, you can also add little dots of puff paint all over the back of your mat before use, and if you want to get really fancy, top stitch a few seams across the top of your mat for a quilted look. Now your mat is done and ready for use!
We tested the mat in Elsie's laundry room and it works perfectly! Takes up way less space for a small job, and you just roll or fold it up when you're done–perfect for small laundry spaces or apartments. I'm up for anything that can make household chores a little bit easier, so I'm pretty happy with how this turned out. Think you'll give it a try for your laundry area? xo. Laura
Credits // Author and Photography: Laura Gummerman. Photos edited with A Beautiful Mess actions.
West Elm is diving into the office furniture arena with an exclusive 75+ piece collection created in collaboration with Inscape. The in-house team at West Elm designed the stylish series that’s broken up into four collections including: mid-century, modern, industrial, and contemporary. West Elm Workspace aims to fill the void in the marketplace by offering affordability, flexibility, comfort, and style, while bringing a residential vibe to the office.
The beauty of the collection is that the majority of the pieces will be manufactured in North America and many of them utilize environmentally friendly practices and materials. Upholstered pieces feature high-performance fabrics by Designtex for added durability.
The Mid-Century collection was inspired by the golden age of office design in America with distinct details like walnut veneers, beveled edges, and antique bronze finishes.
The Modern collection features easy to clean, white laminate surfaces paired with pecan finished ash accents.
The Industrial collection utilizes steel frames with warm oak to give a workshop-crafted feel.
The Contemporary collection offers flexible solutions depending on how you work and has modular options to customize your workspace.
Wanna know the easiest way to wow your dinner party guests? Pineapple cups! These are so easy to make. I'm so excited to show you how! And I'll give you two yummy daiquiri recipes to fill your cups with, but spoiler—anything that's blended with rum is gonna be wonderful!
I researched all the different ways to remove the inside of the pineapple and there are methods that don't need a tool. But this tool works AWESOME, and I found one on Amazon for only $7.99 with prime shipping—so I would highly recommend it (I bought mine locally and it was a lot more than $7.99). It makes it super easy and quick to remove all the pineapple while keeping the skin intact and it even slices it for you.
Tip—be sure not to go too deep. On one of my pineapples (I made two, just to practice) I punctured a hole in the bottom on accident.
When you are done, you just pull the slices out...
and cut the core out, and you have a perfect pineapple cup!
Next I cut my slices into fourths and froze them. When making smoothies or frozen cocktails, I try to freeze some of my ingredients so I don't have to use any ice and it has more flavor.
One last thing...cut a little v out of the top and you have a place for your straw!
Pineapple Coconut Daiquiri, serves one. *this recipe is less sweet and you can taste the rum more
1 slice of lime (skin removed) 3 mint leaves 2 cups frozen pineapple 2 scoops ice cream (I used Pineapple Coconut Haagen-Dazs—so good!) 1/2 cup coconut milk 1/4 cup coconut chips 1.5 ounces rum (I used dark rum)
Blend all ingredients and serve in your super cute pineapple cup!
Pineapple Strawberry Daiquiri, serves one. *this recipe is more sweet
2 cups frozen pineapple 1 cup frozen strawberries 2 scoops vanilla frozen yogurt 1 tablespoon sugar 1/2 cup pineapple juice 1.5 ounces light rum
Blend all ingredients and serve in your super cute pineapple cup!
Are you adding this to your weekend list? Cheers, friends! xx. Elsie
HAO Design Studio designed this apartment in Kaohsiung City, Taiwan for a couple, their three beloved cats, and all of their collectibles. They swapped out the bright marble floors for a more subdued concrete, which instantly set the tone for the modern/industrial space.
An iron panel welcomes the homeowners and guests upon entering with their favorite image.
Once inside, the space is bright and open and decked out with a mix of modern and vintage finds.
The massive plywood shelf is the highlight of the living room holding books and other ephemera.
In the dining room, the table is made from wood and pipes, as is the shelf hanging on the brick wall. A red vintage phone hangs beside it.
Just off the dining room is the cat den, a space for them to play and sleep.
The cats access the area via an arched doorway built just for them.
The display cases slide to reveal storage for their collection of records.
That space is also used to watch movies on a big screen that pulls down.


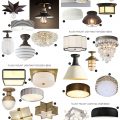 The 30 Best Flush Mount Lighting Fixtures
 No More Popcorn Ceiling
 Kitchen Lighting?
 Push-Button Switches


 Believe it or not, you can find a great-looking sofa for under $500.


