The following post is brought to you by ChefSteps. Our partners are hand picked by the Design Milk team because they represent the best in design.
Despite being a favorite of molecular gastronomists for years, only recently has sous vide cooking become achievable for the home cook. For those who aren’t as familiar with sous vide cooking, it’s similar to poaching, but much more precise. Sous vide cooking is when a chef cooks meat and vegetables in a controlled water bath at a very specific temperature. This results in the food being cooked at the right temperature, without losing moisture or flavor. Enter, the Joule. The Joule is a modern-day, affordable solution for home-cooks to bring the science and convenience of sous vide cooking into their own home. We give it a spin.
Unlike previous iterations of the home sous vide machine, which were the size of microwaves, the Joule is small, light, and sleek. It’s a simple wand with a single cord, and takes up minimal space. To get started cooking, all you need is the Joule, a large pot or container, plastic bags, clip, and your smartphone.
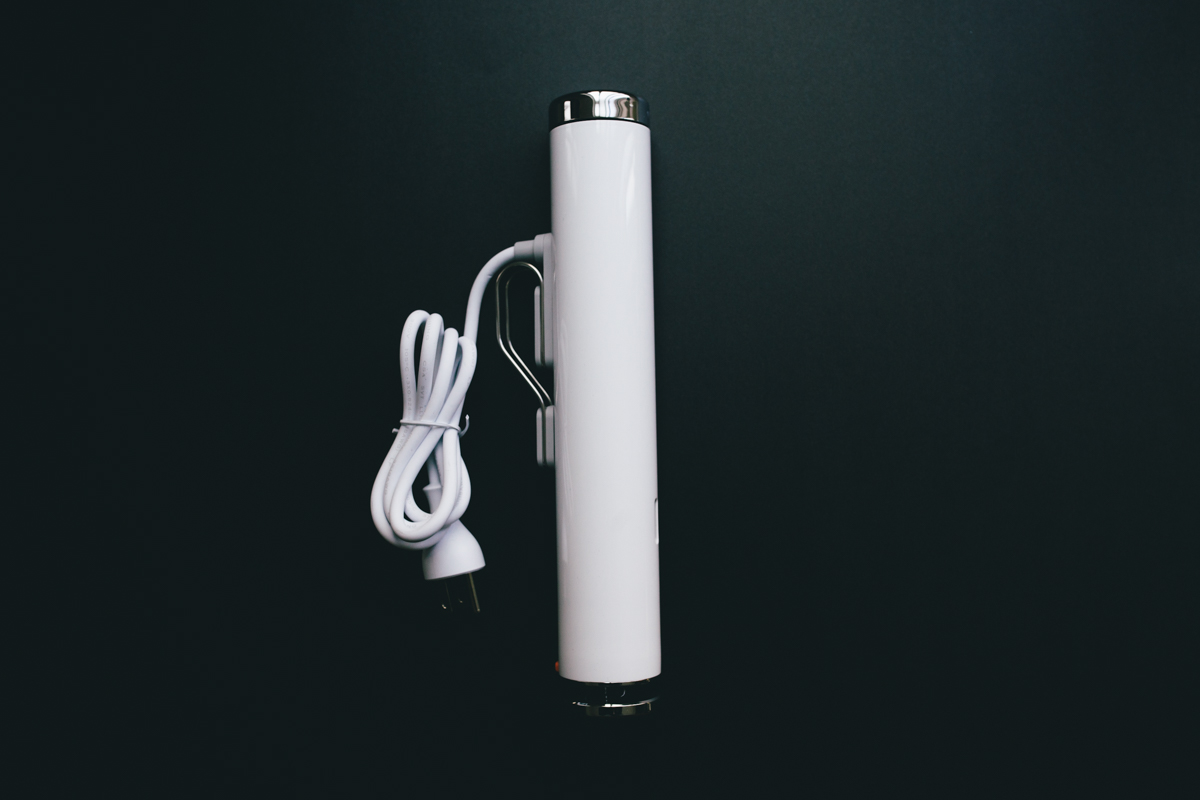
ChefSteps, which makes the Joule, states that it’s incredibly easy to use. I’d have to agree. I’ve used other sous vide machines before, and none were as easy to use as the Joule. There is minimal set-up—all you need to do is put it in a vat of warm water, clasp it on the side, plug it in and press a button on the top. For someone who hates reading instructions, the ease of set-up is a huge plus. You also have to download the app to be able to run the Joule, as well as create an account. While it was slightly annoying to have to sign up while I was getting ready to cook, it wasn’t by any means, a deal breaker. Once you download the app, it has a very helpful onboarding system, with an interactive step by step system to help you get acquainted with the Joule. I didn’t have this with the previous sous vide machines I used, and I felt like it made a big difference.
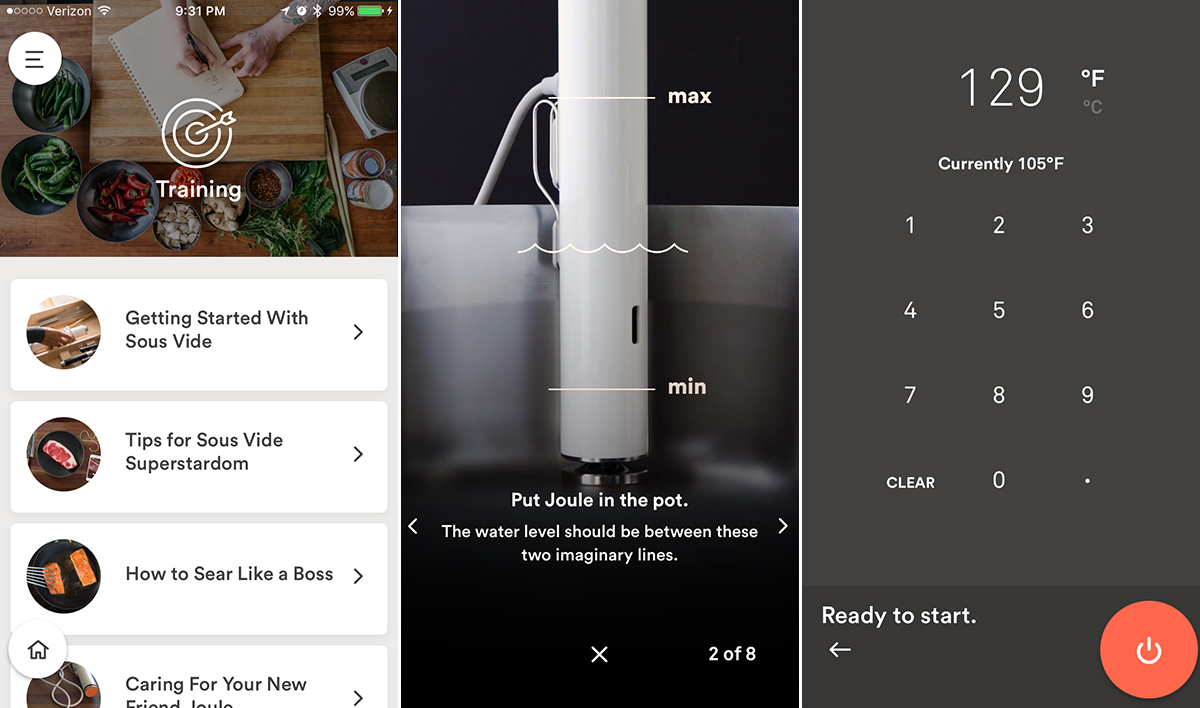
Screenshots from the Joule app
My only minor qualm was at one point, it seemed to be too easy. With my previous experience using sous vide machines, I knew the bags have to be airtight. I used a Foodsaver previously, and I dug around the ChefSteps website to see if I needed a Foodsaver. Everywhere I read, it said I only needed a plastic bag, which sounded a little suspicious to me. It was difficult to find (which was frustrating) but eventually I realized I can use the water dispersion method to ensure that the bag was airtight, and clip it to the container. The whole time I was cooking, I was a little iffy about this but as you’ll see, it worked.
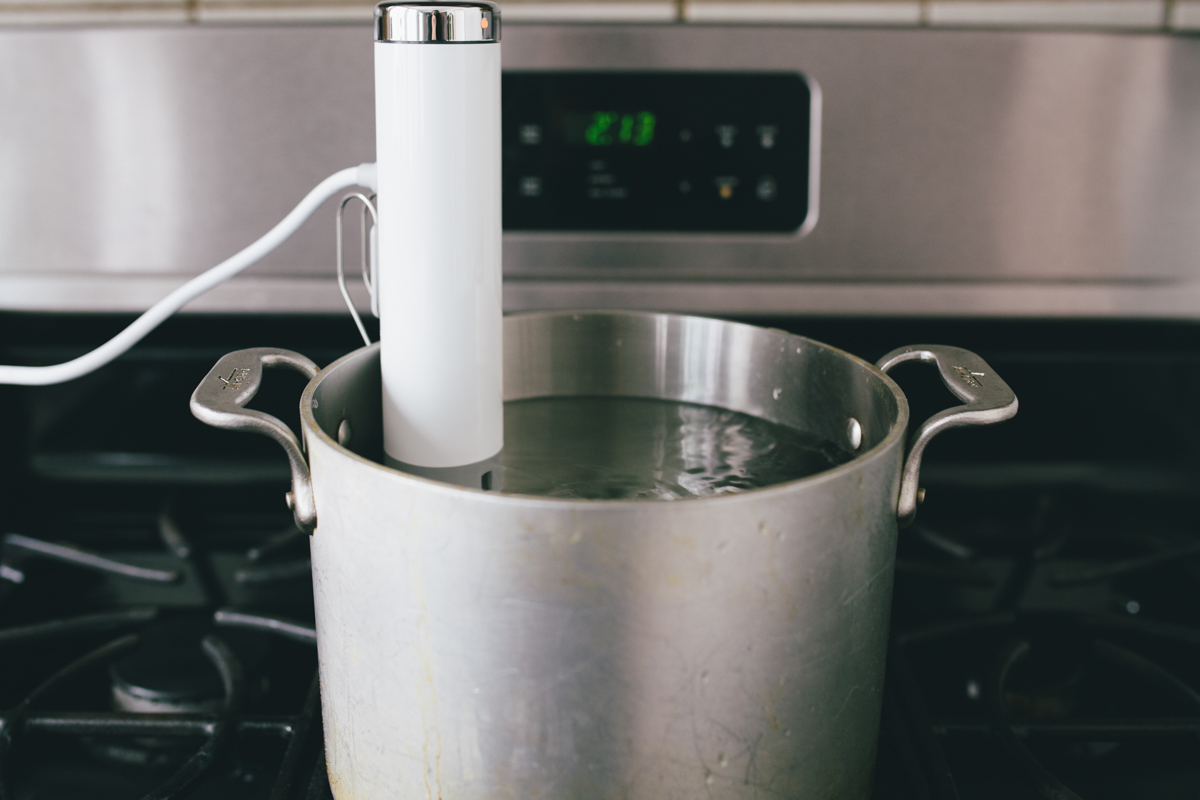
Once I felt prepared, it was time to start cooking. With the Joule, the phrase “set it and forget it” takes on a whole new meaning. You can either set the temperature manually depending on what you want to cook, or if you’re new, simply choose a recipe, and it’ll set the temperature and timer for you. As I was doing a side-by-side comparison, I set the temperature to what I wanted. Unlike boiling water, the Joule got the water bath to be at the right temperature very quickly—in under five minutes.
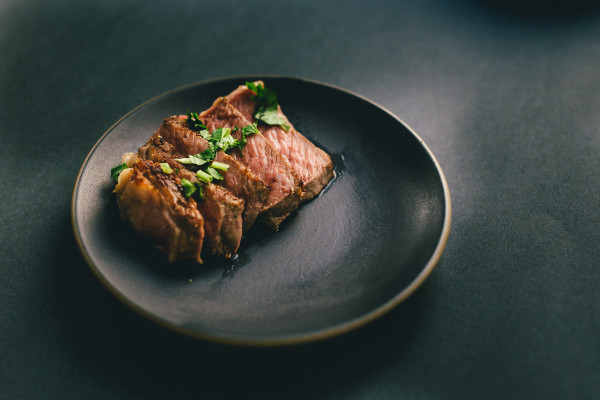
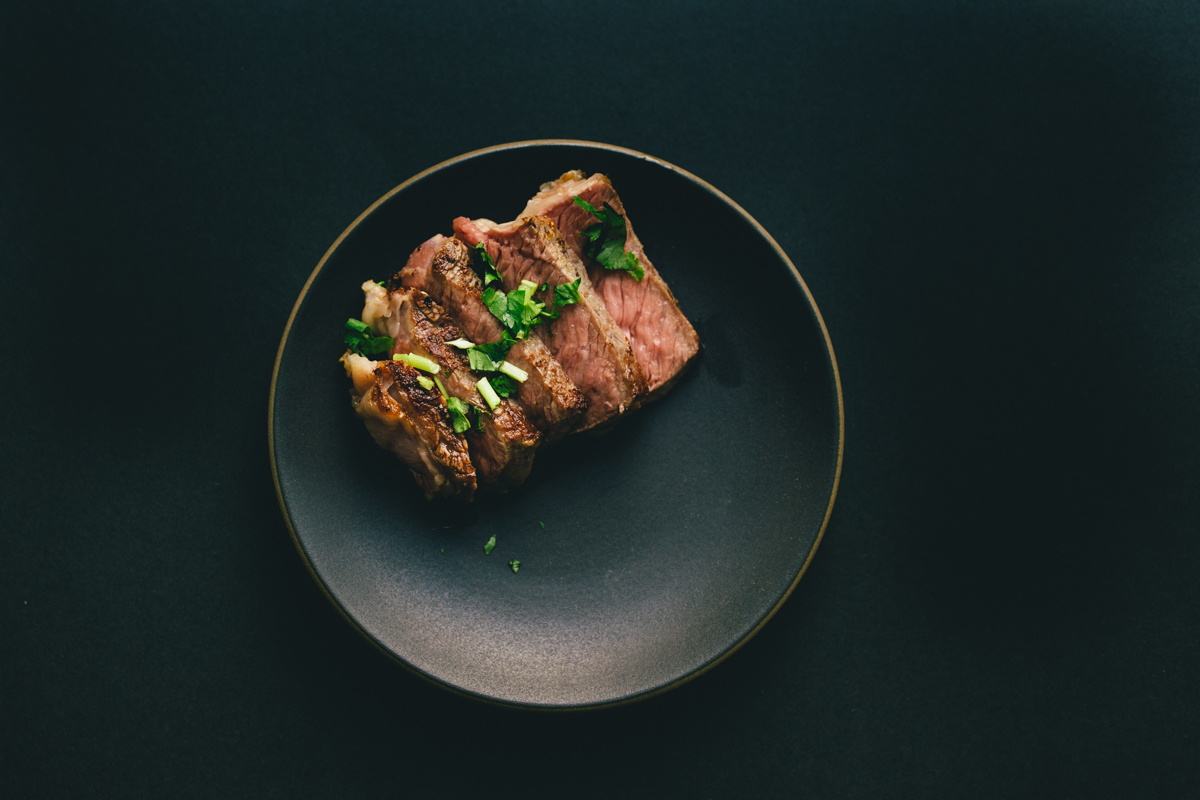
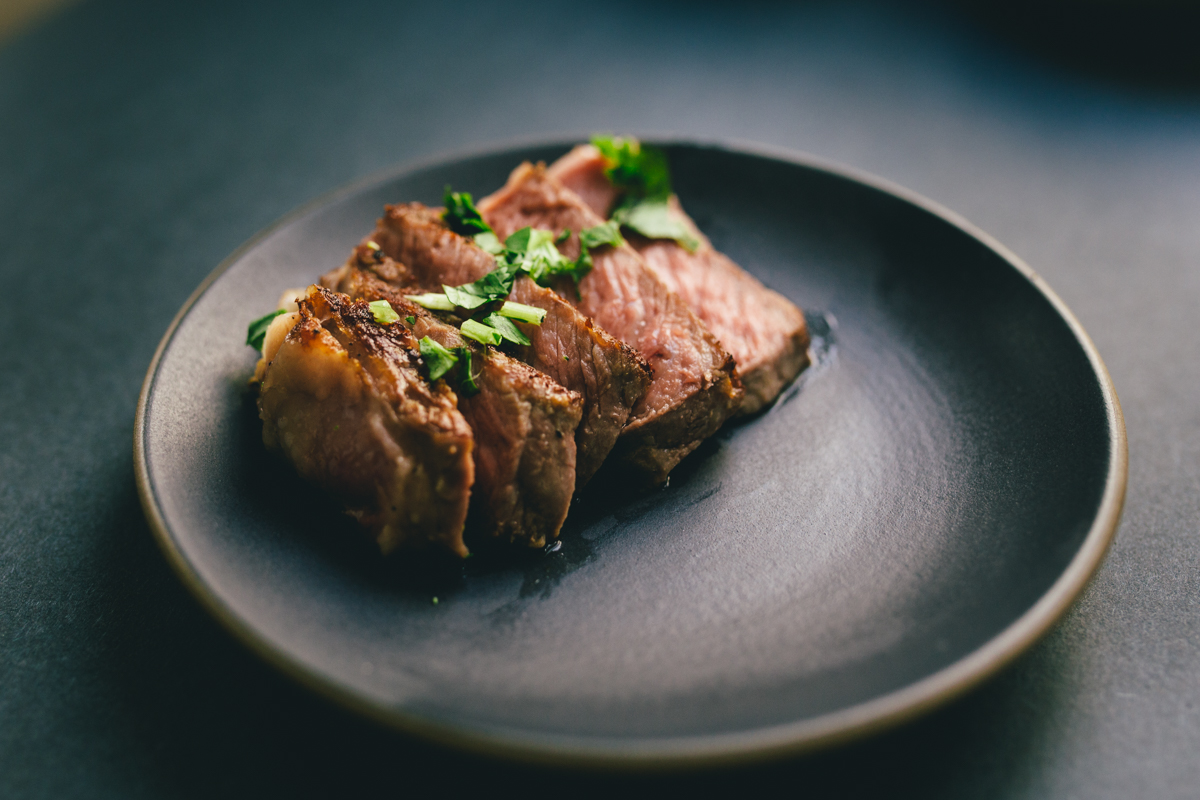
I decided to test the Joule with steak and eggs because it’s easy to see how changing the temperature by a little bit can drastically alter the end result. The thing about sous vide is that it’s also supposed to work like magic, in a way. You should be able to take cheaper, rougher cuts of meat and still cook it so it’s perfectly juicy and not overcooked. ChefSteps recommends going with a thicker cut of steak, so I chose a 1.5″ top sirloin steak with minimal marbling. Normally, I personally veer away from these cuts because it tends to be dry, but it was a perfect meat for the Joule test run.
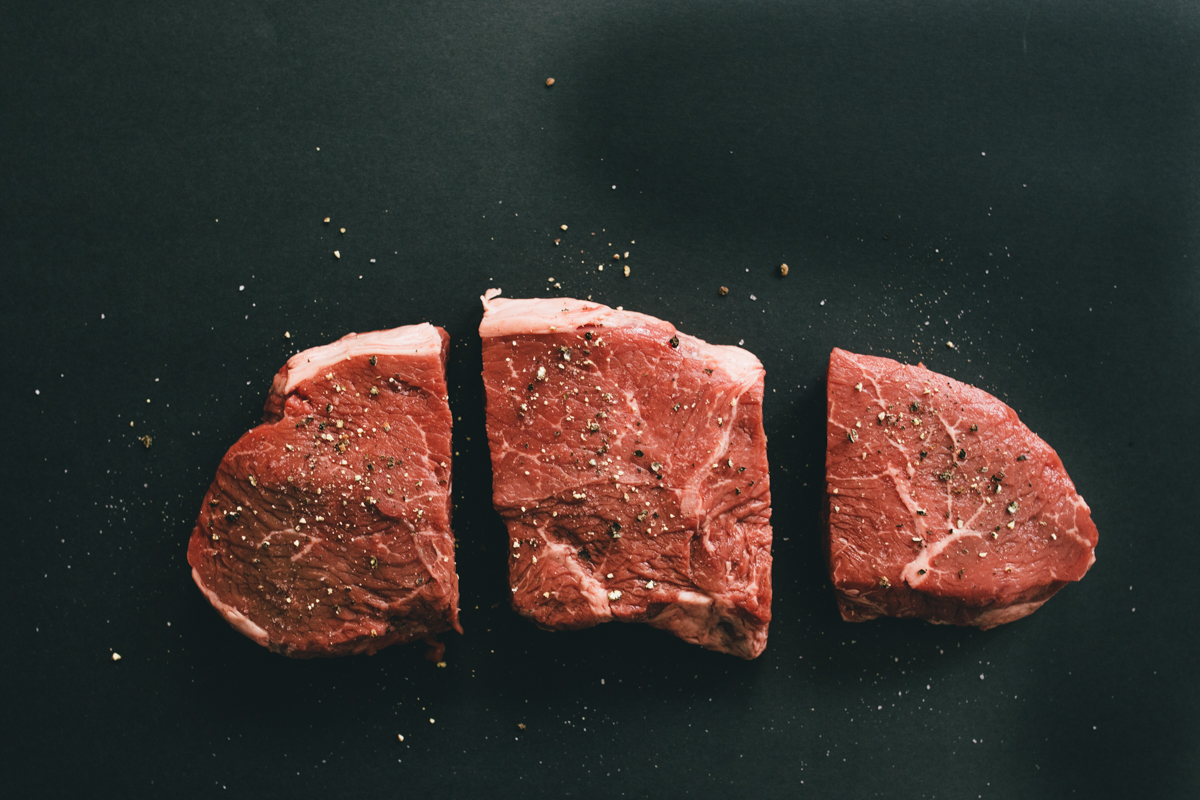
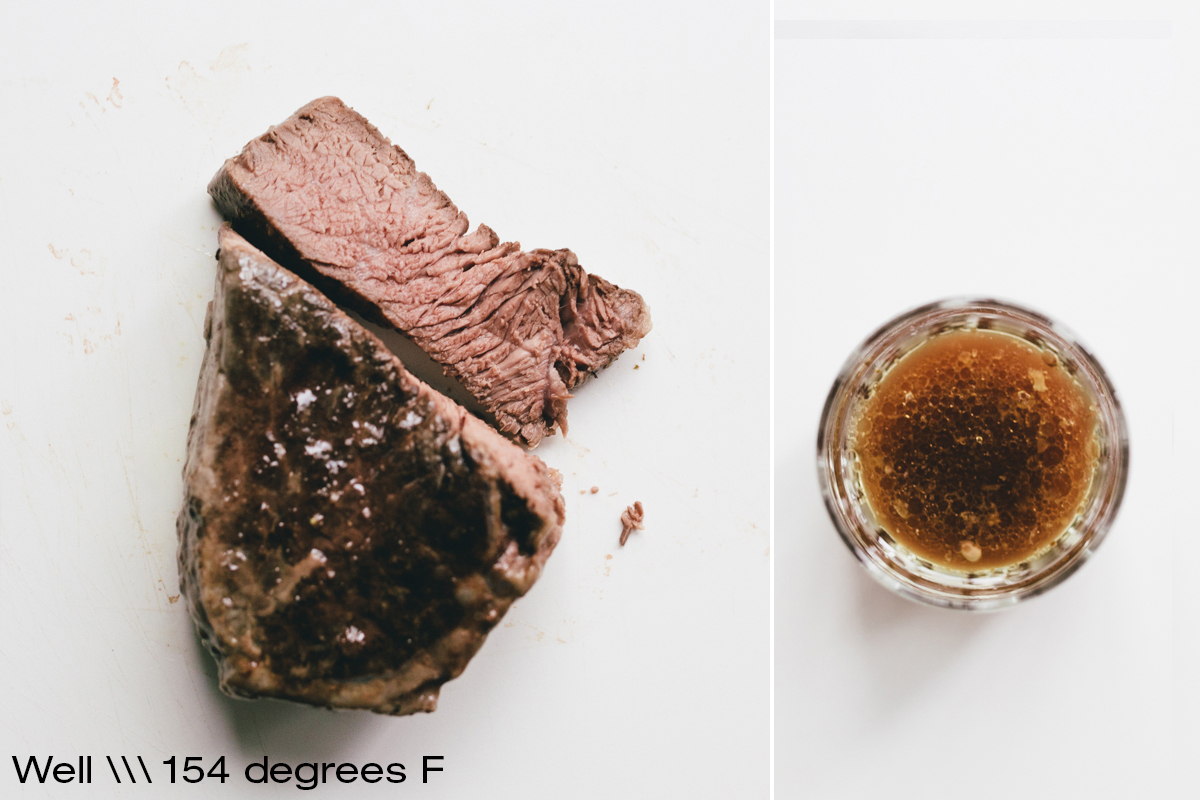
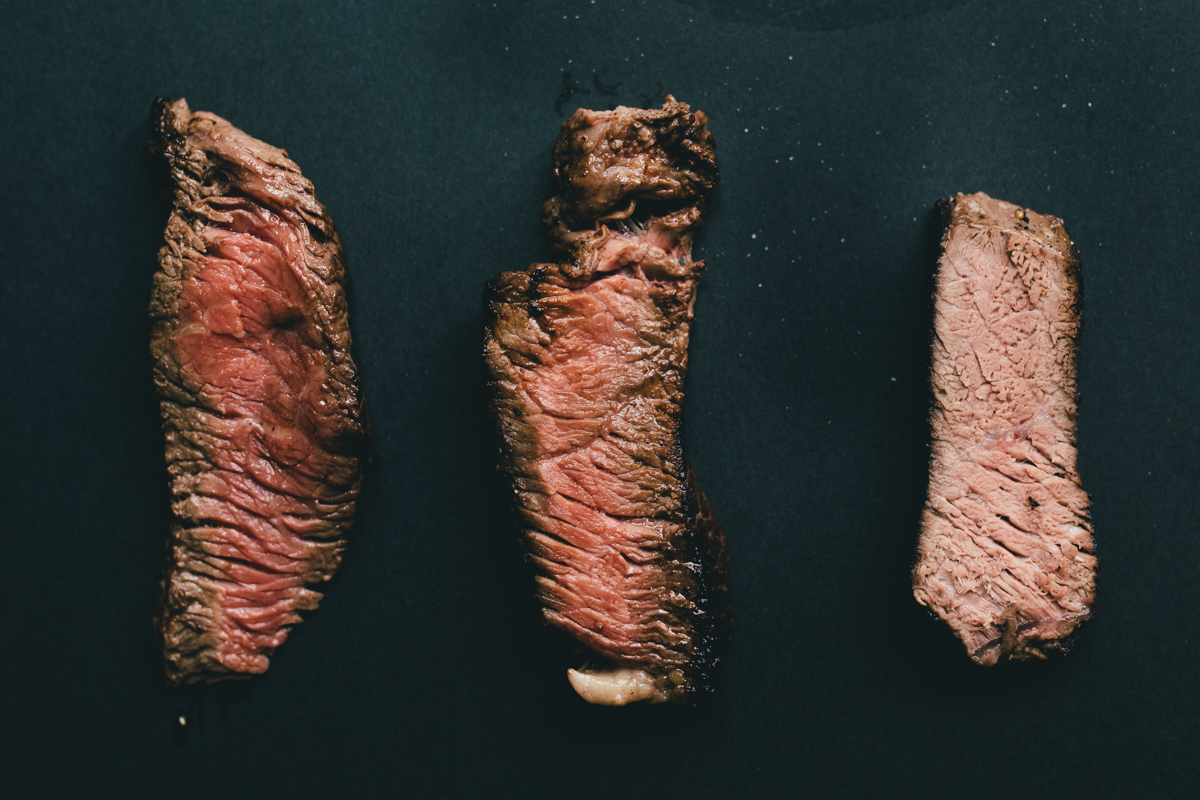
I cut the steak into three pieces and cooked it at three different temperatures, 129 degrees F (rare), 136 degrees F (medium), and 154 degrees F (well done) for one hour. The app has a timer and alerts you when your food is ready.
When you see the steak immediately after being sous vide, it has an unappetizing, slightly grayish pallor to it, which might confuse first time sous vide users but is completely normal. You are supposed to sear it afterwards to give it a nice crust on the outside. At this point, I was a little conflicted as to whether or not I should sear it, because in my thinking, it seems like you’d be cooking the steak and thus, defeating the whole purpose of cooking it precisely with the Joule. However, the sear is so brief that it doesn’t cook the inside of the steak—it merely gives it a nice brown on the outside.
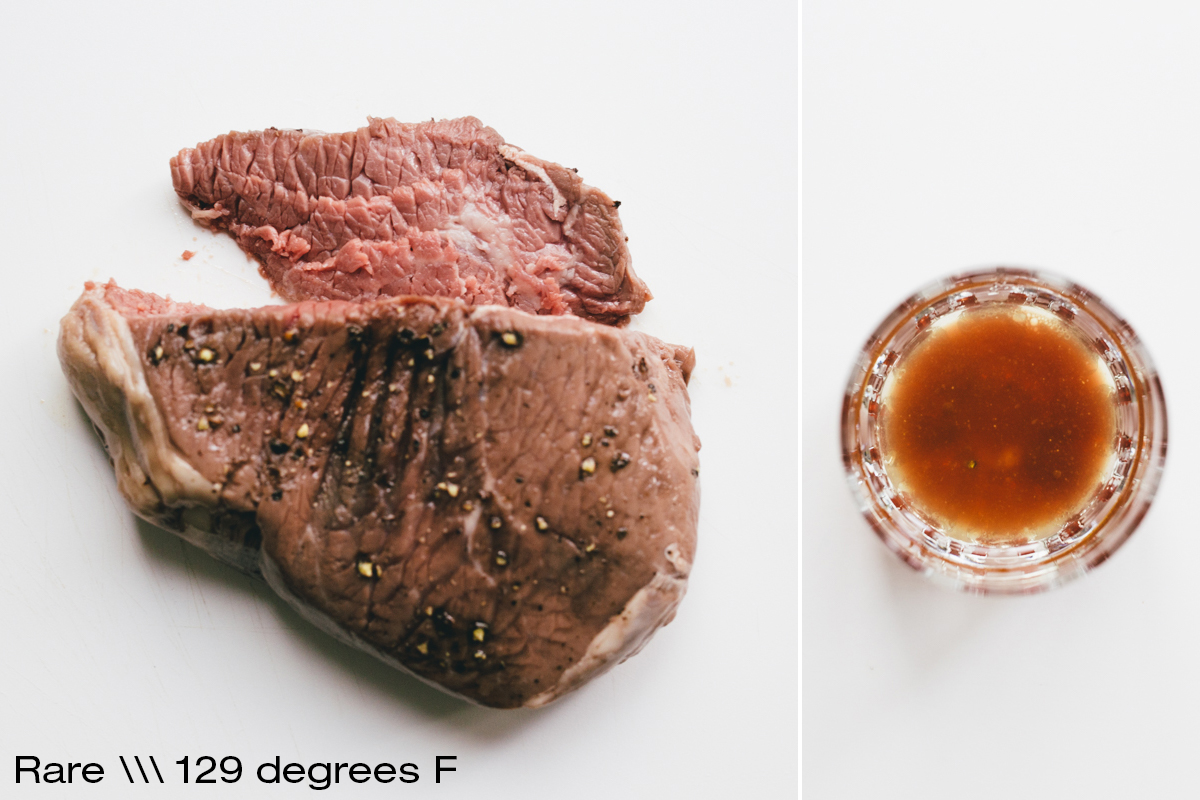
Though the rare and medium look closer in color, the difference in texture and even juice, is palpable.
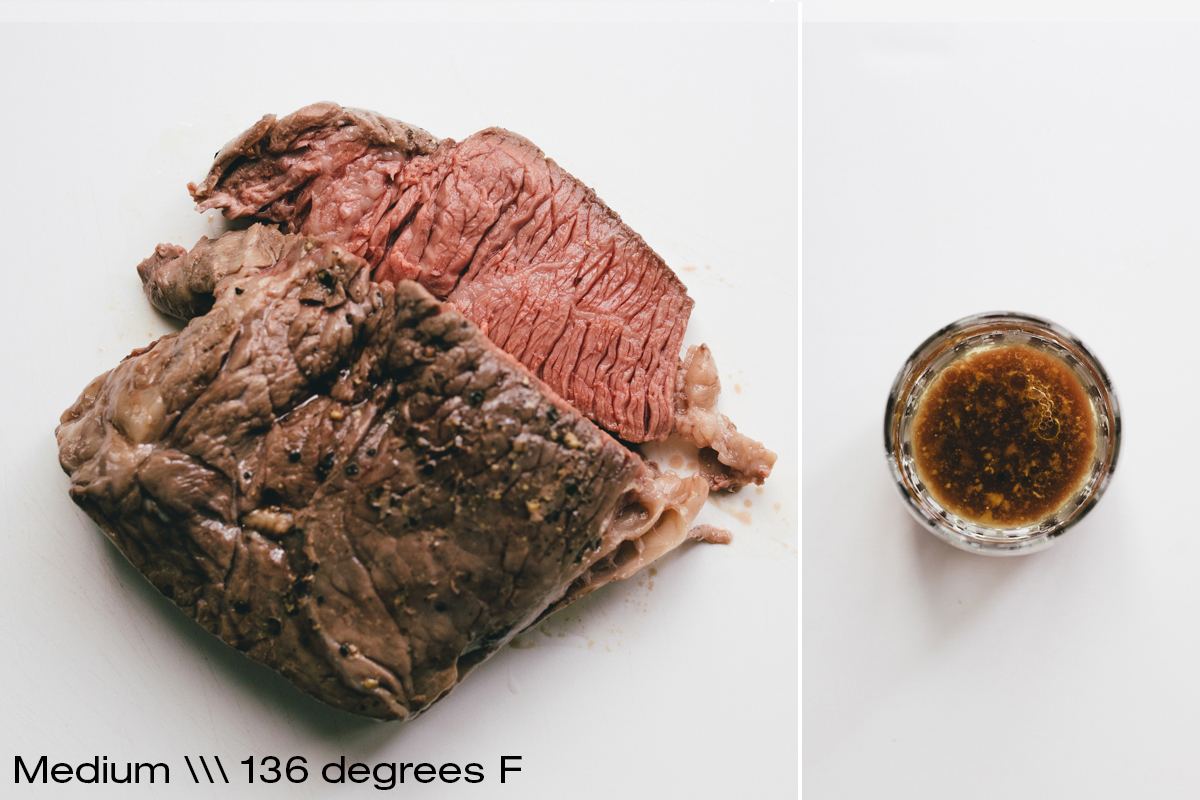
Though rare and medium look a little closer in color, the texture was very different when slicing.
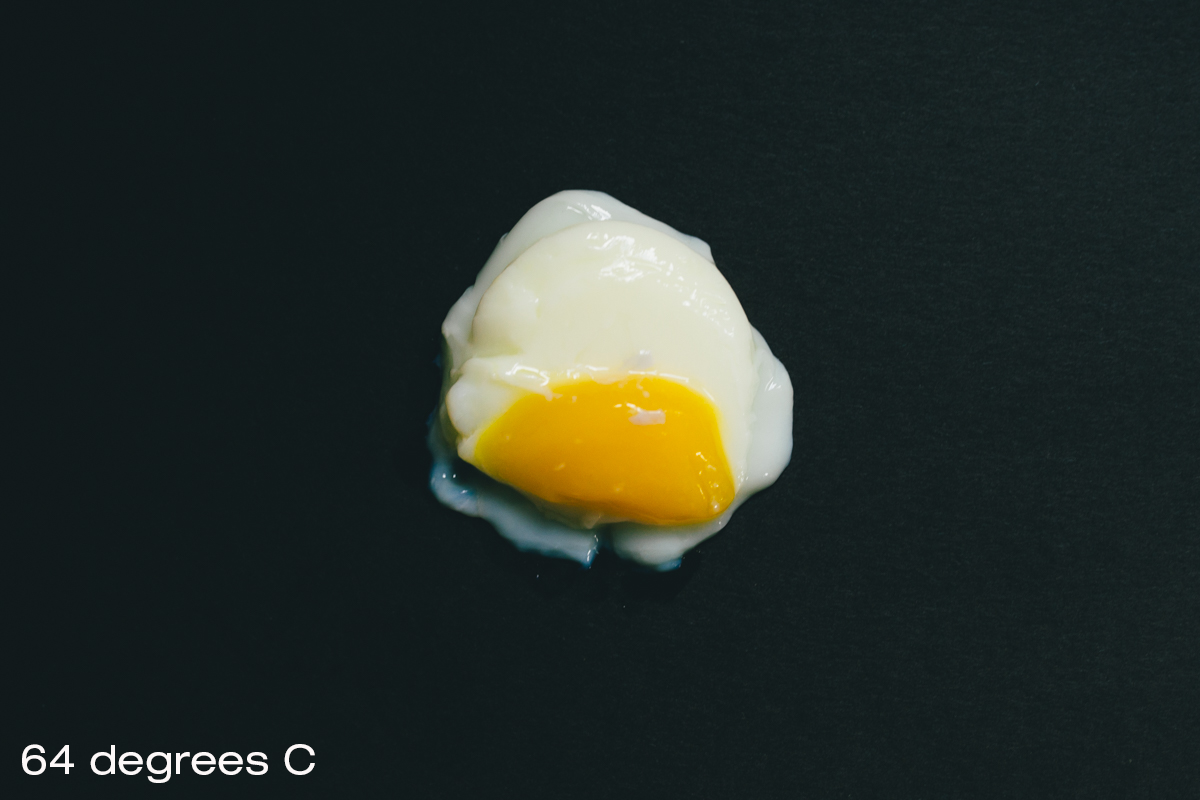
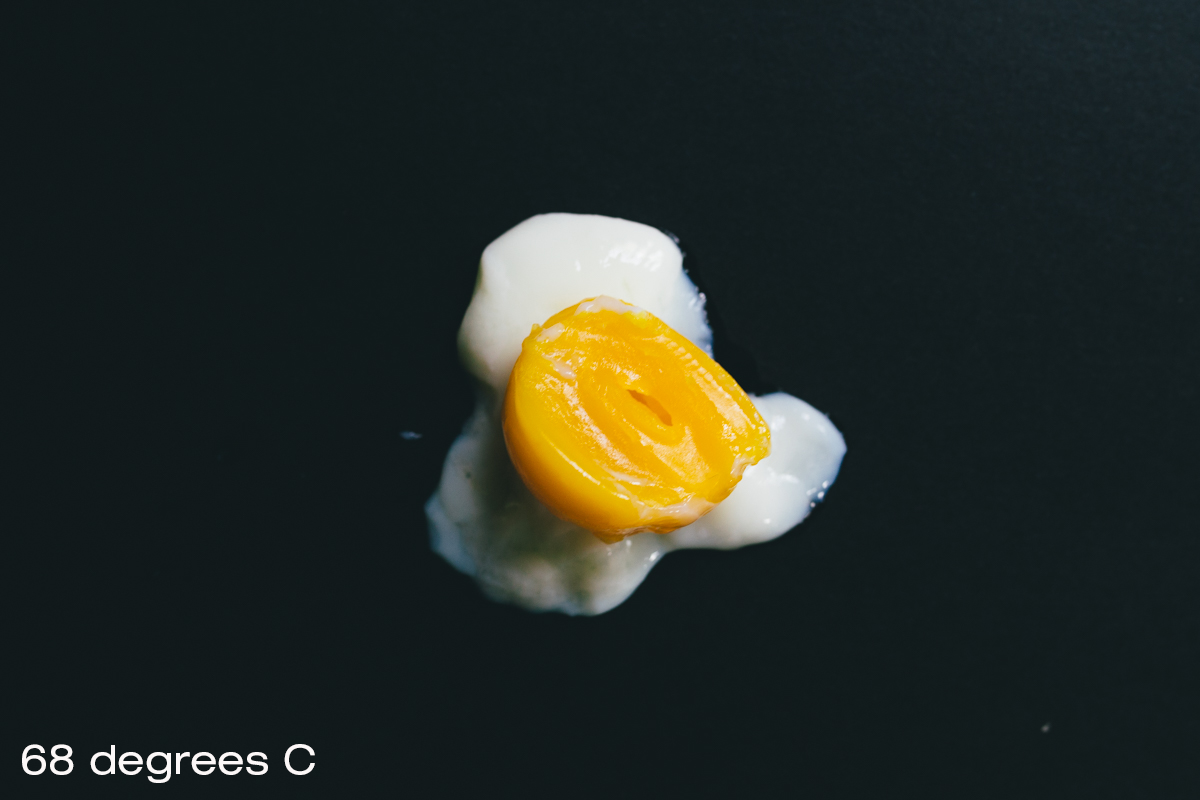
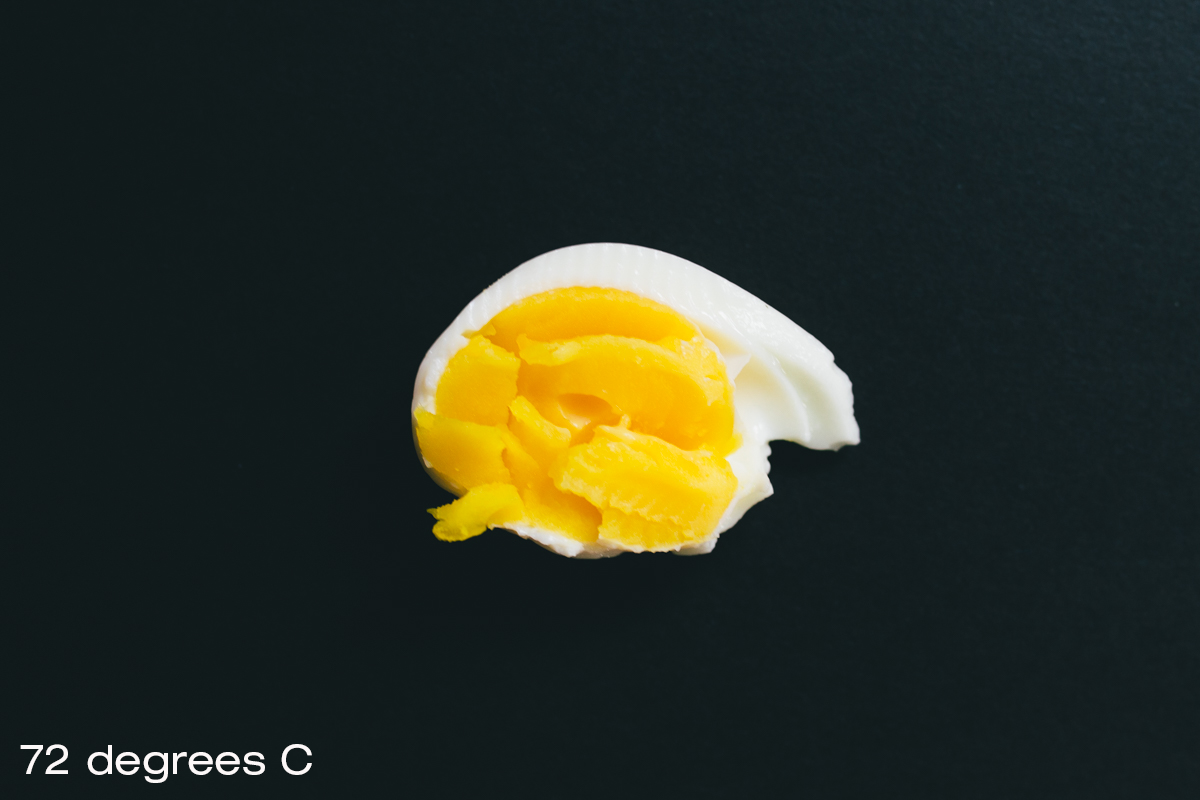
Next, we tested three different eggs at three different temperatures—64 degrees C, 68 degrees C, and 72 degrees C for one hour (We used Celsius for temperature accuracy). Though it seems like it might be easier, getting the right temperature and time for eggs was much more difficult. With eggs, you not only have to worry about the yolk being the right texture, but also the whites. The whites are the most fickle. What seems like a dramatic change in temperature can only slightly affect the whites (as you’ll see), but dramatically affect the yolks.

As you can see, methodically cooking the eggs at 4 degrees C higher showed a consistent firming of the yolk, but for some reason the egg whites at 64 and 68 degrees C didn’t change much. The Joule app also lacked recipes for any eggs besides a poached or soft boiled egg. However, they do have an egg calculator on desktop, which would be handier in the app. I do think though, practice makes perfect in this situation. The difficulty with eggs is not a unique problem for the Joule, I also had the same issues with other sous vide machines. All three of them had sticky whites as well, and peeling them was much more difficult than peeling eggs I had cooked with a pot.
I would describe myself as a cooking enthusiast, and the Joule fits into my lifestyle perfectly, especially when I want to just “set it and forget it.” However, I would say it takes some of the experimentation out of cooking, and can also end up taking longer time than just throwing a steak on the grill. However, it also takes the guesswork and meticulous time-suck that cooking can sometimes result in. You don’t have to babysit the food while it cooks, just let it do its thing. That means one can get all fancy with the toppings, like create a rosemary clarified butter or whatever your heart desires.
Set-up was ridiculously easy, and the app was really helpful with all the videos and onboarding they do to get a user comfortable with the product. It doesn’t take a lot of space, which is a huge plus as a city dweller. My only qualm is with the recipes. The app doesn’t have all the recipes, in fact it has less than I would expect in an accompanying app. There are also “free” recipes and “premium” options, where you get more recipes and more sous vide/cooking classes as well. However, I do know that this is something they’re working on, and are about to release a whole slew of helpful guides, including a roast guide and CUSTARD guide (um whoa). I’m looking forward to seeing the new recipe guides to help me push my sous vide cooking in a new direction, beyond the classic steak and eggs.
The overall consensus? Love the Joule.


