

Loving this rainy cloud illustration by James Gulliver Hancock which just launched as part of the Radiant Set over at Tattly. Rainy clouds for rainy days! Waving with my umbrella!
Shh.listenGOLD TEMP TATTOOOOS
Loving this rainy cloud illustration by James Gulliver Hancock which just launched as part of the Radiant Set over at Tattly. Rainy clouds for rainy days! Waving with my umbrella!

Office Buddy lets you update your in-real-life status to colleagues, in a beautifully analog way.
You may think kitchen cabinets are nothing to get excited about. But that's because you haven't seen these kitchen cabinets: designs that elevate kitchen storage from a simple box with a door to something unusual and even incredibly beautiful. They are all evidence that good design can transform even the most humble of objects.
<p><a href='http://www.apartmenttherapy.com/kitchen-cabinets-that-are-incredibly-beautiful-235952'><strong>READ MORE »</strong></a></p>Shh.listenSharing bc wtf are those dishes in the link. Why are they ruining food?
Fall is finally and irrefutably here. And while I'm wholly settled into a steady habit of chai lattes and spiced cider, there's one thing my autumnal agenda is bereft of: anything resembling a fitness regimen. In my search for the best way to reinvigorate my workout routine for cooler weather, I've happened across an abundance of activity-focused ideas. Here are five of the best for kick-starting your own schedule in spite of any seasonal opposition.
<p><a href='http://www.apartmenttherapy.com/5-ways-to-stay-active-in-cooler-weather-238387'><strong>READ MORE »</strong></a></p>
I did it. Probably everyone you know has done it. But if you're reading this, and you're currently working on decorating your first apartment (or home), you can avoid making this classic blunder.

Are you a sneaker head? You might really dig this sneaker puzzle designed by Yoni Alter, made from 19 colorful, handmade resin pieces.

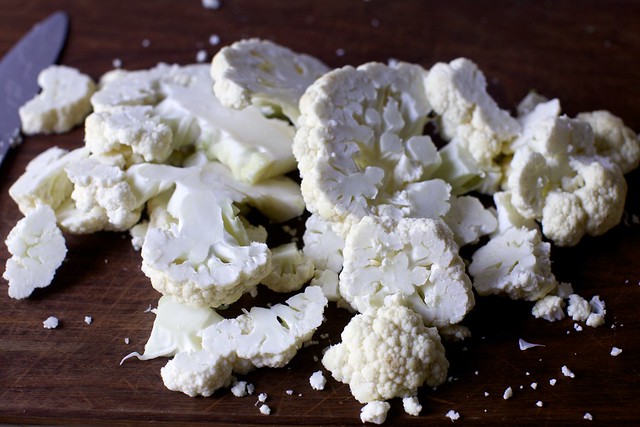
Given how much I love biscotti and how easy they are to make, I’m not sure why I don’t make them more often. Crunchy, dippable cookies, these little guys are addictive and full of flavor possibilities.

Biscotti are twice baked: the name is derived from an old Latin word meaning “twice cooked.” The dough is shaped into logs, baked, sliced, and then baked again. The resulting cookies have a crunch that is irresistible and perfect for dipping.

Dip your biscotto (yep, that’s the singular … although, I don’t think I’ve ever eaten just one) in an espresso, cappuccino, or even wine. I’ve also been known to dip my biscotti in Nutella. Just do it.
Playing with flavors is easy when making biscotti. Experiment with extracts, citrus zests, chocolate chips, nuts, etc. Keep the add-ins to about 1 cup total.

For this recipe, we’re using espresso powder, vanilla, and chocolate chips. Look for espresso powder near the Sanka or in the Italian foods section of the grocery store.

More traditional biscotti recipes, like this one, don’t call for butter or oil. The basic recipe is flour, sugar, salt, eggs, and baking powder. Adding butter or oil will make for a softer cookie and one that is less traditional—and a little less dunkable.

Beat the eggs, sugar and flavoring for several minutes until thickened. (Do you see a smiley face?)

Next up, add the dry ingredients. The dough will be sticky.

This is the time to stir in any add-ins like chocolate chips or chopped nuts. Or both!

Form the dough into two logs using wet hands. The dough is very sticky and this is the easiest way, although it’s not the prettiest.

Bake the dough until light golden.

Once it rests for a bit, spray with water to make cutting easier.

Slice straight down with a serrated knife. The cut cookies will bake standing up, so you don’t want them lopsided. You can also cut these on the diagonal, but be sure to hold that knife straight up and down.

Bake the cookies again until crisp.

Cool. Serve. Dunk if desired.
Store cookies in a container. They won’t go stale, but some add-ins might cause the cookies to soften a bit. To crisp them up, bake them for about 5 minutes at 300ºF.
Here are a few flavor ideas for you:

Biscotti are great to have handy for unexpected company, or for an afternoon treat, especially after a day of shopping. They also make great gifts! Experiment with your favorite flavor combinations, and enjoy!


Here's an easy little quick bread recipe I threw together recently with some leftover butternut squash. This bread is similar to banana bread, quick to throw together with a dense, cake-like crumb. One of the great mysteries of life is if these kinds of breads are meant for breakfast, as an afternoon snack, or dessert? Seems to me it can work for all three if you like. :)
Butternut and Chocolate Chip Quick Bread, makes one loaf
1 lb butternut squash, roasted and mashed (about 1 cup once mashed)
1 3/4 cups all-purpose flour
1 teaspoon baking soda
1/2 teaspoon salt
1/2 teaspoon cinnamon
1/2 cup butter, melted and cooled
3/4 cup packed brown sugar
1 teaspoon vanilla extract
2 eggs
6 oz. dark or semisweet chocolate chips
First, roast and mash the butternut squash. Then pop the mashed squash in the refrigerator while preparing the next few things so it cools some before adding. You don't want the squash or melted butter so hot that it begins to cook the eggs.
In a small bowl, whisk together the flour, baking soda, salt, and cinnamon. Set aside.
In a large bowl, whisk together the butter, sugar, and vanilla well. Then stir in the eggs as well as the mashed squash. Add the dry ingredients to the bowl and stir to combine. Then stir in the chocolate chips.
Line a loaf pan with parchment paper or grease well with a little butter. Pour the batter in the prepared pan and bake at 350°F for 55-60 minutes. Insert a toothpick in the center towards the end of the bake time. So long as it comes out clean of gooey batter, you are good to pull the pan out of the oven.
Allow to cool before cutting into the loaf.
Serve warm with a little butter on top. Happy baking! xo. Emma
Credits // Author and Photography: Emma Chapman. Photos edited with A Beautiful Mess actions.
Sometimes a big bowl of soup is exactly what is needed. This soup has a few somewhat unexpected ingredients, but it's still packed with everything a good soup should have: flavor, warmth, comfort, and preferably a big serving of vegetables. :)
The inspiration behind this recipe pretty much stems from my love of spring roll dipping sauce. We eat spring rolls pretty often at home, and Trey and I are both obsessed with that recipe. So I took two of the flavors from that, red curry paste and peanut butter, and paired them with butternut squash. The result? A truly unique and delicious soup!
Butternut and Red Curry Soup, serves four
1 medium butternut squash (mine was 1lb 6 oz. once peeled and cubed)
1/2 large red onion (around 4 oz.)
3 cloves of garlic
2 tablespoons olive oil
salt and pepper
1 1/2 cups vegetable stock
2 tablespoons natural peanut butter
1 tablespoon red curry paste
1 can (13.5 oz.) coconut milk
cilantro and pumpkin seeds for serving (optional)
Peel the skin from the butternut squash and cut into cubes, removing the inside seeds as you do. The squash I used the day I took these photos (pictured below) was rather large, so I ended up only using about half of the squash for this soup. If you end up with WAY more than the above measurements, you can still peel and cube, and then save in an airtight container in the refrigerator for a few days or freeze if you want to save for longer.
Remove the skin from the onion and give it a rough chop. Cook the onion in 1 tablespoon oil for about 8 minutes over medium heat. The onion will brown and begin to smell very sweet. Then add the cubed squash and minced garlic. Add another tablespoon of oil, and lightly season with salt and pepper. Cook for another minute or two.
Then add the vegetable stock, cover, reduce the heat to low, and cook for 10-12 minutes. You should be able to easily crush a piece of butternut squash with the side of your mixing spoon.
Add the soup along with the peanut butter and red curry paste to a good blender. Blend on high for a few minutes until everything is well pureed. You can also do this in batches in a food processor. Or you can use an immersion blender right inside your pot. Whatever method you choose, be careful as you work since the liquid is hot, and your goal is to blend all ingredients throughout the puree.
Transfer back to your pot and add the coconut milk. Continue to cook on medium for a few minutes until everything is warm. Taste and add more salt and pepper as needed.
Top with a little cilantro and pumpkin seeds and serve hot! I reserved just a couple of spoonfuls of coconut milk so I could drizzle it over the top in these images, which is a really fun and easy presentation if you are making this for guests or just trying to impress your significant other. ;)
A couple of notes:
-If you want to make this soup vegan, make sure to use a red curry paste that is vegan friendly.
-The squash measurement above is exactly what I used in one of my tests, but it's totally OK if you use slightly more or less (a few ounces) squash. If you use a little more and your soup is a bit on thick side, just add a few tablespoons of vegetable stock or water at the end and you'll be fine.
Happy soup making, guys! xo. Emma
Credits // Author and Photography: Emma Chapman. Photos edited with the NEW A Beautiful Mess actions.

Soup season is here!
With all the potlucks, tailgating, and football parties this time of year, it’s helpful to have a few cozy recipes in your arsenal to fill bellies and lift faces. Soup is my absolute favorite go-to dish. No one ever complains when a hot steaming bowl of hearty soup is set before them!

Enchilada soup is a dish I love to make in the fall. It’s thick, zesty, and packed with chunky goodness. My family often piles on tortilla chips, shredded cheese, and avocado for a clashing hot-cool sensation!

This recipe is so easy to make, and so tasty, you’ll find yourself whipping it up often.

Start by sautéing onions and garlic in a large sauce pot.

Once the onions are soft, add whole chicken breasts, chicken broth, cumin, and a couple cans of red enchilada sauce. Simmer the soup base until the chicken is cooked through.
You can use mild or spicy enchilada sauce to suit your family’s taste buds.

Once the chicken is cooked, chop or shred the chicken and add it back to the soup. Toss in corn kernels, black beans, and fresh tomato salsa to offer contrasting flavors and textures.

The salsa is the key ingredient to giving this enchilada soup a wide array of flavors. It offers a pop of freshness to offset the slow-cooked depth of the enchilada sauce.

Ladle up hot bowls of soup!

Top with fresh cilantro, scallions, avocado, sour cream, cheese, or any other topping you like!

This easy enchilada soup recipe is so inviting, I’d bet your family will ask for it again and again this fall!


I don’t remember when I first stumbled upon the magical woodland scenes that fill up the instagram account of Jessica Lewis Stevens, but I remember being immediately captivated. Hers was a world I wanted to dive into—and her photos were so evocative, I practically felt like I had. In this interview, Jessica answered my questions about living in a rural place, her connection to commercial goods from the perspective of a small business owner, and her philosophy on kids and their ‘stuff’, among other things.

Erin: Can you tell Reading My Tea Leaves readers a bit about yourself and your work?
Jessica: I live with my husband and young son (with a baby on the way!) in southern Vermont where we tend to our garden and chickens and otherwise work hard to live well. I am the maker behind Sugarhouse Workshop, a small handmade brand that focuses on heirloom-quality quilts made with naturally dyed fibers. I also use natural dyes to make cheerful and useful goods like buntings, play silks, bags, and blankets. The work I make for my home and shop reflects my efforts to make intentional, non-disposable objects and to foster both a meaningful and whimsical connection with the natural world around us.
 Erin: You live on a self-described homestead. Have you always lived in a rural place? What are your favorite aspects of living in a secluded spot? What’s a challenge?
Jessica: I grew up in upstate New York and lived for the most part in a rural setting, so it’s certainly where I feel most comfortable. I spent some time during college and grad school in Philadelphia and Buffalo, but my husband and I chose to settle down in Vermont soon after our son arrived. There’s so much to love; we get to be constantly immersed in the changing seasons, we have access to really incredible, thoughtfully produced food, and our children get to spend all the time they want outdoors. The biggest challenge is something I would say has really become another benefit: Living on a mountain miles from town means we just don’t have access to anything in an impulsive (or even convenient) way. But as a result of this, I’ve really deepened my understanding of what our needs are as a family and how to fulfill them in the most conscious way. Instead of ordering take out or running to the store like we could in the city, I’ve learned I have to plan and prepare our meals carefully and therefore I think a lot about what we eat, how it’s made, and where it comes from. The same goes for toiletries and clothing and toys and nearly everything else we use. There’s nowhere easy to get these things, so it gives me the time and motivation to do my research and figure out how best to meet those needs in a sustainable and thoughtful way.
Erin: Glimpses of your life reveal a deeply colorful environment, but lots of that color comes from things found in nature. How would you describe your relationship to the outdoors and how does it impact your life indoors?
Jessica: We spend so much of our time outdoors three seasons of the year, and I find the impact of that especially present in the day to day rhythms with my son Henry, and in my work. In spring, we’re out preparing and planting the garden and bringing in bits of nature that mean winter is finally over. In summer, we spend lots of time in the garden, swimming in the pond, and hunting for edibles and dye plants in the forest. Our indoor life becomes sort of secondary until it’s time to bring in the harvest and we spend time putting food up and turning those plants into teas and dyes. In autumn, there are plenty of dye pots to be simmered, cider-making, baking, and long crunchy walks.
It’s around that time that we all start to feel the pull inwards, and our indoor life becomes more rich with projects and preparations for winter and for me, lots more sewing, quilting, and knitting. The change of each season always feels exciting because it means real shifts in our days both indoors and out.
 Erin: As a quilter and crafter, part of your work is to make things for other people to purchase and enjoy. Do you feel like you have a unique relationship to commercial goods? What are your own purchasing habits like, especially living in a remote place?
Jessica: I do feel like my relationship to commercial goods and consumption in general has changed and evolved considerably as I’ve grown into making for a living. As I mentioned earlier, everything we buy is thoroughly considered, and I find myself wanting to buy less and less in general as my understanding of modern manufacturing processes, as well as traditional ways of doing things, increases. This is especially true when it comes to clothing, toys, and our soft goods. I’ve learned with a few tricks and skills there aren’t very many clothes we have to buy, and when we do, we rely on handmade and otherwise small, ethical brands. I’ve learned that when we purchase things that are well-made, have a story, or show the signs of hand-making, we treat them better and they last considerably longer.

Erin: It looks as though you’re always immersed in a new project. As someone who’s so good at making things for yourself, do you ever feel like you end up with more than you need?
Jessica: I find that time and again our needs are really the greatest “muse” to my work; most of what I produce for my shop came first from something I wanted or needed for our home, and then evolved into something I could offer to other folks. Our cabin is tiny, so there’s nowhere for me to keep things we don’t specifically need and use – something I consider a major benefit to living in a small space. For my shop and custom projects, I acquire materials in small amounts so I don’t end up with too much in my small work space, and because of the nature of my collections being very limited and often seasonal, I don’t have any back stock to store. It’s a system that works well for me to limit the “stuff” I have in general, and it allows me to stay on top of what we need without making too much of any one thing.
 Erin: When you describe your quilting you write, “ I think children deserve functional, beautiful, and well-made objects in their lives and in their play…”. What do you think are the best ways parents can seek out those kinds of items for our children? Do you have any tips for parents who are hoping to do that?
Jessica: This is an idea that’s really important to me both in what I make and how I collect items for our own home. I think sometimes parents worry that investing more in their children’s toys or bedding isn’t wise because they’ll soon outgrow or tire of it, or they won’t be able to maintain them effectively. In my experience, children are just as capable of appreciating and understanding well-made items as adults. My son gravitates toward toys made from natural materials, and the open-ended nature of those toys (like play silks, wooden figures and blocks, quality art supplies) mean they last long past a particular phase or age group. It also gives us as parents the opportunity to teach them about caring for their belongings in a way that can often be fun for little ones. Henry enjoys polishing his wooden toys with beeswax and coconut oil, or washing his play silks in the sink. When his quilt needs mending, he picks a new color for the patch. It instills a sense of pride in what they own that I think can lay the groundwork for making good purchasing decisions in their own lives.
I think it’s important for parents to consider how a prospective toy or item (or even an item on your child’s shelves already) makes the parent themselves feel. ‘Would you enjoy playing with it? Does it engage the senses and invite you to handle it? Is it made in a way that fits with your values?’ I think answering these questions honestly can give a lot of perspective to parents feeling like they’d like to pare down or change how they buy for their children.

Erin: Based on my own anecdotal experience, there’s a lot of anxiety among parents of young kids about the amount of toys and gifts they’re given. What’s been your approach to kid’s toys so far?
Jessica: Gosh, this is so true. I find the best advice or wisdom I’ve been given when it comes to the amount of toys kids have is that less is always, always more. Children play so much more thoughtfully with open-ended toys that are presented in limited quantities (and they’re easier to put away, too!) I think it’s often hard to tell well-meaning friends and relatives not to buy so much for your child, but it can be freeing as a parent to have that conversation, and most of the time people are very receptive to it. It can help to find a shop you like to buy from and make a wish list there around a birthday or a holiday. Often, folks are happy to oblige but may want some steering in the right direction.
 Erin: You live in a small cabin; what’s been your approach to creating spaces for a child (soon children!) in your home so far?
Jessica: Creating spaces for little ones is one of my favorite things to do. We don’t have separate rooms for the children in our cabin, so making small nooks for toys and belongings has become essential. I find when you collect beautiful toys, they’re just as nice to show off on a living room shelf as anything else. I like to consider my son’s comfort in the places he likes to play, making sure they are warm and inviting, and to keep those spaces close to where I do my work or close to the kitchen so we can be engaged with one another throughout the day. I like to change things seasonally and bring lots of natural elements into his spaces – I think it fosters a bit of a sense of magic that children so often love. From a practical perspective, I think it’s essential to provide children with easy access to the things they need and use. A low coat rack for them to hang their own sweaters and jackets, a basket they can reach for hats and mittens, shelves where their art supplies are neatly organized. I think it makes our job as parents easier to foster this independence, and it makes children feel like they really have their own place in the home.
To see Jessica’s beautiful goods, head to her online shop.
To keep abreast of Jessica’s daily adventures, follow @sugarhouseworkshop on Instagram.
The Simple Matters Series is inspired in part by curiosity piqued while writing my book of the same title. I wanted to know what simple matters were for other folks. And why simplicity mattered to them in the first place. My own story came out in January of 2016. It’s available right this way.

Kodak has unveiled Ektra, a smart phone aimed at photographers. It runs on Android and features a 21 megapixel fast focus camera with a f2.0 aperture. The camera also boasts DSLR functionality and can capture video in 4K.
Drool.


Holy smokes Google Arts & Culture is amazing. You can virtually explore museums. My head is exploding! I know what I am doing with my kids tonight!

Faye is very into building forts lately. There’s a fort under my desk most weekday evenings. The ritual of making them is usually the same: Drag the sheepie from the bedroom to the desk, carefully arrange the couch pillows and sheepie underneath it, hang up blankets or play silks or anything else that will make for a cozy place to hang out in. I very much encourage the habit, in part because it sometimes means the difference between making dinner in relative peace or not, and in part because fort building was one of my own favorite childhood pastimes.
As everyone might know, a good fort experience is vastly helped along by a flashlight, so a few weeks ago, I went to our linen closet to get a flashlight out of the toolbox to present to Faye. James and I both entered our romance with mini Maglite flashlights and we’ve held on to both of them. Alas, as is too often the case with the lazy flashlight owner, when I tried to turn them on, they both were dead. Batteries, I figured. But when I tried to open the flashlights, I realized that in both cases the batteries had bloated, leaked, and were stuck inside the flashlights with a solid crust of battery acid oozing out of them. Whoops.
An internet search ensued. What do you do with such a flashlight? I found myself in a deep Reddit rabbit hole with forums of people saying that with a power drill, a bit of vinegar, and a basin of hot water I could potentially dislodge the stuck batteries. (Caveats included toxic battery acid, the risk of explosion, and a flashlight that still wasn’t working once you finished.) This was not a DIY I wanted to experiment with. So how to responsibly care for them? I don’t want a non-working flashlight in my house, but I don’t want my decluttering frenzy to result in adding a piece of toxin-coated metal to a landfill either.
I took to the Maglite website. I read through their warranties, their FAQs, their user forums. I eventually wrote a quick note, asking what I could do about the fact that I had two flashlights that needed attention. Send them our way, they said, we’ll dispose of them and replace them at a discount. I won’t claim that the system is perfect. I wish I could have fixed them safely myself. (I wish I hadn’t let them become damaged in the first place!) But, the two women I spoke to on the phone assured me that the company deals responsibly with the waste of this sort that’s returned to them. In all, my search took about 25 minutes on a weeknight after Faye was asleep.
Here’s the thing: In my book, I write about wanting to fill my home with objects that are knowable. I’ll take a French press over a coffee maker with buttons and a plug any day. But there are still objects in my house—electronics and appliances, mostly—that include technology that I can’t claim an intimate knowledge of and that are made with materials that come at a significant price to the planet and to the people working with them.
I recently had the chance to preview the film Death by Design and it’s been weighing on my conscience. The documentary covers the environmental impact of so many of our gadgets. But it also explores the idea that some of the unknowability is by design. Planned obsolescence means that even care and attention might not be enough to keep our tech in working order. Storing my flashlights without batteries in them would have likely prevented their demise, but there are lots of electronics that are designed to fail regardless of user behavior. And fixing or responsibly recycling those things isn’t always so obvious. Despite the ubiquity of these things in our homes and hands and everyday lives, most of us wouldn’t know where to begin when tackling a repair. Cell phones that used to have easily replaceable batteries now have batteries built into them and they’re screwed shut with proprietary screws. When we send our electronic waste out for recycling the metals inside of them are often mishandled, often in the hands of small children. At the same time, we have a tech industry that’s churning out ever-greater numbers of brand-new electronics to satisfy our yen for the latest and greatest.
Okay; before I lose you to a deep depression, here’s my pledge: to get a little bit more mindful about fixing what I have. Clothes, for sure. But other things, too. As we enter into a holiday season, we’ll be bombarded with advertisements for what the tech world has to offer. I know that the iPhone I’ve now dropped countless times will look even more worse for wear next to ads for this year’s shiny model. I’m going to try my best to turn a blind eye. And when I get my replacement flashlights, you can bet I’ll be storing the batteries separately.
A few helpful tips:
+ If you’re interested in watching the documentary Death By Design yourself, check out the list of upcoming community screenings or host one yourself! (The film will be available for renting online in 2017.)
+ If you have an electronic that’s broken and you’re not sure if you can do anything about it, see if the folks at iFixit might have solution. If they don’t, get in contact with the manufacturer themselves. You might find better answers than you’d imagine.
+ If you’re looking for a responsible way to dispose of something you can’t fix, head to e-Stewards to find a responsible drop-off center for electronic waste near you.
+ If you’re in the market for something new, look into buying something that’s been refurbished. Many manufacturers have refurbished items for sale on their own sites; alternately you can find refurbished products at many electronic stores.
+ If you’re still wringing your hands, sign a petition demanding safer and more sustainable products.
What about you guys? How do you try to handle your tech responsibly?
Pixar Animators spent 5 years making this devastatingly beautiful short film in their spare time
– 100 Women in Tech and Founders to Follow on Twitter
– Interesting and counter-intuitive article on how to pick the fastest line at the Supermarket.
– This made me laugh: A solution to the texting and walking epidemic! (via)
– Collection of articles, videos, and resources made by designers at Facebook.
– Wow! Beautifully designed athletic hijabs made to get more young Muslim girls into athletics.
– Smart: Store your phone in your water bottle during your next work out.
– What to do when the name of your business becomes associated with terrorism. I feel for the owner of the ISIS hair salon.
– How to make a nasty cold suck less
– Cool: Maslow is a 4×8 foot CNC router for $350. Imagine the stuff you can build!
– This little guy made me chuckle.
– Just discovered this free (!) Skillshare class by Mailchimp teaching you how to automate, optimize, and personalize emails to increase sales. So good.
– CEO school.
– This brand new CreativeMornings talk by Simon Sinek is fantastic. 30mins well spent.
– If you’ve ever wondered which countries have the most introverted vs. extraverted norms, here’s a map of the data from 51 cultures.
– Guzzle Buddy is a handy device that transform an entire bottle of wine into a personal drinking glass. Low in class, high in fun.
– I wish people would be more open about the topic of money. Here’s an interesting article with 7 questions that might help start a conversation around it.
– Treehugger wrote an article about my co-working space FRIENDS WORK HERE.
– Psst… Tattly is running a SALE until the end of Sunday.
Shh.listenI like the pegs

These fold-up market totes are beautiful.

There’s an easy way to elevate your fall and holiday desserts, and it’s this: use fresh pumpkin puree.
Several years ago, my husband and I did a blind taste test with two otherwise identical pumpkin pies—except I made one with canned pumpkin and one with fresh. Aside from the pumpkin, I used the exact same ingredients and baked them side-by-side in the oven.
The difference was astonishing.

I know, I know. It’s more work to go the fresh pumpkin route, and I definitely get the appeal of canned pumpkin. I find myself using the canned stuff from time to time because of the convenience. But whenever I can, I’ll try to use fresh pumpkin puree for my pumpkin desserts. It always tastes so much better!
If you’ve never had the fresh stuff before, it’s definitely worth trying at least once to see if you think the difference is worthwhile. Fresh pumpkin puree is very easy to make. Let me show you the process.

When you get to the store, look for pumpkins labeled “sugar pumpkins” or “pie pumpkins.” You don’t want to use the decorative pumpkins you stick outside your doorstep, but rather the ones designated for cooking. They will be sweeter and much less stringy.

Start by trimming the stem off.

Then slice the pumpkin in half, through the top.

Now remove the seeds and stringy stuff from the middle of the pumpkin.
I like to use a melon baller and think it’s the best tool ever for removing seeds from pumpkins and squash. In fact, I can’t remember the last time I used a melon baller to ball melon, because it’s officially my squash-seed-and-string-remover tool. That’s what it should be called. Doesn’t have the same ring to it though.

Place the pumpkin halves cut-side down on a sheet tray.
It’s very important to place them cut-side down because otherwise you’ll get dried out edges to the pumpkin. Placing them cut-side down keeps the pumpkin moist without needing to add oil.

Roast in a 375ºF oven for about 45 minutes until the skin darkens and becomes puckered.

When you flip the pumpkin halves over, the pumpkin will have pulled away from the skin and it will be very soft.

Scoop the pumpkin out of the skin with a spoon, then place into a food processor.

Puree for about 30 seconds until completely smooth. Then it’s ready to use in your pumpkin recipes!
Note: Pumpkin puree will keep in the fridge for 5 days. Some people freeze pumpkin puree but I personally don’t like the change in texture, so I don’t like to freeze it.

Shh.listenWant want
First of all, let me just say a resounding you're welcome to all you fellow cat owners out there. I know how tough it can be to love the adorable little kitty that naps on the couch with you but not always love the rest of the kitty gear that comes with that furry little face. So far, I've done my best to upgrade versions of cat essentials with a color-blocked scratching post, junk food kitty toys, a hand-stamped cat collar, and even a mini Palm Springs scratch house to make the feline essentials fit in (rather than stand out) from our home decor. Now, while all these things have really helped integrate our human and cat worlds, there is still one area I haven't gotten around to making aesthetic improvements in—the litter box. I think I didn't feel the need for a litter box cover in our last house because we had a separate laundry room where we could keep all those kitty necessities, and it was rather hidden under a shelf in a corner. At this house, however, the laundry is actually in the garage with no kitty access to the house. So we have to do the dreaded "litter-box-in-the-middle-of-the-room" scenario. Ever since we moved last year, doing a DIY cover has been on my to-do list. So here we are!
Supplies:
-sheets of 1/2" thick plywood (one big enough to fit your 4 sides or several smaller sheets)
-1 1/2" wide boards for your rooftop (I used 6 boards that were about 30" long.)
-nails
-wood glue
-jigsaw
-miter saw (optional but needed if you want a top that opens)
-2 small hinges
-cat shaped opening template
-wax paper
-paint
To determine the size that your box cover should be, you'll need to first measure the length and width of your litter box to make sure it will fit. Take the measurements and use the guide above to find what size your panels should be (don't forget you need two sides and two front pieces). The above dimensions should give you a pretty snug fit with about 1/4" of perimeter space between the litter box and the cover, but you can always make the cover bigger if you want (you just don't want it smaller than your litter box obviously). Draw out your dimensions for all four sides onto your plywood sheets and use a jigsaw to cut out your sides.
Determine how big you want your cat-shaped opening to be and print out your template the correct size. You'll probably have to print it on multiple pages and tape together unless you have a large printer. Remember that you want the opening to be big enough for the cat to use, so make sure they have room to get through it comfortably (I made mine about 12" wide). Trace the opening onto the center of the front panel 2-3" from the bottom of the panel.
Drill a few holes (at least the width of your jigsaw blade) into your traced cat shape so you have an opening to get the jigsaw into. Use the entry holes to cut out your shape.
Sand the edges of each of your panels to remove any rough spots.
Match up your panels so that the sides are between the front and back panels with sheets of wax paper underneath to catch any extra glue. It's helpful to have an extra set of hands for this part (thanks, Todd!) when trying to get the pieces squared up. Use wood glue and tape to keep the pieces in place while the glue sets (a few strategically placed boxes would work as well).
Once the glue is set, use a few nails to hammer your box together from the front and back panels.
If you have access to a miter saw, you'll take your 1.5" boards and use the saw to cut four of them at the correct angle so they meet together at the peak of your roofline (on the front and back) with a 1/2" overhang on the bottom edges. While I'm sure there are more technical ways of figuring out what that angle is before cutting it, I just use scrap pieces of wood and keep cutting angles and adjusting until I find the right one. It's actually pretty fast that way and my dimensions ended up needing a 25° angle to meet up correctly. Center your 4 boards, and then measure the distance between the front and back boards and cut 8 more boards that will fit in between them.
If you don't have access to a miter saw, you can use your jigsaw to cut 8-10 of the 1 1/2" boards that will run from the front of the roof to the back (with about 1/2" overhang on both sides). Just space them out evenly across the roof and nail into place after painting. You won't have the option to open the roof this way, but it will look pretty similar and you can just clean the box from the front opening instead.
Space your 8 boards equally over some wax paper between your 4 angled boards and use wood glue to adhere into place. I glued them together over a cutting mat so I could use the lines below to make sure the pieces were squared up correctly.
Paint your cover and your roof pieces your desired color, and then attach the two roof halves with your hinges once the paint is dry. Decide which half of the roof you'll want to open for cleaning purposes. Then glue or nail the other half of the roof shut for stability when opening the roof. Place your cover over your litter box and admire your hard work!
It looks SOOOOOO much better if you ask me! You can also add as many or as few slats to the roof as you want to expose more or less of the litter inside from the top view, but some cats don't like to be totally closed in from above (while others don't mind it), so use your cat mama judgement on that one. Either way, this is a giant visual improvement for us, so I'm thrilled with how it came out, and it got, ahem, used pretty quickly once it was put out. So I think the cats like it too. If you've been looking to improve your litter box situation, then this may be just the solution for you! xo. Laura
Credits // Author and Photography: Laura Gummerman. Photos edited with the NEW A Beautiful Mess actions.
Last month I visited Nashville with Rachel and Jacki. As you can probably guess, we spent a disproportionate amount of the trip eating—because what is traveling for after all. And one place that Elsie took us was Avo, which is a mostly raw/vegan spot. When my parents visited, they had checked out this spot too, and my mom insisted that IF we went, then I had to get the spring rolls and the raw Pad Thai.
And I pretty much always do what my mom says because she's smart and also has good taste. They were delicious, of course. And I added the raw Pad Thai to my list of things I should try to make at home because I thought it might be something, with a few tweaks, that Trey would enjoy as well.
Somewhere along the way, I think my brain decided that I should just turn the raw Pad Thai into a spring roll—so I tried that and loved it! Figured I'd share with you all too.
But I must admit right out of the gate here—this recipe is not 100% raw. For one, I don't think the spring roll wrappers would qualify, but for another, I do believe a few items in my sauce don't quite fall under the raw category either. But, if you are looking for a super satisfying dinner idea that is brimming with veggies and flavor, then I would still highly recommend you try this out. :)
Mostly Raw Pad Thai Spring Rolls, makes 6
1 small/medium zucchini
2 carrots, or about 6 baby carrots
1/2 small cabbage
1 red bell pepper
6 chives
6-12 mint leaves, depending on size (see notes)
18 cilantro leaves
6 spring roll wrappers
a couple big handfuls of peanuts or other nuts you prefer
For the sauce:
juice from 2 limes
2 tablespoons tamarind pulp (I use this brand.)
2 tablespoons tahini
2 tablespoons natural peanut butter
1 tablespoon maple syrup
1 tablespoon tamari or soy sauce
1/4 teaspoon ground ginger
First you want to cut up all the vegetables. I used a spiralizer to make my zucchini resemble noodles (ZOODLES!) and also to cut up my carrots. I had bought my cabbage already shredded as I used some to make coleslaw later that week. You can shred by hand, but just make sure it's really shredded thin. And same with the bell pepper, you want to cut it into matchsticks. You can give the nuts a rough chop or just leave them in whole pieces—up to you. I kind of like leaving them whole, but if you use nuts that are a bit bigger, you might want to give them a chop.
Next make the sauce. Simply whisk together all the sauce ingredients listed above until smooth. If your sauce appears too thick, like it's very difficult to whisk, then add a little water, but I found this was not necessary for me. I could see a little water helping though if you are using tahini or peanut butter from the very bottom of the jar. Sometimes if the oil separated and you didn't get to mix it together well when you opened the jar, then the very bottom becomes quite hard. You should be able to pour the final sauce pretty easily.
In a large mixing bowl, combine zucchini, carrots, cabbage, and bell pepper. Add 3 tablespoons of the sauce (a little less than half) and mix well so everything gets coated. Reserve the remaining sauce to serve on the side along with your final spring rolls.
Fill each wrapper with a chive, a few mint leaves, a few cilantro leaves, some nuts, and then a small handful of the raw pad thai. Roll up and repeat until you've made all six rolls. If you've never made spring rolls, I show how to handle the wrappers in this post with a basic spring roll recipe.
Serve with the remaining sauce and a wedge of lime. YUM! And here's a couple notes:
-You can see the size of the mint leaves I was using here in the photos. These are smaller than I normally see them, so I probably used 12 throughout all my spring rolls. But when they are larger, I'd use less, sometimes only one big leaf per spring roll that I tear into a few pieces. The main idea is the chives, mint, and cilantro will add a lot of flavor to your spring rolls, but you don't want to overpower them with any one flavor (or too much of all). So use your judgement here based on how big your herbs are.
-Tamarind pulp is sort of a weird ingredient, I know. But it's also useful in making Pad Thai sauce (you know, for noodles, not the hippie raw version) and other thai dishes. We love Thai food at our house, so I find it really useful. Don't be afraid to try it out.
-You can totally use any nuts you prefer or even mix. I like peanuts and cashews the most, but any nuts will work well as we're just looking to add a little crunch. :)
Make these spring rolls, guys. They are so yummy and pretty healthy too—delicious food you can feel good about! Wahoo! xo. Emma
Credits // Author and Photography: Emma Chapman. Photos edited with A Beautiful Mess actions.
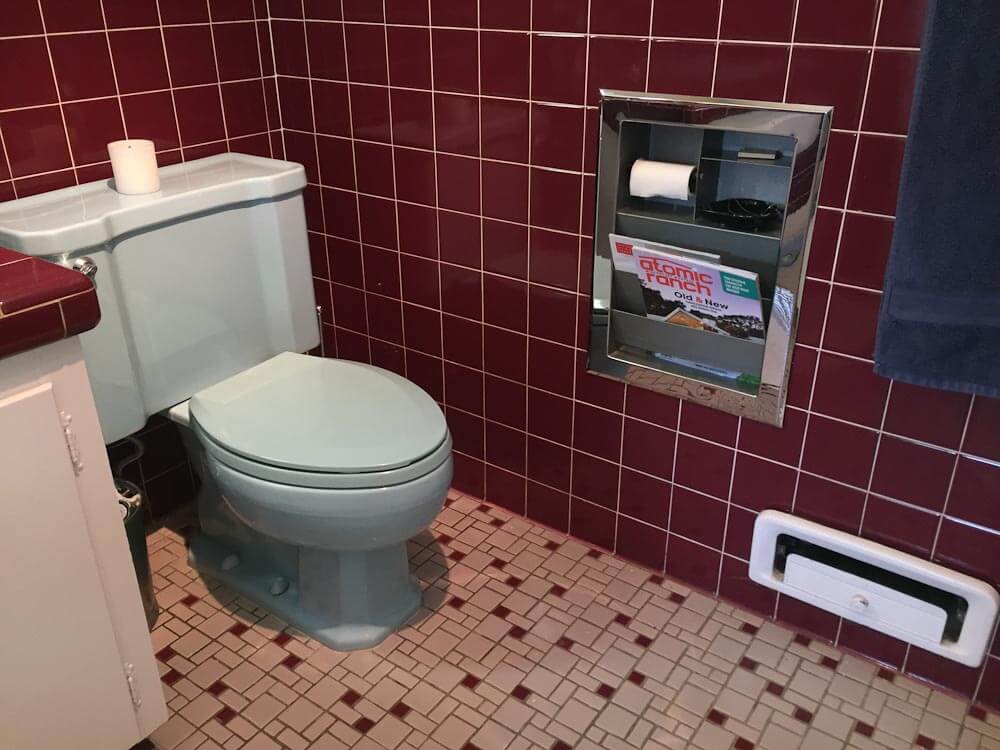 First we discovered Hall-Mack Relaxation Units … Then, Satin Glide Relaxation Units … And now, what is likely a very rare vintage recessed bathroom accessory: A “Family Hospitality” Relaxation Unit. Thanks so much for reader Kristopher for sending in three photos of this treasure! And: Oh my, what a gorgeous original bathroom you have, Kristopher!
 Kristopher wrote:
Hi Pam,
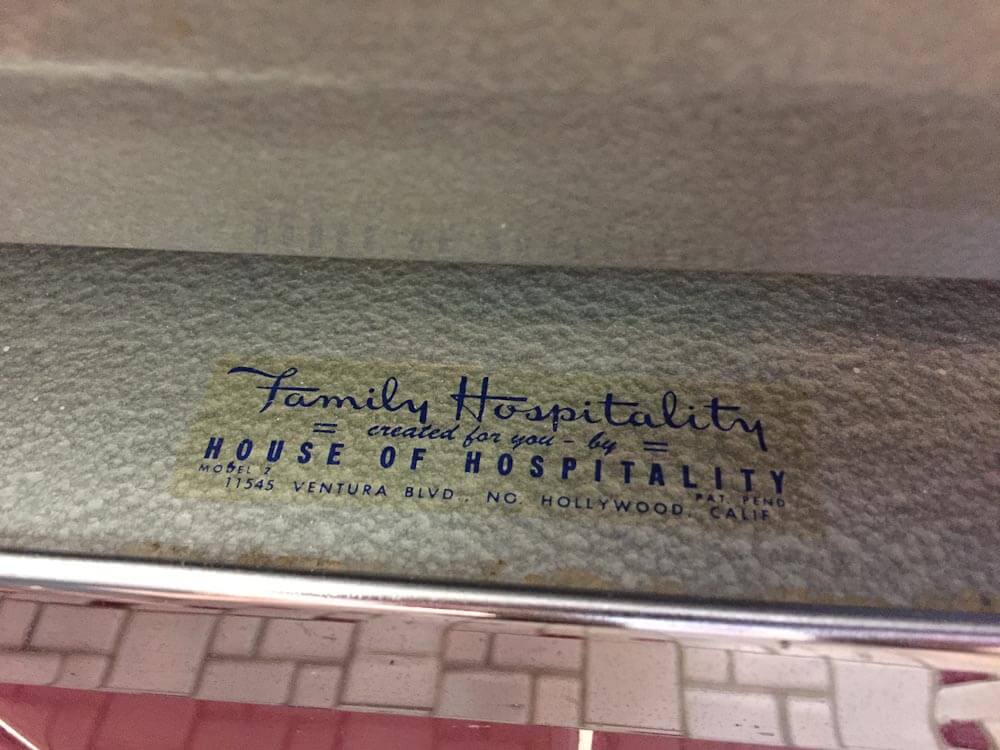
Our 1954 home in Wisconsin has a similar recessed toilet paper holder/magazine rack, but it looks to be a third brand? The label calls it “Family Hospitality – created for you by House of Hospitality” in No. Hollywood, Calif. A quick google search didn’t turn up anything, but I haven’t explored too far yet.
Everything in our master bathroom is original including wall tile, flooring, lighted medicine cabinet, Bathe-Rite free-standing shower stall, and Kohler Cerulean Blue fixtures.
We corresponded a couple years ago when my nephew was featured in a photo at Christmas time with our cardboard fireplace.
Loving the blog, as always!
Some day, it would be fun to research who was first with the idea for this type of bathroom fixture — House of Hospitality, Hall-Mack, or Satin Glide? The Family Hospitality unit appears more complex in its design than the other two… it looks more substantial … and the label says Patent Pending. I will bet: It was first to market, then Hall-Mack and Satin Glide created simpler designs.
Thank you, Kristopher! What a wonderful, historic woddity! I am not envious by nature, but this one: ooooooooh!
The post Family Hospitality Relaxation Unit — our third design of Relaxation Unit appeared first on Retro Renovation.
Shh.listenYes, please. Yes.

I doubt this leather wrist ruler is practical to measure anything but it sure looks cool.
As someone who really doesn’t like to clean the stove, I love the idea behind this slightly silly looking product called Frywall. It is a silicone splatter guard that fits inside the rim of any pot or pan, so spattering and sizzling food won’t spray out.
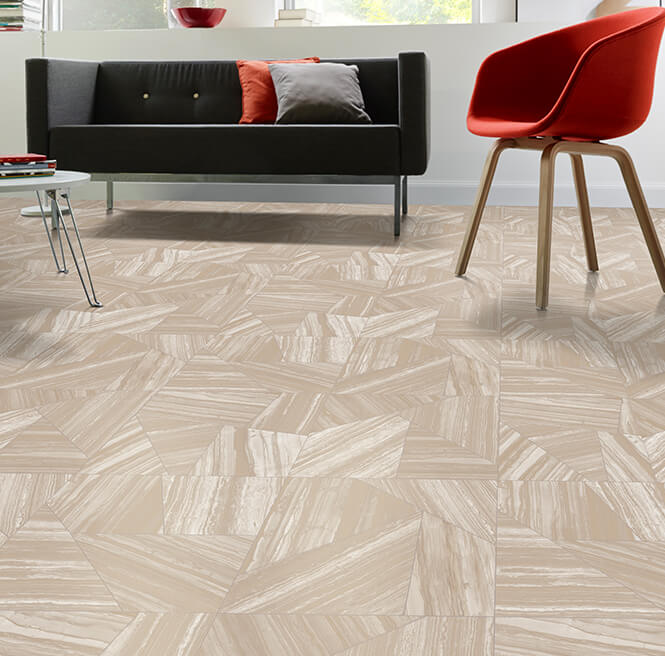 Obsessively searching to find new vinyl flooring for my basement, I ran into this new design — “Raeburn” from IVC’s Flexitech @ Work Collection Astro series. I love how IVC has reimagined the classic streaky jaspe vinyl tile into this larger polygons-into-square design. The color looks pretty nice too — I am a beige person, not a gray person, and there’s been a real dearth of beige in the market for the last 5-8 years. This flooring is an IVC Commercial flooring and comes in 13’2″ widths — nice! I would call this a nice choice for a retro-modern home. Nice floor!
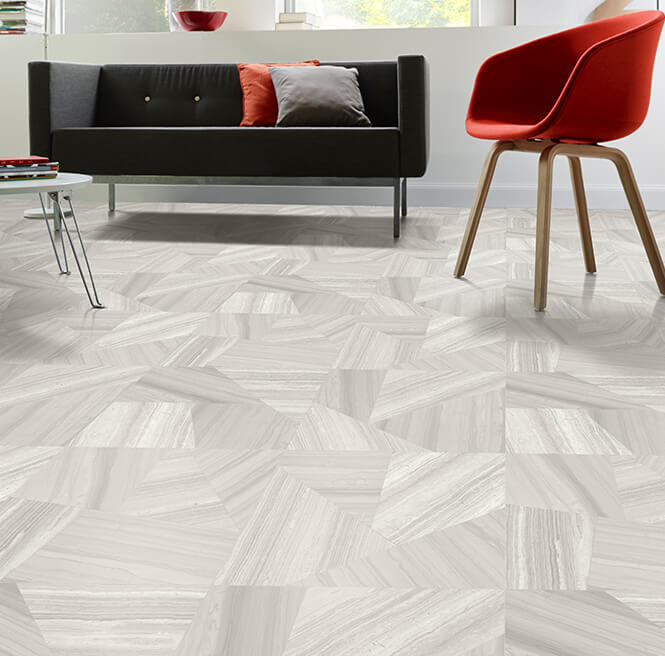 Oh, and for those of you who prefer gray, they have that too.
Remember: When looking for flooring options, be sure to check the commercial section of manufacturers’ websites! Big roundup: 25 companies that make flooring — cork, linoleum and vinyl — suitable for a midcentury house.
The post Streaky jaspe style vinyl sheet flooring — could be great for a retro-modern home appeared first on Retro Renovation.
Shh.listenThis is my dream decor/house
Today we have an extra special At Home With feature for you guys—from our very own Jacki Moseley. All you avid ABM readers probably already know Jacki as she is our Community Engagement Manager, meaning she's the sweet gal behind the Instagram, support emails, and blog comments. Jacki does SO many things at ABM that I think the whole thing would stop working without her (I'm not joking—really, she keeps the machine moving). She also has a passion for vintage, as you can tell from her Etsy shop The Paisley Suitcase. Her house is insanely adorable with too many cute details to count. So we were so, so pleased when she agreed to share her space with our ABM community.
Coffee table/Amazon, Wooden legs (spray painted)/Home Depot., Yellow pillow and Starburst mirror/Pier 1.
"Totally blushing right now, Emma. I'm SO excited to share my home with you guys today. I'll start with a little background info. My uncle bought this amazing early 1920s home a few years ago, and I've been renting it from him ever since. I was pretty content in my 700 square ft. apartment, but I mean... hello! Instant upgrade. I love everything vintage and old architecture makes me super happy. So this place has been an absolute dream to live in and decorate.
"I love decorating with a lot of color so everything really stands out against the white walls. The teal couch was Elsie's, and it's by far my favorite thing in this room. I had a yellow couch before this and had WAY too much gold and brown in here. I felt really inspired to add even more colorful decor and redecorate after I replaced the couch. Sometimes that's all it takes to get in the mood to redo things!
Engineer print/Staples, Vase/Target, Table/Hobby Lobby.
"If you know me, then it's pretty obvious that I'm 100% in love with my dog, Kingston. And when people know that, you receive a lot of Boston terrier gifts. I love this old book, and it's the perfect centerpiece for my coffee table. Just a note on that. I'm not the craftiest person in the world, but a can of spray paint can do wonders. :) I painted the wooden legs yellow, and I love how it looks with the couch.
"A common theme in my home is having keepsakes from my family around. My grandma has given me a lot of hand-me-downs over the years, like the cool wicker chair in the living room. The engineer print is an old photo of my other grandma (bottom right) and her friends. It's by far my favorite photo, and I love seeing it on the wall everyday. My family has owned an office supply store in downtown Springfield for over 70 years. I have a lot of little memories from it, like my great-grandfather's business card and other items from the original location.
Rug/Amazon.
"I kept the decor pretty minimal in this room, but I love how the blue rug and bright white hutch are the main focus. It has an original flour sifter inside and it's perfect for storage. The printer's drawer was my grandma's. I used to play with the little trinkets when I was a kid! It's really fun to add to the collection when I come across them at the flea market.
Tassel garland/Love Garlands on Etsy, Fireplace screen/Amazon (painted).
"I love that I can display my favorite glassware and knick knacks in the kitchen display cabinet. I found the bar cart at my favorite flea market. The colored aluminum shot glass and shaker set is the best!
Hand towels/Amazon.
"The house is very close to its original form, but the bathroom has been renovated since I moved in. My uncle has amazing taste, and I couldn't be happier with how this room turned out. We removed the bathtub and put in a walk-in shower (showers are so necessary nowadays!), chose black and white subway tile all around, and penny tile for the floors. It really fits with the era of the home. The old medicine cabinet (found it on eBay) is great for bathroom storage and my old perfume bottle collection.
Planter/Lowes.
"I kept my bedroom pretty simple, focusing on white and airy elements. I chose mint and peach as the main colors for this room based on a photo I took of the Loveless Cafe sign in Nashville. This cart was an estate sale find, and I couldn't imagine a better spot for my mom's old Dr. Seuss books.
Mirror set/Urban Outfitters, Comforter and Rug/Amazon, Throw/Overstock (similar), Mint pillowcases/Grey and peach pillow/Target.
Paper lanterns, crystal drawer pulls/Amazon.
"Little details like this make my heart so happy. I'm still pinching myself over this home tour, so thanks so much for reading! And a special thanks to Janae Hardy for making me fall in love with this home all over again."
You can follow Jacki on Instagram and visit her Etsy shop here. xo!
Credits//Author: Jacki Moseley. Photography: Janae Hardy.

Pumpkin pancakes and cinnamon rolls are well and good, but what about those of us who like something savory instead of sweet for our weekday breakfasts? These Paleo muffins prove that pumpkin plays just as well with cumin and paprika as it does with cinnamon and nutmeg.
These muffins make a great grab-and-go breakfast or a healthy afternoon snack. They are also grain-free and very nutritious!
Continue reading "Spicy Paleo Pumpkin Muffins" »


