Greta Garbo in Mata Hari
Russian Sledgesvia baron
Russian Sledgesthose pockets
Hello! So today I’m sharing a sewing project to promote* and support Sewing Indie Month. If you’re not familiar with it, Sewing Indie Month (SIM) is a month-long celebration of indie sewing patterns where designers collaborate to bring you fun blog posts and informative tutorials. It begins in September and supports small, women-owned businesses, as well as raises money for charity. It’s accompanied by a sew-along contest with fantastic prizes! Sounds pretty awesome, right?!

The pattern bundle sale will run from Monday August 3rd to Wednesday August 12th, with 20% of bundle proceeds being donated to the International Folk Art Alliance, which provides education and exhibition opportunities to folk artists from around the world.

Here are the 10 awesome indie patterns included in the SIM bundle:

The pattern I chose to make is the Melissa Skirt by Muse Patterns, which is a 1940s inspired 3-in-1 pattern including a dress, a blouse and a skirt. I fell in love with the arrowhead pocket detail right away!

This skirt came together surprisingly quickly considering it has so many pieces! There was one small part in the pocket instructions that tripped me up, but that’s probably because I was sewing on caffeine and lack of sleep (you know how that goes). It also took me a few minutes to figure out how to print all of the skirt pieces since half of them are included in (attached to, actually) the B or D cup size dress pattern. I kept ignoring the bust information since I wasn’t making the dress or blouse, and therefore skipping over how to print my front skirt pieces. If I was being overly picky, I would prefer to have the dress, blouse, and skirt set up as separate patterns, but that’s not always the most conservative thing as far as paper consumption goes.

My buttons ended up way off center because my finished skirt was too big (even after using a 1/2″ seam allowance instead of the recommended 3/8ths) and that was my easy cheater way to get it to fit a little better. It doesn’t bother me really, but if you have OCD with symmetry/proportions and your eye won’t stop twitching right now I apologize, haha!

I’ll count this version as more of a wearable muslin, but I do really look forward to making it a second time after some fitting adjustments. Again, I LOVE the little pointed pockets! They’re small pockets, but still completely functional and very adorable. I’d like to use a contrasting print for the facing on them next time. Lots of potential for extra cuteness!

Outfit Details:
T-shirt – Next Level
Skirt – Muse Melissa Pattern
Belt – Thrift Store
Headscarf – American Eagle
Glasses – c/o Victory Optical
(20% off all frames with code LUCKY20)
And helllooooooooooo new hair color! I’m so in love with it!! It’s called Siren’s Song by Manic Panic and it definitely makes me feel like a Mermaid Fairy Seamstress. …which is everything I ever wanted to be when I grew grow up 

This is definitely not my neatest work so that’s another reason why I’m looking forward to sewing a second version. I used some weird stretch polyester twill from the Jo-Ann’s red tag rack, as well as some seriously contrast-y thread. I was trying to use up an old bobbin, and I was definitely too lazy to change my serger thread out (you also know how that goes, I’m sure), so the insides are quite colorful but that’s only for me to see and giggle at

I’m sorry Guys, I didn’t realize my scheduled blog day was the very last day of the pattern sale! It’s definitely a pretty fantastic bundle though so scoop it up if there’s still time! And definitely sew-along for Sewing Indie Month in September!
Also, if you want to see the other patterns in the bundle, in action, stop by and give some love to the other ladies in the tour:
xo
Rochelle
*I received the SIM bundle for free with the understanding that I’d pick at least one pattern to sew and share on this day. I did not receive monetary compensation for this post, nor will I receive a percentage for any bundles sold. All views and opinions are my own. Blah blah blah, law jargon etc etc…
Wildlife researchers have long struggled with removing the human element whenever possible, so as to monitor patterns like mating and migration without getting in the way. Hidden cameras help, but can only provide so much data. In recent years, camera-mounted drones have been considered for research, and the short-term data looked promising; in particular, anecdotal evidence suggested animals weren't changing their activity much with drones flying overhead.
A research team at the University of Minnesota wondered if anything unseen might be happening during drone studies. So they put biologger collars on four adult bears and two cubs, then flew drones an average of 21 meters above their heads (and an average of 215 meters absolute distance) for five-minute spans. The results, published in Current Biology on Thursday, included a noticeable heart rate spike for all flown-over bears while the crafts were overhead.
In those five-minute windows, one bear's heart rate climbed all the way from 41 beats per minute to 162, while the rest of the bears saw beats-per-minute jumps as low as 30 and as high as 80. Still, each bear had the spike in common, along with a resulting drop to a normal heartrate shortly afterward. This came despite a seeming lack of visible response, with the exception of one bear that appeared to react. The bears in the study included two mama bears and their respective cubs; a lone male bear; and a female bear on the verge of hibernation.
Read 6 remaining paragraphs | Comments
Russian Sledgesvia willowbl00

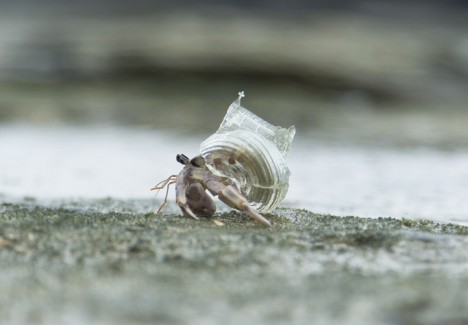
A hermit crab scuttles along the sand, carrying a perfect replica of a Japanese wedding chapel on its back, complete with a tiny spire. After designing a series of crystal-clear ‘crawling cities,’ artist Aki Inomata returns with another detailed architectural alternative to natural shells, rendered in transparent acrylic so we can still see the crab’s body within.
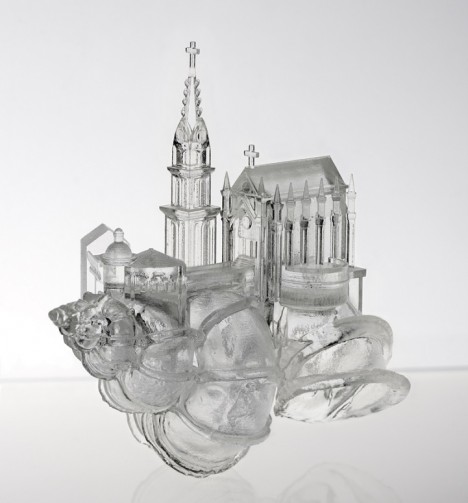
Entitled ‘White Chapel,’ this miniature sculpture is the third installment of Inomata’s project ‘Why Not Hand Over a Shelter to Hermit Crabs?’ The shape will look familiar to Westerners, of course, as we see churches like this practically on every block. But in Japan, such structures are used for weddings only, and rarely for worshipping or any other form of religious services.

“When I visit Western countries, I sometimes notice the origin of architecture, habits, foods, etc… in Japan, they would be transformed into local styles, and I ask myself, ‘are we Japanese living in mimicry of western world?’ says the artist. “For me, these imitations, or I would say reproductions or arrangements of Western-style architecture, seem to reflect identities of post-colonialism inside of Japanese people.”
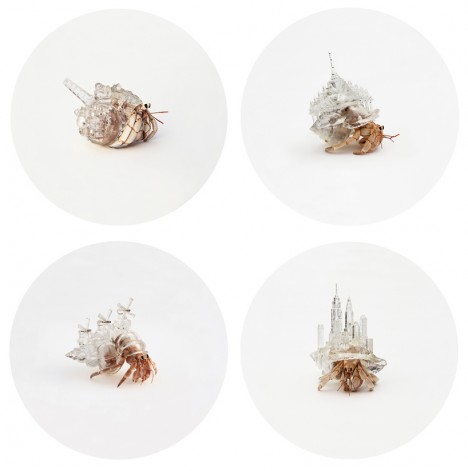
Inomata uses CT scanning to perfectly replicate the interior shape of a natural hermit crab shell so all of her artificial alternatives fit comfortably. Previous versions have included skylines of New York City and Amsterdam, as well as reproductions of buildings in Paris and Tokyo.


Russian Sledgesvia multitask suicide

Holyoke Center, Harvard University, Cambridge, Massachusetts, 1964
(Sert, Jackson & Gourley)
Photograph by Fumihiko Maki, 1964
Russian Sledgesvia bernot


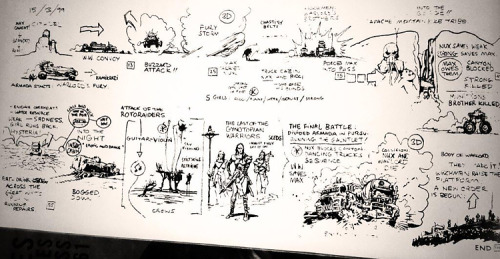
“When we tried to have Max go up to the Citadel with Furiosa, it just didn’t sit right. Hardy felt it. I felt it, everybody felt that.” - George Miller
Russian Sledgesgoing to this because liz coffey said to
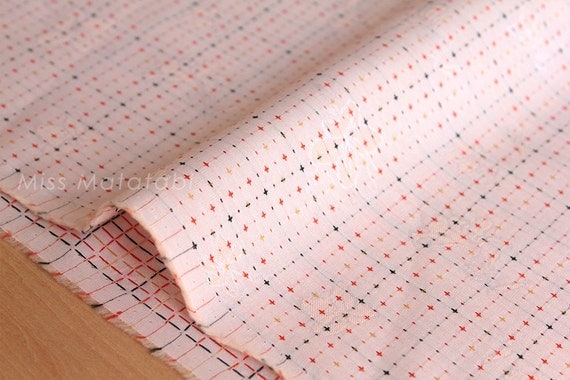
7.00 USD
100% cotton, yarn dyed jacquard shirting.
This fabric features tiny yarn dyed stitches and has a slight sheen. Perfect for garment sewing.
1/2 metre (50cm x 110cm, 19" x 43" wide)
If you would like continuous yardage please change the quantity at the checkout.
Parcels are shipped via small packet international airmail from Japan.
Japan Post does not provide tracking numbers for small packet airmail.
A shipping upgrade with a tracking number and insurance can be purchased
for an additional $5. If you would like to upgrade to registered small packet airmail
please let me know.
Thank you.
All images © Miss Matatabi
Russian Sledgesalso, buy a goddamn edgestitch foot

Topstitching is my secret weapon. It can take a garment from plain to put together, and when executed correctly it can be a stunning detail. I find that so many people are intimidated by this simple technique, because of it’s stand out nature. Mastering topstitching is just a matter of practice and a few key tricks.
Ginger is such a great candidate for topstitching. It offers simple lines, a center front seam, and no drastically curved edges. In celebration of Ginger month here are 8 tips for perfect topstitching.

1) Match the weight of your thread to the weight of your fabric. If you are sewing with a medium weight fabric, chances are an all-purpose thread will do the trick. Denims, canvases, and other heavier fabrics may require more substantial topstitching thread. When working with top stitching thread always use all purpose thread in your bobbin.

2) Working with topstitching thread may require you to change the tension setting on your machine. Low tension settings will result in loose stitching on the wrong side of your fabric. High tension will cause the bobbin thread to be visible from the right side of your fabric. Correct tension will create a well balanced stitch that is attractive from both the right and wrong side.

3) Use the appropriate needle. On medium-weight fabrics where all-purposed thread is being used, try a microtex needle. Microtex needles offer an extra sharp tip that create perfectly precise stitches. On heavy-weight fabrics where topstitching thread is being used choose a topstitching needle. This specialty needle has a longer eye to accommodate thicker thread.

4) Use a slightly longer stitch length. On medium weight fabrics use a stitch length of 3, but heavier fabrics 3.5-4 is more ideal. Using a longer stitch will help you project look neat and uncluttered.

5) There is no need to backstitch when topstitching, as it is a decorative stitch rather than a construction stitch. Backstitching can be visually distracting on your finished garment, and add unnecessary bulk. Instead to combat thread nests, hold onto your thread tails as begin to stitch.

6) Make a plan and stick to it. Draw or print a technical illustration of the garment you are sewing. Take note of where you would like to topstitch and at what width. Cross reference this sketch to your pattern instructions, taking note of when it is the ideal time to topstitch each portion.

7) The contrast of your thread should be directly proportional to your topstitching confidence. If this is your first project featuring topstitching avoid white stitching on black fabric, instead opt for a more subtle color until you have mastered this technique.

8) Practice, practice, practice, I can not stress this enough. Not only to test your stitch setting but also to improve your skill. Sewing is 25% muscle memory, it is hard to be good unless you train those muscles. So even if you are a topstitching pro, make sure to practice on a scrap of fabric to warm up before diving into the real deal.
 Design Detail: Topstitching |
 Basic Maintenance: Tension & Skipped Stitches |
 Tutorial: How to create a hand rolled hem |
Russian Sledgeshey otters
This is a post about a bra.

I grew up with the English dubbed version of Sailor Moon. It was my favourite show and I would watch it endlessly. This was before we could download shows or stream them. I taped tons of Sailor Moon and ran home at various time from school to watch. I was 15/16 when I first started watching. We got the internet around the same time and I discovered that the English dubbed version was pretty different from the Japanese version. Eventually I read the manga and got to watch the Japanese version. I bought Sailor Moon everything and became a hardcore fan.

At 15/16, I bought all of the Sailor Moon mini palaces including the larger moon kingdom palace above. Little chibi Sailor Scouts were a favourite of mine. Sadly, I have nothing left from this era. I loved this stuff, though.
I wasn’t a popular kid growing up. I was a bookworm. Naturally, Sailor Mercury was my favourite. She could kick ass and still get her assignments in on time.
There’s something about the Sailor Scouts for me. The idea of being a young woman and being assertive and strong resonated with me. The show gave me a lot of strength and repaired a lot of my feelings about vulnerability. I wasn’t going to be the victim anymore. I started standing up to bullies and really became the strong woman I am today.
I have been watching the new Sailor Moon Crystal series. I actually really love it. I’m not that far in, though, because the wedding distracting me. I need to catch up!

The bra’s colours instantly reminded me of Sailor Mercury along with the oversized bow. I named her Sailor Mercury and she’s a beauty and strong. I put the bigger bra lower so it wouldn’t be bumpy under whatever dress I am wearing.
This is my best fitting bra yet. I will be tweaking the fit a bit more and more as I make more, but I’m pretty satisfied with this one. It’s super comfortable to wear and has a nice shape and lift.

I’ve gotten mostly rid of the bulk problem in the bottom seam. There is the tiniest of bumps left. I’m going to ask about sheer nylon stabilizers when I am at Bra-Maker’s Supply in a couple of weeks. This should help reduce the bulk in the seam, but make sure I still get the appropriate support.
For this bra, I increased the lower cup a little more and increased the bottom seam of the upper cup. The seam between the two lower cups now sits where it should at the apex. Before the seam wasn’t quite there and definitely contributed to an odd shape. I think for the next one I will increase the upper cup just slightly, because there is still a tiny bit of flatness in the seam between the upper and lower cups. I also increased the band by a little more than a 1/4 on each side. A little bit more than a 1/2 inch in total. I can’t quite remember the amount to be honest. That’s why I am being vague. That was just enough to make it a lot more comfortable for me. My other two are a little bit too tight. I can wear them okay, but after a day my sides pinch a little bit. This one, though, perfection. A bra should be so comfortable that you barely notice that you have it on.


I did a much better job with the straps and hook and eye than I have in the past. The stitching is still not perfect and my machine skipped a couple of stitches, but it’s getting there! They look kind of wonky in the picture above and don’t appear to sit correctly, but on me they scoop perfectly down to the hook/eye and sit very flat. I don’t think I will be working up my nerve to show you a picture of me in these bras. My day job would have a fit about that if it ever got back to them. The back looks great, though, take my word for it.

I did a much better job of making the bridge look nice at the top of the cups. I extended the channeling and used that to cover the raw edges. It also nicely lends a bit more structure to the lace at the top and will help it last.

I also lined the lace! I used stretch mesh with spandex from BMS. It’s definitely going to preserve the stretch lace.

Speaking of the lace, I took the lace off of a nightgown that I had used for a cosplay project last year. The upper part of the nightgown wasn’t needed so I cut it off. The large bow also comes from the nightgown. I made the smaller bows on the straps using the fork method.
The teal blue fabric is duoplex and the band is white power net. Elastic findings are a kit. All these are from BMS.

The insides of my bras are starting to look at lot better. I would still like a way to make the raw edge of the lace look better though. I will be asking about that at BMS.
The final touch I made for this bra was to officially make it Sailor Mercury:


On the right strap at the back, I embroidered a tiny Sailor Mercury symbol to let my geek subtly shine through. Now I have to make sure my strap is showing! ;)
This is my favourite bra yet. I’ll probably be saying that for sew many bras in the future! I have planned out three more bras in terms of fabric combinations and named two with the help of Instagram! I need your help for the last one. :)

Ruby: Black duoplex/elastics/powernet with red lace. Thanks to Maris for naming this one!

Black Raspberry: Black cherry duoplex, dusty rose lace, black power net/elastics, and grey ribbons. Thanks to Elizabeth for naming this one!

Help me name this one!
Fuschia and lilac lace from Arte Crafts, fuschia duoplex, and lilac findings kit.
Update: The name was randomly chosen! Thanks Nicole for Desert Sunset. :)
It’s Lingerie Month over at the Sewcialists blog. Will you be taking part and posting your project to the flickr group for the round up post? I’m definitely posting this!

Russian SledgesI love that today the brattle is screening 'imitation of life' and 'they live'
Russian Sledgesaaaaa need linen yarn-dyed like graph paper now
Pleats are such a classic way to add body to a skirt, but I always assumed they’d be too much of a hassle to sew myself. So when I was recently playing around with a swatch of our Linen Grid fabric, I was pretty excited to have an a-ha moment. It turns out, when you have a woven-in-guide, like the “grid” of our Linen Grid, pleating is a breeze!

As a matter of fact, “breezy” is a good way to describe this entire project. I don’t mean that it’s super easy (it’s more of an advanced beginner/ intermediate project), but rather that every step, from pleating to sewing in the invisible zipper (which is NOT HARD… I swear!), is much simpler than I expected. Plus, the resulting Pleated Skirt is airy, light, and beautiful. It’s a wonderful (and breezy) summer sew!


You will also need an invisible zipper foot and a regular zipper foot for your machine.
Child 2-4 (child 5-7, child 8-10, 28, 30, 33, 36, 39, 42)
SAMPLES: Shown here in sizes child 5-7 (in Dark Graphite), child 8-10 (in Silver Gray, on the model), and 30 (in Glacier Blue, on the model)
Prewash, dry, and press the fabric before starting.
This pattern is very specific to Linen Grid, since we use the woven grid of the fabric to measure the pleats. If you would like to use another fabric, mark the top edge of the Skirt Panel every 1 ½ or 1 ¼ inches before the beginning the “Pleat” section.
Cutting along the grid of the fabric, cut two 29 X 13 (32 X 14, 36 X 16, 40 X 24, 43 X 25, 47 X 25, 51 X 25, 55 X 26, 59 X 26)-inch rectangles. Cut slightly larger, if need be, to make sure that you are cutting right along the grid of the fabric.
Cut one strip 3 X 21 (24, 27, 30, 32, 35, 38, 41, 44) inches.
The Linen Grid fabric doesn’t have a right or wrong side, so assign sides by making a mark on the wrong side with a fabric marker.
Zigzag stitch along one short side of both of the Skirt Panels.
Next, you need to crease one of these zigzagged sides to be a guide for sewing the two Panels together. Here’s how….
If you’re using the Silver Gray color (which has a smaller grid)…
With wrong sides together, fold the zigzagged edge of one Side Panel at the middle of the second row of squares, folding that row in half. Press the fold, then finger press it open. This is the Join Crease. Repeat for the other Skirt Panel.
If you’re using the Glacier Blue or Dark Graphite (which have larger grids)…
With wrong sides together, fold the zigzagged edge of a Side Panel at the middle of the first row of squares, folding that row in half. Press the fold, then finger press it open. This is the Join Crease. Repeat for the other Skirt Panel.

With right sides together, pin the creased end of one Skirt Panel to the zigzagged end of the other Skirt Panel. Line up the grid by placing a pin through the Join Crease at each vertical line of the grid and then into the corresponding line of the grid on the other Panel piece. The photo above shows both size of grids with their Join Creases (in pink) pinned to the other Skirt Panel piece.
Sew the two Panels together along the Join Crease. Press the seam allowances open. From the right side this seam should be almost invisible.
This is the Skirt Panel.
With the Skirt Panel facing right side up and the short sides on the left and right, zigzag stitch along the right short edge. You will start pleating at this right hand edge.


Use the vertical lines of the grid to pleat the skirt. For the Silver Gray grid (above, left), count every other vertical line as one unit. These pleats will measure 1 ¼ inch. For the Glacier Blue or Dark Graphite grids (above, right), every vertical line is one unit. These pleats will measure 1 ½ inch.
Starting at the top right corner, count three units to the left, as shown above. Fold point 3 on top of point 1 (matching up the pink Xs in the photos, above).

Point 2 forms a crease under the pleat.


Pin this first pleat in place at its left and right edges (Silver Gray above, left, and Glacier Blue/ Dark Graphite above, right). Notice that the right edge of the Skirt Panel starts with one un-pleated unit.
Continue pleating in this manner across the whole length of the Skirt Panel. Here’s how…

The point 2 crease of the previous pleat becomes Point 1 of the new pleat, and the next units to the left are Points 2 and 3.

Bring Point 3 on top of Point 1, folding along Point 2.

Pin this pleat into place. Keep folding and pinning pleats into place across the top edge of the Skirt Panel.

Once you have pleated to the left edge of the fabric, measure along the top pleated edge (starting from the right hand side), and make a mark at 20 (23, 26, 29, 31, 34, 37, 40, 43) inches. The left edge must end with at least one un-pleated unit (as shown above), so if necessary, un-pleat the last few inches, re-measure and carefully cut the excess left edge. This cut does not have to be directly along the grid; the important thing is that the measurement is correct and that the cut is straight.
Zigzag stitch the left edge.

Lightly press just the tops of the pinned pleats into place and then, with a ¼-inch seam allowance, sew down the pleats along the pinned edge, being careful to keep the pleats neatly folded as you go.

Flip the Skirt Panel so the wrong side is facing up and press the right-hand zigzagged side 5/8 inch towards the wrong side. This is Side Crease 1.

Flip the Panel so the right side is now facing up and the Side Crease 1 is on the left-hand side. Finger press open the Side Crease 1.
Unzip the zipper all the way so the pull is at the bottom. With the zipper’s wrong side facing up, pin the left side of the zipper to the left edge of the Skirt Panel, right sides together, lining up the edge of the zipper’s teeth with the Side Crease 1. Pin from the top of the zipper all the way to the zipper pull at the bottom.
Attach the invisible zipper foot to your machine.

Notice that the invisible zipper foot has two little grooves on its underside. Starting at the top of the zipper, feed the nylon teeth of the zipper into the right hand groove. The teeth should go into the groove pretty automatically, allowing the needle to sew down the zipper directly next to the teeth.

Sew down the side of the zipper until you reach the zipper pull. Backstitch and cut the thread.

Now, fold the opposite zigzagged edge of the Skirt Panel 5/8 inch towards the wrong side to create Side Crease 2. Finger press the Crease open.
With right sides together, pin the other side of the zipper to the Skirt Panel in the same manner as you did for the first. Make sure the edge of the teeth line up with Side Crease 2.

Starting at the top of the zipper, sew on this side of the zipper by feeding its teeth under the left groove of the invisible zipper foot.
Again, stop sewing at the zipper pull. Backstitch, and cut the thread.

Now that both sides of the zipper are in place, you need to sew together the Panel edges below the zipper. Here’s how…
Zip the zipper up so the pull is at the top. With right sides together, pin together the two side edges of the Skirt Panel. Pin along the Side Creases, being careful to line up the grid. At the zipper’s bottom, pull the loose tails of the zipper away from the fabric so you can pin as close to the zipper as possible.

Now attach your machine’s regular zipper foot and orient it to the left (as shown above). Starting just above where the previous zipper seams ended, sew the pinned edges together along the Side Crease.

Press this seam open, and then sew the last inch of the zipper tape to the right side of the seam allowance, using your zipper foot, as shown above.

Repeat for the left side to tack the bottom down and help keep the zipper flat.

Turn the skirt right sides out and make sure the zipper looks good and is working well.
Attach the Waistband

Press both long edges of the Waistband ½ inch towards the wrong side. These creases are the Waistband Creases. Finger press one Crease open.

Turn the skirt wrong sides out and open the zipper. Beginning at the right-hand side of the zipper opening and with the Waistband’s wrong side facing up, align the open long edge of the Waistband to the top raw edge of the skirt. Leaving a ½-inch overhang of Waistband at the beginning (as shown above), pin the Waistband in place.

Pin across the whole top raw side of the skirt until you reach the other side of the zipper, being careful to keep both sides of the pleats neatly in place as you pin. When you get to the other end, you should have a 1 ½-inch overhang of Waistband.

Sew the pinned edge along the Waistband Crease.

Turn the skirt right side facing out. Pull the Waistband up above the top of the skirt. Unfold the Waistband Crease and finger press the ½-inch overhang ½ inch towards the wrong side, so it is flush with the outer edge of the zipper. Refold the Crease.

Do the same for the 1 ½-inch overhang, folding it ½ inch towards the wrong side to hide the raw end.

Now fold the Waistband over towards the skirt’s right side and pin the Waistband to the front of the skirt through the fold of the Waistband Crease. Pin it so that it is just a hair lower than your previously sewn seam. Keep both sides of the pleats neatly in place as you pin. Pin all the way across the width of the skirt. The short ends of the Waistband will be folded neatly with no raw edges showing.

Edgestitch the Waistband down by starting at the upper left hand corner of the Waistband, sewing down the short-end fold, and then sewing along the pinned edge. Make sure this seam is very neat and that none of the pleats are folded as you sew. When you get to the opposite end, edgestitch up the other short-end fold.

The zipper and waistband should look like the photo above, with a 1-inch overhanging flap on the right-hand side.

Hand-sew two hooks to the wrong side of the 1-inch overhang, 1/8 inch from the edge.
Use a fabric marker or chalk to mark on the other end of the Waistband where the eyes will go.

Orient the straight eyes vertically and hand-sew them to their marked locations.
To hem the skirt, press and pin the bottom raw edge ½ inch twice towards the wrong side and edgestitch the fold down.

You are now done sewing, but if you’d like to press your pleats sharp, here’s how…

Following along the grid and using the top of the pleats to guide you, pin the pleats into place along the bottom hemmed edge of the skirt.

Then, working from right to left press the pleats into place. Pull the Waistband away from you to tauten the pleats as you iron.

Your skirt is ready to wear!


Marilyn Monroe poses as Jean Harlow, Theda Bara, Marlene Dietrich, Lillian Russell and Clara Bow. Photographed by Richard Avedon, 1958.

For many U.S. conservatives, the most important incident of the summer was the July 1 killing of a young San Francisco woman, Kathryn Steinle, allegedly by an undocumented immigrant, Juan Francisco Lopez-Sanchez.
While it was certainly a hot topic before, since Steinle’s death, anti-immigrant sentiment has transformed the Republican presidential primary race. This in turn has once again encouraged moderates in both parties to pursue harsher stances and measures on immigration policy.
How did a single Bay Area homicide end up having this much influence on national politics? What follows is a guide to understanding this summer’s most misrepresented controversy.
Juan Francisco Lopez-Sanchez allegedly shot Steinle, maybe accidentally and possibly under the influence of sleeping pills, with a gun that he’s said he found on the street (this gun, by the way, was reportedly stolen from a federal agent). Lopez-Sanchez had served time in federal prison for illegally reentering the United States after previously being deported. But instead of being deported again after serving that prison term, he was transferred to San Francisco at the request of the Sheriff's Department because of an outstanding warrant stemming from a minor 1995 marijuana arrest.
Lopez-Sanchez was released onto city streets by the San Francisco Sheriff’s Department, which like many local law enforcement agencies, limits cooperation with Immigration and Customs Enforcement under a set of policies sometimes referred to as “sanctuary.” It was after this release that Lopez-Sanchez allegedly shot Steinle.

Here’s where the controversy starts: ICE had issued a request that Lopez-Sanchez be detained, and that ICE receive advance notification of his release. "That detainer was not honored," according to an ICE statement. "As a result, an individual with a lengthy criminal history, who is now the suspect in a tragic murder case, was released onto the street rather than being turned over to ICE for deportation."
Steinle's killing remains obscure to many on the left but has proved cataclysmic on the right, proof that immigrants pose a lethal threat and that left-leaning cities like San Francisco are coddling them. Recall that in his June 16 campaign announcement, Donald Trump declared that Mexico is "sending people that have lots of problems, and they’re bringing those problems with us. They’re bringing drugs. They’re bringing crime. They’re rapists. And some, I assume, are good people."
So when just weeks later Steinle’s killing made headlines, for Trump, it was political gold.
"This senseless and totally preventable act of violence committed by an illegal immigrant is yet another example of why we must secure our border immediately," Trump declared. "This is an absolutely disgraceful situation and I am the only one that can fix it. Nobody else has the guts to even talk about it. That won't happen if I become President."
There may be no more striking example than the Steinle case of the siloing of American political information.By mid-July, Trump had pulled ahead in polls, according to Real Clear Politics.
"Something happened in July to send Trump’s numbers soaring," writes The Atlantic’s David Frum, one of many establishment conservatives who believes the real estate mogul is channeling, however clownishly, legitimate outrage over immigrant crime. "That something may have been the murder of Kathryn Steinle."
There may be no more striking example than the Steinle case of the siloing of American political information. Liberals at least know that conservatives are fixated on Benghazi, even if they can't comprehend why. By contrast, the Steinle killing is practically unknown outside the orbit of Fox News and Rush Limbaugh. For anti-immigrant conservatives, Steinle’s death has seemingly confirmed a number of core beliefs—that immigrants are dangerous, and that the liberal politicians governing "left-wing loony-bin cities" betray Americans and put them at risk.
In reality, Steinle's death is a tragedy that offers no real lessons about immigration, or cities with so-called “sanctuary” policies.
Perhaps the most pervasive idea to come out of the fervor over the Steinle case is this: a dangerous criminal like Lopez-Sanchez should never have been released.
The Washington Post, for example, reported that Lopez-Sanchez "has seven felony convictions since 1991 and has been deported five times from the United States to Mexico." That sure is a lot of felony convictions. But according to ICE, four of those felonies were drug-related, while the other three were apparently for illegal reentry. (You might not know, given the pervasive sense that America doesn't enforce its immigration laws, that a huge portion of the federal prison population is made up of people convicted of reentering the United States without authorization. According to the U.S. Sentencing Commission, the average sentence in 2014 was a not-so-lenient 17 months.)
Lopez-Sanchez, who had just served time for his last illegal reentry, had no (so far as yet) known history of violent offenses. There was no reason, as far as publicly available information is concerned, that authorities should have suspected that he posed a safety risk.
Lopez-Sanchez is frequently said to have admitted that he kept going back to San Francisco because of its “sanctuary” policies.
Marco Rubio, for one, told Fox News that Steinle died because of "liberal local officials who refused to comply with the law," and claimed that Lopez-Sanchez repeatedly "found his way to San Francisco because he knew it was a city and a jurisdiction that would not turn him over to federal authorities."
But it’s not at all clear that this is true. Watch the television interview with Lopez-Sanchez where he supposedly said this. Whether due to a language barrier or other issues, not only is it not clear he understands the question, it’s not clear he understands what’s going on around him.
Even conservative jurisdictions like Finney County, Kansas, are now "sanctuaries" in the sense that they refuse to hold onto immigrants at ICE's mere request. That's because of federal court rulings against such detentions. Over the past year, it has become clear that no city can comply with an ICE request to imprison someone without a sufficient legal basis.
In the case of Lopez-Sanchez, ICE requested that the San Francisco Sheriff both detain him after he would have otherwise been released and that they notify ICE as to his release, according to a copy of a detainer request, using the name of a reputed alias, obtained by CityLab. In San Francisco, the Sheriff not only refuses to honor most such requests for detention but limits notifying ICE about an immigrant's release.
Many, many cities have moved to restrict cooperation with ICE on their own at the behest of law enforcement.San Francisco's policy allows for detainers to be honored if an immigrant has been convicted of a violent felony in the prior seven years, or if there is probable cause to believe they have committed one. The policy is silent on the question of notifying ICE before a release, and this refusal to notify ICE could go beyond what has been required by recent federal court rulings.
The San Francisco Sheriff’s refusal to notify ICE is in line, however, with the spirit of most “sanctuary” policies, which is to stop local law enforcement from routinely facilitating deportations. Notifying ICE of an immigrant's release is effectively facilitating their deportation. Many, many cities have moved to restrict cooperation with ICE on their own at the behest of law enforcement—more than 360 jurisdictions, according to the Immigrant Legal Resource Center. There had long been broad concerns that the Secure Communities program, which shared local jurisdiction fingerprints with ICE, made cops into de facto immigration agents—and thus made communities more fearful of law enforcement and cops' jobs harder.
"The only reason to now notify federal immigration officials of an individual’s release would be to facilitate the release of the individual to the federal immigration officials," Sheriff Ross Mirkarimi wrote in a July 16 letter to San Francisco Mayor Ed Lee, who harshly criticized Mirkarimi in the wake of Steinle's killing. "This would completely circumvent the requirements and intent of the Sanctuary City Ordinance, the Due Process For All Ordinance and lead to unconstitutional detentions."
This is true: If the San Francisco Sheriff's Department had facilitated Lopez-Sanchez's transfer to ICE custody, then he could not have shot Steinle. He would have been either in custody, or in Mexico. You could say, by the same logic, that any crime committed by anyone who had ever committed a previous crime—even for, say, shoplifting—could not have done so had they been given a life sentence without parole. If San Francisco were not a sanctuary city, Steinle might very well be alive. But that does not in turn in any way suggest that cooperation with ICE would make cities safer as a whole.
The point of sanctuary city policies is to stop local law enforcement from facilitating the deportation of those undocumented immigrants who don't pose a public safety risk. And prior to Steinle’s killing, there was no evidence that Lopez-Sanchez was a threat. It will always be the case that some immigrants who seem to pose no threat will ultimately commit a violent crime. The same is true for native-born Americans. Which brings me to another important point.
It's hard to believe that this bears repeating, but: immigrants commit less crime than native-born Americans. This is a fact substantiated by research.
And yet, Republicans this summer have insisted on scapegoating immigrants and sanctuary cities.

"We need to eliminate the sanctuary cities in this country," declared Jeb Bush, the purported immigration moderate, in last week's GOP primary debate. "It is ridiculous and tragic that people are dying because of the fact that… local governments are not following the federal law."
Ted Cruz even went so far as to pledge to “defund” sanctuary cities and boasted of having authored "Kate Steinle's law," which would strip sanctuary cities of some federal funding and hike penalties for illegally reentering the United States after deportation. Similar legislation has already passed in the House.
California Senators Diane Feinstein and Barbra Boxer have also floated the idea of legislation to curb sanctuary cities, and Hillary Clinton criticized San Francisco for standing in the way of deporting "someone that the federal government strongly felt should be deported."
The Obama Administration has opposed legislation but has nonetheless used Steinle's killing as a cudgel to push cities to submit to cooperation with ICE. ICE's new Priority Enforcement Program is replacing Secure Communities. It maintains the same fingerprint sharing mechanism, the only difference being that ICE will mostly request notifications, and not detentions, and has once again pledged to focus attention on serious criminals.
"ICE is now issuing detainers and requests for notification with respect to individuals who meet our heightened enforcement priorities under PEP to ensure individuals who pose a threat to public safety are not released from prisons or jails into our communities," according to an ICE statement. "PEP is a balanced, common-sense approach, that places the focus where it should be: on criminals and individuals who threaten the public safety."
Immigrant advocates worry that the new program will suffer from the same old problems.
"Routine use of notification requests raises the same concerns that immigration detainers (also known as 'holds') do--namely, the undermining of community-police trust and creation of an unsafe environment where immigrant victims of or witnesses to crime fear contacting the police," emails Saira Hussain, an attorney with Asian Americans Advancing Justice-Asian Law Caucus. "These concerns remain the same whether it is local law enforcement facilitating deportation through holding people for extra time on immigration detainers or through notifying ICE of release dates and home addresses."
The San Francisco Sheriff’s Department did make an error, and that was that they requested, for unknown reasons, that Lopez-Sanchez be returned to San Francisco to face marijuana charges so minor and old that they never would have been prosecuted. Steinle’s death is no doubt a tragedy. But politically, if you look at the facts, it signifies nothing.

From the ground, the deadly blast on Wednesday at a Chinese warehouse for hazardous chemicals looked like nuclear armageddon. From space, the disaster remains visible in the form of a nasty, brownish vapor ghosting across the Bohai Sea.
NASA’s Terra satellite picked up on the escaping cloud on Thursday, the same day Chinese President Xi Jinping swore to investigate the ground-shaking eruption in Tianjin. (The latest casualty count is more than 50 dead and hundreds in the hospital.) “The source of the smoke appears to be industrial fires associated with two massive explosions” at the Tianjin port, writes the space agency.

Later that afternoon, the Aqua satellite passed over the area and captured the cloud farther southeast. The trails of gray smoke in both images probably originated from wildfires, says NASA:

Japan’s Himawari-8 weather satellite also observed the movement of the mud-colored miasma:

The Chinese authorities are still trying to figure out what caused the blast. There is reportedly a “chemical odor” lingering in the air, and military materials specialists are working to remove hazardous substances like sodium cyanide from the scene, according to the BBC.

Science has now confirmed what supple-wristed baristas have known all along: People are suckers for latte art. According to a new study published in the Journal of Sensory Studies, customers both expect and are willing to pay more for coffee drinks with a frothy finishing touch.
The study—whose authors include Oxford experimental psychologist Charles Spence and three-time U.K. Barista Champion Maxwell Colonna-Dashwood—consisted of a series of experiments. In the first, participants were shown photos of cappuccinos with and without milk-based art and asked to rate the likability and the expected price of the drinks. Survey respondents expected to like the embellished drink better—and also to pay 11 percent more for it.
These results were supported by a second experiment, which took place in the coffee shop environment. While participants did not report liking the drink with latte art better, they did say they’d be willing to pay up to 13 percent more for it.

Of course, it’s no secret that people love latte art; the proof is in the heftier tips baristas tend to receive for these skill-intensive drinks. But now that this truism is backed up by science, should we expect coffee shops to charge extra for the artistic flourish?
Certainly not, says Peter Giuliano, senior director of the Specialty Coffee Association of America (and a founder of Counter Culture Coffee). The thought of adding a surcharge to drinks with latte art “never even crossed my mind,” he says. “I would be shocked if I saw it as an a la carte sort of thing.”
That’s because baristas consider latte art “part of a holistic approach to quality,” rather than a mere flowery add-on—like, say, the 75-cent squirt of whipped cream or soy milk you’ll find at certain coffee shops that shall remain nameless. Giuliano views latte art as the final link in a production chain that stretches all the way back to the farm on which the coffee was grown. “There's farmers who work on building the flavor of coffee, there's roasters who try to reveal the work of the farmers, and there's coffee buyers [who] find and select and describe the coffee,” he says. “But then it's a barista's job to make it appealing to the consumer. The chain behind them relies on baristas to communicate those things.”
Superficial as it seems, that frothy cloud of concentric circles (or hand-etched portrait, as the case may be) is the last-mile gesture that embodies all the care, attention, and plain hard work that came before. “Latte art exists within a context of caring about presentation,” says Giuliano. In that sense, it’s as integral to a cappuccino as plating is to a restaurant dish.
For Giuliano, the study affirms that baristas can, with a practiced flick of the wrist, increase the way customers value coffee. “Latte art is just one of those symbols that shows that the barista cares,” he says.
Top image: CoffeLover/Shutterstock.com.
Russian Sledgesvia Ibstopher
A Reader submitted this gem of a spam email:
We are giving away $100 or more in rewards for citing us in your publication! Earn $100 or more based on the journal’s impact factor (IF). This voucher can be redeemed your next order at [Company] and can be used in conjunction with our ongoing promotions!
How do we determine your reward?
If you published a paper in Science (IF = 30) and cite [Company], you will be entitled to a voucher with a face value of $3,000 upon notification of the publication (PMID).
This is a new one on me.
Russian Sledgesvia baron
Russian Sledgesvia rosalind
bring me space lettuce

[Rendering via Simon]
You may have noticed that the Prudential is undergoing major changes, what with Eataly taking over the Food Court. Well, there are major changes coming for the Prudential Mall's significant other, too.
Come September, Copley Place is getting renovated.
You may be used to the comely classical music that often wafts through the main thoroughfare, as well as that yellowish brown marble that permeates the interior palette.
 [Rendering via Simon]
Well, the music may stay, but that color will not. Property owner Simon has released renderings, which show a super bright interior. Other enhancements:
· New flooring throughout the center that will showcase a unique blend of stone, stone mosaic, and porcelain
· New ceiling treatments
· Upgraded escalators including the addition of a new escalator in the Neiman Marcus wing that will connect shopping levels 1 and 2
· Glass handrails to enhance visibility to the upper shopping levels and 16-foot retail storefronts on level 2
· Updated restrooms, with a new family restroom on the first level
· Upscale fast casual dining
· Energy-efficient LED lighting that will complement the recently unveiled Electric Vehicle · Fast-Charging Freedom Station
· A more modern look throughout the entire shopping center
Office space upgrades began last year, which should finish in 2015. Most mall enhancements will finish up by summer 2016, though all will stay open while work is being done. Simon will begin to upgrade the Southwest Corridor along Dartmouth Street, which has to be completed prior to the a 52-story residential Copley Tower construction. This work will include alternate and improved accessibility into Copley Place via an elevator.
 [Rendering via Simon]
Stores are moving around and coming in. Versace, a slinkier, edgier brand is one that Boston could potentially use more of. A list includes:
· CH Carolina Herrera (Opening August 2015)
· Versace (Opening Spring 2016)
· Moncler (Opening September 2015)
· EILEEN FISHER (Relocated)
· Banana Republic (Relocated)
· L.K. Bennett (Expanded current location)
· Tory Burch (Expanded current location)
· Simon Announces Major Renovation Plans for Copley Place [BisNow]
· Major Retail Changes Are in Store for Copley Place [BostInno]
· Copley Place [BRA]
Russian Sledgesvia saucie
This song is a vessel.
It carries the unbearable anguish of millions.
We recorded it to channel the pain, fear, and trauma caused by the ongoing slaughter of our black brothers and sisters. We recorded it to challenge the indifference, disregard, and negligence of all who remain quiet about this issue.
Silence is our enemy. Sound is our weapon.
They say a question lives forever until it gets the answer it deserves …
Won’t you say their names?
Russian Sledgesvia saucie
eyebrows that upstage idris elba
I am a simple woman, with simple joys.
They're writing songs of love, but not for bees
A lucky star's above, but not for bees
With love to lead the way, I found more skies of grey
Than any Russian play could guarantee
I was a fool to fall, and get that way,
Heigh-ho, alas, and also lack-a-day
Although I can't dismiss
The memory of her kiss
I guess she's not for bees
***
All of bees
Why not take all of bees
Read more Torch Songs Where The Word “Me” Has Been Replaced By “Bees” at The Toast.
Russian Sledgesvia ThePrettiestOne

"The defendant rolled down the window and said 'I know why you stopped me.' The defendant then made reference to the events in Ferguson, Missouri," according to the criminal complaint.In the meantime, be black and:Joseph Parker, 34, in a wild rant, threatened to kill police, then pounced, police said. He punched 57-year-old Lt. Jeremian Goodwin, knocking him out.
From the overnight scene to lockup, Parker allegedly injured seven officers. The police chief says the man battled, nearly breaking the metal detector.
Sell cigarettes, get killed
Play at a park, get killed
Shop at Walmart, get killed
Walk with friends, get killed
Go down the stairs, get killed
Come home from work, get killed
In all of those cases, and in hundreds more like them, unarmed African Americans who posed no physical threat to police were killed by law enforcement.
Yet this man, Joseph Parker, injured seven police officers and sent two to the hospital?
This, ladies and gentlemen, is your America.
Russian Sledgesvia multitask suicide ("!!!!!!!!! This is actually impressively good")
saved for lunchtime viewing
R. Kelly's modern masterpiece gets the metal treatment.
The post It’s the Heavy Metal Version of R. Kelly’s “Trapped in the Closet” You Always Needed appeared first on MetalSucks.