Shared posts

10 Jun 21:36

Kodak’s Problem Child: How the Blue-chip Company Was Bankrupted by One of Its Own Innovations

by Kenny Suleimanagich

Kodak’s Problem Child: How the Blue chip Company Was Bankrupted by One of Its Own Innovations

Rochester, New York — The cold hits me as soon as I leave the Amtrak station, stepping into a swirl of snow eddies that etch the low streets in black and white.

The terminal sits just outside the city center. In the short car ride into town, one building stands out to me from all the others. It is an impressive beaux arts landmark with five large letters, glowing in red, resting at the top:

K-O-D-A-K

George Eastman invented casual photography here in the 1880s, made a fortune, and built a small town into a city. Millions of people around the world “pressed the button” and for more than a hundred years, Kodak “took care of the rest.”

At its peak, in 1996, Kodak was rated the fourth-most-valuable global brand. That year, the company had about two-thirds of the global photo market, annual revenues of $16 billion, and a market capitalization of $31 billion. At the time of its peak local employment, in 1982, the company had over 60,000 workers in Rochester, most of whom worked in Kodak Park, as it’s known to employees and locals. The campus, a private city within the city, sprawled over 120 acres with its own power plant and fire department, once stood as a monument of imaging and innovation. Today it still stands, but vastly scaled back from the days when film production was at the core of Kodak’s work.

Kodak’s Problem Child: How the Blue chip Company Was Bankrupted by One of Its Own Innovations I traveled here in late January to see firsthand the slow, unstoppable, excruciating decline.

With a bitter blizzard hammering down in upstate New York, a bankruptcy judge had just approved a proposal to resolve a big chunk of Kodak’s $6.8 billion in debt and pave the way for it to emerge from Chapter 11 after more than a year of insolvency. The company expects to finalize the process and exit bankruptcy protection in the third quarter of this year.

I headed to a diner, and was immediately greeted with a banal tableau of defeat — the first of many variations on the theme that unfolded during my visit.

Two middle-aged men sit at the table next to mine. One wears a KODAK PHOTOFINISHING PRODUCTS sweatshirt. He drowns his coffee in cream and spoons in sugar while his friend peruses a headline in the Democrat and Chronicle, a local paper. On the front page is news of the sale of thousands of Kodak’s digital-imaging patents to a consortium led by Apple, Google, and Microsoft. The price is a fraction of the $2 billion that Kodak executives thought the patents would bring, but it will help buy time as the cash-poor company pursues its reorganization plan.

Among other things, Kodak CEO Antonio M. Perez is betting his commercial-printing business on high-volume customers who need a lot of ink, like product-packaging manufacturers. Even if this latest “pivot” is successful — and a lot of people think it’s a stretch — the company would be reduced to helping other people make the boxes used to ship the devices that will take the photographs of the future.


There is a certain tone that former Kodak employees take whenever I asked them about the 1980s and ‘90s, a time within easy memory when Kodak ruled the film-imaging universe. It falls somewhere between baffled and resigned, especially for those whose careers were curtailed by years of fruitless restructuring.

I had come to Rochester to meet Ron Andrews, a chemical engineer who was laid off in 2005 when the company first began to phase out the film-manufacturing business he’d worked on for more than thirty years. The film that he helped refine and develop, Kodachrome, was finally discontinued in 2009. For nearly seventy-two years, Kodachrome was the crown jewel of the color-film portfolio. Photojournalist Steve McCurry used it to shoot the now-iconic June 1985 National Geographic cover, an image of a wide-eyed Afghan girl. Today, it is just another discontinued film stock.

Andrews calls himself a victim of “technological substitutions,” but it is clear that he carries very deep and divided feelings about Kodak, both the company where he had worked since graduating college in the early 1970s and the company that stumbled and had no place for him in the end.

“In retrospect, it was probably a good time to leave,” he recalls when we meet, in the lobby of the Radisson Hotel. “Everybody else was sitting around plotting their endgame.”

Andrews was part of the old school of innovators that first made possible the “Kodak Moment” — optical engineers and mechanics, who built cameras, and chemists, who manipulated molecules that froze light and fixed it in gelatin and paper.

By the late-twentieth century, molecules were at the heart of Kodak’s business, so much so that its chemical division — divested in 1993 — continues as an R & D and earnings powerhouse today, with $8.6 billion in revenues in 2012.

Chemistry was work that Eastman himself, with one foot still planted in the nineteenth century, well understood. Over the span of about a decade, the Kodak founder invented the first practical roll film and then built the first cameras that could reliably use it. Never again would photography be a cumbersome process, the domain of professionals only.

Kodak’s Problem Child: How the Blue chip Company Was Bankrupted by One of Its Own Innovations kodakpatent

The original patent Eastman filed in 1888

In his original patent, he wrote that his improvements applied to “that class of photographic apparatus known as ‘detective cameras,’ ” — concealed and disguised devices, made possible by a new wave of miniaturization, that were used mostly for a lowbrow entertainment: snapping pictures of people unaware. Cameras equipped with single-use chemical plates were hidden in opera glasses, umbrellas, and other everyday objects, and sharing the surreptitious, random, and sometimes compromising photos that resulted became a popular fad.

Eastman, in other words, was obsessively tinkering with what many people at the time would have considered a cheap novelty or a toy. Like Netflix in its early days, Kodak relied on the U.S. Postal Service: Customers sent their spent cameras to Rochester, where the film was removed, processed, and cut into frames; the resulting negatives and prints, along with the camera, reloaded with a fresh roll of film, were returned to the sender. Suddenly it was easy for anyone to take lots of pictures, and Eastman’s new business became a juggernaut almost overnight.

About ninety years later, another tinkerer in Kodak labs would create an integrated circuit that turned light waves into digital images. It too would be labeled a toy by the few people who saw it. It too would eventually launch a huge new business all but overnight. But this time, Kodak wouldn’t be part of it.


How is it that big, established companies fail to recognize and seize new opportunities? When I first started wondering about this problem and what had happened at Kodak, I e-mailed Raymond Demoulin.

Demoulin started “at the lowest rung” at Kodak in 1954 and eventually rose to become vice president of professional imaging from 1986 through 1993. He has long been identified as an early — though mostly ignored — advocate of the digital-imaging revolution inside the company.

Dubbed “Saint Raymond” — in earnest or ironically, depending on who’s talking — Demoulin retired more than a decade ago. But he’s continued to follow the news at Kodak from a distance, and he has expressed some voluble opinions.

Through Demoulin, Andrews, and several other former Kodak engineers and scientists, I began piecing together an oral history — sourced from the largely overlooked circle of Kodak’s original digital innovators — of what may be one of the greatest gambits in the history of technology to have been declined; whisked away by executives in denial of the impending doom for film photography.

In the course of our correspondence, Demoulin sent me copies of two business reports he’d written going over Kodak’s collapse in a point-by-point analysis.

According to his numbers, a roll of film that cost one dollar to produce was marked up 800 percent, which allowed the company to generate its enormous profits. This drove the company’s growth, he argued, but eventually it turned into a trap when managers, addicted to the revenue, ignored clear signs that the market was shifting to digital and the end of the old way was in sight.

“They were in denial all the way,” he says. “They didn’t want to give up a 90 percent market in film to have a 10 to 20 percent market in consumer electronics.”

Kodak’s Problem Child: How the Blue chip Company Was Bankrupted by One of Its Own Innovations

Demoulin at the Center for Creative Imaging, 1992. ©Benjamin Magro


Kodak’s worship of film is still alive and well and on display at the George Eastman House Museum. Situated in the picturesque old Park Place neighborhood of Rochester, it stands in stark juxtaposition to the derelict and demolished buildings of Kodak Park. Eastman House has a large collection, covering most of the key photographic advances over more than a century of innovations, many of them by Kodak: the first 16-millimeter movie camera; a plethora of the Brownie and Instamatic models; the device used by NASA to take the first photographs of Earth from outer space.

Two oddballs stand out. One, the Nikon DCS-100, is an old film SLR outfitted with a fat electronic umbilical cord attaching it to a grey box — a storage device that, aside from the tininess of tiny capacity, isn’t that much different in principle from the one in a smartphone today. The other, a Canon, has a built-in attachment serving the same purpose that about doubles its usual size.

They’re examples of the first marketable digital cameras, and Kodak designed them both.

Kodak’s Problem Child: How the Blue chip Company Was Bankrupted by One of Its Own Innovations

A 1991 advertisement for the Nikon DCS-100, marketed for professionals.

In an early 1980s interview with the Democrat and Chronicle, then CEO Colby Chandler was asked to predict where he saw Kodak in ten, twenty-five, and fifty years. Uncertain, he responded that Kodak’s work had always been with the “miracle of the molecule,” and it would continue to be in the future. In fact, images were already being organized as bits of information and the molecule was, inexorably, on its way out.

The tipping point had come years earlier, in 1975.

That year, Steve Sasson was a 25 year-old electrical engineer working in Kodak’s Photographic Research Laboratory. His assignment was not considered pressing or significant to anyone but himself, his team, and his supervisor: the task was to find a way for captured light to be converted into an electronic signal with a numeric, or digital, value.

For digital imaging, this was the genesis.

To many people at Kodak who were not involved with the project, Sasson’s camera looked more like a device built by a hobbyist, recalls Robert Shanebrook, a retired Kodak employee who worked near the research lab at the time. It was impressive and interesting, they thought, but it was a toy, like their Instamatic plastic cameras. “Electronic photography was certainly paid attention to by some, but many didn’t think much of it,” he recalls.

Analysts have pointed to a number of factors in Kodak’s fall, from general mismanagement to poor financial decisions. Its divestiture of Eastman Chemical stripped billions in cash flow that might have propped it up as it struggled to make the transition to digital. Others point to antitrust suits that hampered the company for decades and opened the door to rivals. Some of those, notably Fuji, were able to manage the analog-to-digital conversion successfully.

To the people in the trenches, like Demoulin, the failure always comes back to the same key error: Kodak, they say, suffered from a fundamental breakdown between, on one side the engineers and tinkerers — many of whom saw the digital future clearly and fought to bring it forth — and on the other the top management, whose interest remained fixed on molecules and the miracle of near-monopoly profits.

Demoulin told me about watching a team in 1980 demonstrate a scanner-printer that converted film images to digital. “That’s when I thought: This digital thing is going to happen,” he recalls. His place at the helm of the professional-imaging division allowed him to autonomously invest in developing a digital still camera, and he says he pursued that vision, despite lukewarm support from the company.

“Very few companies have been successful in straying away from the expertise of its employees,” says Andrews, who works today as a senior engineer at Bausch and Lomb. Many Kodak alumni, like Andrews, found work at smaller tech-based companies that filled the employment vacuum and averted a repeat of Detroit and the automobile industry.

As demand for electronic photography slowly grew through the 1980s, the Electronic Photography Division (EPD) became the catchall for a new generation of Kodak engineers trained not in chemicals, but computer science. Engineers like Bruce Rubin began working at EPD in 1987, when printers and film scanners were being developed to transmit data through telecommunication channels; these devices were part of how the Tiananmen Square photographs were leaked.

Kodak’s Problem Child: How the Blue chip Company Was Bankrupted by One of Its Own Innovations

Kodak engineers posing with thumbs up, 1989. Scan courtesy of Peter J. Sucy

But as exciting as the work was, it led to frustration and a disconnect between executives and employees. “One of the things that always drove me crazy,” Rubin remembers, “was when a proposal was denied because either somebody else was doing it, or nobody else was doing it. There was no wiggle room…[unless] Fuji was doing it too.”

Peter Sucy, another computer engineer at Kodak, describes the rarity of computers in the workplace in the late 1980s. “Almost no one had a computer at their desk,” he recalls. When the Macintosh II was announced, packed with new state-of-the-art features, he had to buy one himself. With a $3,000 price tag, it allowed him to do things with images he could not do before, including digital photo editing. Based on those exhilarating experiences, he began making proposals for products that could expand Kodak’s reach in digital platforms.

Sucy’s biggest hurdle, he asserts, was the head of marketing at EPD, who exemplified the disconnect between manager and engineer. “He used an Underwood typewriter to send out weekly missives,” Sucy recalls. “He told my boss to tell me to stop writing computer proposals, because Kodak would never be a computer peripheral company…not on his watch, at least.”

Undeterred, Sucy continued developing products using a clandestine approach, giving them code names that “didn’t sound like computer products.”

The subterfuge helped them bring some experimental products to market, but then they encountered a new problem they hadn’t expected: No matter what they came up with, nothing digital would sell. To consumers, everything was too expensive, and to professionals, the quality was not yet good enough. “It was a difficult thing to market,” Sucy admits, “especially for people who didn’t have any kind of experience marketing this kind of product; people who didn’t really know what it did.”

In the end, being early did not help, because the market simply wasn’t ready. As obvious as the endgame was, Kodak’s leaders were faced with an unwinnable predicament: either keep investing in end-of-life products until the profits dried up — and die over the long run; or switch to stillborn product lines that produced mostly red ink in the ledgers — and die immediately.

Chris Anderson, former editor in chief of Wired and founder of 3D Robotics, a designer of DIY drone kits, has written extensively about business models in the digital age. I asked Anderson about his thoughts on Kodak’s bankruptcy, and told him about the Electronic Photography Division, how the engineers had developed a four-megapixel sensor by the late 1980s. How did Kodak fail to convert such a massive head start into success?

“Who could afford that?” Anderson fired back, unimpressed. “Macs were really expensive. Computing technology couldn’t have kept up until much later.”


When Kodak finally entered consumer photography in force, at the end of the 1990s, it did so as a dominant brand in a growing market. They produced cameras that were forerunners technologically and in 2003 were best sellers — but, crushingly, had to sell them to consumers at a loss of up to sixty dollars apiece.

The company threw its remaining R & D muscle at a dizzying array of digital-imaging technologies and products, notably scanners and printers. Though Kodak was still loaded with cash and patents, it now needed a hit product to push it back into profitability, a situation that led it to attempt ever more desperate strategies. The depressing reality is painfully visible on YouTube. In videos posted of building demolitions in Kodak Park from the late 2000s, chipper executives doggedly proclaim a bright future ahead during festivities attended by crowds of locals who came to witness the creation of rubble and dust.

Not everyone felt like partying.

Kodak’s Problem Child: How the Blue chip Company Was Bankrupted by One of Its Own Innovations

Freezeframe from video of Building 23 being demolished.

“As a Kodak retiree who worked in Building 9 as well as many others in Kodak Park…I see no reason to celebrate the destruction of what was once a Fortune 500 company asset,” comments Harry Trulli in an online post about one well-attended blast. “I want to cry when I think of the future of our country.”

Instead of finding new opportunities, Kodak faced even more disruption as the consumer camera market moved into phones, and nimble start-ups pounced on social photo-sharing opportunities. In a matter of months, Instagram went from start-up to Facebook acquisition with a valuation of $1 billion— more than twenty-five times Kodak’s recent market capitalization of about $40 million.

“Even if Kodak went into [digital] wholeheartedly, things would remain the same,” says Anderson. “It’s a fact that they were too early, and inevitably doomed.”

Kodak’s Problem Child: How the Blue chip Company Was Bankrupted by One of Its Own Innovations

The Kodak Tower

The day I left Rochester, the blizzard was spent and the city was returning to its quotidian hum. From my seat on the train, the Kodak Tower loomed tall in the window overlooking the city, much as it must when it was first built, in 1916. As we pulled away from the station, it blended before long into the newer buildings around it, and disappeared.


About the author: Kenny Suleimanagich is a multimedia journalist focusing on media and culture. He received his masters degree in Journalism from Columbia University, where he concentrated in Digital Media storytelling. He enjoys writing everything from film reviews to live-blogs, and favors being behind the camera instead of in front of it. This article originally appeared here.

10 Jun 17:12

PQI unveils upcoming micro-USB OTG drives and accessories

by Richard Lai

Image

Taiwanese flash memory specialist PQI had quite a big presence at Computex, and luckily for us, it also brought along several new products to show off. The biggest bunch from the lot were the company's new Connect 200 and Connect 300 series micro-USB OTG dongles, most of which offer memory expansion that will come in handy for microSD-less devices. Do bear with us while we go through all six of these products.

Filed under: Peripherals, Storage

Comments

10 Jun 17:00

In your bag No: 538 – N.K.S. Chow

by Bellamy


In your bag No: 538, N.K.S. Chow
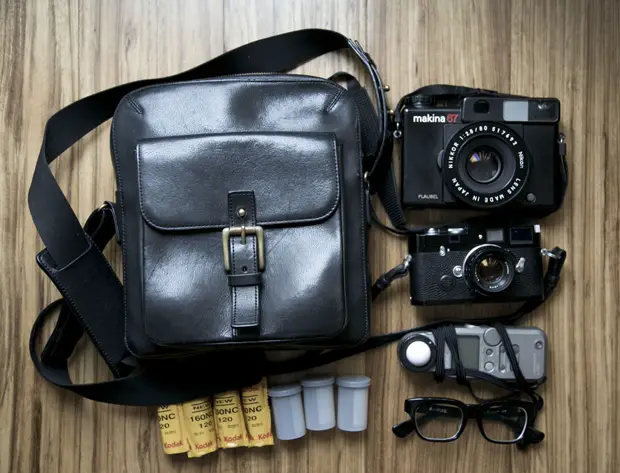
Todays bag sounds like something a superhero (or supervillan as the case may be) would carry. N.K.S. Chow is also carrying one of the cameras that I want more than any other, the stunning Paubel Makina 67. Man, what a camera, everything about is is remarkable. I love this stealthy bag and I hope you enjoy it too.

This is N.K.S. Chow from Hong Kong and here is a picture of my photobag, which does not look like a photobag at all. This allows me to take it on my business trips and pretty much everywhere I go, and when I meet with clients, all suited up, they won’t know that I have something else entirely on my mind.
What you see here is the very tip of the iceberg and i tend to leave my other 35mm and MF cameras at home, usually after packing, unpacking and repacking again my bag many times over. I have a weakness for light and unfussy camera bags which means that I usually walk out of the door with my Leica a la carte, mounted with a 35 pre-aspherical summilux – one of the smallest lenses ever made by Leica, with an incredibly dreamy character -, as well as my Plaubel Makina, possibly the most compact MF camera ever.
The Leica is usually loaded with Tri-X while I favour Portra NC 160 for the Makina. These cameras accompany me when I prowl the backstreets of Jordan, Yau Ma Tei and Mongkok and on my many business trips to Japan, Taiwan and Europe. I don’t have a website, but my self-published books can be found at Komiyama-shoten in Tokyo’s Kanda district, as well as at AO Bookstore in Chaiwan, Hong Kong.
Best wishes,
N.K.S. Chow

Thanks for sharing your bag with us N.K.S. I only wish that you had a site so that we could see some more of your work. If you want to send me a photobook I can feature it and share it with others.
Please come and comment and enjoy the bag.

Keep them coming folks, we need more submissions, so get your bag on Japancamerahunter.com. Send me a hi resolution image of the bag (please make sure it is horizontal) and its contents, with some details about yourself and what you shoot. Oh and don’t forget your contact details (twitter, flickr, tumbler et al). Send the bag shots here.

Cheers
Japancamerahunter

09 Jun 11:22

College Researchers Unveil Robo Raven, a Robot That Flies Exactly Like a Real Bird

Researchers at UMD have developed an incredible robot that's so realistic that bystanders may easily confuse it for a real live bird. John Gerdes, a mechanical engineer, says that "seagulls, songbirds and sometimes crows tend to try to fly in a formation near the bird during testing, but birds of prey, like falcons and hawks take a much more aggressive approach." Continue reading for a video and more information.

09 Jun 11:07

Hyrel 3D introduces new extruder for printing with Clay, Plasticine & Play-Doh #3dthursday

by Matt

Hyrel 3D introduces new extruder for printing with Clay, Plasticine & Play-Doh, from 3Ders.org:

Atlanta-based Hyrel 3D has created a new extruder, which can print with Clay, Plasticine and even Play-Doh and RTV Silicone.

According to Daniel Hutchison of Hyrel 3D, this HYREL Emulsifiable Extruder (EMO1) has several advantages including:

  • The cartridge-based system, which the user can load themselves.
  • The ability to reuse the material. Thus it has a very low impact on the environment.
  • Modular, using Hyrel 3D’s patent pending interchangeable head technology.
  • Currently operated at room temperature, with no extra heat requirements, therefore no chance of getting burned.
  • Perfect for schools – from Elementary up!
  • Does not require a homogenized build environment (air ducts do not affect the prints).
  • Safe and Non-toxic (clay, plasticine & Play-Doh).
  • Variety of materials is virtually limitless

Read more.


649-1
Every Thursday is #3dthursday here at Adafruit! The DIY 3D printing community has passion and dedication for making solid objects from digital models. Recently, we have noticed electronics projects integrated with 3D printed enclosures, brackets, and sculptures, so each Thursday we celebrate and highlight these bold pioneers!

Have you considered building a 3D project around an Arduino or other microcontroller? How about printing a bracket to mount your Raspberry Pi to the back of your HD monitor? And don’t forget the countless LED projects that are possible when you are modeling your projects in 3D!

The Adafruit Learning System has dozens of great tools to get you well on your way to creating incredible works of engineering, interactive art, and design with your 3D printer! If you’ve made a cool project that combines 3D printing and electronics, be sure to let us know, and we’ll feature it here!

09 Jun 10:53

Retro Roomba (1959)

by adafruit

Shorpy 04107U1
@Shorpy via BB.

“Anne Anderson in Whirlpool ‘Miracle Kitchen of the Future,’ a display at the American National Exhibition in Moscow.”Kodachrome by Bob Lerner for the Look magazine article “What the Russians Will See.”

09 Jun 10:27

How to use Chrome’s serial API to talk with Arduino

by Zoe Romano

Api chrome

Adobe’s evangelist Renaun, created a video to explain how to use Chrome’s serial API to talk with an Arduino board as well as receive data from it. You just need to run this sketch file on your board and then run the code in Chrome. Watch the video below to hear Renaun commenting the code!

09 Jun 10:23

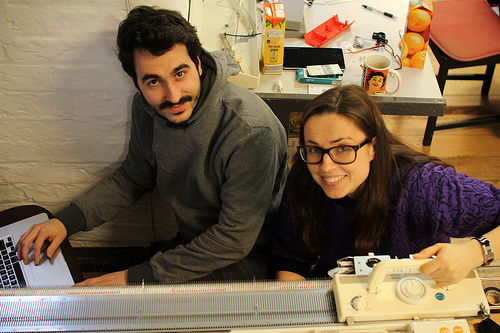
Knitic project, or how to give a new brain to knitting machines

by Zoe Romano

knitic - Varvara&Mar

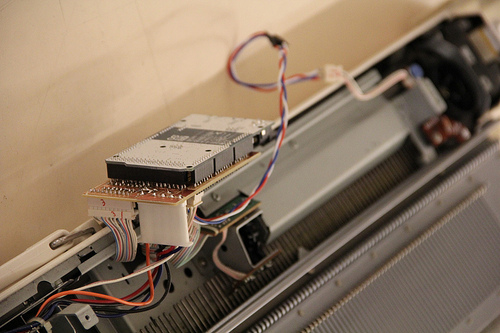
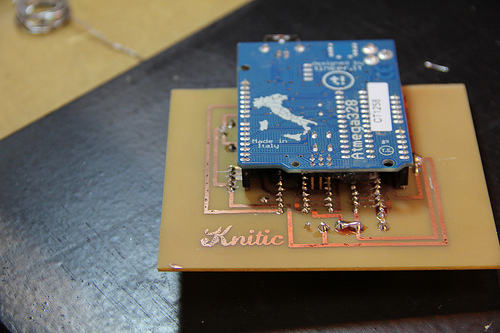
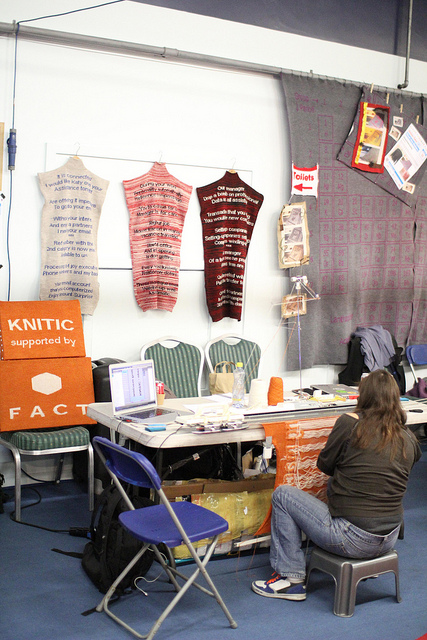
Knitic is an open source project which controls electronic knitting machines via Arduino. To be more precise, Knitic is like a new ‘brain’ for the Brother knitting machines allowing people to create any pattern and modify them on the fly. Knitic kit is composed by an Arduino Due, a diy printed circuit board on top of it, connected to the electronic parts of the original machine, (like end-of-line sensors, encoder, and 16 solenoids) and a software to control the needles real-time.

knitic - Arduino Due

In the past days I interviewed Varvara & Mar, the duo who developed the project. They’ve been working together as artists since 2009 and their artistic practices lay at the intersection between art, technology, and science. When I run into their project I immediately liked their approach as they see knitting machines as the first real domestic fabrication tool, that has been  overlooked in the age of digital fabrication.

Check the tutorial above and then below some answers to the questions I sent them.


How come you got interested in knitting?
Everything started in January 2012. We had an idea to knit poetry from spam emails. Hence, we were invited to the 3-month-long residency at MU gallery in Eindhoven and 1-month residency with solo exhibition at STPLN in Malmö,  to develop our project. After seeing MAKE magazine article on hacked knitting machine by Becky Stern, we thought it’s easy and fun to do the hack. Well, we had a bit underestimated the complexity of the project, but finally made more than one knitting machines work and started also Knitic project.

How and why did Arduino become useful to your project?
Arduino is A and B in our work. It means we use Arduino for many purposes, and to be honest, we don’t imagine our lives without it.
We applied Arduino already in our first hack of knitting machines, when floppy emulation script didn’t work for us, since we had 940 and not the 930 machine. Hence, we connected all buttons of knitting machine keypad to Arduino and were able to program knitting machine automatically.
In terms of Knitic, Arduino has a key role, because it gets the outputs of sensors, energize the right solenoids according to the pattern, and communicates with Knitic program written in Processing.

knitic
Some weeks ago you were at Maker Faire in Newcastle : which type of people got interested mostly about Knitic? 
Interestingly, the most interested group of people were Dutch educators and the ones connected to creative industries. Also people from local hacklabs were very interested.

In some of your presentations you said that knitting and some other more crafty practices are a bit overlooked by fablabs and makerspaces, why do you think is it like that? Is it a matter of gender balance or there’s something more?
We think it is mainly because of the gender and also because MIT, where the  concept of fablab comes from, is dominated by engineers and architects, who saw more potential in hard-surfaced object fabrication, like 3d printing, laser cutting, CNC, etc. Plus there is not much information about hacking and developing open source knitting or sewing machine online. But we hope that things are slowly changing and soon lots of makerspaces will have knitting machines and other tools for handcraft. Hence, we think Knitic is an important example for re-empowering crafts with novel digital fabrication approaches.

knitic - Makerfaire

I have a knitting machine at home and I realized you need a lot of patience to make it work, but then it’s fun. Do you think that these hacks could lower the barriers and make it more attractive to less nerdish types?
We don’t think that knitting requires more patience than 3D printing, for example. To be honest, with knitting one is able to achieve first results much faster than with a 3D printing machine. To learn a new skill always requires some time investment.

In your opinion, what type of micro-business connected to these knitting machines could flourish in the next years?
Good question. Definitely, custom made knitwear. At the moment, there are no services which are offering knitwear (sweater, scarf, etc) with your own pattern and letting you chose the yarn type. There could be also  lots of interactive knitting and unique pattern generations. For example, we are working on a project called NeuroKnitting right now.
Soon we’ll make more information available on it. In addition to that, there is another business option that is open hardware in the form of Knitic Kit (pcb and components) or, why not, the whole knitting machine.

Thank you!

08 Jun 09:38

iam8bit Entertainment System retro gaming console / art project to debut during E3

by Richard Lawler

iam8bit Entertainment System to debut during E3,

The iam8bit collective has presented intersections of art and old-school gaming frequently over the last few years, and at an LA event during E3 this hand-built console will join the show. Designed "specifically with retro gaming in mind" and put together by artist Travis Chen, the iam8bit Entertainment System's hardware specs will be revealed at its public launch Friday night. The systems will be made available for purchase both in person and online, although price is still TBA just like the heavyweights from Microsoft and Sony. Is the promise of a retro gaming PC featuring some classic wood paneling not enough to draw you in? The exhibition also features work from more than 80 artists plus a real-life replica of Uncle Scrooge McDuck's money bin to celebrate Ducktales: Remastered. It's scheduled to run until June 30th, take a look after the break for the location and time.

Filed under: Gaming

Comments

Source: iam8bit

06 Jun 17:04

Graveyard Girls: A Photo Shoot with a DIY Dam, Water, Milk, and Flour-Covered Girls

by Kyle Thompson

Graveyard Girls: A Photo Shoot with a DIY Dam, Water, Milk, and Flour Covered Girls graveyardgirls1

I’ve been living out of my car and driving all over the country to create new work. This past Sunday, I stopped near Nashville, Tennessee to see my friend and fellow photographer Marissa Bolen. While there, we collaborated to put together a photo shoot — a shoot that involved a homemade dam, water, milk, and girls covered with flour.

We found this huge hole in her backyard with a small puddle of water in it. We had some friends come over and help build a dam, and remove any roots and plants that would block the shot.

Once we dammed it up, we filled it up with water, and bought everything necessary for the shoot:

Graveyard Girls: A Photo Shoot with a DIY Dam, Water, Milk, and Flour Covered Girls bts1

Graveyard Girls: A Photo Shoot with a DIY Dam, Water, Milk, and Flour Covered Girls bts2b

Our friend Zach testing the water out

We were planning on making them look like statues so we tested out different ways to do this, and ended up deciding on covering them in flour. Marissa made these beautiful crowns out of flowers and leaves and we spray painted them white. We picked out outfits and had the three models come over.

Graveyard Girls: A Photo Shoot with a DIY Dam, Water, Milk, and Flour Covered Girls bts3b

Me getting into the water to shoot

The water ended up being around three feet deep. We had them kneel so that it looked like they were more deeply submerged. We poured a gallon of milk into the water to make it less translucent and more white. We were going for a ghostly feel, and to create an atmosphere that looked cold and desolate.

We then covered the girls in flour and had them move between poses. We also had a friend lightly drop flour from above to add a misty atmosphere. The shoot went very well, and it was a total group effort.

Here are the photographs I created, titled “Graveyard Girls (2013)”:

Graveyard Girls: A Photo Shoot with a DIY Dam, Water, Milk, and Flour Covered Girls graveyardgirls1

Graveyard Girls: A Photo Shoot with a DIY Dam, Water, Milk, and Flour Covered Girls graveyardgirls2

Here are the photographs Marissa shot:

Graveyard Girls: A Photo Shoot with a DIY Dam, Water, Milk, and Flour Covered Girls bolen1

Graveyard Girls: A Photo Shoot with a DIY Dam, Water, Milk, and Flour Covered Girls bolen2

You can see more of our work on my and Marissa‘s Tumblr sites.


About the author: Kyle Thompson is a 21-year-old photographer based near Chicago. He’s passionate about photographing in forests and abandoned houses. You can find him on Facebook and Tumblr.

06 Jun 16:57

I'd Hang It: Poster Of Famous Cars From Popular Culture

famous-car-poster-small.jpg Note: Larger version HERE so you can't blame not being able to name them all on not being able to see them. This is Star Cars, a poster of 77 famous vehicles drawn by artist Scott Park. Can you name where each is from without looking at the legend? Because I did. Just kidding, I cheated. And you know the last time we played Monopoly during game night at your place? "You cheated then too?" No, but I am the one who clogged the toilet in your bathroom. Thanks to justin and Side Effect, who were more than a little disappointed the car and red tractor trailer from Spy Hunter didn't make the cut. Right? Now how am I supposed to get the oil slick?
06 Jun 16:56

Creepy 'Interactive' Anime Woman Dolls Coming Soon

creepy-interactive-doll-1.jpg Note: NSFW shot of the doll without the blue ribbon HERE in case you were wondering if this doll was or was not made specifically for giant perverts (it was). This is a Mirai Suenaga doll (links to NSFW info site), an interactive doll being developed in Japan that was built to respond to all sorts of external stimuli. Plus come to life while you sleep and try to hold your nose and mouth closed.
Packed inside Mirai's 60-centimetre jointed body, designed earlier this year, will be a system of 24 servo motors to move her limbs and body, custom designed to fit inside her tiny joints, as no commercially available servo motors were small enough. It will also include sensors that respond to external stimuli -- touch, ultrasound, sights, sounds and location -- with the custom-designed CPU housed in her head.
I'm not sure how Mirai's touch interactions work, but based on those ridiculous hooters and the kind of person that would buy a doll like this, I probably don't want to. Some things are better left unknown, you know? Like asking your friends how they like to pleasure themselves. Thanks to Kate V, who's really hoping this is not the future.
05 Jun 20:52

Film for the Digital Photographer – Film By Dan K

by Bellamy


Film for the Digital Photographer – Cameras, By Dan K
Dan K returns with part 2 of this 3 part series on film for digital photographers. In this article Dan outlines film choices available for people just getting into film (and some for old hands too).

In my previous articles, Shooting Film AND Digital and Film for the Digital Photographer – Cameras, I introduced the idea of digital photographers’ migrating back to film and suggested several genres of photography equipment to get started with and work up to. In this article, I will discuss the selection and characteristics of the various films currently available.

“Can You Still Buy Film?”
For sure! Film is far from dead. If I had a roll of film for every time I heard this, I’d have more film than I could ever shoot. In fact, being an overly paranoid hoarder, I have more film than I can possibly shoot before it expires. There’s no need to hoard though; film remains varied and plentiful and looks set to be so for a long time yet.

Yodobashi film store display

Yes, we often hear of film emulsions being discontinued, but I strongly believe that we will always be able to buy and develop film, if we are willing to go to a little effort. The consumer market has already evaporated and pros have moved on, but what remains is a small but vibrant enthusiast market. Daily I hear of newcomers, digital apostates converting to film. This series of articles is dedicated to them. In this piece, I’ll revisit some of the film formats and emulsions currently available.

Formats

Film comes in various formats. The ones you might expect to find in a good high street store are called “135″ (35mm perforated film in cans) and “120″ (roll-film).

You can get 36 to 40 full frame sized exposures out of a 36-exposure can, and it is sometimes sold in 24(27) frame cans. I also buy film in 100′ cans from a supplier and use a bulk loader to refill my cartridges, saving money in the process.

Bulk Loader and 100 Foot Rolls

A roll of 120 film will give 10 exposures of 6cm x 6cm frames. 220 is the same size as 120, but with twice as many exposures. Film sold in 120 or 220 rolls is known as “medium format”.

Large format film comes in boxes of sheets. The most common size is 8″x10″. 135 and medium format film is easy to get processed. To develop large format film, you’ll need to find a specialist lab or do it yourself.

A frame of 135 or roll-film can be any length, depending on your camera and its frame mask. Typical lengths of medium format film frames are 6×4.5cm, 6×6, 6×7, 6×9 and occasionally 6×12.

Lomography Belair 6×12

Most 135 cartridge frames are 36x24mm, but half-frame is 18×24 and longer frames are possible. For example, the Hasselblad X-Pan can shoot 65x24mm frames and being larger than a Full Frame, you could class that as medium format.

Hasselblad X-Pan, Including Sprockets

As you can see, changing the frame length changes the aspect ratio. Not all odd aspect ratio cameras use a longer or shorter full width strip of film. Crop frame panorama cameras cut off the top and bottom of the image, leaving the total length the same as Full Frame (36mm, with a standard 2mm gap between frames).


Crop Frame Panorama with Kodak ColorPlus 200

The longer the frame, the less pictures you get per roll. Half frame gives a little under twice the number of exposures. At the same time, the bigger the sensor (frame), the bigger you can enlarge an image and the better the lens can resolve an image onto it.

Half Frame Tri-X vs Full Frame B/W Slide

Depth of Field is also affected, as it the apparent grain size. Shooting larger negatives gives less grain in the print or scan and smaller negatives make grain seem larger. Film frame size affects image quality, even more so than with digital photography. I recommend you start with Full Frame 35mm and work up or down to the other formats as your requirements change.

In my last article on film cameras, I described how other formats can be obtained or re-spooled from common film stocks, but as they represent more of a challenge, I suggest you cut your teeth on 135 cartridges and 120 rolls.


Recently Shot but Long Discontinued Fujicolor 110 Film

Types of Film

Print film is the most common type. You expose and develop a negative. The negative is processed and either scanned and printed, or optically enlarged into the final image. The negative itself contains the detail of the image, but reds, greens and blues, dark and light is reversed. Print film is robust, both in terms of storage and exposure. Consider it the first stage of forming your image. The true artistry is done in the darkroom. The darkroom may be a true darkroom, filled with papers, chemicals and equipment, but a good job can be done through a digital post-process similar to the way you’d deal with a digital image. Unfortunately, while the development is standardised and straightforward, printing is not. The lab technician must make subjective and artistic adjustments to determine the final look of the image and that has led to a great many people being disappointed with the output. It is best to do all your own work, or find a specialist lab that listens to your instructions and does a consistent job.

Slide film, or reversal film, has its advantages and disadvantages as compared to print film. With a slide, you expose your film as you would a negative, but the negative image is reversed by a chemical process in the lab to produce a positive. Reds, greens and blues, highlights and shadows come out as shot. You can scan and even print from slides, but like negative prints, this may require a degree of skill. Slides also produce better images. Colours and shades are more vibrant and consistent. Many serious photographers swear by slide film and wouldn’t shoot negatives.

Why then, are negatives so much more popular than slides? The first reason is cost. It is more expensive to buy and much more expensive to process. Secondly, it is less robust than negative film. It is badly affected by improper storage, both before and after exposure. Exposure has to be spot on, because what you expose is exactly what you get.

Variety

Film is comprised of a plastic base, an anti-halation layer that reduces halos, emulsion layers and a protective gelatin coating. All the light sensitive chemical activity happens in the emulsion.

Whereas there used to be much more variety of films available, only the most popular and easy to process have survived the digital onslaught. That doesn’t mean that the modern photographer’s palette is severely curtailed. I still actively use a score of different film types depending on the light and look that I want. I’ll present some of the films available below. They show the rich palette of colours and tones still available to the film shooter.

Most are current production films. Others may be discontinued, recently expired, or domestic-market only, but are available in specialist stockists, or on eBay.

Black and White

• Kodak Tri-X 400 – the classic photojournalist film. Sharp
• Fujifilm Neopan 1600 Super Presto – ultimate street shooting film. Daido Moriyama look
• Eastman Double-X 200 – beautiful tone curve, good dynamic range
• Kodak P3200 – globulous grain like coarse ground pepper
• Bluefire Police 80 – ultra fine-grained tech pan film
• Lucky SHD100 – lacks anti-halation for glowing highlights
• Fujifilm Neopan 100 Acros – unbeatable all-round quality at 100ASA
• Kodak T-Max 400 – a bulletproof, scanner-friendly film
• Kodak T-Max 100 – great 100ASA film for scanning
• Kodak BW400CN – good all-round film for when only C-41 lab chemistry is available

Also:
• I used to use the many excellent Ilford films not pictured, including HP5, Delta 400, Delta 100, FP4, HP5 and will revert to them if necessary. I do often use Ilford Delta 3200, which is like P3200 (but still widely available), an 800ASA film for pushing up to 6400ASA.
• Chinese films like ERA and Shanghai – Chinese black and white films have always been excellent quality and while being the cheapest on the market. Sadly, all the brands I know of have recently gone, but there is plenty of old stock about.
• Agfa APX and other Agfa films – Agfa films, especially those with a high silver content have a wonderful classic era look.
• Fujifilm Neopan SS and other black and white films – all top notch, just harder to get and pricey outside of Japan, so I mostly stick to Kodak products.
• Rollei Retro 100 Tonal – good tone, good dynamic range, medium grain


Retro 100 Tonal


Delta 3200


BW400CN


Trix 400

Colour Negative Film
• Fujicolor Superia Reala 100 – perfect skin tones and landscape colours
• Kodak Ektar 100 – super fine grain and exceptional colours, especially blues and greens and reds and well … it’s just perfect
• Provia 400H – low contrast film for harsh light
• New Portra 400 – for shooting portraits, you can’t beat Portra
• Portra 800 – my favourite 800 film. Fast, with vast latitude. Lovely skin tones
• Portra 400VC – punch up your colours without making skin tones look bizarre
• Fujicolor Natura 1600 – formerly Japan-only, but now the best all-round low light colour film, especially beautiful when overexposed a couple of stops
• Fujicolor Superia Premium 400 – same idea as Portra
• Kodak Profoto XL 100 – a premium, fine grain 100-round 100ASA colour print film, less punchy than Ektar
• Konica 100 – this is so long expired I reach for it when I want an aged photo look


Rollei Digibase CN 200 Pro

Also:
• Kodak Ultramax 400 – this unpretentious film is almost the cheapest film you can buy here, but the results never cease to impress me. Universal appeal and ubiquitous availability
• Kodak Super Gold 400 – lovely if you can get it. Colours and fine grain, good in lower light too
• Kodak 400 Ultracolor – was a great film, but this batch is tired. 400VC was better anyway
• Fujicolor Superia 800 – ‘cheap’ fast film but fresh and fast
• Fujicolor Superia 1600 – likewise, ‘cheap’ fast film but fresh and fast
• Fujicolor Superia Venus 800 – Fuji’s equivalent of Portra 800

Colour Slide Film
• Fujichrome Velvia 50 – super saturated super contrast
• Fujichrome Provia 400X – if I have to go to 400 in slides this is the film
• Fujichrome Sensia 100 – cheap and less finicky. I miss the 200ASA
• Fujichrome Provia 100F – a very versatile film for all colours from vivid to pastels
• Fujichrome Fortia 50 – aka consumer Velvia
• Kodak E100G – for true-to life colours. VS was good, but not like VELVIA
• Kodak Elite Chrome Extracolor 100 – great saturated colours
• Agfa Precista CT – cross processes with strong colour shifts
• Fujichrome T64 – long expired but cross processes with strong reds and greens
• Lomography XPRO Chrome – comparatively more subtle cross-processing

Also:

• Velvia 100F – not quite the punch of Velvia 50
• Fujichrome 160T – again for XPRO

Oddballs

• Fomapan R – it’s a clear base black and white suitable for reversal if you can get a lab to process it
• Rollei Infrared 400S – a portrait film that has the blessed ability to reduce acne and scarring redness in skin tones
• Ilford SFX 200 – best used with an IR filter
• Efke IR820 – consider it an extreme version of SFX
• Lomography Redscale – I know redscale is just colour print film that’s spooled reversed, but the Lomo product gets better results than when I’ve done it myself.

Remember this huge selection is only a fraction of what is still out there in 135 (35mm) format. I have stocks of a variety of films in 120, 127, APS and other formats. Yes, I still shoot APS and yes, I can get it developed.

Selection

The primary consideration in the selection of film is whether I can reliably expose my image. If I am eyeballing the light level with an un-metered camera like my Leica M4, or worse, a fixed exposure toy camera, I personally do not have the skill to get slide exposure just right. Some photographers do, but if you’re transitioning from an automated digital camera, the chances are you won’t… yet.

The second consideration is the level of lighting. This is a bit like setting a fixed ISO setting in a digital camera. I select a film speed that suits the level of lighting. I pick a film that is in the ballpark of the typical aperture and shutter speed that I plan to use. I might choose a fast film for low light, a 400ASA (a.k.a. ISO) for general daylight city photography, or a slow film for bright daylight or flash photography.

The third consideration is the look. This is like choosing the creative style in a digital camera, but it is more critical with film. I ask myself several questions. Do I want a grainy or smooth image? Do I want high or low contrast? Do I want vibrant colours or muted tones? Strong colour casts and deep blue skies, or neutral? Will I be photographing people, vegetation or objects? Is monochromatic tone and texture more important to what I’m trying to say, or is colour needed? Would it look better with orthochromatic black and white film or infrared film? Will I filter and post process, or get it right in camera? Does the film push well? What does it look like cross-processed? More often than I’d like to admit, it comes down to “What do I have left in my camera bag?” It pays to go out with a selection of film and if shooting in the late part of the day migrate from fine-grained colour film to fast or push-able black and white film as the light starts to fail.


Velvia 100 Cross-Processed

The fourth consideration is to choose daylight or tungsten film. This is akin to the white balance setting in a digital camera. It’s not such a big deal with print film, but it makes a big difference in slide film. The bad news is I don’t know of any remaining slide films that are tungsten balanced, so you’ll just have to beware of the limitation. Likewise, when in early twilight, or under fluorescent lighting, you’re best off using print film. The good news is that daylight balanced films handle flash well, as the colour temperature is similar. If you’re picky, you can gel your flash.

The final consideration is cost and processing. The cheapest and easiest to buy and have processed in a lab is colour negative film. Hunt about. I buy 135 format colour negative film at prices ranging from US$3 to $10, but mostly it’s at the lower end of the range. I can get it processed and scanned for $2 and $2 respectively. Slide film is at the upper end of the purchase price range and costs double to process. Black and white is costs around $4 to buy and $4 to process, but I develop mine at home for almost nothing in cost of chemicals.


Bags of Processed 135 Film Cans

Care and Storage

It is generally recommended to store your negative film in a cool dry place, away from direct sunlight, sources of radiation (for example, if you’re a radiologist or air traveller) and humidity. Slide film needs to be stored cold. If you store your film in a fridge, remember that the inside of a fridge can get very damp, so make sure your film is sealed.


My Refrigerator at Home

Japan Camera Hunter also sells egg-carton style boxes to protect your film. This can save time if you go through a lot of film and can also allow you to bring a variety of film. This is for on-the go storage.


JCH Film Case

Remember to let your film warm up to room temperature before loading and using it.

Conclusions
I realise all this information is a lot to take in. There’s no harm in just trying lots of different films till you have found the ones that suit your style.

I recommend you start out with these:

Colour Print: Kodak Ultramax 400. Robust, ubiquitous, cheap and much better than the price would suggest. It’s just so good that Kodak makes it in huge quantities.

Colour Slide: Velvia 50. It will blow your socks off. Shoot it on bright but overcast days when print film would look drab.

Black and White Print: Kodak Tri-X 400. If Kodak discontinued that one, the uproar would be deafening. It’s so popular that it is often used as the baseline/ test emulsion for developing experimentation, so information abounds. It’s also fairly robust and you can push it 2, maybe 3 stops.

Black and White Slide (yes it exists!): Scala 200X. If you can find a lab that can process it, you will have a quasi-religious epiphany. If not it makes good print film with rich blacks and whites and a glorious tone curve.

Please share all your comments, observations and questions in the comments below. I would love to hear your opinions on this topic, especially if they differ from mine! I am still learning and I will until the day they bury me with my Zeiss Ikon ZM and a roll of Tri-X. Hmm, they’d better include a spare set of batteries, as I don’t know how long my current set will last!

In my next article, I will discuss the peculiarities of film technique and processing as compared to digital photography.

In case you missed part one you can catch it here.

If you haven’t already done so, please read my article Using Film and Digital and check back here for more instalments on this theme.

You can follow Dan on his social networks. He always has something interesting to say about photography and cameras.

Tumblr
Twitter
He was also on ‘In your bag’

Photos and text © Dan K. All rights reserved.
Yodobashi photo © Japan Camera Hunter. All rights reserved.

Japancamerahunter

05 Jun 20:42

Review: The Zeiss Touit 12mm f/2.8 Feels Un-Zeiss-Like. Don’t Touit

by Colin Peddle

Review: The Zeiss Touit 12mm f/2.8 Feels Un Zeiss Like. Dont Touit  zeiss12.0613.DSC 9284

If you’re here to read about the Zeiss Touit 12mm f/2.8 for the Fujifilm X-mount, you’ve probably heard words like “great”, “amazing”, “superb”, “lovely” and “well damped” used to describe this lens. It’s wider then the Fuji 14mm and maybe, just maybe, as sharp as the Fuji 35mm. These too are all things others will say about this lens. The jury, however, is still out for this guy.

Review: The Zeiss Touit 12mm f/2.8 Feels Un Zeiss Like. Dont Touit  zeiss12.0613.DSC 9262

To begin, let’s talk a little about expectations. It may be painful for some to see the “Made in Japan” etched into the underside of this beautiful looking lens. Standards are standards and one would think that Zeiss would not let the foreign-born Zeiss glass rank sub-par in any way.

It’s still the same old recipe for Zeiss soup — Cosina’s just stirring the pot. Sitting on their stacks of dollars, you won’t hear Zeiss shouting, “It’s not made in Germany, so let’s phone this one in boys! HUZZAH!”

Review: The Zeiss Touit 12mm f/2.8 Feels Un Zeiss Like. Dont Touit  zeiss12.0613.DSC 9283

The simple fact of the matter is that labor costs in Japan are less than those of Germany. As we saw last week, the Touit lenses are still hand built. And as Eric pointed out in his post, “the lenses are subject to excruciating individual testing, which includes sixty steps of quality control.”

SIXTY! Expected for your grandfather’s pocket watch, but a crop-sensor digital lens? That’s like making a peanut butter sandwich and then asking five chefs if you’ve made it correctly. While it’s impressive and bordering on pedantic to say the least, that’s Zeiss for you. The old saying goes, you get what you pay for. And heck if you don’t pay for it.

Review: The Zeiss Touit 12mm f/2.8 Feels Un Zeiss Like. Dont Touit  zeiss12.0613.DSCF0318

Getting super close is required with any ultra wide and the 12mm Zeiss handles the distortion at the corners pretty well. For your reference I was within 12-14″ inches from this man.

Which leads me to the rub. This lens is not cheap. At $1,250 it’s the most expensive lens available for the Fuji X-Mount. The nearest choice: their own 14mm f/2.8 at nine bills. Had the Touit been made in Germany, the price would surely be $1,950.

Review: The Zeiss Touit 12mm f/2.8 Feels Un Zeiss Like. Dont Touit  zeiss12.0613.DSCF0353

The manual focus and aperture control rings are smooth and may even put some people off completely. Visually, the rings look divine, but they’re not the knurled rubber bands most are used to. In use, you forget the visual differences immediately.

Yes, this is an autofocus lens, but a Zeiss wouldn’t be a Zeiss if the manual focusing wasn’t just perfect. Still, not including a distance scale is a little off putting, but it’s not the end of the world in a mirrorless setup.

The lack of a depth of field scale is though. Given that the Fuji 14mm has one, it surely couldn’t of been so hard for Zeiss to stamp one on the lens.

Review: The Zeiss Touit 12mm f/2.8 Feels Un Zeiss Like. Dont Touit  zeiss12.0613.DSCF0359

And when it comes to street, frankly, this lens at this price point scares me a little. If I drop my Zeiss glass on a sidewalk, I expect the sidewalk to lose. It’s disappointing to say this, but the 12mm f/2.8 feels brittle and doesn’t have the solid concrete-cracking ability one has come to expect with Zeiss glass.

Review: The Zeiss Touit 12mm f/2.8 Feels Un Zeiss Like. Dont Touit  zeiss12.0613.DSCF0364

And so while the manual focus ring is perfect, what isn’t perfect — at least on the Fuji version I tested — is the aperture control ring. Was this an afterthought on the part of Zeiss? I don’t know, but it’s nearly impossible to keep the aperture set on any f-stop.

It moves so freely, and without any locking function on the lens you’re left having to check the your aperture every other second. I routinely shifted the aperture two to three stops just raising my left hand up to support the camera while taking a picture.

No one should have to put gaffer tape on a $1,250 Zeiss lens. Furthermore, if expectation is that it will loosen up a tad over time, then it’s going to be like a bicycle wheel after several years of use. Round and round.

The rubber grips definitely exacerbate the issue and it became a general nuisance in making pictures. To clarify, this issue is only prevalent on the Fuji version; the Sony one has no aperture control ring on the lens barrel.

Review: The Zeiss Touit 12mm f/2.8 Feels Un Zeiss Like. Dont Touit  zeiss12.0613.DSCF0332

Review: The Zeiss Touit 12mm f/2.8 Feels Un Zeiss Like. Dont Touit  zeiss12.0613.DSCF0308

Review: The Zeiss Touit 12mm f/2.8 Feels Un Zeiss Like. Dont Touit  zeiss12.0613.DSCF0308 2

100% crop of the above photo at f/3.2.

Keeping in mind I’m not a pixel peeping lens chart junkie, I’d say that optically (in proper usage), the lens was fair to decent.

Wide open, it isn’t insanely sharp. Nor does it control flare so well as to get rid of it completely or bad enough where it becomes artsy-fartsy when put to use. I had to step down to f/3.2 to begin seeing tack-sharp images.

The light falloff in the corners is minimal and unless you’re that one guy who makes his living photographing white walls, it’s not noticeable in regular usage.

With adapters galore for the Sony/Fuji mounts, it’s easy to find a lot of manual focus glass for either. We’re talking about a 12mm (18 if we convert to 35mm), and at that range, pretty darn well everything is going to be in focus, especially if you’re going to use this for those massive drama-filled landscape pictures.

On an ultra wide, manual focus isn’t quite as difficult to pin down like it would be on a 50mm or 85mm f/1.4 — you can almost set it at f/8 and forget it. That is, if it will stay at f/8 long enough for you to take a picture.

Review: The Zeiss Touit 12mm f/2.8 Feels Un Zeiss Like. Dont Touit  zeiss12.0613.DSCF0347

We frugal photographers will likely ponder any manual-focus ultra-wide we can get our grubby mitts on. Moreover, the Sony has focus peaking and Fuji is continuing to upgrade their manual focus trickery as we speak, so the use of an older manual focus lenses gets easier with these faux rangefinders.

Autofocus isn’t a necessity when shooting static subjects like waterfalls, canyons, and crayons. It’s nice to have and can definitely expedite the process, but it isn’t a required function to keep those mountains in focus.”

Review: The Zeiss Touit 12mm f/2.8 Feels Un Zeiss Like. Dont Touit  zeiss12.0613.DSCF0422

As with most prosumer lenses, the 12mm is not weather-sealed, but mounting it up to the Fuji or Sony, it’s not something to be upset over. Neither of those companies are making any bold statements about the rain-stopping abilities of the NEX or X series bodies.

Personally, looking at the body of the lens, I can see gaps between the focus ring and the plastic barrel that are just asking to be filled with water.

Review: The Zeiss Touit 12mm f/2.8 Feels Un Zeiss Like. Dont Touit  zeiss12.0613.DSC 9284 2

If you’re like me, you’re still wondering what the kebab the name Touit is all about. Well, it’s for a genus of parrot in the Psittacidae family. Zeiss is branding the new family of lenses around the idea that birds have great vision and agility. Yeah, sure. No doubt Zeiss was throwing darts at the dictionary on that one. FYI, Touit is pronounced like “Do It”.

Review: The Zeiss Touit 12mm f/2.8 Feels Un Zeiss Like. Dont Touit  zeiss12.0613.DSC 9278

Review: The Zeiss Touit 12mm f/2.8 Feels Un Zeiss Like. Dont Touit  zeiss12.0613.DSC 9248

Conclusion

I’d love to say the Zeiss Touit 12mm f/2.8 should be purchased for your Fuji without question, but I can’t. As the pronunciation of the lens family implies, Zeiss would like you to just run out and do it today. I wouldn’t.

I’d put the Fuji 14mm f/2.8 ahead of this particular lens. It’s less expensive and doesn’t have an aperture control ring that spins whenever the wind changes direction. On top of that, the Fuji 14mm sports a very useful depth of field scale and, despite being lighter, actually feels denser and less toy-like then the Zeiss.

Out of the box I really, really wanted to love this lens. I love ultra wides, putting the 12mm right up my alley. Maybe if the price was $900 to $1,000, I could see past the minor flaws.

But at $1,250, with the issues it has — most annoyingly is the aperture control ring — I can’t see to it to plunk down that much cash. For the Sony, where the aperture ring is a non-issue, I suspect it’s the same game: not sharp wide open, feels toy like and is a little too pricey for most when many other options are available.

At this point for the Zeiss, I’m paying an extra few hundred bucks for a lens with blue logo, no depth of field scale and a wonky aperture ring.

03 Jun 17:59

Bare Bulb Strobes - Polaroid Jumps In The Game?

by udijw

Hot shoe flashers don't have it easy when it comes to using bare bulb strobes. Generally speaking, it has not been trivial. You either have to hack the flash electronics (BTW, Lumopro, what about the promised LP180?) or eat a bunch of light using an Omnibouce or (DIY waxfen) or any other yogurt-cup-light-eating solution.

But if you wanted a good solid bare bulb strobe that you can use with your big gun light modifiers choices were limited. If you wanted bare bulb speed light, you could have looked at the Cheetah Light, but that ran off a dedicated battery pack, and not off standard AA batteries. (+ it is about $420).

Bare Bulb Strobes - Polaroid Jumps In The Game?

Amazon is now selling a Polaroid PL-135 which has a Nikon Flavor and a Canon Flavor which have corresponding contacts on the hotshoe and TTL systems.

Home Studio Photography

heya, reading this via Google reader? It is closing soon. If you are looking for alternatives, try feedly an awesome free RSS reader

read more

03 Jun 05:18

Photos of Recipe Ingredients Arranged Into Well-Balanced Meals… Literally

by DL Cade

Photos of Recipe Ingredients Arranged Into Well Balanced Meals... Literally ricettario1

Food stylist Elena Mora recently collaborated with photographer Karsten Wegenerto to put a new spin on the term “balanced diet.” The two took recipe ingredients for four popular meals and arranged them into precarious structures that are supposed to encourage viewers to eat healthy.

The meals they chose were Pizza Margherita, Apple Cake, Minestrone and Salmon. Each meal was then deconstructed into its primary ingredients, after which Mora got to work arranging them. The resulting playful structures were then photographed by Wegenerto in front of a color that would complement the meal itself.

The series is titled Ricettario: A Balanced Diet (ricettario means “recipe book”), and only consists of those four meals for now, but we hope Mora and Wegenerto reunite to put more of these balanced still life creations together in the future:

Photos of Recipe Ingredients Arranged Into Well Balanced Meals... Literally ricettario2

Photos of Recipe Ingredients Arranged Into Well Balanced Meals... Literally ricettario3

Photos of Recipe Ingredients Arranged Into Well Balanced Meals... Literally ricettario4

To see more from Mora head over to her website by clicking here.

(via Junkculture)


Image credits: Photographs by Elena Mora and Karsten Wegenerto and used with permission.

02 Jun 10:55

Beautiful Camera Lens Ring Creations by Photographer Ben High

by Michael Zhang

Beautiful Camera Lens Ring Creations by Photographer Ben High lensring1

Ben High of Marion, Iowa has two big passions: making jewelry and making photographs. When he’s not designing jewelry at Philip’s Diamond Shop, High loves tinkering with old cameras and shooting instant film photographs.

The two talents sometimes come together for some pretty fantastic results; a number of rings High has created are inspired by camera lenses.

We’ve seen rings based on lens focusing rings before (see here and here), but High has taken the concept one step further. See that ring above? The “focusing ring” actually turns.

High says that after creating his first camera lens ring, it didn’t take long for a customer to ask if he could “make it move like a real lens.”

His response? “Of course I can.”

The “focusing focus ring” is made of 14k white gold, and the markings can rotate from infinity to macro focus. “You can spin it one way for when you’re looking out to the future and the other for when you’re focusing on the task right in front of you,” High writes.

High is also quite good at creating non-focusing focus ring rings. He created this Polaroid-inspired wedding band for NYC-based photographer Patrick Tobin, who does marketing for The Impossible Project:

Beautiful Camera Lens Ring Creations by Photographer Ben High polaroidring

Patrick Tobin’s Polaroid lens ring, created by Ben High. Photograph by Patrick Tobin

Tobin writes that the ring was based on the focus scale around the lens of the Polaroid SX-70:

Beautiful Camera Lens Ring Creations by Photographer Ben High polaroidcamera

Polaroid SX-70. Photograph by Patrick Tobin

Here’s a third ring that was inspired by the distance scale focus ring found on the Canon 24mm tilt-shift lens. On one side of the ring is a distance scale, and on the other side are two shifting marks:

Beautiful Camera Lens Ring Creations by Photographer Ben High lensring31

Beautiful Camera Lens Ring Creations by Photographer Ben High lensring3b

Want to have high create a custom photography-inspired ring just for you? You can drop him an email to get the ball rolling. If you’re looking for a pre-designed ring, check out the Titanium Buzz lens ring that we featured earlier this month.

02 Jun 10:47

Beautiful Light Painting Photos Created With Dancers and Athletes

by DL Cade

Beautiful Light Painting Photos Created With Dancers and Athletes breakdance1

Combining light painting with sports that involve long fluid motion is a match made in photography heaven that companies like Red Bull have already taken advantage of to create some pretty spectacular shots.

Photographers Joanna Jaskólska and Zach Ancell both had similar ideas, and their resulting photo series — Breakdance Baby! and Trajectory — are both unique examples of the awesome photography you can create when you mix dance, athletics and light painting.

First up is Jaskólska, whose photo series Breakdance Baby! was created by putting a special LED wand in the hands of her breakdancer friends Max and Chris and then letting them do their thing. This is only her first experiment with the light painting/dance combination, but she assures us it’s “definitely not the last:”

Beautiful Light Painting Photos Created With Dancers and Athletes breakdance2

Beautiful Light Painting Photos Created With Dancers and Athletes breakdance3

Beautiful Light Painting Photos Created With Dancers and Athletes breakdance4

Beautiful Light Painting Photos Created With Dancers and Athletes breakdance5

Beautiful Light Painting Photos Created With Dancers and Athletes breakdance6

Ancell’s series Trajectory is similar in that it is capturing movements of dancers and athletes with some help from light painting, but his photos are shot against a black background. His photos show athletes going through the motions you may see them make on the field, court or stage; only when the shutter is slowed down, we get to see the trail they leave in their wake.

After many moths of work putting together composite after composite, he wanted to do something different. He set a goal to shoot 50 test shoots over the course of the year, and the first manifestation of this goal is his the 17 photos in this series:

Beautiful Light Painting Photos Created With Dancers and Athletes slowshutter1

Beautiful Light Painting Photos Created With Dancers and Athletes slowshutter2

Beautiful Light Painting Photos Created With Dancers and Athletes slowshutter3

Beautiful Light Painting Photos Created With Dancers and Athletes slowshutter4

Beautiful Light Painting Photos Created With Dancers and Athletes slowshutter5

Beautiful Light Painting Photos Created With Dancers and Athletes slowshutter6

Beautiful Light Painting Photos Created With Dancers and Athletes slowshutter7

Beautiful Light Painting Photos Created With Dancers and Athletes slowshutter8

Beautiful Light Painting Photos Created With Dancers and Athletes slowshutter9

Beautiful Light Painting Photos Created With Dancers and Athletes slowshutter10

You can see more from either Jaskólska or Ancell by following the respective links to their websites. Be sure to keep an eye out as they continue to experiment and Jaskólska in particular continues to merge light painting and dancing in future shoots.

(via Laughing Squid and Behance)

31 May 16:31

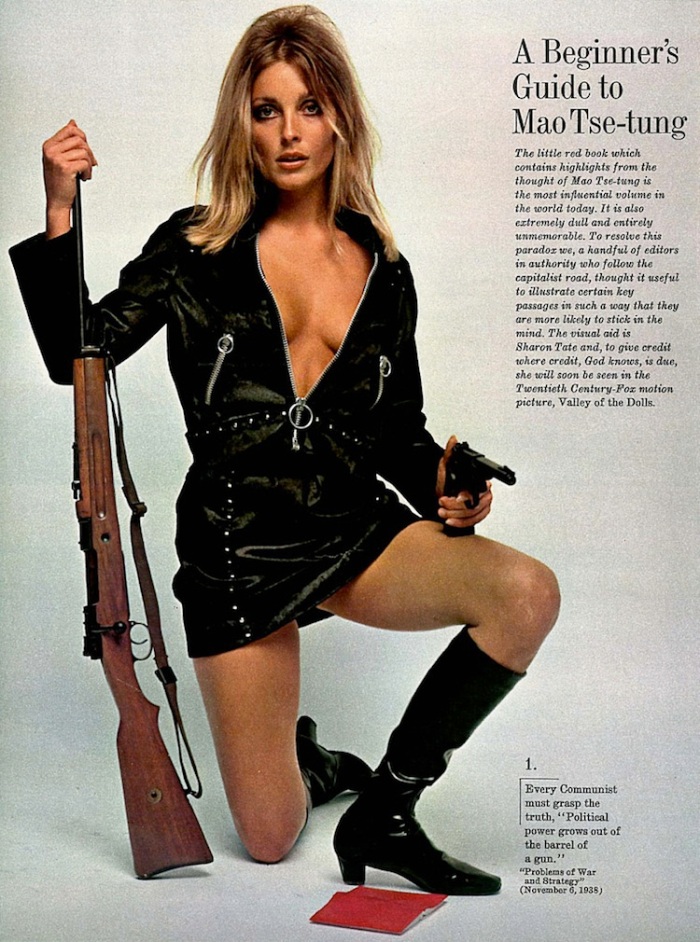
THE SIX DEGREES OF SHARON TATE | MAO, McQUEEN, MANSON & MAD MEN…

by JP

Sharon Tate esquire mao

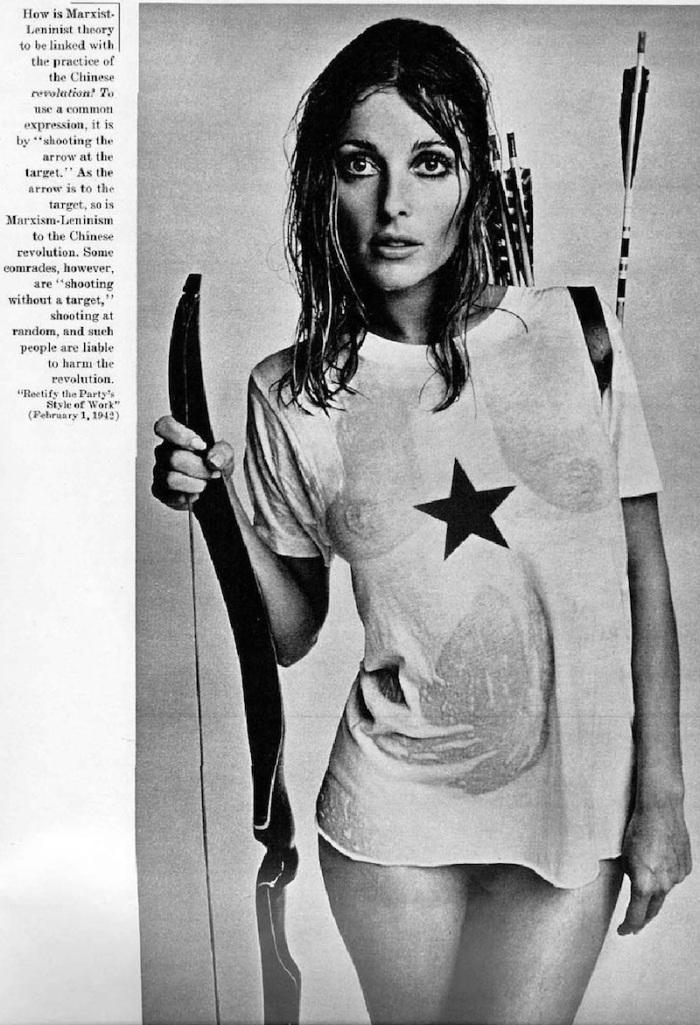
1967– Sharon Tate for a spread in Esquire Magazine, 1967, in a t-shirt printed with the Vietnam Star. –Photo by William Helburn

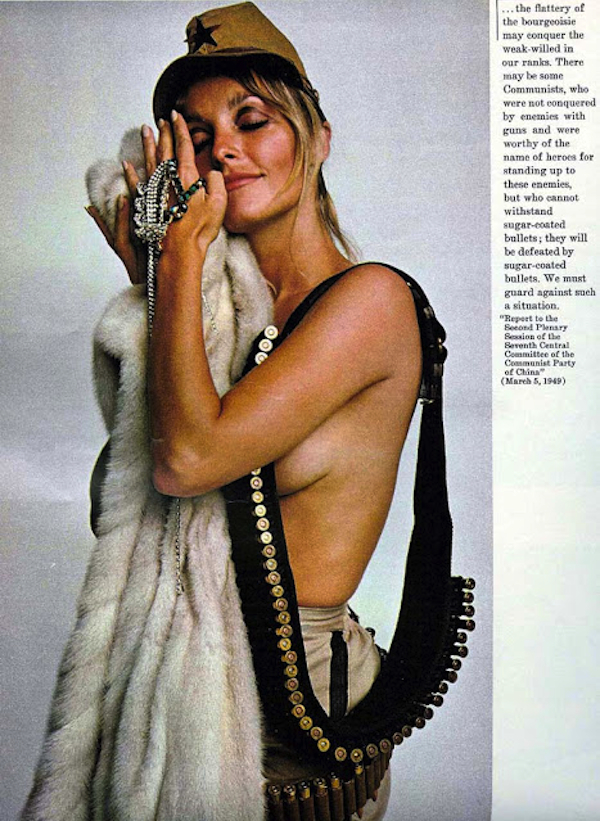
So this is what the internets are recently abuzz about– The Mad Men costume designer channeling the essence of Sharon Tate, circa Esquire magazine 1969, by placing the same Vietnam Star T-shirt on Megan Draper. Which, mind you– was probably not for sale at your local Hot Topic, head shop, or Amazon.com back then, so kinda random and creepy. It’s a pretty good ploy to generate some buzz– made me look twice, and I haven’t watched the show in a few years now. Probably exactly what they were going for. I will say, for the record, that the original photography by William Helburn is amazing– downright titillating, even.

But if you find this kind of stuff remotely interesting, the real tingler is how Steve McQueen himself almost ended up a part of the Manson massacre, and could have shared in Sharon Tate and the other’s gruesome fate…

-

Saron tate esquire gun mao

Sharon Tate for Esquire magazine, 1967 –Photo by William Helburn

-

Sharon Tate esquire magazine mao 1967

1967– Sharon Tate for a spread in Esquire Magazine, 1967, in a t-shirt printed with the Vietnam Star. –Photo by William Helburn

-

From The Daily Mail, the alleged accounts of McQueen’s infidelities and loathsome ways that put him on the road to creeps-ville, and in the path of Manson’s murderous crew–

“For years, as his [a young Steve McQueen's] career failed to ignite, he leeched off a successful dancer called Neile Adams — spending her earnings on new cars, drugs and other women.

Eventually marrying her in 1956, he landed a small role soon afterwards in the film of Harold Robbins’s trashy novel, Never Love A Stranger. Within days, he’d embarked on an intensely sexual affair with the film’s leading lady actress Lita Milan — and then proudly told his wife about it. According to Neile: ‘Lita would be the first in a long line of flings that would plague me throughout our married life. OK, I thought, I can handle it — I have to — as long as he doesn’t flaunt it.’

But, as McQueen’s career gathered pace, he never stopped flaunting his affairs — with co-stars including Jacqueline Bisset and Lee Remick, not to mention a host of starlets and fans. Perhaps as a test of his wife’s devotion, he made indiscreet phone calls within her hearing and left lipstick smudges on his shirts (and trousers) and love notes in his pockets.

By 1960, Neile had given up work and given birth to a son and daughter. Still struggling to be the kind of wife he wanted, she’d boil up the high-grade peyote he bought from Navajo Indians, and then disappear while McQueen got stoned with his friends.

He also started going for all-night benders at the Whisky a Go Go club on the Sunset Strip in West Hollywood, where he met one of his chief partners in crime: a womanising hairdresser called Jay Sebring. The two men, fuelled by alcohol and cocaine, shared the sexual favours of a Bambi-eyed starlet called Sharon Tate, often in the same bed at the same time. And their friendship continued even after she married the director Roman Polanski.

-

sharon tate esquire magazine mao

Sharon Tate for Esquire magazine, 1967 –Photo by William Helburn

-

On the afternoon of August 7, 1969, Sebring went to McQueen’s house to give him a trim and suggested they attend a party that evening at Sharon’s house. McQueen said he’d be there. Before setting out, however, he was called by a young and beautiful blonde he was seeing at the time. Come along to the party, he said — but she told him she had a better idea for just the two of them.

Thus, by a whisker, Steve McQueen avoided being massacred by the Manson ‘family’, the hippie followers of the manipulative psychopath Charles Manson, who butchered Tate and three guests — including Sebring, who was shot and stabbed. Ironically, McQueen’s adultery had saved his life.

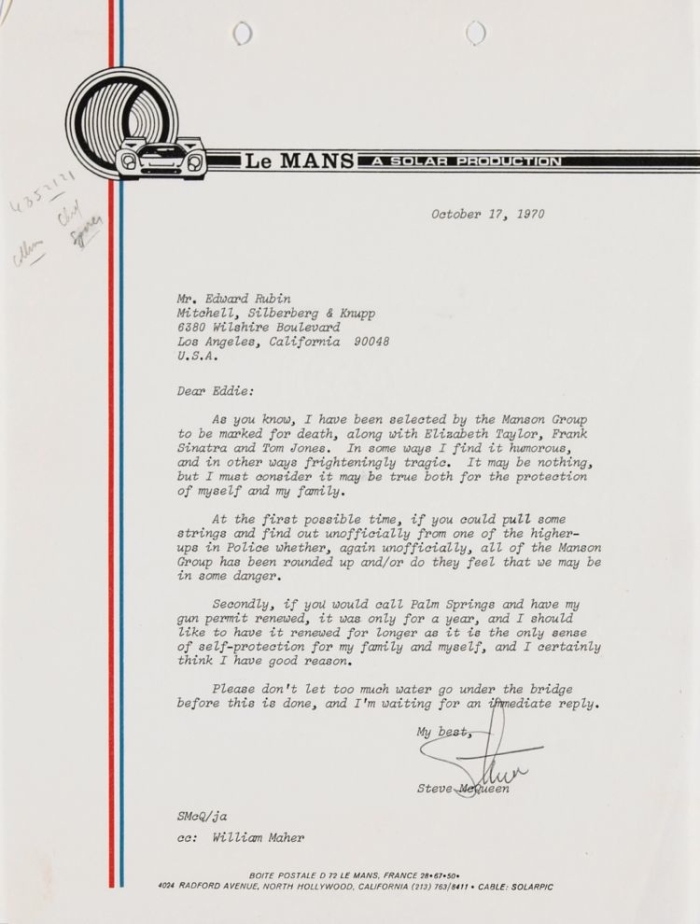
Two months later, when the killers were arrested, police discovered McQueen’s name on a hit-list of people whom Manson had decided to kill. It turned out that someone at McQueen’s production company had once rejected a screenplay by Manson. From then on, the actor carried a loaded Magnum at all times.

-

steve-mcqueen-letter

Letter written to McQueen’s attorney, Edward “Eddie” Rubin on Le Mans / Solar Productions letterhead, by Steve McQueen, documenting his concerns about Charles Manson and his murdering crew of misfits. He, as wells as, Elizabeth Taylor, Frank Sinatra, and Tome Jones (good company…) were believed, through an investigation of the murders, to be targeted for assassination by Charles Manson’s crew.

-

RELATED TSY POSTS:

STEVE McQUEEN | LE MANS & BEYOND GRATUITOUS 1970s RACING GOODNESS

1970 12 HOURS OF SEBRING RACE | STEVE McQUEEN’S BRUSH WITH VICTORY

STEVE McQUEEN | HOLLYWOOD’S ANTI-HERO & TRUE SON OF LIBERTY

REQUIRED VIEWING “BULLITT” | THE GRANDDADDY OF CAR CHASE SCENES

-


30 May 12:20

Sound DNA

by Troy Turner

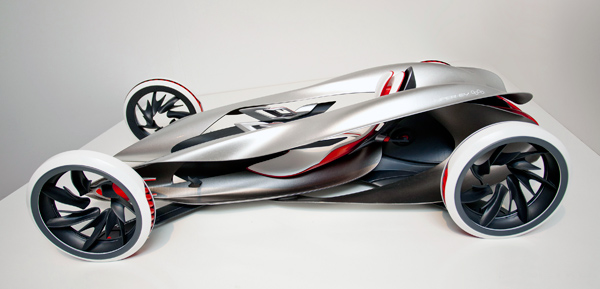
In the shift to electric vehicles, there’s one thing we’re really going to miss about our old combustion engines… the sound! Whether your tone of choice is a low grumble or high-pitched whir, the voice of the vehicle has forever been a deciding factor for new car owners. While it doesn’t offer a solution to maintaining the sound experience, the Spectra concept vehicle’s unique form was inspired by the Doppler effect created by today’s F1 cars.

From the fairings to the fenders, the shape represents the observable sound frequencies in the F1’s spectrum, paying homage to the soon-to-be-extinct combustion engine.

Designer: Teeravit  Hanharutaivan

-
Yanko Design
Timeless Designs - Explore wonderful concepts from around the world!
Shop CKIE - We are more than just concepts. See what's hot at the CKIE store by Yanko Design!
(Sound DNA was originally posted on Yanko Design)

Related posts:

  1. Sit on Sound
  2. Sound Ray
  3. See With Sound


30 May 08:00

One man’s adventures in custom keyboard development

by Brian Benchoff

BlueCube-flat

As a software developer, [suka] spends a lot of time every day in front of a keyboard. He had been trying out different keyboard layouts far less common than even the moderetly obscure Dvorak layout, and after some time decided a custom ergonomic keyboard was what he wanted. His progress of designing his own custom ergonomic keyboard is a fascinating read, made even cooler by the fact these are real, professional-quality keyboards with mechanical switches and custom enclosures.

After starting off with a few USB numpads, [suka] dove in to the world of Cherry switches by crafting his own wing-style keyboard. [suka] works for one of the larger manufacturers of laser-sintering machines, so he was able to create the enclosures for his keybaord – as well as the key caps – fairly easily. The technology behind laser sintering allowed [suka] to create some strange bowl and trough-shaped keyboards before settling on his daily driver, seen above.

The Blue Cube, as [suka] calls it, includes an integrated stand, an integrated IBM trackpoint mouse, and is powered by a Teensy microcontroller. [suka]‘s keyboards might not be heafty enough for melee combat like the venerable IBM Model M, but it’s exactly what [suka] wants, and that’s just fine by us.


Filed under: peripherals hacks
30 May 07:54

Programming microcontrollers with a Raspi

by Brian Benchoff

rasduino

The advent of the Arduino brought the world of microcontrollers to hobbyists, students, and artist the world over. Right now we’re in the midst of a new expansion in hobbyist electronics with the Raspberry Pi, but we can’t expect everyone to stay in the comfortable, complex, and power-hungry world of Linux forever, can we? Eventually all those tinkerers will want to program a microcontroller, and if they already have a Raspberry Pi, why not use that?

[Kevin] wanted to turn his Raspi into an AVR development workstation, without using any external programmers. He decided to use the Raspi’s SPI port to talk to an AVR microcontroller and was able to make the electrical connections with just a few bits of wire an a handful of resistors.

For the software, [Kevin] added support for SPI to avrdude, available on his git. Theoretically, this should work with any AVR microcontroller with the most popular ATMegas and ATtinys we’ve come to love. It doesn’t support the very weird chips that use TPI programming, but it’s still extremely useful.


Filed under: Microcontrollers, Raspberry Pi
30 May 07:50

Reflow soldering improved with carbon dioxide

by Mike Szczys

co2_reflow-oven

This is exactly what it looks like. [Oleg] calls it soldering in inert atmosphere, but it’s just a toaster oven reflow hack dropped into a container full of carbon dioxide.

Why go to this trouble? It’s all about solder wetting. This is the ability of the molten solder paste to flow into all of the tinned areas of a board. [Oleg] talks about the shelf life of hot air leveled PCB tinning, which is about six months. After this the tin has oxidized. It will certainly not be as bad as bare copper would have, but it can lead to bad solder joints if your PCBs are more than about six months off the production line. This is one of the reasons to use solder flux. The acid eats away at the oxidized layer, exposing tin that will have better wetting.

But there is another way. Soldering in the absence of oxygen will also help the wetting process. CO2 is heavier than air, so placing the reflow oven in a plastic container will allow you to purge air from the space. CO2 canisters are cheap and easy to acquire. If you keg your own homebrew beer you already own one!

If you’ve got everything but the reflow oven just look around for a few examples of how to build your own.


Filed under: chemistry hacks, tool hacks
30 May 07:49

Illylamp

by Neokentin

The Illylamp is made by Ankie Wessels van Rubbish Design.

hanglamp illy 2 600x768 Illylamp in lights  with Upcycled Reused Recycled Metal Light Lamp

More information at Rubbish Design website !

29 May 22:10

Tintype Portraits of Photography Students Created on Their Discarded Film Canisters

by Michael Zhang

Tintype Portraits of Photography Students Created on Their Discarded Film Canisters 11 Student Tintype 004 copy

Photographer David Emitt Adams experiments with unique metal bases in his experiments with tintype photography. Last week we shared a project in which he used abandoned tin cans found in a desert to create tintype photographs.

36 Exposures is another project of his that uses unconventional materials for creating old school photos. It’s a series of tintype photographs that were created using 35mm film canisters.

Adams came up with the idea for the project after teaching an “Introduction to Photography course.” Students in the class had learned the basics of photography using film cameras, and their work in the darkroom produced a pile of discarded film canisters.

Seeing that these canisters played a crucial role in his students’ initial understanding of photography, Adams decided to upcycle them into photographs.

Each canister was flattened from a cylinder into a rectangle and then used as the metal base for tintype portraits of the students. Each of the resulting piece looks like a flattened film canister on one side, but flip it over and you’ll see a beautiful photograph created through the labor-intensive collodion process from the 19th century.

Tintype Portraits of Photography Students Created on Their Discarded Film Canisters 11 Student Tintype 001 copy

Tintype Portraits of Photography Students Created on Their Discarded Film Canisters 11 Student Tintype 007 copy

Tintype Portraits of Photography Students Created on Their Discarded Film Canisters 11 Student Tintype 011 copy

Tintype Portraits of Photography Students Created on Their Discarded Film Canisters 11 Student Tintype 012 copy

Tintype Portraits of Photography Students Created on Their Discarded Film Canisters 11 Student Tintype 013 copy

Tintype Portraits of Photography Students Created on Their Discarded Film Canisters 11 Student Tintype 014 copy

Tintype Portraits of Photography Students Created on Their Discarded Film Canisters 11 Student Tintype 016 copy

Tintype Portraits of Photography Students Created on Their Discarded Film Canisters 11 Student Tintype 017 copy

Tintype Portraits of Photography Students Created on Their Discarded Film Canisters 11 Student Tintype 018 copy

In addition to the tintypes themselves, Adams also created a gorgeous display case out of mahogany to store and show off the work. The case looks like a wooden box when it’s all packed up:

Tintype Portraits of Photography Students Created on Their Discarded Film Canisters 11 Display 04

Open up the side, and you’ll see the collection of tintypes stored in wooden holders:

Tintype Portraits of Photography Students Created on Their Discarded Film Canisters 11 Display 01 copy

Tintype Portraits of Photography Students Created on Their Discarded Film Canisters 11 Display 05 copy

Lift up the top of the box, and the lid becomes a stand on which the portraits can be proudly displayed:

Tintype Portraits of Photography Students Created on Their Discarded Film Canisters 11 Display 02 copy

Tintype Portraits of Photography Students Created on Their Discarded Film Canisters 11 Display 07 copy

You can find more of Adams’ work over on his personal website.


Image credits: Photographs by David Emitt Adams and used with permission

29 May 22:07

Quick Tip: How To Make A 5 Minutes Battery Pack

by udijw

Flickr user Raw Sniper (aka ak Photographie) just sent in this great tip on creating a quick and dirty battery pack using an empty battery case and a few pieces of metal.

_DSC0117.jpg

This can come in handy if you want to power a strobe from external power (or if you just need a 6V pack). So if the strobe goes week, you just replace the external pack without fiddling with batteries.

If you use this as a system, you can keep a few in the bag, and once a pack is drained remove the batteries from it so you get a nice system to tell charged packs from empty packs (which will literally be empty).

Home Studio Photography

heya, reading this via Google reader? It is closing soon. If you are looking for alternatives, try feedly an awesome free RSS reader

read more

29 May 22:05

A Look at Reducing Noise in Photographs Using Median Blending

by Pat David

A Look at Reducing Noise in Photographs Using Median Blending noisegalaxy

Between a recent post here on PetaPixel about the Beauty of Space Photography, and my own experiments on blending series of images using averaging techniques, I noticed some rather interesting alignments in technique.

In image averaging, I had previously blended images together by averaging the value of each pixel in an image to produce something entirely new.  The way that this process relates to astrophotography is that the general method is commonly used as a means of noise reduction.  It becomes interesting when you realize that you don’t have to be blending images or taking photos of the cosmos to benefit from the same methods of noise reduction.  It works incredibly well for any images that are relatively static.

Have a look at this image (click it for a larger version):

A Look at Reducing Noise in Photographs Using Median Blending ISO25600 Desk median1 500x359

Although a relatively boring image, the interesting thing about it is that it was shot at ISO 25,600. To be fair, there is a little bit of cheating going on. The result above is derived from combining 10 images of the same scene. This is the power of using median image stacking to increase the signal-to-noise ratio in images.

Here are a few 100% crops to demonstrate what is happening (single ISO 25,600 left, median stack right):

A Look at Reducing Noise in Photographs Using Median Blending 100 crop 1

A Look at Reducing Noise in Photographs Using Median Blending 100 crop 3

A Look at Reducing Noise in Photographs Using Median Blending 100 crop 2

A Look at Reducing Noise in Photographs Using Median Blending 100 crop 4

The last image really shows the strength in this technique.  The words in the banner “Fast, Focused, Fearless” are not even distinguishable in the single ISO 25,600 shot.  Stacking 10 images cleans up the noise enough to clearly read the text.

What Median Stacking Does

Median stacking will consider all the values of a pixel at a single location across each image in the stack, then choose the final value for that pixel based on the median result.

Assuming you took 5 images for a stack, then for a given pixel location, there will be at most 5 different pixel values:

Red  ( 115, 120, 130, 190, 191 )
Green( 150, 166, 169, 200, 210 )
Blue ( 200, 205, 209, 211, 220 )

A Median stack will give a final pixel value as RGB( 130, 169, 209 ). Basically, median will pick the value as the number that falls in the middle of the ordered list. If there are an even number of values, it will average the two values that fall on either side of the middle. This means that values that are spurious or  outside of the range will be disregarded.

This works wonderfully, as noise is random, while the signal should remain constant at a location. It is this property of median stacking that is so useful for astrophotographers who often need to shoot at higher gain to capture their subjects. By combining multiple images they can significantly increase their Signal-to-Noise ratio.

Pushing the Results

An interesting result of this method is that it can be useful even when shooting in ideal conditions.  Granted, you may not shoot a still subject at ISO 25,600 – but even shooting at a cameras base ISO, you can decrease that noise even further than what a camera is capable of in a single shot.

Below is a 200% crop from an image shot at my cameras base ISO 200:

A Look at Reducing Noise in Photographs Using Median Blending 200 crop base

Here is the same portion from a median stack of 6 images:

A Look at Reducing Noise in Photographs Using Median Blending 200 crop median

You can see that even at my cameras base ISO 200, there is still some noise when pixel-peeping (200%).  The extra effort to create the median stack result was trivial overall.  In fact, most modern enthusiast cameras can be setup for high-speed capture – so firing off 6 frames is effortless once everything is set up already.

This technique can be exploited by others as well – not just for astrophotography.  It should be immediately apparent that this can be quite useful for any still image being captured.  Some great uses for this technique can be applied in other areas as well:

  • When shooting stock images you will sometimes shoot static scenes, and if it requires a very noise-free image, then this is a perfect technique to consider.
  • I’ve seen some tutorials recently about digitizing negatives/slides using a dslr - this would again be a perfect technique to minimize the noise coming from the digital sensor, and to maximize the quality of the final scan.
  • If you need to capture an image of a highly trafficked area, and want to easily remove people, cars, etc. from the scene quickly and easily (see below).

Creating a Median Stack

I’m primarily a Free/Open Source Software user – so the tools to create these stacks were already in my basic toolkit (Hugin/Imagemagick/GIMP).  Median stacks can also be created using Photoshop (from CS3 Extended on).

Photoshop

Creating the median stack in Ps is relatively straightforward (disclaimer: I’m not a Ps user personally – so I apologize if there is some other method of achieving this that I am overlooking).

  1. Open each of the images in your stack as layers in Ps.
  2. Align them (Edit → Auto-Align Layers…).  Auto should work fine here.
  3. Select all of the layers and turn them into a Smart Object (Convert to Smart Object).
  4. Now apply the Median Stack mode (Layer → Smart Objects → Stack Mode  Median).

Free/Open Source Tools (Hugin/Imagemagick)

Hugin is an open source panorama software that gets fairly heavy use on my system for a myriad of things, but in this case you only need the command align_image_stack to automatically align your images.  It’s fairly straightforward:

/path/to/align_image_stack -m -a OUT_PREFIX file1 file2 ...

Where file1, file2, etc… are the images to be stacked.

Once this command is finished, there will be a series of images that are now aligned and named with the out_prefix from the command.  At this point it only takes one more command using Imagemagick to create the median blended output:

convert OUT_PREFIX* -evaluate-sequence median OUTPUT.jpg

This will stack all of the OUT_PREFIX images, evaluate them using a median stack, and save the results to OUTPUT.jpg.

Interesting Side Effects

An interesting side effect of doing median stacks is that objects that move between the different images in the stack might be removed.  In fact – this is another common use of median stacking.  A good example is if you want to capture an image of a location that has people/cars/etc. moving about, but you don’t want those objects in the final image.  A great example of this is trying to shoot touristy locations, but the desire is to remove all of the other tourists from the final result.  Manually masking out each object could be time consuming, whereas a median stack might remove them quickly and easily.

Here is a simple example to illustrate:

A Look at Reducing Noise in Photographs Using Median Blending ultramarine combined1

The top 5 images have an object that is moving across the frame, and the bottom image shows the result of doing a median stack.  As far as the median stack is concerned, the pixel data that makes up the moving object is spurious data, and is not considered for the final output.

Overall, median stacking can be an incredibly powerful method of producing very clean and noise-free images.  The only caveat is that the subject be static between each of the frames.

28 May 16:43

The Complete Tokyo Camera Shopping Guide

by Bellamy


The Complete Tokyo Camera Shopping Guide
As many of you may know, I have written buyers guides on Tokyo, that have been very popular. But some have mentioned that they are hard to navigate on the site. I am a man who likes things to be uncomplicated, so I thought it might be nice of they were all in one place.

My Tokyo camera buyers guides are probably one of the most popular series of posts on the site, and I have met many people in Tokyo who have been shopping and have found what they need thanks to them. I am really happy to have people find what they want and have a nice time doing it.

The first guide is for Shinjuku and surrounding areas.
japancamerahunter.com/2012/04/camera-shopping-in-tokyo-pt-1-shinjuku

A little note about this is that Yodobashi camera has been left off the list. Yodobashi is the big boy in the area and sells everything. But only new, nothing used. This is the place to come for new cameras that may not be available outside of Japan. The film department is the stuff of legend, despite it shrinking in recent years.

Top tips: Check the camera has English menus, Sony and Panasonic do not because they want you to by the higher priced “international” versions to stop gray market exports. Oh, and haggle. If you are a tourist then you automatically get 5% off (tax free). But you can get more. Almost all items in the store have points available for point card holders. If you are a tourist then you don’t need or want these points. You can get them to know these off the price for larger items, especially if you have cash. And this could net you up to 10% more off in some cases. Don’t be afraid to ask. Shy kids get no sweets.

Touristy stuff: Check out Kabukicho after dark. The red light and bar district is a lot of fun in the evenings. Careful who you shoot though, there are some rather unsavoury characters there and you could find yourself in a spot of bother. If in doubt, don’t take pictures of the touts and pushers. It is better to ask in this area if you don’t know your way around.

The second guide is Ginza and surrounding areas
japancamerahunter.com/2012/04/camera-shopping-in-tokyo-pt-2-ginza

Not a lot has changed with regards to this guide. The Ricoh service centre has moved away, but Ring Cube is still there.
One I forgot to mention is the Crumpler Ginza store, which is not a camera shop, but a cool bag shop that yours truly used to work in.

Top Tip: Check the cameras in Lemon very very carefully. They do not check them themselves and do not set the prices, so the camera could say A rank, but could really be junk. Make sure you test them, as they don’t do returns, even if it breaks 5 minutes after walking out the door.

Touristy stuff: If you are in the Ginza area then you owe it to yourself to go to the ultimate foreigner tourist spot, the Tsukiji fish market. But be warned, there are some rules. If you go there early, you might be lucky enough to get a ticket for the auction. But the tickets are limited, so if you missed the chance then you have a long wait until the main market opens to tourists. Carry as little as possible, smaller bags are better. Wear shoes that you don’t mind getting wet, because you will. Keep your eyes and ears open, it is a place of work and they are not going to move for you. With that you should be good.

The final guide is Northern Tokyo and surrounding areas

japancamerahunter.com/2012/04/camera-shopping-in-tokyo-pt-3-northern-tokyo

But this is a bit of a misnomer. It should really be North and western Tokyo, as this one is a bit spread out. But it was designed with the idea that you could take a day and walk it. Which I have done many times. Not a lot has changed.

Top tip: A lot of the places in Akihabara can be bargained with, much in the same fashion as Yodobashi. The Yodobashi in Akihabara has a great film selection too. Well worth a look.

Touristy stuff: Take a stroll through Ueno park, there are so many people to take pictures of it really is staggering. Get lost around the backstreets on Akihabara to see the weirdest shops.

The map
japancamerahunter.com/2012/12/visiting-tokyo-then-go-here

I made the map, which has been viewed over 10,000 times now. It is by no means complete, there are places that I have deliberately left off, you will have to find them on your own. That is part of the joy of rolling around Tokyo though, finding the little places.

Notes on travel
If you are coming in the summer be prepared for it to be insanely hot and humid. Stay hydrated and carry a hand towel with you, you will definitely need it. Silica gel in the bag wouldn’t hurt.
If you are coming in the winter be prepared for it to be bitterly cold. The light will be amazing though, very bright and beautiful golden hours.
Carry cash, it is a very safe city. ATM’s can be problematic (language or availability) so always have some cash. Often stores will offer a discount for cash too. Money talks.

I hope this makes things a lot easier for you all and that you have a fantastic time if you are coming to Tokyo. Shoot, eat and enjoy.
Japancamerahunter

24 May 16:31

Dear Model: Posing Tips for How to Look Your Best in Photographs

by Jen Brook

Dear Model: Posing Tips for How to Look Your Best in Photographs dearmodel 9

Dear (new’ish) Model,

My name is Other Model. I have spent the last couple of years finding out a few things that I wish I’d known from the start. Please don’t think I’m patronising as I mean this only in goodwill, as there is absolutely no gain for me by sharing these cheats. Not all of my points will be valid for you as posing varies in each genre. Just take what you can and ignore the rest. If only one suggestion helps your future career then my time has been well spent…

Rule one, the mirror is your BFF. Stand there, perfect your poses and learn how your body shapes. The mirror is a perfect tool to show you what the camera can see – try to imagine it behind your photographers head when shooting and always consider what can be seen from that angle. For example, if your foot is closest to the lens, it is worth remembering that your foot is going to the largest thing in the picture….and nobody wants to be remembered as Bigfoot…

Dear Model: Posing Tips for How to Look Your Best in Photographs dearmodel 1

Create separation between your limbs from your body. Not only does it prevent the arm/leg from being squashed against you spreading out any fat, it is also an optical illusion for a slimmer appearance in terms of overall width. A basic cheat that makes a massive difference.

Dear Model: Posing Tips for How to Look Your Best in Photographs dearmodel 3

Fat arm to thin arm

Dear Model: Posing Tips for How to Look Your Best in Photographs dearmodel 7

Body width shrunk by optical illusion

Have a basic understanding of light. For example, if you raise an arm to the light, it could be a whole F-stop brighter in camera than your face (being the object closest to the source of light according to the inverse square law). It will also cast a shadow across you. You can counteract this by using your other arm (!)…or, move your arm a fraction backwards, away from the direct beam of light. Learning how lighting falls is invaluable. Ask which is your key light and then work towards it.

Dear Model: Posing Tips for How to Look Your Best in Photographs dearmodel 4

Be aware of ‘mothing’. If the light has been metered to an exact spot, try to stick to it, or at least notice when you’ve crept closer to the light so you can rectify it if required.

No harry, don’t fly into the light!”…”I can’t help it, it’s so beeeeautiful… (A Bug’s Life)

Recognise when your eyes are over-rotating. It is always advisable to follow the line of your nose to keep your sight central. This stops you from looking bog eyed from too much white of the eye showing.

Dear Model: Posing Tips for How to Look Your Best in Photographs dearmodel 5

Know how far you can turn your head before your nose ‘breaks your cheek’. Go back to the mirror to see what angle becomes too far. This is perhaps a dying rule, but one that many competition judges still take into account so worth being aware of.

Elongate your neck to simulate height and poise. Possibly one of the hardest things to remember because it genuinely feels unnatural. Stand in front of the mirror and look at yourself…stand normally, then roll your shoulders back allowing your face to come forward…notice the difference in the width of your neck? An instant slimming trick.

Go one step further by popping your jaw towards camera if you want a strong line created by the shadow.

Dear Model: Posing Tips for How to Look Your Best in Photographs dearmodel 6

If the photographer is at a 12 o’clock angle, then standing angled at 1:30 rather than 3 o’clock will lose inches to your overall width. When you do, make sure it is shadow you are turning into and not the light. Always one rule: hide what you don’t want seen in shadow. Forget Weight Watchers, it’s all about tactical posing!

If you want to appear slimmer you can create a ‘false waist’. You can do this by positioning yourself to camera, then creating the waist you want seen with the positioning of your hands on your ‘hips’. See…crafty huh :)

Dear Model: Posing Tips for How to Look Your Best in Photographs dearmodel 8

If you’re like me and you don’t have natural curves, then fake them! And I don’t mean plastic surgery. As shown above, learning how to pop your hip is not something everyone can do but can be a big advantage if you can for great shape. Allowing your knees to cross slightly will emphasise that ‘S’ figure with it.

Keep your hands loose and fluid. The term ‘ballet hands’ is often thrown around…but if you’re like me and the only dancing you do well is the truffle shuffle, then keep your middle finger lower than the others whilst relaxing them with a slight curve. Don’t clump your fingers together and avoid showing the back of your hand. Why? Because backs of hands are big and ugly…sides of hands are small and dainty. This was drilled into me from the start of my career by friend and photographer Gary Hill.

See how much longer and larger my hands look when left straight:

Dear Model: Posing Tips for How to Look Your Best in Photographs dearmodel 11

Play with what is available. If you are wearing a flowing dress, play with it by tossing it into the air or working the movement in the bottom. Remember if you are wearing trousers then your legs don’t need to be so clamped together.

Dear Model: Posing Tips for How to Look Your Best in Photographs dearmodel 9

Putting theory into practice in Paris, photograph by Andrew Appleton (MUA Donna Graham & assistant Vicki Head)

You should have knowledge of what you are wearing and why. If you have been hired to sell a specific product, make sure you are pulling poses that are commercially complimentary and not hiding the product.

Own a ‘modelling kit’ and take it on all shoots. These are the things you will need, but may not be directly mentioned in pre-shoot communications. They are; outdoor/studio shoes, nude/black underwear, face wipes, moisturiser/oil for your legs, a plain vest top, safety pins/clamps, a straw for drinks (as not to ruin your lipstick), your own water with a sugary snack to keep you going (your shoot location may be far away from shops), spare stockings for lingerie shoots….and also hairspray, a top up lipstick, hair grips, brush and eyelash glue (in case the MUA can’t stay). If you have been booked for a specific job such as bridal, it is also well received if you bring appropriate accessories i.e. a pretend wedding ring.

Please be honest about your size and measurements. Nobody minds how tall or small, big or slim you are…but they do need to know in advance for obvious reasons. You may be sent home unpaid if you have exaggerated the truth and wasted time by not fitting the casting criteria. Save yourself and others the embarrassment.

Talk to other models, check references and don’t ever assume anything. Despite many people thinking models are the bitchy ones, it’s actually very untrue most of the time. We look after each other and the best out there are very supportive. I was terrified to talk to the people I admired, but then I realised they’re only human, we are all the same…and they’re pretty damn awesome guys and girls when it comes to helping you out.

Most of all be fun, easy going and willing to go that extra mile! If you are genuinely a delight to be around, you are 100% more likely to be rebooked. You are part of a team so pull your weight, diva’s are so 2010.

Dear Model: Posing Tips for How to Look Your Best in Photographs dearmodel 10

Fun times to get the shot despite being in the cold rain, creating ‘I bleed colours’ from my personal Dreamcatcher Project with Richard Powazynski, Lauri Laukkanen and Donna Graham

I hope this letter has been of some use to you and that you can take something from it. As I said, not all of this will work for you, it’s just tricks I wish I’d known when I began modelling. But then again look at Kate Moss, she breaks all of the ‘rules’…and still looks amazing – that’s fashion darling.

The day you stop enjoying your job is the day you need a new one. Work hard and love your life!

Kindest regards,

Other Model.


P.S. All pose examples are unedited for a true representation – taken by Jon Brook


P.P.S. If you found this helpful I’d really appreciate it if you ‘like’ my Facebook page and follow me on Twitter. Thank you!


About the author: Jen Brook is a creative fine art, conceptual and fashion model from UK. You can find her on Facebook and on Twitter. She also blogs over on Tumblr. This article originally appeared here.

21 May 19:51

Happy 81st Birthday Dieter Rams !

by Simon Martin
feature
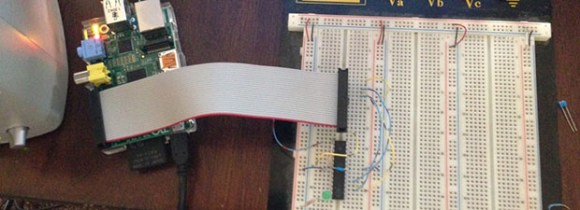
Perhaps the most widely-respected industrial designer of all time, Dieter has inspired thousands—if not millions of designers with his perspectives on ‘good design’. From Apple’s Jony Ive to budding design school students, the Ten Principles of Good Design is just as relevant today as it was in the early 1980’s when Dieter began to recognize “an impenetrable confusion of forms, colors, and noises” in the world of design and manufacturing. In honor of his 81st, perhaps take a moment to reflect–yet again–on Rams’ ten principles. Like a good book, I find myself reading from a different perspective every time I read them. Enjoy your cake, Dieter!

1

Good design is innovative

The possibilities for innovation are not, by any means, exhausted. Technological development is always offering new opportunities for innovative design. But innovative design always develops in tandem with innovative technology, and can never be an end in itself.

2

Good design makes a product useful

A product is bought to be used. It has to satisfy certain criteria, not only functional, but also psychological and aesthetic. Good design emphasizes the usefulness of a product whilst disregarding anything that could possibly detract from it.

3

Good design is aesthetic

The aesthetic quality of a product is integral to its usefulness because products we use every day affect our person and our well-being. But only well-executed objects can be beautiful.

4

Good design makes a product understandable

It clarifies the product’s structure. Better still, it can make the product talk. At best, it is self-explanatory.

5

Good design is unobtrusive

Products fulfilling a purpose are like tools. They are neither decorative objects nor works of art. Their design should therefore be both neutral and restrained, to leave room for the user’s self-expression.

6

Good design is honest

It does not make a product more innovative, powerful or valuable than it really is. It does not attempt to manipulate the consumer with promises that cannot be kept.

7

Good design is long-lasting

It avoids being fashionable and therefore never appears antiquated. Unlike fashionable design, it lasts many years – even in today’s throwaway society.

8

Good design is thorough down to the last detail

Nothing must be arbitrary or left to chance. Care and accuracy in the design process show respect towards the user.

9

Good design is environmentally-friendly

Design makes an important contribution to the preservation of the environment. It conserves resources and minimizes physical and visual pollution throughout the lifecycle of the product.

10

Good design is as little design as possible

Less, but better – because it concentrates on the essential aspects, and the products are not burdened with non-essentials.

Back to purity, back to simplicity.