Shared posts

13 May 17:31

Crispy Chipotle Cheddar Smashed Potatoes.

by Jessica

How to make chipotle cheddar smashed potatoes and elevate your life!

These super crispy chipotle cheddar smashed potatoes are the best side dish. A little spicy and smothered in cheese, they are irresistible.

Just joking. Sort of. I mean, these might elevate your life right now in a delicious, spicy way?

It’s worth a try. 

smashed chipotle potatoes on a baking sheet

I’m popping in today with this bonus cop-out recipe for you because it’s just TOO good. I wanted to share it with you in case you need a quick side dish (or, let’s be honest… a snack?) with all the cooking you’re doing at home. P.S. who else is majorly over the dishes situation?

SO!

We make crispy smashed potatoes constantly in this house. They are easily Eddie’s favorite side dish. 

Judging from how much you guys make this recipe, I think you love them too!

smashed chipotle cheddar potatoes on baking sheet

They are easy, you can prep them ahead of time (I do at least every other week) and they just taste.so.good. And the best best best part is that they go with so many dishes.

Oh and that they are wildly versatile.

!!!!!!!!

All the exclamation points. Because who wouldn’t want to eat this?

chipotle cheddar smashed potatoes with sour cream and chives

I love a smashed potato recipe so much that I included it in my next cookbook, along with a sweet potato version. So excited for you to see!

We make the classic version constantly, but sometimes I like to switch it up. Obviously, since I have the I’m-always-bored brain the kitchen.

Depends on what the main meal is, you know? 

sour cream and bacon on chipotle cheddar smashed potatoes

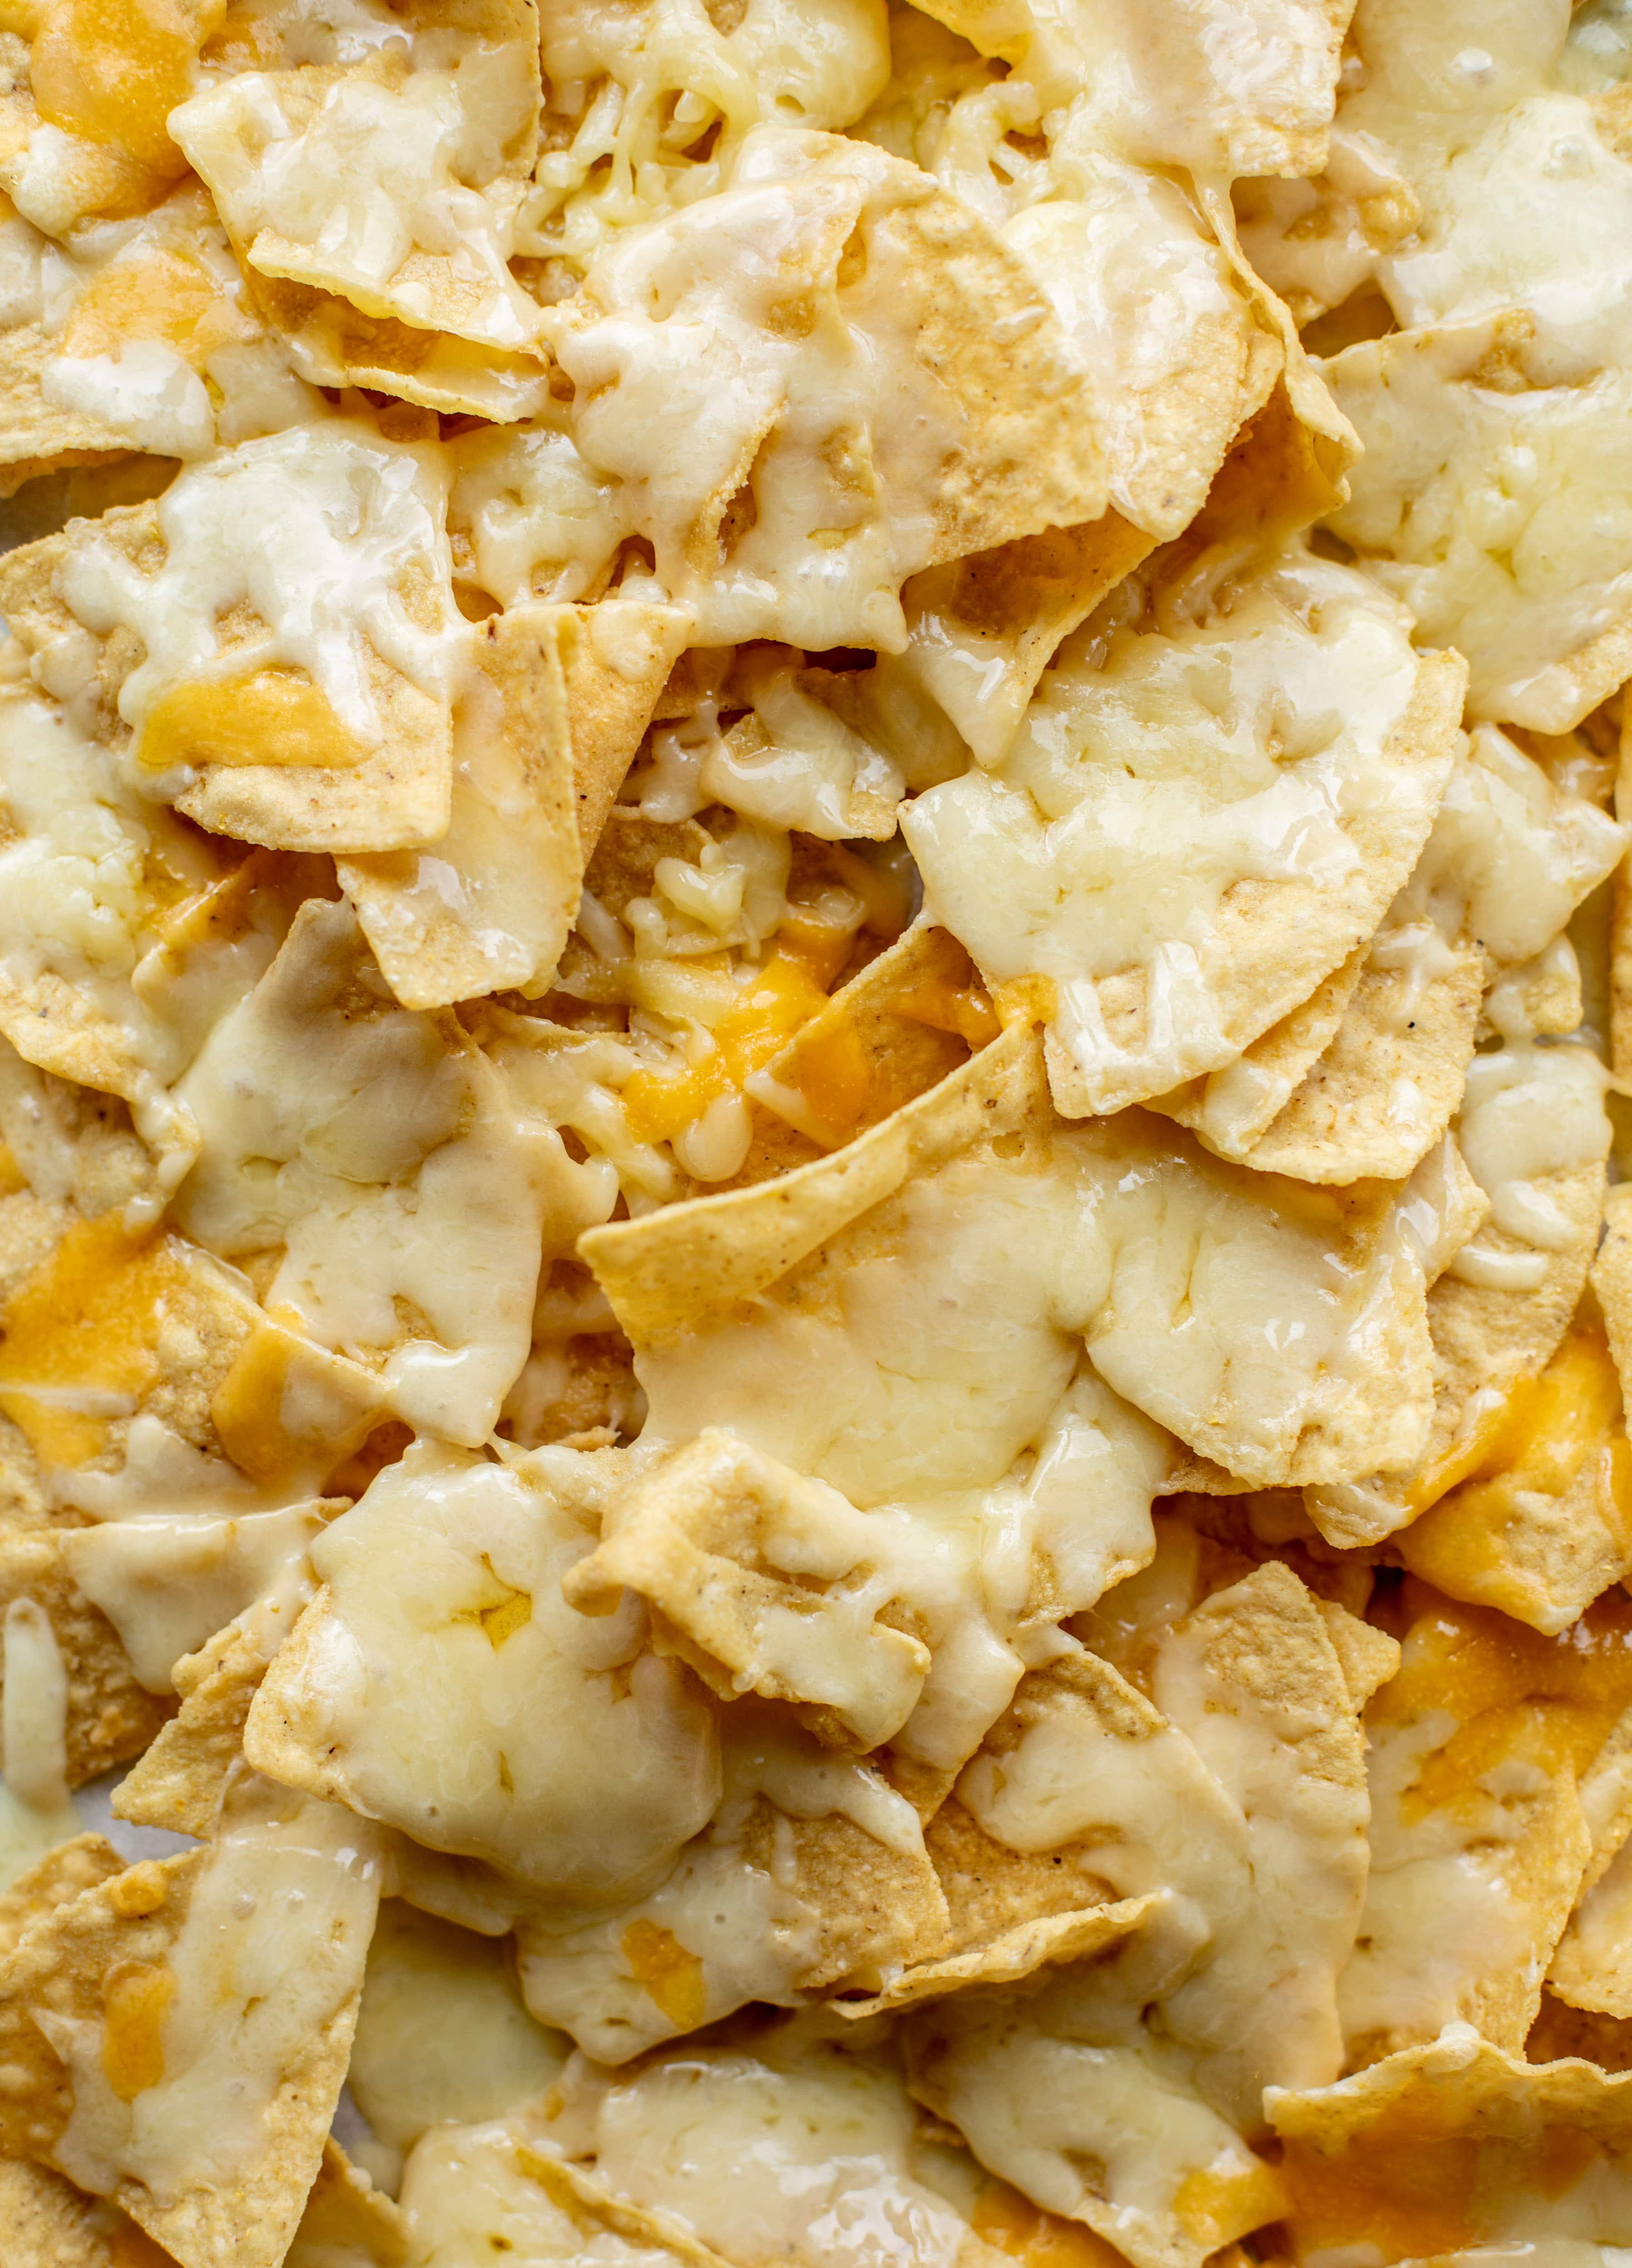
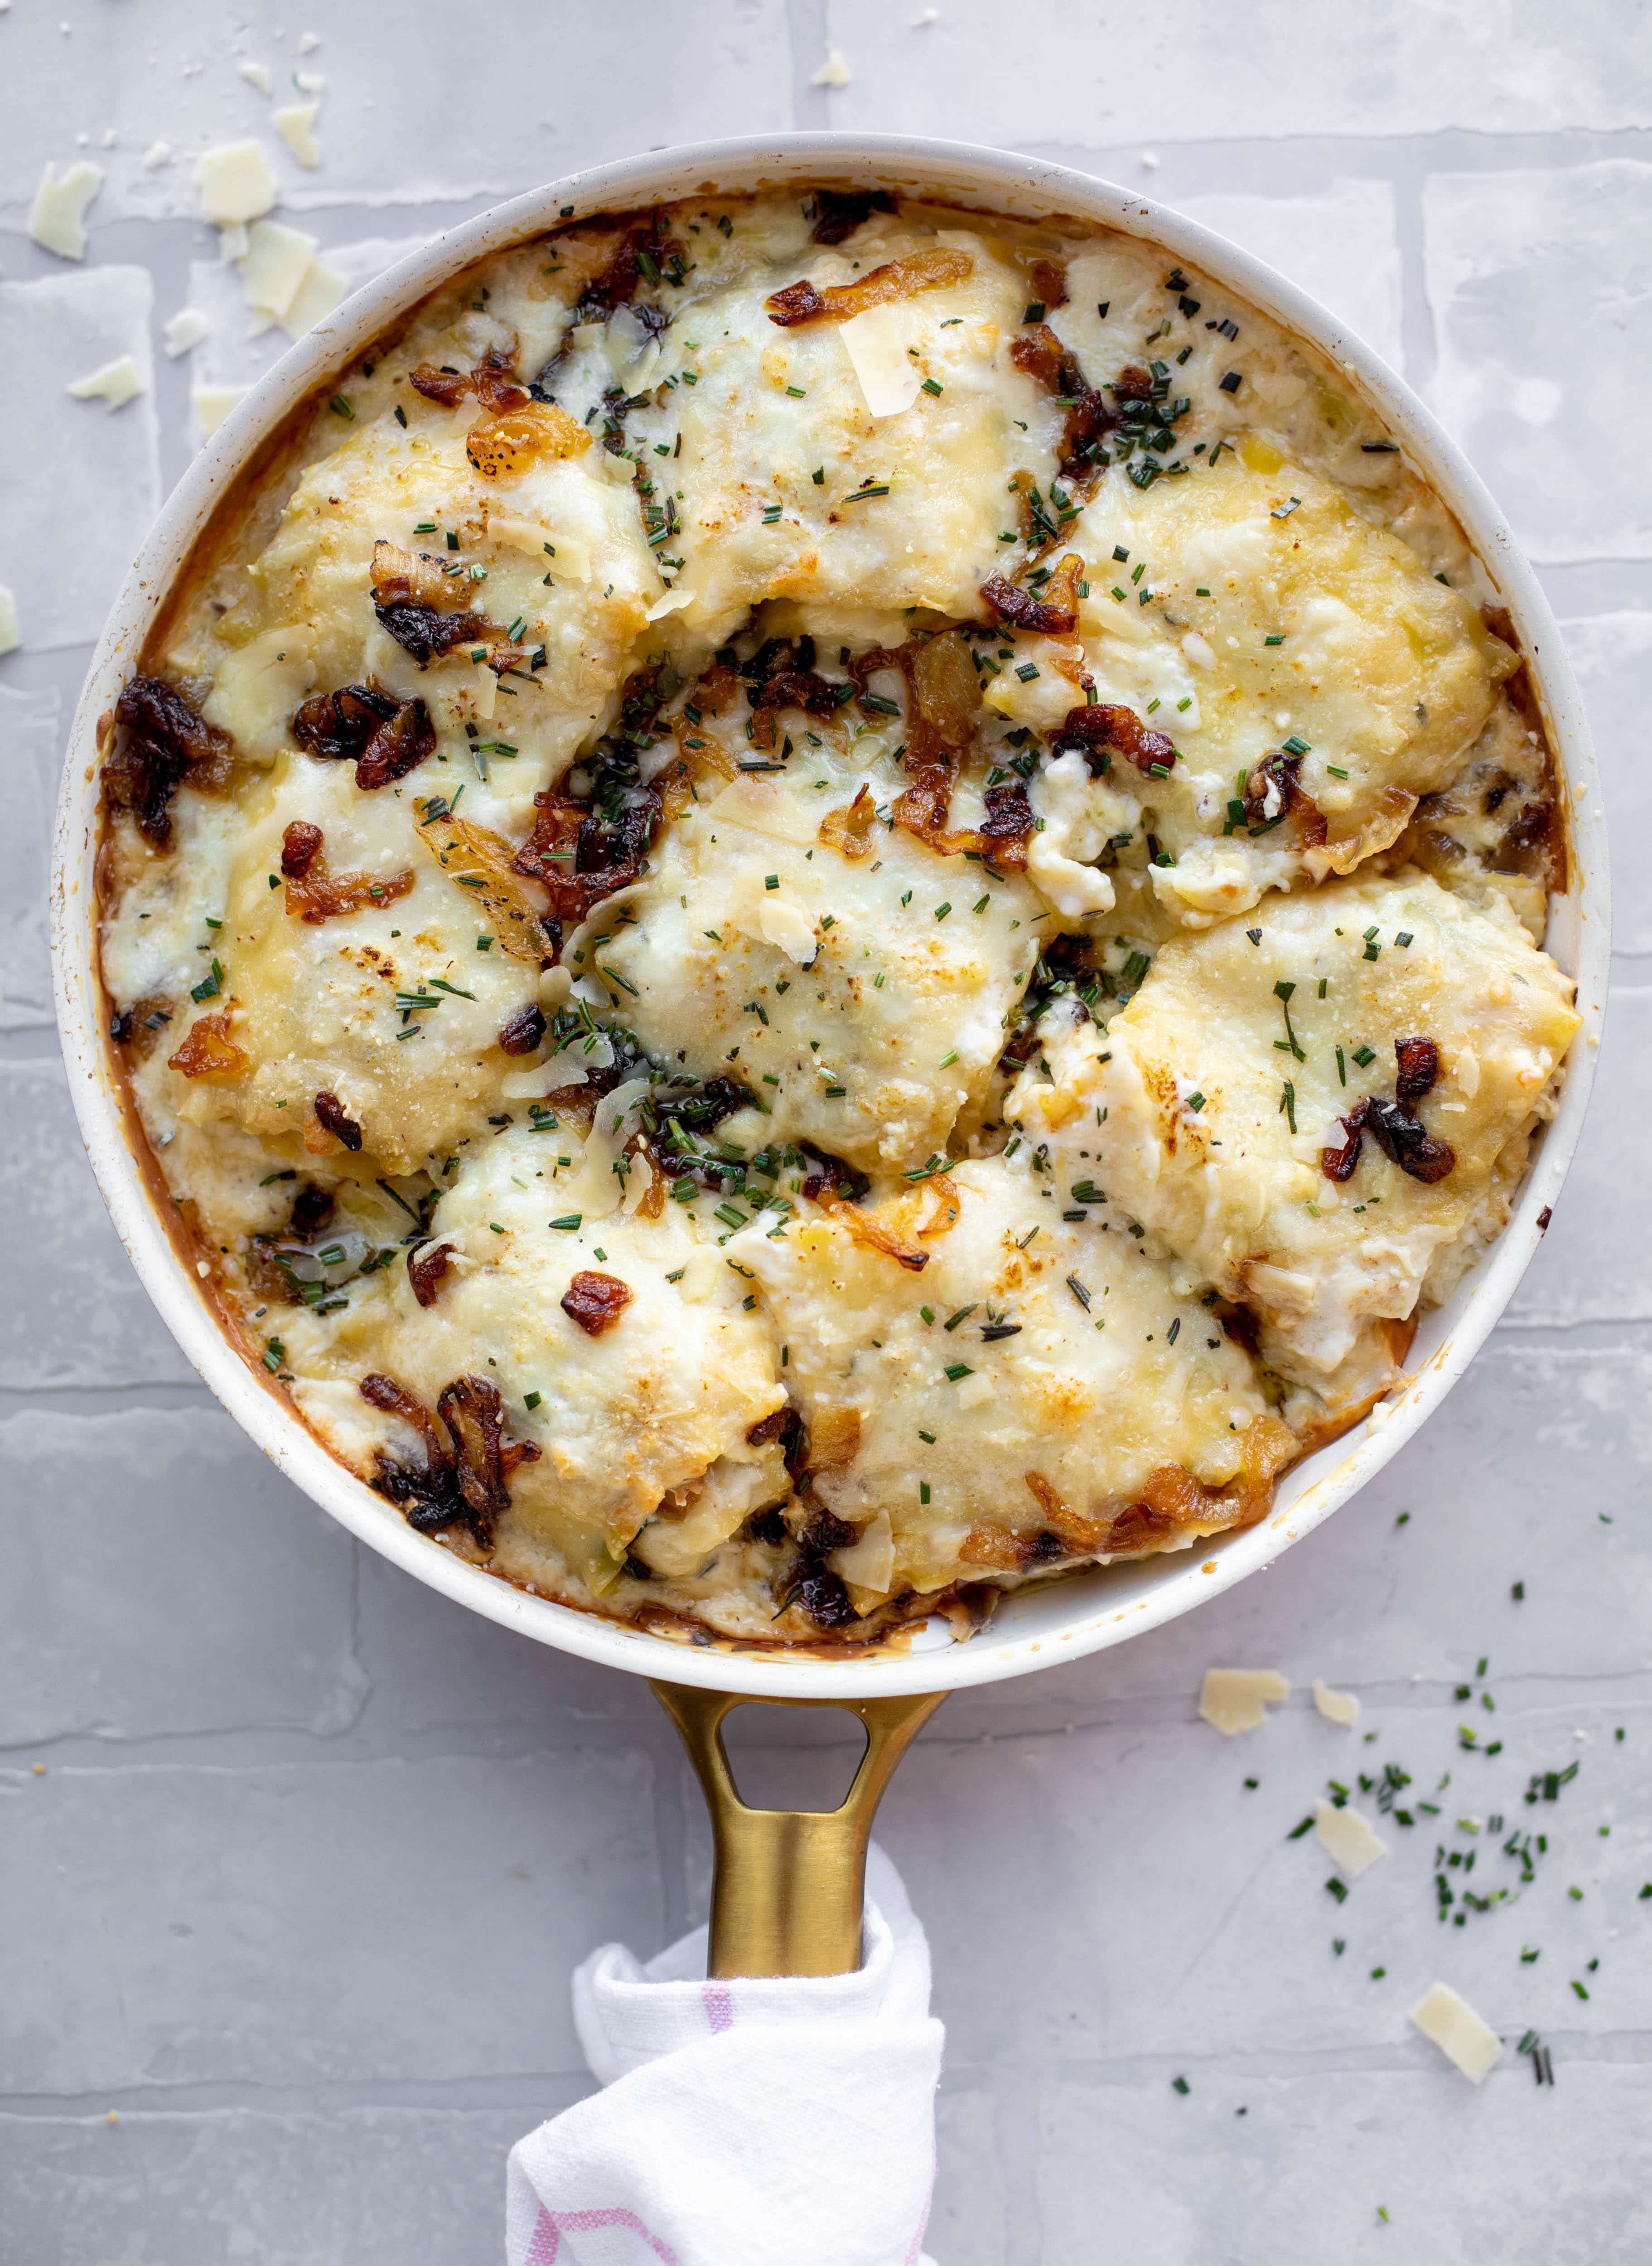
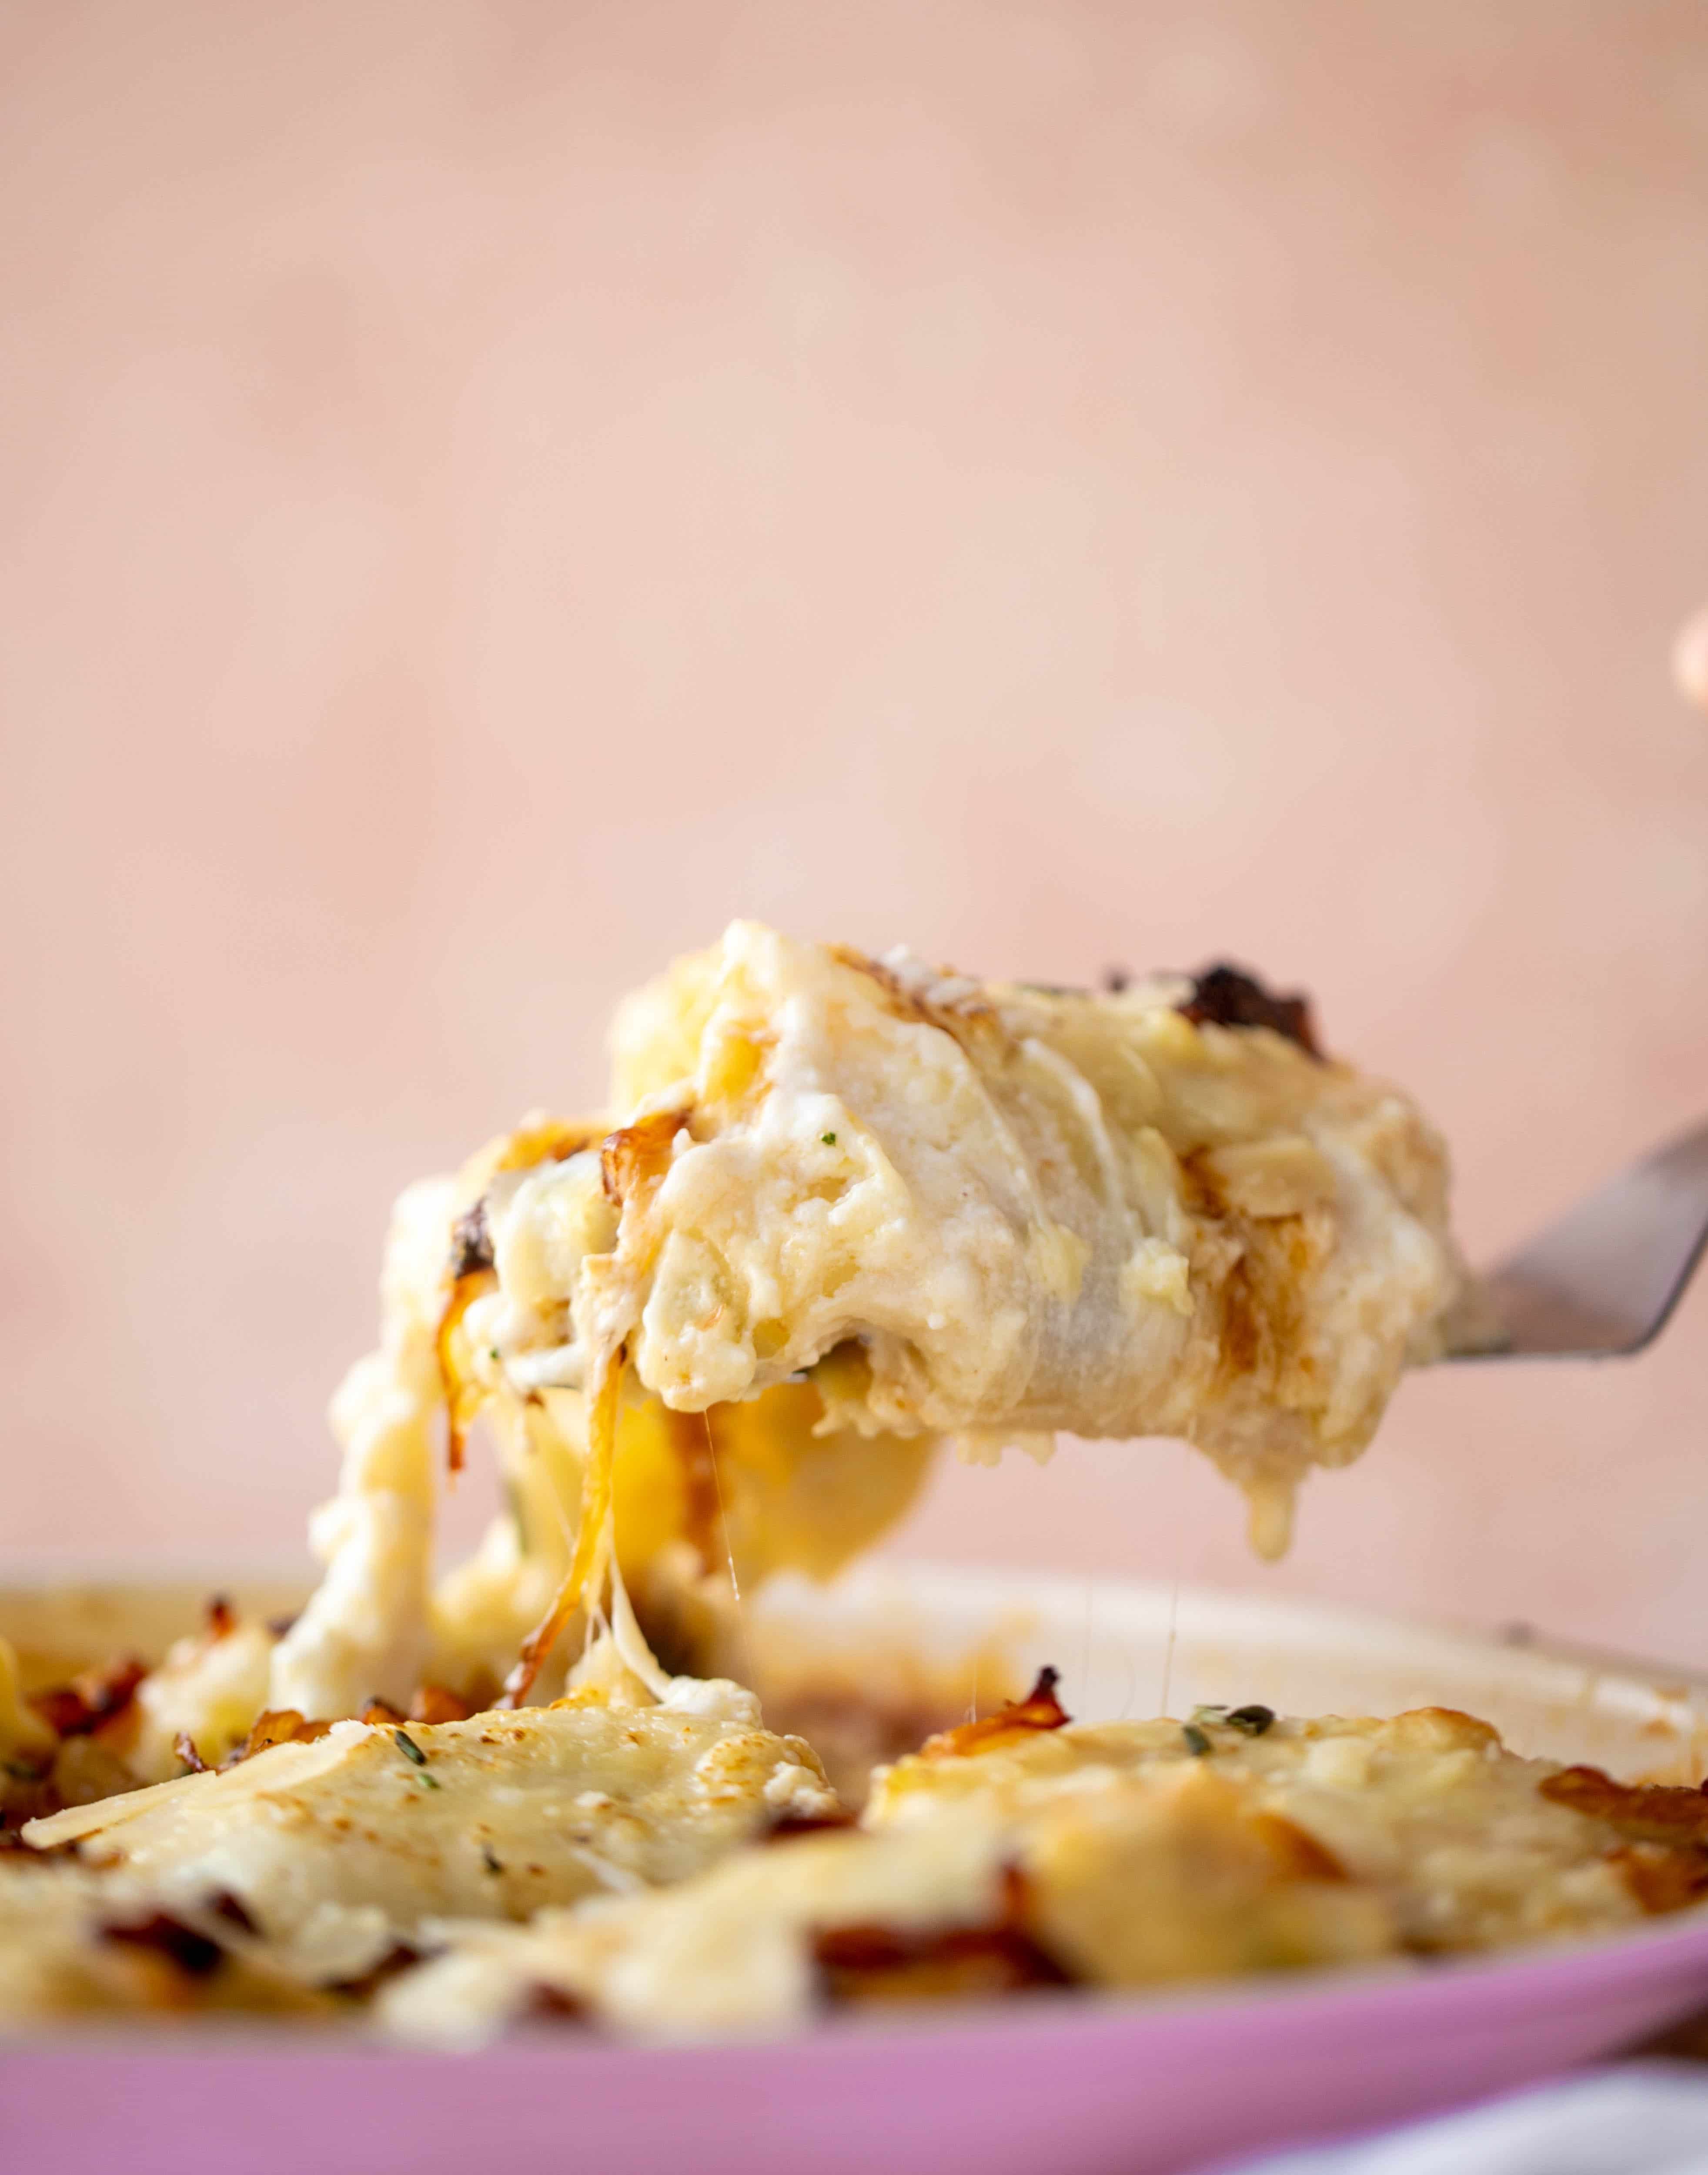
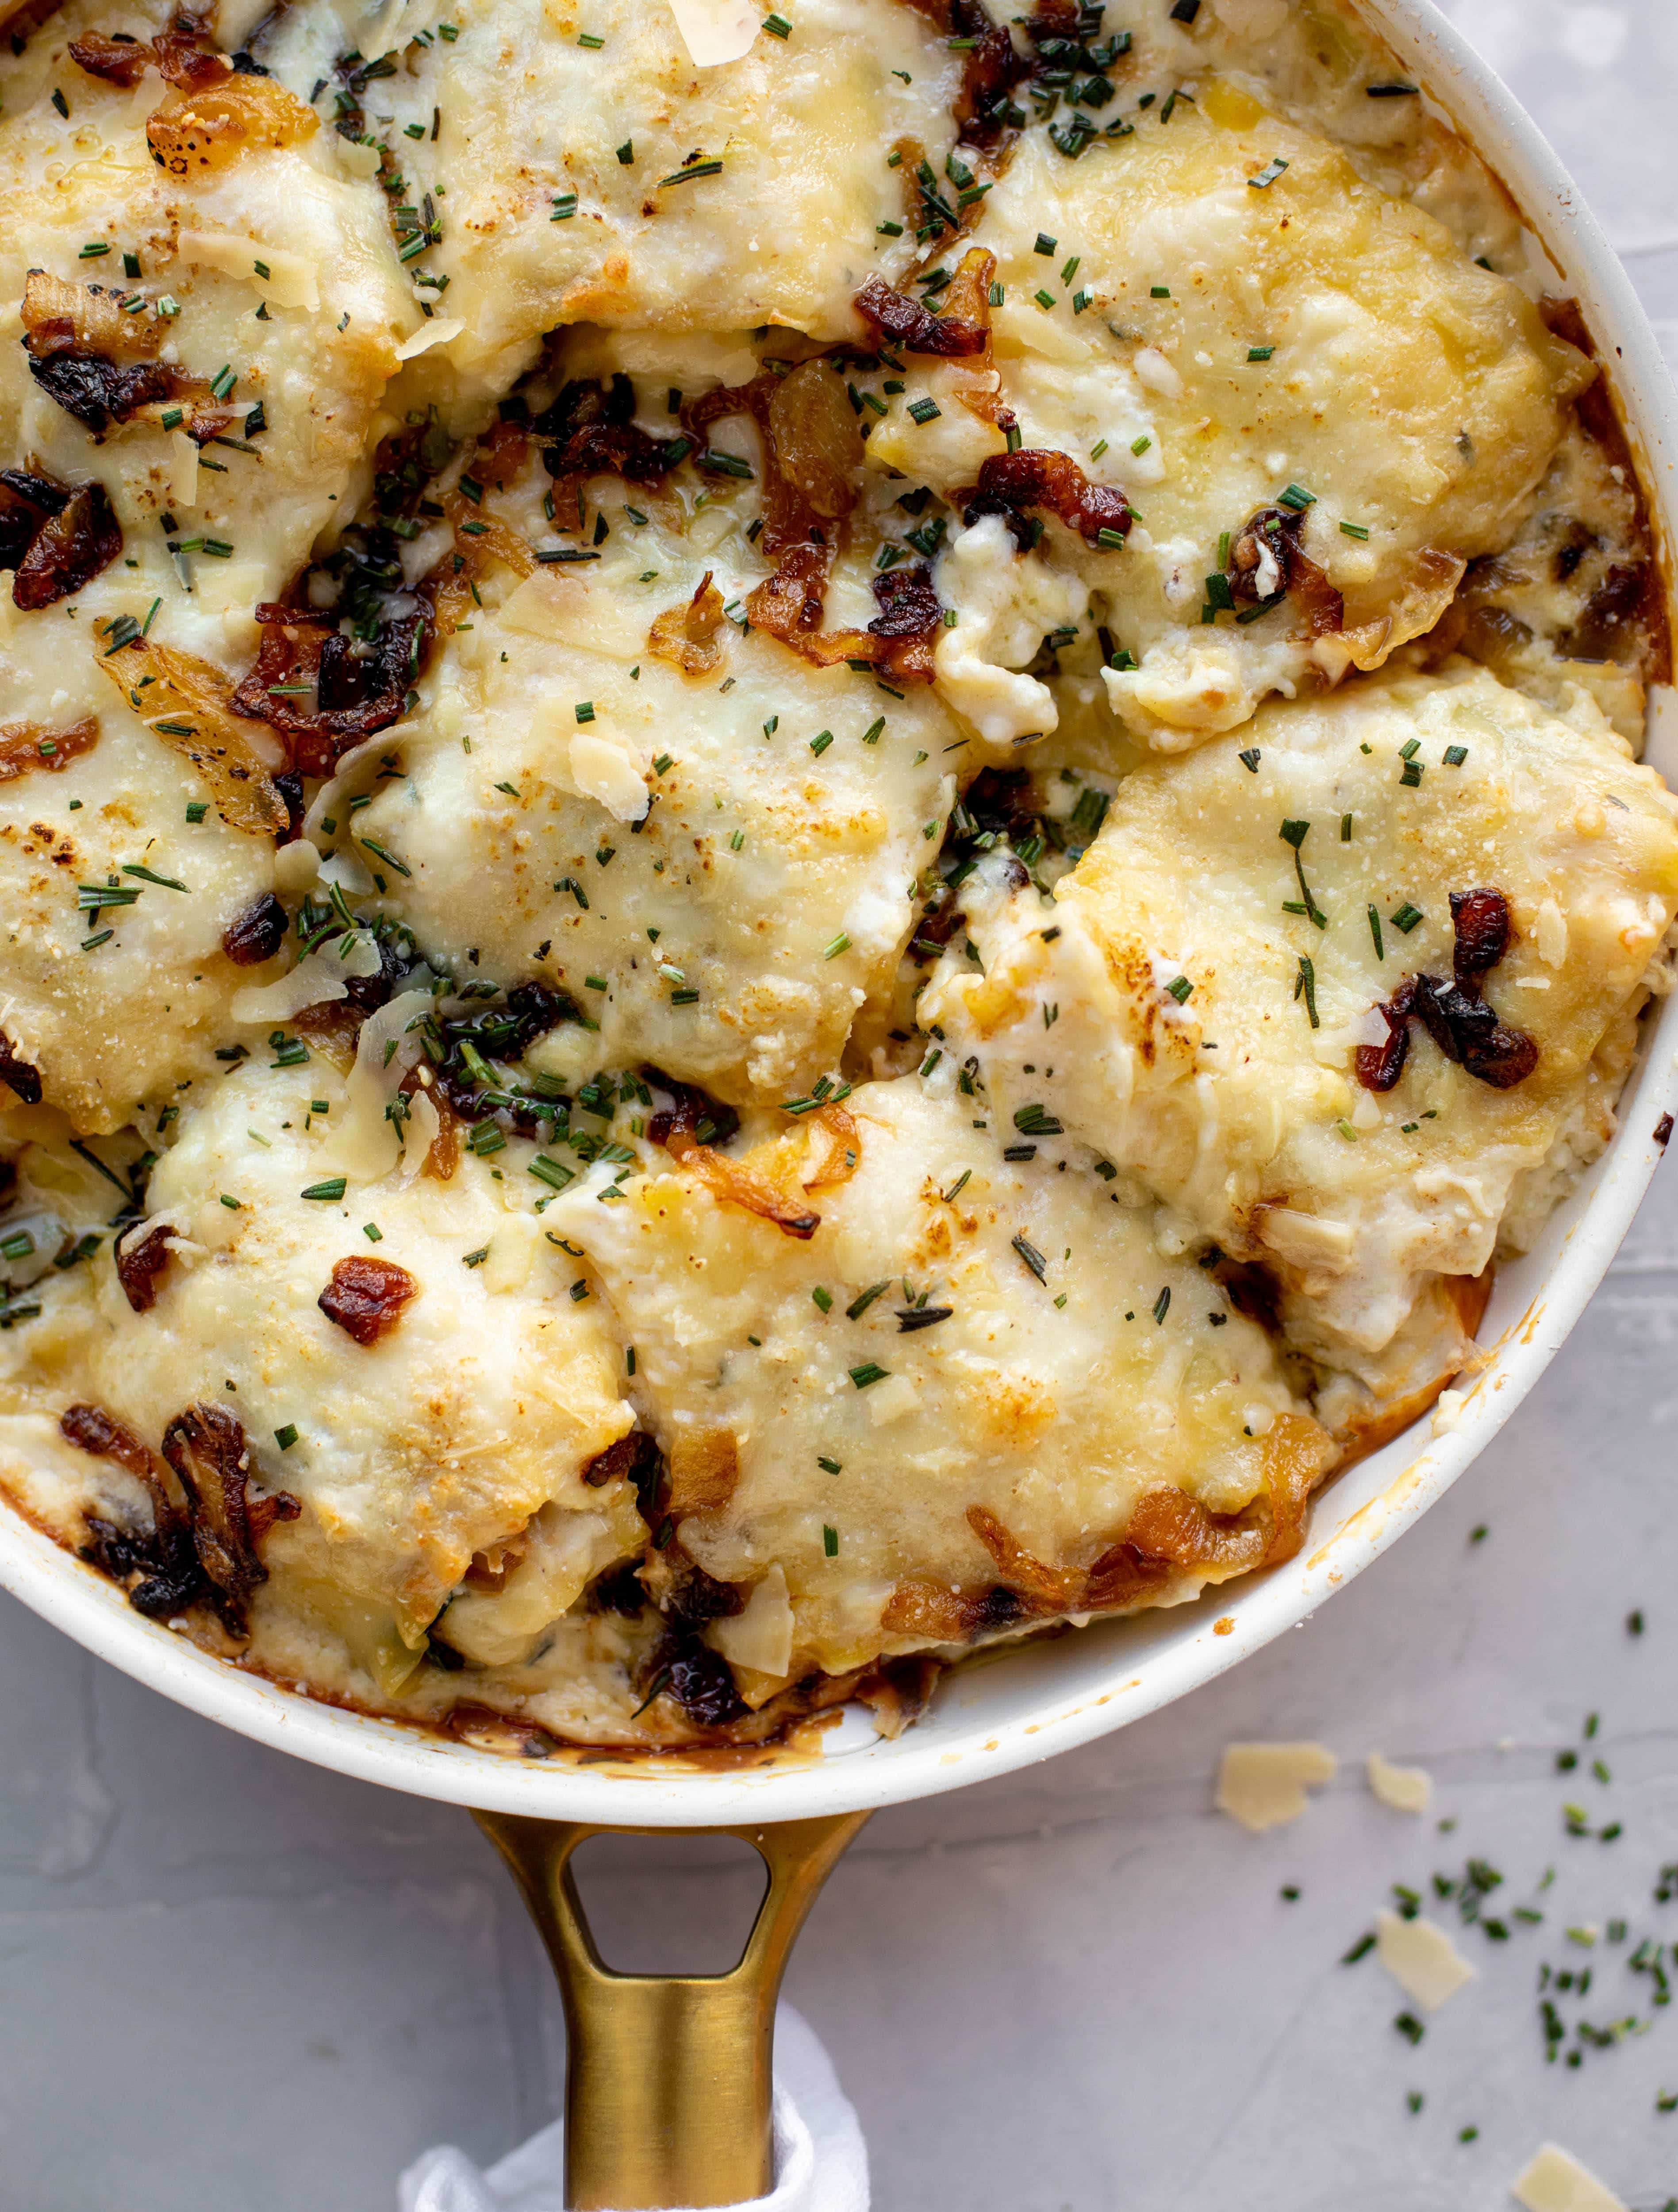
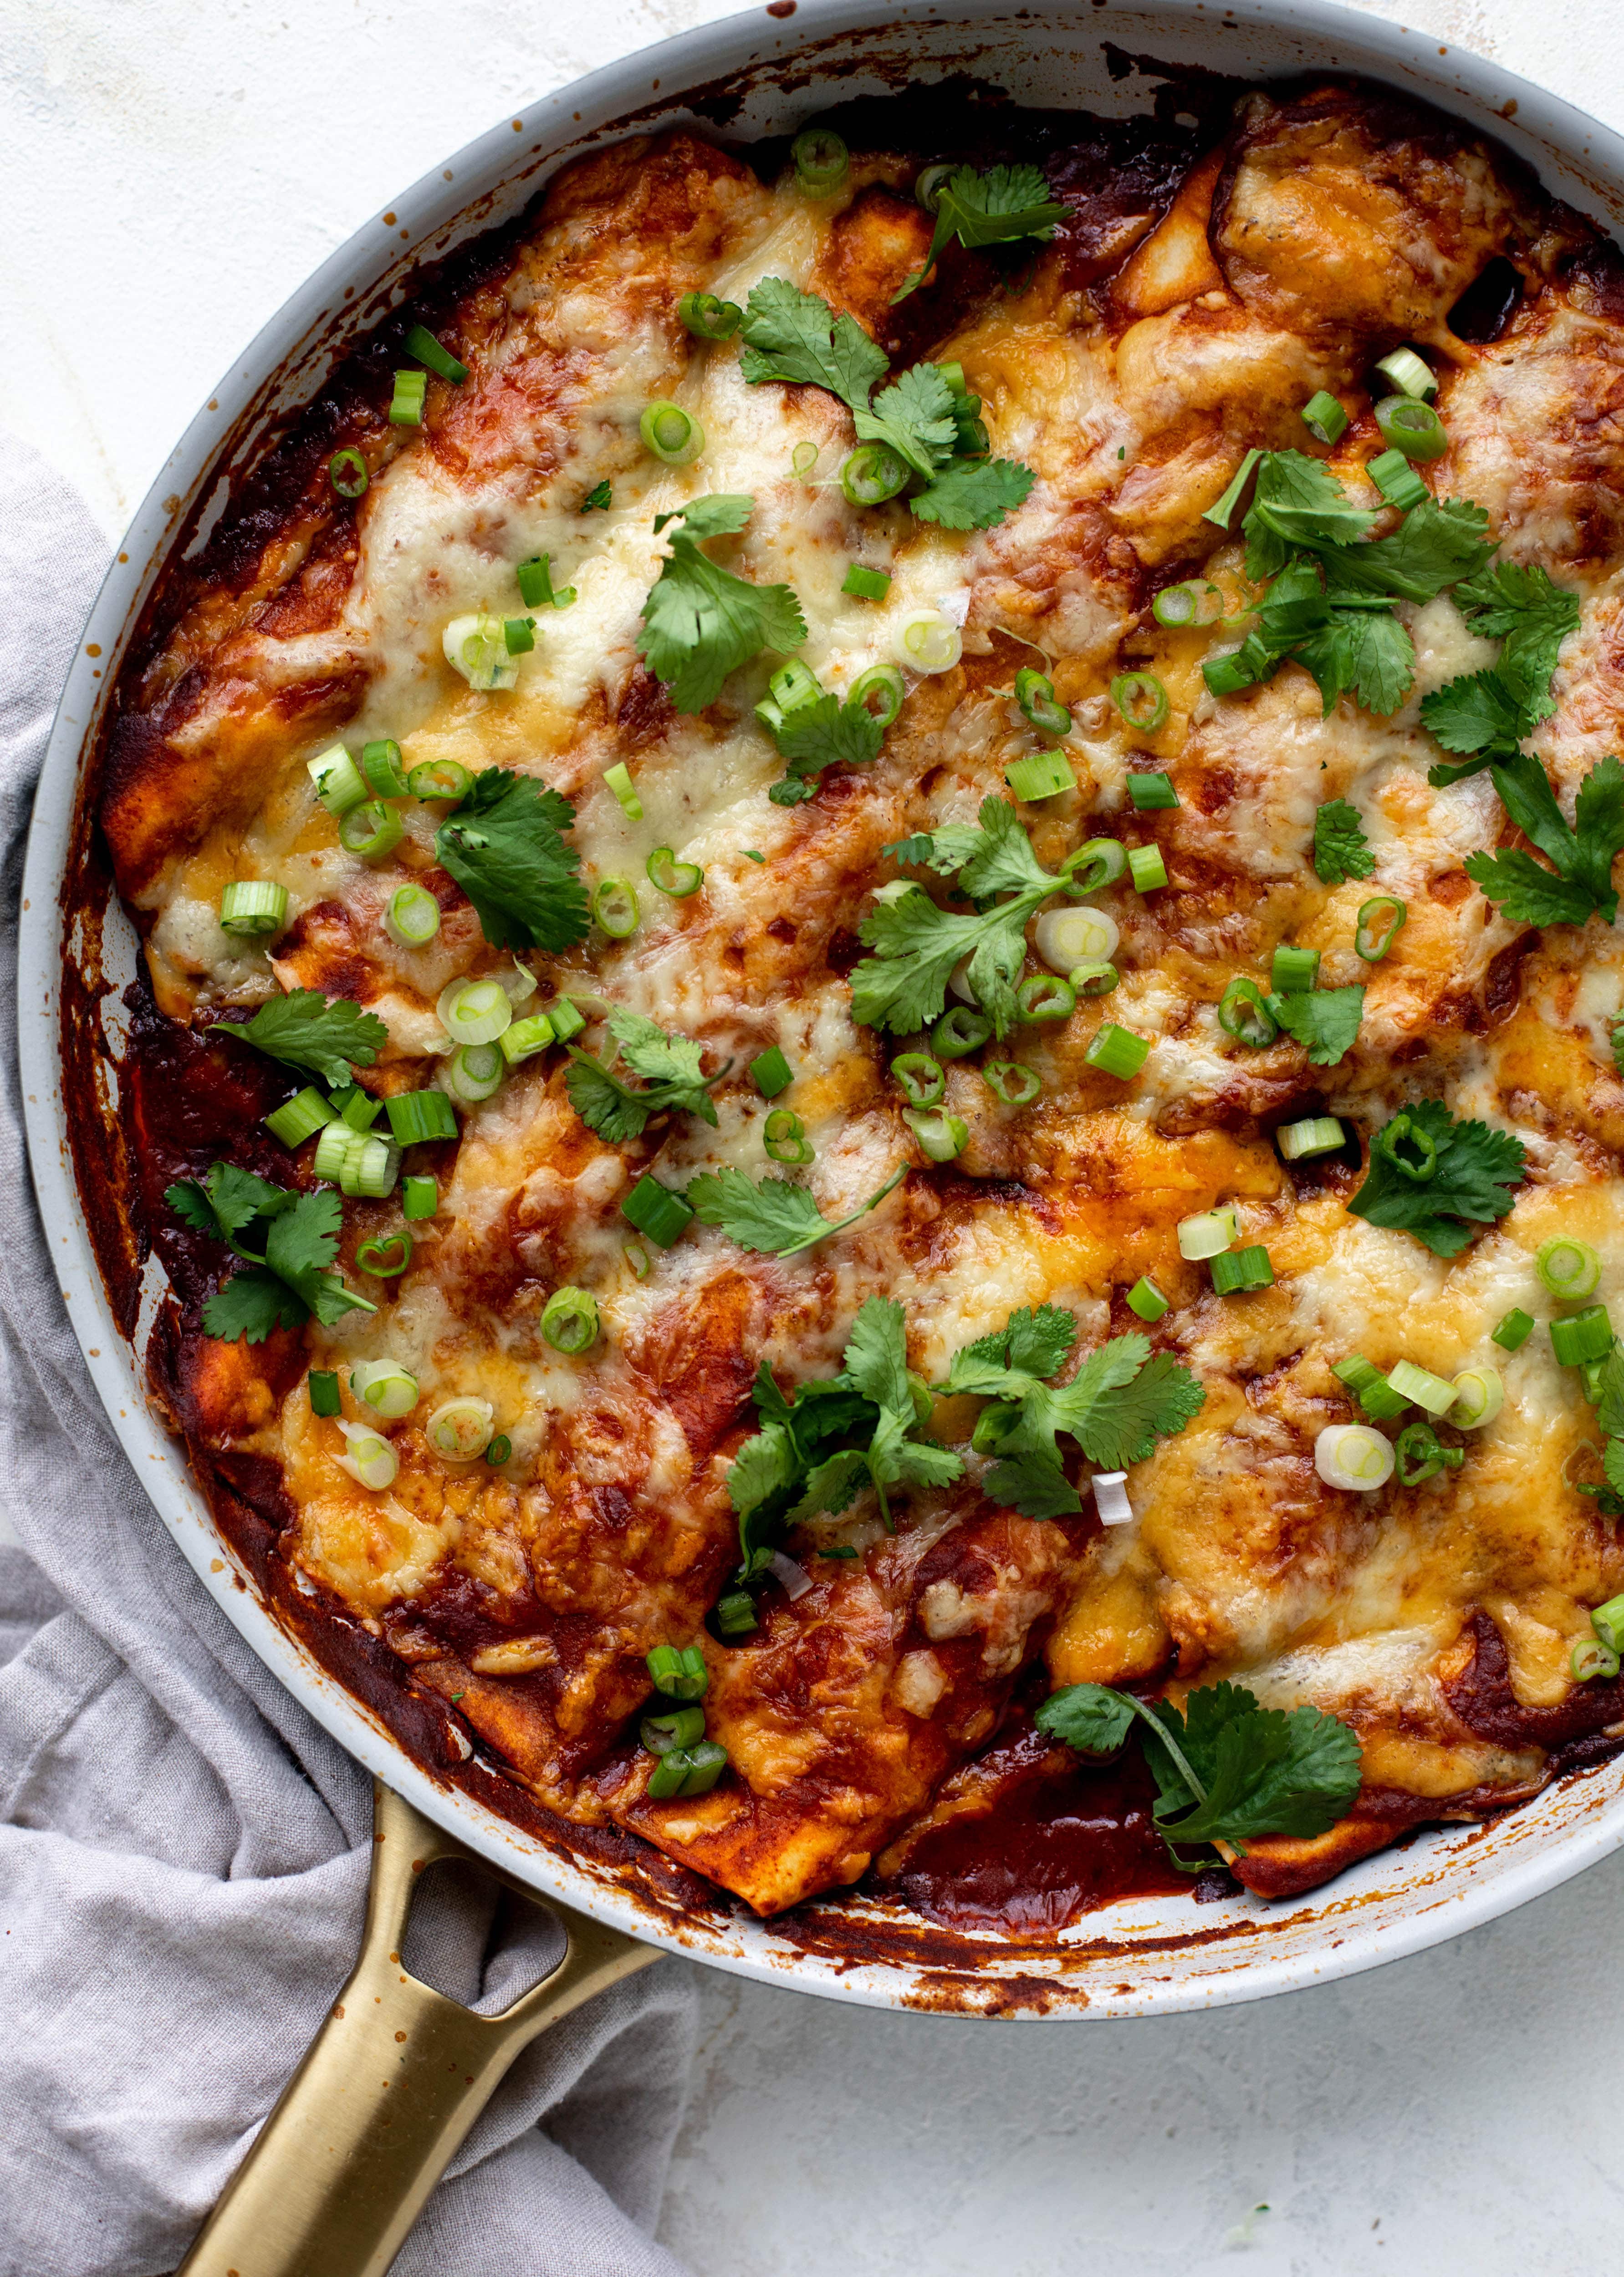
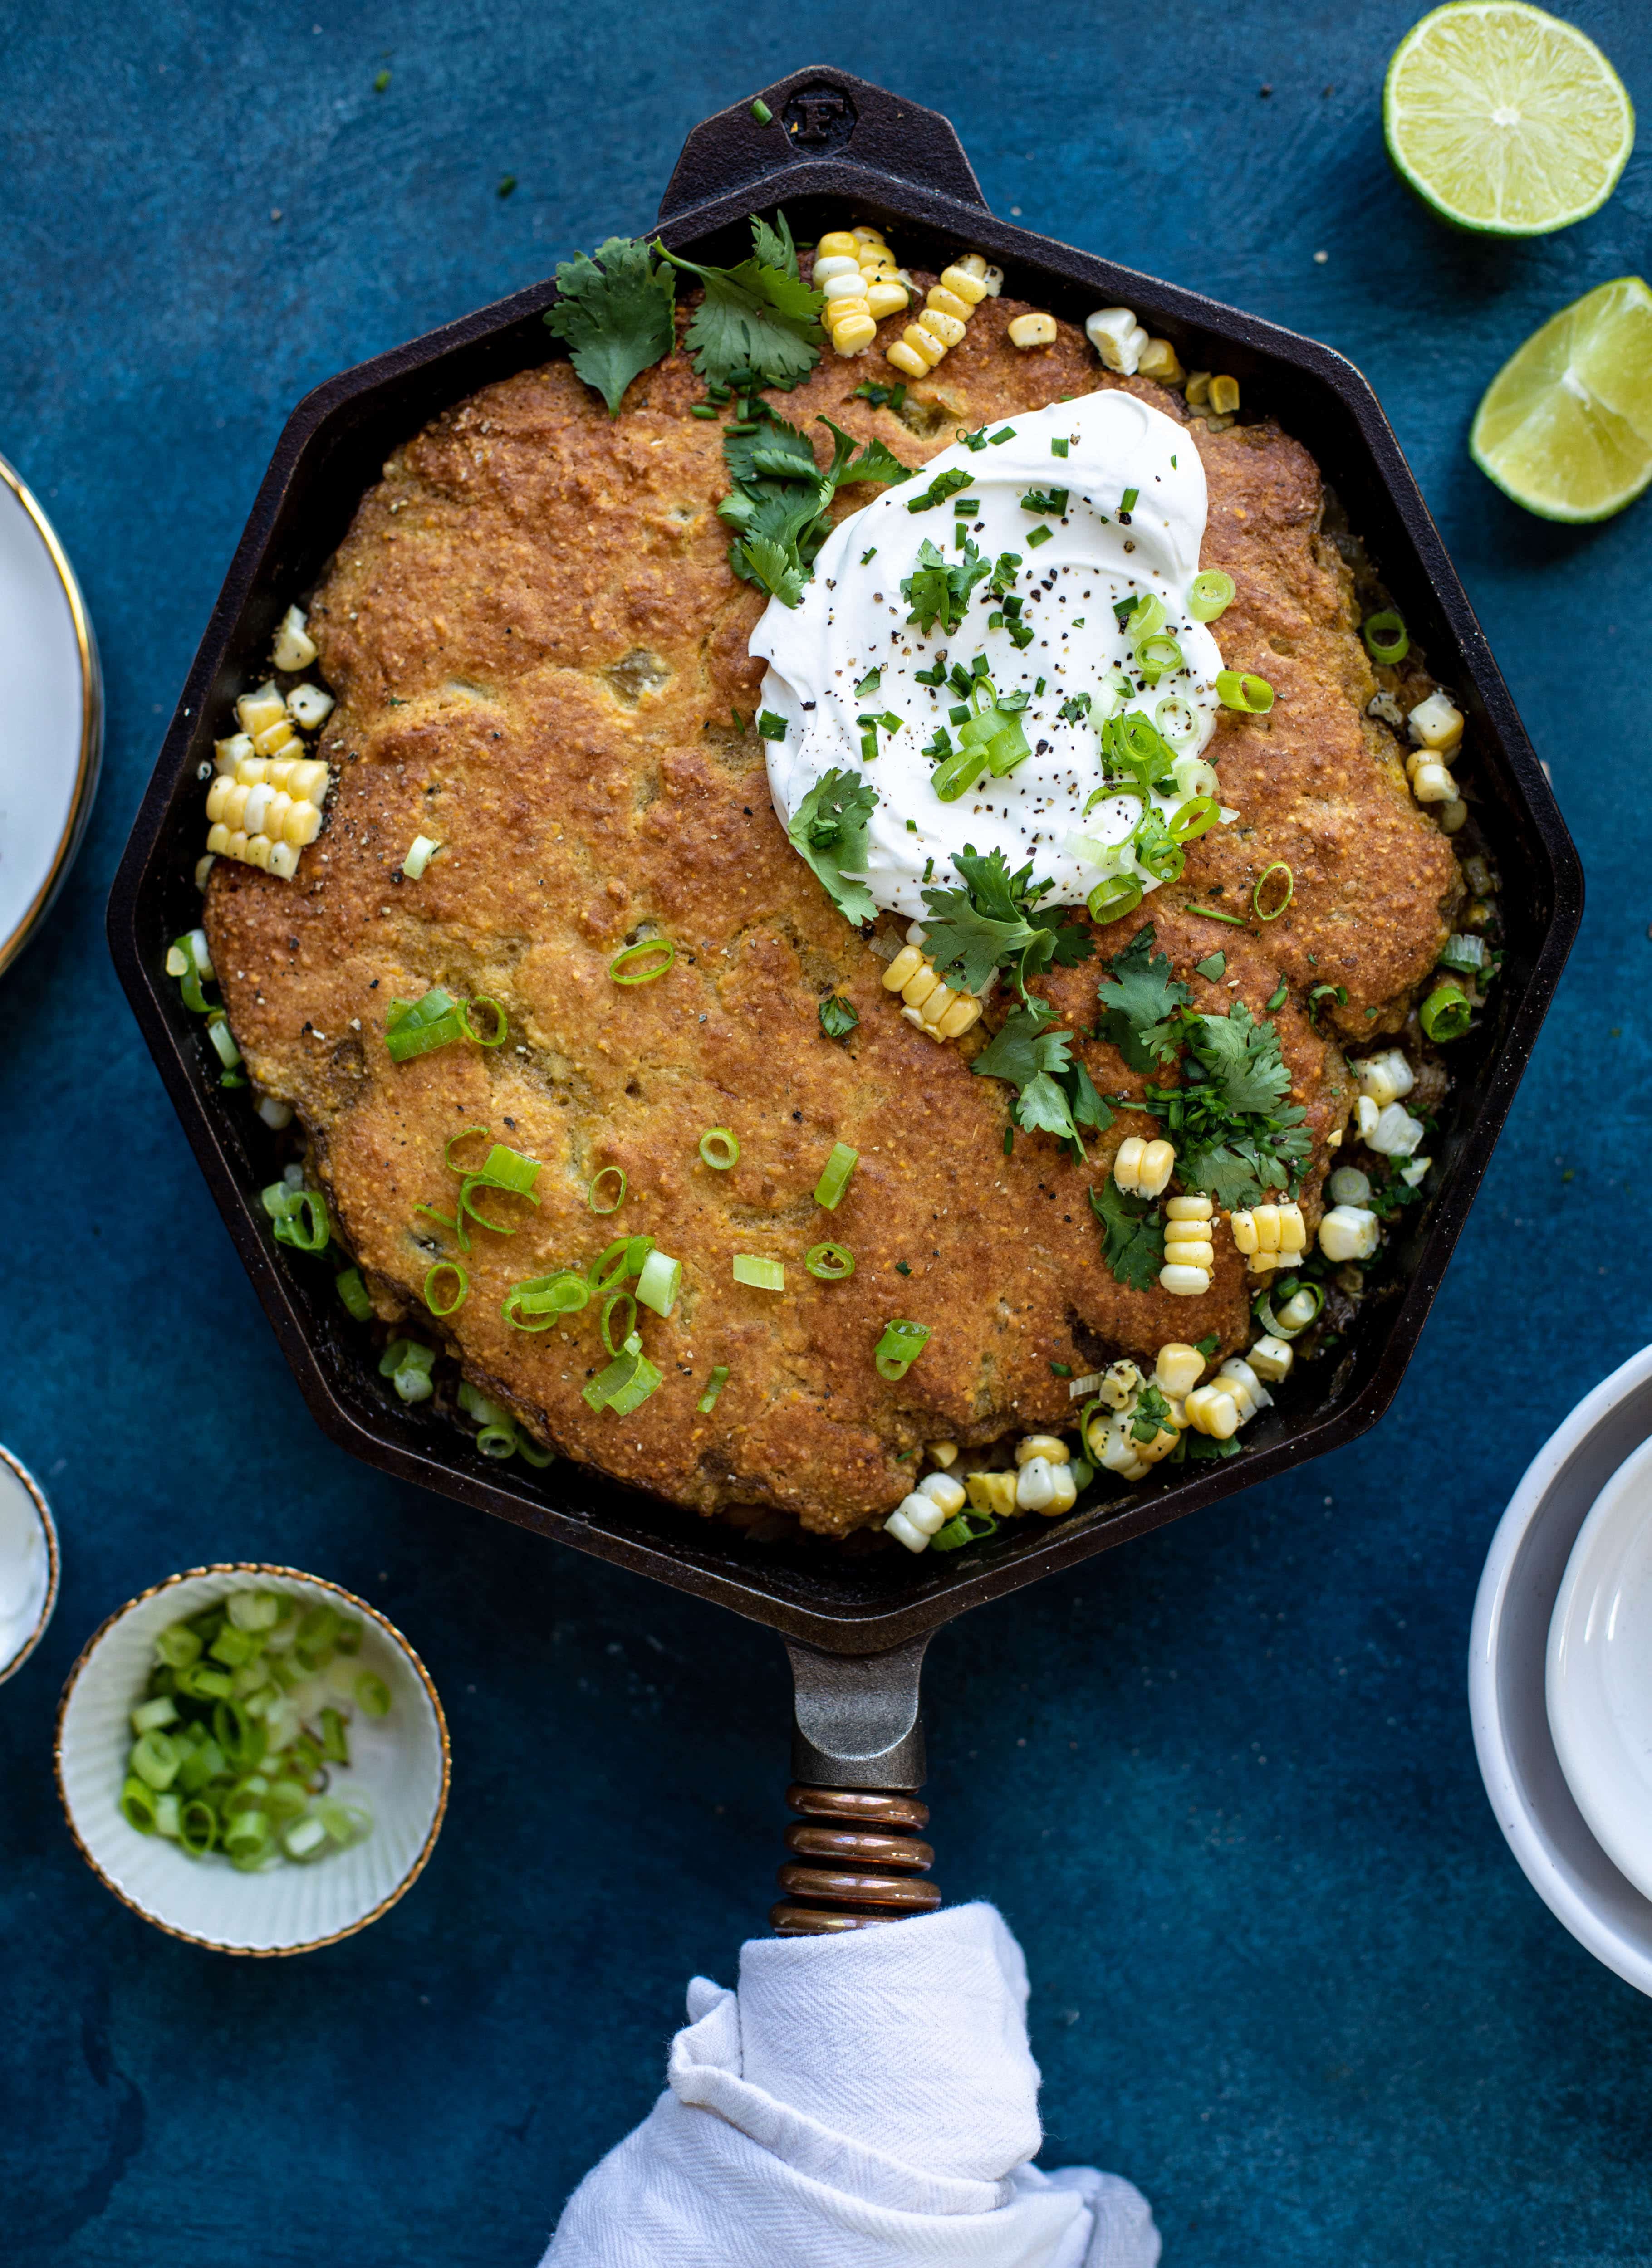
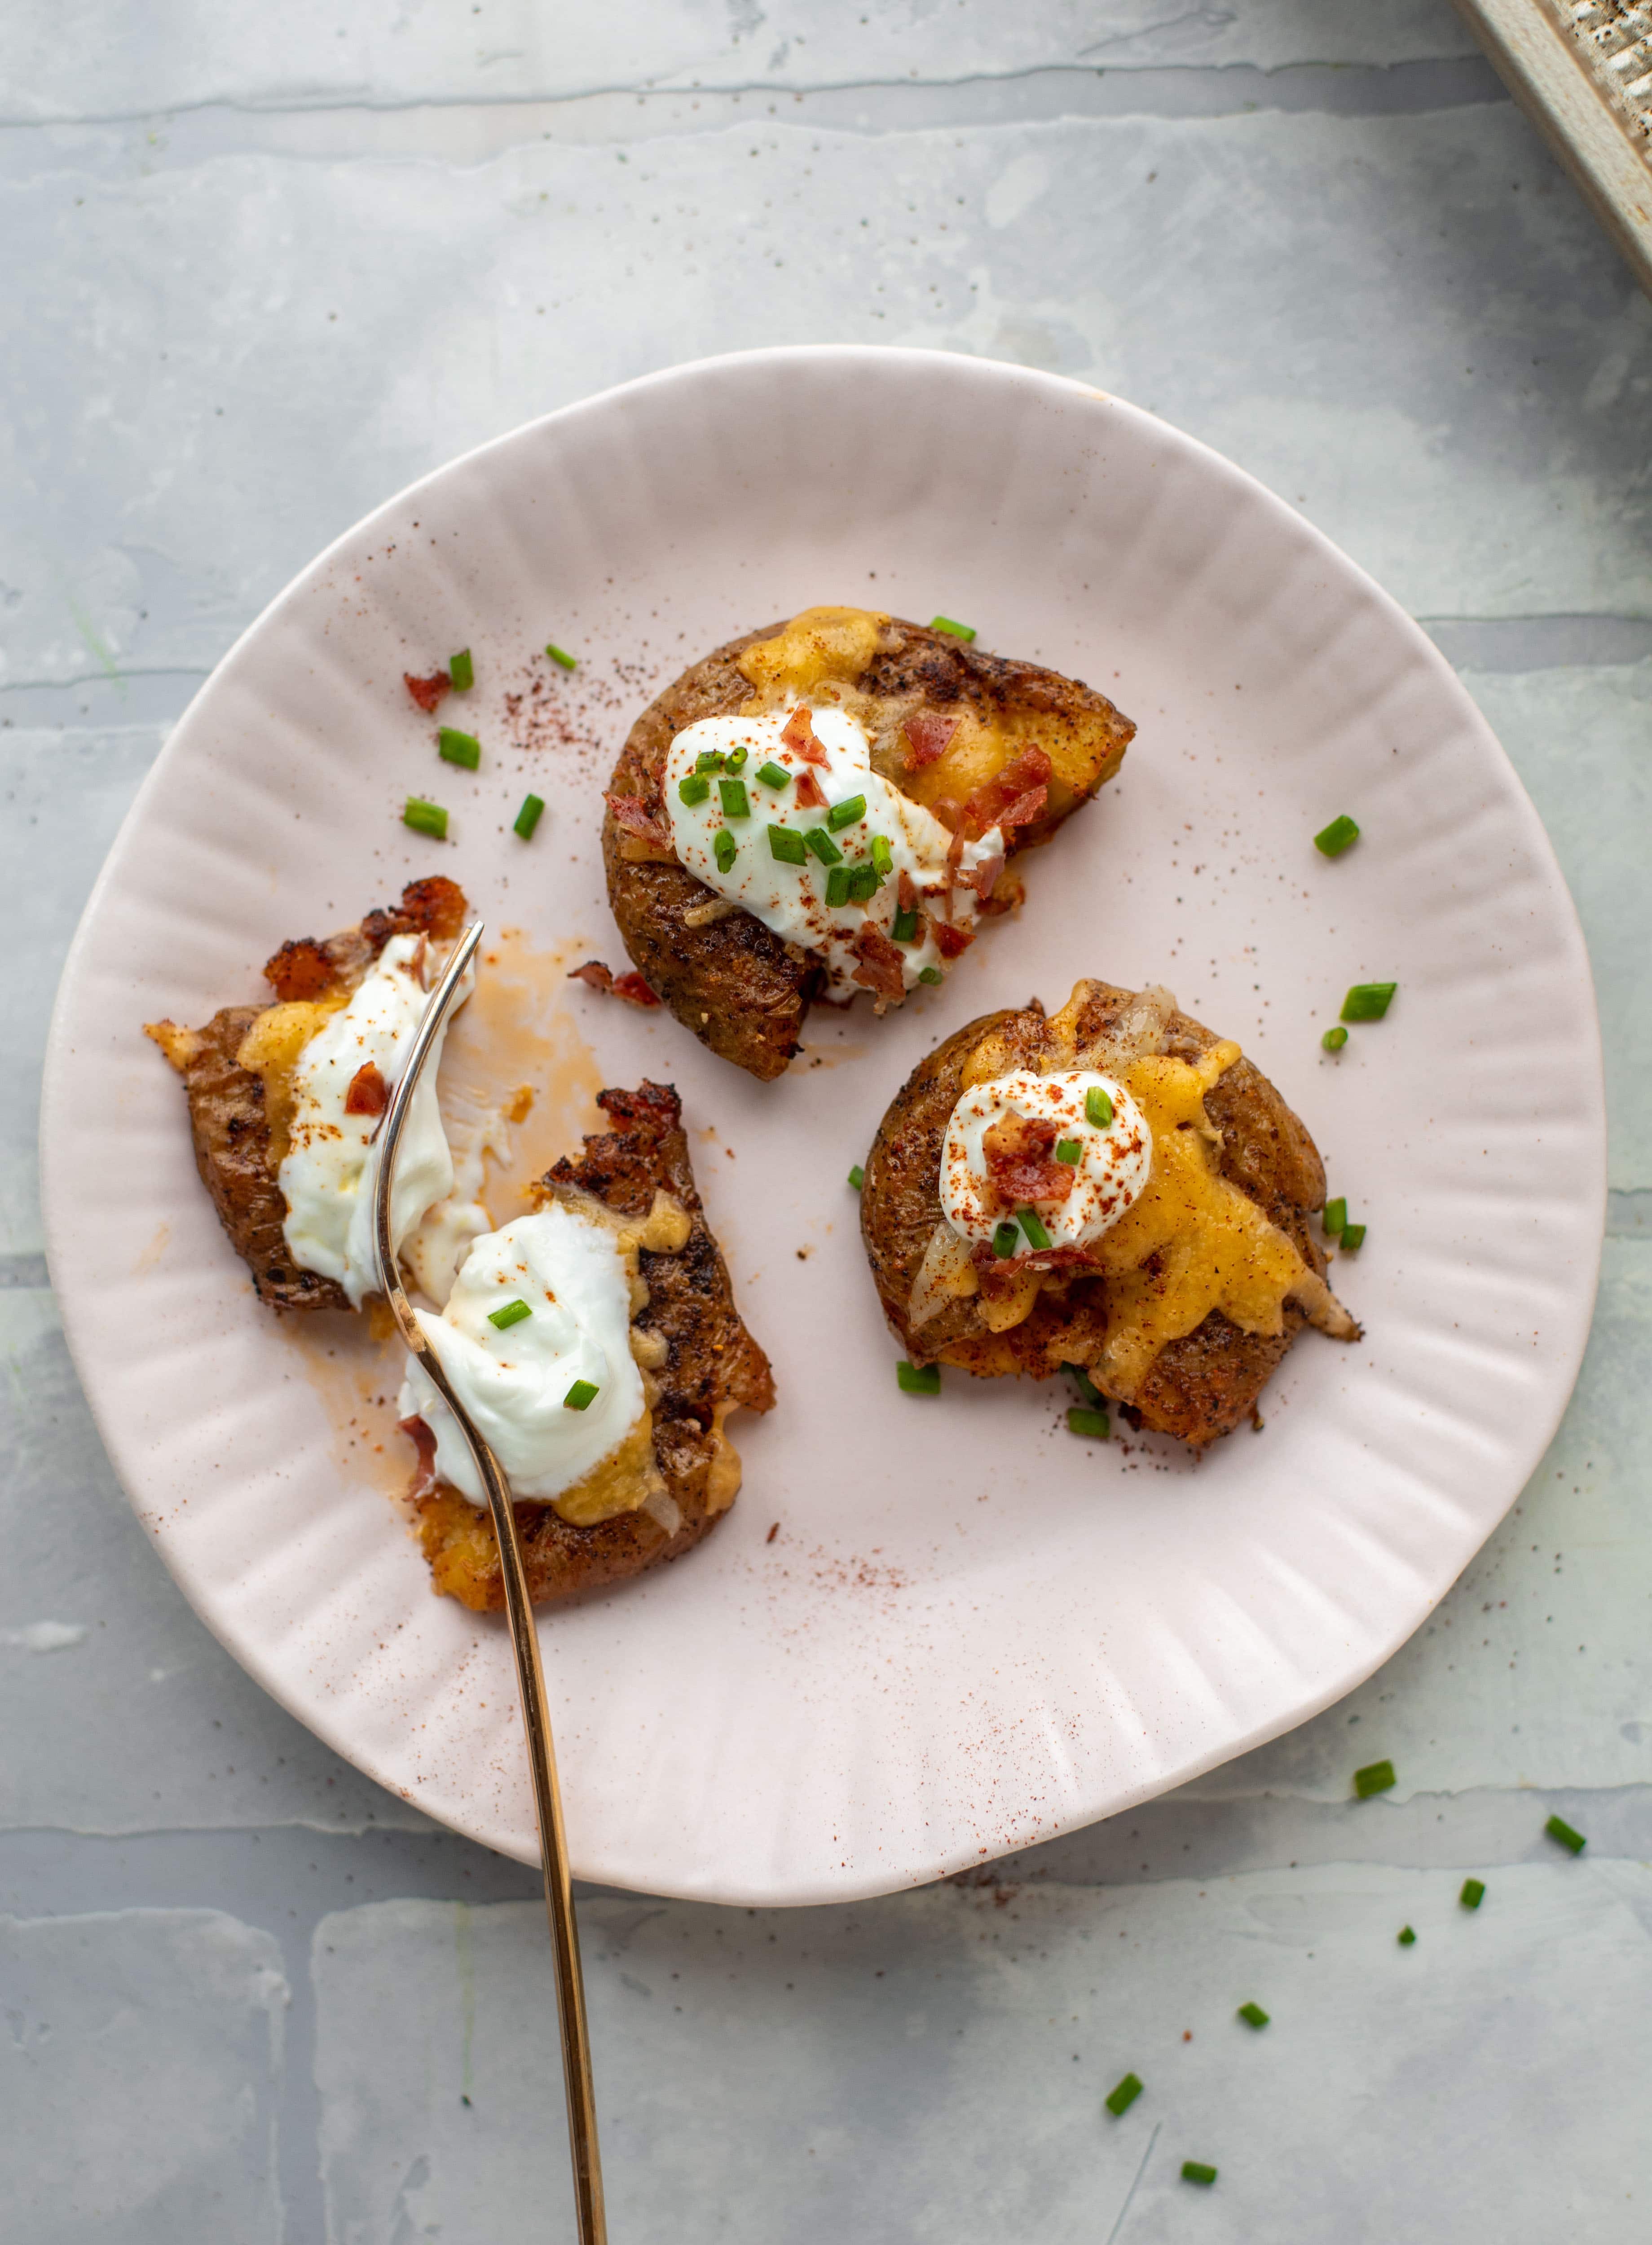
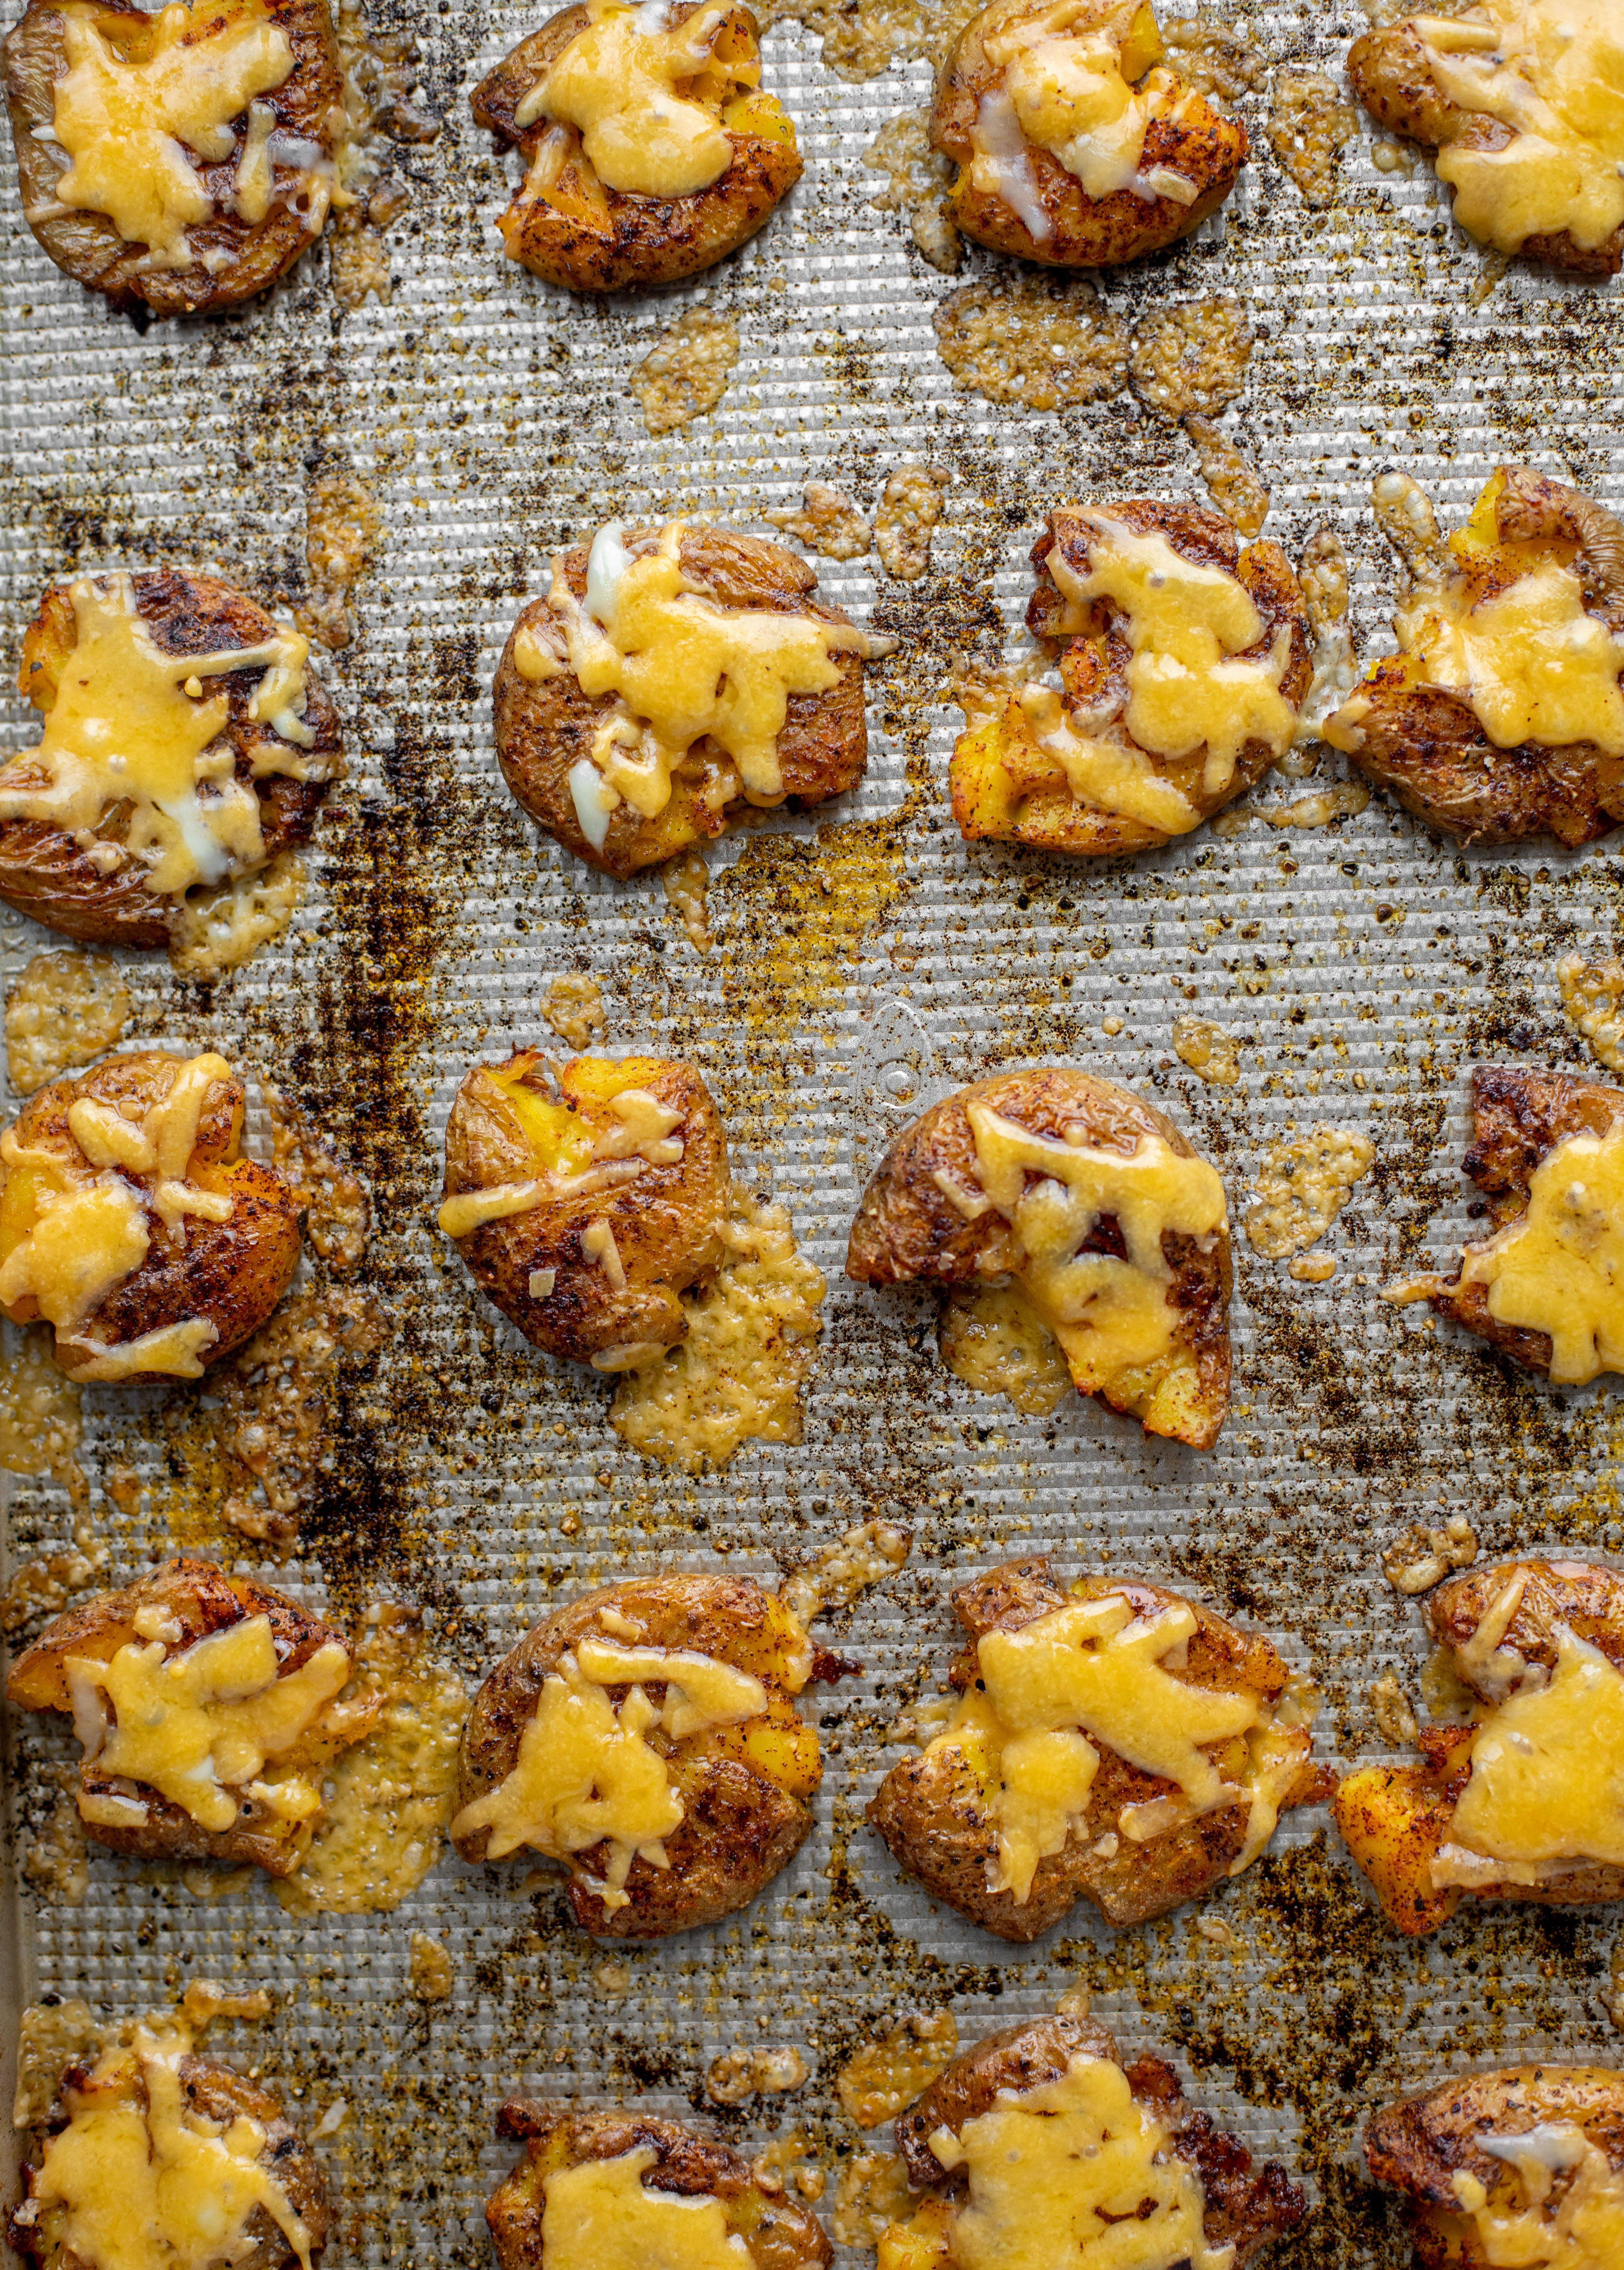
These potatoes are showered with chipotle chili powder, roasted until crispy (the edges are everything) and then smothered in cheddar cheese.

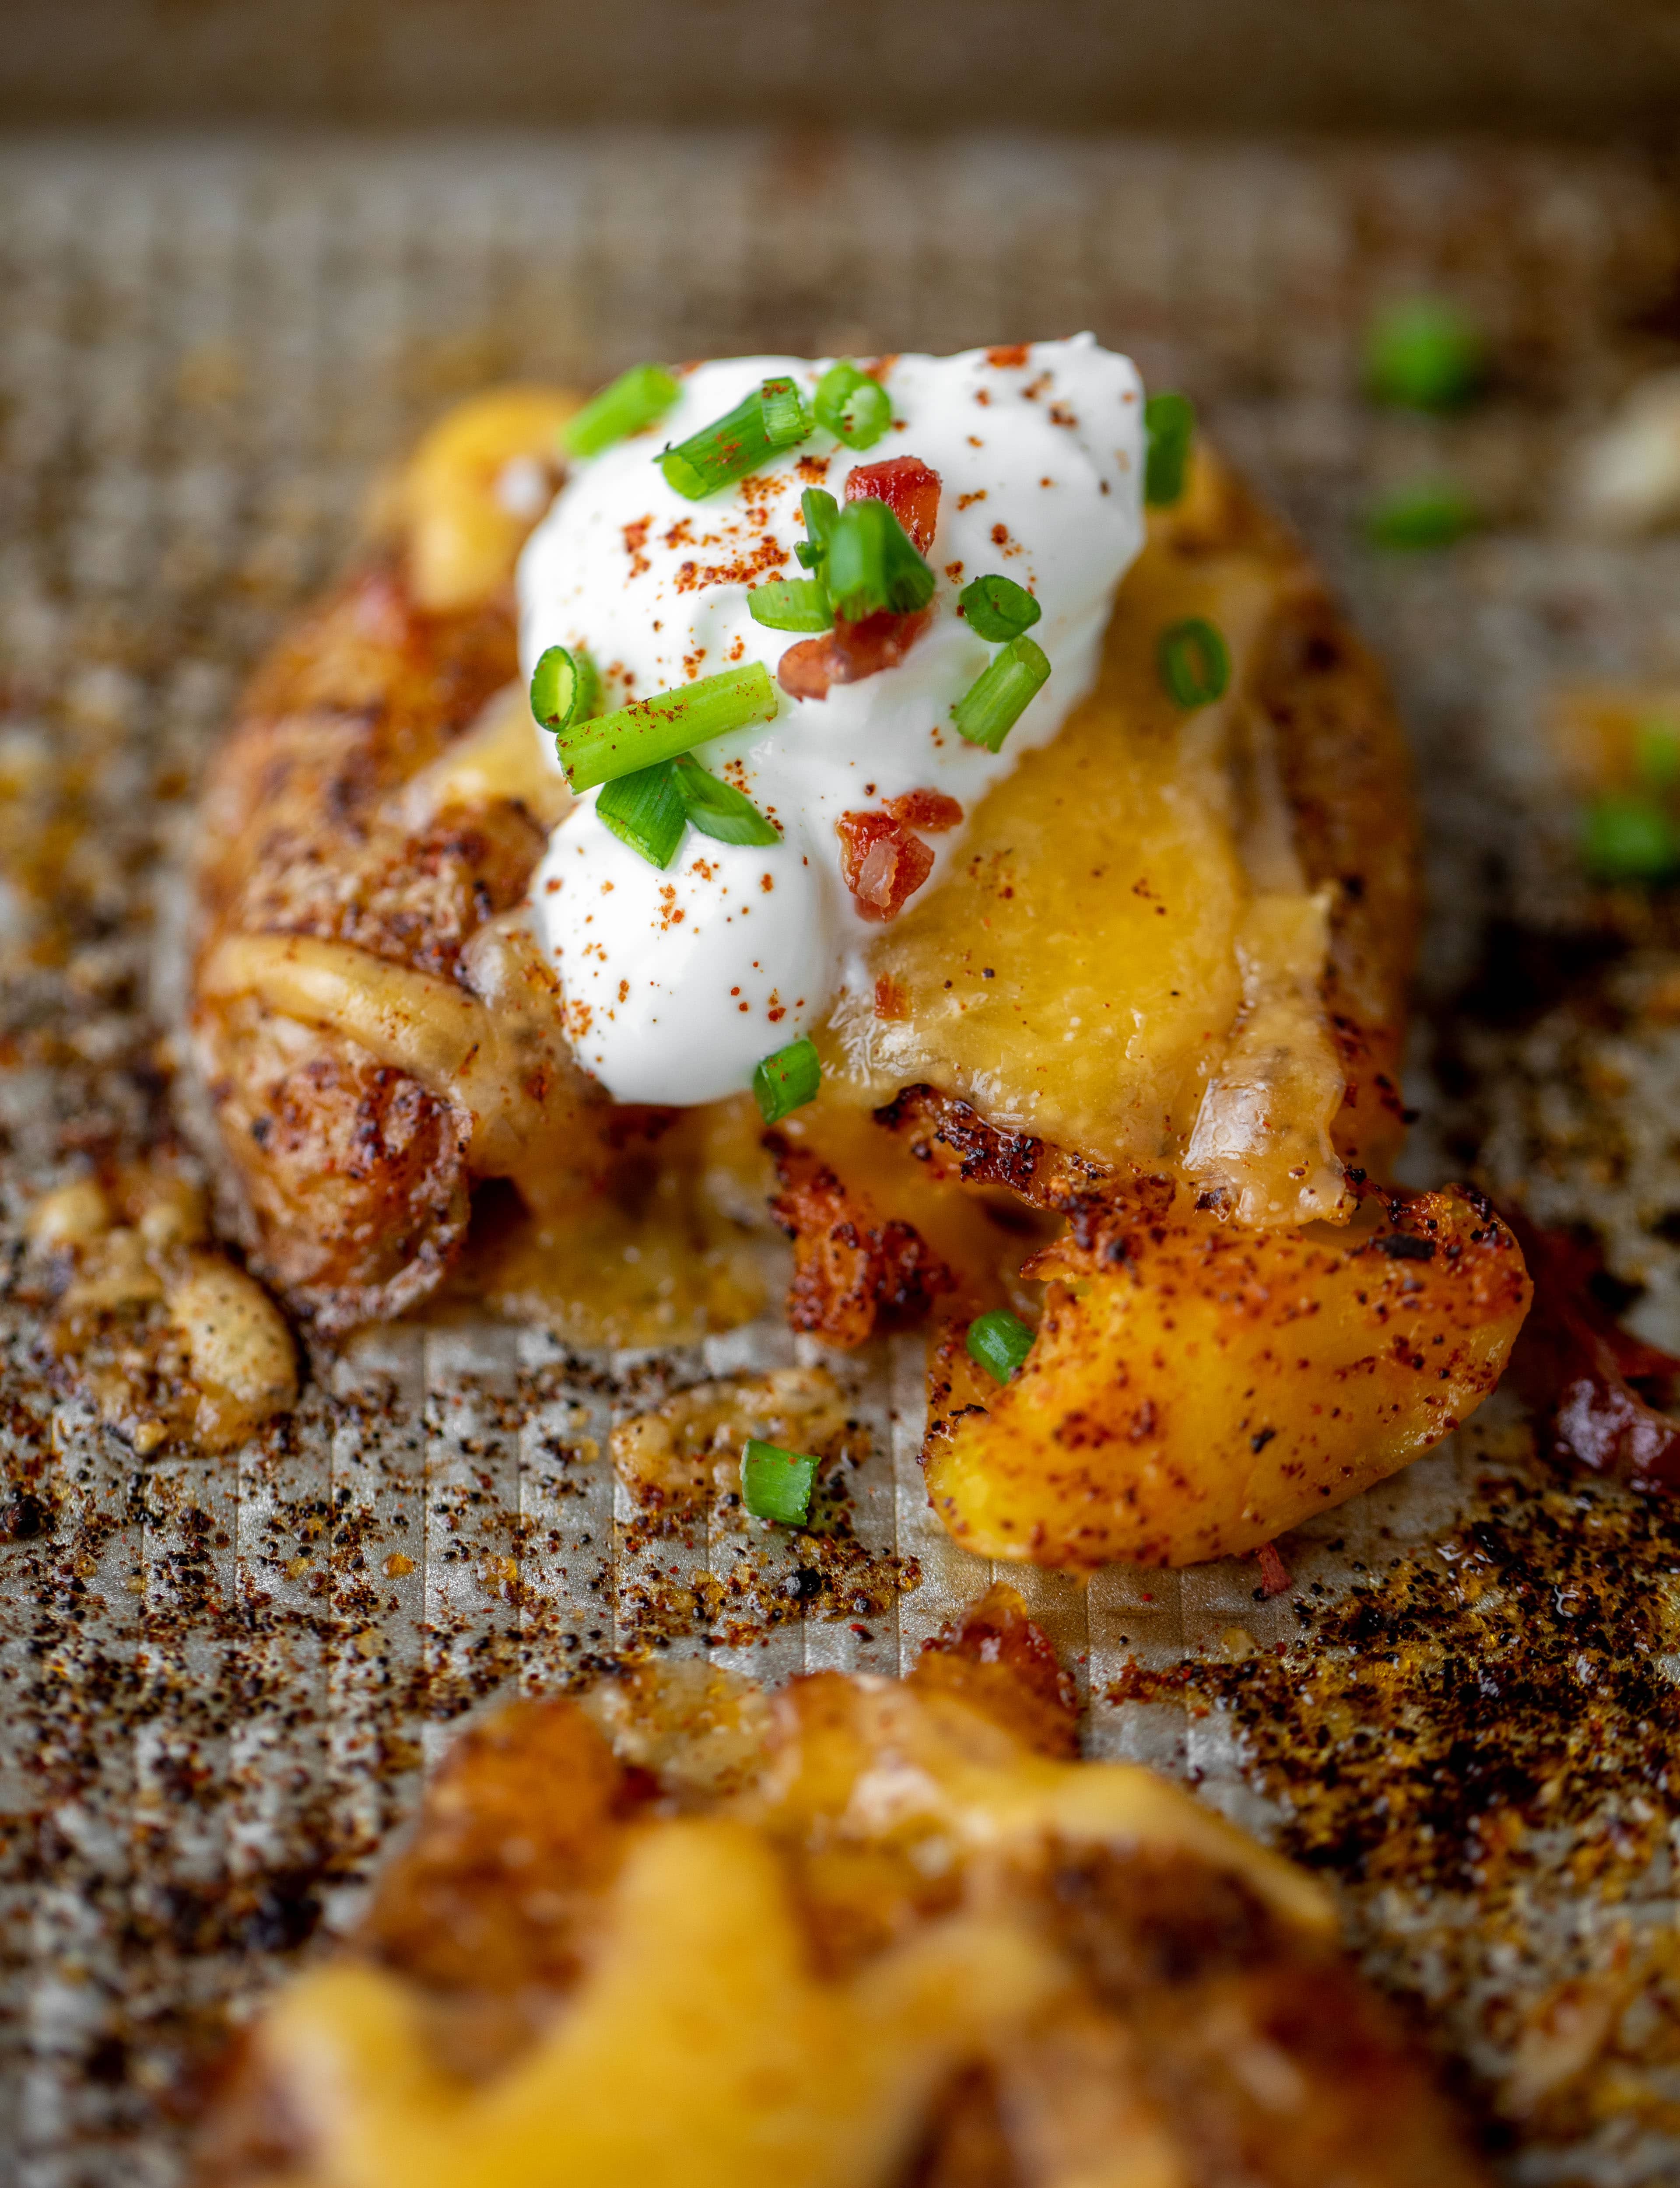
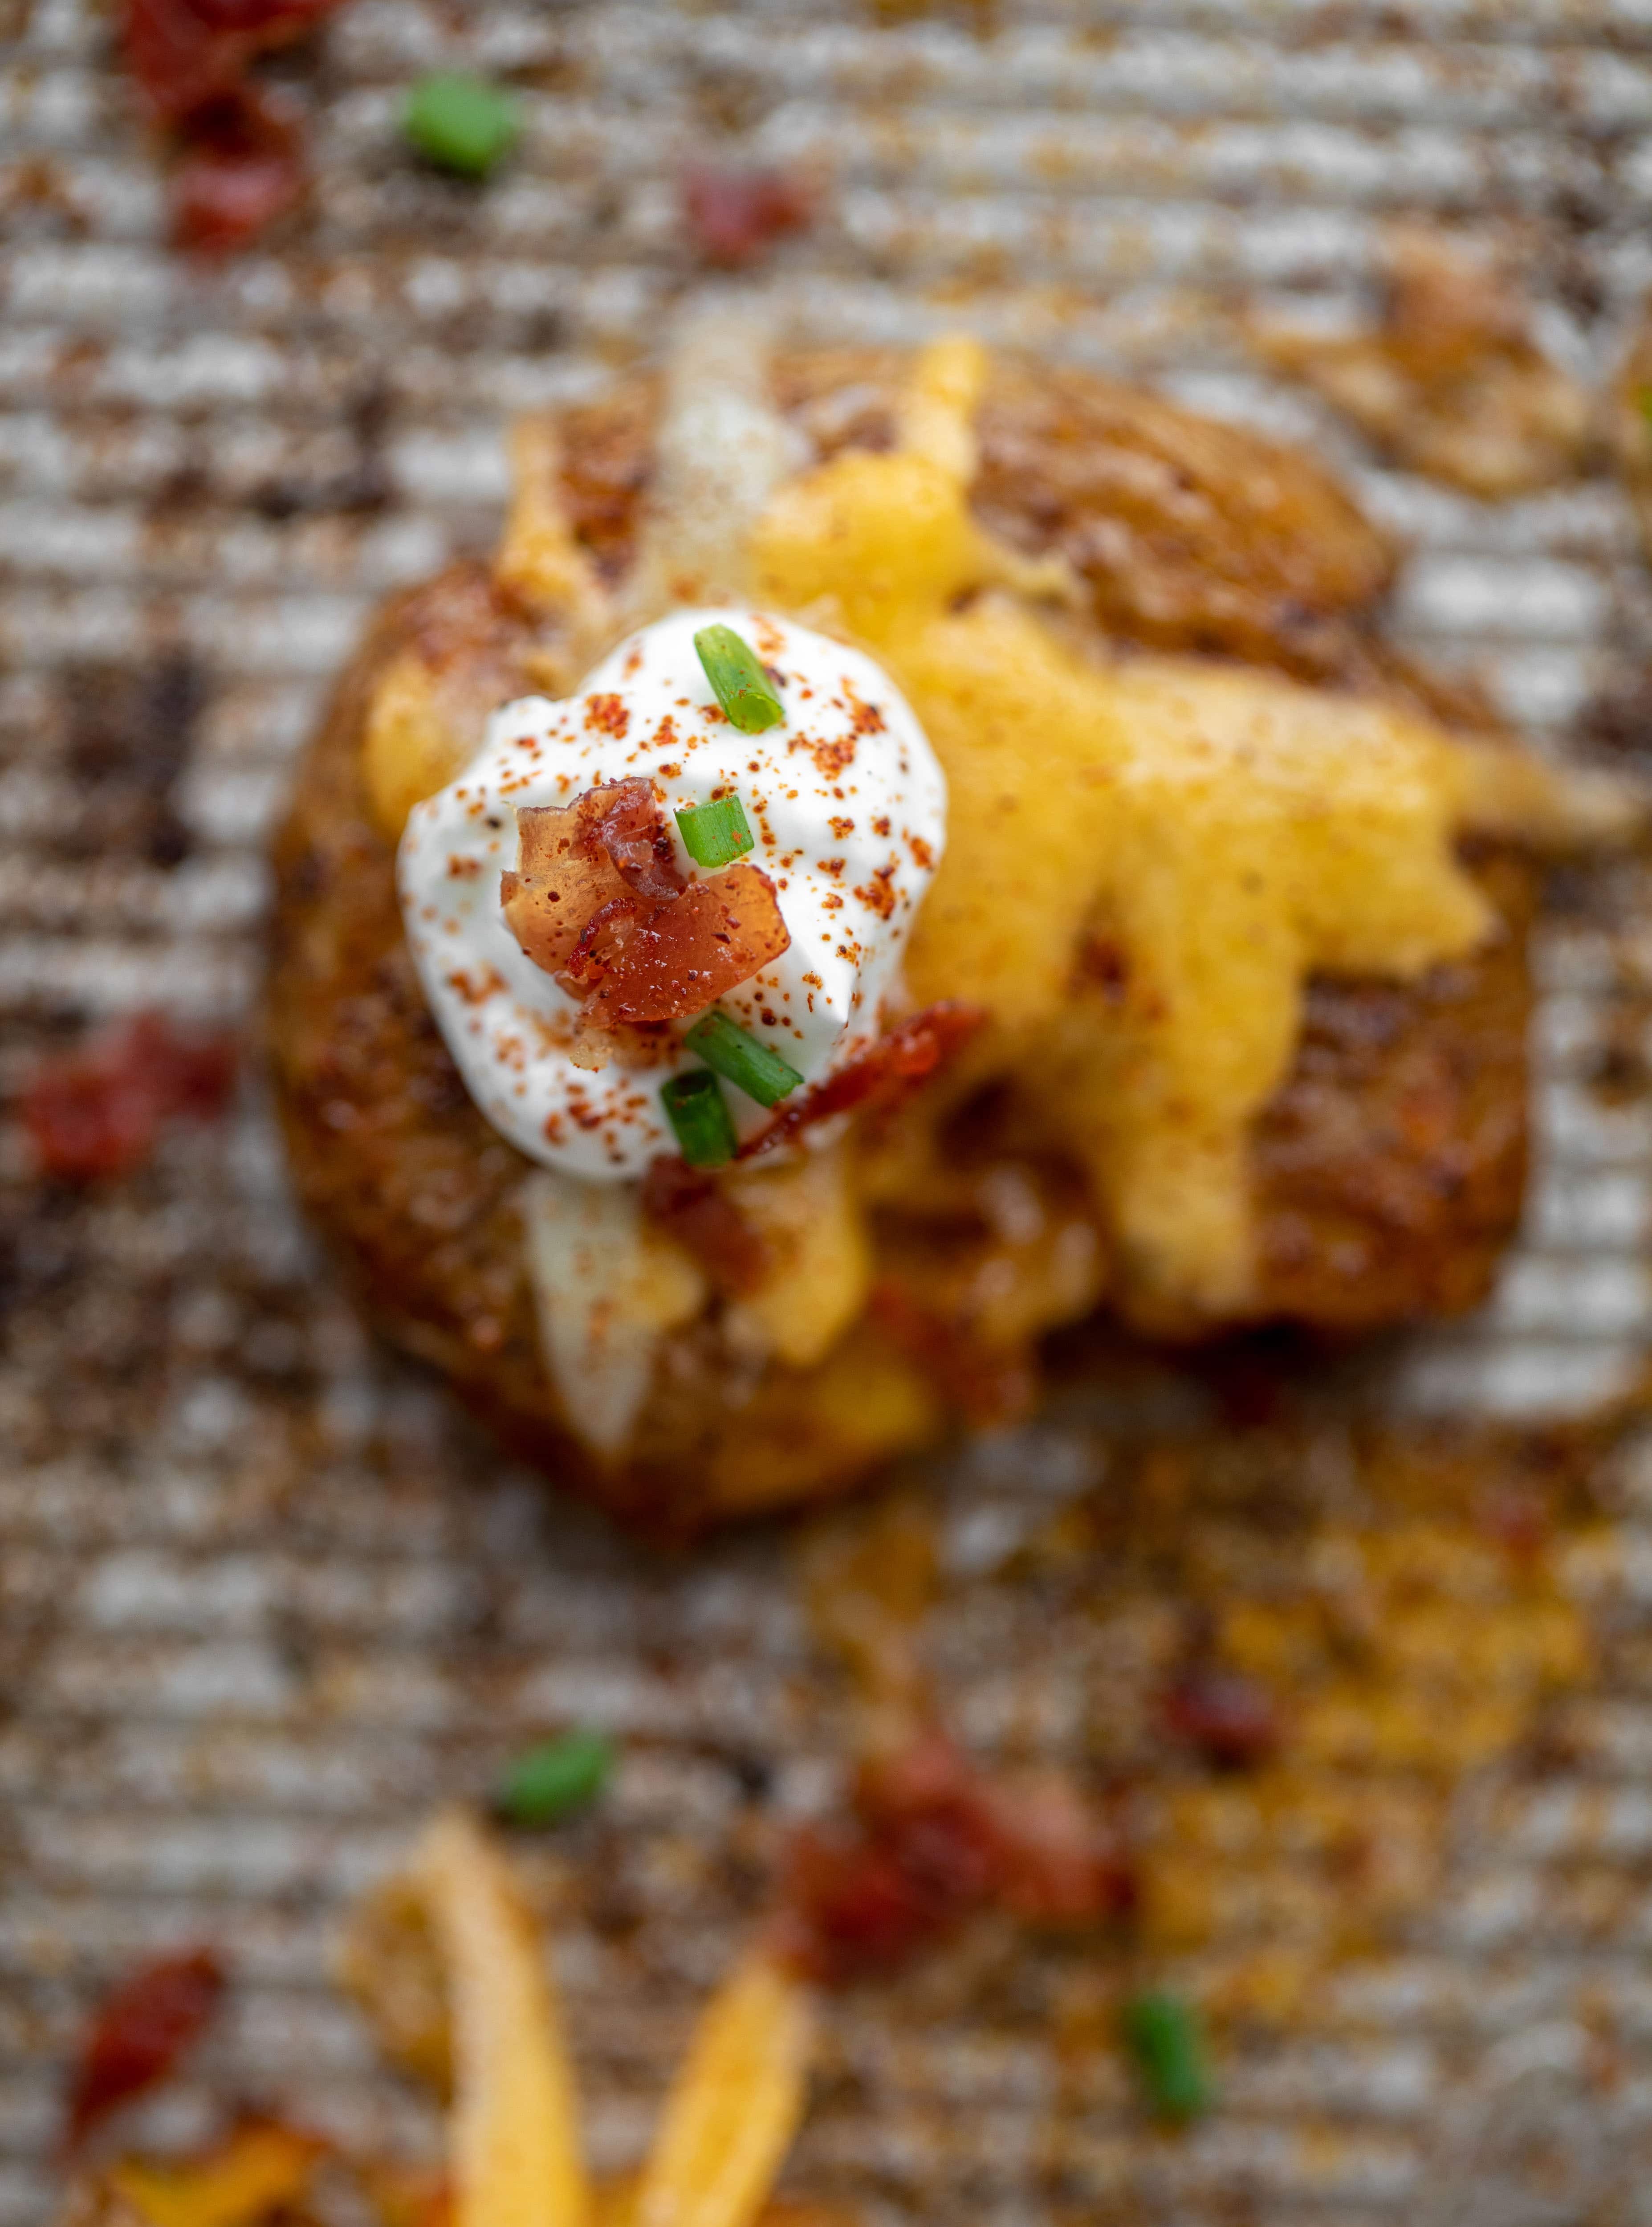
After a quick bake for the cheese to melt, I top them with plain greek yogurt, a few bacon shards and chives. They are spicy but cheesy and crunchy. A little tangy and refreshing from the yogurt. Savory and crisp from the bacon. Seriously, they are just outstanding.

We are in BUSINESS.

These super crispy chipotle cheddar smashed potatoes are the best side dish. A little spicy and smothered in cheese, they are irresistible.

Chipotle Cheddar Smashed Potatoes

Print

Crispy Chipotle Cheddar Smashed Potatoes

These super crispy chipotle cheddar smashed potatoes are the best side dish. A little spicy and smothered in cheese, they are irresistible.
Course Side Dish
Cuisine American
Prep Time 30 minutes
Cook Time 30 minutes
Total Time 1 hour
Servings 4 people
Author How Sweet Eats

Ingredients

  • 2 pounds baby yukon gold potatoes
  • 3 tablespoons olive oil
  • ½ teaspoon chipotle chili powder
  • ½ teaspoon salt
  • ½ teaspoon freshly cracked black pepper
  • ½ teaspoon garlic powder
  • 2 sliced bacon, chopped
  • 4 ounces sharp cheddar cheese, freshly grated
  • plain greek yogurt or sour cream, for topping
  • fresh chives or scallions, for topping

Instructions

  • Place the potatoes in a large pot and fill it with cold water. Bring the water to a boil. Simmer the potatoes until they are just barely fork tender. Strain the potatoes and let them cool slightly.
  • Preheat the oven to 450 degrees F.
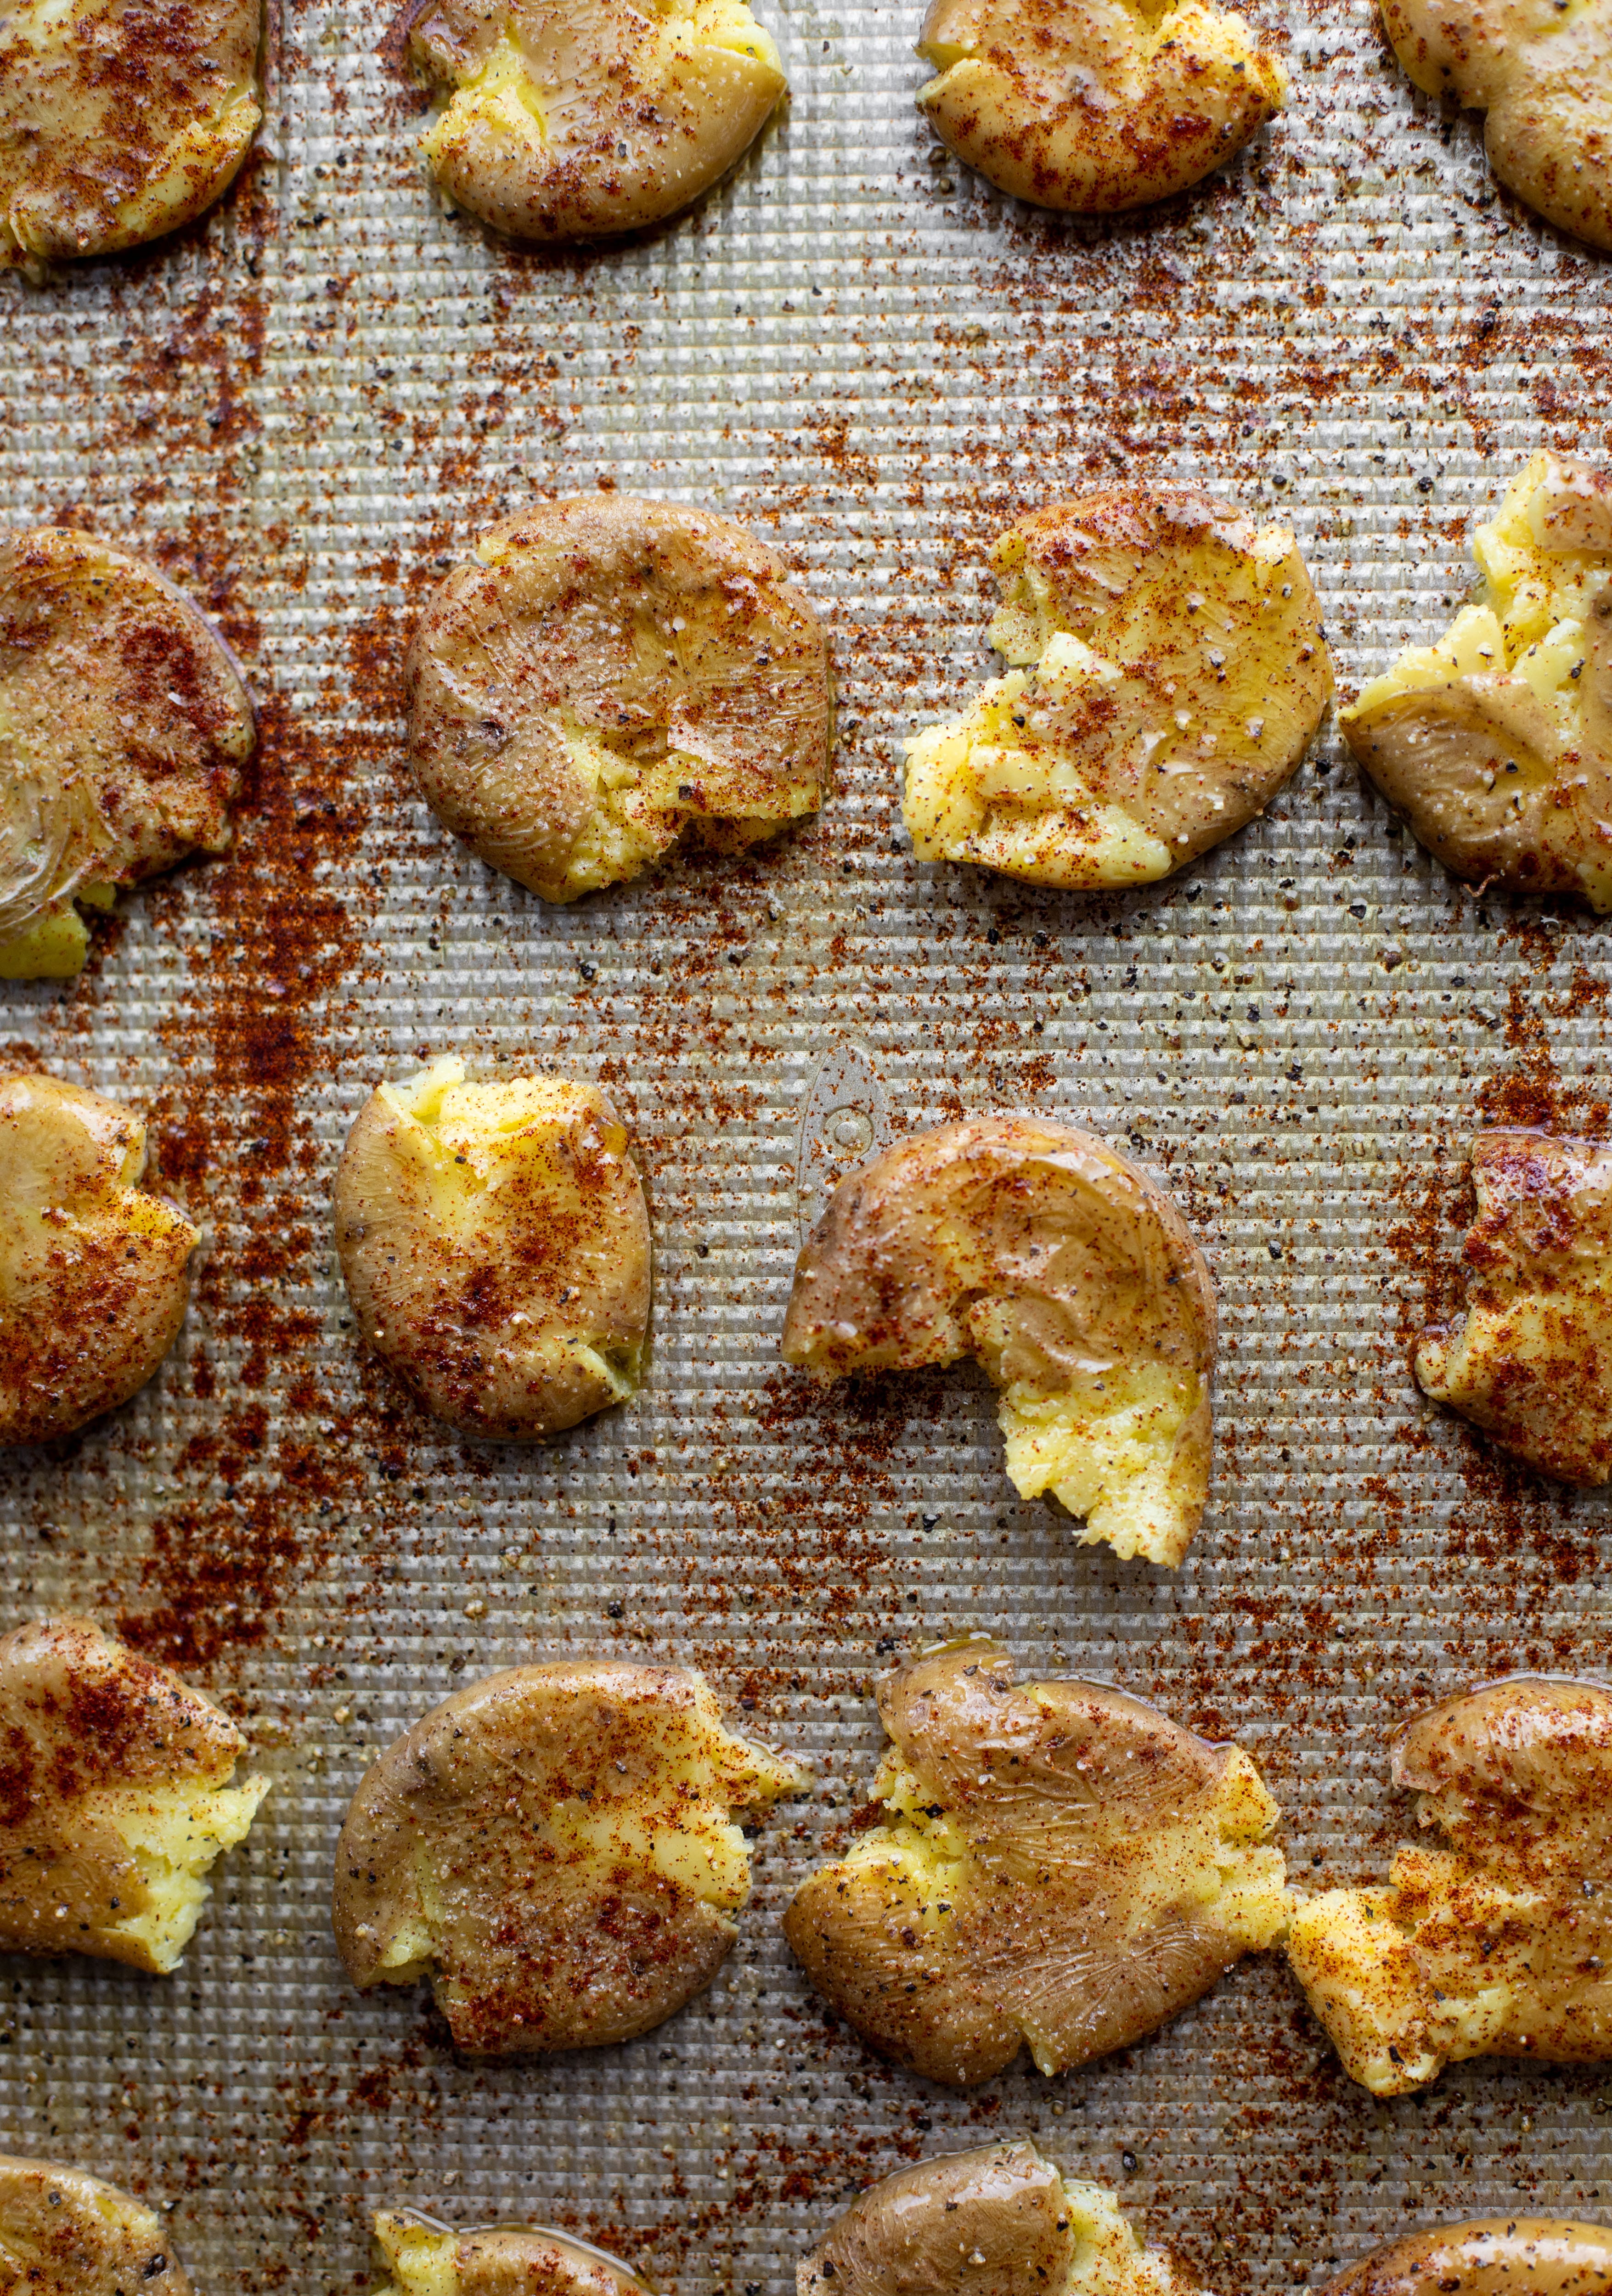
  • Brush a baking sheet with 1 1/2 tablespoons of olive oil. Place the potatoes on the sheet. Use your hand or the bottom of a glass to smash them once, trying to keep them in one piece. It’s okay if they kind of break apart!
  • Drizzle or brush the remaining olive oil over the potatoes. I actually use an olive oil spritzer for this part! Sprinkle the potatoes with the chipotle chili powder, salt, pepper and garlic powder.
  • Place the sheet in the oven and roast the potatoes for 20 minutes, until golden and crispy. While the potatoes are cooking, heat a skillet over medium-low heat and cook the bacon until crispy.
  • Remove the potatoes from the oven and sprinkle cheddar on the tops of each. Bake for 5 minutes more, until the cheese melts. Remove and top with yogurt/sour cream, bacon and chives. Serve immediately!

Chipotle cheddar smashed potatoes on a baking sheet. These super crispy chipotle cheddar smashed potatoes are the best side dish. A little spicy and smothered in cheese, they are irresistible.

Who wants to fight me for the cheese on the baking sheet?

The post Crispy Chipotle Cheddar Smashed Potatoes. appeared first on How Sweet Eats.

13 May 17:25

Coffee Crusted Strip Steak with Herbed Corn Salsa.

by Jessica

(This coffee crusted steak post is sponsored by ALDI!)

Who else is craving summer?! It’s time to bust out the grill to make this coffee crusted steak!

This coffee crusted steak is incredibly flavorful! Topped with a fresh and bright herbed corn salsa, it's the perfect meal to kick off summer.

This is rich, flavorful, smothered in an herby corn salsa that’s super refreshing and the entire thing tastes like summer on a plate. It’s fantastic!

I’m partnering with ALDI again today to bring you this delish recipe just in time for Memorial Day! While we broke out the grill a few weeks ago, I am in MAJOR grill mode now after spending the last few months inside. I’m craving warm days and grilled plates! Just the smell of the grill alone sends me into a nostalgic spiral, and I’m so glad that grilling at home is something we can actually do these days. 

ground coffee, brown sugar, salt, pepper, smoked paprika, garlic, mustard powder

Also! I’m here to tell you that ALDI has an incredible selection of ingredients for all of your grilling needs. Seriously, my mind is blown. For today’s recipe, I grabbed a strip steak and a ribeye, but you can substitute with whatever you have in your fridge or freezer.

The quality is top notch. 

coffee crusted steaks

The coffee crust spice mix is absolutely incredible. It smells wonderful, and I was honestly tempted to taste it with a spoon! You can grind whole beans or use ground coffee – whatever you have on hand. I used the Simply Nature Whole Bean Coffee from ALDI – it’s so fragrant and rich. 

corn on the cob on the grill

Along with the ground coffee, we’re using brown sugar, smoked paprika, garlic powder, mustard powder, salt and pepper. SO many of my favorite things in one! Stir it all together and it looks like 90s sand art which is basically my favorite part. Of course.  

coffee crusted steak on the grill

Once the coffee rub is ready go, coat the steaks! They grill in just a few minutes and the crust is outstanding. It’s crisp and tastes like heaven. And no, it doesn’t have an over-the-top coffee flavor! Eddie can’t stand the taste of coffee so I would never do that to him. Well, maybe I would, and wouldn’t tell him until later. But I’m here to report that he loved these, even with the coffee crust.  

P.S. I love to use coffee in the crust because it enhances the flavor of the steak (sort of like it does with chocolate, you know?!) and it also acts as a bit of tenderizer. It’s really quite versatile.

sliced coffee crusted steak

Now let’s talk salsa. Herbed corn salsa is super delicious and flavorful too, but in a different way than the coffee crusted steak. It adds a freshness and also a little hint of sweet, crunchy flavor.

I absolutely love that ALDI has corn on the cob in their produce section. I always find it to be ready to eat and super sweet. 

corn, jalapeno, onion, cilantro and basil in a bowl

We’re going to toss the corn on the grill too and then mix it with some fresh herbs, lime, onion and jalapeño. This is pure heaven.

I could eat it with a spoon! Love it so much.

This coffee crusted steak is incredibly flavorful! Topped with a fresh and bright herbed corn salsa, it's the perfect meal to kick off summer.

When you serve the sliced steak with the salsa on top, it’s like a major flavor explosion. So, so good and perfect for the season.

It’s definitely something that will be on repeat for us all summer long! 

This coffee crusted steak is incredibly flavorful! Topped with a fresh and bright herbed corn salsa, it's the perfect meal to kick off summer.

Coffee Crusted Steak

Print

Coffee Crusted Strip Steak with Herbed Corn Salsa

This coffee crusted steak is incredibly flavorful! Topped with a fresh and bright herbed corn salsa, it's the perfect meal to kick off summer.
Course Main Course
Cuisine American
Prep Time 40 minutes
Cook Time 10 minutes
Resting Time 10 minutes
Total Time 1 hour
Servings 4 people
Author How Sweet Eats

Ingredients

coffee crusted steak

  • ¼ cup Baker’s Corner Brown Sugar
  • 2 tablespoons ground coffee
  • 1 teaspoon Stonemill paprika
  • 1 teaspoon Stonemill Garlic Powder
  • 1 teaspoon kosher salt
  • ½ teaspoon freshly cracked black pepper
  • ½ teaspoon ground mustard
  • 2 Black Angus Choice Strip Steaks

herbed corn salsa

  • 4 ears corn
  • 1/3 cup chopped herbs, such as cilantro and basil
  • 3 tablespoons diced sweet onion
  • 1 jalapeño pepper, diced
  • 2 limes, freshly juiced
  • salt and pepper

Instructions

  • Preheat your grill to the highest setting. Take the steak out of the fridge for at least 30 minutes to take the chill off.
  • In a bowl, whisk together the brown sugar, ground coffee, smoked paprika, salt, pepper and ground mustard. Rub it all over both sides of the steak.
  • Place the steak on the grill grates and cook for 5 minutes, then flip and cook for 3 to 5 minutes more. I like to cook mine until they reach an internal temperature of 140 degrees F. Remove the steaks and let them rest for 10 to 15 minutes before slicing.
  • Place the corn directly on grill grates. You can do this while the steak is cooking too! Grill for 10 minutes, rotating the corn every other minute. Remove it from the grill and let it cool slightly. Once cool, slice the kernels off the cob.
  • In a bowl, stir together the corn, herbs, onion, peppers, lime juice, and a pinch of salt and pepper. Toss a few times to combine it well.
  • Slice the steak against the grain. Top it with the corn salsa and serve!

This coffee crusted steak is incredibly flavorful! Topped with a fresh and bright herbed corn salsa, it's the perfect meal to kick off summer.

These flavors are everything.

The post Coffee Crusted Strip Steak with Herbed Corn Salsa. appeared first on How Sweet Eats.

04 May 12:38

Sheet Pan Street Corn Nachos.

by Jessica

Street corn nachos are happening!

These sheet pan street corn nachos are ridiculously easy and delicious! Grilled corn, chili, lime, tons of cheese and all the flavor you could dream of!

I am absolutely a nacho person. All the way. I adore any and all sorts of nachos, except (and this is a big EXCEPT) the stadium or arena nachos that are just yellow rounds with yellow sauce scooped out of a big reheated can. No can do.

But all other nachos? I am in it for the long haul. 

P.S. I have every and all dishes you could ever need right here for cinco de mayo tomorrow!

cheesy melted tortilla chips

There is a local taco place near us that just opened. And while I’d love to say it’s amazing, they’ve messed up our order multiple times and the street corn nachos left… a lot to be desired.

So I took things into my own hands.

The combo in my brain just SOUNDED amazing. Cheesy, sweet, salty, savory, fresh – a dish like that checks all the boxes.

Plus, I am a sucker for anything with a mexican street corn vibe. Who isn’t?! 

grilled corn

So let’s make it happen! 

These sheet pan street corn nachos are ridiculously easy and delicious! Grilled corn, chili, lime, tons of cheese and all the flavor you could dream of!

There are two ways you can go about the cheese in my opinion. First, throw all the cheese on the chips and stick the sheet pan in the oven. 

OR.

The other option would be to make a quick little queso and drizzle it all over the nachos. It depends on how you like your cheese.

Melted and crisp, or creamy and queso-y? 

Maybe I just go for the melted and crisp version because I spent so many of my tween years eating tortilla chips microwaved with cheddar on top. Can’t beat that. 

These sheet pan street corn nachos are ridiculously easy and delicious! Grilled corn, chili, lime, tons of cheese and all the flavor you could dream of!

When it comes to the corn, use what you can find. My ALDI usually has corn on the cob in the produce section, so that’s what I went with. Our local corn obviously won’t be great here in PA until late summer.

I grill the corn until just slightly charred and slice it right off the cob.

If corn on the cob isn’t an option, you can also use frozen corn. Just steam it is as usual and then make sure to drain it well. You definitely don’t want soggy, watery corn on your nachos, Trust me. 

These sheet pan street corn nachos are ridiculously easy and delicious! Grilled corn, chili, lime, tons of cheese and all the flavor you could dream of!

The rest is allll in the toppings. Cotija cheese, but if you can’t find it, you can surely sub in feta. Chopped cilantro, a mayo/sour cream drizzle and a big pinch of tajin (because, omg yum) or chili powder on top. Oh and a quick spritz of lime.

I LOVE IT. 

All I want in life right now is a pile of cheesy chips! 

These sheet pan street corn nachos are ridiculously easy and delicious! Grilled corn, chili, lime, tons of cheese and all the flavor you could dream of!

Oh and I should add that Eddie is not a nacho person. Sure, he may grab a few if there is an appetizer for the table but he would never order them himself and especially not as a meal.

Well.

He nearly ate this entire sheet! It was actually kind of funny. I think he even surprised himself.

I win!

These sheet pan street corn nachos are ridiculously easy and delicious! Grilled corn, chili, lime, tons of cheese and all the flavor you could dream of!

Street Corn Nachos

Print

Street Corn Nachos

These sheet pan street corn nachos are ridiculously easy and delicious! Grilled corn, chili, lime, tons of cheese and all the flavor you could dream of!
Course Main Course
Cuisine American
Prep Time 10 minutes
Cook Time 20 minutes
Total Time 30 minutes
Servings 2 to 4 people
Author How Sweet Eats

Ingredients

  • 4 ears of corn, shucked (about 1.5 to 2 cups corn kernels, or one bag frozen!)
  • 1 (9 ounce) bag of tortilla chips
  • 8 ounces monterey jack cheese, freshly grated
  • 4 ounces cheddar cheese, freshly grated
  • 3 tablespoons mayonnaise
  • 3 tablespoons sour cream
  • 1 lime, zest freshly grated
  • 1/2 teaspoon tajin (or chili powder)
  • ⅓ cup crumbled cotija cheese
  • ½ cup chopped fresh cilantro
  • lime wedges for spritzing
  • pickled onions, for garnish

Instructions

  • Preheat your grill to the highest heat. Brush the corn with a drop of olive oil
  • Preheat the oven to 350 degrees F. Line a baking sheet with foil or parchment. Spread the chips out on the sheet. Cover the chips with the grated cheeses.
  • In a bowl, whisk together the mayo, sour cream and lime zest.
  • Place the corn directly on the grates. Grill for about 10 minutes, turning every few minutes.
  • While you grill the corn, stick the baking sheet in the oven. Bake the chips with cheese for 10 minutes, or until the cheese is melted.
  • When the corn is done, slice the kernels off the cob. I like to mix the corn with a sprinkle of tajin and cotija cheese while it's warm. Sprinkle the corn all over the chips. Drizzle the mayo/sour cream mixture all over the nachos. Sprinkle the rest of the tajin (or chili powder) on next. Sprinkle on the cotija cheese and cilantro. Serve immediately with a spritz of lime.

These sheet pan street corn nachos are ridiculously easy and delicious! Grilled corn, chili, lime, tons of cheese and all the flavor you could dream of!

However, this is all I need to eat. Forever.

The post Sheet Pan Street Corn Nachos. appeared first on How Sweet Eats.

03 May 01:44

Cheesy Lemon Flatbread Pizza with Hot Honey.

by Jessica

I’m basically the happiest with this lemon flatbread pizza.

This cheesy lemon flatbread pizza is covered with burrata cheese, parmesan, roasted vegetables and hot honey. It's a flavor dream!

At least, as happy as I can be right now. Let’s just say that crunchy flatbread, lots of cheese and bright, fresh lemon definitely helps.

lemon zest

I love a good flatbread pizza! From this old school four cheese version to the roasted cauliflower one from The Pretty Dish, it’s a great option to have when you’re either out of yeast (hi, me!) or just feel like mixing up a super quick dough. It’s more cracker-like that regular pizza dough, but it’s SO good.

lemon oil

In this case, I’m using the base of my garlic butter naan! So these are essentially naan pizzas. Yes.

Works every time.

This cheesy lemon flatbread pizza is covered with burrata cheese, parmesan, roasted vegetables and hot honey. It's a flavor dream!

Here’s how it goes down…

We start by making a quick little lemon oil because that stuff is delish. Brush it all over the dough and it can even be used for drizzling after!

Also going to make some hot honey. You can buy hot honey these days (how cool!), but I’ve been making it since before I could buy it. In fact, I made a hot honey pepperoni pizza a few years ago which first got me reeeeeally hooked on the combo. It’s just fantastic. Sweet heat! 

This cheesy lemon flatbread pizza is covered with burrata cheese, parmesan, roasted vegetables and hot honey. It's a flavor dream!

Once your dough is made, the rest is really up to you. I went with some bacon because I didn’t have pepperoni and I don’t like sausage. I also used some leftover roasted broccoli! You could throw on any greens or vegetables you have. You could roast some just for this flatbread or you could use something hanging out in your fridge.

Make sure you verrrry thinnnnly slice a lemon. Like, paper thin! See through! 

This cheesy lemon flatbread pizza is covered with burrata cheese, parmesan, roasted vegetables and hot honey. It's a flavor dream!

Next up – CHEESE. I had two (!) containers of burrata cheese in my fridge that were about to go. They’d been hanging out in there since I finished a few photographs for the book back in February and I just didn’t need them. 

Well, now I needed them and I couldn’t be more thrilled to have them.

You don’t have to use burrata – use freshly grated mozzarella or provolone or fontina or even parmesan. 

As much as it pains me to say it, this isn’t about the cheese here. Yes, of course, it’s always about the cheese for me. But this is much more about the lemon and the hot honey on top of crunchy dough. And just exactly what you decide to pair with it. 

This cheesy lemon flatbread pizza is covered with burrata cheese, parmesan, roasted vegetables and hot honey. It's a flavor dream!

I absolutely LOVE the combo.

The dough edges get crunchy in the oven. The lemon oil is bright almost slightly sweet. Then you have cheese and vegetables and a big old drizzle of hot honey, which is spicy and sweet. The flavor combination is out of this world! 

I can’t stress this enough: use what you have on hand! Any veggies work here – truly, almost anything works with cheese and lemon and honey. And bacon. 

Then you can be the happiest too.

This cheesy lemon flatbread pizza is covered with burrata cheese, parmesan, roasted vegetables and hot honey. It's a flavor dream!

Cheesy Lemon Flatbread Pizza with Hot Honey

Print

Cheesy Lemon Flatbread Pizza with Hot Honey

This cheesy lemon flatbread pizza is covered with burrata cheese, parmesan, roasted vegetables and hot honey. It's a flavor dream!
Course Main Course
Cuisine American
Prep Time 2 hours
Cook Time 15 minutes
Total Time 2 hours 15 minutes
Servings 4 flatbreads
Author How Sweet Eats

Ingredients

flatbread

  • 2 cups all-purpose flour
  • ¾ teaspoon baking powder
  • ½ teaspoon baking soda
  • 1/2 teaspoon salt
  • 1/2 cup warm milk
  • ½ cup plain greek yogurt
  • 1 teaspoon honey

toppings

  • 1 tablespoon fresh lemon zest
  • 1 garlic clove, minced
  • 3 tablespoons olive oil
  • 3 slices bacon, chopped
  • 2 cups freshly grated mozzarella cheese
  • 1 8-ounce ball burrata cheese
  • 1 cup roasted broccoli, or your favorite vegetable! roasted, leftover, etc
  • 1 lemon, very thinly sliced
  • hot honey, for drizzling
  • 1 handful micro greens or your favorite green, for topping
  • parmesan cheese, for sprinkling

Instructions

  • In a large bowl, whisk together the flour, baking powder, soda and salt. In another bowl, whisk together the milk, yogurt and honey. Add half of the milk mixture to the dry ingredients and stir until the dough starts to come together. Add the remaining milk gradually, stirring and bringing the dough together with your hands.
  • Place the dough in an oiled bowl and cover it. Let it sit in a warm place for 1 to 2 hours. It won't rise much! But let it rest.
  • While it rests, prep the rest of the ingredients. Whisk together the lemon zest, garlic and olive oil in a bowl. Heat a large skillet over medium heat and add the bacon. Cook until the bacon is just starting to crisp - do not cook until completely crunchy, because you want it to crisp in the oven. Remove it from the pan with a slotted spoon and place it on a paper towel. Note: you can replace the bacon with pancetta, prosciutto or even sausage. Whatever you have!
  • Grate the cheese and if desired, roast the vegetables. I roast broccoli at 425 for 15 minutes. You can use any vegetables here - or none at all!
  • Preheat the oven to 450 degrees F. Brush a baking sheet with olive or canola oil.
  • Once the dough has rested, remove it from the bowl and knead it a few times on a floured surface, using a little extra flour if it’s too sticky. Divide the dough into 4 separate balls. Roll each ball out into an oval shape. Place 2 of the ovals on a baking sheet (that is most likely all that will fit.).
  • Brush the dough with the lemon olive - especially the edges so they get golden and crisp. Cover it with the cheese - freshly grated or burrata or whatever you’re using! Top with any vegetables that you’re using and some very thin lemon slices.
  • Bake for 10 to 15 minutes, or until the dough is crisp and the cheese is golden. Remove the pizza from the oven and drizzle with hot honey. Slice and serve!

This cheesy lemon flatbread pizza is covered with burrata cheese, parmesan, roasted vegetables and hot honey. It's a flavor dream!

That golden, crunchy bubbly cheese on the end… omg.

The post Cheesy Lemon Flatbread Pizza with Hot Honey. appeared first on How Sweet Eats.

14 Apr 14:17

Chipotle Sweet Potato and Quinoa Breakfast-For-Dinner Skillet.

by Jessica

I’ve craving a new sweet potato hash!

This chipotle sweet potato hash is perfect for breakfast, lunch or dinner. Bulked up with quinoa and tons of flavor, it's a great pantry weeknight meal!

I mean, sure, top anything with an egg and I am THERE. Or here. 

Actually, right now, I wish that I was THERE so it meant that I was somewhere other than my house. You get the gist. 

sweet potatoes

Breakfast for dinner is pretty much my favorite thing ever. We go through spurts of having breakfast for dinner once a week, and I love it. 

First, it’s comfort food. I will never think otherwise, because when I was probably 15 years old, my mom made me a scrambled egg, crispy ham and mustard sandwich (I know, are you freaking out?) and told me that it was comfort food. It’s lived in my brain ever since. 

This chipotle sweet potato hash is perfect for breakfast, lunch or dinner. Bulked up with quinoa and tons of flavor, it's a great pantry weeknight meal!

Second, the options are endless!

Sweet breakfast? Savory? Do I want pancakes or potatoes and eggs? Maybe I’ll just make waffles AND bacon AND eggs so I can have sweet and savory.

Truly, everyone loves it and it adds a nice variety to the week. Especially if you’re not someone who ever eats eggs or pancakes for breakfast. We’re usually not, aside from the occasional weekend. 

This chipotle sweet potato hash is perfect for breakfast, lunch or dinner. Bulked up with quinoa and tons of flavor, it's a great pantry weeknight meal!

Eddie almost ALWAYS requests some sort of potato skillet hash when we’re doing breakfast for dinner. And this isn’t the first time I’ve shared one here on the blog. I’ve done this sheet pan sweet potato hash that you all go crazy for! It’s wonderful.

I’ve also made a quinoa skillet hash, brussels sprouts hash, a grilled corn summer hash and even a white bean hash. LOTS to choose from. 

This chipotle sweet potato hash is perfect for breakfast, lunch or dinner. Bulked up with quinoa and tons of flavor, it's a great pantry weeknight meal!

Here’s how the skillet goes down!

I start this whole thing off with some chopped bacon for extra flavor. If you don’t eat bacon, just skip it! You’re going to cook onions, garlic and sweet potato with a few different spices – hearty ones like chipotle chili pepper that add some heat. Once everything is golden and soft, toss in some cooked quinoa if you have it.

The quinoa makes it even more satisfying but I secretly love it for the texture. 

This chipotle sweet potato hash is perfect for breakfast, lunch or dinner. Bulked up with quinoa and tons of flavor, it's a great pantry weeknight meal!

I also like to toss in some corn! Use frozen or canned – whatever you have on hand. This brings a sweetness to the dish that is just perfect with the chipotle. 

Once that’s ready – crack in your eggs. They will cook right in the skillet and you can prepare them to the level of doneness you prefer. I love this because you can add eggs at different times for different people! 

This chipotle sweet potato hash is perfect for breakfast, lunch or dinner. Bulked up with quinoa and tons of flavor, it's a great pantry weeknight meal!

Finish off the skillet with sliced avocado if you have it. It brings a creaminess to the skillet and cutes the heat.

Then lime, fresh chives or scallions – any herbs you may have for a hint of freshness.

This is a fabulous pantry meal, plus eggs! Can’t beat it. 

This chipotle sweet potato hash is perfect for breakfast, lunch or dinner. Bulked up with quinoa and tons of flavor, it's a great pantry weeknight meal!

Chipotle Sweet Potato Hash

Print

Chipotle Sweet Potato Breakfast-For-Dinner Skillet

This chipotle sweet potato hash is perfect for breakfast, lunch or dinner. Bulked up with quinoa and tons of flavor, it's a great pantry weeknight meal!
Course Breakfast, Main Course
Cuisine American
Prep Time 10 minutes
Cook Time 30 minutes
Total Time 40 minutes
Servings 2 to 4 people
Author How Sweet Eats

Ingredients

  • 2 slices bacon, chopped
  • 1 sweet onion, diced
  • 2 garlic cloves, minced
  • 3 sweet potatoes, peeled and chopped into 1-inch cubes
  • 1 tablespoon chipotle chili powder
  • 1 teaspoon smoked paprika
  • ¼ teaspoon salt
  • ¼ teaspoon freshly cracked pepper
  • 1 tablespoon tomato paste
  • 1 cup cooked quinoa
  • ⅔ cup corn, frozen or thawed is fine!
  • 2 to 4 large eggs
  • 1 avocado thinly sliced
  • 2 tablespoons chopped cilantro for topping
  • 1 tablespoon chopped chives for topping

Instructions

  • Heat a large (10 or 12 inch) skillet over medium-low heat and add the bacon. Cook until the bacon starts to become crispy and most of the fat has rendered. Stir in the onion and garlic. Cook, stirring often, for 2 to 3 minutes until the onions soften.
  • Stir in the sweet potatoes. If you feel that you need more fat in the skillet, add 1 teaspoon of olive oil or butter. Stir in the chili powder, smoked paprika, salt and pepper. Cover the skillet and cook, stirring often, for 10 minutes, or until the potatoes start to soften. If at any time you feel like the potatoes aren’t softening and the skillet is dry, you can stir in 1 to 2 tablespoons of water and cover the skillet again.
  • Uncover the skillet and stir in the tomato paste. Cook for 1 to 2 minutes so the flavor develops in the pan. Stir in the quinoa if you’re adding it - stir until it’s fully incorporated into the potatoes. Stir in the corn. If you’re using frozen corn (it works!) just stir and cook for a few minutes until it’s thawed and warm.
  • Now it’s time for the eggs! Keep the skillet over medium-ish heat and crack the eggs into the skillet with the potatoes. Cover the skillet and cook until your egg whites are fully cooked.
  • To serve, top with sliced avocado, fresh chopped chives and cilantro and a spritz of lime.

This chipotle sweet potato hash is perfect for breakfast, lunch or dinner. Bulked up with quinoa and tons of flavor, it's a great pantry weeknight meal!

The perfect egg can change everything.

The post Chipotle Sweet Potato and Quinoa Breakfast-For-Dinner Skillet. appeared first on How Sweet Eats.

14 Apr 14:11

How to Make a Giant Berry Pop Tart with Ingredients In Your Freezer.

by Jessica

This giant pop tart is like a virtual hug to you, from me.

This giant pop tart recipe can be made exclusively with ingredients in your freezer! I love to make a berry lavender flavor - so perfect for spring!

Pretty sure we could all use a pop tart hug right about now!

Hi, how are you? Please stay and chat with me here on the internets. I need all the human interaction I can get.

triple berry lavender filling with frozen fruit

In full disclosure, I made this giant pop tart waaaay back in early February before any sort of stay-in-place orders happened. I’ve wanted to make a big one ever since seeing food 52 do a strawberry version back in 2017. 

And that’s hilarious, because I’ve always been on the fence about pop tarts!

triple berry lavender filling

My mom occasionally bought them when we were kids and my brothers loved them. I was sort of “meh” on them, aside from brown sugar which was completely delicious. But that sort of thing just wasn’t what I wanted for breakfast – maybe I’d have one for dessert if anything. 

I also thought the strawberry and cherry versions were good on occasion. Nothing I ever flipped over though.

Until now! With a homemade version.

giant pop tart filling

This pop tart comes together successfully with freezer ingredients, and quarantined or not, I’d use freezer ingredients any day over a pie crust because I just love puff pastry oh-so much. Truth!

In fact, I’ve even made a few of my own mini puffy pastry pop tarts before, like these nutella s’mores ones, these smoked cheddar and cherry ones and these goat cheese and peach chutney ones. 

I love ‘em!

lavender glaze

But a big one – well, it’s super simple with these ingredients, even if my flavor is a little fancy. I know that right now, puff pastry is a luxury to add to your grocery order. But if you have some already or don’t mind getting a sheet, go for it. You can also, of course, make your own puff pastry from scratch!

I mean, we do have a ton of time now to do that, don’t we… 

giant puff pastry pop tart

The filling is made from frozen fruit that gets thick and syrupy and saucy. It is so delicious that you’ll want to eat it with many other things. I used a triple berry frozen fruit blend and some dried culinary lavender. Again, this was made before we were in a pandemic.

But I’m glad to let you know that you can order lavender extract (works just as great) or dried lavender flowers on amazon too. I use them ALL the time in my house – mostly for iced coffee, but also for this banana bread, this blueberry ricotta cake, this lemonade (it’s fab!), this sangria, these cupcakes and this ice cream that you will officially freak over. 

Promise.

It’s actually a fancy pantry staple for me, mostly because it comes in such a large bag that I gotta use it up. 

This giant pop tart recipe can be made exclusively with ingredients in your freezer! I love to make a berry lavender flavor - so perfect for spring!

I decided to still share this recipe with you from my quarantine kitchen because Easter’s coming up, and for most of us, celebrations won’t be the same. We usually go to at least two family gatherings on Easter Sunday, and Easter week has always been a lot of fun family time for us.

This giant pop tart recipe can be made exclusively with ingredients in your freezer! I love to make a berry lavender flavor - so perfect for spring!

While I have lots of cakes and treats that you can make at home to still make the day special, I wanted to give you one more option in case you do an Easter brunch or dessert.

This is such a good treat and everyone went CRAZY over it. 

This giant pop tart recipe can be made exclusively with ingredients in your freezer! I love to make a berry lavender flavor - so perfect for spring!

And the best part – use what you have. Whatever frozen fruit is your favorite? Use it! 

Berries, peaches, etc – along with a plain glaze or a vanilla glaze. You can add citrus zest or cocoa to a glaze too!

This giant pop tart recipe can be made exclusively with ingredients in your freezer! I love to make a berry lavender flavor - so perfect for spring!

Bringing the actual pop tart together could not be easier. You have to make the fruit filling, but once you fill the pastry, all it takes is baking it in the oven until golden and flakey. I’m going to make it today on my instagram stories so you can see how quickly it can come together.

Then whisk up a quick glaze and you’re good to go! 

Make it extra special with sprinkles because OF COURSE. 

This giant pop tart recipe can be made exclusively with ingredients in your freezer! I love to make a berry lavender flavor - so perfect for spring!

Now spring at home can look (and taste!) a little more festive and fun.

This giant pop tart recipe can be made exclusively with ingredients in your freezer! I love to make a berry lavender flavor - so perfect for spring!

Berry Lavender Giant Pop Tart

Print

Giant Triple Berry Lavender Pop Tart

This giant pop tart recipe can be made exclusively with ingredients in your freezer! I love to make a berry lavender flavor - so perfect for spring!
Course Breakfast, Dessert
Cuisine American
Prep Time 1 hour
Cook Time 25 minutes
Total Time 1 hour 25 minutes
Servings 6 people
Author How Sweet Eats

Ingredients

  • 4 cups mixed frozen berries
  • 2 tablespoon lemon juice
  • 1 cup granulated sugar
  • 1 teaspoon cornstarch
  • 1 teaspoon vanilla extract
  • 2 sheets thawed puff pastry
  • 1 large egg + 1 teaspoon water, lightly beaten for egg wash

lavender glaze

  • 1 1/4 cups of powdered sugar
  • ½ teaspoon vanilla extract
  • ¼ teaspoon lavender extract
  • 2 tablespoons heavy cream
  • 2 1/2 tablespoons milk
  • a drop of light pink or purple food coloring
  • sprinkles for topping
  • optional: culinary lavender flowers

Instructions

  • Preheat the oven to 425 degrees F. Line a baking sheet with parchment paper.
  • Combine the berries, lemon juice, sugar and cornstarch in a saucepan over medium heat. If desired, you can add in ½ teaspoon dried culinary lavender flowers here if you have them! Heat the mixture over medium heat. Bring it to a boil then reduce it to a simmer and cook for 5 to 6 minutes. Remove from the heat and let it cool completely. It will be thicker and more syrupy as it cools. This will take about 30 minutes of hands-off time. Once it cools, stir in the vanilla extract. You can make it the day before too. Or you can even submerge the pot in an ice bath so it cools quicker.
  • Place a sheet of the puff pastry on the parchment and pierce it all over with a fork. Spread the cooled fruit mixture over the sheet, leaving a 1-inch border. Brush the border with water. Place the other sheet of puff pastry carefully over top, lining it up with the bottom sheet. Use a fork to press the edges together and make them stick.
  • Carefully poke a few holes in the top of the pastry with a fork. This is just so it doesn’t bubble up. If it does bubble up, it’s no big deal - you can just pierce the pastry once it comes out of the oven. Brush the entire top with the egg wash.
  • Bake for 25 to 30 minutes. Remove the pan and let it cool slightly before glazing it. Slice and serve!

lavender glaze

  • To make the lavender glaze, whisk all ingredients together until smooth. If it seems to thick, add in more milk 1 teaspoon at a time. If desired, you can add a drop of food coloring to make it purple/pink!

This giant pop tart recipe can be made exclusively with ingredients in your freezer! I love to make a berry lavender flavor - so perfect for spring!

This makes me happy.

The post How to Make a Giant Berry Pop Tart with Ingredients In Your Freezer. appeared first on How Sweet Eats.

21 Mar 14:38

Shaved Parmesan Asparagus with Soft Boiled Eggs and Crunchy Brown Butter Breadcrumbs.

by Jessica

This is one seriously delicious shaved asparagus salad.

This shaved asparagus salad is tossed with a delicious parmesan vinaigrette, then topped with soft boiled eggs and finished with crunchy garlic breadcrumbs!

Look at those eggs! And the crisp green ribbons! Makes me want to eat spring in a bowl. This is like a sunshine hug.

This shaved asparagus salad is tossed with a delicious parmesan vinaigrette, then topped with soft boiled eggs and finished with crunchy garlic breadcrumbs!

I know that this isn’t a pantry meal at the moment (unless you’ve got some breadcrumbs, ha!) but I made it before everything hit the fan and it’s too good not to share. If you’re still able to get produce (I am as of right now), grab some asparagus. It’s coming into season and wonderful right now. 

P.S. You can always also use frozen asparagus here too! It might not “shave” as pretty, but you can always just chop it up! 

This shaved asparagus salad is tossed with a delicious parmesan vinaigrette, then topped with soft boiled eggs and finished with crunchy garlic breadcrumbs!

My oh my I’ve come a long way from the last time I made a shaved asparagus salad! That’s quite crazy if I do say so myself. 

It also seems like a lifetime ago.

This shaved asparagus salad is tossed with a delicious parmesan vinaigrette, then topped with soft boiled eggs and finished with crunchy garlic breadcrumbs!

So let’s do this thing! Make a perfect shaved asparagus bowl that you’ll want for lunch AND dinner. 

First step? Shave the asparagus and toss it in a bowl. I find that depending on the thickness of the spears, I end up having a mix of shaved asparagus and chopped ends. Whatever works! Just chop them finely since we’re not going to cook this. 

This shaved asparagus salad is tossed with a delicious parmesan vinaigrette, then topped with soft boiled eggs and finished with crunchy garlic breadcrumbs!

Then! Then make a parmesan vinaigrette and toss the asparagus well. It will sort of marinate and get super delicious. Not to mention that the parm vinaigrette is practically drinkable. It’s freaking good.

We also have soft boiled eggs! If you’re not into those, use hard boiled. Or just throw a fried egg on top. Again, make it your own!

I’m very much into exclamation points today. I’m craving exclamation points.

So!

I love the soft boiled eggs because the buttery yolk also runs into the asparagus and turns into a silky dressing-like blanket. Gosh, eggs are just my favorite food of all time. 

This shaved asparagus salad is tossed with a delicious parmesan vinaigrette, then topped with soft boiled eggs and finished with crunchy garlic breadcrumbs!

Okay but that’s not even the best part!! It’s not. Just wait.

We’re going to do my garlic brown butter breadcrumbs and get them super crunchy… then sprinkle them all over the top of the salad. 

OH MY WORD.

The flavor. The texture! It’s all so good. Satisfying, delicious, crunchy, creamy and green. Because I desperately need some brightness right now.

This shaved asparagus salad is tossed with a delicious parmesan vinaigrette, then topped with soft boiled eggs and finished with crunchy garlic breadcrumbs!

Shaved Asparagus Salad

Print

Shaved Parmesan Asparagus Salad

This shaved asparagus salad is tossed with a delicious parmesan vinaigrette, then topped with soft boiled eggs and finished with crunchy garlic breadcrumbs!
Course Salad
Cuisine American
Prep Time 25 minutes
Cook Time 10 minutes
Total Time 35 minutes
Servings 2 to 4 people
Author How Sweet Eats

Ingredients

  • 4 large eggs
  • 1 pound asparagus, woody stems removed
  • 2 tablespoons diced shallot
  • 2 tablespoons freshly squeezed lemon juice or white wine vinegar
  • 1 teaspoon honey
  • 2 garlic cloves, minced or pressed
  • 1/4 teaspoon salt
  • 1/4 teaspoon pepper
  • 1 pinch crushed red pepper flakes
  • 1/2 cup extra virgin olive oil
  • 3 tablespoons finely grated parmesan cheese
  • ¼ cup shaved parmesan cheese
  • breadcrumbs
  • 2 tablespoons unsalted butter
  • 1 garlic clove, minced or pressed
  • 1/3 cup seasoned panko bread crumbs

Instructions

  • To make the eggs: Heat about 3 inches of water in a small saucepan over medium heat until boiling. Once boiling, reduce the heat until it’s barely at a simmer. Add the eggs gently and cook for 6 minutes. Remove the eggs with a slotted spoon and place in an ice bath. Let cool completely before peeling.
  • To shave the asparagus spears, take a vegetable peeler and run it along the sides of the asparagus. I shave off as much as I can and leave the tops whole, adding it all to a large bowl.
  • In another bowl or measuring glass, whisk together the shallot, lemon juice, honey, garlic, salt, pepper and red pepper flakes. Stream in the olive oil while whisking. Whisk in the finely grated parm.
  • Pour a few tablespoons (enough to coat!) of the dressing over the shaved asparagus. Toss well and add more dressing as needed. Toss in the shaved parmesan.
  • Top the asparagus with the sliced soft boiled eggs and the breadcrumbs. Add more dressing if desired!
  • breadcrumbs
  • Add the butter to a small saucepan over medium heat and whisk constantly while it bubbles. The minute brown bits begin to form on the bottom of the pan, add in minced garlic and breadcrumbs. Stir constantly, cooking for a few minutes until the breadcrumbs are golden and crunchy.

Notes

inspired by bon appetit

This shaved asparagus salad is tossed with a delicious parmesan vinaigrette, then topped with soft boiled eggs and finished with crunchy garlic breadcrumbs!

Everything I want right now. Can this salad be my social interaction?

The post Shaved Parmesan Asparagus with Soft Boiled Eggs and Crunchy Brown Butter Breadcrumbs. appeared first on How Sweet Eats.

18 Mar 23:56

Creamed Spinach Mac and Cheese.

by Jessica

No problem eating greens with this creamed spinach mac and cheese! 

This creamed spinach mac and cheese is a dreamy, cheesy mac and cheese dish with tons of fresh baby spinach! Super comforting and flavorful.

I am serious. A whole huge bunch of fresh spinach. Baked into the loveliest mac and cheese pot that you ever will see. It’s everything you want and more, plus it is full of vegetables. There is NO getting around this one. 

Who needs a bowl of mac and cheese with extra pow? ME! And you. Definitely you. 

This creamed spinach mac and cheese is a dreamy, cheesy mac and cheese dish with tons of fresh baby spinach! Super comforting and flavorful.

Secret time? I never had creamed spinach growing up. My mom and grandma never made anything like it – in fact, it wasn’t until my 20s that I had it. Obviously, I avoided it like the plague if I was offered it prior to that. My distaste for vegetables was off the charts and even creamed spinach, with what appeared to be a silky bechamel, was off limits for me.

The only thing that got me eating spinach was when it was drenched in hot bacon dressing.

And let’s be real – that dish is amazing. 

fresh baby spinach

But creamed spinach? No way! I feel like I totally missed out on plates of comfort food by avoiding it most of my life. 

No longer! I’m here for all the creamed spinach. I’m even putting it in your mac and cheese. 

I shared this on instagram a few weeks ago and many of you have been anticipating the recipe! It’s finally here, and you can find me making it on my instagram stories later today too!

creamed spinach

Okay so here’s the deal. You’re basically going to make creamed spinach (like, a bunch of it) and then throw in tons of cheese. And tons of pasta.

This creamed spinach mac and cheese is a dreamy, cheesy mac and cheese dish with tons of fresh baby spinach! Super comforting and flavorful.

Then sprinkle it with crispy crunchy fried onions. Or breadcrumbs!

Then bake it until super melty and cheese and hot. 

And you just WON’T BELIEVE how fabulous it is.

This creamed spinach mac and cheese is a dreamy, cheesy mac and cheese dish with tons of fresh baby spinach! Super comforting and flavorful.

This is such a great side dish or comforting meal, it has lots of green for Saint Patrick’s Day and it’s super satisfying and warming. Food is love all the time, but especially right now.

This creamed spinach mac and cheese is a dreamy, cheesy mac and cheese dish with tons of fresh baby spinach! Super comforting and flavorful.

The crunchy topping is my favorite part. I like to use those crispy onions you may still have hiding in your pantry from the holiday season (use ’em up! they’re going to expire soon!) but you can also use breadcrumbs, cracker crumbs, heck – even pretzel crumbs!

This creamed spinach mac and cheese is a dreamy, cheesy mac and cheese dish with tons of fresh baby spinach! Super comforting and flavorful.

Just look at that perfection! Cheesy, melty, soft but sturdy noodles, tons of green! I love it so much. There is no better time to eat our feelings.

This creamed spinach mac and cheese is a dreamy, cheesy mac and cheese dish with tons of fresh baby spinach! Super comforting and flavorful.

Creamed Spinach Mac and Cheese

Print

Creamed Spinach Mac and Cheese

This creamed spinach mac and cheese is a dreamy, cheesy mac and cheese dish with tons of fresh baby spinach! Super comforting and flavorful.
Course Main Course, Side Dish
Cuisine American
Prep Time 40 minutes
Cook Time 30 minutes
Total Time 1 hour 10 minutes
Servings 8 people
Author How Sweet Eats

Ingredients

  • 1 pound short cut pasta, cooked according to package directions
  • 4 tablespoons unsalted butter
  • 1 sweet onion, diced
  • 3 garlic cloves, minced
  • pinch of salt and pepper
  • 4 tablespoons flour
  • ¼ teaspoon freshly ground nutmeg
  • 12 ounces fresh baby spinach
  • 2 1/2 cups milk
  • 12 ounces fontina cheese, freshly grated
  • 6 ounces white cheddar, freshly grated
  • 2 ounces parmesan cheese, freshly grated
  • ½ cup crispy onions or breadcrumbs, for topping

Instructions

  • Preheat the oven to 350 degrees F.
    Heat a large oven-safe pot over medium-low heat and add the butter. Stir in the onion and garlic with a pinch of salt and pepper. Cook, stirring often, until the onions have softened.
  • At this time, you can also cook the pasta in another pot. You can cook it before too - just make sure to give it a quick spritz of olive oil so it doesn't stick together.
  • Toss all the grated cheese together.
  • Stir the flour into the onions to create a roux. Cook for 2 to 3 minutes, until it becomes golden in color and starts to smell nutty. Slowly stream in the milk while stirring constantly. The mixture will begin to come together and thicken. Stir in the nutmeg.
  • Add in the spinach - it will seem overwhelming at first, but it will quickly cook down! Stir until it cooks down and softens.
  • Once the spinach cooks down, stir in almost all of the cheese (reserve a bit for topping) and the pasta. Toss it together over and over until it is combined.
  • Top with the remaining grated cheese. Top with crispy onions. Bake for 35 to 30 minutes, until golden and bubbly.

This creamed spinach mac and cheese is a dreamy, cheesy mac and cheese dish with tons of fresh baby spinach! Super comforting and flavorful.

I mean I’m pretty sure this is what they mean by eat your greens. 

The post Creamed Spinach Mac and Cheese. appeared first on How Sweet Eats.

18 Mar 23:55

Easy Parmesan Pasta Frittata with Spring Greens.

by Jessica

Dinner tonight is the simplest pasta frittata! 

This super easy pasta frittata uses leftover ingredients and can be prepped ahead of time. Leftovers are great and it's satisfying and delicious!

I promise this is going to be your new go-to easy, favorite weeknight recipe. Because whether you don’t know how to cook, don’t like to cook or you looooove to cook, you can 100% make this recipe your own! Without even relying on a full recipe. 

Now isn’t that just the best?!

frittata ingredients

Okay so this is the EASIEST satisfying recipe and perfect for dinner tonight.

Here’s the deal:

You can use whatever veggies you want. Whatever you have on hand. I used baby bella mushrooms, shallots and baby kale. You can use broccoli, bacon, peas, peppers – seriously, whatever you have on hand! 

eggs

You can use leftover roasted vegetables from dinner last night. Or you don’t have to use any vegetables at all – use bacon or pancetta or ham or even chicken. The options are seriously endless! This is such a versatile meal. 

From a former vegetable hater, I suggest not skipping the veg. If you can handle it. Because this is such a great way to get some in (especially ones like spinach or red pepper) without straight up eating a bowl of vegetables. 

frittata ingredients

You can also use leftover pasta too. This is actually such a great recipe for leftover pasta – and if you are making a meal plan for the next coming days, you can prep pasta ahead of time earlier in the week to have this. You can use ANY kind of noodle. If it’s a long noodle – cut it up. If it’s penne or shells or bowties, you’re good to go. 

I used campanelle because it’s cute! HELLO.

This super easy pasta frittata uses leftover ingredients and can be prepped ahead of time. Leftovers are great and it's satisfying and delicious!

Another reason it’s the best meal ever? It’s good COLD. Yes! 

Now of course, I prefer it warm because I’m slightly high maintenance.

But you can eat it cold straight from the fridge. It also reheats well, so there’s that. 

This super easy pasta frittata uses leftover ingredients and can be prepped ahead of time. Leftovers are great and it's satisfying and delicious!

Add a ton of cheese or just a little cheese. Make it taco-inspired with some scallions and salsa and black beans. Seriously, you can do ANYTHING with this!

Use the recipe below as your guide and then go.to.town.

P.S. the texture is out of this world too. DELISH.

This super easy pasta frittata uses leftover ingredients and can be prepped ahead of time. Leftovers are great and it's satisfying and delicious!

Parmesan Pasta Frittata

Print

Easy Parmesan Pasta Frittata with Spring Greens

This super easy pasta frittata uses leftover ingredients and can be prepped ahead of time. Leftovers are great and it's satisfying and delicious!
Course Main Course
Cuisine American
Prep Time 15 minutes
Cook Time 25 minutes
Total Time 40 minutes
Servings 4 people
Author How Sweet Eats

Ingredients

  • 3 tablespoons unsalted butter
  • 1 shallot, diced
  • 1 cup cremini mushrooms, chopped
  • 2 garlic cloves, minced
  • 8 large eggs
  • ½ teaspoon salt
  • ½ teaspoon pepper
  • 2 to 3 cups baby kale or spinach
  • 1 ½ cups cooked pasta
  • ⅔ cup freshly grated parmesan cheese, plus more for sprinkling
  • 3 to 4 cups spring greens (or more baby kale or spinach)
  • 1 tablespoon olive oil
  • 2 teaspoons freshly squeezed lemon juice

Instructions

  • Preheat the oven to 350 degrees F.
  • Heat an oven-safe skillet (about a 10-inch) over medium-low heat. Add 1 ½ tablespoons butter and once melted, add in the shallots and mushrooms with a pinch of salt and pepper. Stir in the garlic. Cook until softened, about 5 minutes.
  • While the onions are cooking, whisk together the eggs, salt and pepper. Stir in the 2 to 3 cups greens, pasta and parmesan until combined.
  • Add the remaining 1½ tablespoons of butter to the skillet. Pour the egg mixture into the skillet. Use a spatula to stir and even everything out. Let it cook for 5 minutes.
  • Place the skillet in the oven and bake for 10 to 15 minutes, or until the center is set.
  • While the frittata bakes, whisk together the olive oil and lemon juice with a pinch of salt and pepper. Toss the greens with the olive oil + lemon juice and toss.
  • Remove from the oven and serve with the dressed spring greens and extra parmesan!

This super easy pasta frittata uses leftover ingredients and can be prepped ahead of time. Leftovers are great and it's satisfying and delicious!

Looks a little funny and tastes fantastic.

The post Easy Parmesan Pasta Frittata with Spring Greens. appeared first on How Sweet Eats.

02 Mar 19:58

French Onion Chicken Lasagna Roll Ups.

by Jessica

Dinner tonight! These chicken lasagna roll ups are going to be a new fave for you.

These french onion chicken lasagna roll ups are loaded with flavor! Creamy sauce, chicken, spinach, caramelized onions and gruyere cheese. Love!

Because they are everything FRENCH ONION. Creamy sauce, tons of caramelized onions and melty gruyere cheese. 

Give.me.the.whole.pan. 

I know, I know, I’ve been waaaaay into french onion things this year. From sweet potatoes to the real deal soup. I swear this is the last one. For now at least.

caramelized onions

We’re kicking the week off with some major comfort food right here. With only a few weeks of winter left, I want to celebrate some of the cold weather favorites! 

This season is always SO hard for me when it comes to developing recipes. It seems like nothing is in season. Citrus is on it’s way out, but it’s still too early for asparagus, I’ve hit my limit with squash and frankly I can’t think of one more thing to do with a potato right now.

You know?

Cheesy, creamy, comforting pasta it is then.

lasagna roll ups ready to bake

This meal is going to be a little labor of love. Think of french onion soup! You have to take the time to caramelize the onions. Here, you also have to sauté the spinach, make a thyme bêchamel and roll up the noodles. It’s a little dinner project and the best to do when you feel like spending an hour in the kitchen. It’s such a rewarding meal! 

P.S. I’m making it over on instagram today too! It’s not difficult, there are just a few steps.

These french onion chicken lasagna roll ups are loaded with flavor! Creamy sauce, chicken, spinach, caramelized onions and gruyere cheese. Love!

So I have a really delicious (and simpler) lasagna roll up recipe coming in my next book. It’s SO good and it’s made us become obsessed with lasagna roll ups. I love them for a weeknight meal. And since I have to wait an entire year to share that recipe with you, I’ve been toying with other ones in my kitchen!

That’s how we found our way here.

These french onion chicken lasagna roll ups are loaded with flavor! Creamy sauce, chicken, spinach, caramelized onions and gruyere cheese. Love!

This meal is so comforting. So flavorful. A little high maintenance.

And so worth it!

These french onion chicken lasagna roll ups are loaded with flavor! Creamy sauce, chicken, spinach, caramelized onions and gruyere cheese. Love!

The flavor is just out of this world. It’s creamy and chewy and slightly sweet from the caramelized onions. It’s filled with chicken and spinach and fresh herbs. A roll up paired with a salad is the perfect meal.

These french onion chicken lasagna roll ups are loaded with flavor! Creamy sauce, chicken, spinach, caramelized onions and gruyere cheese. Love!

While this dish does have a lot of moving parts, you can essentially make most of it in one skillet. Caramelize the onions, then remove them and do the spinach and garlic and chicken. Remove that and make a thyme béchamel sauce right in that same skillet. Build your lasagna roll ups, and place them back into the béchamel. 

Bake it all up! 

These french onion chicken lasagna roll ups are loaded with flavor! Creamy sauce, chicken, spinach, caramelized onions and gruyere cheese. Love!

This cheesy, melty roll is your reward. With a glass of chilled pinot!

These french onion chicken lasagna roll ups are loaded with flavor! Creamy sauce, chicken, spinach, caramelized onions and gruyere cheese. Love!

And yes, you can make this entire thing ahead of time and reheat. Or just make portions of it to prep. That’s a great idea if you really want to have this on a weeknight. I find it to be more of a sunday night meal. Throw in a house salad. Some garlic bread.

These french onion chicken lasagna roll ups are loaded with flavor! Creamy sauce, chicken, spinach, caramelized onions and gruyere cheese. Love!

But who am I kidding! I’d eat this every single day forever.

These french onion chicken lasagna roll ups are loaded with flavor! Creamy sauce, chicken, spinach, caramelized onions and gruyere cheese. Love!

French Onion Chicken Lasagna Roll Ups

Print

French Onion Chicken Lasagna Rolls Ups

These french onion chicken lasagna rolls ups are loaded with flavor! Creamy sauce, chicken, spinach, caramelized onions and gruyere cheese. Love!
Course Main Course, pasta
Cuisine American
Servings 4 people
Author How Sweet Eats

Ingredients

caramelized onions

  • 2 tablespoon unsalted butter
  • 3 sweet onions, thinly sliced
  • pinch of salt and pepper

spinach and chicken

  • 16 ounces baby spinach
  • 3 garlic cloves, minced
  • 2 cups cooked, shredded chicken

ricotta layer

  • 12 ounces ricotta cheese
  • ⅓ cup freshly grated parmesan cheese
  • 1 egg, lightly beaten
  • pinch of salt and pepper
  • 8 traditional lasagna noodles, cooked
  • 8 ounces gruyere cheese, freshly grated

thyme bechamel

  • 2 tablespoons unsalted butter
  • 2 tablespoons flour
  • 1 ½ to 2 cups milk
  • ½ teaspoon dried thyme
  • ½ teaspoon freshly grated nutmeg
  • pinch of salt and pepper
  • fresh thyme and/or chives for garnish

Instructions

  • Heat a large oven-safe skillet over medium-low heat and add the butter. Add in the onions with a pinch of salt and pepper and stir. Cook, stirring often, until the onions caramelize, about 30 to 40 minutes. Once the onions are golden and caramelly, transfer them to a plate.
  • Add the olive oil to the same skillet and toss in the spinach and garlic. Stir, cooking until the spinach wilts. Stir in the chicken and a pinch of salt and pepper. Transfer the mixture a separate plate from the onions.
  • (At this point, you can boil a pot of salted water and cook the lasagna noodles until they are al dente. Once they are finished, lay them out on a clean towel. Don’t let them stick together! )
  • Preheat the oven to 350 degrees F. In a bowl, stir together the ricotta, parmesan, egg, salt and pepper.
  • Assemble your roll ups! Lay all the lasagna noodles out in a single layer. Spread a spoonful or two of the ricotta on all the noodles. I would do all the ricotta first, so you can spread any extra on the noodles. Top the ricotta with the spinach and chicken mixture on each noodle. Then go through and top each with the caramelized onions. Sprinkle the roll ups with the gruyere cheese, keeping some to sprinkle on top of the noodles.
  • To make the bechamel, heat the same skillet to medium heat. Add the butter and once melted, whisk in the flour to create a roux. Cook the roux for 2 to 3 minutes until it smells nutty and fragrant. Slowly stream in the milk while whisking constantly until it’s smooth. Once smooth, add in the thyme, nutmeg and a pinch of salt and pepper.
  • Roll up each lasagna noodle and place it right in the bechamel with the seam side down. Repeat with the remaining noodles and then spoon the bechamel over all the noodles. Top with the remaining gruyere cheese.
  • Bake for 30 minutes, or until golden and bubbly. Garnish with fresh thyme and chives. Serve immediately.

These french onion chicken lasagna roll ups are loaded with flavor! Creamy sauce, chicken, spinach, caramelized onions and gruyere cheese. Love!

Might just have to burrow right into that center for the end of winter.

The post French Onion Chicken Lasagna Roll Ups. appeared first on How Sweet Eats.

27 Feb 20:43

Lemon Garlic Fish Sticks with Jalapeño Tartar Sauce.

by Jessica

Oh my gosh. Say hello to lemon garlic homemade fish sticks.

These crispy homemade fish sticks are flavored with lemon and garlic! They are super crunchy and delicious when dipped in the jalapeño tartar sauce.

We are in looooooove. I mean, major lust and love because of these babies.

If you want to make a creative, out-of-the box meal tonight, I have the answer. Because FLAVOR. And if you observe ash wednesday and the lenten season, you’ve got a new exciting fish recipe under your belt!

homemade fish sticks

Pssst. If fish sticks aren’t your thing, this is basically a crunchy lemon garlic baked fish and you can do whatever you would like with it! Anything! Throw it on a sandwich. Have it with a side of fries. Throw it on a salad! 

Don’t freak about the whole stick thing. Promise.

jalapeño tartar sauce

Believe it or not, this isn’t the first time I’ve made fish sticks on the blog!! Years ago I made these crispy fish sticks which are so good – and classic. I also made this potato chip crusted fish sandwich which remains one of my favorite fish recipes of all time. 

The funny thing is that I never really ate fish sticks as a kid. My mom didn’t buy them. But they were EVERYWHERE come lent. They were marketed like crazy in grocery stores and ads and all over our school lunches. I can still see the blue box in the advertisement. 

But I just… couldn’t.

However, then I grew up and realized I could when I made them at home.

crispy lemon garlic fish sticks

So here, we have some grown up fish sticks, but ones that kids love too!

These crispy homemade fish sticks are flavored with lemon and garlic! They are super crunchy and delicious when dipped in the jalapeño tartar sauce.

Just look at that texture!

The breading is a mixture of panko breadcrumbs and crushed potato chips. SUPER CRUNCHY was the goal and that goal was achieved! Super crisp. Garlic, lemon zest, lemon pepper – all comes together with this breading so the texture is phenomenal. It sticks, it’s crispy, it’s irresistible. It’s flavorful and light and the texture will have you crying tears of delicious joy!

These crispy homemade fish sticks are flavored with lemon and garlic! They are super crunchy and delicious when dipped in the jalapeño tartar sauce.

And the tartar sauce? Well. OMG.

I also always thought I hated tartar sauce , but that was only until I learned that it is mayo + relish. Okay, I can handle that. In fact, last year I made some tartar sauce to go along with this incredible fish sandwich and now I’m in love. It tricked my tastebuds and changed my life.

This version is OUTSTANDING! You grate fresh jalapeño right into the sauce. It gives it a wonderful fresh jalapeño flavor without the heat. My kind of sauce! And a slightly green color too. It might be the best jalapeño flavored thing I’ve ever tried. Yes yes yes. I love it.

From now on, I’m grating the jalapeño and that’s that.

These crispy homemade fish sticks are flavored with lemon and garlic! They are super crunchy and delicious when dipped in the jalapeño tartar sauce.

While this is such a retro throwback type of meal, you can totally make it however you’d like. Serve it with some parmesan roasted broccoli or smashed potatoes. That flavor profile is comforting and classic. Or skip the tartar and do ketchup or BBQ sauce if you must. Add some chili and lime to the breading instead of lemon. Make an open face sandwich with slaw. Cover it in hot sauce! Put it in a taco!

There are just so many ideas. I can’t take it!

Enjoy dinner tonight.

These crispy homemade fish sticks are flavored with lemon and garlic! They are super crunchy and delicious when dipped in the jalapeño tartar sauce.

Homemade Fish Sticks

Print

Lemon Garlic Fish Sticks

These crispy homemade fish sticks are flavored with lemon and garlic! They are super crunchy and delicious when dipped in the jalapeño tartar sauce.
Course Main Course
Cuisine American
Prep Time 30 minutes
Cook Time 15 minutes
Total Time 35 minutes
Servings 2 to 4
Author How Sweet Eats

Ingredients

  • 1 pound fresh or thawed cod, tilapia or other whitefish
  • 2 eggs, lightly beaten
  • ⅔ cup crushed potato chips
  • 1 cup seasoned panko breadcrumbs
  • 1 teaspoon garlic powder
  • ½ teaspoon smoked paprika
  • ½ teaspoon lemon pepper seasoning
  • ½ teaspoon fresh lemon zest
  • pinch of salt

jalapeño tartar sauce

  • ¾ cup mayonnaise
  • 1 ½ tablespoons sweet relish
  • 1 tablespoon freshly grated jalapeno pepper
  • ½ lemon, juiced
  • pinch of salt and pepper

Instructions

  • Preheat the oven to 425 degrees F. Place a wire rack on a baking sheet and spray with nonstick spray.
  • Pat the fish dry with a paper towel. Cut it into “sticks” or pieces of a desired size.
  • Place the eggs in one bowl and lightly beat them. In the other bowl, place the crushed chips, breadcrumbs, garlic powder, lemon pepper, lemon zest, salt and smoked paprika. Stir until combined.
  • Dip each piece of fish into the egg and then into the breadcrumb mixture. Press the crumbs gently to adhere to the fish. Place the fish on the sprayed wire rack and repeat with remaining fish.
  • Bake the fish for 15 to 17 minutes, or until crispy and golden on the outside and opaque on the inside. Serve immediately with the jalapeno tartar sauce.

jalapeño tartar sauce

  • Whisk together the ingredients until combined.

These crispy homemade fish sticks are flavored with lemon and garlic! They are super crunchy and delicious when dipped in the jalapeño tartar sauce.

Make me the happiest and make them.

The post Lemon Garlic Fish Sticks with Jalapeño Tartar Sauce. appeared first on How Sweet Eats.

21 Feb 15:15

Skillet Cornbread with Chipotle Honey Butter.

by Jessica

Oh my gosh. This might be the best skillet cornbread of my life. 

This skillet cornbread is so fluffy and delicious! Serve it hot from the oven with chipotle honey butter. It makes a great appetizer or side dish.

It’s fluffy and sort of sweet and crunchy at the edges and everything I want cornbread to be.

This skillet cornbread is so fluffy and delicious! Serve it hot from the oven with chipotle honey butter. It makes a great appetizer or side dish.

One of my favorite ways to surprise Eddie is by making cornbread to go with a meal. HE LOVES IT. I mean, loves love loves it. Like, loves it to a point that when we had a chili bar for Max’s first birthday, I ordered two pans of cornbread from a local restaurant and Eddie called and changed the order to FOUR pans.

That’s cornbread dedication.

Also, I was right. It was too much cornbread.

But it was delicious while it lasted! 

chipotle honey butter

So THIS cornbread. It’s so delicious and has texture and tastes almost like cake. Cornbread cake!

This skillet cornbread is so fluffy and delicious! Serve it hot from the oven with chipotle honey butter. It makes a great appetizer or side dish.

I’ve made plenty of cornbreads here on the blog before, but it’s been so long and I’ve never made the bread just in the skillet. I LOVE how this turned out. It’s thick and fluffy, the edges are crisp and it has the nicest crumb. I based mine on this recipe which calls for using a 10 inch skillet, but I used a 12 inch and it still works great- it’s just a little thinner.

There is loads of flavor – I used sweet corn kernels over creamed corn. And plain greek yogurt! It gives it such a tender bite.

This skillet cornbread is so fluffy and delicious! Serve it hot from the oven with chipotle honey butter. It makes a great appetizer or side dish.

Oh wait, the butter!

I’ve made lots of compound butters over the years (there are four amazing ones in The Pretty Dish too!) and they are something I love to have on hand. That’s why they are so delish to make – you will probably have extra, can stick it in the fridge and use it SO many different ways.

P.S. this chipotle honey butter is amazing on sweet potatoes. Just sayin’. 

This skillet cornbread is so fluffy and delicious! Serve it hot from the oven with chipotle honey butter. It makes a great appetizer or side dish.

For the butter, I like to add honey and adobo sauce from a can of chipotles. I add one (or even just a half) or a diced chipotle pepper, trying to somewhere discard as many seeds as I can. Because seeds are sneaky and definitely hide in the adobo sauce and that makes it spicy! 

This skillet cornbread is so fluffy and delicious! Serve it hot from the oven with chipotle honey butter. It makes a great appetizer or side dish.

Now doesn’t this just look like the perfect weekend treat? Make a pan now and you can enjoy it!

This skillet cornbread is so fluffy and delicious! Serve it hot from the oven with chipotle honey butter. It makes a great appetizer or side dish.

Skillet Cornbread with Chipotle Honey Butter

Print

Skillet Cornbread with Chipotle Honey Butter

This skillet cornbread is so fluffy and delicious! Serve it hot from the oven with chipotle honey butter. It makes a great appetizer or side dish.
Course Side Dish
Cuisine American
Prep Time 25 minutes
Cook Time 45 minutes
Total Time 1 hour 10 minutes
Servings 6 people
Author How Sweet Eats

Ingredients

  • 1 ¼ cups all purpose flour
  • 1 ½ cups finely ground cornmeal
  • 1 tablespoon baking powder
  • 1 teaspoon salt
  • ⅔ cup sugar
  • ¾ cup unsalted butter, at room temperature
  • 4 large eggs, lightly beaten
  • 1 cups sweet corn, fresh or frozen is fine
  • 1/3 cup plain greek yogurt or sour cream

chipotle honey butter

  • ½ cup unsalted butter, softened
  • 1 tablespoon honey
  • ½ to 1 chipotle pepper in adobo, diced and some seeds discarded
  • 2 teaspoons adobo sauce from a can of chipotles
  • pinch of cinnamon
  • pinch of salt

Instructions

  • Preheat the oven to 400 degrees F. Place a cast iron skillet in the oven while you prep the batter.
  • In a large bowl, whisk together the flour, cornbread, baking powder and salt.
  • In a small bowl, stir together the softened butter and sugar with a wooden spoon until combined, so it’s almost like the texture of sand. (Most of the sugar will be absorbed by the butter!)
  • Add the eggs, corn and yogurt to the butter mixture. Whisk until combined (it won’t be smooth). Add the wet ingredients to the dry and mix until they are just incorporated. Don’t overmix!
  • Remove the skillet from the oven and pour the batter into the center. It will mostly stay in the center and you can use a spatula to slightly smooth it out and spread it to the sides, but don’t overdo it.
  • Bake the cornbread until golden and set in the center, about 35 to 45 minutes. Let cool slightly before serving with the chipotle honey butter!

chipotle honey butter

  • Stir together all ingredients until combined. This stays great in the fridge for a week.

Notes

slightly adapted from bon appetit

This skillet cornbread is so fluffy and delicious! Serve it hot from the oven with chipotle honey butter. It makes a great appetizer or side dish.

That butter swirl though.

The post Skillet Cornbread with Chipotle Honey Butter. appeared first on How Sweet Eats.

12 Feb 20:13

Sweet Potato Fontina Pierogies with Brown Butter.

by Jessica

Oh yes. We’re doing this today with sweet potato pierogi! 

The most delicious sweet potato pierogi recipe! Roasted sweet potato and fontina cheese in pillowy dough. Make sure to serve with brown butter!

Eddie is in heaven. Let me just tell you. These sweet potato pierogi are so much easier than you would think and they ARE SO GOOD. The flavor is fantastic. They are puffy yet crisp on the outside . The filling is creamy and cheesy. We cover them in brown butter and chives and then give them a little twirl through a pile of sour cream.

I am officially dead. 

pierogi filling

P.S. there is a huge debate on whether to call these pierogi or pierogIES. I’m on the fence and usually say “pierogi” as the plural. What do you say?! 

pierogo dough

AnyWAY. 

Remember when I made pierogi pizza way back when? I mean, it was an embarrassingly long time ago. Pierogies are a staple here of course, given my location! Especially this time of the year when Lent is about to begin, pierogies are everywhere. Everywhere! 

The most delicious sweet potato pierogi recipe! Roasted sweet potato and fontina cheese in pillowy dough. Make sure to serve with brown butter!

I’ve always loved them, especially since potatoes were my favorite food when I was growing up. Where they really hit me though is right in the nostalgia heart. Pierogies remind me of my elementary school days when I would go to our church’s fish fry which also happened to be at our school – and I would have the best plate of pierogies, hold the onions please. 

I can still taste them. 

filled peirogi

And you know what? Pierogies might be Eddie’s favorite food of all time. But we can be major pierogi snobs. I won’t buy a box of Mrs. T’s or anything, so then we end up going an entire year without eating them. Unless we hit up a fish fry come Lent or Eddie makes a pit stop at the pierogi truck

I mean, it’s really a shame considering our baseball team has pierogi races during every single game. Which, by the way, is basically the only reason other than the food to head to that stadium. 

Yep.

So now that I’ve made them at home, let’s just say that we will be making them ALL THE TIME.

just boiled pierogi

Guys, it’s really so easy! Even when I told my mom I made them, the first words out of her mouth were “the dough is so easy, isn’t it?” And she isn’t necessarily a baker. 

But she’s right!

The most delicious sweet potato pierogi recipe! Roasted sweet potato and fontina cheese in pillowy dough. Make sure to serve with brown butter!

The dough IS easy. It’s flour, eggs, yogurt (or sour cream) – a few other things but it comes together quickly and doesn’t have to rise or anything. You roll it out, cut out circles and add your filling. SO SIMPLE. It takes a few steps but it’s really quite easy.

I’ll be making these on my instagram stories this afternoon so you can head over and see!

The most delicious sweet potato pierogi recipe! Roasted sweet potato and fontina cheese in pillowy dough. Make sure to serve with brown butter!

As for the filling, roasted sweet potatoes all the way! I wanted to roast the potatoes instead of boil them, that way they’d be even more flavorful than expected. The sweet potatoes get tender but have caramely bits on the edges and those make them taste delish. 

After the potatoes are roasted (which, by the way, you can totally make the filling ahead of time!), I whip them up in the food processor. Then I stir in alllllll the fontina cheese.

Yes, the meltiest goodness that is fontina.

I love it so much.

The creamy, silky filling is wonderful. You will want to eat it with a spoon! The fontina somewhat melts into the filling when you’re making it, but then it REALLY melts when you boil and crisp up the pierogies. 

The most delicious sweet potato pierogi recipe! Roasted sweet potato and fontina cheese in pillowy dough. Make sure to serve with brown butter!

Here’s the great thing about this recipe: you can make them at once and freeze them once made. While these aren’t difficult, they are definitely not my idea of an easy weeknight meal from start to finish. They are more-so a meal you make on a snow day, or on a sunday afternoon when you don’t have plans.

But the best news is that you can make a batch, seal the dough and freeze them all! I have a bag in in my freezer right now. 

The most delicious sweet potato pierogi recipe! Roasted sweet potato and fontina cheese in pillowy dough. Make sure to serve with brown butter!

From freezer to plate, these only take about 10 minutes. Well, maybe more if you wait for your water to boil. But you only need to boil them for roughly 3 minutes, then toss them in a pan with some butter for another 5. 

Boom.

Dinner is here!

The most delicious sweet potato pierogi recipe! Roasted sweet potato and fontina cheese in pillowy dough. Make sure to serve with brown butter!

Sweet Potato Pierogi

Roasted Sweet Potato and Fontina Pierogi

The most delicious sweet potato pierogi recipe! Roasted sweet potato and fontina cheese in pillowy dough. Make sure to serve with brown butter!

  • 2 large sweet potatoes, (peeled and cubes)
  • 1 tablespoon olive oil
  • ½ teaspoon salt
  • ½ teaspoon freshly cracked pepper
  • ½ teaspoon garlic powder
  • 1 ½ cups fontina cheese, (freshly grated)
  • 2 1/4 cups all-purpose flour
  • 1 teaspoon salt
  • 1 tablespoons unsalted butter, (melted)
  • 1 cup plain greek yogurt or sour cream
  • 1 large egg
  • 1 large egg yolk
  • 1 tablespoon canola or vegetable oil
  • 3 to 4 tablespoons unsalted butter, (for browning/crisping the pierogi)
  • plain greek yogurt, (or sour cream for serving)
  • freshly chopped chives
  1. Preheat the oven to 425 degrees F.
  2. Place the cubed sweet potatoes on a baking sheet and drizzle with the olive oil. Sprinkle with the salt, pepper and garlic powder. Roast the potatoes for 20 to 25 minutes, until fork tender.
  3. While the potatoes are roasting, make the dough. In a large bowl, whisk together the flour and salt. In a small bowl, whisk together the butter, yogurt, egg, egg yolk and oil. Add the wet ingredients to the dry ingredients and stir until a dough forms. Let the dough rest for 10 to 20 minutes.
  4. Once the potatoes are roasted, add them to a food processor while still hot. Puree until smooth and no lumps remain. Transfer the potatoes to a bowl and stir in the fontina cheese until combined. It might melt slightly which is fine, but don’t worry if it doesn’t – it will melt when cooked!
  5. Divide the pierogi dough in half. Roll one of the halves out until it’s very thin – about ⅛ of an inch. You don’t want the dough to tear, but you want it to be thin! Use a round cutter like a biscuit cutter or glass to cut rounds out from the dough. Place them on a sheet of parchment paper. Repeat with all the remaining dough, including the other half.
  6. Take about 1 to 2 teaspoons of filling and place it in the center of each dough round. Repeat with all dough rounds. Brush the edges of each piece of dough then fold it over and press it closed, creating the pierogi shape. If desired, you can use a fork to press the edges together.
  7. At this point you can freeze the pierogi or boil them.
  8. To freeze, place the pierogi on a baking sheet and freeze the sheet for 30 to 60 minutes. After that, remove the pierogies and place them in a resealable bag. They can be frozen for about 3 months!
  9. To cook right away or from freezer, bring a pot of salted water to a boil. I cook about 5 to 6 pierogi at a time. Cook for 3 to 5 minutes, just until they float. Once they float, remove with a slotted spoon.
  10. To crisp the pierogi, heat a large skillet over medium heat and add the butter. Once it begins to brown, add in the boiled pierogi in a single layer. Cook for 1 to 2 minutes per side, until golden and crisp. Serve immediately with plain greek yogurt and chives, plus a drizzle of the butter in the skillet.

adapted from allrecipes and king arthur flour

The most delicious sweet potato pierogi recipe! Roasted sweet potato and fontina cheese in pillowy dough. Make sure to serve with brown butter!

Plate of heaven.

The post Sweet Potato Fontina Pierogies with Brown Butter. appeared first on How Sweet Eats.

11 Feb 18:45

Saucy Chipotle Chicken Skillet Enchiladas.

by Jessica

Skillet enchiladas for the win today.

Chipotle chicken skillet enchiladas are loaded with flavor and come together so quickly! They are the perfect spicy weeknight meal.

There is no shortage of enchiladas here on the blog, but let’s just add another to the mix. Why not? I get bored with everything after I make it a few times anyway, so let’s go. 

homemade enchilada sauce

This is such an easy, perfect weeknight meal. Use some leftover chicken (or a rotisserie!) and make your own sauce so the flavorful is out of this world. It will come together quickly and the leftovers are DELISH. 

Chipotle chicken skillet enchiladas are loaded with flavor and come together so quickly! They are the perfect spicy weeknight meal.

I’m declaring that these skillet enchiladas are technically easier than my traditional ones because we lose a step and a dish! Which makes it only slightly simpler to put together but for some reason, it FEELS much easier. You know?

I mean, anytime I have less dishes in my life is a good time. If you even knew how many dishes I wash in this house. It is absolutely insane. 

Chipotle chicken skillet enchiladas are loaded with flavor and come together so quickly! They are the perfect spicy weeknight meal.

So! First things first. 

I always make my enchilada sauce in a skillet or saucepan and this time, I got lazy and decided to just add my enchiladas right to that same skillet. But like, actual rolled up enchiladas – not just layered tortillas. Instead of scooping out of the sauce and placing it in a baking dish with the enchiladas and then pouring the rest over top…

NOPE! Everything is going directly into the skillet. Boom. 

P.S. if you want a throw-it-all-together skillet dinner, I made one here a few years ago. 

Chipotle chicken skillet enchiladas are loaded with flavor and come together so quickly! They are the perfect spicy weeknight meal.

Our kicker ingredient here is chipotle peppers in adobo sauce. We’re mostly adding the adobo sauce to our enchilada sauce and it will give it the perfect spicy flavor. I like to then add a touch of the enchilada sauce to the chicken mixture before rolling it in the tortillas. 

That alone is delicious enough to scoop up with tortilla chips. Wish I was eating it right now. 

Chipotle chicken skillet enchiladas are loaded with flavor and come together so quickly! They are the perfect spicy weeknight meal.

This cheesy goodness is everything!

I’ve said it a million times but enchiladas have a little special place in my heart because they was one of the first meals I ever cooked for Eddie, waaaay before I REALLY knew how to cook. Since then, my enchiladas have become even more flavorful since nearly everything is homemade and they are just.so.good.

So, dinner tonight!!

Chipotle chicken skillet enchiladas are loaded with flavor and come together so quickly! They are the perfect spicy weeknight meal.

Chipotle Chicken Skillet Enchiladas

Chipotle Chicken Skillet Enchiladas

Chipotle chicken skillet enchiladas are loaded with flavor and come together so quickly! They are the perfect spicy weeknight meal.

chipotle enchilada sauce

  • 2 tablespoons olive oil
  • 2 tablespoons flour
  • 1 1/2 cups low-sodium chicken stock
  • 15 ounces tomato sauce
  • 2 tablespoons tomato paste
  • 1 chipotle pepper, diced ((as many seeds removed as you can get))
  • 2 tablespoons adobo sauce from a can of chipotle chilis
  • 2 tablespoons chili powder
  • 1 teaspoon cumin
  • 1 teaspoon onion powder
  • 1/2 teaspoon garlic powder
  • 1/4 teaspoon smoked paprika
  • 1/8 teaspoon cayenne pepper
  • 1/4 teaspoon salt
  • 1/4 teaspoon pepper

chipotle chicken filling

  • 1 ½ cup shredded chicken
  • ½ teaspoon chipotle chili powder
  • ¼ cup sliced green onions
  • ½ cup enchilada sauce
  • 1 cup monterey jack cheese, (freshly grated)
  • 10 to 12 tortillas, (4-inch size (flour or corn!) )

for serving: cilantro, scallions, sliced radish, queso fresco, lime wedges, sour cream

  1. Preheat the oven to 350 degrees F.
  2. Heat a large skillet (either 10-12 inches) over medium heat and add the olive oil. Whisk in the flour and cook until it is golden brown, about 2 minutes.
  3. Add in all the remaining ingredients and whisk together, bringing the mixture to a simmer. Reduce the heat to low and cook for 5 more minutes. Turn off the heat.
  4. Once the sauce has cooked a bit, scoop out ½ cup to reserve for the chicken mixture. If you want, you can also scoop some out here to top the enchiladas, but I find it’s equally as easy to scoop it up from the sides of the skillet for topping.
  5. In a large bowl, toss together the chicken, chipotle chili powder, green onions and enchilada sauce. Mix it well to make sure all the chicken is covered. Toss the chicken with ½ cup of the cheese.
  6. Take each tortilla (you can use flour or corn, it’s your call!) and place 2 to 3 tablespoons of the chicken mixture in the center. Roll it up tightly and place it directly in the skillet on top of the enchilada sauce. Repeat with remaining tortillas and chicken mixture.
  7. Use a spoon to scoop up enchilada sauce from the sides, covering all the tops of the tortillas. Sprinkle with the remaining cheese.
  8. Bake the enchiladas for 20 to 25 minutes, until the cheese is golden and bubbly. Top the enchiladas with cilantro, green onions, anything else you love! Serve!

Chipotle chicken skillet enchiladas are loaded with flavor and come together so quickly! They are the perfect spicy weeknight meal.

All those flavors bits on the side!! YES.

The post Saucy Chipotle Chicken Skillet Enchiladas. appeared first on How Sweet Eats.

14 Dec 01:43

Everything Cheesy Spinach Artichoke Twists.

by Jessica

The rest of December officially just got better, thanks to these spinach artichoke twists! 

These spinach artichoke twists are filled with cheese and pancetta. They are buttery and flaky on the outside then sprinkled with everything seasoning. YUM.

I mean… aren’t these THE CUTEST!!

Yes. They are. But wait until you taste them. If you need a fun little appetizer to serve this holiday season, it is here for you.

spinach artichoke filling

This is SO much easier than it looks. I first saw the recipe on bon appetit. It looked incredible and I was dying to make it for a party, but thought it might be too involved.

Spoiler alert: it isn’t at all!

If I can do it, you definitely can do it.

All you need to make this happen is two sheets of puff pastry and a couple ingredients for the filling. Maybe a glass of wine for yourself on the side.

puff pastry filled with spinach artichoke

In fact, I changed a lot of things about the filling. For example, their’s uses frozen spinach and for some reason, I just never have frozen spinach on hand. I don’t love frozen spinach either. But we ALWAYS have fresh baby spinach in our fridge because we use it in smoothies daily. Plus, there is no thawing required! 

And I added in chopped artichokes too. Because nothing screams “the holidays!” like spinach artichoke dip. It’s addictive.

puff pastry filled with spinach artichoke

The filling isn’t overly cheesy, because if is, it will end up seeping out and bubbling all over the pan. It’s best to use a crumbly cheese, one that doesn’t get super melty. You know? I prefer gorgonzola with my spinach, which I have ever since I made this fancier spinach dip. It has blue cheese in it and the flavor is elevated about a million points because of that.

The combination is just wonderful. 

These spinach artichoke twists are filled with cheese and pancetta. They are buttery and flaky on the outside then sprinkled with everything seasoning. YUM.

Oh! The other thing?

I always use pancetta in these twists too. YEP. So we have spinach, shallot, artichokes, pancetta and blue cheese. I mean… I would eat that out of a bowl alone. Snuggled up on the couch with a spoon. And netflix. 

These spinach artichoke twists are filled with cheese and pancetta. They are buttery and flaky on the outside then sprinkled with everything seasoning. YUM.

Then the top is showered with everything seasoning! Just when you didn’t think things could get more flavorful. Wowza.

These spinach artichoke twists are filled with cheese and pancetta. They are buttery and flaky on the outside then sprinkled with everything seasoning. YUM.

The answer to the million dollar question: yes you can prep it ahead of time. YES! See, puff pastry is one of those things that really has to be baked and served almost immediately. It’s how you get the best buttery, flakey flavor and texture.

However, you can assemble this entire thing and throw it in the fridge for later in the day. It’s a win win!

Run run run and make it.

These spinach artichoke twists are filled with cheese and pancetta. They are buttery and flaky on the outside then sprinkled with everything seasoning. YUM.

Everything Spinach Artichoke Twists

Everything Spinach Artichoke Puff Pastry Twists

These spinach artichoke twists are filled with cheese and pancetta. They are buttery and flaky on the outside then sprinkled with everything seasoning. YUM.

  • 2 sheets frozen puff pastry, (thawed)
  • 4 ounces diced pancetta
  • 1 shallot, (diced)
  • 2 garlic cloves, (minced)
  • ½ teaspoon freshly cracked black pepper
  • 3 cups fresh baby spinach, (chopped)
  • 6 artichoke hearts, (chopped)
  • ½ cup crumbled gorgonzola, (or any blue! cheese)
  • 1 egg + 1 teaspoon water, (lightly beaten, for egg wash)
  • 1 to 2 tablespoons everything seasoning
  1. Preheat the oven to 425 degrees F. Line a baking sheet with parchment paper.
  2. Heat a large skillet over medium-low heat and add the pancetta. Cook until the pancetta is crispy and the fat is rendered. Remove the pancetta with a slotted spoon and place it on a paper towel to drain excess grease. Discard all by 1 teaspoon of the pancetta grease from the skillet.
  3. Add the shallot and garlic to the skillet and stir in the black pepper. Cook, stirring often, until the shallot softens, about 5 minutes. Remove the skillet from the heat and let the mixture cool slightly.
  4. While it’s cooling, prep you puff puff pastry. Use a circular object about the same size as your puff pastry to cut a circle out of the middle of both sheets, the exact same size. You want it to be as large as it can (so it goes to the edges!) – so you don’t waste much pastry. Place both circles on the parchment paper.
  5. In a large bowl, stir together the chopped fresh spinach, artichokes, pancetta, shallots and garlic. Stir in the crumbled cheese. Mix until everything is combined, then place it in the center of one of the puff pastry circles, leaving a ½ border along the edge. On that edge, brush with egg wash. Top the mixture with the other puff pastry circle, so they line up perfectly on top of each other with the filling in the center. Press the edges together.
  6. Use a biscuit cutter (or the rim of a glass) to press into the center, but don’t cut through. Use a sharp knife to cut slits in the puff pastry circle about 1 inch apart – from the center out to the edge. (see my third photo down!) Take each of those slices and gently twist it from the center. (see the fourth photo down.) Twist it two or three times. Don’t worry if filling is falling out and it looks messy – it will still bake up pretty!
  7. Brush the tops with egg wash and sprinkle on the everything seasoning.
  8. Bake on the center rack for 20 to 25 minutes, or until the puff pastry is golden and shiny. Serve immediately!

These spinach artichoke twists are filled with cheese and pancetta. They are buttery and flaky on the outside then sprinkled with everything seasoning. YUM.

Now maybe I need a dip for this too…

The post Everything Cheesy Spinach Artichoke Twists. appeared first on How Sweet Eats.

07 Dec 04:50

Hot Cocoa Cake with Whipped Marshmallow.

by Jessica

Happy hot cocoa cake day!

This hot cocoa cake is made with the fudgiest chocolate cake, smothered in chocolate cream cheese frosting and dolloped with whipped marshmallow!

Or should we (un)officially call this Christmas cake day?

You know how much I love a Christmas cake.

layered frosted chocolate cake

Which is funny since I hate baking cakes. It’s definitely not a passion of mine. When it comes to a Christmas cake though? I’m so there.

Two years ago I made the white sparkle Christmas cake. It has been such a favorite with you guys, something many of you have turned into a tradition now!

Last year, I made a pink peppermint cake. I’m all about that pink peppermint life. It’s fun and festive and whimsical. Looks like a cake straight out of The Grinch! If you are (or know) a peppermint lover, that’s for you.

whipped marshmallow

Let’s take a moment to pray at the altar of whipped marshmallow.

I mean LOOK AT THIS.

This hot cocoa cake is made with the fudgiest chocolate cake, smothered in chocolate cream cheese frosting and dolloped with whipped marshmallow!

So I figured it was high time to do a CHOCOLATE Christmas cake. I almost did the hot cocoa cake last year, but pink peppermint won out. We’re here this year with the most decadent, lovely cake for all the chocolate lovers.

That’s definitely me and I’m raising both hands. 

This hot cocoa cake is made with the fudgiest chocolate cake, smothered in chocolate cream cheese frosting and dolloped with whipped marshmallow!

Isn’t it a beauty?! It’s easy too! 

I mean, sure, it’s high maintenance. But there is no slicing weird layers or anything. Nothing overly complicated, just the preparation of a few recipes (cake, frosting, marshmallow) and assembly.

Trust me, if I can do this, you can totally do it. Promise. Pinky swear.

LYLAS. 

Bonus points if you know that last one.

This hot cocoa cake is made with the fudgiest chocolate cake, smothered in chocolate cream cheese frosting and dolloped with whipped marshmallow!

The cake is a super rich chocolatey cake that is light at the same time. Does that make sense? With a chocolate frosting that is to die for. 

A chocolate cream cheese frosting, because I just can’t resist. I KNOW. This is the millionth time in 2019 that I’ve made a version of cream cheese frosting. But FYI, it’s the most incredible frosting around.

All my life, THIS has been my favorite kind of cake. I wasn’t a huge cake lover growing up and I’ve actually never loved frosting (aside from cream cheese frosting… obvs). For any birthday, or anytime that a cake was warranted, I chose something like this. My mom would always ask what kind of cake I wanted and my response was robotic: “chocolate fudge cake with the dark chocolate fudge icing. You know, the dark chocolate kind.”

This hot cocoa cake is made with the fudgiest chocolate cake, smothered in chocolate cream cheese frosting and dolloped with whipped marshmallow!

Both mother lovett and my mom made a delish chocolate frosting, but it was lighter in appearance and I wanted FUDGE.

So here we are!

At a super fudgy chocolate cake (thanks Ina) with super fudgy chocolate frosting. 

This hot cocoa cake is made with the fudgiest chocolate cake, smothered in chocolate cream cheese frosting and dolloped with whipped marshmallow!

The topping may be my favorite part. I accidentally typed “party,” so I may as well tell you that it may be my favorite party too. 

It’s so light and fluffy. It’s sweet, but it’s light enough in texture that it cuts the richness of the cake. This is the whipped marshmallow that I’ve used on my peanut butter cheesecake. So I know just how well it cuts the richness of desserts. 

The cloud-like texture is also something to write home about and it isn’t very complicated either.

This hot cocoa cake is made with the fudgiest chocolate cake, smothered in chocolate cream cheese frosting and dolloped with whipped marshmallow!

And the entire cake reminds me of my toasted marshmallow cream hot chocolate, which is literally like dessert in a mug. It’s decadent.

This hot cocoa cake is made with the fudgiest chocolate cake, smothered in chocolate cream cheese frosting and dolloped with whipped marshmallow!

It’s the perfect cake to celebrate the season. Or the perfect cake to celebrate your birthday! Or the perfect cake to celebrate a random winter Saturday. Because you can freeze half and you’re good to go.

Or you can share half with a friend, which let’s be real, may be the best way to make friends ever. Try it!

This hot cocoa cake is made with the fudgiest chocolate cake, smothered in chocolate cream cheese frosting and dolloped with whipped marshmallow!

Hot Cocoa Cake

Hot Cocoa Cake with Whipped Marshmallow

This hot cocoa cake is made with the fudgiest chocolate cake, smothered in chocolate cream cheese frosting and dolloped with whipped marshmallow!

cocoa cake

  • 1 3/4 cups all-purpose flour
  • 1 3/4 cups sugar
  • 3/4 cup unsweetened cocoa powder
  • 2 teaspoons baking soda
  • 1 teaspoon baking powder
  • 1 teaspoon salt
  • 1 cup buttermilk
  • 1/2 cup vegetable oil
  • 2 large eggs
  • 3 teaspoons vanilla extract
  • 1 cup freshly brewed hot coffee

chocolate cream cheese frosting

  • 3 8-ounce blocks of cold cream cheese
  • 3/4 cup unsweetened cocoa powder
  • 3 1/2 cups powdered sugar
  • 2 1/2 ounces milk chocolate, (melted and cooled)
  • 1 tablespoons vanilla extract

whipped marshmallow

  • 4 large egg whites
  • 1 cup granulated sugar
  • 1/4 teaspoon cream of tartar
  • 1 teaspoon vanilla extract

cocoa cake

  1. Preheat the oven to 350 degrees F. Spray three 8-inch round baking pans with nonstick baking spray – make sure it’s the kind that has the flour in the spray!
  2. In a bowl, whisk together the flour, sugar, cocoa, baking soda, powder and salt.
  3. In the bowl of your electric mixer fitted with a paddle attachment, beat the buttermilk, oil and eggs on medium speed until combined. Beat in the vanilla extract. With the mixer still on medium speed, beat in the dry ingredients until they are just combined, scraping the bottom and sides of the bowl if needed. Beat in the coffee until combined.
  4. Divide and pour the batter into the prepared cake pans. Bake the cakes for 30 to 35 minutes, or until a tester inserted in the center comes out clean. Let the cake cool for about 30 minutes in the pan, then carefully invert onto parchment paper to let them cool completely.
  5. I actually like to do this part ahead of time. Once cool, I wrap the cake layers in plastic wrap and stick them in the freezer, if only for 30 minutes. This helps the frosting go on nicely!
  6. When you’re ready to frost, add a dollop of frosting on top of two cakes and layer the cakes together. Add the remaining frosting and cover the cake.
  7. Pipe the whipped marshmallow on top of the cake. Sprinkle with cocoa powder. Slice and serve when you’re ready!
  8. We love to keep this cake in the fridge (Eddie loves cold cake!) and I would recommend that since it has the cream cheese frosting. Bring it out 30 to 60 minutes before serving so it can come to room temperature.

chocolate cream cheese frosting

  1. In the bowl of an electric mixer, beat cream cheese until smooth. Add in vanilla. With the mixer on low speed, slowly add powdered sugar 1/2 cup at a time and add cocoa powder, increasing the speed to mix. Add in melted chocolate. If the frosting it a bit too thick, add milk 1 teaspoon at a time until desired consistency is reached. If it is too thin, add additional sugar gradually.

whipped marshmallow

  1. To make the frosting, combine the egg whites, sugar and cream of tartar in a heat-proof bowl, preferably the bowl of your electric stand mixer. Place over top of a double-boiler that contains simmering water, and whisk constantly for 3-4 minutes until the sugar has dissolved and the egg whites are slightly warm. Immediately remove the bowl and place it on your stand mixer with the whisk attachment, beating slow at first and gradually increasing the speed to high.
  2. Beat for 6-7 minutes until glossy and thick, then beat in vanilla extract for another minute until combined.
  3. Fill a piping bag with the marshmallow and pipe puffs on top of the chocolate cake. Sprinkle with cocoa powder!
  4. Note: the marshmallow can be done ahead of time and holds up nicely in the fridge. If you have more than 24 hours though, I would wait as long as you can to add the marshmallow!

cocoa cake layers from ina

This hot cocoa cake is made with the fudgiest chocolate cake, smothered in chocolate cream cheese frosting and dolloped with whipped marshmallow!

What.a.looker.

The post Hot Cocoa Cake with Whipped Marshmallow. appeared first on How Sweet Eats.

04 Dec 19:44

Loaded Butternut Squash Pot Pie.

by Jessica

[This post is sponsored by Swanson! I’m so excited to be working with them to create some delicious recipes for you in the coming months. Their broth is the best and the only one that has a place in my kitchen!]

Okay guys. I’m here to tell you that this butternut squash pot pie is where it’s AT.

If you are in the mood for total comfort food, like you are super pumped that winter is coming and all you can envision is snowflakes and fires and cozy, comforting meals, this is for you. And me.

I mean, it’s for us! You’re going to freak. Because we’re about to break down your new favorite fall recipe.

Today I’m partnering with Swanson to share this incredible butternut squash pot pie recipe with my favorite broth – Swanson Vegetable Broth! Swanson is a staple in my kitchen! And I just love to have the broth on hand because it’s so versatile. It adds so much flavor to everyday meals and, not to mention, makes meal prep easier. 

Ohhh just let me tell you how flavorful the broth makes this pie.

It does double duty!

First, we take our starchy veggies and cook them in the vegetable broth so they soften a bit. This is a trick I learned from my friend Jenna way back in the day, and it’s a key component to a good pot pie recipe. Your veggies get super tender this way, without being overly mushy.

Then! It gets good. Then, we take the veggies and the broth they were cooked in, and stir it into the pot pie base to create the most flavorful filling EVER. Seriously. This Swanson Vegetable Broth is full of goodness and you won’t believe how delish it makes this base taste. It provides excellent flavor without overpowering the pot pie. And that’s key, since it’s packed with veggies!

When I make a pot pie, I always start with a sweet onion. Instead of using celery here, I used shredded brussels sprouts. Along with the butternut squash, golden potatoes, carrots and sage, we have a one-way ticket to flavor town. The Swanson Vegetable Broth pulls the whole dish together. It creates an easy sauce for the filling where all the veg can hang out and party.

Sounds amazing, right?

Now the topping? The crust is straight-up irresistible. Puff pastry is the only thing I use on my pot pies – this should come as no surprise given my serious aversion to pie crust. One of the reasons I love puff pastry is because of the layers. Stick a spoon down in there and hear the crunch – it’s like ASMR for your tastebuds. 

I also love puff pastry for the topping because it’s lighter – which really counts in this otherwise rich dish. It’s flakey and delicious, yes, but it’s also light and airy on top of the saucy filling. Works so perfectly together! 

For this puff pastry crust, brush it with egg wash, then cover it in fresh sage leaves. And a sliiiiightly heavy handed sprinkle of parmesan (which is the only kind, right?).  The sage crisps up in the oven and adds something extra to the crust – like that fresh fall taste that only sage can bring. 

The whole mix of flavors – all the warming, fall vegetables in the silky filling, topped with the crust, is the ultimate comfort food. It’s fantastic.

Oh oh oh and guess what? So you probably know that my annual Thanksgiving leftover post is coming later this week. This would be a fabulous option to add in to your leftover repertoire, because if you’re really feeling it, you could always toss some turkey in with everything else. Winning! Yes I love it so much.

You must let me know once you try it.

Butternut Squash Pot Pie

Loaded Butternut Squash Pot Pie

This butternut squash pot pie is loaded with squash, brussels sprouts, potatoes and carrots, topped with a flaky sage parmesan puff pastru crust!

filling

  • 3 cups cubed butternut squash
  • 1 cup sliced carrots
  • 1 cup chopped gold potatoes
  • 6 cups Swanson Vegetable Broth
  • 8 tablespoons unsalted butter
  • 1 sweet onion, (diced)
  • 1 cup shredded brussels sprouts
  • 3 garlic cloves, (minced)
  • 1 teaspoon salt
  • ½ teaspoon freshly cracked black pepper
  • 3 tablespoons chopped fresh sage
  • ½ cup flour
  • ⅔ cup half and half
  • 3 tablespoons finely grated parmesan cheese
  • ¼ teaspoon fresh ground nutmeg

crust

  • 1 sheet prepared puff pastry
  • 1 egg + 1 teaspoon water, (lightly beaten)
  • 1 bunch of fresh sage leaves
  • 3 tablespoons finely grated parmesan cheese
  1. Preheat the oven to 425 degrees F. Spray a 9×13 inch baking dish with nonstick spray.
  2. Fill a saucepan with the squash, carrots and potatoes. Pour the Swanson Vegetable Broth over top. Bring the mixture to a simmer and cook for 10 to 15 minutes, until the vegetables are tender. Place a strainer over a large bowl and pour the vegetables into the strainer, catching the broth in the bowl. We will use the broth to stir into the base!
  3. While the veggies are simmering in the broth, heat a large pot over medium heat and add the butter. Stir in the onion, brussels sprouts, garlic, salt and pepper. Stir in the sage. Cook, stirring often, until the onions and brussels soften, about 5 minutes. Stir in the flour to create a roux. Cook, stirring often, for 2 to 3 more minutes, until the flour becomes slightly golden and smells fragrant.
  4. Slowly stream in the Swanson Vegetable Broth, stirring the entire time, so the filling thickens as you stir. Add the vegetables into the pot. Cook, stirring often, for 5 or 6 minutes until the base is thickened. Stir in the half and half, parmesan and nutmeg. Taste the mixture and season it with more salt and pepper if necessary.
  5. Pour the filling into the baking dish. Layer the puff pastry over top. Beat together the egg and water in a bowl, then brush it all over the pastry. Press the sage leaves into the pastry and sprinkle with parmesan. Use a sharp knife to cut slits in the puff pastry so the steam escapes.
  6. Bake the puff pastry for 30 to 35 minutes, or until the pastry is puffed and golden and the filling is bubbly underneath. Let cool slightly before serving!

Just want to dive on in.

The post Loaded Butternut Squash Pot Pie. appeared first on How Sweet Eats.

04 Dec 19:39

The Tortellini Salad that We Can’t Stop Eating!

by Jessica

Just going to say it: this cilantro lime tortellini salad is life changing.

This cilantro lime tortellini salad is loaded with flavor! Served warm or cold, it has pepitas, sun dried tomatoes and crumbled feta. It's ridiculously good!

This tortellini salad is my new favorite thing. Out of all the favorite things right now. And it’s going to be your new favorite thing!

I realize that’s a bold statement, but coming from someone who has a new favorite thing every few days, I figure it’s fine. And expected.

But you are going to love it!

cilantro lime vinaigrette

Okay so you want to know something embarrassing? This is another recipe I’m making inspired by lunch from Nordstrom Cafe. I KNOW I KNOW I KNOW. This might be the fourth recipe on this blog that I made based on a meal there?

And what’s even worse – it’s not even in the cafe. It’s sold at the E Bar in our Nordstrom! The grab and go place!

p.s. this is obviously not sponsored and Nordstrom has no idea who I am, aside from the fact that a few months ago Max knocked over a mannequin while we were shopping and I wanted to crawl into a hole and disappear. 

cheese tortellini

I’ve rambled approximately ten million times about how we still love to go to the mall. We still love it! My mom, aunt and Mother Lovett would take Lacy and me every Friday when I was growing up and it’s a fun tradition that we like to try and hold on to every now and then. We don’t go every week, but when we do go, it can turn into a marathon day. My kids are just used to it by now!

See also: I get them a cookie from E Bar to bribe them into enjoying our marathon shopping day.

See also again: that’s where we first learned of the cilantro lime tortellini salad!

I love it so much. 

This cilantro lime tortellini salad is loaded with flavor! Served warm or cold, it has pepitas, sun dried tomatoes and crumbled feta. It's ridiculously good!

Lacy actually had the salad first and straight up RAVED about it. Then I grabbed it for lunch a few weeks ago when I took my dress (for her wedding!!) to get alterations. I can’t even BELIEVE how delicious it is. I had to create it the moment I got home. 

Cheese tortellini has never been a staple in our meals, so I rarely think of it. But this salad? I was obsessed from the get go. I AM in love. I.am.living.for.it.

This cilantro lime tortellini salad is loaded with flavor! Served warm or cold, it has pepitas, sun dried tomatoes and crumbled feta. It's ridiculously good!

Here are just a few reasons why:

First, it’s incredible. Tastes so, so good, has crunch and texted and creaminess. I love it.

Second, it’s better served cold. At least, I think so. This makes it a perfect make-ahead meal, whether it be for lunch or for a big party. Make it ahead of time. Transport it to where ever you need to go. It works! 

Third, it works as meal (for me, sure!) or a side dish. It can be your lunch tomorrow or a side to your dinner tonight. 

Finally, it has kale in it. It’s good for us. And sun-dried tomatoes. It’s red and green and kind of festive, so it’s perfect for the holiday season and all those potlucks.

This cilantro lime tortellini salad is loaded with flavor! Served warm or cold, it has pepitas, sun dried tomatoes and crumbled feta. It's ridiculously good!

Everyone in this house loved it. The salad has crumbly cheese and roasted pepitas too, so the flavor is just over the top. You can add as much or as little dressing as you’d like. And the Nordstrom version also has corn and poblanos, which I left out her because they felt slightly summery to me. If you’re feeling it, I suggest throwing in a ⅓ cup of sweet corn, because the sweetness really complements everything. 

Yes yes yes!

This cilantro lime tortellini salad is loaded with flavor! Served warm or cold, it has pepitas, sun dried tomatoes and crumbled feta. It's ridiculously good!

I’m sharing this today because I know in this crazy season, we all need something incredible to take to a gathering. Bring this dish if you’re looking for something different to share, something that everyone would love. Something that can be made ahead of time and something that can be made in a big batch for a group.

Promise it’s a hit every time.

This cilantro lime tortellini salad is loaded with flavor! Served warm or cold, it has pepitas, sun dried tomatoes and crumbled feta. It's ridiculously good!

Cilantro Lime Tortellini Salad

Cilantro Lime Tortellini Salad

This cilantro lime tortellini salad is loaded with flavor! Served warm or cold, it has pepitas, sun dried tomatoes and crumbled feta. It’s ridiculously good!

  • 1 pound cheese tortellini, (cooked)
  • 1 jar sun dried tomatoes, (drained and chopped)
  • 3 cups baby kale. (coarsely chopped)
  • 1/4 cup crumbled cotija, ((or feta!) cheese)
  • 3 tablespoons roasted and salted pepitas
  • 2 tablespoons fresh cilantro

cilantro lime vinaigrette

  • 3 tablespoons freshly squeezed lime juice
  • 1 1/2 tablespoons honey
  • 1/4 cup fresh cilantro
  • 2 garlic cloves, (minced or pressed)
  • ¼ teaspoon salt
  • ¼ teaspoon pepper
  • Pinch crushed red pepper flakes
  • 1/3 cup extra virgin olive oil
  1. Boil the cheese tortellini according to the package instructions. Once drained, toss the tortellini with the sun dried tomatoes and kale. Drizzle on a few tablespoons of the vinaigrette and toss.

  2. Add in the cheese and pepitas. Drizzle more dressing if desired. Toss in some fresh cilantro. Taste and season with more salt and pepper if needed. Serve.

  3. This is amazing served warm or cold. I prefer it cold and it's even better after it sits for a few hours!

cilantro lime vinaigrette

  1. In a blender or food processor, combine the lime juice, honey, garlic, cilantro salt, pepper, pepper flakes and olive oil. Blend until combined an

This cilantro lime tortellini salad is loaded with flavor! Served warm or cold, it has pepitas, sun dried tomatoes and crumbled feta. It's ridiculously good!

Totally making it for lunch today.

The post The Tortellini Salad that We Can’t Stop Eating! appeared first on How Sweet Eats.

22 Nov 19:38

Butternut Baked Ziti.

by Jessica

Okay so just give me all the butternut squash baked ziti!

Butternut squash baked ziti is the ultimate comfort food! Squash, fire roasted tomatoes, parmesan and mozzarella make the best sauce ever.

Seriously look at this fantastic cheesy dish. I realize that right now I need to be in serious turkey and stuffing mode, but HELLO. How can I do that when I’m staring at this lovely sight? 

roasted butternut squash

And if we’re being real, this could be part of your Thanksgiving if you wanted it to! 

Butternut squash baked ziti is the ultimate comfort food! Squash, fire roasted tomatoes, parmesan and mozzarella make the best sauce ever.

Remember my butternut squash shells and cheese recipe? It’s a major hit on the site – one of the most popular recipes! And then I also have a butternut baked penne (with bacon) that’s also delish.

So obviously, since I try to reinvent the wheel of things I love, and since I just couldn’t get enough, I made… butternut baked ziti. 

YES.

Not just any butternut baked ziti. This is loaded with fire roasted tomatoes (my all-time fave!), roasted butternut squash, parmesan, mozzarella, ricotta, herbs – all the good stuff! I did not include sausage or ground beef in mine, but you absolutely could do that. Brown it and throw it in the dish with the rest of the ingredients. 

Butternut squash baked ziti is the ultimate comfort food! Squash, fire roasted tomatoes, parmesan and mozzarella make the best sauce ever.

I got a the wildest craving for some sort of butternut pasta a few weeks ago. It was all I could think about! So I made the butternut skillet shells for dinner and we enjoyed the leftovers for a few days. But it still didn’t curb the craving.

Ever since making this harvest pasta sauce last year, I’ve come to love the combo of fire roasted tomatoes and squash. It’s that whole sweet and savory thing, you know? I rarely want tomato sauce on its own, but pair it with something sweet and I am so there. 

Butternut squash baked ziti is the ultimate comfort food! Squash, fire roasted tomatoes, parmesan and mozzarella make the best sauce ever.

Now, if you haven’t made a butternut pasta dish before, you should know that it’s a little different. It’s not as ooey-gooey, melty and cheesy as traditional mac and cheese or ziti, though this is the closest I’ve ever got to that. The sauce is thicker and heartier, but the flavor is SO good.

I mean, really good.

Oh and it’s filling to the max! Like so satisfying. I love having just a bowl of this for dinner with a greens salad – I’m set. 

Butternut squash baked ziti is the ultimate comfort food! Squash, fire roasted tomatoes, parmesan and mozzarella make the best sauce ever.

This is one of my favorite dishes to make because you can totally make it ahead of time! It is a bit time intensive – you have to roast the squash first, then puree everything together, and then heat it and melt the cheese into a sauce. But it’s 100% WORTH IT. 

And plus, do it ahead! You can bake it ahead of even wait until it’s all assembled and stick it in the fridge. Bake when you’re ready!

Butternut squash baked ziti is the ultimate comfort food! Squash, fire roasted tomatoes, parmesan and mozzarella make the best sauce ever.

I probably won’t be putting this on my Thanksgiving table, since the last time I did something like that (with this lasagna), my family flipped their lids. But it’s definitely going to be a staple for the rest of the fall and winter months.

It’s hearty.

Comforting. 

Ridiculously delicious. 

Butternut squash baked ziti is the ultimate comfort food! Squash, fire roasted tomatoes, parmesan and mozzarella make the best sauce ever.

Perfect for a game day meal, a Sunday dinner, a weeknight (especially if you prep ahead!) or a holiday. I mean, LOOK AT THAT CHEESE.

Butternut squash baked ziti is the ultimate comfort food! Squash, fire roasted tomatoes, parmesan and mozzarella make the best sauce ever.

Seriously, this should be your weekend plan. Now you have plans!

Butternut squash baked ziti is the ultimate comfort food! Squash, fire roasted tomatoes, parmesan and mozzarella make the best sauce ever.

Butternut Squash Baked Ziti

Butternut Baked Ziti

Butternut squash baked ziti is the ultimate comfort food! Squash, fire roasted tomatoes, parmesan and mozzarella make the best sauce ever.

  • 4 cups cubed butternut squash
  • 2 tablespoons olive oil
  • 1 teaspoon salt
  • 1 teaspoon freshly cracked pepper
  • 1 pound ziti pasta, (cooked)
  • 1 14 ounce can fire-roasted tomatoes
  • 2 garlic cloves, (minced)
  • ¾ cup milk, (whatever kind you prefer!)
  • 8 ounces mozzarella cheese, (freshly grated)
  • 4 ounces parmesan cheese, (freshly grated)
  • 1 (8 ounce) container ricotta cheese
  • ¼ cup seasoned fine breadcrumbs
  • ¼ cup panko bread crumbs
  1. Preheat the oven to 425 degrees F. Toss the squash with the olive oil, salt and pepper. Spread it on a baking sheet and roast until tender and slightly caramelized on the edges, about 20 to 25 minutes.
  2. While the squash is roasting, cook the pasta according to the directions. When finished, you can run it under cool water to stop it from cooking and also give it a quick spray of olive oil, tossing it, to keep it from sticking together.
  3. Reduce the heat in the oven to 375 degrees F. Spray a 9×13 inch baking dish with nonstick spray.
  4. Place the squash, tomatoes and garlic in a blender or food processor. Puree until smooth and creamy. Transfer the mixture to a large saucepan or skillet (make sure it’s large enough to add the ziti!) and add the milk. Heat over medium-low heat, stirring often.
  5. Once the squash mixture is warmed, stir in most of the cheese. Add in small handfuls and stir until completely melted before adding more. I like to do about three quarters of the cheese, saving some for the top. Once the cheese is all melted, taste the sauce and season it more if needed. I like to start with 1/4 teaspoon of salt and pepper if needed.

  6. Add the ziti to the squash sauce and toss well. Transfer all of the ziti into the baking dish. Scoop the ricotta in between the ziti – I like to do spoonfuls folded between the pasta all throughout the dish. Top the ziti with the remaining cheese. Top with the breadcrumbs.
  7. Bake for 35 to 40 minutes, until golden and bubbly on top. Serve!

Butternut squash baked ziti is the ultimate comfort food! Squash, fire roasted tomatoes, parmesan and mozzarella make the best sauce ever.

Crisped and crunchy burnt cheese is my love language.

The post Butternut Baked Ziti. appeared first on How Sweet Eats.

09 Nov 00:00

Roasted Cauliflower Farro with Pomegranate and Pistachios.

by Jessica

A cauliflower farro salad is a feel-good way to start the week.

This cauliflower farro salad is filled with roasted cauliflower, pistachios, pomegranates and drizzled with a dill vinaigrette. Delicious!

It looks like nothing special, because some of the drab colors of the season are filling up this bowl and the vibrant tomatoes and greens of summer have said see ya. 

But what it lacks in vibrancy, it makes up for in major flavor. Like, major. 

This cauliflower farro salad is filled with roasted cauliflower, pistachios, pomegranates and drizzled with a dill vinaigrette. Delicious!

This has clearly been the year of farro for me. This slow roasted tomato farro salad is what my dreams are made of. It’s so good – fantastic as a side dish or a main dish. Super flavorful!

And while I used to be a bit wishy-washy on farro, because let’s be honest, sometimes it can taste like cold, chewy oatmeal… when it’s cooked properly and tossed with a ton of other delicious ingredients, I’m sold. I love it.

Like this salad. I am alllll over this.

This cauliflower farro salad is filled with roasted cauliflower, pistachios, pomegranates and drizzled with a dill vinaigrette. Delicious!

Give me all the farro. Starting with this bowl.

Roasted cauliflower is just the best. THE BEST.  Tell me you don’t love it!?

I’ve said a million times about how it was one of the first roasted veggies I ever really got into (because it sort of tastes like popcorn, right?!) and it remains a fave. It’s works with almost everything!

So there’s that.

This cauliflower farro salad is filled with roasted cauliflower, pistachios, pomegranates and drizzled with a dill vinaigrette. Delicious!

Then we have crunchy, salty pistachios. I love how rich the flavor of pistachios can be when paired with roasted vegetables. Really, they add that extra oomph.

A big sprinkle of pomegranate arils comes next, and those add a sweet pop along with some tartness. And pretty color, of course. They are adorable autumn jewels and I’ll just never get over it.

The pleasant surprise is the dill vinaigrette. It makes the whole thing tastes incredible. Even my mom, who stopped over the first day we were testing this, was super interested in the bowl. She sees it, her face lights up. This is NOT her cup of tea – she would never make or order something like this. And as soon as I mentioned dill vinaigrette she’s all “UM NO WAY NO THANKS.” 

But curiosity got the best of her and she tasted it and LOVED it. 

I think she was more shocked than I was.

This cauliflower farro salad is filled with roasted cauliflower, pistachios, pomegranates and drizzled with a dill vinaigrette. Delicious!

I’m telling you right now that this can be theeee go-to holiday side dish. It will work on Thanksgiving or Christmas. But at the same time it can also be your Monday night dinner, you know? It’s super satisfying and filling and full of texture and taste. It’s like a non-deconstructed (constructed?!) grain bowl salad. One that you can keep in the fridge and eat the next day for lunch.

Yes! Newsflash: it’s just as good cold as it is warm. You might fight over leftovers.

This cauliflower farro salad is filled with roasted cauliflower, pistachios, pomegranates and drizzled with a dill vinaigrette. Delicious!

Roasted Cauliflower Farro Salad

Farro Cauliflower Salad

This farro cauliflower salad is filled with roasted cauliflower, pistachios, pomegranates and drizzled with a dill vinaigrette. Delicious!

  • 1 head cauliflower, (cut into florets)
  • 1 to 2 tablespoons olive oil
  • ½ teaspoon salt
  • ½ teaspoon freshly cracked black pepper
  • 2 cups cooked farro
  • ½ cup pomegranate arils
  • ⅓ cup chopped pistachios
  • 2 to 3 tablespoons chopped chives

dill vinaigrette

  • 3 tablespoons chopped fresh dill
  • 2 tablespoons red wine vinegar
  • 1 tablespoon lemon juice
  • 1 1/2 tablespoons honey
  • 1/4 teaspoon salt
  • 1/4 teaspoon pepper
  • 2 garlic cloves finely minced or pressed
  • 1/2 cup extra virgin olive oil
  1. Preheat the oven to 425 degrees F. Place the cauliflower florets on a baking sheet and drizzle with olive oil then sprinkle with salt and pepper. Roast for 20 to 25 minutes, tossing once, until golden.
  2. Cook the farro while the cauliflower is roasting.
  3. In a large bowl, combine the farro and cauliflower. Drizzle with some of the vinaigrette and toss. Sprinkle in the pistachios and pomegranate. Toss well, adding a bit more dressing. Taste the salad and if desired, add more dressing!
  4. This salad is awesome served warm or cold, and leftovers are great too!

dill vinaigrette

  1. Whisk together the dill, vinegar, lemon, honey, salt, pepper and garlic until combined. Continue to whisk while streaming in the olive oil until the dressing emulsifies.

This cauliflower farro salad is filled with roasted cauliflower, pistachios, pomegranates and drizzled with a dill vinaigrette. Delicious!

Promise this will be the last farro salad I share this year! I think.

The post Roasted Cauliflower Farro with Pomegranate and Pistachios. appeared first on How Sweet Eats.

03 Nov 01:18

Twice Baked Sweet Potatoes with Pumpkin and Sage.

by Jessica

These are some twice baked sweet potatoes with attitude. 

These twice baked sweet potatoes are whipped with crispy sage and pumpkin puree! Topped with cheese and baked until melty, they are super delish.

Crispy sage, melty sage butter, tons of parmesan and… pumpkin!

Yes, I am telling you to put some squash inside a potato. May sound weird, but tastes fantastic. 

You will see! I promise. 

sweet potato pumpkin filling

I say it approximately 54 times a year, but right now really IS the most wonderful time of the year. Earlier this week, I saw the best meme that said November is basically the Thursday of the entire year. 

It’s so true! Right? 

If you know me, you know I love Thursday – all the anticipation of the weekend to come! And naturally, I love November, not only because it’s still peak fall, and because it houses one of my favorite holidays (if not theee favorite), Thanksgiving, but because it’s the start of the holiday season!

All the spooky, scary Halloween stuff is finally gone and we can settle in and listen to our Christmas music in peace. Or maybe that’s just me. But you’ll be glad to know I’ve passed it on because Max asked me a million times yesterday to listen to Jingle Bell Rock. 

These twice baked sweet potatoes are whipped with crispy sage and pumpkin puree! Topped with cheese and baked until melty, they are super delish.

It’s not just the best time of year because of all that fun holiday stuff, but HELLO – the food. We’re in the thick of it now and I could not be more excited.

I dub myself the Thanksgiving queen.

I adore the craziness of the week before the meal, pulling everything together to make it, well, come together. And then actually bringing it together. It’s my life blood. I look forward to year it the entire year. 

These twice baked sweet potatoes are whipped with crispy sage and pumpkin puree! Topped with cheese and baked until melty, they are super delish.

While this recipe definitely screams more Friendsgiving than Thanksgiving for us (my family can’t live without the classics, you know?), it could also totally be your dinner tonight! Or, a side dish to your dinner.

I would 100% consider this dinner. Eddie, not so much. But sweet potatoes are one of his favorite foods, so he is on board.

And that’s kind of funny, because he “doesn’t like” pumpkin. Yet he ate these and couldn’t hold back, so I was thrilled to tell him the ingredients shortly after he finished. 

These twice baked sweet potatoes are whipped with crispy sage and pumpkin puree! Topped with cheese and baked until melty, they are super delish.

Oh man. They are so good.

The smooth and creamy sweet potatoes filling with just the tiniest hint of pumpkin – filled with crispy sage and butter and nutmeg and cheese.

The cheese! About the cheese. I really like to use one of those parmesan-cheddar blends, like Sartori Montamore and Trader Joe’s Unexpected Cheddar. Both are so wonderful and add incredible flavor to the potatoes.

These twice baked sweet potatoes are whipped with crispy sage and pumpkin puree! Topped with cheese and baked until melty, they are super delish.

My grandma made the best twice baked potatoes, and I have a recipe for greek yogurt twice baked potatoes on the site too. I’ve always loved that crispy, crunchy skin.

These twice baked sweet potatoes are whipped with crispy sage and pumpkin puree! Topped with cheese and baked until melty, they are super delish.

So yes, this is how we kick off November with the biggest flavor punch!

These twice baked sweet potatoes are whipped with crispy sage and pumpkin puree! Topped with cheese and baked until melty, they are super delish.

Twice Baked Sweet Potatoes with Pumpkin

Twice Baked Sweet Potatoes with Pumpkin and Crispy Sage

These twice baked sweet potatoes are whipped with crispy sage and pumpkin puree! Topped with cheese and baked until melty, they are super delish.

  • 4 medium sweet potatoes
  • 3 tablespoons unsalted butter
  • 1 handful of sage, (about 15 to 20 leaves)
  • ½ cup pumpkin puree
  • ½ teaspoon salt
  • ½ teaspoon freshly cracked black pepper
  • ¾ cup freshly grated parmesan cheese ((I love a parm-cheddar mix, like sartori montemori or trader joe’s unexpected cheddar))
  1. Preheat the oven to 425 degrees F. Poke a few holes in the sweet potatoes with a fork. Place them on a baking sheet and bake until potatoes are tender, about 45 to 60 minutes.
  2. While the potatoes are cooking, place the butter in a saucepan over medium heat. Add the sage leaves and cook until they are just crispy, 1 to 2 minutes, then remove the leaves with kitchen tongs and place them on a paper towel.
  3. Let the potatoes cool slightly, then slice them down the center lengthwise. Gently scoop out the sweet potato flesh, leaving the skin in tact so you can stuff it.
  4. Place the sweet potato in the bowl of an electric mixer. (Note: you can totally mash it with a fork, but I find that whipping it in a mixer makes it super silky and fluffy!) Add the salt, pepper, pumpkin puree, half of the crispy sage leaves and all of the butter. Add half of the cheese mixture. Mix on medium speed until combined and smooth.
  5. Scoop the mixture back into the sweet potato skins. Sprinkle with the remaining cheese. Bake for 15 to 20 minutes, or until potatoes are warmed through and the cheese is melty. Remove the potatoes from the oven and top with the remaining sage leaves. Serve!


These twice baked sweet potatoes are whipped with crispy sage and pumpkin puree! Topped with cheese and baked until melty, they are super delish.

Tastes like cozy comfort.

The post Twice Baked Sweet Potatoes with Pumpkin and Sage. appeared first on How Sweet Eats.

01 Nov 03:34

Tuscan Tomato Bean Soup with Kale.

by Jessica

This tuscan tomato bread soup is so good I could cry.

This tuscan tomato bread soup is super hearty, satisfying and delicious! Leftovers are a hit and you will find yourself craving this in the cooler months.

Forgive me because I’m putting bread IN your soup.

Just when I thought that I couldn’t love tomato soup more… oh my gosh.

tomato bread soup

YOU GUYS.

This tomato bread soup is the coziest soup I have ever eaten. It’s super hearty. It’s packed with flavor. And it’s ridiculously satisfying.

And it’s not like I’m saying you SHOULDN’T make a grilled cheese with this, but what I’m saying is… you don’t even need it.

That means a lot coming from me. I’m like the grilled cheese queen. I live for them. So this is CRAZY.

This tuscan tomato bread soup is super hearty, satisfying and delicious! Leftovers are a hit and you will find yourself craving this in the cooler months.

A few years ago I made a tortilla soup that is actually thickened by tortillas. It remains one of my favorite recipes. So when I saw a recipe like this, I knew I had to try. 

You add the bread directly to the soup and simmer it until it thickens the entire pot. It’s so… rich. Without any added cream or milk or cheese. 

Sure, these IS some cheese (you add a parmesan rind – that’s my favorite thing ever!) and of course, the bread. But it’s such a soul-warming recipe, one that reheats fabulously and all around tastes SO GOOD that you won’t know what to do with yourself.

This tuscan tomato bread soup is super hearty, satisfying and delicious! Leftovers are a hit and you will find yourself craving this in the cooler months.

I’ll say it right now – Eddie is not a tomato soup person. You probably already know this, if only because the guy you’ve been reading about for a decade, the guy who had framed photos of WWE wrestlers hanging on his walls when I met him, has never been a serious soup lover. And I’ve all but skewered him here for it. 

He loves a hearty, meaty chili or even chicken noodle soup – that’s about it.

HOWEVER!!

This passed the Eddie test. It is so, SO hearty for a tomato soup. Honestly it feels more like a bean soup that a tomato soup, that is how packed it is! But the flavor is 100% tomato based and boy oh boy is it fantastic.

This tuscan tomato bread soup is super hearty, satisfying and delicious! Leftovers are a hit and you will find yourself craving this in the cooler months.

So here’s the deal.

You want to use a really good non-seedy, non-grainy bread! That was tricky for me because I actually only like grainy, seedy breads. I had to go out and find a great crusty italian loaf that would work here. 

It’s amazing how the bread melts and dissolves into the soup, while also leaving just the slightest reminder that it is, in fact, bread that is doing the thickening. You know how occasionally you dunk a sandwich into soup, and a piece of the bread gets lost at the bottom until you’re almost finished, and you slurp it up with that last spoonful?

This is kind of like that, but in a really good way. Makes me so happy!

This tuscan tomato bread soup is super hearty, satisfying and delicious! Leftovers are a hit and you will find yourself craving this in the cooler months.

I’ve always loved the tradition of tomato soup with grilled cheese on Halloween night before trick or treating. This is this year’s contribution!

If you’re looking for more inspo, this is my most favorite ever tomato soup in shooter form with grilled cheese sticks. I’ve also made pumpkin bisque with grilled cheese croutons. And tomato cream pasta with grilled cheese crumbs! Oh yes.

Now we can have it all in one bowl.

This tuscan tomato bread soup is super hearty, satisfying and delicious! Leftovers are a hit and you will find yourself craving this in the cooler months.

Tuscan Tomato Bread Soup

Tuscan Tomato Bean Soup with Kale

This tuscan tomato bread soup is super hearty, satisfying and delicious! Leftovers are a hit and you will find yourself craving this in the cooler months.

  • 1 pound dry white beans (navy, cannellini, etc) (, soaked overnight)
  • 1 tablespoon unsalted butter
  • 1 tablespoon olive oil
  • 1 sweet onion, (diced)
  • 4 garlic cloves, (minced)
  • ½ teaspoon salt
  • ½ teaspoon freshly cracked pepper
  • ¼ teaspoon crushed red pepper flakes
  • ¾ cup chopped or sliced carrots
  • 2 tablespoons tomato paste
  • 2 14 ounce cans fire roasted diced tomatoes
  • 4 cups vegetable stock
  • 2 ½ cups crusty italian bread chunks
  • ½ cup freshly grated parmesan cheese, (plus more for topping)
  • 1 parmesan cheese rind
  • 1 head tuscan kale, (torn from stems and coarsely chopped)
  1. To soak the beans overnight, place them in a large bowl or pot and cover them with a few inches of water. Drain the beans in the morning.
  2. Heat a large pot over medium heat and add the butter and olive oil. Stir in the onion, garlic, salt, pepper and pepper flakes. Cook until the onions soften, about 5 minutes.
  3. Stir in the carrots and cook for 5 minutes more. Stir in the tomato paste, stirring to coat all the vegetables in the pot.
  4. Add the diced tomatoes and vegetable stock. Add the bread in chunks. Stir in the beans, parmesan cheese and parmesan rind. Bring the mixture to a boil, then reduce it to a simmer and cover it. Cook for 30 to 40 minutes, stirring occasionally to make sure nothing is sticking to the bottom. If it is, reduce the heat!
  5. When the soup is finished, the bread will have mostly disintegrated into the soup. You can taste and season the soup here if you wish – add more salt and pepper if it doesn’t seem to have enough flavor. This step is important! All canned tomatoes can be different in salt quantities, so be sure to taste and adjust the flavor to your linking.
  6. 5 to 10 minutes before serving, stir in the kale. I love that the kale has a crisp chew and texture to it. If you prefer it to be softer and more wilted, you can add it in earlier or cook the soup a bit longer. The kale gets softer as it sits.
  7. Serve the soup with lots of grated parmesan for topping.

slightly adapted from real simple

This tuscan tomato bread soup is super hearty, satisfying and delicious! Leftovers are a hit and you will find yourself craving this in the cooler months.

Craving a bite of this so badly.

The post Tuscan Tomato Bean Soup with Kale. appeared first on How Sweet Eats.

29 Oct 04:19

Pumpkin Beer Brisket Melts on Everything Pretzel Rolls.

by Jessica

Brisket melts might be my new favorite thing!

This pumpkin beer brisket melts are smothered in havarti cheese and served on everything pretzel rolls. They are ridiculously delicious!

Because ‘tis the season for comfort food.

And comfort food this is. 

It’s a dreamy, cheese smothered sandwich that is decadent and goes great with an icy beer. 

brisket in the slow cooker

There is so much going on in this recipe but I promise it all comes together to create a flavor explosion. 

First, brisket slow cooked in pumpkin beer (or you could use cider!) then pulled and shredded to create the best sandwich ever. 

The brisket goes on pretzel rolls that have been showered in everything seasoning (I shared my own recipe for everything seasoning here!), making you feel like you could never have another pretzel without everything again!

Havarti cheese makes our melt happen. 

Then! Then you swirl together some honey mustard with a touch a mayo to create the most incredible spread. It’s unreal. It’s delicious. It takes things over the top!

everything pretzel buns

I’ve found the slow cooker to be my favorite way to make pulled brisket. It comes out so tender and wonderful. And this is the slow cooker I use, which you know I’m obsessed with because you can sear right in the cooker! It’s the best ever.

This pumpkin beer brisket melts are smothered in havarti cheese and served on everything pretzel rolls. They are ridiculously delicious!

For the pretzel buns?

Well, back in the day I used to make them at home ALL the time. But now I can find them more easily – they are more accessible! So sometimes I buy them too, depending on how fresh they are. The good news is that however you get them, whether you make them from scratch or buy them, you can still brush them with butter and cover them in everything seasoning.

They are delish.

This pumpkin beer brisket melts are smothered in havarti cheese and served on everything pretzel rolls. They are ridiculously delicious!

These melts are perfect for a fall weekend or even for Halloween night. You can make the brisket ahead of time (or do it in the slow cooker all day, the day of!) and assemble the sandwiches when you’re ready to serve. They are RICH, and they go perfectly with a big greens salad.

Or fries or chips, of course. 

This pumpkin beer brisket melts are smothered in havarti cheese and served on everything pretzel rolls. They are ridiculously delicious!

Between this and my cauliflower schnitzel, you have everything you need for the perfect October sandwich fest! 

This pumpkin beer brisket melts are smothered in havarti cheese and served on everything pretzel rolls. They are ridiculously delicious!

Pumpkin Beer Brisket Melts

Pumpkin Beer Brisket Melts

This pumpkin beer brisket melts are smothered in havarti cheese and served on everything pretzel rolls. They are ridiculously delicious!

  • 1 batch of pretzel rolls, (homemade or store bought!)
  • 2 tablespoons unsalted butter, (melted)
  • 2 tablespoons everything seasoning

slow cooker brisket

  • 3 to 4 pounds beef brisket
  • 1 teaspoon smoked paprika
  • 1 teaspoon garlic powder
  • 1 teaspoon salt
  • 1 teaspoon pepper
  • 6 ounces pumpkin beer or cider
  • sliced harvarti cheese, (for melting)
  • microgreens or arugula, (for serving)

honey mustard spread

  • 1/2 cup honey mustard
  • 2 tablespoons mayonnaise

pretzel buns

  1. Whether your pretzel buns are homemade or store bought, I like to cover them in everything seasoning! Right before serving the sandwiches, heat your oven to 325 degrees, just to warm them for the sandwiches. Brush the tops with the melted butter and sprinkle the everything seasoning on top. Place the buns in the oven for 8 to 10 minutes.

slow cooker brisket

  1. Season the brisket all over with the paprika, garlic powder, salt and pepper. Place it in your slow cooker and cover it with the beer. Cook on low for 8 hours.
  2. When finished, if the brisket is still in one piece, remove it and place it on a cutting board. Use a sharp knife and a fork to shred the brisket (you can also do this in the slow cooker) and then place it back in the cooker for another 30 minutes or so on low. It should combine with the juices and soak some of them up. You also may need to toss the beef a few times in the crockpot.
  3. To assemble the sandwiches, preheat the oven to 325 degrees F. If you have just prepped the pretzel buns, it will already be on! Spread some of the honey mustard mayo on the bottom of your bun. Top with the brisket, then a slice of havarti cheese.
  4. Stick the sandwiches in the oven for 5 to 6 minutes, just until the cheese melts. Remove the sandwiches and top with a handful of microgreens or arugula. Top with your everything pretzel bun and serve!

honey mustard spread

  1. Whisk together the mustard and mayo and use immediately as a spread on sandwiches!

This pumpkin beer brisket melts are smothered in havarti cheese and served on everything pretzel rolls. They are ridiculously delicious!

I mean, there is some green in there!

The post Pumpkin Beer Brisket Melts on Everything Pretzel Rolls. appeared first on How Sweet Eats.

25 Oct 20:20

Three Cheese Spaghetti Squash.

by Jessica

Three cheese spaghetti squash that is straight out of your dreams?

Three cheese spaghetti squash in a squash bowl! Squash tossed with fontina, gruyere and parmesan to make a creamy comforting meal.

It’s here! Right here. For you to make for dinner tonight. 

And it is cheesy, comfort food perfection. 

roasted spaghetti squash

Some of you might remember way back in the day when I shared my squash and cheese recipe. It’s a lighter take on mac and cheese, captured terribly as many things were in 2009 but still super delicious. And I’m always blown away every fall by how many of you still make and enjoy that recipe. And embarrassed, to be honest, because who wants to go back and read what is basically a diary entry from ten years ago?!

But still. It’s delish and probably my favorite way to enjoy spaghetti squash!

Three cheese spaghetti squash in a squash bowl! Squash tossed with fontina, gruyere and parmesan to make a creamy comforting meal.

How adorable are these squash bowls?!

Three cheese spaghetti squash in a squash bowl! Squash tossed with fontina, gruyere and parmesan to make a creamy comforting meal.

I LOVE cutting spaghetti squash this way because it feels even more like a cozy bowl. Like all of your squash is in that bowl and you can twirl your fork around and enjoy it on the couch while crying your eyes out to This Is Us. Or something like that.

Three cheese spaghetti squash in a squash bowl! Squash tossed with fontina, gruyere and parmesan to make a creamy comforting meal.

So here’s the deal. 

You cut the squash, scrape the seeds and roast it until tender. Scrape the spaghetti squash strands, toss them with some milk or cream, three cheeses and sprinkle with a few crunchy garlic bread crumbs. Bake them again for 15 minutes or so, until the cheesy is extra melty and you essentially have a bowl of squash mac and cheese.

I mean, OMG.

Three cheese spaghetti squash in a squash bowl! Squash tossed with fontina, gruyere and parmesan to make a creamy comforting meal.

This is comfort food HEAVEN.

While I don’t tend to use spaghetti squash as a meal replacement (the chickpea pastas are so much better for that!), this makes a fantastic side dish or meal in itself. Words cannot even explain how much I love this recipe! It makes your kitchen smells amazing and everyone (seriously EVERYONE) who has taken a taste of it? Is completely sold.

Even those who don’t go crazy for spaghetti squash have loved this. 

Three cheese spaghetti squash in a squash bowl! Squash tossed with fontina, gruyere and parmesan to make a creamy comforting meal.

And!!

The best part about this recipe is that you can do this ahead of time!! I have roasted the squash up to three days ahead of time. Don’t pull the squash, just let it cool completely then wrap it up and stick it in the fridge. When you’re ready to make it, stick it in the oven to warm it up, pull the strands, then do the whole milk+cheese addition until melty. It’s embarrassingly easy. And maybe embarrassingly easiER if you use the microwave for all that. You know?

It’s so comforting. So satisfying. Really really delicious. At the same time, it’s rather light because spaghetti squash is, well… light. And you can keep twirling the strands from the sides and “adding” to your squash and cheese bowl as you go. Very much the perfect fall meal.

Three cheese spaghetti squash in a squash bowl! Squash tossed with fontina, gruyere and parmesan to make a creamy comforting meal.

Three Cheese Spaghetti Squash and Cheese

Three Cheese Spaghetti Squash Bowls

Three cheese spaghetti squash in a squash bowl! Squash tossed with fontina, gruyere and parmesan to make a creamy comforting meal.

  • 2 spaghetti squash
  • 1 to 2 tablespoons olive oil
  • 1 teaspoon salt
  • 1 teaspoon freshly ground pepper
  • ⅓ cup freshly grated fontina cheese
  • ⅓ cup freshly grated gruyere cheese
  • ⅓ cup freshly grated parmesan cheese
  • ¼ cup panko bread crumbs
  • ¼ cup fine seasoned bread crumbs
  • ⅓ to ¾ cup milk, half and half or cream ((milk works, cream will make it richer!))
  1. Preheat the oven to 400 degrees F. Line a baking sheet with parchment or foil.
  2. Slice the spaghetti squash in half width-wise, right down the center. Scrape out the seeds (I like to use a grapefruit spoon for this) and place it on a baking sheet. Spritz or brush it with olive oil and sprinkle with salt and pepper.
  3. Roast the squash for 30 to 35 minutes, or until the strands easily scrape away from the sides.
  4. While the squash is roasting, toss together the cheeses in a bowl. In another bowl, stir together the breadcrumbs.
  5. Use a fork to scrape the strands of the squash. Pour 2 to 3 tablespoons of milk or cream into each squash, then 2 to 3 tablespoons of cheese. Stir with your fork to toss and mix everything together, making sure the cheese is dispersed. Sprinkle the top with the remaining cheese and the breadcrumbs.
  6. Return the squash to the oven and bake for another 10 to 15 minutes or so, until the cheese is melty and bubbly.
  7. Remove from the oven and serve immediately.

Three cheese spaghetti squash in a squash bowl! Squash tossed with fontina, gruyere and parmesan to make a creamy comforting meal.

p.s if you’re looking for something more tomato saucy, this spaghetti squash parmesan is where it’s at!

The post Three Cheese Spaghetti Squash. appeared first on How Sweet Eats.

25 Oct 20:19

Snickers Almond Butter Tart.

by Jessica

Don’t even have words for this snickers almond tart. I mean, NO WORDS.

This snickers almond tart is made with an almond crust, homemade almond butter caramel and a chocolate ganache. It's to die for!

This is like grown up Halloween candy! Homemade adult candy.

Not to mention, it’s insane.

Yes please.

homemade almond butter caramel

I’ve rambled on and on and on here on this little corner of the internet about how growing up, Snickers bars were my favorite candy bar by FAR. We didn’t really get to eat candy bars often, but on Halloween? I was all about the Snickers. I mean, I would give my brothers all my peanut butter cups JUST for their Snickers. Oh, and their mallo cups.

The joke was on me, because they hated peanuts (and coconut!) anyway and probably would have just handed them over freely.

chocolate ganache pour

Remember when I made Homemade Snickers Bars?! They remain one of the most popular recipes here on the blog. They make me so happy! And tastes (insanely) exactly like legit Snickers.

chocolate ganache

The weirdest thing about my love for Snickers? I really don’t care for nuts in desserts. Cookies and brownies with nuts are disastrous for sure, especially the classics. I’ve always said that nuts ruin desserts and sure, these days, I know there are a few desserts that are enhanced by nuts. 

But still. 

This snickers almond tart is made with an almond crust, homemade almond butter caramel and a chocolate ganache. It's to die for!

So what all goes in this tart? A TON OF DELICIOUSNESS!

First, an almond tart crust. It’s easy! It’s good! Almond flour, butter, maple syrup.

While the tart filling is no bake, you do want to bake the crust for a few minutes just to set it. No big deal, it only takes a second. 

This snickers almond tart is made with an almond crust, homemade almond butter caramel and a chocolate ganache. It's to die for!

The filling? Homemade almond butter caramel. YES. Say it with me. 

Almond butter caramel.

I cannot! This stuff is so so so good. 

All you do is make a quick classic caramel with cream and sugar and then stir in almond butter until it all melts. Let it cool and thicken a bit and try not to eat the entire pot! Because it’s heavenly.

This snickers almond tart is made with an almond crust, homemade almond butter caramel and a chocolate ganache. It's to die for!

Even though it freaked me out a bit at first, I stirred chopped almonds into the caramel layer of the tart because my forever Snickers loving heart told me to. It adds the best crunch! 

The top layer is a classic ganache. Topped with flaked salt. 

Then! 

You stick this baby in the fridge and serve it cold. 

It’s rich. Like super rich. Decadent and ridiculously delicious! You see the slices I cut above in my tart? You can even cut in them half again, it’s so rich. However, a small bite is the perfect dessert.

If you want to serve something homemade and wildly wonderful, this is it. 

This snickers almond tart is made with an almond crust, homemade almond butter caramel and a chocolate ganache. It's to die for!

Snickers Almond Tart

Snickers Almond Butter Tart

This snickers almond tart is made with an almond crust, homemade almond butter caramel and a chocolate ganache. It’s to die for!

almond tart crust

  • 2 cup almond flour
  • ⅓ cup unsalted butter, (melted)
  • 3 tablespoons maple syrup

almond butter caramel

  • 1 cup brown sugar
  • 3 tablespoons unsalted butter
  • 1/2 cup heavy cream
  • ⅓ cup creamy almond butter
  • 1 tablespoon vanilla extract
  • ½ cup raw almonds, (chopped)

chocolate ganache

  • 6 ounces high-quality semi-sweet chocolate, (chopped)
  • ⅓ cup heavy cream
  • ½ teaspoon vanilla extract
  1. Preheat the oven to 350 degrees F.
  2. Spray a tart pan (mine is a 9-inch round) with nonstick spray.
  3. Place the almond flour, butter and maple syrup in a large bowl. Stir until combined and the mixture is all moistened. Press it into the tart pan, pressing up the sides slightly.

  4. Bake the crust for 10 to 12 minutes or until slightly golden. Let it cool completely.

almond butter caramel

  1. Combine the sugar, butter, cream and almond butter in a saucepan over medium-low heat. Whisk to combine, then cook and stir until the mixture is bubbling. Cook for 5 to 6 minutes until it slightly thickens and is smooth. Remove from heat and stir in the vanilla. Let it cool to room temperature – it will thicken as it cools!
  2. Once it’s cool, pour the caramel into the almond tart crust. Top with the chopped almonds. Stick the tart in the fridge while you make the ganache.

chocolate ganache

  1. Place the chopped chocolate in a bowl.
  2. Heat the cream in a saucepan over low heat just until it’s warm and the edges bubble. Pour it over the chocolate and let it sit for a minute or two.
  3. Stir continuously until the chocolate melts, about 2 to 3 minutes. Remove the tart from the fridge and pour the ganache over top. Sprinkle with the flaked salt. Stick the tart back in the fridge.
  4. Refrigerate for at least 4 hours, or even overnight. To serve, slice into very thin slices because it is so rich. Serve immediately!

This snickers almond tart is made with an almond crust, homemade almond butter caramel and a chocolate ganache. It's to die for!

Probably going to frame that corner.

The post Snickers Almond Butter Tart. appeared first on How Sweet Eats.

19 Oct 03:03

Sweet Potato Chowder.

by Jessica

 This sweet potato chowder is a huge hug in a bowl for you! 

This sweet potato chowder is a hug in a bowl! Made with lots of greens and crunchy pancetta and pepitas for topping, it's a perfect weeknight meal.

Because… Monday. Yes yes. We all need a hug today. 

This sweet potato chowder is a hug in a bowl! Made with lots of greens and crunchy pancetta and pepitas for topping, it's a perfect weeknight meal.

Just LOOK AT THIS BOWL. I want to devour every last bite. 

This soup is super comforting and hearty. It’s so warming and flavorful, it’s ridiculous! It’s a soup that can easily be a meal, no salad or bread needed. Of course those are welcome additions and if you feel like pairing with some beer bread or a house salad, I don’t blame you.

This sweet potato chowder is a hug in a bowl! Made with lots of greens and crunchy pancetta and pepitas for topping, it's a perfect weeknight meal.

The whole pot starts off with some pancetta that we crisp up, then reserve for topping later. If you don’t eat meat, you can easily skip this part and use olive oil (or your oil of choice) to start everything off. The pancetta adds a lot of flavor and the crunch that I need on top. 

This sweet potato chowder is a hug in a bowl! Made with lots of greens and crunchy pancetta and pepitas for topping, it's a perfect weeknight meal.

The crunchy bits are what make it SO good. I’m never one to turn down a potato soup. I have a classic loaded potato soup recipe, as well as a loaded sweet potato soup too!

While they are both major comfort food, I always find that they need some texture on top. 

Or should I say… that I need some texture on top. 

Of course I do.

High maintenance for life!

My favorite way to add texture on top is the pancetta and a sprinkling of roasted, salted pepitas. So crunchy! So tasty! And so satisfying.

p.s.I actually loathe the word “tasty” but sometimes no other one will do. It’s a vibe. 

This sweet potato chowder is a hug in a bowl! Made with lots of greens and crunchy pancetta and pepitas for topping, it's a perfect weeknight meal.

After the soup simmers for a while, we’re going to toss in some tuscan kale too. I LOVE THIS. Getting in some greens, but in a warm bowl of comfort food, you know? I like to stir the greens in a few minutes before eating, because the kale holds a little crunch. It will soften by the next day for leftovers but it’s still super good.

Finally I stir in some milk or cream or even coconut cream. A little goes a long way and it makes the soup richer, more satisfying and overall more comforting. It’s not as brothy or thin and makes it FEEL like a heartier dish.

I mean, YUM. There is nothing like a giant pot of love to start the week off right.

This sweet potato chowder is a hug in a bowl! Made with lots of greens and crunchy pancetta and pepitas for topping, it's a perfect weeknight meal.

Sweet Potato Chowder

Sweet Potato Chowder

This sweet potato chowder is a hug in a bowl! Made with lots of greens and crunchy pancetta and pepitas for topping, it’s a perfect weeknight meal.

  • 4 ounces pancetta, (diced)
  • 1 tablespoon unsalted butter
  • 1 sweet onion, (diced)
  • 3 garlic cloves, (minced)
  • ½ teaspoon salt
  • ½ teaspoon pepper
  • ¼ teaspoon ground sage
  • ¼ teaspoon freshly ground nutmeg
  • ½ cup chopped carrots
  • 3 cups chopped sweet potato, (about 1 inch in size)
  • 5 cups reduced-sodium chicken stock
  • ⅓ cup cream, half and half or coconut cream/milk
  • 2 cups chopped tuscan kale
  • 3 tablespoons roasted salted pepitas, (for topping)
  1. Heat a large pot over medium-low heat and add the pancetta. Cook, stirring occasionally, until the fat is rendered and the pancetta is crisp, about 6 to 8 minutes. Remove the pancetta with a slotted spoon and place it on a paper towel lined plate to remove any excess grease.
  2. Keep the pot on medium low heat and add the butter. Stir in the onion, garlic, salt, pepper and sage. Stir in the fresh nutmeg. Cook, stirring occasionally, until the onions softened, about 5 minutes. Stir in the carrots and sweet potato, tossing everything to combine.
  3. Pour in the chicken stock and bring the mixture to a boil. Reduce it to a simmer and cook for 10 minutes. Cover and cook for an additional 10 to 15 minutes, or until the sweet potatoes cubes soften. Stir in the cream/halfhalf/etc. Taste the soup and season with additional salt or pepper if needed, but remember we will add the salty pancetta back on top too!
  4. A few minutes before serving, stir in the kale. I like to serve it almost immediately, but you can simmer the soup for another 10 minutes or so to soften it.
  5. Serve with the pancetta and pepitas for topping.

This sweet potato chowder is a hug in a bowl! Made with lots of greens and crunchy pancetta and pepitas for topping, it's a perfect weeknight meal.

Acceptable to eat for breakfast? I think.

The post Sweet Potato Chowder. appeared first on How Sweet Eats.

19 Oct 03:02

Cauliflower Schnitzel Sandwiches with Caramelized Onion Mayo.

by Jessica

Cauliflower schnitzel sandwiches are happening! 

These cauliflower schnitzel sandwiches are full of flavor! Crispy cauliflower, caramelized onion mayo, pickled cabbage and microgreens. Delish!

Get ready. A super crunchy, crisp, flavorful bite is right here waiting for you!

These cauliflower schnitzel sandwiches are full of flavor! Crispy cauliflower, caramelized onion mayo, pickled cabbage and microgreens. Delish!

This is my trashed up attempt at an Octoberfest recipe. Instead of making any kind of meat schnitzel, we’re using a veggie.

I KNOW I KNOW I KNOW.

2009 me is like who are you and how is this happening and how is this your life?

These cauliflower schnitzel sandwiches are full of flavor! Crispy cauliflower, caramelized onion mayo, pickled cabbage and microgreens. Delish!

Well it is and it’s good. You’re going to be into it! I promise.

These cauliflower schnitzel sandwiches are full of flavor! Crispy cauliflower, caramelized onion mayo, pickled cabbage and microgreens. Delish!

There are a couple steps here and the finished product is a flavorful sandwich stack that you won’t be able to stop thinking about. 

First, we have to bread and crisp up our cauliflower. Easy! Slice it into big pieces, like this.

In order to make it delicious (and, well, bite-able) in our sandwich, we have to bake it too. This will help keep the crispy exterior while softening the inside. Sort of like a big crispy, roasted cauliflower slab.

These cauliflower schnitzel sandwiches are full of flavor! Crispy cauliflower, caramelized onion mayo, pickled cabbage and microgreens. Delish!

While that’s all going on, we can chop some red cabbage and do a quick pickle on it. You can make this ahead of time or about an hour before you eat. I love the briney flavor and the little crunch that comes along with it too. 

OH and of course, the COLOR. Hot neon-y pinkish purple that is… natural? Sold. 

Throw a few micro greens on the bottom of the sandwich for health. Or enjoyment. Whatever. 

These cauliflower schnitzel sandwiches are full of flavor! Crispy cauliflower, caramelized onion mayo, pickled cabbage and microgreens. Delish!

Um, can we talk about this caramelized onion mayo?

OMG.

It is insane. It is my new favorite thing. I don’t care about mayo that much and this is the best mayo I’ve ever had!

And all you have to do is caramelize some onions and whip them into your favorite mayo.

Okay okay, it does take a bit of time to do that. But the best part is that you can make it ahead of time if you wish. After all, this mayo is a sliiiightly high maintenance because, you know, to caramelize your onions, it takes patience. 

But it’s WORTH IT too.

These cauliflower schnitzel sandwiches are full of flavor! Crispy cauliflower, caramelized onion mayo, pickled cabbage and microgreens. Delish!

Then you assemble it into this masterpiece! That isn’t really very fancy at all but looks very fancy. Because hello.

These cauliflower schnitzel sandwiches are full of flavor! Crispy cauliflower, caramelized onion mayo, pickled cabbage and microgreens. Delish!

Self care in a sandwich! That’s what it is.

These cauliflower schnitzel sandwiches are full of flavor! Crispy cauliflower, caramelized onion mayo, pickled cabbage and microgreens. Delish!

Cauliflower Schnitzel Sandwiches

Cauliflower Schnitzel Sandwiches

These cauliflower schnitzel sandwiches are full of flavor! Crispy cauliflower, caramelized onion mayo, pickled cabbage and microgreens. Delish!

pickled cabbage

  • 1 small head red cabbage, (chopped or shredded into thin pieces (about 1 1/2 cups))
  • ½ cup warm water
  • 1 1/2 tablespoons sugar
  • 1 teaspoon coarse salt
  • 3/4 cup apple cider vinegar

caramelized onion mayo

  • 2 tablespoons unsalted butter
  • 1 sweet onion, (thinly sliced)
  • ¼ teaspoon salt
  • ¾ cup your favorite mayonnaise

cauliflower

  • 1 head of cauliflower
  • 1 egg, (lightly beaten)
  • 1 cup seasoned bread crumbs
  • ½ cup panko bread crumbs
  • pinch of salt and pepper
  • 2 to 3 tablespoons olive oil
  • 1 large or 2 small baguettes, (sliced for 2 or 4 sandwiches)
  • 1 cup microgreens
  1. Preheat the oven to 400 degrees F.
  2. Line a baking sheet with parchment or foil and top it with a wire rack. Spray the rack with olive oil spray (or nonstick spray).
  3. To make the cabbage, place the cabbage in a large jar or bowl. In a smaller bowl, whisk together the water with sugar and salt until they dissolve. Whisk in the vinegar. Pour it over the cabbage. Let it sit at room temperature for 30 minutes to 1 hour. If making it ahead of time, you can stick it directly in the fridge.
  4. Heat a large skillet over medium-low heat and add the butter. Add the sliced onions and salt, then toss to combine. Cook, stirring often, until the onions are caramelized, about 30 minutes.
  5. To make the cauliflower, slice the cauliflower from the top down into 1-inch pieces, like big cauliflower slabs. If some pieces fall apart, that’s fine too! You can bread all the pieces.
  6. Place the egg on one plate (and lightly beat it) and the breadcrumbs on another with a generous pinch of salt and pepper. Stir the bread crumbs. It’s easier to use a plate than a bowl for both of these since the cauliflower pieces are large.
  7. Heat a large skillet over medium-high heat and add the olive oil. Dip each piece of cauliflower in the egg, then coat it in the bread crumbs, pressing gently to adhere. Place the cauliflower in the skillet and cook until it’s golden and crunchy on both sides, about 3 minutes per side. Remove the cauliflower gently with tons and place it on the wire rack. Repeat with the remaining cauliflower. If needed, you may need a little more oil!
  8. Once the cauliflower is all breaded and on the baking sheet, place the sheet in the preheated oven. Bake for 15 to 20 minutes, until the cauliflower inside is tender. Once the cauliflower is finished, everything else should be ready too!
  9. Stir the caramelized onions into the mayo.
  10. To make the sandwich, spread the mayo on the bottom of the bun, then top with the microgreens. Place the cauliflower on top – you might need to bread it into pieces or add a few if the pieces are smaller. Top with the pickled cauliflower. If desired, you can spread the top bun with more of the caramelized onion mayo!
  11. Serve immediately with chips!

These cauliflower schnitzel sandwiches are full of flavor! Crispy cauliflower, caramelized onion mayo, pickled cabbage and microgreens. Delish!

Holy flavor punch to the face.

The post Cauliflower Schnitzel Sandwiches with Caramelized Onion Mayo. appeared first on How Sweet Eats.

19 Oct 03:00

Pumpkin Dream Cake.

by Jessica

I know I’m dramatic 105% of the time, but this is the best pumpkin sheet cake of life. 

This pumpkin sheet cake is a legit pumpkin dream cake! It's so moist and fluffy and flavorful. With a blanket of cinnamon cream cheese frosting!

And I’m not exaggerating one single bit.

pumpkin cake batter

So here’s the deal.

Yes, why yes, I did make a pumpkin cake last year too! I made this pumpkin coconut cake and it’s been a huge hit. But the thing is that coconut is so polarizing. I obviously love it, but even in this house? Eddie loathes it. 

It’s a recipe I’ve received loads of questions over, because lots of you want to remove the coconut. Either you don’t love it, have an allergy or want to serve it to a crowd minus the coconut, and I get that!

But because it’s a coconut cake, there is a lot to swap out if you DON’T want the coconut. Like, it’s easier to just make a whole different cake.

This pumpkin sheet cake is a legit pumpkin dream cake! It's so moist and fluffy and flavorful. With a blanket of cinnamon cream cheese frosting!

That’s why this pumpkin dream cake was born.

I’ve seen pumpkin dream cakes floating around the internet for years but they are all layer cakes. I love a good layer cake but I love my sanity (and patience!) more.

Pumpkin cake, almost like pumpkin bread, is one of those things that is amazing to make ahead of time for a party or get together or even just a fall weekend. Heck, I’ve even bought the Trader Joe’s pumpkin bread mix before just to have something easy to make on a Friday!

pumpkin sheet cake

While this cake is homemade, it is so much easier than a layer cake. And let me be real: I wasn’t necessarily planning on calling this plain old pumpkin sheet cake a pumpkin dream cake. 

Oh no. I mean, I don’t even worship at the altar of pumpkin. We all know I’m much more of an apple cider girl

This pumpkin sheet cake is a legit pumpkin dream cake! It's so moist and fluffy and flavorful. With a blanket of cinnamon cream cheese frosting!

But then I went and covered this in my cinnamon cream cheese frosting. I took the first bite and was basically screaming. Running around for everyone else to try it. They are like me – pumpkin treats are good, but they don’t lose their mind over them, you know?

Everyone. Everyone was freaking out. 

This pumpkin sheet cake is a legit pumpkin dream cake! It's so moist and fluffy and flavorful. With a blanket of cinnamon cream cheese frosting!

As they very well should be. LOOK AT THIS!

This pumpkin sheet cake is a legit pumpkin dream cake! It's so moist and fluffy and flavorful. With a blanket of cinnamon cream cheese frosting!

This cake is UNREAL! It’s so soft and fluffy. It’s not overwhelmingly spiced. (Feel free to add more if you want!) The blanket of icing on top is so delicious that even the lowest level of icing lovers (like myself) will not be able to contain themselves. 

This pumpkin sheet cake is a legit pumpkin dream cake! It's so moist and fluffy and flavorful. With a blanket of cinnamon cream cheese frosting!

It might be a bold statement, but I am going to make this cake every year for the rest of my life. Maybe (definitely) multiple times a year. I will probably make it on Thanksgiving, over all other desserts.

I might even make it on Christmas. It’s currently rivaling a pumpkin bar that I’ll be sharing in a few weeks, a bar I’ve made for the last two years and have LOVED.

This pumpkin sheet cake is a legit pumpkin dream cake! It's so moist and fluffy and flavorful. With a blanket of cinnamon cream cheese frosting!

It’s that good. So good! Please please please go make it right now. And save me a piece!

This pumpkin sheet cake is a legit pumpkin dream cake! It's so moist and fluffy and flavorful. With a blanket of cinnamon cream cheese frosting!

Pumpkin Sheet Cake

Pumpkin Dream Cake

This pumpkin sheet cake is a legit pumpkin dream cake! It’s so moist and fluffy and flavorful. With a blanket of cinnamon cream cheese frosting!

  • 2 cups all-purpose flour
  • 2 teaspoons baking soda
  • 1 1/4 teaspoons ground cinnamon
  • ½ teaspoon salt
  • ¼ teaspoon freshly grated nutmeg
  • 1 15 ounce can pumpkin puree
  • 1 ¾ cups brown sugar
  • ½ cup plain greek yogurt
  • ½ cup vegetable oil
  • 4 large eggs
  • 2 teaspoons vanilla extract

cinnamon cream cheese frosting

  • 2 8- ounce blocks cream cheese
  • 1/2 cup unsalted butter
  • 2 1/2 cups powdered sugar
  • 1/2 teaspoon cinnamon
  • 1 teaspoon vanilla extract
  1. Preheat the oven to 350 degrees F. Spray a 9×13 inch baking dish with nonstick baking spray.
  2. In a bowl, whisk together the flour, baking soda, cinnamon, salt and nutmeg. Note: If you LOVE spice, feel free to add some extra spice in here (pumpkin! allspice! more cinnamon!) as this isn't overly spiced.

  3. In a large bowl, whisk together the pumpkin, sugar, yogurt and oil. Once smooth and combined, whisk in each egg one at a time. Whisk in the vanilla extract.
  4. Add the dry ingredients to the wet, mixing until combined and no large lumps remain.
  5. Pour the batter into the greased baking dish. Bake for 30 to 40 minutes, or until a tester inserted in the center of the cake comes out clean.

  6. Note: every time I’ve made this cake, it has smelled “eggy” in the oven which has scared me. No worries – once the cake comes out and cools, it does not taste eggy!
  7. Cool the cake completely. Once the cake has cooled, frost with the cream cheese frosting. Slice and serve!

cinnamon cream cheese frosting

  1. Beat the cream cheese and butter together until creamy. Beat in the sugar and cinnamon until combined. Beat in the vanilla extract. Frost the cooled cake! I like to keep the cake in the fridge because of the cream cheese frosting, plus we love cold cake!

cake slightly adapted from all recipes

This pumpkin sheet cake is a legit pumpkin dream cake! It's so moist and fluffy and flavorful. With a blanket of cinnamon cream cheese frosting!

That bite is everything.

The post Pumpkin Dream Cake. appeared first on How Sweet Eats.

03 Oct 03:25

White Chicken Chili Cornbread Skillet.

by Jessica

Comfort food season calls for chicken chili cornbread pie.

This white chicken chili cornbread pie is the ultimate comfort food! White chicken chili topped with green chile cornbread. It's loaded with flavor.

Don’t you think? It’s like the ULTIMATE comfort food, what with two comfort foods (hello chili… and cornbread) built into one. 

This is one of those dishes that never turns out pretty but it tastes fantastic. You want a second bowl, there’s a fight over the leftovers and you start thinking about just how soon you can make the dish again. YEP it’s one of those. 

green chile cornbread

If you haven’t made the white chicken corn chili/chowder in The Pretty Dish yet, well, you must! It’s such a great recipe, especially in September and October as corn season comes to a close. It’s a soup that isn’t very heavy so it works great on days when it still reaches 90 degrees, like today. 

(BUT WHY?!)

My favorite thing to serve with it is the herb feta cornbread which is also in The Pretty Dish. And that combination is one of my favorite things to make, so I figured… why not combine them!

the start of cornbread chili pie

The whole point of this ramble is that I took the base of that recipe and turned it into the base of this skillet! Oh my gosh. It’s GOOD.

Eddie loves dishes like this so obviously I love to make them. It’s kind of an inside-out version of my tamale pie. Oh and waaaay back in the day I did this cornbread-leftover-chili bake thing

Pretty sure that’s when I used to take my dishes outside and photograph them over the green grass. So you could see the green grass. You know. Maybe photographed on a diagonal. Because WOW.

That was fun. 

This white chicken chili cornbread pie is the ultimate comfort food! White chicken chili topped with green chile cornbread. It's loaded with flavor.

ANYWAY.

This cornbread chili pie skillet thing. 

You make the base of your chili in a big oven-safe skillet. Top it with green chile cornbread. Bake it so the chili is hot and bubbly and the bread is soft and fluffy. Serve a big scoop of it with extra corn if you’d like, some plain greek yogurt or sour cream, a bunch of herbs and even a spritz of line. 

Basically be the happiest person at dinner, ever.

This white chicken chili cornbread pie is the ultimate comfort food! White chicken chili topped with green chile cornbread. It's loaded with flavor.

It’s soul-warming! A hug in a bowl! All that cliche phrases I love to use with comfort food. Yes, it’s all of those. 

This white chicken chili cornbread pie is the ultimate comfort food! White chicken chili topped with green chile cornbread. It's loaded with flavor.

Chicken Chili Cornbread Pie

White Chicken Chile Cornbread Pie

This white chicken chili cornbread pie is the ultimate comfort food! White chicken chili topped with green chile cornbread. It’s loaded with flavor.

chili layer

  • 2 tablespoons olive oil
  • 1 sweet onion, (diced)
  • 2 garlic cloves, (minced)
  • 1 (4 ounce) can diced green chiles
  • 1 cup cooked, (shredded chicken)
  • 1 1/2 teaspoons ground cumin
  • 1 teaspoon smoked paprika
  • ¼ teaspoon salt
  • ¼ teaspoon pepper
  • 1 (14 ounce) can cannellini beans, (drained and rinsed)
  • 1 cup corn, ((fresh cut, frozen, etc))
  • 1 ½ to 2 cups low-sodium chicken stock

cornbread layer

  • 1 cup fine ground cornmeal
  • 1 cup all-purpose or whole wheat pastry flour
  • 1 tablespoon brown sugar
  • 1 tablespoon baking powder
  • ½ teaspoon baking soda
  • ½ teaspoon salt
  • 2 large eggs
  • 1 cup milk
  • 1 (4 ounccan diced green chiles
  • 1/2 cup unsalted butter, (melted)

for serving

  • plain greek yogurt or sour cream
  • fresh cilantro
  • fresh chives
  • fresh scallions
  • corn
  • lime wedges
  1. Preheat the oven to 350 degrees F.
  2. Heat a large skillet over medium-low heat and add the olive oil. Add the onions and garlic with a pinch of salt. Cook, stirring occasionally, until they soften, about 5 minutes. Stir in the diced green chiles and shredded chicken. Add in the cumin, paprika, salt and pepper. Stir well until the spices are combined with the mixture. Stir in the cannellini beans, corn and 1 ½ cups chicken stock. You don’t want the chili layer to appear soupy, but if it looks dry, add the other ½ cup of chicken stock. Taste the soup later and add more salt and pepper if needed. Reduce the heat to low while you make the cornbread layer.
  3. In a large bowl, stir together the cornmeal, flour, sugar, baking powder, soda and salt. In a smaller bowl, stir together the eggs and milk. Pour the egg mixture into the dry ingredients, stirring until just almost combined. Stir in the green chiles. Stir in the melted butter until combined.
  4. Drop spoonfuls of the cornbread over the chili, using the back of the spoon to spread it slightly.
  5. Bake the skillet for 20 to 25 minutes, or until the cornbread layer it set. Be sure to check that the cornbread is set right above the chili – sometimes it needs a few extra minutes to cook through!
  6. Serve with sour cream/greek yogurt, fresh cilantro, chives, scallions and limes for spritzing.

This white chicken chili cornbread pie is the ultimate comfort food! White chicken chili topped with green chile cornbread. It's loaded with flavor.

It’s like cornbread pie therapy.

The post White Chicken Chili Cornbread Skillet. appeared first on How Sweet Eats.

03 Oct 03:23

Pumpkin Cacio e Pepe.

by Jessica

This is where the world stops as we make pumpkin cacio e pepe!

This pumpkin cacio e pepe is just like the classic pasta dish with a hint of fall. Pumpkin, black pepper and parm come together to make the delicious sauce!

Oh yes oh yes oh yes.

Guys, I wasn’t planning on sharing this recipe until later this month, but after I posted a quick sneak peek on instagram last week, I knew I had to share it NOW. So many of you have requested it and I figured it had to be out in all of its pumpkin glory. That way we (it?) can enjoy all of pumpkin season!

Because newsflash: it’s amazing.

This pumpkin cacio e pepe is just like the classic pasta dish with a hint of fall. Pumpkin, black pepper and parm come together to make the delicious sauce!

It’s crazy because cacio e pepe isn’t even a dish I would order until about two years ago. I have never LOVED black pepper to the point where I want to eat a dish that bears its name. You know? Growing up, I shunned most pepper sprinkles and even now, I rarely say yes to freshly ground black pepper in a restaurant. 

This pumpkin cacio e pepe is just like the classic pasta dish with a hint of fall. Pumpkin, black pepper and parm come together to make the delicious sauce!

Like many other dishes, this is one that I once disliked and all of a sudden came around to. When I mean “all of a sudden,” I truly mean it that way. This has happened to me with so many foods, recipes and dishes that it’s unbelievable. For years, I can have an unsubstantiated mental block against a food, only to see a photo of it in a magazine that looks crave-worth and BOOM.

I’m crazy about it. Just like that. 

That’s what happened with cacio e pepe, so a few years ago I started making it and fell in love. It reminds me of a not-as-heavy carbonara, even though I know the ingredients are different. It’s such a simple, flavorful and classic dish that it’s hard to pass up.

This pumpkin cacio e pepe is just like the classic pasta dish with a hint of fall. Pumpkin, black pepper and parm come together to make the delicious sauce!

Or in my brain, trash up. 

I know I know! Cacio e pepe is so delicious on its own, why do we have to go and add PUMPKIN?

Well, first of all, I’m much more into pumpkin in a savory form than I am in a sweet. Clearly. Considering that less than a week ago, I made pumpkin queso

And here I find myself, rambling on and on about pumpkin and cheese. Again.

This pumpkin cacio e pepe is just like the classic pasta dish with a hint of fall. Pumpkin, black pepper and parm come together to make the delicious sauce!

It’s so very worth it. Promise you that.

The pumpkin is mild. It’s nothing to freak out over. If anything, you can look on the bright side: it adds extra fiber to this dish!

I do find that adding a few grates of nutmeg or even a shake of cinnamon help to bring out the flavor. It tastes like squash pasta, so you could easily sub in butternut squash or your gourd of choice. 

It’s cheesy, and squashy and might just replace this butternut squash carbonara as my favorite squash pasta dish.

Maybe we should have a side-by-side taste test! 

This pumpkin cacio e pepe is just like the classic pasta dish with a hint of fall. Pumpkin, black pepper and parm come together to make the delicious sauce!

Pumpkin Cacio e Pepe

Pumpkin Cacio e Pepe

This pumpkin cacio e pepe is just like the classic pasta dish with a hint of fall. Pumpkin, black pepper and parm come together to make the delicious sauce!

  • 1/2 pound pasta of your choice ((I used campanelle))
  • 1 to 2 cups reserved pasta water
  • 1 teaspoon olive oil
  • 4 tablespoons unsalted butter
  • 3 cloves garlic, (finely minced or pressed)
  • 1 teaspoon freshly cracked black pepper, (plus extra for topping)
  • ⅔ cup pumpkin puree
  • Pinch of freshly grated nutmeg
  • 1 cup finely grated parmesan cheese
  • 1/4 cup finely grated pecorino cheese
  • parmesan shavings for topping
  1. Bring a pot of salted water to a boil and prepare the pasta according to the package directions. Once the pasta has cooked, you want to make sure to reserve 2 cups of the pasta water.
  2. While the water is boiling/pasta is cooking, heat a large skillet over medium-low heat and add the oil and 2 tablespoons of butter. Once the butter melts, stir in the garlic with a pinch of salt and all of the pepper. Toast for 1 to 2 minutes. Stir in the pumpkin puree until combined.
  3. Stir in 1 cup of the reserved pasta water. Stir in the remaining 2 tablespoons of butter and the nutmeg and bring the mixture to a simmer. Add idn the pasta and toss it together. Reduce the heat to low and stir in the parmesan and pecorino. Toss until the cheese is melted and becomes somewhat of a sauce with the water and the pasta. If needed, you can add in more of the reserved pasta water to thin out the sauce.
  4. Serve immediately with extra parmesan shavings and freshly cracked black pepper.

This pumpkin cacio e pepe is just like the classic pasta dish with a hint of fall. Pumpkin, black pepper and parm come together to make the delicious sauce!

My kind of comfort food!

The post Pumpkin Cacio e Pepe. appeared first on How Sweet Eats.