Personally, I don't care if I'm talking to a robot but don't know it. But, apparently, a lot of people do, so it's nice that Google has responded so quickly.
Google showed off a new technology at Google I/O earlier this week. It’s called Duplex and it allows Google Assistant to call places to schedule appointments at your request. The example given was a pre-recorded call between Assistant and a barber.
The technology is frankly mind-blowing, because Google Assistant sounds completely natural. It (she?) even adds “um” and pauses to sound even more natural.
This feature isn’t coming to our phones particularly soon, but people were already up in arms because of the idea that AI imitating humans could cause potential problems in the future. These are valid concerns too, because the implications of such technology is scary looking towards the future.
Google has responded to the worries, claiming that Assistant will properly identify itself when making such calls in the future.
“We understand and value the discussion around Google Duplex — as we’ve said from the beginning, transparency in the technology is important. We are designing this feature with disclosure built-in, and we’ll make sure the system is appropriately identified. What we showed at I/O was an early technology demo, and we look forward to incorporating feedback as we develop this into a product.”
Though we had nothing to worry about since the feature isn’t being released soon, it’s good to see that Google is paying attention. Google Duplex will enter testing sometime this summer, and it’s exciting what it will be able to do!
That’s a wrap! After a bustling three days at Google I/O, we have a lot to look back on and a lot to look forward to, from helpful features made possible with AI to updates that help you develop a sense of digital wellbeing. Here are 100 of our Google I/O announcements, in no particular order—because we don’t play favorites. �
1. Hey Google, you sound great today! You can now choose from six new voices for your Google Assistant. 2. There will even be some familiar voices later this year, with John Legend lending his melodic tones to the Assistant. 3. The Assistant is becoming more conversational. With AI and WaveNet technology, we can better mimic the subtleties of the human voice—the pitch, pace and, um, the pauses. 4. Continued Conversation lets you have a natural back-and-forth conversation without repeating “Hey Google” for each follow-up request. And the Google Assistant will be able to understand when you’re talking to it versus someone else, and respond accordingly. 5. We’re rolling out Multiple Actions so the Google Assistant can understand more complex queries like: “What’s the weather like in New York and in Austin?” 6. Custom Routines allow you to create your own Routine, and start it with a phrase that feels best for you. For example, you can create a Custom Routine for family dinner, and kick it off by saying "Hey Google, dinner's ready" and the Assistant can turn on your favorite music, turn off the TV, and broadcast “dinner time!” to everyone in the house. 7. Soon you’ll be able to schedule Routines for a specific day or time using the Assistant app or through the Google Clock app for Android. 8. Families have listened to over 130,000 hours of children’s stories on the Assistant in the last two months alone. 9. Later this year we’ll introduce Pretty Please so the Assistant can understand and encourage polite conversation from your little ones. 10. Smart Display devices will be available this summer, bringing the simplicity of voice and the Google Assistant together with a rich visual experience. 11. We redesigned the Assistant experience on the phone. The Assistant will give you a quick snapshot of your day, with suggestions based on the time of day, location and recent interactions with the Assistant. 12. Bon appetit! A new food pick-up and delivery experience for the Google Assistant app will be available later this year. 13. Keep your eyes on the road—the Assistant is coming to navigation in Google Maps with a low visual profile. You can keep your hands on the wheel while sending text messages, playing music and more. 14.Google Duplex is a new capability we will be testing this summer within the Google Assistant to you help you make reservations, schedule appointments, and get holiday hours from businesses. Just provide the date and time, and your Assistant will call the business to coordinate for you. 15.The Google Assistant will be available in 80 countries by the end of the year. 16. We’re also bringing Google Home and Google Home Mini to seven more countries later this year: Spain, Mexico, Korea, the Netherlands, Denmark, Norway and Sweden.
17.Soon you’ll see Smart Compose in Gmail, a new feature powered by AI, that helps you save you time by cutting back on repetitive writing, while reducing the chance of spelling and grammatical errors in your emails. 18. ML Kit brings the breadth of Google’s machine learning technology to app developers, including on-device APIs for text recognition, face detection, image labeling and more. It’s available in one mobile SDK, accessible through Firebase, and works on both Android and iOS. 19.Our third-generation TPUs (Tensor Processing Units) are liquid-cooled and much more powerful than the previous generation, allowing us to train and run models faster so more products can be enhanced with AI. 20. We published results in a Nature Research journal showing that our AI model can predict medical events, helping doctors spot problems before they happen. 21.AI is making it easier for Waymo’s vehicles to drive in different environments, whether it’s the snowy streets of Michigan, foggy hills of San Francisco or rainy roads of Kirkland. With these improvements, we’re moving closer to our goal of bringing self-driving technology to everyone, everywhere.
22.We unveiled a beta version of Android P, focused on intelligence, simplicity and digital wellbeing. 23. We partnered with DeepMind to build Adaptive Battery, which prioritizes battery power for the apps and services you use most. 24. Adaptive Brightness in Android P learns how you like to set the brightness based on your surroundings, and automatically updates it to conserve energy. 25. App Actions help you get to your next task quickly by predicting what action you’ll take next. So if you connect your headphones to your device, Android will suggest an action to resume your favorite Spotify playlist. 26. Actions will also show up throughout your Android phone in places like the Launcher, Smart Text Selection, the Play Store, the Google Search app and the Assistant. 27. Slices makes your smartphone even smarter by showing parts of apps right when you need them most. Say for example you search for “Lyft” in Google Search on your phone—you can see an interactive Slice that gives you the price and time for a trip to work, and you can quickly order the ride. 28. A new enterprise work profile visually separates your work apps. Tap on the work tab to see work apps all in one place, and turn them off with a simple toggle when you get off work. 29. Less is more! Swipe up on the home button in Android P to see a newly designed Overview, with full-screen previews of recently used apps. Simply tap once to jump back into any app. 30. If you’re constantly switching between apps, we’ve got good news for you. Smart Text Selection (which recognizes the meaning of the text you’re selecting and suggests relevant actions) now works in Overview, making it easier to perform the action you want. 31.Android P also brings a redesigned Quick Settings, a better way to take and edit screenshots (say goodbye to the vulcan grip that was required before), simplified volume controls, an easier way to manage notifications and more. 32. Technology should help you with your life, not distract you from it. Android P comes with digital wellbeing features built into the platform. 33.Dashboard gives you a snapshot on how you’re spending time on your phone. It includes information about how long you’ve spent in apps, how many times you unlocked your phone and how many notifications you’ve received. 34.You can take more control over how you engage with your phone. App Timer lets you set time limits on apps, and when you get close to your time limit Android will nudge you that it is time to do something else. 35. Do Not Disturb (DND) mode has more oomph. Not only does it silence phone calls and texts, but it also hides visual disruptions like notifications that pop up on your display. 36. We created a gesture to help you focus on being present: If you turn your phone over on the table, it automatically enters DND. 37. With a new API, you can automatically set your status on messaging apps to “away” when DND is turned on. 38.Fall asleep a little easier with Wind Down. Set a bedtime and your phone will automatically switch to Night Light mode and fade to grayscale to eliminate distractions. 39.Android P is packed with security and privacy improvements updated security protocols, encrypted backups, protected confirmations and more. 40.Thanks to work on Project Treble, an effort we introduced last year to make OS upgrades easier for partners, Android P Beta is available on partner devices including Sony Xperia XZ2, Xiaomi Mi Mix 2S, Nokia 7 Plus, Oppo R15 Pro, Vivo X21, OnePlus 6, and Essential PH‑1, in addition to Pixel and Pixel 2.
41. Say hello to the JBL LINK BAR. We worked with Harman to launch this hybrid device that delivers a full Google Assistant speaker and Android TV experience. 42. We released a limited edition Android TV dongle device, the ADT-2, for developers to create more with Android TV. 43. Android Auto is now working with more than 50 OEMs to support more than 400 cars and aftermarket stereos. 44. Volvo’s next-gen infotainment system powered by Android will integrate with Google apps, including Maps, Assistant and Play Store. 45. Watch out! You can get more done from your watch with new features from the Google Assistant on Wear OS by Google. 46. Smart suggestions from the Google Assistant on Wear OS by Google let you continue conversations directly from your watch. Choose from contextually relevant follow-up questions or responses. 47. Now you can choose to hear answers from your watch speaker or Bluetooth headphones. Just ask Google Assistant on your watch “tell me about my day.” 48. Actions will be available on all Wear OS by Google watches, so you can use your voice to do tasks like preheat your LG oven while you’re unloading your groceries or ask Bay Trains when the next train is leaving. And we’re working with developers and partners to add more Actions and functionalities.
49. We’ve mapped more than 21 million miles across 220 countries, put hundreds of millions of businesses on the map, and provided access to more than 1 billion people around the world. 50.Google Maps is becoming more assistive and personal. A redesigned Explore tab features everything you need to know about dining, events and activity options in whatever area you’re interested in. 51. Top lists give you information from local experts, Google’s algorithms and trusted publishers so you can see everything that's new and interesting—like the most essential brunches or cheap eats nearby. 52. New features help you easily make plans as a group. You can create a shortlist of places within the app and share it with friends across any platform, so you can quickly vote and decide on a place to go. 53. Your "match" helps you see the world through your lens, suggesting how likely you are to enjoy a food or drink spot based on your preferences. 54. Updated walking directions help you get oriented on your walking journey more quickly and navigate the world on foot with more confidence. So when you emerge out of a subway or reach a crossing with more than four streets, you’ll know which way to go.
55. Suggested actions, powered by machine learning, will start to show up on your photos right as you view them—giving you the option to brighten, share, rotate or archive a picture. Another action on the horizon is the ability to quickly export photos of documents into PDFs. 56. New color pop creations leave the subject of your photo in color while setting the background to black and white. 57. We’re also working on the ability for you to change black-and-white photos into color in just a tap. 58. We announced the Google Photos partner program, giving developers the tools to build smarter, faster and more helpful photo and video experiences in their products, so you can interact with your photos across more apps and devices.
59. The updatedGoogle News uses a new set of AI techniques to find and organize quality reporting and diverse information from around the web, in real time, and organize it into storylines so you can make sense of what’s happening from the world stage to your own backyard. 60. The “For You” tab makes it easy to keep up to date on what you care about, starting with a “Daily Briefing” of five stories that Google has organized for you—a mix of the most important headlines, local news and the latest on your interests. 61.With Full Coverage, you can deep dive on a story with one click. This section is not personalized—everyone will see the same content including related articles, timelines, opinion and analysis pieces, video, timeline and the ability to see what the impact or reaction has been in real time. 62. The separate Headlines section, also unpersonalized, lets you stay fully informed across a broad spectrum of news, like world news, business, science, sports, entertainment and more. 63. Subscribing to your favorite publishers right in the Google News app is super simple using Subscribe with Google—no forms, new passwords or credit cards—and you can access your subscriptions anywhere you’re logged in across Google and the web.
64. Updates to Google Lens help you get answers to the world around you. With smart text, you can copy and paste text from the real world—like recipes or business cards—to your phone. 65. With style match, if an outfit or a home decor item catches your eye, you can open Lens and not only get info on that specific item (like reviews), but also see similar items. 66.Lens now uses real-time identification so you’ll be able to browse the world around you just by pointing your camera. It’s able to give you information quickly and anchor it to the things you see. 67. Use Lens directly in the camera app on supported devices from the following OEMs: LGE, Motorola, Xiaomi, Sony Mobile, HMD/Nokia, Transsion, TCL, OnePlus, BQ, Asus—and of course the Google Pixel. 68. Lens is coming to more languages, including French, Italian, German, Spanish and Portuguese. 69. Tour Creator lets anyone with a story to tell, like teachers or students, easily make a VR tour using imagery from Google Street View or their own 360 photos. 70.With Sceneform, Java developers can now build immersive, 3D apps without having to learn complicated APIs. They can use it to build AR apps from scratch as well as add AR features to existing ones. 71. We’ve rolled out ARCore’s Cloud Anchor API across Android and iOS to help developers build more collaborative and immersive augmented reality apps. Cloud Anchors makes it possible to create collaborative AR experiences, like redecorating your home, playing games and painting a community mural—all together with your friends. 72. ARCore now features Vertical Plane Detection which means you can place AR objects on more surfaces, like textured walls. Now you can do things like view artwork above your mantlepiece before buying it. 73. Thanks to a capability called Augmented Images, you’ll be able to bring images to life just by pointing your phone at them—this works on QR codes, AR markers and static image targets (like maps, products in a store, logos, photos or movie posters).
74. We launched updates to the YouTube mobile app that will help everyone develop their own sense of digital wellbeing. The Take a Break reminder lets you set a reminder to (you guessed it!) take a break while watching videos after a specified amount of time. 75. You can schedule specific times each day to silence notification sounds and vibrations that are you sent to your phone from the YouTube app. 76. You can also opt in to a scheduled notification digest that combines all of the daily push notifications from the YouTube app into a single, combined notification. 77. Soon you’ll have access to a time watched profile to give you a better understanding of the time you spend on YouTube.
78. Lookout, a new Android app, gives people who are blind or visually impaired auditory cues as they encounter objects, text and people around them. 79. We’re introducing the ability to type in Morse code in Gboard beta for Android. We partnered with developer Tania Finlayson, an expert in Morse code assistive technology, to build this feature.
80. After launching in beta at Game Developers Conference, Google Play Instant is now open to all game developers. 81.Updated Google Play Console features help you improve your app’s performance and grow your business. These include improvements to the dashboard statistics, Android vitals, pre-launch report, acquisition report and subscriptions dashboard. 82. Android Jetpack is a new set of components, tools and architectural guidance that makes it quicker and easier for developers to build great Android apps. 83. Android KTX, launching as part of Android Jetpack, optimizes the Kotlin developer experience. 84. Android App Bundle, a new format for publishing Android apps, helps developers deliver great experiences in smaller app sizes and optimize apps for the wide variety of Android devices and form factors available. 85.The latest canary release of Android Studio 3.2 focuses on supporting the Android P Developer Preview, Android App Bundle and Android Jetpack, plus more features to help you develop fast and easily. 86.We added Dynamic Delivery so your users download only the code and resources they need to run your app, reducing download times and saving space on their devices. 87.With Android Things 1.0, developers can build and ship commercial IoT products using the Android Things platform. 88.The latest improvements to Performance Monitoring on Firebase help you easily monitor app performance issues and identify the parts of your app that stutter or freeze. 89. In the coming months, we're expanding Firebase Test Lab to include iOS to help get your app into a high-quality state—across both Android and iOS—before you even release it. 90. We shipped Flutter Beta 3, the latest version of our mobile app SDK for creating high-quality, native user experiences on iOS and Android.. 91. We launched an early preview of the Android extension libraries (AndroidX) which represents a new era for the Support Library. 92. You can now run Linux apps on your Chromebooks (starting with a preview on the Google Pixelbook), so you can use your favorite tools and familiar commands with the speed, simplicity and security of Chrome OS. 93. Material Theming, part of the latest update to Material Design, lets developers systematically express a unique style across their product more consistently, so they don’t have to choose between building beautiful and building fast. We also redesigned Material.io. 94. We introduced three Material tools to streamline workflow and address common pain points across design and development: Material Theme Editor, a control panel that lets you apply global style changes to components across your design; Gallery, a platform for sharing, reviewing and commenting on design iterations; and Material Icons in five different themes. 95. With open-source Material Components, you can customize key aspects of an app’s design, including color, shape, and type themes.
96. We’ll launch a beta that allows developers to display relevant content from their apps—such as a product catalog for a shopping app—within ads, giving users more helpful information before they download an app. 97. We started early testing to make Google Play Instant compatible with AdWords, so game developers can use Universal App campaigns to reach potential users and let them try out games directly from ads. 98. Developers using ads to grow their user bases will soon have a more complete picture with view through conversion (VTC) reporting, providing more insight into ad impressions and conversions. 99. With rewarded reporting to AdMob, developers can understand and fine-tune the performance of their rewarded ads--ads that let users opt in to view ads in exchange for in-app incentives or digital goods, such as an extra life in a game or 15 minutes of ad-free music streaming. 100. Developers who sell ad placements in their app can now more easily report data back to advertisers with the integration of IAB Tech Lab’s Open Measurement SDK.
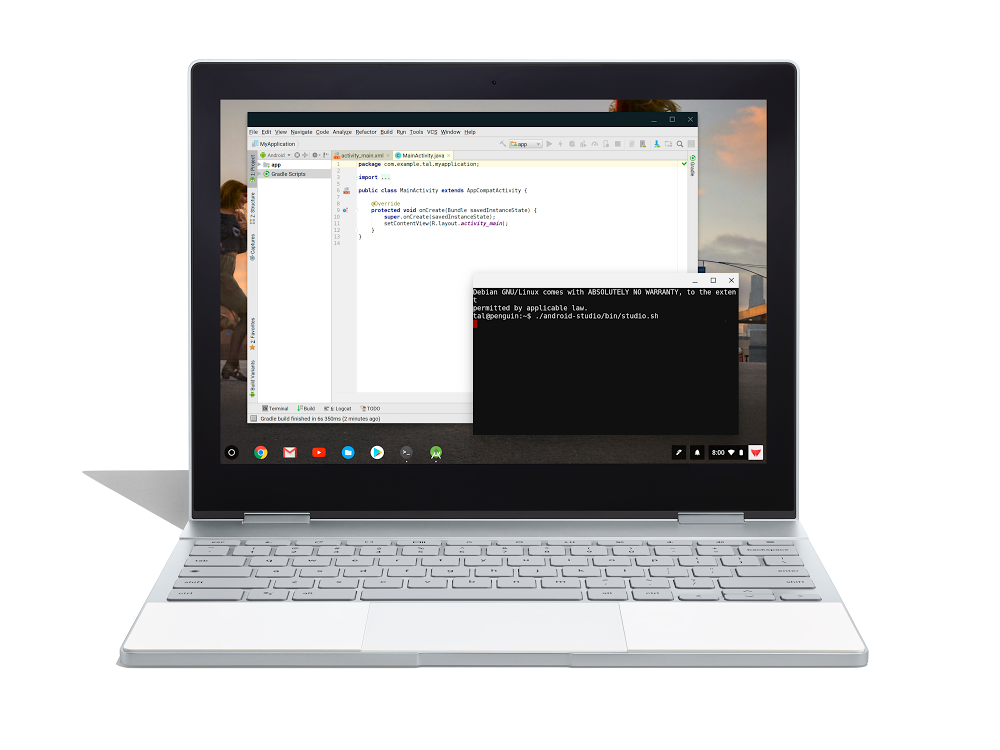
This year we’re making it possible for you to code on Chromebooks. Whether it’s building an app or writing a quick script, Chromebooks will be ready for your next coding project.
Last year we announced a new generation of Chromebooks that were designed to work with your favorite apps from the Google Play store, helping to bring accessible computing to millions of people around the world. But it’s not just about access to technology, it’s also about access to the tools that create it. And that’s why we’re equipping developers with more tools on Chromebooks.
Support for Linux will enable you to create, test and run Android and web app for phones, tablets and laptops all on one Chromebook. Run popular editors, code in your favorite language and launch projects to Google Cloud with the command-line. Everything works directly on a Chromebook.
Linux runs inside a virtual machine that was designed from scratch for Chromebooks. That means it starts in seconds and integrates completely with Chromebook features. Linux apps can start with a click of an icon, windows can be moved around, and files can be opened directly from apps.
Starting today you’ll be able to preview Android Studio and other Linux apps on Google Pixelbook. Remember to tune in to Google I/O to learn more about Linux on Chromebooks, as well as more exciting announcements.
Owen Grover, the new post-acquisition CEO of Pocket Casts:
We’re a private and separate company and our privacy policy
remains unchanged. We can’t and won’t share any of your personal
data with NPR, WNYC, WBEZ or This American Life. They didn’t buy
Pocket Casts for that reason.
It’s also worth pointing out that we’ve spent 8 years caring about
the kind of data we do and don’t store about you, it’s literally
the minimum amount required to run our sync service. If you don’t
sign in and leave push notifications off, we literally have no
data about you. That’s less than any other podcast platform we
know of. If you choose to sign in we have your email address,
password and data to sync to other platforms. If you turn on push
we store the unique ID Apple gives us so we can send you push
notifications. We find it so easy to justify this because every
piece of data we store is to provide you with services, not us
with your data.
Good to hear.
Concern 4: Pocket Casts will start tracking users [sic] locations.
This one perplexes me, but hey we did say we’d address everything.
We don’t need your location data. We don’t want your location
data. We won’t be collecting or storing your location data. Where
you go day to day is none of our business…I have no idea why
people even think we’d do that.
Again, good to hear, but I find it hard to believe Grover is genuinely perplexed by this concern. The reason they’d start tracking location is to serve targeted local ads.
LOL! Mad Max: Fury Road - Mario Kart: Apocalypse Edition. The Hunger Games - Like Twilight But Violent. The Shape of Water - Beastiality is Good and Okay. If movie posters and slogans were "honest"...
The first day of a new job is always an adjustment. There's a fine line between explaining that you're unused to a procedure and constantly saying "At my old company...". After all, nobody wants to be that guy, right? So you proceed with caution, trying to learn before giving advice.
But some things warrant the extra mile. When Samantha started her tenure at a mid-sized firm, it all started out fine. She got a computer right away, which is a nice plus. She met the team, got settled into a desk, and was given a list of passwords and important URLs to get situated. The usual stuff.
After changing her Windows password, she decided to start by browsing the source code repository. This company used Subversion, so she went and downloaded the whole repo so she could see the structure. It took a while, so she got up and got some coffee; when she got back, it had finished, and she was able to see the total size: 300 GB. That's... weird. Really weird. Weirder still, when she glanced over the commit history, it only dated back a year or so.
What could be taking so much space? Were they storing some huge binaries tucked away someplace that the code depended on? She didn't want to make waves, but this just seemed so... inefficiently huge. Now curious, she opened the repo, browsing the folder structure.
Subversion bases everything on folder structure; there is only really one "branch" in Git's thinking, but you can check out any subfolder without taking the whole repository. Inside of each project directory was a layout that is common to SVN repos: a folder called "branches", a folder called "tags", and a folder called "trunk" (Subversion's primary branch). In the branches directory there were folders called "fix" and "feature", and in each of those there were copies of the source code stored under the names of the branches. Under normal work, she'd start her checkout from one of those branch folders, thus only pulling down the code for her branch, and merge into the "trunk" copy when she was all done.
But there was one folder she didn't anticipate: "backups". Backups? But... this is version control. We can revert to an earlier version any time we want. What are the backups for? I must be misunderstanding. She opened one and was promptly horrified to find a series of zip files, dated monthly, all at revision 1.
Now morbidly curious, Samantha opened one of these zips. The top level folder inside the zip was the name of the project; under that, she found branches, tags, trunk. No way. They can't have-- She clicked in, and there it was, plain as day: another backups folder. And inside? Every backup older than the one she'd clicked. Each backup included, presumably, every backup prior to that, meaning that in the backup for October, the backup from January was included nine times, the backup from February eight times, and so on and so forth. Within two years, a floppy disk worth of code would fill a terabyte drive.
Samantha asked her boss, "What will you do when the repo gets too big to be downloaded onto your hard drive?
His response was quick and entirely serious: "Well, we back it up, then we make a new one."
[Advertisement]
ProGet supports your applications, Docker containers, and third-party packages, allowing you to enforce quality standards across all components. Download and see how!
Traveling to Spain in 1936, Escher visited the Alhambra for the second time and visited the mosque in Córdoba. The renewed exposure to Arabic design occasioned an important change in his work — he became fascinated with geometry and symmetry and how those abstract design elements could be incorporated into his representations of the natural world. The images in his later prints are created from within his mind rather than representations of the physical world. He explored how to represent people, animals, and objects rising from the flat page and then returning, as well as how to represent the endlessness of infinity.
Browsing through these takes me back to my college days. I don’t know what the situation is now, but when I was in school, it was almost a requirement that 50% of the dorm rooms on any given floor had to have an M.C. Escher poster hanging on the wall. (via @john_overholt)
As Google I/O kicked off, we hosted our third annual Google Play Award ceremony to recognize the best apps and games on Google Play over the past year. These apps and games battled it out across nine categories, and proved not only to deliver delightful experiences to fans, but also have larger positive impact in their communities.
Congrats to this year’s winners:
Standout Well-Being App
Apps empowering people to live the best version of their lives, while demonstrating responsible design and engagement strategies.
Apps or games that create a positive impact in communities around the world (focused on health, education, crisis response, refugees, financial health and fundraising functions).
For decades, I worked in an industry where you were never allowed to say no to a user, no matter how ridiculous the request. You had to suck it up and figure out a way to deliver on insane requests, regardless of the technical debt they inflicted.
Users are a funny breed. They say things like I don't care if the input dialog you have works; the last place I worked had a different dialog to do the same thing, and I want that dialog here! With only one user saying stuff like that, it's semi-tolerable. When you have 700+ users and each of them wants a different dialog to do the same thing, and nobody in management will say no, you need to start creating table-driven dialogs (x-y coordinates, width, height, label phrasing, field layout within the dialog, different input formats, fonts, colors and so forth). Multiply that by the number of dialogs in your application and it becomes needlesslypointlessly impossibly difficult.
But it never stops there. Often, one user will request that you move a field from another dialog onto their dialog - just for them. This creates all sorts of havoc with validation logic. Multiply it by hundreds of users and you're basically creating a different application for each of them - each with its own validation logic, all in the same application.
After just a single handful of users demanding changes like this, it can quickly become a nightmare. Worse, once it starts, the next user to whom you say no tells you that you did it for the other guy and so you have to do it for them too! After all, each user is the most important user, right?
It doesn't matter that saying no is the right thing to do. It doesn't matter that it will put a zero-value load on development and debugging time. It doesn't matter that sucking up development time to do it means there are less development hours for bug fixes or actual features.
When management refuses to say no, it can turn your code into a Pandora's-Box-o-WTF™
However, there is hope. There is a way to tell the users no without actually saying no. It's by getting them to say it for you and then withdrawing their urgent, can't-live-without-it, must-have-or-the-world-will-end request.
You may ask how?
The trick is to make them see the actual cost of implementing their teeny tiny little feature.
Yes, we can add that new button to provide all the functionality of Excel in an in-app
calculator, but it will take x months (years) to do it, AND it will push back all of the
other features in the queue. Shall I delay the next release and the other feature requests
so we can build this for you, or would you like to schedule it for a future release?
Naturally you'll have to answer questions like "But it's just a button; why would it take that much effort?"
This is a good thing because it forces them down the rabbit hole into your world where you are the expert. Now you get to explain to them the realities of software development, and the full cost of their little request.
Once they realize the true cost that they'd have to pay, the urgency of the request almost always subsides to nice to have and gets pushed forward so as to not delay the scheduled release.
And because you got them to say it for you, you didn't have to utter the word no.
[Advertisement]
Otter - Provision your servers automatically without ever needing to log-in to a command prompt. Get started today!
Today, we are going to explore the concept of broadcasting in the Laravel web framework. It allows you to send notifications to the client side when something happens on the server side. In this article, we are going to use the third-party Pusher library to send notifications to the client side.
If you have ever wanted to send notifications from the server to the client when something happens on a server in Laravel, you're looking for the broadcasting feature.
For example, let's assume that you've implemented a messaging application that allows users of your system to send messages to each other. Now, when user A sends a message to user B, you want to notify user B in real time. You may display a popup or an alert box that informs user B about the new message!
It's the perfect use-case to walk through the concept of broadcasting in Laravel, and that's what we'll implement in this article.
If you are wondering how the server could send notifications to the client, it's using sockets under the hood to accomplish it. Let's understand the basic flow of sockets before we dive deeper into the actual implementation.
Firstly, you need a server that supports the web-sockets protocol and allows the client to establish a web socket connection.
You could implement your own server or use a third-party service like Pusher. We'll prefer the latter in this article.
The client initiates a web socket connection to the web socket server and receives a unique identifier upon successful connection.
Once the connection is successful, the client subscribes to certain channels at which it would like to receive events.
Finally, under the subscribed channel, the client registers events that it would like to listen to.
Now on the server side, when a particular event happens, we inform the web-socket server by providing it with the channel name and event name.
And finally, the web-socket server broadcasts that event to registered clients on that particular channel.
Don't worry if it looks like too much in a single go; you will get the hang of it as we move through this article.
Next, let's have a look at the default broadcast configuration file at config/broadcasting.php.
<?php

return [

    /*
    |--------------------------------------------------------------------------
    | Default Broadcaster
    |--------------------------------------------------------------------------
    |
    | This option controls the default broadcaster that will be used by the
    | framework when an event needs to be broadcast. You may set this to
    | any of the connections defined in the "connections" array below.
    |
    | Supported: "pusher", "redis", "log", "null"
    |
    */

    'default' => env('BROADCAST_DRIVER', 'log'),

    /*
    |--------------------------------------------------------------------------
    | Broadcast Connections
    |--------------------------------------------------------------------------
    |
    | Here you may define all of the broadcast connections that will be used
    | to broadcast events to other systems or over websockets. Samples of
    | each available type of connection are provided inside this array.
    |
    */

    'connections' => [

        'pusher' => [
            'driver' => 'pusher',
            'key' => env('PUSHER_APP_KEY'),
            'secret' => env('PUSHER_APP_SECRET'),
            'app_id' => env('PUSHER_APP_ID'),
        ],

        'redis' => [
            'driver' => 'redis',
            'connection' => 'default',
        ],

        'log' => [
            'driver' => 'log',
        ],

        'null' => [
            'driver' => 'null',
        ],

    ],

];
By default, Laravel supports multiple broadcast adapters in the core itself.
In this article, we are going to use the Pusher broadcast adapter. For debugging purposes, you could also use the log adapter. Of course, if you're using the log adapter, the client won't receive any event notifications, and it'll only be logged to the laravel.log file.
From the next section onward, we'll right away dive into the actual implementation of the aforementioned use-case.
Setting Up the Prerequisites
In broadcasting, there are different types of channels—public, private, and presence. When you want to broadcast your events publicly, it's the public channel that you are supposed to use. Conversely, the private channel is used when you want to restrict event notifications to certain private channels.
In our use-case, we want to notify users when they get a new message. And to be eligible to receive broadcast notifications, the user must be logged in. Thus, we'll need to use the private channel in our case.
Core Authentication Feature
Firstly, you need to enable the default Laravel authentication system so that features like registration, login and the like work out of the box. If you're not sure how to do that, the official documentation provides a quick insight into that.
Pusher SDK—Installation and Configuration
As we're going to use the Pusher third-party service as our web-socket server, you need to create an account with it and make sure you have the necessary API credentials with your post registration. If you're facing any trouble creating it, don't hesitate to ask me in the comment section.
Next, we need to install the Pusher PHP SDK so that our Laravel application can send broadcast notifications to the Pusher web-socket server.
In your Laravel application root, run the following command to install it as a composer package.
$composer require pusher/pusher-php-server "~3.0"
Now, let's change the broadcast configuration file to enable the Pusher adapter as our default broadcast driver.
<?php

return [

    /*
    |--------------------------------------------------------------------------
    | Default Broadcaster
    |--------------------------------------------------------------------------
    |
    | This option controls the default broadcaster that will be used by the
    | framework when an event needs to be broadcast. You may set this to
    | any of the connections defined in the "connections" array below.
    |
    | Supported: "pusher", "redis", "log", "null"
    |
    */

    'default' => env('BROADCAST_DRIVER', 'pusher'),

    /*
    |--------------------------------------------------------------------------
    | Broadcast Connections
    |--------------------------------------------------------------------------
    |
    | Here you may define all of the broadcast connections that will be used
    | to broadcast events to other systems or over websockets. Samples of
    | each available type of connection are provided inside this array.
    |
    */

    'connections' => [

        'pusher' => [
            'driver' => 'pusher',
            'key' => env('PUSHER_APP_KEY'),
            'secret' => env('PUSHER_APP_SECRET'),
            'app_id' => env('PUSHER_APP_ID'),
            'options' => [
                        'cluster' => 'ap2',
                        'encrypted' => true
            ],
        ],

        'redis' => [
            'driver' => 'redis',
            'connection' => 'default',
        ],

        'log' => [
            'driver' => 'log',
        ],

        'null' => [
            'driver' => 'null',
        ],

    ],

];
As you can see, we've changed the default broadcast driver to Pusher. We've also added cluster and encrypted configuration options that you should have got from the Pusher account in the first place.
Also, it's fetching values from environment variables. So let's make sure that we do set the following variables in the .env file properly.
Next, I had to make a few changes in a couple of core Laravel files in order to make it compatible with the latest Pusher SDK. Of course, I don't recommend making any changes in the core framework, but I'll just highlight what needs to be done.
Go ahead and open the vendor/laravel/framework/src/Illuminate/Broadcasting/Broadcasters/PusherBroadcaster.php file. Just replace the snippet use Pusher; with use Pusher\Pusher;.
Next, let's open the vendor/laravel/framework/src/Illuminate/Broadcasting/BroadcastManager.php file and make a similar change in the following snippet.
return new PusherBroadcaster(
  new \Pusher\Pusher($config['key'], $config['secret'],
  $config['app_id'], Arr::get($config, 'options', []))
);
Finally, let's enable the broadcast service in config/app.php by removing the comment in the following line.
App\Providers\BroadcastServiceProvider::class,
So far, we've installed server-specific libraries. In the next section, we'll go through client libraries that need to be installed as well.
Pusher and Laravel Echo Libraries—Installation and Configuration
In broadcasting, the responsibility of the client side is to subscribe to channels and listen for desired events. Under the hood, it accomplishes it by opening a new connection to the web-socket server.
Luckily, we don't have to implement any complex JavaScript stuff to achieve it as Laravel already provides a useful client library, Laravel Echo, that helps us deal with sockets on the client side. Also, it supports the Pusher service that we're going to use in this article.
You can install Laravel Echo using the NPM package manager. Of course, you need to install node and npm in the first place if you don't have them already. The rest is pretty simple, as shown in the following snippet.
$npm install laravel-echo
What we're interested in is the node_modules/laravel-echo/dist/echo.js file that you should copy to public/echo.js.
Yes, I understand, it's a bit of overkill to just get a single JavaScript file. If you don't want to go through this exercise, you can download the echo.js file from my GitHub.
And with that, we're done with our client libraries setup.
Back-End File Setup
Recall that we were talking about setting up an application that allows users of our application to send messages to each other. On the other hand, we'll send broadcast notifications to users that are logged in when they receive a new message from other users.
In this section, we'll create the files that are required in order to implement the use-case that we're looking for.
To start with, let's create the Message model that holds messages sent by users to each other.
$php artisan make:model Message --migration
We also need to add a few fields like to, from and message to our messages table. So let's change the migration file before running the migrate command.
<?php

use Illuminate\Support\Facades\Schema;
use Illuminate\Database\Schema\Blueprint;
use Illuminate\Database\Migrations\Migration;

class CreateMessagesTable extends Migration
{
    /**
     * Run the migrations.
     *
     * @return void
     */
    public function up()
    {
        Schema::create('messages', function (Blueprint $table) {
            $table->increments('id');
            $table->integer('from', FALSE, TRUE);
            $table->integer('to', FALSE, TRUE);
            $table->text('message');
            $table->timestamps();
        });
    }

    /**
     * Reverse the migrations.
     *
     * @return void
     */
    public function down()
    {
        Schema::dropIfExists('messages');
    }
}
Now, let's run the migrate command that creates the messages table in the database.
$php artisan migrate
Whenever you want to raise a custom event in Laravel, you should create a class for that event. Based on the type of event, Laravel reacts accordingly and takes the necessary actions.
If the event is a normal event, Laravel calls the associated listener classes. On the other hand, if the event is of broadcast type, Laravel sends that event to the web-socket server that's configured in the config/broadcasting.php file.
As we're using the Pusher service in our example, Laravel will send events to the Pusher server.
Let's use the following artisan command to create a custom event class—NewMessageNotification.
$php artisan make:event NewMessageNotification
That should create the app/Events/NewMessageNotification.php class. Let's replace the contents of that file with the following.
<?php

namespace App\Events;

use Illuminate\Broadcasting\Channel;
use Illuminate\Queue\SerializesModels;
use Illuminate\Broadcasting\PrivateChannel;
use Illuminate\Broadcasting\PresenceChannel;
use Illuminate\Broadcasting\InteractsWithSockets;
use Illuminate\Contracts\Broadcasting\ShouldBroadcastNow;
use App\Message;

class NewMessageNotification implements ShouldBroadcastNow
{
    use SerializesModels;

    public $message;

    /**
     * Create a new event instance.
     *
     * @return void
     */
    public function __construct(Message $message)
    {
        $this->message = $message;
    }

    /**
     * Get the channels the event should broadcast on.
     *
     * @return Channel|array
     */
    public function broadcastOn()
    {
        return new PrivateChannel('user.'.$this->message->to);
    }
}
The important thing to note is that the NewMessageNotification class implements the ShouldBroadcastNow interface. Thus, when we raise an event, Laravel knows that this event should be broadcast.
In fact, you could also implement the ShouldBroadcast interface, and Laravel adds an event into the event queue. It'll be processed by the event queue worker when it gets a chance to do so. In our case, we want to broadcast it right away, and that's why we've used the ShouldBroadcastNow interface.
In our case, we want to display a message the user has received, and thus we've passed the Message model in the constructor argument. In this way, the data will be passed along with the event.
Next, there is the broadcastOn method that defines the name of the channel on which the event will be broadcast. In our case, we've used the private channel as we want to restrict the event broadcast to logged-in users.
The $this->message->to variable refers to the ID of the user to which the event will be broadcast. Thus, it effectively makes the channel name like user.{USER_ID}.
In the case of private channels, the client must authenticate itself before establishing a connection with the web-socket server. It makes sure that events that are broadcast on private channels are sent to authenticated clients only. In our case, it means that only logged-in users will be able to subscribe to our channel user.{USER_ID}.
If you're using the Laravel Echo client library for channel subscription, you're in luck! It automatically takes care of the authentication part, and you just need to define the channel routes.
Let's go ahead and add a route for our private channel in the routes/channels.php file.
<?php

/*
|--------------------------------------------------------------------------
| Broadcast Channels
|--------------------------------------------------------------------------
|
| Here you may register all of the event broadcasting channels that your
| application supports. The given channel authorization callbacks are
| used to check if an authenticated user can listen to the channel.
|
*/

Broadcast::channel('App.User.{id}', function ($user, $id) {
    return (int) $user->id === (int) $id;
});

Broadcast::channel('user.{toUserId}', function ($user, $toUserId) {
    return $user->id == $toUserId;
});
As you can see, we've defined the user.{toUserId} route for our private channel.
The second argument of the channel method should be a closure function. Laravel automatically passes the currently logged-in user as the first argument of the closure function, and the second argument is usually fetched from the channel name.
When the client tries to subscribe to the private channel user.{USER_ID}, the Laravel Echo library does the necessary authentication in the background using the XMLHttpRequest object, or more commonly known as XHR.
So far, we've finished with the setup, so let's go ahead and test it.
Front-End File Setup
In this section, we'll create the files that are required to test our use-case.
Let's go ahead and create a controller file at app/Http/Controllers/MessageController.php with the following contents.
<?php
namespace App\Http\Controllers;

use App\Http\Controllers\Controller;
use App\Message;
use App\Events\NewMessageNotification;
use Illuminate\Support\Facades\Auth;

class MessageController extends Controller
{
    public function __construct() {
        $this->middleware('auth');
    }

    public function index()
    {
        $user_id = Auth::user()->id;
        $data = array('user_id' => $user_id);

        return view('broadcast', $data);
    }

    public function send()
    {
        // ...

        // message is being sent
        $message = new Message;
        $message->setAttribute('from', 1);
        $message->setAttribute('to', 2);
        $message->setAttribute('message', 'Demo message from user 1 to user 2');
        $message->save();

        // want to broadcast NewMessageNotification event
        event(new NewMessageNotification($message));

        // ...
    }
}
In the index method, we're using the broadcast view, so let's create the resources/views/broadcast.blade.php view file as well.
In the constructor method of the controller class, you can see that we've used the auth middleware to make sure that controller methods are only accessed by logged-in users.
Next, there's the index method that renders the broadcast view. Let's pull in the most important code in the view file.
Firstly, we load the necessary client libraries, Laravel Echo and Pusher, allowing us to open the web-socket connection to the Pusher web-socket server.
Next, we create the instance of Echo by providing Pusher as our broadcast adapter and other necessary Pusher-related information.
Moving further, we use the private method of Echo to subscribe to the private channel user.{USER_ID}. As we discussed earlier, the client must authenticate itself before subscribing to the private channel. Thus the Echo object performs the necessary authentication by sending the XHR in the background with necessary parameters. Finally, Laravel tries to find the user.{USER_ID} route, and it should match the route that we've defined in the routes/channels.php file.
If everything goes fine, you should have a web-socket connection open with the Pusher web-socket server, and it's listing events on the user.{USER_ID} channel! From now on, we'll be able to receive all incoming events on this channel.
In our case, we want to listen for the NewMessageNotification event and thus we've used the listen method of the Echo object to achieve it. To keep things simple, we'll just alert the message that we've received from the Pusher server.
So that was the setup for receiving events from the web-sockets server. Next, we'll go through the send method in the controller file that raises the broadcast event.
Let's quickly pull in the code of the send method.
public function send()
{
    // ...

    // message is being sent
    $message = new Message;
    $message->setAttribute('from', 1);
    $message->setAttribute('to', 2);
    $message->setAttribute('message', 'Demo message from user 1 to user 2');
    $message->save();

    // want to broadcast NewMessageNotification event
    event(new NewMessageNotification($message));

    // ...
}
In our case, we're going to notify logged-in users when they receive a new message. So we've tried to mimic that behavior in the send method.
Next, we've used the event helper function to raise the NewMessageNotification event. Since the NewMessageNotification event is of ShouldBroadcastNow type, Laravel loads the default broadcast configuration from the config/broadcasting.php file. Finally, it broadcasts the NewMessageNotification event to the configured web-socket server on the user.{USER_ID} channel.
In our case, the event will be broadcast to the Pusher web-socket server on the user.{USER_ID} channel. If the ID of the recipient user is 1, the event will be broadcast over the user.1 channel.
As we discussed earlier, we already have a setup that listens to events on this channel, so it should be able to receive this event, and the alert box is displayed to the user!
Let's go ahead and walk through how you are supposed to test the use-case that we've built so far.
Open the URL http://your-laravel-site-domain/message/index in your browser. If you're not logged in yet, you'll be redirected to the login screen. Once you're logged in, you should see the broadcast view that we defined earlier—nothing fancy yet.
In fact, Laravel has done a quite a bit of work in the background already for you. As we've enabled the Pusher.logToConsole setting provided by the Pusher client library, it logs everything in the browser console for debugging purposes. Let's see what's being logged to the console when you access the http://your-laravel-site-domain/message/index page.
Pusher : State changed : initialized -> connecting

Pusher : Connecting : {"transport":"ws","url":"wss://ws-ap2.pusher.com:443/app/c91c1b7e8c6ece46053b?protocol=7&client=js&version=4.1.0&flash=false"}

Pusher : Connecting : {"transport":"xhr_streaming","url":"https://sockjs-ap2.pusher.com:443/pusher/app/c91c1b7e8c6ece46053b?protocol=7&client=js&version=4.1.0"}

Pusher : State changed : connecting -> connected with new socket ID 1386.68660

Pusher : Event sent : {"event":"pusher:subscribe","data":{"auth":"c91c1b7e8c6ece46053b:cd8b924580e2cbbd2977fd4ef0d41f1846eb358e9b7c327d89ff6bdc2de9082d","channel":"private-user.2"}}

Pusher : Event recd : {"event":"pusher_internal:subscription_succeeded","data":{},"channel":"private-user.2"}

Pusher : No callbacks on private-user.2 for pusher:subscription_succeeded
It has opened the web-socket connection with the Pusher web-socket server and subscribed itself to listen to events on the private channel. Of course, you could have a different channel name in your case based on the ID of the user that you're logged in with. Now, let's keep this page open as we move to test the send method.
Next, let's open the http://your-laravel-site-domain/message/send URL in the other tab or in a different browser. If you're going to use a different browser, you need to log in to be able to access that page.
Let's navigate to the console to see what has just happened.
Pusher : Event recd : {"event":"App\\Events\\NewMessageNotification","data":{"message":{"id":57,"from":1,"to":2,"message":"Demo message from user 1 to user 2","created_at":"2018-01-13 07:10:10","updated_at":"2018-01-13 07:10:10"}},"channel":"private-user.2"}
As you can see, it tells you that you've just received the App\Events\NewMessageNotification event from the Pusher web-socket server on the private-user.2 channel.
In fact, you can see what's happening out there at the Pusher end as well. Go to your Pusher account and navigate to your application. Under the DebugConsole, you should be able to see messages being logged.
And that brings us to the end of this article! Hopefully, it wasn't too much in a single go as I've tried to simplify things to the best of my knowledge.
Conclusion
Today, we went through one of the least discussed features of Laravel—broadcasting. It allows you to send real-time notifications using web sockets. Throughout the course of this article, we built a real-world example that demonstrated the aforementioned concept.
Yes I know, it's a lot of stuff to digest in a single article, so feel free to use the comment feed below should you find yourself in trouble during implementation.
When I turn on a video game, I do so with the same mentality that I have when I clock in for work in the morning. I have a set list of things in mind that I have to accomplish. So yes, I do feel like I'm being productive when I play video games...
I love Pocket Casts. It's been my podcatcher for several years now.
I also love NPR. So, I think this is likely a good match.
Chris Welch, writing for The Verge:
Pocket Casts, widely considered to be one of the best mobile apps
for podcast listening, has been acquired by a collective
group that includes NPR, WNYC Studios, WBEZ Chicago, and This
American Life. […]
Moving forward, Pocket Casts will operate as a joint venture
between the new owners. Philip Simpson and Russell Ivanovic, who
formed Shifty Jelly (Pocket Cast’s developer) in 2008, will have
unspecified “leadership roles.” The existing staff and development
team is staying put. Owen Grover, a veteran of iHeartRadio / Clear
Channel, has been named as Pocket Cast’s CEO. NPR’s apps including
NPR One will remain in development.
The acquisition price isn’t being disclosed. But the people behind
Pocket Casts are insistent they chose this path not because of
what the buyers paid, but because of who they are. “We have had
acquisition offers in the past,” Ivanovic told The Verge by email.
“We turned them down because the unique thing about this
opportunity is the mission driven nature of these organizations.
They want what’s best for the podcasting space, they want to build
open systems that everyone can use.”
I hope this works out great, but I would wager money that this is about user-tracking (for user-profile-based dynamic ad insertion) and embedding crap like listener surveys right in the player. Many of the shows in this collective are already doing dynamic ad insertions based on their best guess of your location based on your IP address. I could be wrong, and hope I am, but I’ll bet Pocket Casts will soon ask for permission to access your location. A CEO from Clear Channel is not encouraging.
The big podcast companies have been clamoring for intrusive user tracking in podcast players for years now, and podcast player makers — led by Apple — have resisted. So I think the NPR group just went ahead and bought a podcast player — and a good, popular one at that.
i decided after much thought to just not try to be funny about this and just present the situation to my readers. I was really shocked when my coworker told me about this and this is pretty much our proceeding conversation. it was an eye opener for me and my hope is that you guys will read this and maybe get some meaningful conversation out of it with the people in your life.
Today we’re announcing .app, the newest top-level domain (TLD) from Google Registry.
A TLD is the last part of a domain name, like .com in “www.google.com” or .google in “blog.google” (the site you’re on right now). We created the .app TLD specifically for apps and app developers, with added security to help you showcase your apps to the world.
Even if you spend your days working in the world of mobile apps, you can still benefit from a home on the web. With a memorable .app domain name, it’s easy for people to find and learn more about your app. You can use your new domain as a landing page to share trustworthy download links, keep users up to date, and deep link to in-app content.
A key benefit of the .app domain is that security is built in—for you and your users. The big difference is that HTTPS is required to connect to all .app websites, helping protect against ad malware and tracking injection by ISPs, in addition to safeguarding against spying on open WiFi networks. Because .app will be the first TLD with enforced security made available for general registration, it’s helping move the web to an HTTPS-everywhere future in a big way.
Starting today at 9:00am PDT and through May 7, .app domains are available to register as part of our Early Access Program, where, for an additional fee, you can secure your desired domains ahead of general availability. And then beginning on May 8, .app domains will be available to the general public through your registrar of choice.
Just visit get.app to see who’s already on .app and choose a registrar partner to begin registering your domain. We look forward to seeing where your new .app domain takes you!


 This is the most masculine version of Robin I have ever seen in a comic.


 [Advertisement]
ProGet supports your applications, Docker containers, and third-party packages, allowing you to enforce quality standards across all components. Download and see how!
[Advertisement]
ProGet supports your applications, Docker containers, and third-party packages, allowing you to enforce quality standards across all components. Download and see how!


 [Advertisement]
Otter - Provision your servers automatically without ever needing to log-in to a command prompt. Get started today!
[Advertisement]
Otter - Provision your servers automatically without ever needing to log-in to a command prompt. Get started today!


 When I turn on a video game, I do so with the same mentality that I have when I clock in for work in the morning. I have a set list of things in mind that I have to accomplish. So yes, I do feel like I'm being productive when I play video games...

 A perfect twenty! That is the true bane of crime.

 In this linear edit of Season 4, the dysfunctional Bluths embark on separate journeys -- but always find a way back into each other's lives.


 i decided after much thought to just not try to be funny about this and just present the situation to my readers. I was really shocked when my coworker told me about this and this is pretty much our proceeding conversation. it was an eye opener for me and my hope is that you guys will read this and maybe get some meaningful conversation out of it with the people in your life.

