Shared posts

08 Jun 15:45

Strawberry, Avocado, and Spearmint Smoothie. Vegan Summer Sips!

by Gena

PicMonkey 7

Two days ago, I mentioned the generous and wonderful bounty basket that I received from Relay Foods. It was bursting with fresh greens, strawberries, and mint–a wonderful offering, if you ask me. I’ve already whipped up one delicious salad with it. But with all of the fresh and beautiful strawberries I had on hand, I figured I had to come up with a smoothie, too! I whipped up a refreshing smoothie with strawberries, avocado, and spearmint, and it’s a new favorite.

PicMonkey 2

This smoothie uses avocado for creaminess and texture, fruit and coconut water for sweetness, and the fresh mint for flavor. It’s not a high protein smoothie in its own right, but of course you could add a protein powder of choice, some hempseeds, or use my homemade hemp milk in place of the coconut water for a protein boost. Otherwise, it’s a light, energizing, and blissfully summery treat, perfect as a snack, a dessert, or a light breakfast option (for breakfast, I’d probably need to eat it with some sprouted toast to stay full).

But no matter how you enjoy this smoothie, I hope you’ll appreciate the silky texture and bright flavors. Be sure to garnish with a sprig of fresh spearmint to get the full effect!

PicMonkey 4


Strawberry, Avocado, and Spearmint Smoothie

Ingredients

  • 1/2 frozen banana
  • 2 cups fresh strawberries, halved
  • 3 tbsp fresh spearmint + extra for garnish
  • 1 1/2 cups coconut water
  • 1/2 Haas avocado
  • 1 pitted date (optional)
  • A few ice cubes

Instructions

  1. Blend all ingredients in a blender till smooth. Garnish with spearmint, and enjoy!
  2. Makes 2 small or 1 extra large serving.
Schema/Recipe SEO Data Markup by ZipList Recipe Plugin
2.2
http://www.choosingraw.com/strawberry-avocado-and-spearmint-smoothie-vegan-summer-sips/

PicMonkey 5

If you’re in VA, MD, or DC, and you’d like to try out relay foods for yourself, you can still take advantage of a special offer of $30 off of any order over $50. Simply use this link or enter “ryxh59” as a coupon code at checkout. And don’t forget to check out my kale, strawberry, and avocado salad with basil! Also a beautiful way to put seasonal produce to good use.

Relay Foods2

xo


08 Jun 15:40

Piña Colada inspired Tropical Smoothie

by noreply@blogger.com (Addicted to Veggies)
Little.pink.hat

when we have our cookout

When Mister AtV and I honeymooned in Mexico (almost 6 years ago now -- holy cow, time flies!) ninety percent of my non-water consumption was Piña colada's in a hallowed out coconut shell. We haven't been back to Mexico since, but whenever the weather gets humid and sunny my mind quickly goes to; lounging on a sandy beach, sipping that tropical drink while vendors walked by trying to sell their random gimmicks. After running Saturday errands we came home to the sun beating down on our back porch and I knew what needed to happen next. I don't normally post recipes on the weekend but to be perfectly honest, this smoothie is so damn good it needed to be shared sooner than later! It's also superduper filling and full of healthy fats and proteins. Make a double batch and serve it as a special blended drink for your Summer get-togethers! 
Piña Colada inspired Tropical Smoothie
***Makes roughly 7 liquid cups
Ingredients:
  • 3 large Bananas
  • 2 c frozen Pineapple chunks
  • 2 c frozen OJ Cubes //or// 2 c Orange Sections
  • 1/2 c Coconut Butter //or// Coconut Cream
  • 1/2 c AtV Sour Cream (Nut Free: Sub with Coconut Cream/Butter)
  • 4 to 5 Medjool Dates 
  • 1.5 cups Water
Directions:

  1. Blend everything to a thick creamy yummy perfection! 
  2. For maximum enjoyment serve with a lime wedge, a paper umbrella, and a generous side of sunshine. 
xoxo,
08 Jun 15:39

Creamy Cucumber-herb Salad (and another Salad Pizza!)

by noreply@blogger.com (Addicted to Veggies)
Little.pink.hat

I want to eat this

This one came to me in a rush for lunch yesterday - and I'm so glad  it did. 
I'm looking forward to a visit from my Mom next month, and in my excitement I've been planning out meals...perhaps a bit early. I just can't help it! The thought of feeding people makes me so stinkin' happy, and I'm sure this trait is from my Mother. However, being an over achiever where entertaining is concerned has bit me in the butt on more than one occasion. I've learned through trial and error that keeping entertainment food simple always works out for the best, but just because it's simple doesn't mean it can't be gourmet. I do love a fancy salad bar, but a build-your-own-raw-pizza bar is way more exciting!
 One thing I'm planning for certain is to have a bunch of flat-bread and a few different raw cheeses on hand. Oh, and of course the components for this creamy cucumber salad. 
Creamy Cucumber-Herb Salad
Makes roughly 2 cups
*see bottom of recipe ingredients for more options
Ingredients:
  • 2 c chopped/seeded Cucumber (slice cucumber in half and scrape out all of the seeds with a spoon, otherwise leaving seeds will make the salad very watery)
  • 1/2 c AtV Sour Cream
  • 1/4 c chopped Chive
  • 1/4 c chopped *Sun-dried Tomato
  • 2 tsp minced Dill
  • 1 tsp Lemon Juice
  • 1 tsp Apple Cidar Vinegar
  • 1/2 tsp Nutritional Yeast
  • 1/2 tsp Onion powder
  • 1/4 tsp Garlic granules
  • Salt & Pepper to taste (I used roughly 1/4 tsp of each)
Other Ingredient Options:
Omit the Sun-dried Tomato and add one or more of the following
  • 1/4 c minced Celery // 2 Tbsp minced Dill Pickle
  • 1/4 c chopped Bell Pepper (red, yellow or green)
  • 3 Tbsp Capers // 1 Tbsp minced Shallot 
  • 3 Tbsp minced dried Apricot // 2 tsp minced Dill (in addition to the existing Dill)
Directions:
  1. Place all of the ingredients into a bowl
  2. Mix together evenly
  3. Transfer salad to an air tight container and let it chill in the fridge for at least 10 minutes so the flavors can build. (If you can't wait for this step I totally understand!) 
  4. Build your Salad Pizza, or enjoy this as it, atop a big bed of leafy greens.
*Always start with cheese/Avocado first when building your Salad Pizza, this helps keep the greens in tact. 
Want to make this into an Appetizer Dip?
Simply mince all of your veggie components evenly -- you can do this by hand or using the "pulse" option on your food processor.
Proceed to mix all of your ingredients together like you normally would and enjoy with crackers, veggies, or lettuce leaves.
A nice dimly lit cell phone pic of my Salad Pizza slice.
You may want to have a fork handy since this tends to get a little messy.
xoxo,
08 Jun 15:37

Lavender Lemon Frozen Yogurt (no ice-cream maker needed)

by noreply@blogger.com (Addicted to Veggies)
When it comes to Lavender I'd rather eat it than wear it as a perfume. There's something about the subtle aromatic flavors of Lavender that really get me going -- like being a kid and a "fancy grown-up" at the same time. Lavender is a true testament to nature's candy. If you haven't tried this lovely relative to the Mint plant then this might be the perfect time to do so...
Important Recipe Notes
When making this recipe take into consideration that less is more where the Lavender and Lemon are concerned. You see, in order to get a truly flavorful frozen yogurt you have to let the Lemon zest and Lavender sit in the cream for at least an hour -- letting the flavors "infuse" and build.
Yes, it does take a little bit of prep before you get to enjoy this gorgeous handcrafted dessert, but it's all very minimal, and mostly about just "waiting".
Both the Lavender and Lemon are meant to be subtle and present, but not overpowering. If you make this and decide you'd like more of a robust lavender or lemon presence then by all means, go for it. I do recommend trying the recipe as-is before you make any alterations to the ingredients.
About the Sweetener
Pay special attention to the notes about *liquid sweetener in the "directions" portion of the recipe. If you're wondering why I've chosen to use only 1/2 cup of Date Paste it's because using any more will change the consistency of the frozen yogurt. Try the yogurt mixture after adding the Date Paste - you may like it as-is (without any added sweetener) if you prefer a semi-sweet frozen yogurt. 
Lavender-Lemon Frozen Yorgurt
Yields roughly 3 cups
Ingredients
  • 2 c AtV Sour Cream
  • *Liquid Sweetener to taste
  • 1/2 c Date Paste 
  • 2 Tbsp Lemon juice
  • 1 T (packed) Lemon zest
  • 1 Tbsp plus 2 tsp dried Lavender buds
Directions:
  1. Mix the Lavender and Lemon zest into the AtV Sour Cream and let sit for at least 1 hour (over night is even better)
  2. When your cream is finished "sitting" with the Lavender and Lemon zest add the rest of the ingredients except for the *Liquid Sweetener (see next step for details)
  3. Add the *Liquid Sweetener: This part is up to you, although I recommend using one of the following: Grade B Maple Syrup, Raw Unfiltered Honey, or Coconut Nectar. Start with only adding 2 Tbsp. Mix, and add more as needed/to taste.
  4. Transfer your yogurt to a shallow glass dish with a lid
  5. Place your yogurt into the freezer
  6. Check and stir your yogurt every 1.5 hours - placing it back into the freezer after stirring
  7. Repeat step 6 until your yogurt begins to thicken/freeze to desired consistency. The more frozen it gets the less time you will want to wait in between stirring.
  8. If your frozen yogurt gets too frozen/solid simply leave it out on the counter to thaw, stirring every 15 minutes or so until it reaches desired consistency. **You can also place it into the high-speed blender or food processor and pulse a few times to speed up the thawing process.
Enjoy! And stick around for more Lavender recipes in the very near future. 

xoxo,
08 Jun 15:30

Dr. Seuss Hop on Pop

Little.pink.hat

Father's Day Storytime!

Dr. Seuss Hop on Pop
Special Event, Storytime
Children's
Jun 15, 2013 11:00 AM

Barnes & Noble Booksellers
Hingham
The Derby Street Shoppes
96 Derby Street Suite 300
Hingham
MA
02043
781-749-3319
04 May 19:54

Cinnamon Swirl Caramel Cheesecake Bars

by Chef Amber Shea

This will come as a surprise to few (and certainly no one who knows me “in real life”), but I’m a rather strange girl. My taste in just about everything (food included!) is at least a little off the beaten path, and I have a history of doing/saying/wearing/liking/
listening to/being interested in/laughing at things that others may find odd. Oh yes, I was definitely one of “those kids” in high school—straddling the line between nerdy and gothy, the wallflower with dyed hair and unusual clothing, pierced face usually buried in a book.


(Me, age 15)

Speaking of “nerdy,” as many of you may know, my B.A. is in Linguistics, and my #1 love (yes, even above and beyond food!) will always be language. Romance languages were/are my specialty, and though my fluency has faded over the years, I still have a working knowledge of several of them. One that I studied for many years was good old Latin, and it remains among my very favorites. Its grammar’s ridiculous complexity, its frozen-in-time vocabulary, its indelible relation to an ancient culture now extinct but never forgotten…I owe my love for all other Romance languages to Latin, the original Italic tongue. It all goes back to Latin! (Well, in truth, it all goes back to Proto-Indo-European. But actually, that goes back to Proto-Eurasiatic. Really, though, that goes back to Proto-Nostratic…but I digress.)

Where am I going with all this? One quirky pasttime I’ve indulged in for the last several years is having parties for unexpected occasions. For example, my Groundhog’s Day parties are always wild, and a JFK Assassination Anniversary Party I had a few years back was particularly memorable. Last Friday, March 15th, I finally had a chance to have a party that my Latin-scholar-self has been waiting YEARS to host (I had to hold off until the date fell on a weekend, you see)—an Ides of March party! An Ides of March toga party, that is. Yes!

And so my friends and I came together to commemorate the 2057th anniversary of the death of one of my favorite historical figures and one of the all-time greatest badasses that ever lived, Gaius Julius Caesar. It was smashing success. Senātus Populusque Rōmānus!

As with all my parties, I made a themed buffet of snacks, this one full of Roman and Italian finger food:
- Choice of crisp wheaten flatbread (i.e. crackers)
- Choice of cubed cheeses
- Manzanilla olives
- Barhi dates
- Raw almonds
- Fresh red grapes
- Ancient Roman honey cake
- Cinnamon swirl caramel cheesecake bars
- Assorted alcoholic beverages (duh)

What’s that? Oh, did you catch the “Cinnamon swirl caramel cheesecake bars” there? Yeah, they were as amazing as they sound. And despite this rambling introduction, they’re the things I’m really here to share with you today.

I’ve had this idea in my head for awhile now to make a cultured raw cheesecake. I wanted to derive the tang not from lemon juice, but from actually culturing the filling. Thing is, I didn’t want to use probiotic powder—I realize it’s not something everyone has in their fridge at all times, plus it can be difficult to find a nondairy (if desired), loose-powder version, so many people skip over recipes that require it. Instead, I’ve been brainstorming this cultured cheese filling made with…yogurt!

I used a dairy-free, coconut-based vanilla Greek yogurt by SoDelicious—but honestly, you can use whatever kind you like, even dairy yogurt. I recommend Greek-style if you can find it, but if not, regular yogurt will work just fine.

So here you have it: high-raw/no-bake, [optionally] dairy-free/vegan, home-cultured cheesecake bars with a dreamy cinnamon-caramel swirl. Caesar would be proud!

Cinnamon Swirl Caramel Cheesecake Bars

Yield: 24 servings

Egg-Free, Gluten-Free, Grain-Free, Soy-Free
Dairy-Free (if dairy-free yogurt is used), High-Raw, No-Bake

Per bar: 146 calories, 12g fat (6g sat), 9g carbs, 1g fiber, 2.7g protein

Ingredients

    For the crust:
  • 1½ cups almond flour
  • ¼ teaspoon ground cinnamon
  • Big pinch of sea salt
  • 3 tablespoons maple syrup
  • 2 tablespoons melted coconut oil
  • For the filling:
  • 1 cup raw cashews (or macadamia nuts), soaked for 2 hours, drained
  • 1 (6-oz.) container vanilla or plain yogurt of choice (I used SoDelicious’ Greek-style coconut milk yogurt)
  • ¼ cup coconut nectar (or raw honey)
  • 2 tablespoons lemon juice
  • Big pinch of sea salt
  • ½ cup melted coconut oil
  • 1 tablespoon maple syrup
  • ¼ teaspoon ground cinnamon

Instructions

  1. Line an 8-inch square pan with parchment paper or waxed paper. Use enough paper that an extra inch or two hangs off each side.
  2. To make the crust, combine the almond flour, cinnamon, and salt in a large bowl. Add the maple syrup and coconut oil. Using a pastry cutter, a large fork, or your fingers, cut/stir the mixture together until it is crumbly but just starting to clump together. (Alternatively, pulse everything together in a food processor.)
  3. Transfer the mixture to the lined pan and press it very firmly and evenly onto the bottom. Place the pan in the refrigerator while you make the filling.
  4. To make the filling, in a high-speed blender (or food processor), combine the soaked-and-drained cashews (or macnuts), yogurt, coconut nectar (or honey), lemon juice, and salt. Blend to combine. With the blender running on low speed, pour in the coconut oil in a thin stream, then blend on high speed until the mixture is completely smooth.
  5. Transfer ¼ cup of the filling mixture to a small bowl. Remove the pan with the crust from the fridge and pour the remaining filling mixture on top of the crust. Gently tap the pan on the counter to coax any air bubbles out of the cheesecake. Set it aside on the countertop.
  6. To the ¼ cup filling mixture in the small bowl, add the maple syrup and cinnamon and stir until well-combined. Transfer the mixture to a squeeze bottle, then squirt it in large swirls all across the top of the cheesecake.
  7. (Alternatively, if you don't have a squeeze bottle, simply randomly drop the mixture in heaping teaspoonfuls across the cheesecake.)
  8. Gently swirl a knife or chopstick across the surface of the cheesecake just a few times (don't over-swirl).
  9. Dehydrator instructions: place the cheesecake in a dehydrator at about 105°F for 4 hours.
  10. No-dehydrator instructions: set the cheesecake on the countertop and leave it there for about 8 hours or overnight.
  11. After 4 hours in the dehydrator - or 8 hours on the countertop at room temperature - the probiotics in the yogurt will have cultured the cheesecake filling! At this point, transfer the cheesecake to the refrigerator for at least 4 hours, or until ready to serve.
  12. Just before serving, remove the pan from the fridge and carefully lift out the cheesecake using the extra "flaps" of parchment paper.
  13. Trim off the edges, then cut the cheesecake into small bars or squares. Serve chilled.
Schema/Recipe SEO Data Markup by ZipList Recipe Plugin
2.0
http://chefambershea.com/2013/03/21/cinnamon-swirl-caramel-cheesecake-bars/
© 2013 ChefAmberShea.com

These bars were a resounding triumph! The almond crust is melt-in-your-mouth tender, and my idea of culturing the filling with storebought yogurt worked like a charm, imbuing each creamy bite with the authentic tang of traditional cheesecake.

There’s just enough cinnamon in the swirl to give it that “warm” taste, and the coconut nectar and maple syrup intertwine into a deliciously unique caramel flavor.

They’re rich enough that bite-sized portions were perfect for my party guests. Nonetheless, these were the first item on the buffet to disappear!

Do you speak (or have you studied) any other languages?
Do you ever have themed parties?

P.S. If you liked this dessert, you should know there’s less than one month left until the release of my second book, which happens to be made up entirely of sweet treats: Practically Raw Desserts! Have you preordered yet?

Leave a Comment

01 May 13:27

Review: Rockin’ Wellness shake mix

by Chef Amber Shea
Little.pink.hat

those cookies, tho

Hello, friends! Thank you all so much for your warm reception of Practically Raw Desserts. If you have the book already and are enjoying it, I’d be honored if you would take a quick moment to leave a 5-star review on Amazon. Also, I’m going on a “blog tour” this week in support of the book! You can check out the details here; feel free to stop by some of those blogs this week to say hello and voice your support. I couldn’t have created this book without YOU guys!

Now, let’s get down to business. The subject of today’s review is Rockin’ Wellness, a relative newcomer to the world of “nutrition shakes.” When I first heard of it awhile back, I figured it was just another protein powder, but I was quite wrong. When I got a chance to sample some recently, I was not only set straight, but I was pleasantly surprised as well.

Rockin’ Wellness is actually a total body nutrition shake made with the world’s top superfoods. Its creators, Seth and Mike, wanted an energizing drink they could feel good about fueling their bodies with while on the go. The result is a gluten-free, vegan, nutrient-rich powder that not only tastes great and provides a natural pick-me-up, but also offers a number of unique health benefits not found in your typical shake mix.

Serving Suggestion: Mix 1-2 scoops with 8-10 oz. almond, soy, rice, or hemp milk or water. Shake well or blend. Tastes great chilled.

Ingredients: raw organic cacao bean, non-GMO brown rice protein, raw organic goji berry, non-GMO lecithin (soy), raw organic evaporated cane juice, banana, raw organic hulled hemp seed, raw organic maca root, chia seed, organic green tea, organic yerba maté, guar gum, organic flaxseed, lactobacillus acidophilus (vegan probiotics; 4 billion cultures per serving), pure stevia extract.

At first glance, Rockin’ Wellness‘ ingredients list may appear to be a mixed bag. Those of us who are quite picky about our diets tend to immediately home in on ingredients we’re not huge fans of. Some people may wrinkle their nose at the organic cane sugar (while others might not like the stevia), or some may dislike the inclusion of soy lecithin (even though it’s non-GMO) or guar gum.

However, when you stand back and look at the list as a whole, I think it’s rather impressive. In addition to the cacao (mmm, chocolate), brown rice protein, and superberry (goji!) powders, it contains tons of raw, organic, and non-GMO ingredients; a bevy of omega-3-rich seeds (hemp, chia, and flax); nondairy probiotics (!); and even natural energy enhancers like green tea and yerba maté. No matter how you shake it (har har), this is a high-quality product, and it’s clear that a lot of thought was put into its development. I’m ok with the small amounts of natural sweeteners, emulsifier, and stabilizer it contains, because I know that’s part of what helps it taste so great—which helps encourage me to consume it regularly and reap the benefits.

Speaking of consuming it regularly, Rockin’ Wellness developed something they call the 45-Day Challenge. They suggest you consume 2 scoops (mixed with 10 ounces of nondairy milk) every morning for 45 days before or instead of breakfast or lunch. Three bags of Rockin’ Wellness will last you 45 days, so that means the total cost of the 45-Day Challenge is less than $3.00 per day.

This “45-Day Challenge” was clearly created in the spirit of the “90-Day Challenge” and “24-Day Challenge” that certain other, lesser-quality, MLM-style, to-remain-unnamed supplement companies have made big. Nothing against those other companies or anyone who works for them, but I say hey, more power to Rockin’ Wellness for creating a healthful alternative to those less-than-good-for-you marketing schemes.

I didn’t take the 45-Day Challenge myself, but I will admit that I have found myself consuming at least a scoop a day of this stuff since it landed in my hands. I honestly didn’t expect to like it as much as I do. Sure, I’ve done the obvious and put it into shakes and smoothies, but I’ve really gotten into employing it in some unusual ways.

For one thing, I’m addicted to this “protein pudding” I’ve been whipping up every afternoon using Rockin’ Wellness and a handful of other powders:

Another fun way to use it is in recipes, especially raw recipes! For example, since Rockin’ Wellness is chocolatey, you can use it in place of cacao/cocoa powder in recipes in Practically Raw Desserts. (Seriously, try the Ultimate Raw Brownies on page 67 with Rockin’ Wellness in place of the cacao. WOWOWOW.) You can also use it in the handful of recipes calling for protein powder, if you want a chocolate-flavored treat.

One thing I’ve been especially enjoying is making…Rockin’ Wellness Cookies! It’s so simple, I can’t even really call it a recipe.

In a small bowl, simply mix together 1 scoop Rockin’ Wellness with 2 teaspoons melted coconut oil.

Stir, stir, stir with a fork until it comes together (it’ll still be a little grainy; that’s ok).

Scoop it onto a small square of wax paper on a plate.

Place in the fridge for 20 minutes or the freezer for 5 minutes, until chilled and firm.

Then eat. That’s it!

So there you have it. If you’re looking for a protein/supplement powder that’s a little out of the ordinary, contains a variety of nutritious, high-quality ingredients, offers a natural energy boost, and tastes amazing, give Rockin’ Wellness a shot.

Leave a Comment

01 May 13:22

Curried Split Pea-Cauliflower Stew

by Chef Amber Shea

Heads up! My Practically Raw Desserts blog tour is happening this week, and there have already been so many great posts (and recipe sneak peeks) so far! Click here to check out all the links.

Is it too late for stew? Considering we’ve had some 40-odd-degree days in the past week, I’m gonna say no, it isn’t. Besides, I’ll go for a good curry any time of year!

I’m calling this curry a “stew” because it’s just barely on the liquidy side, as far as curries go, but you are more than welcome to serve it over cooked brown rice or quinoa like a traditional curry.

It makes use of some of my favorite ingredients, such as legumes (the underutilized split pea), cauliflower (curry-roasted, but of course!), and curry powder (yeah I know, it’s an inauthentic “cheat” ingredient for a “real” curry, but I love it to death). It makes a nice big batch that can feed you all week or can even be frozen for later. In short, it’s nutritious, filling, and flavorful—what more could you ask for?

Curried Split Pea-Cauliflower Stew

Yield: 6 to 8 servings

Per serving (if 6): 316 calories, 11.5g fat (8g sat), 43.9g carbs, 16g fiber, 14.2g protein
Per serving (if 8): 237 calories, 8.6g fat (6g sat), 32.9g carbs, 12g fiber, 10.6g protein

Ingredients

  • 1 1/3 cups yellow split peas, parboiled*
  • 1 batch Curry-Roasted Cauliflower, chopped small
  • 1 tablespoon coconut oil
  • 1 teaspoon mustard seeds
  • 1 teaspoon cumin seeds
  • 1 large yellow onion, peeled and roughly chopped
  • 1 large or 2 small carrots, peeled if desired, chopped
  • 1 (2-inch) knob fresh ginger, peeled and minced
  • 6 cloves garlic, peeled and minced
  • 2 tablespoons good-quality curry powder
  • 1 teaspoon ground turmeric
  • 2 cups (or one 15-oz. can) vegetable broth
  • 1 (15-oz.) can light coconut milk
  • 2 teaspoons apple cider vinegar
  • 1 teaspoon garam masala
  • 1 to 1½ teaspoons sea salt, or to taste
  • Chopped cilantro and/or green onions, for serving (optional)

Instructions

  1. Parboil the split peas in advance by placing them in a saucepan, covering with cold water, and simmering over medium-low heat for 45 minutes to an hour, until softened. (*If desired, you can replace the split peas with 2 cups cooked or canned chickpeas or lentils.) When finished, drain and set aside.
  2. Prepare the Curry-Roasted Cauliflower; while it's in the oven, you can chop your onion and carrot and prep the rest of the stew. When it's done roasting, simply remove it from the oven and set it aside.
  3. In a large pot over medium heat, add the coconut oil. When it's hot, add the mustard seeds and cumin seeds, stir to coat with the oil, and cover the pot with a lid. Listen for the mustard seeds to begin popping; when the popping has subsided, remove the lid and add the chopped onion. (You can omit the mustard seeds and skip this "popping" step if you prefer, simply adding the onion about 30 seconds after the cumin seeds.)
  4. Sauté the onion for 4-5 minutes or until softened, stirring often.
  5. Add the carrot and the minced ginger and garlic. Cook and stir for 1 minute, until fragrant.
  6. Add the curry powder and turmeric and stir to coat the veggies. Cook for about 30 seconds, stirring constantly.
  7. Add the vegetable broth, coconut milk, and pre-parboiled split peas; stir to combine. Turn the heat down to medium-low and simmer for 15 minutes, stirring occasionally.
  8. Stir in the roasted cauliflower, apple cider vinegar, garam masala, and 1 teaspoon sea salt. Simmer for 10 more minutes.
  9. Just before serving, taste for seasoning and add additional salt as desired. Serve hot, garnished with chopped cilantro and/or green onions, if desired.
Schema/Recipe SEO Data Markup by ZipList Recipe Plugin
2.0
http://chefambershea.com/2013/04/25/curried-split-pea-cauliflower-stew/
© 2013 ChefAmberShea.com

If you like this recipe, you might enjoy some of my other Indian (or Indian-inspired) recipes as well:

Leave a Comment

01 May 13:18

Sun-dried Tomato & Corn Chowder

by noreply@blogger.com (Addicted to Veggies)
This soup is a wonderful example of how rich and flavorful raw food can be without getting too complicated.
I've been in a bit of a funk over the last week, wrestling over how to regain my lost momentum...and then it hit me; I've totally fallen away from the little things that truly ignite my passion for making recipes. I grabbed a note book, went to the fridge and started my inventory. After that I took my list of fresh ingredients, along with three vintage cook books into my office -- oh yes, there may have been iced tea involved too.
It's pretty amazing how such a simple act got the wheels in my head turning, the excitement flowing, and helped in making one heck of a tasty chowder! Goodness knows I needed it.
One of my favorite things about today's recipe is how perfectly it can fit into warm or cold weather. I'll be enjoying it chilled with a big side salad for dinner tonight. It would also taste just as good warmed with a side of crackers and zucchini pasta tossed in your favorite pesto. 
Sun-dried Tomato & Corn Chowder
Yields roughly 3 cups 
Step 1.
Ingredients
Ingredients List #1
  • 2 c Raw Corn Kernals (Tip: Buy locally grown organic corn when it's in season, remove the kernels and store it in your freezer so you can enjoy it throughout the year)
  • 1/2 c chopped Sun-dried Tomatoes (Tip: if packed in oil wash the oil off, if dry re-hydrate the toms by soaking them in warm water for 10 minutes then pat dry)
  • 1/4 c fresh Dill
  • 1/4 c fresh Chive
  • 1 tsp Smoked Spanish Paprika
  • 1/2 tsp Onion powder
  • 1/4 tsp Garlic Granules
  • 1 tsp Black Pepper
  • Salt to taste -- I used 1/2 tsp
Ingredient List #2
Step 2. 
Directions
  1. Combine all of the ingredients from List #1 and puree in your food processor for 1 minute
  2. Add the AtV Sour Cream from List #2 and puree
  3. While your food processor is on, slowly stream in all of the water
  4. Puree for an additional 1 minute
  5. Transfer your soup to and air tight container and let it chill in the fridge for at least 30 minutes so all of the flavors can develop.
Enjoy!

xoxo,
29 Apr 16:33

Mini Raw, Vegan Almond Joy Bars

by Gena

PicMonkey Collage9

Hi all! Thanks for the warm responses to Meghan Telpner’s interview–and her marvelous recipe for Orange Zest-Infused Stew!

Are you ready for a treat? I was browsing through Food52 this week (I’m one of their columnists, but I also love getting inspired by all of the creativity on the site), and I saw this recipe for mini almond joys, created by Kristin Rosenau of Pastry Affair. They looked easy and delicious, which is how I like my desserts to be. They were already darn near close to a raw food recipe, but I decided to put a homemade raw, vegan spin on them, using the simple homemade raw chocolate coating or chip recipe that I learned from Nicole Axworthy and Lisa Pitman. The results? Bite-sized (almond) joy. 

This recipe calls for cacao butter in the raw chocolate coating. If you don’t want to invest in the cacao butter, or you can’t find it, that’s cool; just go ahead and follow the Food52 instructions for using melted chocolate. That said, cacao butter is a fragrant, beautiful, and fascinating ingredient, and a little goes quite a long way. I’ve had the same bag I got on Amazon for months, and each time I make a batch of chocolate, I get a lot out of it. So in spite of the price tag, it’s worth checking out cacao butter for yourself–you can peek at the one I’ve used here!

Otherwise, this recipe is a cinch. Just watch.

PicMonkey Collage6

Mini Raw, Vegan Almond Joy Bars (Inspired by Food52 and Pastry Affair)

Ingredients

  • For the filling:
  • 1 1/2 cups dried unsweetened coconut
  • 2 tbsp coconut oil
  • 3 tbsp maple syrup
  • 1 tsp vanilla
  • pinch salt
  • For the coating:
  • 1/3 cup melted cacao butter
  • 1/3 cup raw cacao powder
  • 2 tbsp maple syrup
  • Pinch sea salt
  • 12 almonds

Instructions

  1. 1. In a food processor fitted with the "S" blade, process all filling ingredients till well mixed and uniform. They'll be a little wet, but they should stick together well.
  2. 2. Shape the filling into twelve mini rectangles. Place them on a parchment lined shallow casserole or baking pan. Refrigerate for 30 minutes.
  3. 3. Set up a double boiler, using a medium sized mixing bowl. Melt the cacao butter, then whisk in the cacao powder, syrup, and sea salt.
  4. 4. Take each mini bar and dip it into the coating, quickly placing it back on the parchment. Return them to the fridge for 10-15 minutes, or until one coating has set. Repeat the process, so that each has a double coat.
  5. 5. Press one almond on top of each mini bar. Return them to the fridge for another 15 minutes (or more), to let them set. When ready to serve, let them sit outside the fridge for about 15 minutes, then share them!
Schema/Recipe SEO Data Markup by ZipList Recipe Plugin
2.2
http://www.choosingraw.com/mini-raw-vegan-almond-joy-bars/

 PicMonkey Collage3

See? Easy. Easy, but delightful.

PicMonkey Collage5

PicMonkey Collage1

I was never a coconut person growing up–raw foods actually converted me–but I do recall Almond Joys with fondness, and these little raw, vegan snacks are a pretty wonderful adaptation. They’ve also been post-bacc tested, which is currently my ultimate barometer of recipe success.

Make some this weekend, and enjoy every bite!

xo

29 Apr 16:31

Maple Streusel Coffee Cake Squares from ‘Practically Raw Desserts’

by allyson

photo credit Allyson Kramer

Hey everyone! Today I’m happy to share with you a delectable recipe from Amber Shea Crawley’s newest book Practically Raw Desserts. This delightful book is exactly what you need when you have a nagging sweet tooth, but a desire to keep the junk food to a minimum. These delicious and wholesome desserts will not disappoint!

My kids gobbled up these Maple Streusel Coffee Cake Squares; however, since they only took about 3 minutes from start to finish, it was quite an easy task to just whip up another batch.

Thanks to Vegan Heritage Press and Amber Shea for sharing the recipe!

Maple Streusel Coffee Cake Squares

Ingredients:

  • 1 cup dry walnuts
  • 1 cup dry pecans
  • 1/2 cup old-fashioned rolled oats
  • 1/4 teaspoon ground cinnamon
  • 1/8 teaspoon sea salt
  • 1/4 cup coconut flour
  • 1/2 cup pitted dates
  • 1 teaspoon vanilla extract
  • 1/4 cup + 1 tablespoon maple syrup, divided
  • 1 tablespoon coconut palm sugar

Preparation:

  1. In a food processor, combine the walnuts and pecans and pulse a few times, until the nuts are roughly chopped. Add the oats, cinnamon, and salt, and pulse just until the nuts are coarsely ground (be careful not to overprocess). Trans- fer 2/3 cup of the nut mixture to a small bowl and set aside.
  2. Add the coconut flour to the remaining mixture in the food processor and pulse until just combined. Add the dates, 2 to 3 at a time, pulsing between additions until each date is well-incorporated. Add the vanilla and 1/4 cup of the maple syrup and pulse until the mixture clumps together. Transfer the batter to an 8-inch square baking pan (lined with plastic wrap for easy removal, if desired), using your fingers or a spatula to press it firmly and evenly into the pan.
  3. Add the coconut palm sugar and remaining tablespoon of maple syrup to the reserved nut-oat mixture in the small bowl. Use a fork to stir it together until it becomes sticky. Scatter the streusel evenly on top of the cake in the pan, and firmly press it down with your fingers or the bottom of a cup. Refrigerate until ready to cut and serve.
  4. Store the squares in an airtight container in the refrigerator for up to a week or in the freezer for up to a month.

Yield: 12 servings

Practically Raw Desserts

From Practically Raw Desserts by Amber Shea Crawley. ©2013 Amber Shea Crawley. Used by permission from Vegan Heritage Press.


24 Apr 13:27

giveaway : Titina : CLOSED

by noreply@blogger.com (The Dainty Squid)
Around this time last year there was a giveaway for an owl bag from Titina on The Dainty Squid. Julieta Ruezga is still at it, designing incredibly cute bags! Most recently an adorable cat shaped one! She's been kind enough to offer one up to one very lucky winner. I'm totally jealous, aren't they the cutest?!
What? The winner will receive a cat bag in their choice of either of the two colors shown in this post.
When? You have until Monday, April 29th to enter.
How to enter - Visit Titina and come back telling us your favorite item. Please make sure there is a way to contact you if you win.

Optional bonus entries...
(please leave a separate comment for each entry or they won't be counted!)
• tweeting about the giveaway, feel free to use this -
win a cat bag from @titinasworld on the @thedaintysquid blog http://bit.ly/11b0iCI
• share the giveaway on facebook, tumblr or your own blog!
• Follow Titina on twitter.
• Like Titina on facebook.


The winner is Cody! Congratulations!  
24 Apr 12:43

TDS & Scratch Nail Wrap Collab : Update!

by noreply@blogger.com (The Dainty Squid)
Late last month I announced my collaboration with Scratch. In order for the nail wraps I designed to be produced we needed to reach a $6,000 goal on kickstarter. Well, I'm absolutely blown away because the goal was met and majorly exceeded within days. Currently over 1,000 people have donated to the project!!
The days are dwindling down now (it ends this Wednesday at 11am EDT so less than 24 hours now!) and I just wanted to remind everyone that was interested it's your last chance to get your hands on these limited edition nail wraps! The early bird special pricing is sold out but for $30 you can get your hands on all of my three designs. You can purchase them here.

Thank you SO much to everyone who has donated so far. I'm over the moon. I can't wait to start seeing photos of them pop up.
xoxo
19 Apr 16:36

You Ask, I Answer: All About Vegan Nail Polish

by Gena

photo

Before I start: This is going to be an incredibly “light” post (I had actually scribbled it yesterday morning), but before I say anything else, I want to send my love and good wishes out to everyone affected by the events in Boston yesterday.

Lately, at the urging of Sayward, I’ve been using Instagram more often (you should totally follow me). This means more photos of me clutching things like coffee, smoothies, midday snacks, and lunchboxes. A few of you have commented on my often brightly colored nails, and asked what polish varieties I use, so I figured it would be a good time to talk about vegan nail polish!

My obsession with nail color is a little funny, because it’s pretty much my only major cosmetic embellishment. I rarely wear makeup, and my skin care routine (which I talk about in this post) is pretty basic. Since I wrote that post, I’ve started using a vegan moisturizer with SPF 15 during the day, but at night, I usually just rinse my face in hot water and slather either coconut or Argan oil on it before calling it a day. Easy.

Where my face is au natural, though, my nails are usually all sorts of bold and unusual shades. I’m not sure where my penchant for nail color comes from, but I think it’s a lot of fun.

photo (1)

What’s not fun is supporting nail polish makers who participate in animal cruelty or use animal products in their nail polish, so here’s a quick primer on some brands that are animal-friendly.

If you get your nails done at a conventional salon, you should know that OPI nail lacquers, which can be found in nearly all nail salons, are vegan. I read this via PETA and some other vegan beauty blogs, but Veganize This got word directly from the source, and posted Opi’s information on animal products and testing. The company states,

“Thank you for your email. We apologize for the delayed response. Yes, our lacquers are vegan. Our lacquer does not contain any animal ingredient and we do not test on animals, and we are registered with PETA (People for the Ethical Treatment of Animals). You can visit their web site; www.peta.org.

OPI does not perform animal testing, nor do we contract to have it performed elsewhere. When sensitization testing is necessary, we use informed, consenting, paid human volunteers – not animals.”

You can read the full statement here. It goes on to detail the few animal products used in other OPI products (not nail lacquers) and notes that many are going out of use. It’s an impressively detailed response, and shows willingness to evolve on the part of a major beauty brand—which I like.

Animal testing and cruelty is my major concern when it comes to nail colors, but it’s not the only concern. Many consumers are getting more savvy about toxins in various beauty products, and nail colors are no exception. Three ingredients to be wary of are toluene, DBP (dibutyl phthalate), and formaldehyde (a string of names that brings memories of orgo lab flooding back). DBP has been associated with birth defects (in animal tests, anyway—and sadly), and may disrupt male hormones. Toluene is a mild skin irritant and can exacerbate asthma (it’s also in some glues and in gasoline). Formaldehyde, once a common preservative, has been described by The National Toxicology Program as a known carcinogen; at the least, it is a potent and volatile toxin.

Until recently, I’d believed it was very hard to find “3 free” (no DBP, no toluene, no formaldehyde) nail colors, and I’d thrown up my proverbial hands and reasoned that, so long as I could find vegan shades, I was doing my best. It’s actually much, much easier to find 3 free nail polishes than I thought, as I learned when Rebecca asked me about non-toxic brands on Instagram. Most of the brands that are vegan-friendly are also free of the major toxins, which makes shopping easy. Here’s a roundup of brands that I’ve either seen or purchased myself, and loved.

opi-nail-polish

Opi

Opi nail colors are easy to find, and they’re both vegan and free of DBP, toluene, and formaldehyde (this is a recent development, and details of the switch away from DBP and toluene can be found in a statement on the company website). Tons of fun, constantly updated shades.

Priti

Possibly my favorite nail color brand, Priti has a huge variety of shades. My personal favorite is an electric blue called “blue sage,” but the lighter shades are beautiful as well. At $13.50, these are not cheap, but they do tend to last a while.

Zoya

Zoya is the best—and I say that without having tried any of their colors yet. Vegan, non-toxic, priced at $8.00, and easy to order with easily accessible customer service. Readers recently made me aware of this brand, and I promptly checked out the website—and was mighty impressed!

SpaRitual

Lots of original colors and cool packaging. These retail for about $12.00, and can be a little tough to find, but the company has a good philosophy.

E.L.F.

I’ve used ELF products before and really liked them—plus, it’s hard to beat the incredibly low price!
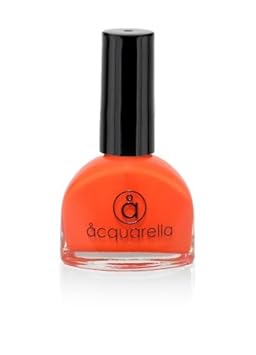
Acquarella

These polishes are totally non-toxic and water based, which means no powerful odors. I love the idea, but they’re priced at $16.00, which means they’re a tough purchase if you’re on a budget,

Ginger and Liz

This company has been making vegan nail polish for a long time, and it boasts cheeky names for its shades! You can find it at Ricky’s, at Urban Outfitters, and through the company website.

Left to Right: Pool Boy, Ghostly, Shellac'd, Femme, Pansy, Rx, Echo, Chlorophyll, Wasabi

OCC (Obsessive Compulsive Cosmetics)

Both a makeup and a nail brand, I love the company’s offering of colors, all available online. But I also love the no-nonsense vegan mission statement:

What’s with the ‘Vegan’ thing?

In a time when many cosmetic companies make the claim that their products are "Cruelty Free" simply because Animal Testing has become unfashionable and less cost-effective, OCC felt it was necessary to raise the bar on this issue. We pledge never to use animal-derived ingredients (including Lanolin, Beeswax, Carmine and more) in our products and accessories. Beyond any personal convictions, we simply believe that it’s unnecessary, especially when there are alternatives that are just as readily available, and equally effective in the formulation of our products. Further, you need not necessarily be aligned with animal rights issues to reap the benefits of a vegan cosmetic line: animal ingredients can be amongst the most allergenic and skin reactive, and prevent makeup from being considered Kosher, Halal or otherwise compliant with various dietary (and sanitary!) regulations.

What about you guys—any recommendations? Favorite brands or colors? My guess is that many of my readers are far more savvy about cruelty-free beauty than I am! Speaking of, I cannot recommend the following resources enough for information about makeup, skin, nail and hair care that is animal-friendly:

Cruelty Free Face (Melisser is the best!)

Vegan Beauty Review

Chic Vegan

Enjoy!

xo

19 Apr 13:24

Hands-On Learning With Leapfrog

Hands-On Learning With Leapfrog
Special Event
Games
Apr 27, 2013 11:00 AM

Barnes & Noble Booksellers
Hingham
The Derby Street Shoppes
96 Derby Street Suite 300
Hingham
MA
02043
781-749-3319
11 Apr 13:31

How to win Snake

How to win Snake
11 Apr 13:15

This is Still Happening.

by noreply@blogger.com (Kittee Bee Berns)
Little.pink.hat

sounds goooood


Rice paper wraps brimming with dressed Spring greens, fresh cilantro, a home-grown sprout mixture, thin apple slices, baked lemony tofu and garlic potatoes.
Yes, while you've been busy with your X and Y, I've been continuously stuffing things into rice paper wrappers, and then stuffing those into my mouth.   These were a favorite, and the most awesome and enjoyable way to eat greens.  If I might say, which I'm obviously giving myself permission to do.  Seriously, these two rolls contained an ENTIRE Pyrex bowl crammed with greens, fresh cilantro and home-grown sprouts.  You'd just never know, because they get condensed super tightly in the wrap.

While I made these with leftovers, I would gladly whip all of these components together to get to eat these again, they were that satisfying.  And also, SO EASY, with lefties I made them in five minutes.  I'm not even complaining about the freakin' cold potatoes.  In case you were wondering, rice paper wraps are perfect for that Spring potluck social you've just been invited to.  I'd recommend you get on this horse (not really, 'cuz duh).  But yea.

I'm not quite decided on this whole orange and purple combo.
For the potatoes, I modified the "recipe" over here.  I just tossed a few thin skinned potato wedges in EVOO, smoked salt, lots of minced fresh garlic, a bit of nutritional yeast and some ground coriander.  Then tossed them in potato starch and placed them on a lightly oiled baking sheet.  They took about 40 minutes to brown at 425F.

The tofu, I  made on the fly.  I mixed lemon juice and zest, wheat-free tamari, a squirt of cock sauce and a wee bit of water then layered in the pressed tofu slices.  I like to bake tofu in a little bit of liquid.  I think it's more flavorful to do so, but it does take extra time.  I also baked the tofu at 425F, but I'd say it took an hour to cook out the liquid, and then brown and firm up.

The greens were tossed in my favorite Caeser dressing of the moment from The Bold Vegetarian Chef, which I modified with a sub of raw cashews for the almonds, and an omission of the nori.  The Internet, god bless her, has gifted you with the recipe.

And then sliced apples, fresh cilantro and sprouts, which you know how to do.  I did put the apple on my mandoline, so mine were really, really thin.  No fingers were injured in the making of these wraps, either.  In case you were interested.

xo
kittee

10 Apr 16:20

Vegan Mango Lassi. A Creamy Warm Weather Treat!

by Gena

PicMonkey Collage 6

True to form, D.C. has transitioned directly from winter to summer within a week’s time. It is 85 degrees here and sunny, and a short lunchtime walk left me sweating in my long sleeved shirt and jeans. In honor of the abrupt change of seasons, I’m featuring a sweet and cool drink: a vegan mango lassi made with coconut milk.

I first mentioned this recipe in my Food52 column about coconut milk as a versatile and wonderful ingredient. A few of my readers asked me to share the recipe itself here on the site. I’m happy to do so—and it’s such an easy recipe! I hope you’ll enjoy it, and savor it as a midday refresher or after dinner treat as temperatures climb.

PicMonkey Collage 5

Print Vegan Mango Lassi. A Creamy Warm Weather Treat! (vegan, gluten free, soy free)

Ingredients

  • 2 heaping cups of frozen mango chunks
  • 1/2 cup full fat coconut milk and 1/2 cup coconut water, OR use 1 cup light coconut milk
  • Seeds of 1 vanilla bean, sliced lengthwise and seeds scooped out (I use a spoon to do this)
  • 1/2 tsp garam masala spice (readily available at grocery stores and online)
  • 1 pitted date

Instructions

  1. Blend all ingredients together in a blender till smooth. Add extra coconut milk as needed to obtain the desired consistency. This drink would be delicious with a sprig of fresh mint!
Schema/Recipe SEO Data Markup by ZipList Recipe Plugin 2.2 http://www.choosingraw.com/vegan-mango-lassi-a-creamy-warm-weather-treat/

Those dark flecks you see in the photograph are vanilla beans from the fresh vanilla. This is a costly ingredient, for sure, but ever since I ordered a bunch, I’ve found that it makes a tremendous difference in my recipes. You can order a quarter of a pound for about $15 on Amazon; a luxury, to be sure, but a small amount goes a very long way (and vanilla extract isn’t cheap, either). If you don’t use the vanilla bean, rest assured that vanilla extract will still make a very tasty beverage.

PicMonkey Collage 2

Mango isn’t my favorite fruit, but with the addition of cardamom (a prominent flavor in the garam masala spice blend) and vanilla, it’s hard not to go crazy for this drink. Enjoy it—stay cool—and I’ll be back soon.

xo

09 Apr 13:17

Hats Off to Poetry With Dr. Seuss

Little.pink.hat

I hope we have another great turnout!

Hats Off to Poetry With Dr. Seuss
Special Event, Children's Event
Children's
Apr 20, 2013 11:00 AM

Barnes & Noble Booksellers
Hingham
The Derby Street Shoppes
96 Derby Street Suite 300
Hingham
MA
02043
781-749-3319
05 Apr 15:22

Cashew and Squash Canapés: A Raw, Vegan Spin On Deviled Eggs!

by Gena

PicMonkey Collage8

As I’ve mentioned before, in spite of the fact that I was raised Episcopalian, the Easter I tend to celebrate is Greek Orthodox Easter (which is really, really late this year). Even so, I like to create at least a couple of holiday dishes every year at this time. Last year, I prepared an easy raw, vegan Charoset for Passover. This year, I thought I’d try to recreating the appetizer that accompanied every (Western) Easter celebration of my childhood: deviled eggs. I think my raw, vegan version turned out pretty well—and it was a lot of fun to make!

The process for these deviled eggs is easy. Simply whip up a creamy cashew pate (with curry and turmeric for yellow color), slice some raw zucchini or yellow squash diagonally, into ovals, and top them with a rounded tablespoon of the pate. Sprinkle with paprika if you want to be all traditional-like, and serve.

PicMonkey Collage7

These will make a fantastic hors d’oeuvre for holiday gatherings, or a cute appetizer for the table. And though I had a family tradition from childhood in mind when I thought to make deviled eggs, it occurred to me that hard boiled eggs are included in Seder plates as well, so perhaps this recipe will come in handy both for Easter and Passover gatherings this year!

PicMonkey Collage5

Print Raw, Vegan Cashew and Squash Canapés ("Deviled Eggs")

Ingredients

  • 1 cup cashews, soaked 2-3 hours
  • 1/4 - 1/2 tsp sea salt (to taste)
  • 3/4 tsp curry powder
  • 1/2 tsp turmeric
  • 1 tbsp lemon juice
  • 1/3 cup water
  • Dash paprika
  • 1 zucchini or summer squash, cut diagonally into ovals

Instructions

  1. Place the cashews in a food processor fitted with the S blade. Add the salt, spices, and lemon. Pulse till the cashews are broken down.
  2. Run the motor and drizzle the water in. Continue blending till the pate is silky smooth, stopping frequently to scrape the sides of the bowl down. You'll have one cup of pate.
  3. Place a rounded tablespoon of pate on each zucchini oval. Sprinkle lightly with paprika, and serve.
  4. Serves many--you can reserve extra pate for crudites or wraps!
Schema/Recipe SEO Data Markup by ZipList Recipe Plugin 2.2 http://www.choosingraw.com/cashew-and-squash-canaps-a-raw-vegan-spin-on-deviled-eggs/

PicMonkey Collage3

PicMonkey Collage2

So cute and authentic!

I have to say, the filling for this canapé really does taste a lot like the center of deviled eggs (maybe a little less thick). If you don’t believe me, believe my Mom, who tasted one soon after I whipped them up. She looked at me, wide-eyed, and exclaimed “it tastes just like an egg!” My mother is incredibly supportive and open minded about vegan food, but she’s not one to pretend that something is a “dead ringer” if it’s not. I took her words as a high compliment.

The idea of “cravings” is always a little loaded in conversations about veganism. Critics of veganism, some former vegans among them, often cite cravings for animal food as proof that veganism is incomplete or unnatural. But cravings for food, for drink, and for substances are everywhere, all the time, and they don’t necessarily have to suggest some kind of insidious deficiency. Sometimes, cravings are an expression of our desire for stimulation; I crave cigarettes all the time, and I’m perfectly capable of craving a soy latte when I’ve already had three or four cups of coffee for the day, but this doesn’t mean I need either. It usually means I’m bored, tired, or frustrated with studying. Sometimes I crave a particular food simply because I’m hungry; as soon as I have something to eat, whether or not it’s the thing I was daydreaming about, I feel satisfied.

Sometimes persistent cravings really do indicate that a person isn’t eating enough of a particular food. People who are on super low-carb diets tend to crave carbs because they are so obviously deprived of readily accessible energy. When I was obsessed with eating low fat—as I always was in my disordered periods—I craved fatty foods relentlessly. In this instance, the cravings certainly were an indication of something imbalanced in my diet. And yes: if a vegan happens to be craving animal foods, the craving might indicate that he or she isn’t eating enough fat, or enough protein. This is not to be minimized or brushed aside, and it’s something that a vegan-savvy R.D. or health care practitioner can help to troubleshoot.

It’s worth noting, though, that the food one craves isn’t necessarily the very food one must eat in order to feel better. When I was fifteen and ravenous for fried dumplings and pizza, it wasn’t because I needed those two foods in particular. It was because I was crying out for fat. I could have satisfied my cravings with some pizza, sure, but I might also have satisfied them by welcoming all kinds of fats into my diet more regularly. If you are new to plant-based eating and you’re struggling with persistent cravings for something that isn’t vegan, a health care provider (one who is knowledgeable about plant based diets) can take a look at what you’re eating, help you to identify why you’re craving that particular food, and work with you to correct imbalances. You may find that the craving was an expression of something broad and global—not a literal command from your body to eat animal foods in particular.

As a vegan, the cravings I’ve had most often are not, like the cravings described above, an expression either of boredom or of something amiss in my diet. They are an expression of nostalgia. Food is charged with meaning and emotion, and it’s natural to crave dishes or ingredients that evoke a feeling or a particular time in our life. Sometimes I miss laughing with my mom as we piled our plates of spaghetti high with parmesan cheese, or eating turkey wraps from a café that used to be around the corner from my high school, or cups of coffee turned the color of light caramel with half and half. It’s not so much that I can’t live without these foods; it’s that they’re a part of the fabric of my past. The good news is that there are now vegan foods that can help to replace them, both commercial and homemade, and there are other foods that satisfy the craving even if they don’t simulate the food precisely. Piling a bowl of spaghetti high with hemp seeds and/or nutritional yeast replace some of the texture, salt, and umami I miss from cheese.

Obviously, cashew pate situated on top of a zucchini slice is no real replacement for a deviled egg. Egg lovers certainly won’t be fooled, and the nutritional profile isn’t the same. But if we’re talking about cravings for the spirit of a dish—the flavor, the taste, the mouth feel—this dish might just fit the bill. It’s creamy and rich in fat. It’s salty and gently spiced. It has a contrast of textures. And, most importantly, it’s delicious, and worthy of sharing. I may have left out one kind of craving that a vegan might feel, which is a craving for the inclusiveness and shared experience that comes with eating a more conventional diet. The best way to address this craving is to create vegan food that will be savored by all. If my mom gives these little appetizers her ringing endorsement, then I guarantee you she won’t be the only one.

Happy holiday weekend, friends!

xo

05 Apr 15:19

Brandy Fudge

by noreply@blogger.com (The Dainty Squid)
Little.pink.hat

I wonder if these could somehow magically be made sugar-free?

Let me tell you about my favorite, absolutely horrible for you, guilty pleasure - brandy fudge! It all started with me attempting to make truffles. I literally have no idea what a truffle is (I mean, unless we're talking about mushrooms!) I've never seen one in person nor do I know what one is supposed to taste like. The recipe I tried left me with something that reminded me of fudge. So the next day I tried again but with my own spin. Instead of making little balls, I poured the mix into a cake pan so I could slice it into squares. I fiddled with the ingredients and even topped it off with some shredded coconut. What I ended up with was perfection. PERFECTION!!! I could eat these until I'm green in the face (which really wouldn't take long considering they're super rich!)
You will need:
4 cups powdered sugar
1 8oz container Tofutti Better Than Cream Cheese
16oz chocolate chips*
3T Brandy
Shredded coconut for garnishing

Mix together the powdered sugar and "cream cheese". Beat until thoroughly combined. Melt chocolate chips using double boiler. When they are completely melted add chocolate to sugar/cream cheese mixture and beat again. Finally add in your brandy one tablespoon at a time. Mixing thoroughly after each tablespoon. Pour the mixture into a cake pan that has been lined with parchment paper. Spread the fudge evenly at your desired thickness and garnish with coconut. Let sit in the refrigerator for 3 or 4  hours before cutting into pieces. Store in airtight container in the fridge.
Enjoy!
xoxo

*16oz of chocolate chips is around 1.5 bags my favorite chocolate chips to use. Your measurements don't have to be exact. If you're running low on chocolate chips just accommodate by using slightly less brandy.
05 Apr 15:16

All About Tempeh (and a Killer Salad)

by Gena
Little.pink.hat

I need more tempeh in my life.

8617260159_3997252452_z

All images © James Ransom for Food52

No food is more closely associated with veganism, at least in the popular imagination, than tofu (with the possible exception of sprouts). Versatile and nutrient-dense though tofu is, I’ve always thought that it is unduly favored over its fellow soybean-based cousin, tempeh. Today, I’m here to argue that you should get to know tempeh if you haven’t already, and I’m sharing a recipe that I hope will help you to fall in love with this nutritious and unusual ingredient.

While I was researching tempeh a little for today’s Food52 column, I was surprised to learn that tempeh is Indonesian in origin, and not Chinese (like tofu). Soybeans may have been farmed in China as early as the 11th century B.C., but the first written records date to around 2000 B.C.. By the first century A.D., soybeans had spread to Korea, and by the 7th century, they were being cultivated in Japan. Ultimately, they spread to Indonesia, the Philippines, Vietnam, Thailand, Malaysia, Burma, Nepal and northern India. The earliest written reference to tempeh dates back to the 19th century, though it is likely that it was a traditional Indonesian food for many years before that.

Tempeh is made by fermenting whole, cooked soybeans with Rhizopus oligosporus, a mold that encourages the growth of Bacillus subtilis (a bacteria that may be used as a beneficial probiotic). The world “mold” is far from appealing, but the process of tempeh making, honed through time and practice already, is now conducted under safe and controlled conditions. The fermentation process binds tempeh together into blocks (traditionally, it was wrapped in banana leaves throughout this process), and it can subsequently be sliced and used in stir fries, on salads, or however you like.

8618367906_c489f1d6bb_z

Me? I like to marinate and sear my tempeh in a bit of coconut oil. And in today’s “new veganism” column over at Food52, I give you a recipe for a perfect tempeh marinade, as well as cooking instructions. As an extra incentive to eat this wonderful food, I’m giving you a recipe for a tasty, crunchy salad with red cabbage, snow peas, and mizuna, all dressed in a sweet/salty miso mustard dressing. Phew.

A four ounce serving of tempeh contains 20 (!) grams of protein, about 20% of your daily RDA iron, and about 10% of your RDA of calcium. It also contains nearly half of the official RDA of fiber (11 grams–though getting even more fiber than that is well worth it for many people.) Such a rich offering of nourishment is good reason for you to discover tempeh, but don’t do it for the nutrition stats. Explore tempeh because it is satisfying and delicious—and because this salad recipe is killer Smile 

Enjoy!

xo

29 Mar 13:43

How I Take Self-Portraits

by sokolum79
Little.pink.hat

for gebby

I often get questions about what camera I use and how I take my FOTD photos so I thought a blog post to cover my procedure would be choice! I'll cover what equipment, camera settings, environment and edits I try to use. 


EQUIPMENT

The equipment that I use when taking self-portraits are:
  • tripod; 
  • mirrorless DSLR; 
  • shutter remote; and
  • mirror.


The two particular items that I suggest are essential to taking a successful self portrait are a camera and a shutter remote. A remote prevents the stretched-out-arm-I-am-taking-a-photo-of-myself look and it most importantly prevents a warped face, due to the lens being too close. If you can't afford a remote, or if one isn't available for your camera, try the self-timer.

You can always place your camera on window sill or stack of books; however, a tripod makes life so much easier. The one in the photo was only $20, so you don't necessarily have to invest a lot of money. 

The camera I have been using for the past year is the mirrorless four-thirds Olympus PEN E-PM1. I used to use either my Canon Rebel XS (EOS 1000D), which is far too basic, or my Panasonic HDC-TM60 which is pretty poor quality photo-wise. The little PM1 has nice options, such as face/eye detection, interchangeable lenses, many customizable settings and high quality 1080i HD video (you can see here). The face/eye detection comes in pretty handy when taking self portraits because the camera will focus on your face and not something in the background, which is an issue I had with the Canon. 

The lens I use is a prime lens (fixed, no zoom) that I purchased separate from the camera kit. It's is the M. Zuiko Digital ED 45mm f1.8 lens. It has an wonderfully large aperture/f-stop at 1.8 and it takes beautifully sharp photos. A large aperture, which is a low number, such as f1.8, can give you very nice bokeh (pronounced boh-kay). Bokeh is when the out of focus area is blurred. You can see bokeh in most of my self-portraits because I use a large aperture of f2.2. The zoom lens that came with the camera is also a very nice lens, but I want MORE bokeh! :D

Olympus PEN E-PM1
I am actually going to upgrade to the Olympus PEN E-PL5 in a week or two because it has a more advanced sensor and, most importantly, a flip LCD touch screen. Because my current camera doesn't have a flip LCD, the mirror is needed behind the camera somewhere because it's easier and faster to see if I'm in frame while taking photos. 

Lastly....DO NOT USE A FLASH FOR THE LOVE OF NEMO!!! This is because a typical camera flash will always wash out colours, leave an unflattering glare in the eyes and on the skin, and creates shadows. I only recommend professional flash setups for portraits. Always try to use a setting with natural light or bright ambient lighting. 

CAMERA SETTINGS

Firstly, I always set my camera so that I take photos in the RAW format because I can't be bothered in setting my white balance and shutter speed every time. I set WB and exposure to automatic and I later adjust them manually in Photoshop or iPhoto. The RAW format saves every pixel, so a 12MP camera will save a 12MB RAW photo, whereas JPEG will be approximately half the size. RAW formats are more dull than JPEG, but they are easier to edit because they don't lose quality like a JPEG while adjusting in a photo editor. 

I also always set my camera to aperture priority. I like to use an aperture setting of f2.2 because of my bokeh obsession. The lower the number, the more blur effect you will get in the background. Some newer point and shoots also come with aperture priority and shutter priority settings. If you don't have an aperture priority mode (A) then you can try using the portrait mode (face icon on some cameras).

I use the face and eye recognition/priority setting so that it will focus on my face and I also use a Portrait setting that my camera has to help produce a natural skin tone. Everything else is set to automatic.

ENVIRONMENT

This is pretty simple, but I almost always take my photos in front of a large window during the day (sun or cloud). Lately, I have created a darker background by ensuring the lights are turned off and the only light coming through the windows is where I'll be standing. This creates a nice ambiance and creates a focus on the face.

I usually take between 20-60 photos until I am satisfied that I have three or four photos that I can work with. I've learned that I prefer the left side of my face over the right. :D

EDITS

I use Adobe Photoshop to edit my RAW images. Photoshop has a nice RAW photo editor where you can adjust the photo like you would in your camera. I almost always adjust the exposure, black level, clarity, vibrance and saturation because RAW photos are a little lackluster. Reducing the clarity is the finishing adjustment for my flawless skin. It softens all my pores and skin texture and gives a soft glow. 

After everything is adjusted, I open it in Photoshop to edit out my red eyes. I have VERY red eyes because I suffer from dry eye and I wear contact lenses. That is basically all the edits that I do to my photos. 

I hope this has been helpful and gives some insight into the process of taking my self-portraits. If you have any questions, just ask in the comments and I'll try my best to answer them from the best of my knowledge.
29 Mar 13:42

#veganmofo – Pumpkin Cinnamon Rolls

by Adrienne
Little.pink.hat

I'm hungry.

Post image for #veganmofo – Pumpkin Cinnamon Rolls


Happy Halloween, blog family. Today is the last day of Vegan Month of Food. I decided to participate in veganmofo completely on a whim, literally the day before it started, but I’m so happy I did. I’ve discovered so many wonderful blogs and recipes from it. It’s been a bit of a crazy month between working on my record and writing these posts. It was a major challenge for me to post almost every day, but I succeeded in reaching my goal of at least 20 posts, so yay!

Ok so as a quick aside, I tried the tesco cheese I reviewed in this post in a grilled cheese and it was amazing and I have updated the post to reflect this information.

Today’s recipe is sugar-free pumpkin cinnamon rolls. These cinnamon rolls are not super sweet on their own, but you can add +10 sweetness by glazing them, putting icing on them, or eating them alongside some vanilla ice cream. I don’t have a big sweet tooth so I don’t bother to glaze mine, and I am also lazy, but there’s a fantastic glaze recipes here on Chocolate Covered Katie, or if you know of any other recipe, use that.

Sugar Free Pumpkin Cinnamon Rolls

adapted from here
Makes 8 Cinnamon rolls
For the rolls:

  • 1 packet dry yeast
  • 3 TBSP Granulated Stevia or NuNaturals Stevia Baking Blend
  • 3/4 cup lukewarm water
  • 1/4 cup (61g) pumpkin puree
  • 1/4 tsp nutmeg
  • 1/2 tsp salt
  • 3 cups flour
    For the filling:
  • 1/2 cup (122g) pumpkin puree
  • 1 cup granulated Stevia
  • 1 TBSP Pumpkin pie spice
  • 1 banana, mashed (about 1/2 cup)

Method: Proof the yeast by mixing it with the water and the stevia in a small bowl. It should bubble and look foamy. Once done, add the yeast mixture to the nutmeg and salt in a large bowl and whisk in the pumpkin until it is mostly dissolved in the water.

Add 2 cups of flour to the water mixture one cup at a time and start kneading the dough. As you knead the dough, add the remaining cup of flour little by little. I usually knead the dough for about 15 minutes.

Roll the dough into a ball and put it in a bowl with a towel over it to prevent it from drying out. Set aside the dough to rest for an hour.

Meanwhile, prepare the filling by mixing all the ingredients – either in a food processor or by hand.

Preheat the oven to 175 c / 350 f. Once the dough has risen, divide it in half. Take one half of the dough and roll it out into a 9″x13″ rectangle, and spread half the filling on it, leaving 2 inches at the bottom like this:

Starting at the top, roll the dough until you reach the part with no filling. Then, wet the dough at the bottom a little with some water and finish rolling, like this:

Placing the roll fold side down, cut the roll into 4 equal pieces and place on a cookie sheet or other oven-safe dish.

Repeat the process with the other half of the dough and filling.

Bake in the oven for about 20 minutes, or until golden brown. Remove from oven and set aside to cool.

Once cool, add icing. Eat. In my opinion, they taste even better the next day!

I love you all and thank you for putting up with my posts all month.

Until next time…

xxxxxxx
adorpheus

29 Mar 13:39

#veganmofo – Sugar Free Maple Syrup

by Adrienne
Little.pink.hat

Gebby, I want to try this.

Ok! I’ve posted a little bit about the fact that I don’t really eat sugar. I could seriously write an entire book on sugar free eating, because I’ve done that much research on it, but I’ll try not to bore you. However, if a sugar free book is something you’d read, let me know.

I first became interested in sugar free baking and cooking when my beloved dad was diagnosed with diabetes. I’m a firm believer that no matter what diet restrictions you have, you should still be able to enjoy good food. Then I started to wonder if cutting out sugar would help me lose weight. So I stopped eating refined sugar too, in order to learn more about sugar free baking and cooking. I LOVE cookies, ice cream, and so on – and my favourite food ever ever ever is chocolate. I was re-starting my weight loss journey at the time with a renewed vigor, and I am always up for a challenge, so I figured this would be kind of the ultimate challenge for me.

Little did I know what kind of impact this was going to have on my life. When I first stopped eating refined sugar, it was really really hard for a couple weeks. I had no idea I was so addicted to sugar! I had the worst cravings for it.

During this time, I instead ate fruit when I wanted something sweet. I also experimented a little bit with using dates, bananas, and other fruits to make raw food desserts, all of which I loved. I got stevia to sweeten my tea and coffee with.

After a couple weeks, I noticed that I no longer had cravings anymore! It was so much easier to maintain a healthy diet when I wasn’t craving cookies every five seconds. I was still eating plenty of fruit and making raw chocolate, but I wanted to try making pancakes and baked goods sugar free. Back then, most stevia came in a very concentrated powder – there was only one brand that made a variety of stevia that could be used the same way as sugar in baking – NuNaturals Stevia Baking Blend Powder. Now, there’s tons more, like Stevia in Raw, and you can even get stevia here in the UK now. It’s great how far things have progressed in only 2 years.

Eventually I ran into another problem – there wasn’t (and still isn’t, as far as I know) a stevia based sugar free version of maple syrup. There are sugar free maple syrups, but all of them are made with sucralose. I’m actually not super-duper anti artificial sweetener – I think a little splenda every once in a while isn’t going to kill you. However, the main problem with splenda aside from the fact that its an artificial sweetener and some people have a negative reaction to it – is that it’s made from sugar and therefore, eating it will not curb sugar cravings the way replacing sugar with stevia does. Additionally, sugar free syrup (splenda or otherwise) is not nearly as readily available here in the UK as it is in America. So I decided I wanted to figure out a way to make stevia syrup at home – at least that I could use in baking!

I found a few recipes and while I have not experimented with them all, I’ve found one that works, that I adapted from this steviva recipe. I reckon eventually some company will make a commercially available maple syrup that’s made with stevia and not sucralose… but until then here’s my recipe.

Stevia Maple Syrup

Ingredients:

Please note: The brand of stevia you use in this recipe will have a big impact on the flavor. NuNaturals brand tastes the best. I’ve also made this with the Whole Foods brand and the results were… ok, but not as yummy. If you would prefer to use a granulated brand of stevia, try the original recipe I adapted this from.

Method: In a bowl or pyrex measuring jug, mix the water, maple extract, and liquid stevia. Using a whisk, very slowly add the xanthan gum. You can use a sifter if you have one. I found it very difficult to avoid lumps – but they don’t impact the flavor, so I just let them be!

Transfer to a bottle and use on pancakes (or on the Fronch Toast from Vegan with a Vengeance, like I did above!).

In other mofo news…

tonight for dinner I made the Red Curry Soup with Rice and Kale from thePPK! I used regular kale instead of the purple kind, but it was just as delicious! I can’t wait to have the leftovers tomorrow.

xxxxxxx
adorpheus