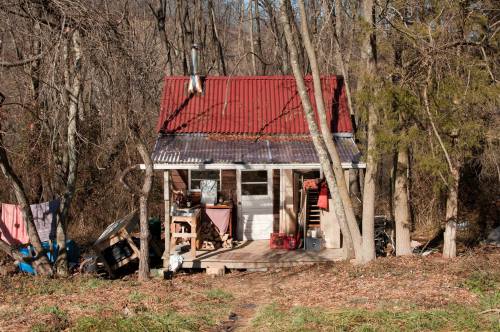
Off-grid shack in Keezletown, Virginia.
Built by Annie Cantrell from free & salvaged materials.
Photo by Bryan Vana and contributed by Oren Cantrell.
Off-grid shack in Keezletown, Virginia.
Built by Annie Cantrell from free & salvaged materials.
Photo by Bryan Vana and contributed by Oren Cantrell.
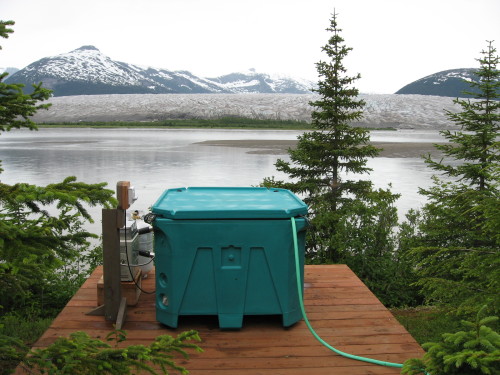
Propane-fired, fish tote hot tub at Taku Point Cabin, near Juneau, Alaska, USA.
Ron and Nan Schonenbach.
This week Alec sits down with David Simon, the creator of HBO’s The Wire, which some call the best television show of all time. Simon talks about his early years as a newspaperman at The Baltimore Sun and how he doesn’t “belong” in the world of Hollywood. “I can’t help it,” says Simon, “I’m from a different planet, which is journalism.”
***Better late than never for this post. While maple syrup season is long over and the leaves are on the trees, my reason for perfecting the rocket stove will now shift to boiling clams, lobster, corn, etc. for those outdoor summer cookouts. If built right, the Rocket Stove might make a permanent addition to our future outdoor kitchen.
I’ve also decided to break this project up into several posts. With so many photos and so many variations of this stove, I thought it best to organize as the stove evolves.***
The idea of the rocket stove began in March when we decided to tap a few maple trees around the house and make syrup in small batches. Normally we have about 100 maple trees tapped on our property, but over the last few seasons, while building the house, we have sent all the sap up the road to our neighbor Sam’s sugaring operation, Bixby’s Best Pure Maple Syrup. Throughout the year he’ll drop off finished syrup but we never seem to have enough (I’m an addict). The few buckets we decided to hang will give us extra to cook with and will supplement the “drop” I put in my coffee every morning.

At first we assumed boiling the sap in a giant lobster pot over a propane flame would be the easiest. We were right —it would be the easiest — and the most expensive. With long burn times and the cost of propane, it would have been cheaper to buy syrup at full price from the local gift shop.
The trees were already tapped and the buckets were hung on the trees so there was no turning back. It would be disrespectful to the trees (and probably really bad JuJu) if we were to give up, rip out all of the taps, and let the sap run down the face of the tree and onto the forest floor. Blasphemy.
What to do? The old timer method of babysitting a pot over an open flame was not going to work.
Enter the Rocket Stove.
The concept is simple. I recommend Wikipedia for a detailed description of how a rocket stove works. An excerpt:
“A rocket stove is an efficient cooking stove using small diameter wood fuel which is burned in a simple high-temperature combustion chamber containing an insulated vertical chimney which ensures complete combustion prior to the flames reaching the cooking surface.”
Below are some simple design found on the web.
So far I have built several variations throughout sugaring season and beyond. At least 7 in total — all with individual tweaks and adjustments. It should be noted, every version I built was capable of bringing a large pot of sap to a boil (and is perfectly suitable for cooking on). What varied was the amount of effort needed to keep a consistent boil that sometimes bordered on absolute frustration. ”Losing” the boil was common.
My goal however was to start a good fire, get the sap up to a boil, walk away, and leave the pot unattended for an hour or two. Ideally the stove would maintain a slow roiling boil without assistance. Easier said than done and therein lies the real challenge — build a rocket stove that can compete with a low maintenance propane burner.
Rocket Stoves 1 & 2
Built from materials I had laying around, at their core is 4″ metal stovepipe. These two stoves are a typical configuration —an insulated ‘L’ shaped tube with a burn shelf that allows air to pass under the fire. The burn shelf is made from a flattened piece of stove pipe and is held in place by resting on several protruding sheet metal screws. For rocket stove number two I added a “J” tube extension (not pictured) late one night. This improved the intensity of the burn and also made a the stove somewhat “self feeding” with its vertical configuration. As you’ll see, I replicated the ‘J’ tube several times with other stoves. These stoves worked fine if you continually push the ends of the fuel towards the fire. Not a problem if you’re actively cooking and don’t intend on walking away from the stove.
Rocket Stoves 3 , 4, & 5
Focusing on fundamentals, with stove number three I wanted to start with brick only. I wanted to strip down the design and see how the stove might work in its simplest form. Using only brick made rearranging the stove quick and easy. I could re-size the height of the chimney by adding or removing a course. Unfortunately bricks without mortar proved too drafty and allowed too much cool air to enter the stove. For stove number four I increased the height of the the chimney by adding a length of flue tile and inserted a length of 4″ galvanized pipe to stop the drafts. An air shelf was also added. Eventually the fire’s intensity cracked the flue tile and for stove five I returned to only brick. Stove number five had many face-lifts. It was rebuilt several times to replicate the ‘J’ style feed tube success I had with stove number two . Once again, they all worked — but not for my purposes. One noted improvement was making a more substantial base to work from. This helped with the rebuilds that followed.
—NEXT: ”Maple Syrup Rocket Stove Part 2″ — I change my fuel source and get into a little off-grid solar welding.
—Mild celebration follows.


