Het lijkt goed te gaan met de enkelblessure van Wout van Aert (31). De renner is momenteel op stage met zijn ploeg Team Visma Lease-a-Bike. Vanop trainingskamp deelt de renner enkele geruststellende sfeerbeelden.
Cassius was an 18-foot-long saltwater crocodile living in captivity in Marineland Crocodile Park in Australia. He died last year at the age of about 120, and we finally know why.
Novak Djokovic said Thursday he was "concerned" about his physical state, but still dispatched Belgium's Zizou Bergs 6-3, 7-5 to set up a Shanghai Masters semifinal against tournament…
When it comes to managing an e-commerce business, no two business needs are the same. For example, one e-commerce store might need a dashboard focused on tracking real-time inventory, while another prioritizes visualizing sales trends and customer engagement. That’s why off-the-shelf admin dashboards or pre-built templates frequently fall short: they’re not designed to accommodate the specific needs of individual businesses.
However, a customizable solution like Medusa solves this by providing the building blocks and REST API endpoints you need to build custom e-commerce solutions that can adapt to the business’s current needs. This ensures you retain control over every aspect of your e-commerce ecosystem.
In this article, you’ll learn how to:
Set up an e-commerce backend using MedusaJS and Supabase.
Build a custom sales dashboard using Next.js and Tailwind CSS.
Extend MedusaJS’s admin functionality to meet specific business requirements.
By the end of this guide, you’ll have an admin dashboard that looks like this:
Prerequisites
To follow along with this tutorial, you need the following:
Basic knowledge of Next.js and PostgreSQL
Node.js (v16 or later) — Install it from nodejs.org.
Setting up your Medusa store locally
Follow these steps to set up your Medusa store:
Step 1: Create a PostgreSQL database using Supabase
To access the admin dashboard, create an admin account or use the default credentials ( Email: admin@medusa-test.com Password: supersecret)
Add a custom Sales Overview page.
Aside from the default features, MedusaJS allows you to add custom routes to your admin dashboard, enabling you to track specific business metrics like sales performance. Here’s how you can add a custom Sales Overview page:
1. Creating a custom Admin UI route
MedusaJS admin routes are React components in the src/admin/routes directory. To create a custom route for sales:
Navigate to src/admin/routes in your project directory.
Inside page.tsx, export a React component for the sales page:
const Sales = () => {
  return (
    <div>
      See the number of products sold and the number remaining in stock
    </div>
  )
}

export default Sales
Visit http://localhost:7001/a/sales to see your custom page. However, it is not accessible from the sidebar; you will fix that in the next section.
2. Adding the route to the Sidebar
To make the route accessible from the sidebar:
Import RouteConfig from @medusajs/admin and define the route configuration:
import { RouteConfig } from "@medusajs/admin"
import { CircleStack } from '@medusajs/icons';

const Sales = () => {
  return (
    <div>
      See the number of product sold and the number left in stock
    </div>
  )
}

export const config: RouteConfig = {
  link: {
    label: "Sales",
    icon: CircleStack,
  },
}

export default Sales
The Sales route will now appear on the admin dashboard sidebar.
Extending your Product Entity to add custom fields
To make the Sales Overview page functional, you need to ensure your database supports all the required data. Specifically, you’ll want to display each product’s current stock, price, and units sold. While the first two are available in the default schema, the units_sold data isn’t. So, how do you add custom fields?
Step 1: Reviewing the current schema
Start by exploring the existing data structure. You can make a GET request to the /admin/products endpoint to see the available fields for each product. This endpoint is accessible at:
http://localhost:9000/admin/products
You’ll notice there isn’t a column for units_sold. This is where customization becomes necessary.
Step 2: Modifying your database schema to the units_sold Column
Since Medusa uses a PostgreSQL database with TypeORM as the ORM, you’ll need to update both the database schema and the MedusaJS product entity model to add new columns.
To start, modify your database schema to include a units_sold column. For better granularity, you can add quarterly columns (units_sold_q1, units_sold_q2, etc.). Run the following SQL commands directly on your database:
ALTER TABLE product ADD COLUMN units_sold_q1 INT DEFAULT 0;
ALTER TABLE product ADD COLUMN units_sold_q2 INT DEFAULT 0;
ALTER TABLE product ADD COLUMN units_sold_q3 INT DEFAULT 0;
ALTER TABLE product ADD COLUMN units_sold_q4 INT DEFAULT 0;
💡 After running these commands, the new columns will exist in your database but won’t yet appear in API responses or the admin dashboard. To fix this, you’ll need to update the MedusaJS entity model.
Step 3: Extending the Product Entity Model
Medusa uses TypeORM to define its models. To add the new columns to the product entity, create a file named product.ts in ./src/models/:
The @Column decorator ensures that TypeORM maps the fields to your database.
Step 4: Updating type definitions
If you’re using TypeScript, add the new columns to your IDE’s autocomplete by extending Medusa’s core Product interface. Create a file at src/index.d.ts:
Medusa’s API won’t return your custom columns by default. To include these fields, you need to modify the products endpoint configuration. Create a file at src/loaders/extend-product-fields.ts:
To update the database schema programmatically, create and execute a migration:
Generate a migration file:
npm run build
npx typeorm migration:create src/migrations/AddUnitsSoldColumnToProduct
Edit the generated migration file:
import { MigrationInterface, QueryRunner } from "typeorm";

export class AddUnitsSoldColumnToProduct implements MigrationInterface {
  public async up(queryRunner: QueryRunner): Promise<void> {
    await queryRunner.query(`
      ALTER TABLE product ADD COLUMN units_sold_q1 INT DEFAULT 0;
      ALTER TABLE product ADD COLUMN units_sold_q2 INT DEFAULT 0;
      ALTER TABLE product ADD COLUMN units_sold_q3 INT DEFAULT 0;
      ALTER TABLE product ADD COLUMN units_sold_q4 INT DEFAULT 0;
    `);
  }

  public async down(queryRunner: QueryRunner): Promise<void> {
    await queryRunner.query(`
      ALTER TABLE product DROP COLUMN units_sold_q1;
      ALTER TABLE product DROP COLUMN units_sold_q2;
      ALTER TABLE product DROP COLUMN units_sold_q3;
      ALTER TABLE product DROP COLUMN units_sold_q4;
    `);
  }
}
Run the migration:
npm run build
npx medusa migrations run
Step 8: Verifying your changes
After running the migration, your database schema will include the new columns, and they’ll be visible in your /admin/products API responses. Test these changes by sending a GET request to the endpoint.
Now, your MedusaJS project is equipped to track and display quarterly sales data, enabling you to create a fully functional Sales Overview page tailored to your needs.
Building the Sales Page UI
Now that the data flows seamlessly between your admin dashboard and the Medusa backend, it’s time to implement the code for your Admin UI. This section will guide you through building the user interface for a Sales Overview Page.
MedusaJS comes bundled with Medusa UI, a React-based design system that includes components, hooks, utility functions, icons, and pre-made Tailwind CSS classes. These tools ensure a consistent and professional design across your admin dashboard.
Your Sales Overview Page will feature three main components:
Header: Displays key metrics like revenue and customer counts.
Next, create a component folder under src/admin/routes/sales; inside the component folder, create the following files: TopCards.tsx, BarChart.tsx and RecentOrders.tsx.
Header section
The Header Section displays sales statistics such as quarterly revenue and total customers. Create this component in TopCards.tsx:
The Bar chart visualizes sales revenue by quarter. Create this component in BarChart.tsx:
src/admin/routes/sales/components/BarChart.tsx
import React, { useState, useEffect } from 'react';
import { Bar } from 'react-chartjs-2';
import {
  Chart as ChartJS,
  CategoryScale,
  LinearScale,
  BarElement,
  Title,
  Tooltip,
  Legend,
} from 'chart.js';
ChartJS.register(
  CategoryScale,
  LinearScale,
  BarElement,
  Title,
  Tooltip,
  Legend
);

import {useAdminProducts} from 'medusa-react'

const BarChart = () => {

    const { products} = useAdminProducts();
    const [totalRevenueQ1, setTotalRevenueQ1] = useState(null);
    const [totalRevenueQ2, setTotalRevenueQ2] = useState(null);
    const [totalRevenueQ3, setTotalRevenueQ3] = useState(null);
    const [totalRevenueQ4, setTotalRevenueQ4] = useState(null);

    useEffect(() => {
      async function calculateTotalRevenue() {
        // Check if products is available
        if (!products) {
          console.error('Products data is not available.');
          return;
        }

        // Step 1: Map through Products and calculate revenue for each product, each quarter
        const revenuePerProductQ1 = products.map((product) => {
          const amount = product.variants[0].prices[0].amount;
          const sold_q1 = product.units_sold_q1;
          console.log('amount:', amount, 'sold_q1:', sold_q1);
          return amount * sold_q1;
        });
        const revenuePerProductQ2 = products.map((product) => {
          const amount = product.variants[0].prices[0].amount;
          const sold_q2 = product.units_sold_q2;
          return amount * sold_q2;
        });
        const revenuePerProductQ3 = products.map((product) => {
          const amount = product.variants[0].prices[0].amount;
          const sold_q3 = product.units_sold_q3;
          return amount * sold_q3;
        });
        const revenuePerProductQ4 = products.map((product) => {
          const amount = product.variants[0].prices[0].amount;
          const sold_q4 = product.units_sold_q4;
          return amount * sold_q4;
        });

        // Step 2: Sum the individual multiplication results to get the total revenue for each quarter
        const totalRevenueQ1 = revenuePerProductQ1.reduce(
          (total, revenue) => total + revenue,
          0
        );
        const totalRevenueQ2 = revenuePerProductQ2.reduce(
          (total, revenue) => total + revenue,
          0
        );
        const totalRevenueQ3 = revenuePerProductQ3.reduce(
          (total, revenue) => total + revenue,
          0
        );
        const totalRevenueQ4 = revenuePerProductQ4.reduce(
          (total, revenue) => total + revenue,
          0
        );

        // Set quarterly totalRevenue states with the calculated value
        setTotalRevenueQ1(totalRevenueQ1);
        setTotalRevenueQ2(totalRevenueQ2);
        setTotalRevenueQ3(totalRevenueQ3);
        setTotalRevenueQ4(totalRevenueQ4);
      }
      // calculate total revenue when products data is available
      if (products) {
        calculateTotalRevenue();
      }

    }, [products]);

   const data = {
     labels: ['Q1', 'Q2', 'Q3', 'Q4'],
     datasets: [
       {
         label: 'Total Revenue',
         data: [totalRevenueQ1, totalRevenueQ2, totalRevenueQ3, totalRevenueQ4],
         backgroundColor: '#32de84',
         borderColor: 'rgb(0,128,0)',
       },
     ],
   };

  return (
    <>
      <div className="w-full md:col-span-2 relative lg:h-[70vh] h-[50vh] m-auto p-4 border rounded-lg bg-white">
        <div className="w-100% h-[70vh]">
          <Bar data={data} />
        </div>
      </div>
    </>
  );
};

export default BarChart;
The useAdminProducts hook gives you access to the list of available products in the database and also automatically handles auth, passing along credentials in its requests to the Medusa backend as long as you’re signed in to the Admin dashboard. You can learn more about the Admin APIs for managing products here.
Recent Orders section
The Recent Orders Section lists customer orders. Create this component in RecentOrders.tsx:
The useAdminOrders hook gives you access to the list of orders made by clients, and only authorised credentials have access to this.
The useAdminOrders hook also gives you access to all of its properties like first_name, payments_amount, title, etc.
Your Sales Overview Page is now functional and visually appealing with these components. You can modify and add as many functionalities as you want to suit your needs.
Conclusion
This tutorial demonstrated how to build a custom MedusaJS admin dashboard using Next.js, Supabase, and Tailwind CSS. By following these steps, you learned how to set up a Medusa backend, create a dynamic user interface, and extend the Medusa functionalities to build tailored components like the Sales Overview Page.
Check out the Medusa documentation to learn more about advanced features and other customization options you can add to your e-commerce experience.
Een Belgisch-Marokkaanse toeriste is donderdagmiddag het slachtoffer geworden van een mesaanval op het strand van de Marokkaanse badplaats Agadir. Dat melden meerdere buitenlandse media. Opmerkelijk: de dader probeerde na de aanval al zwemmend te ontsnappen.
Today in the curriculum of my bootcamp they were introducing the concept of require and require_relative. However the example they used had classes and so I did some digging and are ruby classes somewhat similar or conceptual close to react components? I mean you build it so that when it is passed data it builds an object and in react you pass a component data to create DOM elements. Is this conclusion accurate?
New submitter Klaxton shares an excerpt from a new report released today by the International Energy Agency (IEA): Global methane emissions from the energy sector are about 70% greater than the amount national governments have officially reported, according to new IEA analysis released today, underlining the urgent need for enhanced monitoring efforts and stronger policy action to drive down emissions of the potent greenhouse gas. Methane is responsible for around 30% of the rise in global temperatures since the Industrial Revolution, and quick and sustained emission reductions are key to limiting near-term warming and improving air quality. Methane dissipates faster than carbon dioxide (CO2) but is a much more powerful greenhouse gas during its short lifespan, meaning that cutting methane emissions would have a rapid effect on limiting global warming.
The energy sector accounts for around 40% of methane emissions from human activity, and this year's expanded edition of the IEA's Global Methane Tracker includes country-by-country emissions from coal mines and bioenergy for the first time, in addition to continued detailed coverage of oil and natural gas operations. Methane emissions from the energy sector grew by just under 5% last year. This did not bring them back to their 2019 levels and slightly lagged the rise in overall energy use, indicating that some efforts to limit emissions may already be paying off. "At today's elevated natural gas prices, nearly all of the methane emissions from oil and gas operations worldwide could be avoided at no net cost," said IEA Executive Director Fatih Birol. "The International Energy Agency has been a longstanding champion of stronger action to cut methane emissions. A vital part of those efforts is transparency on the size and location of the emissions, which is why the massive underreporting revealed by our Global Methane Tracker is so alarming."
If all methane leaks from fossil fuel operations in 2021 had been captured and sold, then natural gas markets would have been supplied with an additional 180 billion cubic meters of natural gas. That is equivalent to all the gas used in Europe's power sector and more than enough to ease today's market tightness. The intensity of methane emissions from fossil fuel operations range widely from country to country: the best performing countries and companies are over 100 times better than the worst. Global methane emissions from oil and gas operations would fall by more than 90% if all producing countries matched Norway's emissions intensity, the lowest worldwide.
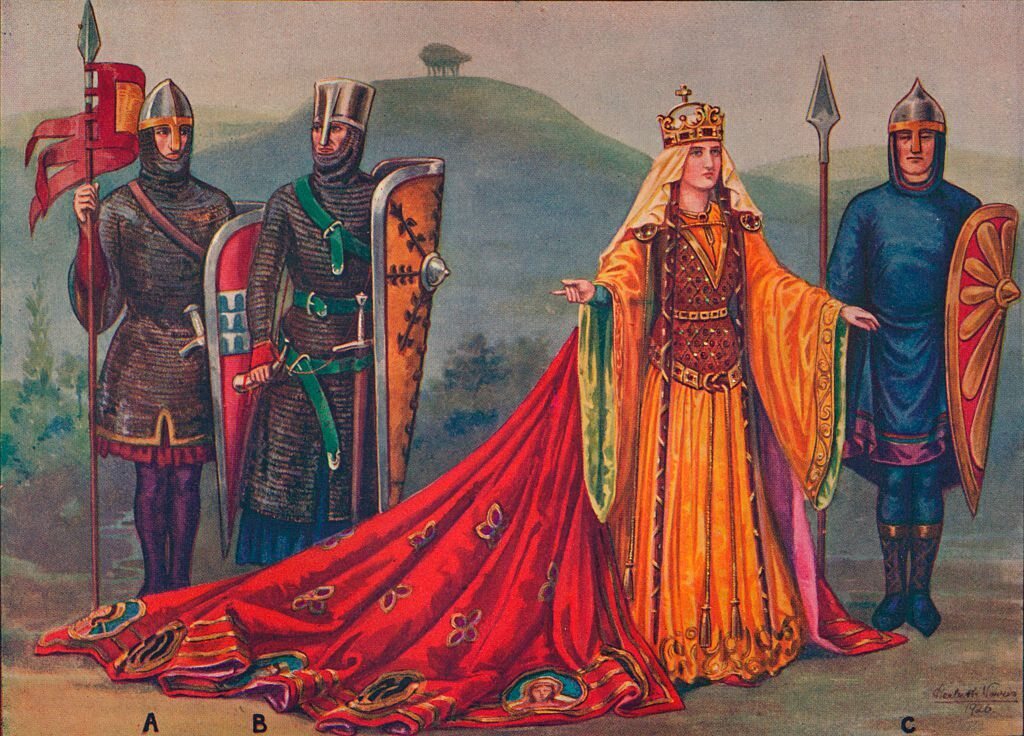
Damascus wasn’t in good shape in 1132. Assassins had just killed the king. The new king, Isma’il, was paranoid, greedy, and prone to violence—even brutally executing his own half-brother. Then, in a move that violates kingship’s most basic tenets, Isma’il planned to give Damascus away to the enemy. Enter Khatun Zumurrud, Isma'il's mother. She was not about to let that happen. In 1135, she had her own son assassinated and his body dragged through the streets.
Zumurrud wasn’t the only woman you didn’t want to mess with in the medieval Middle East. The Kingdom of Jerusalem, a Christian Crusader State founded by Europeans in 1099, saw two queens during this period, Melisende and her granddaughter Sibylla, whose political machinations, affairs, and rebellions could rival those of Game of Thrones. There was also Theodora of Jerusalem, the widowed queen who ran away to the Islamic world with the man she loved (who also happened to be her father's cousin), Alice of Antioch, who twice tried to take the throne, and more.
Atlas Obscura talked to Katherine Pangonis, whose new book, Queens of Jerusalem: The Women Who Dared to Rule, explores the complicated lives and legacy of the forgotten women who ruled the medieval Middle East.
What was the role of women in the medieval European world? In the Crusader State of Jerusalem?
At this time, women are very much second-class citizens. They have limited rights in terms of inheritance, owning property, their marriages. Women aren't meant to be in power unless they're protecting their husband's land or his interests. So that's one of the places in which it's acceptable for a woman to have power and that's the same in Europe as it is in the Middle East.
What I found quite interesting was that the unique instability and this constant state of crisis in Outremer [another name for the Crusader States] gave women more opportunities to not just inherit power, but also to wield it.
Does there have to be instability to upend the patriarchal structure?
That's generally a key part of women getting power. Basically, for women to take power, there has to be a shortage of suitable men—either sons aren’t being born or kings and heirs are dying.
So if you look at the example of Matilda of England. She's an English queen who, in theory, would become one of the first queens regnant. Her father, Henry I, has a son and heir, but then his son is killed in the wreck of the White Ship. And he names Matilda heir and she's a direct contemporary of Melisende [of Jerusalem]. So it's a great comparison because Melisende is going through something similar in the Middle East.
The difference is that in the Middle East, there isn't the possibility of having a succession crisis because the Crusader States are so fragile. They're in danger all the time. They can't afford a civil war of the sort that England then has over whether or not Matilde should inherit, a civil war that lasts well over a decade.
Tell us more about Queen Melisende of Jerusalem. How did she come to power?
Melisende is the daughter of Baldwin II, the third king of Jerusalem. And Baldwin has four daughters and no sons, and he makes it clear from quite early that Melisende’s the heiress to Jerusalem. Then she's married to a suitable man, a guy called Fulk of Anjou. And Fulk is 100% expecting to be named the sole heir to the kingdom. However, on Baldwin's deathbed, he changes the rules. And he says, in fact, I'm leaving my kingdom in three parts to Melisende, Fulk, and their baby son, which is obviously infuriating to Fulk.
Then there's this major scandal that erupts very shortly after they come to power—someone accuses Melisende's cousin, the Count Hugh of Jaffa, of treason and challenges him to trial by combat. There's a rumor that Melisende was having an affair with her cousin. And then this plunges the Kingdom of Jerusalem into what is tantamount to a civil war. Hugh rebels and allies with the Egyptians of Ascalon and tries to fight Fulk and is defeated. After that, Hugh is sentenced to exile. And while he waited to be exiled, there's an assassination attempt made in his life. He gets stabbed very badly and then dies there shortly after.
Melisende at this point loses her temper. She’s just is so furious about Hugh’s death and about being dragged into this scandal that she suddenly really comes into her own and starts asserting her authority. Fulk is genuinely terrified of her. And from that moment forward, Melisende's name is on charters. We start to see her influence in making donations to various causes, such as the military orders, the Church, and then—Fulk dies! This leaves Melisende as regent for her son because he’s too young to rule.
And what's even more remarkable is that even once her son comes of age, Melisende keeps ruling and doesn't surrender power to him. Eventually she goes to war with her son over who should rule the kingdom. And even when she's defeated, she's not really excluded from politics. She just has to take a step back. She was a very powerful woman with a very magnetic personality who had been very clever in building up serious alliances in her kingdom.
What’s the legacy of the Crusader States and the women who ruled them?
It's a hard question because the Crusades were very bad. There's mass genocide and it's proto-colonialism. It's a very thorny topic. So, I mean, a hugely negative legacy, to be honest with you.
When it comes to the women of the Crusader States, I think Melisende's rule did influence the roles women play in medieval Europe. They saw women commanding in the Middle East, and that strengthened the case for women to have more power back home.
I also think it's very important to know that women were wielding power on both sides, both Christian and Islamic. That's often not what people expect. People often think of medieval princesses sitting alone in towers. If they think of Islamic princesses, they think of women in harems not able to go outside or be educated. But we know Saladin’s wife [Ismat ad-Din Khatun, who in 1176 married Saladin, the Muslim sultan who took back Jerusalem from the crusaders in 1187] is writing letters to him on an almost daily basis and was commanding negotiations and sieges. The myths aren't always true.
Why have these women been overlooked?
Because the chronicles are written by men. And they're pretty much always written by churchmen as well and obviously, in medieval times, churchmen aren't having a lot of experiences and interactions with women. So there's just a lot of discomfort about including the deeds of women in the chronicles because they're not considered to have the same power and importance as men. The chronicles often attribute things done by women to men.
And then that, in turn, influences how much modern historians write about women because if there's less source material, it's much harder to focus on them because there's less evidence for what they did. So the project of my book really was going through and collecting all the evidence for the deeds of these women and trying to string it together in a compelling and accurate way.
‘Het Laatste Nieuws’ en ‘VTM Nieuws’ verrassen met een misdaadpodcast, ‘De kroongetuigen’, een bewerking van de populaire documentairereeks op tv. En dat is meteen een primeur voor Vlaanderen. “De verhalen zijn nog beklijvender als je ze enkel hoort.”
The man behind these comics is RandoWis from Singapore. He bases all of his characters on real people and gathers the inspiration for the comics from his daily life and funny situations. Take a look at some of his best comics below.
“Thank you for watching my art and comics, I’m really grateful for that! If you like them comics, then stick around and tell your friends to share the love!”
Huawei verkoopt zijn Honor-merk om de banen van medewerkers te redden, zo is op te maken uit een afscheidstoespraak van de ceo van Huawei. Het gaat in totaal om 'miljoenen' mensen die een baan hebben die afhankelijk is van het succes van het dochtermerk, aldus de ceo.
Athlete endorsements are meaningful to people buying sporting goods. Want some basketball shoes? Check out what Steph Curry's wearing, if those kicks can keep his wonky, hundred-million-dollar ankles safe, chances are they'll work for you too. Tiger Woods ain't hackin' round the fairways with no crappy golf clubs, and you can probably trust Roger Federer to pick a half-decent tennis racquet.
Bij een aanval van de taliban op een militaire basis in Afghanistan zijn tien soldaten om het leven gekomen. Volgens een legerwoordvoerder groeven de aanvallers een tunnel tot onder de militaire basis, waarna ze hun explosieven tot ontploffing brachten.
De Mechelse gemeenteraad heeft dinsdag beslist zich volgende week maandag tijdens de algemene vergadering van Eandis te onthouden bij de stemming over de deal met State Grid Europe Limited. Een aantal gemeenten uit de rand ten zuiden van Antwerpen, met onder meer Mortsel, Edegem en Hove, stemden tegen de deal.