Buying reliable USB-C cables has just gotten easier on Amazon, as the retailer has added non-compliant cables to the list of items prohibited for sale.
Any USB-C™ (or USB Type-C™) cable or adapter product that is not compliant with standard specifications issued by "USB Implementers Forum Inc."
Non-compliant USB-C cables can have adverse affects on a device, as Google engineer Benson Leung found out when a faulty cable destroyed his Chromebook Pixel. The engineer has since tested hundreds of cables, calling out vendors like OnePlus for not complying to USB Implementers Forum standards.
Really great news, but we all have to continue to be vigilant and call out any bad products we find on Amazon and other stores (both online and brick and mortar) as we find them.
For more on the USB Type-C standard and how it affects your devices, be sure to check out our extended coverage from the link below:
On-demand streaming music is inevitable, so Spotify is taking whatever fuel it can get to win the race against Apple. Whoever can sign up customers faster to consume their data and network effect could earn money off them for a long, long time. So it makes sense that Spotify would be willing to raise money at ugly, exploitative terms now for a better chance at earning those riches later.… Read More
I used to think Star Wars was the story of C3P0 and R2D2, but The Force Awakens suggests Anakin's lightsaber may be the talisman that ties the room together. This fantastic video by youtuber Christopher Sherwood shows us that iconic weapon from inspiration up to its place in the current story.
Adobe and Dropbox are making it easier for users on the go to access and work on PDF files store in the cloud with tighter integration between Acrobat Reader and Dropbox on Android. Users can now access their PDF files stored in Dropbox from within the Acrobat Reader app once updated to the latest versions of each.
To get started, you can add your Dropbox account to the Acrobat Reader app, which will then give you access to your PDFs stored in the cloud. The integration works in reverse as well, with the Dropbox app offering an option to "do more" with your PDFs, which will then open them in Acrobat Reader. Any changes made will be automatically saved back to Dropbox.
If you're anxious to test out the integration, you can grab the latest versions of Dropbox and Adobe Acrobat Reader on Google Play.
Twitter is working to make it easier for people with visual impairments to access and understand images uploaded to the site. Although screen readers and braille technology work efficiently with text posts, images have been out of reach — until now. Starting today, people using the iOS and Android apps will be able to add descriptions for images they post on the site.
Visually impaired people can now "see" images on Twitter
Using up to 420 characters, people can provide details of the image they are tweeting. The description can then be accessed by the visually impaired and be read like any other text post using their assistive technology.
Last year, research showed that tweets with photos drive 313 percent higher engagement....
For his most recent cover of Bob Dylan’s Just Like a Woman, Jeff Buckley’s creative team has pulled out all the stops. Dropping today is an interactive music video with a gabazillion possible iterations for the viewer to explore, creating a unique listening experience every time. In Buckley’s new video, the listener can click on various panels of the video to change the story… Read More
USB-C is the shiny new thing, but there's a lot more to it.
More people every day are picking up Android phones with a new power port on the bottom. MicroUSB has started the slow march out, and USB-C is taking its place. It's an unusual port that does a whole lot more than charge your phone, and the companies that make third-party cables for everything have been learning as they go that USB-C is wildly different from what we've been using up to this point.
It's a change that has brought about a ton of questions regarding safety and extended usage over time, so we've put together this handy little FAQ to get you ready to use USB-C.
Why the switch to USB-C?
We've been using microUSB in lots of things for a long time now. As an industry standard, it saved many people from needing to worry about using multiple kinds of cables to charge their various gadgets. (So long as those gadgets all used microUSB.) USB-C takes that idea and expands it to a single port that can be used on any kind of computer, not just the small one you keep in your pocket. This oval port aims to replace microUSB, miniUSB, and the rectangular USB-A port you see in desktops and laptops.
Not only is it universal, it's more capable than all of these other ports combined. USB-C enables faster data transfer between two devices and significantly faster charging of all your devices. It's a significant step forward, but because there are already a massive number of devices in the world with other USB ports it's going to be a slow step forward.
Will my battery actually charge faster with USB-C?
Yes. Sort of. Here's how this works.
The USB-C spec is capable of delivering power at significantly greater rates than anything you're using to charge your phones and tablets right now. For example, Google's Pixel C includes a 15W charger that will charge the tablet significantly faster than a Quick Charge 3.0-enabled USB-A power adapter. Google's Chromebook Pixel 2 includes a 60W charger to charge the massive battery inside that laptop within 2 hours. MicroUSB isn't capable of delivering that kind of power safely.
That said, USB-C phone chargers for the Nexus 6P and Nexus 5X charge at a similar rate to Quick Charge 3.0. Battery capacity and safety come in to play here, so you won't be seeing phones charging fully in minutes or anything like that. It's a very fast charge, but if you're up on current-generation charging tech you won't notice any significant difference on a phone. Five or 10 minutes, maybe.
When it comes to laptops and tablets, however, things get a lot more interesting.
What are the different kinds of cables?
In order to play nice with most of the computers out there today, as well as all of your current wall and car chargers, many phones with USB-C are shipping with a pair of cables. One has USB-C on both ends, and one has USB-C on one and and the rectangular USB-A on the other end. Shipping both cables ensures you're able to connect to everything, but it also ensures you get the fastest possible charging and data transfer by using the cord with USB-C on both ends.
Will I need new power adapters?
Eventually, yes. In fact, you should probably plan for it now.
USB-A power adapters aren't as capable as USB-C power supplies, and while you're able to charge your phone relatively the same way you can charge your phone right now with your current power adapter, things like supporting multiple rapidly charging USB-C phones and tablets on the same adapter is possible with USB-C. At some point, you're going to want to update.
Why hasn't every phone manufacturer switched to USB-C yet?
Phones and tablets are planned months in advance, and the phones we're seeing released now with microUSB still were being planned before the USB-C spec was finalized. Manufacturers had to choose between rushing to support the new standard or waiting a year. For a company like Samsung, which already had invested significant resources in the microUSB-powered Gear VR, rushing to support a new standard this generation didn't make sense.
What about the articles I read about faulty USB-C cables?
Some third-party manufacturers had problems early on making USB-C cables that followed the spec and were safe to use. This meant some particularly nasty side effects that resulted in damaged laptops, phones, and testing equipment. When you have a massive retailer like Amazon allowing new products to be listed regardless of regulatory clearance, and manufacturers willing to lie about whether their cables had passed safety checks in order to sell quickly in a market that is competing to see which cable is cheaper and somehow better at the same time, problems arise.
Fortunately, a lot of those issues are being dealt with in a number of key ways. For starters, extra USB-C cables are now much easier to purchase from the companies that made your gadget in the first place. We're also seeing public outcry and reviews from incredibly smart folks result in significant changes to cables being sold on store like Amazon.com. You can check the reviews section of just about any of the top-rated USB-C cables on Amazon right now and find commentary regarding the quality and safety of the cable. Here's a great example of what to look for in the Amazon review.
How do I know I'm buying a safe USB-C cable?
The first step should always be your manufacturer. The company that made the hardware you're using either made the cable that goes with it themselves or contracted out to a trusted source to get those cables made. Those cables are designed to work with the hardware you are using. With exception to a recall performed by Apple, cables provided by the manufacturer have all been safely made. If you're ever not sure, buying cables from your manufacturer or a trusted brand is a good way to go in this situation.
If you're specifically looking for third-party cables and want to confirm the quality, you can look in the reviews section for that product on Amazon for detailed analysis or check out Google Engineer Benson Leung's suggestions on quality USB-C cables.
Are you sure this USB-C thing isn't a fad?
While nothing is ever set in stone, USB-C is a standard that has been adopted by Apple, Google, LG, HTC, and dozens of other companies already. It's a new standard, which means it'll be a while before most folks are only using USB-C, but it looks like that is the general direction things are heading. If you only end up using USB-C to charge your phone for the next year or two, that's okay. If you dive in head first and only use things that are USB-C enabled, that's OK, too.
Google has introduced a new home phone service, Fiber Phone. The service will only be available in select areas, but will offer unlimited local and nationwide calling for just $10 a month, with the same affordable international rates as Google Voice already offers. You'll also be able to utilize standard features like call waiting, caller ID and 911 services with ease. From Google's announcement post:
For $10/month, you get unlimited local and nationwide calling, and the same affordable rates as Google Voice for international calls. You can keep your old phone number, or pick a new one. You can use call waiting, caller ID, and 911 services just as easily as you could before. Fiber Phone can also make it easier to access your voicemail—the service will transcribe your voice messages for you and then send as a text or email.
To start, Fiber Phone will only be available to customers who live in select Fiber cities. Google plans to continue to roll it out over time to residents in all of its Fiber cities. The installation kit from Google will include a Fiber Phone box that will make your existing home phone hardware compatible with the service. You can sign up now to keep up to date on the latest information about Fiber Phone from Google.
Your phone has been able to talk to you for years, but it started out sounding like a computerized toaster with laryngitis. Google has improved its text to speech (TTS) voice over the years, and a new version is rolling out now. The change is fairly dramatic, with the new voice sounding much more natural and pleasant.
You can hear the old voice above on the right phone and the new one on the left.
PowerPoint lets you put presentations together in a snap, but your slide shows can be dull and boring if you only know the basics. It’s time to learn how to customize templates, add animations and slide transitions, make slide notes, and more.
This post is part of Microsoft Office Week, a series at Lifehacker where we offer tips to get started with or master Microsoft Office. Want more? Be sure to keep an eye on the Office Week tag page throughout the week.
Get Up and Running With PowerPoint Quickly
PowerPoint is fairly easy to use, and if you’ve used other Microsoft Office applications before, the menus and toolbars will look familiar. You have basic menus for opening and creating files, and just like Microsoft Word, there’s a “ribbon” running across the top of the application’s window that contains all the formatting options and contextual commands you’ll need. You’ll also see options for creating shapes, inserting images, designing slide layouts, and choosing interesting slide transitions.
How to Do the Most Common, Essential Tasks in Microsoft PowerPoint
No matter what kind of presentation you’re putting together, you’ll need to know how to work with templates, tweak the Slide Master, prepare your slide notes, and maybe even add an animation or two. Here are a few of the fundamentals you should know.
How to Customize Templates
Templates are like blueprints for your slide show. They also make it easy to create a slide show layout once and use it over and over again. Say, for example, you were teaching a class about tigers. You could load your pre-made template and create a separate slide show for each lecture, but still always have the same layout, cool fonts, and background images.
You can use the pre-made templates that come with PowerPoint 2016, download templates from reputable sources online (like from Microsoft themselves), or even create your own. Of course, you can also customize any template you download or have installed. Once you open a fresh or pre-made template, go to the View tab on your menu bar (it’s above the ribbon), then choose Slide Master in the ribbon bar. On the left side, you’ll see the Slide Master at the top and all the different slide layouts in the template below it. Any changes you make to the Slide Master at the top will affect each and every one of the different slide layouts, but you can also customize things on a slide by slide basis.
If we return to our tiger lecture example (shhh that’s totally a thing), you could pick a pre-made template and modify it to be more, well, tiger-y. You could change the background of every slide to an awesome tiger photo, for instance:
Select the Slide Master
Right-click the background (or hit Shift+F10 to bring up the context menu) and select Format Background
In the Format Background window on the right, go to the Fill tab
Select the Picture or texture fill radio button
Under “Insert picture from,” select either File, Clipboard, or Online
Choose your awesome tiger photo and click Insert
In the Format Background window you can also choose solid colors, gradient colors, and patterns to fill the background of your slides if you’d rather not use a photo. Or if you have a bunch of cool tiger photos you want to use, you can set the background for each individual slide using the same process above. The same goes for formatting any shapes (random colored squares, circles, and rectangles your template might have). Right-click the shape, select Format Shape, and tweak things the same way you would in the Format Background window.
If you want to change the font used in your template slides, mouse over a text box, right-click, and choose your font style and size from the dropdown menu. You can set separate fonts and colors for titles and for several levels of text. Again, you can do this on a slide by slide basis, or set the style throughout the entire template on the Slide Master.
Of course, every object on each slide can also be moved around or deleted. If you want to adjust an object, left-click it to select it. Once selected, you can click and drag the item, adjust the item’s size, or hit the delete key to make it go away. When you have your template the way you like it, you can save it for future use:
Go to File > Save As
Choose OneDrive, This PC, or Add a Place
Select PowerPoint Template (*.potx) from the dropdown menu
Name your template
Click Save
Now the next time you want to throw together a tiger lecture, you can start with the same template and just fill in all the new information. You can also share your template with other tiger enthusiasts so they can create their own slide shows as well.
Last but not least, let’s say you need to give your tiger presentation to some important businessmen and you’ve been told they hate cool photo backgrounds and nifty fonts. Well, you can apply any template and its associated color and style themes to any slide show that’s already made. Just go to the Design tab, pick a new pre-made template, or browse for a template file you have already. All of your information will stay as it was, but reformatted to fit the new template. There may be some jankiness for specific slides, but it’s nothing you won’t catch when you give them a once-over..
How to Align Images and Other Objects
When you add images, charts, graphs, shapes, or other objects to a slide they’ll pop up right in the center. You can select the objects to resize them or drag them around individually, but you can also align them with each other or other objects in the slide so they look nice and orderly. Here’s how to do that with just a few clicks:
Hold the Shift key and select each object you’d like to align
While they’re selected, go to the Format tab on your menu bar
On your ribbon bar, select Align
Select “Align Selected Objects” from the dropdown menu (it may have a check mark already)
Select the Align dropdown again and select alignment type
There are a few options to choose from: Align Left will align the left side of each object with the furthest left object selected. Align Right does the same thing with the furthest right object as the anchor point. Align Center will center all selected objects on the horizontal center point of the selected objects. If the objects are on the same horizontal line, they’ll end up on top of each other (same goes for left and right alignment too). Align Top, Middle, and Bottom do similar things, but work with the vertical instead of the horizontal. That means if objects are on the same vertical line and you align to the top, bottom or middle, they’ll end up on top of each other that way as well. You can also “Align to Slide” in the dropdown menu and align objects with the sides and center of the slide as opposed to aligning them in relation to each other.
The Align dropdown menu also has another useful feature: you can evenly distribute objects so their spacing will be equidistant from each other. Select your objects, go to the Align menu, and select either Distribute Horizontally or Distribute Vertically. If you have “Align Selected Objects” checked, the two outside objects will stay and the middle object will perfectly space itself between the two. If you have “Align to Slide” selected, the objects will perfectly space themselves across the span of the slide.
How to Add Slide Animations and Transitions
Once you have all your objects where you want them, you can have a little fun and add animations to them. You can make text appear one line at a time with a dissolve effect, or have images fly into view from off-screen. PowerPoint makes adding animations super simple:
Go to the Animations tab
Select the slide you’d like to animate
Select the object you’d like to animate
Choose an effect in the ribbon
Keep in mind, animations play in the order you add them. If you want an object or some text to appear first on the slide, add that animation first, then continue to the next one. You can always re-order the animations on the ribbon bar or in the Animation Pane, but it’s easier to just animate everything in the order you want it.
If you want some snazzy transitions between each slide, that’s even easier. Go to the Transitions tab, select the slide you want to add a transition to, then choose a transition from the ribbon bar. Whatever effect you pick for that slide will be what transitions into that slide from the previous slide, not out of it and into the next slide.
If you’d like to jot down notes for each of your slides and see them when you present them without the audience seeing them too, PowerPoint has that built right in. While in Normal View, select the slide you’d like to add notes to and click in the text box at the bottom of your screen (it should say “Click to add notes” if there’s no text yet). Type in your notes and you’re all set.
If you want to use those notes during your presentation, you have two options: you can print them out, or use Presenter View during the presentation. To print out your slide notes, go to File, choose Print, then select Notes Pages in the Print Layout menu. To use Presenter View:
Go to the Slide Show tab
Select From Beginning or From Current Slide
Hit Alt+F5 or use your mouse to tap the three dots button in the lower, left-hand corner of your screen
Select “Show Presenter View”
Presenter View shows you the current slide, how many slides are left, how much time you’ve been on the current slide, the next slide in your presentation, and your notes for each slide. If you’re projecting your slide show on a separate monitor, projector, or online, only you will see Presenter View.
Best New Features In PowerPoint 2016
PowerPoint has gotten a little sleeker and a little more user friendly in more recent versions, but it’s still the same slide show-making machine people have used for years. That said, there are a few welcome new features in PowerPoint 2016:
You can search the ribbon: On the Windows version, you’ll see a “Tell me what you want to do” box above the ribbon bar (the little light bulb symbol). Here, you can type in any question you have and PowerPoint will find what you want. For example, you can ask it how to insert a picture, how to add animations, or how to create and add charts. For whatever reason, this isn’t included in the Mac version.
Collaborate on presentations in real time: PowerPoint 2016 now lets people work on the same slide show at the same time. You can see when someone else is working with you and also see exactly what they’re working on in each slide.
Draw on touch-enabled devices: If you’re working with PowerPoint 2016 on a tablet or other touch-friendly device, you can use the Draw tab to make handwritten annotations. You can also draw shapes and write out equations.
Beyond that, PowerPoint’s changes are pretty minor: a new high-contrast black theme, some new slide transitions, and some new chart types. Hey, if it ain’t broke...
Alt+H, F, and then S: Change the font size for selected text.
Ctrl+X, Ctrl+C, Ctrl+V: Cut, Copy, or Paste selected text, object, or slide.
Shift+F10: Display the context menu for the selected item.
Alt+N, P: Insert a picture.
Alt+H, S, and then H: Insert a shape.
Alt+G, H: Select a theme.
Alt+H, L: Select a slide layout.
Alt+W, Q: Change the zoom for the slide.
Alt+H: Go to the Home tab.
Ctrl+Z: Undo the last action.
Ctrl+S: Save the presentation.
Alt+S,B: Start the slide show.
Esc: End the slide show.
Get familiar with these and you’ll be able to whip up a presentation in no time.
Additional Reading for Power Users
There is a lot you can do in PowerPoint, but we’ve barely scratched the surface here. If you want to pop the hood and really get your hands dirty, here are some other resources worth checking out:
Use the right charts for your data: A chart can be a powerful way to represent data or it can be confusing and make your material fall flat. Make sure your charts and graphs are easy to interpret.
Avoid common presentation problems: Make sure your slides aren’t too crowded or complex, your presentation isn’t too long, and your message is clear.
Redirect your audience’s attention: Use the B key to black out your PowerPoint slide show and bring the focus back to you. Hit the B key again to bring the previous slide back up.
Get some sweet add-ins for Microsoft Office: Random number generators, specialty graphs and charts, and built-in Wikipedia search. These add-ins work with the entire line of Microsoft Office products.
PowerPoint is still a presentation powerhouse and essential skill for anyone who wants to run a focused meeting, wow investors, or reveal important information to the right people. If you spend some time working with it, you can make your presentations engaging—and maybe even fun.
Google is constantly beefing up its library of Street View imagery, but rarely does that warrant a blog post. Not so with a new batch of locations form Thailand. Google has uploaded more than 150 locations from Thailand, including the most beautiful historical sites in the country.
Google was good enough to include a few direct links to the coolest stuff it has captured including the ancient capital of Siam in Sukhothai Historical Park.
MedStar Health was forced offline this week after hackers took over its computer systems. An unconfirmed virus reportedly strangled the network and rendered it completely useless. Because of the attack, the healthcare operator’s 30,000 staff members and 3,000 affiliated physicians can’t access online record systems, check their emails, or look up phone numbers. Patients also can’t book appointments, according to the Associated Press.
A MedStar spokesperson hasn’t yet responded to a request for comment from The Verge, but the company told the AP that it couldn’t confirm what kind of malware was affecting its system and said its systems were still offline yesterday. The healthcare provider, which operates 10 hospitals in Washington, DC...
As Pinterest continues to ramp up the parts of its business that generate revenues (namely advertising), it’s also expanding the free features that might entice users and brands to linger around for longer and engage more on it’s image-based social network for sharing ideas. Today, Pinterest unveiled a new kind of dynamic Rich Pin called a How-to Pin, which provides… Read More
Look what we have here: another WhatsApp beta update that adds lots of new things. Who knew? Alright, I guess we all knew that the team was on a roll of new features lately, but this one is more interesting than many of the previous beta updates. In version 2.12.560 of the app, we get a new Reply button in the notification, multiple selection and actions on contacts and groups, and there's a little easter egg from a previous version that we hadn't talked about before.
One of the biggest hurdles with wearable tech is actually wanting to wear the things. It sounds vain, maybe, but if you're not aesthetically inclined to wear a smart watch or an activity tracker, all promise of function is worthless. In an effort to be more attractive (literally) to female shoppers, we're seeing wearables take on a jewelry feel: Jawbone adapted a metal hook closure, Mira has a design that hides its tracker inside of a cuff bracelet, and Tory Burch designed a pendant necklace to disguise Fitbit's Flex tracker.
An update to the Android version of Google Photos was released yesterday that adds an important feature from the iOS version of the app: non-destructive editing. The updated Android app will now track and save any individual edits you make to a photo, letting you go back — at any point — to adjust those edits or undo them completely.
Before the update, Google Photos would save an entirely new version of a photo every time you made new edits and tapped save, making it easy to wind up with an app full of multiple versions of (nearly) the same photo. Worse, if you opened up one of those edited photos, you weren't able to go back and adjust any of the edits you made — any further changes just created another new, edited version of the...
The FBI has unlocked Farook’s iPhone 5c involved in the San Bernardino shooting using an alternative method that didn’t involve Apple. Given this new development, the Department of Justice is dropping the case. The government has been evasive about this alternative method, but it looks like it worked. The filing is very succinct. “The government has now successfully accessed… Read More
Microsoft Word is easily the biggest, most popular word processing program available, but it does a lot more than just edit text and TPS reports. If you’ve been telling yourself that you’ll finally learn Word’s ins and outs, now’s the time to actually learn how to edit styles, add a table of contents, and more.
This post is the first part of Microsoft Office Week, a series at Lifehacker where we offer tips to get started with or master Microsoft Office. Want more? Be sure to keep an eye on the Office Week tag page throughout the week.
Get Up and Running with Word Quickly
Of all of the Microsoft Office programs, Microsoft Word is probably the simplest from a user interface perspective. If you’ve ever used a word processing program in your life, you’ll recognize the menus for opening and creating files in the top left corner. The larger menu that runs across the top of the document Microsoft refers to as the “ribbon.” The ribbon has all the formatting tools you’ll need, as well as a few contextual commands that change depending on which tab you’re on.
How to Do the Most Common, Essential Tasks in Microsoft Word
Of course, everyone’s needs are a little different, but considering most people use Office in an office setting, we’re willing to bet you’ll need to do things like edit styles, compare two documents, prepare a table of contents, and more.Let’s go ahead and cover some of those common tasks.
How to Apply and Edit Styles
A style in Word is a preset formatting for your document. This is what the document looks like, so it includes the font, font size, paragraph style, and so on. Creating or changing a style makes it possible to alter the look of a document all at once so you don’t need to go through and highlight individual sections and make specific changes. You can do things like set a universal heading style,or change what the default bulleted list looks like.
For example, if you’re working on a book, you might get a list of style guidelines from a publisher. Or if you’re working on weekly interoffice memos, a style is an easy to way to create a format guideline so every one you make looks the same way every time. Plus, you get the flexibility to change styles at any time, so if one department likes their memos one way, but your boss prefers a different style, you don’t have to change a bunch of formatting every time you open a new document.
To apply a style, make sure you’re on the Home tab, select a block of text in a document that you want to alter, and then click the Style menu in the ribbon. For example, if you want to make a heading in the middle of a block of text, you’d select the text you want as a heading, then click Styles > Heading 1. It’s as easy as that.
Making your own specific styles is pretty easy too. This is useful when you’re writing something consistently, like a newsletter or a book, and want a specific set of rules you can easily apply to a document as a whole. For example, you might want to change the font size of the default heading option, or change how creating a list works. Here’s how to do it:
From the Home tab, click on Styles Pane.
Click New Style or select the style you’d like to edit.
You’ll get a pop up window to edit a number of parameters here, including type, basis, and formatting. Click through the options you want to change.
If you’re confused about what each term means, don’t worry, it’s pretty straightforward. Paragraph styles determine the look of the text on a paragraph level. When you apply this style, it’ll change the whole paragraph. Character styles determine the look on a character level, so you can make one word stand out. Table styles alter the look of tables, like the header row or how the grid lines work. Finally, list styles alter the look of a list, such as bulleted lists or a number scheme.
How to Add a Table of Contents to the Beginning of a Document
If you’re working with a big document, a table of contents adds quick navigation. Thankfully, creating a table of contents in Word is easy and it’ll update itself automatically as you add more to the document.
Word’s automatic table of contents generator takes each heading you add to a document, and then creates the table of contents based on that. If you plan on creating a table of contents, make sure you style each of your section titles with a heading.
Click an empty paragraph where you want to insert the table of contents.
Click the References tab.
Click Table of Contents and then select the appearance you want to use.
That’s it. Word automatically updates that table of contents any time you add or alter a header.
How to Compare and Merge Two Documents
If you have two versions of a document, whether it’s because someone did edits in their own copy, a cloud backup failed, or if you’re just trying to hash out what exactly changed between two versions of the same thing, you’ll need to use the compare and combine functions.
If you just want to see what changes exist between two documents, you can compare them. Here’s how to compare two documents:
Open one of the two documents you want to compare.
Click Tools > Track Changes > Compare Documents.
Pick your original document and revised document files.
Type in a name under “Label changes with” text field so you can tell the difference between the two documents. This way, Word will add a note telling you where each change comes from.
Combining a document works the same way, but the end result is a single document that merges the contents of both documents together so everything that’s the same is overwritten:
Open one of the two documents you want to combine.
Click Tools > Merge Documents.
Pick your original document and revised document files.
When the documents are merged, the differences between the two are highlighted. From here, you can go in and pick what you want to keep in the final version.
How to Format a Document Properly with Tab Stops and Indents
If you’re the type who formats a document by pressing spacebar or tab a bunch of times, it’s time to learn how to do it the right way: Using indents and tab stops. The video above shows off how tabs and indents work so it’s easy to understand, but let’s just sum up what the two terms actually mean.
Tab stops: A tab stop is the location a cursor stops after the tab key is pressed. In Word, it’s a way to easily align text. When you click the ruler in Word, a tab stop appears as a little curved arrow. When you tap the tab key, the cursor and text will jump to that arrow. If you add in multiple tab stops, you can make it so you can format text by simply tapping the tab key a couple of times to get it in place and perfectly lined up.
Indents: As the name suggests, indents determine the distance of the paragraph from the left or right margin. On the ruler, you’ll see two triangles that adjust the indentation. You can click either triangle and move it to change the indentation. The top triangle adjusts the indentation of the first line of a paragraph. The bottom triangle adjusts the indentation for subsequent lines (aka the hanging indent) in the paragraph. You can also click on the square below them to move both at the same time.
Learning how to use these indents and tab stops can make creating a document like a resume or academic paper a lot easier.
How to Add Citations and References
Academic papers are a beast to write, but Word makes creating bibliographies and citations super easy. Once you’ve created a new document and you’re writing that paper, you can add a citation with just a few clicks.
Click the Reference tab.
Click the Dropdown arrow next to Bibliography style and select the style you’re using for that paper.
Click the end of a sentence or phrase where you want to add the citation.
Click Insert Citation. In the Create New Source box, enter in all the info you need.
Once you enter a citation once, you can add additional citations from the same text by selecting a sentence, then clicking the Citations box and selecting the reference you want to insert. When you’re all done, click the Bibliography button and select either Bibliography or Works Cited to automatically generate the reference page for your paper.
The Best New Features in Word 2016
Word 2016 is a word processor—that means it doesn’t have to make giant, revolutionary leaps over its previous versions. However, Word 2016 does have a few improvements worth noting:
You can search the ribbon: In Windows, above the ribbon, you’ll see a “Tell me what you want to do” box. Here, you can type in any question you have and Word will tell you how to do it. For example, you can ask it how to insert a picture, how to format text in a specific way, or how to create lists. It’s basically a boring version of Clippy for the 21st century. For whatever reason, this isn’t included in the Mac version.
You can see collaborators edits in real time like in Google Docs: You’ve been able to work on Word documents as a team for a while, but Word 2016 adds in live edits, so you’ll see other people’s notes and updates instantly.
Smart lookup makes research a little easier: Word is now a little more connected to the web than it used to be. In Word 2016, you can right-click a word, then select “Smart Lookup” from the menu to look up a word’s definition, the related Wikipedia article, and top search results from Bing.
Other than those minor improvements, if you’ve used older versions of Word you’ll be right at home in Word 2016 within minutes.
Work Faster in Word with These Keyboard Shortcuts
Microsoft has full lists of every keyboard shortcut in Word for Windows and Word for Mac that are worth bookmarking,, but let’srun through some of the big ones you’re likely to use every day, and a few specific to word that are really useful:
CTRL+N/CTRL+O/CTRL+S: Create, Open, and Save a document.
CTRL+X/CTRL+C/CTRL+V: Cut, Copy, Paste
CTRL+B/CTRL+I: Bold, Italic
CTRL+A: Select All
CTRL+Z: Undo
CTRL+K: Insert a hyperlink
CTRL+P: Print a document
CTRL+H: Open Find and Replace
Shift+F3: Toggle Capitalization options
CTRL+SHIFT+C: Copies the formatting for selected text so you can apply it to another set of text with CTRL+Shift+V
CTRL+Shift+N: Applies the normal style to the selected text
Beyond that, Word supports universal text editing keyboard shortcuts like Shift+CTRL+Up/Down arrows to select whole paragraphs. These can make navigating and highlighting text a lot easier, and we’ve got a list of all of them here. If you use Word heavily, get to know these shortcuts, they will make your life better.
Word’s a big program and we can’t cover everything here. Here are a few more guides to help you push the boundaries of what Word’s capable of.
Six tips for better formatting: Formatting is a big deal in MS Word, and if you want to get better at skills like showing hidden characters, dealing with sections, and more, this post should help.
Everything you need to know about collaboration: Collaboration is a big part of Word. From tracking changes to learning how to use markup, this post covers everything you need to know about working on documents as a group.
Word might just look like a boring old text editor at a glance, but as you can see, it’s a lot more complex than most people give it credit for. Mastering it can take a long time, but once you have the basics and understand what’s possible in Word, you’ll be well on your way to being a Microsoft Word ninja.
Welcome to the roundup of the best new Android applications, games, and live wallpapers that went live in the Play Store or were spotted by us in the previous 2 weeks or so.
Please wait for this page to load in full in order to see the widgets, which include ratings and pricing info.
Looking for the previous roundup editions? Find them here.
Video network Vimeo has taken another step forward today with its efforts to better promote its original content – meaning those movies and programs available for rent or purchase on its network. Today, the company is making it possible for viewers to rent or buy films and series directly from their TV sets for the first time. This is feature is arriving through an updated Roku… Read More
Despite getting a drubbing from critics before its debut last Friday, Batman v Superman: Dawn of Justice charged to an impressive $170.1 million at the domestic box office over the weekend. According to Variety, that's the most any DC film has earned in theaters to date, the biggest March debut ever, and the sixth-biggest opening weekend in history.
When you decide that life needs to change, the biggest problem areas of your life will stand out. The gap between where you are and where you want to be is overwhelming. Don’t focus on the end point. Focus on the minor steps you can take to get there instead.
As entrepreneur James Altucher explains, focusing on fixing the big picture stuff can screw with your perceptions. While you’re planning for your big goals years down the road, you live in the day-to-day. The only thing you can change is how you behave today. So, focus on that:
Here are the habits I do every day. Most important – I don’t think about past or future. I just think: did I do these habits today? That is the only question I ask at the end of the day.
The minor improvements you make will start to compound over time. Sure, saving $5 at the grocery store isn’t going to make you rich, but practicing being aware of your spending can. Working on a side project for 5 minutes isn’t going to suddenly launch your own business, but it can lead you to thinking more constructively about how to do so. By focusing on the small things, you can impact the big things.
Holi is a spring festival in India and Nepal, also known as the festival of colours or the festival of sharing love. It’s a wonderful festival for participants but presents photographers with an amazing opportunity.
The festival happened in the last week so we thought we’d put together a collection of images from it (and previous years).
If you’ve been – we’d love to see your images from it in comments below!
Jennifer Null is impossible: her name can't be entered into most modern databases (plane reservations, wedding registries) because "null" is used to separate fields in databases themselves.
(more…)
In 2014 leaked documents from the Sony hack revealed that the MPAA helped Mississippi Attorney General Jim Hood to revive SOPA-like censorship efforts in the United States.
In a retaliatory move Google sued the Attorney General, hoping to find out more about the secret plan. The company also demanded internal communication from the MPAA and its lawfirm Jenner & Block, as well as several movie studios.
More recently Google requested a deposition of MPAA lead counsel Steve Fabrizio, who could possibly provide additional details on the case. These type of interrogations are part of the discovery process, but the MPAA argued that this would violate its First Amendment rights.
However, in a response submitted to a federal court in Mississippi this week, Google strongly disagrees.
“The MPAA’s attempt to invoke the First Amendment privilege to hide its efforts to suborn a public official to attack Google is wholly disingenuous and misunderstands the nature of the privilege itself,” Google writes.
Google points out that there’s is no chilling effect on speech in this case, as the MPAA’s lobbying efforts and anti-piracy focus are already widely known. In addition, they point out that the First Amendment privilege is limited and not applicable in this case.
Instead, the search giant informs the court that the Hollywood group is merely trying to keep its lobbying efforts out of the public eye in order to avoid scrutiny or embarrassment.
“It is simply not enough for the MPAA to claim that its associational rights would be ‘chilled’ because the MPAA would prefer that its covert lobbying efforts remain secret so that it can avoid scrutiny or embarrassment,” Google writes.
“It must actually show consequences which objectively suggest an impact on, or ‘chilling’ of, the members’ associational rights,” they add.
Another crucial point raised by Google is that the First Amendment privilege doesn’t protect lobbying, something the MPAA’s anti-piracy efforts would certainly fall under.
Turning the tables, the search engine argues that it’s the MPAA who are helping the Attorney General to breach Google’s First Amendment rights.
“There is something deeply troubling in the MPAA claiming the First Amendment privilege to shield its role in lobbying Attorney General Hood to threaten Google’s First Amendment rights.
“The MPAA should not be permitted to spend years lobbying a public official to suppress the speech of a business rival and then turn around and hide behind the very rights it was trying to squelch,” Google adds.
Google therefore asks the court to deny the MPAA’s motion to quash and order Mr. Fabrizio to appear at a deposition so he can be heard.
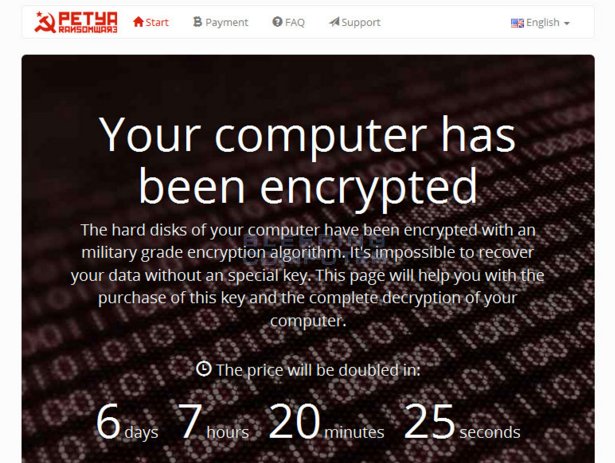
A month after a hospital in Hollywood was shut down by a ransomware infection that encrypted all the files on its computers and computer-controlled instruments and systems, another hospital, this one in Kentucky, has suffered a similar fate.
(more…)
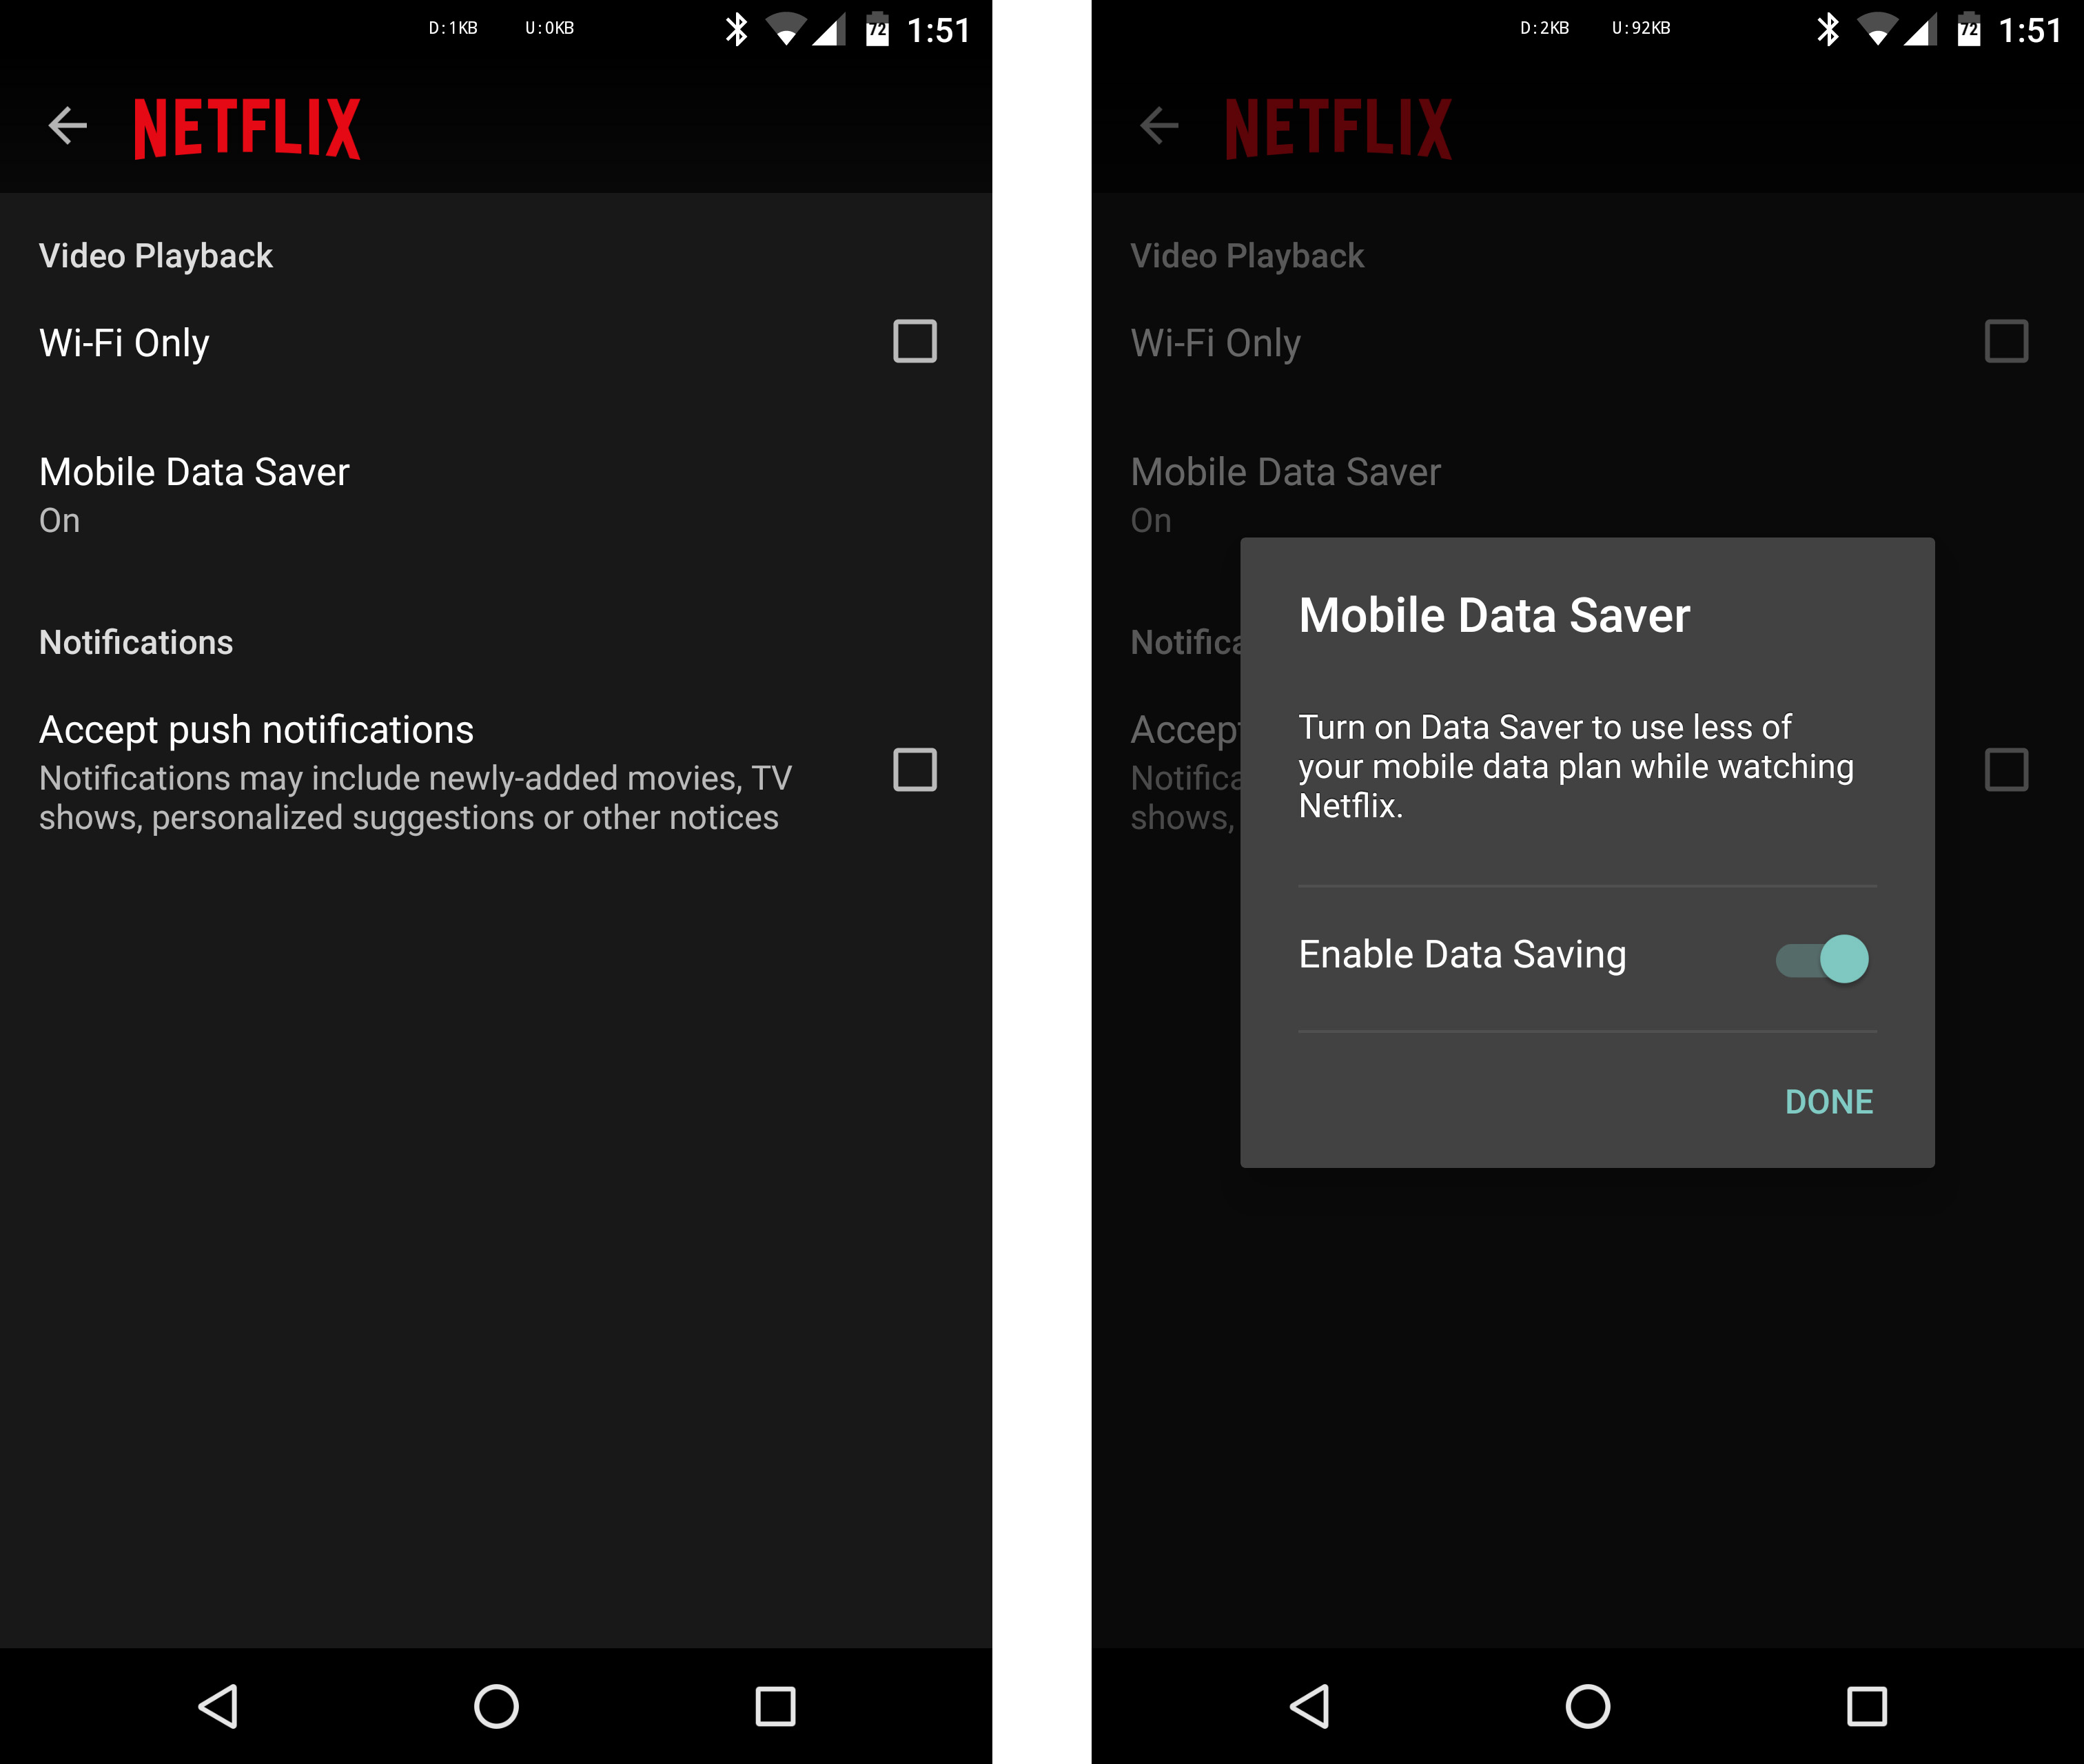
Netflix has been testing a mobile data saver option in its settings to limit the app's bandwidth usage on a data connection. We spotted it a couple of weeks ago, but as it turns out, the feature had been intermittently showing up for many users before that. Now the company is ready to make the option official.
Netflix explained on its blog that it's been testing the data saver and hasn't noticed any major issues with it.

 On-demand streaming music is inevitable, so Spotify is taking whatever fuel it can get to win the race against Apple. Whoever can sign up customers faster to consume their data and network effect could earn money off them for a long, long time. So it makes sense that Spotify would be willing to raise money at ugly, exploitative terms now for a better chance at earning those riches later.…


 For his most recent cover of Bob Dylan’s Just Like a Woman, Jeff Buckley’s creative team has pulled out all the stops. Dropping today is an interactive music video with a gabazillion possible iterations for the viewer to explore, creating a unique listening experience every time. In Buckley’s new video, the listener can click on various panels of the video to change the story…


 Your phone has been able to talk to you for years, but it started out sounding like a computerized toaster with laryngitis. Google has improved its text to speech (TTS) voice over the years, and a new version is rolling out now. The change is fairly dramatic, with the new voice sounding much more natural and pleasant.


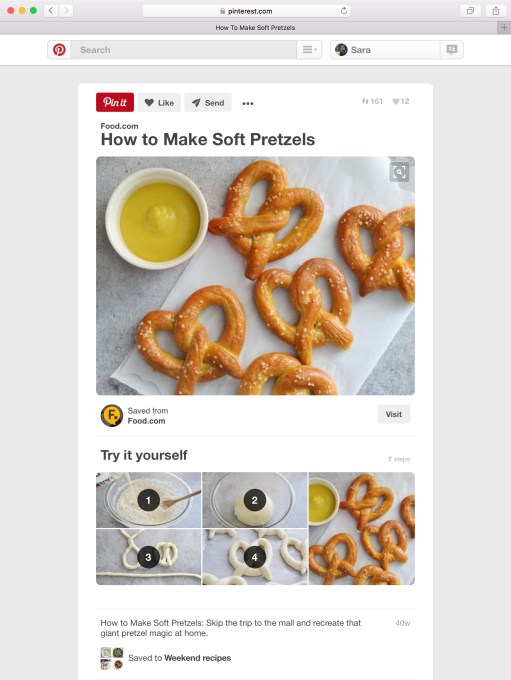 As Pinterest continues to ramp up the parts of its business that generate revenues (namely advertising), it’s also expanding the free features that might entice users and brands to linger around for longer and engage more on it’s image-based social network for sharing ideas. Today, Pinterest unveiled a new kind of dynamic Rich Pin called a How-to Pin, which provides…


 The FBI has unlocked Farook’s iPhone 5c involved in the San Bernardino shooting using an alternative method that didn’t involve Apple. Given this new development, the Department of Justice is dropping the case. The government has been evasive about this alternative method, but it looks like it worked. The filing is very succinct. “The government has now successfully accessed…


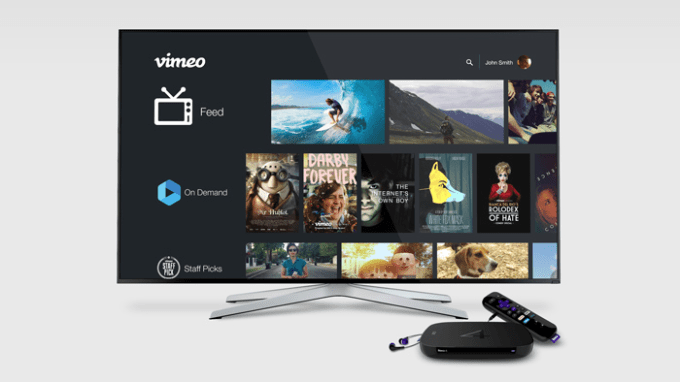 Video network Vimeo has taken another step forward today with its efforts to better promote its original content – meaning those movies and programs available for rent or purchase on its network. Today, the company is making it possible for viewers to rent or buy films and series directly from their TV sets for the first time. This is feature is arriving through an updated Roku…


 In 2014