Submitted by: Unknown (via Tastefully Offensive)
Tagged: poop , crayons , dog shaming , rainbow , pugs Share on FacebookShared posts
29 Mar 09:37
 Print Recipe

Glazed Easter Ham
by Ree
Maria Bakharevaокорок в докторе пеппере.
вообще эта телка потрясающую нямку готовит!
 Easter is coming, the goose is getting fat!
Wait. That’s Christmas.
And Christmas isn’t coming. At least not for 272 more days.
Okay, now that I’ve both confused and depressed everyone: Here’s the recipe for the yummy glazed ham I made on my show last Saturday—the same ham I’ll be making this Sunday for Easter brunch. It’s totally easy, exceedingly delicious, and results in a purty and glossy ham that’ll make your guests say “Oooooooh!” with wide, expectant eyes and, hopefully, hearty appetites because this ham could feed an army.
Here’s how I made it.
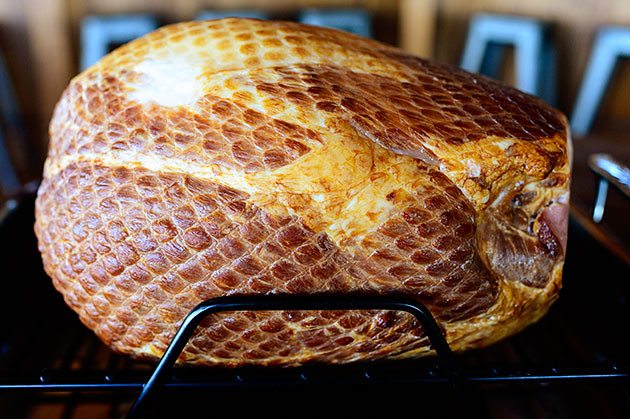 Get a big honkin’ bone-in ham. Fully cooked.
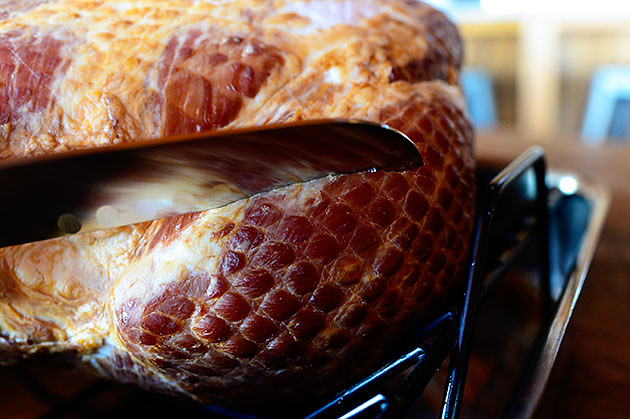 Use a really sharp knife to score a diamond pattern all over the surface of the ham: First cut lines in one direction…
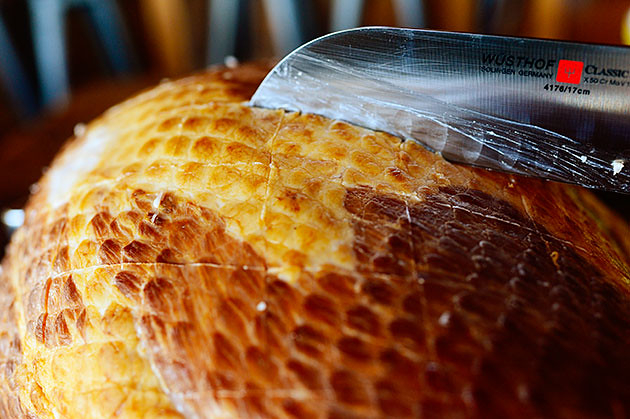 Then cut in the other direction.
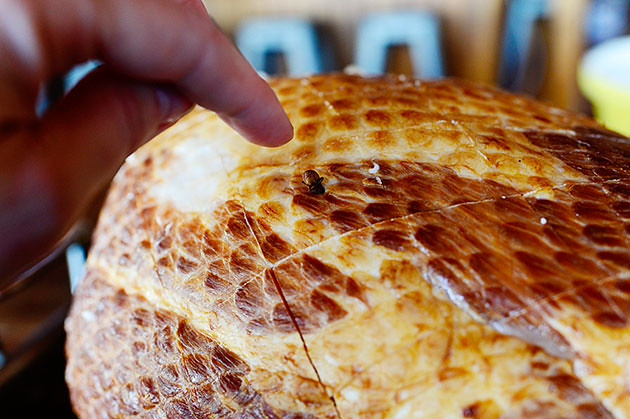 Grab a handful of cloves and poke them into the center of each diamond…
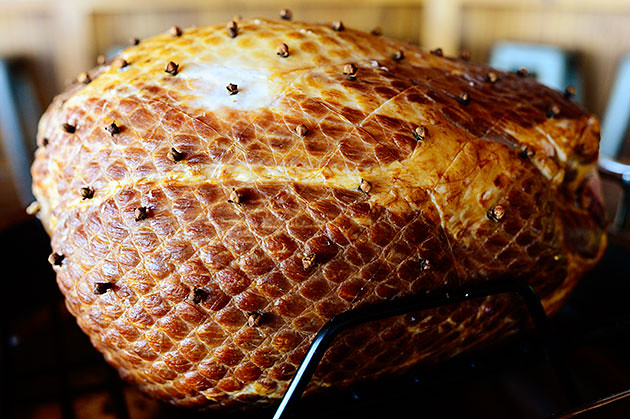 And keep going until the whole surface is dotted. I do this for looks more than flavor: I just think it looks lovely and traditional when it’s all done baking.
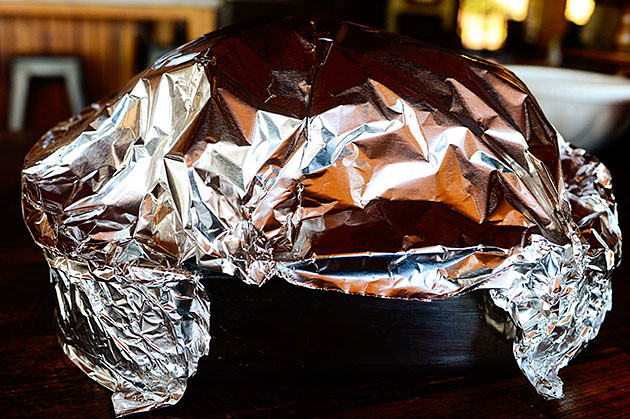 Cover the ham with foil, then put it into the oven to warm it up. I do 325 for at least 2 to 2 1/2 hours, but I’d say just look at the instructions on the package and follow those. Some hams say to go 3 to 4 hours, some at a lower temperature. The whole goal here is just to heat the ham slowly…and it takes awhile to do that.
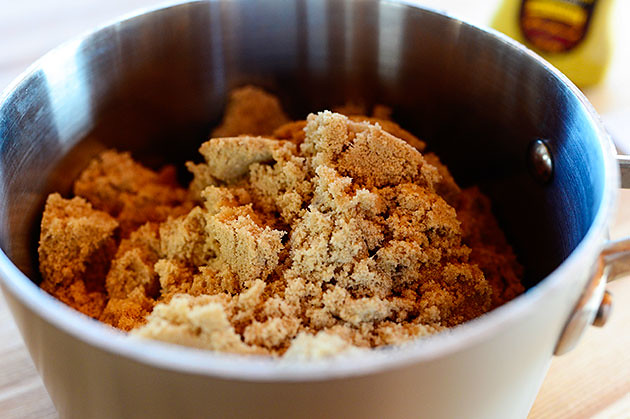 While the ham is in the oven, you can make the glaze: Throw 3 cups of brown sugar into a saucepan…
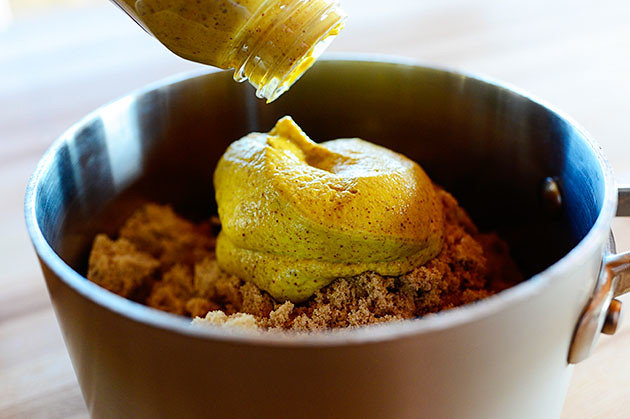 Along with 1/2 cup of grainy, spicy mustard for a nice tang…
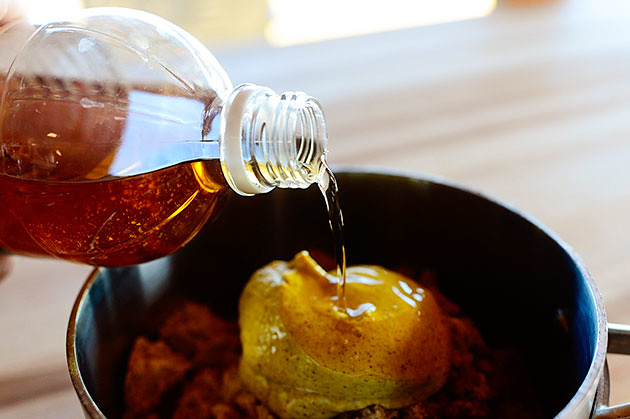 3 tablespoons apple cider vinegar for a little bite…
 And the star of the show!
 A whole can of Dr Pepper.
You can use Coke. Heck, you could probably even use root beer. But please, for the love of all things good and caramelized, do not use diet pop.
(It’s the sugar we’re after here.)
Amen.
 Bring this mixture to a boil, then reduce the heat…
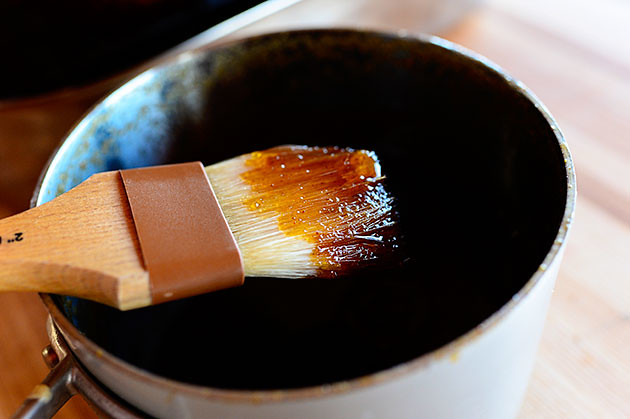 And simmer it for a good 15-20 minutes until it’s gotten darker and thicker.
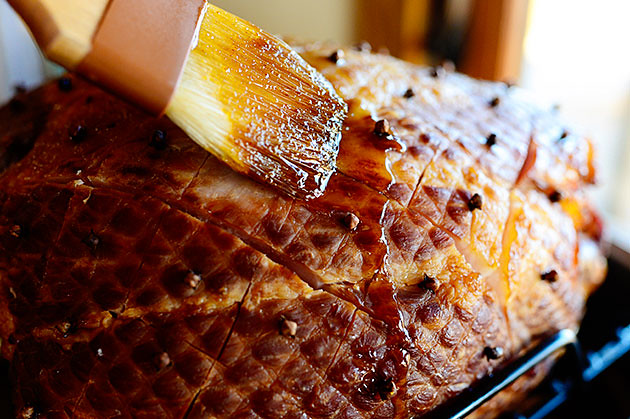 After the ham has cooked for 1 1/2 to 2 hours, brush the surface with some of the glaze. Then pop it back into the oven, uncovered, for another 20 minutes or so.
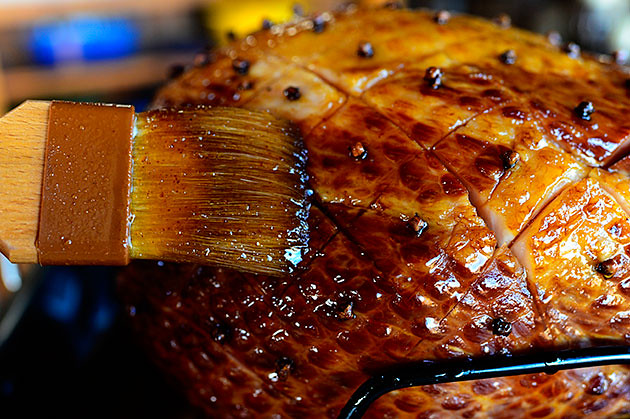 Pull it out and brush on more glaze, then pop it back in the oven.
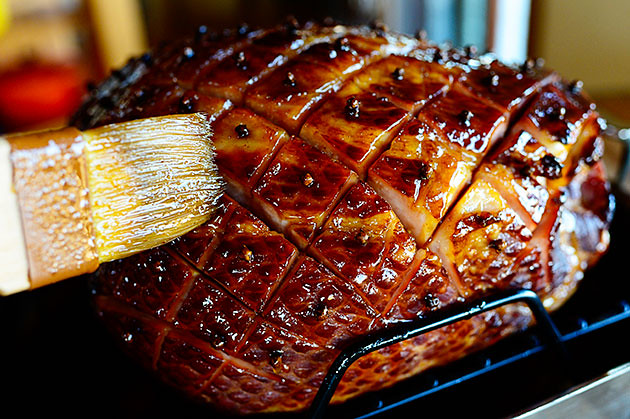 Then pull it out and brush on more glaze! Keep doing this until the ham is fully heated and the glaze is really gorgeous and glossy.
Note: On my Food Network episode last weekend, I only glazed it once because I had been at church and didn’t want to add too much more time before we ate. It was still totally delicious, but glazing the ham 2 or 3 (or 4) times really results in more of a masterpiece in terms of gorgeous surface.
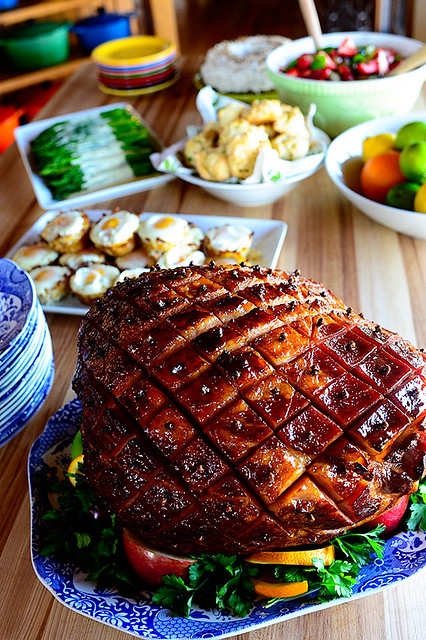 Mmmm. Easter feast!
Enjoy, guys. This ham’ll take you far in life.
Here’s the handy printable!
RecipeGlazed Easter Ham
- Prep Time:
- Cook Time:
- Difficulty:
- Easy
- Servings:
- 18
Print Recipe
Ingredients
- 1 whole Fully Cooked Bone-in Ham (15-18 Pounds)
- Whole Cloves
- 3 cups Brown Sugar
- 1/2 cup Spicy Brown Mustard
- 1 can Dr Pepper Or Coke
- 3 Tablespoons Apple Cider Vinegar
Preparation Instructions
Preheat the oven to 325 F.
Score the surface of the ham in a diamond pattern about 1/8-inch deep. Place cloves in the middle of each diamond. Place the ham in a large roasting pan with a rack, tent it with foil, and bake for 2 to 2/12 hours---or longer, depending on the package directions. (Some hams may require 3 to 3 1/2 hours at a lower temp; just check the package.)
Heat the brown sugar, mustard, vinegar and soda in a small saucepan until bubbly. Cook until reduced and a bit thicker, about 15 minutes.
After about 2 hours of baking time, remove the foil and brush the glaze on the ham in 20 minutes intervals (put the ham back in the oven, uncovered, in between) until it's nice and glossy. Remove from the oven and allow to rest 15-20 minutes before carving.
Posted by Ree on March 27 2013
29 Mar 04:41
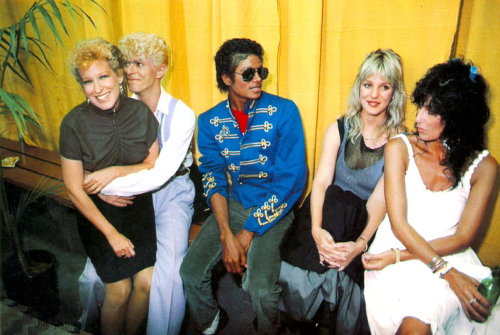
Bette Midler, David Bowie, Michael Jackson and Cher
by marialfc
Maria Bakharevaбоуи тут какой-то эээ
Bette Midler, David Bowie, Michael Jackson and Cher
Raphael Rissato likes this

21 Mar 13:18
Kent's Cups and Saucers
by Julie L. Mellby
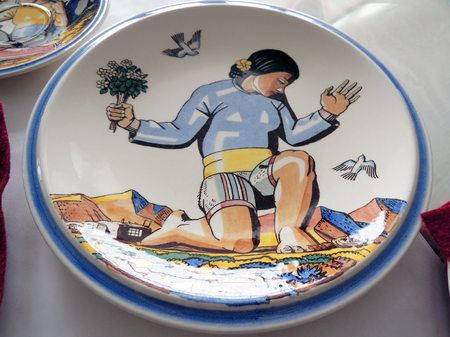
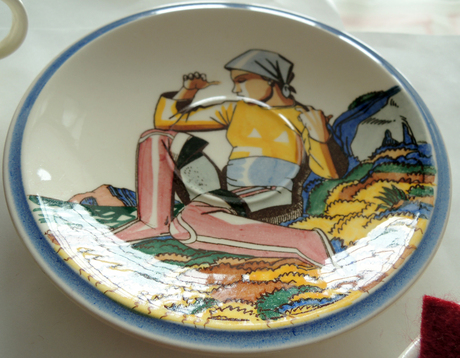
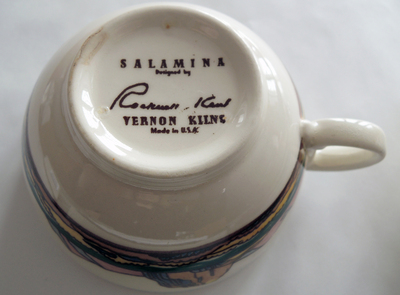
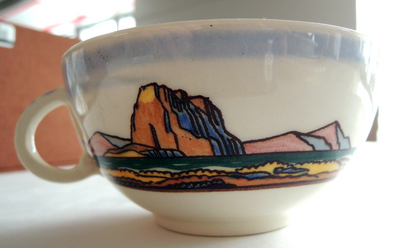
Around 1937, the American artist Rockwell Kent (1882-1971) was commissioned by Faye Bennison, the owner of Vernon Kilns in Vernon, California, to design several dinnerware patterns. Kent completed at least three sets, using images from two of his most popular books, Moby Dick (1930) and Salamina (1935), along with a patriotic set he called “Our America.” The Graphic Arts Collection holds a set of Salamina dishes, pictured here.
Rockwell Kent (1882-1971), Salamina (New York: Harcourt, Brace and company, 1935).Graphic Arts Collection (GAX) G750 .K4 1935
Herman Melville (1819-1891), Moby Dick; or, The Whale; illustrated by Rockwell Kent (New York: Random House, 1930). Graphic Arts Collection (GAX) PS2384 .M6 1930b
Elena Bulygina, Daria Nifontova likes this
20 Mar 15:48

Photo
by chupakka
Maria Bakharevaэто я
Mila Semenova, Daria Nifontova and one other like this
20 Mar 15:42


World's Smallest Horse
Maria Bakharevaя слева
That's not a baby horse you're looking at—it's Thumbelina, the world's smallest dwarf miniature horse! She's only about a foot-and-a-half tall and weighs 57 pounds! They don't make 'em any tinier or squeer than her.
Life's too short to avoid the SPLORT! Visit Daily Squee for your daily cuteness!
Squee! Spotter: Unknown (via Thumbelina )
Tagged: Miniature Horse , tiny , horses , squee Share on Facebook
Elena Bulygina, Tom likes this
17 Mar 17:44
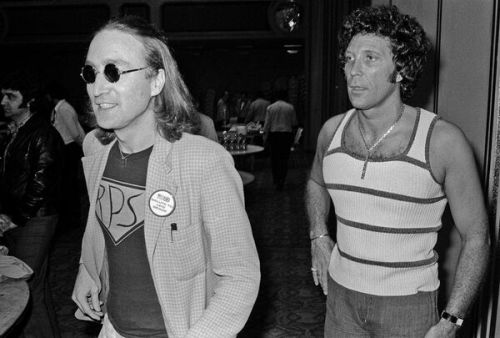
John Lennon and Tom Jones
Maria Bakharevaлеонид агутин и валерий леонтьев
John Lennon and Tom Jones
Viktoria Martsenyuk, Daria Nifontova likes this
17 Mar 14:04


How Well Do You Know Your Cartoon Cats?
Maria Bakharevaя всего 15 знаю, подозреваю, что половина тут из всяких ебучих анимешек (((
How many of these famous cartoon cats can you name? Put your answer in the comments!
Editor's Note: I could only name around 26, so I'm curious to see how you guys do!
LoL by: Unknown (via Rosie J Sees You)
Tagged: challenge , cartoons , Cats Share on Facebook
14 Mar 06:57
Adobe Photoshop CS2 скачать бесплатно
Maria Bakharevaнапример
Good news everyone! Adobe Photoshop CS2 стал бесплатным и легальным, и доступным для скачивания вместе с некоторыми другими продуктами.
Это версия 2005 года, но, если вы не сидите в фотошопе по восемь часов в день, вряд ли вам нужен CS6. А для RAW-файлов с новых камер, можно купить последний Adobe Lightroom и попрощаться с пиратством.
09 Mar 14:34
 Timothy Bobbin (John Collier 1708-1786), The Passions, Humourously Delineated: containing twenty-five plates, with his portrait, title plate and poetical descriptions (London: Orme, 1810). Graphic Arts Collection 2013- in process
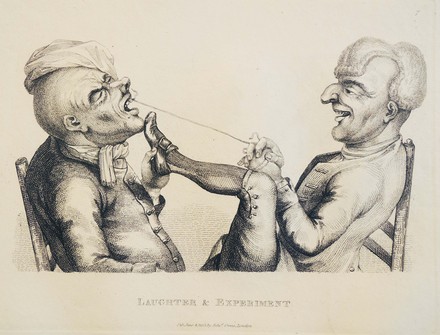
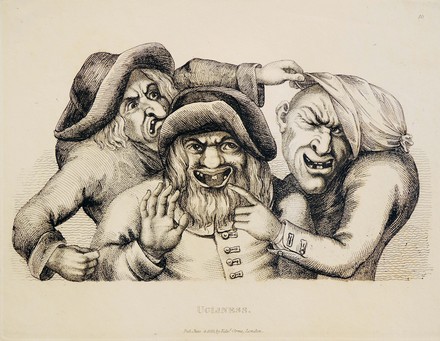
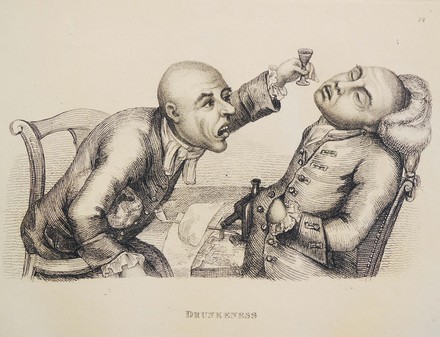
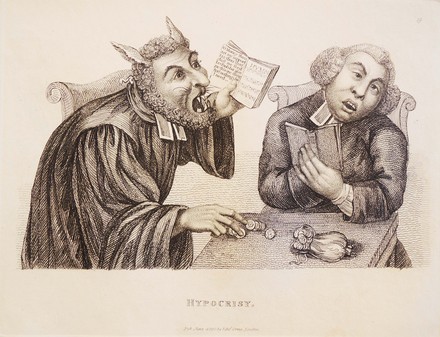
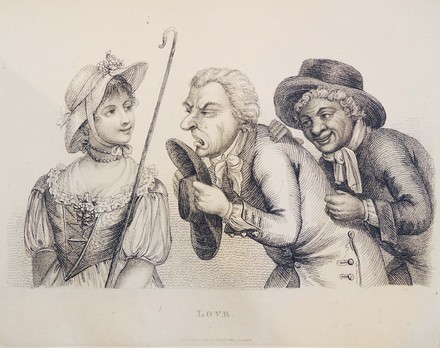
The Passions, Humourously Delineated
by Julie L. Mellby
Timothy Bobbin (John Collier 1708-1786), The Passions, Humourously Delineated: containing twenty-five plates, with his portrait, title plate and poetical descriptions (London: Orme, 1810). Graphic Arts Collection 2013- in process
British satirist John Collier (1708-1786), using the pseudonym Tim Bobbin, “developed his trade as a painter … producing inn signs, painted panels, and grotesque caricatures which were widely distributed, reaching the American colonies via a Liverpool merchant. He promoted and distributed his own work, travelling all over northern England collecting and delivering orders and commissions for books and pictures and consuming the proceeds as he went.
“…In 1773 was published his Human Passions Delineated, an upmarket edition of his caricatures which acted as a catalogue, in which he described himself as the ‘Lancashire Hogarth’…The 1810 London edition of Human Passions systematically softened his caricatures… The Victorian antiquary W. E. Axon thought his pictures ‘execrable … gross and cruel’, while the Dictionary of National Biography found them ‘grotesque’ and ‘absolutely devoid of artistic merit’.”— DNB
Bond Street print publisher Edward Orme (1775-1848) resurrected Collier’s caricatures in 1810 and reissued the set on 27 leaves with the only title on a printed label pasted to the wrapper (not included with this set).
Sasha.gavrilov likes this
21 Feb 21:59
New Jane Austen Stamps Arrive
by Nate Pedersen
This one is for the philatelists amongst the bibliophiles.
In celebration of the 200th anniversary of the publication of Pride and Prejudice, the Royal Mail in Britain yesterday issued six commemorative Jane Austen stamps. Each of her novels is represented by a separate stamp. The artwork was produced by Angela Barrett.
 You can order the stamps (even from America), as well as other commemoration material, via the Royal Mail website.
Active stamp collectors might remember this isn't the first time the Royal Mail issued Jane Austen stamps. Four Austen stamps were also released in 1975, when rates were a bit cheaper.

In another celebratory gesture, the Royal Mail is using a special postmark this week only for any letters mailed from Chawton or Steventon (i.e. Jane Austen Country), which will include an oft-quoted line from Pride and Prejudice, "Do anything rather than marry without affection."
So, which stamp is your favorite?


In celebration of the 200th anniversary of the publication of Pride and Prejudice, the Royal Mail in Britain yesterday issued six commemorative Jane Austen stamps. Each of her novels is represented by a separate stamp. The artwork was produced by Angela Barrett.
You can order the stamps (even from America), as well as other commemoration material, via the Royal Mail website. Active stamp collectors might remember this isn't the first time the Royal Mail issued Jane Austen stamps. Four Austen stamps were also released in 1975, when rates were a bit cheaper.
In another celebratory gesture, the Royal Mail is using a special postmark this week only for any letters mailed from Chawton or Steventon (i.e. Jane Austen Country), which will include an oft-quoted line from Pride and Prejudice, "Do anything rather than marry without affection."
So, which stamp is your favorite?
29 Dec 14:14
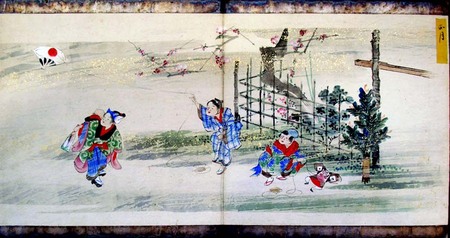 January
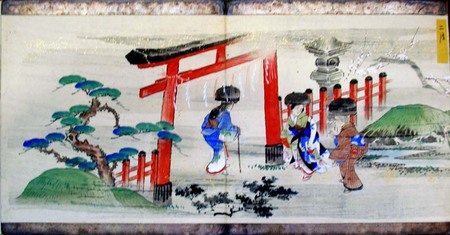 February
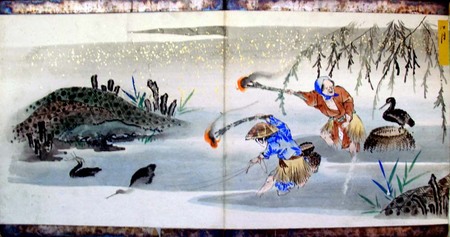 March
March
 June
June
 November?
 December
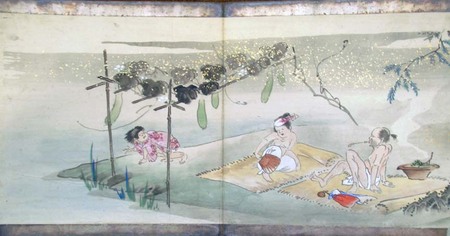
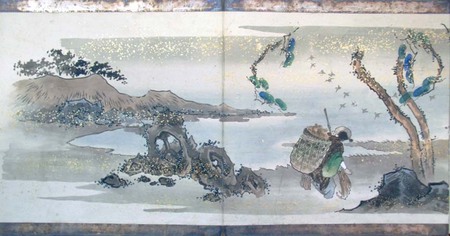
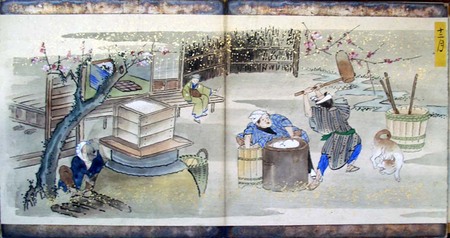
 This unidentified Japanese artist recorded his/her year in watercolors, creating a different scene for each month.
Japanese sketchbook, 1900s. Watercolor. Graphic Arts Collection GA2013- in process
Month by Month
by Julie L. Mellby
January
February
March
June
November?
December
This unidentified Japanese artist recorded his/her year in watercolors, creating a different scene for each month. Japanese sketchbook, 1900s. Watercolor. Graphic Arts Collection GA2013- in process
Daria Nifontova likes this
11 Dec 13:50
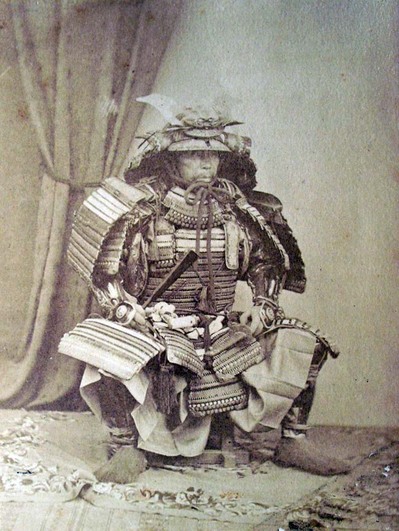 Samurai, fully armed
John Reddie Black (1826-1880) was born in Scotland but lived most of his life in China and Japan. Of the many newspapers and journals he published, The Far East (founded in 1870) is appreciated in particular because of the original photographs used as illustrations. Black was himself a photographer and although he employed both English and Japanese photographers, Black also published his own work from time to time.
Samurai, fully armed
John Reddie Black (1826-1880) was born in Scotland but lived most of his life in China and Japan. Of the many newspapers and journals he published, The Far East (founded in 1870) is appreciated in particular because of the original photographs used as illustrations. Black was himself a photographer and although he employed both English and Japanese photographers, Black also published his own work from time to time.
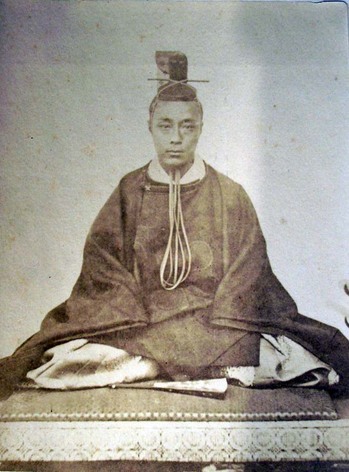 His Highness the Last Shogun
In his memoir, entitled Young Japan, Black writes about the portrait [above], which he chose for the frontispiece of his book:
His Highness the Last Shogun
In his memoir, entitled Young Japan, Black writes about the portrait [above], which he chose for the frontispiece of his book:
“I well remember the excitement in Kioto as the time approached for opening Osaka and Hiogo to foreigners. I was but 15 years old, and yet I fully recollect that my prejudices against foreigners were as strong as those of others of my countrymen. I never heard the Tycoon make any remark about them; although I was present when at Osaka the French Minister visited him, and received a sword with the Tokugawa badge as a gift, which he immediately transferred to his sword-belt and wore as he left the palace. I also was present when an English photographer from one of the English men-of-war, was invited to take the Tycoon’s portrait, and I had the honour of receiving a copy of the portrait, in conjunction with my adopted father. I have it still. (A reduced copy of it serves as the frontispiece to the first volume of this work.)”
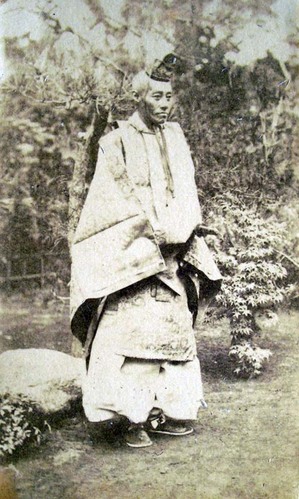 A Kuge
 Uragawa
 Kamakura
 At Osaka, Castle
 Kubota Sentaro
Young Japan through Photographs
by Julie L. Mellby
Samurai, fully armed
John Reddie Black (1826-1880) was born in Scotland but lived most of his life in China and Japan. Of the many newspapers and journals he published, The Far East (founded in 1870) is appreciated in particular because of the original photographs used as illustrations. Black was himself a photographer and although he employed both English and Japanese photographers, Black also published his own work from time to time.
His Highness the Last Shogun
In his memoir, entitled Young Japan, Black writes about the portrait [above], which he chose for the frontispiece of his book: “I well remember the excitement in Kioto as the time approached for opening Osaka and Hiogo to foreigners. I was but 15 years old, and yet I fully recollect that my prejudices against foreigners were as strong as those of others of my countrymen. I never heard the Tycoon make any remark about them; although I was present when at Osaka the French Minister visited him, and received a sword with the Tokugawa badge as a gift, which he immediately transferred to his sword-belt and wore as he left the palace. I also was present when an English photographer from one of the English men-of-war, was invited to take the Tycoon’s portrait, and I had the honour of receiving a copy of the portrait, in conjunction with my adopted father. I have it still. (A reduced copy of it serves as the frontispiece to the first volume of this work.)”
A Kuge
Black’s memoir was widely published and reprinted (it can easily be found today), but only a few copies were issued with original albumen photographs pasted into the book as illustrations. The Graphic Arts Collection is fortunate to have recently acquired one of these rare editions.
The first volume holds fifteen photographs, only one of which is almost completely faded (a map of Japan). Black died before volume two of the memoir was completed and so, perhaps, only had a hand in selecting images for the first volume.
Uragawa
John Reddie Black (1826-1880), Young Japan. Yokohama and Yedo. A Narrative of the Settlement and the City from the Signing of the Treaties in 1858, to the Close of the Year 1879 (London and Yokohame: Trubner and Kelly & Co. [printed at the private printing office of the author, Yokohama], 1880-1881). Graphic Arts Collection GAX 2012- in process.
Kamakura
At Osaka, Castle
Kubota Sentaro
See also Terry Bennett, Photography in Japan: 1853-1912 (Rutland, Vermont: Charles E. Tuttle, 2006). SAPH Oversize TR105 .B45 2006q
Mihhalek likes this
07 Dec 03:07

Marmite Limited Edition Jubilee Jar: Corgis
by Filippo
Maria Bakharevaсвииииит (хотя я больше люблю виджимайт)

Marmite launched a nationwide outdoor campaign to showcase the limited edition ‘Ma’amite’ Jubilee Jar by playing on the ‘love it or hate it’ positioning with the Queen’s treasured corgis. The outdoor poster ad features a twist on the Royal crest; it has a pair of corgis reacting to the Marmite and a quirky crown-like rack of toast.
The slogan ‘One either loves it or one hates it’ completes the design, adding a tongue-in-cheek Royal twist to Marmite’s traditional message. The nationwide campaign, which went live in April 2012 on poster sites outside major supermarkets, also benefitted from print advertising, experiential activity and digital support.
Advertising Agency: adam&eveDDB, London, United Kingdom
Copywriter: Jonathan John
Art Director: David Mackersey
Illustrator: Garry Walton
Typographers: Garry Walton
Digital Artwork: Trevor Slabber & Gutenberg Networks
Executive Creative Director: Jeremy Craigen
Designer: Pete Mould
Art Buyer: Fiona Bailey
Retoucher: Jamie May
Marketing Director, Marmite: Pankaj Sharma
Brand Managers, Marmite: Nicola Waymark & Joanne O’Riada
Agency Managing Partner: Anna Hopwood
Agency Business Director: Matthew Bundy
Agency Account Manager: Angharad Thomas
Planner: Tom Lloyd
Project Management: Craig Neilson & Jon Dewart
Media Agency: Mindshare
Olga Ermakova likes this
05 Dec 04:08

Meryl Streep & Hillary Clinton
by bootybeauty
Maria Bakharevaебашат лук для инстаграма
Meryl Streep & Hillary Clinton
Volossova, Daria Nifontova likes this
05 Dec 04:07


Dreams Do Come True
Maria Bakharevaэто про меня
LoL by: Unknown (via Anything Comic)
Tagged: when I grow up , illustrations , growing up , comics , dreams , catwoman , crazy cat ladies , Cats Share on Facebook
Nvinko likes this
12 Nov 03:52
 Gif your butt (!) over to Animal Gifs for MOAR cyoot and funneh on loop!

Unroll for Instant Armadillo
Gif your butt (!) over to Animal Gifs for MOAR cyoot and funneh on loop!
Submitted by: Unknown
Tagged: gif , roll , ball , armadillo , cute , squee Share on Facebook
06 Nov 03:40
 Gif your butt (!) over to Animal Gifs for MOAR cyoot and funneh on loop!

What Did I Just Watch...
Maria Bakharevaaaaaaaaaaaaaaaaaaa
Gif your butt (!) over to Animal Gifs for MOAR cyoot and funneh on loop!
Submitted by: Unknown
Tagged: balls , wtf? , cheetah , fat , antelope , chase , animated , weird? Share on Facebook
03 Nov 16:07


Lesbian couple kisses in front of a anti-gay protest in France.
by bspcn
Maria BakharevaШара для Танатоса

Masha Vorslav, Osiasjota and 3 others like this
31 Oct 16:52
Как мы строили дом
Maria Bakharevaну слава богу, дом есть!
Приехав на свою землю и установив палатку, мы начали искать варианты строительства дома. Строить самостоятельно мы не хотели — слишком сложно, долго и много всего надо знать, поэтому искали специально обученных людей в газетах, интернете и среди соседей. Общались с потенциальными исполнителями по телефону, всё конспектировали. ⚓

Выяснили, что за строители за работу берут 50-70% от стоимости материала, и самый дешёвый дом нам построят за 350 тысяч рублей. Словесное описание этого дома нас не устроило. Уже примерно понимая, как устроен каркасный дом, мы с женой нарисовали его примерный план — это должен быть полутораэтажный дом 6×4м (второй этаж только под спальню), с открытой верандой, пологой крышей из металлочерепицы. Планировка примерно такая: ⚓

Посчитали его примерную стоимость и сроки — получалось около 250 тысяч и два месяца при неполной занятости. Но ни у кого из нас не было опыта строительства, поэтому мы решили попробовать построить сарай, если получится — взяться за дом, а помощников привлекать только к тем работам, с которыми сами не справимся. ⚓
Доски для дома нам привезли где-то через неделю после того, как мы закончили с сараем (мы уже успели уехать в Питер). В основном это брус 150×150 для каркаса, 150×100 для пола и 100×50 для всего остального. ⚓

Всё это было напилено на нужные детали и подписано. Концы бруса нарезал взятой у соседа бензопилой. Идеально ровно не получилось, но это и не обязательно. ⚓

Фундамент к этому моменту уже был готов. ⚓

Один брус 150×150 весит примерно 113кг. Я мог поднять только один конец, но не целиком, поэтому для переноски пришлось привлекать соседа (выгружали доски без нас, куда попало — рядом с сараем, это в сотне метров от места строительства дома). Нижнюю обвязку сложил довольно быстро. ⚓

Жена следила, чтобы я не умер от голода: рядом всегда была миска со свежими овощами. ⚓

В качестве угловых стоек использовался брус 150×150, но длина его — всего 3м, было несложно поднимать одному. ⚓

По углам всё это скреплено усиленными металлическими уголками и 50мм шурупами. ⚓

Вертикальные стойки выравнивались пузырьковым уровнем и фиксировались временными укосами. ⚓

6-метровый брус наверх поднимали вместе с соседом, по одной штуке: один становился на бочку, один оставался на земле — поднимали один конец, клали его на нужную стойку, затем примерно так же поднимали второй. Второй конец без бочки с земли было не достать — приходилось подталкивать его длинной палкой. Брус тяжёлый и широкий, безо всякого крепежа спокойно держался на одном конце, пока мы поднимали второй. Один раз брус выскочил из рук и по касательной прошёлся по моей спине. Соседи были в ужасе, хотя на самом деле ничего такого, сильного удара не было, даже ссадины не осталось. ⚓
В общем, было сложно, но мы справились за несколько часов. Фотографий этого процесса нет, есть результат: ⚓

Только на последнем брусе я придумал, как делать это одному: используя усиленные уголки в качестве полок поднимал концы по очереди где-то на метр. Поднял довольно быстро (на фото он ещё примерно на полпути). ⚓

Внутри стен установлены стойки из доски 100×50 с шагом около 60см (ширина плит выбранного нами утеплителя). ⚓

Для удобства работы был сложен (но не скручен) пол веранды. ⚓

Через 8 дней каркас был готов. ⚓

Главным слабым местом сарая получился пол: он ощутимо пружинит, особенно заметно звенят чашки на столе. И хотя нагрузку он выдерживает нормальную (загружали 6 взрослых человек и все наши вещи), но ощущения неприятные. Поэтому к полу подошли на этот раз очень основательно: в качестве лагов (балок, на которые кладётся пол) использовали брус 150×100. ⚓

Крыша по плану должна быть длиной 7.82м, а доски все — 6м, поэтому коньковую доску пришлось собирать из нескольких 100×50. Стоит она на четырёх полутораметровых фрагментах бруса 100×100, которые упираются в верхнюю обвязку. ⚓

Основная часть стропил (балок, на которые кладётся кровля) крепилась элементарно. Угол — 26.56°, как и в сарае. ⚓

Сложнее было крепить то, что висит в воздухе, не имея нужной лестницы. ⚓

Каркас готов. Как раз привезли металлочерепицу. ⚓

Тёплые стены и крышу снаружи обтягивают специальной ветро- и влагозащитной плёнкой. ⚓

Плёнка эта продаётся любом строительном магазине в рулонах. ⚓

Обрешётку крепил к стропилам с шагом, соответствующим шагу рисунка металлочерепицы (в сарае я этого не учёл, поэтому некоторые листы прикреплены не полностью). Обрешётка нужна только для того, чтобы к ней крепить кровлю, больше никакой функции она не выполняет. ⚓

Для обрешётки использовалась «дюймовка» — доска 100×25мм. Все доски мы заказывали разом, но везли их по частям. «Дюймовку» мы ждали долго, не дождались и разобрали сарай, который обшит как раз такой доской. ⚓

Изначально мы думали звать кровельщиков, но сосед убедил, что ничего сложного нет, и он поможет, если что. Главным сюрпризом оказалось то, что эту черепицу надо класть слева направо, а не справа налево, как нам сказали в магазине в первый раз. ⚓

Черепица скользкая, ходить по ней без страховки — рискованно. Кровельная лестница, которую я попытался собрать, оказалась очень тяжёлой, поэтому я пользовался в качестве страховки бельевой верёвкой. ⚓

Верёвку проверял на земле — вес мой спокойно выдерживала. Она довольно тонкая, так что повиснуть на ней было бы неприятно, но это и не планировалось: она была всегда натянута, то есть постоянно меня придерживала, не давая потерять равновесие и упасть, а не ловила в случае падения. ⚓
Конец верёвки крепился либо к коньку, либо к обрешётке. ⚓

Черепица довольно прочная, шуруп в неё просто так не вкручивается — надо пробивать дырку. Для этого я использовал молоток и один из длинных шурупов. ⚓

Когда с кровлей было покончено, можно было приступать к обшивке стен и пола. Весь дом был обмотан той же ветрозащитной плёнкой: ⚓

К этому моменту нам уже установили пластиковые окна. Окно на веранде у нас большое, 2×1.76м: ⚓

Снаружи к каркасу и стойкам прибита контр-обрешётка из «дюймовки». Это создаёт вентиляционный зазор между утеплителем и внешней обшивкой, чтобы лучше убирать лишнюю влагу. ⚓

К этой обрешётке крепится обшивка, в нашем случае — имитация бруса (что-то вроде вагонки, только крупнее). ⚓

Обшивку я крепил шурупами, чтобы не треснула — предварительно сверлил отверстия. ⚓

Имитацию бруса, кстати, надо крепить не впритык, а оставлять между рядами зазор в 1-1.5мм, иначе при повышенной влажности (в сезон дождей) доска набухнет, расширится и начнёт выгибаться, сорвёт шляпки шурупов и вздуется волнами. У нас так и вышло, пришлось переделывать. ⚓

Одновременно со стенами собирался пол. Для крепления чернового пола к самому низу лагов были прибиты рейки 30×30мм. ⚓

На эти рейки были положены куски влагостойкой OSB-плиты (типа фанеры) нужного размера. ⚓

Полученные ёмкости для утеплителя были гидроизолированы, плёнка крепилась к дереву степлером. ⚓

Для пола использовали более плотную плёнку, которая вообще ничего не пропускает. ⚓

Затем был уложен утеплитель — минеральная вата (Isover). ⚓

Сверху пол был затянут плёнкой для внутреннего применения. ⚓

Затем была положена обрешётка, создающая вентиляционные зазоры, на которую потом был положен пол из шпунтованной доски (35мм). ⚓

К этому моменту у нас получился обшитый каркас с окнами и дверьми, то есть почти готовый дом, только не до конца утеплённый. ⚓

Утеплением стен занималась жена, на это ушло несколько дней. Технология та же: сначала кладётся утеплитель, затем стена затягивается пароизоляционной плёнкой. ⚓

Для отопления мы купили печь-камин «Бавария». Она весит около 100кг, тащить её пришлось вдвоём, с помощью ручек, прикрученных к поддону. ⚓

Печку установили перед обшивкой дома изнутри (дымоход надо пропускать через кровлю, которая не должна быть зашита к этому моменту). Поставили её на лист стекломагнезита, чтобы пол не горел. ⚓

Отверстие в кровле для дымохода вырезал болгаркой. ⚓

Через это отверстие был выведен дымоход. В месте прохода через кровлю (и утеплитель) использован сэндвич (двойная труба с теплоизолятором), чтобы крыша от нагрева не загорелась, в остальных местах — где прямого контакта с горючими материалами нет — простая труба, рассеивающая дополнительное тепло. Печкой стало можно пользоваться, что сразу и было опробовано. ⚓

Сверху на трубу надел термостойкую резиновую штуку, которая называется «Мастер Флэш», швы загерметизировал битуумным герметиком. ⚓

Стены внутри зашили вагонкой. Вроде ничего сложного, но я упустил один момент: вагонка прибита к промежуточным стойкам каркаса (шириной 10см), но к угловым стойкам (шириной 15см) надо было тоже прибить бруски шириной 10см, чтобы концы вагонки не висели в воздухе. Этого сделано не было, поэтому концы получились висящими. ⚓

Выход был найден простой: к выступающему углу бруса были прикручены рейки 3×3см, к которым затем была притянута вагонка. Получилось довольно прочно и немного декоративно. ⚓

К этому моменту уже похолодало, и мы перебрались в дом, несмотря на то, что внутри стены ещё не были обшиты. Из остатков половой доски я собрал широкий подоконник, на котором можно и сидеть, и лежать. Под ним ещё можно что-нибудь хранить — дом небольшой, поэтому с пользой будем использовать всё возможное пространство. ⚓

Вскоре мы протянули от соседа электрический кабель. В будущем тамбуре я установил счётчик, раскидал электричество по дому с помощью удлинителей. ⚓

Свободное пространство первого этажа поделено пополам стеллажом, который заодно подпирает верхний настил, на котором мы спим. ⚓

Вот, в общем, и всё. Надо ещё кое-что доделать снаружи (зашить углы), внутри (отгородить тамбур, сделать кухню и немного мебели), но в целом — дом готов, мы в нём живём и уже зимуем, т.к. по ночам уже морозы. ⚓

На втором этаже у нас спальня. Полезная площадь — 2×3м, ещё метр под самой кровлей (на фото справа) можно использовать в качестве ниш для хранения всяких постельных вещей (будем зашивать или ящики делать). ⚓

С противоположной стороны — такой же отсек, пока пустой; в будущем там будет бак с водой, насос и кладовка. Доски между ними лежат пока для быстрого перемещения (делали для гостей); их быть не должно, останется только лестница. Снизу находится тамбур и будущий совмещённый санузел, вместо которого пока склад. Установить двери и перегородки пока не успели. ⚓

Жилой отсек практически сформирован. Из остатков половой доски сделана скамья, на которую положены подушки от кресел (соседи дали). Стол пока используем складной. Места уже достаточно, чтобы нормально разместить гостей, напоить чаем и угостить Интернетом. ⚓

Кухню пока используем походную, позже будет самодельная. Подоконник и столик рядом с ним — ещё одно удобное место для сидения с ноутбуком. ⚓

Веранда будет открытая. Летом на ней будет уличный стол и что-нибудь ещё, весной дом покрасим (предположительно под палисандр). Зимой на веранде, скорее всего, будут только дрова и мангал, на котором мы иногда жарим гренки. Под крышей видны фонари, которые освещают веранду, и прожектор, который освещает тропу к дому. Слева к дому прикреплена лестница для выхода на крышу, к ней же прикреплена направленная 3G антенна, дающая нам интернет. ⚓

Так мы построили полутораэтажный дом с жилой зоной 6×4м и верандой 6×2м. Его можно было сделать основательнее и теплее, но мы сознательно не стали усложнять: жить в этом доме мы планируем год-два, затем построим более просторный (в котором будет место для детей), а этот дом станет гостевым. Жить в нём будут редко, большую часть времени будет простаивать, поэтому тратиться на дополнительный утеплитель (15см вместо нынешних 10, как советовали соседи) не стали — решили, что целесообразнее будет активнее топить эти две зимы. ⚓
Уже приняли гостей из Москвы, ждём новых. ⚓
Всё это обошлось нам примерно в 250 тысяч рублей. Примерная смета: ⚓
- 40,000р на древесину (около 8м³).
- 2,000р на антисептик.
- 5,000р на уголки.
- 2,500р на шурупы (14кг).
- 800р на цемент (2 мешка, ещё мешок с лишним оставался с прошлого раза).
- 1,500р на рубероид.
- 2,000р на арматуру.
- 12,600р на утеплитель (14 упаковок)
- 9,500р на пароизоляционную плёнку.
- 22,000р на окна.
- 5,000р на двери (2 шт).
- 32,000р на металлочерепицу.
- 4,300р на ОСП плиты (черновой пол).
- 21,000р на половую доску.
- 28,000р на печку и трубы.
- 30,000р на имитацию бруса.
- 15,000р на вагонку (нужно ещё примерно столько же).
- 100р на гвозди для вагонки.
- 5,000р на проводку и лампочки.
- 6,000р на доставку.
- 5,000р на неучтённые мелкие расходы.
Итого: 249,300р. ⚓
21 Oct 06:56
 Our friends at Catsparella brought these incredible images to our attention. CATS vs. PINUP GIRLS: SO SIMILAR CAN YOU EVEN TELL THE DIFFERENCE???!??!?!?!

Cats That Look Like Pinup Girls
Our friends at Catsparella brought these incredible images to our attention. CATS vs. PINUP GIRLS: SO SIMILAR CAN YOU EVEN TELL THE DIFFERENCE???!??!?!?!
LoL by: Unknown (via Cats That Look Like Pinup Girls)
Tagged: cats , girls , look-alikes , pinup girls , pinups , poses , sexy , vintage Share on Facebook
Osiasjota, Daria Nifontova and 2 others like this
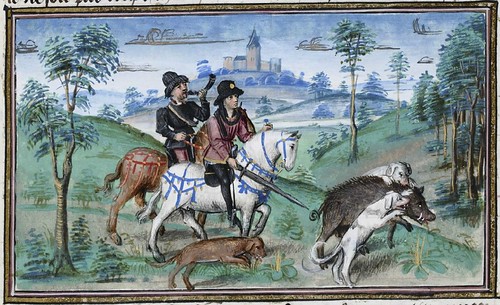
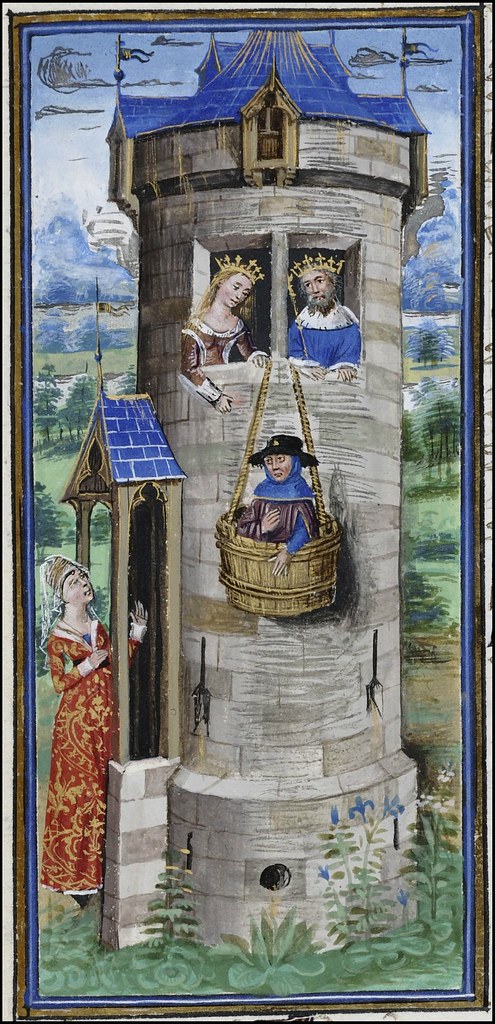
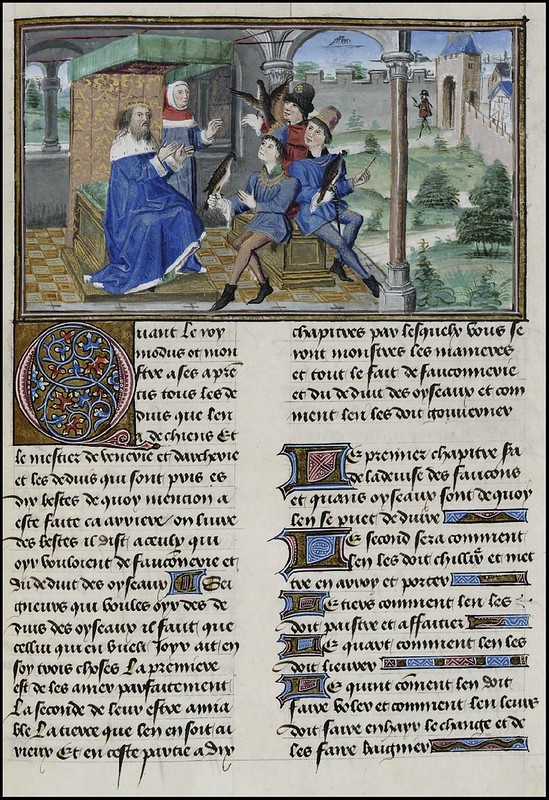
19 Oct 11:29
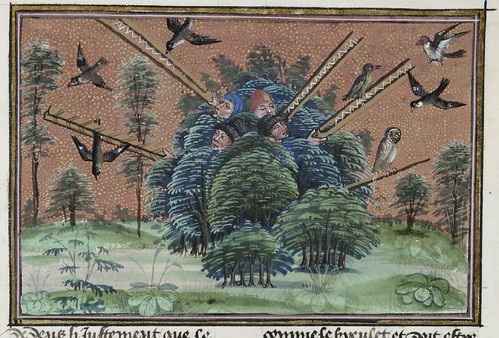
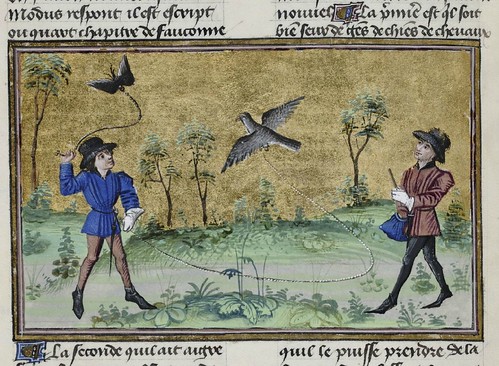
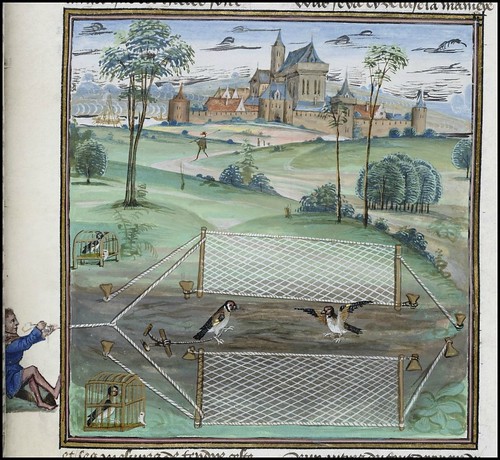
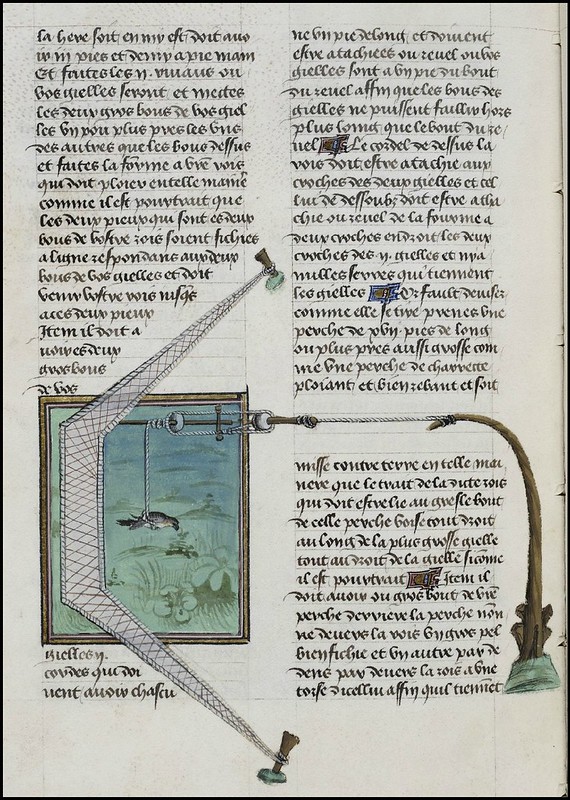
The Time of the Hunt
by peacay
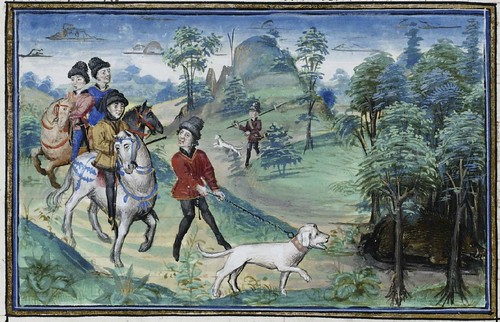
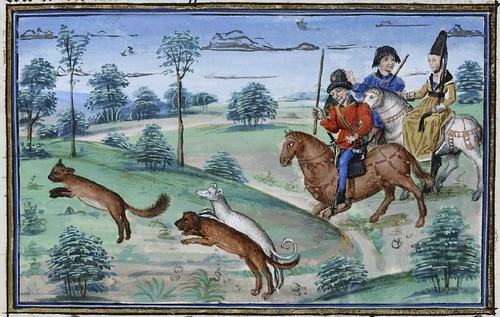
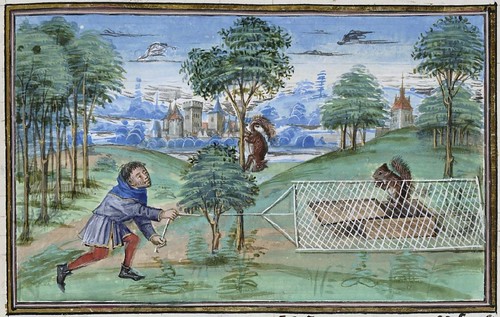
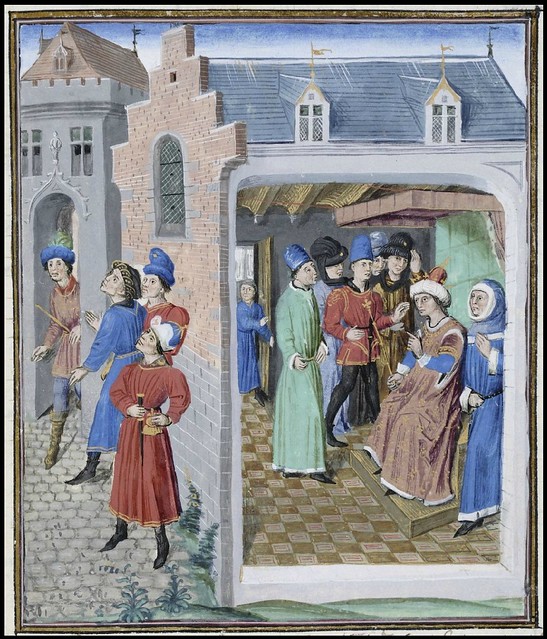
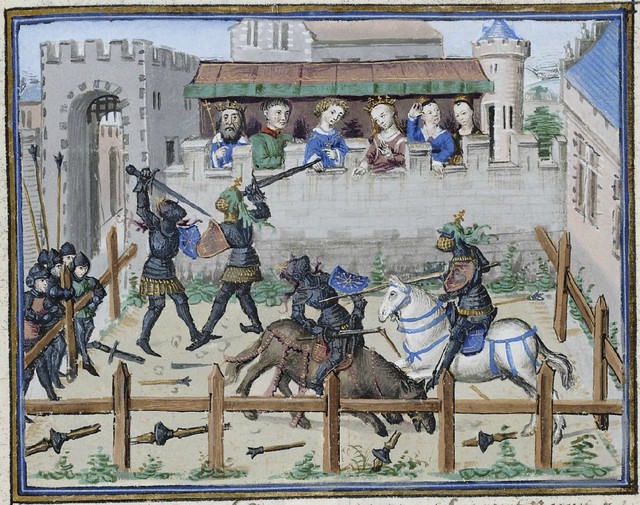
The Book of the Hunt of King Modus & Queen Ratio -
15th century Flemish manuscript miniatures
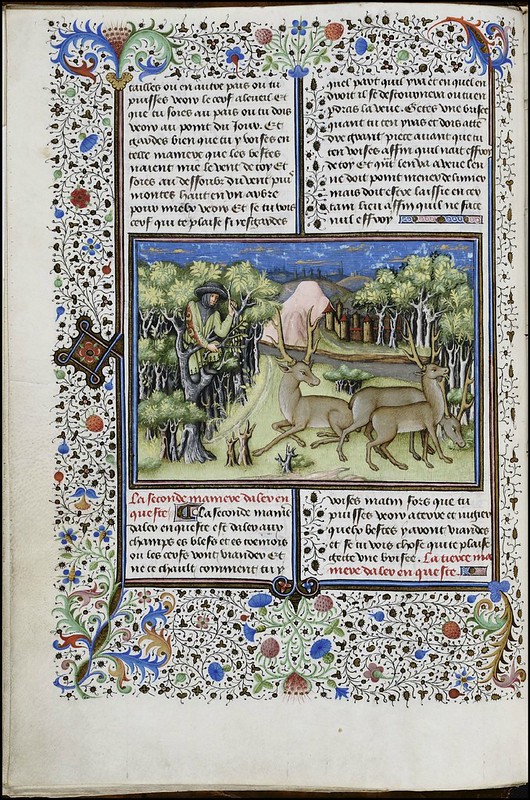
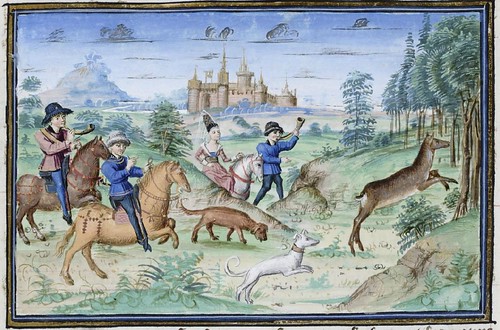
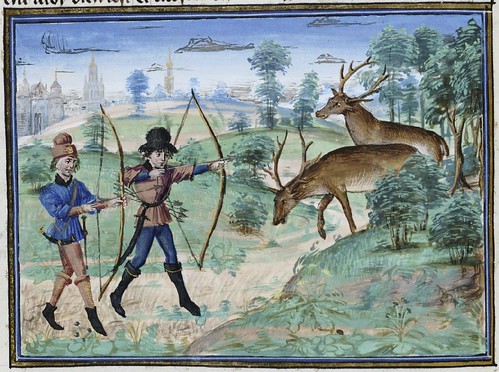
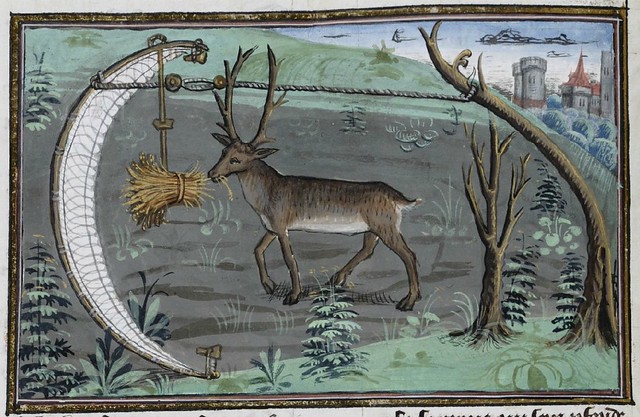

A deer with ten antlers (and Christ on the cross), representing the ten commandments
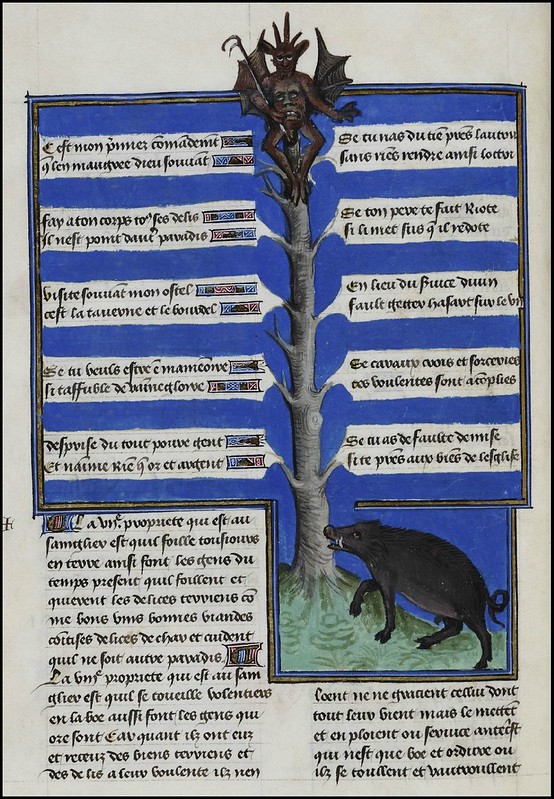


[The miniatures above have been cropped and the larger images were made from spliced screencaps. They are otherwise unaltered.]
Attributed to an anonymous Burgundian illuminator known as the Master of Girart de Roussillon^, 'The Book of King Modus and Queen Ratio' (after 1455) is a treatise on hunting and, in the form held by the Royal Library of Belgium, is bound with a second book, 'The Dream of Pestilence', something of a poetic exposition on contemporary morals.


A deer with ten antlers (and Christ on the cross), representing the ten commandments
[The miniatures above have been cropped and the larger images were made from spliced screencaps. They are otherwise unaltered.]
Attributed to an anonymous Burgundian illuminator known as the Master of Girart de Roussillon^, 'The Book of King Modus and Queen Ratio' (after 1455) is a treatise on hunting and, in the form held by the Royal Library of Belgium, is bound with a second book, 'The Dream of Pestilence', something of a poetic exposition on contemporary morals.
The Book of the Hunt of King Modus – this is the title of a work conceived in 1370 by Henri de Ferrières^, a knowledgeable expert of the art and practice of hunting. The Norman nobleman, who as an old man exchanged the pen against the sword, wrote the first treatise on hunting in the French language, which has since been copied several times. It is assumed that this manuscript was made for Philip the Good, the third of the great dukes of Burgundy who assembled a kingdom more wealthy and powerful than any other in Europe.
Who was King Modus? - The author wished to underline the authority of his text while also capturing the readers’ attention. He therefore patterned this work after the manner of the Greek philosophers, as a dialogue between a student and his teacher conversing on the hunting profession. The teacher in this case is embodied in the allegorical figure of King Modus.
56 lively miniatures - The miniatures of our manuscript, which was produced in 1455 in Burgundy, deserve special mention. Their rich golden decoration is not only intended to illustrate the instructions of the text but also to glorify the pompous lifestyle of the nobility. They intrigue us with a certain liveliness, the expert representation of animals and the authenticity of the luxurious vestments. The close association with nature was intended by the illuminators who attached great importance to authenticity in their depictions. The book thus displays the pinnacle of Flemish art in a work made for a prince of the high nobility." [Adeva Fine Manuscripts]
- Henri de Ferrières, Les Livres du Roy Modus et de la Royne Ratio is available online in full via the Royal Library of Belgium.
- Book of King Modus and Queen Ratio by Henry of Ferrers at Condé Museum - Domaine de Chantilly.
- Les Livres Du Roy Modus from the Hunting in Europe site.
- Hunt Scenes from Karen Larsdatter's excellent Medieval and Renaissance Works of Art site (worth looking around).
- 'The Book of Archery' 1841 by GH Hansard (see French Archery chapter) from The Archery Library ("an online library containing digital versions of old archery books, prints and articles from times past.")
- Le Livre de Chasse de Gaston Phebus : (fabulous) site at BNF. -> this is the most famous hunting manuscript in French.
- Previously: Falconry.
17 Oct 16:15
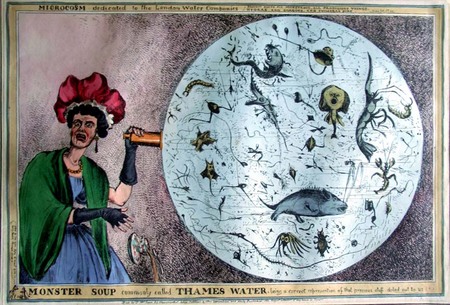 William Heath (1794/95-1840), Monster Soup Commonly Called Thames Water, Being a Correct Representation of that Precious Stuff Doled Out To Us!!! [Above the design:] Microcosm, dedicated to the London Water Companies, Brought Forth All Monstrous, All Prodigious Thigs [sic], Hydras, and Gorgons, and Chimeras Dire. Vide Milton. [‘Paradise Lost’, ii.], ca. 1828.
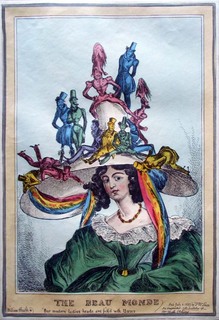 William Heath, The Beau Monde. “Our modern ladies heads are fill’d with bows.” July 6, 1829.
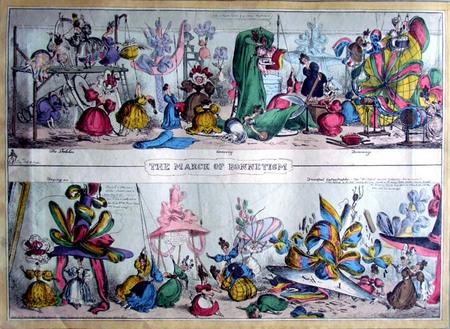 William Heath, The March of Bonnetism, ca. 1828.
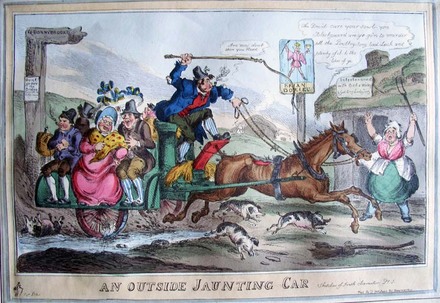 William Heath, An Outside Jaunting Car (from the series: Sketches of Irish character plate 1), ca. 1827
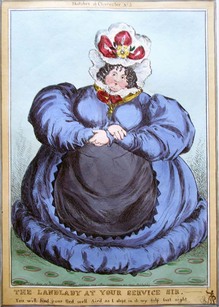 William Heath, The Landlady at Your Service Sir, You Will Find Your Bed Well Air’d as I Slept in it Myself Last Night (from the series: Sketches of Character, plate 5) ca. 1829.
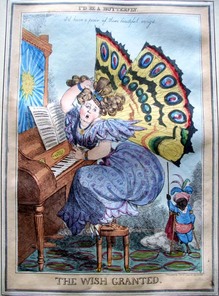 Attributed to William Heath, The Wish Granted. [above design]”I’d be a butterfly,” 1820s. Note the same carpet in both prints.
Monster Soup Commonly Called Thames Water
by Julie L. Mellby
William Heath (1794/95-1840), Monster Soup Commonly Called Thames Water, Being a Correct Representation of that Precious Stuff Doled Out To Us!!! [Above the design:] Microcosm, dedicated to the London Water Companies, Brought Forth All Monstrous, All Prodigious Thigs [sic], Hydras, and Gorgons, and Chimeras Dire. Vide Milton. [‘Paradise Lost’, ii.], ca. 1828.
William Heath, The Beau Monde. “Our modern ladies heads are fill’d with bows.” July 6, 1829.
This satire on the Metropolitan Water Supply of London was drawn and etched by William Heath. Although not dated, the Commissioners were appointed in 1827 and reported in 1828. This is also the time when Heath was using the figure of Paul Pry as his signature [bottom left]. Here Pry has his own water pump and says “Glad to see you hope to meet you in every Parish through London.”
The young, obviously well-read artist often used verses from Shakespeare or Milton as the basis for his satire. For this print, he takes a section from Paradise Lost, which reads, “Where all life dies, death lives, and nature breeds / Perverse, all monstrous, all prodigious things / Abominable, inutterable, and worse / Than fables yet have feigned or fear conceived / Gorgons, and Hydras, and Chimeras dire.”
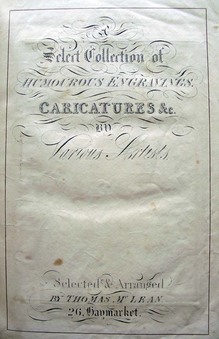
Princeton recently acquired a unique compilation of caricatures organized by one of Heath’s publishers, Thomas McLean, in the early 1830s. The album includes approximately sixty hand-colored caricatures, most by Heath but also a handful by Robert Seymour, Michael Egerton, Robert Cruikshank, and another unidentified artist.
McLean sold many versions of these albums, each with its own decorative letterpress title page. This one reads: A Select Collection of Humourous Engravings, Caricatures, &c. by Various Artists Selected and Arranged by Thomas McLean.
William Heath, The March of Bonnetism, ca. 1828.
William Heath, An Outside Jaunting Car (from the series: Sketches of Irish character plate 1), ca. 1827
William Heath, The Landlady at Your Service Sir, You Will Find Your Bed Well Air’d as I Slept in it Myself Last Night (from the series: Sketches of Character, plate 5) ca. 1829.
Attributed to William Heath, The Wish Granted. [above design]”I’d be a butterfly,” 1820s. Note the same carpet in both prints.
I am working on a catalogue raisonné of William Heath, including his prints, drawings, and illustrated books. Here’s a first draft (pdf). If anyone would like to comment or correct, I’d be glad to hear from you.
http://libweb5.princeton.edu/visualmaterials/gapdf/heath4.pdf
Elena Bulygina likes this
17 Oct 16:13
 Back in July, I wrote about the efforts of actor Johnny Depp and author Douglas Brinkley to bring to light Woody Guthrie's long forgotten novel: "House of Earth." At the time, Depp and Brinkley said the novel would be published by a "major New York publisher." That major New York publisher, as it turns out, will be Johnny Depp himself.
Yes, Johnny Depp is starting his own imprint: Infinitum Nihil, which will be part of the Harper Collins family. Guthrie's "House of Earth," which appears poised to be the first publication from Depp's imprint, will be released in January, 2013.
Also on the slate: "The Unraveled Tales of Bob Dylan," based on a series of interviews between Brinkley and Dylan. That book, however, won't be out until 2015.
And in between, Depp pledged that Infinitum Nihil "will do our best to deliver publications worthy of people's time, of people's concern, publications that might ordinarily never have breached the parapet."
The imprint is actively seeking "authentic, outspoken and visionary ideas and voices."
So any imprint collectors out there, there's a new kid on the block. Infinitum Nihil's publications will be well worth watching.
(Photo of Mr. Depp from Wikipedia)

Johnny Depp: Publisher
by Nate Pedersen
Maria Bakharevaон теперь еще и издатель
Back in July, I wrote about the efforts of actor Johnny Depp and author Douglas Brinkley to bring to light Woody Guthrie's long forgotten novel: "House of Earth." At the time, Depp and Brinkley said the novel would be published by a "major New York publisher." That major New York publisher, as it turns out, will be Johnny Depp himself.Yes, Johnny Depp is starting his own imprint: Infinitum Nihil, which will be part of the Harper Collins family. Guthrie's "House of Earth," which appears poised to be the first publication from Depp's imprint, will be released in January, 2013.
Also on the slate: "The Unraveled Tales of Bob Dylan," based on a series of interviews between Brinkley and Dylan. That book, however, won't be out until 2015.
And in between, Depp pledged that Infinitum Nihil "will do our best to deliver publications worthy of people's time, of people's concern, publications that might ordinarily never have breached the parapet."
The imprint is actively seeking "authentic, outspoken and visionary ideas and voices."
So any imprint collectors out there, there's a new kid on the block. Infinitum Nihil's publications will be well worth watching.
(Photo of Mr. Depp from Wikipedia)
13 Oct 14:11
Кончина кемпинговой палатки
Maria Bakharevaзима надвигается, а дома все нет
Палатку EasyCamp Boston 600 мы купили в качестве временного жилья на первые месяцы после переезда на землю, на время строительства более прочного дома.

Палатка просторная, в ней мы успешно прожили весну. Планировали брать её с собой в путешествия, вроде летних поездок на море. Оказалось, ресурс её был очень ограничен: ровно через 5 месяцев нахождения под открытым небом под действием дождя порвалась крыша.

Оказалось, материал, из которого сделана крыша, испортился настолько, что рвётся от всего: от севших на него птиц, от надавливания пальцем. Если пальцем в крышу можно было и не тыкать, то птиц и дожди контролировать невозможно.
Удивительно то, что ни жары, ни холодов, ни каких-либо других агрессивных погодных явлений за это время не наблюдалось, разве что в солнечные дни воздух внутри заметно прогревался, как минимум один раз — выше 42 градусов.
Наши друзья-односельчане, кстати, поступили проще: купили обычную палатку и уличный тент 3×9м от Балтики (без дна). В несколько раз дешевле и, по моим наблюдениям, практичнее.