Shared posts

11 Jun 13:34

Data Mine the Windows Event Log by Using PowerShell and XML

by The Scripting Guys

Summary: Microsoft Scripting Guy, Ed Wilson, talks about using Get-WinEvent in Windows PowerShell with FilterXML to parse event logs.

Microsoft Scripting Guy, Ed Wilson, is here. Today I am sipping a cup of English Breakfast tea. In my pot, I decided to add a bit of spearmint, peppermint, licorice root, lemon peel, orange peel, and lime peel to the tea. The result is a very refreshing cup of tea with a little added zing.

XML adds zing to event log queries

The other day when I opened the event log on my laptop, I noticed all the red stop signs, and I thought, "Dude, I really need to investigate this."

I decided to look at the application hangs. Although I can use the Event Viewer to filter for application hang, errors, and event ID 1002, that is as far as I can go by default. To see what application is hanging, I need to go into the message details box. This is a manual process and it is shown here:

Image of menu

It is possible to improve this situation, and to filter only on a specific application. This is because the data is stored in the Event Data portion of the message. This section appears when I select XML View from the Details tab, as shown here:

Image of menu

I can use this information to create a custom XML query by clicking Filter Current Log, clicking XML, and then clicking the Edit query manually check box. This is shown here:

Image of menu

In fact, this process outlines my process for creating a custom XML filter to filter the event log. I select as much as I need by using the graphical tools, then I edit the XML query manually in the dialog box. The advantage is that if I do not get the query correct, it does not display any records, it displays the incorrect records, or it tells me my query is invalid. At least that is what happens to me.

But I do not directly edit the query in the dialog box because if I get it wrong the first time, I have messed up my query. So I copy the autogenerated XML filter and paste it for safe keeping in a blank Notepad. I then edit the query. If I mess it up, I simple return to Notepad, retrieve my previous query, and start over. Simple.

Looking for instances of LYNC hangs

When I was rummaging around in the Event Viewer, I noticed that several of the hangs were caused by Lync.exe. So, I thought I would create a custom query to look for those instances. To do this, I need to get into the Event Data node and look for Lync.

After I create a generic XML query by using the GUI tools, I copy the query, and turn it into a here string. Here is the basic query:

<QueryList>

  <Query Id="0" Path="Application">

    <Select Path="Application">*[System[Provider[@Name='Application Hang'] and (Level=2) and (EventID=1002)]] </Select>

  </Query>

</QueryList>

To make it a here string, I add @” and “@ around the string, and I assign it to a variable. Now I need to access EventData and the first data that is equal to Lync.exe. I add it after EventID=1002)]] by using and to bring them together. Here is the completed query.

$query = @"

<QueryList>

  <Query Id="0" Path="Application">

    <Select Path="Application">*[System[Provider[@Name='Application Hang']

    and (Level=2) and (EventID=1002)]]

    and *[EventData[Data='lync.exe']]</Select>

  </Query>

</QueryList>

"@

To run it, all I do is call the Get-WinEvent and pass it to the $query parameter as a value for –FilterXML. This is shown here:

Get-WinEvent -FilterXml $query 

The command and the results are shown in the following image:

Image of command output

Without using XML

Without using XML, someone may come up with a command something like the following:

Get-WinEvent -LogName application |

    where { $_.providername -eq 'application hang' -and

    $_.level -eq 2 -and

    $_.ID -eq 1002 -and

    $_.message -match 'lync.exe'}

It works, and it gets the job done. But what about the results?

Although the command seems to work pretty well, I will use Measure-Command to see how well. To do this, I add the command to a script block for Measure-Command. Here is what it looks like:

Measure-Command {Get-WinEvent -LogName application |

    where { $_.providername -eq 'application hang' -and

    $_.level -eq 2 -and

    $_.ID -eq 1002 -and

    $_.message -match 'lync.exe'} }

The results? It takes 10.16 seconds as shown here:

Image of command output

And now for the XML query...

$query = @"

<QueryList>

  <Query Id="0" Path="Application">

    <Select Path="Application">*[System[Provider[@Name='Application Hang']

    and (Level=2) and (EventID=1002)]]

    and *[EventData[Data='lync.exe']]</Select>

  </Query>

</QueryList>

"@

Measure-Command {Get-WinEvent -FilterXml $query }

The results take a mere 0.07 second. This is an amazing speed increase. Here is an image of the script and the output:

Image of command output

Although this is a great performance, and it makes me happy on my laptop, suppose I was trying to run the command against a thousand computers. That ten seconds stretches into over two and a half hours. I spent less than five minutes making the query. So five minutes to save ten seconds is not a great investment. But five minutes dev time to save over two and a half hours is a great ROI.

Spend a little time to work out the syntax for XML filters by using Get-WinEvent. This is an area where a bit of investment in learning will pay off handsomely in the future.

That is all there is to using Get-WinEvent and an XML filter to parse the event log message data. Event Log Week will continue tomorrow when I will talk about more cool stuff.

I invite you to follow me on Twitter and Facebook. If you have any questions, send email to me at scripter@microsoft.com, or post your questions on the Official Scripting Guys Forum. See you tomorrow. Until then, peace.

Ed Wilson, Microsoft Scripting Guy 

06 Jun 09:09

New PowerShell Pluralsight Course

by Jeffery Hicks

WatermarkLogo151x79I am so happy to announce that my first course under the Pluralsight badge has been released. My latest course is titled PowerShell v4 New Features. This course is aimed at IT Pros with previous experience using PowerShell, especially PowerShell v3. The course runs just under 3 hours (although it felt much longer than that while preparing it :-) ) and covers just the new bits that have changed from v3 including an introduction to Desired State Configuration (DSC). I provide enough information to get you started.

If you need to get caught up on v3 first, you can find my other courses on my author page. I hope you find my new course helpful.

04 Jun 19:23

Creating a DSC Configuration Template

by Jeffery Hicks

During the recent TechEd in Houston, there was a lot of talk and excitement about Desired State Configuration, or DSC. I’m not going to cover DSC itself here but rather address a minor issue for those of you just getting started. When you build a configuration, how can your figure out what resource settings to use?

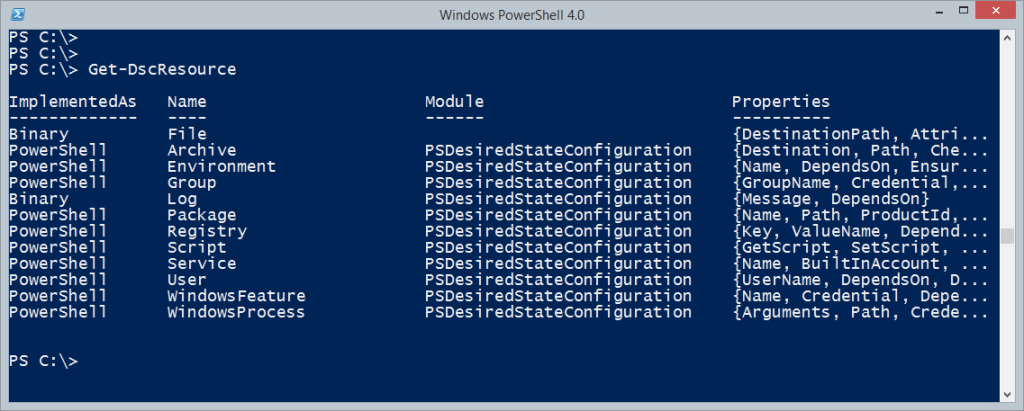
To start with, you can look use the Get-DSCResource cmdlet which will list all resources in the default locations.

get-dscresource

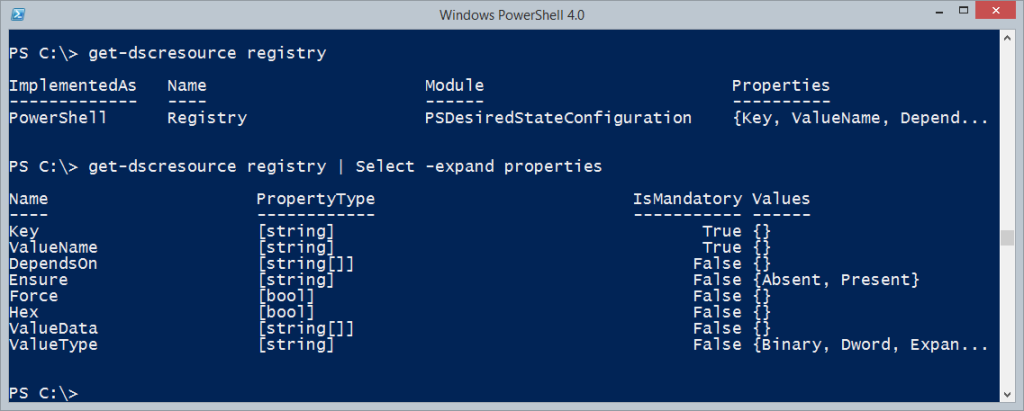
The properties for each resource are also there, although you have to dig a little.

get-dscresource registry | Select -expand properties

get-dscresourceproperties

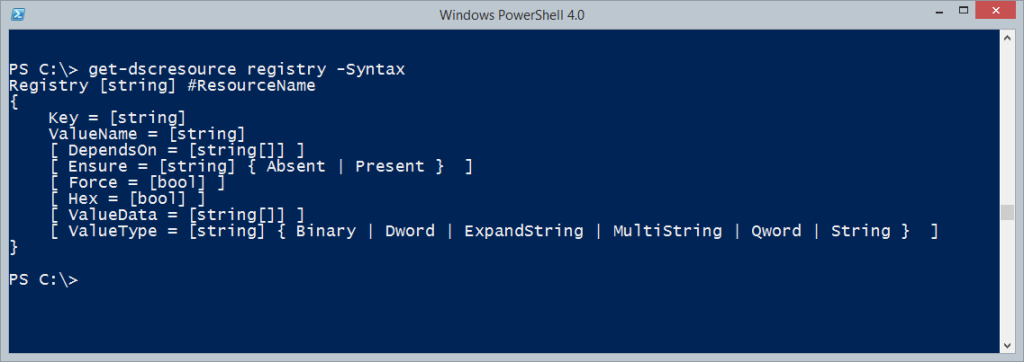
From the screen shot you can see which properties are mandatory and the possible values for the rest. The Get-DSCResource cmdlet will even take this a step further and show you the complete syntax on how to use a particular resource.

get-dscresource registry -Syntax

get-dscresourcesyntax

To build a configuration, you can copy, paste and edit. But I wanted more, as I often do when it comes to things PowerShell. So I wrote a function called New-DSCConfigurationTemplate that will generate a complete configuration with as many resources as you have available.

#requires -version 4.0
#requires -module PSDesiredStateConfiguration

Function New-DSCConfigurationTemplate {

<#
.SYNOPSIS
Create a DSC configuration template
.DESCRIPTION
This command will create a DSC configuration template using any of the available DSC resources on the local computer. By default, it will create a configuration for all resources. The template will show all possible values for each set of resource properties. Mandatory property names are prefaced with a * , which you must delete.

If you don't specify a file path or to use the ISE, then the configuration will be written to the pipeline.
.PARAMETER Name
The name of the DSC resource
.PARAMETER UseISE
Open the template in the PowerShell ISE. You must be running this command in ISE or specify a path.
.PARAMETER Path
Save the file to the specified path. You can also opt to open the file in the ISE after creating it.
.EXAMPLE
PS C:\> New-DSCConfigurationTemplate File,Service,Registry -path d:\configs\template1.ps1 -useIse

Create a DSC configuration template for resources File, Service and Registry. The example code will save it to a file and then open the file in the PowerShell ISE.
.EXAMPLE
PS C:\> New-DSCConfigurationTemplate -useISE

Assuming this command is run in the ISE, it will create a configuration template using all DSC resources on the local computer and open it in the ISE as an untitled and unsaved file.
.LINK
Get-DSSResource
.LINK
http://jdhitsolutions.com/blog/2014/05/creating-a-dsc-configuration-template
.NOTES
Last Updated: May 17, 2014
Version     : 0.9
Author      : @JeffHicks

Learn more:
 PowerShell in Depth: An Administrator's Guide (http://www.manning.com/jones2/)
 PowerShell Deep Dives (http://manning.com/hicks/)
 Learn PowerShell in a Month of Lunches (http://manning.com/jones3/)
 Learn PowerShell Toolmaking in a Month of Lunches (http://manning.com/jones4/)
 
"Those who forget to script are doomed to repeat their work."

  ****************************************************************
  * DO NOT USE IN A PRODUCTION ENVIRONMENT UNTIL YOU HAVE TESTED *
  * THOROUGHLY IN A LAB ENVIRONMENT. USE AT YOUR OWN RISK.  IF   *
  * YOU DO NOT UNDERSTAND WHAT THIS SCRIPT DOES OR HOW IT WORKS, *
  * DO NOT USE IT OUTSIDE OF A SECURE, TEST SETTING.             *
  ****************************************************************
#>

[cmdletbinding()]
Param(
[parameter(Position=0,ValueFromPipeline=$True)]
[ValidateNotNullorEmpty()]
[string[]]$Name="*",
[switch]$UseISE,
[string]$Path
)

Begin {
    Write-Verbose -Message "Starting $($MyInvocation.Mycommand)"  
    $template=@"
#requires -version 4.0

Configuration MyDSCTemplate {

#Settings with a * are mandatory. Delete the *.
#edit and delete resource properties as necessary

Node COMPUTERNAME {

"@

} #begin

Process {


foreach ($item in $name) {
Write-Verbose "Getting resource $item "
$resources = Get-DscResource -Name $item

    foreach ($resource in $resources) {
[string[]]$entry = "`n$($resource.name) <ResourceID> {`n"

    Write-Verbose "Creating resource entry for $($resource.name)"
    $entry+=  foreach ($item in $resource.Properties) {
     if ($item.IsMandatory) {
       $name="*$($item.name)"
     }
     else {
     $name = $item.name
     }

     if ($item.PropertyType -eq '[bool]') {
       $possibleValues = "`$True | `$False"
     }
    elseif ($item.values) {
      $possibleValues = "'$($item.Values -join "' | '")'"
     }
    else {
      $possibleValues=$item.PropertyType
    } 
    "$name = $($possibleValues)`n"

    } #foreach
 $entry+="} #end $($resource.name) resource`n`n"
 #add the resource listing to the template
 $template+=$entry
}
} #foreach item in $name

} #process

End {

Write-Verbose "closing template"
$template+=@"
 } #close node

} #close configuration

"@

if ($path) {
Write-Verbose "Saving template to $path"
  Try {
    $template | Out-File -FilePath $path -ErrorAction Stop
    if ($UseISE) {
        Write-Verbose "Opening $path in the ISE"
        ise $path
    }
  }
  Catch {
    Throw $_
  }
}
elseif ($UseISE -And ($host.name -match "PowerShell ISE")) {
    Write-Verbose "Creating a new ISE PowerShell tab"
    $new = $psise.CurrentPowerShellTab.Files.Add()
    Write-Verbose "Inserting template into a new tab"
    $new.Editor.InsertText($template)
}
elseif ($UseISE -And ($host.name -notmatch "PowerShell ISE")) {    
        Write-Warning "Could not open template in the ISE. Are you in it? Otherwise, specify a path or run this in the ISE."
  }
else {
    Write-Verbose "Writing template to the pipeline"
    $template
}

    #All finished
    Write-Verbose -Message "Ending $($MyInvocation.Mycommand)"
} #end

} #end function

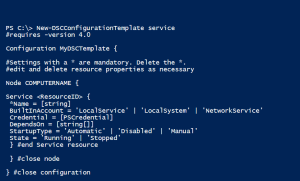
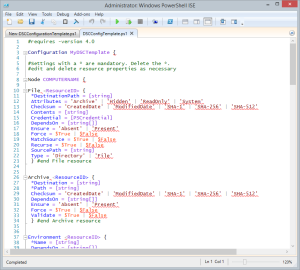
The function will create a configuration template with whatever resources you specify.
new-dscconfig01
By default the function writes to the pipeline, but you can specify a file name and even open the file in the ISE. Here’s how to create a single template for all DSC resources on your computer.

New-DSCConfigurationTemplate -Path c:\scripts\DSCConfigTemplate.ps1 -UseISE

new-dscconfig02
Mandatory properties are preceded by a *, which you need to delete. Properties have all of the possible values or at the very least what type of value you need to enter. Simply delete what you don’t want and in no time you have a complete DSC configuration! Don’t forget to substitute a name in for without the .

I wrote this with the assumption that I could run this once to create a template, then copy and paste what I need into a new configuration. Another option would be to create ISE snippets for these resources.

Personally, anything that saves me typing is a great help. I hope you’ll let me know what you think.

01 Jun 08:24

PowerShell Best Practices for the Console

by The Scripting Guys

Summary: Microsoft Scripting Guy, Ed Wilson, talks about Windows PowerShell best practices for the console.

Microsoft Scripting Guy, Ed Wilson, is here. This morning, the Scripting Wife and I decided to head to a new breakfast place that had great reviews on Yelp. We grabbed our Surface 2s and headed into town. Teresa had her new Surface 2 RT with 4G, and I took my new Surface 2 Pro with the power keyboard.

One of the things that got my attention about this restaurant was the statement that they made their scones in house from fresh ingredients instead of from mixes. They also claimed to have 30 different types of tea, so I was in.

Well, they did have scones, but most were covered with ½ inch thick sugar icing. I did find a multiberry one that was not. Most of the teas were fruit or herb, which I am sure you know is not even a real tea. But I did settle on a nice cup of English Breakfast tea. They had a good Internet connection, so our breakfast was worthwhile.

Speaking of worthwhile…

I spend most of my day with the Windows PowerShell console. In fact, I generally have two Windows PowerShell consoles open at the same time. I have one in which I am working, and a second one where I am looking up Help content. If I need elevated permissions, I open a third Windows PowerShell console.

Remember the purpose

The key thing to remember is the purpose of the operation. For example, when I am working interactively at the Windows PowerShell console, I am focusing on commands and quickly getting work done. Here are some of the things that I do:

  1. I turn on the Windows PowerShell transcript: Start-Transcript.
  2. I do not use Set-StrictMode.
  3. I use aliases as much as I possibly can.
  4. I use Tab expansion where I cannot use an alias.
  5. I make extensive use of the history: Get-Command –noun history.
  6. I make extensive use of my Windows PowerShell profile.
  7. If a command goes to more than two lines, I move it to the Windows PowerShell ISE, and format it so it is easier to read.
  8. I use positional parameters.
  9. I tend to use rather non-complicated syntax.
  10. I do a lot of grouping, and I select properties from returned collections.
  11. I explore Help for cmdlets and examples in my other Windows PowerShell console. Often I experiment with modifying Help examples.
  12. I use type accelerators when appropriate, but I prefer to use standard Windows PowerShell cmdlets.
  13. I am not shy about using standard command-line utilities inside the Windows PowerShell console if no easy Windows PowerShell equivalent exists.
  14. I like to use Out-Gridview to help me visualize data and to help explore data relationships.
  15. I prefer to store returned objects in variables, and then sort, filter, and group the data. In this way, I only have to obtain the data once.
  16. I like to set $PSDefaultParameterValues for cmdlets that I always use in a standard way.
  17. I like to store my credentials in a variable. I use Get-Credential early in my Windows PowerShell session, and then I can reuse the credentials. I typically use a variable named $cred so it is easy for me to remember.
  18. I like to create a list of the remote computers I am going to use early in my Windows PowerShell session. Typically, I use the Get-ADComputer cmdlet and filter out what I do not need.
  19. I like to create remote Windows PowerShell sessions to my target computers early in my Windows PowerShell session. I store the sessions in a variable I typically call $session. Most of the time this is a CimSession, but occasionally it is a normal remote Windows PowerShell session.
  20. In my Windows PowerShell profile, I create aliases for the cmdlets I use on a regular basis. My list is now around 20 aliases.
  21. I create several Windows PowerShell drives (PSDrives) in my profile. I like to have a PSDrive for my module location and one for my script library.
  22. I parse my environmental variable so it is easy for me to access resources such as my document library, music library, and photo library. I store the paths in appropriate variables, so I can use $doc instead of C:\Users\ed\Documents\.
  23. I use PSReadline.

That is a quick overview of best practices for working with the Windows PowerShell console. Best Practices Week will continue tomorrow when I will talk about best practices for Windows PowerShell scripts. What are some of the things that you do to make life easier when you are working in the Windows PowerShell console?

I invite you to follow me on Twitter and Facebook. If you have any questions, send email to me at scripter@microsoft.com, or post your questions on the Official Scripting Guys Forum. See you tomorrow. Until then, peace.

Ed Wilson, Microsoft Scripting Guy 

01 Jun 08:01

Wish I can author DSC Resource in C#!!

by PowerShell Team

In previous blog, we learned how one can use their PowerShell skills to author DSC resources very easily. Still there are folks (we met some at TechEd NA) who want to author their DSC resources using C# because they are more productive with it than PowerShell language. Well, you can fully leverage the power of DSC by writing your resources in C#. In this blog, we will explore how you can write a C# based DSC resource and later seamlessly consume it from your DSC Configurations.

Authoring DSC resources in C#

For the purpose of this blog, we will write a DSC resource named “xDemoFile”. This resource will be used to assert the existence of a file and its contents. It is similar to a File resource but with limited functionalities.

I)             Project Setup:-

a)      Open visual studio

b)      Create a C# project and provide the name (such as  “cSharpDSCResourceExample”)

c)       Select “Class Library” from the available project templates

d)      Hit “Ok”

e)    Add assembly reference to system.automation.management.dll preferably from PowerShell SDK [but you can add assembly reference to your project from the windows assembly cache, GAC (<systemDrive>\ Windows\Microsoft.NET\assembly\GAC_MSIL\System.Management.Automation\v4.0_3.0.0.0__31bf3856ad364e35\System.Management.Automation.dll)].

f)      *Update the assembly name to match the DSC resource name. (write right click on the project then hit properties and change the Assembly Name to MSFT_xDemoFile)


II)           Resource Definition

Similar to script based DSC resource. You will need to define the input and output parameters of your resources in <ResourceName>.schema.mof.  You can generate the schema of your resource using the Resource Designer Tool.

Save the following in to a file named MSFT_xDemoFile.Schema.mof

[ClassVersion("1.0.0"), FriendlyName("xDemoFile")]

class MSFT_XDemoFile : OMI_BaseResource

{

                [Key, Description("path")] String Path;

                [Write, Description("Should the file be present"), ValueMap{"Present","Absent"}, Values{"Present","Absent"}] String Ensure;

                [Write, Description("Contentof file.")] String Content;                  

};


III)         Resource Implementation

In order to write DSC Resources in C#, you need to implement three PowerShell cmdlets. PowerShell cmdlets are written by inheriting from PSCmdlet or Cmdlet. Detail on how to write PowerShell Cmdlet in C# can be found in this MSDN documentation.

See below for the signature of the cmdlets:-

Get-TargetResource

       [OutputType(typeof(System.Collections.Hashtable))]

       [Cmdlet(VerbsCommon.Get, "TargetResource")]

       public class GetTargetResource : PSCmdlet

       {

              [Parameter(Mandatory = true)]

              public string Path { get; set; }


///<summary>

/// Implement the logic to write the current state of the resource as a

/// Hash table with keys being the resource properties

/// and the Values are the corresponding current values on the target machine.


///</summary>

              protected override void ProcessRecord()

              {

// Download the zip file at the end of this blog to see sample implementation.

 }


Set-TargetResouce

         [OutputType(typeof(void))]

    [Cmdlet(VerbsCommon.Set, "TargetResource")]

    public class SetTargetResource : PSCmdlet

    {

        privatestring _ensure;

        privatestring _content;


[Parameter(Mandatory = true)]

        public string Path { get; set; }


[Parameter(Mandatory = false)]     

       [ValidateSet("Present", "Absent", IgnoreCase = true)]

       public string Ensure {

            get

            {

                // set the default to present.

               return (this._ensure ?? "Present");

            }

            set

            {

                this._ensure = value;

            }

           } 

            public string Content {

            get { return (string.IsNullOrEmpty(this._content) ? "" : this._content); }

            set { this._content = value; }

        }


///<summary>

        /// Implement the logic to set the state of the machine to the desired state.

        ///</summary>

        protected override void ProcessRecord()

        {

//Implement the set method of the resource

/* Uncomment this section if your resource needs a machine reboot.

PSVariable DscMachineStatus = new PSVariable("DSCMachineStatus", 1, ScopedItemOptions.AllScope);

                this.SessionState.PSVariable.Set(DscMachineStatus);

*/    

  }

    }

Test-TargetResource    

       [Cmdlet("Test", "TargetResource")]

    [OutputType(typeof(Boolean))]

    public class TestTargetResource : PSCmdlet

    {  


        private string _ensure;

        private string _content;


        [Parameter(Mandatory = true)]

        public string Path { get; set; }


        [Parameter(Mandatory = false)]

        [ValidateSet("Present", "Absent", IgnoreCase = true)]

        public string Ensure

        {

            get

            {

                // set the default to present.

                return (this._ensure ?? "Present");

            }

            set

            {

                this._ensure = value;

            }

        }


        [Parameter(Mandatory = false)]

        public string Content

        {

            get { return (string.IsNullOrEmpty(this._content) ? "“:this._content);}

            set { this._content = value; }

        }


///<summary>

/// Write a Boolean value which indicates whether the current machine is in   

/// desired state or not.

        ///</summary>

        protected override void ProcessRecord()

        {

                // Implement the test method of the resource.

        }

}


IV)        How to handle Machine reboot in C# based DSC Resources.

If your resource needs a machine reboot. The way to indicate that in script-based DSC resource is setting the global variable $global:DSCMachineStatus  to 1 in the Set-TargetResource function of the resource.  To do similar in C#-based DSC resource, you will need to set the same variable in the runspace where the Set Cmdlet of the resource will be executed.

Adding the following two lines will signal a machine reboot to the DSC engine.

PSVariable DSCMachineStatus = new PSVariable("DSCMachineStatus", 1, ScopedItemOptions.AllScope);

this.SessionState.PSVariable.Set(DSCMachineStatus);


Consume C# based resources

I)        How to deploy C# based DSC Resource

The folder structure of C# based DSC resource is the same as the script based resource. Please refer to this blog to see how DSC resources should be deployed in your machine.

The output binaries from your project and the schema mof of the resource should be deployed to the correct path before you can use it to author or apply configurations.

Example: - if you deploy the resource under a module “CSharpDSCResource” inside $env:programfiles, the folder structure would look like:-

             $env:ProgramFiles\WindowsPowerShell\Modules\CSharpDSCResource\DSCResources\MSFT_XDemoFile\MSFT_XDemoFile.dll

             $env:ProgramFiles\WindowsPowerShell\Modules\CSharpDSCResource\DSCResources\MSFT_XDemoFile\MSFT_XDemoFile.Shema.mof

II)        Create Configuration:-


Configuration CsharpExample

{

    Import-DSCResource -Module CSharpDSCResource

    Node("localhost")

    {

        xDemoFile fileLog

        {

            Path = "c:\foo.txt"

            Content = "content example"

            Ensure = “Present"         


        }

    }

}


III)        Run the configuration:-


Start-DSCConfiguration -ComputerName localhost -Path .\CsharpExample\ -Verbose -Wait


Berhe Abrha

Windows PowerShell Team


01 Jun 08:00

How to retrieve node information from DSC pull server

by PowerShell Team

As described in “Push vs. Pull Mode” blog, DSC configuration can be applied on target nodes using pull or push mechanism.  In this blog I will talk about how to retrieve node information from DSC pull server. When the node pulls a configuration from the pull server and applies it locally, it can either succeed or fail. DSC compliance endpoint stores the configuration run status and node information in a database. Compliance endpoint can be used by admins to periodically check the status of the nodes to see if their configurations are in sync with pull server or not (using tools like Excel or write their own client application).

In this post I will cover the following:

  • Sending node’s information to pull server
  • Query node information in json from pull server

Before configuring a node to pull a configuration from pull server, you will need to setup DSC pull server in your environment that is covered in “DSC Resource for configuring pull server environment” blog.

You will also need to setup a compliance endpoint that will record the node information that is covered in the same blog.

DSC Compliance endpoint stores the following information about the nodes in database:

  • TargetName – Node name
  • ConfigurationId – Configuration ID associated with the node

  • StatusCode – Node status code.

Here is the list of status codes. Note that there might be additions or changes to the list in the future.


Status Code

Description

0

Configuration was applied successfully

1

Download Manager initialization failure

2

Get configuration command failure

3

Unexpected get configuration response from pull server

4

Configuration checksum file read failure

5

Configuration checksum validation failure

6

Invalid configuration file

7

Available modules check failure

8

Invalid configuration Id In meta-configuration

9

Invalid DownloadManager CustomData in meta-configuration

10

Get module command failure

11

Get Module Invalid Output

12

Module checksum file not found

13

Invalid module file

14

Module checksum validation failure

15

Module extraction failed

16

Module validation failed

17

Downloaded module is invalid

18

Configuration file not found

19

Multiple configuration files found

20

Configuration checksum file not found

21

Module not found

22

Invalid module version format

23

Invalid configuration Id format

24

Get Action command failed

25

Invalid checksum algorithm

26

Get Lcm Update command failed

27

Unexpected Get Lcm Update response from pull server

28

Invalid Refresh Mode in meta-configuration

29

Invalid Debug Mode in meta-configuration

  • NodeCompliant  - Configuration on the target node is in sync with the configuration stored on pull server or not.
  • ServerCheckSum – Checksum of the configuration mof file stored on the pull server
  • TargetCheckSum –Checksum of the configuration mof file that was applied on the node
  • LastComplianceTime – Last time the node run the configuration successfully
  • LastHeartbeatTime  -Last time the node connected to pull server.
  • Dirty – True if node status was recorded in the database, and false if not.

Compliance endpoint database connection is defined through its web.config settings. If you did not define it for your environment, compliance endpoint would not be recording node information into the database. Below snippet shows how to define database connection:


Set-Webconfig-AppSettings `

                 -path $env:HOMEDRIVE\inetpub\wwwroot\$complianceSiteName `

                 -key "dbprovider" `

                 -value "ESENT"


Set-Webconfig-AppSettings `

             -path $env:HOMEDRIVE\inetpub\wwwroot\$complianceSiteName `

             -key "dbconnectionstr" `

 -value "$env:PROGRAMFILES\WindowsPowerShell\DscService\Devices.edb"


Getting ready

First, we need to write a simple configuration that the node will be pulling from pull server, compile the configuration into mof, create it’s checksum file, deploy the mof and checksum files to the pull server. Then, configure the node to be in pull mode as by default LCM on the node is configured to be in push. For details please refer to “push vs. pull mode” blog.


Sending node’s status to pull server

When the node pulls a configuration from the pull server, the node includes the previous configuration run status with the new pull request which then gets recorded by compliance endpoint into the database.

Query node information in json from pull server

We will use the following function to query the node’s information from pull server.

<#

# DSC function to query node information from pull server.

#>

function QueryNodeInformation

{

  Param (     

       [string] $Uri = "http://localhost:7070/PSDSCComplianceServer.svc/Status",                         

       [string] $ContentType = "application/json"          

     )

  Write-Host "Querying node information from pull server URI  = $Uri" -ForegroundColor Green

  Write-Host "Querying node status in content type  = $ContentType " -ForegroundColor Green


 $response = Invoke-WebRequest -Uri $Uri -Method Get -ContentType $ContentType -UseDefaultCredentials -Headers
    @{Accept = $ContentType}


 if($response.StatusCode -ne 200)

 {

     Write-Host "node information was not retrieved." -ForegroundColor Red

 }


 $jsonResponse = ConvertFrom-Json $response.Content


 return $jsonResponse


}

You need to replace Uri parameter with your_pull_ server_ URI.  To retrieve the node information in xml format, you should set the ContentType to ”application/xml”.

Now, let us retrieve the node information in the parameter $json and format the output to be in a table:

$json = QueryNodeInformation –Uri http://localhost:7070/PSDSCComplianceServer.svc/Status


$json.value | Format-Table TargetName, ConfigurationId, ServerChecksum, NodeCompliant, LastComplianceTime, StatusCode


In result you will see an output similar to:


TargetName       ConfigurationId      ServerCheckSum      NodeCompliant  LastComplianceTime   StatusCode

----------                ---------------            --------------               -------------                      -----------------               ----------

Machine-975..  1C707B86-EF8E……  AE467E88D512...    True                    1899-12-30T00:00:00                  0


Hope this helps.


Thanks,

Narine Mossikyan

Software Engineer in Test


21 May 12:32

Weekend Scripter: Best Practices for PowerShell Scripting in Shared Environment

by The Scripting Guys

Summary: Microsoft PFE, Dan Sheehan, shares Windows PowerShell scripting best practices for a shared environment.

Microsoft Scripting Guy, Ed Wilson, is here. Today I would like to welcome a new guest blogger, Dan Sheehan.

Dan recently joined Microsoft as a senior premiere field engineer in the U.S. Public Sector team. Previously he served as an Enterprise Messaging team lead, and was an Exchange Server consultant for many years. Dan has been programming and scripting off and on for 20 years, and he has been working with Windows PowerShell since the release of Exchange Server 2007. Overall Dan has over 15 years of experience working with Exchange Server in an enterprise environment, and he tries to keep his skillset sharp in the supporting areas of Exchange, such as Active Directory, Hyper-V, and all of the underlying Windows services.

Here's Dan…

I have been working and scripting (using various technologies) in enterprise environments where code is shared, updated, and copied by others for over 20 years. Even though I don’t consider myself a Windows PowerShell expert, I find myself assisting others with their Windows PowerShell scripts with best practices and speed improvement techniques, so I thought I would share them with the community as a whole.

This blog post is centered on the best practices I find myself sharing and championing the most in shared environments (I include all enterprise environments). In my next blog post, I will be discussing some Windows PowerShell script speed improvement techniques.

But before we try to speed up our script, it’s a good idea to review and implement coding best practices as a form of a code cleanup. Although some of these best practices can apply to any coding technology, they are all relevant to Windows PowerShell. For another good source of best practices for Windows PowerShell, see The Top Ten PowerShell Best Practices for IT Pros.

The primary benefit of these best practices is to make it easier for others who review your script to understand and follow it. This is especially important for the ongoing maintenance of production scripts as people change jobs, get sick, or get hit by a bus (hopefully never). They also become important people and post scripts in online repositories, such as the TechNet Gallery, to share with the community.

Some of these best practices may not provide a lot of value if the script is small or will only be used by one person. However, even in that scenario, it is a good idea to get into a habit of using best practices for consistency. You never know when you might revisit a script you wrote years ago, and these best practices can help you save time refamiliarizing yourself with it.

Ultimately, the goal of the best practices I discuss in this post is to help you take messy script that looks like this:

Image of script

…and turn it into an exact functional, but much more readable, version, like this:

Image of script

Note  I format my Windows PowerShell script for landscape-mode printing. It is my personal opinion that portrait-mode causes excessive line wraps in script, which makes the script harder to read. This is a personal preference, and I realize most people stick to keeping their script to within 85 characters on a line, which is perfectly fine if that works for them. Just be consistent about wherever you choose to wrap your script.

Keep it simple (or less is more)

The first best practice, which really applies to all coding, is to try to keep the script as simple and streamlined as possible. The first thing to remember is that most humans think in a very linear fashion, in this case from the top to the bottom of a script, so you want to try to keep your script as linear as possible. This means you should avoid making someone else jump around your script to try follow the logical outcome.

Also during the course of learning how to do new and different things, IT workers have a tendency to make script more complex than it needs to be because that’s how some of us experiment with and learn new techniques. Even though learning how to do new and different things in Windows PowerShell scripting is important, learning exercises should be separate from production script that others will have to use and support.

I’m going to use Windows PowerShell functions as an example of a scenario where I see authors unnecessarily overcomplicating script. For example, if a small, simple block of code will accomplish what needs to occur, don’t go out of your way to turn that script into a function and move it somewhere else in the script where it is later called…just because you can. Unnecessarily breaking the linear flow of the script just to use a function makes it harder for someone else to review your script linearly.

I was discussing the use of functions with a coworker recently. He argued that modularizing his script into functions and then calling all the functions at the end of the script made the script progression easier for him to follow.

I see this type of modularization behavior from those who have been full-on programming (or taught by a programmer)—all the routines, voids, or whatever in the code are modularized. Although I appreciate that we all have different coding styles, and ultimately you need to write the script in the way that works best for you, the emphasis in this blog post is writing your script so others can read and follow it as easily as possible.

Although using a couple of single-purpose functions in a script may not initially seem to make it hard for you to follow the linear progression of the script, I have also seen script that calls functions inside of other functions, which compounds the issue. This nesting of functions makes it exceedingly difficult for someone else to follow the progression of events because they have to jump around the script (and script logic) quite a bit.

To be clear, I am not picking on all uses of functions because there is definitely a time and place for them in Windows PowerShell. A good justification for using a function in your script is when you can avoid listing the same block of code multiple times in your script and instead store that code in a multiple use function. In this case, reducing the amount of code people have to review will hopefully make it easier for them to understand.

For example, in the Mailbox Billing Report Generator script I wrote at a previous job, I used a function to generate Excel spreadsheets because I was going to be reusing that block of code in the script multiple times. It made more sense to have the code listed once and then called multiple times in the script. I also tried to locate the function close to the script where it was going to be called, so other people reviewing the script didn’t have to go far to find it.

Let's take the focus off of functions and back to Windows PowerShell scripting techniques in general…

Utimately when you are thinking about using a particular scripting technique, try to determine if it is really beneficial. A good way to do this is by asking yourself if the technique is adding value and functionality to the script and if it will potentially unnecessarily confuse another person reading it. Remember that just because you can use a certain technique doesn’t mean you should.

Use consistent indentation

Along with keeping the script simple, it should be consistently organized and formatted, including indentations when new loop or conditional check code constructs are used. Lack of indentation, or even worse, inconsistent use of indentation makes script much harder to read and follow. One of the worst examples that I have seen is when someone pasted examples (including the example indentation level) from multiple sources into their script, and the indentation seemed to be randomly chosen. I had a really hard time following that particular script.

The following example uses the Tab key to indent the script after each time a new If condition check construct is used. This is used to represent that the script following that condition check is executed only if the outcome of the condition check is met. The Else statement is returned to the same indentation level as the opening If condition check, because it represents closure of the original condition check outcome and the beginning of the alternate outcome (the condition check wasn’t met). Likewise, the final closing curly brace is returned to the same level of indentation as the opening condition check because the condition check is now completely finished.

Image of script

If you add another condition check inside of an existing condition check (referred to as “nesting”), then you should begin indenting the new condition check at the current indentation level to show it is nested inside a “parent” condition check. The previous example shows a second If condition check on line #6, which is nested inside a parent If condition check where everything is already indented one level. The nested If condition check then indents a second level on line #7 for its condition check outcome, but then it returns to the first indentation level when the condition check outcome is complete.

Indentations should be used any time you have open and close curly braces around a block of code, so the person reading your script knows that block of code is a part of construct. This would apply to ForEach loops, Do…While condition check loops, or any block of code in between open and closing curly brackets of a construct.

The use of indentation isn’t limited to constructs, and it can be used to show that a line of script is a continuation of the line above it. For example as a personal preference, whenever I use the back tick character ( ` ) to continue the same Windows PowerShell command on the next line in a script, I indent that next line so that as I am reviewing the script, I can easily tell that line is a part of the command on the previous line.

Note  Different Windows PowerShell text editors can record indentations differently, such as a Tab being recorded as a true Tab in one editor and multiple spaces in another editor. It’s a good idea check your indentations if you switch editors and you aren’t sure they use the same formatting. Otherwise, viewing your script in other programs (such as cutting and pasting the script into Microsoft Word) can show your script with inconsistent indentations.

Use Break, Continue, and other looping controls

Normally, if I want to execute a large block of code only if certain conditions are met, I would create an If condition check in the script with the block of code indented (following the practices I discussed previously). If the condition wasn’t met, the script would jump to the end of the condition check where the indentation was returned back to the level of the original condition check.

Now imagine you have a script where you only want the bulk of the script to execute if certain condition checks are met. Further imagine you have multiple nested condition checks or loops inside of that main condition check. Although this may not seem like an issue because it works perfectly fine as a scripting method, nesting multiple condition checks and following proper indentation methods can cause many levels of indenting. This, in turn, causes the script to get a little cramped, depending on where you chose to line wrap.

I refer to excessive levels of nested indentation as “indent hell.” The script is so indented that the left half of the screen is wasted on white space and the real script is cramped on the right side of the screen. To avoid “indent hell,” I started looking for another method to control when I executed large blocks of code in a script without violating the indentation practice.

I came across the use of Break and Continue, and after conferring with a colleague infinitely more versed in Windows PowerShell than myself, I decided to switch to using these loop processing controls instead of making multiple gigantic nested condition checks.

In the following example, I have a condition check that is nested inside of a ForEach loop. If the first two condition checks aren’t met, the Windows PowerShell script executes the Continue loop processing control, which tells it to skip the rest of the ForEach loop.

Image of script

Using these capabilities in your script isn’t ideal for every situation, but they can help reduce “indent hell” by helping streamline and simplifying some of your script.

For more information about these Windows PowerShell commands, see:

Use clear and intelligently named variables

Too often I come across scripts that use variables, for example, $j. This name has nothing to do with what the variable is going to be used for, and it doesn’t help distinguish its purpose later in the script from another variable, such as $i.

You may know the purpose of $j and $i at the time you are writing the script, but don’t assume someone else will be able to pick up on their purposes when they are reviewing your script. Years from now, you may not remember the variable’s purposes when you are reviewing your script, and you will have to back track in your own script to reeducate yourself.

Ideally, variables should be clearly named for the data they represent. If the variable name contains multiple words, it’s a good idea to capitalize the first letter of each word so the name is easier to read because there are no spaces in a Windows PowerShell variable name. For example, the variable name of $GatheredMailboxes is easier to read quickly and understand than $gatheredmailboxes.

Providing longer and more intelligently named variables does not adversely affect Windows PowerShell performance or memory utilization from what I have seen. So there should be no arguments for saving memory space or improving speed to impede the adoption of this practice.

In the following example, all mailbox objects gathered by a large Get-Mailbox query are stored in a variable named $GatheredMailboxes, which should remove any ambiguity as to what the variable has stored in it.

Image of script

Building on this example, if we wanted to process each individual mailbox in the $GatheredMailboxes variable in a ForEach loop, we could additionally use a clear purpose variable with the name of $Mailbox like this:

Image of script

Using longer variable names may seem unnecessary to some people, but it will pay off for you and others working with your scripts in the long run.

Leverage comment-based Help

Sometimes known as the “header” in Windows PowerShell scripts, a block of text called comment-based Help allows you to provide important information to readers in a consistent format, and it integrates into the Help function in Windows PowerShell. Specifically, if the proper tags are populated with information, and a user runs Get-Help YourScriptName.ps1, that information will be returned to the user.

Although a header isn’t necessary for small scripts, it is a good idea to use the header to track information in large scripts, for example, version history, changes, and requirements. The header can also provide meaningful information about the script’s parameters. It can also provide examples, so your script users don’t have to open and review the script to understand what the parameters are or how they should use them.

For example, this is the Get-Help output from a Get-GroupMembership script I wrote:

Image of command output

If the –detailed or –full switches are used with the Get-Help cmdlet, even more information is returned.

For more information about standard header formatting, see WTFM: Writing the Fabulous Manual.

Place user-defined variables at top of script

Ideally, as the script is being written, but definitely before the script is “finished,” variables that are likely to be changed by a user in the future should be placed at the top of the script directly under the comment-based Help. This makes it easier for anyone making changes to those script variables, because they don’t have to go hunting for in your script. This should be obvious to everyone, but even I occasionally find myself forgetting to move a user-defined variable to the top of my script after I get it working.

For example, user might want to change the date and time format of a report file, where that file should be stored, who an email is to be sent to, and the grouping of servers to be used in the script:

Image of script

There are no concrete rules as to when you should place a variable at the top of a script or when you should leave it in the middle of the script. If you are unsure whether you should move the variable to the top, ask yourself if another person might want or need to change it in the future. When in doubt, and if moving the variable to the top of the script won’t break anything, it’s probably a good idea to move it.

Comment, comment, comment

Writing functional script is important because, otherwise, what is the point of the script right? Writing script with consistent formatting and clearly labeled variables is also important, otherwise your script will be much harder to read and understand by someone else. Likewise adding detailed comments that explain what you are doing and why will further reduce confusion as other people (and your future self) try to figure out how and sometimes more importantly, why, specific script was used.

In the following detailed comment example, we are figuring out if a mailbox is using the default database mailbox size limits, and we are taking multiple actions if it is True. Otherwise we launch into an Else statement, which has different actions based on the value of the mailbox send limit.

Image of script

This level of detailed commenting of what you are doing and why can seem like overkill until you get into a habit of doing it. But it pays off in unexpected ways, such as not having to sit with a co-worker and explain your script step-by-step, or having to remember why a year ago you made an array called $MailboxesBothLimits. This is especially true if you are doing any complex work in the script that you have not done before, or you know others will have a hard time figuring it out.

I prefer to err on the side of caution, so I tend to over comment versus under comment in my script. When in doubt, I pretend I am going to publish the script in the TechNet Gallery (even if I know I won’t), and I use that as a gauge as to how much commenting to add. Most Windows PowerShell text editors will color code comments in a different color than the real script, so users who don’t care about the comments can skip them if they don’t need them.

When it comes to inline commenting when comments are added on the same line of script but at the end, my advice is to strongly avoid this practice. When people skim script, they don’t always look to the end to see if there was a comment. Also, if others start modifying your script, you could end up with old or invalid comments in places where you didn’t expect them, which could cause further confusion.

Note  There are different personal styles of Windows PowerShell commenting, from starting each line with # to using <# and #> to surround a block of comment text. One way is as good as another, and you should use a personal style that makes sense to you (be consistent about it). For example, in my scripts, the first line of a new block of commenting always gets a # followed by one space. Each additional line in the continued comment block gets a # followed by three spaces. You can see this demonstrated in the second and third lines of script in the previous example. I like using this method because it shows me when I have multiple separate comments next to each other in the script. The important point is that you are putting comments in your script.

Avoid unnecessary temporary data output and retrieval

Occasionally, I come across a script where the author is piping the results of one query to a file, such as a CSV file, and then later reading that file information back into the script as a part of another query. Although this certainly works as a method of temporarily storing and retrieving information, doing so takes the data out of the computer’s extremely fast memory (in nanoseconds) and slows down the process because Windows PowerShell incurs a file system write and read I/O action (in milliseconds).

The more efficient method is to temporarily store the information from the first query in memory, for example, inside an array of custom Windows PowerShell objects or a data table, where additional queries can be performed against the in-memory storage mechanism. This skips the 2x file system I/O penalty because the data never leaves the computer’s fast memory where it was going to end up eventually.

This may seem like a speed best practice, but keeping data in memory if at all possible avoids unnecessary file system I/O headaches such as underperforming file systems and interference from file system antivirus scanners.

~Dan

Thank you, Dan, for a really helpful guest post. Join us tomorrow when Dan will continue his discussion.

I invite you to follow me on Twitter and Facebook. If you have any questions, send email to me at scripter@microsoft.com, or post your questions on the Official Scripting Guys Forum. See you tomorrow. Until then, peace.

Ed Wilson, Microsoft Scripting Guy 

10 May 08:14

Windows PowerShell 4.0 and Other Quick Reference Guides

by Aleksandar Nikolic

We are pleased to announce the availability of Windows PowerShell 4.0 quick reference guides created by PowerShell Magazine. They are now part of “Windows PowerShell 4.0 and Other Quick Reference Guides” package that you can visit site to read more]

05 May 13:25

JSON Is the New XML

by The Scripting Guys

Summary: June Blender provides a primer about JSON.

Honorary Scripting Guy, June Blender, here. Today I'm going to introduce you to JSON.

June is a writer for the Azure Active Directory SDK. She is also a frequent contributor to the Hey, Scripting Guy! Blog and for PowerShell.org. She lives in magnificent Escalante, Utah, where she works remotely when she's not out hiking, kayaking, or convincing lost tourists to try Windows PowerShell. She believes that outstanding documentation is a collaborative effort, and she welcomes your comments and contributions. Follow her on Twitter at @juneb_get_help. To read more by June, see these Hey, Scripting Guy! Blog posts

I've been having a lot of fun learning web programming and working in Microsoft Azure and Azure PowerShell. I've noticed that I'm encountering a lot more JSON and a lot less XML over time. So, I thought I'd give our beginners a little primer on JSON.

JavaScript Object Notation (JSON) is a "lightweight data-interchange format." It is a way for programs to talk to each other, which is easy for humans to read and write, and easy for machines to parse and generate. It's also really compressible. Unlike XML, which is wordy, you can squish JSON into a very few bytes so it's small enough to include in fields with character limits, like the headers in the HTTP requests that web programs use to communicate.

A JSON document is a string that looks like a hash table with name=value (or name:value) pairs, such as {"Color"="Purple"} and  {"State":"Utah"}. It allows nesting, such as the "address" element this Wikipedia example:

{

    "firstName": "John",

    "lastName": "Smith",

    "isAlive": true,

    "age": 25,

    "height_cm": 167.64,

    "address": {

        "streetAddress": "21 2nd Street",

        "city": "New York",

        "state": "NY",

        "postalCode": "10021-3100"

    }

}

JSON documents that are used for interprogram communication are based on a schema. The schemas are also written in JSON and are easy to interpret. You can use a JSON schema to determine how to write a JSON document, and then after writing, use it to validate a JSON document.

Fortunately, JSON is very easy to manage in Windows PowerShell. The ConvertFrom-Json cmdlet converts the JSON object into a custom object (PSCustomObject). JSON is case-sensitive, but the custom objects are case-insensitive.

To get a JSON string from a JSON file, use the Get-Content cmdlet with its Raw parameter. 

PS C:\> Get-Content -Raw -Path .\myJson.json

{

    "firstName": "John",

    "lastName": "Smith",

    "isAlive": true,

    "age": 25,

    "height_cm": 167.64,

    "address": {

        "streetAddress": "21 2nd Street",

        "city": "New York",

        "state": "NY",

        "postalCode": "10021-3100"

    }

}

To convert it to a custom object, pipe the JSON string to the ConvertFrom-Json cmdlet:

PS C:\> $j = Get-Content -Raw -Path .\myJson.json | ConvertFrom-Json

PS C:\> $j

firstName : John

lastName  : Smith

isAlive   : True

age       : 25

height_cm : 167.64

address   : @{streetAddress=21 2nd Street; city=New York; state=NY; postalCode=10021-3100}

PS C:\> $j.address

streetAddress     city       state      postalCode

-------------     ----       -----      ----------

21 2nd Street     New York   NY         10021-3100

The Raw parameter tells Get-Content to ignore line breaks and return a single string. You can tell how many strings you have by counting the number of objects that are returned. Without Raw, you get 13 separate strings. With Raw, you get a single string.

PS C:\> (Get-Content -Path .\myJson.json).count

13

PS C:\> (Get-Content -Path .\myJson.json -Raw).count

1

If you forget the Raw parameter and pipe multiple strings to ConvertFrom-Json, you get this distinctive error message, which is Pig Latin for "Did you forget the Raw parameter?"

ConvertFrom-Json : Invalid object passed in, ':' or '}' expected. (1): {

At line:1 char:20

+ cat .\myJson.json | ConvertFrom-Json

+                    ~~~~~~~~~~~~~~~~

    + CategoryInfo          : NotSpecified: (:) [ConvertFrom-Json], ArgumentException

    + FullyQualifiedErrorId : System.ArgumentException,Microsoft.PowerShell.Commands.ConvertFromJsonCommand

The ConvertFrom-Json cmdlet converts each JSON string into a custom object. It converts each name-value pair into a note property and its value.

PS C:\> $j = Get-Content -Raw -Path .\myJson.json | ConvertFrom-Json

PS C:\> $j | Get-Member

   TypeName: System.Management.Automation.PSCustomObject

Name        MemberType   Definition

----        ----------   ----------

Equals      Method       bool Equals(System.Object obj)

GetHashCode Method       int GetHashCode()

GetType     Method       type GetType()

ToString    Method       string ToString()

address     NoteProperty System.Management.Automation.PSCustomObject

age         NoteProperty System.Int32 age=25

firstName   NoteProperty System.String firstName=John

height_cm   NoteProperty System.Decimal height_cm=167.64

isAlive     NoteProperty System.Boolean isAlive=True

lastName    NoteProperty System.String lastName=Smith

For example, it converts this:

"firstName": "John"

…into a firstName note property with a value of John:

PS C:\> $j.firstName

John

When it encounters a nested JSON object, like the one in the value of address, it converts the value into a nested custom object with note properties representing each name-value pair.

For example, it converts this:

"address":  {

                    "streetAddress":  "21 2nd Street",

                    "city":  "New York",

                    "state":  "NY",

                    "postalCode":  "10021-3100"

                }

To:

PS C:\> $j.address

streetAddress     city       state      postalCode

-------------     ----       -----      ----------

21 2nd Street     New York   NY         10021-3100

…which is a custom object with its own note properties:

PS C:\> $j.address | Get-Member

   TypeName: System.Management.Automation.PSCustomObject

Name          MemberType   Definition

----          ----------   ----------

Equals        Method       bool Equals(System.Object obj)

GetHashCode   Method       int GetHashCode()

GetType       Method       type GetType()

ToString      Method       string ToString()

city          NoteProperty System.String city=New York

postalCode    NoteProperty System.String postalCode=10021-3100

state         NoteProperty System.String state=NY

streetAddress NoteProperty System.String streetAddress=21 2nd Street

You can edit the custom object and then use the ConvertTo-Json cmdlet and Set-Content cmdlets to replace the value in the .json file. Let's move John Smith to a more scenic location:

$j.address.city = "Escalante"

$j.address.state = "UT"

$j.address.postalCode = "84726"


PS C:\> $j

firstName : John

lastName  : Smith

isAlive   : True

age       : 25

height_cm : 167.64

address   : @{streetAddress=21 2nd Street; city=Escalante; state=UT; postalCode=84726}

Now, convert the custom object back to JSON...

PS C:\> $j | ConvertTo-Json

{

    "firstName":  "John",

    "lastName":  "Smith",

    "isAlive":  true,

    "age":  25,

    "height_cm":  167.64,

    "address":  {

                    "streetAddress":  "21 2nd Street",

                    "city":  "Escalante",

                    "state":  "UT",

                    "postalCode":  "84726"

                }

}

…and replace the content in the myJson.json file:

PS C:\> $j | ConvertTo-Json | Set-Content -Path .\myJson.json

Now you're ready to work with more complex JSON strings, such as the new Azure Gallery templates. More on that subject in another post.

I invite you to follow the Scripting Guys on Twitter and Facebook. If you have any questions, send email to scripter@microsoft.com, or post your questions on the Official Scripting Guys Forum

June Blender, senior programming writer and Microsoft Scripting Guy

05 May 13:25

Calling an Orchestrator Runbook from a Service Management Automation (SMA)

by Christopher Keyaert
Hi Guys, You problably already saw the following blog about calling an Orchestrator runbook from SMA: http://blogs.technet.com/b/privatecloud/archive/2013/11/01/calling-an-orchestrator-runbook-from-sma-part-1.aspxThe problem with the approach on this blog is that for each Orchest

Created by: Christopher Keyaert
Published date: 4/22/2014
18 Apr 15:05

Software Updates OS deployment and Unknown Computers

by Jörgen Nilsson

This topic is not new but it has been asked a lot lately on the forums so a post is in order.

To use the “Install Software updates” step in a Task Sequence to install Software updates requires that the computer that is being deployed/reimaged is a member of one or more collections with the updates that should be installed deployed to it.

There are two options for the “Install Software Updates Step”:

Mandatory Software Updates = This naming is perhaps not really clear as in Configuration Manager 2012 Software Updates are deployed as “Required”. This option will install all updates deployed to the computer as required.

All Software Updates = this option will install all Software Updates that are deployed to the computer as “Available”

What if I am using Unknown Computer support to install my clients? In that scenario you have two options:

  • Deploy all the “Software Update Groups” to the “Unknown Computers” collection. This option will require you to deploy all updates multiple times which is not fun.
  • Include the two “Unknown Computer”(one for x86 and one for x64) objects in your normal Collection that you use to deploy Software Updates.
    Capture1This is a much better option which doesn’t require multiple deployments of all Software Update Groups

Also check out this KB article, http://support.microsoft.com/kb/2894518 for an issue with deploying Software Updates during a Task Sequence that requires multiple reboots.

17 Apr 13:04

Catching Non-Terminating Errors

by ps1

Non-terminating errors are errors that are handled by a cmdlet internally. Most errors that can occur in cmdlets are non-terminating.

You cannot catch these errors in an error handler. So although there is an error handler in this sample, it will not catch the cmdlet error:

try
{
  Get-WmiObject -Class Win32_BIOS -ComputerName offlineIamafraid 
}
catch
{
  Write-Warning "Oops, error: $_"
} 

To catch non-terminating errors, you must turn them into terminating errors. That is done by setting the -ErrorAction to "Stop":

try
{
  Get-WmiObject -Class Win32_BIOS -ComputerName offlineIamafraid -ErrorAction Stop
}
catch
{
  Write-Warning "Oops, error: $_"
} 

You can temporarily set $ErrorActionPreference to "Stop" if you do not want to add a -ErrorAction Stop parameter to all cmdlets within your error handler. The preference is used if a cmdlet does not explicitly specify an -ErrorAction setting.

Twitter This Tip! ReTweet this Tip!

09 Apr 20:28

#PSTip Create your own DSC resource snippets in PowerShell ISE

by Aleksandar Nikolic

Note: This tip requires PowerShell 4.0 or above.

PowerShell ISE 4.0 comes with just two DSC-related snippets (DSC Configuration (simple) and DSC Resource Provider (simple)). (Be aware that DSC Configuration (simple) snippet has a … [visit site to read more]

04 Apr 20:48

Veeam Explorer for Active Directory Beta released

Veeam just released a beta version of Veeam Explorer for Active Directory. This nice piece of software allows a simple restore of Active Directory objects without having to restore a complete Active Directory server. Just  do a file level recovery of a domain controller. The guest filesystem will be mounted locally on the backup server to C:\veeamflr folder. After that, browse into that folder with Explorer for Active Directory and open ntds.dit . Use the Explorer ...
02 Apr 20:01

Introduction to PowerShell Endpoints

by The Scripting Guys

Summary: Learn about Windows PowerShell endpoints and how they relate to remoting.

Hey, Scripting Guy! Question Hey, Scripting Guy! I keep hearing about Windows PowerShell endpoints and constrained endpoints related to remote management. Can you tell me more about these?

—KP

Hey, Scripting Guy! Answer Hello, KP. Honorary Scripting Guy, Boe Prox, here today filling in for my good friend, The Scripting Guy. Here's a bit about me:

Boe Prox is a Microsoft MVP in Windows PowerShell and a senior Windows system administrator. He has worked in the IT field since 2003, and he supports a variety of different platforms. He is a contributing author in PowerShell Deep Dives with chapters about WSUS and TCP communication. He is a moderator on the Hey, Scripting Guy! forum, and he has been a judge for the Scripting Games since 2010. He recently presented talks on the topic of WSUS and PowerShell at the Mississippi PowerShell User Group. He is an Honorary Scripting Guy, and he has submitted a number of posts as a guest blogger, which discuss a variety of topics. To read more, see these Hey, Scripting Guy! Blog posts.

Boe’s blog: Learn Powershell |Achieve More
CodePlex projects: PoshWSUS, PoshPAIG, PoshChat, and PoshEventUI

This is the first part in a series of five posts about Remoting Endpoints. The series includes:

  1. Introduction to PowerShell Endpoints
  2. Build Constrained PowerShell Endpoint Using Startup Script
  3. Build Constrained PowerShell Endpoint Using Configuration File
  4. Use Delegated Administration and Proxy Functions
  5. Build a Tool that Uses Constrained PowerShell Endpoint

When performing a variety of tasks, system administrators can leverage Windows PowerShell remoting to connect to remote systems and run commands as though they were logged directly into the server. Remoting has been available since Windows PowerShell 2.0, which means that it goes as far back as Windows Server 2003. Prior to Windows Server 2012, you had to manually enable PSRemoting to provide the necessary configuration to grant access to each server. In Windows Server 2012, Windows PowerShell remoting is already enabled and ready to go.

Administrators do nothing more than connect to a remote session or issue commands from a single workstation against multiple remote systems (known as “fan-out”), and they leverage Windows PowerShell Remoting to accomplish this.

When connecting to a Windows PowerShell endpoint or using Invoke-Command, you are connecting to a remote session configuration (an endpoint) where, depending on the configuration of the endpoint, you have a certain level of access to that remote system. I am going to take you through what an endpoint is, show various properties, and provide examples of a couple different types of endpoints that show how they affect the session.

An endpoint is a set of configurations on a computer that help customize the environment when a user connects to the endpoint from a remote computer. Sessions that offer fewer cmdlets, functions, and other language features that you normally see when using Windows PowerShell are called constrained endpoints. This means that the sessions are tightened up to prevent unauthorized use of commands that could potentially cause harm, or to prevent commands from being run accidently. These can be used to provide a means to run certain commands by a junior system administrator or a service desk.

Following is an example of connecting to a remote system and running a couple of commands:

PS C:\> Enter-PSSession -ComputerName DC1

[DC1]: PS C:\> $env:Computername

[DC1]: PS C:\> Get-Process | Sort WS -Descending | Select -First 5

[DC1]: PS C:\> Exit-PSSession

Image of command output

Starting with Windows PowerShell 3.0, there are typically the following built-in endpoints:

  • microsoft.powershell (standard endpoint)
  • microsoft.powershell32 (optional if running a 64-bit operating system)
  • microsoft.powershell.workflow
  • microsoft.windows.servermanagerworkflows

You can see all of your available endpoints by running Get-PSSessionConfiguration.

Note You must run this command as an Administrator. You can only run this locally and not in a remote session (you will get an Access Denied error).

PS C:\> Get-PSSessionConfiguration

Image of command output

In its current default list view, we can see the names of each of the configuration session settings in addition to seeing if the session uses a startup script, and what version of Windows PowerShell will be used with the session. Also note the Permission property. This shows who has access to the remote session. In Windows PowerShell 4.0, Remote Management Users was added as a group for session configuration access.

My example of remoting into a server did not specify a session configuration name, but it did use Microsoft.powershell by default. Let’s take a closer look at this configuration to see some of the settings and take a look at what they mean.

PS C:\> Get-PSSessionConfiguration -Name microsoft.powershell | Select *

Image of command output

Beyond what we have already seen with the default list view of the configuration sessions, we can also see a couple of other settings that are worth noting:

  • SecurityDescriptorSddl
    This is the Security Descriptor Description Language (sddl), which is the non-human readable representation of the Permission property. If you are planning to script session configurations, this is where you would go to apply the proper permissions for the configuration.
  • URI
    This is the Uniform Resource Identifier (URI) that you can connect to on the remote system.
  •  RunAsUser and RunAsPassword
    These are used to provide delegated administration. More about this will be discussed in the coming days.

I mentioned earlier about constrained sessions, which are typically custom created. We can see what those look like in the same way. A custom session configuration resides in a configuration file (.pssc), which resides on the remote server.

PS C:\> Get-PSSessionConfiguration -Name ExampleSession | Select *

Image of command output

Many of the same properties that were in the built-in endpoints are here in the custom endpoint. One is the location of the .pssc file that the session configuration references. Other points of metadata include CompanyName, Description, and Copyright.

Different from the built-in configuration is the Language property, which dictates the language features that are available to the user when they are in the remote session. In this case, FullLanguage is available, which is what you see in a typical Windows PowerShell console session. Other options that are available for LanguageMode are:

NoLanguage

Users can run commands, but they cannot use any language elements.


ConstrainedLanguage

Permits all Windows cmdlets and all Windows PowerShell language elements, but it limits permitted types.
 

RestrictedLanguage

Users can run commands (cmdlets, functions, CIM commands, and workflows), but they are not permitted to use script blocks. Only the following proxy functions are available to use: Get-Command, Get-FormatData, Select-Object, Get-Help, Measure-Object, Exit-PSSession, Out-Default.

You can find more information about Windows PowerShell languages in the TechNet Library at about _Language_Modes.

In the end, when you connect to a constrained endpoint, you will see that certain features are not allowed. For instance, let’s say that I am given two cmdlets to use (besides the proxy functions required for the remote session), and I have no access to any .NET types:

PS C:\> Enter-PSSession -ComputerName 'boe-pc' -ConfigurationName ExampleSession

[boe-pc]: PS>Get-WmiObject -Class Win32_Service

[boe-pc]: PS>[datetime]'03/01/2014'

[boe-pc]: PS>Get-Command

Image of command output

KP, tomorrow I will talk about how to use a startup script to configure a constrained endpoint much like what I have just shown. Remoting Endpoint Week will continue tomorrow when I will talk about writing a startup script for a constrained endpoint.

I invite you to follow the Scripting Guys on Twitter and Facebook. If you have any questions, send email to me at scripter@microsoft.com, or post your questions on the Official Scripting Guys Forum. See you tomorrow.

Boe Prox, Honorary Scripting Guy 

26 Mar 13:51

Specifying PowerShell 4.0 DSC Configuration Data

by The Scripting Guys

Summary: Microsoft Scripting Guy, Ed Wilson, talks about using Windows PowerShell 4.0 DSC and specifying configuration data.

Microsoft Scripting Guy, Ed Wilson, is here. One of the cool things about Prague is that it is at least as beautiful at night, as it is during the day. Windows PowerShell MVP, David Moravec, and his lovely wife Andrea have been a lot of fun, and they have been terrific hosts to their city. Here is a nighttime picture, that sort of shows what I mean:

Photo of Prague

Note  Today is the third day in a series of blog posts about Desired State Configuration. Portions of these posts are excerpted from my book, Windows PowerShell Best Practices, which is published by Microsoft Press.

Image of book

To modify the way a configuration runs, it is necessary to specify configuration data. This can take the place of a separate file, or it can be added directly via an array of hash tables. To create a local user, it is necessary to specify PSDscAllowPlainTextPassword = $true in the configuration data. This is a requirement even if you are not directly supplying the password as plain text.

In the DemoUserConfig.ps1configuration script that follows, the user credentials are supplied to the configuration via the Get-Credential cmdlet. This produces a secure string. But the error message that generates from running the configuration states that storing an encrypted password as plaintext is only supported if the configuration permits it. This error message is shown in the image that follows.

Image of error message

The complete DemoUserConfig.ps1 configuration script is shown here:

DemoUserConfig.ps1 

#Requires -version 4.0
Configuration DemoUser
{
 $Password = Get-Credential
    node Server1
    {
      User EdUser
      {
        UserName = "ed"
        Password = $cred
        Description = "local ed account"
        Ensure = "Present"
        Disabled = $false
        PasswordNeverExpires = $true
        PasswordChangeRequired = $false
      }
     }
    }

DemoUser

The problem is not the way the password is supplied to the configuration, but rather what happens after the configuration runs. It decrypts the password and stores it in plaintext in the MOF file as shown in the following image:

Image of script

Because this stores the password in plaintext in the MOF file, the Windows PowerShell team wanted to ensure that you are aware of exactly what you are doing. (By the way, the alternative to storing the password in plaintext is to encrypt the password with a certificate.)

After you create the configuration data, you call the configuration and specify the newly created configuration data as shown here:

$configData = @{
                AllNodes = @(
                              @{
                                 NodeName = "Server1";
                                 PSDscAllowPlainTextPassword = $true
                                    }
                    )
               }

ScriptFolder -ConfigurationData $configData

Creating users with the User provider

To create a local user, call the User provider, and specify the user name. The password is passed to the Password property as a PSCredential object. This is different than a SecureString, which might be expected. This is because the PSCredential object contains the user name and the password (as a SecureString).

Next comes the Description, and choosing whether to enable the user account. It is possible to create disabled user accounts by setting the Disabled property to $True.

The last two things to configure are the PasswordNeverExpires property and the PasswordChangeRequired property. The following portion of the configuration script illustrates this technique:

User EdUser
      {
        UserName = "ed"
        Password = $cred
        Description = "local ed account"
        Ensure = "Present"
        Disabled = $false
        PasswordNeverExpires = $true
        PasswordChangeRequired = $false
      }

DSC Week will continue tomorrow when I will talk about more cool Windows PowerShell DSC stuff.

I invite you to follow me on Twitter and Facebook. If you have any questions, send email to me at scripter@microsoft.com, or post your questions on the Official Scripting Guys Forum. See you tomorrow. Until then, peace.

Ed Wilson, Microsoft Scripting Guy 

26 Mar 13:51

Using PowerShell 4.0 DSC Parameters

by The Scripting Guys

Summary: Microsoft Scripting Guy, Ed Wilson, talks about using Windows PowerShell 4.0 Desired State Configuration parameters.

Microsoft Scripting Guy, Ed Wilson, is here. The Scripting Wife and I are still in Prague. I’ll tell you what, there is excellent tea here, and totally rad buildings to photograph. David and Andrea are proving to be excellent hosts. I am not sure we will ever come back. Here is a photo of the beautiful city of Prague:

Photo of Prague

As always, when David and I get together, the conversations float to Windows PowerShell—in fact, to DSC. This is the second in a series of articles about DSC. The first one was Intro to PowerShell 4.0 Desired State Configuration.

Note  Portions of today’s post are excerpted from my book, Windows PowerShell Best Practices, which is published by Microsoft Press.

To create parameters for a configuration, use the param keyword in the same manner as you use it with functions. The param statement goes just after opening the script block for the configuration. You can even assign default values for the parameters.

When a configuration is created, it automatically receives three default parameters. These parameters are: InstanceName, OutputPath, and ConfigurationData. The InstanceName parameter holds the instance name of the configuration.

  • The InstanceName of a configuration is used to uniquely identify the resource ID that is used to identify each resource specified in the configuration. Normally, the default value for this is good.
  • The OutputPath parameter holds the destination for storing the configuration MOF file. This permits redirecting the MOF file that is created to a different folder than the one holding the script that is run. The default is to create the MOF files in the same folder that holds the script that creates the configuration. However, storing the MOF files in a different location makes it easier to reuse them and to update them.
  • The ConfigurationData parameter accepts a hash table that holds configuration data. In addition, any parameters that are specified in the param statement in the configuration are also available when calling the configuration. By calling the configuration directly from the script that creates the configuration, you are able to simplify the process of creating the MOF. The following ScriptFolderVersion.ps1 script adds a second resource provider to the configuration. The Registry provider is used to add the forscripting registry key to the HKLM\Software registry key. The registry value name is ScriptsVersion and the data is set to 1.0. The use of the registry provider is shown here:

      Registry AddScriptVersion
      {
        Key = "HKEY_Local_Machine\Software\ForScripting"
        ValueName = "ScriptsVersion"
        ValueData = "1.0"
        Ensure = "Present"
      }

The additional resource provider call is placed right under the brace that is used to close off the previous call to the File resource provider.

 The complete ScriptFolderVersion.ps1 script is shown here:

ScriptFolderVersion.ps1

#Requires -Version 4.0

Configuration ScriptFolderVersion
{
 Param ($server = 'server1')
    node $server
    {
      File ScriptFiles
      {
        SourcePath = "\\dc1\Share\"
        DestinationPath = "C:\scripts"
        Ensure = "present"
        Type = "Directory"
        Recurse = $true
      }
      Registry AddScriptVersion
      {
        Key = "HKEY_Local_Machine\Software\ForScripting"
        ValueName = "ScriptsVersion"
        ValueData = "1.0"
        Ensure = "Present"
      }
     
    }
}

ScriptFolderVersion

Setting dependencies

Everything does not happen at the same time when calling a DSC configuration. Therefore, to ensure that activities occur at the right time, use the DependsOn keyword in the configuration. For example, in the ScriptFolderVersionUnzip.ps1 script that follows, the Archive resource provider is used to unzip a compressed file that is copied from the shared folder.

The script files are copied from the shared folder with ScriptFiles activity that is supported by the File resource provider. Because these files must be downloaded from the network shared folder before the zipped folder can be uncompressed, the DependsOn keyword is used.

Because the File ScriptFiles resource activity creates the folder structure that contains the compressed folder, the path used by the Archive resource provider can be hardcoded. The path is local to the server that actually runs the configuration. The Archive activity is shown here:

      Archive ZippedModule
      {
        DependsOn = "[File]ScriptFiles"
        Path = "C:\scripts\PoshModules\PoshModules.zip"
        Destination = $modulePath
        Ensure = "Present"
      }

The ScriptFolderVersionUnzip.ps1 script parses the $env:PSModulePath environmental variable to obtain the path to the location of the Windows PowerShell modules in the Program Files directory. It also calls the configuration and redirects the MOF file to the C:\Server1Config folder. It then calls the Start-DscConfiguration cmdlet and provides a specific job name for job. It then uses the –verbose parameter to provide more detailed information about the progress. The complete script is shown here:

ScriptFolderVersionUnzip.ps1

#Requires -version 4.0

Configuration ScriptFolderVersionUnzip
{
 Param ($modulePath = ($env:PSModulePath -split ';' |
    ?  {$_ -match 'Program Files'}),
    $Server = 'Server1')
    node $Server
    {
      File ScriptFiles
      {
        SourcePath = "\\dc1\Share\"
        DestinationPath = "C:\scripts"
        Ensure = "present"
        Type = "Directory"
        Recurse = $true
      }
      Registry AddScriptVersion
      {
        Key = "HKEY_Local_Machine\Software\ForScripting"
        ValueName = "ScriptsVersion"
        ValueData = "1.0"
        Ensure = "Present"
      }
      Archive ZippedModule
      {
        DependsOn = "[File]ScriptFiles"
        Path = "C:\scripts\PoshModules\PoshModules.zip"
        Destination = $modulePath
        Ensure = "Present"
      }
    }
}

ScriptFolderVersionUnZip -output C:\server1Config
Start-DscConfiguration -Path C:\server1Config -JobName Server1Config –Verbose

DSC Week will continue tomorrow when I will talk about more cool Windows PowerShell DSC stuff.

I invite you to follow me on Twitter and Facebook. If you have any questions, send email to me at scripter@microsoft.com, or post your questions on the Official Scripting Guys Forum. See you tomorrow. Until then, peace.

Ed Wilson, Microsoft Scripting Guy

26 Mar 13:50

Weekend Scripter: Intro to PowerShell 4.0 Desired State Configuration

by The Scripting Guys

Summary: Microsoft Scripting Guy, Ed Wilson, provides an introduction to Windows PowerShell 4.0 Desired State Configuration (DSC).

Microsoft Scripting Guy, Ed Wilson, is here. Today the Scripting Wife and I are in Prague, and we have been hanging out with Windows PowerShell MVP, David Moravec, and his lovely wife Andrea. Here they are waiting for me to get in the elevator:

Photo of friends

One of the things David and I have been talking about is how cool Windows PowerShell Desired State Configuration (DSC) is.

Note  Portions of today’s post are excerpted from my book, Windows PowerShell Best Practices, which is published by Microsoft Press.

Image of book

The killer feature of Windows PowerShell 4.0 is DSC. Every presentation at TechEd 2013 in North America and in Europe that discussed DSC received high marks and numerous comments from audience participants. Clearly, this feature resonates soundly with IT pros. Therefore, what is DSC, how is it used, what are the requirements for implementing it, and how does it help the enterprise administrator?

DSC is a set of extensions to Windows PowerShell that permit the management of systems for the software and the environment on which software services run. Because DSC is part of the Windows Management Framework (which includes Windows PowerShell 4.0), it means that it is operating system independent, and it runs on any computer that is able to run Windows PowerShell4.0. DSC ships with the following resource providers:

  • Registry
  • Script
  • Archive
  • File
  • WindowsFeature
  • Package
  • Environment
  • Group
  • User
  • Log
  • Service
  • WindowsProcess

The twelve default resource providers each support a standard set of configuration properties. The providers and supported properties are listed in the following table.

DSC Resource Providers and Properties

Provider

Properties

Archive       

Destination, Path, Checksum, DependsOn, Ensure, Force, Validate

Environment   

Name, DependsOn, Ensure, Path, Value

File          

DestinationPath, Attributes, Checksum, Contents, Credential, DependsOn, Ensure, Force, MatchSource, Recurse, SourcePath, Type

Group         

GroupName, Credential, DependsOn, Description, Ensure, Members, MembersToExclude, MembersToInclude

Log           

Message, DependsOn

Package       

Name, Path, ProductId, Arguments, Credential, DependsOn, Ensure, LogPath, ReturnCode

Registry      

Key, ValueName, DependsOn, Ensure, Force, Hex, ValueData, ValueType

Script        

GetScript, SetScript, TestScript, Credential, DependsOn

Service       

Name, BuiltInAccount, Credential, DependsOn, StartupType, State

User          

UserName, DependsOn, Description, Disabled, Ensure, FullName, Password, PasswordChangeNotAllowed, PasswordChangeRequired, PasswordNeverExpires

WindowsFeature

Name, Credential, DependsOn, Ensure, IncludeAllSubFeature, LogPath, Source

WindowsProcess

Arguments, Path, Credential, DependsOn, Ensure, StandardErrorPath, StandardInputPath, StandardOutputPath, WorkingDirectory

 Because it is possible to extend support for additional resources by creating other providers, you are not limited to only configuring the 12 previous types of resources.

The DSC process

To create a configuration by using DSC, you first need a Managed Object Format (MOF) file. MOF is the syntax that is used by Windows Management Instrumentation (WMI), and therefore it is a standard text type of format. A sample MOF file for a server named Server1 is shown in the following image.

Image of MOF file

You can easily create your own MOF by creating a DSC configuration script and calling one of the 12 built-in DSC providers or by using a custom provider. To create a configuration script, begin by using the Configuration keyword, and provide a name for the configuration. Next open a script block, followed by a node and a resource provider. The node identifies the target of the configuration.

In the ScriptFolderConfig.ps1 script, the configuration creates a directory on a target server named Server1. It uses the File resource provider. The source files are copied from a share folder on the network. DestinationPath defines the folder to be created on Server1. Type identifies that a directory will be created. Recurse specifies that all folders beginning at and following SourcePath are copied. The complete ScriptFolderConfig.ps1 script is shown here.

ScriptFolderConfig.ps1 

#Requires -version 4.0

Configuration ScriptFolder
{
    node 'Server1'
    {
      File ScriptFiles
      {
        SourcePath = "\\dc1\Share\"
        DestinationPath = "C:\scripts"
        Ensure = "Present"
        Type = "Directory"
        Recurse = $true
      }
    }

}

After the ScriptFolderConfig.ps1 script runs inside the Windows PowerShell ISE, the ScriptFolder configuration loads into memory. The configuration is then called in the same way that a function would be called. When the configuration is called, it creates a MOF file for each node that is identified in the configuration. The path to the configuration is used when calling the Start-DscConfiguration cmdlet. Therefore, there are three distinct phases to this process:

  1. Run the script that contains the configuration to load the configuration into memory.
  2. Call the configuration, and supply any required parameters to create the MOF file for each identified node.
  3. Call the Start-DscConfiguration cmdlet and supply the path that contains the MOF files that you created in Step 2.

This process is shown in the following image. The configuration appears in the upper script pane, and the command pane shows running the script, calling the configuration, and starting the configuration via the MOF files.

Image of command output

DSC Week will continue tomorrow when I will talk about more cool Windows PowerShell DSC stuff. 

I invite you to follow me on Twitter and Facebook. If you have any questions, send email to me at scripter@microsoft.com, or post your questions on the Official Scripting Guys Forum. See you tomorrow. Until then, peace.

Ed Wilson, Microsoft Scripting Guy

12 Mar 22:10

Upgrading Configuration Manager 2012 SP1 to R2

by Damian Flynn

In the previous post, we covered the steps necessary as we prepared Configuration Manager 2012 SP1 for upgrade to Configuration Manager 2012 R2. In this post we will continue this work, and focus on the actual update, and remind ourselves of some of the points we may encounter in our production upgrade.

System Center 2012 R2 Configuration Manager (SCCM 2012 R2): Setup

The upgrade does not really care about the roll-up or patch level of the SP1 environment you are upgrading from, so there is no need to deploy any missing roll-ups prior to the upgrade.

Installation

From the SCCM 2012 R2 installation media, we simply need to launch on our primary server the installation wizard, and select the option to Install SCCM. After a few moments, the main setup wizard will be presented and should have automatically selected the option to Upgrade this Configuration Manager Site.


Upgrade to Configuration Manager 2012 R2 wizard


After passing the initial pages of the wizard, agreeing to licences, downloading components, and so on, you will finally reach the Prerequisite Check page, which will validate that everything is correctly in place for the upgrade to proceed. This check will take a little time to complete, as it will connect to every server in your environment that hosts an SCCM role.


Upgrade to Configuration Manager 2012 R2 prerequisite check

Assuming that your WAN is fully operational and the environment is healthy, we can finally proceed with the upgrade, by clicking on Begin Install.

Now, you can go for a dozen or so coffees. In one of my production environments, I have four management servers, and just over 40 deployment points. With the SCCM log monitor open, I saw that the upgrade wizard required more than 80 minutes to reach out to all servers and actually stop the control managers.

The wizard suggests that the upgrade itself lasted 3 hours and 20 minutes, which does not account for restarting the control managers and getting the all the dependent services started. For a better presentation of the actual work duration, referring back to the ConfigMgrSetup.log the final monitoring completed some 7 hours and 35 minutes after the upgrade was started.


Upgrade to Configuration Manager 2012 R2 status screen

You can expect some issues to be reported. Most of these will be trivial, but before you proceed to the next steps, you really should take 20 minutes and read the ConfigMgrSetup.log to see exactly what has occurred on your system. If some problems were reported, you will be be able to determine if these are serious enough to be concerned with.

For example, the worst issues I found in the log for this particular upgrade referred to some missing .resx files. When I checked the file systems I clearly saw that they are truly missing, but I don’t think it's currently a critical problem for my environment. As a sanity check, I will open a low priority case with Microsoft Support to get their comments and suggestions on these issues, but for now, I am happy to proceed.

SCCM 2012 R2 Installation Log Errors

At this stage I am now happy to relaunch my SCCM console, to check that it is working correctly, and to see what new options are been presented with this new version of SCCM. I can also check the About dialog to confirm that my environment is indeed running SCCM 2012 R2, and represented by the latest build number

SCCM 2012 R2, About Dialog Version Number

Deployment Toolkit

Assuming you are leveraging the Operating System Deployment functions of SCCM, then we will also want to upgrade the version of the Microsoft Deployment toolkit that is deployed to our primary server, so that it also is ready for Windows 8.1 and the new version of the ADK we have installed.

MDT 2012 SP1

As with the upgrade of our ADK earlier, we can now close out of the SCCM console again, and reopen the Add-Remove programs page, this time locating the currently installed version of the Microsoft Deployment Toolkit, and selecting to uninstall it. The wizard will then do its task, removing the binaries from the server. If you have some deployment shares configured on this installation, don’t worry, as these will remain unharmed and ready for us to upgrade after we deploy the new version of the toolkit.

MDT 2013

Still working from our primary server, we now just need to launch the installation wizard for the Microsoft Deployment Toolkit 2013, and tell it to install this new Windows 8.1 compatible version of the utility.

MDT 2013 Installation Wizard

The installation will be quite fast. Assuming you have some deployment shares that were in use from the previous version of the toolkit, you can launch the Deployment Workbench and reconnect to your respective deployment shares.

Upgrade Deployment Share

On first connection, you'll see a yellow warning icon. You'll not see the content of the shares until you select the option from the context menu, or action pane to upgrade the deployment share. The upgrade procedure may take a little time depending on the size of the share.

MDT 2013 Deployment Share Upgrade Message


It is not uncommon to see the Deployment Workbench to report in its title bar that it is not responding. Just let it continue with its work, and normally this will remediate itself once the share has been upgraded. If it is any consolation, the update has taken over two hours on some of my shares, which I would not consider to be terribly large, so you can focus on other work and come back later to see how the deployment workbench is getting on.

MDT 2013 Deployment Share Upgrade Progress

SCCM Integration

Once the shares have been upgraded and you satisfied that the new version of MDT is working correctly, you can proceed with the the integration of MDT with SCCM. This is a 15-second process, simply launching the Configure Configuration Manager Integration tool, and selecting the options to Install the extensions.

MDT 2013 Integration options for SCCM 2012 R2

MDT 2013 Integration options for SCCM 2012 R2

Operating System Deployment

After all the updates have been completed, you can now return to the SCCM console and prepare your Operating System Deployment settings to leverage the new functions you have just enabled. This is a topic for another post, but for now, you will simply need to create a new set of boot images to leverage the new Windows PE 5.0 environment, create an updated package for the MDT Toolkit functions for your deployments, and recreate new versions of your task sequences referencing these new boot images, and toolkit packages.

Of course you will also want to start building Windows 8.1 test images for deployment with you cool new SCCM 2012 R2 infrastructure.

SCCM Clients

The main work is now complete. All that remains is that we update the SCCM clients to the current version. This is very simple to accomplish, with SCCM capable of doing all the work for us with no extra effort if we configure the Click Push Installation settings for the site to be enabled.

SCCM 2012 R2 client push installation

Then all we need to do is wait,; over time SCCM will manage the work to have all our agents updated for us.

Important Hotfix

While we have a cool new version of SCCM 2012 R2 deployed, there is a reason we sometimes wait a little before we take the leap and upgrade our environments. As experience will confirm, nothing is perfect and issues are clearly going to be found – and in this case SCCM 2012 R2 RTM is no different.

A set of problems were quickly discovered involving deploying operating systems taking an exaggerated amount of time, and problems using the PXE deployment as an option. However, Microsoft has a somewhat mandatory Hotfix that you will want to deploy to any SCCM 2012 R2 RTM environment you may have.

Available from the normal places, including support.microsoft.com and premier.microsoft.com, you can read the release notes and download Hotfix KB2910552, ready for installation on your new primary server.

SCCM 2012 R2 - Mandatory Hotfix Installer


Following the procedure we described in an earlier post for applying Cumulative Roll Ups for SCCM 2012, the same procedure is applicable for this hotfix, which is deployable to clients, servers and consoles in your new environment.

SCCM 2012 R2 Mandatory Hotfix Installation Summary

Do not forget to update the collections that we have previously used for targeting our cumulative updates to ensure that they work correctly with the latest build number of SCCM 2012 R2. For reference, the build number of the 2012 R2 RTM release is 5.00.7958.1000

Reestablish SQL Replicas

With the upgrade complete, we can now turn our attention back to the SQL replica configuration, which we originally disabled so that we could execute the upgrade process. As the upgrade is now complete, we know that any remaining copies of old replicas on each local SQL instance is no longer valid. Therefore all we need to do is reestablish the replication partners once more. This will be a lot easier than the first time we setup our replicas – for that procedure we needed to be concerned with the shares and permissions necessary to enable this functionality. Now we just focus on the store procedure to recreate and reseed each of our desired replicas. As the replicas do not grow to be very large, the initial replications will not take much time to complete.

Once the replicas are working as expected, we can go back to the management point database configuration settings again and set these to the original design utilizing the local SQL replicas for their respective database work.

Good Luck

Prepare carefully, and I am sure your update will also run without issues. Also don’t forget the backups, and ensure that you give yourself lots of time for the procedures to complete.

10 Mar 15:55

Reusing Existing Configuration Scripts in PowerShell Desired State Configuration

by PowerShell Team

You are an expert in PowerShell DSC (or maybe not an expert, just someone playing around with configurations in DSC) and have already written fairly large and complex configurations for configuring your environment/data center. Everything is working well and you are a great fan of DSC. There’s only one problem: your work is complicated. Before long, you have a configuration that is hundreds or thousands of lines long – people from many different teams are editing it. Finding and fixing problems becomes nearly impossible… your configuration is just too unwieldy. Then comes a day when there arises a need to add something more (or maybe delete something) to your configuration. The problem looks trivial to solve right? –Just add one more resource to your (already big) configuration. But you are a forward thinking person and find yourself wondering if there is something clever you can do leverage your existing configuration scripts.


That is why we made configurations composable and reusableJ. Yes, one configuration can call another. How? That is what we are going to cover in this post.


The way to make a configuration reusable is by making it what we call a composite resource. Let me walk you through an example to do just that.


I have the following parameterized configuration (the parameters of the configuration become the properties of the composite resource) which I will turn into a composite resource:


Configuration xVirtualMachine

{

param

(

# Name of VMs

[Parameter(Mandatory)]

[ValidateNotNullOrEmpty()]

[String[]]$VMName,


# Name of Switch to create

[Parameter(Mandatory)]

[ValidateNotNullOrEmpty()]

[String]$SwitchName,


# Type of Switch to create

[Parameter(Mandatory)]

[ValidateNotNullOrEmpty()]

[String]$SwitchType,


# Source Path for VHD

[Parameter(Mandatory)]

[ValidateNotNullOrEmpty()]

[String]$VhdParentPath,


# Destination path for diff VHD

[Parameter(Mandatory)]

[ValidateNotNullOrEmpty()]

[String]$VHDPath,


# Startup Memory for VM

[Parameter(Mandatory)]

[ValidateNotNullOrEmpty()]

[String]$VMStartupMemory,


# State of the VM

[Parameter(Mandatory)]

[ValidateNotNullOrEmpty()]

[String]$VMState

)


# Import the module that defines custom resources

Import-DscResource -Module xComputerManagement,xHyper-V


# Install the HyperV role

WindowsFeature HyperV

{

    Ensure = "Present"

    Name = "Hyper-V"

}


# Create the virtual switch

xVMSwitch $switchName

{

    Ensure = "Present"

    Name = $switchName

    Type = $SwitchType

    DependsOn = "[WindowsFeature]HyperV"

}


# Check for Parent VHD file

File ParentVHDFile

{

    Ensure = "Present"

    DestinationPath = $VhdParentPath

    Type = "File"

    DependsOn = "[WindowsFeature]HyperV"

}


# Check the destination VHD folder

File VHDFolder

{

    Ensure = "Present"

    DestinationPath = $VHDPath

    Type = "Directory"

    DependsOn = "[File]ParentVHDFile"

}


 # Creae VM specific diff VHD

foreach($Name in $VMName)

{

    xVHD "VhD$Name"

    {

        Ensure = "Present"

        Name = $Name

        Path = $VhDPath

        ParentPath = $VhdParentPath

        DependsOn = @("[WindowsFeature]HyperV",

                      "[File]VHDFolder")

    }

}


# Create VM using the above VHD

foreach($Name in $VMName)

{

    xVMHyperV "VMachine$Name"

    {

        Ensure = "Present"

        Name = $Name

        VhDPath = (Join-Path -Path $VhDPath -ChildPath $Name)

        SwitchName = $SwitchName

        StartupMemory = $VMStartupMemory

        State = $VMState

        MACAddress = $MACAddress

        WaitForIP = $true

        DependsOn = @("[WindowsFeature]HyperV",

                      "[xVHD]Vhd$Name")

    }

}

}


The key is to place the configuration in a file with the extension schema.psm1. You can take a look here to find out how to deploy a DSC Resource. Here is how it looks on my machine:

PS C:\Program Files\WindowsPowerShell\Modules\TestCompositeResource\DSCResources\xVirtualMachine> dir

    Directory: C:\Program Files\WindowsPowerShell\Modules\TestCompositeResource\DSCResources\xVirtualMachine

Mode                LastWriteTime     Length Name                                                                         

----                -------------     ------ ----                                                                         

-a---         2/25/2014   8:42 PM       2642 xVirtualMachine.psd1                                                         

-a---         2/25/2014   8:42 PM       2957 xVirtualMachine.schema.psm1   

Note: Take note of the .psd1 file (xVirtualMachine.psd1) inside the DSCResources folder. On my first attempt, I did not put that file in there and wasted some time trying to figure out where I was going wrong (yes, yes, yes a valid PowerShell module must have one out of .psd1, .psm1, .cdxml, .dll extension and it took me some time to figure out the fact that .schema.psm1 does not satisfy that condition).

Inside the .psd1 file, I have this line:

RootModule = 'xVirtualMachine.schema.psm1'


That is it, you are done!


Edit: For the resource to be discoverable and usable, it must be part of a valid PowerShell module.  For this example to work, you would also need to create a TestCompositeResource.psd1 module manifest under the "TestCompositeResource" Folder.  The best way to do that is by running "New-ModuleManifest -path "C:\Program Files\WindowsPowerShell\Modules\TestCompositeResource\TestCompositeResource.psd1"".  Sorry for the confusion!


PS C:\> Get-DscResource -Name xVirtualMachine

ImplementedAs        Name                           Module                                                Properties                                      

-------------              ----                               ------                                                  ----------                                      

Composite               xVirtualMachine           TestCompositeResource                    {VMName, SwitchName, SwitchType, VhdParentPath...}


Your configuration shows up as a composite resource.

Let us now see how to use it:

configuration RenameVM

{

Import-DscResource -Module TestCompositeResource


Node localhost

{

    xVirtualMachine VM

    {

        VMName = "Test"

        SwitchName = "Internal"

        SwitchType = "Internal"

        VhdParentPath = "C:\Demo\Vhd\RTM.vhd"

        VHDPath = "C:\Demo\Vhd"

        VMStartupMemory = 1024MB

        VMState = "Running"

    }

    }

   Node "192.168.10.1"

   {  

    xComputer Name

    {

        Name = "SQL01"

        DomainName = "fourthcoffee.com"

    }                                                                                                                                                                                                                                                              

}

}


We have used the dynamic keyword Import-DscResource to make our composite resource type available in the configuration. The parameters of the composite resource become its properties. You can discover this in two ways, one way is to use the Get-DscResource cmdlet as above and the other is in ISE. I like the one in ISE since it does not require me to shift my focus to the command window and type in the cmdlet. You can take the cursor to the place where you have the name of the resource, and press CTRL+space. You can discover all the resources by using CTRL+Space after the configuration keyword as well. .You have to do it after Import-DscResource if importing custom resources.

Here is what ISE displays:


Untitled


Tab completion works on the names of the properties just like any other resource, isn’t that cool?

This way, I have a configuration, where I reused one of my existing configurations and added one more resource to the overall configuration of my machine. This configuration first creates a VM and then uses the xComputerResource to rename it. I can thus build upon my existing configurations as and when the need arises for more complex configurations.


Happy configuring!

Abhik Chatterjee

Windows PowerShell Developer


26 Feb 19:32

Use $PSScriptRoot to Load Resources

by ps1

Beginning in PowerShell 3.0, there is a new automatic variable available called $PSScriptRoot. This variable previously was only available within modules. It always points to the folder the current script is located in (so it only starts to be useful once you actually save a script before you run it).

You can use $PSScriptRoot to load additional resources relative to your script location. For example, if you decide to place some functions in a separate "library" script that is located in the same folder, this would load the library script and import all of its functions:

# this loads the script "library1.ps1" if it is located in the very
# same folder as this script.
# Requires PowerShell 3.0 or better.

. "$PSScriptRoot\library1.ps1" 

Likewise, if you would rather want to store your library scripts in a subfolder, try this (assuming the library scripts have been placed in a folder called "resources" that resides in the same folder as your script:

# this loads the script "library1.ps1" if it is located in the subfolder
# "resources" in the folder this script is in.
# Requires PowerShell 3.0 or better.

. "$PSScriptRoot\resources\library1.ps1" 

Twitter This Tip! ReTweet this Tip!

26 Feb 14:02

Where Do I Add the Code for My Desired State Configuration (DSC) Module?

by Damian Flynn

Welcome back to our in-depth series on Desired State Configuration (DSC)! In the previous post we created the templates using the free module from Microsoft called xDSCResourceDesigner for our new hotfix resource. Now we will take the template that was generated and add some sample code to bring the module to life.

Editor's note: Need to catch up? Check out our previous articles in this series:

Developing the DSC Module Code

Now we can navigate to the new module files we just created and take a closer look at the file Hotfix.psm1, which is the heart of the template we just created. Inside this file, we will see that the wizard has created three primary functions that we now need to extend with the actual working logic of our module.

  • Get-TargetResource
  • Set-TargetResource
  • Test-TargetResource

Over the next few sections, we will proceed to define the code that is appropriate for each of these functions. As the focus of the post is to walk through the procedures of creating a DSC resource, leveraging GIT to keep our code managed, and sharing the results with the community, I am not going to describe each line of the code in detail. (Plus, I am sure that someone out there is far smarter than I who will break down crying when he or she sees my coding skills!)

DSC Modules and the 3 Functions

Looking to each function in turn, lets start with the Get-TargetResource command.

Get-TargetResource

As we take our initial look at the function, what is presented is the outline and the parameters appropriate for this function, along with some comments in the main body to provide us some hints and guidance.

function Get-TargetResource
{
   [CmdletBinding()]
   [OutputType([System.Collections.Hashtable])]
   param
   (
      [parameter(Mandatory = $true)]
      [System.String]
      $HotfixID
   )

   #Write-Verbose "Use this cmdlet to deliver information about command processing."
   #Write-Debug "Use this cmdlet to write debug information while troubleshooting."

   <#
   $returnValue = @{
      Name = [System.String]
      SourcePath = [System.String]
      Ensure = [System.String]
   }

}

The purpose of this function is to run a simple check on the Key resource properties and return their current settings on the node in the format of a hash table. This detail is then used by the Local Configuration Manager to determine whether it actually needs to run the Set-Target Resource function to apply the desired state.

function Get-TargetResource
{
   [CmdletBinding()]
   [OutputType([System.Collections.Hashtable])]
   param
   (
      [parameter(Mandatory = $true)]
      [System.String]
      $Name
   )

   $HotfixInfo = Get-HotFix -id $Name -ErrorAction SilentlyContinue

   if ($HotfixInfo -ne $null)
   {
      return @{
         Ensure   = "Present";
         HotfixID = $HotfixInfo.HotfixID
      }
   }
   else
   {
      return @{
         Ensure   = "Absent";
         HotfixID = $Name
      }
   }
}

Set-TargetResource

One could consider this function as the main work engine, with the the responsibility of setting up the node to the desired state. The state, of course, can be to apply or remove a specific setting or configuration (as in this example, to apply a missing hotfix or to remove a hotfix that might be already applied). The actions of this function may also call for the node to be rebooted, so the function is responsible to indicate back to the Local Configuration Manager that this action is pending, but the function should not apply such a reboot if called for.

The code below is quite verbose. I am aware of cleaner methods to implement this function, but for purpose of the example this should prove easier to read. The most important point in this code is that we need to check for all eventualities and address them, for if we miss a scenario, we could cause an error for the local configuration manager, which would then fail to execute any proceeding DSC configuration steps.

function Set-TargetResource
{
   [CmdletBinding()]
   param
   (
      [parameter(Mandatory = $true)]
      [System.String]
      $Name,

      [System.String]
      $SourcePath,

      [ValidateSet("Present","Absent")]
      [System.String]
      $Ensure
   )

   $HotfixInfo = Get-HotFix -id $Name -ErrorAction SilentlyContinue
   if ($HotfixInfo -ne $null)
   {
      Write-Verbose ($LocalizedData.HotfixInstalled -f $HotfixInfo.Description, $Name, $HotfixInfo.InstalledOn)
   } else {
      Write-Verbose ($LocalizedData.HotfixMissing -f $Name)
      return $false
   }

   if ($Ensure -eq 'Present')
   {
      Write-Verbose "Ensure -eq 'Present'"
      if ($HotfixInfo -eq $null)
      {
         Write-Verbose ($LocalizedData.AddingMissingHotfix -f $Name)

         if (Test-Path $SourcePath -ErrorAction SilentlyContinue)
         {
            Write-Verbose -Message "Applying Hotfix $Name"
            $Process = Start-Process $SourcePath -ArgumentList "/quiet /norestart" -Wait -PassThru
            Switch ($Process.ExitCode)
            {
            0       {
               $a = $LocalizedData.Error0000 }

            1       {
               $a = $LocalizedData.Error0001
               return $false }

            2       {
               $a = $LocalizedData.Error0002
               return $false }

            1001    {
               $a = $LocalizedData.Error1001
               $global:DSCMachineStatus = 1 }

            3010    {
               $a = $LocalizedData.Error3010
               $global:DSCMachineStatus = 1 }

            Default {
               $a = $LocalizedData.ErrorMsg
               return $false }
            }
            Write-verbose($LocalizedData.InstallationError -f $LastExitCode, $a)
         }
         Else
         {
            Write-Verbose -Message "Unable to locate hotfix $Name on source location $SourcePath"
            return $false
         }
      }
      else
      {
         Write-Verbose ($LocalizedData.HotfixIDMissing)
         return $false
      }
   }

   elseif($Ensure -eq 'Absent')
   {
      Write-Verbose "Ensure -eq 'Absent'"
      if ($HotfixInfo -ne $null)
      {
         Write-Verbose ($LocalizedData.RemovingHostfix -f $Name)
         $UpdateID = $Name.Substring(2,$Name.Length -2)
         $Process = Start-Process -Wait wusa -ArgumentList "/uninstall /kb:$UpdateID /quiet /norestart" -PassThru
         Switch ($Process.ExitCode)
         {
            0       {
               $a = $LocalizedData.Error0000 }

            1       {
               $a = $LocalizedData.Error0001
               return $false }

            2       {
               $a = $LocalizedData.Error0002
               return $false }

            1001    {
               $a = $LocalizedData.Error1001
               $global:DSCMachineStatus = 1 }

            3010    {
               $a = $LocalizedData.Error3010
               $global:DSCMachineStatus = 1 }

            Default {
               $a = $LocalizedData.ErrorMsg
               return $false }
         }

         Write-verbose($LocalizedData.InstallationError -f $LastExitCode, $a)
      }
      else
      {
         Write-Verbose ($LocalizedData.HotfixMissing -f $Name)
         return $false
      }
   }
}

Test-TargetResource

Now, the final function we need to define is the Test-TargetResouce, which is to simply check the status of the resource instance that is specified in the key parameters. If the actual status of the resource instance does not match the values specified in the parameter set, return False. Otherwise, we will return True.

function Test-TargetResource
{
   [CmdletBinding()]
   [OutputType([System.Boolean])]
   param
   (
      [parameter(Mandatory = $true)]
      [System.String]
      $Name,

      [System.String]
      $SourcePath,

      [ValidateSet("Present","Absent")]
      [System.String]
      $Ensure
   )

   $HotfixInfo = Get-HotFix -id $Name -ErrorAction SilentlyContinue

   if ($Ensure -eq 'Present')
   {
      if ($HotfixInfo -eq $null)
      {
         Write-Verbose ($LocalizedData.HotfixMissing -f $Name)
         return $false
      }
      else
      {
         Write-Verbose ($LocalizedData.HotfixInstalled -f $HotfixInfo.Description, $Name, $HotfixInfo.InstalledOn)
         return $true
      }
   }
   elseif($Ensure -eq 'Absent')
   {
      if ($HotfixInfo -ne $null)
      {
         Write-Verbose ($LocalizedData.HotfixInstalled -f $HotfixInfo.Description, $Name, $HotfixInfo.InstalledOn)
         return $false
      }
      else
      {
         Write-Verbose ($LocalizedData.HotfixMissing -f $Name)
         return $true
      }
   }
}

Comments and Localization

As we are going to share our code, it is good practice to include comments and some details related to each revision of the code. Over time others may offer to help, and if you provide some details in the file, it makes things much easier for everyone to understand what the code is doing and what changes or fixes you might be applying. I like placing a header at the top of the file to get it up and running

#
# Author  : Damian Flynn (www.DamianFlynn.com \ www.petri.co.il/author/damian-flynn)
# Date    : 15 Jan 2014
# Name    : Windows Hotfix DSC Module
# Build   : 1.0 Petri.co.il example release
# Purpose : DSC Module to manage a Hotfix status on Servers
#         : Primary use for this module, is to ensure servers are configured
#         : using hotfixes which may not be auto-deployed using tools like WSUS
#         : common use would be with Hyper-V and Clustering Server roles
#

#
# Revision: 1.0  16/01/2014  Initial version from Petri.co.il Blog Example
#

As you read through the code above, you will notice that I am not actually defining the string that is reported back as part of the messages we are logging. Instead, I am referencing a hash table called $LocalizedData and selecting the name of a specific entry in that table to represent the message Iwish to convey. This practice enables us to support localization of our modules with great ease, requiring no change in the code; instead just updating the actual strings with the relevant language sentences that we wish to report back.

To achieve this, at the top of the file I am defining my LocalizedData for en-US as follows. Note that I am also leveraging the string replacement functions to allow me to place specific results from the functions where I desire in the output message.

# Fallback message strings in en-US
DATA localizedData
{
# same as culture = "en-US"
ConvertFrom-StringData @'
HotfixInstalled=The {0} Hotfix {1} is installed {2}.
HotfixMissing=The Hotfix {0} is not installed.
AddingMissingHotfix=The Hotfix {0} is missing so adding it.
RemovingHostfix=The Hotfix {0} is been removed.
InstallationError=Error {0}: {1}.
Error0000=Action completed without error
Error0001=Another instance of this application is already running
Error0002=Invalid command line parameter
Error1001=A pending restart blocks installation
Error3010=A restart is needed
ErrorMsg=An unknown error occurred installing prerequisites
HotfixIDMissing=No HotfixID was provided
'@
}

Commit Our Changes

With the first version of our module now in place, we will update our GIT repository with this new version.

git add . –A
git commit –m "Implemented the code to enable our new module to manage Hotfixes, as shared on http://petri.co.il"

Now, we can go back to basics, and see if we can discover our new module.

25 Feb 13:27

PowerTip: Find Information about PowerShell Errors

by The Scripting Guys

Summary:  Use Windows PowerShell to find information about Windows PowerShell errors.

Hey, Scripting Guy! Question How can I find more information about a specific error when I look at the $error automatic variable?

Hey, Scripting Guy! Answer The $error automatic variable contain rich objects. For example, the InvocationInfo property shows
          what code was called that generated the error.
          The following illustrates how to find the most recent error (error 0):

$Error[0].InvocationInfo

Note  Tab expansion works for this.

22 Feb 14:52

How to Deploy a Custom Windows 8.1 Image Onto a Surface Pro Via USB Media

by Peter De Tender

With the launch of Windows 8 in fall 2012, I wrote a series of articles around Windows 8 deployment using MDT 2012. This article has been listed as one of my top articles for a few months now, so I’m assuming Petri IT Knowledgebase readers are interested in more content on the topic.

So my next batch of articles focuses on how you can deploy Windows 8.1 onto the Surface Pro using the Microsoft Deployment Toolkit (MDT) 2013. This first article will focus on getting started, while the second part of this series will continue with the deployment by covering the specifics on how to deploy the Windows 8.1 image by using offline USB device media, which is a built-in (but rather unknown) feature of MDT since version 2010.

(Editor’s note: While this article talks about installing the Windows 8.1 image on a Surface Pro, the described approach will also work for any other device you have on which you want to install your custom Windows 8.1 image using offline USB media.)

Why Update Windows 8.1 Using USB Device Media?

While most organizations are using Windows Deployment Services (WDS), Microsoft Deployment Toolkit (MDT), System Center Configuration Manager (SCCM), or even non-Microsoft deployment tools, most of them are relying on a PXE boot from the network. While this approach works fine for a Surface Pro device as well, it requires you to buy a specific Surface USB-based network controller. Although it's not extremely expensive, I just thought it would be more fun to guide you through the offline USB media possibilities as well. Another advantage is it allows you to (re-)deploy your custom image even if you don’t have a network connection.

Required Tools

Before diving into how to create the image and do the deployment, it’s important to have the tools you need.

  • Microsoft Deployment Toolkit 2013 (Required to deploy Windows 8.1.)
  • Windows 8.1 ISO file (This link is to Enterprise trial version, but use your own if you have it.)
  • Surface Pro offline drivers for Windows 8.1
    • As not all device components in the Surface Pro are automatically detected by Windows 8.1, it is required to have the compatible drivers available, so we can upload them into MDT 2013 and have them installed as part of our deployment task sequence.

MDT Configuration

I’m not going to explain how to install MDT 2013, as the setup should be self-explanatory. Once MDT is installed, you should find an application called Deployment Workbench.

1. Create Deployment Share

  • Select Deployment Shares > New Deployment Share, and give it a descriptive foldername (e.g. C:\SurfaceDeployShare).
  • Create a Windows Shared folder (eg. SurfaceDeployShare$) and share description (eg. Surface Pro Deployment Share). Leave the default options activated and finish the wizard. Your shared folder will be created.

The deployment workbench should look about similar to mine:

MDT Configuration deployment workbench

2. Configure Deployment Share by Importing Windows 8.1 ISO File

  • Go to your downloaded Windows 8.1 ISO file and right-click Mount. This will load the ISO file as a drive letter. This drive letter is used in the next step.
  • From within the SurfaceDeployShare topic, select Operating Systems / Import Operating Systems / Full Set of Source Files / <path to mounted ISO file drive letter>.
  • Give a descriptive name for the Destination Directory (e.g. Fresh Windows 8.1 Ent x64).
  • Complete the wizard. At the end the ISO file content will be copied over to your deployment share / Operating Systems subdirectory.

MDT Configuration import ISO wizard

3. Import Surface Pro Device Drivers

  • Extract the downloaded SurfacePro device drivers to a subfolders on your system.
  • From within your Deployment Share / select Out-of-box-Drivers / Create Folder (eg. SurfacePro) (this will allow us to create specific driver folders, which will make your live easier if you are using the same deployment share for different types of devices, like Surface Pro 2 for example).
  • Select the folder you just created and choose Import Drivers. Browse to the folder where you extracted the device drivers, and have all drivers imported.

 Import surface pro device drivers

 In my lab, the wizard imported 16 different drivers:

Import Surface Pro device drivers

Resulting in the following view in the Deployment Share:

Import Surface Pro device drivers deployment share

4. Create a Deployment Task Sequence

As both Windows 8.1 ISO Operating System and SurfacePro drivers are imported, we can now create our deployment task sequence. (Feel free to add additional applications first if needed, but it’s not covered in this article).

  • From within the deployment share, select Task Sequence / New Task Sequence. Give this an ID, Task Sequence Name (e.g. Fresh install Windows 8.1 on SurfacePro Task Sequence), and a descriptive comment.
  • Choose Standard Client Task Sequence as template in the next step.
  • Select your Windows 8.1 Enterprise Operating System.
  • Choose your valid option for the product key. (If you don’t enter it now, the installation will still work, and you will have to enter the appropriate product key when activating.)
  • Enter your company details in the Windows information step.
  • If required, enter the administrator account name and password you want to use. If this information is not entered here, the MDT deployment client will ask you for this information during the deployment itself.

 Create a Deployment Task Sequence

To finish the configuration of your Deployment Share, select the deployment share itself and choose Update Deployment Share from the task pane on the right. This step will copy the necessary drivers and ISO file content into the deployment share folders, as well as create x86 and x64 boot media. In my lab, this step took about ten minutes.

image7

At this point, you actually have a fully operational deployment server available, which allows you to deploy the images by using a PXE boot.

In the second part of this article, we will explain the steps that are required to build a bootable USB media to deploy the image.

19 Feb 15:43

How Do I Create My Own Desired State Configuration (DSC) Resource?

by Damian Flynn

After working with Desired State Configuration (DSC) for a little time, you may get to the point where you consider the steps required to create your very own DSC resource. And given that you have already benefited from the community, you may want to share your work as a small thank you? And you never know, someone might actually find some tweaks that would add just a little extra to your efforts, helping you to learn new tricks and meeting new personalities.

Editor's note: Need to catch up? Check out our previous articles in this series:

Why Create a Desired State Configuration Resource?

In this post I am going to cover a scenario that I recently had. As I rebuilt my lab, I started to go through a few "what ifs." What if I could possibly leverage DSC to get all these ever-so-important hotfixs for Hyper-V and clustering (that for some reason never appear in Windows Update) automatically and consistently applied on my hosts?

After a quick look around the web, it did not take long to realize that there were no DSC resources for this job, but I did happen to find quite a lot of different type scripts that set about applying hotfixes with a wide range of approaches. Yet none of them were really "perfect."

Planning Your First DSC Resource

Before we get into the actual building of our new provider, I first wanted to take a moment and plan what it is I really want to achieve. I started with a little mock-up of what a configuration using my new resource might actually look like.

Hotfix ShortName
{
  Ensure = "Present"
  Name = "KB12312312"
  SourcePath = \\Server\Share\Path\Update.msu
}

Attempting to not stray from the standard configuration templates, this turned out to be very simple. I just require an ensure property to validate whether the hotfix is going to be present or not – a unique identifier for the instance, which was very easy, as every update has a unique KB number, and lastly a path to locate the update binary for the scenarios where we will need to install the update!

Getting Creative

To assist in generating our module, we are going to leverage yet another resource, which Microsoft has kindly shared with us on the Technet Gallery called xDSCResourceDesigner. As the name suggests, this PowerShell module offers us an easy method to get started on our custom resource and will create all the necessary files, including the schema .MOF, our module definition, and the template for our actual module.

In a similar manner to our previous work, we will place our new module in our PS Modules path so that it is ready for us to import. Of course, you can also place the module in any path you wish and import the module by providing the full path to the module. For example:

Import-Module X:\PowerShell\Modules\xDscResourceDesigner\xDscResourceDesigner.psm1

Once the module is loaded, you can use the Get-Command commandlet to enumerate the new commands provided by the module.

Create a Desired State Configuration Resource: xDSCResourceDesigner

Defining the Module

First we will use the command New-xDSCResourceProperty to define each of the parameters we will be using in our new module. Following the rules of DSC Resources, one of the parameters must be defined as a unique key; in this example is the Name, or our Hotfix ID.

$name       = New-xDscResourceProperty -Name Name       -Type String -Attribute key   -Description "Hotfix ID"
$sourcePath = New-xDscResourceProperty -Name SourcePath -Type String -Attribute Write -Description "Source Path"
$ensure     = New-xDscResourceProperty -Name Ensure     -Type String -Attribute Write -ValidateSet @("Present","Absent") -Description "Ensure"

Next, we are going to use the module to create the actual files that form the template of our new module. As I plan to share this back with the community, and also leverage the features of GIT to help maintain my code versions, I will be creating the resource in my PowerShell.org GIT repo, which we forked in the earlier post.

Starting with GIT, create a new branch in the repository. I am calling this DSCHotfix. This will allow me to track the changes I am applying in the repo, which are specific to this new resource.

git branch DSCHotfix
git checkout DSCHotfix

Our next step is to combine the parameters we defined earlier; using the module command New-xDSCResource we will define the name for our resource and the path to which the new resource template files will be created. Adhering to the naming conventions I will create a new module to reference all my resource modules under DSC_DamianFlynn.com and the command will also make a sub-folder specifically for this new DSC Resource.

$cHotfix = New-xDscResource -Name Hotfix `
-Property $name, $sourcePath, $ensure `
-FriendlyName "Hotfix" `
-ModuleName "DSC_DamianFlynn.com" `
-Path "X:\PowerShell\Repos\PowerShell.org\Resources\" `
-Verbose

The optional –Verbose switch provides some feedback as the command proceeds to create the template for our new module.

Create a Desired State Configuration Resource: New-xDSCResource -Verbose

Switching back to GIT, I can now add the new files to my repository branch and commit them with a comment explaining what I have just completed with the following commands.

git add . -A
git commit –m "Initial Commit of the newly generated template code for my new Hotfix DSC Module"

Next Steps

Be sure to check back for the next post in this series, in which we will take a closer look at the new files created, and fill out the necessary code to make our new module functional.

15 Feb 16:37

Configuring a SQL High Availability Group with DSC

by PowerShell Team

Let's use DSC to configure something complicated!  In past blogs, we’ve shown you how to use Windows PowerShell Desired State Configuration (DSC) to configure relatively simple systems.  However, the technologies you deal with on a day to day basis can sometimes become complicated.  Don’t worry, DSC can still help simplify configuration.  Let’s use SQL AlwaysOn Availability Group (AG) as a example. SQL AG is a new SQL feature that enables replication on top of Windows Server Failover Clustering. While the feature is cool, configuring the environment is quite complex. It involves many steps across multiple machines. Some steps in one machine might depend on progress or status of others.


In this blog post, we will demonstrate using DSC to configure a SQL AG. When using the provided example, one PowerShell command will deploy a SQL AG on Virtual Machines (VMs). 

Environment

Using the DSC configuration scripts described in this blog you can fully deploy and configure the following environment: 

Configuration Overview

To deploy the environment described above in a virtual environment using DSC a configuration is generated for each guest server described above and the VM host machine. All of these configurations are coordinated by a single PowerShell script (Deploy-Demo.ps1). A description of what each of the configuration scripts does is below. A zip (Dsc-SqlDemo.zip) containing all of the configuration files is attached to this blog (see the bottom of the blog) and should be downloaded before you read on so that you can follow along while looking at the associated scripts.


Configuring the Host and VMs


First, Deploy-Demo.ps1 runs Dsc-SqlDemo\ConfigSqlDemo.ps1.  This configures the host machine by doing the following:


1.       Ensure that a VM Switch for an internal network is present (in the demo, subnet of 192.168.100.*)

2.       Ensure that a local user called vmuser is present, so that VMs can access data in host

3.       Ensure that a net share (c:\SqlDemo\Sql12Sp1) is present. 

4.       Ensure that three VMs are created in the correct state by:

o   Ensuring that a DSC Configuration, DSC Resources, and other files are copied to the VHD image.

o   Ensuring that the VMs are started from the VHDs.


Once the host machine is configured, we have three VMs running.  Each of these VMs has a configuration that has been bootstrapped into it.  Because of the way we bootstrap the VMs, they will configure themselves after startup, using the .mof we have injected into them.


Stay tuned for a blog post about the bootstrapping procedure. 


Configuring the Primary Domain Controller - pdc


The .mof file injected into the Primary Domain Controller (pdc) VM was generated from the configuration in Dsc-SqlDemo\Scenarios\nodes.ps1 from the node statement è Node $AllNodes.Where{$_.Role -eq "PrimaryDomainController" }.NodeName


1.       Ensure the VM has a static IPAddress

2.       Ensure necessary WindowsFeatures are present

3.       Ensure that a Domain Forest is created

4.       Sets  up a network share folder that will be used in the SQL replication process


Setting up the first SQL Server- Sql01


The .mof file injected into the first SQL Server (Sql01) VM was generated from the configuration in Dsc-SqlDemo\Scenarios\nodes.ps1 from the node statement è Node $AllNodes.Where{$_.Role -eq "PrimarySqlClusterNode" }.NodeName


1.       Ensures that the machines IPAddress is correctly set

2.       Ensures that necessary WindowsFeatures are present

3.       WaitFor Primary Domain Controller to have created the AD Domain

4.       Ensure that the machine is joined to the Domain

5.       Ensure that .Net 3.5 and SQL Server 2012 SP1 are installed

6.       Ensures that Firewalls are configured such that Sqlbrowser.exe and SqlServr.exe are accessible in the private network.

7.       Ensure that a Windows Cluster is created and that Sql01 is added to the cluster

8.       Ensure that the SQL Server for High Availability (HA) service is enabled

9.       Ensure that there is an Endpoint for the HA

10.   Ensure that the SQL HA group for databases is created (in the demo, TestDB)


Setting up the second SQL Server - Sql02


The .mof file injected into the second SQL Server (Sql02) VM was generated from the configuration in Dsc-SqlDemo\Scenarios\nodes.ps1 from the node statement è Node $AllNodes.Where{$_.Role -eq "ReplicaSqlClusterNode" }.NodeName


1.       Ensures that the machines IPAddress is correctly set

2.       Ensures that necessary WindowsFeatures are present

3.       WaitFor Primary Domain Controller to have created the AD Domain

4.       Ensure that the machine is joined to the Domain

5.       Ensure that .Net 3.5 and SQL Server 2012 SP1 are installed

6.       Ensures that Firewalls are configured such that Sqlbrowser.exe and SqlServr.exe are accessible in the private network.

7.       WaitFor the first SQL node to have created the windows cluster

8.       Ensure that Sql02 is added to the cluster

9.       Ensure that the SQL Server for High Availability (HA) service is enabled

10.   Ensure that there is an Endpoint for the HA

11.   WaitFor the first SQL node to have created the HA group

12.   Ensure that sql02 is joined to the HA group.


Deploy the environment

Now that you have an understanding of the environment and what the DSC scripts do, let’s go ahead and deploy the environment using the scripts. Note there is quite a bit of preparation to complete before the scripts can be executed so please be patient.

Requirements

Hardware


To simulate a SQL AG, we need a decent machine that is capable of running Windows Server 2012 R2 and Hyper-V (64-bit) with at least 16GB of RAM and around 100GB of free disk space. Because this is a demo, we also recommend that you not store important items on the machine, in case it is cleaned up.


Software


The following software are needed to perform the steps in the demo.


1.       An evaluation version of Windows Server 2012 R2 Datacenter (both ISO and VHD). A download can be found here.  Note: We need both the VHD and the ISO because SQL Server requires .Net 3.5, which is not available in the VHD. Fortunately, in the expanded ISO image, there is a folder named Sources\sxs, that includes all .Net 3.5 files.

2.       An evaluation version of SQL Server 2012 SP1 (ISO).  A download can be found here.

3.       The following DSC resources:

a.       User (Ships in Windows Server 2012)

b.      Windows Feature (Ships in Windows Server 2012)

c.       xComputerManagement (Download here)

d.      xNetworking (Download here)

e.      xHyper-V (Download here)

f.        xActiveDirectory (Download here)

g.       xFailOverCluster (Download here)

h.      xSqlps (Download here)

i.         xSmbShare (Download here)


Certificate


Setting up domain controllers or SQL servers requires a few credentials.  To keep these credentials secure, DSC encrypts them before placing them into the plain text of the .mof files.  For details on this process, check out this blog. To secure credentials, DSC uses a certificate’s public key to encrypt the credentials and the private key to decrypt the credentials on the target machine that is being configured. To ensure that this demo works correctly, we need to ensure that the host and the target machines have the appropriate certificates.


To do this, we first create a self-signed certificate on the host machine, then copy it with private key to the target machines.  We then install the certificate to the target’s local machine certificate store. Since private key should be kept secret, it is important to clean them up as soon as possible (instructions can be found below).   Again, with this, please ensure you do NOT run the demo in production or on machines that require security by default. 


1.       Steps to setup certificate on the host machine:

·         Get MakeCert.exe if you don’t have. (It is shipped with Windows SDK, a download can be found here).

·         Create a certificate with CN=DSCDemo. To do this, open a PowerShell console with Administrator elevation, cd to place that can see MakeCert.exe, and run the following command (notice, for security reasons, I make the cert expire as soon as possible, please adjust the highlighted date as needed).


makecert -r -pe -n "CN=DSCDemo" -sky exchange -ss my -sr localMachine –e 02/15/2014


The command line above will create a self-signed certificate on localhost certificate store (cert:\localMachine\My, with Subject = “CN=DSCDemo”).  Remember the subject, we will need it very soon. In my example, the UI in the certificate store looks like the following in (Certificates(Local Computer)\Personal\Certificates)


·         Create a folder to hold the keys for the demo. In my example, I created C:\keys

·         Public key. Export the public key of the certificate.  You can do this manually, or do it with the following PS script. In my example, I saved the public key as: C:\keys\Dscdemo.cer


$certSubject = "CN=DSCDemo"

$keysFolder = Join-Path $env:SystemDrive -ChildPath "Keys"

$cert = dir Cert:\LocalMachine\My | ? { $_.Subject -eq $certSubject }

if (! (Test-Path $keysFolder ))

{

    md $keysFolder | Out-Null

}

$certPath = Export-Certificate -Cert $cert -FilePath (Join-Path $keysFolder -ChildPath "Dscdemo.cer")


·         Private key and protection-Password. For security reason, export the private key certificate as the following:

o   In Personal\Certificates, find the certificate Issued to “DSCDemo” as shown above. Right click and select the “Export…” option.

o   Take the option of “export private key”

o   UI will ask you for apassword for the protection. Enter and remember your password, youneed it very soon. For this demo, we used P@ssword

o   Export the certificate to the appropriate folder.  In my example, it is C:\keys\Dscdemo.pfx

·         Certificate Thumbprint. Run the following PS script to get certificate’s thumbprint, we need it very soon.


dir Cert:\LocalMachine\My | ? { $_.Subject -eq "CN=DSCDemo" }


In my example, it is E513EEFCB763E6954C52BA66A1A81231BF3F551E


2.       Update the deployment scripts:

With above steps, we need update deployment scripts to point to the correct certificate values.


·         Public key location: in my example, it is C:\keys\Dscdemo.cert

·         Thrumbprint: in my example, it is E513EEFCB763E6954C52BA66A1A81231BF3F551E

·         Private key location: in my example, it is C:\keys\Dscdemo.pfx

·         Private key protection password: in my example, it is P@ssword


Update the following places in the deployment scripts:


2.1 ConfigSqlDemoData.psd1


At line 56, modify the file to point to your private key location.


           SourcePath = "C:\Keys\Dscdemo.pfx";


At line 145-146, modify the file to point to your certificate file and Thumbprint:


         @{

            NodeName= "*"


            CertificateFile = "C:\keys\Dscdemo.cer"

            Thumbprint = "E513EEFCB763E6954C52BA66A1A81231BF3F551E"


2.2 deployment\installcert.ps1


          -Password $(ConvertTo-SecureString -String "P@ssword"


This corresponds private key protection password. Change it to the value you just entered.


3.       Install the certificate to the VMs.  Now that we’ve done steps 1 and 2, the deployment script will do the following automatically:


1.       Encrypt credentials for the environment that is going to set up.

2.       Copy the private key and the script (installcert.ps1) that holds the private key protection password to each VM’s VHD file (into the VHD’s c:\deployment folder). Once the VM is started, it will install the certificate with the private key.


4.       Clean up the certificate.  After you are done with the demo, please remove certificate and keys as soon as possible with the following steps:


1.       Delete the certificate files. In my case, I delete all files under C:\keys

2.       Remove the self-signed certificate we just created. In my case, I used the UI to go to Certificates(Local Computer)\Personal\Certificates, and deleted certificate issued to DSCDemo

3.       Remove the password in the deployment\installcert.ps1 file.

4.       Delete the xml files under deployment (pdc.xml, sql01.xml, sql02.xml) because they have passwords for VMs bootstrap.

5.       In each VM, delete the files under C:\deployment

6.       Shred the recycle bin of the host machine.


Prepare the host


Before we can run the demo, we need to make sure that we have all of the necessary files in the appropriate places. 


Copying Files


1.        Confirm that the host machine is running Windows Server 2012 R2. If that is not the case, you can expand the ISO downloaded above to DVD, and install Windows Server 2012 R2 from there. The host is also required to have Hyper-V. Please see the Hyper-V Start Guide in the reference section for more details on Hyper-V.  It is recommend to upgrade the OS with latest patches by running Windows Update.

2.       Create a folder named SqlDemo. In my case, I created the folder here: C:\SqlDemo

3.       Copy the Windows Server 2012 R2 VHD file to C:\SqlDemo. For me, this looks like: “c:\SqlDemo\9600.16415.amd64fre.winblue_refresh.130928-2229_server_serverdatacentereval_en-us.vhd”

4.       Copy the Windows Server ISO to C:\SqlDemo. To make things simple, you can rename the file to a short name. In my case, this looks like: C:\SqlDemo\WS12R2.ISO

5.       Similarly, copy the SQL ISO  to C:\SqlDemo. Again, rename the file to a short name like this: C:\SqlDemo\SqlSP1.iso

6.       Unzip Dsc-SqlDemo.zip. In my case, it is like C:\Dsc-SqlDemo, the entire folder like the following:


7.       download xActiveDirectory, xComputerManagement, xFailOverCluster, xHyper-V, xNetworking, xSmbShare, xSqlPs modules if not. Copy them to root of unzipped folder. It looks like the following in the end:


Extracting Content


Now that we’ve copied the ISOs into the necessary locations, we need to extract some of their content.  Specifically, we need to get the sxs files (which include .Net 3.5), and the SQL content.  While there are many ways to do this, the simplist way in this situation is to run the “GetFilesFromImage.ps1” script in DSC-SqlDemo folder.


1.       Open a Windows PowerShell console (with Administrator privileges), and cd to the Dsc-SqlDemo folder.

2.       Run the following script to get sxs files including .Net 3.5


.\GetFilesFromImage.ps1 -ImagePath c:\SqlDemo\WS12R2.ISO -SrcPath “sources\sxs” -DstPath c:\SqlDemo\Srv12R2\sxs


Figure 1: Note: -SrcPath has no driver letter because we don’t know which driver letter the ISO image will mount to until runtime.


3.       Similarly, get the entire Sql ISO content by running the following script:


.\GetFilesFromImage.ps1 -ImagePath c:\SqlDemo\Sql12SP1.ISO -SrcPath “*” –DstPath c:\SqlDemo\Sql12SP1


Remember folder c:\SqlDemo\Srv12R2\sxs and c:\SqlDemo\Sql12SP1, we need them later on.


Checking the Configuration Data File


It’s important to ensure the configuration data file (c:\dsc-SqlDemo\ConfigSqlDemoData.psd1) has the correct information. If you used the same paths as above for SqlDemo, and are okay with using the default credentials, the demo should work without any change. However, if SqlDemo and underneath files is in different path, driver, or name, their locations need to be updated in the data file.


Checking Credentials


By default, “P@ssword” is the password for every credential. You can change to your own if you would like, but please remember them. And don’t forget to do clean up after the demo.


Also, notice, those three VMs are created in private network of the host. In another word, they are only visible to each other and the host. To make vm access software’s on the host, we create a local user: vmuser, which could read access to SqlDemo folder (in my case: c:\SqlDemo).


Checking Paths


Confirm that the following paths in the ConfigSqlDemoData.psd1 file are correct:


# Windows Server 2012 R2 vhd

VhdSrcPath = "c:\SqlDemo\9600.16415.amd64fre.winblue_refresh.130928-2229_server_serverdatacentereval_en-us.vhd"


# .Net 3.5 source files  

@{ Source = "C:\SqlDemo\Svr12R2\sxs";    Destination = "sxs" }


# Sql software folder on Host

SqlSrcHostPath = "C:\SqlDemo\Sql12SP1" 


Running the demo


Once everything is ready, running the demo is as simple as this:


The script will ask you to enter password for private domain administrator, sql administrator, user to access host file share, and user on the host for the file share access. The last two should have the same password. In my example, I entered "P@ssword" four times for the sake of simply.


After about 30-60 minutes, the SQL AG will be set up across three VMs running on the host machine:


1.       SqlDemo-pdc – the primary domain controller, which ensures the private domain for two SQL cluster nodes.

2.       SqlDemo-Sql01 – the primary node in SQL AlwaysOn Availability Group

3.       SqlDemo-Sql02 – the secondary node in SQL AlwaysOn Availability Group


Verification (How do you know it worked)


It's worth noting that when the configuration returns success on the host machine, that only indicates that the VMs have been created, NOT that SQL AG deployment on VMs is completed.  The deployment takes about 30-60 minutes, so be patient with the installation script.


To check for complete status:

·         Monitor the size of the vhds being created on the host machine under Vm\. pdc vhd should be about 2.4 GB, sql vhds should be about 8GB.


To debug a failure:

·         Check the ETW events on each VM under Applications and Services Logs\Microsoft\Windows\Desired State Configuration/Operational


To confirm success:

1.       Login to one of SQLs nodes

2.       Start “Microsoft SQL Server Management Studio”

3.       Connect to one of SQL instances (like sql01, or 192.168.100.11 in IP)

4.       Under “AlwaysOn High Availability”, you should see something like the following snapshot:


5.       Expand the Databases folder

6.       Open TestDB

7.       Populate some data

8.       Check that it is replicated on the second node shortly thereafter.

Key Takeaways

This example is far more complex than most others that have been shown or created.  As such, it demonstrates many characteristics of configurations that may be lost in the simpler scenarios.  Here are a few things we think are worth noting.


  1.  Each configuration uses a Configuration Data File to separate the structural configuration data from the environmental configuration.  This allows the example to easily scale up.
  2. The “WaitFor” pattern is used many times to coordinate across machines.  This pattern is used in scenarios where a machine needs to wait for another machines to do something.  For example, Sql02 needed to wait for the Primary Domain Controller to create the domain before ensuring that it was joined to the domain.
  3. The configurations that ran in pdc, sql01, and sql02 were bootstrapped into the VHDs as .mof files.  This technique improves scalability and performance when configuring VMs at startup.  Stay tuned for a blog post on this later.


That’s it!  Let us know what you think in the comments.


Enjoy the fun!


Chen Shang, Mark Gray, John Slack, Narine Mossikyan

Windows DSC Team

15 Feb 15:55

How to Participate in the Desired State Configuration (DSC) Community

by Damian Flynn

As you begin to leverage Desired State Configuration (DSC) in evaluations, lab, or production, you will ultimately need to consume and create your own DSC resources. Leveraging and supporting the community is a really great place to learn what you can do and share your own work with others who may help you develop these resources even further.

As IT pros, we sometimes need to take on a tiny persona of a developer as we create scripts to automate our day-to-day jobs. In this post I will walk you through the procedure of working with these repositories, enabling you to version control your work, and even have it pulled back into the main community library.

Editor's note: Need to catch up? Check out our previous articles in this series:

DSC and GitHub

We are going to start off with a quick introduction to GitHub, with which we will connect and access the PowerShell.org repository of DSC resources. These resources are maintained and updated quite regularly.

Browsing this repository, you will see that a number of interesting DSC resources are already available to use, including community versions of some open source providers recently shared by the Microsoft Powershell team.

  • cPSDesiredStateConfiguration
  • cNetworking
  • cHyper-V
  • CComputerManagement
  • cWebAdministration

And new resources created by the community, which currently include the following.

  • GlobalAssemblyCache
  • CertificateStore
  • FirewallRule
  • NetworkAdapter
  • Pagefile
  • PowerPlan
  • SetExecutionPolicy
  • HostFile

From GIT, simply download a copy of these to your system and then publish them to your pull server by selecting the option in the right action pane called Download ZIP.

Desired State Configuration (DSC) GitHub

I would encourage you to participate in the community, which could not be simpler and only needs a few simple steps to get started.

Install GIT

On your workstation, start by downloading and installing a copy of the GIT tools, these are free and updated regularly. Installation is painless and will add an extension to your Explorer shell and some new utilities to your command interface. The main one of concern is called git.

GitHub git setup

Create a Free Account

Register for a free account on GitHub.com. This will permit you to host a copy of the community DSC resources in your personal account which you can then edit as you like, updating your change history, and only when you are happy that your work is stable, you can then request that the maintainer of the community DSC resources update the main repository with your contributions.

Create a Fork

With your free account created, creating a copy of the community resources could not be simpler. Navigate back to the PowerShell.org community repository and click Fork. A copy of the repository will be created in your new account, similar to the example below.

Desired State Configuration (DSC)  GitHub

Clone the Fork

This copy is now your starting point. You can check this out to your computer, edit it as you wish, create new resources, etc. Once you are satisfied that all the changes you wish to make are completed, you can request that the changes are pulled back to the main repository.

Using our recently installed GIT tools, we can clone this repository to your workstation so that you can begin to use and edit the resources. Navigate the the folder on your workstation you plan to use as the working folder, and then issue the following command. Remember to replace the username with your personal account name.

git clone https://github.com/username/DSC.git

This will instruct GIT to create a local clone of your repository.

Desired State Configuration (DSC)  GitHub powershell

Configure Associations

Our new clone is now associated with our personal copy of the resources, which is known to Git as Origin. But as we are doing this to support the community, we need to also make an association to the original PowerShell.org version of the repository, which we will refer to as Upstream. This is important, as we might want to get any new updates others may be adding to the main repository to be merged with the version we are working on. And, of course, we'll want to have our updated pulled into the upstream version when we are ready.

To accomplish this, we update Git with the following command:

git remote add upstream https://github.com/PowerShellOrg/DSC.git

If you wish to check for any updated in the upstream version then we can simply issue the command:

git fetch upstream

This will not affect your working copy; instead, it will create a branch called upsteam\master. You will quite likely want to merge in any changes from the upstream copy to your active copy by using the command:

get merge upstream/master

Your Working Changes

With a working copy that is up-to-date with the latest versions from the upstream, you can begin editing your clone. As you proceed with the edits and creation of new resources you will want to update your repository with the latest versions with the following:

git push origin master

This command tells Git to push the current work to the repository called Origin, which we know is our personal copy. The branch we are working on is by default the master branch. If you added or removed files, you will need to update Git to reflect these changes using Git add, Git delete, and Git commit.

Pulling in Changes

That’s all there is to this. When you are ready to share your work back to the main repository all you need to do is use the Web interface to request a “Pull." The option is located on the right action pane. From there you will work with the repository maintainer to explain what changes you have made, why you are sharing these, and then merge your copy into the main distribution.

15 Feb 15:15

Using Office 365 ProPlus with the Office Deployment Tool

by Peter De Tender

In the first part of this two-part article series on Office 365 Pro Plus, I started by explaining what Office 365 ProPlus is, followed by a quick walkthrough of the Click-To-Run installation approach. While the super-easy click-to-run install is very useful for home offices or SMB-segment customers, it is not the most advised deployment approach for larger organizations. Another concern companies of such size have is control. The IT department wants to define who should get the Office 365 Pro Plus components installed and who not. That’s where the integration between the Office 365 Pro Plus cloud-based installation and your existing deployment solution can come together. Today I'll discuss how to use Office 365 ProPlus with the Office Deployment Tool.

Office 365 ProPlus and the Office Deployment Tool

The magic tool behind this integration is the Office Deployment Tool. It’s actually a small exe-file, that allows you to do the following:

  • Download the Office 365 Pro Plus install files from the Microsoft cloud.
  • Deploy, uninstall and update by using command-line script (*).
  • Create a package file that you can reuse in App-V (Microsoft Application Virtualization engine).

(*) the command-line based install allows you to integrate with about any existing corporate deployment tool you might already have:

  • Active Directory Group Policy software application deployment
  • Integrate as task sequence in MDT 2012/2013 (Microsoft Deployment Toolkit)
  • Create an application package you can publish from SCCM 2012 / 2012 R2
  • Create an installation command-line sequence in ANY OTHER tool you are using. I've heard of successful deployments out of LanDesk, Altiris, etc.), so it is not at all only possible by using Microsoft tools.

Office Deployment Tool for Click-to-Run

In this section, I will demonstrate the different possibilities from the Office Deployment Tool.

Office Deployment Tool

  • Browse for a folder where you want to save the exe-file (e.g. c:\ODT).
  • Run the setup.exe tool from an admin command prompt.

Office Deployment Tool Run setup.exe

  • Now, as you can see, the missing component is the [configuration file] for each of the different options we can specify. Microsoft makes it already a bit easy for you, by providing a sample configuration.xml file. When opening this file, the content looks like this:
<Configuration>

<!--  <Add SourcePath="\\Server\Share\Office\" OfficeClientEdition="32" >

<Product ID="O365ProPlusRetail">

<Language ID="en-us" />

</Product>

<Product ID="VisioProRetail">

<Language ID="en-us" />

</Product>

</Add>  -->

<!--  <Updates Enabled="TRUE" UpdatePath="\\Server\Share\Office\" /> -->

<!--  <Display Level="None" AcceptEULA="TRUE" />  -->

<!--  <Logging Name="OfficeSetup.txt" Path="%temp%" />  -->

<!--  <Property Name="AUTOACTIVATE" Value="1" />  -->

</Configuration>

Check out this Technet document for all possible configuration parameters.

While this is not a requirement as such, my personal best practice is to create separate XML-files for my different setup.exe options, allowing me to have control of the different steps. For example, I’ve created the following XML-files in my demo environment:

  • Download.XML
  • Install.XML
  • Package.XML

The contents look like this:

Sample Install.xml Sample Download.xml
<Configuration><Add SourcePath="C:\Data\" OfficeClientEdition="32" ><Product ID="O365ProPlusRetail"><Language ID="en-us" /></Product><Product ID="VisioProRetail"><Language ID="en-us" /></Product>

</Add>

<Updates Enabled="TRUE" />

<Display Level="None" AcceptEULA="TRUE" />

<Logging Name="OfficeSetup.txt" Path="c:\temp" />

</Configuration>

<Configuration><Add SourcePath="c:\data" OfficeClientEdition="32" ><Product ID="O365ProPlusRetail"><Language ID="en-us" /></Product><Product ID="VisioProRetail"><Language ID="en-us" /></Product>

</Add>

<Logging Name="OfficeSetup.txt" Path="C:\Temp" />

</Configuration>


The fields marked in red may need some explanations.

C:\Data – This is the location where I save the Office 365 Pro Plus install files

Product ID – This parameter define the different install packages and applications I want to install; as you can see, Visio Professional is also available as part of the subscription

Logging Name – While this parameter is optional, it is very interesting in the beginning to troubleshoot possible issues during the download of the deployment itself.

Download the Install Files with Setup.exe

Assuming you have created a download.xml file, based on my example input, you should now run the following command: Setup.exe /download c:\ODT\download.xml

 Office 365 ProPlus with the Office Deployment Toolkit  download install file

The install files are now stored in the C:\Data folder, as was configured in my download.xml file.

In fact, that’s the only thing you have to do to allow deployment in the next step.

Custom Deployment Command Line Script

In this step, I want to show you how easy it is to actually “deploy” the Office 365 Pro Plus. Only thing you need is a command line script, which is actually comprised of the following syntax: C:\ODT\setup.exe /configure install.xml

That’s it! By using this command line, you can integrate your deployment in Active Directory Group Policy software deployment, using the same parameter settings in MDT 2012/2013, or any other deployment tool you have. It’s even possible to perform a manual installation from a PC in your network, by connecting to the shared folder: \\deploymentserver\ODT<sharedfolder>\setup.exe /configure install.xml

Create an Application Virtualization (App-V package) – Optional

If you are already using application virtualization in your enterprise environment today, the last setup switch parameter will be very welcome to you. The /packager parameter allows you to create an App-V package on-the-fly. This package can then be deployed from within App-V or published as an App-V package from within SCCM 2012 for example.

The command line might look similar to this:

C:\odt\setup.exe /packager c:\odt\package.xml c:\data\O365package

The only main difference between the other earlier commands is this one needs an output directory, which is the location where the App-V package will be created.

This process will take about 15 minutes, depending on your hardware resources, showing the following processes.

 Office 365 ProPlus with the Office Deployment Toolkit

 Office 365 ProPlus with the Office Deployment Toolkit

 Office 365 ProPlus with the Office Deployment Toolkit

When the process is successfully completed, the end result are the App-V packages in the specified directory (e.g. c:\data\O365Package in my example).

 Office 365 ProPlus with the Office Deployment Toolkit app-v

This package is all you need to import in your App-V Manager. And you're done!

That’s about it for this second part of the article, I hope you liked it and can make use of it in your own environment.

Until next time!


13 Feb 13:46

VMware for Small-Medium Business Blog: Back To Basics: Post-Configuration of vCenter 5.5 Install (Web Client)

Post by Mike Laverick, Senior Cloud Infrastructure Evangelist, Competitive Team

This post originally appeared on Mike Laverick’s blog

This is part of my “back to basics” series, I’m covering typical post-configuration tasks you would expect to carry out after the install of vCenter has completed. These typical include tasks such as:

  • Creating Datacenters
  • Adding ESX hosts
  • Creating a vCenter Inventory Folder Structure
  • Licensing both vCenter and the VMware ESXi hosts

I’m going to show how this all done by the web client, the replacement of the vSphere client. The next “back to basics” article will be about automating this process with PowerCLI.

This post was recently updated with a video demoing the common post-configuration changes, and it was recorded in late January, 2014.

Note: If you are watching the video on YouTube, be sure to enter a full-screen view, and change the settings to HD/720p for best quality. Alternatively, the Native Quality video is available on mikelaverick.com

Using to the vSphere Web-Client

The Legacy C# vSphere Client:

1 - Using to the vSphere Web-Client

The All-New vSphere Web Client:

2 - The All New vSphere Web Client

The vSphere Web Client is VMware’s replacement of the desktop installed vSphere Client (commonly referred to the C# vSphere Client. Although vSphere5.5 supports both the web-client and the vSphere Client since vSphere 5.1, new features and options are being exposed to the web-client only. Currently, the vSphere Client has a warning about this period of transition. The vSphere Client is still used currently for VMware VUM and a few other solutions such as Site Recovery Manager and vCloud Connector. Another ancillary use of the legacy vSphere Client is to establish direct connections to the VMware ESX host in environments where vCenter is not in use, unavailable or yet to be deployed.

3 - use, unavailable or yet to be deployed.

For the web-client to work the web-browser will need Adobe Flash installed, and at the logon screen there is an installer for “Client Integration Plug-in.” This needs to be downloaded and installed in order for the web-client to be able to connect a console to the virtual machine. Additionally, the plug-in is required as part of the process of enabling the “Windows Session Authentication” feature. This allows the web client to accept the local logon credentials from a Windows system.

4 - feature. This allows the web client to accept the local logon credentials from a Windows system

Whilst a wide range of web-browsers work with the vSphere Web Client, many users in the community prefer Mozilla Firefox, as it appears to handle untrusted certificates generated by the installer in an easier way.

Adding Microsoft Active Directory and Delegating Responsibility

With a clean installation vCenter use its own internal director service called “Single Sign-On” (SSO) as the primary authentication domain. The default username is administrator@vsphere.local. It is possible add the Active Directory domain to SSO, and enable user accounts and groups from it as the logon to the web-client.

1. Login to the vSphere Web Client as administrator@vsphere.local

2. From the home location, navigate to >>Administration >>Sing Sign-on >>Configuration

5 - 2. From the home location, navigate to Administration

Note: Click the green + to update the configuration.

3. Select the radio button - “Active Directory (Integrated Windows Authentication”

6 - “Active Directory (Integrated Windows Authentication”.

Note: This type of authentication enables the pass-through of your logged on local credentials from the Windows domain to the web-client.

Note: In a simple installation of vCenter, SSO should pick up on the single domain that vCenter is joined to.

4. After clicking OK, this should add the domain to the list

7 - 4. After clicking OK, this should add the domain to the list

Next we can add in accounts to the vCenter to delegate responsibility. The best method is to create a group in Active Directory called “vCenter Admins”, and populate it with user accounts from the administration team.

5. Navigate to >>vCenter >> vCenter Servers

6. Select the Manage tab, and the Permissions category

8 - 6. Select the Manage tab, and the Permissions category

Note: Click the green + to update the configuration.

7. Click Add, in the subsequent dialog box select the domain, and from the second pull-down list “Show Groups First”. Select the group created – and click Add

9 - 7. Click Add, in the subsequent dialog box select the domain, and from the second pull-down list “Show Groups First”. Select the group created – and click Add

8. Finally, assign the “Administrator” role and click OK

10 - 8. Finally, assign the “Administrator” role and click OK

Once enabled, you should be able to enable the “Use Windows Session Authentication” option at the web-client:

11- able to enable the “Use Windows Session Authentication” option at the web-client

Creating vCenter Datacenters (Web Client)

A “Datacenter” in vCenter is a logical construct which could be compared to an object like a “domain” in Active Directory. It acts as an administrative boundary, separating generally one site from another. Therefore it’s not uncommon for datacenters to be named after locations like “New York” and “New Jersey”. Whether one vCenter instance will be sufficient for an organisation with many sites is large dependent on factors outside of the control of VMware. These include the quality of the network links from one site to another – as well as the internal politics of a given organisation. It may have always been the case that the West Coast of the USA is managed independently of the East Coast of the USA – this might reflect the time zone difference between the regions. Similarly in a European context each country within the EU maybe administrated separately because of language differences, and that fact that despite existence of European Law, systems of data protection, compliance and audit rule still differ from one member state to another.

a1

Note: Screen grab from the vSphere 5.5 Configuration Maximum guide.

One datacenter can contain many clusters, and clusters can contain many VMware ESX hosts. This means vCenter scales quite well for large datacenters which have been packed with a large number of servers to maximise economies of scale. Nonetheless, vCenters like VMware ESX has its own configurable maximums. This might force organisations to adopt multiple vCenters because they are rubbing up to those configurable maximums. It’s salutatory to remember that increasingly these maximums are only of theoretical interest. The numbers are now so large, most customers will find they run out of physical resource on the host before they hit the configurable maximums.

VMware publishes a list of configurable maximums of vSphere which is well worth consulting if you know your organisation is going to have many hundreds of ESX hosts, and many thousands of VMs. The configuration maximum guide for vSphere 5.5 is located here:

http://www.vmware.com/pdf/vsphere5/r55/vsphere-55-configuration-maximums.pd

Creating a datacenter

1. Select the Go to vCenter button

13 - Creating a datacenter

2. In the Inventory List, select Datacenters

14 - 2. In the Inventory List, select Datacenters

3. Click the New Datacenter icon

15 - 3. Click the New Datacenter icon

4. In the New Datacenter dialog box, type in a friendly name for the datacenter – in this case “New York”

16 - 4. In the New Datacenter dialog box, type in a friendly name for the datacenter – in this case “New York”

Note: You must select a vCenter Server or folder (if one exists) to create the datacenter.

Adding VMware ESX hosts

Once a datacenter object is created in vCenter, you can start to add VMware ESX hosts. This then allows you to perform further post-configuration tasks such as managing the network and storage layers, ready for creating a VM. Adding a VMware ESX hosts is relatively simple affair, but not a terrifically exciting task, so you may wish to automate this process with a PowerCLI script if you dealing with a rollout of large number of servers.

1. In the Datacenter view, select the datacenter

2. Click the Actions button, and from the menu select Add Host

17 - 2. Click the Actions button, and from the menu select Add Host

3. In the Add Host wizard, type the FQDN of the ESX host

18 - 3. In the Add Host wizard, type the FQDN of the ESX host

4. Type in the root account and password

19 - 4. Type in the root account and password

Note: You should prompted by warning that the ESX host certificate is untrusted (as it was auto-generated during the installation), together with its SHA1 Thumbprint.

20 - NoteYou should prompted by warning that the ESX host certificate is untrusted (as it was auto-generated during the installation), together with its SHA1 Thumbprint

Once the certificate is accepted the host information page should be refreshed with a table of data that shows the FQDN, Vendor and Model of Server, and ESX version and build number. If the host has virtual machines present on it these will be listed as well.

5. Assign a license to the host if these have been inputted, alternatively continue to use the evaluation period

a2

6. Enabled Lockdown Mode [OPTIONAL]

22 - 6. Enabled Lockdown Mode [OPTIONAL]

This is an optional configuration. Lockdown mode does improve security, but at the expense of ease of management. Consult the policies of your organisation if any.

7. Select a VM location - This maybe blank on clean system. But on existing system with virtual machine folder hierarchy, and with a host with pre-existing VMs on it, the option can be used to control where VMs are located in the vCenter Inventory

23 - 7. Select a VM location - This maybe blank on clean system. But on existing system with virtual machine folder hierachy, and with a host with pre-existing VMs on it, the

8. Click Next and Finish to add the host

Creating vCenter Folder Structure

vCenter supports the creation of folder structure for virtual machines and templates, as well for datastores. Like a folder structure on hard disk or an OU structure in Active Directory – the intention is to create a layout that allows the administration team to collect and sort objects in such a way that makes them easy to find. Additionally, these folder structures can be used to hold permissions – and limit the view of a user or groups to a subset objects. The folder structure is entirely free form, and it’s entirely up to your organisation how to lay these folders out. It’s useful to have these folders created upfront as it means VMs are being sorted and categorised from day one. However, it’s entirely possible to create and modify these folder structures after the fact, and move VMs from one folder to another at will. It’s worth mentioning that some technologies from VMware (and others) such as Horizon View and vCloud Director will automatically create folders for you, as these management systems create new objects in the vCenter inventory.

Typically, the folders top-level might reflect departmental subgroups

  • Templates
  • Sales
  • Accounts
  • Distribution

or they may reflect the server’s operational role

  • Templates
  • Web Servers
  • Databases
  • Mail

alternatively they may reflect the relationship between the VMs

  • Templates
  • CRM Application
  • Horizon EUC
  • Sharepoint

In a more “cloud” like environment each of the top-level folders may reflect different “tenants” within the system. For example imagine “Corp, Inc” has four distinct subsidiaries – the Corporate Headquarters (CorpHQ), Corp Overseas Investment Group, Inc (CIOG), iStocks Inc, (a stocks and shares, day trading company) and Quark AlgoTrading, Inc (a company that trades on the international exchanges using the latest algorithms for the short-selling of stocks). Using this folder structure keep the tenants separate from each other, and allows permissions to reflect the appropriate rights needed to manage them.

Each subsidiary might be top-level folder

  • Templates
  • CorpHQ
  • COIG
  • Quark
  • iStocks

Creating these folders is as easy as creating a folder on a hard-drive

1. Select VMs & Templates within the Web Client

2. Select the appropriate datacenter

3. Click the Actions button

4. Select in the menu – All vCenter Actions, and New “VM Template and Folder

24 - 4. Select in the menu

5. Type in a friendly label for your folder name

25 - 5. Type in a friendly label for your folder name

Note: You may notice a folder called “Discovered virtual machines.” This is created by default when new hosts are added into vCenter. It is used to hold VMs that have been found to be pre-existing on the VMware ESX host. Additionally, it may be used if a rogue administrator bypasses vCenter, and creates a VM directly on the VMware ESX host. Once you have a VM folder created, selecting it makes subfolders.

Finally, it is possible to create folders in the “Host & Clusters”, Network and Storage View. Depending on the size, scale and complexity of your environment you may or may not find these useful.

Licensing vCenter and ESX Hosts

Most VMware products are licensed by text string. For vCenter integrated technologies these licenses are stored and inputted in the licensing section of the vCenter server. Other technologies store these strings under the context of their management front-end. For example VMware Horizon View, the companies “Virtual Desktop” solutions stores the license string inside its dedicated management portal. Without a valid license key most VMware technologies expire on their evaluation by 60s day. When this occurs, assets like VMware ESX hosts become disconnected and unmanageable.

Currently, two license policies dominate – either licensing by the number of physical CPU sockets (as is the case with vSphere) or by the number of VMs (as is the case with VMware Site Recovery Manager). Within the vSphere product different SKUs exist for SMB as well as Enterprise – with each progressively offering more features and functionality. Somewhat confusingly the “vCloud Suite Enterprise” edition contains the “Enterprise Plus” version of vSphere. The terminology is a little skewed by the inherited history of previous editions, flavours and licensing models used in the past.

vCenter is licensed by the number of instances of vCenter that you have running in your environment.

Pricing and packaging of VMware Technologies is an endless evolving process – we recommend you consult VMware’s online documentation for up to the minute data. vSphere Enterprise Plus (the most functional version of vSphere) is available as part of the vCloud Suite – which offers not just vSphere but other components required to build the “cloud” or the new “Software Defined Datacenter”.

This whitepaper (PDF) offers a high level view of vCloud Suite licensing for version 5.5:

26 - PDF URL

Adding Licenses to vCenter:

1. Navigate to >> Licensing >> License

2. Click the Green + symbol to add a license

a3

3. Type your license key into the edit box

4. The key should then be validated – and report the Product Type, Capacity, and expiration date (if applicable)

28 - 4. The key should then be validated – and report the Product Type, Capacity, and expiration date (if applicable)

5. Next we can assign these license keys to the appropriate asset. In this case these are VMware ESX host licenses. Select the Host tab.

6. Select the all the VMware ESX hosts, and click the Assign License Key button

29 - 6. Select the all the VMware ESX hosts, and click the Assign License Key button

7. In the subsequent dialog box, select the license key to be assigned

30 - 7. In the subsequent dialog box, select the license key to be assigned

Note: This self same workflow can be used to input the vCenter license and assign them to the vCenter. Once the license has been inputted and assigned, the licensing node shows a very simple view of what licenses have been used, and how much free is available.

a4

In this case 1 vCenter license has been assigned, and there is 1 vCenter license left. Three VMware ESX hosts with two physical CPU sockets completed – consume 6 CPU license in total, leave 10 CPU socket license left. This would allow for another 5 VMware ESX host of this specification to be added before the organisation would run out license allocation.

12 Feb 21:46

DSC Diagnostics Module– Analyze DSC Logs instantly now!

by PowerShell Team
 
Have you ever witnessed a DSC Configuration run where you had no idea about what it might have done behind the scenes? Well, then your worries end here! During any DSC Operation, the DSC engine writes into windows event logs, which are like bread crumbs that the engine leaves along the way during any execution. If you read the blog here about DSC troubleshooting, you could learn how to use the Get-WinEvent cmdlet to debug a DSC failure using event logs. However, something that really simplifies life is the new module that has been published in Wave 2 of the DSC Resource Kit , called xDscDiagnostics.

Introduction

xDscDiagnostics is a PowerShell module that consists of two simple operations that can help analyze DSC failures on your machine – Get-xDscOperation and Trace-xDscOperation. These functions help in identifying all the events from past DSC operations run in your system, or any other computer (Note: you need a valid credential to access remote computers). Here, we use the term DSC Operation to define a single unique DSC execution from its start to its end. For instance, Test-DscConfiguration would be a separate DSC Operation. Similarly, every other cmdlet in DSC (such as Get-DscConfiguration, Start-DscConfiguration, etc.) could each be identified as a separate DSC operation.

The two cmdlets are explained here and in more detail below. Help regarding the cmdlets are available when you run get-help <cmdlet name>.

Get-xDscOperation

This cmdlet lets you find the results of the DSC operations that run on one or multiple computers, and returns an object that contains the collection of events produced by each DSC operation.

For instance, in the following output, we ran three commands, the first of which passed, and the others failed. These results are summarized in the output of Get-xDscOperation.

image001

Figure 1 : Get-xDscOperation that shows a simple output for a list of operations executed in a machine


Parameters

  • Newest – Accepts an integer value to indicate the number of operations to be displayed. By default, it returns 10 newest operations. For instance,

image002

Figure 2 : Get-xDscOperation can display the last 5 operations’ event logs


  • ComputerName – Parameter that accepts an array of strings, each containing the name of a computer from where you’d like to collect DSC event log data. By default, it collects data from the host machine. To enable this feature, you must run the following command in the remote machines, in elevated mode so that the will allow collection of events

    New-NetFirewallRule -Name "Service RemoteAdmin" -Action Allow      
  • Credential – Parameter that is of type PSCredential, which can help access to the computers specified in the ComputerName parameter.

Returned object

The cmdlet returns an array of objects each of type Microsoft.PowerShell.xDscDiagnostics.GroupedEvents. Each object in this array pertains to a different DSC operation. The default display for this object has the following properties:

  1. SequenceID: Specifies the incremental number assigned to the DSC operation based on time. For instance, the last executed operation would have SequenceID as 1, the second to last DSC operation would have the sequence ID of 2, and so on. This number is another identifier for each object in the returned array.
  1. TimeCreated: This is a DateTime value that indicates when the DSC operation had begun.
  1. ComputerName: The computer name from where the results are being aggregated.
  1. Result: This is a string value with value “Failure” or “Success” that indicates if that DSC operation had an error or not, respectively.
  1. AllEvents: This is an object that represents a collection of events emitted from that DSC operation.


For instance, if you’d like to aggregate results of the last operation from multiple computers, we have the following output:


image003

Figure 3 : Get-xDscOperation can display logs from many other computers at once.


Trace-xDscOperation


This cmdlet returns an object containing a collection of events, their event types, and the messages output generated from a particular DSC operation. Typically, when you find a failure in any of the operations using Get-xDscOperation, you would want to trace that operation to find out which of the events caused a failure.

Parameters

  • SequenceID: This is the integer value assigned to any operation, pertaining to a specific computer. By specifying a sequence ID of say, 4, the trace for the DSC operation that was 4th from the last will be output

image004

Figure 4: Trace-xDscOperation with sequence ID specified

  • JobID: This is the GUID value assigned by LCM xDscOperation to uniquely identify an operation. Hence, when a JobID is specified, the trace of the corresponding DSC operation is output.

image005

Figure 5: Trace-xDscOperation taking JobID as a parameter – to output the same record as above – they just have two identifiers- job id and SequenceID

  • Computer Name and Credential: These parameters allow the trace to be collected from remote is necessary to run the command :

    New-NetFirewallRule -Name "Service RemoteAdmin" -Action Allow

image006

Figure 6: Trace-xDscOperation running on a different computer with the -ComputerName option

Note: Since Trace-xDscOperation would aggregate events from Analytic, Debug, and operational logs, it will prompt the user to enable these logs. If the logs are not enabled, an error message is displayed stating that these events cannot be read until it has been enabled. However, the trace from other logs are still displayed. This error can be ignored.


Returned object

The cmdlet returns an array of objects, each of type Microsoft.PowerShell.xDscDiagnostics.TraceOutput. Each object in this array contains the following fields:

  1. ComputerName: The name of the computer from where the logs are being collected.
  1. EventType: This is an enumerator type field that contains information on the type of event. It could be any of the following :

a.       Operational : Indicates the event is from the operational log

b.      Analytic : The event is from the analytic log

c.       Debug : This would mean the event is from the debug log

d.      Verbose: These events are output as verbose messages during execution. The verbose messages make it easy to identify the sequence of events that are published.

e.      Error: These events are error events. Please note that by looking for the error events, we can immediately find the reason for failure most of the times.

  1. TimeCreated : A DateTime value indicating when the event was logged by DSC
  1. Message: The message that was logged by DSC into the event logs.


There are some fields in this object that are not displayed by default, which can be used for more information about the event. These are:

  1. JobID : The job ID (GUID format) specific to that DSC operation
  1. SequenceID: The SequenceID unique to that DSC operation in that computer.
  1. Event: This is the actual event logged by DSC, of type System.Diagnostics.Eventing.Reader.EventLogRecord. This can also the obtained from running the cmdlet Get-Winevent, as in the blog here. It contains more information such as the task, eventID, level, etc. of the event.

Hence, we could obtain information on the events too, if we saved the output of Trace-xDscOperation into a variable. To display all the events for a particular DSC operation, the following command would suffice:

(Trace-xDscOperation-SequenceID3).Event


That would display the same result as the Get-Winevent cmdlet, such as in the output below.

image007

Figure 7 : Output that is identical to a get-winevent output. These details can be extracted using the xDscDiagnostics module as well


Ideally, you would first want to use Get-xDscOperations to list out the last few DSC configuration runs on your machines. Following this, you can dissect any one single operation (using its sequenceID or JobID) with Trace-xDscOperation to find out what it did behind the scenes.

In summary, xDscDiagnostics is a simple tool to extract the relevant information from DSC logs so that the user can diagnose operations across multiple machines easily. We urge the users to use this more often to simplify their experience with DSC.


Inchara Shivalingaiah
Software Developer
Windows PowerShell Team