Shared posts

10 Aug 01:40

How to Use Google’s Data Gif Maker in the Classroom

by Jennifer Carey

Google just announced a new tool, primarily aimed at journalists, a data gif maker. This is a great tool for students to use in the classroom as it allows for a new way to convey information (specifically change over time) visually. Check out how to create data gifs on google’s blog.

trends_BatmanSuperman


29 Jul 02:04

How HyperDocs Can Transform Your Teaching

by Jennifer Gonzalez


Listen to my interview with Lisa Highfill, Kelly Hilton, and Sarah Landis, authors of The HyperDoc Handbook (transcript):


In many classrooms, a learning cycle looks something like this: First, we write plans for a series of lessons and a final assessment. We gather materials—handouts, websites, rubrics, video clips. Then we teach the lessons one at a time, to the whole class, at the same pace, distributing materials as needed. Finally, we end with a project, test, or other assessment.

It’s a very teacher-directed model, which can limit learning in a number of ways:

  • Students don’t feel much ownership for their own learning. Instead, they depend on the teacher to tell them when and how to learn the material.
  • Because so much of the teacher’s time is spent in direct instruction, there’s little opportunity to work one-on-one with students.
  • Because it’s up to the teacher to adjust instruction for students with varied needs and levels of readiness, differentiation becomes one more thing to do.

ENTER THE HYPERDOC

A HyperDoc is a digital document—such as a Google Doc—where all components of a learning cycle have been pulled together into one central hub. Within a single document, students are provided with hyperlinks to all of the resources they need to complete that learning cycle. Here’s an example.

This is page 1 of a 3-page HyperDoc. Click here to view the whole thing.


In the above HyperDoc, all of the bolded words are linked to outside resources. The right-hand column is set aside for students to take notes and do other kinds of thinking and planning as they work through the lesson.

One of the earliest iterations of the this type of “hub” was the WebQuest, which guided students through a lesson using all online resources. Now that Google tools like Docs and Slides have become so prevalent, teachers are using these tools to create similar lessons, choosing and mixing resources that go well beyond simple web pages. Last year, we looked at something called a playlist, which teacher Tracy Enos used to organize her language arts lessons and differentiate instruction for her students.


This post contains Amazon Affiliate links; if you purchase from Amazon after going through these links, Cult of Pedagogy receives a small commission at no extra cost to you.


Meanwhile, teachers Lisa Highfill, Kelly Hilton, and Sarah Landis were doing similar work in their own classrooms. They coined the term “HyperDoc” to describe their version of this, and in 2016, they published The HyperDoc Handbook to teach others their method for creating these lessons.


Kelly Hilton, Lisa Highfill, Sarah Landis


The book explains how HyperDocs work, why they have such an impact on instruction, and their model for how teachers can design HyperDocs for high-quality instruction. In the podcast episode above, I interviewed all three about their work. Here I will blend their expertise with some of my own thoughts about this exciting format.


BENEFITS OF HYPERDOCS

  • Fewer lectures. Teachers have been told for decades that we need to do less lecturing, to step away from being the sage on the stage and become more of a guide on the side. “I feel so bad for teachers when they hear that,” Highfill says, “because they’re like, ‘Well, what am I supposed to do? I need to get information into their heads.'” A HyperDoc offers a solution by taking care of the direct instruction part of a lesson and offering a lot more as well.
  • More face-to-face interaction. A good HyperDoc runs itself, allowing students to work through it without needing you to guide them through each step. “Although it seems odd that you’re putting a student in front of a device,” Landis notes, “really what it’s doing is freeing you up to move around and have increased face time with the students.”
  • Flexibility. If one part of your lesson isn’t working, you can just change it in the HyperDoc and the change takes effect immediately; no need to re-copy all your materials. Similarly, if each student gets their own copy of a HyperDoc, the elements can be changed on each to meet individual students’ needs.
  • Multimodal opportunities. Because it is digital, a HyperDoc allows us to include all kinds of multimedia. “Living in this digital age, we’re able to expose kids to different types of media that allows each child to access the learning or the content or the information in a way that’s visually or auditorily appealing to them,” Landis says. “I might be visual, and I might first study an image, then watch a video, and then I’m finally ready to tackle that article my teacher really wants me to read.”
  • Privacy. If students’ HyperDocs have been customized for them, no one else needs to know. “They don’t know that maybe their text … is at a different reading level,” says Hilton. “Or they’re able to use Read&Write for Google and just put headphones in, and that’s just a little agreement between you and that student.”

MODELS FOR BUILDING HYPERDOCS

Because HyperDocs are such adaptable tools, teachers structure them in many different ways, and you should experiment until you find a structure that works for you. Here are some options to consider:

Playlist: This model, explained in this article, follows a step-by-step sequence of activities that consist of learning activities as well as check-ins with the teacher and housekeeping tasks like setting up accounts on websites.

Self-Paced Learning: Explored in this post by math teacher Natalie McCutchen, this system lays out a path of lessons for a whole unit, along with links to review materials, pre-tests, and practice questions. Students decide how much practice they need and determine when to take the assessment for each learning goal. If they grasp the material quickly, they can test and move on.

5E Model: This first stage of this model is to Engage student interest. Next, students Explore the topic, Explain what they have learned, and Extend their learning by applying it in new situations. The last stage Evaluates student learning.

HyperDoc Model: The HyperDoc Handbook authors have developed a model that has some components of the 5Es above, but with some additions and adjustments. This template explains all 7 stages. One important component of this model is the first step, Explore. Highfill explains the value of this stage: “Kids are exploring and coming up with ideas and answers about a concept on their own, and it’s engaging them from the beginning, instead of passively listening to a teacher explain something.” During this time, while students explore, the teacher is actively gathering information: “I listen to my students,” Highfill says, “I’m studying them and hearing to what level are they understanding a concept. I have the ability to pull a small group. I can work with my language learners during that time. The whole time I’m doing formative assessment in the classroom, which will then really be my basis for the next part of the lesson.”

Agenda: This model, borrowed from the kind of planning done at a typical Montessori school, provides each student with a planner listing out their assignments for the week. Students decide how they want to use their class time each day, but are expected to complete all goals by the end of the week. Although these are traditionally done on paper, they could easily be converted to a HyperDoc format.

OTHER USES FOR HYPERDOCS

Building an extended lesson or unit is one of the most instructionally robust ways to use HyperDocs, but they can also be used for:

  • substitute teacher plans
  • video or podcast playlists
  • learning centers or stations
  • student-made HyperDocs
  • parent resources
  • departmental-, team-or grade-level HyperDocs to gather and share resources among teachers

TIPS FOR SUCCESS

Start with a template.
Rather than build your first HyperDoc from scratch, you might find more success by starting with a pre-made template, like the ones available for free on HyperDocs.co. You could also start with a completely finished HyperDoc that someone else created for their own classroom and modify it for your own use.

A few samples of the templates teachers can copy for their own use on HyperDocs.co


Build in participation, collaboration, and multimedia.
One risk inherent in HyperDocs is that they could simply become online worksheets, replicating the kind of work students could just as easily do on paper. Take advantage of this medium by including ways for students to participate actively, collaborate with others, and learn from a variety of media: video, interactive posters like ThingLinks, podcasts, online flashcards, and so on.

Offer choice…
HyperDocs are designed to allow students to work at different speeds and navigate learning in a way that works best for them. So when you can, offer choices: Give students options for the kind and quantity of materials they need to learn the material, how they will practice and apply it, and how they will demonstrate their learning.

…but don’t “kitchen sink” it.
If you stuff your HyperDoc with every possible resource on a topic (“everything but the kitchen sink”), you’ll overwhelm students. Choose resources thoughtfully.

Give students HyperDocs training.
Even if your students have used HyperDocs in other classes, your design probably has its own unique qualities, so take the time to demonstrate how it should be used. And within the HyperDoc itself, provide clear directions for its use.

Collaborate with other teachers.
You do not need to do this alone! Thousands of teachers are sharing and collaborating on the HyperDocs.co site and using the #hyperdocs hashtag on Twitter. And be sure to give credit to the person who created the original: “So if you create a HyperDoc,” says Hilton, “in the header or footer, say Created by, and maybe link to your Twitter handle or your email, for yourself, and then if you make a copy of someone’s, we encourage you to give that person credit by saying Inspired by or Remixed HyperDoc originally created by, just because we want an inclusive, appreciative sharing community.”

Don’t feel like you have to create a HyperDoc for every lesson.
“That’s not something that any teacher should feel pressured to do,” says Landis, “and it’s not really realistic. We don’t want teachers doing any one thing all the time, because then it becomes redundant for our kids.”

HyperDocs Resources: How to Learn More

Book: The HyperDocs Handbook

Website: HyperDocs.co: The online hub for Landis, Hilton, and Highfill’s work on HyperDocs. It contains helpful blog posts and the Teachers Give Teachers system where participants share their own HyperDocs with one another. To browse and borrow other teachers’ HyperDocs, all you need to do is register.

Professional Development

Social Media


There’s more where this came from.
Join our mailing list and get weekly tips, tools, and inspiration—in quick, bite-sized packages—all geared toward making your teaching more effective and fun. You’ll get access to our members-only library of free downloads, including 20 Ways to Cut Your Grading Time in Half the e-booklet that has helped thousands of teachers save time on grading. Come on in!!


26 Jul 02:16

4 Ways To Grow Your Personal Learning Network This Week

by Steven Anderson
“Alone we are smart, but together we are brilliant. We can use the collective wisdom to do great things when we are connected.”

I said that way back on September 17, 2013 and yet I think it is even more true today than even back then.

When I was in the classroom, I felt isolated as a teacher. Teaching middle school math and science my first few years out of college I had ideas as to what I wanted to do but I really needed help. I would reach out to my colleagues but many were apprehensive to give away their secrets. They wanted their kids to be the best using the methods they had developed over the years. All I wanted to do was improve and I felt stuck.

We live in an age where we have near real time access to just about anything you want to know and to the people who know it best. Social media allows us to connect, to learn, to grow and to reflect not only within ourselves but with each other. As just as my quote says we are brilliant together.

Recently, on a webinar with my friend Erin Olson, she talked about an activity she does with teachers. She has them write 3 things they need to improve their learning and 3 things they can give to improve the learning of others. As you could guess it’s easy for them to write the 3 things they need. However, when asked about the 3 things to give many struggle to come up with one. Many educators still believe they have little to offer to improve the learning of their colleagues.

All of us have something to offer. An incredible lesson or teaching method that just worked. Or maybe it was an idea that was born out of a struggle to get kids to better understand their content. All of us have had those wins that could help others win too. Being a connected educator is more than just taking ideas from a Twitter chat or even this blog post. It’s about always being in pursuit of that selfish goal of improving our learning so we can improve learning for kids.

Our personal learning networks are all different. Mine looks different from yours and yours from mine. But that is where the beauty lies. Each of us has something different to learn and different to offer. They are going to naturally look different. And they are a constant work in progress. We don’t just decide to have a personal learning network and we find some folks to follow and we are done. Connected educators constantly have to be chasing down the learning they need and the educators who know it best.

4 Ways To Grow Your Personal Learning Network This Week

Edweb-Most know Edweb for their awesome webinars (like this one this week on school culture.) But what many don’t know are the extensive communities that come with those webinars. In those communities there are blogs, messages boards and tons of people to follow and learn from. And you don’t have to feel like you have to visit all the time. At the end of the day you can get a simple email that tells you all that was discussed and upcoming events. You can participate at your pace. The Leadership 3.0, Early Childhood Learning Solutions, Game-Based Learning and Amazing Resources For Educators. Come for the webinars, stay for the conversations!

ASCD Edge-The ASCD Edge community is full of some of the brightest minds in education sharing blogs, having discussions and posting resources. You don’t have to be a member of ASCD (although you should be) to join. Create a free account and browse the hundreds of groups, and insightful blogs. The groups cover topics like Being A New Teacher, Mobile Learning, Problem Based Learning and more. And if you don’t find a group that suits your learning needs you can request a new one created for you.

Google Communities-Often overlooked, Google Communities can be a great place to connect with others on loads of topics. Of course they have many Google related like the Google Classroom community. But there are several other active ones like Connected Classroom, PBL, and Digital Leadership.

Voxer-This one will surprise many, because I am not a Voxer fan. I have used it sparingly and honestly don’t know if I even have the app on my phone any more. For me Voxer doesn’t work. For others it may be the best thing ever. Voxer is a 2-way, walkie-talkie type app. Think of it like leaving a voicemail for someone without calling. You can create small groups and leave longer voice messages or text. The app is free and many educators use them for book talks, reflection, or to, believe it or not deliver professional development. This is a very comprehensive list of ongoing Voxer conversations that you can jump into.

If you are looking for more ways to grow your PLN, Shaelynn Farnsworth and I recently wrote a blog post about why it’s important to be connected, and you can check our our resources we shared recently at ASCD.

It’s important to point out here that the tool is just the means we use to connect. It’s what we do with those connections that really matters. The art of being connected is in the conversations, the discussions, the debates, the learning, sharing and growing that all take place when we connect to each other.

Download The Post Image: https://spark.adobe.com/post/wWaq6mvPl5ESh/ 

29 Jun 00:02

Soapbox - A New Tool for Creating Screencast Videos on Chromebooks

by noreply@blogger.com (Richard Byrne)
Soapbox is a new tool from Wistia that makes it easy to create great screencast videos on a Chromebook or any computer that is using the Chrome web browser. With Soapbox installed in the Chrome web browser you can quickly record your screen and your webcam at the same time.

Soapbox is a little different from other screencast tools. The most distinguishing feature is that you can have your video transition from your screen to your webcam to a combination of the two. Soapbox includes some simple editing tools for zooming in on an area of your screen and calling attention to specific parts of your screen.


Completed Soapbox videos can be shared via email or anywhere else that you want to post a link to your video. The shortcoming of Soapbox is that you cannot download your video. It lives on Wistia's hosting service.

Applications for Education
Soapbox is another option to explore if you aren't happy with the current options for creating screencasts on Chromebooks. The editing tools make it stand out a bit from some of the other screencasting tools that work on Chromebooks. Screencasts in general are useful in helping students learn how to navigate a new web tool.

Come to the Practical Ed Tech Chromebook Camp to learn more about making videos on Chromebooks. 
online PD this summer

This post originally appeared on Free Technology for Teachers if you see it elsewhere, it has been used without permission.
29 Jun 00:02

How to Create a Word Cloud In Google Docs

by noreply@blogger.com (Richard Byrne)
Last week during Practical Ed Tech Live I answered a request for a suggestion for a tool to create word clouds. One of the tools that I suggested was the Word Cloud Add-on for Google Docs. In the video embedded below I demonstrate how to quickly create a word cloud in Google Documents.

online PD this summer

This post originally appeared on Free Technology for Teachers if you see it elsewhere, it has been used without permission.
28 Jun 23:51

Individual Sausage Casseroles by The Pioneer Woman

by Ree

There’s no evading this simple truth of the universe: Sausage and egg casserole is one of the greatest breakfasts there is. It’s retro (80’s bridal showers, anyone?), it’s satisfying, it’s flavorful, and best of all, it’s family friendly.

These are individual versions of the original, and they’re great. I love making them for the Drummond kids. The Drummond kids love it too, haha. They’re delicious fresh, of course, but they’re a good thing to keep in the freezer, too! You can find different versions everywhere with everything from chorizo to ham to mushrooms, so rest assured you can add anything you want and they’ll still be delicious!

 
In a large skillet over medium-high heat, crumble and cook the sausage until it’s about ¾ brown.


Add the onion and reduce the heat to medium-low.


Stir and continue cooking the sausage, stirring occasionally, until the sausage is cooked and the onion is soft. Remove this from the heat and set it aside to cool.


Crack the eggs into a bowl and add the salt, pepper, and chili powder. Whisk it until it’s combined.


Add the cheddar and bell pepper and stir them in…


And when the sausage has cooled slightly, add it by the spoonful…


And stir it until it’s all mixed together.


Use a measuring cup to scoop the mixture into the muffin cups…


And bake them for 20-22 minutes, until they’re puffy and just barely set.


Within a minute or two, the casseroles will start to flatten just a little bit. Don’t be sad; This is normal! Run a knife along the edges of each muffin cup…


And serve them warm with a little fruit.


I’ve been snacking on these for the past few days! Delicious and so simple.

Helpful tip: The casseroles freeze beautifully! Just seal them tightly in plastic zipper bags. Thaw and reheat in the microwave when you’re ready to serve them.

Change it up!

* Substitute half the diced bell pepper with finely chopped mushrooms.
* Add several dashes of hot sauce to the egg mixture for a little more spice.
* Substitute pepper jack cheese for the cheddar.
* Add diced ham instead of cooked sausage; it’ll save ya time!


30 May 18:29

Great Tools for Making Videos on Chromebooks - A Handout from the Archive

by noreply@blogger.com (Richard Byrne)
Due to an injury and some pressing personal matters requiring my attention, posts for the rest of the week will be favorites from the archive.

Making videos is one of my favorite digital media projects to do with students and teachers. Chromebook users aren't able to access iMovie, Final Cut, and some of the full-fledged video production tools that you'll find for desktops. But that doesn't mean there aren't some good alternative options available. In the handout embedded below I highlight twelve good options for creating videos on Chromebooks.


Please note that if your school blocks Box.com you won't be able to see the PDF.

You can learn lots of ways to use Chromebooks in your classroom during the Practical Ed Tech Chromebook Camp this July. Register this month and you'll save $50 on the registration cost.


online PD this summer

This post originally appeared on Free Technology for Teachers if you see it elsewhere, it has been used without permission.
30 May 18:28

10 Ways to Use Adobe Spark in School - From the Archive

by noreply@blogger.com (Richard Byrne)
Due to an injury and some pressing personal matters requiring my attention, posts for the rest of the week will be favorites from the archive. New posts will return on Monday.

On Tuesday morning I published a video about how to use Adobe's new creative suite called Adobe Spark. That video was focused on how to use the three parts of Adobe Spark; post, page, and video. If you haven't seen the video, it is embedded below.


Now that we know how the tools work, let's take a look at some ways that teachers and students can use Adobe Spark.

Post:
Post is the part of the Adobe Spark that lets you create graphics like posters, announcements, and Internet memes.
  • Students and teachers can create simple posters to print and post in their schools to announce club meetings, campaigns for class elections, or to post encouraging messages to students.
  • To help students understand and show that they understand what propaganda messages look like, I have had them create simple early 20th Century-style propaganda posters of their own. Adobe Spark has built-in Creative Commons search that can help students find pictures to use for those posters. Students can also upload pictures they've found in the public domain.
  • Create a meme-style graphic to share on your classroom, library, or school website. The graphic could be intended to encourage students and parents to remind each other of an upcoming school event. You could also create a meme to encourage students to continue reading over the summer. 
Video:
As the name implies, this is the Adobe Spark tool for creating videos. Videos are created by adding text and images to slides. You can record yourself talking over each slide. A library of free music is available to layer under your narration or you can use that music in lieu of narration.

  • Create a short flipped-lesson with Adobe Spark. The recording tool makes it easy to precisely record your narration over the slides in your lesson. 
  • Have your students create video lessons. The slide aspect of Adobe Spark's video tool lends itself to students creating short Ken Burns-style documentary videos. Have them use Spark's search tool to find images to use in their videos or have them use a place Flickr's The Commons to find historical images. I've had students make this style of video to tell the stories of people moving west across the United States in the 19th Century. 
  • This is the time of year for end-of-school assemblies and celebrations. Use Adobe Spark's video creation tool to make a video of highlights of the school year. Rather than narrating the video you can use music from Adobe Spark's library. 
Page:
Page is the tool for creating simple web pages to showcase pictures, posters, videos, text, and links. 
  • Create an event invitation page. Create a page that outlines the highlights of an upcoming school event like a fundraiser or open house night. Include images of past events, images of prizes, or include a video about the event. Should you need people to register for your event, include a link to a Google Form. (Learn how to use Google Forms).
  • Create a digital portfolio. Spark pages provide a great format for digital portfolios. Students can organize their pages into sections to showcase videos they've made, documents they've written, and their reflections on what they've learned. 
  • Make a multimedia timeline. While it wasn't designed specifically for making timelines, Spark Page's formatting does lend itself to timelines. Ask your students to research a series of events, find media representative of those events, caption the events and media with dates, and then place them into the proper order.
  • Write an image-based story. Students can write a story about themselves by using pictures they've taken placed into a Spark Page. Another way to think about image-based stories is to have students search for images and use them as writing prompts. Ask them to choose five pictures and write a story that connects the images. 

Adobe Spark works in your web browser including on Chromebooks. Adobe Spark is also available as a series of iPad apps for Page, Video, and Post. 
online PD this summer

This post originally appeared on Free Technology for Teachers if you see it elsewhere, it has been used without permission.
30 May 18:28

How to Create a Progress Chart in Google Sheets - From the Archive

by noreply@blogger.com (Richard Byrne)
Due to an injury and some pressing personal matters requiring my attention, posts for the rest of the week will be favorites from the archive. New posts will resume on Monday.

Flippity provides a handful of great Google Sheets templates. I've featured their Random Name Picker, Flashcard, and Jeopardy templates in the past. The latest Flippity template that I've tried is their Progress Indicator template. With that template you can create a progress chart that will update whenever you update the data in the chart. In the video embedded below I provide an overview of how to use Flippity's Progress Indicator template.

online PD this summer

This post originally appeared on Free Technology for Teachers if you see it elsewhere, it has been used without permission.
18 May 14:39

Exploring and Learning with Google Expeditions

by Gail Moore
I don’t know about you, but when I was a kid, one of my favorite toys was the View-Master. I’m sure you know the one. That red toy that you put a thin cardboard disk in, pull the handle on the side, and step into a new scene with each arm pull. It was like being transported to a new world. Through the View-Master’s pictures, there was an excitement that I had for learning. Well fast forward 30+ years from my childhood, and I find myself with another View-Master, it’s name, Google Expeditions.


Back in February, I had the opportunity to host Google Expeditions at my school site. These expeditions are virtual trips that students can take to locations in and out of this world. A teacher, through the use of a tablet app, can lead students through ancient ruins, national monuments, or outer space. Exciting, right?!?!


To be honest, I wasn’t excited, I was terrified. When the kit arrived, I saw that there were so many cords and plugs. Would I be able to connect with all of the devices ? Would there be enough devices for all students? Would I break the red and white cases when trying to take the devices out to charge? All of these questions raced through my mind. As it turns out, the expeditions were a phenomenal success.

The screams of excitement, the “oooohs”, “ahhhs”, and “WOWs” of students as they looked through the Google Expeditions View-Master, was my favorite indication of success! It transported me back to my own childhood excitement. Students who don’t have an opportunity to travel to exotic places, were delighted to see and virtually interact with underwater sea creatures, “climb” Mount Everest, and explore the inside of the human body. Topics they were learning about in their textbooks, but laid static and two dimensional on a desk, were virtually brought to life.

To hold students accountable for their learning, they were instructed to work through a hyperdoc with video resources that supplemented the content of the expedition. Afterwards, students answered questions and completed a Google Form reflection log.


Here’s what I found to be the key to having a successful expedition, ditch the script. Though it gives students and teachers a great amount of background content information, your main goal shouldn’t be to read through all of the content, word for word, during the expedition. Give students time to be completely engulfed in the wonder and excitement of virtually exploring the world through Google Expeditions. It’s this natural, unabashed excitement that sparks their interest. When student interest is sparked, therein lies the flame that fuels authentic learning.


Canesha Wrathall
Elementary School
TOSA- Digital Learning Coach
Orange County, CA
16 May 19:12

20 New Ways to Use Google Classroom [infographic]

by Kasey Bell

The post 20 New Ways to Use Google Classroom [infographic] appeared first on Shake Up Learning.

20 New Ways to Use Google ClassroomExpand Your Use of Google Classroom

Google has opened up Google Classroom to users outside of G Suite for Education. Users with a personal Google account can now both join and create classes. This opens so many doors for teachers, students, and parents to connect, collaborate and learn.

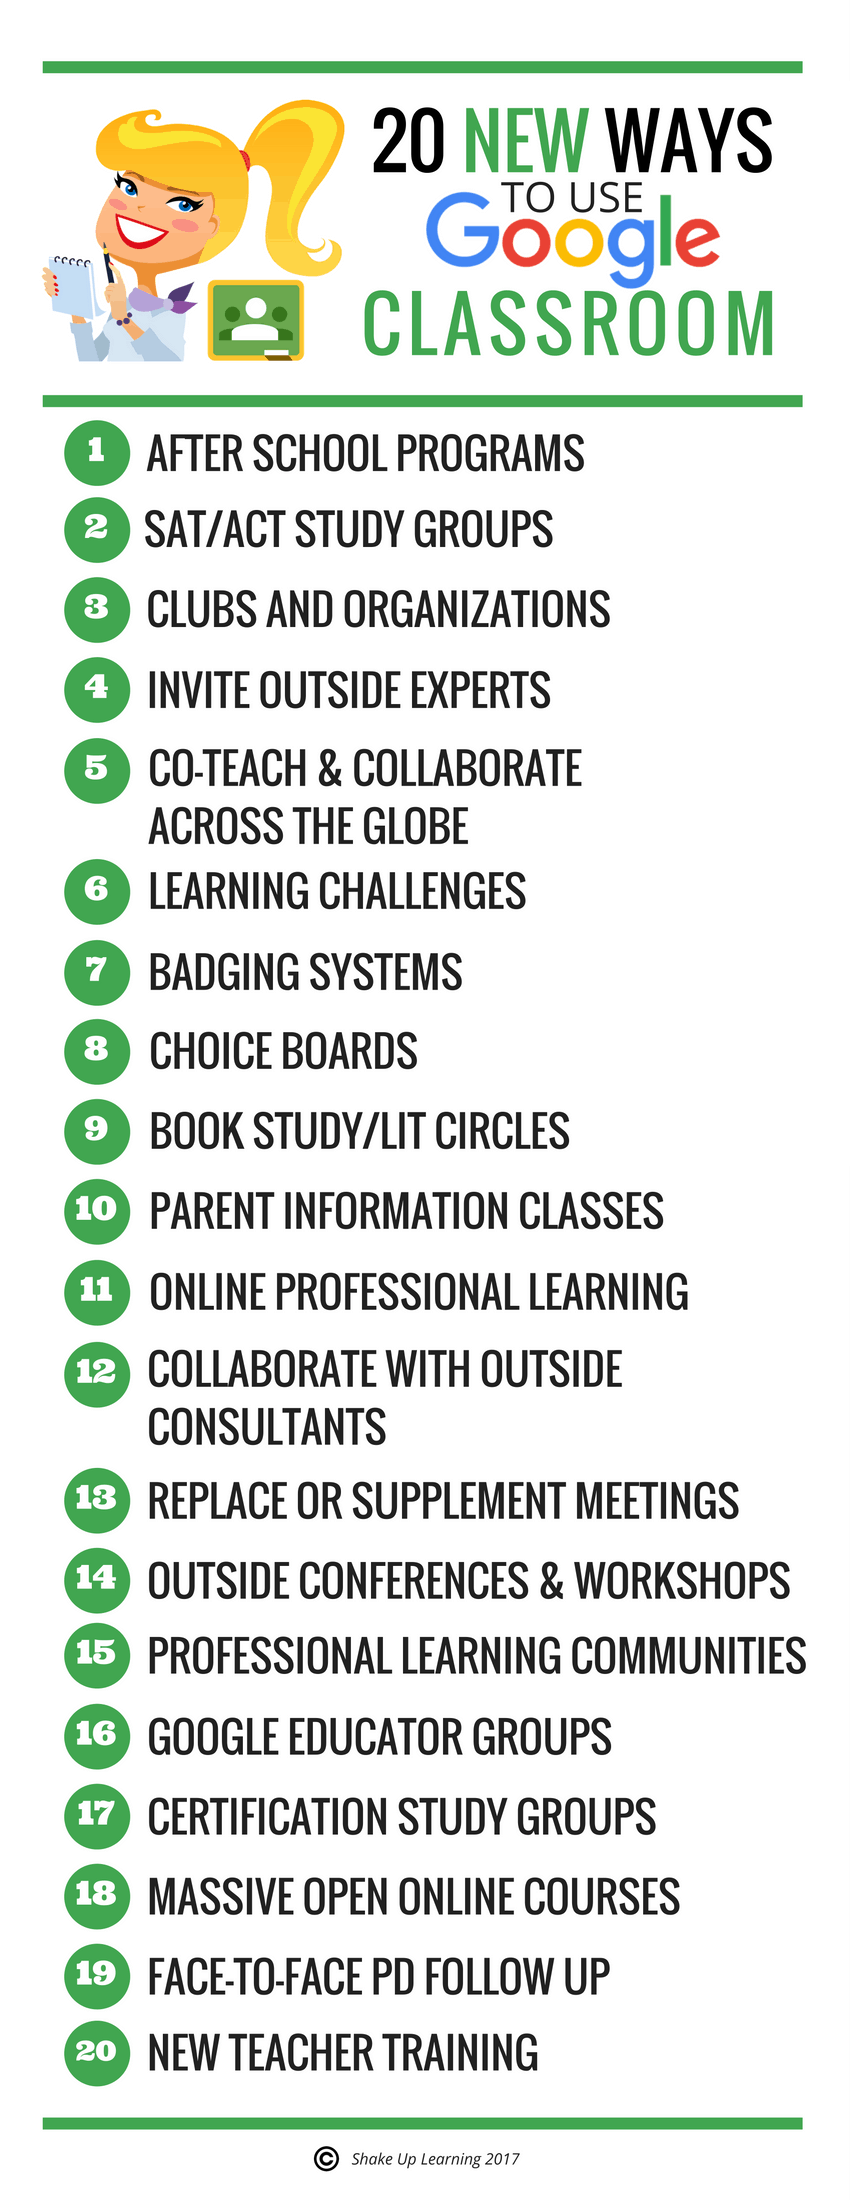
I have created this handy infographic with 20 New Ways to Use Google Classroom that goes beyond just the idea of using it for our everyday classrooms. I have also included details for each of the twenty ways in this blog post. Keep reading! I hope this will inspire you to think of other new ways to use Google Classroom.

I want you to understand how using Google Classroom outside of your G Suite domain works. It’s not a perfect system, but keep in mind that it was designed to protect students and your G Suite for Education accounts. Google opened up Google Classroom to even more learners, which gave users with personal Google accounts the ability to join or create classes within Google Classroom. BUT (and this is a big but), it all depends on the settings in your domain and what your school allows you to do with your G Suite for Education account.

I try not to get too technical on this blog, but it’s important to know there are certain domain settings that you will need to make some of the ideas in this post a reality. Discuss with the decision-makers at your school and/or your G Suite for Education administrator. If that happens to be you, here’s a support page to explain the new controls and settings in your admin console.

Depending on the settings at your school and the classes you are joining, some of these ideas may require that you use your personal Google account. For tips on toggling between personal and school Google accounts, see my tutorial video: You’re Doing it Wrong! How to Manage Multiple Google Accounts.


20 NEW Ways to Use #GoogleClassroom #gttribe #SUL #googleedu #gsuiteedu #edtech
Click To Tweet


20 NEW Ways to Use Google Classroom

1. After School Programs

Students and teachers are involved in many after school programs that could utilize Google Classroom to share resources and improve communication and collaboration. Think of ways this could be used in programs both in and outside of your own schools like the YMCA, tutoring programs, community sports, and libraries.

2. SAT/ACT Study Groups

When it comes time to prepare for the SAT and ACT, often times students will form study groups across the area or region. Think of how awesome it would be to use Google Classroom to share resources, flashcards, tips, practice tests, and feedback through the Google Classroom platform.

3. Clubs and Organizations

We can also use Google Classroom to help connect and share resources within our school clubs and organizations. What about a Student Council Class within Google Classroom? Or one for the Robotics Club, National Honor Society, Made with Code, Girls/Boys Scouts, etc. And think about using it for your adult organizations as well like church groups, alumni associations, intramural teams, and philanthropic organizations.

4. Invite Outside Experts into Your Class

Wouldn’t it be great to give students an authentic audience? What if you invited an outside expert into your special class project in Google Classroom? They could give meaningful feedback and connect and share with your students.

5. Co-Teach and Collaborate Across the Globe

Google Classroom allows you to add up to 20 teachers to one class. This means we can add co-teachers from across the hall OR across the globe. How fun would it be to teach and collaborate with another teacher on another continent?!!! Consider ways you can bring the world to your students by co-teaching with a teacher and group of students in another country.

6. Create a Class for Learning Challenges

As challenge-based learning grows in popularity, let’s think of ways that we can use Google Classroom to allow students and teachers to, “sign-up,” for optional challenges by joining a Google Classroom Class designed to detail the challenge, provide resources, and allow the user to submit their evidence for meeting the challenge.

7. Badging Systems

Digital Badging as become a fun way for teachers and students to show off their accomplishments. Organizing and tracking badges could easily be managed through Google Classroom. The details of the assignment could be shared through Classroom as well as offer a way for users to submit their evidence. Badging has become particularly popular for encouraging teachers to learn new tech skills. Be sure you check out these blog posts to learn more about how some districts are using badges for professional learning.


Great idea!! Use #GoogleClassroom for Badging! #googleedu #gsuiteedu #edtech
Click To Tweet


8. Choice Boards

Offering choice in learning is important for the K-12 classroom as well as adult and professional learning. What if we used Google Classroom Classes to offer choices. Each class could offer a different learning path, level of skill, and/or topic of interest. I think this is a particularly interesting way to engage teachers in professional learning but could also come in handy for students in the classroom.

9. Book Study/Lit Circles

It seems like educators are always doing book studies, whether that is a study within our own district or cross-collaborating with educators in other areas. Google Classroom would be a great way to communication, collaborate, share reflections and resources, and stay on top of reading deadlines. Of course, Google Classroom would also make a great tool for the lit circles within our classes and on our campus. Librarians and Media Specialists could also facilitate these on a campus level for outside reading.

10. Parent Information Classes

Streamlining the communication between the school and the parents can be a challenge, to say the least. We hold informational parent meetings about all kinds of initiatives like the rollout of a 1:1 program, opening a new school, bonds, transition to middle or high school, AP courses, etc. This list could go on and on. What if we supplemented these types of meetings with online classes for parents through Google Classroom? We can add videos, information, permission slips, resources, etc. inside the Google Classroom Class.


Oh!! You can use #GoogleClassroom with Parents! #googleedu #gttribe #edtech
Click To Tweet


11. Online Professional Learning

One of the most exciting ways that we can use Google Classroom, especially outside consultants and coaches like myself, is to offer online professional learning courses. I am #superexcited to start working on this idea! Now that I can invite teachers to join my Google Classroom Classes, I’m looking forward to offering new ways to connect and learn together!

12. Collaborate with Outside Consultants and Coaches

Many schools and districts will contract with outside consultants and instructional coaches to offer support and training for their teachers. Using Google Classroom should be a no-brainer for collaboration and learning between teachers and outside consultants. This way consultants can answer questions, share new and updated resources, and continue to collaborate with schools beyond a one-and-done workshop.

13. Replace or Supplement Meetings

Whether it’s a faculty meeting, department meeting, team meeting, or committee meetings, Google Classroom can offer a way to sometimes replace meetings or allow you to flip informational meetings. By recording informational videos and posting to Google Classroom, some meetings can be replaced altogether. Other types of groups that meet regularly can use Google Classroom to continue the conversation asynchronously, share important resources, docs, links, etc. Consider ways that you can use Google Classroom to streamline your meetings, become more efficient, and improve communication.

14. Outside Conferences and Workshops

Each Google Classroom Class allows for up to 1000 students. These means that Google Classroom could be used to provide supplemental information, resources, and follow-up for outside conference and workshops. Educators could share notes, links to presentations, and continue to collaborate beyond the conference or workshop.

15. Professional Learning Communities (PLCs)

Many schools have adopted Professional Learning Communities (PLCs) as a way of fostering collaborative learning among groups of educators. Each community could easily create their own Google Classroom Class to share ideas, reflections, resources and connect in new ways.

16. Google Educator Groups (GEGs)

Are you a member of a Google Educator Group (Google+ Communities)? You should be! GEGs are Google+ communities that connect you with other Google using educators in your area. I am co-leader of the GEG for North Texas (GEG-NORTX). We have face-to-face events, meet-ups, and even offer some learning opportunities via Google Hangouts. Using Google Classroom we could extend that connect and learning and offer a one-stop-shop for resources and collaboration.

17. Certification Study Groups

Whether you are studying for the Google Certified Educator exams or preparing for other teaching certification exams, Google Classroom offers a great way to support your studies. Inside Google Classroom, you can share study materials, ask questions, and support each other as you prepare to master your certification exams.

18. Massive Open Online Courses (MOOC)

As mentioned above, you can have as many 1000 students enrolled in one class in Google Classroom. MOOC’s are usually free online courses offered by universities with no limit on enrollment. With Google Classroom, free, open online courses can be created and shared. I haven’t seen this done yet, but I believe it is a possibility with the new open features of Google Classroom.

19. Face-to-Face PD Follow Up

One of the biggest complaints about professional development is the lack of follow-up. Google Classroom would be a great way to follow-up on professional learning and workshops. This is an excellent way to talk about classroom implementation and share examples, reflections on what worked and what didn’t, and continue the learning beyond the workshop.

20. New Teacher Training

My first year of teaching was the hardest–by far! Most schools offer new teacher training and orientation for teachers that are new to the profession or new to the district to learn the ins and outs of procedures, tools available, and school initiatives. Let’s leverage Google Classroom to deliver some of the new teacher training, offer support and guidance, and a way for new teachers to connect with each other.


Love the idea of using #GoogleClassroom for New Teacher Training! #googleedu #gttribe #edtech
Click To Tweet


What do you think? What would like to try or add to this list? Please leave a comment below.


Become a Google Certified Trainer E-CourseBecome a Google Certified Trainer E-Course

Learn all you need to know about the trainer assessment and application! This is the e-course you have been waiting for: the course to help you on your journey to becoming a Google for Education Certified Trainer! Becoming a Google Certified Trainer was one of the best decisions I ever made, and it transformed my learning and my career!

CLICK HERE to learn more about the e-course!


This self-paced, e-course includes EVERYTHING you need to know to pass the Trainer Skills Assessment AND complete the application requirements, including:

  • 35+ Video Lessons (including archived lessons)
  • Private Google+ Community
  • Tips and Tricks
  • The Ultimate Google Certified Trainer Planner
  • VIP BONUSES!
  • and much more!

Learn more: BecomeAGoogleTrainer.com


© Shake Up Learning 2017. Unauthorized use and/or duplication of this material without express and written permission from this blog’s author and/or owner is strictly prohibited. Excerpts and links may be used, provided that full and clear credit is given to Kasey Bell and Shake Up Learning with appropriate and specific direction to the original content on ShakeUpLearning.com. See: Copyright Policy.

The post 20 New Ways to Use Google Classroom [infographic] appeared first on Shake Up Learning.

16 May 18:05

Compliance is Not the End Goal of Education

by George

Recently, I was listening to a teacher talk about their more “traditional” view of education, and how “compliance” wasn’t a bad thing for students. Even going a step further, saying students should be “obedient”.

I cringed a little.  Okay, maybe a lot.

First off, let’s look at the definition of “obedient”:

obedient – complying or willing to comply with orders or requests; submissive to another’s will.
Is this what we really want from our students?  That they are simply submissive to the will of their teachers?  Do we want to develop generations of students that will challenge conventional ideas, think for themselves, or simply do what they are told?  I do not know many teachers who would want to be “obedient” to their principals.  We teach the “golden rule” to our students; we must follow it ourselves.
So let’s look at the word “compliant”.
compliant – inclined to agree with others or obey rules, especially to an excessive degree; acquiescent.
Is compliance a bad thing to teach in education?  Not really. In some ways, people have to be compliant.  Think of tax season.  You have to be compliant with the rules that are set out by your government.  As educators, there are times that we have to be compliant in our work as well.  You have deadlines that you have to meet (ie. report cards).  Compliance is not a bad word, but it should not be your end goal in education.  My belief is that we need to move beyond compliance, past engagement, and onto empowerment.
Screen-Shot-2015-01-07-at-7.59.52-PM
These ideas are not separate, but in some ways, can be seen as a continuum.
Let’s go back to the word compliance.  Has that really ever been the end goal of schools? Maybe as a system overall, but I think the best educators have always tried to empower their students.  They know that if you are truly good at your job as an educator, the students will learn to not need you eventually. That is why “lifelong learning” has been a goal in education forever.  If we truly want our students to be “compliant” when they walk out of schools, they will always need someone else’s rules to follow.  To develop the “leaders of tomorrow”, we need to develop them as leaders today.
Focusing on “empowering” students is seen by some as “fluffy”; students just show up to school to do whatever they want.  This is not my belief at all.  Empowering students teaches them to have their own voice and follow their own direction, but if they are going to be successful, they will need to truly have the discipline (using the definition, “train oneself to do something in a controlled and habitual way”), to make it happen.  “Empowerment” and “hard work” are not mutually exclusive; in fact, both elements are needed to make a true difference in our world.
Think about how many of our kids in school talk about becoming “YouTubers”.  If you truly want to make that happen, you do not apply to some job, but you will have to focus on creating content consistently over time while building an audience.  This might be your dream, but to make it happen, there is a lot of work to be done. Becoming a content creator allows you to follow your own path, yet to be successful, hard work is needed.
I love this quote:
“Hard work does not guarantee success, but lack of hard work guarantees that there will be no success.” Jimmy V
Helping students find their own paths, not the ones we set out for them, has always been the focus in education, yet we need to be more explicit about this path. We all want our students to be respectful to educators and peers, but hopefully, we all want them to walk out of school, become intrinsically motivated, and find their own ways to success and happiness.  Compliance is sometimes a part of this, but it is not the end goal.  Are we trying to develop students to fit into our world, or are we hoping that students feel that they have the power to create a better world, now and in the future?
“The people who are crazy enough to think they can change the world are the ones who do.” Steve Jobs
10 May 20:29

Image Template for Google Forms Header

by Wanda

I always have the hardest time getting a custom image header the right size in Google Forms (the “new” Google Forms, of course). I made this Google Drawing template for my use but am making it available to anyone else needing it.

Get your own copy by going to http://bit.ly/formimagetemplate. Instructions are on the sides of the drawing but here is how it works.

The image canvas is set to be 1600 x 400 pixels. There is a rectangular area that represents the center top above the form. If you put your design elements there, you will be a-ok. When you have that area the way you want it, you can delete the rectangle (unless you want to keep it visible on the form). Then, download the image as a PNG. When you upload the image into the color palette on the Google Form, set the cropping markers to match the layout of the canvas on the template.

Here is a quick video – no audio – showing the process.

10 May 00:58

Save Your Sanity with a Things to Revamp for Next Year List

by Catlin Tucker

Some teachers will probably hate me for even mentioning next year when we still have a month of school left, so my apologies for those of you who don’t have the bandwidth to think about it yet. However, I find myself feeling the same way every year around this time. I experience a mix of guilt, frustration, and exhaustion. I feel guilty about all of the things I didn’t get to or all of the aspects of my teaching that could have been better. I feel frustrated by the routines that did take and my students’ unwillingness to buckle down in the last month of school to finish strong. And, I feel exhausted by all of the mental, emotional, and physical energy that has gone into my work this year.

I’ve developed a strategy for managing my mixed emotions as we head into the final few weeks of the school year. I create a “Things to Revamp for Next Year” Google Document to reflect on the year and brainstorm new strategies, routines, lesson ideas, project concepts, and skill labs that I want to build into my classroom and curriculum next year.

I find this strategy helpful on two fronts.

First, it helps me feel like I’m in control of my teaching reality when I actually feel like things are a little crazy and out of control. The end of the year feels like a tidal wave. There is so much to do and not enough time to do it all. Adding items to my revamp list allows me to identify the aspects of my current teaching reality that aren’t working well and gives me a place to articulate how I can make them better next year.

Second, I know that when I leave my classroom for summer the pain points I’m experiencing right now won’t be as poignant. I want to capture my thoughts about how to improve my teaching practice for next year while I’m feeling the pain. When I am stressed out or feeling frustrated, I tend to organically think of a multitude of different ways to improve my current situation, so I want to capture those great ideas for next year.

This is a simple sanity-saving strategy that I’ve come to lean on in my moments of desperation at the end of the school year, so I wanted to share it with other teachers who might also be feeling down or being too hard on themselves. We have to remember that we do the best we can every day. There is always room to improve, but we have to appreciate all that we are currently doing for our students.

10 May 00:57

Desmos Now Embedded in Year-End Assessments Across the United States

by Dan Meyer

Amy X. Wang, writing in Quartz:

Enter Desmos, a San Francisco-based company that offers a free online version of TI’s graphing calculator. Users across 146 countries, most of them teachers or students, are currently logging 300,000 hours a day on the platform—and today, Desmos announced a major partnership with testing consortium Smarter Balanced, which administers academic exams in 15 US states. Beginning this spring, students in those areas will use the online tool in math classrooms and on statewide performance assessments.

When students take their year-end assessment in 15 states, they’ll see the same free calculator they’ve been using at school and at home the rest of the year. That assessment will more closely reflect what they know, rather than what they were able to express through unfamiliar or costly technology.

USA Today has the reaction quote from Texas Instruments president Peter Balyta:

Peter Balyta, president of TI Education Technology and a former math teacher, defended the purchases, saying a TI calculator “is a one-time investment in a student’s future, taking students through math and science classes from middle school through high school and into college and career.” He said TI’s technology is evolving, but that models like the TI-84 Plus come with “only the features that students need in the classroom, without the many distractions that come with smartphones, tablets and internet access.”

This is interesting. In a world where more and more assessments are delivered digitally (and pre-loaded with digital calculators) the sales pitch for hardware calculators is their lack of features, rather than their abundance.

There is clearly a market today for a calculator that lacks internet access. Around 20% of teachers in my survey said they wouldn’t let students use mobile devices on exams for reasons of “test security” and another 10% cited “distraction.”

Open, interesting questions:

  • Are those figures trending upwards or downwards?
  • Will schools and parents continue to pay Texas Instruments an estimated 50% profit margin for more test security and fewer distractions?
  • How do math coaches and instructional technologists help teachers harness the advantages of the internet while also managing concerns about security and distraction?

2017 May 12. Peter Balyta makes a longer case for hardware calculators, one which won’t surprise anyone who has followed this discussion. He mentions (1) lower cost, (2) fewer distractions, (3) greater test security, (4) more features, and (5) availability on tests.

08 May 15:30

How to Create a Flowchart on Padlet

by noreply@blogger.com (Richard Byrne)
Late last month Padlet introduced a handful of new features. One of those features is the option to show connections between notes on a Padlet wall. Connector lines are now available to show the connections between notes. The connector lines can be used on Padlet walls that you create entirely by yourself and on Padlet walls that are created collaboratively. Watch my video embedded below to learn how to create a flowchart on Padlet.

learning & lighhouses

This post originally appeared on Free Technology for Teachers if you see it elsewhere, it has been used without permission.
05 May 13:18

360 Video Spotlight: Mount Everest Virtual Reality from LIFE VR

by Monica
360 Video Spotlight Mount Everest Virtual Reality from LIFE VR

Although it’s warming up here in the northeast I definitely felt a chill as I watched these fantastic 360 videos from LIFE VR. With this collection of four video clips you can introduce students to a Mount Everest virtual reality experience. Students will follow the journey of climbers from preparation at home to making it…

The post 360 Video Spotlight: Mount Everest Virtual Reality from LIFE VR appeared first on Class Tech Tips.

05 May 13:17

3 Misconceptions About Innovation in Education

by George

“Innovation” is one of the most used words in education right now. It is something that I am obviously passionate about, hence the reason I wrote the book, “The Innovator’s Mindset”.  I am scared that we use the word “innovation” in the wrong way when there is power to this type of thinking. Words do not become “buzzwords” because they are used too frequently; they become “buzzwords” when they are used frequently in an incorrect manner.

Here are some misconceptions about the word that we need to dispell to protect “innovation” in education from becoming a buzzword.

  1. Innovation is about how you use technology. Nope…this is incorrect.  My belief is that this happens because a lot of technologies that are advertised are deemed innovative, which can be true.  But innovation is a way of thinking, not simply the way we use technology.  For example, is using a “scantron” to mark multiple choice exams innovative?  It is definitely convenient, but does this lead to better learning in the classroom?  My answer is that it could actually lead to worse learning, faster. Students do not necessarily become better learners, but better test takers. I am not about absolutes, so if you do a multiple choice exam here and there, I am fine with it, but it is not innovative.  Using a SmartBoard; innovative or doing the same thing we were doing before, just “cooler”?  There are a million ways that you can use google forms, but the ability to use “google forms” is not innovative’; it is what you do with it that creates the innovative practice in the classroom.
    That being said, there are many ways that educators are innovative without using technology. Look at EdCamp. This has become one of the best ways that educators have taken ownership of their own learning yet technology is not necessarily at the forefront of this process; it is the process of the professional learning that is innovative.
    Dispell the myth that “technology equals innovation” and you will see more educators seeing that many things they are doing in classrooms right now are extremely innovative, with or without technology.Innovation is about “mindset”, not skill set.

    screen-shot-2015-10-01-at-12-38-19-pm

    This leads to the next misconception.

  2. Innovation is reserved for the few. Again, no.  If innovation is about “doing new and better things”, why would this only be reserved for the few?  This does not mean you get rid of what you were doing previously, but always evaluating is it working for your students.  Many people will stick with things because they know them, not because they are better.  This is human nature and happens in relationships all of the time.  It is the same for personal as it is for professional.The process of innovation in teaching and learning is something that all educators should aspire to. Here is an image that may help you see why it is important.Process-of-Innovation
    Are there only a few educators in your organization that should look at the process of teaching and learning this way, or everyone?  This is not something that should be done by the few but should be the norm in school.
  3. Innovation is solely a “product”. People believe the iPhone was innovative. It is in some ways.  Yet it is the thinking that created the iPhone in the first place that was the innovation.  Someone had to have a vision of what a “phone” could be, but when you look at the innovation of mobile technology, this has led to other innovations. Uber, AirBnB, iTunes, and a myriad of other developments were created because smartphones were created.  Innovation happens in the thinking to create these things in the first place; they did not come to fruition on their own.  Many people have great ideas, but making these ideas happen is the innovation.  Creativity leads to innovation, but I have met many “creative” thinkers who do not make things happen.

As I have stated numerous times, innovation should not be reserved for the few, but become the norm in education. It trickles into how we do everything, whether that is assessment practices, leadership, professional learning, how we use technology, and so many other areas, but ultimately in teaching and learning.  The first step to getting people to move there is to see that this is not an individual effort, but a team sport.

(If you are interested in learning more about “innovation in education”, I would encourage you to read my book, “The Innovator’s Mindset“, if you haven’t already.  The hope is that we see innovation become the norm in education, not reserved for the few.)

04 May 15:40

Growing Up Good at Math

by Great Minds

by Miko McDaniel, Eureka Math Curriculum Developer

“When did you get so good at math?” I asked my 12-year-old son, Tucker, and he couldn’t contain his smile.

Eureka Math Curriculum Developer Miko McDaniel with her son Tucker.

Starting Eureka Math

In the fall of 2013, Lafayette Parish Schools in Louisiana implemented Eureka Math. I was part of a team of math coaches tasked with helping teachers transition to the new math standards as well as this new curriculum. I began to study the curriculum and quite honestly, just let Eureka Math teach me. Embedded in each module were vignettes, explanations, drawings, and sequences of problems that told the story of mathematics in a brand new way, a way that deepened and sharpened my own understanding of math. This was not the way I learned it in school. I used my new learnings to assist the teachers in Lafayette Parish. The job expanded quickly beyond assisting teachers, to supporting our entire community. Families across the district were struggling to help students with homework, even at the elementary level.

Our math coach team employed many different strategies to address the rising concerns of the community regarding this “new math.” We teamed up with neighboring districts and wrote topic newsletters so teachers could send something home that explained the math. We also answered questions at family math nights and brown bag lunches, and even presented at a local pizza parlor while people were eating dinner, PowerPoint and all. One of the ways we responded to parent needs was by creating a homework help area on our district’s website. The vision was to have short YouTube videos explaining some of the new math models students were using in class with one of our first real challenges involving the teaching of tape diagrams. Tape diagrams are visual math models in Eureka Math that use rectangles to represent parts of a whole or parts of a ratio. I set out to make a video explaining how tape diagrams work. My son, Tucker, was just starting to use them in his 4th grade class and without much coaxing, he volunteered to explain tape diagrams for my video. His little video now has thousands of hits, and parents in our community have found it, and others like it, very helpful. You can see the video for yourself here.

Miko McDaniel’s son, Tucker, demonstrating how to use tape diagrams to solve a math problem.

Tucker’s Eureka Moment

Fast forward to now — Tucker’s in the 7th grade. A while back, he was doing math homework and I noticed some tape diagrams on his paper. Just out of curiosity, I asked him to explain a few of them to me. He was calculating percent and his explanations were right on point. “When did you get so good at math?,” I asked him. He understood not only the ‘what’ of the math he was doing, but also the how and why.

Since Tucker did such a superb job explaining his work, I asked if he’d like to make another tape diagram video — this time for older kids and their families. He couldn’t wait to get started on this one.

Tucker demonstrating tape diagrams for older students and their families.

At age 12, I think I would have freaked out at the thought of having to make a video explaining how to calculate percentages. Tucker doesn’t have the same anxiety that I and many of my peers had growing up. The math instruction he gets in class is challenging, but he uses logic and understanding and mathematical models like tape diagrams to overcome those challenges, all of which, add to his confidence and ability. Tucker is growing up good at math!

Future Opportunity

With Eureka Math, he learns to think and strategize; he learns to solve problems not just get answers. Middle schoolers, like my son, will be faced with major problems in their futures, such as population growth, environmental changes, and energy demands. This requires society to produce thinkers and Eureka Math is a tool that can help develop them.

Parents often tell children they can be anything they want to be when they grow up. Yet, I remember so many of my college friends changing their majors to ones that had fewer, less difficult math requirements. Tucker’s future will no longer be limited by a lack of math confidence or ability. Now, for Tucker, and so many students like him who grow up good at math, the possibilities are endless.

___________________________________________________________________

Before becoming a Curriculum Developer with Great Minds, Miko McDaniel was a math instructional coach in Lafayette, Louisiana, where she helped her district implement Eureka Math. Miko also taught fourth grade math and science at Westside Elementary prior to becoming an instructional coach.

Tucker, Miko’s son, is a 7th grader at Paul Breaux Middle School. He loves to play basketball, likes theatre, and throws shot put and discus for his school’s track team. And he likes math most of the time.


Growing Up Good at Math was originally published in Eureka Math on Medium, where people are continuing the conversation by highlighting and responding to this story.

03 May 15:23

What is the experience our students tell others about their time in school?

by George

The following is an excerpt from Jeff Bezos (CEO and founder of Amazon) and the annual letter to his shareholders:

“Jeff, what does Day 2 look like?”

That’s a question I just got at our most recent all-hands meeting. I’ve been reminding people that it’s Day 1 for a couple of decades. I work in an Amazon building named Day 1, and when I moved buildings, I took the name with me. I spend time thinking about this topic.

“Day 2 is stasis. Followed by irrelevance. Followed by excruciating, painful decline. Followed by death. And that is why it is always Day 1.”

To be sure, this kind of decline would happen in extreme slow motion. An established company might harvest Day 2 for decades, but the final result would still come.

I’m interested in the question, how do you fend off Day 2? What are the techniques and tactics? How do you keep the vitality of Day 1, even inside a large organization?

Such a question can’t have a simple answer. There will be many elements, multiple paths, and many traps. I don’t know the whole answer, but I may know bits of it. Here’s a starter pack of essentials for Day 1 defense: customer obsession, a skeptical view of proxies, the eager adoption of external trends, and high-velocity decision making.

True Customer Obsession

There are many ways to center a business. You can be competitor focused, you can be product focused, you can be technology focused, you can be business model focused, and there are more. But in my view, obsessive customer focus is by far the most protective of Day 1 vitality.

Why? There are many advantages to a customer-centric approach, but here’s the big one: customers are always beautifully, wonderfully dissatisfied, even when they report being happy and business is great. Even when they don’t yet know it, customers want something better, and your desire to delight customers will drive you to invent on their behalf. No customer ever asked Amazon to create the Prime membership program, but it sure turns out they wanted it, and I could give you many such examples.

What does this mindset have to do with education?

Some people will shun ANYTHING that comes from business because they will say “schools are not a business”.  I agree to some point. Profit is not the bottom line of education, but if you can’t apply and learn from the lessons of success from others, and make your own connections, ultimately our students lose out.

The “obsessive customer focus” that Bezos speaks of, is the same reason I have been challenging people for years to start from the question, “Would you want to be a learner in your own classroom?”  This is not a one-off question, but something that we should ask ourselves daily. It should be something posted in our schools and classrooms.  Even moving further, “What is the experience our students tell others about their time in school?”  This ties into the first question, but it also helps others understand that the experience of school is something that every person in our organisations helps to create.

This is not asking what would work best for you (the adult). It is asking you to try your best to understand your students, their realities, their viewpoints, and take that learning and create something meaningful for them.

This is why I wrote about “8 Things to Look For in Today’s Classroom”.  The term “today” focuses on what the students in front of you need.  We talk about preparing our students for the future, but that often comes at the cost of ignoring who is in your room today.  They need you to be your best, and at your “Day 1” right now.  You only have one opportunity to work with the students you have this year.  Today’s classroom is understanding to serve the future, you focus on serving your students in the present. They are the future.

I will continue to look at this image and think about how I can iterate it to move forward while digging deeper in each area:

8 THINGS TO LOOK FOR IN TODAY'S CLASSROOM (Badura)

What is irrelevant? What do we need to add or subtract?  If I am focusing on “Today’s Classroom”, I have to be open to my learning changing as well.

Some people will take this as I am saying that schools are not good enough. I take this notion of “Day 1” as always growing.  Remember, Jeff Bezos started Amazon out of his garage, by only selling books. They are continually evolving to become better, even piloting “brick and mortar” stores.  This also doesn’t mean we need to revamp what schools do every single day. Remember, Amazon still sells books, but much of the company looks different from its original inception.  We need to figure out when to go deep, when to iterate, invent, and/or reinvent.  Focusing on who we serve first and moving backwards from there will always help you to figure those things out.

Innovate or die.

This isn’t about “are we good enough?”; the focus is on continuously getting better and understanding who you serve, and what you do to serve them.  If you move backwards from there, you will always be at “Day 1”.

03 May 15:22

It Is Time to Move Away From the Idea of “Tech Leads”?

by George

Just some random thoughts…

Right now, there are many plans in schools or districts on “effective technology integration”.  What is great about these plans is that they are now really focusing on professional learning for all staff to bring them up to speed, and provide a comfort level on the use of technology.  What I struggle with is that they are too focused on professional learning for technology, not new and better ways of teaching and learning.

Another component that I am struggling with is the number of “tech leads” that are popping up in districts (or titles that are similar).  The focus often is these people will come and help teachers meaningfully integrate technology into their classroom context, yet this is not always the case.  For many people that have “technology” in their title, no matter the role, it means to other people “please come fix things in my classroom that use electricity”.

Another concern is that when “technology” is in the title of a position that is not about IT, it almost forces you to find ways to use technology in a classroom setting, whether good or bad.  Go to a conference and someone uses Kahoot in a session, and then suddenly you have Kahoot parties popping up all over your school. Is this leading to deeper learning, or simply using technology more in classrooms for the sake of justifying a position?

Finally, I also have a concern that the “techies” and those leading in curriculum see their roles as separate.  Why separate these jobs instead of connecting them?  They need to work in collaboration with one another (or see their roles as very similar).  There are people reading this right now thinking, “our technology leads and curriculum department work great together”. Kudos to you, because this is often not the situation.

This is why the term “Innovative Teaching and Learning Leads” is one that is so appealing to me.  This focus on “innovative” (doing new and better things) leads focusing on teaching and learning means that you are not simply trying to find ways to implement technology, but you are looking for better ways to teach and learn.  By the way, you can’t just replace the word “technology” with “innovation” and then magic happens. The role and focus will have have to change.  Yet, how often do you see curriculum titles changing to focus on “innovation”? It is usually the “techies”, which ultimately leads to the misconception that “technology equals innovation”.

I am not saying that technology is not important.  Although I love technology I do not feel comfortable being associated with the idea that I am an “EdTech”; it has never been my focus. My focus has always been on teaching, learning, and leadership. I just understand that technology is such a major factor in our world today, that I have to continually grow in my use of it, but ensuring it is implemented is not my driver.  Better ways of teaching, learning, and leadership are the focus. Isn’t that ultimately what you are trying to do? Does the title of your role suggest something else?

Is your focus technology or new and better ways of learning-

02 May 16:06

10 Math Tutorial YouTube Channels Not Named Khan Academy

by noreply@blogger.com (Richard Byrne)
One of the most popular posts of all time on this blog featured math tutorial YouTube channels for high school and college students. That post was originally created as a response to an email from a reader who was seeking suggestions for math videos that were not on Khan Academy. This evening I took some time to update my list of math tutorial channels on YouTube that are not Khan Academy. Here's the new list.

Yay Math! features an excited teacher teaching mathematics lessons to his students. The videos capture just the teacher and his whiteboard with some feedback from students. The videos cover topics in Algebra and Geometry. You can check out the Yay Math! companion website to learn more about Robert Ahdoot, the teacher featured in the videos.

WowMath.org is developed by high school mathematics teacher Bradley Robb. His YouTube channel has more than six hundred videos covering topics in Algebra and Calculus. You can access the videos on a mobile version of WowMath too.

Patrick JMT offers of hundreds of videos covering topics in Algebra, Trigonometry, and Calculus. The channel also includes tips for answering math questions on the SAT and on the GED.

Numberphile is a neat YouTube channel about fun number facts. There are currently thirty-three videos in the Numberphile collection. The videos cover things like 998,001 and its Mysterious Recurring DecimalsPi and Bouncing Balls, and 1 and Prime Numbers.

Bright Storm is an online tutoring service. On their YouTube channel Bright Storm provides hundreds of videos for Algebra I, Algebra II, Trigonometry, Precalculus, and Calculus. Bright Storm also offers some SAT and ACT prep videos.

Ten Marks is another online tutoring service that offers mathematics tutorial videos on their site as well as on their YouTube channel. Some of the lessons in their playlists include lessons on units of measurement, decimals, fractions, probability, area and perimeter, and factoring.

Math Class With Mr. V features seven playlists made by a mathematics teacher teaching lessons on basic mathematics, geometry, and algebra. In all there are more than 300 video lessons. Like most mathematics tutorials on YouTube, Math Class With Mr. V uses a whiteboard to demonstrate how to solve problems.

The Open University is one of my go-to YouTube channel for all things academic. A quick search on The Open University reveals seven playlists that include lessons in mathematics. The lessons that you will find in these playlists are more theoretical than they are "how to" lessons.

The New Boston is primarily a channel for computer science lessons, but it also has some good playlists of geometryalgebra, and basic mathematics lessons.

Math Doctor Bob's YouTube channel offers nearly 700 video lessons on statistics, algebra I and II, calculus, geometry, and much more. The lessons feature Doctor Bob giving the lesson in front of a whiteboard so you see him and don't just hear his lessons.
learning & lighhouses

This post originally appeared on Free Technology for Teachers if you see it elsewhere, it has been used without permission.
18 Apr 17:47

3 Strategies for Using G Suite for Education in the K-3 Classroom

by kate

G Suite for Education provides opportunities for students of all ages to learn and grow.  When combined with a Chromebook or laptop, the core G Suite programs create a powerful platform for learning.   By designing interactive learning experiences for students in the K-3 classroom with G Suite, we also provide opportunities for students to start building the skills that they will need to be successful in the intermediate grade levels and in our digital world.

Google Drawings for Interactive Activities

By engaging students in Google Drawings learning experiences, teachers are creating opportunities for students to engage in sequencing, classification, evaluating, analyzing, as well as demonstrating their understanding of math, language, social studies, or science concepts.  Additionally, students are interacting with icons and menus, strengthening their touchpad or mouse skills, and navigating Google Drive as they work with files and folders.  These activities also provide opportunities for students to begin to explore concepts such as URL, website, hyperlink, and file.  Building working definitions for these concepts is a key component in successfully navigating more complex systems and sequences.

Google Drawings provides a blank canvas for generating almost anything!  It combines a drawing interface in which images can easily be moved and positioned with text boxes, creating a simple desktop publishing environment.  Additionally, with all the same features as Docs — such as sharing, comments, revision history, and the explore tool — Google Drawings has great power!  

Google Drawings provides gray space on either side of the drawing canvas where teachers can place images, text boxes, and other elements that can later be manipulated by students.  Teachers can create a wide variety of interactive learning experiences in which students move images and text around as they work through sequencing and classification activities.  Follow the links to see examples of both.

Using the new Explore function in Google Drawings, students can also search for images to complete graphic organizers, charts, or diagrams.  Even math activities can be created easily using Google Drawings.  Using the Insert Shape function, teachers can construct simple math manipulatives such as base-ten blocks or images representing coins.  Tables can also be inserted for activities such as place value and simple data charting.  

Google Forms with Image Responses

Google Forms has recently added the capability of inserting images as responses.  For our youngest learners who may still be developing their reading skills, the option to associate an image can help them decode the written word.  One example of a form for younger students might be a Morning Check-in.  Second grade teacher Stacy O’Sadnick uses a morning check-in form with her students to get a better feel for how they are feeling each day.  Stacy said that the answers in the form help her better meet her students’ needs.  Another example of a Google Form for young students is a book vote or a shape recognition activity.  Dawn Johnson, a Kindergarten teacher in Northern Illinois, uses Google Forms to create money recognition activities for her students.   These activities are excellent formative assessment opportunities, helping to make student understanding and perspective visible to the teacher.

Google Slides to Make the Physical Digital

Although it is important to expose our K-3 students to digital learning environments and experiences, most of their day will be spent physically DOING.  Primary students write, draw, cut, paste, move, sing, speak, and listen.  The artifacts of learning that are created most frequently are physical – not digital.  However, recording and chronicling these artifacts can be a great use of the opportunities created by G Suite and a Chromebook or laptop.

In Google Slides, the Insert Image option allows users to Take a Snapshot from the webcam of their laptop or Chromebook.  By using this option to take pictures of physical artifacts of learning, students can record their work.  This activity could be the beginning of a digital portfolio that might be used to chart growth and development over time and possibly shared with parents.   But it could also just be an opportunity for students to practice skills such as taking digital pictures with the computer, inserting those images into slides, creating new slides, and typing letters into text boxes.  

G Suite for EDU provides a platform for a wide variety of activities for K-3 students. Manipulating images and text in a drawing environment, responding to images in formative assessment activities, and making physical artifacts digital through the use of the webcam are just a few of the ways that G Suite can help students build the skills they need to be successful in our digital world!

The post 3 Strategies for Using G Suite for Education in the K-3 Classroom appeared first on EdTechTeacher.

06 Apr 20:11

Google Cultural Institute – Famous People

by Jennifer Carey

search fieldsIf you haven’t been to Google Arts & Culture lately (previously Google Art Project), then check out some of the new features. I recently discovered that you can organize and search by: Historical events, Historical figures, and Places. As a history and social studies teacher, this is a great feature. For example, if I’m teaching Ancient History, I can do a search for Alexander the Great and pull up a series of images, maps, quotes, and more that are in the Google Arts & Culture database. Likewise, I can search for his famous victory during the Battle of Issus and pull up corresponding works of art. It’s a great tool to explore visual resources on various topics.


05 Apr 16:04

Awesome Assessment App Smash: Google Drawings and Google Forms

by kate

In my work as an instructor for EdTechTeacher, I have the pleasure of working with teachers from all over the country in both face-to-face workshops and online learning modules. As the teachers and I work together to explore new ideas, strategies, and tools, we learn and grow together.

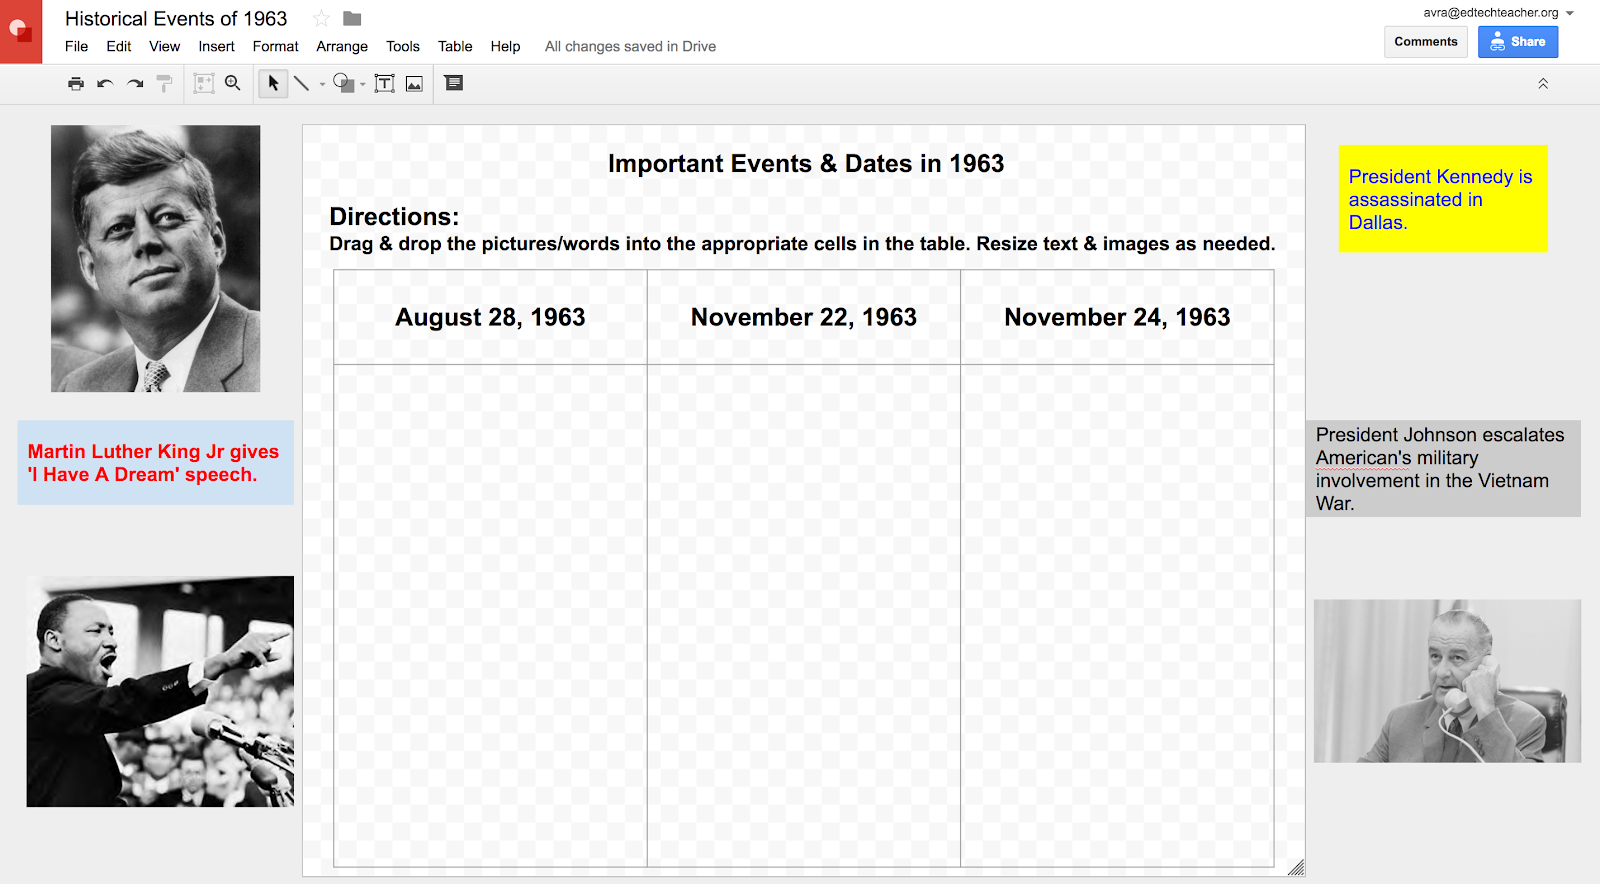
Recently, a Webster Public Schools cohort of teachers were exploring Google Drawings in an online learning module I created. As we discussed ways to utilize Google Drawings in an educational setting, we explored student and teacher uses of the program. Through our discussions, I began to consider how the combination of Google Drawings and Google Forms could be a powerful way for teachers to customize assessments in ways that students will more successfully decipher and learn from them.

One of the science teachers at Bartlett High School, Shari McCarthy, created an awesome image of a cell that she shared with the group in the discussion forum. She challenged her Biotechnology students to create a similar drawing. The requirements for the “Cell-fie” project included creating a “well-labeled model drawing of a plant or animal cell that clearly identifies the structure and function of the organelles in a cell.”

In her discussion post, Shari explained:,
“I actually used this Google Drawings module to reinvent an old lesson. In Biotechnology, students need to know the main organelles of the cell, something they have studied in biology since middle school. There are various ways on the web to practice cell organelles and their functions, but I tweaked a lesson to include google drawings. Here is my example and a screen shot of the assignment. The students were given the option of this Google Drawing assignment or a hand drawn ‘cell-fie’. The submissions were about a 50/50 split. I also allowed students to try other online drawing programs if they chose.”

As we corresponded about her “Cell-fie” project, Shari explained that she really liked using Google Drawings because most standardized tests use obscure, rudimentary drawings that never resemble the textbooks. She felt that this type of activity requires student interpretation – a skill that they rarely get to practice.

The concept of using a teacher-made image that was created or annotated in Google Drawings immediately resonated with me, and I started thinking about the power of the combination of Google Drawings and Google Forms. Now that images can be integrated into both the questions and responses in Google Forms, teachers can completely customize their assessments or activities with images created in Google Drawings.

In the accompanying image, Bartlett High School teacher Sean Hansen uses arrows to annotate a map for his students. Sean says, “The ability to annotate images on Google Drawings is one of its greatest attributes in my opinion! Google Drawings seems like a great tool to use with my 9th grade students to help them visualize concepts and make maps really pop, which is what I’ve attempted to do here. I took a map that highlights the wide array of ethnic groups that lived within the borders of Austria-Hungary just prior to the outbreak of World War I and created color-coded arrows to provide an extra visual that showcases where these groups resided within the empire.”

Once created, the image can be downloaded in a variety of formats including a JPG. A JPG can be stored on a local hard drive or in Google Drive and can quickly and easily be imported into a Google Form for analysis. Teachers can also create images to be used as possible correct and incorrect responses in a Google Form. For example, in the screenshot of the Google Form, the teacher is asking students to identify the capital of Illinois. The four response options were created in Google Drawings by placing a red star in different locations on the Illinois map.

Conversely, an image could be part of the question in a Google form as shown in the accompanying screenshot. In that question, the image of the girl and the water was annotated with thought-bubbles by using the drawing tools in Google Drawings.

As Shari and Sean have discovered, as these form examples demonstrate, Google Drawings has great power to help students develop their knowledge and skills. Combined with Google Forms, it becomes a powerful, customized assessment experience.

The post Awesome Assessment App Smash: Google Drawings and Google Forms appeared first on EdTechTeacher.

05 Apr 13:28

Don't Forget the Greater Context on Your VR Trip

by noreply@blogger.com (Richard Byrne)
During last week's Practical Ed Tech Live episode (join me this Thursday at 4pm EDT) I was asked about virtual reality, specifically Google Expeditions. The point that I tried to emphasize in my response was that it's important that we don't lost the greater physical geographic context when we take students on virtual reality trips.

Before you embark on a virtual reality field trip have your students look at physical maps and have them hypothesize about what they might see on the virtual reality trip. Ask students to use their prior knowledge to form those hypotheses. When they've done that, then go on the VR trip. It will have more meaning to your students if they have a greater context and aren't just touring around a location you sent them to in virtual reality.

For a greater discussion about virtual reality in education, please see the Hangout that I recorded with Greg Kulowiec from EdTechTeacher.org.


The resources that we shared during the Hangout are available at EdTechTeacher.org/VR

learning & lighhouses

This post originally appeared on Free Technology for Teachers if you see it elsewhere, it has been used without permission.
20 Mar 15:59

How to Differentiate Questions with Google Forms

by Kasey Bell

The post How to Differentiate Questions with Google Forms appeared first on Shake Up Learning.

How to Differentiate Questions with Google FormsShut the Front Door (Again)! Updated Differentiation with Google Forms!

UPDATED March 2017! There are so many amazing things we can do with Google Forms. One of my favorite features allows us to differentiate a form for students, meaning we can send students to different questions and pages of information based on how they answer each question. It can get complicated very fast, so hang on tight for some tutorials, details, and classroom application ideas!

Note: The original post was inspired by a comment I received during my “Digital Differentiation with Google Apps,” session at the Texas Google Summit in Brenham, Texas. Michael Ogg, aka @PrincipalOgg, shouted, “Shut the front door,” when I showed how to use branching in Google forms. Thanks, Michael for one of the best comments I’ve ever had during a presentation, and for giving me a great title!


Shut the Front Door (Again!) – Updated Differentiation with #GoogleForms #gttribe #SUL #googleedu
Click To Tweet


Branching in Google Forms

Visualization of Branching in Google Forms

What is Branching in Google Forms?

Branching in Google Forms is a way to send a respondent to a different page or question based on how they answer. You have probably experienced this type of strategy if you have taken a survey that takes you to more specific questions based on how you answered basic questions. For instance, if I asked, “Do you teach elementary, middle, or high school?”, I could then take you to another question to ask what subject area you teach based on your level.

To the left is a visualization of branching in Google Forms (created with Google Drawings). Each answer option could add another branch. The branches can go in as many directions as you like and can get complicated very quickly. This is just to give you an idea of why it is called branching and the importance of planning your “branches.” Be sure you keep reading and take note of the tips below!

To get an idea of how this can be used, I have created a sample form, “Google Drive Review.” This is just one way this feature can be used to help students review material. For instance, if a student answers incorrectly, they can be taken to a review video and be given the chance to answer the question again. Note: my sample form is very short, and just for example purposes (more application ideas included further down.) CLICK HERE to take the review and see how branching works. (Hint! Answer incorrectly, to see where that takes you.)

Google Drive Review Form


How to Differentiate Questions in #GoogleForms! #gttribe #googleedu #gsuiteedu #SUL
Click To Tweet


Google Drive Quiz Example Question

I designed this quiz as a review example for Google Drive. If respondents answer incorrectly, as indicated in this image, they will then be taken to a review page with a YouTube tutorial. (Yes, you can insert YouTube videos!) Then they will be asked to answer the question again, as seen in the image below. Respondents will keep reviewing the skill until they get the question correct, and then they move on to the next question.

Google Drive Review Sample Question


How to Use Branching in Google Forms:


How to Use Branching in #GoogleForms #gttribe #SUL #googleedu
Click To Tweet


Google Forms doesn’t actually call this branching. So if you are searching for this in settings, you will not find it. Branching is really just the concept. In order to send students/respondents to another option based on how they answer, you have to create new pages or, “sections” in your form. This is the key to making branching work! This little setting can make a BIG difference and can offer ways to use Google Forms to differentiate for students.

In Google Forms, you can enable branching for multiple choice or dropdown question types by selecting, “Go to SECTION based on answer.” (formerly, “Go to PAGE based on answer,” in the old forms.)

To see how this works:

1. Create your first question. (Note: This option is only available for multiple choice or dropdown questions types.)

2. Then go to the three dots in the bottom right of the question box and select: Go to section based on answer. (See the animated GIF below.)

3. Make the question “Required.”

4. Shuffle answer options to help discourage cheating. (Optional, but recommended.)


Adding Sections to a Google Form

Now that you see how the process works within the question, it’s time to plan and create your sections. The key to making this work is to create section breaks. Notice in the animation above, the dropdown that appears next to each answer choice once you enable, “Go to section based on answer.” You can only choose another section once the other sections have been created. Again, planning is your best friend in branching! Plan you branches and sections, then go add each section to your form.

1. Using the menu to the left of your question, click on the bottom icon to “add section.” You will see sections added below and numbered accordingly.

2. Add as many sections as you need.

Add Section to Google Form


Add Section Title and Descriptions

I cannot emphasize how much adding a title, and description to each section helps before you go back to each answer and choose a section. This will help keep your organized. Remember, this can get complicated very quickly and staying organized will help greatly.

To add a section title and description, simple click on each section title and description box to get the cursor and edit. Note how I named my sections in the example given above. I titled them, “Question 1”, or “Question 1: Review the Skill.” Depending on how you decide to use this feature, your titles may need to be even more specific.

Section Title 1
Section Title 2

Match Sections to Answers in Each Question

Here’s where those titles come in handy! Now, you need to go back to each question (enable, “go to section based on answer,” if you haven’t already) and then select which section each answer will lead to next. By default they will all just progress to the next section. Once you get this pattern down, it is very easy to do. Again, planning this ahead of time will make this process so much easier!


Branching Tips (PLEASE READ!)


#GoogleForms Branching Tips for the Classroom! #gsuiteedu #gttribe #SUL #edtech
Click To Tweet


Start small, just a few questions.

I cannot say this enough! The first time you try this, do not do more than five questions. I repeat. This gets very complicated very quickly!

Plan or Map out your branches before you begin.

Planning is your best friend when it comes to branching. Decide ahead of time how many answer options and how many “branches,” you need or want. Plan it out on paper, in Google Drawings like I did above, or using your own preferred tool.

Utilize the page titles and descriptions to help you organize.

As mentioned above, this can save you time and frustration if you use consistent and specific titles and descriptions for each title.

Test it! Then, test it again!

Now you have to test it. Test every answer option in every question. Then send it to a friend or colleage to test it. It’s so easy to miss one little thing. Testing is a must!

Your spreadsheet will not be pretty! But that’s okay!

Since students can answer each question multiple times, your spreadsheet will not look like the pretty response spreadsheets you are accustomed to seeing. You will be able to see how many attempts they made, but this is not a spreadsheet for running Flubaroo or Super Quiz.

Remember, this type of assessment will not be graded–This is assessment FOR learning!

The above review example is not intended to be graded. This is a formative assessment strategy that is great for review, checks for understanding, even pre-assessment. But this form isn’t something I would take a grade on. The great thing about it is that students can work at their own pace, watch videos if they need to, and work until they get it right. Even the kid that doesn’t want to raise his hand during a review and admit that he didn’t know the answer can keep working and learning without announcing it to the class.

Kids are smart! You must facilitate this type of assessment!

There is nothing to stop a student from just clicking on each answer choice until they are taken to the next question. Students are smart and they will figure this out. This is why you need to be up and moving, and facilitating during this type of assessment. Make sure they understand your expectations.


Other Ways to Use “Go to Section,” Feature

The possibilities of this feature are endless. There are so many other ways you could use, “Go to section based on answer,” besides the review style I showed in my example. Below are a few ideas to get you thinking about possibilities for your class.

  • When a student answers correctly, they could be taken to a harder question.
  • When a student answers incorrectly, you could show more specifically where they went wrong with each answer choice (not just review a concept)–like solving a math problem incorrectly.
  • Student choice: Use this feature to allow students to select from a menu of choices to demonstrate their learning, then upload the file to the form to submit. The spreadsheet would allow you to see what they select and should be working on during class.
  • Gamify! What if every correct answer revealed a clue or a puzzle piece? Students could collect and work individually or collaboratively to put together.
  • Put this feature in students’ hands and let them create something for their class, or another class to teach a skill, or play a game.

Sylvia Duckworth’s Choose Your Own Adventure with Google Forms

My friend, Sylvia, created this awesome, “Choose Your Own Adventure,” style Google Form for her classes. Her form makes use of the, “Go to section based on answer,” in a different way. This follows the old school style of the Choose Your Own Adventure books. Students read part of a story (in the form), and then make a decision about what to do next by selecting from a multiple choice question. That response determines where they go next in the story. Sylvia teaches French, so the form is available in French and English. CLICK HERE to see her full blog post, including her step-by-step directions. (Oh, and follow Sylvia ! Everything she does is awesome!)

How could you use this feature in your classroom? Please share in the comments below.


Connect with Shake Up Learning

Email me directly: Kasey[at]ShakeUpLearning.com

Click on any of the icons below to connect with Kasey Bell and Shake Up Learning on social media.

facebook-squaretwitterlinkedinpinterestinstagramyoutube


© Shake Up Learning 2017. Unauthorized use and/or duplication of this material without express and written permission from this blog’s author and/or owner is strictly prohibited. Excerpts and links may be used, provided that full and clear credit is given to Kasey Bell and Shake Up Learning with appropriate and specific direction to the original content on ShakeUpLearning.com. See: Copyright Policy.

The post How to Differentiate Questions with Google Forms appeared first on Shake Up Learning.

10 Mar 20:12

Create Comic Strips in Google Slides

by noreply@blogger.com (Richard Byrne)
Yesterday I was asked for a recommendation for a completely free way for students to create comic strips online. Two options immediately came to mind. The first was Make Beliefs Comix. The second was to use Google Slides to create comic strips. In the following video I demonstrate how to create comic strips in Google Slides.

new skills new year

This post originally appeared on Free Technology for Teachers if you see it elsewhere, it has been used without permission.
09 Mar 15:42

Grab a Piece of the Pi Using Cool Classroom Resources

by edutech4teachers

Hey, math gurus! It’s that time of year again when teachers, students and mathematicians from all over the world honor the fun-loving irrational Greek figure pi (π). That’s right! March 14—or Pi Day—is just around the corner so be sure you don’t miss this opportunity to make a lasting impression on your math students!

Let’s get the party started with TeachPi.org site, a one stop shop on the Web for finding and/or sharing teaching and learning ideas related to Pi Day. You name it and TeachPi.org most likely has it: Lessons, stories, music, digit games, poetry, art and even tattoos!

My favorite part of the TeachPi.org web site? A link to the original gangsta rap, “Lose Yourself (In The Digits),” a parody of the well-known Eminem hit. Check out the video below created by students at the Fort Vancouver High School using the lyrics to this song.

Here’s another fun Pi video set to the tune of “American Pie” by Don McLean.

And now for some interactive fun… Check out this multimedia sensation created by ThingLink guru Mathy Cathy containing a variety of super cool activities and info related to Pi Day.

Other great resources for teaching and learning about Pi Day include…

» Edutopia: Classroom Resources for Pi Day

» Education World: Plan a Pi Day Party

» NEA: Math Resources for Pi Day

And this just in… The Last Minute, No-Prep Pi Day Activities Booklet created by Elementary Inquiry. Especially designed for students in Grades 5-8, this Teachers Pay Teachers freebie contains a list of 10 different Pi Day activities that can be completed with no prior planning and minimal materials. Choose just one activity—or do them all for loads of Pi Day fun!

Classroom Connection:

Use the Pi Day resources and materials to generate some enthusiasm and appreciation for mathematics. And while you’re at it, have a piece of your favorite (chocolate peanut butter) pie!

03 Mar 16:16

February's Most Popular Posts on Free Technology for Teachers

by noreply@blogger.com (Richard Byrne)
Good evening from North Carolina where I'm getting ready for the NCTIES 17 conference. I look forward to this conference every year. There are so many engaged educators learning and sharing with each other. In some ways it feels like a huge EdCamp with structure (some of us like structure). If you're going to be at NCTIES 17, please say hello. I am running two workshops on Wednesday and my first presentation is on Thursday afternoon in Ballroom B where I'll be sharing Best of the Web 2017.

As I do at the end of every month, I have assembled the list of the most popular posts of the month. This list is based on total views and shares.

Here are February's most popular posts on FreeTech4Teachers.com:
1. The Things I Wish Every Teacher Knew About Technology...
2. My Five Most Frequently Recommended Google Forms Add-ons
3. How to Insert Videos Into Google Slides Without Using YouTube
4. Practical Ed Tech Handbook - 2017 Edition
5. 21 Tools for Conducting Digital Formative Assessments
6. Get a Free Presidential Timeline Poster for Your Classroom
7. 7 Places to Find Free Music & Sound Effects for Multimedia Projects
8. Tools for Creating, Hosting, and Printing Infographics
9. 5 Great Google Sheets Add-ons for Teachers
10. Quickly Create Bingo Boards In Google Sheets

Join me this summer for the Practical Ed Tech Chromebook Camp or the Practical Ed Tech BYOD Camp. Early registration and group discounts are available.


Please visit the official advertisers that help keep this blog going.
Practical Ed Tech is the brand through which I offer PD webinars.
Storyboard That is my go-to tool for creating storyboards.
QuickKey saves teachers tons of time when scoring formative assessments.
WriteReader is a fantastic multimedia writing tool for elementary school students.
Discovery Education & Wilkes University offer online courses for earning Master's degrees in Instructional Media.
PrepFactory offers a great place for students to prepare for SAT and ACT tests.
Boise State University offers a 100% online program in educational technology.
EdTechTeacher is hosts workshops in six cities in the U.S. in the summer.
My Simpleshow provides a great way to create explanatory videos.
new skills new year

This post originally appeared on Free Technology for Teachers if you see it elsewhere, it has been used without permission.