After watching this short experimental video I have decided I want to live in Lucas Zanotto‘s brain for a little bit. (My kids LOVE his apps.)
Shh.listen
Shared posts
03 Oct 19:36
Creamy Crock Pot Butternut Mac & Cheese
by Emma Chapman
Shh.listenEasily made in the instant pot
 Is there anything better on a chilly autumn night than a bowl of warm, cheesy pasta? Comfort to the max. And I love a classic, comforting dish. But what I love even more is if that meal can be made just a little bit better. Still all the comfort but add in a good dose of plant power and now you’ve really got me hooked. And that is exactly what this butternut mac and cheese is all about.
I am really excited to work with Modern Table on this recipe. If you aren’t familiar, they make delicious pastas (and pasta meals) made from lentils, rice, and pea protein. Needless to say, I am a BIG fan because I love a good source of plant-based protein. Not only are their pastas gluten free and non-GMO, they are also a complete protein. If you need a refresher on what that means and why it’s awesome, go check out our post on great sources of plant-based protein from our Ask a Dietitian series. You can use their pastas in all sorts of dishes, but here I’m sharing a recipe for mac and cheese that includes a good serving of vegetables too. Hello, butternut squash season!

 This meal can be made in a crock pot (often called a slow cooker too, but here in southern Missouri I’ve always heard it called a crock pot). You cook the vegetables and a few other ingredients for hours until soft and creamy, and then you’re just minutes away from dinner by adding the cooked pasta and cheese. I think you’re gonna like this one friends, so get excited for some creamy pasta with me!
 Creamy Crock Pot Butternut Mac & Cheese, makes 4 small servings
1 butternut squash (approx. 15 oz once peeled and insides removed)
1 small yellow onion
5 cloves of garlic
1 sprig of sage or 2 dry bay leaves
1 teaspoon salt
1/2 teaspoon black pepper
1/4 teaspoon cayenne
1 1/4 cup vegetable stock
8 oz. Lentil Elbows from Modern Table
4 oz. shredded cheddar or a mix of cheese
2 oz. cream cheese
First, peel the butternut squash and remove the soft insides containing the seeds. Cube the remaining butternut meat. Remove the papery outside of the onion and give that a rough chop.
 In a crock pot combine the squash, onion, garlic cloves, sage (or bay leaves), salt, pepper, cayenne, and vegetable stock. Cover and cook on high for 3-4 hours, or low for 6-8. Every crock pot is a little bit different, so it’s best to keep an eye on this the first time you make it. The goal is simply to cook the vegetables until they are so soft then can easily be mashed with a fork. But you don’t want to cook so long that all the liquid is gone and the vegetables begin to dry out.
Remove the sage or bay leaves and use an immersion blender or regular blender and puree the mixture. It should be a like a thick soup at this point.
 Cook the noodles according to the package directions (7-8 minutes in boiling water). Drain and add those along with the cheese and cream cheese to the pot. Give that a few stirs and allow the cream cheese to melt and everything to get well coated.
 Taste and add a little more salt and pepper if you prefer. You can divide this into four small servings, it’s great next to a salad or vegetable side dish (might I recommend this brussels sprout salad).
Some of you who have never tried lentil noodles might be wondering about the taste/texture. To me, the texture is very similar to whole wheat noodles, and they taste like, well, lentils. Not much of a surprise there, I guess. 
 And it warms up great the next day too, if you have leftovers. I ate some of these leftovers for lunch one day and it was delicious! Enjoy. xo. Emma
Credits // Author and Photography: Emma Chapman. Photos edited with A Color Story Desktop actions.
03 Oct 10:09


Meal Plan for October Week 1
by Summer Miller
Welcome to our new series of weekly meal plans! This month, Summer Miller will be sharing with us what meal planning looks like in her house. Summer is a mom, a full-time food writer, and also helps test the fabulous recipes we bring you every week at Simply Recipes.
Getting dinner on the table with kids underfoot and work deadlines piling up can seem like an insurmountable challenge at times. I try to keep the weekday dinner insanity to a minimum by committing a little time on the weekend to prep.
Continue reading "Meal Plan for October Week 1" »

02 Oct 18:12
Pumpkin and Almond Stuffed French Toast
by Emma Chapman
 Maybe the words “stuffed french toast” conjures up vision of messy and overly sweet dinner-pancake-house-chain food. If so, believe me, I get it. But I promise this is so much better. I LOVE stuffed french toast. It’s one of those homemade breakfasts that is simple but feels so decadent that it’s not something I make often. I think maybe that’s why spicing it up with some seasonal flavors makes it even more special.
To me, stuffed french toast almost feels like the breakfast version of grilled cheese (or maybe even a dessert version of grilled cheese?). And if that doesn’t get you excited to make this, well then I don’t know what will!
 These are chewy, sweet but not overly so, nutty, and full of my favorite flavor for this season: PUMPKIN. They almost taste like a little slice of pumpkin pie got tucked into your french toast!
Also, realize that loving pumpkin in the fall is SO basic. And I DO. NOT. CARE. Long live pumpkin spice!
 Pumpkin and Almond Stuffed French Toast, makes 3-4 servings.
1/2 cup pumpkin puree
4 oz. softened cream cheese
2 tablespoons brown sugar
1/2 teaspoon cinnamon, plus more for sprinkling
1/4 teaspoon nutmeg
1/2 loaf of French bread (6-8 thick slices, see instructions)
2 eggs
2-3 tablespoons whole milk or cream
1 teaspoon vanilla extract
1/4 cup almond meal
butter and olive oil for cooking
powdered sugar and maple syrup for serving
Oh! You can find those cute plates and notebook tray here. 
First make the filling. In a small to medium sized bowl, cream together the pumpkin, cream cheese, brown sugar, cinnamon, and nutmeg until well combined. Set aside.
 Here’s the trick with stuffed French toast. I think it’s best if you slice your French bread so that each thick piece a slice down the center that only goes about 1/2 to 3/4 through the bread (see photo above). These leaves a kind of pocket for your filling and also makes flipping the french toast easier as you cook. If you’re bread is already pre sliced that’s OK, it will still work fine. But this is an easy little trick that makes cooking stuffed French toast even easier.
On a large plate with a lip, add the eggs, milk or cream, and vanilla extract. Whisk until just combined. Then sprinkle a little cinnamon over the top of the mixture. On another plate, add the almond meal in a thin layer.
Add a little pad (1/2 tablespoon or so) of butter, plus a small drizzle of oil to a large pan or skillet over low/medium heat. Once the butter is melted, give the pan a swirl to distribute the mixture all over the surface.
 Take each piece of bread and add filling to the center. Press the edges together to seal the filling into the bread, like a PB&J sandwich. Dip each side of the bread in the egg mixture and then into the almond meal. Cook in the prepared pan for 2-4 minutes on each side, until golden brown and fragrant (the almond meal will become especially fragrant as it cooks). Remove to a plate and repeat until you’ve cooked all the pieces.
  Top each piece with a little bit of butter, powdered sugar, and serve alongside some maple syrup. If you add a latte in there, then you’re doing it right! This is a total weekend worthy breakfast that only takes about 20 minutes to make from start to finish. Enjoy! xo. Emma
Note: You can cook the French toast in only butter or only oil. I like to use a combination as I think the butter adds flavor and the oil adds a little more of a crispy edge to the final dish, which I love. But if you want to use just one or the other, that’s totally OK too.
Credits // Author and Photography: Emma Chapman. Photos edited with the ACS Desktop actions. Check them out and you can get 20% off with the code abeautifulmess20
02 Oct 18:07
 Challah, that stretchy, rich, lightly sweet, braided glossy bread that’s brushed with egg and baked to an burnished burnt umber shine, like many great traditional foods, does not exist in a vacuum. While challah is a Jewish ceremonial bread, eating on Sabbath and major Jewish holidays, and is usually paerve (dairy product-free, so it’s Kosher regardless of what is being served), pulled away from the Judaic lens, it’s a close cousin to brioche and other enriched breads.
chocolate tahini challah buns
by deb

Kimmo Saari, Tomas and one other like this
27 Sep 18:29


5 Things The “New You” Doesn’t Need (And 5 Things You Do)
by Brittney Morgan
In the end, decluttering is generally pretty satisfying. But in the process? It can be an emotional, guilt-ridden and stressful situation. You want your home to be a positive space, but if you're holding onto things that you really don't need, or even things that actively make you feel bad, it's time to let go. It's time to invest in and focus on the things that do make you happy.
If you're ready to pare down a little, here's what you should get rid of—and what to replace it with or look for instead.
27 Sep 14:25

The Best-Kept Plant Lady Secret Is Something You’re Not Doing
by Caroline Biggs
Keeping your plants clean (and dust-free) is vital to their health and happiness. Along with attracting harmful pests, too much dust on your plant's leaves can make it hard for your houseplants to absorb light and properly photosynthesize (remember that from elementary school?). That's why experts recommend dusting off your plants at least once a month by using a clean microfiber cloth.
27 Sep 13:50
Chocolate Pecan Granola
by Laura Gummerman
Shh.listenMaking the heck outta this
 I’m one of those people that take a few minutes (at least) to fully wake up in the morning. While I don’t mind making a bigger effort on a weekend brunch-type meal, most mornings I just want something fast, filling, and healthy—that’s where this granola comes in! I make a big batch of it and then I just pour it into a bowl like cereal in the morning. It’s really easy to make and the cacao nibs add a nice touch of chocolate to the granola (and who isn’t up for a little chocolate in the morning?).
 Chocolate Pecan Granola, makes 8 cups
Recipe adapted from Apple Pie Granola in The China Study Quick and Easy Cookbook
8 cups rolled oats
1 cup pitted dates
1 cup water
1 tablespoon cinnamon
1 teaspoon nutmeg
1 teaspoon sea salt
1/2 cup cacao nibs
1/2 chopped pecans
 Take your pitted dates and water and add them to a blender. Blend until a smooth paste forms.
  Cook your date puree in a large pot over medium heat just until the mixture starts to boil. Add in your salt, cinnamon, and nutmeg and stir to combine.
 Add your oats to the pot and stir so they are evenly coated with the date mixture. Allow the oats to cook another 5 minutes while stirring periodically to keep from burning.
  Mix in your chopped pecans and pour the granola onto two baking sheets. Bake at 325° for 20 min with one sheet on the middle rack and one on the rack below. After 20 minutes, give each sheet a stir with a spatula, switch the rack placement, and bake for another 15-20 minutes. Allow the granola to cool, mix in your cacao nibs and store in an airtight container.
 I like to top my granola with bananas and eat it with almond milk, but you can eat this over yogurt, in a smoothie bowl, or even plain! This makes a good amount of granola so I can get at least a week of breakfasts out of it before having to make another batch, so that’s another plus for me too. If you wanted to up the chocolate factor, you could add some cacao powder into the date puree as well to make it a little more decadent. But I love how the cacao nibs interact with the pecan flavor, so it’s the perfect amount of chocolate for breakfast, if you ask me … enjoy! xo. Laura
Credits // Author and Photography: Laura Gummerman. Photos edited with A Color Story Desktop.
21 Sep 17:13


9 Ways to Elevate Cake Mix by Bridget
by Bridget

Raise your hand if you’ve ever used a cake mix.
Let’s agree that, while we’d all prefer a homemade cake, sometimes a cake mix comes in handy or is the perfect ingredient in a recipe. My two favorite examples of cake mix love are Ree’s Christmas Rum Cake and these Caramel Brownies. Those are two downright delicious desserts made using cake mix.
Using just a handful of tricks, any cake mix can taste more like homemade. Chose any ideas on this list—or combine a few!

Use an extra egg
Most boxed mixes will call for 3 eggs. Use four for a cake that’s richer-tasting and moister. This tip is one I use practically every time I make a boxed cake mix.

Substitute dairy
Replace the water called for on the package with dairy. My favorite is buttermilk for that little bit of tang. Dairy adds fat and makes for a more homemade-tasting cake.

Replace water with other liquids
If you’re not going the dairy route, replace the water with another liquid for added flavor. Use coffee for a deep, dark chocolate cake, or ginger ale in light and bright yellow cake. Combine with dairy to get the added fat by using 3/4 cup liquid and 1/4 cup sour cream or buttermilk.

Add a mix-in
Mix-ins always make a cake special and taste more like homemade. A combo I love is cream of coconut plus shredded coconut. Fold the mix-in into the batter last, adding up to 1 cup.

Go all-citrus
Make a cake with a citrus punch, replacing the water with juice and adding lots of zest. Try orange, lemon, or lemon-lime. Add lemon and lime zest to a cake made with lemon-lime soda for the liquid.

Add extracts
A little more vanilla is never a bad thing. Boost the flavor with an extra teaspoon or so of extract. Vanilla is always an excellent choice, but any extract can enhance a flavor. How about a teaspoon of almond extract in that strawberry cake mix?

Put some pudding in the mix
Add a small box of pudding mix in with the cake mix. (Don’t make the pudding.) The mix adds additional flavor, moistness, and a denser texture.

Make a filling
A filling in the center definitely screams (or at least politely says) “homemade!” Make a simple one by stirring together a cup of mini chocolate chips with 1/2 cup light brown sugar and 1/2 cup chopped pecans. Pour the 1/2 of the cake batter into a Bundt pan. Top with the filling mixture. Cover the filling with the remaining cake batter and bake.

Frost with a homemade frosting
Now, I’ll admit to liking canned frosting—but spread on graham crackers, not cakes. To elevate a cake mix cake, top with a homemade frosting. It doesn’t have to be fancy or time-consuming, but a homemade frosting will take your cake to the next level. Try the Fluffy Mocha Frosting here on a Devil’s Food or Yellow Cake.

You know what’s weird? I have a sudden craving for cake. You too? If you’ve tried any of the tips or have others of your own, I’d love to hear them!

AmandaVW likes this
21 Sep 15:53


Pasta with Butternut Parmesan Sauce
by Elise Bauer
Shh.listenI AM HUNGRY
One of the best things about fall is the abundance of pumpkins and hardy winter squash. Ever wonder why winter squash is called “winter” squash when it first makes its appearance in the fall?
Perhaps because if stored in a cool place, they’ll last several months, well into winter.
Continue reading "Pasta with Butternut Parmesan Sauce" »

21 Sep 15:53


Honey-Mustard Sheet Pan Pork Chops
by Aaron Hutcherson
Sheet pan recipes are popular for a reason — the simplicity just can’t be beat!
In this iteration, I channel favorite fall flavors by pairing Brussels sprouts and sweet potatoes with honey-mustard glazed pork chops.
Continue reading "Honey-Mustard Sheet Pan Pork Chops" »

21 Sep 15:53


Cauliflower Pasta Bake
by Sally Vargas
This is a mac and cheese for grown-ups. It is not the ooey-gooey comfort food of your childhood, but something a little more refined that just so happens to be cheesy and crispy.
For this baked pasta recipe, sweet, roasted cauliflower and onions are paired with salty Parmesan and buttery Gouda and topped with a crispy Ritz cracker crust. It can be served as a simple vegetarian dinner or as a side dish for roast chicken or grilled steak.
Continue reading "Cauliflower Pasta Bake" »


20 Sep 09:53
 Less than a week after I delivered the ostensibly completed manuscript for that my second cookbook (just 40 days now!), I received an email from someone was looking for a recipe for a chocolate-vanilla marble cake like the one her grandmother had made, one that had great texture and wasn’t too sweet. She said that no recipe she’d tried had achieved this, and could I help?

marbled banana bread
by deb

15 Sep 11:10
Vertical Gold Hoop Photo Display
by Laura Gummerman
While it’s great to have cool and unique photo frames around the house, it’s nice to mix it up a bit with an unexpected photo display option here and there. I still love this metal hand photo garland that I made last year so I partnered with our friends at Canon USA again to think of another hanging photo display for the living room to add a touch of gold to the walls there as well! Turns out, with the right supplies you can make a simple yet elegant display in a matter of minutes! Here’s how:
Supplies:
-gold macrame rings (in 5″ and 6″ sizes)
–large jump rings
–gold chain spool
-gold paper clips
-Canon PIXMA TS8020
–jewelry tool kit
Print out square 4″ and 3.25″ photos (2 of each size) to display in your loops. Use scissors or an X-Acto knife and mat to cut out your photos. My PIXMA TS8020 is perfect for printing photos, because regardless if the photos are black and white or in color, the prints always come out super crisp and clear.
Use your chain cutters to cut 4 chain sections that are all 3″ long.
Attach your large jump rings to each side of your 3″ chain sections and then use 3 of those sections to connect your 4 macrame rings together. Attach the last 3″ section to your top macrame ring and that will be what you use to hang your display once finished.
Attach a paper clip to each jump ring at the top of your macrame loops.
Slide your photos into the paper clip so that it is evenly centered in your loop. Once all your photos are secure, you’re ready to hang your display!
I love the simple lines and geometric shapes in this display and it’s a nice bonus that you can switch out the photos in a snap as well. You can also buy those macrame hoops in many sizes, so you can also vary the size and amount of rings pretty easily to fit your space. Of course with an adorable little baby face like Lola’s in the house, there’s not enough wall space in the world for all her sweet pictures. But that’s just my mama opinion talking
 xo. Laura
Credits // Author and Photography: Laura Gummerman. Photos edited with A Color Story Desktop.


01 Sep 10:24
Chocolate Flecked Slice and Bake Cookies
by Emma Chapman
 I’d like to think I’m pretty fancy, but the truth is when it comes to desserts (and probably most things, if I’m being honest) what I really love is the basics done well. If you feel the same, then you will love these cookies because that’s exactly what they are: classic slice and bake cookies flecked with delicious dark chocolate. They are perfect for dunking in milk, or a favorite serving option of mine is to add a scoop of ice cream to the top of a still warm cookie. Mmmmm.

 Slice and bake cookies are pretty self explanatory, right? You make this dough ahead of time and freeze in a roll. Then you can slice off the cookies and bake when you are ready. This is precisely why you want small flecks of chocolate and not big chips or chunks in these. I’m all for oversized chocolate chips, but they would be much more difficult to slice through, so that’s why we want small pieces of chocolate. An added bonus to this is you can use a fairly small amount of chocolate and it will get more evenly distributed throughout all the cookies. And since you don’t need tons and tons, I recommend you choose something high quality for these (I love Askinosie Chocolate myself).
Slice and bake are so, so awesome for two reasons: First, you can have this cookie dough in your freezer for months and months and if you end up with unexpected guests or an impromptu party at your house, just pull this out, slice, bake, and you’re ready to go. But the second reason is probably my favorite. You can slice off just one or two cookies at a time and bake on a night that it’s just you and Netflix. I love a good Friday night in by myself (warning: introvert) and I love cookies, but if I bake a whole dozen I am much more likely to EAT THEM ALL—if not that night then at least by the end of the weekend, which is not a great habit. So being able to make just one or two for yourself when needed is nice.
 Chocolate Flecked Slice and Bake Cookies, makes two dozen
1 cup softened butter
3/4 cup granulated sugar
1/2 teaspoon vanilla extract
1 egg
2 cups all-purpose flour
1/8 teaspoon salt
3 oz (about 90 grams) chopped dark chocolate
First, cream together the butter, sugar, and vanilla extract. Stir in the egg until well combined. Then stir in the flour and salt until a dough ball forms. Then stir in the chopped chocolate.

You may need to use your (clean) hands to press the dough together here. Roll the dough into a long cylinder, cover in plastic wrap, and freeze for at least 2 hours or overnight. You can keep this frozen in your freezer for at least a couple months (probably longer).
 When you are ready to make cookies, remove from the freezer and allow to sit out for a few minutes while your oven preheats. Then slice into 1/4 inch or slightly thicker rounds and place on a baking sheet lined with a baking mat or parchment paper.
Bake at 325°F for 12-15 minutes in the upper 1/3 of the oven. Remove from the oven and place the cookies on a cooling rack.
 Notes: The above recipe will make around two dozen cookies. If you like, you can divide the dough in half before rolling into a cylinder, wrapping, and freezing. This will give you two batches, each being a dozen cookies. Or you can simply do one large cylinder and cut off as you go. It’s really up to you and how much space/options you may have in your freezer.
If you want to use dark chocolate chips, you’re aiming for around 1/2 cup, chopped to get to the 3 oz. measurement.
Also, if you’re not a “chocolate person,” then check out these Vanilla and Thyme Slice and Bake cookies. Happy baking! xo. Emma
Credits // Author and Photography: Emma Chapman. Photos edited with A Color Story Desktop.
25 Aug 10:12
I’m a motion graphic designer. I was doing some work with the client sitting beside me. Client: I...
I’m a motion graphic designer. I was doing some work with the client sitting beside me.
Client: I wish I had the patience to learn After Effects so I could do these graphics myself.
I paused for a bit, staring into the void, and then, trying to be as polite as possible:
Me: Well, it’s not really like that, you know. What if I said “I wish I had the patience to learn Excel and Outlook so I could be a marketing manager”?
Client: This is not the same thing, because in order to become a marketing manager you have to have special training and management skills and you have to work intellectually. These apps only help me implement the work I do with my brain.
Client: Why are you laughing?
23 Aug 20:05


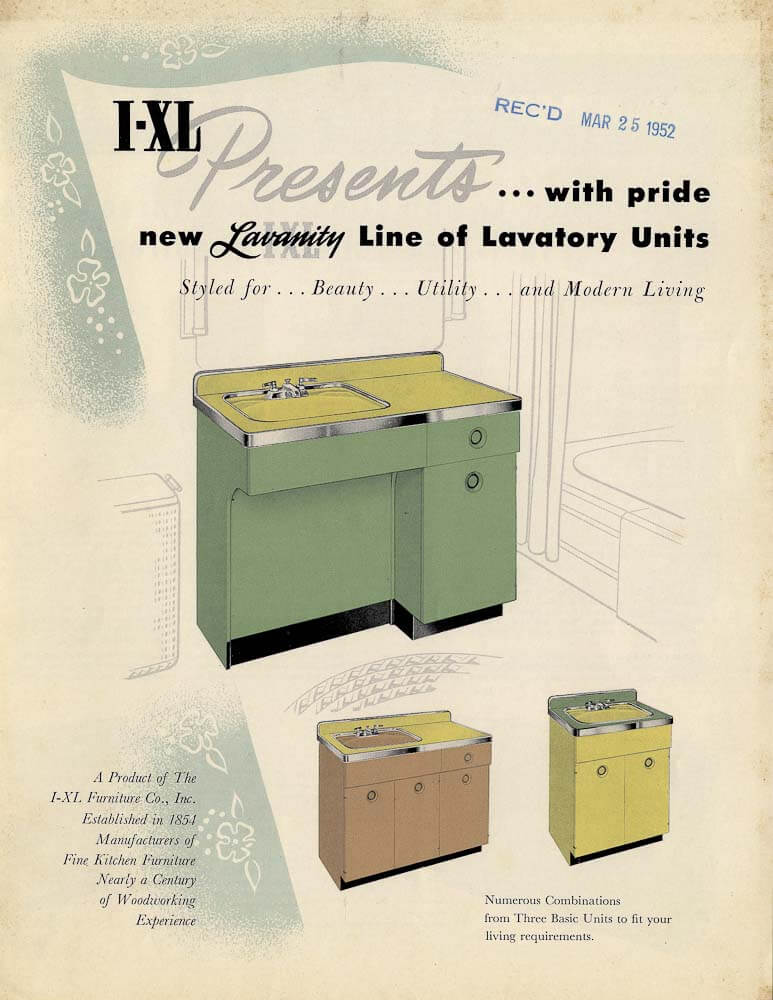
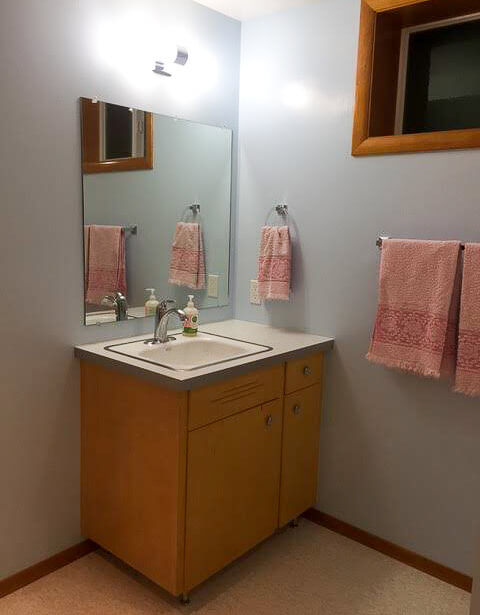 Above are just a sliver of the vanities we’ve shown over the years.
Jenna comes to love her 1948 pink bathroom
by Pam Kueber
Shh.listenthat first bathroom is exactly our bathroom
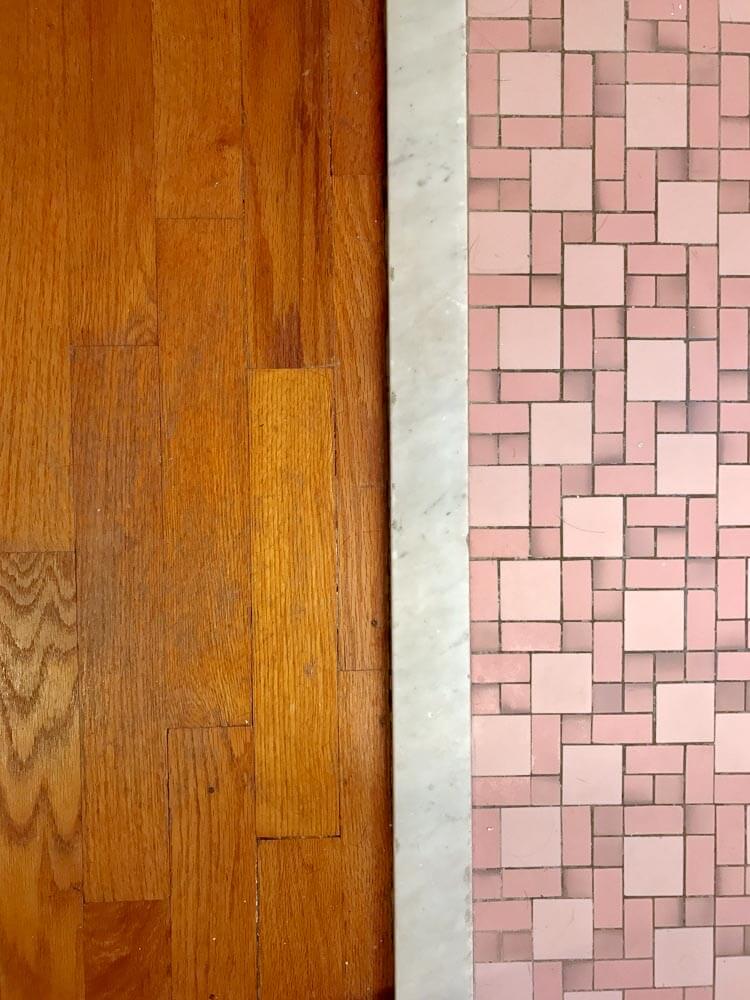
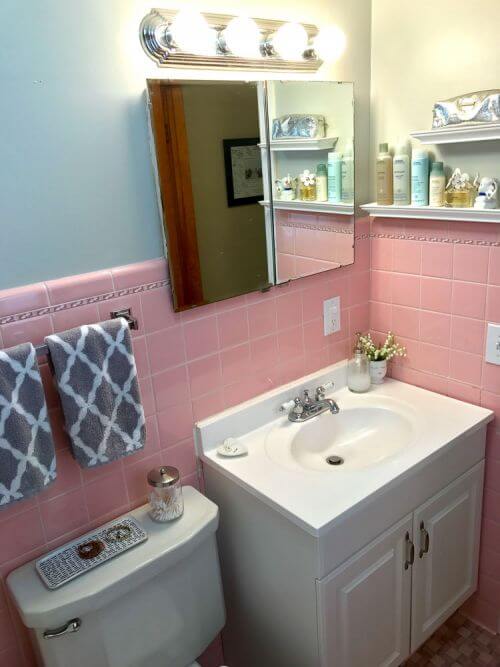
 We pause from our regularly scheduled program — to bask in some glowy pink bathroom happiness to brighten our days! Jenna is fully on board the Pink Potty Procession, Pledging to Protect and Proclaim the Pretty Provenance of her own Puny Piece o’ Paradise.
Pam,I hope you enjoy these photos of my very tiny, very pink bathroom. I have always wanted an older home with character and charm, though I was not quite thrilled when I first saw the pink bathroom.

To my dismay, I saw how the tile, tub, toilet, light fixtures (all original to the house!) were in perfect condition.

Since I had no budget for renovations and an appreciation for the craftsmanship that obviously went into building this house, I turned to your website for inspiration.

All it took was looking at it from a different lens to see it for the gem that it really is. I would love to replace the vanity with something more correct to the time period (1948). If you or your readers have any suggestion, I’d love to hear!
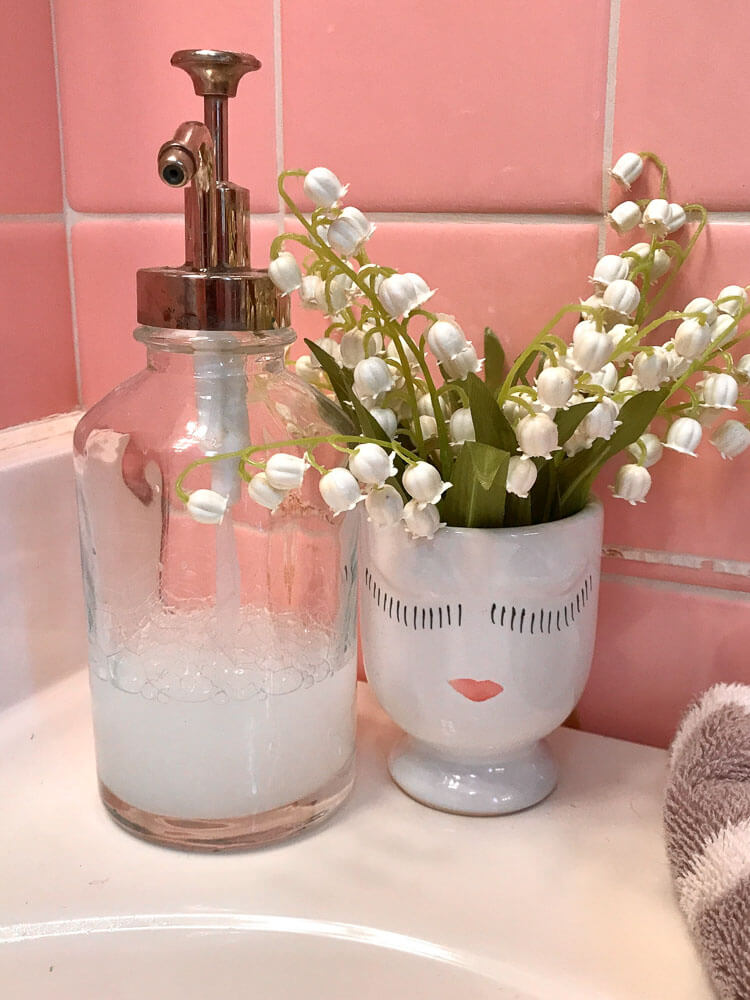
Your site helped me to not only embrace my pink bathroom, but want to show it off! I hope that more people take the “pledge” to save the pink bathrooms.Enjoy!
Goodness, Jenna, what a lovely bathroom you have. That liner tile! It’s priceless! I don’t want to jump to conclusions, but I will, and say, that you look… on the young side. It’s so nice for ole lady blogger me to see members of younger generations taking up the preserve-and-restore ethos. Hooray for our priceless little dream houses! Way to go, Jenna!
Bathroom vanities for a midcentury house
Regarding that vanity: I will guess that originally, the bathroom had a wall-hung sink on chrome legs with attached towel holders. To be authentic, you can go back to that. That said, if the previous renovators pulled out pink wall tiles behind the new vanity, or any of the flooring underneath the new vanity, you will have a *project” on your hands. With lots of searching sure to drive you krazee, you are likely to be able to find wall tile to match. But that floor tile: That will be super difficult, I think.
Honestly, the vanity you have doesn’t bother me all that much. It’s pretty neutral. If you want to switch it up for aesthetics — and don’t want to go down the rabbit hole of looking for replacement tiles to go the wall-hung route — you can go with a spiffier vanity design made new for you by a custom cabinet-maker or you can start stalking craigslist and salvage places for a vintage vanity.
Above are just a sliver of the vanities we’ve shown over the years. - For all our vanity stories, see our Bathroom Help / Sinks & Vanities category here.
- Another good place to hunt: our stories about Readers and their Bathrooms here.
- And, the Search box works pretty darned well, too: Search bathroom vanity here.
Thanks for sharing, Jenna!
The post Jenna comes to love her 1948 pink bathroom appeared first on Retro Renovation.
23 Aug 14:24

Sorry, Parents: Nobody Wants the Family "Heirlooms"
by Melissa Massello
In a modern world currently intrigued by minimalism, there's something that all three adult generations can agree on: the problem of dealing with the collections curated (hoarded?) by our family members. From younger boomers and Gen X'ers sandwiched between their aging/dying parents and their own children to millennials trying to gently manage expectations (and their own limited budgets and storage space) without hurt feelings, the message is crystal clear. As Forbes said recently, "Sorry, nobody wants your stuff."
22 Aug 16:51
 I evicted a longtime resident of my To Cook list this week with this corn chowder. I have no argument with traditional corn chowder — it has cream, bacon, and potatoes and thus would be impossible not to love as soup or salad — but I adore to the point of boring everyone around me with my gushing, Mexican-style corn either elote-style (on the the cob rolled in butter, mayo, lime juice and coated with salty crumbled cotija cheese and chile powder or a chile-lime seasoning blend) or esquites-style (all of the above, but in a cup). This corn chowder attempts to celebrate the best of both.

corn chowder with chile, lime and cotija
by deb

Josh Brodie, clauaud and 2 others like this
21 Aug 19:05
Best Weeknight Nachos
by Emma Chapman
 Confession: One of my go-to movie theater snacks is nachos. I know! It’s terrible. I mean who knows what is in that nacho cheese, plus the entire meal consists of chips, questionable cheese (or maybe I should say “cheese”), and for me jalapeños (from a jar, not fresh, that would be way too spicy). So not exactly a nutritious meal, although in all fairness, who goes to the movie theater to eat nutritious food?
But here is a nacho recipe, complete with some delicious nacho cheese, that you can actually feel good about eating. I should know, I ate this two days in a row since it made leftovers and I can honestly say that I like this a lot more than the movie theater version. I’m not even pulling your leg, I swear! And this version is packed with SO much good for me ingredients (like actual, real plants). Double win!

 One more confession before we start cooking. I used to totally roll my eyes at the mere mention of vegan cheese, or non-dairy cheese of any kind. It just sounded really ridiculous to me and, I like real (dairy) cheese. So, why bother? If you feel similar or you’ve felt similar before, believe me, I get it. But, at least hear me out before rolling your eyes.
So this cheese is very similar in texture and color to what probably comes to mind when you think of nacho cheese. It tastes cheesy for sure, but I would say the taste is probably the most different thing about it. It’s made from mostly potatoes and nutritional yeast. If you’ve never tried nutritional yeast before, you totally should; it’s a pretty rad ingredient. Plus it packs a pretty decent plant-based protein punch (say that 3x fast!). The recipe below contains 16 grams of protein just from the nutritional yeast alone (divided by two, the recipe is for two servings). So that’s pretty cool, right? And bottom line: If you’re willing to eat the processed-who-knows-what-it’s-made-of nacho cheese, then there’s really no reason not to give this weirdo non-dairy cheese a try!
Also, I’ll probably still eat the questionable nacho cheese once in a while. But I LOVE that I can make something similar that tastes better AND nourishes my body. I think that’s pretty darn awesome.
Are you ready to nacho cheese yourself? Good, me too.
 Best Weeknight Nachos, serves two
For the nachos:
1 can (15 oz.) black beans
1 small red onion
2 small bell peppers
4 cloves of garlic
1 tablespoon olive oil
1 avocado
2 tablespoons chopped green onion
2 tablespoons chopped cilantro
salt and pepper
tortilla chips (see note)
For the nacho cheese:
2 small red potatoes (around 235 grams)
1/4 cup nutritional yeast
juice from 1/2 lemon
1 tablespoon olive oil
1 chipotle pepper in adobo sauce
1/2 teaspoon salt
1/4 teaspoon garlic powder
1/4 teaspoon onion powder
1/4 teaspoon cumin
1/4 teaspoon mustard powder
3-4 tablespoons water (vegetable stock would also work here if you have some you need to use up)
Slice up the onion and bell peppers. Mince the garlic. Cook the onion and bell peppers in the olive oil over medium heat for 3-4 minutes until they begin to soften. Then add the garlic and continue to cook for another minute. Then add in the drained beans and cook just until everything is warmed through. Season with a little salt and pepper.
 In the meantime, peel and cube the potatoes. Boil in water for 10-12 minutes until they are soft enough that you can easily mash them with a fork. Drain and add to a food processor or blender. Then add the nutritional yeast, lemon juice, olive oil, chipotle pepper, salt, and spices. Pulse until creamy. It will likely be quite thick, more like a paste at this point. So use water (or vegetable stock) to thin it to a nice nacho cheese consistency. Just add a few tablespoons, pulse, and see what you think.
Add the cooked vegetables and beans on top of a small bed or chips, drizzle in the nacho cheese sauce, then top with sliced avocado, chopped green onion, and chopped cilantro. Dinner is served!
 Notes: For the chips here, I like use something that’s 100% corn or whole grain and organic (or at least non-GMO). But another great option is to swap out the chips for brown rice. Then you have kind of a veggie burrito bowl situation—yum!
– Start with one chipotle pepper (in adobo sauce) but feel free to taste and add more to the cheese if you like. Whenever I’m cooking something with spice/heat, I like to start small and add more as I go, because if you make something too spicy for you it’s pretty much impossible to go back. So just start with one, but I’m sure some of you will want more.
– You could absolutely change up what vegetables go into this dish. To me, onions and peppers just feel right for nachos, but any vegetable the sounds good to you covered in nacho cheese is a go here. Experiment with what may be in season or what you have in your refrigerator that you need to use up. There’s lots of possibilities here.
– This will make plenty of nacho cheese for two servings, and you may have some left over. If you do, you can totally save it in an airtight container for at least three days in your refrigerator (probably longer, but that’s how long I’ve done it so far with good results). When you reheat it, if it seems too thick just thin it out with water again. I’ve found that when I reheat this cheese, it seems a little too thick at first, but it’s a super easy solve.
– I suspect that you could swap out the potatoes for a similar weight in tofu for the nacho cheese. I haven’t tried it yet, but I just have a feeling it would work well. You’d need to warm it after blending since the heat from the cooked potatoes wouldn’t be a part of it anymore. But yeah, just options in case anyone is like, “I hate potatoes” or something.
Now if you’ll excuse me, I’m gonna dim the lights and put on a movie because I’ve got some nachos to DEVOUR IN THE DARK LIKE A PSYCHO. xo. Emma
Credits // Author and Photography: Emma Chapman. Photos edited with A Color Story Desktop.
16 Aug 16:43


Quick Green Curry Chicken with Zucchini Noodles
by Lisa Lin
This green curry chicken dish is one of my favorite things to cook on a weeknight. It comes together so fast and it is packed with vegetables!
Continue reading "Quick Green Curry Chicken with Zucchini Noodles" »

15 Aug 13:55
Weekday Weekend – Our Cookbook
by Emma Chapman
 Today we are beyond thrilled to announce that our cookbook, Weekday Weekend, is now available for pre-order! We have shared lots of little peeks as we’ve been working on this book since 2015 (when we let you in on the secret). Elsie and I have emailed, texted, and traveled to work together on this book SO many times over the past year and a half. You can see a few pictures from when Elsie and I shot the final images at her house in this Casual Friday post. Plus, there have been (and will be—you’ve been warned) lots of behind the scenes shared on our IG stories. This is one of the first big projects we’ve completed together while living in two different states and I kind of can’t believe it’s already here!

 So what the heck is this book? Maybe the name “Weekday Weekend” sounds like more a calendar project to you than a cookbook. Well, like we hinted at in our announcement post, our goal was not to write just any old cookbook. We really wanted to create something that reflects the overall message of our brand, A Beautiful Mess. So we wanted the book to be brimming with positivity and inspiration, with a message aligned with living a happy and healthy (balanced!) life, and if it would somehow have a sprinkle of goal-setting thrown in, that would be a big plus (obviously we packed it full of recipes and beautiful food photography as well).
The book really has two components: First, there’s a challenge you can take. We call it the Weekday Weekend challenge, which is how the book got its name. For 4-6 weeks, you eat according to five rules for five consecutive days (your weekdays) and then on the weekend you kick back and enjoy a few treats you’ve been craving all week. It’s simple but, hopefully, still challenges many of you. It’s a lifestyle that we both feel really good about living, or you can use the challenge as a kind of reset button after you may have gotten a bit off track (hello holiday season, am I right?). What are the five weekday rules?
Eat a variety of foods.
No refined or artificial sugars or sweeteners.
No refined white flour or white rice.
No dairy.
No alcohol.
It’s basically four no’s and one BIG yes. And the cookbook is also based on a mostly plant-based diet, as basically every recipe is vegetarian-friendly and many are vegan-friendly as well. But there is a LOT more information about the rules, the challenge, and what it all means in the book.
And speaking of information, we developed this cookbook along with two dietitians’ who also provide lots of additional information throughout the book. You will LOVE learning from Lindsey and Sarah; I have learned so much from them already. And I hope many of you will get to know them through this cookbook as well as through a small series we are going to begin on the blog later this month called “Ask a Dietitian.” I don’t know about you but I’ve found that eating healthy can become really challenging when you’re presented with lots of different, and often conflicting, information. So it was really important to us to work alongside our experts, Lindsey and Sarah, so that we can all learn more together and feel empowered to make the best choices we can.
And if you are wondering if every single recipe in the cookbook is based on the weekday rules, the answer is no. A large portion of the cookbook is dedicated to recipes that fit within the challenge, but we’ve also included recipes for your weekend too, including desserts and cocktails. We believe the good life is a balanced life.

 And if taking the challenge just doesn’t sound like your thing, that’s cool. No pressure! But if you enjoy beautiful cookbooks that are filled with a blend of healthy and indulgent recipes, then you’re already gonna love this cookbook anyway.
 So in a nutshell that is what our cookbook is all about. I promise we will be sharing lots more here on our blog as well as on our IG, but for now above are just a few peeks of some of the recipes you can find in our book.
Weekday Weekend is currently available to pre-order, and it will be in bookstores (as well as available online for immediate purchase) on November 7. We also plan to host a Weekday Weekend challenge for you all to join in on via social media starting January 1 for the New Year, so I do recommend you pick up your copy before then if you want all the info and recipes.
Maybe some of you are wondering what the deal is with pre-orders. Like, you don’t get the book now so why bother ordering now? We get it, really we do! Pre-orders are a way for retailers to gauge how interested people may be in an author’s new book, so for us it’s a really, really good thing if you pre-order. But for you, it just means you buy something without getting anything yet, and that’s not so great. So it was really important to us to create some fun and super exciting freebies that you will receive if you pre-order. It’s our way of saying THANK YOU for showing interest in our cookbook early, because it really does mean a lot to us. With every pre-order, you will receive four REALLY fun downloads you can use. Here’s what you get …
 First, we commissioned Brittany Wright of @wrightkitchen to create a print that communicated the theme of the cookbook and we LOVE how it turned out. I am a huge fan of Brittany’s work and have followed her online for years. If you’re not familiar with her photography, go check her out immediately because she creates some really beautiful and artistic images—mostly centered around food. She created the above image just for our pre-order readers and you’ll receive the high-res version with your pre-order (see instructions here), so you can print it as large as you like for your home. I have this print hanging in my dining area right now and it adds so much color and excitement to the wall. Rainbow food? Sign me up!

 We also created three more digital downloads that are useful for the challenge. You’ll receive a calendar to mark your progress, a meal prep game plan you can print for any or every week (includes shopping list area!), and a fun sheet of icons you can use all sorts of ways. The icons can be printed on any kind of paper so they could become: stickers, magnets, vinyl decals, or even temporary tattoos.
Something beautiful
Something useful
Something fun
You get it all with your pre-order as our way of saying thank you. To get instructions on how to receive the downloads after you pre-order, check out our cookbook info page.
 I turned the icons into both magnets and vinyl decals, which I added to my phone (similar to this post I shared recently). But you do you and please someone make them into temporary tattoos and send us a pic!
 Friends, I also have to add a big, huge THANK YOU to all A Beautiful Mess readers. I have about one million cookbooks on my shelves at home. I would say the word “obsessed” might apply to my love of cookbooks. And I’ve been dreaming about getting to write one for probably nearly a decade by the time this one comes out. And really, truly, I don’t know if we would have gotten this opportunity without this blog, and without all of you who read it. From the very bottom of my heart, thank you. I am silently thanking the universe as well because I feel so incredibly happy to be writing today about our cookbook coming out. It feels so good and a little bit surreal.
If you want to know more about our cookbook, check here. And if you have any questions or want to know more, please let us know in the comments. xo. Emma (+Elsie)
Credits // Author: Emma Chapman. Photography: Amber Ulmer, Emma Chapman, and Brittany Wright. Other pre-order designs by Mara Dockery.
14 Aug 19:12


Cold Pea Salad
by Elise Bauer
Shh.listenyummmmmm
Long warm summer days are perfect for chilled pea salad!
This recipe uses frozen peas, which you don’t even have to defrost, green onions, water chestnuts, and smoked almonds. The peas do thaw a bit, but they’re wonderful crunchy and cold too.
I first encountered this delightful salad at a friend’s potluck. It was one of the dishes that everyone went back for for seconds.
I’m not sure of the original source of the recipe, but since the recipes calls for Smokehouse Almonds, perhaps the almond company? It could easily be made with tamari almonds as well. You just want salty, crunchy, roasted almonds for this salad.
Do you have a favorite pea salad? Please let us know about it in the comments.
Photos and recipe updated, first published 2007
Continue reading "Cold Pea Salad" »

14 Aug 19:12


Turkey Taco Salad
by Sally Vargas
For a quick supper, especially in warm weather, you can’t beat a big taco salad like this one.
Make the bean and turkey topping in a big skillet, and serve it warm over lightly dressed crisp romaine. Or make it ahead and serve it cold. It’s up to you.
Continue reading "Turkey Taco Salad" »

14 Aug 19:11


9 Back-to-School Ideas! by PW Food & Friends
by PW Food & Friends
Is it just us, or is summer is flying by? It’s hard to believe, but school will be starting before we know it! As we prepare for all things back-to-school, the thought of packing school lunches every day can make us want to lie down and take a nap. To gear up and adjust our attitudes, we combed Food & Friends for some fresh ideas to help us earn an A+ in school lunch. The following are some great recipes that we think are contenders to be go-to lunchbox items this year. We’ve got alternatives to the basic sandwich, homemade nut butters, delicious granola bars and more!

You Rule! Cookies. Yes, school means no more sleeping in. But cookies make everything—even homework—a little better!

Oatmeal Sandwich Bread. This bread can transform even a simple peanut butter and jelly sandwich into a special treat.

5 Pinwheel Sandwiches for Lunch Boxes. The kids will enjoy these colorful sandwiches, and these are easy enough for them to make on their own!

5 Gluten-Free Lunchbox Ideas. Can’t do regular wraps and sandwiches? These gluten-free options are just what you need to escape the lunchbox rut.

How to Prep Veggies for the Week. Take control of your busy schedule with these tips for prepping veggies ahead of time. Then you can easily incorporate them into your weekly menu!

How to Make Granola Bars. Better than store-bought, and easily customizable to include their favorite ingredients.

Baked Apple Chips. Give them a healthy alternative to regular chips. For an added protein boost, dip these in almond butter or go nut-free with chocolate sunflower butter spread.

Fruit and Nut Energy Bites. These morsels are the best thing ever. Make extra for yourself!

How to Make Chocolate Pudding. Perfect for their lunchboxes, or for an after-school treat!
We hope these recipes help you introduce some fresh, homemade options to your lunch packing game. Please tell us in the comments if you have favorite lunchbox meals or tricks to keep them interesting. And enjoy your summer while it lasts!
11 Aug 10:06
A Certain Silence
by swissmiss
Shh.listenIs this the artist that your mom has a painting or two from?


The artwork by Jim Verburg made me look.
04 Aug 14:43
Screen Time
by swissmiss
“There’s not a single exception. All screen activities are linked to less happiness, and all nonscreen activities are linked to more happiness.”