Shared posts

08 Feb 00:06

Watch Out for that Snowbank! How to Recover from 5 Types of Skids

by A Manly Guest Contributor

Skids_Header_550

Editor’s Note: This is a guest post from Wyatt Knox from Team O’Neil Rally School.

With winter comes a whole new range of driving hazards — darkness sets in much earlier, wind and snow reduce visibility, and ice makes roads slippery and treacherous. Annually, there are over 100,000 injuries that occur from car accidents on snowy or icy pavement. If you live in an area where snow is a winter reality (roughly 70% of the U.S. population lives in areas that average at least 5 inches of annual snow), then it’s vital to have the skills necessary for driving safely in inclement conditions. One of those skills is how to recover from a skid. The feeling of losing control of one’s vehicle can be quite scary, and it’s easy to panic and make the wrong moves if you don’t know what to do.

Below we outline the 5 most common types of skids on wintery pavement, and how to recover when they happen. In general, if you stay calm, restrain yourself from making drastic movements, and follow the tips below, you’ll be able to safely travel the nation’s highways and byways throughout the winter months.

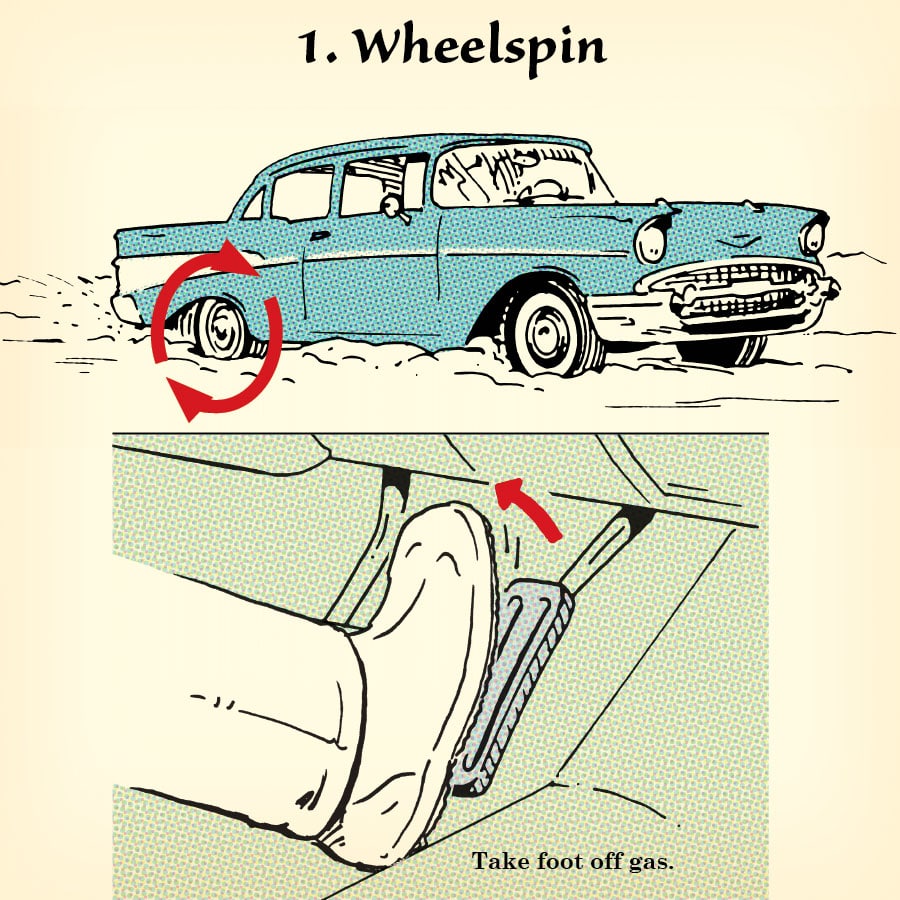
1. Wheelspin

Skids_900-1

Wheelspin occurs when you try to accelerate too abruptly or enthusiastically for the available traction. The tires will start to spin at a faster rate than the vehicle is actually traveling, which can lead to different outcomes depending on whether the vehicle is front, all, or rear-wheel drive. The cure for wheelspin is simple: just back off the throttle until the tires regain traction, and try ramping it up more slowly and cautiously next time. This makes wheelspin a very easy litmus test for how much grip you actually have. For example, intentionally hitting the gas while leaving your driveway on a snowy day to see how easily the tires spin is like dipping your toes into a pool to test the temperature.

Wheelspin is generally to be avoided in turns, but can often actually work to your advantage when moving in a straight line. On pavement or glare ice, there is no real benefit to spinning the tires, but we need to think of the road surface as three dimensional in many cases. Say you have a few inches of snow on top of a good paved or gravel surface; spinning the tires will chew through the fluff and catch good traction on the underlying surface, which can often make the difference between getting up a snowy hill or sliding back down. The same is true in mud or anywhere else there is a slippery material on top of a hard, grippy material.

Traction control in some vehicles will not allow your tires to spin in this fashion. It will either cut the throttle, apply brakes to the spinning wheels, or both. This might mean that your vehicle can’t make it up slippery hills or even get out of your parking space if there’s snow. Try the same thing with the traction control off and you might find that you have no problem at all.

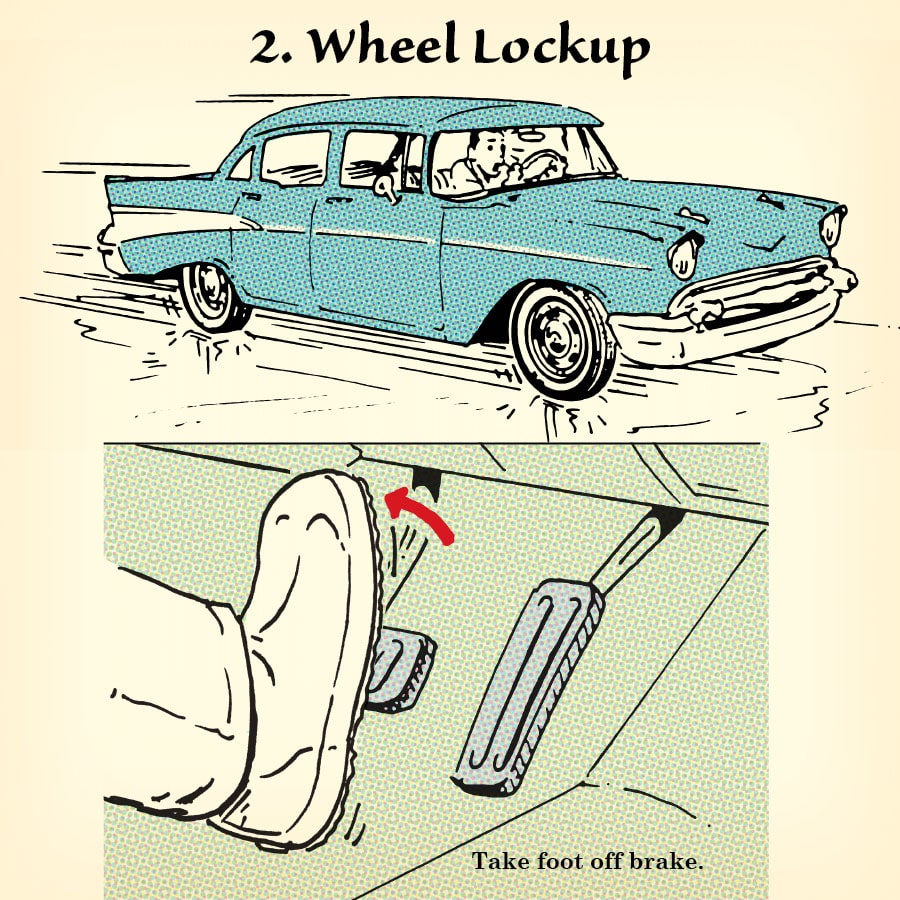
2. Wheel Lockup

Skids_900-2

Wheel lockup occurs when you try to brake too aggressively or suddenly for the surface you’re on. The tires will essentially stop turning while the vehicle is still moving. The solution is thankfully very simple: release the brakes until the tires start to turn again. You may need to release the brakes completely, and try braking again more softly and progressively.

You may find that you can actually brake fairly hard on a slippery road, as long as you do it smoothly. If you suddenly go from 0% to 50% brake on the snow, for example, the tires will probably lock up. If you build up the brake pressure slowly and progressively, however, you might be able to brake well beyond 50% on the same surface. Just like with wheelspin, wheel lockup can be a very handy gauge to have in changing conditions. Occasionally test the brakes in a straight line as you’re driving on a slippery road to feel for wheel lockup; this is a good indication of how much grip you’re working with.

Wheel lockup can also be an advantage in a straight line, in the same conditions that spinning the tires would have benefit. On a loose surface, locking the tires will scuff away the top surface, often digging in and plowing the soft stuff out of the way to find better grip. On snow, gravel, and especially sand, locking the tires up can stop the vehicle very quickly.

Anti-Lock Brake Systems (ABS) will not allow your wheels to lock up; they’ll pulsate brake pressure at all four wheels so that the tires keep turning.  This means that on a loose surface, your car may not decelerate very well, and you’ll need to leave extra braking and following distances to compensate.

3. Understeer

Skids_900-3

An understeer skid occurs when the front tires lose grip, and the car is unable to turn around a corner. It’s often referred to as “plowing” or “pushing,” and it most often occurs when you enter a corner with too much speed for the conditions. If you’re doing 70 mph in a 30 mph corner, unfortunately it’s all over…look for something soft to hit and work on reading the road and the conditions better next time. If you’re only slightly too hot coming into a corner, the solution is to let off of the gas and apply the brakes gently, while looking where you want the car to go at all times.

Spinning the front tires can also cause massive understeer. In a front-wheel drive car, don’t spin the tires if you want to have any chance of turning. Locking the front tires in a corner will also cause horrible understeer; if you’re braking aggressively in any vehicle and trying to turn at the same time, you’ll need to release the brakes somewhat in order for the car to steer.

Understeer also happens because of weight transfer. If you’re accelerating, especially up a hill or in a vehicle with soft suspension, there won’t be much weight on the front end and you’ll have to lift off the gas or apply the brake a little to get the nose down. Weight on the front tires will push them down onto (or into) the surface, often giving you much better grip.

Resist the temptation to give the car more actual steering when you enter an understeer skid. It’s the natural thing to do — “The car won’t turn, so I’ll turn more!” — but the problem needs to be fixed with the pedals and not with your hands. You’re either accelerating or braking too much or not enough; adding more steering will only compound the problem and waste valuable time. You have the most grip with slight steering inputs — if your front tires are turned at high angles there’s very little chance they’ll do what you want.

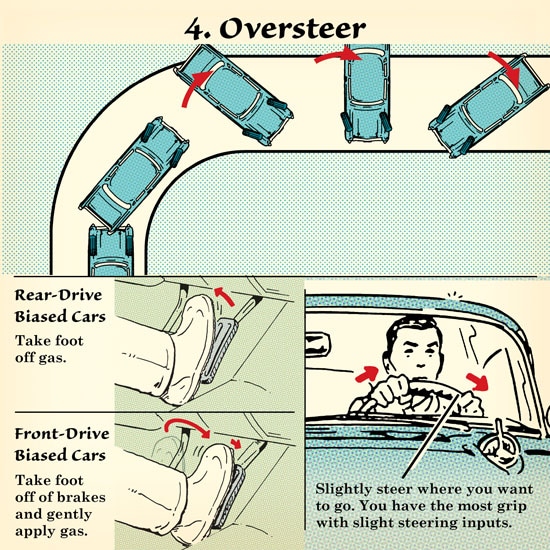
4. Oversteer

Skids_550-4-1

An oversteer skid occurs when the rear tires lose grip, and the rear of the vehicle starts to slide sideways. This most often occurs because of wheelspin in rear-wheel drive (and some all-wheel drive) vehicles, and the solution in that case is simply to back off the throttle, look where you want to go, and slightly steer in that direction.

Oversteer also occurs fairly often when you’re going too fast for the conditions, and apply brakes while turning a corner. This will shift much of the vehicle’s weight onto the front tires and off of the rear. The rear will start to come around simply because there is no weight on those tires, especially in pick-up trucks, front-wheel drive cars, or other vehicles that are naturally light in the back. This also happens going downhill around corners for the same reason. Again, the solution is to look down the road where you want to go, release the brakes, and even accelerate a little to put some weight back onto the rear tires to stop them from sliding.

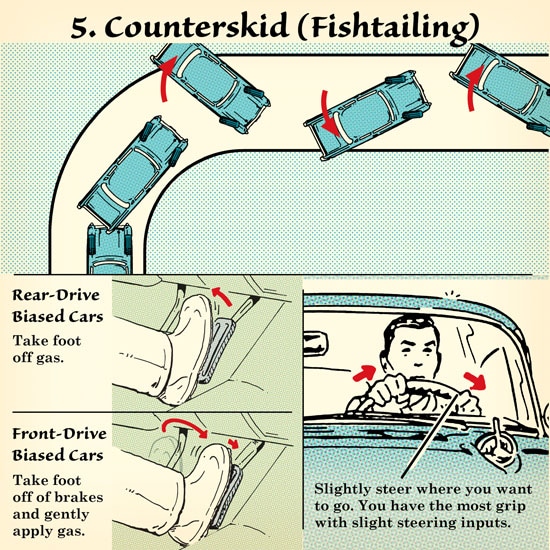
5. Counterskid

Skids_550-5

Skids_900-4-2

The counterskid occurs when you have met with oversteer and failed to correct appropriately. The rear end of the vehicle will skid back and forth, often building momentum with each swing. If you don’t fix the first or second skid, you’ll often generate enough energy to make the third skid very violent and difficult to recover from.

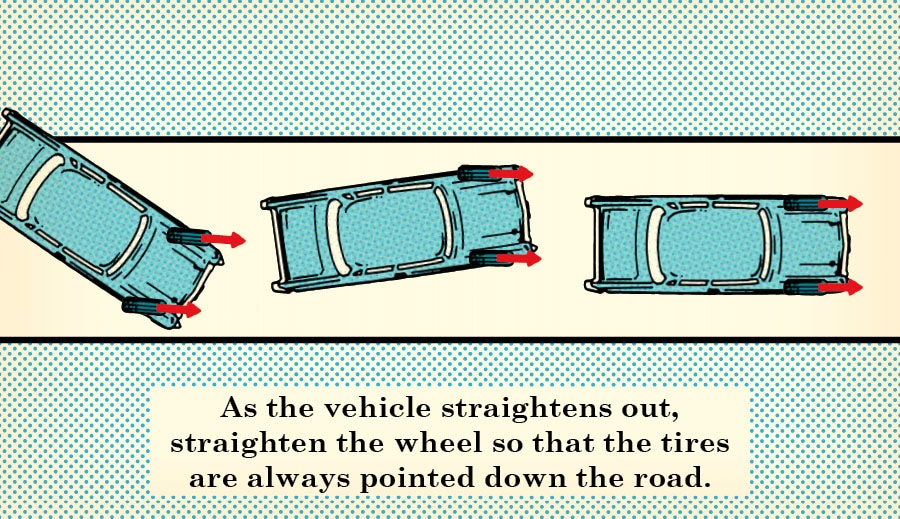
When you encounter oversteer, the key is to look down the road and only use enough corrective steering to point the front tires where you want to go. As the vehicle straightens out, straighten the wheel so that the tires are always pointed down the road. Counterskids most often happen when drivers correct late, overcorrect, and then repeat this mistake until they’re off the road. Known as “fishtailing” or “tankslapping,” counterskids can be difficult to recover from, but your vision is the key. Regain control of the steering, don’t let the car bounce back and forth, and you’ll be fine.

___________________

Wyatt Knox is a former US Rally Champion in the Two Wheel Drive Class. He is also the Director of Special Projects at Team O’Neil Rally School, instructs at several performance driving schools in the US, and currently races in both North and South America. 

Illustrations by Ted Slampyak

23 Nov 08:35

5 Classic Holiday Cocktails and Drinks to Warm Your Spirit

by A Manly Guest Contributor

1953coctails

Brand_Discover_125x125 This post is brought to you by Bespoke Post and their #BoxOfAwesome, your monthly lifestyle upgrade. To stock the right tools for the job below, try their mixology-inspired offering, Agave. We’re giving you 20% off to get you started.

Editor’s note: This is a guest post from Michael Hagan.

Ahhh, the holidays…

Whatever winter solstice-based holiday you celebrate, these drinks will get you into the holiday spirit, whether it’s to wind down after a long day of fighting the hordes of holiday shoppers, or to celebrate with friends and family. Holiday traditions and drinking oftentimes go hand in hand. Even the most teetotaling grandmother might reach for a snort of the old Glogg around the holidays. Many of these drinks are traditionally served warm, to warm the body and the spirit during the cold and dark days of the year. I hope you enjoy!

Hot Buttered Rum

This cocktail dates back to colonial times. Rum was more popular than whiskey around the time of the Revolutionary War. When the British imposed a heavy tax on imported molasses (for the making of rum) bribery and smuggling ensued, and played a part in sparking the sentiment of “No taxation without representation.” Our forefather’s taste for rum may have lead to revolution!

You’ll need to make a batter of butter and spices:

  • 4 oz of unsalted butter (I prefer Kerrygold — it’s grass-fed, and a little sweet)
  • 1 cup of brown sugar
  • 1 teaspoon of ground cinnamon
  • 1 teaspoon of ground nutmeg
  • 1/4 teaspoon of ground cloves
  • 1/8 teaspoon of salt

With the butter at room temperature, smash all the ingredients together in a bowl with a fork until fully combined. Using plastic wrap or wax paper, roll and form into a log. Refrigerate for later use.

To make the drink, use 2 tablespoons of batter and toss in a mug. Pour about 6 oz of hot water or hot cider (I prefer cider) on top of the batter and stir until it is completely dissolved, then add dark aged rum, about 1.5 oz or to your tastes. Stir to incorporate all the flavors, add a little sprinkle of nutmeg on top, and you have hot buttered rum! Serve with a stick of cinnamon to garnish and to use as a stir stick.

There are a few options for making this drink. You can choose a light or spiced rum if you prefer a lighter taste. You can also use either cider or water as the main mixer– try both! There are also some recipes that call for a bit of light cream to float.

Traditional Eggnog

eggnog

Eggnog dates all the way back to the 17th century. In Britain, it was a drink for rich landowners, as they had access to milk and eggs from their farms that city dwellers in London didn’t have and couldn’t afford. The American colonists, however, had plentiful access to farms, and therefore milk and eggs, so the drink became more popular here and eventually transformed into a holiday staple.

The following recipe can be used with any type of alcohol, though I don’t recommend clear liquors like vodka, gin, or light rum. A cup of dark or spiced rum, aged whiskey, or brandy (or combinations of them) all can make this drink shine.

  • 6 eggs
  • 3/4 cup of sugar
  • 1 quart of half & half
  • 1/2 cup bourbon
  • 1/2 cup brandy
  • 1/2 teaspoon ground nutmeg

Separate the eggs, set whites aside. Beat the yolks with a mixer with 1/2 cup of the sugar, then stir in the half & half, bourbon, brandy, and nutmeg. In a separate bowl, beat the egg whites with 1/4 cup of sugar, until it thickens and you get “stiff peaks.” Fold the whites into the yolk/booze mixture, then refrigerate. When ready to serve, spoon into a mug and sprinkle nutmeg as a garnish.

If you’re looking for a tasty variation on traditional eggnog, try the Tom and Jerry. It has nothing to do with the cartoon cat and mouse. Rather this classic drink was invented in 1821 by journalist Pierce Egan as a way to promote his book with one amazingly elongated title: Life in London: The Day and Night Scenes of Jerry Hawthorn, Esq. and His Elegant Friend Corinthian Tom, Accompanied by Bob Logic, The Oxonian, in their Rambles and Sprees through the Metropolis. Warm, whipped, and made with brandy and rum, the Tom and Jerry was a holiday staple and popular wintertime belly-warmer up through the 1950s. Because the batter that makes up its foundation is more difficult to produce in a pre-packaged, ready-to-serve form, it was supplanted by eggnog which could be easily sold at the local grocer (though you can sometimes still find Tom and Jerry batter for sale in the Upper Midwest). But if you’re looking for a unique and classic drink to offer your guests, it’s a recipe worth dusting off and serving up in its traditional vessel — a gold-rimmed mug emblazoned with the Tom and Jerry name.

Obligatory warning about raw eggs: if you don’t want to use raw eggs, you can buy pasteurized eggs, which have all the scary bacteria neutralized. If you want to use raw eggs, use fresh, unblemished eggs with a thick shell.

Holiday Glogg

Glogg is a mulled wine of Nordic origins. Many cultures have a mulled wine holiday tradition, and they’re all very similar, but the following recipe is a close representation of the Nordic style.

  • 1 gallon of dry red wine
  • 1 1/2 cups brown sugar
  • 1 tablespoon of Angostura bitters
  • 5 whole cardamom, crushed
  • 5 whole cloves
  • 1 inch fresh ginger, peeled
  • 1 cinnamon stick
  • peel of 1 orange
  • 2 cups raisins
  • 2 cups almonds, slivered
  • Optional: akvavit, brandy, or vodka

Stir the wine, spices, sugar, and orange peel together in a glass or plastic bowl (some metal bowls could react with the wine) and refrigerate overnight. Strain it into a pot and simmer until warm, stirring. To serve, add a few raisins and almonds into each small mug before ladling in the warm glogg. You can add one of the above liquors to kick it up a bit!

Wassail Punch

wassail

Wassailing is an English winter tradition that reaches back hundreds of years, when peasants would sing in front of the houses of feudal lords, wishing good tidings for the coming new year in exchange for food and drink. The singing would separate the request for sustenance from begging, which was frowned upon. This tradition eventually turned into what we now know as Christmas caroling.

In England’s apple growing regions, wassailing was done at the orchard to ward off evil spirits and bless the trees for a good harvest. Crowds of wassailers would utter incantations, and then wail, bang pots, shoot off guns, and create enough racket to chase away the evil spirits. The revelers would consume plenty of wassail — a hot, mulled cider — as they drank to the health of the trees. This traditional festival continues on today in places like Somerset and Devon.

Warning: simmering this drink on the stove will fill your home with wonderful smells and definitely get you in the holiday spirit!

  • 12 whole cloves
  • 6 whole allspice berries
  • 1/2 inch fresh ginger root, peeled and sliced
  • 3 cinnamon sticks
  • 12 whole white peppercorns
  • 1 gallon fresh apple cider
  • 6 oz. cranberry juice
  • 3/4 cup light brown sugar
  • 1 oz bourbon (or other dark liquor, if so desired)

Place all spices into a large spice bag, or bundle in cheese cloth then tie off with kitchen twine. In a large pot, bring apple cider, cranberry juice, and brown sugar to a boil, making sure you stir up all the brown sugar to get it dissolved. Also throw your spice pack in there. Once boiled, let simmer for at least 30 minutes. When ready to serve, pour into a mug containing 1 oz of your favorite dark liquor, preferably bourbon. Serve with a dusting of nutmeg and a cinnamon swizzle stick.

Peppermint Alexander

Who thinks about the holidays without thinking about candy canes? We’re barraged with pumpkin-flavored everything in the fall, but just after Thanksgiving everything becomes peppermint flavored. They even make white chocolate and peppermint flavored Pringles! Yes…peppermint potato chips.

This cocktail uses the white chocolate and peppermint flavors and keeps the potato chips where they belong — in the bag. This one’s not as traditional as the rest, and probably too foo-fooey for a lot of guys, but it’s good to have a drink or two up your sleeve that can impress your lady party guests or delight a date.

  • 1 oz white chocolate liqueur
  • 1 oz vanilla vodka
  • 1 oz peppermint schnapps
  • Splash of half & half
  • Crushed candy canes, to rim the cocktail glass

Wet the rim of the cocktail glass in simple syrup (1 part sugar and 1 part water — boiled until the sugar is dissolved), then rim the glass with finely crushed candy canes. Set aside. In a cocktail shaker, pour all liquids over ice, and shake until frothy. Strain into previously rimmed cocktail glass. Garnish with a sprinkle of the crushed candy canes or a small whole candy cane. Enjoy!

What are your favorite holiday drinks and cocktails?


22 Nov 09:23

Wouldya believe: a 19-inch tablet monitor for under $400?

by Rick Rodriguez
The Monoprice 19-inch Interactive Pen Display

The Monoprice 19-inch Interactive Pen Display

UPDATE: We've got the unboxing and initial (disappointed) impressions right here.

* * *

The list of products attempting to undercut the premium-priced Wacom Cintiq line of tablet monitors keeps growing.

I've already written about the Bosto Kingtee and the Yiynova product lines (a full review is coming soon, promise!).

But those inexpensive products look like luxury items compared to this forthcoming model from Monoprice.com, which lists for only $390.

Thanks to reader Justin Davis who notified me about this new product. Here's what the Monoprice website has to say about its features:

  • 1440x900 resolution
  • 5080 lines per inch (lpi) resolution
  • 2048 levels of pressure sensitivity
  • 200 RPS report rate
  • 160° horizontal/140° vertical viewing angles
  • Rechargeable pen-stylus
  • Angle adjustable stand from about 10 ~ 80°
  • Compatible with Windows XP and later, Mac OS X 10.4.x and later

Normally I'd be very skeptical of this product, but I've had a lot of success over the years with Monoprice's rock-bottom priced cables and video switchers. Pen tablet expert Ray Frenden has also positively reviewed Monoprice's line of low-cost Huion tablets. 

According to Frenden, Huion employs UC Logic digitizer technology, which powers the Yiynova MVP22UHD. I looked on the UC Logic and found this MJP19U model, which offers the same specs as the Monoprice product but features slightly different styling.

We should know how well the tablet monitor performs soon enough. It is scheduled to be available December 9.

Will you be getting one?

20 Nov 06:43

Surface Pro 2: What Runs, What Doesn't

by Rick Rodriguez
Software tested this update (7/31/14): Mudbox 2015 SP1, runs but multi-touch rotation unresponsive.  Requires May 21, 2014 Intel HD graphics driver or higher.

Software tested this update (7/31/14): Mudbox 2015 SP1, runs but multi-touch rotation unresponsive.  Requires May 21, 2014 Intel HD graphics driver or higher.

So you're dying to max out your credit card on a new Surface Pro 2 but are worried your favorite won't run. Or you've got the Microsoft wonder tablet but don't want to plunk down a bunch of cash on a graphics app that will blow up your new machine. 

Fear not. You've come to the right place. "What Run, What Doesn't V1" was the raison d'etre for this blog and we're proud to present the Surface Pro 2/Windows 8.1 version. Rather than update the original, we'll keep that one in place for anyone who chooses not to update to Windows 8.1. (Don't know why any of you would do that, but we know there are paranoid folks out there who fear change). 

Important note: the list below contains only versions I've personally tested on my Surface Pro 2. It's very likely that older versions listed in the original feature will still operate, but we won't be able to re-test those older apps for Windows 8.1 compatibility.

Recommendations are based on UI suitability to pen and touch navigation. 

The list below will grow as we install more software. Since most graphics apps limit the number of installations, we're have to be somewhat deliberate in how much we migrate at a time. 

As always, if you've got a specific tool you'd like us to test, please let us know in the comments section below. 

Adobe

Allegorithmic

  • Substance Painter 0.3.0 (beta) - runs

Ambient Design

  • ArtRage 4.0.6 - runs, recommended

Autodesk 

  • 3DS Max 2015, 2014 - runs, mouse strongly recommended
  • Maya 2015, 2014  - runs, mouse strongly recommended
  • Maya LT 2014 - runs
  • Mudbox 2015 SP1 - runs, multi-touch rotation unresponsive. Requires May 21, 2014 Intel HD graphics driver or higher.
  • Mudbox 2015*, 2014.5, 2014** - runs, *requires Intel HD display driver update, **crashes on several primitive objects
  • Mudbox 2013, 2012  - incompatible, require discrete graphics
  • Mudbox 2011 x64 - runs
  • Sketchbook Pro 6.2.5, 6.2.4, 6.2.3  - runs, recommended
  • Softimage 2015, 2014  - runs, three-button mouse required

Blender

  • Blender 2.7, 2.69 - runs, mouse recommended

Celsys

  • Clip Studio Paint 1.2.8 (Japanese)  - runs
  • Clip Studio Paint 1.3.1, 1.2.7 (English) - runs, recommended 

Corel

  • Corel Painter X3 - runs

DAZ

  • DAZ Studio 4.6 - runs

eFrontier

  • Shade 3D Professional 14 - runs 

Foundry/Luxology

  • Modo 801 SP1, 801, 701 SP5 - runs

Inkscape

  • Inkscape 0.48.4 - runs

The Krita Foundation

  • Krita Desktop 2.8.1.1 - runs

Nevercenter

  • Silo 2.3, 2.2 - runs

Pixarra

  • TwistedBrush Pro Studio 20.06 - runs

Pixologic

  • Sculptris Alpha 6 - runs, recommended
  • ZBrush 4R6 - runs, not recommended due to small UI

plasq

  • Comic Life 3.0b1 - runs

Serif

  • DrawPlus X6 - runs

61 Solutions

  • Mischief 1.11, 1.10, 1.09 - runs, no multi-touch support

Smith Micro

  • Manga Studio 5.0.4, 5.0.3 - runs, recommended 

Systemax

  • Paint Tool SAI 2 (beta), 1.1 - runs, pressure sensitivity works, but there is limited touch rejection. Very easy to leave stray marks. No touch pan, rotate or zoom.

tetraface

  • Metasequoia 4.1.2 (64-bit) - runs

Trimble

  • SketchUp Make 14.0.4900 - runs

Triple Squid Software Design

  • Moments of Inspiration (MoI3D) 3.0 beta, 2.0 - runs, recommended

TVPaint Developpement 

  • TVPaint Animation 10 Pro - runs

Unity Pro 4.3.0b6 - runs, requires mouse

Web Technology Corp.

  • Comipo! 1.81.00 - runs


15 Nov 11:26

Yiynova MVP22U(V2) Unboxing

by Rick Rodriguez

Look what just arrived... 

The MVP22U(V2) is Yiynova's highest end tablet monitor, featuring a 21.5-inch diagonal 16:9 display with 1920 x 1080 resolution. The pen offers 2048 levels of pressure and ships with two replacement nibs. Most importantly, the tablet monitor retails for $969 plus $30 shipping in the U.S., making it almost exactly half the price of the Wacom Cintiq 22HD.

I'll set it up on a desktop first before testing with both the Surface Pros later this week. 

UPDATE November 10: The tablet monitor I unboxed below had an issue where the picture would go dark after 20- or 30-minutes of use. US distributor The Panda City was very helpful and responsive. After trying a couple of long-distance fixes, they agreed to send a replacement monitor which I received Friday. 

The Yiynova is now working happily alongside the Surface Pro 2, connected via the Docking Station and the Microsoft mini DisplayPort to VGA adapter. I'll post a full review this week. 

The box is professional, though unsurprisingly generic.

The box is professional, though unsurprisingly generic.

Packaging material is clean and compact, much preferable to styrofoam.

Packaging material is clean and compact, much preferable to styrofoam.

I'm not a fan of the white bezel, but the fit and finish of the MVP22U is 
very nice.

I'm not a fan of the white bezel, but the fit and finish of the MVP22U is very nice. 

Package contents, left-righ top-bottom: attached VGA, USB cable, 
miniDisplay to VGA adapter, power cord, power supply, pen holder, stylus, 
nib remover.

Package contents, left-righ top-bottom: attached VGA, USB cable, miniDisplay to VGA adapter, power cord, power supply, pen holder, stylus, nib remover.

More details after I play with it for a while. 

First effort with Manga Studio. Yabba dabba do!

First effort with Manga Studio. Yabba dabba do!

Connecting the Surface Pro 2 with the just arrived docking station was just 
as effortless. No special driver means the SP continues working as is, 
allowing finger pan, zoom, rotate with the left hand while painting with 
the right.

Connecting the Surface Pro 2 with the just arrived docking station was just as effortless. No special driver means the SP continues working as is, allowing finger pan, zoom, rotate with the left hand while painting with the right.

31 Oct 06:57

Want to Start a Business? Consider These 5 Invaluable Lessons Before Diving In

by A Manly Guest Contributor

young businessmen

Editor’s Note: This is a guest post from Justin Spring.

On Friday nights, most testosterone-driven high school guys head out to the football field to either put on the pads or chase after the girls in the stands. I went to turn a profit.

At 16 years old, I started my first business among the throngs of a community gathered on muggy summer nights to cheer on the home team. Cheering means one thing: yelling. And yelling means that people will have tired, sore, dry throats.

For the penny pinchers unwilling to spend concession stand prices for their carbonated relief, the school had conveniently provided a pop machine in the stadium that would deliver an ice-cold can of heaven for 50 cents.

This pop machine had a particular quirk that lent itself fantastically to my young entrepreneurial spirit: it stubbornly required exact change. 

A lot has changed since 1998, but one thing hasn’t: nobody carries exact change. I set up shop beside that beautiful, glowing, humming machine and offered people exactly what they needed: exact change.

For a small fee to compensate my kindness and service, I’d sell them two quarters. Because they needed to soak their thirst, they’d gladly give me one dollar and I’d kindly give them two quarters, easily turning a $10 profit each home game.

It wasn’t much of a payday, granted, but I learned five invaluable lessons from that pop machine that helped me build the two successful businesses that I’m running today. 

Lesson #1: Be Necessary

If I’d sold can-koozies at the game, I have a hunch that I would have had far less success. Why? Because people needed a cold drink, not a holder for one. In my experience, I’ve learned that there are two types of business ideas: 1) “It would be nice if” ideas, and 2) ideas that make necessary things better.

Here are three questions to ask yourself to figure out if you have an “it would be nice if” idea or one that makes necessary things better:

  • Does this help someone do a necessary action more easily? Does it make someone’s job, responsibility, or task less of a pain in the neck?
  • Does this idea save someone money? What about time? Will the idea provide a way for people to do something more efficiently?
  • Is this idea a game changer? Does the idea change the way that people behave, operate, or think? Will this idea revolutionize an industry? How?

If you can’t answer yes to at least one of these three questions, you have an “it would be nice if” idea on your hands. Proceed with caution.

Lesson #2: Do Something You Know Something About 

Over the years, I’ve had hundreds of seemingly great ideas for a moneymaking business. Some of those ideas have since been discovered and turned into great profit by someone else. I should be bitter, right? I’m not. Here’s why:

I wasn’t the right man to lead the companies that would be birthed from those ideas. 

Over the last two years, I have raised over $1 million in investment capital for my technology start-up. All that nerve-conquering, sweat, presenting, and hustle served to teach me an invaluable lesson: the leader’s story (read: your story) matters.

Your background, experience, and education must align with the business that you are creating. Your business must be a part of you. I was able to raise the necessary capital for my start-up because I spent seven years preparing myself. Before building a digital marketing software product, I built a digital marketing agency. That means that I prepared myself to be the one person capable of executing my new business model.

Everyone has ideas. Successful people aren’t measured by the amount of ideas they have, but by their ability to execute a chosen few.

Lesson #3: Resolve Is Your Biggest Asset

Despite anything that you’ve heard or seen on TV, starting your own business isn’t very glamorous. It’s a grind that involves obsessive dedication and an unrelenting amount of effort and resolve.

It took five years for my digital marketing agency to fit into the “successful” label. I wanted to quit every single year before that. There were too many hurdles, too many unknowns, too many obstacles for the company to thrive. Many late nights, I laid awake justifying walking away from it all.

I can’t tell you how glad I am that I stuck it out. Here’s the lesson: Your resolve is the real “X” factor for your business.

Every start-up will encounter obstacles that will threaten to shut it down. Every beginning business will face seemingly insurmountable odds. Getting your idea off the ground will require your weekdays, weeknights, and weekends. There’s no getting around any of that.

To be successful, you must be resolved. 

If you’re launching out to start your own business, you must be able to answer one question without a hint of hesitation: are you prepared to fight? Will you be willing to stick to the plan even if it seems that it’s failing? Are you willing to make the sacrifices today that might pan out in 5 or 10 years?

Building a successful business from the ground up requires the resolve of Leonidas and the patience of Mother Teresa.

Lesson #4: Doing Something Awesome Requires an Awesome Amount of Side Hustle

When I started my first business (which failed), I had enough cash in the bank to support myself for six months. Young, and without the wisdom of the side-hustle approach, I promptly quit my full-time job and dove into the shallow end of the pool head first.

Two years later, I was renting a bedroom in a friend’s house for $200 a month, driving a downgraded car, eating off dollar menus, and living on a salary that brought in less than $1,000 a month.

I could have saved years of my life if I started growing my business while staying employed somewhere else. If you’re toeing the line and thinking of starting a new business, consider keeping your current job. You’ll keep your income and benefits, which will help you to make more level-headed decisions about your start-up and its future.

There should be one important caveat here: If you’re side hustling, don’t cheat hours on the clock. Your priority is your current job, and a man with integrity takes that responsibility seriously. Respect the person who took a risk to hire you, keep producing at your desk, and be a valuable contributor to your current company.

Once you get your start-up off the ground, you’ll expect the same from your employees.

Lesson #5: Ideas Are Cheap, Execution Isn’t 

I once had a friend approach me about a business idea that he was ready to set into motion. He wanted to build a company that would rent high-quality packing/moving crates in order to keep people from buying (and, more importantly, throwing away) boxes when they had to move. Letting him work through his business model and pricing structure, I noticed an unfortunate flaw: to make any real money off the company, he’d need to have several thousand boxes in circulation. Per week.

It’s unbelievable how the excitement of an idea can cloud our senses of judgment. It happened to me. And it happened to my friend above, who, despite my caution, dove into the shallow end of the pool head first and quickly realized there was no water.

No matter how great the idea, the numbers must add up if you’re going to be successful. Work through your overhead costs and schematics. Factor in your salary and the costs of your production. Know up front how many sales you’ll need to consistently make (and maintain) in order to turn a profit. You’re starting a business, after all, not a hobby.

The old adage holds true: You must do the math.

One Final Word

There’s one final lesson that the soda machine taught me during those humid summer nights: most people are addicted to convenience. That’s what helped me get away with charging a dollar for two quarters. Sure, I was saving them money because my product was cheaper than the concession stand, but I was also saving them time.

A lot of people will talk about starting a business and day-dream about being their own boss. Very few people will actually take the leap and invest the time. And a ridiculously small amount will actually see their dreams come to life.

That’s because building your own business isn’t convenient.

You’ll be misunderstood and frustrated along the way.  While your friends are busy buying nice cars and going away on fancy vacations, you’ll be pinching pennies to pay the bills and staying up late to answer emails. There are times that you’ll feel isolated and a bit foolish, and will be close to giving up and walking away from it all. When you have these moments, remember this quote, which I used to keep on my bathroom mirror and read to myself every morning:

“Every adversity, every failure, every heartbreak, carries with it the seed of an equal or greater benefit.” – Napoleon Hill, Think and Grow Rich

Plant those seeds and hang in there. It’s worth every second.

____________

Justin Spring is the Co-founder of Adept, an internet marketing company and BringShare.com, a SaaS application.


28 Oct 09:55

60+ Family Tradition Ideas

by Brett & Kate McKay

FT Header 2

Last week we published an article that discussed why and how to establish family traditions. Traditions offer numerous benefits: they strengthen your family’s bonds, enrich the life you share together, contribute to your children’s well-being, and create lasting memories. For this reason, they form one of the three pillars of family culture.

Today we offer a list of over 60 specific family tradition ideas. You can incorporate some of these directly into your family, or use them as inspiration for creating your own traditions.

Before we get started, let’s cover a few things that will help ensure that your establishment of new traditions will be met with success:

  • While it’s tempting to go crazy with starting lots of traditions, shoot for quality over quantity. If you do a couple from within each category, you’re gold.
  • Choose traditions that most resonate with you. Having said that, as you review the list, try not to immediately write off some as silly or not elaborate enough. This isn’t only about what appeals to you as a jaded adult, but what will appeal to your kids. If you think back to your childhood, some surprisingly silly and simple stuff was a lot of fun and created great memories.
  • Traditions need to be practiced regularly to be effective. It’s easy to throw a tradition out the window when life gets busy and you’ve had a long day. Commit to the tradition and do your best to be as consistent as possible with it.

The ideas below come from The Book of New Family Traditions, from mine and Kate’s respective families, from our friends’ families, and from those we’ve come up with for our own family.

Daily Connection Traditions

Daily Connection Traditions are the small things you do every day to reinforce family identity and values. Without thought and intentionality, your family’s daily “traditions” can devolve into everyone surfing the internet on their own devices. So be sure to incorporate some rituals that bring you together face-to-face and allow you to re-connect each day.

Secret Handshake. Secret handshakes have been used by groups for millennia to distinguish members and non-members. Make one up for your own family. It can be elaborate and complex or simple but meaningful. An example of the latter comes from a family profiled in The Book of New Family Traditions. This family had the tradition of squeezing each others’ hands three times to signal the three words “I love you.” On the day the daughter got married, the father squeezed her hand three times as he walked her down the aisle. “Only she knew that this was happening, a tiny personal ritual lodged invisibly within one of the grandest and most public, and she says it was one of the most moving moments of her life.”

Family Meal. Countless studies have shown the positive influence that sharing a meal together as a family (it doesn’t have to be dinner) has on children. We’ll be dedicating an entire post to how to get the most out of family meals, but in the meantime, consider these suggestions to turn the breaking of bread into a cherished tradition:

  • First: no TV, no cellphones, and no tablets.
  • Begin with grace. If you’re not religious, have everyone share something that they’re grateful for that day.
  • Family news: everyone takes turns sharing something positive and negative that has happened to them during the day.
  • “Got any stories?” This is a tradition that Kate and I have had for a few years. Each person is expected to bring something interesting to the table that they’ve read or heard during the day.

Family Prayer. For religious families, prayer is an important ritual. Family prayer doesn’t have to be just a dinnertime thing. You can pray as a family before everyone leaves in the morning, before everyone goes to bed, or both. Our family has prayers at night. Everyone takes turns saying the prayer, including Gus.

Family Singing Time. There’s something about singing that unites humans on a primal level. What’s more, through song, you can pass on your values and cultural heritage to your children. Our family always sings a song or two when we put Gus to bed. It’s something we’ve done since he was an infant, and you can tell it makes him feel comforted, loved (we often sing songs about being a family), and relaxed. It’s been cool to watch him slowly learn the words and start singing along with us.

I really hope that Gus or Scout is interested in taking piano lessons, as I have a very fond dream of one day standing around the piano singing Christmas carols together.

The “What We Learned Today” Journal. “Buy a fancy, leather-bound journal. Each night before bed, every member of the family needs to write something they learned during the day. Parents can transcribe for little children. Entries don’t have to be long or profound. It can be as simple as, “If you touch a turtle, he puts his head back in his shell.” This is a great way to foster a love of lifelong learning in your children.

Surprise Daily Drawing/Note. There’s a guy here in Tulsa who drew little comics or wrote inspiring quotes on the napkins he put in his daughters’ school lunches. Napkin Dad was born. I want to do something like this when my kiddos start school.

Family Hugs. Kate and I try to get in one family hug a day. Afterwards, we usually put in our hands and say, “Three, two, one,” before lifting them up and shouting “McKays!” Yeah, it’s kind of cheesy, but Gus loves it, and the idea is to really drive home our family identity.

FT 500-1

Bedtime Story. Children who have parents that read to them regularly typically do better in school and have larger vocabularies than children who don’t. Reading with your child will not only make them smarter, but it’s a great way to bond. There’s something really comforting about hearing your dad read aloud to you. For inspiration, check out this dad and daughter who read together every night for 3,128 days straight until the daughter was in college.

Evening Walks. Not only can walking help solve problems, but it can also strengthen families. Evening walks are a great time to get some fresh air and digest the day’s events along with your dinner.

Family Call-and-Response Motto. When they were growing up, brothers Jim and John Harbaugh (the coaches of the NFL’s San Francisco 49ers and the Baltimore Ravens respectively) didn’t have much. But their father always made them feel like they had everything they needed. To reinforce this feeling, he would ask his boys, “Who’s got it better than us?” To which they would respond: “Nooo-body!” Jim now uses the same call and response to build the unity of his football team.

Weekly Connection Traditions

Family Game Night. Analog games, from cribbage to Apples to Apples, are a fun and cheap way to bond and have fun together as a family.  Tamp the competition down and ramp the laughter up. I personally can’t wait to play Boggle with Gus and Scout.

Movie Night. Let the kids take turns picking a movie to watch, and do an occasional dad’s choice night as well to introduce your progeny to classics like Back to the Future and Raiders of the Lost Ark while waxing poetic about how movies were just plain better in the 80s. Have fun with the snacks too – come up with dad’s special popcorn recipe or occasionally take the kids to the drugstore and let them each pick out their own candy.

Saturday Football. There’s something incredibly relaxing and comforting about watching college football with your family on a Saturday afternoon in the fall. Pass down your alma mater pride as you cheer on your team together.

Pizza Night. Everyone loves pizza, and it’s nice to be able to look forward to having it on a certain night each week. Skip the delivery now and again and make your own – allowing the kids to decide how to top their own super simple mini pizzas.

Don’t like pizza? How about Taco Tuesday? We love Taco Tuesday around here.

Family Home Evening. Mormons are encouraged to set aside one night per week (usually Monday night) for Family Home Evening. A typical Family Home Evening includes a fun activity and a short lesson or devotional on some virtue or scripture. FHE is usually capped off with a special treat.

The goal of Family Home Evening is to teach your children the principles and values you want them to carry with them as adults, all within an informal and loving atmosphere. FHE can be adapted by families of any religious stripe or even families who aren’t religious. There’s no formula for Family Home Evening. Just corral the kids for 30 minutes one night a week for fun, discussion, and eats.

Family Vinyl Dance Party. AoM contributor Cameron Schaefer shared a fun family tradition in his post on getting started in vinyl record collecting. On Friday nights the Schaefer family gathers in their family room for a Vinyl Record Dance Party. A family member selects a soundtrack for the night, and they all dance until they collapse on the floor.

FT 500-2

Special Saturday/Sunday Morning Breakfast. Lots of families have special Saturday/Sunday morning breakfast traditions. For some it’s pancakes or cinnamon rolls, for others it’s a giant breakfast casserole. Dads and breakfasts just go together, so work on coming up with your own specialty.

Breakfast need not be a solely in-home tradition, however. I take Gus to Braum’s every Saturday morning for breakfast. Pancakes and milk for Gus. Sausage, egg, and cheese biscuit for dad. We’ve been doing this since Gus was about 10 months old, and we’ve rarely missed a Saturday. It’s a hoot to see Gus get all excited about “Breakfast at Braum’s” on Friday night.

Dinner & Grocery Shopping. Every Monday we go as family to a grocery store that also has their own little restaurant. We eat dinner there first and then do our shopping. Doesn’t sound really exciting, but we all look forward to it.

Weekly Family Meeting. Your family is an organization. And like any successful organization, you need to plan, discuss issues, and synchronize schedules. Enter the weekly family meeting. I’ll be dedicating an entire post on how to run a successful family meeting in the future. Stay tuned.

Monthly Connection Traditions

FT 500-3

Full Moon Walks. A full moon occurs roughly every 29 days. While you may have gotten used to seeing them, they really are a magical sight – especially for kids who haven’t lost their sense of wonder. Whenever a full moon has risen, take a walk outside at night as a family to have a look at it. Get into the woods sometimes if you can in order to experience the awe of nature at night. This is a great way to get your kids keyed in to the rhythms and cycles of our world.

Box of Goals. An important life skill for your children to develop is how to set and work towards a goal. What better way to teach this than with a family tradition? Get a cigar box or fancy wooden box and on the first day of each month, have your family members write down one goal they want to accomplish that month on a piece of paper and place it in the box. When next month rolls around, take out the pieces of paper and review the goals to see how everyone did. Then write new goals for the next month. Rinse and repeat.

Daddy Date. We have a friend who has three daughters. Ever since they were knee-high to a grasshopper, he took one of them each month on a “Daddy Daughter Date.” Rules were simple. The daughter he spent the evening with got to pick the activity they took part in. He didn’t care what they did. His goal was to give each one of his kids one-on-one time with dad.

The monthly date with dad isn’t just for daughters. You can do something similar with your sons as well.

Family Service Day. If creating a culture of service is part of your family mission statement, put that goal into action with a monthly Family Service Day. Designate one Saturday or Sunday to serving others. It could mean spending a morning at the homeless shelter or cleaning the garden of an elderly neighbor or sorting clothes at Goodwill.

Life Changes/Milestone Traditions

Milestone traditions celebrate events that may occur only a few times, or even just once for your immediate family. But they become traditions as they are passed down from one generation to the next.

New Home Traditions

New Home Dedication. Buying a home is a momentous occasion and thus a great time for instituting a family tradition. Some religious folks hold ceremonies in which they dedicate the home (and all those who dwell in it) to God.

In the Jewish tradition, it’s customary to hold a Chanukat Habayit (home dedication) party. At this gathering, words from the Torah are spoken and family and friends use the occasion to express their blessings and wishes for a fruitful and happy stay in this new home.

New Muslim homeowners will often host a feast in their new house and those that enter are to leave their blessing.

Differing Christian denominations have their own unique new home dedication rituals, but they typically involve a dedicatory prayer and a reading from the Bible. For some ideas on which scriptures to read check out this list. I know many Christian families that will place a plaque near their home’s entryway with the famous verse from Joshua 24:15 (“As for me and my house…”) after a home dedication ceremony.

“It’s a Wonderful Life” Blessing. In the classic holiday movie, It’s a Wonderful Life, George Bailey and his wife, Mary, give a nice housewarming gift/blessing to a family that just moved into a new house:

Mary: Bread… that this house may never know hunger.

[Mary hands a loaf of bread to Mrs. Martini.]

Mary: Salt… that life may always have flavor.

[Mary hands a box of salt to Mrs. Martini.]

George Bailey: And wine… that joy and prosperity may reign forever. Enter the Martini Castle.

[George hands Mr. Martini a bottle of wine.]

You don’t need to know a thoughtful couple like the Baileys to experience this tradition. Just do it yourself when you move into your home. Make some focaccia maybe, and enjoy it with wine for mom and dad and grape juice for the kiddos.

Mortgage Burning Party. This one is for you Dave Ramsey “gazelles” out there. Once you pay off your home mortgage, throw a party with your family and ceremoniously burn your mortgage agreement. Mortgage burning parties were actually once a common tradition in America, but due to changing mores and the increasing mobility of Americans (thus making it less likely a homeowner will live long enough in a home to pay it off), Mortgage Burning Parties are pretty much unheard of today. I think it’s a tradition well-worth resurrecting.

FT 500-4

Family Time Capsule. Bury a family time capsule when you move into what you think will be your “forever home.” Fill the capsule with some of your family’s favorites things, notes, and items that represent the time period. Then open in it up in 20 or 30 years. Make sure you exhume it if you end up moving sooner than you thought you would.

School-Related Traditions

First Day of School Photos. On the first day of every school year, take your kiddos to the front of the house and snap a picture of them for posterity. You’ll enjoy looking back at how they’ve grown through the ages. I remember looking forward to this little ceremony as a kid. It was my chance to show off my cool new backpack and Air Force One high-tops.

First Day of School Chalk Pep Talk. Kids can sometimes be a little nervous on the first day of school. Give them a nice surprise by writing messages of encouragement on the driveway with chalk the night before. It will put a smile on their face when they walk out the door the next day.

Parent/Teacher Conference Note. Whenever Kate’s parents came in for parent/teacher conferences, they would leave a note for her in her desk, telling her how neat her desk was, how nice her artwork on the wall was, and a nice thing the teacher had said about her. Kate says she really looked forward to finding the note and that it was cool to think her parents had been there.

College Acceptance Celebration. One family I know would celebrate their kids’ college acceptance letters by buying everyone in the family a t-shirt or sweater with the school’s logo and then having a barbeque with the university’s fight song playing in the background. The mom would then snap a pic of the whole clan dressed in their school colors, frame it, and pack it in their kiddo’s stuff when he or she shipped off to college. Cheesy? A little bit, but I always thought it was a nice gesture.

Wedding Traditions

Night-Before-Wedding Roast. We have another friend whose family always stayed together at a hotel the night before one of the kids got married. They’d hang out and do a good-natured roast of the bride or groom-to-be. They had a big enough immediate family (5 kids) to make this fun. If your family is smaller, invite close extended family to take part too.

Birthday Traditions

Most families have traditions for celebrating birthdays. Cake, presents, dinner at the Cheesecake Factory. You know, the usual. Below are some birthday traditions you may not have thought about.

First Cake Cut Wish. I picked this one up from Kate’s family. In addition to getting a wish for blowing out the candles, the birthday boy or girl gets another wish for making the first cut into the birthday cake. Two wishes, one cake. Can’t beat that.

New Privilege/New Responsibility Cards. Amidst all the fun and hoopla, remind your kid that with age comes greater power and with greater power comes greater responsibility. In addition to birthday presents, present your child with two envelopes. One envelope is labeled, “New Privilege”; the other, “New Responsibility.” Provide an age appropriate privilege and responsibility each year.

8th/ 18th Birthday Time Capsule. On your child’s 8th birthday have him fill a time capsule with some of the things he likes and a note to himself. Open it a decade later on his 18th birthday.

Nose Grease. This birthday tradition comes from our friendly neighbors north of the border. In Canada (particularly the Atlantic Coast providences) it’s common for the birthday boy or girl to get ambushed by friends or family members and have their nose greased with butter for good luck. The buttered nose supposedly makes the person too slippery for bad luck to catch them. This tradition is said to come from Scotland. I think I’m going to have to adopt this one as it hails from my ancestral homeland of Nova Scotia.

FT 500-5

The Yearly Measurement on the Door Frame. Many families have a doorframe where they keep rough pencil lines marking off the height of their kiddos as they age. Make it a tradition to take the measurement on birthdays.

Miscellaneous Traditions

Hunting Traditions. Our hunter/gatherer ancestors developed meaningful traditions to celebrate the life-giving hunt. While hunting is no longer essential for survival, many families continue to have traditions that surround their yearly hunt. A few include celebrating the first kill by having the new hunter share his harvest with those in the group, the Hunting Beard, and the after-hunt breakfast or dinner. There are many more. I’d love to hear yours in the comments.

Meteor Watching Party. Once a year or so (use this handy calendar) get everybody up in the pre-dawn hours, dress warmly, drive out to a spot where there’s less light pollution, lie down on a blanket, and pour cups of cider or cocoa from a thermos as you watch for meteors and point out different constellations to your kids.

Welcome to Fall Dinner. Usher in the first day of the indisputably best season of the year by having a harvest-y dinner: turkey, stuffing, apple crisp, and the like. It’s something my mom did in my family growing up and I really enjoyed it.

Baseball Opening Day. While football has overtaken baseball as America’s favorite sport, there’s still something about celebrating America’s pastime by attending a game on opening day that resonates with me. It’s a chance to connect with your kiddos over a sport that’s connected generations of American families.

FT 500-6

Barbershop Visit with Dad. Every man should frequent the barbershop. So should every little boy. Instill in your strapping little lad the time-honored, manly tradition of visiting the barbershop by making his first visit a big deal. Take pictures of him getting his ears lowered and then take him out for breakfast or lunch afterwards. From then on, get your haircuts together.

Annual Camping Trip. Inspire a love of the great outdoors in your kids by taking them camping at least once a year. If you find a campsite you love, return to it again and again as you build special memories around that place.

Another fun tradition is to pick a day each year that you go backyard “camping” with your kid.

Holiday Traditions

The holidays are the most tradition-rich time of the year. There are a lot of great classic traditions out there from making cookies for Christmas to doing an egg hunt on Easter. Here are some holiday traditions you may not have thought of.

Easter

Easter Basket Scavenger Hunt. Instead of setting out the Easter baskets by their bed or in the living room, have your kids do a fun hunt for them. Leave the first clue by their beds, and have them follow one clue to the next until they find their baskets.

An important note: adding a scavenger hunt to anything turns it into an awesome, memorable tradition. I’m not sure there’s anything more fun as a kid than a scavenger hunt.

Egg Wars. The fun of dyeing Easter eggs doesn’t have to end when you pour out the food coloring. On Easter Day, commence the egg wars. Two people each hold an egg and on the count of three, they hit the end of their eggs together. Whoever’s egg cracks loses; the winner goes on to another battle. You can offer a prize to whoever has the egg that lasts the longest. During the Great Depression, Kate’s grandfather’s family was so poor, that the prize was keeping the other person’s egg.

Halloween

Pumpkinfest. Make the classic tradition of pumpkin carving extra special by finding a nice pumpkin patch that you return to each year, taking a hayride while there, and making a whole pumpkin-themed meal to precede the carving (pumpkin soup, pumpkin bread, pumpkin pie…).

Tombstone Rubbing and Ghost Stories. Tombstone rubbing used to be a popular pastime with folks. It’s still popular among genealogists searching for info about ancestors. Basically, you just get some butcher paper, place it over the face of the tombstone, and then rub charcoal or crayon on it so that the lettering on the tombstone is transferred to the paper.

To make this activity a bit spookier, visit an old cemetery at night and have a contest to see who can get the oldest tombstone rubbing. (Make sure to bring flashlights!) Afterwards, tell ghost stories while sitting in the cemetery. Spoooky!

Candy Swapping Wizard. This is a good one if you’re not crazy about your kids grazing on their trick-o-treat candy for the next 6 months, but want to do something about it that’s more fun than curmudgeonly. Tell your kids to select X number of pieces of candy they get to keep, and then to place the rest of their booty outside the door to their room. During the night, a wizard comes and swaps their candy for a gift.

Jack O’ Lantern Burial. After serving valiantly on Halloween Night, a carved Jack O’Lantern typically experiences an ignoble end by slowly wilting away on the front porch and eventually being tossed in the trash. One family featured in The Book of New Family Traditions didn’t think their Jack O’ Lanterns deserved such an anticlimactic demise. So they decided to give their carved pumpkins a proper burial the day after Halloween. They have a small patch in their backyard that’s designated as the “Pumpkin Graveyard.” The day after Halloween the family brings their respective Jack O’ Lanterns to the graveyard and offer a short eulogy that goes thusly:

“We are gathered here to pay homage to our dearly departed Jack O’ Lanterns. Throughout their short lives our Halloween Pumpkins have brought both us and our Trick-or-Treaters much joy. We now consign them to the earth where they first came. May they rest in peace.”

All of this is done, of course, with tongue firmly placed in cheek.

Says the mother of this family, “The Great Pumpkin would be proud.”

Thanksgiving

Thankful Box. As they hang out before dinner begins, family members are encouraged to take time to anonymously write down a few things they are grateful for on slips of paper, which are then placed in a decorated shoebox. Later on as the family eats dessert, the box is passed around the table and each person draws a slip and reads it aloud until the box is empty. The fun comes both in hearing family members offer heartfelt (and occasionally humorous) thank yous, and in guessing who wrote what.

Turkey Bowl Football Game. For families that have huge extended family gatherings at Thanksgiving, a morning of touch football is a great way to work up an appetite for turkey and pumpkin pie later that day.

Watching the Lions Lose. No Thanksgiving would be complete without the family gathered around the TV to watch the Detroit Lions lose. It would be like Thanksgiving without pumpkin pie or the Macy’s Thanksgiving Day Parade.

Christmas

Out with the Old, In with the New. To teach your kids to live just a bit more simply, to accumulate less stuff, and not to hold onto what they have too tightly, require that for however many gifts they get for Christmas, they have to get rid of the same number of their old toys/clothes. Throw away or donate what they discard.

FT 500-7

Glass Wax Stencils. This is a tradition from Kate’s family that we plan to carry into ours. Glass wax is a liquid window cleaner that comes out pinkish and dries with a white frost. By blotting it with a sponge over stencils, you can, as the makers of glass wax used to tout, “turn you window into a winter wonderland!” Stenciling with glass wax used to be popular decades ago, but has almost entirely disappeared, making both the stencils and the wax hard to find. Look for the stencils on ebay and the glass wax at the Vermont Country Store.

Pickle on the Christmas Tree. Legend has it that during the Civil War, Private John C. Lower was being held at a prison camp and was given a pickle on Christmas Eve by one of the guards. Starving, he believed the pickle helped save his life, and after the war he began a tradition of hiding a pickle on the Christmas tree on Christmas Eve for his family to find the next morning. Other origin stories for this 19th century American tradition are floated as well. Nowadays, a pickle ornament is hung on the tree on Christmas Eve and whoever finds the pickle first the next morning gets an extra gift or is promised a year of good fortune.

Countdown to Christmas with Books. There are a lot of fun ways to count down to Christmas with your kids, from making a paper chain to opening the doors of an advent calendar. Here’s a new one I picked up from The Book of New Family Traditions: wrap 24 books about Christmas, and open and read one each night during December. On the 24th, the book that is opened is The Night Before Christmas.

Run a Marathon Before Opening Presents. The parents of a family we know who are very ambitious, gung-ho about life, and love physical challenges would make their kids run a marathon before they got to open presents. Not individually, mind you! The 26 miles was split between the parents and their 4 kids, depending on age and ability. Quite a way to teach delayed gratification.

New Year’s Eve

Rent a Hotel Room. Staying at a hotel is terribly exciting when you’re a kid. Rent a room on New Year’s Eve, bring board games and snacks, let the kids swim, and have a family slumber party to ring in the new year.

Banging on Pots and Pans at Midnight. The tradition of noisemakers at midnight originates from the belief that it would scare away bad luck and evil spirits. Let your kids run down the streets banging on pots and pans when the clock strikes twelve.

Eating Chinese. I’m not sure why we associate New Year’s Eve with Chinese food, since the Chinese New Year is on a different date, but Kate and I have started a tradition of going out for Chinese food on December 31. Just seems lucky somehow.

If you’re feeling more ambitious, try your hand at making our own fortune cookies and creating personalized fortunes for your family.

Putting Regrets to the Fire. Have each family member write down and then share one of their regrets from the past year. Then throw the regrets into the fireplace to symbolize a fresh start.

Despite the size of this list, there are tons of other great traditions out there – we didn’t even mention all the specific religious/ethnic/cultural traditions that exist! Tradition ideas are limited only by your creativity. Please share your family’s traditions in the comments!

Illustrations by Ted Slampyak


23 Oct 18:33

How to Turn Your Garage Into a Home Gym

by A Manly Guest Contributor

Garage Gym 2


This post is sponsored by Ram Trucks. Do you have a garage in need of an overhaul? Enter here for your chance at being one of three lucky winners.
What’s this?

Editor’s Note: This is a guest post from Jerred Moon.

Are you sick of all that is involved with getting in shape — with becoming stronger and fitter?

Training and getting in shape can be a chore at times, but is it really the training you don’t enjoy? With a little observation, or self-analysis, you may find the chore is often not the training itself. Of course, you may not love to exercise, but is it really that bad?

The worst part about fitness is all that comes with it: a long commute to the gym, crowds of people, occupied equipment, hygiene concerns, monthly fees, and much more. You have a job, family, and all of life’s chores and tasks to worry about. Who wants to start or end their day with what feels like another chore? A trip to the gym involves changing into appropriate clothes, driving, waiting, more driving…and the routine simply takes you from one climate-controlled box (work) to another (the gym) with your only chance for fresh air coming from walking across the parking lot. Not to mention that every day that you “just don’t feel like it” and decide to skip the gym, it costs you money!

Commercial gyms are designed for the masses — TVs, isolation machines, and a bunch of stuff you don’t really need. It may make you feel better to have “gone to the gym today” but wouldn’t you rather train effectively and efficiently?

Your head should be nodding at this point.

The solution to all of your fitness problems is a garage gym!

Perhaps when you think of a garage gym, you think of Rocky Balboa chasing chickens and lifting logs. Or maybe you think of a version of your commercial gym stuffed in your garage.

The reality is somewhere in between. A garage gym can be an effective and efficient world-class training facility. It is built to suit your performance. Some of the fittest people in the world train in garage gyms regularly because they know the secret. Less equipment, fewer isolation exercises, less junk, but more efficient training.

The thought which will eventually cross your mind is, “I don’t have the money or time to make my own garage my gym.” While certainly not dirt cheap, you can do it for as little as $500, which is the equivalent of about a year and a half of the cheapest gym pass. If you use your garage gym for just two years, you will have made money on the investment. In addition, it only takes about two weeks to complete. And that’s if you take your time.

Are you convinced yet? Ready to start a garage gym? Let’s get started!

What I Started With: 

  • 45lb. Olympic Bar
  • three kettlebells (35lb., 55lb., and 70lb.)
  • two 45lb. bumper plates
  • two 35lb. bumper plates
  • two 25lb. bumper plates
  • two 10lb. bumper plates
  • two 5lb. plates
  • a power rack with pull-up bar*
  • parallettes*
  • weight rack storage
  • rings
  • a plyometric box*
  • a 20lb. medicine ball*
  • a tire for dragging and odd object lifting
  • squat/press stands
  • bench press stands
  • a bench
  • a reverse hyper
  • a speed rope

*DIY projects shown below

bag

A few additions to consider: Powerful fan. Bike. Bag. I like to mix things up in my training so I do a little bit of everything. I love to run with the bag, or do any number of other sandbag workouts. I am new to cycling, but it isn’t too bad.

Step 1: The Big Purchase

The big purchase has to be the first thing you do when you are starting a serious garage gym. It means you are fully committed and the big purchase will help keep you accountable. This is the stuff you cannot build yourself or may be too challenging to find used, like a barbell, plates, kettlebells, etc.

Another reason the big purchase is what we do first is because it can take two weeks for the order to come in. This will give us time to set up shop in the garage and get ready for some serious training once the weight is delivered.

First, you have to decide what you need. My list above works really well for most. However, do you want or need rubberized bumper plates? Do you want only iron plates? Do you care if you have new or used equipment? I didn’t go the least expensive route when I first started my garage gym. I bought it all new and I bought the colored, rubberized bumper plates (expensive). If you buy plain black or go the used route you can get it all for much cheaper than I did. You don’t need ALL bumper plates for a garage.

bar

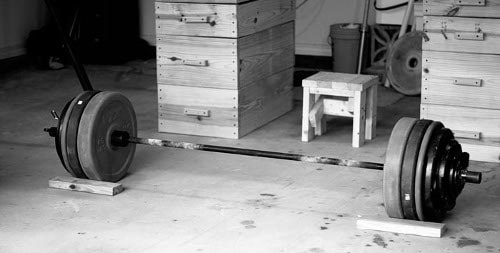
If you can only afford one piece of equipment right now, make it a barbell.

You may be asking, “What is a bumper plate good for?” These plates are good for overhead lifts and quick, high-intensity workouts in which speed is of the essence. This way you can drop the weight. You really only need two 45lb. bumper plates as a base and you can add smaller iron weights that don’t touch the ground for everything else. When squatting or deadlifting, just use iron. I recommend getting more than just two 45lb. plates, depending on your strength level. If you are really strong you will need a combination of bumper plates and iron plates. If you are not as strong, some of the plain bumper package deals will be perfect for you.

rower

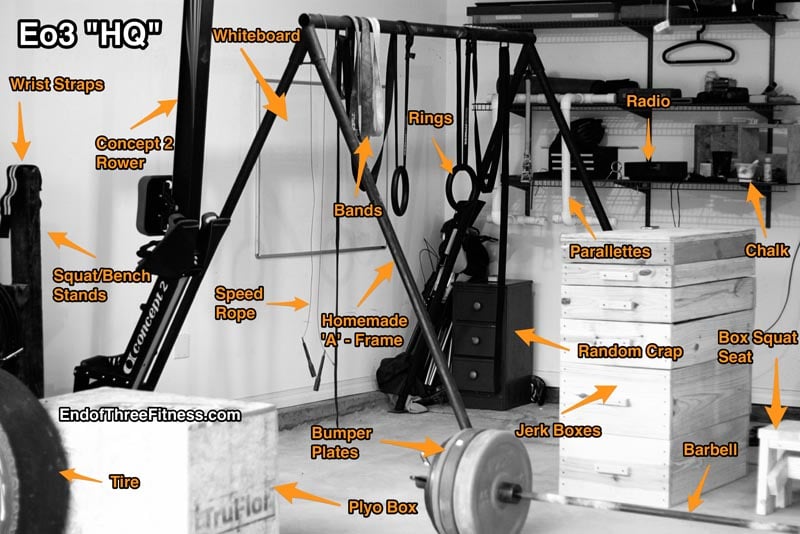
Another thing to consider: how will you do your cardio? You can jump rope, run, cycle, etc. This rower is the most expensive piece of equipment I have purchased for my garage gym…but I love it. I hate running, so I do a lot of rowing. Worth the money if you like rowing. Very durable.

Luckily, the popularity of CrossFit and the sport of weightlifting have exploded in recent years. This popularity has made getting high-quality barbells, plates, and other equipment much more economical.

Step 2: Get the Garage Ready

Embrace the idea of street parking!

Now that the big purchase is made and we are waiting on delivery, it is time to get to work on the garage itself!

When it comes to garage gyms, there are two options. Option one, you can have a garage with a gym in it, or, option two, you can have a gym that is in the shell of a garage. In other words, you can either maintain a garage for storage and all your household items, or you can fully dedicate your garage to being a gym and nothing else. The more viable option for most will be option one. Either way you are probably going to have to declutter. Organization and storage are your two priorities at this point.

Storage Ideas:

If you are not an organized person, it is time to change. If you want a garage gym, that is. If you have a lot of stuff that you need to keep (yes, getting rid of stuff is a real option) you will have to get creative.

  • Hang storage containers from the ceiling
  • Have a dedicated wall for stackable containers
  • Move things to a storage unit (not ideal, due to the monthly cost which you’re trying to save by doing this in the first place)
  • Throw things away
  • Garage sale

If you have a lot of stuff in your garage that you would not mind getting rid of, have a garage sale. This does two things for you, obviously, the first thing is it gives you room for a garage gym. The second awesome thing a garage sale can do for you is it may completely pay for your equipment! Now you really have no excuse.

Bottom line is you don’t need a ton of space, but you will need a dedicated portion of the garage for lifting weights. Clean up, clean out, and keep it clean. You will have to get creative and organized. I recommend having one side of the space for “garage” items and one side for gym items. However you do it, just make sure there is enough space for you to workout, which requires a little planning.

Luckily, the planning for this gym is as easy as scrolling through all the DIY projects we are planning to build (shown in step 3, below). Make sure you have enough space for them and make sure you want all of them. You can cherrypick which projects you like and do not like. Once you have made up your mind you can sketch it on paper, draw it on a whiteboard, or even tape it out on your garage floor. The more realistic you can picture it, the better off you will be. This way we do not work ourselves into a corner here. Do not skip planning — make sure you have a good idea of where absolutely everything will go.

Oh, and if you are married, like me, be sure to run all this stuff by your wife. Maybe that should have been step one…oops.

Step 3: Do It Yourself Projects

Garage Gym 1

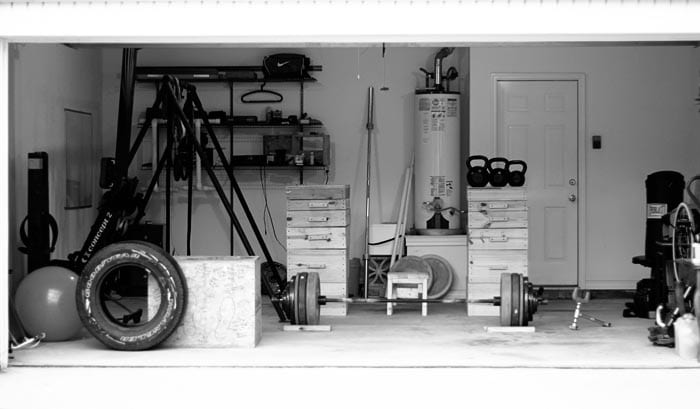
(Click the image to see a larger version.) If you’re wondering where my power rack is, unfortunately, when I moved into my current house, the ceiling was too low to install it. So it is dismantled and in my attic waiting to be reassembled.

You certainly have the option of just buying everything for your gym. To really make it yours, however, and to save some cash, you can build a few pieces on your own. I recommend, to start, building these four projects:

  • Plyometric Box
  • Power Rack
  • Medicine Ball
  • Parallettes

These first few items will help you get started with a core garage gym, and you could get it all done in one dedicated weekend. However, if you are interested in even more projects, there are over a dozen garage gym DIY project tutorials at the DIY Corner.

Plyometric Box

Plyo Box

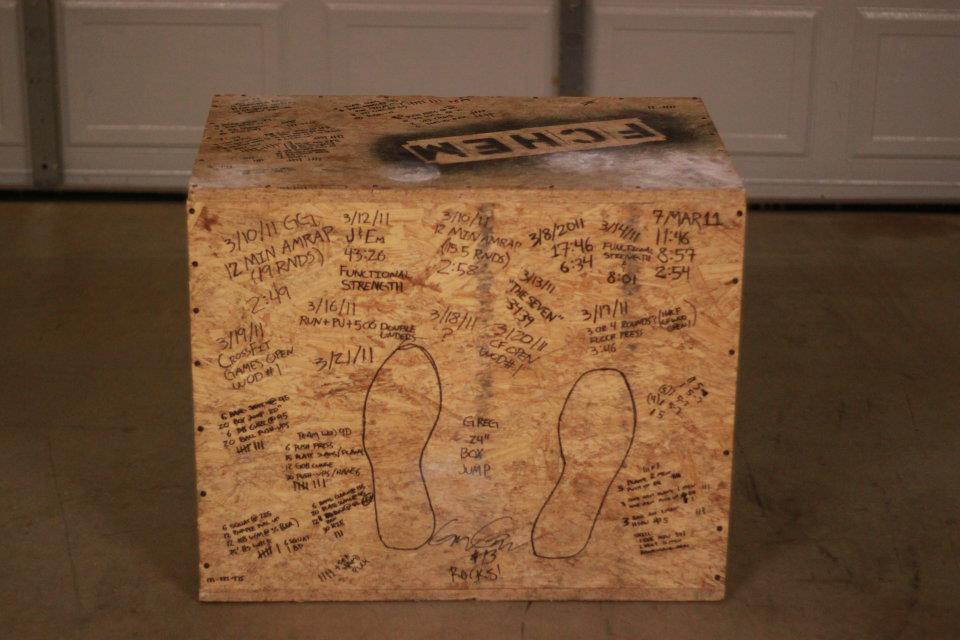
The first project is a plyometric box. One sheet of plywood, six cuts to suit the size you need, some glue, and screws and you are done! A plyometric box can be used for box jumps, dips, step-ups, box squats, and any other creative exercise you can think of. It is a very quick and easy project. It will only cost about $20, take you about 30 minutes, and is not very difficult to complete. Click here for the full tutorial.

Power Rack

Power Rack

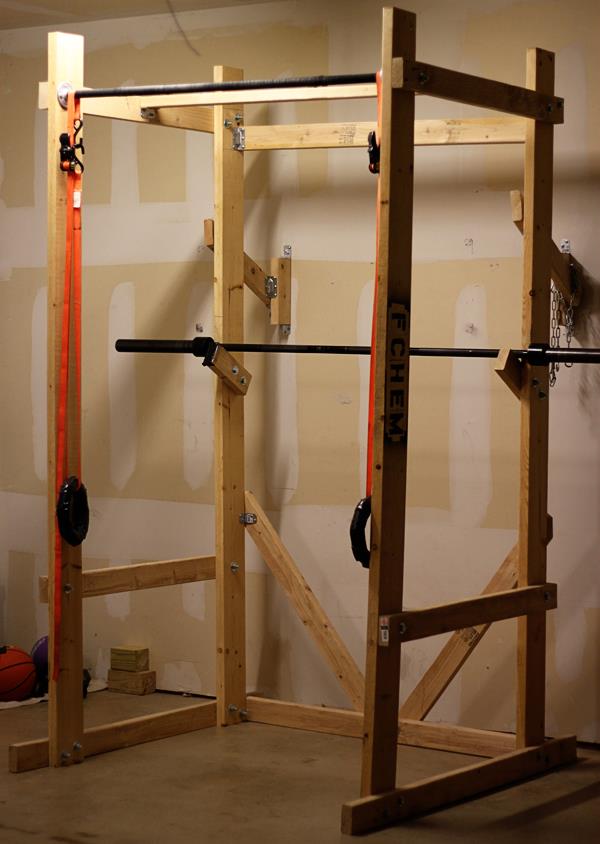
The second project is a little more difficult and time consuming: a power rack. However, if you build this project, and take care of it, it will last a long time and give you a great training capability. You will be able to squat with safety bars and make use of a pull-up bar. You can make any modification you like to suit your needs. If this project is too advanced for you, I recommend some cement buckets and 4x4s — you can find that project here. For the full power rack project, check out the instructions here.

Medicine Ball

Medicine Ball

The third project is very quick and easy: a medicine ball. Just cut open a basketball, fill it with pool salt (not sand) and patch it up. Now you have a medicine ball! A medicine ball is great for wall ball shots (squatting with and throwing to a target 10 feet away), weighted sit-ups, medicine ball cleans, and many other exercises. It is a must when starting a garage gym, and you can check out the full instructions here.

Parallettes

Parrallettes

The fourth project is also quick and easy: parallettes. Parallettes are great for deficit push-ups, L-sits, dips, pass throughs, and many other exercises. This project just takes a few cuts of PVC, some PVC cement, and you are good to go. Very easy and a great addition to a garage gym — you can check out that project here.

These projects are just the start, but with a solid foundation and these few items, you will have enough equipment to have a very simple and effective garage gym. As you become more experienced and learn more about how you operate in a garage gym you can slowly expand your DIY arsenal or purchase the additional items you need.

As with any do-it-yourself project, unfamiliarity with the tools and process can be dangerous. If you are at all uncomfortable or inexperienced working on DIY projects (especially projects involving dangerous tools), please reconsider doing the job yourself. It is very possible on any DIY to damage your property, create a hazardous condition, or harm yourself or others. Be careful!

Conclusion

Ready to get extremely fit, at home? Are you ready for a garage gym?

It is time to take a stand. It is time get rid of all the supplements that don’t work and that you don’t need, time to trade in the crazy-expensive gym memberships, and throw away the fitness magazines that push useless products and programs designed for people who aren’t you.

It is time to start making some decisions for yourself, and decisions affecting your health should not be taken lightly. Thomas Jefferson put it this way, “Leave all the afternoon for exercise and recreation, which are as necessary as reading. I will rather say more necessary because health is worth more than learning.”

Good luck on your garage gym!

Do you have a garage gym? What do you have in it? Share with us in the comments!

________________________________________

Jerred Moon is a strength & conditioning addict, wanna-be adrenaline junkie, loving husband and proud father. He runs a fitness website for the “other guys” called End of Three Fitness and is also the creator of the One Man One Barbell program.


16 Oct 06:51

The Child Is the Father to the Man: 9 Foundational Habits Young Men Should Start Now to Raise Themselves Right

by Brett & Kate McKay

mirror

Awhile back I was driving through the place where I grew up – Edmond, Oklahoma – and happened to pass by my old high school. This wasn’t an unusual event; I now live just an hour and a half from Edmond and my parents still reside there, so I’m back fairly frequently and sometimes pass the school. But this time something was different. On past occasions, I would be hit with a rush of nostalgia and memories of my days there would vividly come back to me. This time, however, I felt…nothing. Cognitively I thought, “There’s my old high school,” but no emotional wires were tripped. It seemed like just another building – my feeling of strong personal connection to it had disappeared.

As I drove on and contemplated this change and the distance I realized I now felt towards my youth in general, a quote from Theodore Roosevelt I had read years earlier came back to me: “The child is father to the man.” When I first came across the quote, it had puzzled me. I couldn’t really grasp what it meant. But as I drove past the home of the Edmond North Huskies, I began to understand it.

Roosevelt, I learned, was not the originator of the quote – he was in fact referencing a poem by William Wordsworth:

My heart leaps up when I behold
A rainbow in the sky:
So was it when my life began;
So is it now I am a man;
So be it when I shall grow old,
Or let me die!
The Child is father of the Man;
And I could wish my days to be
Bound each to each by natural piety.

What Wordsworth had in mind with these lines is the idea that a man’s passions, interests, curiosity, and penchant for awe and wonderment are born in youth and run an unsevered thread into adulthood. While some adults forgot the childlike joy of their younger years, Wordsworth believed it was still within them waiting to be rediscovered.

This is a worthy idea, and one that few men embraced with the vigor of Theodore Roosevelt, who bounded through his entire life with an unflagging boyish enthusiasm. But when TR professed that the child is the father of the man, he had something much different in mind, as he writes in his autobiography:

“Looking back, a man really has a more objective feeling about himself as a child than he has about his father or mother. He feels as if that child were not the present he, individually, but an ancestor; just as much an ancestor as either of his parents.  The saying that the child is the father to the man may be taken in a sense almost the reverse of that usually given to it. The child is father to the man in the sense that his individuality is separate from the individuality of the grown-up into which he turns. This is perhaps one reason why a man can speak of his childhood and early youth with a sense of detachment.”

At a certain point in your life — if you’re like me, it will happen in your late twenties — you will begin to experience the phenomenon of which TR speaks. The person you were as a boy and a young man will begin to seem like another individual, rather separate from your grown-up self. It’s a strange thing to experience. It’s not that you lose memories of your past, or necessarily let go of the youthful ideals and traits that Wordsworth cherished, but simply that your boyhood self and your current self come to seem like two distinct individuals.

Why does this cleaving between youth and adulthood occur? Surely some of it can be chalked up to the simple passage of time; as you grow older, your memories, and thus the attachment you feel to your past, become hazier. But it is also likely has its roots in neurology. As we discussed in our post about twentysomethings, your brain does not finish “setting up” until around your mid-twenties, which is also — not coincidentally, I would argue — around the time that your youthful self will begin to seem more like a distinct entity. The brain of your youth is not the brain of your adulthood, and the latter can remember and view the former almost as an outside observer.

What Kind of Man Are You Going to Father?

oldman

All this may be interesting to ponder, but it also has two practical implications that are vital for young men to understand.

First, what your present self wants and desires probably isn’t going to be what your future self wants and desires. When we’re young, we’re typically more present-focused. We worry about what can give us pleasure NOW and not ten years from now. So we spend money instead of save it, eat like crap, and play video games all night long, instead of eating right, exercising, and seeking experiences that will grow our minds and character. Sure, pleasure-oriented pursuits feel good in the moment, but our future selves will probably prefer to have more money in the bank and less blubber around our mid-sections.

Second, at this very moment, you are creating or “fathering” the man you will be in five, ten, and twenty years. So you want to be a successful, financially secure, physically fit, and well-adjusted forty-year-old? What actions are you taking NOW as a twenty-year-old to father that man? Just like one day you’ll need to be intentional about fathering your biological children, right now you need to be intentional about fathering your future self. Will you be an absentee dad who leaves your 30-year-old self feeling lost and adrift? Or will you raise a man who is intelligent, virtuous, and able to tackle life with confidence and vigor? No one can control the kind of biological father they are born with. But every young man can strive to be the best possible father to his future self.

Doing this doesn’t mean taking life too seriously and eschewing the fun you should be having as a young adult. It simply means establishing a set of foundational habits that will serve you well now and that you will thank yourself for later.

As we explored in our series on your twenties, after your brain finishes developing, changing your habits, while still possible, becomes harder. For this reason, your youth is the best and easiest time to transform yourself into the man you want to become. The positive habits you create as a young man will become a solid foundation you can build on for the rest of your life. What’s more, research has found that simply imagining yourself as an old person can increase your chances of establishing positive habits, like saving money. 

Below are nine foundational habits that will help every young man raise himself right.

1. Save 20% of Your Money  

money

Many young men will say to themselves that when they finally start making “real” money then they’ll start saving. If only that were true. In a post on the financial regrets of college graduates, we mentioned that the majority of men coming out of school wish they had started saving sooner. It may seem hard when you don’t have much income, but like anything, starting small will increase your chances of future success exponentially.

Make it a habit right now, no matter what your paycheck is, to put 20% of your after-tax income into savings. The easy way to do it is to set up an automatic transfer from your checking account to your savings account the day after you get paid. That way, it comes right out of your account just like a bill, and you don’t even have to think about it. Don’t be among the 25% of Americans who don’t save at all. If you own a car or a home, you know how stressful it can be when things inevitably go awry – the air conditioner goes out, a tire gets punctured. There’s a great sense of relief (and even pride) when you have the cash to handle it instead of using credit.

2. Exercise Daily  

exercise

Regular exercise provides a boatload of benefits — from improving cardiovascular health, to fighting stress and depression, to increasing testosterone. Thus, there are few habits that will better ensure a lifetime of success and well-being than making a daily workout a non-negotiable part of your life. Instead of trying to get on the exercise wagon when you’re a tired, out-of-shape, middle-aged man with a lot of responsibilities and very little time, make it a habit now when you’re at the top of your game. Regular exercise is a tough routine to start, but once it becomes a solid habit, most people continue with it indefinitely. The physical and psychological benefits become almost impossible to give up.

3. Eat Healthy

eat

If you want to avoid becoming a pot-bellied man, you need to establish good eating habits today. Research has shown again and again that diet is the biggest factor in maintaining a healthy weight.

Unfortunately, many young men develop poor eating habits in high school and college. With all-you-can-eat cafeterias and vending machines all over campus, it’s easy for a poor diet to become the norm. You can often get away with subsisting on pop tarts and pizza for a while because of your scorching metabolism. But as you age and that metabolism slows down, the junk food diet catches up with you and the pounds start piling on. Develop healthy eating habits now, so you don’t have to struggle to do a one-eighty when you’re facing down your ten-year reunion with a 40-inch waist. Healthy eating doesn’t have to be complicated; for a good place to start, check out Steve Kamb’s easy to follow guide to the paleo diet over on Nerd Fitness.

4. Plan Weekly and Daily

plan

If I were asked which habit has contributed most to my success and well-being as an adult, I’d have to say weekly and daily planning. The power of planning lies in the perspective and control it provides for your life; it gives you both a broad, birds-eye view of the maze that must be navigated to achieve your long-term goals, and the ability to manage the small, day-to-day tasks that are essential to reaching those aims. Without daily and weekly planning, you end up getting distracted, forgetting what you need to do, and ending each day with the restless anxiety born from knowing you pretty much wasted your daylight – again.

Take a look at our post on weekly and daily planning for tips and ideas on how to start this habit.

5. Read for Pleasure

read

Readers are leaders. If you talk to principals and teachers they often say that nothing predicts a student’s success as well as whether or not they read independently. This isn’t very surprising – reading expands your mind and vocabulary, increases your creativity and empathy, and boosts your critical thinking skills and attention span. As a young man you’ll have plenty of required reading assignments for school, but be sure to also always be reading something for pleasure as well.

Not sure what book to pick up first? Check out our recommended reading lists and join the AoM book club!

6. Brush and Floss

floss1

This may sound like a silly habit to mention, but think about it: you only get one set of teeth during your lifetime. It’s not like losing hair or getting wrinkles which are largely cosmetic problems; there are all kinds of negative correlations to poor oral heath, including an increased risk of cancer. The Mayo Clinic even says that your oral hygiene and health offers a window to your overall health. Unless you want to drop a small fortune on fixing your cavities and eventually replacing them with veneers or dentures, you need to take care of the teeth (and gums) nature gave you. So brush those pearly whites two times daily and floss every night. Your future self will thank you every time he eats an apple or corn on the cob with aplomb.

7. Meditate

meditate

There is probably no habit more important for a young man in the 21st century to establish than daily meditation. With the constant barrage of distractions we’re subject to in the modern age, if you don’t learn to discipline your mind now, you can easily find yourself lying on your death bed reviewing your life, and seeing only visions of BuzzFeed and your iPhone flash before your eyes. Not only does meditation increase your willpower, but it also fights stress, improves your mental and physical health, and boosts your resiliency. And here’s even more proof that meditation will help your future self: recent studies have shown that regular meditation can slow down the onset of dementia.

Read our primer on meditation. It doesn’t take much to get started. Start off with 5 minutes a day and work your way up to 20 minutes a day. Lately I’ve been using calm.com for some fantastic (and free!) guided meditations.

8. Journal

journal

When I did a book signing at the Tankfarm store back in May, an AoM reader and I chatted a bit about the importance of journaling. He made this rather rough, but astute analogy: “Your body takes a sh** to keep everything running smoothly. Every now and then your mind needs to take a dump, too. A journal is basically a toilet for the mind.”

Amen.

As I’ve admitted, I’m not the most regular journaler, but I always feel on top of my game when I’m consistent with it. There’s something cathartic about working out your problems with pen and paper. Whenever I’ve hit a wall in life, it’s often through journaling that I find the solution. Moreover, studies have shown that regular journaling improves your emotional and physical health.

Not only will your future self be grateful for the sense of well-being the journal habit will bring, he’ll also be thankful that he has a catalog of all the important events that have occurred in his life. I know from my own experience that I enjoy reading my journals from my high school and college days. It allows me to relive those important moments in my life, reminds me of the youthful ideals and goals I don’t want to lose sight of, and provides me with perspective on how much I’ve progressed as a man.

9. Serve

save

I’m a big believer in the idea that service is the rent we pay for living on earth. In one way or another, we’ve all benefited from the work and sacrifice of generations before us and from the love and support of those around us. Give back by providing regular service.

The great thing about serving is that the more we give, the more we get. Service makes our lives more meaningful and is a potent antidote to the increasing narcissism in our culture.

What foundational habits do you think men should start when they’re young? If you’re an older man, what habits you formed when you were young served you best later in life?


13 Aug 18:20

On Taking a Punch

by A Manly Guest Contributor

takeapunch

Editor’s note: This is a guest post from Billy Coffey.

Four years ago…

It started the way most good stories do, over lunch with a friend. This particular friend was named Charlie, an iron-fisted brawler disguised as a nerdy engineer who worked in the building next to mine.

“You should stop by tonight,” he said. “Great workout. It’ll make a man out of you.”

“I’m already a man,” I answered.

Charlie nodded and said, “Maybe. You ever been punched?”

“No.”

He put his fork down, looked me in the eye, and said, “A man never knows what he’s made of until he gets punched.”

I didn’t know what that meant, but it sounded philosophical enough to get my attention. “I’ll be there,” I told him.

All true boxing gyms are located in much the same place — the nearest poor neighborhood of the nearest city (you’ve seen Rocky III, right?). Which made getting there from the quiet confines of the country an adventure in itself. Charlie had warned me that the gym was much more old school than new, and he was right. There was no heat, no air, and no bathroom. There was merely a ring, several punching bags, dirty mirrors for shadowboxing, and a bucket to throw up in when the trainers pushed you that far. Written in bright red letters above the ring were the words “JESUS SAVES.”

It was, in a word, perfect.

I met with Charlie, the fighters who were warming up, and the trainers. “Gotta hand it to you,” the head trainer said. “Takes stones to show up the first time on sparring night.”

“Sparring night?” I asked. I looked at Charlie, who had looked away. I could see the smile on his face, though.

“You’re gettin’ in the ring, right?” the trainer asked me.

Gettin’ in the ring? No, I was not gettin’ in the ring. I was not stupid.

“Yeah, I’m gettin’ in,” I said. Because macho manliness trumps stupidity every day of the week and twice on Thursday.

“Good,” the trainer said. “You can get in with me, then.”

Charlie looked at me with a look that was part humor and part “Oh, boy.”

“What?” I asked him.

“Nothing,” he said. “You’ll be fine.”

I stared at him.

“He won Tough Man last year,” he confessed. “But don’t worry.”

Don’t worry. Famous last words of rednecks everywhere. On par with, “Hey ya’ll, watch this!”

So. Into the ring.

Charlie adjusted my headgear and said, “Move. Don’t forget that.”

I nodded.

“And keep your hands up. Block and punch. Make your defense offense.”

I nodded again.

He checked my gloves and wiped them against his T-shirt. “And for the love of God Almighty, keep your chin down. You expose that chin, and you’re a goner.”

“I ain’t goin’ down,” I said, and smiled to prove it. “So what is this, sparring or more?”

Charlie looked across the ring, paused, and said, “He’ll let you know. And wipe that smirk off your face. This will not be fun for you.”

“What makes you think—”

And that’s all I managed to say. I was silenced by Charlie shoving my mouthpiece in and yelling, “Time!”

We met in the center of the ring (“Hands up,” Charlie shouted. “Move…move!”), touched gloves, and nodded to one another.

I’d taken plenty of martial arts, and sparring in a dojo was very controlled and normally done at half-speed. But this wasn’t a dojo, and I wasn’t sure what I was supposed to do.

“So,” I said to the trainer, circling him, “what am I—”

SMACK!!

He threw a jab that managed to sneak between my headgear and connect with my nose. And it was not at half-speed. It was so fast I didn’t see his hand until he was pulling it away from my face.

“Move!” Charlie shouted.

SMACK-SMACK-SMACK!

Jab-jab-cross.

“Don’t stand there, do something!”

Boxing is controlled violence. It is technique. It is the mastery of punches and angles that are honed to precision by countless hours of training. Anger won’t get you through ten rounds in the ring.

It will, however, get you through one. Because when that right cross snuck through my headgear and cut my eye, I got mad. Very mad.

He threw another jab, but I slipped it to the left and threw a hook into his side and another to the side of his head. His eyes widened a bit, and Charlie yelled, “Yes! Stick and move! Thirty seconds!”

I learned that night that thirty seconds in a boxing ring is a lot longer than thirty seconds outside of one. Because it felt like we stood in the middle of that ring pounding on each other for an eternity.

“Time!” Charlie shouted. Finally.

We stood there in the middle of the ring, smiling. “Awesome,” the trainer said.

Awesome indeed.

That gym was my home away from home for a while, but in the end family and a lack of time forced me to quit. But there’s still a heavy bag in our exercise room, and I still go a few rounds on it every night.

Because Charlie was right. You don’t know what you’re made of until you get punched. And whether that punch comes by standing in the middle of a boxing ring or the middle of a life, you survive the same way. You keep your chin down, you keep moving, and you never stop swinging.

We’re all going to get hit sooner or later. It’s a given in this world. But I know this. I can take a punch. I’ve taken many. But I can give one, too.

 _____________

Billy Coffey is a part-time writer and a full-time father. Check out his newest novel When Mockingbirds Sing and meet him on his blog, www.billycoffey.com.


06 Aug 05:49

The Long and Shorts of it

by Adam

The Long and Shorts of it

Share

19 Jul 17:33

How to Sharpen a Reel Mower

by Darren Bush

mower

It’s 1968. I’m sitting on the front step of my grandfather’s little house in San Diego. Gramps is pushing a reel mower across his front yard, wearing a Pendleton shirt and a pair of khakis. I hear the snickety-snickety-snickety of the blades. I smell cut grass. He lets me carry the grass catcher and dump it in the trash (this is pre-compost era).

Drive around on a Sunday morning nowadays and in the place of church bells, you’ll hear a chorus of lawnmowers. Gas-guzzling, air-polluting lawnmowers. A gas-powered mower spews more pollution than eleven cars and is responsible for 5% of the greenhouse gases produced in the U.S. Just as bad, homeowners spill more than 17 million gallons of gas a year topping off their lawn and garden equipment. That’s more than the Exxon Valdez.

Reel mowers are also better for your lawn. Instead of rotating blades that chew up and whack off the top of the grass, the reel mower’s blades act like a pair of scissors that snips off the top. Check out the difference between a rotary mower’s cut on a blade of grass vs. a newly-sharpened reel mower:

bad-vs-good-blade

On the left; surgical precision from the reel mower. On the right, well, not so much. A clean cut heals faster and reduces the chances of disease. No kidding.

I believe there are several reasons for the rise of power mowers. Just as the average house has doubled in size since the 1950s, so have lawns. Mowing a giant lawn with a 18-inch reel mower is probably out of reach for many people, or at least we think it is. Pushing a reel mower is a nice workout, but we are a sedentary society. The idea of pushing a reel mower is puzzling to people. It takes longer. We don’t have time, or at least we believe we don’t have time. Brett has done some work on this topic already and outlined for us the benefits of using a reel mower — and he owns and uses one himself.

I believe smaller lawns and larger flower beds and gardens are a good thing. Then, reel mowers make a lot of sense. They’re smaller, easier to store, quiet, require very little maintenance, and have a genteel aesthetic sitting in your garage or garden shed.

Recycling an Old Mower

If you’re looking to buy a new reel mower, Brett’s guide here is quite handy. But another option is to recycle an old reel mower by giving it a tune up. The good news is that old mowers are usually built like Sherman tanks. Quality steel blades retain their strength; all the mower needs is a good cleaning and honing.

mower-done

Above is Exhibit A: a Craftsman Reel Mower, about 40 years old. I bought it from an old guy who had it at a garage sale. It hasn’t been used in at least 15 years, but the parts were sound and he was willing to let it go for $25. He wanted $35 but there weren’t many takers. I took it home and stuck it in my garage to acclimatize to its new home.

A few days ago I pulled out the Craftsman 18, hosed it off to get the cobwebs and dirt off, and started the sharpening process. Today, I’ll walk you through how it’s done whether you’re restoring an old gem or maintaining one you’ve had awhile.

How to Sharpen a Reel Mower

There are two critical parts of a mower: the blades and the bed knife. The rest of the mower exists to support these two parts. Wheels drive a gear that spin the blade mechanism, which consists of a series of 5 to 7 blades mounted in a helical fashion. The angle helps snip the grass better. A roller behind the bed knife allows you to adjust the height of the cut.

hosed-off-2

Now it’s tempting to pull out the files, angle grinders, and just start grinding and filing. Not only is this not necessary, it has the ability to ruin the mower. You need a tight clearance to cut. Filing blades and bed knifes is like trying to sharpen scissors in the same manner. No bueno. Since reel lawn mower blades work like scissors; they’re not necessarily as sharp as they are exact. The edge of the blade needs to be true and close to the bed knife. That’s what lapping does.

lapping-kit

To lap your blades you need two things; lapping compound, an abrasive, and a way to turn your blades. A lapping kit consists of a container of lapping compound and a crank. The lapping compound is basically a heavy duty abrasive, but suspended in a thicker goo so it doesn’t come flying off the blades when you spin then. The handle fits the shaft of most mowers…except in my case, which is fine, as I had other ideas. You’ll see.

remove-drive-wheel

So let’s lap! Start by removing the drive wheel, which is usually the left one when you’re standing behind the mower facing forward. Remove whatever covers the attaching mechanism. Sometimes it’s a nut, sometimes a cotter pin, and in my case, a retaining ring. Whatever it is, remove the wheel and you’ll see the gear that drives the blades.

remove-cog

Remove the gear as well, removing whatever is retaining it. Now you will see the shaft that drives the blades.

You want to adjust your blades so that they are in contact with the bed knife. This is done several different ways on different mowers. Usually it’s some sort of combination of a threaded rod and a bolt, although some use a screw and a retaining bolt. Whatever it is, adjust the blade so that it contacts the bed knife equally across the whole width of the blade. Note: if a blade is bent badly so that it hangs up on the bed knife when the others spin freely, a few taps with a hammer or a twist with a pair of pliers can restore the blade, but avoid it if possible. Most of the time the engine (you) can’t generate enough power to bend the blades while moving, so they’re usually straight.

If you spin your blades now, there should be a little resistance and a scraping noise. That’s good. It means the blades are a little too close to the bed knife. Time to change that.

apply-compound

Using a small brush, paint lapping compound on the blade edges. You don’t need much, just a bead across each of the blade edges.

Once coated, start cranking…but do it backwards. That’s right, you want to knives to sharpen backwards. The lapping compound between the bed knife and blades does its job as the blades run so the cutting edges never meet.

Crank for a long time. Ten minutes, maybe. Re-apply lapping compound. Crank some more. You’ll start to see a flat, shiny surface on the blades where the compound has abraded away the surface and created a precise edge matched to the knife bed. Add more compound, keep cranking. At this point (below) you can see the start of a shiny edge, even though there’s still some corrosion showing. That’s okay.

start-to-see-change

Your arm will probably start to hurt. Reconsider your cranking abilities. I did, and rigged up a cordless drill with a little jury-rigged socket and a piece of inner tube. Whatever works. Making sure the drill was on low and running backwards, I started slow and ran the blades for a minute, added more compound, and ran the blades for a little longer and a little faster. You’ll hear a difference as the lapping progresses; the scraping sound lessens as the blades are honed and material removed.

close-up-adapter

I think I ran the drill for a total of five minutes, adding compound just a few times. Once I saw a shiny finish along each blade, I was done.

sharp-edge

Clean off the compound as best you can, and examine your blades. If there are any spots that look like they’re not quite as clean as other surfaces, you can add more compound and adjust the bed knife so it is closer to the blades. Don’t worry, you’re not going to run out of blade. My mower didn’t need a second lap.

I then backed the blade off just a tiny, tiny bit. You want the gap between the bed knife and the blade to be less than a piece of grass or it won’t cut anything. I’m talking very small back-off, maybe a few thousands of an inch.

testing-sharpness

Test your lapping job with a piece of paper. It should cut like scissors. If it doesn’t, adjust the knife bed until it does.

replacing-cog

Now reassemble your mower in reverse order, cleaning up as you go and re-greasing anything that needs it.

If you’re restoring an old mower, after sharpening the blades you can spruce it up further if you want a fun little project. Chrome polish, steel wool, and a little gun oil on the blades, and a good old toothbrush with some Simple Green can clean it up real nice. Paint the fenders and bars if you want to. Replace the grips on top. Use motocross hand grips if you want to be bad-ass.

sweet-cuts

Adjust the roller in the back to its highest setting. Push it across some nice green grass, listening for the snickety-snickety that was so familiar to Gramps. A Pendelton shirt and khakis might just complete the picture.


14 Jul 01:20

Airsoft. It’s Not Just For Kids: Using Airsoft in Your Firearms Training

by Brett

header

One of my sheepdog goals this year is to become proficient with a handgun and to get my carry license.

I bought my first handgun a few months ago — a Smith & Wesson M&P 9mm — and have been taking defensive handgun classes at the U.S. Shooting Academy. One thing I quickly discovered is that firearm training gets really expensive, really fast. First there’s the range time you need to pay for, but what really kills you is the ammo. Holy smokes, that stuff was like gold for awhile. I saw places selling 9mm ammo for $1.50 a round. Sheesh. While ammo prices are beginning to drop as producers catch up with the demand, you’ll still need to fork over a pretty penny for a day at the range.

At one of my classes I overheard some guys talking about how they were using airsoft guns in addition to their live and dry fire training.

“Airsoft guns? Isn’t that what little kids play with?” I asked with some skepticism.

You see, up until that point my only experience with airsoft guns was watching neighborhood kids run around with their neon orange space ray toy guns and plink each other with plastic BBs.

One of the crusty old-timers responded, “Hell yeah, partner. They’ve gotten real sophisticated in recent years — to the point they have exact replicas of almost every real firearm on the market. I’ve got an airsoft version of my Glock. It even simulates recoil when you fire it. Shooting plastic BBs is a hell of a lot cheaper than shooting live ammo. Plus, I can fire it at my house in my garage. It’s been an invaluable tool in improving my gun manipulation.”

He went on to explain that police departments and even the military are using what used to be a kid’s toy as part of their firearm training. Still dubious, I started doing some research, and I’ll be darned if the old guy wasn’t right. Airsoft guns have gotten incredibly realistic in recent years. If it weren’t for the orange tip that’s required on them, you couldn’t tell the difference between a real gun and the airsoft version of it. He was also right about how military and police forces around the world are using airsoft guns to train recruits. What’s more, many of the top gun instructors across the country are encouraging their students to include airsoft training along with live fire and dry fire training. I also discovered there’s a HUGE airsoft community offline and online. Instead of shooting each other with paintball guns, people are getting together for massive airsoft matches that pretty much replicate real-life military scenarios.

Intrigued by what I read, I went online to some Asian website and bought the airsoft version of my Smith and Wesson M&P 9mm so I could give it a try. I also started researching as much as I could and talking to experts about airsoft and how you can use airsoft guns in tactical training. Below I share what I’ve learned.

Types of Airsoft Guns

There are three types of airsoft guns, each with their pros and cons. The type of airsoft gun you get depends on how you plan on using it.

Spring Action

springactionshotgun

Spring action airsoft shotgun

These are the airsoft guns that I was familiar with before my conversation at the gun range. You can find spring action airsoft guns in the toy section of nearly every big box store. To fire the gun, you simply pull the spring back with a lever until it locks in place. When you pull the trigger, the spring releases and pushes a piston forward in an enclosed cylinder in the gun. The piston pushes air out at a high speed which causes the BB to fire out of the barrel.

Spring action guns are cheap (starting prices are $12, although high-end spring action guns can cost upwards of $80), but they have considerable drawbacks. The big one is a slow rate of fire. Every time you want to fire the gun, you have to pull back and cock the spring. I guess that’s not a problem if you’re training to use a bolt-action rifle or a shotgun, but if your real-life gun is a semi-automatic weapon, having to cock every time you fire ruins the simulation. Another drawback is the quality of the guns. Most spring action guns are poorly made with chintzy plastic and feel like toys in your hands. No good if you’re wanting to simulate your real gun.

Automatic Electric Guns (AEGs)

AEG

AR-15 Automatic Electric Gun

A more suitable type of airsoft gun for tactical training is the automatic electric gun, or AEG. AEGs have a rechargeable battery that powers a small motor that turns a bunch of gears. These gears pull back and release a piston which causes air to be blasted out at a high-rate. The air propels the pellet out of the gun and towards the target.

AEG

Animated example of how an AEG gearbox works. Source Wikipedia.

Most airsoft semi-automatic rifles and machine guns are AEGs, though you can find AEG handguns as well. AEGs are the most popular airsoft gun among folks taking part in organized airsoft skirmishes.

The biggest advantage AEGs have over spring action airsoft guns is that you can achieve automatic or semi-automatic firing rates with them. You don’t have to cock anything to fire. Just pull the trigger and PEW! a 6mm plastic pellet leaves your gun. Higher-end AEGs are typically exact replicas of their real-life counterparts and are made of both plastic and metal parts. You can even add tactical accessories from your real gun to your airsoft version. Some AEG rifles even provide simulated recoil. Because of the 1:1 realism of high-end AEGs, they’re a great tool to practice weapon manipulation. Many police and military units are using AEG rifles for training.

From a tactical training standpoint, the biggest disadvantage of AEGs is the trigger pull. With most AEGs, the trigger doesn’t break. Instead, the trigger on an AEG acts like a switch that completes a circuit. Thus, you don’t experience that “wall” like you would with a real gun. Depending on the type of AEG, you might also miss out on the simulated recoil.

Gas

myairsoft

Airosoft gun on top; real gun on bottom. Not much of a difference, huh?

Gas airsoft guns use some sort of compressed gas to propel the pellet out of the gun. You’ll usually find gas-firing mechanisms on pistols and sidearms, though you can find gas-powered rifles too. Many gas-powered airsoft pistols have a blow-back feature which causes the slide on your pistol to reciprocate when you fire it — just like a real gun. You even get a bit of recoil.

insertgas

On gas-powered airsoft handguns, the gas is kept in the magazine. You inject the gas in the bottom as seen in the picture above.

Gas blow-back airsoft pistols can be an invaluable tool in your handgun training as they provide a nearly identical experience to using your real gun. They’re typically 1:1 replicas of your sidearm. You can even put real handgun parts like sights or tactical lights onto your airsoft version. I was amazed that my airsoft Smith & Wesson weighed about the same as my real S&W. Granted, it’s not exactly the same as live fire training, but it’s pretty darn close. One thing I’ve noticed on my gas blow-back M&P is that there isn’t much slack in the trigger. I hardly have to squeeze the trigger for the gun to fire. I’m sure I could tweak the trigger a bit so it pulls more like my real gun.

If you’re wanting to use airsoft to supplement your handgun training, definitely get a gas blow-back (GBB) version. They’re pricier than non-GBB, but the added simulation is worth it in my opinion. To find where to buy an airsoft version of your real handgun, just Google “Glock 17 airsoft” or “Smith & Wesson MP airsoft.” You’ll find plenty of online stores that sell an airsoft version of your gun. I bought mine from this site. It was the only place I could find it. They’re based in Hong Kong (airsoft is huge in Asia) so I had to pay global shipping.

Types of Gas

gas

1.) Propane gas 2.) CO2 cartridge 3.) Green gas

One thing to take into consideration when using a gas-powered airsoft gun is the type of gas you’re going to use as a propellent. There are three types of gas you can use, each with their pros and cons.

  • CO2. The big pro with CO2 is power. You can get the pellet to travel at high velocities using CO2. The downside is cost. CO2 cartridges can be expensive and (compared to other gas types) you don’t get many shots out of a single cartridge. On top of the cost of the cartridges, you’ll need to buy a special converter so you can fill your magazine with the gas. Power is also a downside of the CO2. If you buy a cheap-o gun, the power from CO2 gas can break it.
  • Propane. Propane gives you a decent amount of power and is much more stable and cheaper than CO2. Just buy a small hand-held propane tank and an airsoft adapter for it and you’ll have access to cheap gas to power your gun. Not only is propane cheaper than CO2, it’s also more accessible. Whenever you run out of propane, just head to a nearby refill station and fill up your tank. With CO2, you have to go to speciality sports stores or order online. The downside of propane is that it’s a dry gas. You’ll need to lubricate your gun with silicone after every firing session.
  • Green gasGreen gas is just propane gas with a bit of silicone mixed in. By adding the silicone into the propane, your gun lubes itself when you fire. Pretty convenient. The downside on green gas is it’s expensive. Look to spend $15 a can. You’ll get about a 1,000 shots from a single can. You’re better off just going with propane and spraying your gun with silicone every now and then. Much more affordable that way.

The Ammo

bbs

Airsoft guns typically use 6mm plastic pellets. You can fire them at other people (assuming they’re wearing eye protection and are game) and they’ll just feel a sting — almost like getting hit with a paintball.

Pellets are pretty cheap. You can buy a bag of 3,500 rounds for $7 online.

When buying BBs for your airsoft gun, make sure to go for quality. Low-grade BBs can break and shatter when firing, causing irreparable damage to the insides of your gun. Some signs of low-quality BBs include:

  • seams
  • bubbles
  • dimpling
  • rough surface

Most big box and sports stores only sell the low-quality stuff.

icsbbs

I use ICS BBs during my airsoft training sessions. They’re a good quality pellet: high density, polished, and no seams.

You’ll find high-quality BBs at speciality airsoft stores or online. Quality airsoft BBs are seamless, polished, and high-density. You’ll pay a bit more, but in the long-run it can help save money by avoiding a costly gun replacement. The guys at Airsoft Megastore have a good write up on what happens when you use crappy BBs in your airsoft gun.

Using Airsoft to Supplement Your Firearms Training

militaryairsoft

Soldiers with the US Army 187th Ordnance Battalion preparing to clear a room during urban combat training at the battalion’s Field Training Exercise site. The Soldiers were armed with airsoft weapons. Notice the orange tips.

Let’s sum up the benefits and limitations of airsoft guns in your real life handgun training.

Benefits of Airsoft Guns

1:1 replica of your real gun. You can buy airsoft guns that look and feel like your real gun. They’ll fit in your holster. You can also add real-life tactical attachments to them. 

Provides near-realistic live-fire experience. Gas blow-back handguns do a good job simulating firing a real handgun. Great for practicing gun manipulation and drawing.

Low cost. This was the big selling point for me. A box of 50 real rounds can set you back $20. I can buy a bag of 3,500 airsoft BBs for $7. The low cost of airsoft allows you to experience a simulated live fire session for a fraction of the cost.

Safe. While you should treat an airsoft gun as if it were a real gun and take the same precautions as you would when practicing, you can rest easy that a BB won’t shoot through your garage wall and kill somebody.

You can do it anywhere. Instead of having to trek 20 miles to the gun range a few times a week, I can go to my garage every evening and practice to my heart’s content.

Provides opportunity for affordable, safe force-on-force training. If you want to practice real, force-on-force tactical scenarios, airsoft can help provide that experience. You can fire it at your buddy pretending to be a bad guy in your house and all he’ll feel is a sting (make sure he’s wearing eye protection though).

Limitations of Airsoft Guns

Not identical to real firearms. Let’s not kid ourselves. While airsoft guns provide a decent simulation of firing a real gun, there’s no way it can replicate it exactly. The trigger pull on airsoft guns aren’t the same as real guns, the recoil is nowhere near the same, and the noise level isn’t the same. You also really can’t practice malfunctions or reloading that well with an airsoft gun. Finally, there’s just a “feeling” you can’t simulate with airsoft. I just feel more alert and on edge when firing a real gun. With good reason — I know that pulling the trigger can have lethal results. I just can’t replicate that feeling when I’m firing my airsoft gun.

Because of this limitation, it’s important that you don’t completely replace live fire training with airsoft. You should continue to get to the range as much as you can to fire your real gun. I like to think of airsoft as a step above dry fire training and a step below live fire. It’s just another tool in your firearm training toolbox.

Airsoft Is Fun Too!

Besides using airsoft as a tactical training tool, it can be a hobby in and of itself. Instead of spending a Saturday with your friends paintballing, you can shoot airsoft guns at each other in the woods. There’s a massive airsoft community out there filled with people who get together for airsoft battles. Tulsa Airsoft even has a huge indoor and outdoor facility for people to take part in airsoft skirmishes. Organized battles often simulate actual military and police scenarios. So you get to have some fun and get a bit of force-on-force training too.

I haven’t taken part in any organized airsoft battles…yet. It’s on my list of things to do, though. Looks like fun. Anybody in the Tulsa area care to join me?

Have you used airsoft in your handgun training? Any other tips for folks looking to supplement their firearms training with airsoft? Share with us in the comments!


08 Jul 15:42

Gary The Primal Guy’s Primal Chocolate Recipe

by Gary Collins, MS

Here is my healthy chocolate recipe, it is far more nutritious and has very little sugar, when compared to store bought chocolate. Of course it is Primal and Paleo approved, as it contains no dairy products and is grain/gluten free.

  • Pre-heat a pan on very low heat, the smaller the pan the easier it is to control and make. I usually use an eight inch frying pan.Gary The Primal Guy's Primal Chocolate
  • Melt equal amounts of coconut oil and cacao butter (do not boil, the slower the melting the better) in the pan. Cacao butter can be found in health food stores and is a yellowish solid looking fat. Cacao butter and powder is the less refined version of cocoa products.
  • Once the above is completely melted turn off heat and mix in real cacao powder. Now it will take a couple of batches for you to get the right flavor you like, there is no magic formula, but it should look dark and somewhat creamy. (Special note: melted homemade real chocolate is runnier than store-bought chocolate.)
  • (Optional) mix in some coconut milk or almond milk (3 to 4 tablespoons), this will give it more of a milk chocolate flavor.
  • Mix in a teaspoon of vanilla extract.
  • (Optional) a teaspoon of cinnamon – I do recommend this as it gives it a little more sweetness.

  • Again you will have to experiment and add stevia to flavor if you prefer this for the low-sugar version. (Optional) use real maple syrup instead of stevia.
  • (Optional) Also mix in some carob powder to taste; I often do this.
  • (Optional) mix in a pinch or two of sea salt.
  • Make sure the above is well-mixed. Use only a spoon, no power mixers are needed, and keep the chocolate in the sauce pan until the end. Now let mixture cool to room temperature. Once at room temperature make any last minute adjustments to the taste you prefer. Stir well one more time.
Gary The Primal Guy Melted Primal Chocolate
  • Keeping in the sauce-pan put in the refrigerator, cover with sauce pan lid. You will have to check every 5 to 10 minutes until solid. I like to mix with a spoon two to three times until it starts to thicken, as the oils tend to separate.
  • (Hint) if you have room in your freezer you can put in there and it will become solid much quicker and you will not have to keep checking or mixing.
  • Once it is solid, usually in about 30 minutes (10-15 in freezer)—break up and put in glass container. Real chocolate has a lower melting temperature than processed store bought chocolate so you have to store it in the refrigerator at all times.

On average this recipe takes me about 5-10 minutes to make and put in the refrigerator or freezer (I usually put mine in the freezer).

Some of the Health Benefits of Cacao:

  • Increased blood circulation which can improve focus, reduce headaches, and more.
  • Did you know chocolate is an anti-aging food?
  • Cacao can be used to suppress coughing.
  • It can reduce cholesterol which is good for heart health.
  • Known in some circles as a mild smart food (boosts brain power synergistically due to the ingredients affect on your body, blood, and more).
  • Can release more of the feel good hormone serotonin.
03 Jun 00:40

101 Healthy Low-Carb Recipes That Taste Incredible

by Kris Gunnars

Woman With Wooden SpoonThis is a collection of 101 low-carb recipes that I have collected from around the web.

All of them are healthy, sugar free and gluten free.

Skip directly to the appropriate section:

With each photo and recipe is a very short description. Click the link beside each image for the full instructions and more photos.

6 Low-Carb Breakfast Recipes (1-6)

Breakfast is a meal that many people struggle with when transitioning to a low-carb diet, but there are tons of excellent options available.

Some are quick to make and can be cooked on demand each morning, others are best prepared ahead of time.

Here are 6 excellent low-carb breakfast recipes:

Eggs and Vegetables, Fried in Coconut Oil - Small

1. Eggs and Vegetables, Fried in Coconut Oil

Ingredients: Coconut oil, carrots, cauliflower, broccoli, green beans, eggs, spinach and spices.

Instructions here.


Sausage And Egg Breakfast Bites

2. Sausage and Egg Breakfast Bites

Ingredients: Dark greens, 1-2 cups of sausage, 8-10 eggs, a small bunch of parsley or other fresh herb.

Instructions with more photos here.


Cowboy Breakfast Skillet

3. Cowboy Breakfast Skillet

Ingredients: Breakfast sausage, sweet potatoes, eggs, avocado, cilantro, hot sauce, raw cheese (optional), salt and pepper.

Instructions here.


Broccoli And Cheese Mini Egg Omelets

4. Broccoli And Cheese Mini Egg Omelets

Ingredients: Broccoli, eggs, egg whites, cheddar, grated cheese, olive oil, salt, pepper and cooking spray.

Instructions with more photos here.


Tex Mex Scramble

5. Tex Mex Scramble

Ingredients: Broccoli, eggs, egg whites, cheddar, grated cheese, olive oil, salt, pepper and cooking spray.

Instructions here.


Savory Cheese Chive Waffles

6. Savory Cheese Chive Waffles

Ingredients: Cauliflower, mozzarella cheese, Parmesan cheese, eggs, garlic powder, onion powder, pepper, chives, parsley and sun-dried tomatoes.

Instructions with more photos here.

6 Low-Carb Lunch Recipes (7-12)

Another meal that people struggle with when changing their diet is lunch.

For people who don’t work at home, lunch needs to be quick, easy and portable.

Some of these recipes do require preparation, so you may need to make them in advance and bring them with you in a box.

Here are 6 great recipes for low-carb lunches:

Ground Beef and Vegetables

7. Ground Beef With Sliced Bell Peppers

Ingredients: Coconut oil, onions, ground beef, spinach, spices and a bell pepper.

Instructions here.


Bacon Wrapped Mini Meatloaves

8. Bacon-Wrapped Mini Meatloaves

Ingredients: Ground beef, bacon, coconut milk, cloves, chives, parsley, black pepper.

Instructions with more photos here.


Paleo Lettuce Wrap

9. Paleo Lettuce Wrap

Ingredients: Fat, chicken, mushrooms, onion, garlic, green onions, cilantro, lemon, soy sauce, chili garlic sauce, sesame oil, lettuce and avocado.

Instructions here.


Moroccan Meatballs

10. Moroccan Meatballs

Ingredients: Parsley, paprika, cumin, salt, black pepper, lamb, coconut oil, onions, garlic, paprika, tomatoes, water and pistachios.

Instructions here.


Healthy Eggs Benedict

11. Healthy Eggs Benedict

Ingredients: Butter, egg, ham slice, Lazy Hollandaise Sauce (mayonnaise, lemon juice, pepper)

Instructions here.


Primal Chili Cheese Dogs

12. Primal Chili Cheese Dogs

Ingredients: Sweet potatoes, fat, hot dogs or sausages, ground beef, roasted tomatoes, chipotle peppers in adobe sauce, red onion, garlic, chili powder, cocoa powder (optional), salt, pepper and cheddar cheese. Instructions here.

9 Low-Carb Salad Recipes (13-21)

Salads can be very versatile meals. You can have them for breakfast, lunch or dinner.

They’re also easily portable if you put them in a food container.

Here are 9 salad recipes that are healthy, delicious, low in carbs and can be eaten at any time of the day:

Bacon, Egg, Avocado and Tomato Salad

13. Bacon, Egg, Avocado and Tomato Salad

Ingredients: Avocado, eggs, tomato, lemon wedge, bacon, salt and pepper.

Instructions with more photos here.


BLT Chicken Salad

14. BLT Chicken Salad

Ingredients: Chicken breast, lettuce, tomato, Swiss cheese, bacon, hard boiled egg, Ranch dressing, pepper and parsley.

Instructions here.


Enchilada Chicken Mango Salad

15. Enchilada Chicken Mango Salad

Ingredients: Romaine, enchilada chicken, mango, avocado, salt and pepper.

Instructions and more photos here.


Paleo No Potato Salad

16. Everyday Paleo “No Potato” Salad

Ingredients: Cauliflower, eggs, red onion, celery, dill pickles,, Paleo Mayo, dill, garlic, yellow mustard and Black pepper.

Instructions here.


Chef Salad Ham Cups

17. Chef Salad Ham Cups

Ingredients: Ham, lettuce, tomato, egg and cheddar cheese.

Instructions here.


Shrimp And Avocado Salad

18. Shrimp and Avocado Salad

Ingredients: Lime juice, olive oil, cilantro, pepper, salt, cilantro dressing, shrimp, avocados, lettuce or baby greens.

Instructions here.


California Grilled Chicken Avocado And Mango Salad

19. California Grilled Chicken Avocado and Mango Salad

Ingredients: Chicken breast, avocado, mango, red onion, baby red butter lettuce, olive oil, white balsamic vinegar and pepper. Instructions with more photos here.


Superfood Salad

20. Superfood Salad

Ingredients: Coconut oil, chicken livers, grainy mustard, Himalayan pink salt, radishes, fresh seaweed, sauerkraut, kimchi, or fermented vegetable of choice, red onion, romaine or butter lettuce. Instructions here.


Macho Nacho Salad

21. Macho Nacho Salad

Ingredients: Iceberg lettuce, beef, ham, hamburger meat, mozzarella cheese, cheddar cheese, tomatoes, yellow onion, jalapenos and black olives.

Instructions here.

More Low-Carb Salads

15 Low-Carb Meat-Based Main Dishes (22-36)

Assembling a healthy, low-carb meal is very simple. Just eat a protein source, a fat source and some vegetables.

Here are 15 delicious meat-based dishes:

Grilled Chicken Wings With Salad

22. Grilled Chicken Wings With Greens and Salsa

Ingredients: Chicken wings, spices, greens and salsa.

Instructions here.


Crispy Carnitas

23. Crispy Carnitas

Ingredients: Boneless pork shoulder/butt cut, salt, cumin, chili powder, cinnamon stick, bay leaf, garlic cloves and onion.

Instructions with more photos here.


Pizza Toppings Casserole

24. Pizza Toppings Casserole

Ingredients: Italian sausage, mushrooms, eggs, heavy cream, pizza sauce, garlic powder, Italian seasoning and/or basil, pepperoni, green pepper, mozzarella cheese, red onion and red pepper. Instructions here.


Bacon And Eggs

25. Bacon and Eggs

Ingredients: Bacon, eggs.

Instructions here.


Carolina BBQ Meatballs

26. Carolina BBQ Meatballs

Ingredients: Pork, sugar substitute, paprika, salt, black pepper, cayenne pepper, cumin, celery salt, egg, almond flour, water, yellow mustard, Frank’s Hot Sauce, onion, apple cider vinegar, low sugar ketchup, salt and pepper. Instructions with more photos here.


Cheese Enchiladas

27. Cheese Enchiladas

Ingredients: Cauliflower, eggs, mozzarella or Monterey jack cheese, onion, garlic, chili powder, oil, oregano, cumin, salt, pepper, pizza sauce and, cheddar cheese.

Instructions here.


Cheeseburgers Without The Bun

28. Cheeseburgers Without The Bun

Ingredients: Butter, hamburgers, cheddar cheese, cream cheese, salsa, spices and spinach.

Instructions here.


Swedish Meatballs

29. Swedish Meatballs

Ingredients: Olive oil, onion, garlic, celery, parsley, beef, egg, breadcrumbs, salt, pepper, allspice, beef stock and cream cheese.

Instructions with more photos here.


Honey Mustard Cuban Pork Burgers

30. Honey Mustard Cuban Pork Burgers

Ingredients: Sausage, plantain chips, egg white, bacon fat, garlic, garlic powder, salt, pepper, avocado, raw honey, dijon mustard, yellow mustard and arugula.

Instructions here.


Fried Pieces of Chicken Breast

31. Fried Pieces of Chicken Breast

Ingredients: Butter chicken breast, salt, pepper, garlic powder, curry and vegetables.

Instructions here.


Asian-Inspired Chicken Wings

32. Asian-Inspired Chicken Wings

Ingredients: Chicken wings, coconut oil, garlic, ginger, anise seed, fennel seed, coconut aminos, honey, coconut vinegar, fish sauce and sesame oil.

Instructions here.


Lamb Sliders With Ginger Cilantro Aoli

33. Lamb Sliders With Ginger Cilantro Aoli

Ingredients: Lamb, sea salt, black pepper, garlic cloves, bacon fat, romaine lettuce, red onion, roma tomatoes, dill pickles, cilantro, lime, mayo, jalapeno and ginger.

Instructions with more photos here.


Fake Meat Based Pizza

34. Fake Meat-Based Pizza… Meatza

Ingredients: Ground beef, salsa, onions, spices, garlic powder, shredded cheese and bacon.

Instructions here.


Greek Chicken Hash

35. Greek Chicken Hash

Ingredients: Fat of choice, waxy potatoes or cauliflower, chicken thighs, garlic, pepperoncini peppers, oregano, zest, lemon juice, chicken stock, salt and pepper. Instructions here.


Bora Bora Fireballs

36. Bora Bora Fireballs

Ingredients: Coconut, salt, cayenne pepper, pineapple, coconut aminos, ginger, garlic, scallions, jalapeno, eggs and pork.

Instructions here.

10 Low-Carb Fish-Based Dishes (37-46)


Simple Herb Crusted Salmon

37. Simple Herb Crusted Salmon

Ingredients: Salmon, coconut flour, parsley, olive oil, dijon mustard, salt, pepper, arugula, red onion, lemon, white wine vinegar, olive oil, salt and pepper.

Instructions here.


Buttery Catfish in a Creamy Shallot Sauce

38. Buttery Catfish in a Creamy Shallot Sauce

Ingredients: Catfish, olive oil, shallot, butter, coconut milk, lemon and chives.

Instructions with more photos here.


Cheesy Tuna Casserole

39. Cheesy Tuna Casserole

Ingredients: Tuna, green beans, mushrooms, celery, onion, butter, chicken broth, heavy cream, salt, pepper, xanthan gum and cheddar cheese.

Instructions here.


Roasted Salmon and Vegetables With Coconut Aminos

40. Roasted Salmon and Vegetables With Coconut Aminos

Ingredients: Coconut aminos or tamari, sesame oil, olive or coconut oil, green onions, garlic, salmon fillets, green beans, mushrooms, red bell peppers, sea salt and black pepper. Instructions with more photos here.


Baked Salmon

41. Baked Salmon

Ingredients: salmon or other fish fillet, butter, garlic powder, salt and pepper.

Instructions here.


Broiled Fish With Summer Grape Tomato Sauce

42. Broiled Fish With Summer Grape Tomato Sauce

Ingredients: Olive oil, garlic, grape tomatoes, salt, pepper, basil, olive oil spray and flounder.

Instructions with more photos here.


Grilled Swordfish With Peach and Avocado Salsa

43. Grilled Swordfish With Peach and Avocado Salsa

Ingredients: Swordfish, coconut oil, apple cider vinegar, honey, lemon juice, garlic clove, cayenne pepper, salt, pepper, peaches, avocado, red onion, jalapeno, cilantro and lime juice. Instructions with more photos here.


Cod With Coconut Slaw And Pico De Gallo

44. Cod With Coconut Slaw And Pico De Gallo

Ingredients: Almond meal, coconut flakes, cayenne pepper, sea salt, pepper, egg, cod, avocado, tomato, red onion, jalapeno pepper, cilantro, lime juice, cabbage, carrots, mayonnaise, lime, Dijon mustard and honey. Instructions with more photos here.


Paleo Fish Sticks

45. Paleo Fish Sticks

Ingredients: Haddock, plantain chips and fat of choice.

Instructions here.


Pan Seared Halibut with Ginger Mango Salsa and Cilantro Sauce

46. Halibut with Ginger Mango Salsa and Cilantro Sauce

Ingredients: Halibut, mango, red onion, ginger, garlic, red bell pepper, lime juice, cilantro, mayonnaise, cumin, hot sauce, coconut oil, sea salt and black pepper. Instructions here.

10 Low-Carb Side Dishes (47-56)


Bacon Wrapped Sweet Potato Fries

47. Bacon Wrapped Sweet Potato Fries

Ingredients: Sweet potatoes, bacon.

Instructions here.


Sautéed Peppers and Onions

48. Sautéed Peppers and Onions

Ingredients: Oil, green peppers, onion, salt, pepper and other desired seasonings.

Instructions here.


Basic Coleslaw

49. Basic Coleslaw

Ingredients: Shredded cabbage or slaw mix, mayonnaise, coconut milk or heavy whipping cream, vinegar, sugar substitute and pepper.

Instructions here.


Spicy Baked Cauliflower and Sweet Potatoes

50. Spicy Baked Cauliflower and Sweet Potatoes

Ingredients: Cauliflower, sweet potato, onion, fat of choice, paprika, cayenne pepper, oregano, red pepper, salt and pepper. Instructions here.


Roasted Baby Carrots

51. Roasted Baby Carrots

Ingredients: Baby carrots, oil and salt.

Instructions here.


Kale Chips

52. Kale Chips

Ingredients: Kale, extra virgin olive oil and salt.

Instructions here.


Holiday Brussels Sprouts

53. Holiday Brussels Sprouts

Ingredients: Butter, onion, Brussels sprouts, walnuts, cherries, honey, balsamic vinegar, olive oil, salt and pepper.

Instructions here.


Paleo Oven Fried Green Tomatoes

54. Paleo Oven Fried Green Tomatoes

Ingredients: Green tomatoes, almond flour, onion powder, garlic powder, cayenne pepper, eggs, olive oil, salt and pepper.

Instructions here.


Au Gratin Turnips

55. Au Gratin Turnips

Ingredients: Turnips, onion, butter, cheese, heavy cream, chicken broth, salt, pepper, chives and Parmesan cheese

Instructions here.


Simple Cucumber Salad

56. Simple Cucumber Salad

Ingredients: Cucumbers, salt, green onions, cilantro, lemon juice, olive oil, lemon zest and pepper.

Instructions here.


More Low-Carb Side Dishes

10 Low-Carb Soups (57-66)


Czech Garlic Soup

57. Czech Garlic Soup

Ingredients: Garlic, salt, marjoram, caraway seeds, black pepper, beef broth, ghee and parsley.

Instructions here.


Fish Soup in Tomato-Saffron Broth

58. Fish Soup in Tomato-Saffron Broth

Ingredients: Fish, butter, onion, garlic, tomatoes, tomato paste, dried dill, parsley, saffron threads, cauliflower or broccoli, cabbage and salt.

Instructions with more photos here.


Creamy Tomato Soup

59. Creamy Tomato Soup

Ingredients: Butter, onion, tomatoes, chicken broth, heavy cream, salt, pepper and parsley.

Instructions here.


Broccoli Cheese Soup

60. Broccoli Cheese Soup

Ingredients: Butter, heavy cream, chicken broth, salt, mustard, cayenne pepper, broccoli, red bell pepper, cheddar cheese and chives.

Instructions here.


Cream of Asparagus Soup

61. Cream of Asparagus Soup

Ingredients: Asparagus, butter, onion, chicken broth, sour cream, salt and pepper.

Instructions here.


Cream of Mushroom Bacon Soup

62. Cream of Mushroom Bacon Soup

Ingredients: Heavy cream, chicken broth, Parmesan cheese, mushrooms, bacon, parsley, salt, pepper, thyme, red bell pepper, green onions, butter and garlic.

Instructions here.


Roasted Red Pepper and Avocado Soup with Sausages

63. Roasted Red Pepper and Avocado Soup with Sausages

Ingredients: Red peppers, avocado, yellow onion, garlic, coconut milk, vegetable broth, lime, paprika, red pepper flakes, oregano, fat of choice, salt, pepper, cilantro and sausage. Instructions here.


Creamy Pumpkin Curry

64. Creamy Pumpkin Curry

Ingredients: Sugar pumpkin, shrimp, carrots, yellow onion, zucchinis, coconut milk, chicken stock, coconut oil, ginger, garlic, coriander, turmeric powder and sea salt. Instructions here.


Bacon and Egg Breakfast Chili

65. Bacon and Egg Breakfast Chili

Ingredients: Ground beef, yellow onion, tomatoes, beef stock, sweet potatoes, paprika, granulated garlic, chili powder, onion powder, lime juice, hot sauce, paprika, salt, bacon, eggs and avocado. Instructions here.


Minestrone-Inspired Soup with Quick Chicken Stock

66. Minestrone-Inspired Soup with Quick Chicken Stock

Ingredients: Butter or olive oil, chicken, leeks, celery, salt, bay leaves, black peppercorns, tomato paste, tomatoes, carrots, green cabbage and kale. Instructions here.

More Low-Carb Soups

10 Low-Carb Desserts and Treats (67-76)


3 Minute Chocolate Cake

67. 3 Minute Chocolate Cake

Ingredients: Almond flour, cocoa, baking powder, low-calorie sweetener, butter and egg.

Instructions here.


Peanut Butter Chocolate Cheesecake

68. Peanut Butter Chocolate Cheesecake

Ingredients: Macadamia nuts, cashews, pecans, erythritol, cocoa powder, butter, 85% chocolate, heavy cream, cream cheese, xylitol, peanut butter, eggs, sour cream and vanilla extract. Instructions here.


Magically Moist Almond Cake

69. Magically Moist Almond Cake

Ingredients: Butter, low-calorie sweetener, eggs , heavy cream , vanilla , almond flour, coconut flour, salt and baking powder.

Instructions here.


Simple Blueberry Lemon Birthday Cake

70. Simple Blueberry Lemon Birthday Cake

Ingredients: Coconut flour, eggs, almond milk, raw honey, vanilla extract, lemon juice, lemon zest, baking soda, salt, blueberries, coconut oil, coconut cream or coconut butter Instructions here.


Simply Delicious Sugar Free Cheesecake

71. Simply Delicious Sugar-Free Cheesecake

Ingredients: Cream cheese, low-calorie sweetener, eggs, Greek yogurt, lemon juice, vanilla extract, almonds, butter, heavy cream and fresh fruit.

Instructions here.


Almond Coconut Bars

72. Almond Coconut Bars

Ingredients: Coconut, almonds, almond butter, coconut oil, coconut flour, salt, Blackstrap molasses, vanilla extract and 85% dark chocolate.

Instructions here.


Chocolate Peanut Butter Ice Cream with Chocolate Shell

73. Chocolate Peanut Butter Ice Cream with Chocolate Shell

Ingredients: Coconut milk, cocoa powder, raw honey, instant coffee, cinnamon, salt, sunflower seed butter, coconut oil, sunbutter and vanilla extract. Instructions with more photos here.


Sweet and Salty Fudge Bombs

74. Sweet and Salty Fudge Bombs

Ingredients: Pecans, dates, vanilla extract, cocoa powder, coarse sea salt and shredded coconut.

Instructions with more photos here.


Mexican Chocolate Coffee Cake

75. Mexican Chocolate Coffee Cake

Ingredients: Eggs, coconut oil, coconut flour, cacao powder, chocolate, Blackstrap molasses, honey, vanilla extract, salt, baking soda, cinnamon and cayenne pepper. Instructions here.


Valentine’s Day Mousse

76. Valentine’s Day Mousse

Ingredients: Dark chocolate, salt, coconut milk, vanilla or almond extract, coarse sea salt.

Instructions here.


More Low-Carb Desserts

My personal favorite low-carb dessert is frozen blueberries with whipped cream. It’s very simple and tastes awesome.

10 Low-Carb Snacks (77-86)


Almond Thins

77. Almond Thins

Ingredients: Almond flour, low-calorie sweetener, egg white, salt, garlic powder and onion powder.

Instructions here.


Pizza in a Cone

78. Pizza in a Cone

Ingredients: Zucchini, eggs, cheese, mozzarella cheese, pizza sauce, pepperoni, green pepper, onion, ricotta cheese and black olives.

Instructions here.


Guacamole Bacon Stuffed Pepper Poppers

79. Guacamole Bacon Stuffed Pepper Poppers

Ingredients: Sweet baby peppers, Haas avocados, lime juice, cilantro, chili garlic or hot sauce, salt and bacon.

Instructions here.


Beef Jerky

80. Beef Jerky

Ingredients: Ground beef, pepper and salt.

Instructions here.


Jalapeno Poppers

81. Jalapeno Poppers

Ingredients: Jalapenos, cream cheese and bacon.

Instructions with more photos here.


Caveman Protein Bars

82. Caveman Protein Bars

Ingredients: beef heart, spinach, kale, blueberries, apricots, coconut oil and tallow.

Instructions here.


Cauliflower Tater Tots

83. Cauliflower Tater Tots

Ingredients: Cauliflower, Parmesan cheese, salt, pepper and onion powder.

Instructions here.


Cheese Roll-Ups

84. Cheese Roll-Ups

Ingredients: Mozzarella cheese, garlic powder, marinara or pizza sauce.

Instructions here.


More Low-Carb Snacks

If you don’t have time to cook and want something really fast and simple, then here are a few ideas:

  • Some Cheese and Meat
  • Full-fat Yogurt
  • Hard-Boiled Eggs
  • Baby Carrots
  • Leftovers
  • Nuts

10 Low-Carb Sauces, Dressings and Condiments (87-96)


Creamy Ranch Dressing

85. Creamy Ranch Dressing

Ingredients: Greek-style yogurt, cultured buttermilk, dill, chives, white wine vinegar, kosher salt, tamari, onion powder, black pepper and garlic clove.

Instructions with more photos here.


Nearly Instant Blender Mayo

86. Nearly Instant Blender Mayo

Ingredients: Egg yolks, apple cider vinegar, Himalayan pink salt, garlic puree, butter and olive oil.

Instructions here.


Dairy-Free Green Goddess Dressing

87. Dairy-Free Green Goddess Dressing

Ingredients: Avocado, coconut milk, lemon juice, garlic, anchovy fillets, parsley, basil, tarragon, salt and olive oil.

Instructions with more photos here.


Low Carb Honey Mustard

88. Low Carb Honey Mustard

Ingredients: Mayonnaise, cider vinegar, yellow mustard, garlic powder, paprika and low-calorie sweetener.

Instructions here.


Alfredo Sauce

89. Alfredo Sauce

Ingredients: Butter, arrowroot, heavy cream, pepper, garlic, mozzarella cheese and Parmesan cheese.

Instructions here.


Guacamole

90. Guacamole

Ingredients: Avocados, lime juice, red onion, garlic, cilantro, salt and pepper.

Instructions here.


Simple Blue Cheese Dip

91. Simple Blue Cheese Dip

Ingredients: Sour cream, mayonnaise, blue cheese, bacon, white wine vinegar and garlic powder.

Instructions here.


Creamy Jalapeno Sauce

92. Creamy Jalapeno Sauce

Ingredients: Mayonnaise, jalapenos, low-calorie sweetener, paprika, cumin, cayenne, garlic powder and salt.

Instructions here.


Spicy Pineapple Salsa

93. Spicy Pineapple Salsa

Ingredients: Pineapple, cucumber, jalapeno pepper, red onion, cilantro, olive oil, lime juice, salt and black pepper.

Instructions here.


American Cheese Sauce

94. American Cheese Sauce

Ingredients: Butter, heavy cream, american cheese and salt.

Instructions here.


More Low-Carb Sauces, Dressings and Condiments

10 Low-Carb Vegetarian Recipes (97-101)


Spinach & Lemon Quinoa Bake

95. Spinach & Lemon Quinoa Bake

Ingredients: Vegetable broth, quinoa, olive oil, egg replacer, onion, garlic, thyme, rosemary, red-pepper flakes, spinach, Tofutti sour cream, lemon zest, black pepper and nutritional yeast. Instructions with more photos here.


Roasted Eggplant Salad With Smoked Almonds And Goat Cheese

96. Roasted Eggplant Salad With Smoked Almonds And Goat Cheese

Ingredients: Eggplants, salt, olive oil, cider vinegar, honey, paprika, cumin, garlic, lemon juice, soy sauce, parsley, almonds, goat cheese and scallions. Instructions with more photos here.


Spicy Potato Curry

97. Spicy Potato Curry

Ingredients: Baby spinach, tofu, potatoes, onions, tomatoes, chickpeas, coconut milk and peas.

Instructions with more photos here.


Raw Zucchini, Carrot and Cashew Salad Rolls

98. Raw Zucchini, Carrot and Cashew Salad Rolls

Ingredients: Zucchini, carrot, red capsicum, cucumber, julienned, coriander, mint leaves, cashews, salt, lemon juice, avocado, red onion, lime juice and tabasco. Instructions here.


Kale Salad with Creamy Lemon Tahini Dressing

99. Kale Salad with Creamy Lemon Tahini Dressing

Ingredients: Kale, cucumber, avocado, tomato, garbanzo beans, hemp seeds, tahini, lemon juice, garlic, salt and pepper. Instructions with more photos here.


Ginger, Citrus and Black Sesame Carrots With Edamame

100. Ginger, Citrus and Black Sesame Carrots With Edamame

Ingredients: Carrots, edamame, black sesame seeds, cilantro, avocado, orange juice, lime juice, salt, pepper, raw honey, ginger, sesame oil and grapeseed oil. Instructions here.


Oven-Baked Mexican Quinoa Casserole

101. Oven-Baked Mexican Quinoa Casserole

Ingredients: Onion, garlic, quinoa, vegetable oil, tomatoes, nutritional yeast, tomato paste, cumin, oregano, chili powder, salt, pepper, black beans, corn kernels and baby spinach. Instructions with more photos here.

For more vegetarian recipes, check out Angela Thompson’s blog: VegAngela.

There is an Endless Amount of Awesome Recipes Out There

Here are more websites where you can find a ton of healthy low-carb recipes:

Make sure to subscribe to some of these awesome sites so that you never run out of meal ideas again!

The post 101 Healthy Low-Carb Recipes That Taste Incredible appeared first on http://authoritynutrition.com/

13 May 23:24

112

by noreply@blogger.com (Frank Zieglar)
FIRSTPREVIOUSNEXT

★ LIKE ★ COMMENT ★ SHARE ★ SUBSCRIBE ★

13 May 23:24

111

by noreply@blogger.com (Frank Zieglar)
FIRSTPREVIOUSNEXT

★ LIKE ★ COMMENT ★ SHARE ★ SUBSCRIBE ★